

Page 1
Installation Manual
www.navman.com
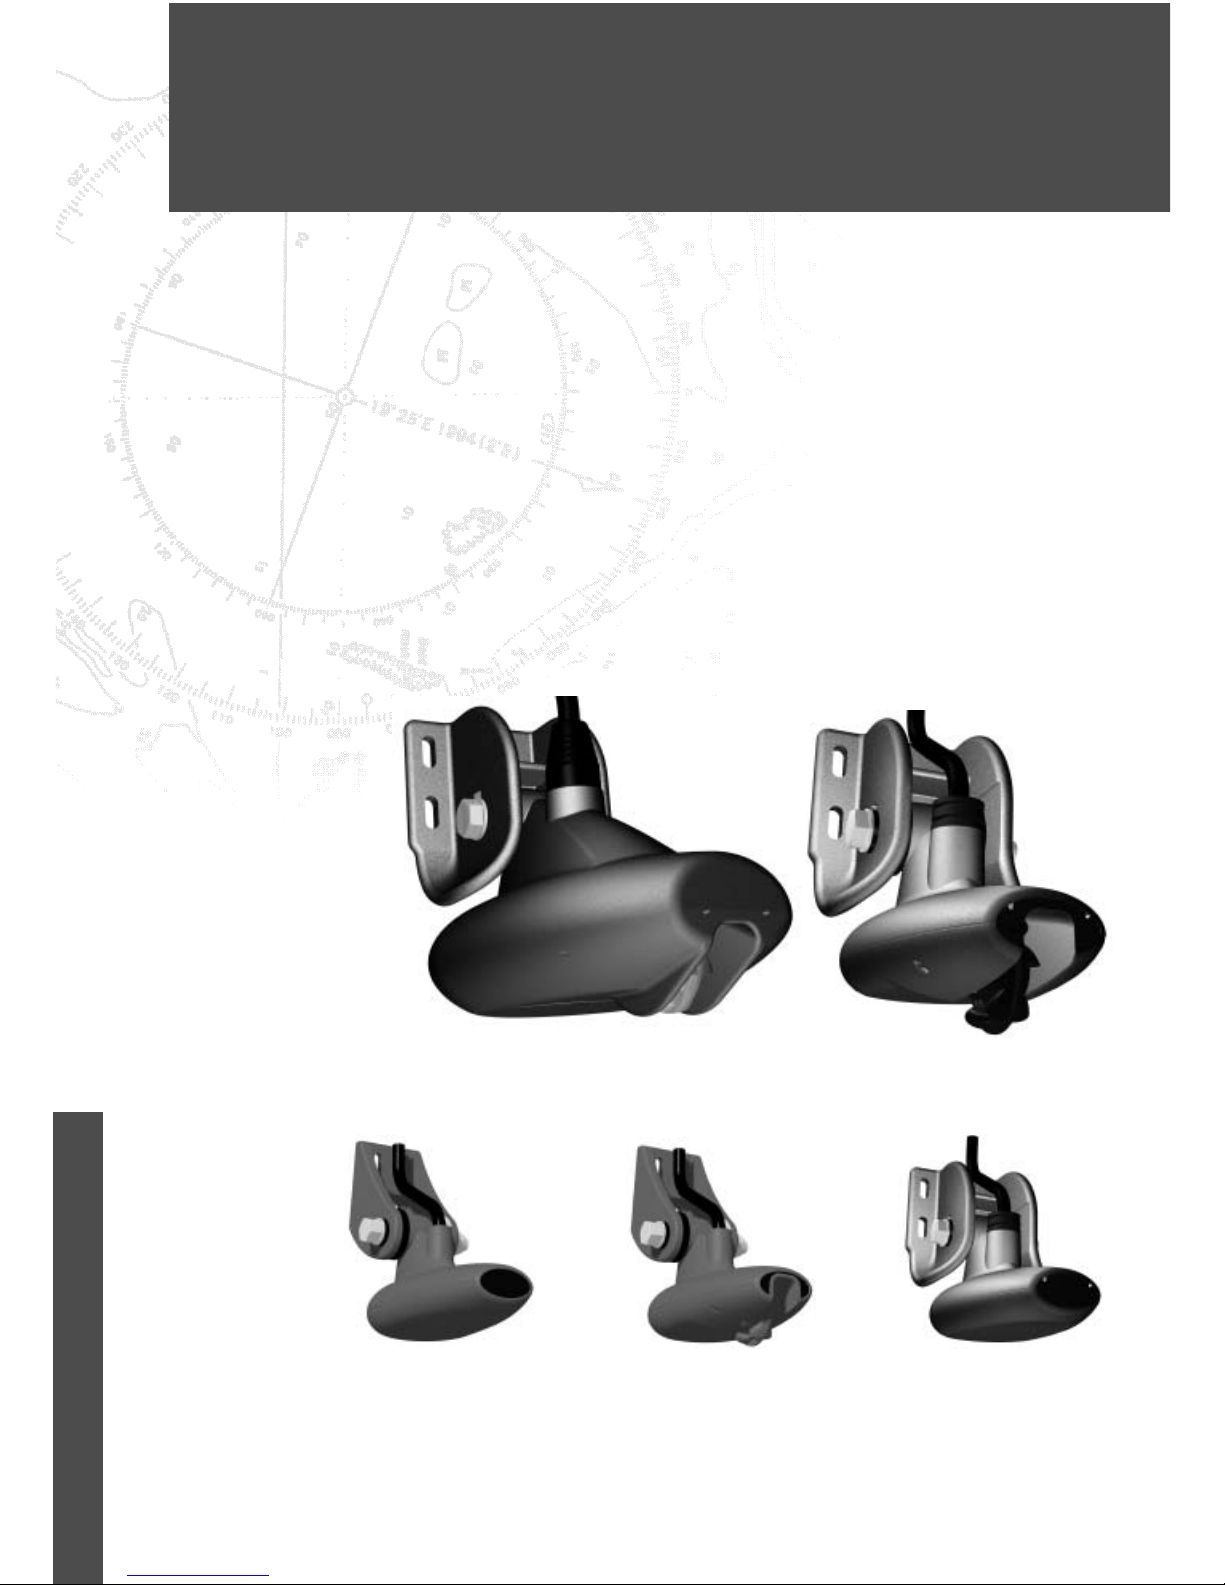
TRANSOM MOUNT
TRANSDUCERS
NAVMAN
Mk3 Transom
Mount Depth
Mk2 Transom Mount
Aquaducer (depth, speed,
temperature transducer)
Mk2 Transom
Mount Depth
Mk3 Transom Mount
Aquaducer (depth, speed,
temperature transducer)
Dual Frequency Aquaducer
(depth 200/50 kHz, speed,
temperature transducer)
Page 2

Transom Mount Tr ansducers Installation Manual
NAVMAN
2
FCC Statement
Note: This equipment has been tested and found to comply with the limits for a
Class B digital device, pursuant to Part 15 of the FCC Rules. These limits are
designed to provide reasonable protection against harmful interference in a normal
installation. This equipment generates, uses and can radiate radio frequency energy
and, if not installed and used in accordance with the instructions, may cause
harmful interference to radio communications. However, there is no guarantee
that interference will not occur in a particular installation. If this equipment does
cause harmful interference to radio or television reception, which can be determined
by turning the equipment off and on, the user is encouraged to try to correct the
interference by one or more of the following measures:
Reorient or relocate the receiving antenna.
Increase the separation between the equipment and receiver.
Connect the equipment into an output on a circuit different from that to
which the receiver is connected.
Consult the dealer or an experienced technician for help.
A shielded cable must be used when connecting a peripheral to the serial ports.
Page 3

3Transom Mount Transducers Installation Manual
NAVMAN
Important
It is the owner’s sole responsibility to install and use NA VMAN’ s transducers in a manner that will
not cause accidents, personal injury or property damage. The user of this product is solely
responsible for observing safe boating practices.
Transducer inst allation: The choice, location and angle of the transducer is the most critical part
of installation. If installation is not correct, the unit can not perform at its designed potential. If in
doubt, consult your NAVMAN dealer . Ensure that any holes cut are in a safe position and will not
weaken the boat’s structure. If in doubt, consult a qualified boatbuilder.
NA VMAN NZ LIMITED DISCLAIMS AL L LIABILITY FOR ANY USE OF THIS PRODUCT IN A W A Y
THA T MAY CAUSE ACCIDENTS, DAMAGE OR THAT MAY VIOLATE THE LA W.
Governing Language: This statement, any instruction manuals, user guides and other information
relating to the product (Documentation) may be translated to, or has been translated from, another
language (Translation). In the event of any conflict between any T ranslation of the Documentation,
the English language version of the Documentation will be the official version of the Document ation.
This manual represents the transducer installation procedures as at the time of printing.
Navman NZ Limited reserves the right to make changes to specifications without notice.
Copyright © 2002 Navman NZ Limited, New Zealand. All rights reserved. NA VMAN is a registered
trademark of Navman NZ Limited.
This manual describes how to install NA VMAN’s
Transom Mount Transducers:
Dual Frequency Aquaducer (depth 200/50
kHz, speed, temperature transducer).
Mk3 Transom Mount Aquaducer (depth,
speed, temperature transducer).
Mk3 T ransom Mount Depth T ransducer.
Mk2 Transom Mount Aquaducer (depth,
speed, temperature transducer).
Mk2 T ransom Mount Depth T ransducer.
What comes with a transducer
Transducer with mounting bracket and
cable [Mk2 and Mk3 Aquaducer cable 26 ft
(8 m), Dual Frequency Aquaducer and
depth only transducer cable 33 ft (10 m)].
Introduction
Four mounting screws for transducer .
Bag with cable cover , two cable clamps
and their four mounting screws.
This installation manual.
Spare p art s
These spare parts are available from your
NA VMAN dealer:
Mk3 and Dual Frequency Aquaducer
Transom Mounting bracket.
Mk2 T ransom Mounting bracket.
Aquaducer paddlewheel.
Mk2 and Mk3 Aquaducer extension cable
13 ft (4 m).
Dual Frequency Aquaducer extension
cable 13 ft (4 m).
Poor location Good location
Poor location
Position of transducer
Transom mount transducers are suit able for planing hulls less
than 26 ft (8 m) long, with outboard or stern-drive power. They
are unsuitable for boats with propellers forward of the transom,
prominent keels or displacement hulls.
Select a position for the transducer that will:
• Be away from the propellers or propeller wash and on the
downstroke side of the propeller/s (normally the starboard
side).
• Have a smooth, clear flow of water at all times, which
means that th e transducer should not be in line with
any hull projections, openings or planing strakes.
Stepped
hull
Page 4

Transom Mount Tr ansducers Installation Manual
NAVMAN
4
Important: Do not cut the transducer cable
to shorten it.
1 Select a suitable position for the
transducer (see
Position of transducer
-
previous page).
2 Tear the drilling template from inside the
back cover of this manual and cut to size.
3 Hold the drilling template in place on the
transom.
Mark four screw holes through the template
so that they will be positioned in the middle
of the transducer bracket’s slots:
• For fibreglass (GRP) or wooden hulls,
ensure the entire bottom face of the
transducer will always be
approximately 1/4" (6 mm) (dual
frequency transducer 1/2" (12 mm))
beneath the surface of the water ,
including when the boat is at speed.
• For aluminium hulls, ensure the entire
bottom face of the transducer will
always be approximately 1/2" (12 mm)
(dual frequency transducer 3/4" (18
mm)) beneath the surface of the water,
including when the boat is at speed.
Note: Locating the screws at the midpoints in the slots enables the transducer
to be moved up or down later.
4 Drill the four screw holes 5/64" (2 mm)
diameter and at right angles to the
transom, so that when the screws are
tightened the screw heads sit flat.
Installing
5 Attach the mounting bracket with the four
longer stainless screws provided, slide the
bracket up or down until the screws are in
the middle of the slots, then tighten the
screws temporarily.
6 If necessary , loosen the transducer pivot
bolt so that the transducer can rotate.
Note: the transducer rotates in ‘clicks’ of
7 degrees.
7 Hold a straight edge on the bottom of the
hull and rotate the transducer so that the
bottom surface of the transducer is parallel
to the bottom of the hull (to the closest click).
8 Push the end of the transducer down by one
click. Tighten the pivot bolt until the rubber
washer on the pivot bolt starts to compress,
then add another 1/4 turn. If the transducer
kicks up when at speed, then tighten the pivot
bolt more.
Note: The face of the transducer should
face forward by about 7 degrees when the
boat is moving.
Push end down
1 click
1/4" (6 mm) or
1/2" (12 mm) or
3/4" (18 mm)
Parallel
Drill 5/64" (2 mm), apply
sealant in holes (after
adjusting and testing)
Pivot bolt
Screw transducer onto
transom
Fit the transducer
so that its axis is
vertical.
• Always have the entire bottom face of the transducer under
water , when the boat is stopped or at speed.
Not interfere with, or be damaged by , launching or retrieving if the
boat is trailered.
Be convenient for the cable to go through the transom into the boat.
Page 5

5Transom Mount Transducers Installation Manual
NAVMAN
3
If the cable is to pass through the transom:
Drill the hole a safe
distance above water line.
If you are unsure where to
put the hole, consult a
qualified boatbuilder.
Do not cut the cable.
Fit cable cover over cable hole
in transom.
Fill the following with sealant:
• Cable hole in transom.
• Inside the cable cover.
• The screw holes.
Fit one or two cable clamps on transom to
hold cable.
Important: Fit a cable clamp close to the
transducer. This may prevent the
transducer from causing damage should
the bracket break while the boat is moving.
Drill 3/4"
(19 mm)
hole in
transom
Insert cable
through hole
21
Drill 7/64"
(3 mm), apply
sealant in
holes
Cable clamp
Fit screws
Cable cover
Mark holes,
Drill 7/64"
(3 mm)
Apply sealant
Fit screws
Cleaning and maintenance
The transducer has a cable to connect it to the
navigation instrument. When fitting this cable:
• Keep the cable away from other cables and
equipment (for example fluorescent lights,
power inverters and VHF transmitters).
• Do not cut the cable.
• If necessary , extend the cable by adding a
NA VMAN 13 f t (4 m) extension cable (a
maximum of one cable can be used).
Ensure no cable connectors lay in the bilge.
Note: There is no extension cable
available for the FISH 4100.
Secure the cable at regular intervals.
Refer to the navigation instrument’s
installation manual for instructions on how
to connect the cable to the instrument.
Wiring
Adjust and test the transducer after the
transducer and instrument have been installed
and with the boat in at least 6 ft (2 m) of water .
1 With the boat moving slowly , turn the
instrument on. If the depth does not
display, follow the troubleshooting
instructions in the instrument manual.
2 Gradually increase boat speed. If the
depth does not display then:
i Remove any oil from the transducer by
wiping the face of the transducer with
mild detergent on a cloth.
ii Adjust the angle of the transducer by
pushing the end down another click.
iii Loosen the screws then slide the
transducer mounting bracket down or
up in steps of 0.1" (2.5 mm) to achieve
best high speed performance. Several
adjustments might be required to find
the optimum position.
i v Review the position of the transducer
(see
Position of transducer
at the
beginning of this manual).
3 Once adjustments are completed, ensure
that all screws are tight, the pivot bolt is
tight and all holes are filled with sealant.
Note i: If the transducer kicks up at high
speed then the pivot bolt needs to be tighter.
Note ii: If you find that your transducer is
causing a ‘Rooster tail’ then the likely
cause is the transducer being mounted too
deep. Lifting the transducer mounting on
the transom should solve the problem.
Adjusting and testing
Clean a transducer with a damp cloth or mild detergent. A void abrasive cleaners and petrol or other
solvents. When repainting the hull, cover or remove any transducers. Do not paint the transducer . Do
not use a high pressure water blast on a speed sensor paddlewheel as it may damage the bearings.
Page 6

15Transom Mount T ransducers Installation Manual
NAVMAN
How to contact us www .navman.com.
NORTH AMERICA
NAVMAN USA INC.
18 Pine St. Ext.
Nashua, NH 03060.
Ph: +1 603 577 9600
e-mail: sales@navmanusa.com
OCEANIA
New Zealand
Absolute Marine Ltd.
Unit B, 138 Harris Road,
East Tamaki, Auckland.
Ph: +64 9 273 9273
e-mail:
navman@absolutemarine.co.nz
Papua New Guinea
Lohberger Engineering
Lawes Road, Konedobu
PO Box 810
Port Moresby
Ph: +675 321 2122
Email: loheng@online.net.pg
Australia
NAVMAN AUSTRALIA PTY
Limited
Unit 6 / 5-13 Parsons St,
Rozelle, NSW 2039, Australia.
Ph: +61 2 9818 8382
e-mail: sales@navman.com.au
SOUTH AMERICA
Argentina
Costanera UNO S.A.
Av Presidente R Castillo y
Calle 13
1425 Buenos Aires, Argentina.
Ph: +54 11 4312 4545
e-mail:
purchase@costanerauno.com.ar
Website:
www.costanerauno.ar
Brazil
REALMARINE
Estrada do Joa 3862,
CEP2611-020,
Barra da Tijuca, Rio de Janeiro,
Brasil.
Ph: +55 21 2483 9700
e-mail:
vendas@marinedepot.com.br
Equinautic Com Imp Exp de
Equip Nauticos Ltda.
Av. Diario de Noticias 1997 CEP
90810-080, Bairro Cristal, Porto
Alegre - RS, Brasil.
Ph: +55 51 3242 9972
e-mail:
equinautic@equinautic.com.br
ASIA
China
Peaceful Marine Electronics Co. Ltd.
Hong Kong, Guangzhou,
Shanghai, Qindao, Dalian.
E210, Huang Hua Gang Ke Mao
Street, 81 Xian Lie Zhong Road,
510070 Guangzhou, China.
Ph: +86 20 3869 8784
e-mail: sales@peaceful-marine.com
Website: www.peaceful-marine.com
India
Access India Overseas Pvt
A-98, Sector 21, Noida, India
Ph: +91 120 244 2697
Email: vkapil@del3.vsnl.net.in
Indonesia
Polytech Nusantara
Graha Paramita 2nd Floor
Jln Denpasar Raya Blok D2 Kav
8 Kuningan, Jakarta 12940
Tel: 021 252 3249
Korea
Kumhomarine Technology Co., Ltd.
#604-842, 2F, 1118-15,
Janglim1-Dong, Saha-Gu
Busan, Korea
Ph: +82 51 293 8589
e-mail: info@kumhomarine.com
Website: www.kumhomarine.com
Maldives
Maizan Electronics Pte. Ltd.
8 Sosunmagu Male
Ph: +960 78 2444
Email: ahmed@maizan.com.mv
Singapore
RIQ PTE Ltd.
81, Defu Lane 10, Hah Building,
#02-00 Singapore 539217
Ph: +65 6741 3723
e-mail: riq@postone.com
Taiwan
Seafirst International Corporation
No.281, Hou-An Road
Chien-Chen Dist.
Kaohsiung, Taiwan R.O.C.
Ph: +886 7 831 2688
e-mail: seafirst@seed.net.tw
Thailand
Thong Electronics (Thailand)
Company Ltd.
923/588 Thaprong Road,
Mahachai,
Muang, Samutsakhon 74000,
Thailand.
Ph: +66 34 411 919
e-mail: thonge@cscoms.com
Vietnam
Haidang Co. Ltd.
16A/A1E, Ba thang hai St.
District 10, Hochiminh City.
Ph: +84 8 86321 59
e-mail: sales@haidangvn.com
Website: www.haidangvn.com
MIDDLE EAST
Lebanon and Syria
Letro, Balco Stores,
Moutran Street, Tripoli VIA Beirut.
Ph: +961 6 624512
e-mail: balco@cyberia.net.lb
United Arab Emirates
Kuwait, Oman, Ir an & Saudi Arabia
Abdullah Moh’d Ibrahim
Trading, opp Creak Rd.
Baniyas Road, Dubai.
Ph: +971 4 229 1195
e-mail: mksq99@email.com
AFRICA
South Africa
Pertec (Pty) Ltd Coastal,
Division No.16 Paarden Eiland Rd.
Paarden Eiland, 7405
Postal Address: PO Box 527,
Paarden Eiland 7420
Cape Town, South Africa.
Ph: +27 21 511 5055
e-mail: info@kfa.co.za
EUROPE
France, Belgium and
Switzerland
PLASTIMO INTERNATIONAL
15, rue Ingénieur Verrière,
BP435,
56325 Lorient Cedex.
Ph: +33 2 97 87 36 36
e-mail: plastimo@plastimo.fr
Website: www.plastimo.fr
Germany
PLASTIMO DEUTSCHLAND
15, rue Ingénieur Verrière
BP435- 56325 Lorient Cedex.
Ph: +49 6105 92 10 09
+49 6105 92 10 10
+49 6105 92 10 12
e-mail:
plastimo.international@plastimo.fr
Website: www.plastimo.de
Italy
PLASTIMO ITALIA
Nuova Rade spa, Via del Pontasso 5
I-16015 CASELLA SCRIVIA (GE).
Ph: +39 1096 8011
e-mail: info@nuovarade.com
Website: www.plastimo.it
Holland
PLASTIMO HOLLAND BV.
Industrieweg 4-6,
2871 RP SCHOONHOVEN.
Ph: +31 182 320 522
e-mail: info@plastimo.nl
Website: www.plastimo.nl
United Kingdom
PLASTIMO Mfg. UK Ltd.
School Lane - Chandlers Ford
Industrial Estate,
EASTLEIGH - HANTS S053 ADG.
Ph: +44 23 8026 3311
e-mail: sales@plastimo.co.uk
Website: www.plastimo.co.uk
Sweden, Denmark or Finland
PLASTIMO NORDIC AB.
Box 28 - Lundenvägen 2,
47321 HENAN.
Ph: +46 304 360 60
e-mail: info@plastimo.se
Website: www.plastimo.se
Spain
PLASTIMO ESPAÑA, S.A.
Avenida Narcís Monturiol, 17
08339 VILASSAR DE DALT,
(Barcelona).
Ph: +34 93 750 75 04
e-mail: plastimo@plastimo.es
Website: www.plastimo.es
Portugal
PLASTIMO PORTUGAL
Avenida de India N°40
1300-299 Lisbon
Ph: +351 21 362 04 57
e-mail:
plastimo@siroco-nautica.pt
Other countries in Europe
PLASTIMO INTERNATIONAL
15, rue Ingénieur Verrière
BP435
56325 Lorient Cedex, France.
Ph: +33 2 97 87 36 59
e-mail:
plastimo.international@plastimo.fr
Website: www.plastimo.com
REST OF WORLD /
MANUFACTURERS
Navman NZ Limited
13-17 Kawana St. Northcote.
P.O. Box 68 155 Newton,
Auckland, New Zealand.
Ph: +64 9 481 0500
e-mail:
marine.sales@navman.com
Website: www.navman.com
Page 7

NAVMAN
TRANSOM MOUNT TRANSDUCERS
Lon 174° 44.535'E
Lat 36° 48.404'S
5/64" (2 mm)
5/64" (2 mm)
Mk2
Mk3
Dual Frequency
Aquaducer
Made in New Zealand
MN000163D
 Loading...