

Page 1
English - United States / Canada
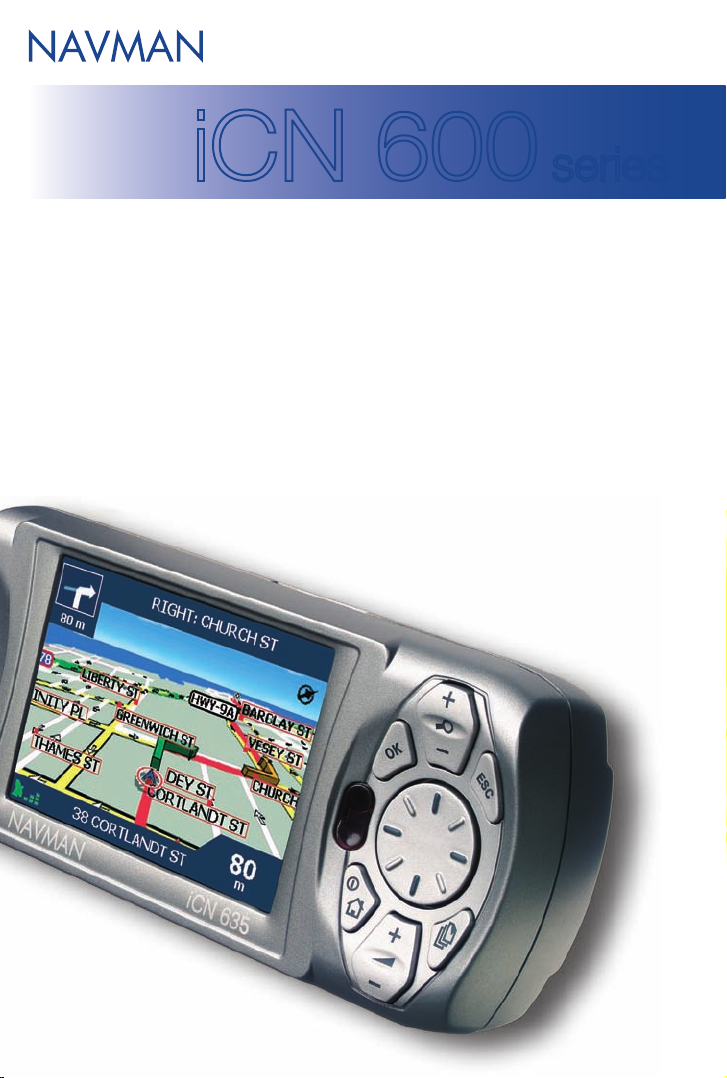
iCN 600 series
with Smart
TM
2005
User Manual
iCN 630
iCN 635
iCN 650
Page 2

Page 3

3
iCN 600 series | User Manual
Contents
Box Contents ............................................................................ 5
1. Introduction ...........................................................................
7
2. iCN Features .........................................................................
8
3. Positioning the iCN in a Vehicle ........................................... 10
4. Getting Started. ................................................................... 13
5. Map Storage ....................................................................... 15
6. GPS Status ......................................................................... 16
7. Setting your Destination ...................................................... 17
Case Study - By Address ................................................ 19
Case Study - By POI ....................................................... 23
8. Using the 2D Map Screen to Plan a Route ......................... 26
9. Multi-stop Trips ................................................................... 27
Case Study ...................................................................... 27
10. Viewing Your Route ............................................................. 34
11. The 2D Map Screen Pop-up Menu ..................................... 39
12. Avoiding an Area ................................................................. 40
13. Route Demonstrator ............................................................ 41
14. Favorites and My Home ...................................................... 43
15. Preferences ......................................................................... 48
16. Smart
Desktop ................................................................ 59
17. Updating your iCN .............................................................. 60
18. Installing Maps Using Smart
Desktop ............................. 61
19. Continuous Continental Navigation ..................................... 63
20. Smart
Desktop Advanced Features ................................ 65
21. Accessories ....................................................................... 70
Appendix: Street Types ............................................................. 71
Support Information .................................................................. 79
Compliance ............................................................................... 79
Copyright ................................................................................... 79
Page 4

4
iCN 600 series | User Manual
Page 5
5
iCN 600 series | User Manual
Getting started
Thank you for purchasing this Navman iCN. We hope you enjoy your new GPS transferable navigation system.
This User Manual will help you Drive-Away™ with your iCN, straight out of the box.
Navman welcomes your feedback. To contact us or visit our website, see Support Information on page 79.
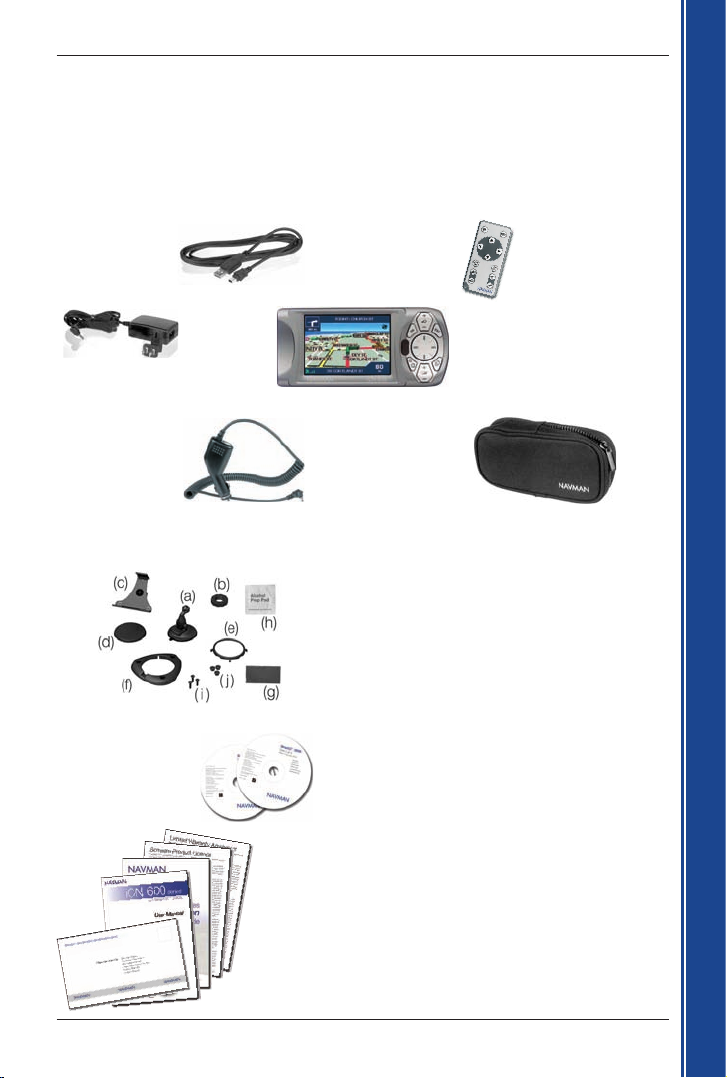
Box Contents
Purchasers of Smart 2005 software-only upgrade kits, see the enclosed Upgrade Guide for your
Box Contents
.
iCN with GPS Antenna
12 V In-Vehicle PowerAdaptor with Power-Cable
USB Cable
Protective Carry-Case
and Screen-Cleaner
Remote Control
AC Power-Pack with
Power-Cable
Mounting brackets:
(a) Suction-cup/ballfoot (f) Screw plate
(b) Locking-nut (g) Adhesive tape
(c) Socket-clip (h) Alcohol swab
(d) Baseplate (i) 3 x Screws
(e) Retainer ring (j) 3 x Screw caps
One or more CD-ROMs, including:
• Smart™ 2005 software including Smart Desktop
• Map data
• User Manual (PDF format) and Adobe Reader
Note: The number of disks varies with country of purchase.
Documentation, including:
• User Manual
• In-Car Installation Guide
• Software Product Licence
• Limited Warranty Agreement
• Registration Card
Page 6

6
iCN 600 series | User Manual
Getting started
Page 7

7
iCN 600 series | User Manual
Getting started
1. Introduction
Whether you travel in your own country or elsewhere, the iCN will direct you to your destination without
the need for map-books and second-hand instructions.
The Global Positioning System (GPS) is available free of charge, at any time, and is accurate to within
5 m (15 ft). Your iCN map provides street-level detail for door-to-door navigation, including Points of
Interest (POIs) such as accommodation, petrol stations, railway stations and airports.
Use this guide to learn how to operate your iCN efficiently and safely, and discover all the different
features available to you.
GPS and GPS Signals
The GPS is a network of satellites that transmit accurate time and position information worldwide.
GPS receivers receive signals from these satellites and use the information to determine an exact
location. Satellites orbit the earth at around 12,000 miles. While a GPS receiver can detect signals
from up to 12 satellites at any time, only three signals are needed to provide a position or “GPS fix”
(latitude and longitude) for vehicle navigation systems.
The iCN GPS antenna receives GPS signals. To receive GPS signals, ensure that the iCN is
outdoors, or in a vehicle outdoors, and the GPS antenna has an unobstructed view of the sky. The
iCN can operate in all weather types except snowfall.
For more information about GPS and your iCN, see page 16.
Safety Notice
WARNING: In a vehicle, it is your sole responsibility to place, secure and use the ICN in a manner
that will not cause accidents, personal injury or property damage. The user of this product is solely
responsible for observing safe driving practices. It is your responsibility to read and follow the
vehicle mount installation instructions and to use the product consistent with your government’s
laws/regulations. Consult the vehicle manual to ensure the mounting location is safe.
It is your sole responsibility to adhere to the following safety instructions at all times:
• Do not operate the ICN while driving or place the ICN in a position that obstructs
the driver’s view.
• Do not mount the ICN in a way that may be distracting or interfere with
the safe operation of the vehicle, the deployment of airbags or other safety equipment.
• Do not leave the ICN in view while your vehicle is unattended, especially in strong or
direct sunlight.
• Do not use or handle the ICN when it is hot; leave it to cool, out of direct sunlight.
Failure to adhere to these instructions may lead to serious personal injury, including death,
or property damage. Navman disclaims all liability for use of the iCN that contributes to
injuries, death, property damage or violates law.
Page 8
9
1
3 4
5
6
8
7
2
8
iCN 600 series | User Manual
Getting started
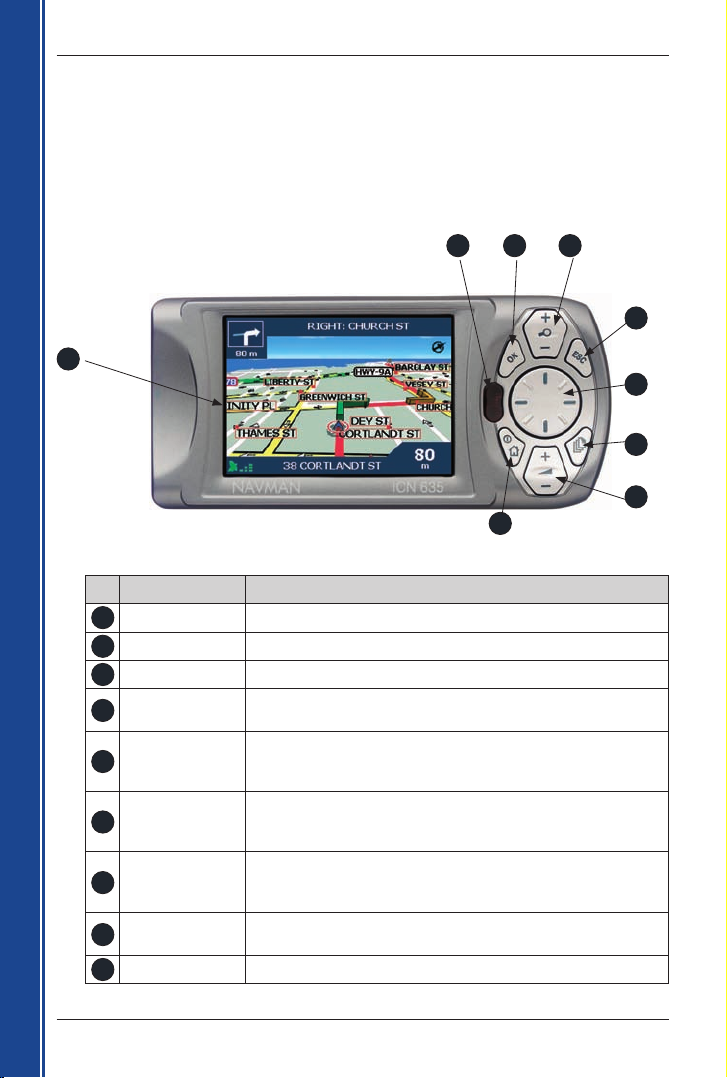
2. iCN Features
We recommend that you familiarize yourself with the iCN’s basic operations, such as using the
8-way toggle and
Volume button.
Some buttons have two functions, and specific features vary between iCN models.
Front Components
Component Description
1 Screen Displays maps and menu options
2 Infrared Receiver* Receives signals from the remote control
3 OK Confirms the selected menu option, text or preference
4 Zoom/Brightness
Changes the amount of map area shown, or press and hold to adjust
the screen brightness
5 ESC
Cancels an action, returns to the previous screen or deletes the
last text character on the Keyboard screen; hold down for longer to
delete a whole line at once.
6 8-Way Toggle
Selects Main Menu options, keyboard characters and Preferences,
moves around the 2D Map screen to select a destination, and scrolls
through lists, such as lists of search results.
7 Page
Cycles through the 2D Map, 3D Map, Next Turn and Next 4 Turns
screens; displays additional preference or search-result screens,
when available.
8 Volume
Broadcasts the next voice-guidance instruction and adjusts voiceguidance volume.
9 Menu/Power
Displays the Main Menu screen and turns the iCN on and off.
* iCN 610, 635 and 650 only.
Page 9
1
2
3
4
5
6
9
iCN 600 series | User Manual
Getting started
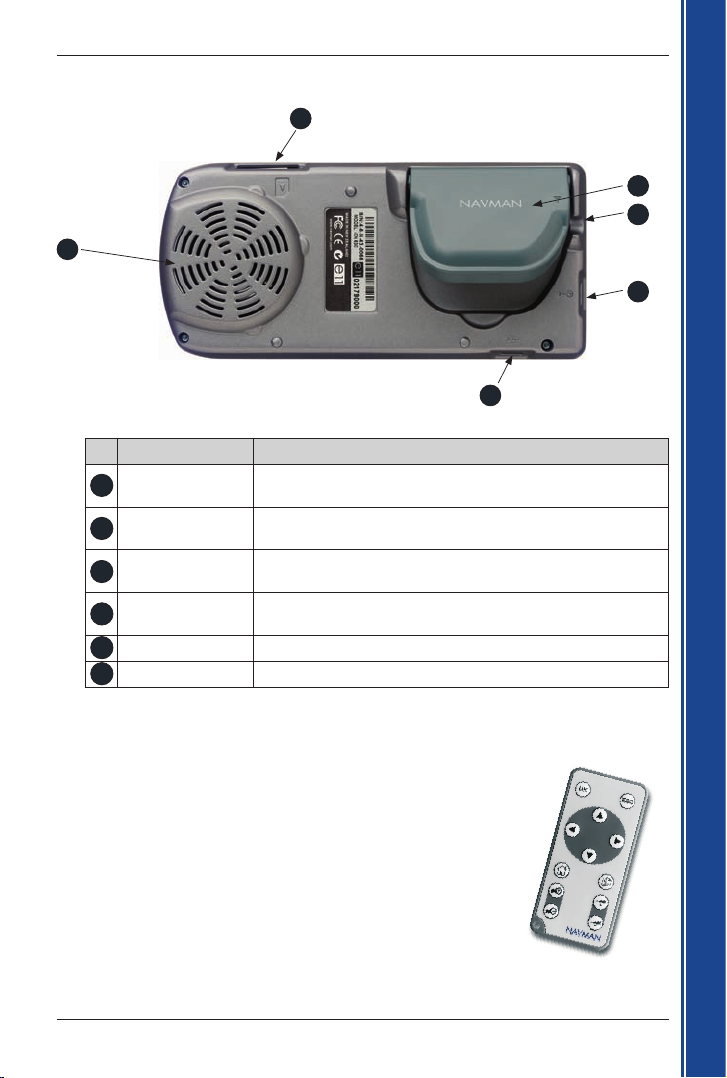
Back Components
Component Description
1 Speaker
Broadcasts voice commands and warnings; use Volume button
to adjust
2 Memory Card Slot*
Memory card may be inserted into slot with label facing the front of
the iCN
3 GPS Receiver
Receives signals from GPS satellites when lifted out to the
horizontal position
4
External Antenna
Socket
Connection socket for GPS MCX External Anntenna (not included)
5 Power Socket Connection socket for AC Power-Pack or In-Vehicle Power Adaptor
6 USB Socket Connection socket for USB cable to your computer
* iCN 630, 635 only;
iCN 650 does not have a Memory Card Slot and does not require a memory card.
Remote Control
Button functions are the same as the iCN control buttons except that the iCN
cannot be turned on using the Remote Control.
Page 10
2
1
a b
Click
10
iCN 600 series | User Manual
Getting started
3. Positioning the iCN in a Vehicle
The iCN can be mounted in a vehicle two ways:
1. By suction on the windscreen;
2. By suction, adhesive tape and screws drilled directly into the dashboard.
Note: This is a permanent solution and will mark your dashboard.
Follow the safety guidelines on page 7 to ensure that the iCN does not obstruct the driver’s view or
interfere with the operation of vehicle airbags and safety devices.
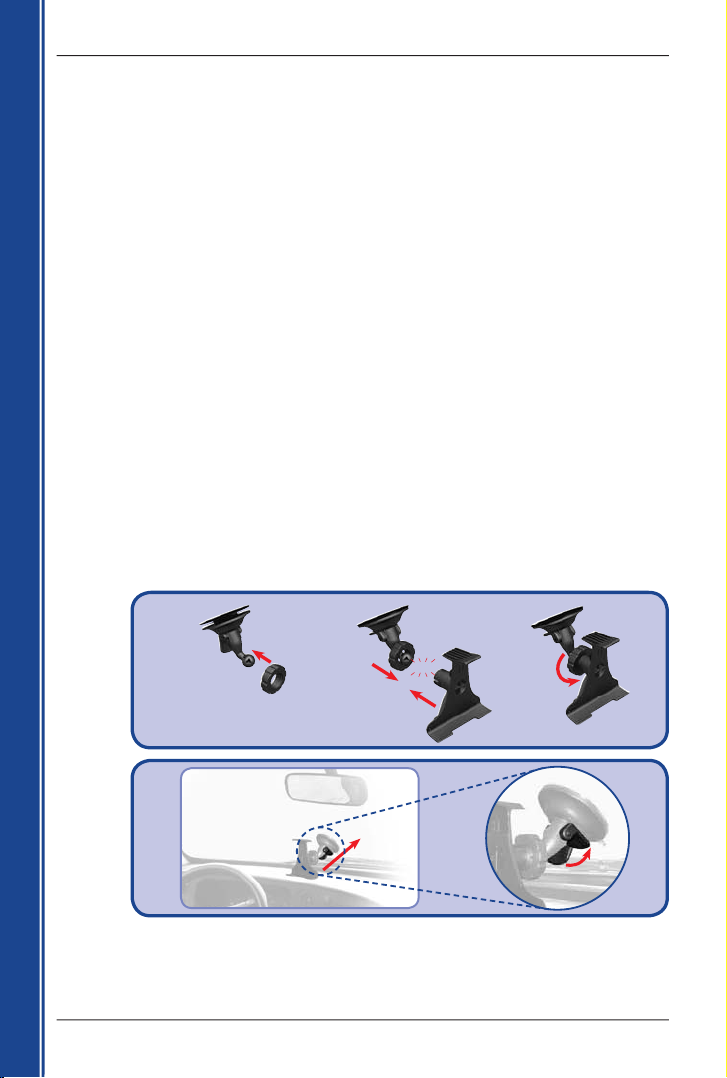
Suction Mount
Assembling the iCN Suction-Mount
Choose a position on the windshield that is clearly visible to the driver without obstructing the
view of the road.
1. Assemble the suction-mount:
• Slip the locking-nut over the ballfoot.
• Snap the socket-clip onto the ballfoot.
• Screw the locking-nut onto the thread of the socket-clip until firm.
2. Use the alcohol swab to clean and dry the suction-cup and the mounting-area on the
windshield, then attach the suction-mount to the windshield:
a. Hold the suction-cup firmly against the windshield; and
b. Press the lever towards the suction-cup.
Page 11

3
4
a b
5
a b
6
11
iCN 600 series | User Manual
Getting started
Inserting the iCN into the Suction-Mount
3. Open the GPS antenna outwards, so that it has a clear view of the sky.
4. Insert the iCN into the suction-mount:
a. Position the two locating-tabs on the underside of the iCN into the corresponding
slots on the socket-clip.
b. Snap the upper side of the iCN into the socket-clip.
5. Connect the iCN to the vehicle power supply:
a. Plug the small end of the In-Vehicle Power-Adaptor into the Power Socket on the left
side of the iCN.
b. Plug the other end of the In-Vehicle Power-Adaptor into the 12 V vehicle power-socket.
6. Press
for one second.
The iCN will turn on.
Page 12
12
iCN 600 series | User Manual
Getting started
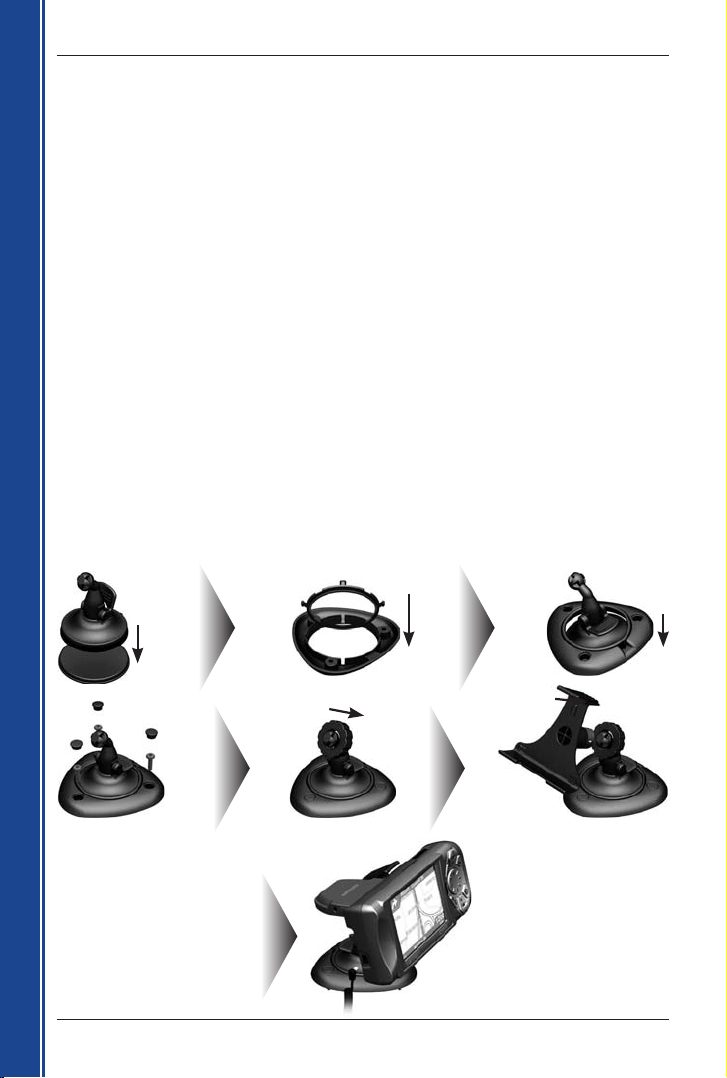
Adhesive Tape and Screw-Mount
You can use the baseplate, adhesive tape and screws supplied to permanently mount the iCN
directly into the vehicle dashboard.
Note: This is a permanent solution. Once fixed, the adhesive tape cannot be removed.
Assembling the iCN Screw-Mount
1. Choose a position on the dashboard where the iCN will be clearly visible to the driver,
and ensure that the mounting surface is clean and dry.
2. Remove the protective layer from the tape and press down firmly for 30 seconds.
3. Press the suction-cup firmly against the surface and press the lever down.
4. Use the baseplate and screws supplied to fix the iCN base into the dashboard.
5. Slip the locking-nut over the ballfoot, with the flat side facing upwards.
6. Snap the socket-clip onto the ballfoot.
7. Screw the locking-nut onto the thread of the socket-clip until firm.
Inserting the iCN into the Screw-Mount
1. Snap the iCN onto the socket-clip. Position the two locating-tabs on the underside of the
iCN into the corresponding slots on the socket-clip. Then push the iCN into the clip.
2. Open the GPS antenna outwards, so it has a clear view of the sky.
3. Plug the power-cable into the socket on the left side of the iCN and the other end into
the 12 V vehicle power-socket.
Page 13

13
iCN 600 series | User Manual
Getting started
4. Getting Started
The Main Menu screen provides access to all of the iCN’s functions, including navigating to a destination.
Step One: Turn iCN On
1. Plug the power adapter into the socket on the left of the iCN and the other end into the
12 V vehicle power-socket.
2. Gently pull the bottom of the GPS receiver away from the iCN.
The receiver will lift out to a horizontal position to allow it to obtain a GPS fix.
3. Press
for one second.
The iCN will turn on and display the Language screen.
Step Two: Language Screen
1. Use the 8-way toggle to choose your language, then press OK.
• To prevent the Language screen from displaying on each startup, use the 8-way toggle to
select the Do not show on startup check box, then press OK
.
2. Press
to go to the next screen.
The Warning screen will display.
Page 14
14
iCN 600 series | User Manual
Getting started
Step Three: Warning Screen
1. Read the warning message.
2. Select Accept, then press OK to confirm that you understand.
The first
Tutorial screen will display.
Step Four: Tutorial Screens
1. Read the Tutorial screen.
• To prevent the Tutorial from displaying on startup, use the 8-way toggle to select the
Do not show Tutorial on startup check box, then press OK
.
2. Press
to move through each Tutorial screen.
The Main Menu screen will display.
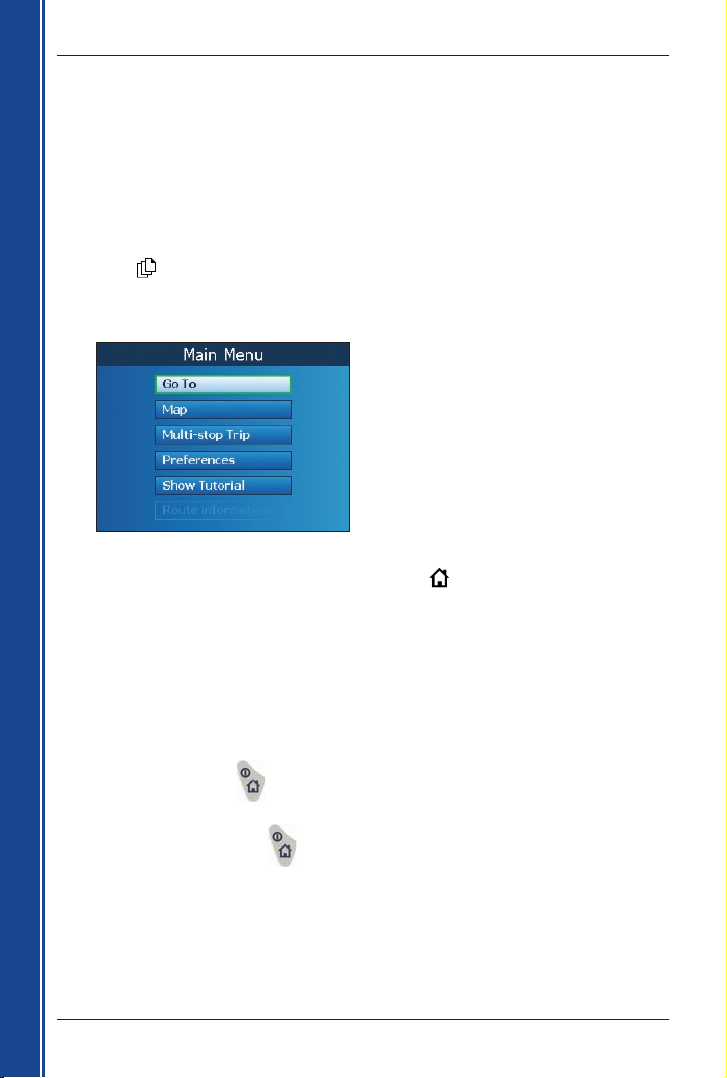
Main Menu Screen
• Use the 8-way toggle to select a Main Menu option; confirm a selection by pressing OK.
• Return to the Main Menu screen at any time by pressing .
• The Route Information option is only available when a route has been calculated.
See page 37 for more information.
To Turn iCN Off
1. Gently push the GPS receiver back towards the iCN. The receiver will click into place.
2. Complete one of the following:
• iCN 650: Press for three seconds. When the confirmation message displays,
select Yes, then press OK. The iCN will turn off.
• iCN 630, 635: Press for three seconds until the iCN turns off.
Page 15
15
iCN 600 series | User Manual
Getting started
5. Map Storage
iCN 635
Your iCN contains a pre-installed Basemap of continental United States. The Basemap contains
the main roads that connect cities and towns (for more information see page 63). Your iCN may or
may not come with a memory card containing a preactivated, detailed map. To navigate to your
destination you must insert the memory card into your iCN.
To navigate in an area outside of the pre-activated map, you must first purchase a Map Product
Key from your Navman supplier. Install Smart
Desktop, then use it to activate your Map Product
Key and install the required map. For more information on installing maps, see page 61.
IMPORTANT: If your iCN did not come with a memory card, you will first need to install a map on
your iCN internal memory or a blank memory card (sold separately) using Smart
Desktop on
your computer. Until you do this, you will only be able to navigate using the pre-installed Basemap,
which contains the main roads that connect cities and towns. For more information on Basemaps,
see page 63.
• To install Smart
Desktop on your computer, see page 59.
• To install a map on your iCN or blank memory card, see page 61.
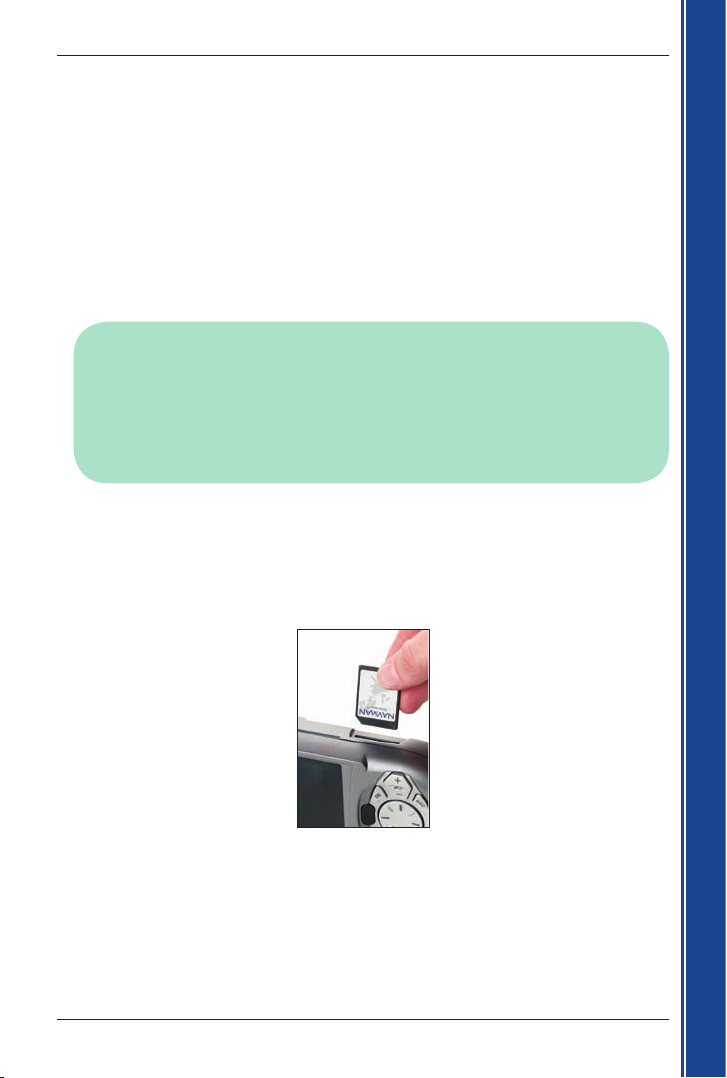
Inserting Memory Card
Note: Before inserting the memory card for the first time, remove the plastic space-saver from
the Memory Card slot
: gently push down on the top edge of the space-saver to release it,
and pull it out of the slot.
Before inserting the memory card, turn off the iCN. Next, gently insert the card in the Memory
Card slot with the label facing the front of the iCN.
Removing Memory Card
Before removing the memory card, turn off the iCN. Next, gently push down on the top edge
of the card to release it, and pull it out of the slot.
iCN 650
The iCN 650 contains all preactivated maps of continental United States and Canada in internal
memory and does not come with a memory card slot.
Page 16
16
iCN 600 series | User Manual
Getting started
6. GPS Status
Signals are transmitted by Global Positioning System (GPS) satellites orbiting the Earth.
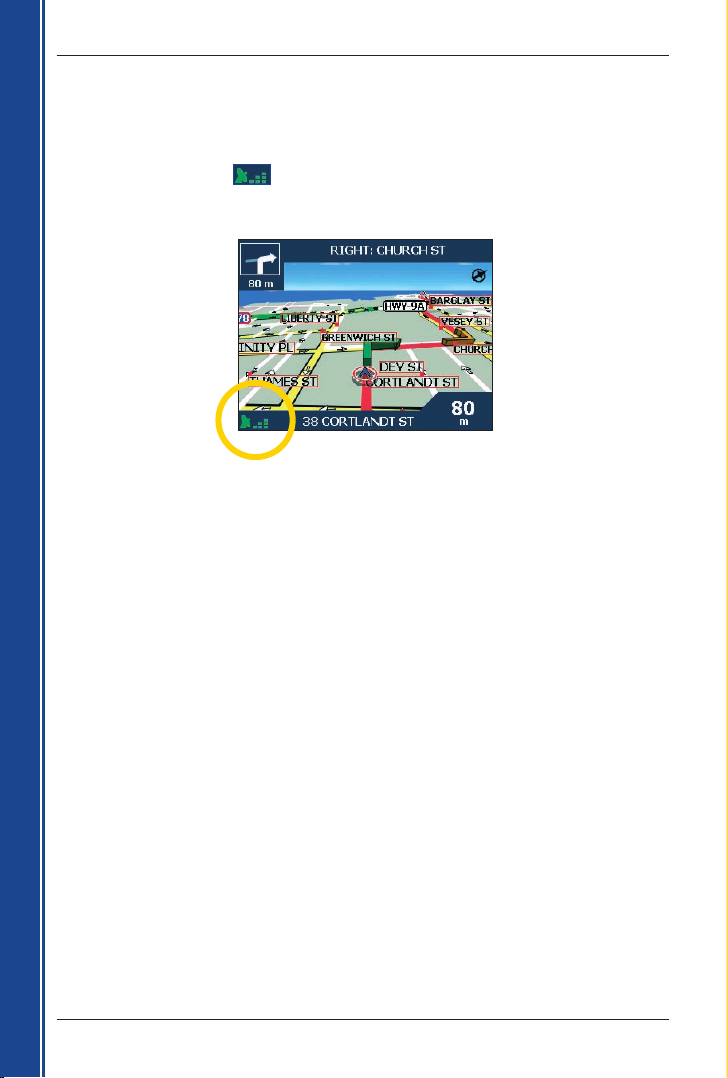
You can view your GPS status at any time from the 2D Map, 3D Map, Next Turn and Next 4 Turns screens.
The GPS Strength Indicator
will display green when there is a valid fix (2D or 3D), and between
one and three bars will display to indicate the strength of the signal; the GPS Strength Indicator will display
red when no fix is available.
For more detailed information on your current GPS fix, see GPS Status
on page 57.
Page 17
17
iCN 600 series | User Manual
Getting started
7. Setting Your Destination
For your safety, enter destination information before you start a journey.
Do not operate the iCN while driving
.
Select a destination using the Destination, Keyboard and Preview screens, which used together form a
destination wizard.
This section describes how to use each of these screens and provides two case studies to help guide
you through setting your destination.
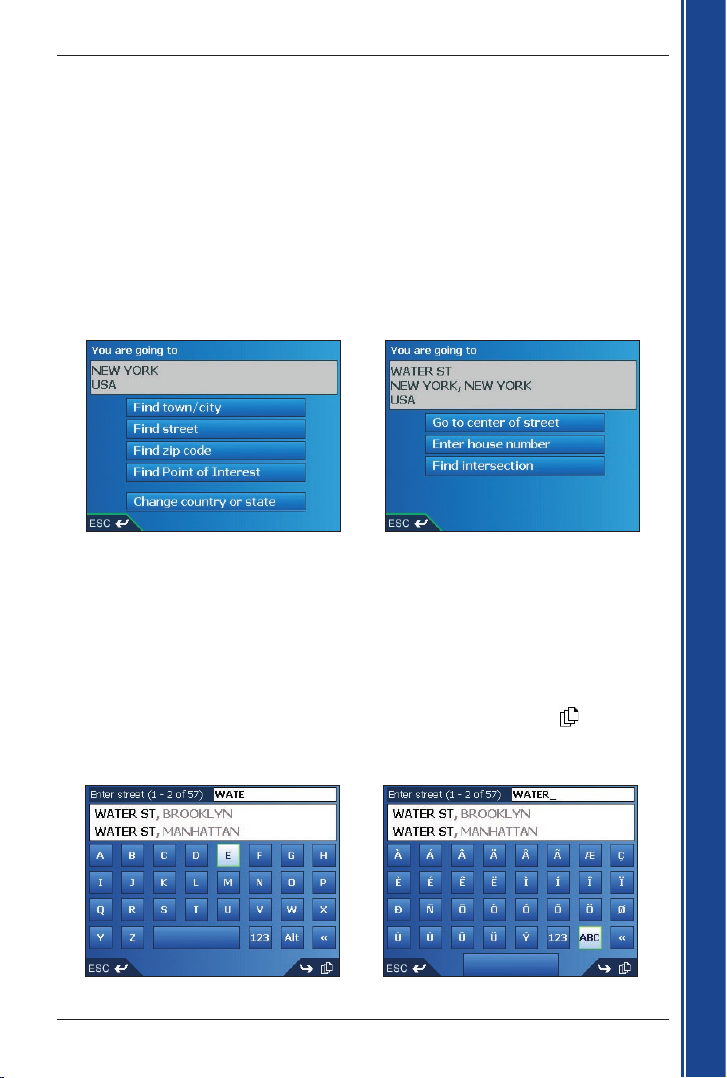
Destination Screen
The Destination screen is used to select your destination by area, street, postal code/ZIP code,
Point of Interest (POI), intersection, city, town, country or state.
As you specify each part of the address, it will display in the You are going to field at the top of the screen.
The available options will change to reflect the parts of the address still to be completed.
• Use the 8-way toggle to move around the Destination screen.
• To select an option, press OK
.
Keyboard Screen
The Keyboard screen will display when you are required to enter text, such as when searching for
a street name. As you select each character, the first two results will display. Press
to see more
search results. Search results will be listed in matching order, with the closest matches appearing at
the top of the list.
The Keyboard screen can display in three modes: alphabet, alternate and number/symbol.
Figure 1. Alphabet Keyboard Figure 2. Alternate Keyboard
Page 18
18
iCN 600 series | User Manual
Getting started
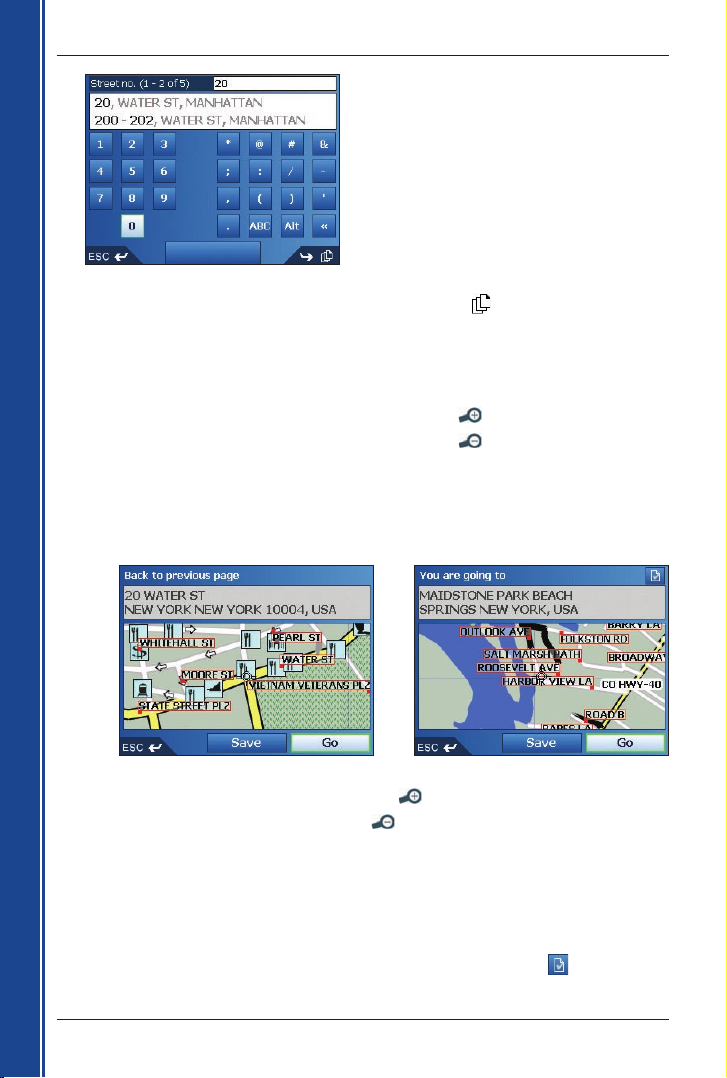
Figure 3. Number/Symbol Keyboard
As you select each character, the first two results will display. Press
to see more search results.
• Use the 8-way toggle to move around the Keyboard screen.
• To select a character or a search result, press OK
.
• To delete a character, press ESC or select <<, then press OK.; hold ESC to delete the line.
• To display the number/symbol Keyboard screen (Figure 3), select 123, then press OK
• To display the alternate Keyboard screen (Figure 2), press
, or select Alt, then press OK.
• To display the alphabet Keyboard screen (Figure 1), press
, or select ABC, then press OK.
Preview Screen
The Preview screen is used to display a preview of your destination before navigating to it, saving it
as a Favorite or displaying it on the 2D Map screen.
• Use the 8-way toggle to move around the Preview screen.
• To display a smaller area in greater detail, press
.
• To display a larger area in less detail, press
.
• To display your destination on the 2D Map screen, select the preview map, then press OK
.
The 2D Map screen will display.
• To save your destination as a Favorite, select Save, then press OK.
The New Favorite screen will display. See Favorites and My Home on page 42.
• To calculate the route and open the 3D Map screen, select Go, then press OK.
The 3D Map screen will display.
• To view Point of Interest (POI) details when your destination is a POI, select
, then press OK.
The POI Detail screen will display.
Page 19
19
iCN 600 series | User Manual
Getting started
Case Study:
Setting Your Destination by Address
This case study will show you how to set your destination by selecting your country, then state,
then town or city, then street, then house number.
Step One: Open the Destination screen
a. From the Main Menu, select Go To, then press OK.
b. From the Go To screen, select Address or POI, then press OK.
The Destination screen will display.
Important Note:
i. If this is the first time you are setting your destination and you have maps from more than
one country installed and selected, then the Select Country
screen will display instead of
the Destination screen. Go directly to Step Two: Select the Country of Destination,
step b
.
The next time you perform this procedure, the Destination screen will open as expected.
ii. If this is the first time you are setting your destination and you have maps from only one
country, but more than one state installed and selected, then the Select State screen will
display instead of the Destination screen. Go directly to Step Three: Select the State
of Destination.
The next time you perform this procedure, the Destination screen will open as expected.
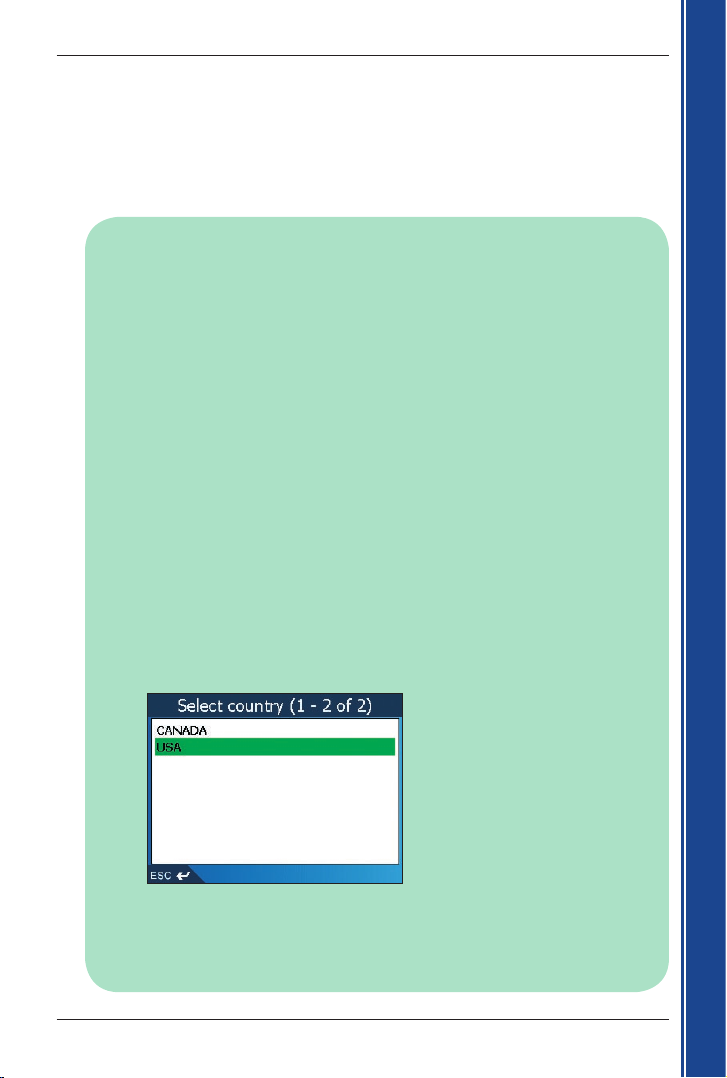
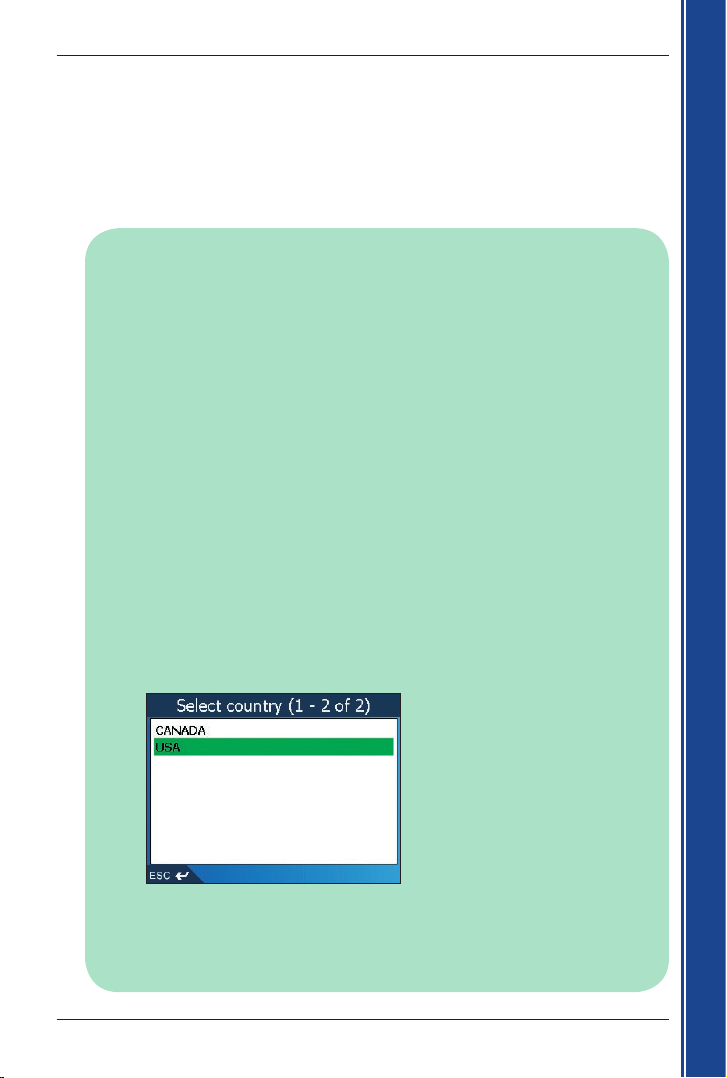
Step Two: Select the Country of Destination
If you only have the map of one country installed and selected, that country is selected for
your destination by default and cannot be changed. Go to Step Three: Select the State of
Destination
.
a. From the Destination screen, select Change country or Change country or state then
press OK.
The Select country screen will display.
b. Select a country using the 8-way toggle. Press OK to select from the list.
The Select state screen will display.
• If you only have the map of one state installed and selected, that state is selected for
your destination by default. Go to Step Four: Find the Town or City of Destination
.
Page 20
20
iCN 600 series | User Manual
Getting started
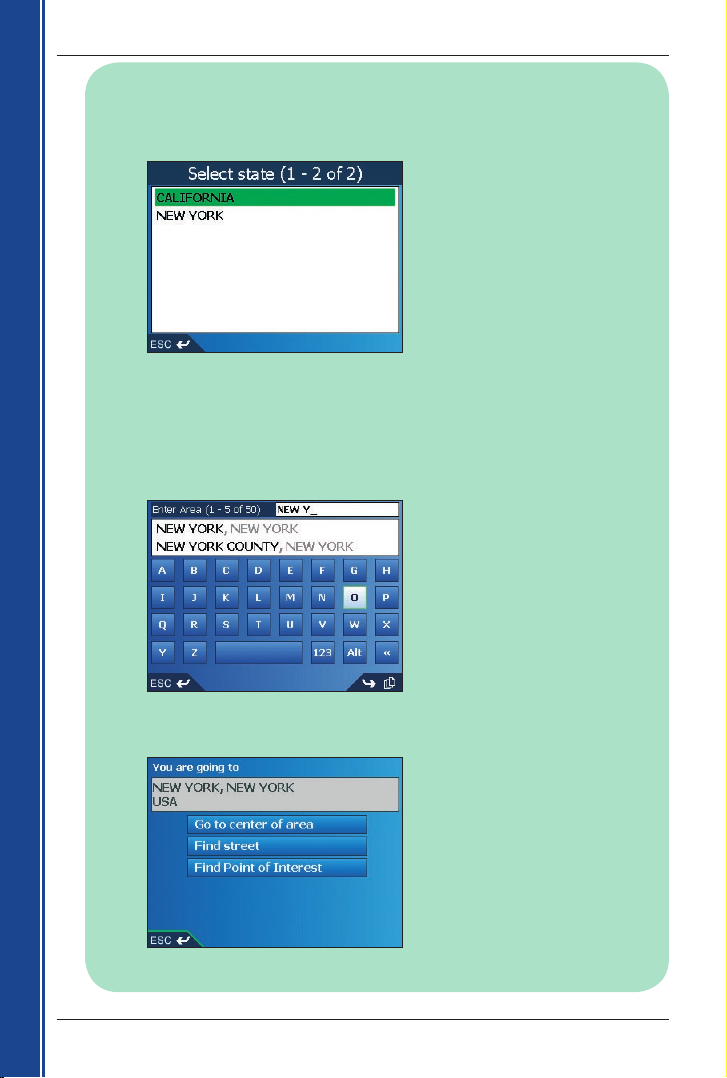
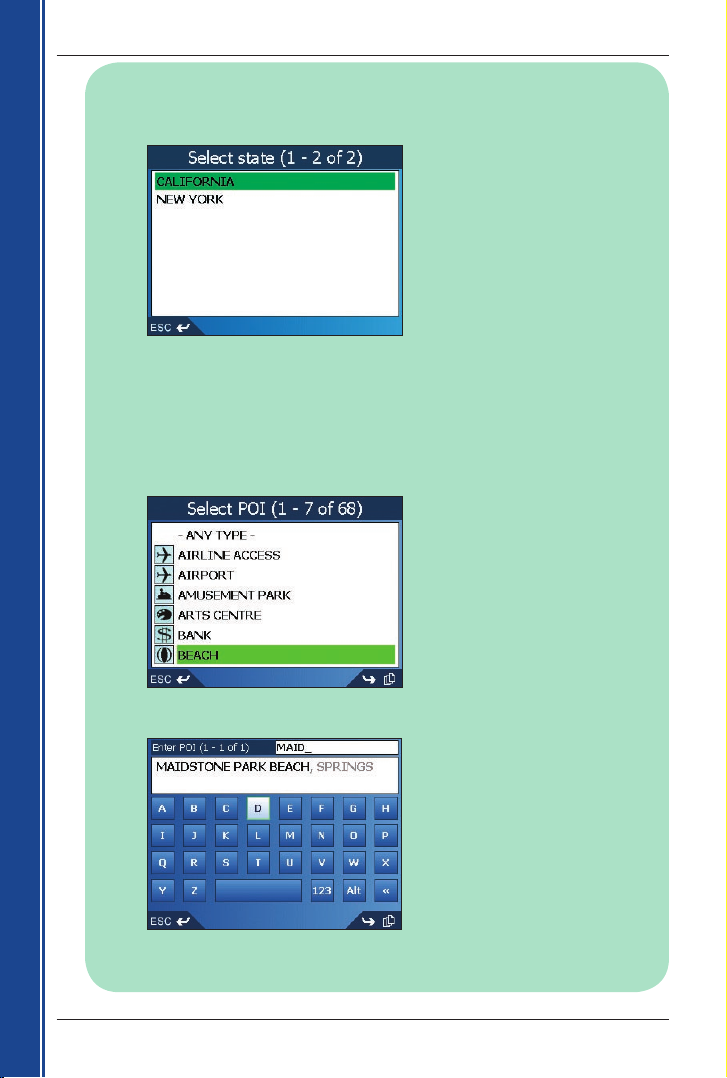
Step Three: Select the State of Destination
If you only have the map of one state installed and selected, that state is selected for your
destination by default and cannot be changed. Go to Step Four: Find the Town or City of
Destination.
a. Select a state using the 8-way toggle. Press OK to select from the list.
The Destination screen will display.
Step Four: Find the Town or City of Destination
a. From the Destination screen, select Find town/city, then press OK.
The Keyboard screen will display.
b. Use the Keyboard screen to find the town or city of your destination. For information on
using the Keyboard screen, see pages 17-18
.
The Destination screen will display.
Page 21
21
iCN 600 series | User Manual
Getting started
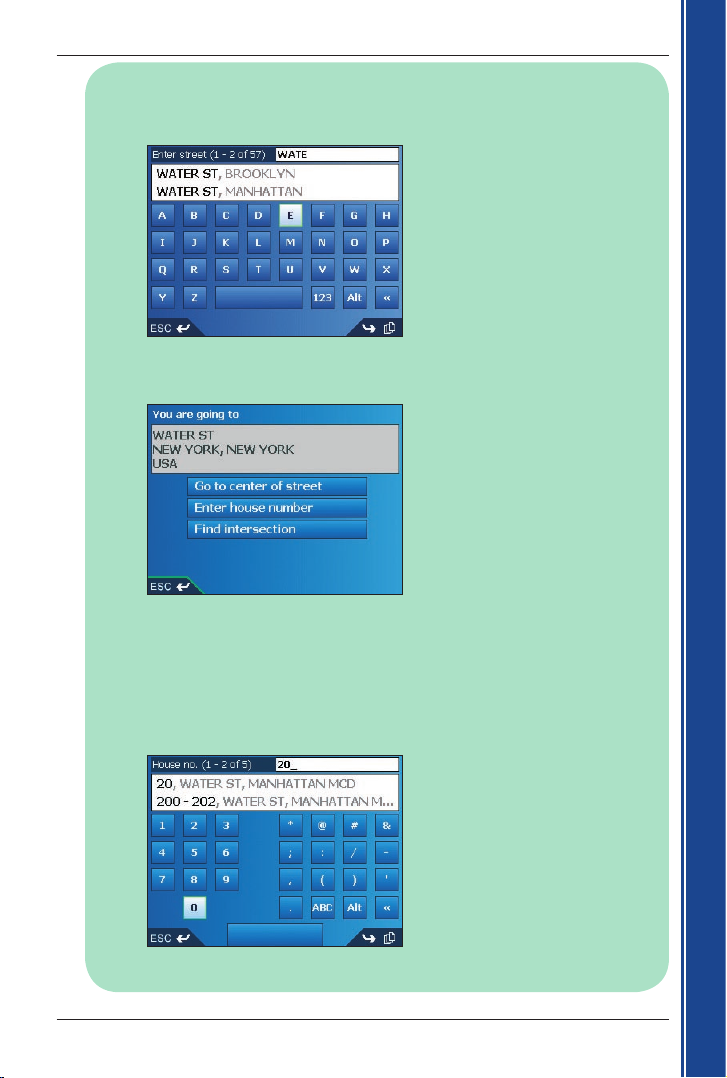
Step Five: Find the Street of Destination
a. From the Destination screen, select Find street, then press OK.
The Keyboard screen will display.
b. Use the Keyboard screen to find the street of your destination. For information on using
the Keyboard screen, see pages 17-18.
The Destination screen will display.
Step Six: Find the House Number of Destination
a. From the Destination screen, select Enter house number, then press OK.
The Keyboard screen will display.
Note: If Enter house number option is not displayed, house numbers are not available for
your selected street. Select Go to center of street, then press OK to display the Preview
screen. Go to step c.
Page 22
22
iCN 600 series | User Manual
Getting started
b. Use the Keyboard screen to find the house number of your destination. For information
on using the Keyboard screen, see pages 17-18.
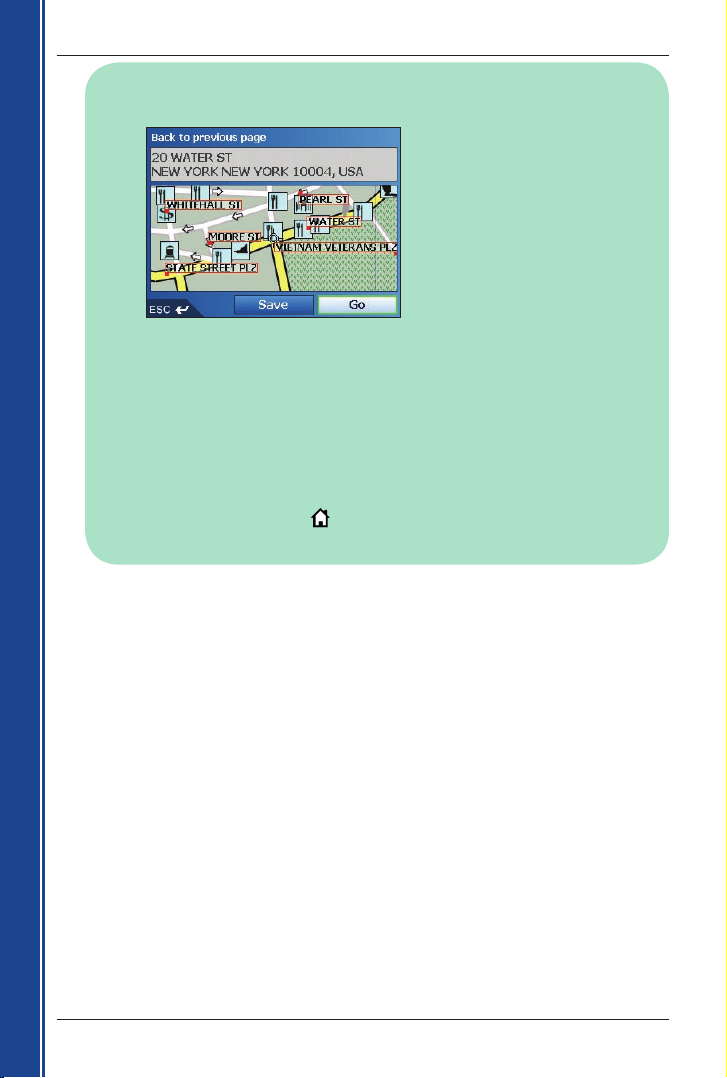
The Preview screen will display.
c. Complete one of the following:
• To calculate the route and open the 3D Map screen, select Go, then press OK
.
The 3D Map screen will display.
• To display the destination on the 2D Map screen, select the preview map, then press OK
.
The 2D Map screen will display.
• To save the destination as a Favorite, select Save, then press OK.
The New Favorite screen will display. See Favorites and My Home on page 43.
• To change your destination, press ESC.
The Desintation screen will display.
To return to the Main Menu, press
.
Page 23
23
iCN 600 series | User Manual
Getting started
Case Study:
Setting Your Destination by POI
This case study will show you how to set your destination by selecting a Point of Interest (POI).
A POI is a named site, feature, landmark or public venue which can be displayed as an icon on the
map. POIs are grouped by type, such as parks and museums.
Step One: Open the Destination screen
a. From the Main Menu, select Go To, then press OK.
b. From the Go To screen, select Address or POI, then press OK.
The Destination screen will display.
Important Note:
i. If this is the first time you are setting your destination and you have maps from more than
one country installed and selected, then the Select Country
screen will display instead of
the Destination screen. Go directly to Step Two: Select the Country of Destination,
step b
.
The next time you perform this procedure, the Destination screen will open as expected.
ii. If this is the first time you are setting your destination and you have maps from only one
country, but more than one state installed and selected, then the Select State screen will
display instead of the Destination screen. Go directly to Step Three: Select the State
of Destination.
The next time you perform this procedure, the Destination screen will open as expected.
Step Two: Select the Country of Destination
If you only have the map of one country installed and selected, that country is selected for
your destination by default and cannot be changed. Go to Step Three: Select the State of
Destination
.
a. From the Destination screen, select Change country or Change country or state then
press OK.
The Select country screen will display.
b. Select a country using the 8-way toggle. Press OK to select from the list.
The Select state screen will display.
• If you only have the map of one state installed and selected, that state is selected for
your destination by default. Go to Step Four: Select the Type of POI
.
Page 24
24
iCN 600 series | User Manual
Getting started
Step Three: Select the State of Destination
If you only have the map of one state installed and selected, that state is selected for your
destination by default and cannot be changed. Go to Step Four: Select the Type of POI
.
a. Select a state using the 8-way toggle. Press OK to select from the list.
The Destination screen will display.
Step Four: Select the Type of POI
Note: To narrow the search for a type of POI, you can first search by Town or City.
a. From the Destination screen, select Find Point of Interest, then press OK.
The Select POI screen will display.
b. Select a POI type using the 8-way toggle. Press OK to select from the list.
The Keyboard screen will display.
Page 25
25
iCN 600 series | User Manual
Getting started
c. Use the Keyboard screen to find the POI. For information on using the Keyboard screen,
see pages 17-18
.
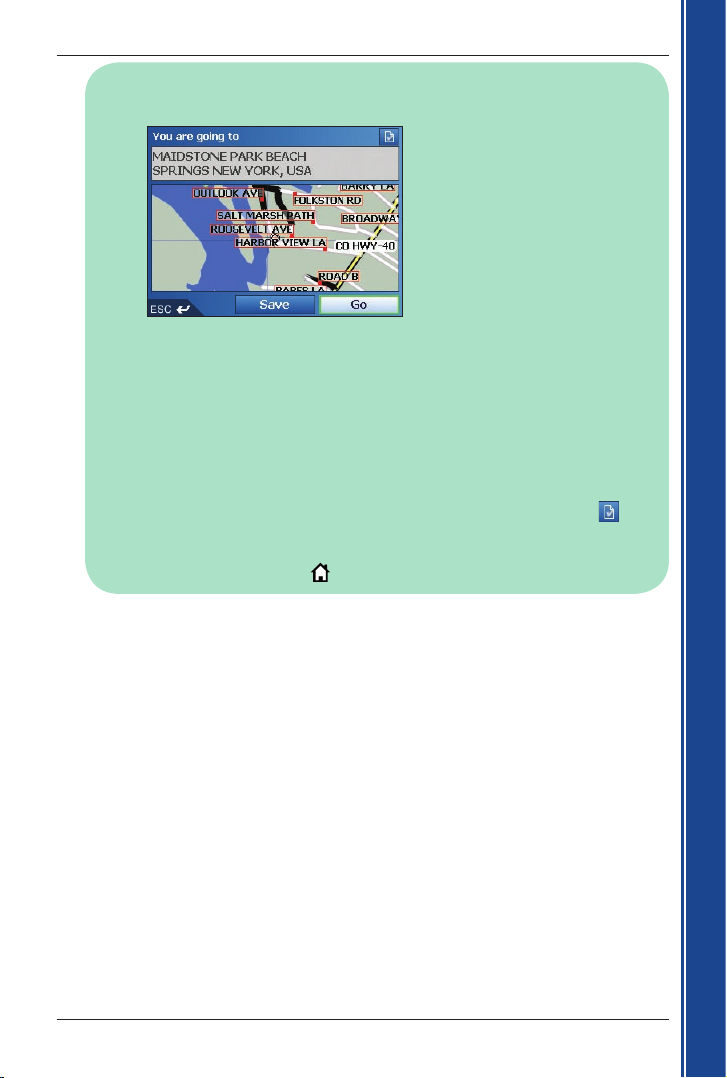
The Preview screen will display.
d. Complete one of the following:
• To calculate the route and open the 3D Map screen, select Go, then press OK
.
The 3D Map screen will display.
• To display the destination on the 2D Map screen, select the preview map, then press OK
.
The 2D Map screen will display.
• To save the destination as a Favorite, select Save, then press OK.
The New Favorite screen will display. See Favorites and My Home on page 42.
• To change your destination, press ESC.
The Desintation screen will display.
•
To view Point of Interest (POI) details when your destination is a POI, select , then
press OK
.
The POI Detail screen will display.
To return to the Main Menu, press
.
Page 26
26
iCN 600 series | User Manual
Getting started
8. Using the 2D Map screen to
Plan a Route
You can plan a route directly from the 2D Map screen using the Pop-up menu.
1. From the Main Menu, select Map, then press OK.
The 2D Map screen will display.
• Move around the 2D Map screen using the 8-way toggle
.
• To display a smaller area in greater detail, press
.
• To display a larger area in less detail, press
.
2. Press OK to display cross-hair on the 2D Map screen.
• To remove the cross-hair press ESC
3. Use the 8-way toggle to place the intersection of the cross-hair on a destination; the street will
highlight and the street name will display.
4. Press OK to select the street as your destination.
The Pop-up menu will display
5. Select Navigate To.
The route is calculated and displayed on the 3D Map screen.
Page 27

27
iCN 600 series | User Manual
9. Multi-stop Trips
You can use the Multi-stop Trip screen to set multiple destination points for your trip. Your route will be
calculated to go via each of these points in the specified order.
Destination points can be added via the Multi-stop Trip screen or by selecting Show Details from the
pop-up menu on the 2D Map screen, then Add to Trip.
You can save up to 200 multi-stop trips, each with up to 14 destination points.
Case Study: Setting a Multi-stop Trip
This case study will show you how to set a multi-stop trip by selecting your country, then area, then
street, then house number for each destination point.
Step One: Start Your Multi-stop Trip
a. From the Main Menu, select the Multi-stop Trip option.
The Multi-stop Trip screen will display.
b. Select Add, then press OK.
The Add to Trip screen will display.
Page 28

28
iCN 600 series | User Manual
c. Select Address or POI, then press OK.
The Destination screen will open.
Note: You can also add destination points using Favorites, recent destinations and
nearest Point of Interest.
Step Two: Select the Country of Your Destination Point
If you only have the map of one country installed and selected, that country is selected for
your destination point by default and cannot be changed. Go to Step Three: Select the State
of Your Destination Point.
a. From the Destination screen, select Change country or Change country or state, then
press OK.
The Select Country screen will display.
b. Select a country using the 8-way toggle. Press OK to select from the list.
The Destination screen will display.
• If you only have the map of one state installed and selected, that state is selected for your
destination by default. Go to Step Four: Find the Town or City of Your Destination Point.
Page 29

29
iCN 600 series | User Manual
Step Three: Select the State of Your Destination Point
If you only have the map of one state installed and selected, that state is selected for your
destination by default and cannot be changed. Go to Step Four: Find the Town or City of
Destination.
a. Select a state using the 8-way toggle. Press OK to select from the list.
The Destination screen will display.
Step Four: Find the Town or City of Your
Destination Point
a. From the Destination screen, select Find town/city, then press OK.
The Keyboard screen will display.
b. Use the Keyboard screen to find the town or city of your destination. For information on
using the Keyboard screen, see pages 17-18
.
The Destination screen will display.
Page 30

30
iCN 600 series | User Manual
Step Five: Find the Street of Your Destination Point
a. From the Destination screen, select Find street, then press OK.
The Keyboard screen will display.
b. Use the Keyboard screen to find the street of your destination point. For information on
using the Keyboard screen, see pages 17-18.
The Destination screen will display.
Page 31

31
iCN 600 series | User Manual
Step Six: Find the House Number of Your
Destination Point
a. From the Destination screen, select Enter house number, then press OK.
The Keyboard screen will display.
Note: If the Enter house number option is not displayed, house numbers are not available
for your selected street. Select Go to center of street, then press OK to display the
Preview screen. Go to step
c.
b. Use the Keyboard screen to find the house number of your destination point. For
information on using the Keyboard screen, see pages 17-18.
The Preview screen will display.
c. Select Add to Trip, then press OK
.
The Multi-stop Trip screen will display, listing your destination point.
Page 32

32
iCN 600 series | User Manual
d. Complete one of the following:
Note: Destination points added, updated or deleted after a multi-stop trip has
commenced will not affect the current route.
If you want to ... Then ...
add another destination point
Note: Destination points added after a
multi-stop trip has commenced will not
be included in the current route.
• select Add, then press OK
.
The Add to Trip screen will display.
• select Address, then press OK
.
The Destination screen will display.
•
go to Step Three: Find the Area of Your
Destination Point
.
change the order of your destination
points
• select a destination point to move
using the 8-way toggle. Press OK to
select from the list.
The Preview screen will display.
• select Move, then press OK
.
The Multi-stop Trip screen will display.
• use the 8-way toggle to move the
selected destination point to the
correct position, then press OK
.
calculate the route
select Go, then press OK.
The 3D Map screen will display the
calculated route.
delete all destination points
select Clear, then press OK.
delete one destination point • select a destination point to delete
using the 8-way toggle. Press OK to
select from the list.
The Preview screen will display.
• select Delete From Trip, then press
OK. The Multi-stop Trip screen will
display.
save the multi-stop trip as a Favorite •
select Save, then press OK.
The New Favorite screen will display.
• select Save, then press OK
.
The Favorite will save and the Multi-
stop Trip screen will display.
To return to the Main Menu screen, press
.
Page 33

33
iCN 600 series | User Manual
Skipping a Destination Point
You can modify a multi-stop trip at any time from the Multi-stop Trip screen; however, if you have
already commenced a trip, changes will not affect the current route:
Main Menu Multi-stop Trip
To skip a destination point during a multi-stop trip, complete the following:
1.
Press to return to the Main Menu screen, .
The Main Menu screen will display.
2. Select Route Information, then press OK
.
The Route Information screen will display.
3. Select Skip Next Dest.
, then press OK.
The next destination point will be skipped and the route recalculated to the following
destination point.
Page 34

34
iCN 600 series | User Manual
10. Viewing your Route
Once a route has been calculated, you can view it in several ways. Press to cycle through the screens.
2D Map Screen
The 2D Map screen is always oriented North and shows your current position (if a GPS fix is active)
and surrounding street names. If a route has been calculated, the route and turns are highlighted.
To view the 2D Map screen, either select Map on the Main Menu screen then press OK, or when a
route has been calculated, press
to cycle through the screens.
• Use the 8-way toggle to move around the map.
• To display a smaller area in greater detail, press
.
• To display a larger area in less detail, press
.
• To display the cross-hair press OK. Press again to display the Pop-up menu.
Your current location
Displays one of the
following
options:
• Speed
• Time
• Heading
• Distance to Turn
• Distance to Go
• ETA (Estimated Time
of Arrival)
• Time to Go
Your next turn is
highlighted in a different
color to future turns. The
color will depend on the
theme you are using.
GPS strength indicator
Your current position is
marked with
.
Page 35

35
iCN 600 series | User Manual
3D Map Screen
The 3D Map screen displays when a route is calculated, oriented to the traveling direction with an
adjustable horizon.
To view the
3D Map screen when a route has been calculated, press to cycle through the screens.
•
To adjust the viewing angle, press the 8-way toggle up or down.
• To display a smaller area in greater detail,
press .
• To display a larger area in less detail,
press .
•
To display the Go To Pop-up summary, press OK.
North oriented compass
Additional information
can display here. Press
the 8-way toggle left or
right to scroll the options
:
• Speed
• Time
• Heading
• Distance to Turn
• Distance to Go
• ETA (Estimated Time of
Arrival)
• Time to Go
Direction of the next turn
Your current location
GPS strength indicator
Page 36

36
iCN 600 series | User Manual
Next Turn Screen
The Next Turn screen displays information that you need for the next turn, the direction of the turn
and the distance to the turn. A route must have been calculated for this screen to be able to display.
Access to this screen is controlled by the Settings - Display screen.
To view the Next Turn screen when a route has been calculated, press
to cycle through the screens.
Next 4 Turns Screen
The Next 4 Turns screen displays the next four turns of your route, the turn direction, the street name
and the distance to the turn. A route must have been calculated for this screen to be able to display.
Access to this screen is controlled by the Settings - Display screen.
To view the Next 4 Turns screen when a route has been calculated, press
to cycle through the screens.
Back-On-Track™ Automatic Rerouting
Your route is redirected if you make a wrong turn. The ? symbol will display upper left of the 3D Map
and Next Turn screens while the route recalculates.
Map of the next turn
The next instruction
Direction of the next turn
Distance to the next turn
GPS strength indicator.
Your current location
Additional information can
display here. Press the
8-way toggle left or right to
scroll the options
:
• Speed
• Time
• Heading
• Distance to Turn
• Distance to Go
• ETA (Estimated Time of
Arrival)
• Time to Go
Additional information can
display here. Press the
8-way toggle left or right to
scroll the options
:
• Speed
• Time
• Heading
• Distance to Turn
• Distance to Go
• ETA (Estimated Time of
Arrival)
• Time to Go
Distance to the next turn
Your current location
GPS strength indicator.
The next turn is
highlighted at the top
of the list.
Page 37

37
iCN 600 series | User Manual
Route Information Screen
The Route Information screen provides information about your current route and lets you skip a trip
destination point or cancel a route.
The screen is only available from the Main Menu when you are navigating a route:
Main Menu
Route Information
Show Route
Select Show Route, then press OK to display your entire route on the 2D Map screen.
Instruction List
Select Instruction list, then press OK to display the Instruction List screen.
The Instruction List screen is similar to the Next 4 Turns screen except that it displays your
entire route.
• Use
to cycle through the instruction list.
Page 38

38
iCN 600 series | User Manual
Summary
Select Summary, then press OK to display the Route Summary screen containing your From
and To addresses, Estimated Time to arrival and the Distance remaining to your destination.
If you are navigating a multiple destination trip, the information displayed will relate to your next
destination point.
Skip Next Destination
Select Skip Next Dest., then press OK to skip the next destination point of your trip.
Only available when navigating a multi-stop trip.
Cancel Route
Select Cancel Route, then press OK to cancel the route.
Page 39

39
iCN 600 series | User Manual
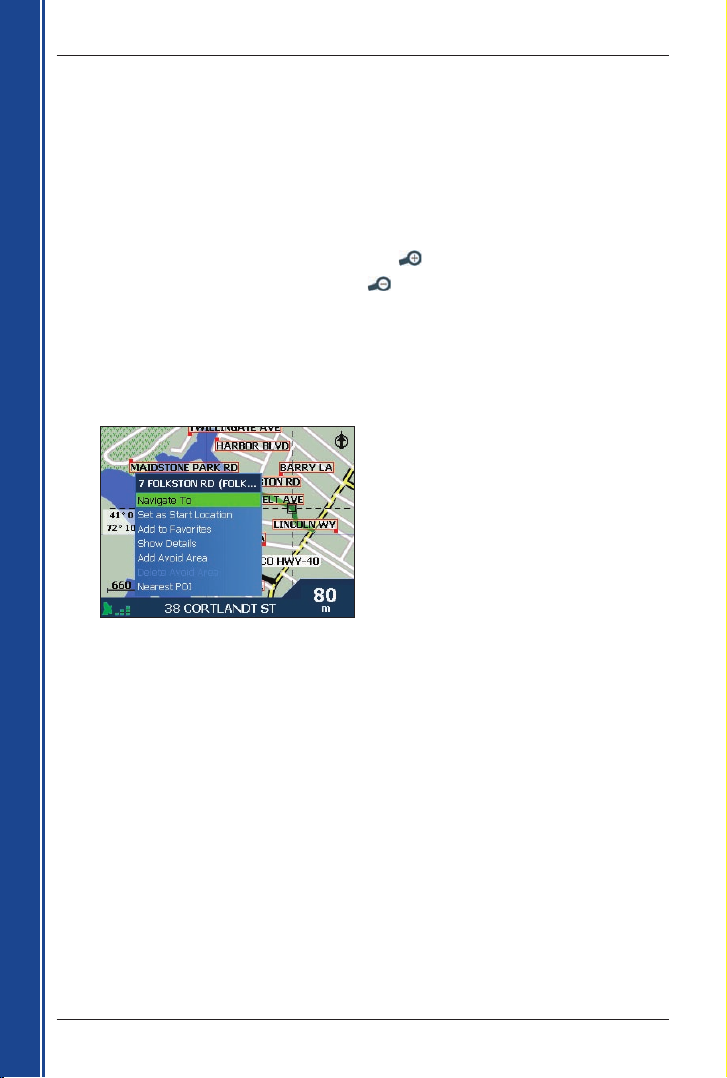
11. The 2D Map Screen
Pop-up Menu
The Pop-up menu allows you to access navigational functions from the 2D Map screen.
To display the Pop-up menu complete the following:
1. From the Main Menu,
select Map, then press OK.
The 2D Map screen will display.
2. Use the 8-way toggle to move around the 2D Map screen.
• To display a smaller area in greater detail,
press .
• To display a larger area in less detail,
press .
3. Press OK to display the cross-hair on the 2D Map screen.
• To remove the cross-hair press ESC
.
4. Position the intersection of the cross-hair using the 8-way toggle. Where the cross-hair
intersects with a street, the street name will display at the bottom of the 2D Map screen.
5. Press OK.
The Pop-up menu will display.
6. You can choose one of the following options:
Menu Option Description
Navigate To Calculates a route from your current location.
Set as Start Location
Sets the selected point as your departure point.
Smart
will calculate and display the route to your destination.
Add to Favorites
Displays the New Favorite screen for you to add the selected point
as a Favorite
.
Show Details
Displays the Address Details screen from which you can:
• View details of the selected point
• Add the point to your multi-stop trip.
• Set the point as your destination point
• Save the point as a Favorite.
Add Avoid Area Adds an Avoid Area for you to size.
Delete Avoid Area Deletes the selected Avoid Area
.
Nearest POI
Displays the Select POI screen.
Select the POI type, then the POI to navigate to.
7. Press OK to confirm your selection.
Page 40

40
iCN 600 series | User Manual
12. Avoiding an Area
You can calculate a route that avoids a specified area on the map. Up to ten Avoid Areas can be added.
Avoid Areas are displayed as shaded areas. If no alternative route around an Avoid Area exists, you will
be routed through an Avoid Area.
Adding an Avoid Area
1. From the Main Menu screen, select Map, then press OK.
The 2D Map screen will display.
2. Press OK and use the 8-way toggle to place the cross-hair over the area that you want
to avoid.
3. Press OK to display the Pop-up menu.
4. Select Add Avoid Area, then press OK.
An Avoid Area is displayed.
5. Set the Avoid Area to the correct size and position using the 8-way toggle
.
6. Press OK to enable the Avoid Area.
Deleting an Avoid Area
1. From the Main Menu screen, select Map, then press OK.
The 2D Map screen will display.
2. Press OK and use the 8-way toggle to place the cross-hair over the Avoid Area that you
want to delete.
3. Press OK to display the Pop-up menu.
4. Select Delete Avoid Area, then press OK.
The Avoid Area is deleted.
Deleting All Avoid Areas
1. From the Main Menu screen, select Preferences, then press OK.
2. From the Preferences
screen, select My Data, then press OK.
The My Data screen will display.
3. From the My Data screen, select Clear Data, then press OK.
The Clear Data screen will display.
4.
Select Clear Avoid Areas, then press OK. When the warning dialog-box opens, select
Yes, then
press OK.
5.
To return to the Main Menu, press .
Page 41

41
iCN 600 series | User Manual
13. Route Demonstrator
The Route Demonstrator allows you to:
• Preview a route.
•
Plan and view a route without a GPS fix, such as when you are inside a building.
Step One: Activate Route Demonstrator
1. From the Main Menu screen, select Preferences, then press OK.
2. From the Preferences screen, select Routing, then press OK.
The Routing screen will display.
3. Press
twice.
4. Select the Demonstrate Route check box, then press OK.
5. Select Save, then press OK.
The Main Menu screen will display.
Step Two: Select Departure Point
If you have a GPS fix, you do not need to select a departure point unless you want the
demonstrated route to start elsewhere.
1. From the Main Menu screen, select Map.
The 2D Map screen will display.
2. Press OK to display the cross-hair on the 2D Map screen.
3. Position the intersection of the cross-hair using the 8-way toggle. Where the cross-hair
intersect on a street, the street name will display at the bottom of the 2D Map screen.
4. Press OK.
The Pop-up menu will display.
5. Select Set as Start Location, then press OK.
The Pop-up menu will close.
Step Three: Select Destination Point
Set a destination either by using the Destination screen (see pages 17-25) or by using the
2D Map screen Pop-up menu by completing the following:
1. Press OK to display the cross-hair on the 2D Map screen.
2. Position the intersection of the cross-hair using the 8-way toggle. Where the cross-hair
intersect, with a street, the street name will display at the bottom of the 2D Map screen.
3. Press OK.
The Pop-up menu will display.
4. Select Navigate To, then press OK.
The Pop-up menu will close. The 3D Map screen will display the calculated route in
Route Demonstrator mode.
• If you have selected the Repeat check box on the Routing screen, the Route
Demonstrator will continue to repeat the route.
Page 42

42
iCN 600 series | User Manual
To Disable Route Demonstrator
1. Press to display the Main Menu screen.
2. From the Main Menu screen, select Preferences, then press OK.
3. From the Preferences screen, select Routing, then press OK.
The Routing screen will display.
4. Press
twice.
5. Clear the Demonstrate Route check box, then press OK.
6. Select Save, then press OK.
Route Demonstrator will be disabled. The Main Menu screen will display.
Page 43

43
iCN 600 series | User Manual
14. Favorites and My Home
You can save up to 200 destinations as Favorites, one of which can be saved as My Home. My Home
can be any designated Favorite, but we recommend that it is your home or other common destination.
You can save a Favorite from the Preview screen after searching for an address, or from the Pop-up
Menu on the 2D Map screen.
Saving a Favorite
1. Either search for an address using the Destination and Keyboard screens as described in
Setting Your Destination, pages 17-25, or create a multi-stop trip as described in Multi-stop
Trips, pages 27-33, until the Preview screen is displayed.
2. Select Save, then press OK.
The New Favorite screen will display.
3. To change the name of the Favorite, select the Name box, then press OK.
The Enter text screen will display.
• Use the 8-way toggle to move around the Enter text screen.
• To select a character, press OK
.
• To delete a character, press ESC; hold ESC to delete the line.
• To display the number/symbol Enter text screen, select 123, then press OK.
• To display the alternate Enter text screen, press
, or select Alt, then press OK.
• To display the alphabet Enter text screen, press , or select Alt, then press OK.
• After you have entered a name for the Favorite, select Enter, then press OK.
The New Favorite screen will display.
Page 44

44
iCN 600 series | User Manual
4. Complete one of the following:
• To save as a favorite, select Save as favorite, then press OK.
The Favorite is saved. The Go To screen will display.
• To save as My Home, select Save as My Home, then press OK
.
The Favorite is saved as My Home. The Go To screen will display.
Saving a Favorite from the 2D Map Screen
1. From the Main Menu, select Map, then press OK.
The 2D Map screen will display.
2. Press OK to display the cross-hair.
3. Position the cross-hair on a destination using the
8-way toggle.
Where the cross-hair intersect on a street, the street will highlight and the street name will display.
4. Press OK.
The Pop-up menu will display.
5. Select Add to Favorites, then press OK.
The New Favorite screen will display.
Page 45

45
iCN 600 series | User Manual
6. To change the name of the Favorite, select the Name box, then press OK.
The Enter text screen will display.
• Use the 8-way toggle to move around the Enter text screen.
• To select a character, press OK
.
• To delete a character, press ESC; hold ESC to delete the line.
• To display the number/symbol Enter text screen, select 123, then press OK
• To display the alternate Enter text screen, press , or select Alt, then press OK.
• To display the alphabet Enter text screen, press , or select Alt, then press OK.
• After you have entered a name for the Favorite, select Enter, then press OK.
The New Favorite screen will display.
7. Complete one of the following:
• To save as a favorite, select Save as favorite, then press OK.
The Favorite is saved. The 2D Map screen will display.
• To save as My Home, select Save as My Home, then press OK
.
The Favorite is saved as My Home. The 2D Map screen will display.
Editing the Name of the Favorite
1. From the Main Menu, select Go To, then press OK.
2. From the Go To screen, select Favorites, then press OK.
The Favorite screen will display.
3. Select a Favorite to edit using the 8-way toggle, then press OK
.
The Preview Favorite screen will display.
Page 46

46
iCN 600 series | User Manual
4. Select the Name box, then press OK.
The Enter text screen will display.
• Use the 8-way toggle to move around the Enter text screen.
• To select a character, press OK
.
• To delete a character, press ESC; hold ESC to delete the line.
• To display the number/symbol Enter text screen, select 123, then press OK
• To display the alternate Enter text screen, press , or select Alt, then press OK.
• To display the alphabet Enter text screen, press , or select Alt, then press OK.
• After you have entered a name for the Favorite, select Save, then press OK.
The New Favorite screen will display.
5. Complete one of the following:
• To save as a favorite, select Save as favorite, then press OK.
The Favorite is saved. The Favorite screen will display.
• To save as My Home, select Save as My Home, then press OK
.
The Favorite is saved as My Home. The Favorite screen will display.
Deleting a Favorite
1. From the Main Menu, select Go To, then press OK.
2. From the Go To screen, select Favorites, then press OK.
The Favorite screen will display.
3. Select a Favorite to delete using the 8-way toggle, then press OK
.
The Preview Favorite screen will display.
Page 47

47
iCN 600 series | User Manual
4. Select Delete, then press OK.
A Warning dialogue box will display asking for confirmation to delete the Favorite.
5. Select Yes, then press OK
.
The Favorite is deleted. The Favorite screen will display.
Navigating to a Favorite
1. From the Main Menu, select Go To, then press OK.
2. From the Go To screen, select Favorites, then press OK.
The Favorite screen will display.
3. Select a Favorite using the 8-way toggle, then press OK
.
The Preview Favorite screen will display.
4. Select Go, then press OK
.
The route is calculated and displayed on the
3D Map screen.
Navigating to My Home
1. From the Main Menu, select Go To then press OK.
2. From the Go To screen, select My Home then press OK.
The route is calculated and displayed on the 3D Map screen.
Page 48

48
iCN 600 series | User Manual
15. Preferences
You can modify the following preferences to suit your needs.
Screen Brightness
1. Press and hold the Zoom/Brightness button to display the Brightness scale.
2. To increase screen brightness, press
+
. To decrease screen brightness, press
-.
The Brightness scale comprises ten rectangular boxes in a row. As screen brightness is
increased, the first seven boxes progressively turn from gray to green; the last three turn red.
Warning: The iCN can heat up when the Brightness scale is set above 70% - i.e., when more
than seven rectangles are colored - therefore,
use lower brightness whenever acceptable.
Volume
1. Press and hold the Volume button to display the Volume scale.
2. To increase volume, press
+
. To decrease volume, press
-.
Routing Preferences
1. From the Main Menu, select Preferences. Press OK.
2. From the Preferences screen, select Routing.
The first of three Routing screens will display. Press
to move through the Routing
screens.
Page 49

49
iCN 600 series | User Manual
3. Complete one of the following:
If you want to... Then...
change the Route Type move the Route Type slider towards
Quickest to give more weighting to the
fastest time when calculating a route.
move the Route Type slider towards
Shortest distance to give more weighting
to the shortest distance when calculating
a route.
change the Preference for freeways move the Preference for freeways slider
towards Less often
to use roads other
than freeways where possible when
calculating a route.
move the slider towards More often
to use freeways where possible when
calculating a route.
change the Preference for urban roads move the Preference for
urban roads
slider towards Less often to use roads
other than urban roads where possible
when calculating a route.
move the Preference for urban roads
slider towards More often to use urban
roads where possible when calculating
a route.
revert to default settings select Set default, then press OK
on the first Routing screen. This will
restore default setting for Route Type,
Preference for freeways and Preference
for urban roads.
avoid toll roads select the Avoid toll roads check box.
avoid unsealed roads select the Avoid unsealed roads
check box.
avoid ferries select the Avoid ferries check box.
receive a warning if your route includes toll
roads
select the Toll roads check box to display
a warning message at the start of your
trip, if your route includes toll roads.
receive a warning if your route includes
unsealed roads
select the
Unsealed roads check box to
display a warning message at the start of
your trip, if your route includes unsealed
roads.
receive a warning if your route includes
ferries
select the Ferries check box to display a
warning message at the start of your trip,
if your route includes ferries.
enable the Route Demonstrator select the Demonstrate Route check
box. This allows you to plan and view a
route without a GPS fix. See page 40
for
more information.
Page 50

50
iCN 600 series | User Manual
If you want to... Then...
enable the Route Demonstrator to play
repeatedly
select the Repeat check box.
enable Smart
Demonstration to be played
select the SmartST Demonstration
check box. The demonstration willl
navigate between the first and second
Favorite after a 10-second delay.
enable Track Recording
(only to be used if required by Navman
Customer Support)
contact Navman Customer Support,
as we recommend this feature be used
only under the supervision of a Navman
technician.
4. Select Save, then press OK.
The Main Menu screen will display.
Language Preferences
1. From the Main Menu, select Preferences, then press OK.
2. From the Preferences screen, select Language, then press OK.
The Language screen will display.
3. To change your language, including the voice scheme used for voice-guidance during
navigation, select your preferred voice scheme from the Language box using the left and
right sides of the 8-way toggle
.
Note: If your preferred language is not available, install it to your iCN from Smart Desktop:
Speech Change languages loaded on iCN
4. To enable Voice guidance instructions during navigation, select the Enable check box.
5. Select Save, then press OK.
The Main Menu screen will displ
ay.
Page 51

51
iCN 600 series | User Manual
Map Preferences — Display Settings
1. From the Main Menu, select Preferences, then press OK.
2. From the Preferences screen, select Maps, then press OK.
3. From the Maps screen, select the Display option.
The Display screen will display.
4. Complete the following:
If you want to... Then...
enable Auto Zoom during navigation select the Auto Zoom check box. If
selected, the 2D Map and 3D Map
screen will automatically zoom in or out,
depending on your speed, to allow optimal
route-viewing.
enable access to the Next Turn screen
select the Display Next Turn Screen
check box.
enable access to the Next 4 Turns screen
select the Display Next 4 Turns Screen
check box.
change the color scheme select your preferred scheme from the
Map color schem
e box using the left and
right side of the 8-way toggle
.
improve screen contrast in light or dark
conditions
under Map colors, select either Day
or Night
.
display a topographical map on the 2D
Map and 3D Map screens
select the Topographic display
check box.
display grid lines on the 2D Map and 3D
Map screens
select the Display Map Grid check box.
display a north-pointing compass on the
2D Map and 3D Map screens
select the Display Compass on Map
check box.
display “no entry” icons on “no entry” roads
on the 2D Map and 3D Map screens
select the Display no entry roads
check box.
5. Select Save, then press OK.
The Main Menu screen will display.
Page 52

52
iCN 600 series | User Manual
Map Preferences — Internal Memory
1. From the Main Menu, select Preferences, then press OK.
2. From the Preferences screen, select Maps, then press OK.
3. From the Maps screen, select Internal memory.
The Maps - Internal memory screen will display.
4. To activate a map, use the 8-way toggle to select the desired map, then press OK to select
the map check box
Note: There may be more than one page of map listings, depending on the number of maps
installed. To view additional pages of map listings, scroll down using the 8-way toggle, or
press
.
5. Repeat step 4 until all required maps are selected.
6. Select Save, using the right side of the 8-way toggle, then press OK.
The Main Menu screen will display.
Map Preferences — Memory Card*
1. From the Main Menu, select Preferences, then press OK.
2. From the Preferences screen, select Maps, then press OK.
3. From the Maps screen, select Memory card.
The Maps - Memory card screen will display.
4. To activate a map, use the 8-way toggle to select the desired map, then press OK to select
the map check box
Note: There may be more than one page of map listings, depending on the number of maps
installed. To view additional pages of map listings, scroll down using the 8-way toggle, or
press
.
5. Repeat step 4 until all required maps are selected.
6. Select Save, using the right side of the 8-way toggle, then press OK.
The Main Menu screen will display.
* iCN 630, 635 only.
Page 53

53
iCN 600 series | User Manual
Map Preferences — Points of Interest (POIs)
Points of Interest in a region are grouped into types. This function allows you to select the types you
need. For example, you may be only interested in entertainment venues and want to disable other
POI types such as schools.
1. From the Main Menu, select Preferences, then press OK
.
2. From the Preferences screen, select Maps, then press OK.
3. From the Maps screen, select Points of Interest.
The Points of Interest screen will display.
4. You may either choose to display (or hide) icons of all POI types on the 2D Map and 3D Map
screens, or to selectively display desired icons chosen from the list of POI types.
• To display all POI icons (i.e., icons from all POI types) on the 2D Map and 3D Map
screens, select Turn all on, then press OK. To display no icons, select Turn all off, then
press OK.
• To select a specific POI type icon for display, use the 8-way toggle to select the desired POI
type, then press OK to select the check box. Repeat until all desired POI types are selected.
Note: There may be more than one page of POI types, depending on the installed maps. To
view additional pages of POI types, scroll down using the 8-way toggle, or press
.
5. On any page of POI types, select Save, using the right side of the 8-way toggle, then press OK
.
The Main Menu screen will display.
Page 54

54
iCN 600 series | User Manual
Alerts Preferences — Active POIs
The Active POI settings allow you to set warning chimes and visual warnings for custom POIs that
will activate within a chosen distance-radius of your location. For example, a warning chime will
sound or a visual warning will display when an active POI is within 150 ft (46 m), but not necessarily
on your route.
Note: Custom POIs must first be installed on your iCN using Smart Desktop before they can be
set as active POIs. See Points of Interest (POI) Editor on pages 66-68
.
1. From the Preferences menu, select Safety Alerts, then press OK.
The Safety Alerts screen will display.
2. On the Safety Alerts screen, select Active POI, then press OK.
The Select Active POI screen will display.
3. Use the 8-way toggle to select a custom POI type, then click OK
.
The POI Activation Settings screen will display.
4. Select the Active check box to activate the POI.
5. Modify the settings as required:
• To enable a warning chime when the POI is in close proximity, select the Audio Warning
check box.
• To enable a visual warning when the POI is in close proximity, select the Visual Warning
check box.
• Move the Distance to POI slider to select the distance at which the warnings will activate.
6. Use the 8-way toggle to select Save, then press OK.
The Main Menu screen will display.
Page 55

55
iCN 600 series | User Manual
Alerts Preferences - Speed and GPS Signals
The Active POI settings allow you to set warning chimes and visual warnings for custom POIs.
1. From the Preferences menu, select Safety Alerts, then press OK.
The Safety Alerts screen will display.
2. On the Safety Alerts screen, select Safety, then press OK.
The Safety screen will display.
3. Complete the following:
If you want to... Then...
enable a warning chime
when traveling at or above a
designated speed
select the speed in the Speed box using the left and
right buttons on the 8-way toggle. Select Save, then
press OK.
The Safety alerts screen will display.
Note: The GPS signal alert will be active when a
Speed alert is selected.
enable a visual warning if the
Main Menu screen is accessed
in a moving vehicle
select the Warn driver when operating check box,
then press OK
.
enable a warning chime and
visual warning when the GPS
signal has been lost
select the Warn when GPS lost check box, then
press OK
.
Note: The GPS signal alert will be active when a
Speed alert is selected.
4. Use the 8-way toggle to select Save, then press OK.
The Main Menu screen will display.
Page 56

56
iCN 600 series | User Manual
My Data Preferences - My Points of Interest
(My POI)
Custom Points of Interest (POIs) are installed from the Smart Desktop POI Editor (see pages
66-68), and listed on the My POIs screen.
1. From the Main Menu, select Preferences. Press OK.
2. From the Preferences screen, select My Data. Press OK.
3. From the My Data screen, select My POI. Press OK.
The My POI screen will display.
4. Use the 8-way toggle to select the POI file or files you require. Press OK to select the POI
check box
Note: There may be more than one page of POI types, depending on the number of maps
installed. To view additional pages of POI types, scroll down using the 8-way toggle, or
press
.
5. Use the 8-way toggle to select Save, then press OK.
The Main Menu screen will display.
My Data Preferences - Clear Data
1. From the Main Menu screen, select Preferences. Press OK.
The Preferences screen will display.
2. From the Preferences screen, select My Data. Press OK.
The My Data screen will display.
3. From the My Data screen, select Clear Data, then press OK.
The Clear Data screen will display.
4. Complete the following:
If you want to... Then...
clear recent destinations select Clear Recent, then press OK. When the warning
dialog-box opens, select Yes, then press OK.
clear favorites select Clear Favorites, then press OK. When the warning
dialog-box opens, select Yes, then press OK
.
Note: This option will not clear My Home.
clear avoid areas select Clear Avoid Areas, then press OK. When the
warning dialog-box opens, select Yes, then press OK
.
5. Press to return to the Main Menu screen.
Page 57

57
iCN 600 series | User Manual
GPS Status
Signals are transmitted by Global Positioning System (GPS) satellites orbiting the Earth. The
Satellite Signal Strengths screen provides a visual representation of the information being received.
Latitude and longitude are displayed, along with a north-pointing compass, the heading in degrees
and ground speed. The strength of each satellite is displayed on a bar chart.
From the Main Menu screen, select Preferences
More Preferences GPS Status.
The Satellite Signal Strengths screen will display.
The circle on the right side of the screen displays green when there is a valid fix (2D or 3D),
and red when no fix is available. A fix will be obtained more quickly if the vehicle is stationary than
if it is moving.
The satellites available from your current position are shown as grey, red and green colored bars:
Bar Color Description
Grey No signal at all
Red A valid signal, but not being used to fix your position
Green A valid signal being used to fix your position
Measurement Preferences
1. From the Main Menu screen, select Preferences. Press OK.
The Preferences screen will display.
2. From the Preferences screen, select More Preferences. Press OK.
The second Preferences screen will display.
3. On the second Preferences screen, select Measurements, then press OK
.
The Measurements screen will display.
Page 58

58
iCN 600 series | User Manual
4. Complete the following:
If you want to... Then...
change the Position
Format
select either the Decimal Degrees or the Degrees,
Minutes, Seconds option.
change the local time
offset
select the offset from the Coordinated Universal Time (UTC)
for your location from the Local Time Offset box using the
lefthand and righthand buttons of the 8-way toggle.
Next, select either the 12 Hour or 24 Hour
option for time-
format.
choose distance units
* select either the kilometers or miles option.
5. Use the 8-way toggle to select Save, then press OK.
The Main Menu screen will display.
* Only available when UK English or US English language is selected.
Startup Preferences
1. From the Main Menu screen, select Preferences. Press OK.
The Preferences screen will display.
2. From the Preferences screen, select More Preferences. Press OK.
The second Preferences screen will display.
3. On the second Preferences screen, select Startup, then press OK
.
The Startup screen will display.
4. Complete the following:
If you want to... Then...
display the Tutorial on
startup
select the Tutorial Screen check box under Show at
Startup
.
display the Language
Selection screen on startup
select the Language Selection Screen check box under
Show at Startup
.
view the Tutorial
select Show Tutorial. The first Tutorial screen will display.
Press
repeatedly to cycle through the Tutorial screens.
5. Use the 8-way toggle to select Save, then press OK.
The Main Menu screen will display.
Page 59

59
iCN 600 series | User Manual
16. Smart Desktop
Smart Desktop is used to manage maps to and from your iCN, obtain software updates, manage
Custom Points of Interest (POIs) and install Basemaps.
Note: For Windows XP, install XP Service Pack 1 before you install Smart Desktop.
Install Smart Desktop on your Computer
1. Close all open programs on your computer.
2. Insert the Smart Application Installer CD into your computer CD-ROM drive.
The Smart Desktop installer will start.
• If your computer does not automatically launch the CD, start the installation manually:
Start Run.
Type
D:\Setup SmartST 2005 for iCN600 series.exe where “D” is the letter assigned to your
CD-ROM drive. Click OK
.
3. Follow the screen prompts to install Smart Desktop:
• Select your preferred language for Smart Desktop when prompted.
• Review and accept the Licence Agreement when prompted.
• Select a destination folder when prompted.
Smart
Desktop will open. You are now ready to install maps on your iCN.
To Open Smart Desktop
Once Smart Desktop has been installed, you can access it from the Start menu:
Start
Programs Navman Smart Desktop 2005 for iCN600 series
Map information
Selected maps
Download selected
maps to the iCN,
memory card or
memory card reader
(not supplied)
Map Display screen
Map Color Key
Page 60

60
iCN 600 series | User Manual
Uninstalling Smart Desktop from your
Computer
We recommend that you use the Add or Remove Programs feature in your Windows Control Panel:
Start Control Panel Add or Remove Programs
Uninstall: Smart Desktop 2005 for iCN600 Series.
17. Updating your iCN
Updating your Version of Smart
Update your iCN software to the most recent version of Smart by accessing the Navman website
through Smart
Desktop.
To update your iCN, complete the following:
1. Open Smart
Desktop:
Start
Programs Navman Smart Desktop 2005 for iCN600 series
2. On the Setup menu, select Update software, then Check for updates on the web
.
Your computer will connect to the Internet and display the Navman website.
3. Download the update for your region to your computer, if available.
4. On the Setup menu, select Update software, then
Update software on iCN.
Follow the prompts to update your iCN software.
Upgrading from Previous Version of Smart
See the Upgrade Guide that came with your software upgrade.
Page 61

61
iCN 600 series | User Manual
18. Installing Maps Using
Smart Desktop
Your iCN comes with a pre-activated map. If you require additional maps, you must first purchase a Map
Product Key. Use Smart
Desktop to activate your Map Product Key and install the required map.
Install and Activate Maps on your iCN
US and Canadian Maps
1. Open Smart Desktop:
Start
Programs Navman Smart Desktop 2005 for iCN600 series
2. Insert a Smart Map CD into your computer CD-ROM drive.
The available maps will display.
Note: If your computer opens Windows Explorer, close the Windows Explorer window.
3. Click the map you want to install to your iCN. You may need to install multiple maps to
cover the desired geographical area.
The map will change color to indicate it has been selected. The map is now listed in the
Selected section of the Desktop Selected Maps tab.
• If you have another map to select, go to step 3.
4. Click an Add to button to install all maps listed in the Selected section of the Desktop
Selected Maps tab to your iCN, memory card, or memory card reader (not supplied).
The selected map or maps are now installed on your iCN or iCN memory card.
European, Australian and New Zealand Maps
1. Open Smart Desktop:
Start Programs Navman Smart Desktop 2005 for iCN600 series
2. Insert a Smart Map CD into your computer CD-ROM drive.
The available maps will display.
Note: If your computer opens Windows Explorer, close the Windows Explorer window.
3. Click the map you want to install to your iCN. You may need to install multiple maps to
cover the desired geographical area.
•
If you have already activated a Map Product Key, or if your iCN came with a pre-
activated Map Product Key, the map will change color to indicate it has been selected.
Go to step 6.
4. Follow the prompts to activate your Map Product Key:
• Enter your Map Product Key from the back of the CD box when prompted.
• Your computer will connect to the Internet to activate your Map Product Key.
• You will be prompted to enter or update your contact details, so that Navman can
advise you when updates are released.
• Your computer will again connect to the Internet to confirm the activation of your Map
Product Key.
Page 62

62
iCN 600 series | User Manual
5. Click the map to install to your iCN.
The map will change color to indicate it has been selected. The map is now listed in the
Selected section of the Desktop Selected Maps tab.
• If you have another Map Product Key to activate, go to step 3.
6. Click an Add to button to install all maps listed in the Selected section of the Desktop
Selected Maps tab to your iCN, memory card, or memory card reader (not supplied).
The selected map or maps are now installed on your iCN or iCN memory card.
Remove Maps from your iCN
1. Open Smart Desktop:
Start
Programs Navman Smart Desktop 2005 for iCN600 series
2. Open the Maps on iCN section: iCN tab
Maps on iCN.
3. Click the map to be removed and select Remove from iCN from the pop-up menu.
Page 63

63
iCN 600 series | User Manual
19. Continuous Continental
Navigation*
Basemaps allow you to seamlessly navigate between installed maps without installing maps of all
regions along your route. Each Basemap covers a large area, such as Western Europe or continental
United States and contains main roads that connect cities and towns. On the Basemap, you can select
a road or POI as your departure point or destination.
All Basemaps:
• contain roads and ferry connections of high national and international importance.
• use less memory than would be necessary to install all equivalent detailed maps.
• exclude smaller roads and have a reduced level of geographical detail.
You can add and remove Basemaps using the Basemap Installer (see below).
* The iCN 635 contains a pre-installed Basemap of continental United States.
The iCN 650 does not require a Basemap, as all detailed maps of United States and Canada are pre-installed.
Install Basemap
1. Open Smart Desktop if it is not already open:
Start
Programs Navman Smart Desktop 2005 for iCN600 series.
2. On the Map menu, click Basemaps.
The Navman Basemap Installer window will open.
3. Click the appropriate Add button to install the Basemap to the iCN, memory card or memory
card reader (not supplied).
Page 64

64
iCN 600 series | User Manual
Activate Basemap
1. Disconnect the USB cable from the iCN.
The iCN will turn on.
• If the iCN does not turn on, press
for one second.
2. From the iCN Main Menu screen, select Preferences, then press OK.
3. From the Preferences screen, select Maps, then press OK
.
4. Complete one of the following:
• If the Basemap is on the iCN, from the Maps screen, select Internal Memory, then press OK.
The Maps - Internal Memory screen will display.
• If the Basemap is on the memory card, from the Maps screen, select Memory Card, then
press OK
.
The Settings - Memory Card screen will display.
5. To activate the Basemap, use the 8-way toggle to select the Basemap, then press OK to
select the check box.
6. Select Save using the right side of the 8-way toggle, then press OK.
The Main Menu screen will display.
Remove Basemap
1. Open Smart Desktop if it is not already open:
Start
Programs Navman Smart Desktop 2005 for iCN600 series.
2. On the Map menu, click Basemaps.
The Navman Basemap Installer window will open.
3. Select the Basemap to remove.
4. Click the appropriate Remove button to remove the Basemap from your iCN, memory card
or memory card reader.
Page 65

65
iCN 600 series | User Manual
20. Smart Desktop Advanced
Features
This section details advanced features of Smart Desktop. If you have not installed Smart Desktop,
see page 59.
To Find a City or Town
1. From the Map menu, click Find City.
The Find City window will open.
2. Type the name of the city or town in the City Name field.
The list of available cities will reduce to match your search.
3. Double-click the name of the city or town.
The Map Display will rotate to center on the selected city or town and
will mark the city
or town location.
Map Colors and Textures
To access the Desktop Colors section: Desktop tab Settings Colors.
Adjust the settings to change the look of the map type.
Color Settings Description
Controls map colors
Displays the:
• map border color
• map color
• map border width
Adjusts the map border width
Controls the map display:
• solid color
• no color
• crosshatch texture
Controls geographic features displayed on the map. Features are
only visible if the map has no color or crosshatch texture.
Page 66

66
iCN 600 series | User Manual
Map Layers
To conserve space on your iCN and memory card, you can choose map layers to install.
The layers you can choose from are:
• Points of Interest (POIs)
• Bodies of water and parks
• Land contours (topography).
To access the Map Layers section: Desktop tab
Settings Layers.
Select or clear each checkbox to indicate the layers to install for each map.
Points of Interest (POI) Editor
You can create custom Points of Interest (POIs) using the POI Editor in two ways:
• by creating your own POI files, or
• by using compatible POI files downloaded from the Internet.
A maximum of 25 Custom POI files can be saved on your iCN. The Custom POI files are listed on
the My POI screen.
Custom POIs can be set to enable a warning chime or visual warning when in close proximity at the
Select Active POI screen.
Creating a Custom POI File
1. Create a new POI File using the POI Editor.
• On the Smart Desktop Map menu, click Points of Interest.
The POI Editor window will open.
• On the POI Editor window File menu, click New Text File.
The POI File Name window will open.
• Type a name for the file in the File Name box, then click OK. The file name can be up
to eight characters with no spaces.
Page 67

67
iCN 600 series | User Manual
2. Add a POI to the POI File.
• On the POI Editor window Edit menu, click New.
The POI Details window will open.
• Type a description for the POI in the Description box.
• On the Degrees, Minutes, Seconds tab, type or select the degree, minute and
second of the POI latitude in the Latitude boxes.
• On the Degrees, Minutes, Seconds tab, type or select the degree, minute and
second of the POI longitude in the Longitude boxes.
• To save the POI, click OK
.
3. Repeat step 2 until all POIs have been added to the POI file.
4. On the File menu, click Save.
The POI file is saved.
5. Complete Saving a Custom POI File to your iCN below.
Importing a Custom POI File
1. Download a POI file from the Internet and save it on your computer.
2. Open the POI file using the POI Editor
• On the Smart Desktop Map menu, click Points of Interest.
The POI Editor window will open.
• On the POI Editor window File menu, click Open Text File.
The Open dialogue box will open.
• Select the POI file from your local or network drive, then click Open
.
3. Complete Saving a Custom POI File to your iCN below.
Saving a Custom POI File to your iCN
1. On the Smart Desktop Map menu, click Points of Interest.
The POI Editor window will open.
2. On the POI Editor window
File menu, click Save to Device.
The POI Options window will open.
Page 68

68
iCN 600 series | User Manual
3. Modify the POI settings as required:
If you want to... Then...
activate the POI select the Active
check box.
Note: If you do not activate the POI, you will be
able to configure only the POI Visibility Level
and Icon File settings.
enable a visual warning when the
POI is in close proximity
select the Visual Alert check box.
enable a warning chime when the
POI is in close proximity
select the Audio Alert check box.
change the units used to measure
distance for this POI
select the Metric or Imperial option.
select the distance from the POI
at which the visual warning should
display or the warning chime
should sound
select the distance from the Distance box.
indicate the priority of this POI
when one or more additional POIs
are in the same locale
move the POI Visibility Level slider left or right.
select a custom POI type icon to
display on the map (if you do not
select a custom icon, a default icon
will display)
Type the path to the icon file to be used to
represent the POI type, in the Icon File box, or
select the icon file from your local or network
drive clicking
, locating the file and clicking
Open. The file must be a bitmap (.bmp)
graphic with a minimum of 6x6 pixels and a
maximum of 32x32 pixels.
4. Click OK and follow the prompts.
The POI file is saved to the iCN as a Custom POI type.
• If you want to change the file name, edit the file name in the POI File Name window
File Name box, then click OK.
The file name can be up to eight characters and cannot contain spaces.
Deleting a Custom POI File from your iCN
1. On the Map menu, click Points of Interest.
The POI Editor window will open.
2. On the File menu, click Manage POI Files.
The Manage POI Files window will open, displaying a list of custom POI files installed on
your iCN.
3. Click the File Name or Size of the POI file to delete.
4. Click Delete.
The file is removed from the list, but is not yet deleted.
5. To select another file to delete, go back to step 2; otherwise, proceed to step 6.
6. Click OK and accept the changes.
The selected file or files are deleted.
Page 69

69
iCN 600 series | User Manual
Backups
You can save backups of all iCN Preferences and Favorites to your computer.
To Back up your Preferences, Favorites and My Home
1. On the Smart Desktop File menu, click Backup.
The Backup window will display.
2. Click New Backup.
The New Backup window will display.
3. Click OK.
The New Backup window will close. The backup will be listed on the Backup window.
4. Close the Backup window.
To Delete a Backup
1. On the Smart Desktop File menu, click Backup.
The Backup window will display.
2. Select from the list the backup to delete.
3. Click Delete, then click OK
.
The backup is deleted.
4. Close the Backup window.
To Restore a Backup
1. On the Smart Desktop File menu, click Restore.
The Restore window will display.
2. Select the backup from the list, then click Restore.
The Restore File Selection
window will display.
3. Select or clear the check boxes to indicate which part of the backup to restore.
4. Click OK.
The Restore File Selection window will close and the backup will be restored.
5. Close the Restore window.
Page 70

70
iCN 600 series | User Manual
21. Accessories
You can purchase almost all items that came with your iCN separately, including additional mountingkits and in-vehicle power adaptors.
The following accessories are also available for your iCN:
MCX External Antenna
Required for vehicles with heated windscreens or to boost GPS performance in weak signal areas
and in areas with poor or limited visibility of the open sky.
12V/24V Installer Power Cable
Powers your iCN through a permanently wired, concealed cable.
Remote Control
Button functions are the same as the iCN control buttons except that the iCN
cannot be turned on using the Remote Control.
Note: The remote control is
not compatible with the iCN 630.
Page 71

71
iCN 600 series | User Manual
Appendix: Street Types
Country Street Type Abbreviation
Canada ABBEY
ACRES
ALLEE
ALLEY
AUTOROUTE
AVENUE (English)
AVENUE (French)
BAY
BEACH
BEND
BOULEVARD (English)
BOULEVARD (French)
BY-PASS
BYWAY
CAMPUS
CAPE
CARRÉ
CARREFOUR
CENTER (English)
CENTER (French)
CERCLE
CHASE
CHEMIN
CIRCLE
CIRCUIT
CLOSE
COMMON
CONCESSION
CORNERS
COTE
COUR
COURT
COVE
CRESCENT
CROISSANT
CROSSING
CUL-DE-SAC
DALE
DELL
DIVERSION
DRIVE
ÉCHANGEUR
END
ESPLANADE
ESTATES
ABBEY
ACRES
ALLEE
ALLEY
AUT
AVE
AV
BAT
BEACH
BEND
BLVD
BOUL
BYPASS
BYWAY
CAMPUS
CAPE
CAR
CARREF
CTR
C
CERCLE
CHASE
CH
CIR
CIRCT
CLOSE
COMMON
CONC
CRNRS
COTE
COUR
CRT
COVE
CRES
CROIS
CROSS
CDS
DALE
DELL
DIVERS
DR
ECH
END
ESPL
ESTATE
Page 72

72
iCN 600 series | User Manual
Country Street Type Abbreviation
Canada (continued) EXPRESSWAY
EXTENSION
FARM
FIELD
FOREST
FREEWAY
FRONT
GARDENS
GATE
GLADE
GLEN
GREEN
GROUNDS
GROVE
HARBOUR
HEIGHTS
HIGHLANDS
HIGHWAY
HILL
HOLLOW
ÎLE
IMPASSE
ISLAND
KEY
KNOLL
LANDING
LANE
LIMITS
LINE
LINK
LOOKOUT
LOOP
MALL
MANOR
MAZE
MEADOW
MEWS
MONTEE
MOOR
MOUNT
MOUNTAIN
ORCHARD
PARADE
PARC
EXPY
EXTEN
FARM
FIELD
FOREST
FWY
FRONT
GDNS
GATE
GLADE
GLEN
GREEN
GRNDS
GROVE
HARBR
HTS
HGHLDS
HWY
HILL
HOLLOW
iLE
IMP
ISLAND
KEY
KNOLL
LANDNG
LN
LMTS
LINE
LINK
LKOUT
LOOP
MALL
MANOR
MAZE
MEADOW
MEWS
MONTEE
MOOR
MOUNT
MTN
ORCH
PARADE
PARC
Page 73

73
iCN 600 series | User Manual
Country Street Type Abbreviation
Canada (continued) PARK
PARKWAY
PASSAGE
PATH
PATHWAY
PINES
PLACE (English)
PLACE (French)
PLATEAU
PLAZA
POINT
PORT
PRIVATE
PROMENADE
QUAY
RANG
RANGE
RIDGE
RISE
ROAD
ROND POINT
ROUTE
ROW
RUE
RUELLE
RUN
SENTIER
SQUARE
STREET
SUBDIVISION
TERRACE
TERASSE
THICKET
TOWERS
TOWNLINE
TRAIL
TURNABOUT
VALE
VIA
VIEW
VILLAGE
VISTA
VOIE
WALK
WAY
WHARF
WOOD
WYND
PK
PKY
PASS
PATH
PTWAY
PINES
PL
PLACE
PLAT
PLAZA
PT
PORT
PVT
PROM
QUAY
RANG
RG
RIDGE
RISE
RD
RDPT
RTE
ROW
RUE
RLE
RUN
SENT
SQ
ST - ‘
SUBDIV
TERR
TSSE
THICK
TOWERS
TLINE
TRAIL
TRNABT
VALE
VIA
VIEW
VILLGE
VISTA
VOIE
WALK
WAY
WHARF
WOOD
WYND
Page 74

74
iCN 600 series | User Manual
Country Street Type Abbreviation
United States of America ALLEY
ANNEX
ARCADE
AVENUE
BAYOO
BEACH
BEND
BLUFF
BLUFFS
BOTTOM
BOULEVARD
BRANCH
BRIDGE
BROOK
BROOKS
BURG
BURGS
BYPASS
CAMP
CANYON
CAPE
CAUSEWAY
CENTER
CENTERS
CIRCLE
CIRCLES
CLIFF
CLIFFS
CLUB
COMMON
CORNER
CORNERS
COURSE
COURT
COURTS
COVE
COVES
CREEK
CRESCENT
CREST
CROSSING
CROSSROAD
CURVE
DALE
DAM
DIVIDE
DRIVE
DRIVES
ALY
ANX
ARC
AVE
BYU
BCH
BND
BLF
BLFS
BTM
BLVD
BR
BRG
BRK
BRKS
BG
BGS
BYP
CP
CYN
CPE
CSWY
CTR
CTRS
CIR
CIRS
CLF
CLFS
CLB
CMN
COR
CORS
CRSE
CT
CTS
CV
CVS
CRK
CRES
CRST
XING
XRD
CURV
DL
DM
DV
DR
DRS
Page 75

75
iCN 600 series | User Manual
Country Street Type Abbreviation
United States of America
(continued)
ESTATE
ESTATES
EXPRESSWAY
EXTENSION
EXTENSIONS
FALLS
FERRY
FIELD
FIELDS
FLATS
FORD
FORDS
FOREST
FORGE
FORGES
FORK
FORKS
FORT
FREEWAY
GARDEN
GARDENS
GATEWAY
GLEN
GLENS
GREEN
GREENS
GROVE
GROVES
HARBOR
HARBORS
HAVEN
HEIGHTS
HIGHWAY
HILL
HILLS
HOLLOW
HOUSE
INLET
ISLAND
ISLANDS
ISLE
JUNCTION
JUNCTIONS
KEY
KEYS
KNOLL
KNOLLS
EST
ESTS
EXPY
EXT
EXTS
FLS
FRY
FLD
FLDS
FLTS
FRD
FRDS
FRST
FRG
FRGS
FRK
FRKS
FT
FWY
GDN
GDNS
GTWY
GLN
GLNS
GRN
GRNS
GRV
GRVS
HBR
HBRS
HVN
HTS
HWY
HL
HLS
HOLW
HSE
INLT
IS
ISS
ISLE
JCT
JCTS
KY
KYS
KNL
KNLS
Page 76

76
iCN 600 series | User Manual
Country Street Type Abbreviation
United States of America
(continued)
LAKE
LAKES
LANDING
LANE
LIGHT
LIGHTS
LOAF
LOCK
LOCKS
LODGE
LOOP
MANOR
MANORS
MARKET
MEADOW
MEADOWS
MILL
MILLS
MISSION
MOTORWAY
MOUNT
MOUNTAIN
MOUNTAINS
NECK
ORCHARD
OVAL
OVERPASS
PARK
PARKS
PARKWAY
PARKWAYS
PASS
PASSAGE
PATH
PIKE
PINE
PINES
PLACE
PLAIN
PLAINS
PLAZA
POINT
POINTS
PORT
PORTS
PRAIRIE
RADIAL
RAMP
LK
LKS
LNDG
LN
LGT
LGTS
LF
LCK
LCKS
LDG
LOOP
MNR
MNRS
MKT
MDW
MDWS
ML
MLS
MSN
MTWY
MT
MTN
MTNS
NCK
ORCH
OVAL
OPAS
PARK
PARK
PKWY
PKWY
PASS
PSGE
PATH
PIKE
PNE
PNES
PL
PLN
PLNS
PLZ
PT
PTS
PRT
PRTS
PR
RADL
RAMP
Page 77

77
iCN 600 series | User Manual
Country Street Type Abbreviation
United States of America
(continued)
RANCH
RAPID
RAPIDS
REST
RIDGE
RIDGES
RIVER
ROAD
ROADS
ROUTE
ROW
RUE
RUN
SHOAL
SHOALS
SHORE
SHORES
SKYWAY
SPRING
SPRINGS
SPUR
SPURS
SQUARE
SQUARES
STATION
STRAVENUE
STREAM
STREET
STREETS
SUMMIT
TERRACE
THROUGHWAY
TRACE
TRACK
TRAFFICWAY
TRAIL
TUNNEL
TURNPIKE
UNDERPASS
UNION
UNIONS
VALLEY
VALLEYS
VIADUCT
VIEW
VIEWS
VILLAGE
VILLAGES
RNCH
RPD
RPDS
RST
RDG
RDGS
RIV
RD
RDS
RTE
ROW
RUE
RUN
SHL
SHLS
SHR
SHRS
SKWY
SPG
SPGS
SPUR
SPUR
SQ
SQS
STA
STRA
STRM
ST
STS
SMT
TER
TRWY
TRCE
TRAK
TRFY
TRL
TUNL
TPKE
UPAS
UN
UNS
VLY
VLYS
VIA
VW
VWS
VLG
VLGS
Page 78

78
iCN 600 series | User Manual
Country Street Type Abbreviation
United States of America
(continued)
VILLE
VISTA
WALK
WALKS
WALL
WAY
WAYS
WELL
WELLS
VL
VIS
WALK
WALK
WALL
WAY
WAYS
WL
WLS
Page 79

79
iCN 600 series | User Manual
Copyright
© 2005 Navman NZ Limited. Navman is a registered trademark of Navman NZ Limited.
All rights reserved.
Smart, Drive-Away and Back-On-Track are trademarks of Navman NZ Limited. All rights reserved.
Microsoft Windows 98 SE, ME, 2000 or XP SP1, Microsoft Internet Explorer are registered trademarks of
Microsoft Corporation.
Acrobat Reader is a registered trademark of Adobe Systems Incorporated. All rights reserved.
All other trademarks and registrations are the property of their respective owners.
Published in New Zealand.
MN000329A
Support for
Australia:
Navman Australia Pty. Ltd
PO Box 479
Gladesville
NSW 2111
Australia
pcnsupport.aus@navman.com
www.navman.com
Support for
New Zealand:
Navman NZ Ltd
PO Box. 68-155
Newton
Auckland
New Zealand
pcnsupport.nz@navman.com
www.navman.com
Support for
Europe:
Navman Europe Limited
4G Gatwick House
Peeks Brook Lane
Horley, Surrey RH6 9ST
United Kingdom
Support: www.navman-europe.com/support.php
www.navman-europe.com
Support for
US and Canada:
Navman USA Limited
27142 Burbank
Foothill Ranch, CA 92610
United States of America
Phone: 866-9-NAVMAN
support@navmanusa.com
www.navmanusa.com
Support Information
NAVMAN DISCLAIM ALL LIABILITY FOR ANY USE OF THIS PRODUCT IN A WAY THAT MAY CAUSE
ACCIDENTS, DAMAGE OR VIOLATE THE LAW.
Compliance
This device complies with part 15 of the FCC Rules. Operation is subject to the following two conditions:
(1) This device may not cause harmful interference, and (2) this device must accept any interference
received, including interference that may cause undesired operation.
Page 80

80
iCN 600 series | User Manual
Notes
Page 81

81
iCN 600 series | User Manual
Notes
Page 82

82
iCN 600 series | User Manual
Notes
Page 83

Page 84

MN000329A
 Loading...