

Page 1

ABSYNTH 3
Operation Manual
Page 2

The information in this document is subject to change without notice and does not
represent a commitment on the part of Native Instruments Software Synthesis GmbH.
The software described by this document is subject to a License Agreement and may
not be copied to other media. No part of this publication may be copied, reproduced
or otherwise transmitted or recorded, for any purpose, without prior written permission
by Native Instruments Software Synthesis GmbH. All product and company names are
™ or ® trademarks of their respective owners.
User’s Guide written by: Paul Sellars
© Native Instruments Software Synthesis GmbH, 2004. All rights reserved.
ABSYNTH is a trademark of Native Instruments Software Synthesis.
Germany USA
Native Instruments GmbH Native Instruments USA, Inc.
Schlesische Str. 28 5631 A Hollywood Boulevard
D-10997 Berlin Los Angeles, CA 90028
Germany USA
info@native-instruments.de info@native-instruments.com
www.native-instruments.de www.native-instruments.com
Page 3

Table of Contents
Welcome to ABSYNTH! . . . . . . . . . . . . . . . . . . . . . . . . . . . .1
Product Authorization . . . . . . . . . . . . . . . . . . . . . . . . . . . . .3
What is the Product Authorization? . . . . . . . . . . . . . . . . . . . .3
Conducting the Product Authorization . . . . . . . . . . . . . . . . . .5
Registration support . . . . . . . . . . . . . . . . . . . . . . . . . . . . . .11
Installation under Windows XP . . . . . . . . . . . . . . . . . . . . . .13
System Requirements and Recommendations . . . . . . . . . . . .13
Software Installation . . . . . . . . . . . . . . . . . . . . . . . . . . . . .13
VST plug-in Installation . . . . . . . . . . . . . . . . . . . . . . . . . . .14
DXi 2 plug-in Setup . . . . . . . . . . . . . . . . . . . . . . . . . . . . . .14
Installation under MacOS X . . . . . . . . . . . . . . . . . . . . . . . .16
System Requirements and Recommendations . . . . . . . . . . . .16
Installing Absynth 3 OS X . . . . . . . . . . . . . . . . . . . . . . . . . .16
MacOS Audio Unit plug-in Installation . . . . . . . . . . . . . . . . .17
Mac/Windows RTAS plug-in installation . . . . . . . . . . . . . . . .17
Audio Interfaces . . . . . . . . . . . . . . . . . . . . . . . . . . . . . . . .18
Stand-alone Application . . . . . . . . . . . . . . . . . . . . . . . . . . .18
Plug-In . . . . . . . . . . . . . . . . . . . . . . . . . . . . . . . . . . . . . . .19
Absynth 3 as Standalone . . . . . . . . . . . . . . . . . . . . . . . . . .22
Soundcard (Audio Interface) . . . . . . . . . . . . . . . . . . . . . . . .22
Routing . . . . . . . . . . . . . . . . . . . . . . . . . . . . . . . . . . . . . .24
MIDI . . . . . . . . . . . . . . . . . . . . . . . . . . . . . . . . . . . . . . . .25
Absynth 3 as Plug-In . . . . . . . . . . . . . . . . . . . . . . . . . . . . .26
VST 2.0 plug-in . . . . . . . . . . . . . . . . . . . . . . . . . . . . . . . . .26
DXi 2 Plug-in . . . . . . . . . . . . . . . . . . . . . . . . . . . . . . . . . .32
Main window . . . . . . . . . . . . . . . . . . . . . . . . . . . . . . . . . . .35
Navigation Bar . . . . . . . . . . . . . . . . . . . . . . . . . . . . . . . . .35
Absynth 3
I
Page 4

Patch window . . . . . . . . . . . . . . . . . . . . . . . . . . . . . . . . . 41
Modules . . . . . . . . . . . . . . . . . . . . . . . . . . . . . . . . . . . . . 41
Oscil module . . . . . . . . . . . . . . . . . . . . . . . . . . . . . . . . . . 42
Wavetable synthesis modes . . . . . . . . . . . . . . . . . . . . . . . . 43
Sampling modes . . . . . . . . . . . . . . . . . . . . . . . . . . . . . . . 49
Audio In mode . . . . . . . . . . . . . . . . . . . . . . . . . . . . . . . . . 53
Filter module . . . . . . . . . . . . . . . . . . . . . . . . . . . . . . . . . . 54
Mod module . . . . . . . . . . . . . . . . . . . . . . . . . . . . . . . . . . 55
Mono/surround . . . . . . . . . . . . . . . . . . . . . . . . . . . . . . . . 57
Waveshape module . . . . . . . . . . . . . . . . . . . . . . . . . . . . . 58
Effect module . . . . . . . . . . . . . . . . . . . . . . . . . . . . . . . . . 59
More Parameter Control . . . . . . . . . . . . . . . . . . . . . . . . . . 59
Wave window . . . . . . . . . . . . . . . . . . . . . . . . . . . . . . . . . . 61
Waveform mode . . . . . . . . . . . . . . . . . . . . . . . . . . . . . . . . 62
Spectrum mode . . . . . . . . . . . . . . . . . . . . . . . . . . . . . . . . 65
Effect window . . . . . . . . . . . . . . . . . . . . . . . . . . . . . . . . . 67
Multicomb mode (pictured above) . . . . . . . . . . . . . . . . . . . 67
Pipe mode . . . . . . . . . . . . . . . . . . . . . . . . . . . . . . . . . . . 68
Multitap mode . . . . . . . . . . . . . . . . . . . . . . . . . . . . . . . . . 69
Echos mode . . . . . . . . . . . . . . . . . . . . . . . . . . . . . . . . . . 69
Resonators mode . . . . . . . . . . . . . . . . . . . . . . . . . . . . . . . 70
Envelope window . . . . . . . . . . . . . . . . . . . . . . . . . . . . . . . 73
Envelope modes . . . . . . . . . . . . . . . . . . . . . . . . . . . . . . . 77
LFO window . . . . . . . . . . . . . . . . . . . . . . . . . . . . . . . . . . 89
LFOs and surround panning . . . . . . . . . . . . . . . . . . . . . . . 92
MIDI window . . . . . . . . . . . . . . . . . . . . . . . . . . . . . . . . . . 93
Working with Custom Tunings . . . . . . . . . . . . . . . . . . . . . . 95
Universal Library . . . . . . . . . . . . . . . . . . . . . . . . . . . . . . . 97
Patch Window Library Functions . . . . . . . . . . . . . . . . . . . . 97
Envelope and Waveform Window Library Functions . . . . . . . 97
Copy and Paste . . . . . . . . . . . . . . . . . . . . . . . . . . . . . . . . 97
Just try it out . . . . . . . . . . . . . . . . . . . . . . . . . . . . . . . . . . 98
Record window . . . . . . . . . . . . . . . . . . . . . . . . . . . . . . . . 99
Global Tempo Sync . . . . . . . . . . . . . . . . . . . . . . . . . . . . 102
Absynth 3
II
Page 5

Welcome to ABSYNTH!
Thank you for purchasing ABSYNTH.
ABSYNTH is a unique, inimitable synthesizer, offering unparallalled
possibilities. From futuristic synths to rhythmic mayhem, vintage sounds
to ambient layers and completely unique, alien soundscapes – ABSYNTH
seduces with its sublime sounds.
Combining subtractive synthesis, FM, ring modulation, classic and
granular sampling with the most advanced envelope control ever
implemented, ABSYNTH leads the way for software synthesizers. The
innovative user-interface merges sophistication with simplicity, providing
an unrivalled sound design experience.
Constantly moving and morphing textures can be generated with the
flexible 68-breakpoint envelopes. You can carefully model new
waveforms one harmonic at a time, or use the real-time waveform
fractalization functions to create a host of lively, individual sounds.
With live audio input ABSYNTH becomes an extraordinary effect unit.
Route other instruments through it, twisting and contorting your sounds
into unimaginable sonic shapes. ABSYNTH’s compatibility with every
popular plug-in format ensures seamless integration into every studio
setup.
ENGLISH DEUTSCH
Absynth 3
English – 1
Page 6

Absynth 3
English – 2
Page 7

Product Authorization
Part of the ABSYNTH installation is a Product Authorization which has
to be fullfilled in order to make permanent use of the software. We recommend that you take notice of this chapter first, then proceed with
the software installation as described in the following chapters and finally return to this chapter.
What is the Product Authorization?
The Product Authorization includes a full registration. After having
completed the authorization, you can make use of all online services
related to the registered product. On the Native Instruments website you
can read online tutorials, get technical support, participate in the NI
forums and download updates.
ABSYNTH requires the Product Authorization in order to use the software
permanently. You can run ABSYNTH for 30 days without any limitations.
As long as the software runs unauthorized a message at every program
start reminds you that the authorization has not been completed yet and
indicates how many more days the software is running without an
authorization.
ENGLISH DEUTSCH
The Product Authorization is performed by a small application called
Registration Tool. The Registration Tool generates a so called System ID
which serves as request code for receiving an Authorization Key. The
Absynth 3
English – 3
Page 8
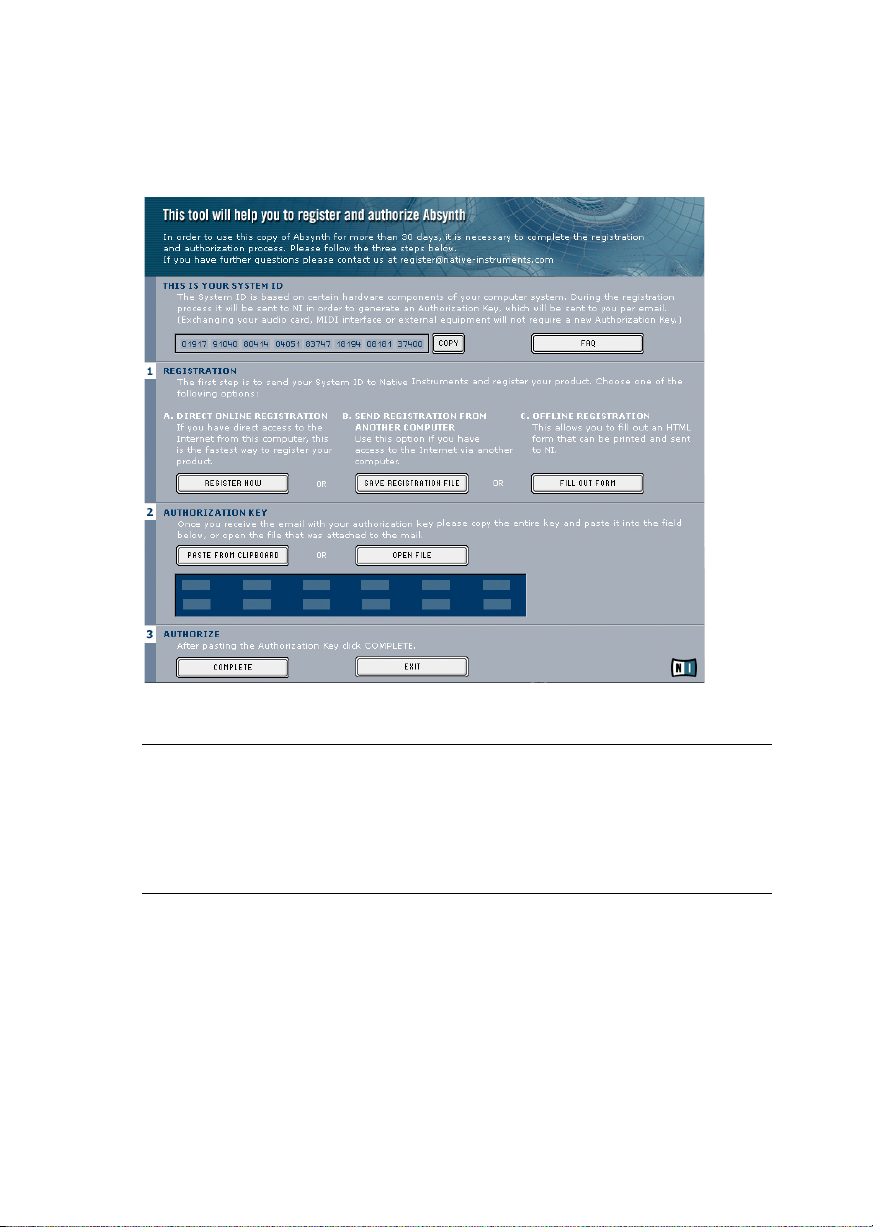
System ID is based on some hardware components of your computer
system, the operating system version and the serial number you have
entered at the ABSYNTH installation.
Registration Tool
Note: Exchanging your audio card, MIDI interface or external equipment
will not start the request for a new Authorization Key. Only exchanging a
basic hardware component in your computer or installing a new operating system might produce a new Product Authorization request. In this
case the Registration Tool will reflect the change by displaying a new
System ID and you have to repeat the Product Authorization.
The System ID has to be sent to Native Instruments in order to receive
the Authorization Key which allows the permanent use of ABSYNTH.
Since the Product Authorization is part of the license agreement
ABSYNTH will stop launching after 30 days if it was not authorized until
Absynth 3
English – 4
Page 9
then. Of course, it is also possible to complete the Product Authorization
after 30 days. In this case the software will launch again as soon as the
Product Authorization has been completed.
Note: The data transfer at the online Product Authorization is done via a
secure connection using 128 bit encryption. Native Instruments keeps
your personal data like email and postal address in confidence. No data
will be passed to a third party.
Conducting the Product Authorization
Native Instruments has set a high value on making the authorization
procedure as easy and comfortable as possible. In the following sections
we describe three methods of conducting the Product Authorization. We
recommend Method A and Method B since these result in the easiest and
fastest way of receiving the Authorization Key.
Method A: Absynth computer has direct access to the internet
ENGLISH DEUTSCH
Important: This method requires a valid email address to complete the
Product Authorization, since the registration code will be sent to you by
email.
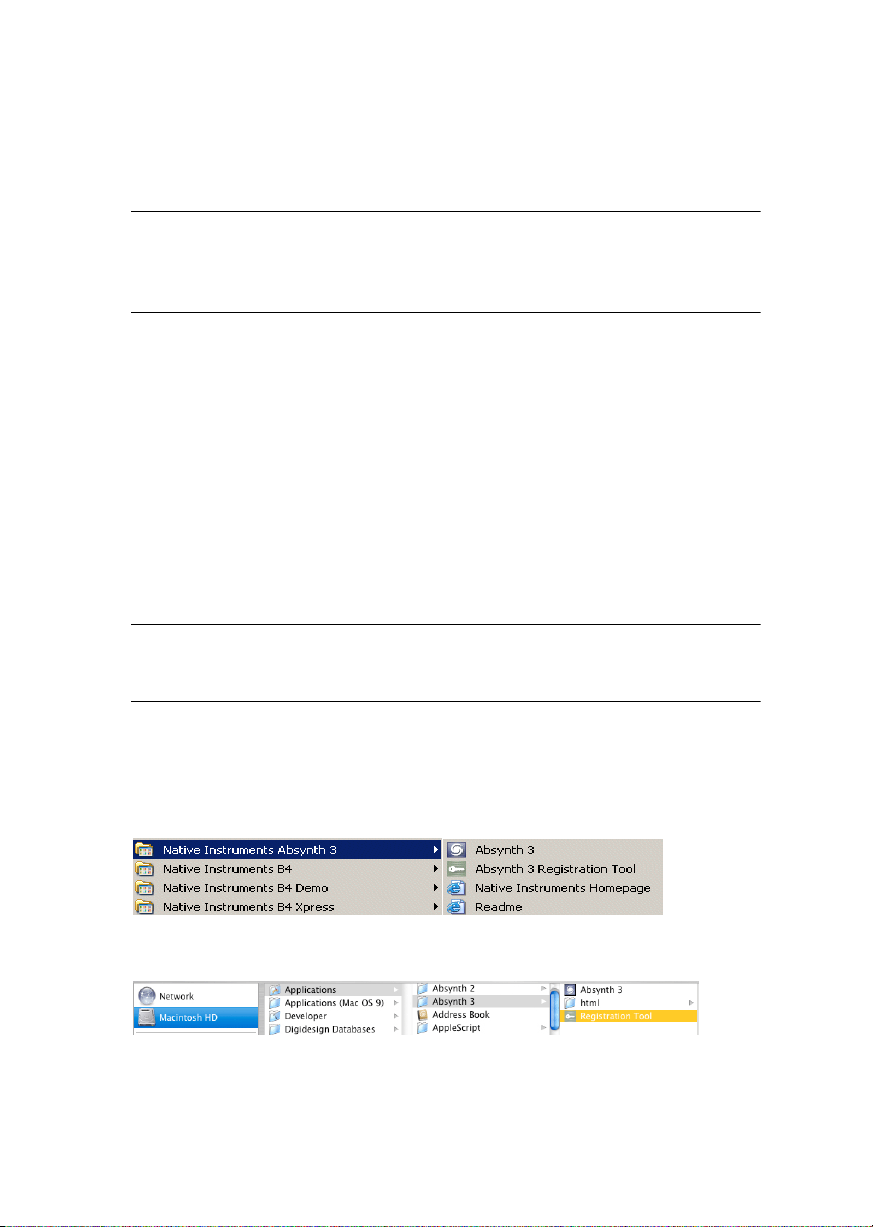
• Windows: Start the Registration Tool from the start menu (Native In-
Ö
struments Absynth 3
SYNTH installation folder (default path: C:\Program Files\Native
Instruments\Absynth 3\).
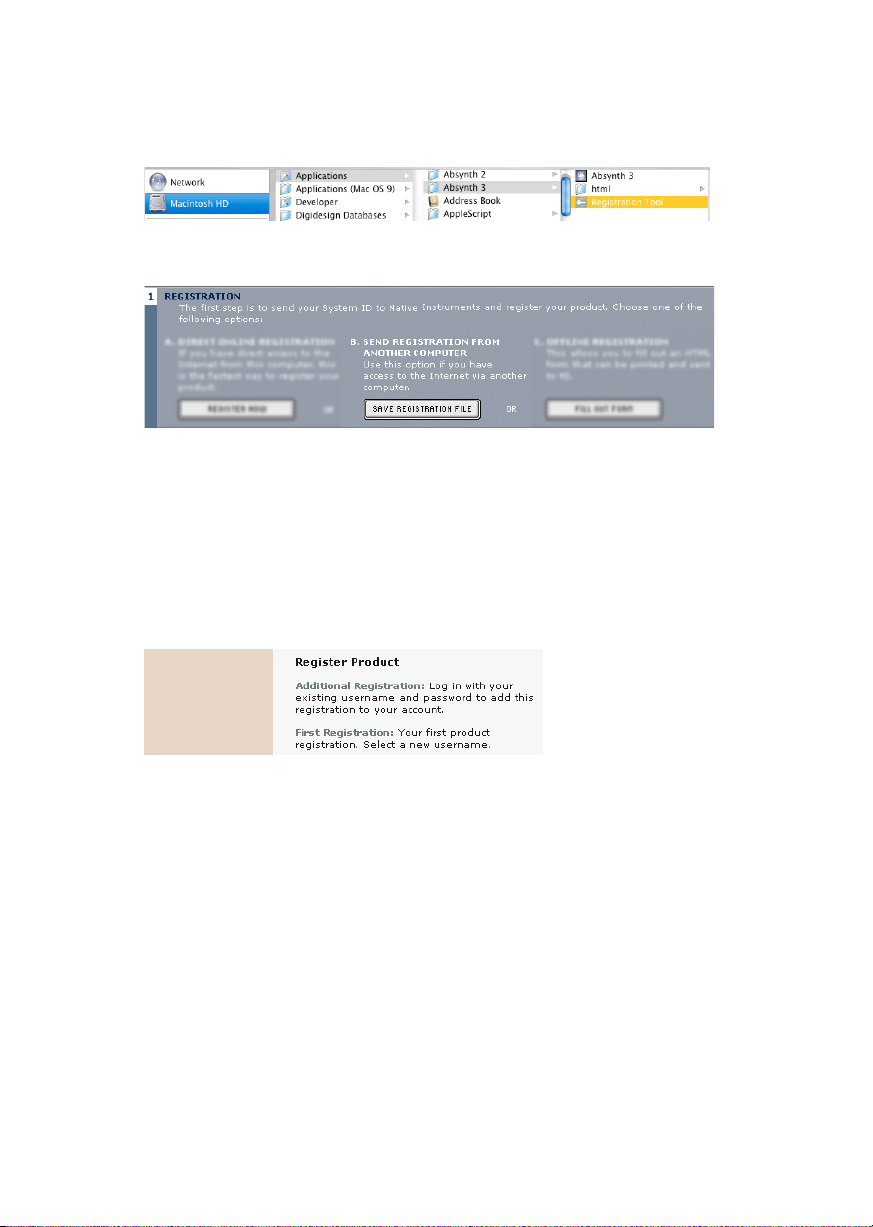
• MacOS: Start the Registration Tool from the ABSYNTH installation
folder (default path: Applications\Absynth 3\).
Absynth 3 Registration Tool) or from the AB-
Absynth 3
English – 5
Page 10
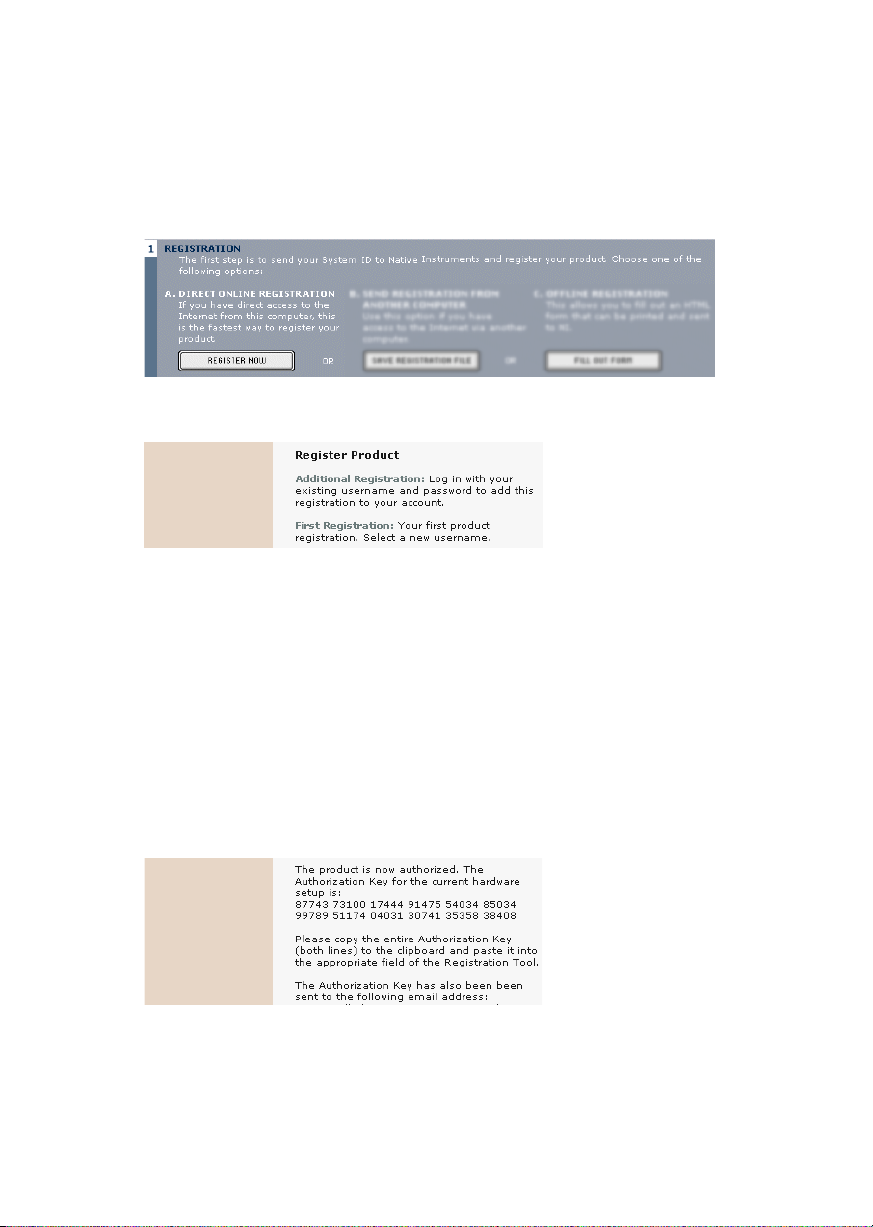
• A click on the Register Now button opens the Native Instruments reg-
istration webpage. Therefore your standard Internet Browser will be
opened and an internet connection will be established according to
your system settings. Your System ID will be automatically transmitted to the registration form.
• On the first online page you are asked if it is your First Registration at
Native Instruments or if you want to do an Additional Registration.
• Depending on the option you have chosen on the first online page you
now get a login page asking for your username and password or a form
where you can fill out your address data. Please fill out all required
fields and follow the instructions on the screen to complete the registration.
• On the last online registration page your Authorization Key is directly
shown in the browser. Please copy the full number (12 x 5 digits) and
paste it to the registration tool. Within a few minutes you will also receive an email from the Native Instruments registration system containing the Authorization key. The Authorization key is available in the
email body and additionally as text attachment. This email also contains the password which is required for using the online services.
Absynth 3
English – 6
Page 11
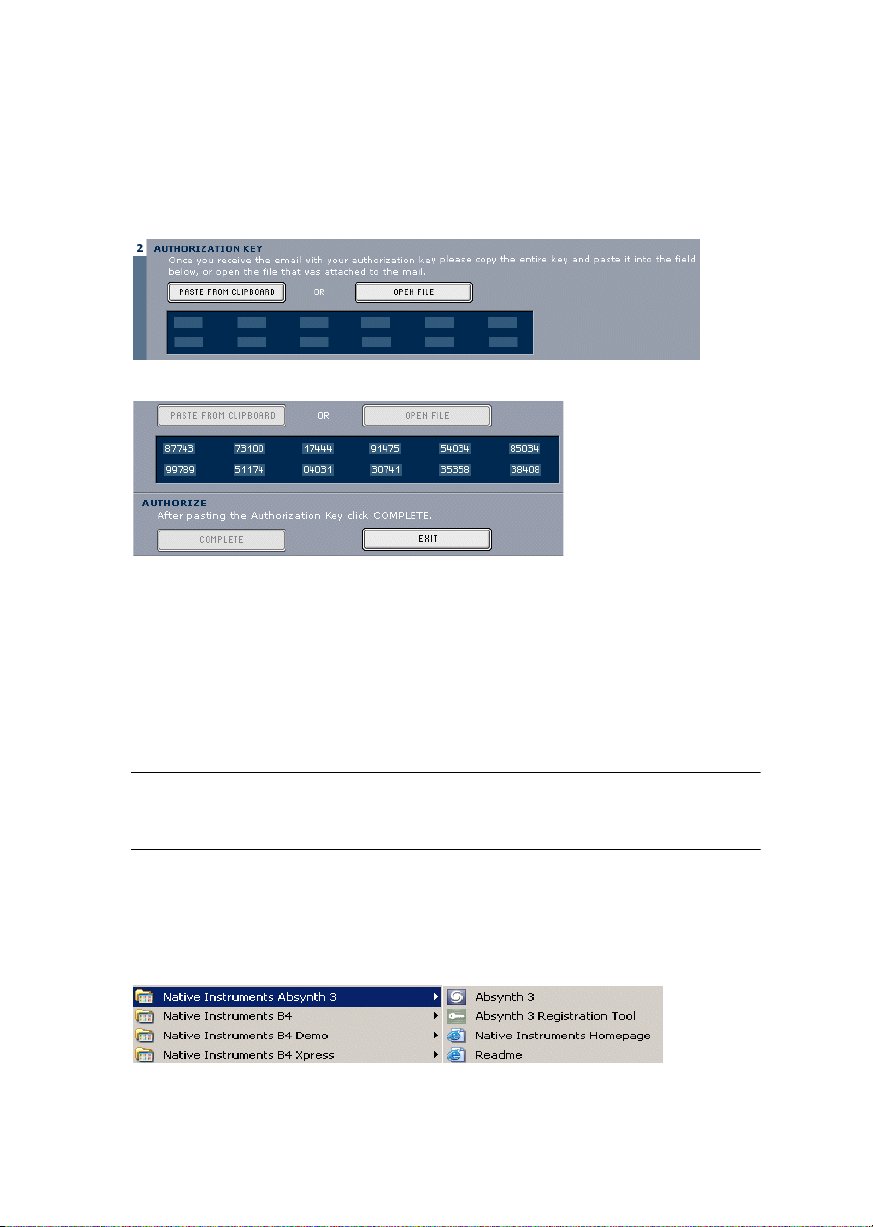
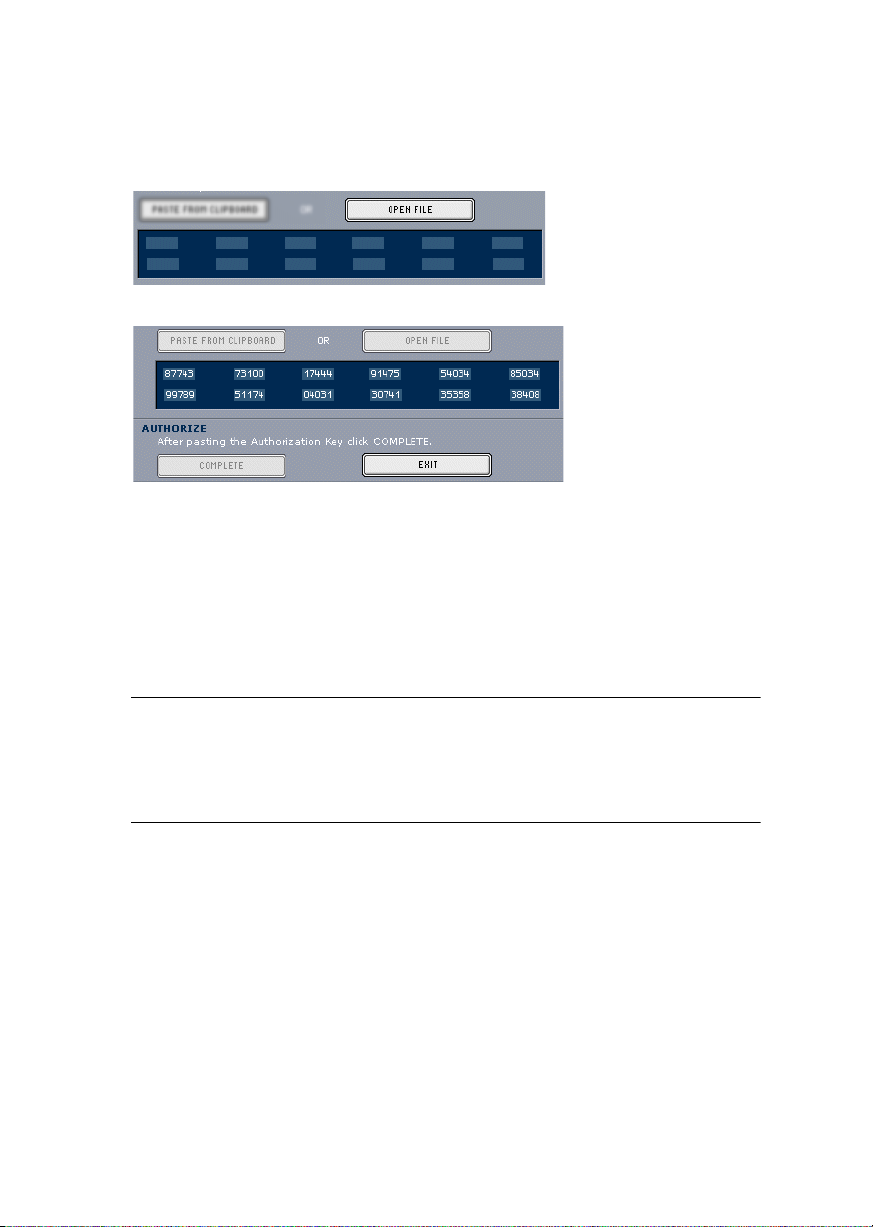
• Start the Registration Tool again and either copy the Authorization
Key from the email and press the Paste from Clipboard button in the
Registration Tool or use the Open File button in the Registration Tool
to open the email attachment which you previously have saved to
hard disk.
• Click on the Complete button.
After completing the Product Authorization the Registration Tool looks like this
Now the ABSYNTH Product Authorization has been completed. The authorization message at every ABSYNTH start has disappeared and you
can use the software permanently:
ENGLISH DEUTSCH
Method B: Internet Connection on another computer
Important: This method requires a valid email address to complete the
Product Authorization, since the Authorization Key will be send to you by
email.
• Windows: Start the Registration Tool from the start menu (Native In-
Ö
struments Absynth 3
SYNTH installation folder (default path: C:\Program Files\Native
Instruments\Absynth 3\).
Absynth 3 Registration Tool) or from the AB-
English – 7
Absynth 3
Page 12
• MacOS: Start the Registration Tool from the ABSYNTH installation
folder (default path: Applications\Absynth 3\).
• A click on the Save Registration File button opens a Save dialog for
saving a HTML file. Save the HTML file to any storage medium.
• Transfer the HTML file to another computer where you have internet
access (via floppy disk, CDR etc.).
• Open the HTML file in your internet browser.
• The HTML page contains a link for the registration page on the Native
Instruments website. When you click on this link an internet connection will be established according to your system settings.
• On the first online page you are asked if it is your First Registration at
Native Instruments or if you want to do an Additional Registration.
• Depending on the option you have chosen on the first online page you
now get a login page asking for your username and password or a form
where you can fill out your address data. Please fill out all required
fields and follow the instructions on the screen to complete the registration.
• Within a few minutes you will receive an email from the Native Instruments registration system containing the Authorization key. The Au-
thorization key is available in the email body and additionally as text
attachment. This email also contains the password which is required
for using the online services.
• Transfer the text attachment to the computer where you have installed ABSYNTH.
Absynth 3
English – 8
Page 13
• Start the Registration Tool again and use the Open File button in the
Registration Tool to open the email attachment which you previously
have saved to hard disk.
• Click on the Complete button.
After completing the Product Authorization the Registration Tool looks like this
Now the ABSYNTH Product Authorization has been completed. The authorization message at every ABSYNTH start has disappeared and you
can use the software permanently:
ENGLISH DEUTSCH
Method C: No Internet Connection available
Important: Following this method you will have to fill in a form which you
send to Native Instruments. You will receive the Authorization Key either
by email (recommended), by postal mail or by fax. If you do not provide
Native Instruments with a valid email address in the form, be prepared to
type in the Authorization Key manually (about 60 digits).
If you do not have access to the internet or if you do not have a working email address, the Product Authorization can also be done via
postal mail or fax. Although Native Instruments goes after a fast handling of your authorization requests, it is generally recommended that
you prefer Method A or Method B for shortest return times and most
comfortable operation. Please note the following instructions to fullfill
the Product Authorization:
English – 9
Absynth 3
Page 14
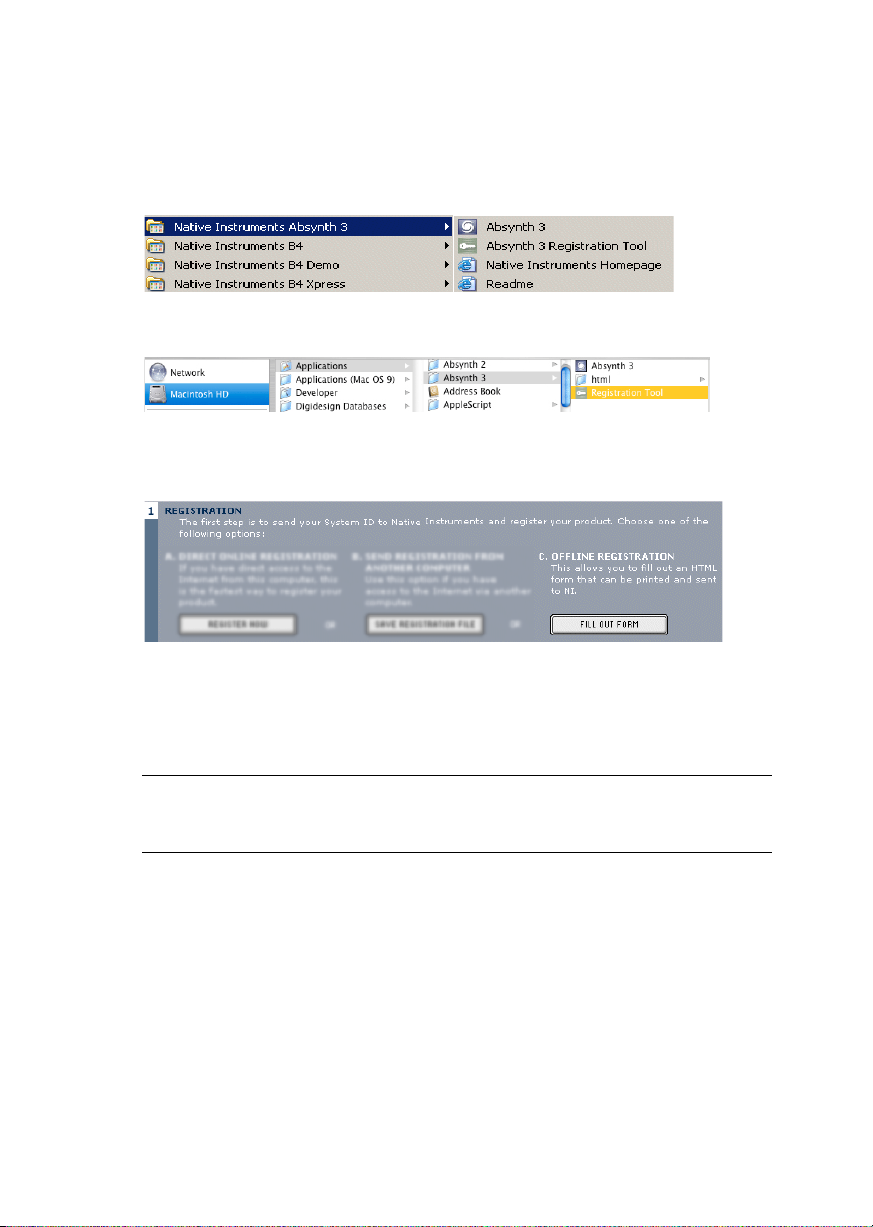
• Windows: Start the Registration Tool from the Windows start menu
Ö
(Native Instruments Absynth 3
from the ABSYNTH installation folder (default path: C:\Program
Files\Native Instruments\Absynth 3\).
• MacOS: Start the Registration Tool from the ABSYNTH installation
folder (default path: Applications\Absynth 3\).
• A click on the Fill Out Form button opens a local HTML file in the operating system’s standard browser or another program which you have
defined as standard application for opening HTML files.
• The HTML file contains all information Native Instruments requires
for completing the Product Authorization and registration. Please fill
in the required data and print it out, or write a letter containing the
data.
Absynth 3 Registration Tool) or
If you write a letter please attend to a legible handwriting to avoid mistakes at the Native Instruments registration team. Not legible email or
postal addresses can cause problems with the Authorization Key delivery.
• Send the form to Native Instruments using one of the following contact addresses:
Native Instruments GmbH
Registration
Schlesische Straße 28
Absynth 3
English – 10
Page 15

10997 Berlin
Germany
Fax: +49 30 61103535
Native Instruments USA
5631 A Hollywood Boulevard
Los Angeles
CA 90028
USA
Fax: +1-323-372-3676
• You will receive the Authorization Key via email (recommended), fax
or mail.
• Start the Registration Tool again and either copy the Authorization
Key from the email and press the Paste from Clipboard button in the
Registration Tool or use the Open File button in the Registration Tool
to open the email attachment which you previously have saved to
hard disk. If you have received the Authorization Key by mail or fax,
type it in manually.
• Click on the Complete button.
ENGLISH DEUTSCH
Now the ABSYNTH Product Authorization has been completed. The authorization message at every ABSYNTH start has disappeared and you
can use the software permanently:
Registration support
If you run into problems during the Product Authorization the Native
Instruments registration support team will be happy to help you. In this
case send a support request on the NI website using the following URL:
http://www.native-instruments.com/registersupport.info
Please describe the occurred problem as accurate as possible and provide
the registration support team with the necessary details to solve the
problem.
English – 11
Absynth 3
Page 16

Absynth 3
English – 12
Page 17

Installation under Windows XP
System Requirements and Recommendations
To use the ABSYNTH software, you need a computer with the following
minimum specifications:
Hardware
• Pentium III/Athlon with 700 MHz.
• 256 MB RAM
• up to 400 MB free space on your hard disk
• A sound card compatible with Windows XP.
The audio engine in ABSYNTH has been designed to make optimum use
of the available computing power in the CPU. The powerful FPUs integrated in modern CPUs are best suited to carrying out the complex computations of real-time synthesis. We recommend the following highperformance processors for using ABSYNTH : Pentium III or 4 with 1.2
GHz or faster, Athlon XP with 1.2 GHz or faster. We also recommend that
you use a large amount of RAM (512 MB or more) that is optimally
matched to the architecture of your processor.
ENGLISH DEUTSCH
Software
•Windows XP
Software Installation
• Insert the ABSYNTH CD into the CD-ROM drive.
• Use the Windows Explorer to view the contents of the CD.
• Start the installation by double-clicking Absynth Setup.exe.
• The setup program will suggest C:\Program Files\Native Instru-
ments\Absynth3 as the path for the destination folder. You may also
choose another folder if you wish.
English – 13
Absynth 3
Page 18

Installed Folders, Files, and Links
The setup program creates a new folder called Absynth 3\ in the
installation directory (Program Files\Native Instruments). This folder
contains the files required to operate the software.
If you do not choose a different program group during the installation,
á
links to ABSYNTH and a ReadMe file are added to the
Ö
under Programs
Native Instruments.
Start menu
VST plug-in Installation
• Insert the Installation CD into the CD drive.
• Use the Windows Explorer to view the contents of the CD. To start,
double-click the Absynth 3 Setup.exe file.
• When the choice is given by the installer, select VST plug-in from the
list of components to install.
• You can now choose to automatically search for the VST plug-in folder
or manually select the VST plug-in folder of your choice. Please select
the option that best suits your installation requirements.
Note: If more than one host program for VST 2.0 plug-ins is installed on
your computer, the installer lets you install to multiple VST-folders by
shift-clicking them. If you decide to install them at a later date, simply
copy the “Absynth 3 VST.dll” file into the VST plug-ins folders of these
programs. Windows: If the VST plug-in files are not visible in the Windows Explorer, select the Show All Files option. This option is located in
Ö
the Explorer menu View
den Files. Optionally, you can set up your programs so that they all use
the same VST plug-ins folder.
Folder Options... on the View tab below Hid-
DXi 2 plug-in Setup
DXi 2 is a plug-in interface for software synthesizers and instruments
based on Microsoft DXi technology. Sonar from Cakewalk and Fruity
Loops are the most well known host sequencers that support DXi.
Absynth 3
English – 14
Page 19

Installation
• Insert the Installation CD into the CD drive of your computer.
• Use the Windows Explorer to view the contents of the CD and doubleclick the Absynth 3 Setup.exe file to start the installation.
• Continue the ABSYNTH installation until you come to the Choose
plug-ins page. Tick the checkbox DXi plug-in.
The installation program copies the ABSYNTH plug-in to your hard disk
and registers it as a DXi 2 plug-in for use in DXi 2-compatible host programs. After the installation, ABSYNTH appears as a plug-in in the host
program.
ENGLISH DEUTSCH
Absynth 3
English – 15
Page 20

Installation under MacOS X
System Requirements and Recommendations
To use the ABSYNTH software, you need a computer with the following
minimum specifications:
Hardware
• Apple PowerMac G3 500MHz or faster (OS X)
• 512 MB RAM (OS X)
• Audio interface compatible with Core Audio
• CoreMIDI compatible MIDI interface for connecting a MIDI keyboard
or an external sequencer (only for the stand-alone version)
• up to 400 MB free space for the library.
The audio engine in ABSYNTH has been designed to make optimum use
of the available computing power in the CPU. The parallel data processing expansions and powerful FPUs integrated in modern CPUs are best
suited to carrying out the complex computations of real-time synthesis.
ABSYNTH makes extensive use of these expansions in order to achieve
optimum performance. As a minimum requirement, we recommend using a G4 1.0 GHz or faster with 512 MB RAM.
Software
MacOS 10.2.6
Installing Absynth 3 OS X
• Insert the Installation CD into the CD drive of your computer.
• Double-click the installation program Install Absynth 3 to start it.
• The start screen appears first. After clicking Continue and confirming
the license agreement, a dialog opens where you can select the installation location and the destination folder.
Absynth 3
English – 16
Page 21

The installation program suggests a path for the ABSYNTH folder; if you
do not select a different destination, the ABSYNTH folder is created on
the first hard disk. You can choose between Easy Install, where both the
stand-alone and plug-in versions are installed, or Custom Install, where
you can select which versions you want to install.
MacOS Audio Unit plug-in Installation
• Launch the ABSYNTH Installer from the CD
• Select the Custom installation type.
• Select only Audio Unit from the list of components to install.
Mac/Windows RTAS plug-in installation
• Launch the ABSYNTH Installer from the CD
• Select the Custom installation type.
• Select only RTAS from the list of components to install.
ENGLISH DEUTSCH
Absynth 3
English – 17
Page 22
Audio Interfaces
Audio interfaces, which include software routines called drivers, allow
ABSYNTH (and other programs you have installed, if present) to
communicate with your computer’s audio hardware. This section
describes how to use various audio interfaces with ABSYNTH.
There are two main ways to implement ABSYNTH:
• As a "stand-alone" device that requires no host software. ABSYNTH's
audio and MIDI connections interact directly with your computer's
audio/MIDI hardware interface.
• As a plug-in that works in conjunction with a "host" program, such as
sequencing or hard disk recording software. In this case, the host program interacts directly with the computer's hardware interface. ABSYNTH connects to the host program via "virtual patch cords."
ABSYNTH's audio outputs appear as signals in the host's mixer, and
the host passes MIDI data to ABSYNTH.
We'll describe each mode in detail, but first let's look at the various interface drivers and plug-in formats used by different operating systems
and programs.
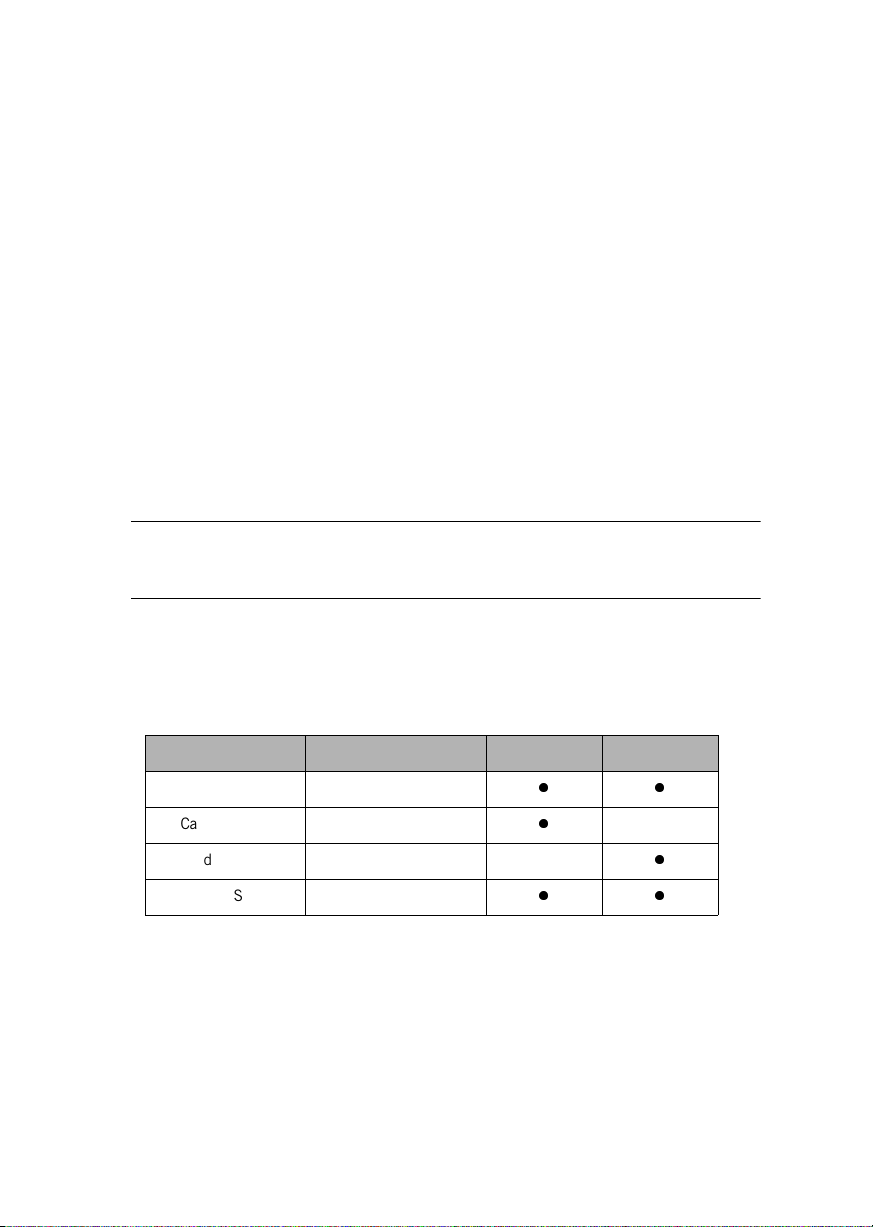
Stand-alone Application
ABSYNTH works in stand-alone mode with ASIO, MME, DirectSound, and
Core Audio. The ABSYNTH/computer combination acts as an instrument,
similar to a hardware digital synthesizer. For example, you can connect
MIDI drum pads to your interface's MIDI input and trigger ABSYNTH's
sounds, then run its outputs to an amplification system - instant
electronic drums.
Absynth 3
English – 18
Interface/driver Windows MacOS X
ASIO 2.0
DirectSound
MME
Core Audio
z
z
z
z
Page 23
Plug-In
Used as a plug-in, ABSYNTH is not a stand-alone program but rather a
program “module” that can be integrated into a “host” program such as
a sequencer. plug-in mode allows you to integrate it seamlessly with the
sequencer. Furthermore, it has many other uses as a plug-in:
• MIDI sequencing of ABSYNTH and audio mix-down of the MIDI
tracks within a single program
• Comfortable automation of ABSYNTH parameters in the sequencer
• Further processing of ABSYNTH signals using additional plug-ins
• Sample-accurate timing with MIDI controllers (when used as VST 2.0
plug-in)
• Restoring of all plug-in settings when the host document (such as a
song file of the sequencer) is loaded
• Integration with other instruments into a “virtual studio”
The shortcuts / key commands do not work in sequencers. This is due to
the fact that the host capture keys for themselves and do not pass them
on the the plug-in.
ENGLISH DEUTSCH
This table provides you with an overview of which interfaces are supported by which host programs:
Interface/pilote Programmes hôtes Windows Mac
Plug-in VST 2.0 Cubase, Nuendo
Cakewalk DXi Sonar
Audio Units Logic 6.x
RTAS Pro Tools 6.x, LE
zz
z
z
zz
Absynth 3
English – 19
Page 24

Overview of Operating Systems Interfaces and plug-ins
The interfaces described below are effectively different ways in which
ABSYNTH can communicate with your sound card. The interfaces that
are available on your computer depend on the sound card you are using
as well as your computer platform (Windows or MacOS).
ASIO ("Audio Streaming Input Output") is a sound card driver
architecture developed by Steinberg. ASIO is available for MacOS and
Windows computers. It offers low latency and supports multichannel
audio cards. With its high performance and low latency, the ASIO driver
interface is highly recommendable.
DirectSound is an interface developed by Microsoft and is a component
of DirectX 5.0 or higher for Windows 98/ME/2000/XP. Whether or not
DirectX works well depends on the sound card you are using. If the audio
buffer size that you set is too small with DirectSound, glitches and clicks
may occur in the audio.
Important: The interfaces DirectSound and MME are not recommended.
These have extremely high latencies.
MME is the standard “Wave” driver in Windows. Most sound cards
support this interface and work with it quite well. However, MME is even
less suitable than DirectSound for real-time applications. This is
noticeable by a comparatively high latency.
DXI 2 is a plug-in interface for software synthesizers and instruments
based on Microsoft DXi technology. Sonar from Cakewalk and Fruity
Loops are the most well known host sequencers that support DXi.
VST is the plug-in format of the company Steinberg. It is a cross platform
format and can be used in many hosts.
Core Audio is a new audio interface available with MacOS X that allows
you to use external audio hardware as well as the integrated audio output
of the Mac.
Audio Units is an OS X plug-in format developed by Apple. Audio Units
plug-ins work similar like VST plug-ins.
RTAS is based on an interface protocol from DigiDesign that allows you
to use plug-ins with ProTools (or other software that is compatible with
DigiDesign). RTAS plug-ins function independently from additional TDM
Absynth 3
English – 20
Page 25

hardware and are nonetheless able to offer the widest range of features.
In this case, the host processor alone performs all of the computations
for the plug-in.
ENGLISH DEUTSCH
Absynth 3
English – 21
Page 26
Absynth 3 as Standalone
When used as a plug-in, the host program has already set up its audio and
MIDI connections, and ABSYNTH simply "plugs in" to these. However,
with stand-alone operation ABSYNTH communicates directly with your
audio interface. It’s therefore necessary to specify audio and MIDI
settings, as well as the preferred driver protocol (of course, plug-in format
is not an issue).
Setup for Mac and Windows machines is essentially identical, except
where indicated. Note that if you change your audio interface, you will
almost certainly need to re-adjust these settings.
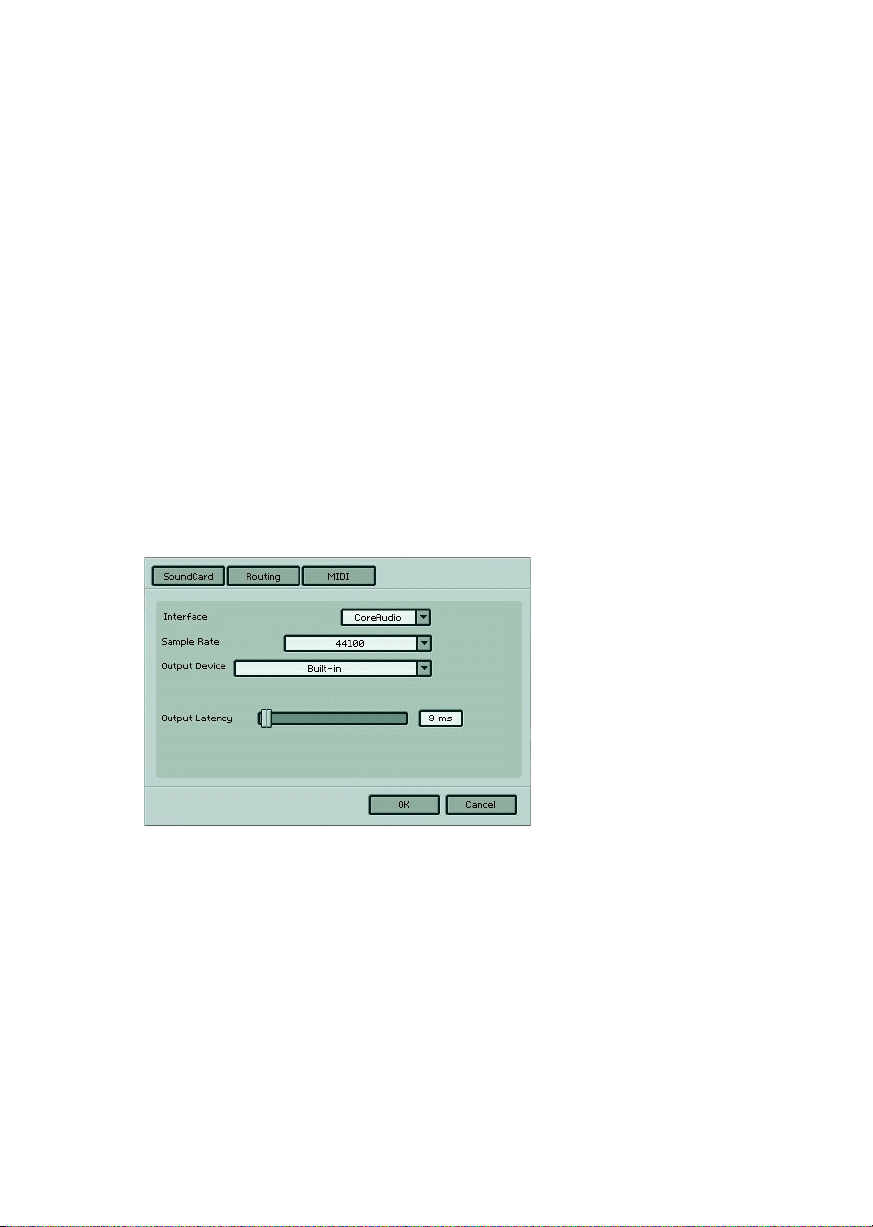
Call up the Audio + MIDI Settings setup dialog from the Setup menu.
You’ll see three tabs for SoundCard, Routing (audio output patching), and
MIDI.
Soundcard (Audio Interface)
Audio + MIDI Settings dialog
Interface: Choose the fastest interface protocol supported by your
interface, which will be ASIO or Core Audio. For Windows, you can also
use DirectSound and Multimedia (also called MME), but expect a
significant delay between the time you play a note and the time you hear
it.
Absynth 3
English – 22
Page 27

Windows only: Avoid using any drivers listed as "emulated," as they provide poorer performance than other drivers. For example, although DirectSound drivers generally outperform MME drivers, MME drivers will
outperform emulated DirectSound drivers.
Sample rate: The drop-down menu will display compatible sample rates
for your audio interface. 44.1kHz is the same sample rate used for CDs,
and is the most “universal” choice. However, some audio interfaces offer
48kHz and 96kHz (ABSYNTH accepts up to 96kHz sample rates). These
higher rates stress your computer more, but offer somewhat better high
frequency response. If you are using ABSYNTH standalone, choose
whichever rate you prefer. When used as a plug-in with a host program
(e.g., Cubase, Digital Performer, Logic, Sonar, etc.), the host will
determine the sample rate.
Output Device: Use ASIO written specifically for your audio interface (not
“ASIO DirectX” or “ASIO Multimedia,” unless no other choices are
available), or for the Mac, Core Audio.
Output Latency: This field displays the output latency. For some drivers
you can adjust the latency individually using a fader.
ENGLISH DEUTSCH
Adjust latency for the fastest possible setting that gives consistent audio
performance. The CPU may not be able to keep up with fast settings,
resulting in possible crackles or pops in the audio. Slower settings will
give more consistent audio performance, but the amount of delay may be
musically unsatisfying.
Experiment with the latency setting until you find the best compromise
between consistent audio performance and fast response. A quick way to
adjust latency is as follows:
• Select any drum kit and play it while moving the Latency slider.
• Move the Latency slider to the left until you start to hear clicks in the
audio output.
• Now move the slider to the right until the clicks disappear. This is the
optimum setting.
Absynth 3
English – 23
Page 28

Routing
Using the drop-down menu, Absynth’s Output 2 is being assigned to an output from
a multi-output sound card.
If your sound card offers multiple inputs and outputs, you can
choose which ones connect to ABSYNTH 3. Click on Inputs to
choose the desired inputs from the drop-down menus, and click on
Outputs to select the outputs, also from drop-down menus. Note
that the right and left channels are independent and can be assigned to any inputs/outputs – not just stereo pairs – as well as disconnected from audio ins and outs.
ABSYNTH provides up to 8 monophonic outs. Using all of these in standalone mode requires an audio interface with eight output channels.
However, it is not necessary to have this many channels. For example, if
a notebook computer has built-in audio and offers only a single stereo
output (two channels), you can assign all the ABSYNTH sounds to the
stereo output.
Each drop-down list shows what outputs are available from the driver/
audio interface selected under the Interface tab. Assign each ABSYNTH
"software" audio out (Channel 1/2 Left, Channel 1/2 Right, Channel 3/4
Left, Channel 3/4 Right, Channel 5, Channel 6, Channel 7, and Channel
8) to the desired hardware output.
Absynth 3
English – 24
Page 29
Windows only: The audio interface’s overall level may be determined by a
mixer applet included with your interface hardware, or the built-in Windows mixer. If you encounter excessively low or high levels, please check
the Windows volume control by going Start > Programs > Accessories >
Entertainment > Volume Control. Then check the Wave volume slider,
and adjust its level as needed.
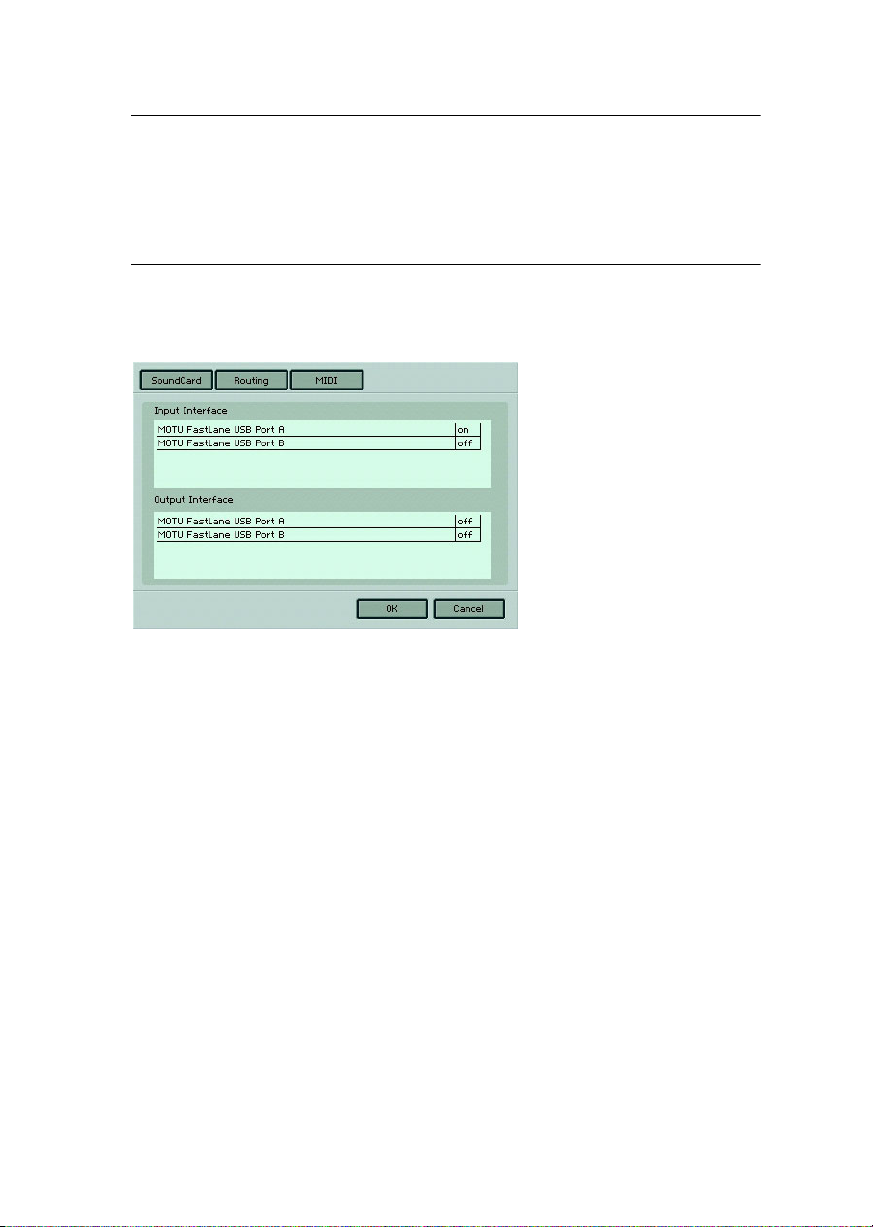
MIDI
ENGLISH DEUTSCH
If your MIDI interface offers multiple ins and outs, you can choose
which one connects to ABSYNTH. When you click on the MIDI tab
you’ll see a list of MIDI I/O. Initially, each one will be Off. This field is a
toggle – click on Off to turn an input or output On, click on On to turn
an input or output Off.
• If you enable more than one input, they will be merged.
Absynth 3
English – 25
Page 30

Absynth 3 as Plug-In
VST 2.0 plug-in
In addition to the stand-alone version, ABSYNTH can also be used as a
VST Audio Effect plug-in. The advantages of the VST 2.0 format allow
us to provide you with a powerful plug-in.
For more information on the VST 2.0 format, refer to the user guide
provided with your VST host program.
Using the Absynth plug-in in Cubase SX 3
• Launch Cubase, go to the Devices menu option and select the VST Instruments menu option or press F11 on your keyboard.
• A window showing the instrument rack appears. Click on an empty
slot and choose ABSYNTH from the available list of instrument plugins.
• The plug-in will now appear in your list and automatically be turned
on. It will also create a set of audio channels in your VST mixer that
will be used for mixdown within your project. This will allow you to
mix, pan, and process ABSYNTH's output just like any other existing
audio track in your Cubase song.
• Click on the Edit button to call up the ABSYNTH interface. Here you
can control and edit all the features and functions that ABSYNTH has
to offer.
• Now go to the "Project" page and add a MIDI track (if you do not have
one already created).
• Go to the Output parameter section for this MIDI Track and click on
the field. This will create a list of available MIDI out ports to assign to
this MIDI track. Choose Absynth from the list.
Absynth 3
English – 26
Page 31

Note: If ABSYNTH does not appear in the list of available VST instruments inside your VST 2 host application, then it is not installed correctly. Please refer to the previous section on installing the plug-in for
both Windows and Mac platforms for more assistance on setting this up.
After having loaded an Instrument from the library you should be able
to trigger it via MIDI using a keyboard controller. ABSYNTH’s sound will
generate through the VST mixer and directly to your sound card. If the
plug-in does not receive MIDI or generate audio, then make sure to
check the following areas:
• Make sure "MIDI thru" is enabled in Cubase.
• The MIDI channel of your MIDI track must correspond to the receive
channel of the loaded instrument.
• Make sure that you have properly configured your sound card for use
with Cubase.
(please refer to your Cubase manual for more information)
Using the Absynth plug-in in Nuendo 2.0
ENGLISH DEUTSCH
• Launch an empty or current project in Nuendo.
• Click on the Devices menu and choose VST instruments from the
menu options (or press F11 on your keyboard).
• A window showing the instrument rack appears. Click on an empty
slot and choose Absynth 3 VST from the available list of installed
plug-ins.
• The plug-in will now appear in your list and automatically be turned
on. It will also create a set of audio channels in your VST mixer that
will be used for mixdown within your project. This will allow you to
mix, pan, and process ABSYNTH's output just like any other existing
audio track in your Nuendo project.
• Click on the Edit button to call up the ABSYNTH interface. Here you
can control and edit all the features and functions that ABSYNTH has
to offer.
Absynth 3
English – 27
Page 32

• Now go to the "Project Editor" page and create a MIDI track (if you do
not have one already created).
• Go to the Output parameter section for this MIDI Track and click on
the field. This will create a list of available MIDI out ports to assign to
this MIDI track. Choose Absynth 3 VST from the list. Also make sure
you assign the MIDI input port to correspond to whatever MIDI controller your are using.
• Record enable the MIDI track.
Note: If ABSYNTH does not appear in the list of available VST instruments inside your VST 2 host application, then it is not installed correctly. Please refer to the previous section on installing the plug-in for
both Windows and Mac platforms for more assistance on setting this up.
After having loaded an Instrument from the library you should be able to
trigger it via MIDI using a keyboard controller. ABSYNTH's sound will
generate through the VST mixer and directly to your sound card. If the
plug-in does not receive MIDI or generate audio, then make sure to check
the following two areas:
• Make sure "MIDI thru" is enabled in Nuendo.
• The MIDI channel of your MIDI track must correspond to the receive
channel of the loaded instrument.
• Make sure that you have properly configured your sound card for use
with Nuendo
(please refer to your Nuendo manual for more information).
Using the Absynth plug-in in Logic 6.x and 5.x
• Launch Logic and create an audio instrument track or set an existing
audio or MIDI track to an audio instrument track by clicking on it,
Ö
holding down the mouse button and choose Audio
Ö
ment
Absynth 3
English – 28
Inst 1.
Audio Instru-
Page 33

• Double click the audio instrument track to open the environment window. Logic scrolls automatically to the first instrument bus in the
Logic mixer.
• Choose the ABSYNTH Audio Unit plug-in in the appropriate insert
slot of the instrument mixer bus, either in the arrange or mixer window. Then click onto the insert slot, hold down the mouse button and
Ö
choose Stereo
(ABSYNTH is also available as a multi-channel insert)
• The plug-in now appears in the instrument slot and is ready to use.
The instrument mixer channel will allow you to mix, pan, and process
ABSYNTH’s output just like any other existing audio track in Logic.
• If the ABSYNTH interface is not already open, double click on the
mixer’s ABSYNTH slot to call up the ABSYNTH interface. Here you
can control and edit all the features and functions that ABSYNTH has
to offer.
Audio Units Ö Native Instruments
Ö
Absynth 3.
ENGLISH DEUTSCH
Note: If ABSYNTH does not appear in the list of available AUinstruments
inside your AU host application, then it is not installed correctly. Please
refer to the previous section on installing the plug-in for the Mac platform for more assistance on setting this up.
After having loaded an Instrument from the library you should be able to
trigger it via MIDI using a keyboard controller. ABSYNTH's sound will
generate through the mixer and directly to your sound card. If the plugin does not receive MIDI or generate audio, then make sure to check the
following two areas:
• Make sure the Inst track is selected in the Arrange window.
• The MIDI channel of your MIDI track must correspond to the receive
channel of the loaded instrument.
• Make sure that you have properly configured your sound card for use
with Logic.
Absynth 3
English – 29
Page 34

(please refer to your Logic manual for more information).
Using the Absynth Audio Units plug-in in Digital Performer 4.1 (or higher)
• Launch Digital Performer and create an instrument track by selecting
Ö
Project
Add Track Ö Instrument TrackÖ Absynth 3.
• Create a MIDI track by selecting Project
In Digital Performer’s track overview window (or in the sequence editor window) assign the ouput of this MIDI track to “Absynth 3-1” and
a MIDI channel. If you instantiate further ABSYNTH Plug-Ins they
will be named “Absynth 3-2”, “Absynth 3-3” etc.
• The plug-in is now ready to use. The mixer of Digital Performer will allow you to mix, pan, and process ABSYNTH's output just like any
other existing audio track.
• To play ABSYNTH with your keyboard, record enable the MIDI track
which you have routed to ABSYNTH and make sure Midi Patch
Through is enabled in the Studio menu of Digital Performer.
• Double click on the ABSYNTH slot in Digital Performers mixing board
to call up the ABSYNTH interface. Here you can control and edit all
the features and functions that ABSYNTH has to offer.
Ö
Add Track Ö Midi Track.
Absynth 3
English – 30
Page 35

Note: If ABSYNTH does not appear in the list of available Audio Unit
plug-ins inside your Audio Units host application, then it is not installed
correctly. Please refer to the previous section on installing the plug-in for
Mac platforms for more assistance on setting this up.
After having loaded an Instrument from the library you should be able to
trigger it via MIDI using a keyboard controller. ABSYNTH’s sound will
generate through Digital Performers mixer and directly to your sound
card. If the plug-in does not receive MIDI or generate audio, then make
sure to check the following two areas:
• Make sure Midi Patch Through is enabled in the Studio menu of Digital Performer.
• The MIDI channel of your MIDI track must correspond to the receive
channel of the loaded instrument.
• Make sure that the instruments track output is correctly set.
• Make sure that you have properly configured your sound card for use
with Digital Performer.
(please refer to your Digital Performer manual for more information).
ENGLISH DEUTSCH
Using Absynth RTAS with Pro Tools 6.x under Mac and Windows
The RTAS format is an interface protocol for Mac OS and Windows that
allows you to use plug-ins with ProTools independently from additional
TDM hardware, while nonetheless offering the widest range of features.
In this case, the host processor alone performs all of the computations
for the plug-in.
• Launch Pro Tools
Ö
• Create a new AUX track File
• Create a new MIDI track the same way
• Locate the channel mixer Windows
• The dark grey box at the topmost section of the AUX channel is the
RTAS insert section. Click on the first empty slot to show all available
RTAS plug-ins.
New Track
Ö
Show mix
English – 31
Absynth 3
Page 36

•Choose Absynth from the menu
• Now locate the MIDI channel you just created
• In the output slot, choose ABSYNTH and the appropriate channel
After record enabling the midi track, you will be able to play ABSYNTH
with your midi keyboard.
(Please refer to your Pro Tools manual for more information on how to
record ABSYNTH’s output).
DXi 2 Plug-in
Using Absynth in Sonar
DXi 2 is a plug-in interface for software synthesizers and instruments based on Microsoft’s DirectX technology.
Using the Absynth DXi 2 plug-in in Sonar
• Launch Sonar
Absynth 3
English – 32
Page 37

• In the synth rack choose Absynth DXi 2.
Loading the Kompakt DXi 2 plug-in in the synth rack
• Route a MIDI track to the DXi 2-Plug-in by selecting Absynth in the
Out drop down list.
Assign a MIDI track to the Kompakt-DXi-Plug-in
Using Absynth 3 in Garage Band
• Launch Garage Band
• Press the “+” button to create a new “Software Instrument” Track.
From here you can choose the icon you wish to use.
• Double-click the instrument track icon or press the “I” icon to get the
Track Info.
• From the Info window expand the Details triangle underneath the Instrument icon to expose the track settings.
• From the Generator drop-down menu, choose ABSYNTH from among
Audio Unit plug-ins.
ENGLISH DEUTSCH
• Clicking on the pencil icon next to the “Manual” drop-down menu
will open the ABSYNTH interface for editing.
• ABSYNTH can now be played using an external midi keyboard or auditioned by clicking on the preferred cells.
Absynth 3
English – 33
Page 38

Absynth 3
English – 34
Page 39

Main window
Navigation Bar
The Navigation Bar runs along the top of the main ABSYNTH window,
and all other ABSYNTH windows.
In addition to providing buttons for switching between the different
windows (MAIN, PATCH, WAVE, EFFECT, ENV, LFO and MIDI), the
Navigation Bar also features three popup menus (File, Edit and Setup),
and the selected preset name field.
ENGLISH DEUTSCH
File (popup)
The File popup duplicates many of the functions found on the manin
application File menu.
Edit (popup)
As above, but for the Edit menu.
English – 35
Absynth 3
Page 40

Setup (popup)
Output Setup…
Opens a dialog in which you can configure ABSYNTH’s output mode.
The configuration options are Stereo, Stereo Wide, Surround 4.1 and
5.1, Front, Quad, Music, Pentaphonic, Hexaphonic, Cinema, Heptaphonic and Octophonic. The ".1" stands for the LFE (Low Frequency Effects) or Subwoofer channel. It can be turned on and off for each
configuration and the frequency and volume of this channel can be adjusted to conform with the loudspeaker setup used. List of available
configurations:
• 2.1 Stereo: The default configuration is standard, two-channel stereo
sound. In this configuration the speakers are placed at 45º and -45º.
• 2.1 Stereo Wide: This configuration is slightly different from 2.1 Stereo. It places the two front loudspeakers at 90º and -90º and therefore makes a wider stereo image.
• 3.1 Surround (LRS): This configuration refers to analog matrix surround, often called Dolby Surround™ (home) or Dolby Stereo™ (cinema), but without a center channel. It has one surround center
channel and left and right front channels.
• 3.1 Front (LCR): This configuration adds one center front channel to
left and right in order to allow a better front-separation.
• 4.1 Surround (LCRS): This configuration adds the center channel to
the 3.1 Surround configuration and is often called Dolby Surround
Pro Logic™.
• 4.1 Quad: four-channel ‘quadraphonic’ sound, comparable to the systems that competed for popularity in consumer audio in the 1970s.
All four speakers are placed symmetrically in the corners of a square.
• 5.1 Music: five-channel ‘surround sound’, comparable to the systems
used in cinema and high-end home entertainment systems, often referred to as Dolby Digital™ or DTS™. It offers 3 front channels (left,
center, right) and two surround channels (left-surround, right-surround).
• 5.1 Pentaphonic: five-channel ‘surround sound’, with 5 channels
symmetrically spread in a circle.
• 6.1 Music: 5.1 Music configuration, but with a surround-center channel added. This configuration is used in Dolby Digital EX™ or DTS ES™.
Absynth 3
English – 36
Page 41

• 6.1 Hexaphonic: six-channel surround sound with 6 channels spread
symmetrically in a circle.
• 7.1 Cinema: seven-channel surround sound, often used for movies.
Well-known surround systems are SDDS™ and IMAX™. This configuration adds two front channels (center-left, center-right) to the "5.1
Music" configuration.
• 7.1 Music: seven-channel surround sound, similar to the 6.1 Music,
but with the surround-center channel split into surround-center-left
and surround-center-right.
• 7.1 Heptaphonic: seven-channel surround sound with 7 channels
spread symmetrically in a circle.
• 8.0 Octaphonic: eight-channel surround sound with 7 channels
spread symmetrically in a circle.
For each of the three configurations you can choose how each of the
Ö
available audio outputs will be used (see Routing under Setup
and Midi settings…).
Surround panning controls are available in the Patch window when
surround mode is activated.
Audio
ENGLISH DEUTSCH
Note: in order to make best use of Quad or Surround 5.1 you’ll need an
audio interface with four (quadraphonic) or more output channels available. You’ll also need to give some thought to speaker placement. Quad
assumes two pairs of speakers: one in front of the listener, and one behind. Surround 5.1 assumes a stereo pair with a mono middle speaker in
front, and another pair behind.
Enable ProgramChange
As per Enable ProgramChange on the main application Setup menu.
Auto Balance Channel
As per Auto Balance Channel on the main application Setup menu.
Midi Channel
Opens a popup sub-menu from which you can select the number of the
MIDI Channel you want ABSYNTH to ‘listen’ on.
Absynth 3
English – 37
Page 42

Selected preset name field
Displays the name of the currently-selected preset. Click to edit its
name.
Panic button
The panic button, marked ‘!’, instantly reinitialises all internal DSP parameters. If something strange, loud or unpleasant happens, don’t
panic: click this.
Preset list
A list of all the presets in the file. The name of the preset is preceded
by it's program change number. To select a preset, click on its name in
the list or send the corresponding program change number via MIDI (if
Enable ProgramChange is checked in the Setup menu). It may take a
second or two for the preset to load on slower machines. Changing presets while other audio programs are running may result in dropouts or
clicks.
Store
Store changes made to the current preset to it's current program number. If you change presets without clicking store, the changes will not
be saved. However, you can recall the changes to unstored edits using
…, described below.
Edits
Store to…
Store the current preset to any program number. This will open a window with a list of all presets. Select the destination preset in this list,
then click the ‘Store’ button, or double-click on the destination preset.
You can use Store to
changing the order of the preset list.
Absynth 3
English – 38
«to make multiple copies of a preset, as well as for
Page 43

Edits…
This popup lists the last 10 edited presets that were not stored. Select an
edit to load it into the current preset.
Keyboard
Click on the keyboard to play a note. The note will sound as long as the
mouse is down and the cursor is over the note. Click and hold = play,
release = stop.
Hold
Hold changes the way the keyboard responds to the mouse. With hold
on, the note will continue to sound after the mouse button is released
until another note is clicked on, i.e. click = play, reclick = stop.
Sustain
When the sustain button is on, all played notes will continue to sound
after the mouse button is released, just like a real sustain pedal! This
makes it possible to play chords with the keyboard. The sustain button
also affects notes coming in via MIDI. This is easier than putting a
brick on your sustain pedal if you want to hold notes for a long time.
ENGLISH DEUTSCH
When a MIDI sustain pedal message (controller #64) is received, the
sustain button turns on or off.
MIDI controller sliders
Each MIDI continuous controller that is assigned to a parameter in the
current preset will have a MIDI controller slider. For example, if MIDI
controller #1 is set to adjust the frequency of a filter, a slider named
‘ctl1’ will appear in the keyboard window. Different presets may have
different controller assignments. If a preset has 10 controllers assigned, 10 controller sliders will appear.
This makes it easy to see what controllers a preset may respond to. See
the sections on the MIDI and LFO windows for more on controller
assignment.
English – 39
Absynth 3
Page 44

MIDI controller sliders can be dragged to change the controller value.
They also move when midi controller data is received, making them
useful to see how your midi controller (keyboard, mixer) is set up.
Poly
Polyphony. The maximum number of voices the selected preset can
play. Setting this to 1 puts ABSYNTH in a legato monophonic mode.
The maximum poly setting is 64.
Polyphony and CPU load
The number of voices you can play for a given preset depends on the
complexity of the patch and the speed of your computer. ABSYNTH
uses dynamic voice allocation, so voices which are not sounding are not
processed. As you play more notes you will notice the CPU meter rise. If
the CPU overloads or the graphic interface starts getting sluggish, just
release a few notes.
If a soundcard is installed and the CPU overloads, the soundcard’s driver
might lose it's marbles. This is easily remedied by clicking the reset ‘
button, selecting a preset or turning a module on or off. This is not a
problem if a soundcard is not installed.
Transpose
Transposes the pitch of the selected preset in ‘floating point’ semitones, i.e. a setting of 1.5 equals one semitone plus a quarter tone (half
a semitone). Tuning resolution is 1/1000th of a semitone.
’
Tuning
Select the tuning used by the current preset. You can choose from a
number of preset tunings, or you can create your own custom tunings.
dB
Adjust the selected preset's output level in decibels.
Pan
Left/right pan of the selected preset. 0.0 = full left, 0.5 = center and
1.0 = full right.
Absynth 3
English – 40
Page 45

Patch window
The Patch window is where you lay out the components that make up a
particular preset, and generate a particular sound.
ENGLISH DEUTSCH
In the Patch window you can switch ABSYNTH’s various modules on and
off individually, and modify the parameters for each module.
To toggle a module on or off, simply click on its name, on the left-hand
side of the module.
Modules
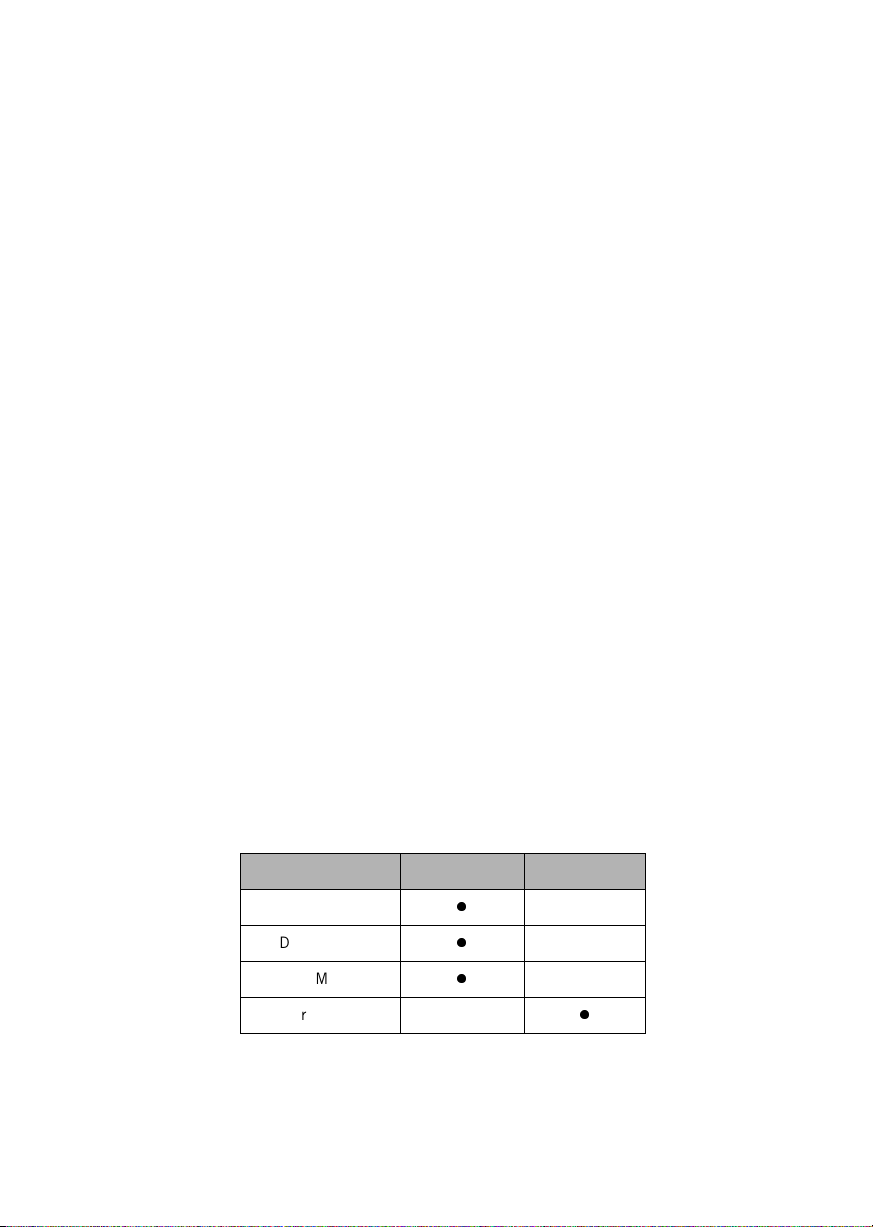
There are 12 modules in ABSYNTH:
•3 Oscils
•4 Filters
•3 Mods
•1 Waveshape
•1 Effect.
English – 41
Absynth 3
Page 46

The modules are arranged into three independent channels, which are
mixed and fed into a master channel. The modules are the same in
each of the three independent channels, and are arranged Oscil
WHU
Ö
0RG. The modules in the master channel are arranged Wave-
Ö
shape
The tubes between modules (also known as ‘the plumbing’) represent the
signal path. The signal starts at the top, with the three Oscils, and ends
after the effect module, in the bottom right corner.
The three level sliders control the output level of each independent
channel. When the menu item Setup
checked, the sliders remain balanced, i.e. lowering one will raise the
other two. The menu item Edit
to the same level.
Individual modules are sometimes referred to by name and channel: ‘oscil 1’, ‘mod 3’, ‘master filter’, etc., especially in the Envelope and LFO
windows.
)LOWHU Ö (IIHFW.
Ö
Auto balance channels is
Ö
Balance levels will set all three sliders
Oscil module
Ö
)LO
Oscil is the only sound-generating module in ABSYNTH. All of the other
modules modify sound originating from the Oscils. If none of the three
Oscils is on, no sound will be produced and none of the other modules
can be switched on. Similarly, if the Oscil at the top of a channel is off,
none of the other modules in the channel can be switched on.
The Mode popup is used to select the Oscil mode.
In ABSYNTH, Oscil has eight different modes, producing signals in three
distinct ways:
• Wavetable synthesis (Single, Double, FM, Ringmod and Fractalize
modes).
Absynth 3
English – 42
Page 47

• Sampling (Sample and Granular modes).
• Routing external audio signals (Audio In mode).
Wavetable synthesis modes
In Single, Double, FM, Ringmod and Fractalize modes, Oscil performs
wavetable synthesis, based on a single-cycle wavetable.
Single mode
A single, ‘Main’ oscillator is active.
Double mode
A pair of oscillators (the ‘Main’ oscillator plus a ‘Mod’ oscillator) is active, and their outputs are mixed. The Mod oscillator’s parameters are
accessed by clicking the Mod tab, and include balance, Wave, fre-
quency and phase.
ENGLISH DEUTSCH
Note: one Oscil module in Double mode is more CPU efficient than two
Oscils modules in Single mode.
FM mode
Frequency Modulation. The Mod oscillator modulates the frequency of
the Main oscillator. The Mod oscillator’s parameters are fm index (or
modulation depth), Wave, frequency and phase offset.
Frequency Modulation was discovered by John Chowning in the late
60's, and made popular in the 80's with Yamaha's DX7 synthesizer.
Much has been written about FM synthesis; an exhaustive explanation is
unfortunately beyond the scope of this manual.
English – 43
Absynth 3
Page 48

Ringmod mode
Ring Modulation and Amplitude Modulation. The output of the Main and
Mod oscillators are multiplied together. The Mod parameters include
balance, Wave and frequency.
Frequency can be specified in semi-tones (Trans), as a Ratio, in Hz, or by
MIDI note number (Note). For that ‘classic’ ring modulation sound, set
one of the oscillators to Hz or Note. (The different ‘frequency modes’ are
discussed in more detail later.)
The Wave popup
In all wavetable synthesis modes, the Wave popup selects the waveform used by the oscillator(s). It can also be used to create new waveforms.
Currently Wave popups are organised into two submenus: factory contains
all of ABSYNTH's built-in waveforms; user contains any user-created
waveforms.
Ö
user
Ö
Wave
editor. Each preset can have up to 8 waveforms allocated. For more on
editing waveforms, see the section on the Wave window.
QHZ«allocates a new waveform and opens the waveform
Main / Mod tabs
As we’ve seen, an Oscil module usually features both Main and Mod tabs,
the Mod tab providing access to various mode-dependent parameters.
(Only Single and Audio In mode, discussed later, lacks a Mod tab.)
Uni tab
New in ABSYNTH, Single, Double, FM and Ringmod modes also feature
a Uni (‘unison’) tab, with three parameters:
• num voices: the number of voices produced per note (the maximum is
8).
• trans: the detune amount in semi-tones (only available if num voices
is greater than 1).
Absynth 3
English – 44
Page 49

• rand trans: the possible range of random detuning (up or down) in
semi-tones.
You can use Uni to quickly stack up voices and create fuller, richer
sounds. Each time you increase num voices, a new voice is added and
mixed into the Oscil’s output.
The trans setting determines the intervals between the original ‘root’ note
and the pitches of the additional voices. ‘Even-numbered’ additional
voices are transposed downwards, ‘odd-numbered’ additional voices are
transposed upwards.
So, for example, if num voices is set to 3 and trans is set to 1, each note
will be accompanied by one voice transposed a semi-tone down, and one
voice transposed a semi-tone up from the original pitch.
If num voices is increased to 4, a new (‘even-numbered’) voice will be
added, one semi-tone below the last even-numbered voice (i.e. two semi-
tones below the root note). If num voices is increased again to 5, a new
(‘odd-numbered’) voice will be added one semi-tone above the last odd-
numbered voice.
The rand trans option causes random voice detuning on each successive
note. Used subtly, with num voices set low, rand trans can create an
effect of loose or imprecise intonation (perhaps to mimic a fretless
stringed instrument, or provide natural-sounding variations in ‘unpitched’
percussion sounds). More drastic settings can result in completely
unpredictable atonal note clusters, among other things!
ENGLISH DEUTSCH
Fractalize mode
Also new in ABSYNTH, Fractalize is the last of the wavetable synthesis
modes. Experienced ABSYNTH users will recognise this as a real-time
implementation of the Fractalize function from the waveform editor in
the Wave window (it works in much the same way).
The Mod tab parameters are:
• iterations: higher values tend to produce brighter, more complex
sounds. (They also increase the CPU load!)
• amount: the amount of fractalization. When set to ‘0’ the sound of
the original waveform is unaltered.
English – 45
Absynth 3
Page 50

• displacement: this is the most dynamic and interesting parameter.
It’s effect is difficult to describe - but easy to hear. The Fractalize
function in the wave window may help you to visualise what’s going
on.
Fractalize mode also has its own Uni tab parameters: trans and rand
trans. These work the same way as in Single, Double, FM and Ringmod
modes.
Note however that Fractalize mode has no num voices parameter
(iterations fulfils a broadly comparable role).
Tip: Fractalize works especially well with waveforms featuring sparse and
strong harmonics - tending to generate clusters of new harmonics around
the original harmonics. With the right kind of waveform this can produce
interesting formant-like effects. With more harmonically dense waveforms (e.g. saw_real) the effect is less noticeable.
Frequency modes and the frequency number box
By default, the frequency mode popup button is labelled ‘Trans’.
We’ve already seen (in Ringmod mode) that oscillators in the Main or
Mod tabs can be set to respond to notes in several different ‘frequency
modes’. The same applies to oscillators in any of Oscil’s wavetable synthesis modes.
The available frequency modes are Trans, Ratio, Hz and Note, and these
can be selected via the frequency mode popup (labelled Trans by
default):
• Tra ns: transpose by semitones. The frequency number box transposes
the pitch of an oscillator in ‘floating-point’ semitones. This allows
fine tuning with a precision of 1/1000th of a semitone.
• Ratio: transpose by frequency ratio (i.e. the harmonic series). This
mode is particularly useful when working in FM and Ringmod modes.
Absynth 3
English – 46
Page 51

• Hz: fixed pitch in Hertz. The pitch of the oscillator will remain fixed
regardless of the note being played. This is very useful in FM and
Ringmod modes. LFOs and pitch bend will not affect the pitch in Hz
and Note modes, however it is possible to control the pitch with an
envelope.
• Note: fixed pitch by MIDI note number. This has the same effect as
Hz mode but is sometimes more useful if you want to tune the main
oscillator to a specific pitch, i.e. 60.5 = C3 plus one quarter-tone.
Tip: you can switch back and forth between Hz and Note to perform note
to Hertz conversion.
Phase invert
The phase invert button (immediately to the left of the phase/free mode button).
In all of Oscil’s wavetable synthesis modes, the phase invert button can
be used to invert the phase of the signal produced by the Main oscillator. Note that if another oscillator is set to exactly the same pitch,
phase offset and wave, total phase cancellation will occur, which means
silence.
ENGLISH DEUTSCH
Phase / free
In all of Oscil’s wavetable synthesis modes, the phase number box can
be used to set the initial phase of an oscillator.
Varying the phase of an oscillator will only have an audible effect if
another oscillator is switched on. It can be useful, for instance, in FM
mode, when working with integer carrier/modulator frequency ratios.
Clicking on the phase label in the Main tab toggles between phase and
free modes.
In phase mode, the phase of the oscillator is reset (according to the value
in the phase number box) with every note-on (provided poly has not been
set to 1).
In free mode, the phase of the oscillator is not reset.
English – 47
Absynth 3
Page 52

If only one oscillator is sounding (e.g. in Single mode with Uni
Ö
voices set to 1) free mode will have almost no effect. If Uni
is greater than 1, or if there is more than one oscil sounding (e.g. in
Double, FM, or Ringmod modes) the sound will be noticeably different
with every note.
num voices
Anti-aliasing
In Single and Double modes, oscillators can be anti-aliased for a
smoother, more ‘analog’ sound. The small ‘staircase/ramp’ button in the
upper left of the Main Oscil tab turns anti-aliasing on or off. The
‘staircase’ means that antialiasing is off, while the ‘ramp’ turns it on.
Clicking the small staircase/ramp button in the upper left corner of the Oscil module
turns anti-aliasing on or off. A staircase signifies that anti-aliasing is off, and a
smooth ramp (pictured) means that it is enabled for that oscillator.
Anti-aliasing makes the most difference in the high ranges. With antialiasing off, you'll probably hear what's called ‘foldback’ - a rough digital
distortion that can make the high ranges sound ‘gritty’ or ‘harsh’ (two
usually - but not always - undesirable characteristics).
Ö
num
By enabling anti-aliasing, this foldback is significantly reduced. Note that
an anti-aliased oscillator requires significantly more CPU than a normal
one. Therefore, if you can't hear a difference with antialiasing on, it's best
to leave it off.
For compatibility, all version 1 ABSYNTH patches are opened with antialiasing off. It's even possible to create a patch with anti-aliasing on in
some channels, and off in the others!
Note: anti-aliasing is only available in Single and Double Oscil modes.
Absynth 3
English – 48
Page 53

Sampling modes
Oscil has two sampling modes: Sample and Granular. These allow ABSYNTH to act as a sampler, playing back sampled sounds loaded from
WAV or AIFF format sound files.
Unlike a conventional, ‘workhorse’ sampler, ABSYNTH doesn’t provide
the usual key-mapping, velocity-layering and AKAI import functions.
With ABSYNTH, the emphasis is less on the ‘realistic’ playback of
sampled instruments, and more on the creative sound design possibilities
presented by sample-based synthesis.
Each of the three Oscils can load a sample; three different samples can
be loaded in a single preset.
Tip: before experimenting with ABSYNTH’s sampling capabilities, you
may first want to load a default patch. To do this select a New bank from
the File menu, then open the patch window.
Loading samples
ENGLISH DEUTSCH
Loading a sample into an Oscil is easy:
• From the Mode popup select either Sample or Granular. A sample
name field, initially marked (none), will appear beneath the Mode
popup.
• Click on the sample name field to open an ‘Open’ dialog.
• Select a sample to load.
ABSYNTH can read mono or stereo AIFF or WAV files, from 16 to 32 bits,
at any sample rate.
Stereo and Mono samples
Stereo samples can be played back in either stereo or mono. Mono
samples are always mono. The ‘ring’ or ‘double-ring’ button next to the
sample name field toggles mono or stereo playback. A single ‘ring’
denotes mono playback, a ‘double-ring’ means that the sample will play
back in stereo.
English – 49
Absynth 3
Page 54

If you can’t switch a sample to stereo, it means that the sample is in
mono. By default, ABSYNTH plays back stereo samples in stereo and
mono samples in mono. Note that master stereo operation needs to be
enabled to hear samples in stereo (see the Panning section for more
information).
Sample mode
In Sample mode, the parameters in the Main tab are:
• frequency mode popup and frequency number box: these work in
much the same way as in the wavetable synthesis modes.
• start %: the start time for sample playback, as a percentage of the total sample length.
On the Mod tab is the Play Mode parameter, which provides three op-
tions:
• No Loop: the sample is played as a ‘one-shot’ sound, with no looping
(for example, a percussion sound).
• Loop All: the entire sample is looped (this works best for samples that
have been edited in advance to loop ‘cleanly’).
• Loop Edit: two additional parameters are available when Loop Edit is
selected: loopstart and loopend, which allow you to specify the loop
start and end positions respectively, in samples.
Granular mode
In Granular mode, the parameters on the Main tab are the same as for
Sample mode, and function in the same way. The Mod tab parameters are
different.
Granular mode works by dividing the sound up into many small ‘grains’,
with each grain playing a tiny fraction of the sound. In this way, the pitch
and time characteristics of the sample can be controlled independently.
In Granular mode, the duration of the sample is constant across the entire
range of the keyboard, while the note played determines the pitch.
The Mod tab parameters for Granular mode are:
Absynth 3
English – 50
Page 55

• time %: sets the playback speed. 50% is half speed, while 200% is
double-time. When time is set to 0%, the sample is ‘frozen’ in time.
When the sample is frozen, adjusting the sample start sets the freeze
point.
• dens: sets the number of grains playing back simultaneously. Can be
set from 1 to 8. A low value will produce a thinner sound, while a
value of 7 or 8 produces a thick, dense cloud. Note that higher dens
settings impose a greater CPU load.
• size: sets the length of each grain, in samples. Shorter values are
good for percussive sounds, while higher values work well for sustained sounds, such as pads or strings. Note that very short values
tend to mask the character of the sample and produce a typically
granular ‘tearing’ noise. The maximum value is 9999 samples
(around 226 milliseconds at a 44.1 KHz sample rate).
• r time: sets the randomness of how often the grains play back. 0
means no randomization, while 100 produces playback times that are
randomized within the time window, set by size.
• r freq: randomizes the pitch of the individual grains. 0 means no randomization, while 100 produces completely random pitches.
• r amp: randomizes the amplitude (volume) of the individual grains. 0
means no randomization, while 100 produces completely random volumes.
ENGLISH DEUTSCH
Sample Management
ABSYNTH's Consolidate Bank command (in the File menu) makes a
copy of every sample used in the bank, and places them in a folder
called Samples, which will be in the same directory that the bank was
saved to.
On the Mac, ABSYNTH uses Aliases to reference samples, while direct
file paths are used on the PC. If ABSYNTH can't find a sample that is
referenced in a patch, it will automatically search for it.
English – 51
Absynth 3
Page 56

Sampling Hints and Tips
Even though ABSYNTH does not support key-mapping (the ability to
play back different samples from different zones of the keyboard) or velocity-layering (the ability to play back different samples on the same
key at different velocities), you can actually use the note scaling editor
in the MIDI window to roughly simulate these functions. You are, however, limited to only three samples - one per oscillator channel.
To have three different samples play back in different ranges of the
keyboard, for instance, first load each sample into the individual
oscillator modules. Open the note scaling editor, and draw in the
approximate key range for oscillator amp 1 (first sample), then proceed
to draw in the key range shapes for oscillator amp 2 and 3 (second and
third samples).
It will probably take some fine-tuning to obtain an even volume across the
entire keyboard range, but using this trick you can play a bass sample in
the low ranges, crossfaded with a vocal in the mids, and a flute in the
high!
By fading one sound out in volume across the keyboard and fading another in, you
can have multiple samples spread across the keyboard.
Absynth 3
English – 52
Page 57

A new type of envelope was created just for the sampler modes: Sample
Jump. using the Sample Jump envelope, you can dynamically slice up
samples, sync up samples to any tempo, or just have fun. Be sure to read
the Sample Jump notes in the Envelope Window section.
Audio In mode
Audio In mode is also new in ABSYNTH. In Audio In mode, Oscil gener-
ates no sound of its own, but instead passes externally-connected audio signals directly to its output. This allows ’real world’ sounds to be
processed and manipulated by ABSYNTH’s other modules in real-time!
Audio In mode is activated by choosing Audio In from the Oscil Mode
popup, and its parameters all appear in the Main tab:
• In: choose from one of six possible audio inputs, as nominated in the
Routing tab of the Audio and Midi settings... dialog.
• db: boost or attenuate the input signal as required. The default is
0db, leaving the level of the input signal unaltered.
As with the sampling modes, the ‘ring/double-ring’ icon can be used to
select either a mono or stereo input signal. If mono is selected, only
one In popup is available. When stereo is selected, a second identical
In popup appears beneath the first.
ENGLISH DEUTSCH
Note: external audio signals follow ABSYNTH's signal path in exactly the
same way as internally-generated sounds, and are thus affected by ABSYNTH's envelopes in just the same way. Consequently you will only be
able to hear external audio signals when one or more keys are pressed,
and the envelopes are triggered!
Absynth 3
English – 53
Page 58

Filter module
Mode
Sets the filter mode.
Fourteen different filter types are available:
• lpf 2 pole: an analog-modelled 2 pole lowpass resonant filter.
• lpf 4 pole: an analog-modelled 4 pole lowpass resonant filter.
• lpf 8 pole: an analog-modelled 8 pole lowpass resonant filter.
• allpass 2: a 2 pole allpass filter.
• allpass 4: a 4 pole allpass filter.
• allpass 8: an 8 pole allpass filter.
• lpf -6dB: a first-order lowpass filter.
• lpf -12dB: a second-order lowpass filter with feedback resonance.
• lpf -24dB: a fourth-order lowpass filter with feedback resonance.
• hpf -6dB: a first-order highpass filter.
• hpf -12dB: a second-order highpass filter with feedback resonance.
• bpf: a bandpass resonator with a Q range of 0.2 to 1000.
• notch: a band-reject filter with feedback resonance. Bandwidth sets
the separation between the high and lowpass sections in octaves.
• comb: a comb filter. Feedback range is from -0.99 to 0.99. Modulate
it for flanging effects. Setting the frequency low enough will produce
a short delay effect.
The number of ‘poles’ of the analog-modelled lowpass filters determines the steepness of the filter curve. This means that the higher-pole
filters will cut the frequencies above the cutoff more severely.
Absynth 3
English – 54
Page 59

Allpass filters are a creative type of filter that can be used for resonant or
phasing effects. For allpass filters, the number of poles indicates the
number of notches and peaks in the filtered signal’s frequency spectrum.
With high resonance, the 8-pole allpass can sound remarkably like a bell.
Mono/Poly
The master filter can be set to operate in either mono or poly mode.
This button only appears on the master filter in the bottom row of the
Patch window. In Poly mode (three little arrows) one filter will be allocated per voice. In Mono mode (merged arrow), only one filter will be
allocated for all voices.
ENGLISH DEUTSCH
Mod module
Mod is a signal processing module, which uses its own internal oscillator to alter or modulate incoming signals. As with Oscil’s oscillators, a
Wave popup can be used to select or create different waveforms for the
oscillator.
Note that Mod’s oscillator’s output is never heard on its own: instead what
you hear is the effect of its interaction with the input signal.
English – 55
Absynth 3
Page 60

Mod operates in two different modes:
Ringmod mode
Performs ring modulation, very similar to Oscil’s Ringmod mode. The
amplitudes of the incoming signal and Mod’s oscillator signal are multiplied together. The Wave popup is used to select or create the oscillator waveform. The balance number box adjusts the balance between the
input signal and the modulated signal.
Freq Shift mode
New in ABSYNTH, Freq Shift does frequency shifting. Frequency shifting
is quite similar to ring modulation, and can produce similar-sounding
results.
Technically speaking, while a ring modulator produces both ‘sum’ and
‘difference’ frequencies, a frequency shifter produces only sum or only
difference frequencies.
In practise, this means that Freq Shift tends to produces subtler, more
controllable effects than Ringmod.
Freq Shift’s parameters are:
• + / - button: set to + to produce sum frequencies, set to - to produce
difference frequencies.
• Wave popup: select or create the oscillator waveform.
• A frequency mode popup and numberbox.
• Feedback.
Slight detuning (relative to the input frequency) with moderate feedback can produce a constantly rising or falling ‘barberpole’ phasing effect. Very low (e.g. 1 Hz) frequency settings can produce similar
effects.
Since there is no interference between sum and difference frequencies, Freq Shift often sounds cleaner with complex input (e.g. samples,
saw waveforms) than Ringmod.
Absynth 3
English – 56
Page 61

Note: frequency shifting is not the same thing as pitch shifting. A pitch
shifter multiplies the frequencies in a signal by a common factor, preserving the harmonic relationships between them. A frequency shifter
adds a common factor to the frequencies in a signal, thereby altering
(compressing or expanding) the harmonic relationships.
Mono/surround
In mono mode, the mono/surround button is marked with a single dot. In surround
mode it shows five dots.
The mono/surround button can be used to toggle between mono and
surround modes. In mono mode, all signals generated in the Patch win-
dow are in mono (until they reach the Effect module, which operates in
stereo).
When surround mode is activated, each active Patch window channel has
its own ‘cross-hair’ control, which can be used either for standard left/
right stereo panning, or for more advanced left/right/front/back surround
panning.
ENGLISH DEUTSCH
Tip: surround mode really comes into its own when the pan parameter is
modulated by an LFO.
Absynth 3
English – 57
Page 62

Waveshape module
Waveshaping (non-linear distortion) uses a waveform to distort the input signal. Perhaps the most familiar example of waveshaping is distortion with an electric guitar amplifier or pedal.
Waveshaping is sensitive to the amplitude of the input, therefore the
timbre of the sound will vary with the amplitude envelopes and the
volume pedal. Waveshaping will also emphasize phasing and detuning
effects.
Mono/Poly
In Poly mode (three little arrows, pictured) one waveshaper will be
allocated for each voice. In Mono mode (merged arrow), only one
waveshaper will be allocated for all voices.
In Poly mode distortion is independent per voice, as if you had a separate
guitar amplifier for each string of an electric guitar. In mono mode,
playing more than one note will result in the voices ‘interfering’ with each
other, much like playing a chord on an electric guitar with distortion.
Hints: Waveshape in mono mode can be used as a simple compressor if
the input level is kept low. A touch of waveshaping can really warm up
the filters.
• Wave: the waveform determines the timbre of the distortion. In this
case the wave is not an oscillator waveform, but instead represents
the transfer function used to distort the input signal. Try creating a
new waveform and editing it in the Waveform window in spectrum
mode.
Absynth 3
English – 58
Page 63

• in dB: input level in decibels. Lowering the input level will generally
result in less distortion.
• out dB: output level in decibels.
• phase: adjusts the phase offset of the waveform. This will change the
sound radically.
Effect module
The effect module provides a variety of delay-based effects. Because of
the large number of parameters, effects are edited in a separate window. To open the Effect window click the edit
tion on the Effect window for details.
« button. See the sec-
More Parameter Control
In ABSYNTH, just about every parameter in the Patch window can be
controlled by the envelopes. Resonance, Waveshape phase, Waveshape
gain, Effect time, Effect feedback, Effect filter frequency, Effect mix,
and Panning can all be controlled by the envelopes.
ENGLISH DEUTSCH
Absynth 3
English – 59
Page 64

Absynth 3
English – 60
Page 65

Wave window
The Wave window allows you to edit waveforms created with one of the
Wave popup menus found in oscillators, LFOs and the Waveshaper
module. They are used to select the waveform used by the module as
well as to create new waveforms. Currently wave popups are organised
into two sub-menus: ‘factory’ contains all of ABSYNTH's built-in wave-
Ö
forms, ‘user’ contains user-created waveforms. Wave
will allocate a new waveform and open the waveform editor. Each preset can have up to 8 waveforms allocated.
user Ö new «
ENGLISH DEUTSCH
User-created waveforms are only available to the preset in which they
were created, they cannot be directly accessed from other presets although they can, of course, be stored and retrieved via ABSYNTH’s
Universal Library functions.
Nearly all of the editing tools and functions listed below work ‘live’ in realtime. You can play sound, modify the wave at the same time and hear the
result immediately.
Wave popup
Select which preset wave to edit. Note: if you want to edit a factory wave,
use the Load Wave
factory waves to the current preset wave.
«function in the Transform popup to copy one of the
English – 61
Absynth 3
Page 66

Waveform/spectrum
The waveform window has two editing modes: waveform and spectrum.
Waveform mode allows editing the wave directly in the time domain.
Spectrum mode allows editing the first 64 harmonics of the waveform
in the frequency domain. Note: harmonics above 64 are retained during all spectrum mode operations (some spectrum based editors chop
off harmonics beyond the editor’s limit).
Waveform mode
Amplitude/offset sliders (waveform mode)
Adjust the amplitude and offset of the waveform. Double clicking on the
offset slider will center the wave around zero.
Line tool (waveform mode)
Draw a waveform using straight lines. The line will be drawn starting at
the origin point (the blue triangle at the top of the waveform display). The
origin point can be dragged to another position.
When you draw a line past the beginning or end of the waveform, a
horizontal line will appear. This line indicates the amplitude of the other
end of the waveform. This is useful for matching the amplitude of the
beginning and end of the waveform.
Curve tool (waveform mode)
Draw a waveform using half-cosine curves. Otherwise similar to the line
tool.
Absynth 3
English – 62
Page 67

Stretch tool (waveform mode)
When the stretch tool is selected, two yellow triangles will appear above
the waveform display. If you drag on the waveform in the space between
the triangles, the waveform will be ‘stretched’. Move the triangles to
change the boundary zone. Option drag a triangle to move both triangles
simultaneously.
Transform popup (waveform mode)
Normalize
Normalize the amplitude of the waveform.
DC offset
Ensure that the waveform has equal total energy above and below the
center line. This is not the same as centering the waveform with the offset
slider.
Offset phase…
Adjust the phase offset of the waveform.
Invert phase
Invert the phase of the waveform.
ENGLISH DEUTSCH
Reverse
Reverse the waveform in time.
Mix
Opens a window where you can mix another waveform with the current
waveform. You can adjust the following parameters:
• Balance of the two waveforms
• Phase invert and offset of the mixed-in waveform.
• Frequency ratio of the mixed-in waveform.
Note: you can use the frequency slider to create chords based on the intervals of the harmonic series. Repeat mix and change the frequency
each time to add a new ‘note’ to the chord.
Absynth 3
English – 63
Page 68

Fractalize
The fractalize function is a unique transformation, and is particularly
useful for creating bright, diffuse, organic sounding waves. Parameters
include:
• Number of iterations. The more iterations the more fine detail is
added to the wave.
• Displacement adjusts the overall shape of the fractalized wave.
• Amplitude slope controls the amount of fractalization. High amplitude settings will produce extremely noisy waveforms.
Tip: Try experimenting with the fractalize parameters while playing on a
MIDI keyboard.
Filter
Filter the waveform.
•Use the filter popup to select the filter type.
•The frequency slider sets the filter frequency on a scale of 0.0 to 1.0.
Lowpass filtering a wave is the best way to eliminate aliasing.
FM
Perform frequency modulation on the waveform. The current waveform
acts as the carrier.
•Use the wave popup to select the modulator wave.
• Modulation index controls the amount of modulation.
• Modulator frequency sets the frequency ratio of the modulator.
• Modulator phase sets the phase of the modulator.
• Carrier frequency sets the ratio of the carrier.
Load Wave
Copy another wave (factory or preset) to the current edit wave.
Extract from AIFF/WAV
Load the first 1024 samples from an AIFF (Mac) or WAV (PC) file as a
waveform.
Load Wave from Library
Recall a saved waveform from ABSYNTH’s library.
Absynth 3
English – 64
Page 69

Save Wave to Library…
Save a waveform to ABSYNTH’s library.
Clear
Silence.
Spectrum mode
In spectrum mode, the waveform window displays the first 64 harmonics of the selected waveform. The top half of the display shows the amplitudes of the harmonics, the bottom half shows the phase. At the
bottom of the window, the harmonic number corresponding to the
mouse position, the harmonic’s amplitude and phase are displayed.
ENGLISH DEUTSCH
Note: It’s a common misconception that the phase of a harmonic is not
very perceptible. Although phase is a little less perceptible than amplitude, changing the phase of a harmonic in a complex waveform can significantly change the sound.
Note: In case you’re wondering, harmonics higher than 64 remain unaffected by the spectrum editor, i.e. they don’t get chopped off when the
wave is resynthesized.
Absynth 3
English – 65
Page 70

Draw one harmonic tool (spectrum mode)
This tool allows drawing the amplitude and phase of one harmonic per
mouse click. Use this for precise drawing.
Draw harmonics tool (spectrum mode)
Use this tool to draw the amplitude and phase of multiple harmonics.
Transform popup (spectrum mode)
Invert phase
Invert the phase of the harmonics.
Shift harmonics
Shift the overall shape of the spectrum up or down.
Load Wave
Copy another wave to the current edit wave.
Clear all
Set amplitude and phase to zero.
Clear amplitude
Set amplitude to zero.
Clear phase
Set phase to zero.
Absynth 3
English – 66
Page 71

Effect window
Effect button
This button will toggle the effect module in the Patch window on and
off. It is equivalent to the effect button in the Patch window.
ENGLISH DEUTSCH
Mode popup
Sets the effect mode. There are currently five different effect modes.
Multicomb mode (pictured above)
Multicomb provides up to 6 independent delay lines with feedback and
a lowpass filter in the feedback loop. Delay time ranges from one sample to 0.74 seconds. Delay time can be modulated by the LFOs and by
a MIDI controller. See the sections on LFOs and the Controllers window.
Time (master)
This sets the master time for the six delay lines. The sec/beat button
allows you to edit time either as seconds or tempo/beat.
Feedback (master)
Master feedback control. Ranges from 0.0 to 0.999.
English – 67
Absynth 3
Page 72

Lowpass (master)
Sets the master frequency for the lowpass filters in the six delay lines.
Time %
The delay time for an independent delay is the master time multiplied by
this value.
Ctl Sens/invert
Sensitivity to control input of the delay time. An LFO or MIDI controller
must be set to control the effect for this to do anything. The invert button
reverses the effect of the control input. See the sections on LFO’s and
MIDI controllers.
Feedback %
The feedback value for a delay channel is the master feedback multiplied
by this value. Ranges from -1.0 to 1.0.
Lowpass %
The lowpass frequency for a delay channel is the master lowpass
frequency multiplied by this value.
Gain and pan
Gain of the delay channel in dB. Pan ranges from 0.0 = full left, 0.5 =
center and 1.0 = full right.
Pipe mode
Pipe is similar to a simple waveguide. Unlike waveguide-based physical
modelling, ABSYNTH’s Pipe mode is not an attempt at a realistic
simulation of anything in particular. However, it is useful to think of it as
a string or tube.
Imagine Pipe is a string. The string has a speaker connected to it which
makes it vibrate (a ‘contact speaker’). The position of the ‘speaker’ along
the length of the string is the input position.
The string also has two pickups like an electric guitar which are panned
left and right. These are the output positions. Adjusting the output
positions is very much like setting the positions of a stereo pair of
microphones.
Absynth 3
English – 68
Page 73

The length of the string and the two output positions can be modulated
by LFOs and a midi controller. This can produce some very nice flanging,
pitch shift and rotary speaker effects, especially if the control input is
inverted for one of the outputs.
Modulating Pipe’s parameters can be a little tricky. If one of the output
positions crosses over the input position a soft thump may result. When
modulating the length of pipe, length might cross the input position
producing a ‘thumpy’ click. The output positions can cross each other
with no problem.
Pipe's graphic display provides an animated view of input and output
positions as well as the length. This is very useful for avoiding crossing
over the input position.
Tip: modulating both output positions with an LFO with one of the output's ctl sensitivity inverted (i.e. the points move in opposite directions),
a nice panning effect can be achieved. If the points cross each other, the
stereo image will be centered (mono) when the points cross.
ENGLISH DEUTSCH
Multitap mode
Multitap is a single delay line with three outputs (taps). The delay time
ranges from one sample to 10 seconds. The first tap has a feedback
control. The three taps can be modulated by the LFOs or a midi controller.
Multitap is less CPU efficient than Multicomb, but it allows for longer
delay times.
Echos mode
New in ABSYNTH, Echos features three delay lines, each with three
different filters in the feedback loop. The Master parameters (Time,
Feedback and the sec/beat button) work the same way as in Multicomb
mode. The maximum delay time is 0.74 seconds.
Each of the three delay lines offers the same set of parameters. Time,
Feedback, Ctl Sens, Gain and Pan are comparable to their namesakes in
Multicomb and Multitap modes.
English – 69
Absynth 3
Page 74

The remaining parameters are:
Lowpass
Applies a lowpass filter to the signal in the feedback loop. The value in
the number box sets the filter cutoff point, in Hz. The effective range is
from 1.0 to 22050 Hz.
Highpass
As above, except that a highpass filter is applied. The effective range is
from 1.0 to 22050 Hz.
Allpass
An allpass filter, equivalent to allpass 4 in the Filter module. Allpass
filters are particularly useful for creating ‘phasing’ effects. Echos’ allpass
parameter is most effective when modulated by an envelope (new
Ö
envelope
effect Ö effect filter freq).
Resonators mode
Also new in ABSYNTH, Resonators provides three independent delaybased ‘resonators’. Resonators can produce delay or reverb effects, as
well as various ‘small object’ kinds of effects (e.g. metal bars, brake
drums, bottles).
Since there are three, you can easily combine different effects. Imagine,
for example, a nearly infinite large reverb-like effect, accompanied by a
smaller, brighter space that fades out quickly.
There are six Master parameters affecting all three resonators:
• Size: maximum delay length, 0 - 100%.
• Feedback: amount of feedback, 0 - 100.
• Ton e: controls filters within the resonators. The effect depends on the
resonator modes selected (see below). The range is 0 -100.
• Predelay: the delay before the onset of the resonator’s effect, in milliseconds.
• Diffusion: random delay variations. Small amounts make the resonators sound less ‘ringy’, large amounts can sound ‘gritty’, like granular
synthesis. The range is 0 - 100.
• ER: toggles ‘early reflections’ on/off.
Absynth 3
English – 70
Page 75

Additionally, each of the three resonators has the following parameters:
Mode
There are 4 modes:
• Raw: damped delay. Tends to be less diffuse, and sound more ‘fluttery’.
• Natural: more diffuse. Tends to sound ‘darker’.
• Resonant: diffuse, brighter.
• Synthetic: like Resonant, but more extreme.
Tone (see above) will have a very different effect depending on mode.
Try experimenting with extreme settings.
Size: Scale
Resonator size is equivalent to the Master Size setting multiplied by the
Size: Scale setting.
Size: Shape
This controls the delay ratios internally. Using reverb as an example, this
could be equivalent to altering the size and/or shape of the room.
Size: Ctl
ENGLISH DEUTSCH
Controls the sensitivity to LFO modulation and MIDI parameter control.
An ‘invert’ button is available.
Tone: Scale
The effective Tone setting is equivalent to Master tone multiplied by Tone:
Scale.
Tone: Spread
Spread tends to make the sound more ‘diffuse’, and also tends to reduce
feedback. (The effect is easier to hear than describe.)
Tone: Ctl
Controls the sensitivity to LFO modulation and MIDI parameter control.
An ‘invert’ button is available.
Absynth 3
English – 71
Page 76

Absynth 3
English – 72
Page 77

Envelope window
ABSYNTH uses breakpoint envelope generators to vary parameters in
time. Each envelope can have up to 68 breakpoints. ABSYNTH’s envelopes are extremely flexible and offer many possibilities you probably
won’t find anywhere else.
ENGLISH DEUTSCH
How envelopes modulate parameters
If a parameter is being modulated by an envelope, the parameter’s value
in the Patch window indicates its maximum value. The envelope can
lower this value, but it can’t go above it.
For example, if a filter is being modulated by an envelope and the filter’s
frequency is set to 5000Hz, the envelope’s maximum range will be from
5Hz to 5000Hz.
Envelopes and voice allocation
By default, each Oscil has an amplitude envelope. The amplitude envelopes are special because they determine whether a voice is being calculated or not. When all of amplitude envelopes in a voice reach their
last breakpoint, the voice stops being calculated, thus reducing the
CPU load.
English – 73
Absynth 3
Page 78

Envelope List
A list of all allocated envelopes. Selected envelopes will be displayed in
the graphic editor. Envelope names indicate: module type (oscil, filter,
mod), channel (1, 2, 3, master) and parameter.
New envelope
Create a new envelope. This will open a window to select the parameter
the envelope will control. Use the popup menu to select the module
(oscil 1, mod 3, master filter…), then select the parameter in the list.
Only relevant parameters will appear in the list. For example if an oscil
is in single mode, the FM index parameter will not appear. If you set
the oscil to FM mode, then click new… again, the FM parameters will
be listed.
Show
The show popup provides an easy way to show or hide groups of
envelopes.
Selecting an envelope
Clicking on the graphic display of an envelope selects it for editing. When
an envelope is selected, its name is highlighted.
Copy/Paste envelope
To copy the selected envelope: menu Edit Ö Copy Envelope. To paste,
Ö
select the destination envelope, then menu Edit
Paste Envelope.
Amplitude/time scale
The amplitude and time scales appear on the left-hand and top edges of
the envelope display respectively. Drag on these zomes to zoom the
amplitude and time scale of the graphic envelope display. It’s possible to
zoom the time scale right down until one pixel equals one sample.
Absynth 3
English – 74
Page 79

Breakpoints
A breakpoint is a target in time. Therefore, the line segment preceding
the breakpoint is affected by it.
A breakpoint has three parameters: delta time, amplitude and slope.
Click on a breakpoint to select it for editing. The time, amplitude and
slope will appear in the number boxes. The number boxes allow very
precise editing of the breakpoint parameters. You can also drag the
breakpoint around to adjust its amplitude and time.
Multiple breakpoints can be select either by Shift-clicking, or by clicking
and dragging a highlighted ‘selection area’ over the portion of the
envelope containing the relevant breakpoints. All edit operations are
applied to all selected breakpoints (amp, abs time, slope, MIDI and LFO
settings are affected).
Below the time and amp number boxes, the absolute time and actual
parameter value are displayed. In the image above, the selected envelope
modulates the frequency of filter 1, thus the actual frequency of the filter
at the selected breakpoint is displayed in the ‘parameter’ field.
Slope adjusts the curve of the breakpoint's line segment. A value of 1.0
produces a straight line, values above or below 1.0 produce varying
degrees of curvature.
ENGLISH DEUTSCH
Creating/deleting breakpoints
Command-click (Mac) or right-click (PC) to create a breakpoint.
Option-click (Mac) or right-click again (PC) to delete it.
Transform menu
The Transfo rm popup menu provides access to seven different functions
which can be used to rapidly transform the selected envelope(s). Each
function opens its own dialog, with its own specific parameters. The
functions are:
Scale…
Scale the time, amp and slope values of the selected envelope(s).
English – 75
Absynth 3
Page 80

Set Duration…
Set the duration of the selected envelope(s).
Generate AR Pulse…
Automatically generate of a series of ‘Attack’ and ‘Release’ pulses. This
can be very useful when creating rhythmic envelope shapes (e.g. to be
used in Retrigger mode).
Load from / Save to library
Either load or save an envelope, via ABSYNTH’s Universal Library
functions.
Initialize Selected Envelope
Reset the selected envelope(s) to ABSYNTH’s default envelope shape.
Delete Selected Envelope
Remove the selected envelope(s) entirely.
Lock/slide
In lock mode, changing the time of a breakpoint will not affect the
absolute time of any other breakpoint. In slide mode, changing the time
of one breakpoint will move all breakpoints that come after it. Lock mode
is particularly useful when creating rhythmic envelopes.
Grid
Use the grid button to toggle the grid on and off. When the grid is
activated a popup menu appears beneath the grid button, from which you
can choose the resolution of the grid. The default value is 1/8 (grid lines
are drawn on eighth notes). Other values include 1/16 (sixteenth notes)
and 1/32 (thirty-second notes).
When the grid is displayed, envelope breakpoints ‘snap’ to grid lines
automatically. Snapping can be over-ridden by Ctrl-dragging (Mac) or Altdragging (PC).
Absynth 3
English – 76
Page 81

Note: this is the opposite of how snapping worked in earlier ABSYNTH
versions! Whereas snapping used to be optional, now it is the default behaviour whenever grid lines are displayed.
Free/Sync button
Each envelope (except for Control Driven envelopes, which are independent of time) can be synced to the tempo with the sync/free toggle button.
Sustain/release marker
The sustain/release marker determines which breakpoint is the sustain/
release point of the envelope. The exact function of the sustain/release
point depends on the envelope mode (see below). You can drag the
marker to any breakpoint, except for the first and last breakpoints.
Envelope modes
ENGLISH DEUTSCH
Envelopes have six different modes: Release, Sustain, Loop, Retrigger
and Control driven. The mode popup sets the mode for the selected
envelope.
There’s also a special Sample Jump envelope mode, which works slightly
differently. We’ll look at this later.
Absynth 3
English – 77
Page 82

Release Mode
If a note is held continuously, the envelope will play all the way to the
last breakpoint. If a note is released before the sustain/release point is
reached, the envelope will ‘jump’ to the time of the sustain/release
point and continue playing to the last breakpoint.
This is useful for percussive and piano-like envelopes where the sound
always decays. If the sustain/release point is set near the very beginning,
the envelope will act as a ‘straight-shot’, i.e. it will always be the same,
regardless of how long the note was held.
Absynth 3
English – 78
Page 83

Sustain mode
ENGLISH DEUTSCH
Sustain mode is similar to a classic ADSR envelope generator.
If a note is held continuously, the envelope will play until the sustain/
release point is reached, at which point it will pause at the amplitude of
the sustain/release point. When the note is then released, the envelope
will resume playing until the last point is reached. If a note is released
before the sustain/release point is reached, the envelope will ‘jump’ to
the time of the sustain/release point and continue playing to the last
breakpoint.
Absynth 3
English – 79
Page 84

Loop mode
When loop mode is selected, in addition to the red sustain/release
marker, the loop start marker will be displayed. This looks like a sideways
‘U’. You can drag it to any breakpoint before the sustain/release point and
after the start point.
Line segments which are part of the loop are blue, line segments outside
the loop are green. It is important to understand that a breakpoint is a
target point in time. Therefore, the line segment preceding the loop start
point is a part of the loop.
In loop mode, when the sustain/release point is reached, the envelope will
go back to the loop start point and continue looping as long as the note
is held. The duration between the end of the loop and the start is the delta
time of the loop start point.
Absynth 3
English – 80
Page 85

Retrigger mode
The envelope will be retriggered at the rate set in the retrigger number
box as long as the note is held. When the note is released, the envelope
will jump to the time of the sustain/release point and play to the end. If
the sustain/release is reached within the retrigger loop, the envelope will
sustain.
Retrigger is particularly useful for creating rhythmic, looping envelopes.
ENGLISH DEUTSCH
The Retrigger beat number box allows you to set the retrigger rate as a
number of beats.
Control Driven mode
Even though Control Driven envelopes look like all other envelopes, they
are inherently very different. A MIDI controller sets the position in the
Control Driven envelope. With a MIDI value of 0, the envelope is at the
beginning, at 64 it’s in the middle, and at 127 it’s at the end. It’s easiest
to understand Control Driven mode by contrasting it with a standard
envelope: While time controls a normal envelope, the MIDI controller
(typically the Mod wheel) controls Control Driven mode.
If a straight diagonal line is drawn from the minimum value to the
maximum, then moving the Mod wheel will directly control the parameter
assigned. But things get really interesting when we draw in a more
complex shape for the Control Driven envelope. We can dynamically
English – 81
Absynth 3
Page 86

morph between sounds, create arpeggios with the turn of a knob, or even
use a Mod wheel to control the speed of an envelopebased rhythm. There
are many patches that demonstrate each of these uses of the Control
Driven envelopes in the Factory Presets bank.
To create a Control Driven envelope, simply choose Control Driven in the
mode menu at the top of the envelope window for the envelope which
you’d like to be control driven.
No matter how long or how many points the Control Driven envelope has,
the range of the MIDI controller controlling the envelope is from the
beginning to the end of the envelope.
Link mode
When two or more envelopes are linked together, any changes to the
master envelope will become immediately apparent to all child
envelopes. To create a linked (child) envelope, choose Link in the mode
menu at the top of the envelope window for the envelope which you’d like
to become linked.
Even though you cannot directly edit a linked envelope, you can still give
it some distinct characteristics. Note that all changes are graphically
shown in the linked envelope display. source menu: Selects the master
envelope.
• time %: Scales the time of the linked envelope. 50% is double the
speed of the master envelope, while 200% is half speed.
• amp %: Scales the amplitude of the linked envelope.
• amp offset: Raises or lowers the baseline of the linked envelope.
• slope %: Scales the slope of the linked envelope.
Absynth 3
English – 82
Page 87

Not only can the Link mode save a lot of time when editing similar envelopes, but it can also be used in creative ways. For instance, the filter cutoffs of different channels can have slight slope or time scalings
to create an organic sound. Likewise, linking and then slightly scaling
oscillator pitch creates interesting detunings.
These two envelopes are linked, but the bottom envelope’s slope is scaled. All
changes to the master envelope (top) are immediately reflected in the bottom.
Sample Jump envelopes
ENGLISH DEUTSCH
The sample jump envelope retriggers the sample in time. The retrigger
position in the sample can be different for each breakpoint in the sample
jump envelope. This type of envelope looks quite different from all other
envelopes - instead of a breakpoint curve, the sample jump envelope
shows the actual sample waveform. The sample jump envelope only
works with an Oscil in Sample mode, not Granular mode.
To create a sample jump envelope, you must first have at least one Oscil
set to sample mode, and a sample loaded. Even though sample jump
works well will all types of material, it’s easiest to see what’s going on with
a drum loop or similar type of sample.
In the envelope window, hit the new envelope button and choose oscil 1
(or whichever oscillator has the sample loaded that you’d like to
Ö
manipulate)
envelope - and your sample’s waveform - in the envelope window.
New points are created in the sample jump envelopes just like all other
envelopes, by command-clicking (Mac) or right-clicking (PC). The delta
time/abs time number box for that breakpoint sets the time that the
oscil 1 sample jump. You should now see the sample jump
Absynth 3
English – 83
Page 88

sample will be retriggered. The retrigger position in the sample can be
changed with the % number box, which sets the position in percentage
of total length.
The sample jump envelope type lets you retrigger different regions of the sample,
and can be synced to tempo.
Integrated LFOs in Envelopes
Each envelope can have its own LFO, and the shape of the LFO can
even be drawn in ABSYNTH’s waveform editor. The whole envelope
shares the same LFO shape, but each breakpoint can have a different
depth and speed. All envelope LFO settings are graphically displayed in
the envelope window.
To activate the LFO for an envelope, select that envelope and click on the
LFO tab at the top of the envelope window. The LFO settings are set per
breakpoint, so select a breakpoint and then increase the depth until you
see the LFO being drawn. Different settings between breakpoints are
smoothly faded. For instance, if one breakpoint had an LFO depth of 100
Absynth 3
English – 84
Page 89

(maximum), and the next breakpoint had a depth of 0 (minimum), then
the LFO would smoothly fade out in intensity. Likewise, speed differences
are also interpolated for fluid LFO speed-ups and downs.
ENGLISH DEUTSCH
Each envelope can have its own LFO, with independent parameters per breakpoint.
The LFO parameters are set in the LFO tab on top of the envelope window.
The envelope-global LFO parameters are:
• wave menu: Selects the LFO waveform, or enables you to draw your
own by selecting a new preset.
• phase: Sets the initial phase of the LFO.
• wave/SH toggle: When set to a triangle icon, then the LFO assumes
the shape of the selected wave. When set to a sample and hold icon,
then the LFO becomes a random sample and hold function.
The breakpoint-specific LFO parameters are directly underneath the
global parameters:
• depth: Sets the depth of the LFO, from 0 to 100.
• sec: Sets the speed of the LFO, in seconds. A fast LFO would have a
low value here.
Absynth 3
English – 85
Page 90

• S/H sec: Sets the sample and hold speed, in seconds. A low value
here would correspond to a fast speed. Only active when the wave/SH
toggle button in the envelope-global section is set to the sample and
hold icon.
MIDI controlled envelopes
The position of each breakpoint in an envelope can be controlled by MIDI.
It’s even possible for each breakpoint in an envelope to be controlled by
unique MIDI controllers! The shape of an envelope can therefore
dynamically change according to MIDI controllers or velocity.
Each breakpoint can have MIDI controller over its time and amplitude. It’s therefore
possible for the shapes of the envelopes to dynamically change in response to
velocity or MIDI controllers.
To activate MIDI control of a breakpoint, simply click on the MIDI tab at
the top of the envelope window. There are no envelope-global MIDI
parameters (except for turning MIDI control on or off for the whole
envelope). The breakpoint-specific MIDI parameters are:
• time source: Selects which MIDI input will scale the time of the
breakpoint. Aftertouch, velocity, pitch bend, or any MIDI controller
can be selected.
• time scale: Amount of time scale. Positive values will shift the time
ahead when the MIDI controller value is positive, while negative values reverse the polarity of the MIDI controller response. The complete
positive range, from 0 to 100, is the percentage of delta time to the
previous breakpoint. The complete negative range, from -100 to 0, is
Absynth 3
English – 86
Page 91

also the percentage of delta time to the previous breakpoint, but the
response of the MIDI controller is inverted - at 0, the breakpoint is
shifted maximally forward, and at 127, the breakpoint is in its graphical position.
• amp source: Selects which MIDI input will scale the amplitude of the
breakpoint. Aftertouch, velocity, pitch bend, or any MIDI controller
can be selected.
• amp scale: Amount of amplitude scale. Negative values will lower the
amp, while positive values raise it. The complete range, from -100 to
100, is from zero to the graphical value of the breakpoint.
For realistically playable sounds, try mapping velocity to control the amplitude envelope or filter envelope attack time, for example.
ENGLISH DEUTSCH
Absynth 3
English – 87
Page 92

Absynth 3
English – 88
Page 93

LFO window
ENGLISH DEUTSCH
ABSYNTH has three low frequency oscillators. Each LFO can modulate
numerous parameters simultaneously. Each parameter can also be modulated by all 3 LFO’s simultaneously for complex modulation effects.
Waveforms can be created and edited with the Waveform window, allowing for any possible waveshape. LFO’s have a sample-and-hold mode.
LFO button
Turns an LFO on or off.
Mono/Poly button
In mono mode, one LFO will modulate all voices. In poly mode each
voice will have its own LFO.
English – 89
Absynth 3
Page 94

Note: because delay effects are always ‘mono’, you probably should
avoid modulating the effect with an LFO in poly mode. The same is true
for the master filter if it's in mono mode.
Wave popup
Select or create a waveform. Currently wave popups are organised into
two submenus: ‘factory’ contains all of ABSYNTH's built-in waveforms,
Ö
‘preset’ contains user-created waveforms. Wave
allocate a new waveform and open the waveform editor. Each preset can
have up to 8 waveforms allocated.
User-created waveforms are only available to the preset in which they
were created, they cannot be accessed from other presets.
preset Ö new… will
Phase
The initial phase of the waveform. In Poly mode, the phase of the LFO is
initialised to this value at the start of a note. In Mono mode the LFO runs
continuously so this will have no perceptible effect, unless the LFO is
retriggered.
Rate
LFO rate in seconds. Can be toggled between sec and beat (temposynced). In beat mode, you can simply enter the duration of an LFO cycle
in number or fractions of a beat.
Sample and hold
Toggles between sample-and-hold and continuous mode. Rate sets the
sample-and-hold rate. Usually the most interesting results are obtained
when the sample-and-hold rate is out of phase with the LFO rate.
Absynth 3
English – 90
Page 95

Depth
Controls the modulation depth for the following parameters: pitch,
amplitude, fm index/balance, filter frequency, effect time and pan. Pitch
depth is displayed in semitones. Depth for the other parameters is a
percentage of the Patch window value.
The invert button for each parameter inverts the modulation.
The channel toggle buttons turn modulation on or off for each channel (1,
2, 3, master). For example, an LFO could modulate the frequency of filter
1, leaving the other filters unaffected. Similarly, one LFO could modulate
the frequency of filter 1, and another LFO could modulate filter 2.
Controller
Three LFO parameters can be modulated by midi controllers: master
depth, LFO rate and sample-and-hold rate. Depth is set with the ‘%’
number boxes.
To set the control source, click on a controller select button. This will
open a window with a list of midi controllers. Double-click on the desired
controller.
ENGLISH DEUTSCH
Retrigger
When retrigger is on, the LFO can be retriggered by the selected control
number. When a control value greater than 0 is received, the LFO will
‘restart’.
For example, if control number 64 (sustain pedal) is selected, depressing
the sustain pedal will retrigger the LFO, but releasing the pedal will have
no effect.
Note: all LFOs use the same control number. Setting the controlnumber
in one LFO will change it in the other LFOs.
English – 91
Absynth 3
Page 96

LFOs and surround panning
When pan is modulated by an LFO and surround mode is activated in
the Patch window, both the left/right and front/back pan position will be
affected.
The wave phase of front/back modulation is offset by 90° from the wave
phase of left/right modulation. With a sine wave this will produce rotation.
Other waveforms produce more complex movements.
Waveforms with discontinuities (sudden jumps, e.g. saw and square
waves) may sound surprising at first. This is because the front/back
panning reaches the discontinuity in the waveform at a different time
than the left/right panning. So for example, left/right panning may ‘jump’
first, with front/back panning jumping a moment later.
Absynth 3
English – 92
Page 97

MIDI window
The MIDI window allows you to control how the active preset will respond to MIDI input.
MIDI controllers
This is where you can set how the active preset will respond to continuous controllers, pitch bend and aftertouch.
Glide
The pitch glide time between notes can be set in the MIDI controllers
panel of the MIDI window. The glide time can be set from 0 to 999. The
keyed button activates a legato mode, where glide is only active when the
note is held down. In legato mode, staccato playing won’t activate glide.
ENGLISH DEUTSCH
Controller select
To set the control source, click on a controller button. This will open a
window with a list of MIDI controllers. Double-click on the desired
controller.
Depth
For pitch bend, depth is displayed in semitones. The maximum pitch
bend range is plus or minus 72 semitones (6 octaves). For other
parameters depth is set as a percentage.
Lag
Lag adjusts how quickly the parameter responds to the continuous
controller. Low settings (1-15) have a subtle smoothing effect, higher
settings ( up to 999) will result in a long exponential curve.
Absynth 3
English – 93
Page 98

Channel buttons (1, 2, 3, master)
The channel buttons determine what channels are affected by the
controller. For example, the mod wheel could be set to control filter 1
without affecting filter 2.
MIDI Controllers: velocity
Velocity depth can be set independently for Oscil amp, Fm index/balance and Filter frequency by channel (1, 2, 3, master). Values range
from 0% to 100%.MIDI
Controllers: note scaling
Note scaling allow you to scale the value of a parameter according to
the note that is played. For example, it would be possible to increase
the frequency of a filter as higher notes are played.
The param popup selects what parameter to edit. Currently the following
parameters can be controlled by a note scaling curve: oscil amplitude, fm
index/balance, and filter frequency.
Absynth 3
English – 94
Page 99

You can draw curves directly in the graphic editor. You can also edit one
note at a time using the note# box to set the edit note and % to set the
scale. If the keyboard button is selected, playing a note will automatically
select the edit note, then you can enter values in the % number box.
Controllers: Tune
ABSYNTH has a tuning editor where nearly any alternate tuning
imaginable can be programmed. You can even set the Hz value of each
key with six decimal place accuracy (one millionth of a Hz precision!).
Working with Custom Tunings
The tune popup menu in the main keyboard window has been expanded.
Several submenus are now available:
• factory…: submenu that displays the familiar factory tunings from
ABSYNTH 1.x.
• bank…: submenu that displays all custom tunings used in the bank.
• library…: submenu that displays the custom tunings available in the
/tuning folder of your ABSYNTH library. Once a library tuning is recalled, it is automatically saved with the bank.
• edit: opens the tuning editor, only available if a bank tuning is se-
lected.
• new: creates a new custom tuning and opens the tuning editor. The
new tuning is automatically saved with the bank.
ENGLISH DEUTSCH
Making Custom Tunings
The center of the tuning editor is a list of all 128 possible MIDI notes.
Each note can have its own tuning value entered in fractional note
numbers, Hz, and ratio (relative to the base key). The ratio is the ratio
between the key you're editing and the base key. Base key is normally set
to a constant reference, like the root of a scale. The ratio numberbox is
disabled if the base key is the same as the selected key.
When octave link is off, you can tune one note at a time without changing
any other notes. When octave link is on, changing one note will also
change notes in the octaves above and below it.
English – 95
Absynth 3
Page 100

What is an octave?
Keys per 8ve sets the number of midi keys in an octave. If it’s set to 11,
for instance, then when you change the pitch of one note (with octave link
on), then every 11th note above and below the chosen key will be
correspondingly tuned, plus the value set in 8ve interval.
For example, let’s consider a typical 12-notes per octave tuning.In this
example, keys per 8ve is 12, and the 8ve interval is also 12.
For stretched tunings (like a piano), then the 8ve interval should be set a
bit sharp, like 12.01.
To automatically generate quarter tones, set keys per 8ve to 1 and the 8ve
interval to 0.5.
To automatically generate eighth tones, set keys per 8ve to 1 and the 8ve
interval to 0.25.
Note that the octave link parameters affect the way the way the other
parameters work, so you won’t hear any changes until you change note,
Hz, or ratio.
Absynth 3
English – 96
 Loading...