

®
C 717
DVD Receiver
ENGLISHFRANÇAISESPAÑOLITALIANODEUTSCHNEDERLANDSSVENSKAРУССКИЙ
Owner’s Manual
IMPORTANT SAFETY INSTRUCTIONS
2
ENGLISH FRANÇAIS ESPAÑOL ITALIANO DEUTSCH NEDERLANDS SVENSKA РУССКИЙ
SAVE THESE INSTRUCTIONS FOR LATER USE.
FOLLOW ALL WARNINGS AND INSTRUCTIONS MARKED ON THE
AUDIO EQUIPMENT.
1 Read instructions - All the safety and operating instructions should be
read before the product is operated.
2 Retain instructions - The safety and operating instructions should be
retained for future reference.
3 Heed Warnings - All warnings on the product and in the operating
instructions should be adhered to.
4 Follow Instructions - All operating and use instructions should be
followed.
5 Cleaning - Unplug this product from the wall outlet before cleaning.
Do not use liquid cleaners or aerosol cleaners. Use a damp cloth for
cleaning.
6 Attachments - Do not use attachments not recommended by the
product manufacturer as they may cause hazards.
7 Water and Moisture - Do not use this product near water-for example,
near a bath tub, wash bowl, kitchen sink, or laundry tub; in a wet
basement; or near a swimming pool; and the like.
8 Accessories - Do not place this product on an unstable cart, stand,
tripod, bracket, or table. The product may fall, causing serious injury to
a child or adult, and serious damage to the product. Use only with a
cart, stand, tripod, bracket, or table recommended by the manufacturer,
or sold with the product. Any mounting of the product should follow
the manufacturer’s instructions, and should use a mounting accessory
recommended by the manufacturer.
9 A product and cart combination should be moved with
care. Quick stops, excessive force, and uneven surfaces may
cause the product and cart combination to overturn.
10 Ventilation - Slots and openings in the cabinet are provided for
ventilation and to ensure reliable operation of the product and to
protect it from overheating, and these openings must not be blocked
or covered. The openings should never be blocked by placing the
product on a bed, sofa, rug, or other similar surface. This product should
not be placed in a built-in installation such as a bookcase or rack unless
proper ventilation is provided or the manufacturer’s instructions have
been adhered to.
11 Power Sources - This product should be operated only from the type
of power source indicated on the marking label. If you are not sure of
the type of power supply to your home, consult your product dealer or
local power company.
The primary method of isolating the amplier from the mains supply
is to disconnect the mains plug. Ensure that the mains plug remains
accessible at all times. Unplug the AC power cord from the AC outlet if
the unit will not be used for several months or more.
12 Grounding or Polarization - This product may be equipped with a
polarized alternating-current line plug (a plug having one blade wider
than the other). This plug will t into the power outlet only one way.
This is a safety feature. If you are unable to insert the plug fully into the
outlet, try reversing the plug. If the plug should still fail to t, contact
your electrician to replace your obsolete outlet. Do not defeat the safety
purpose of the polarized plug.
13 Power - Cord Protection - Power-supply cords should be routed so that
they are not likely to be walked on or pinched by items placed upon or
against them, paying particular attention to cords at plugs, convenience
receptacles, and the point where they exit from the product.
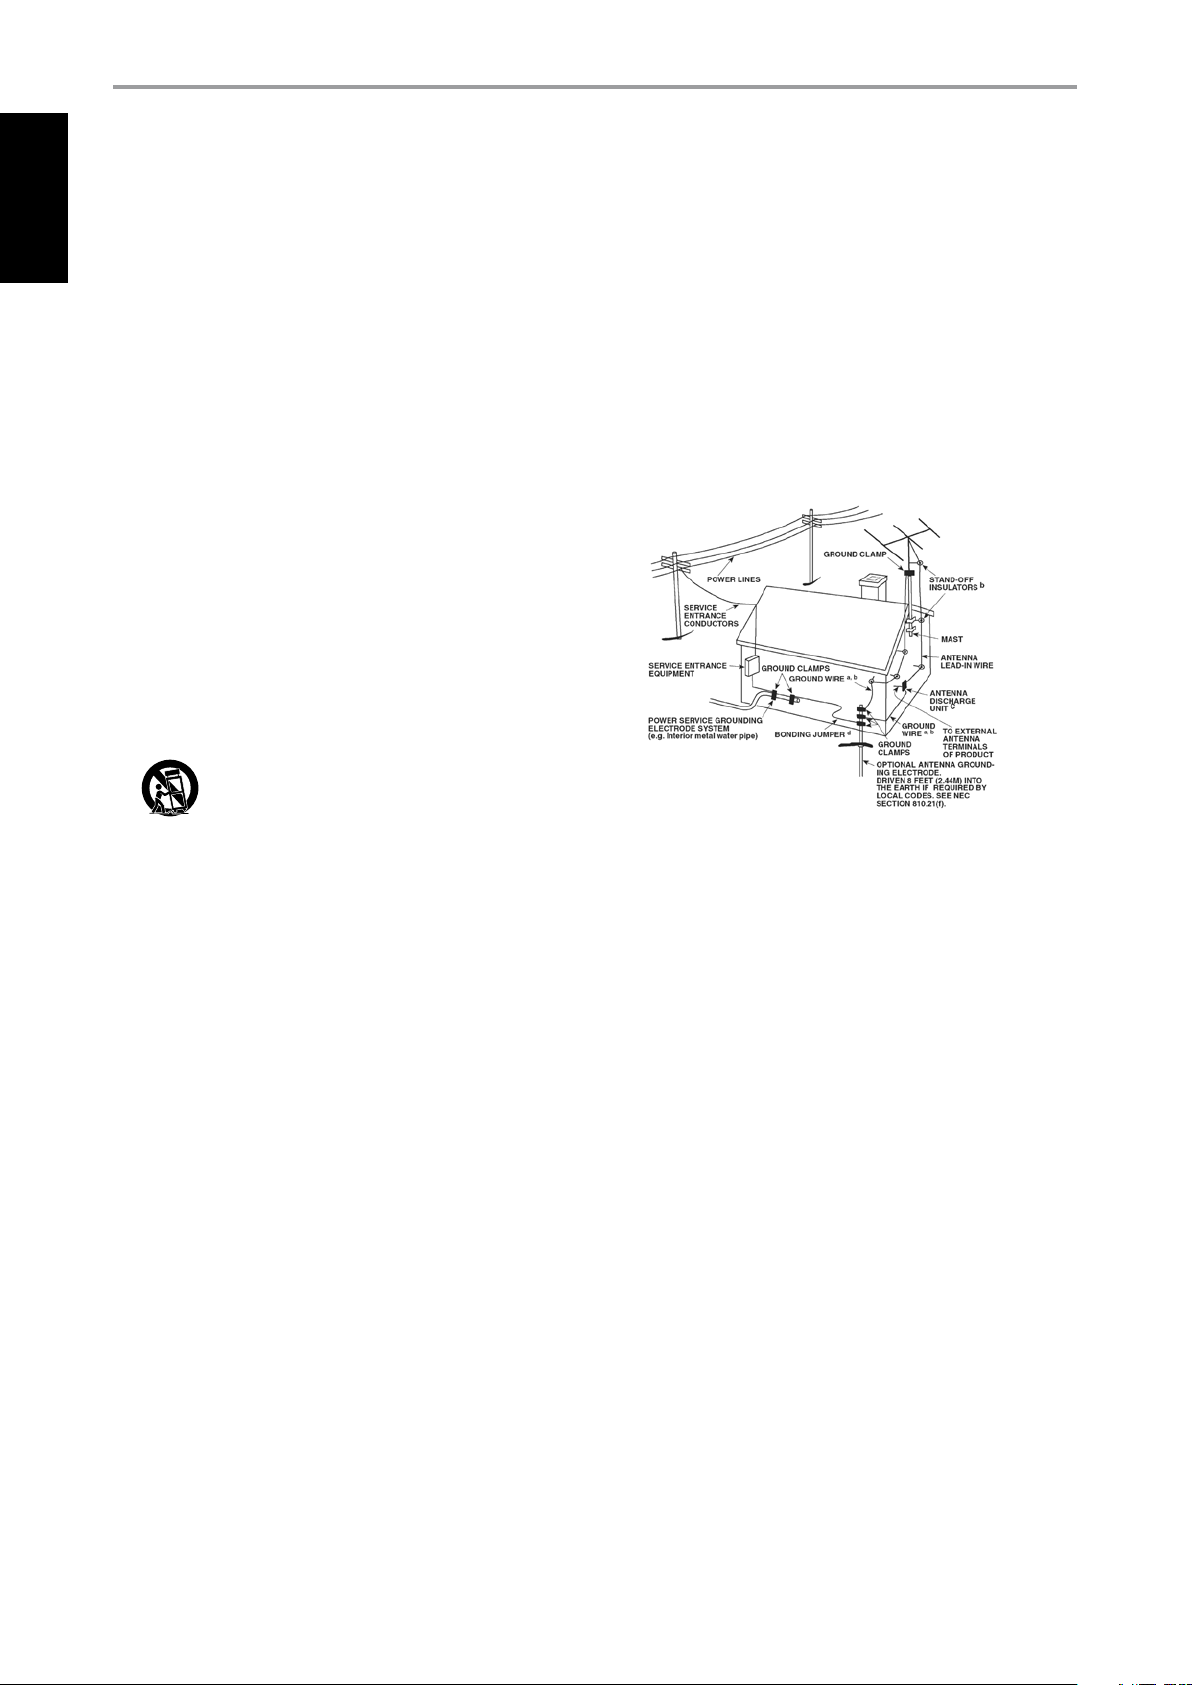
14 Outdoor Antenna Grounding - If an outside antenna or cable system
is connected to the product, be sure the antenna or cable system is
grounded so as to provide some protection against voltage surges
and built-up static charges. Article 810 of the National Electrical Code,
ANSI/NFPA 70, provides information with regard to proper grounding
of the mast and supporting structure, grounding of the lead-in wire
to an antenna discharge unit, size of grounding conductors, location
of antenna discharge unit, connection to grounding electrodes, and
requirements for the grounding electrode.
NOTE TO CATV SYSTEM INSTALLER
This reminder is provided to call the CATV system installer’s attention to Section
820-40 of the NEC which provides guidelines for proper grounding and, in
particular, species that the cable ground shall be connected to the grounding
system of the building, as close to the point of cable entry as practical.
15 Lightning - For added protection for this product during a lightning
storm, or when it is left unattended and unused for long periods of
time, unplug it from the wall outlet and disconnect the antenna or
cable system. This will prevent damage to the product due to lightning
and power-line surges.
16 Power Lines - An outside antenna system should not be located in the
vicinity of overhead power lines or other electric light or power circuits,
or where it can fall into such power lines or circuits. When installing an
outside antenna system, extreme care should be taken to keep from
touching such power lines or circuits as contact with them might be
fatal.
17 Overloading - Do not overload wall outlets, extension cords, or
integral convenience receptacles as this can result in a risk of re or
electric shock.
18 Object and Liquid Entry - Never push objects of any kind into this
product through openings as they may touch dangerous voltage points
or short-out parts that could result in a re or electric shock. Never spill
liquid of any kind on the product.
WARNING: THE APPARATUS SHOULD NOT BE EXPOSED TO
DRIPPING OR SPLASHING, AND OBJECTS FILLED WITH LIQUIDS,
SUCH AS VASES, SHOULD NOT BE PLACED ON THE APPARATUS.
AS WITH ANY ELECTRONIC PRODUCTS, USE CARE NOT TO SPILL
LIQUIDS INTO ANY PART OF THE SYSTEM. LIQUIDS CAN CAUSE A
FAILURE AND/OR A FIRE HAZARD.
IMPORTANT SAFETY INSTRUCTIONS
19 Damage Requiring Service - Unplug this product from the wall outlet
and refer servicing to qualied service personnel under the following
conditions:
a) When the power-supply cord or plug is damaged.
b) If liquid has been spilled, or objects have fallen into the product.
c) If the product has been exposed to rain or water.
d) If the product does not operate normally by following the operating
instructions. Adjust only those controls that are covered by the
operating instructions as an improper adjustment of other controls
may result in damage and will often require extensive work by a
qualied technician to restore the product to its normal operation.
e) If the product has been dropped or damaged in any way.
f) when the product exhibits a distinct change in performance-this
indicates a need for service.
20 Replacement Par ts - When replacement parts are required, be
sure the service technician has used replacement parts specified
by the manufacturer or have the same characteristics as the
original part. Unauthorized substitutions may result in fire, electric
shock, or other hazards.
21 Safety Check - Upon completion of any service or repairs to this
product, ask the service technician to perform safety checks to
determine that the product is in proper operating condition.
22 Wall or Ceiling Mounting - The product should be mounted to a wall
or ceiling only as recommended by the manufacturer.
23 Heat - The product should be situated away from heat sources such as
radiators, heat registers, stoves or other products (including ampliers)
that produce heat.
FCC WARNING
Changes or modications not expressly approved by the party responsible
for compliance could void the user’s authority to operate the equipment.
INDUSTRY CANADA REQUIREMENT
This Class B digital apparatus meets all requirements of the Canadian
Interference-Causing Equipment Regulations.
THE LIGHTNING FLASH WITH ARROWHEAD SYMBOL, WITHIN
AN EQUILATERAL TRIANGLE, IS INTENDED TO ALERT THE USER
TO THE PRESENCE OF UNINSULATED “DANGEROUS VOLTAGE”
WITHIN THE PRODUCT’S ENCLOSURE THAT MAYBE OF
SUFFICIENT MAGNITUDE TO CONSTITUTE A RISK OF ELECTRIC
SHOCK TO PERSONS.
THE EXCLAMATION POINT WITHIN AN EQUILATERAL TRIANGLE IS
INTENDED TO ALERT THE USER TO THE PRESENCE OF IMPORTANT
OPERATING AND MAINTENANCE (SERVICING) INSTRUCTIONS IN
THE LITERATURE ACCOMPANYING THE APPLIANCE.
ENGLISHFRANÇAISESPAÑOLITALIANODEUTSCHNEDERLANDSSVENSKAРУССКИЙ
WARNING
TO REDUCE THE RISK OF FIRE OR ELECTRIC SHOCK, DO NOT EXPOSE THIS
PRODUCT TO RAIN OR MOISTURE.
CAUTION
TO PREVENT ELECTRIC SHOCK, MATCH WIDE BLADE OF PLUG TO WIDE SLOT,
FULLY INSERT.
CAUTION
This DVD Receiver employs a Laser System. To ensure proper use of this
product, please read this owner’s manual carefully and retain for future
reference. Should the unit require maintenance, contact an authorized
service location. Use of controls, adjustments or the performance of
procedures other than those specied may result in exposure to laser
radiation. To prevent direct exposure to laser beam, do not try to open the
enclosure. Visible laser radiation when the enclosure is opened.
DO NOT STARE INTO BEAM.
FCC NOTICE
This equipment has been tested and found to comply with the limits for a
Class B digital device, pursuant to part 15 of the FCC Rules. These limits are
designed to provide reasonable protection against harmful interference in a
residential installation.
This equipment generates, uses and can radiate radio frequency energy and if
not installed and used in accordance with the instructions, may cause harmful
interference to radio communications. However, there is no guarantee that
interference will not occur in a particular installation. If this equipment does
cause harmful interference to radio or television reception, which can be
determined by turning the equipment o and on, the user is encouraged to try
to correct the interference by one or more of the following measures
• Reorient or relocate the receiving antenna.
• Increase the separation between the equipment and receiver.
• Connect the equipment into an outlet on a circuit dierent from
that to which the receiver is connected
• Consult the dealer or an experienced radio/TV technician for help.
The equipment draws its nominal non-operational power from the AC
outlet with its POWER switch in the STANDBY position.
The socket-outlet shall be installed near the apparatus and shall be easily
accessible.
CAUTION
Changes or modications to this equipment not expressly approved by
NAD Electronics for compliance could void the user’s authority to operate
this equipment.
CAUTION REGARDING PLACEMENT
To maintain proper ventilation, be sure to leave a space around the unit
(from the largest outer dimensions including projections) that is equal to or
greater than shown below.
Left and Right Panels: 10 cm
Rear Panel: 10 cm
Top Panel: 50 cm
3
IMPORTANT SAFETY INSTRUCTIONS
4
ENGLISH FRANÇAIS ESPAÑOL ITALIANO DEUTSCH NEDERLANDS SVENSKA РУССКИЙ
IMPORTANT INFORMATION FOR UK CUSTOMERS
DO NOT cut o the mains plug from this equipment. If the plug tted is not
suitable for the power points in your home or the cable is too short to reach
a power point, then obtain an appropriate safety approved extension lead
or consult your dealer. If, nonetheless, the mains plug is cut o, REMOVE
THE FUSE and dispose of the PLUG immediately, to avoid possible shock
hazard by inadvertent connection to the mains supply. If this product is
not provided with a mains plug, or one has to be tted, then follow the
instructions given below:
IMPORTANT
DO NOT make any connection to the larger terminal which is marked with
the letter ‘E’ or by the safety earth symbol or colored GREEN or GREEN AND
YELLOW.
The wires in the mains lead on this product are colored in accordance with
the following code:
BLUE – NEUTRAL
BROWN – LIVE
INFORMATION ABOUT COLLECTION AND DISPOSAL OF
WASTE BATTERIES DIRECTIVE 2006/66/EC OF THE EUROPEAN
PARLIAMENT AND THE COUNCIL OF EUROPEAN UNION FOR
EUROPEAN CUSTOMERS ONLY
Batteries bearing any of these symbols indicate
that they should be treated as “separate collection”
and not as municipal waste. It is encouraged that
necessary measures are implemented to maximize
the separate collection of waste batteries and
to minimize the disposal of batteries as mixed
municipal waste.
End-users are exhorted not to dispose waste
batteries as unsorted municipal waste. In order
to achieve a high level of recycling waste batteries, discard waste batteries
separately and properly through an accessible collection point in your
vicinity. For more information about collection and recycling of waste
batteries, please contact your local municipality, your waste disposal service
or the point of sale where you purchased the items.
As these colors may not correspond with the colored markings identifying
the terminals in your plug, proceed as follows:
The BLUE wire must be connected to the terminal marked with the
letter ‘N’ or colored BLACK.
The BROWN wire must be connected to the terminal marked with the
letter ‘L’ or colored RED.
When replacing the fuse, only a correctly rated and approved type should
be used, and be sure to re-t the fuse cover.
IF IN DOUBT CONSULT A COMPETENT ELECTRICIAN.
NOTES ON ENVIRONMENTAL PROTECTION
At the end of its useful life, this product must not be disposed
of with regular household waste but must be returned to a
collection point for the recycling of electrical and electronic
equipment. The symbol on the product, user’s manual and
packaging, point this out.
The materials can be reused in accordance with their markings. Through
re-use, recycling of raw materials or other forms of recycling of old
products, you are making an important contribution to the protection of
our environment. Your local administrative oce can advise you of the
responsible waste disposal point.
By ensuring compliance and conformance to proper disposal of waste
batteries, potential hazardous eects on human health is prevented and
the negative impact of batteries and waste batteries on the environment
is minimized, thus contributing to the protection, preservation and quality
improvement of the environment.
NOTE: THE C
CONNECT ONLY TO THE PRESCRIBED AC OUTLET, I.E., 120V 60HZ
OR 230V 50HZ.
RECORD YOUR MODEL NUMBER NOW, WHILE YOU CAN SEE IT
The model and serial number of your new C 717 are located on the back of
the cabinet. For your future convenience, we suggest that you record these
numbers here:
Model no: . . . . . . . . . . . . . . . . . . . . . . . . . . . . . . . . . . . . . .
Serial no.: . . . . . . . . . . . . . . . . . . . . . . . . . . . . . . . . . . . . . .
717
IS NOT AN AUTO VOLTAGE DVD RECEIVER.
NAD is a trademark of NAD Electronics International, a division of Lenbrook Industries Limited
Copyright 2008, NAD Electronics International, a division of Lenbrook Industries Limited

INTRODUCTION
TABLE OF CONTENTS
IMPORTANT SAFETY INSTRUCTIONS . . . . . . . . . . . . . . . . . . . . . . . . .2
INTRODUCTION
GETTING STARTED . . . . . . . . . . . . . . . . . . . . . . . . . . . . . . . . . . . . . . . . . . . . . . . 6
UNPACKING AND SETUP . . . . . . . . . . . . . . . . . . . . . . . . . . . . . . . . . . . . . . . . . . . . .6
QUICK START . . . . . . . . . . . . . . . . . . . . . . . . . . . . . . . . . . . . . . . . . . . . . . . . . . . . . . . . .6
ABOUT THE C 717 . . . . . . . . . . . . . . . . . . . . . . . . . . . . . . . . . . . . . . . . . . . . . . . . . . . .6
DEALING WITH HUM AND NOISE . . . . . . . . . . . . . . . . . . . . . . . . . . . . . . . . . . . . .6
IDENTIFICATION OF CONTROLS
FRONT PANEL . . . . . . . . . . . . . . . . . . . . . . . . . . . . . . . . . . . . . . . . . . . . . . . . . . . . 7
REAR PANEL . . . . . . . . . . . . . . . . . . . . . . . . . . . . . . . . . . . . . . . . . . . . . . . . . . . . . 9
SR 9 REMOTE CONTROL . . . . . . . . . . . . . . . . . . . . . . . . . . . . . . . . . . . . . . . . .11
SETUP
SETTING UP THE C 717 . . . . . . . . . . . . . . . . . . . . . . . . . . . . . . . . . . . . . . . . . .12
ABOUT THE ONSCREEN DISPLAY OSD . . . . . . . . . . . . . . . . . . . . . . . . . . . . 12
SELEC TING SOURCES . . . . . . . . . . . . . . . . . . . . . . . . . . . . . . . . . . . . . . . . . . . . . . . 12
ADJUSTING THE VOLUME . . . . . . . . . . . . . . . . . . . . . . . . . . . . . . . . . . . . . . . . . . 12
ADJUSTING TONE AND BALANCE CONTROLS . . . . . . . . . . . . . . . . . . . . . 13
FACTORY DEFAULT SET TINGS . . . . . . . . . . . . . . . . . . . . . . . . . . . . . . . . . . . . . . 13
OPERATION
USING THE C 717’S INTERNAL DVD PLAYER . . . . . . . . . . . . . . . . . . . . .14
REGION MANAGEMENT INFORMATION . . . . . . . . . . . . . . . . . . . . . . . . . . . . 14
PLAYABLE DISCS . . . . . . . . . . . . . . . . . . . . . . . . . . . . . . . . . . . . . . . . . . . . . . . . . . . . 14
DISC LOADING AND PLAYBACK . . . . . . . . . . . . . . . . . . . . . . . . . . . . . . . . . . . . 14
SETUP MENU . . . . . . . . . . . . . . . . . . . . . . . . . . . . . . . . . . . . . . . . . . . . . . . . . . . . . . . 14
TV ASPEC T RATIO . . . . . . . . . . . . . . . . . . . . . . . . . . . . . . . . . . . . . . . . . . . . . . . . . . . 14
TV SYSTEM . . . . . . . . . . . . . . . . . . . . . . . . . . . . . . . . . . . . . . . . . . . . . . . . . . . . . . . . . 14
LANGUAGE . . . . . . . . . . . . . . . . . . . . . . . . . . . . . . . . . . . . . . . . . . . . . . . . . . . . . . . . . 15
SUBTITLE . . . . . . . . . . . . . . . . . . . . . . . . . . . . . . . . . . . . . . . . . . . . . . . . . . . . . . . . . . . 15
DOWN SAMPLING . . . . . . . . . . . . . . . . . . . . . . . . . . . . . . . . . . . . . . . . . . . . . . . . . . 15
DIGITAL OUTPUT . . . . . . . . . . . . . . . . . . . . . . . . . . . . . . . . . . . . . . . . . . . . . . . . . . . 15
PARENTAL LOCK NTSC RATED DISCS ONLY . . . . . . . . . . . . . . . . . . . . . . . . 15
PSCAN . . . . . . . . . . . . . . . . . . . . . . . . . . . . . . . . . . . . . . . . . . . . . . . . . . . . . . . . . . . . . 16
SCREEN SAVER . . . . . . . . . . . . . . . . . . . . . . . . . . . . . . . . . . . . . . . . . . . . . . . . . . . . . 16
VIDEO OUT . . . . . . . . . . . . . . . . . . . . . . . . . . . . . . . . . . . . . . . . . . . . . . . . . . . . . . . . . 16
DIVX CODE . . . . . . . . . . . . . . . . . . . . . . . . . . . . . . . . . . . . . . . . . . . . . . . . . . . . . . . . . 16
USING THE C 717’S INTERNAL DVD PLAYER – FEATURES . . . . . . . . . .17
TITLE AND MENU BUT TONS. . . . . . . . . . . . . . . . . . . . . . . . . . . . . . . . . . . . . . . . 17
RANDOM . . . . . . . . . . . . . . . . . . . . . . . . . . . . . . . . . . . . . . . . . . . . . . . . . . . . . . . . . . 17
REPEAT . . . . . . . . . . . . . . . . . . . . . . . . . . . . . . . . . . . . . . . . . . . . . . . . . . . . . . . . . . . . . 17
REP AB . . . . . . . . . . . . . . . . . . . . . . . . . . . . . . . . . . . . . . . . . . . . . . . . . . . . . . . . . . . . . 17
SLEEP . . . . . . . . . . . . . . . . . . . . . . . . . . . . . . . . . . . . . . . . . . . . . . . . . . . . . . . . . . . . . . 17
ZOOM . . . . . . . . . . . . . . . . . . . . . . . . . . . . . . . . . . . . . . . . . . . . . . . . . . . . . . . . . . . . . . 17
LATE NIGHT . . . . . . . . . . . . . . . . . . . . . . . . . . . . . . . . . . . . . . . . . . . . . . . . . . . . . . . . 18
STILL PICTURE AND FRAMEBYFRAME PLAYBACK . . . . . . . . . . . . . . . . . 18
PROGRAMMING . . . . . . . . . . . . . . . . . . . . . . . . . . . . . . . . . . . . . . . . . . . . . . . . . . . . 18
PLAYING MP3/WMA/JPEG . . . . . . . . . . . . . . . . . . . . . . . . . . . . . . . . . . . . . . . . . . 18
DIVX PLAYBACK . . . . . . . . . . . . . . . . . . . . . . . . . . . . . . . . . . . . . . . . . . . . . . . . . . . . 18
SETTING UP THE TIMER . . . . . . . . . . . . . . . . . . . . . . . . . . . . . . . . . . . . . . . . . . 19
ACTIVATE TIMER OPERATION . . . . . . . . . . . . . . . . . . . . . . . . . . . . . . . . . . . . . . . 19
SET TING THE CLOCK . . . . . . . . . . . . . . . . . . . . . . . . . . . . . . . . . . . . . . . . . . . . . . . 19
SET TING THE ON/OFF TIMER . . . . . . . . . . . . . . . . . . . . . . . . . . . . . . . . . . . . . . . 19
SET TING UP SLEEP TIMER . . . . . . . . . . . . . . . . . . . . . . . . . . . . . . . . . . . . . . . . . . . 19
LISTENING TO AM/FM RADIO . . . . . . . . . . . . . . . . . . . . . . . . . . . . . . . . . . . .20
ABOUT ANTENNAS . . . . . . . . . . . . . . . . . . . . . . . . . . . . . . . . . . . . . . . . . . . . . . . . . 20
ASSEMBLING THE LOOP ANTENNA . . . . . . . . . . . . . . . . . . . . . . . . . . . . . . . . . 20
TUNER MODE . . . . . . . . . . . . . . . . . . . . . . . . . . . . . . . . . . . . . . . . . . . . . . . . . . . . . . 20
CHOOSING THE FM MODE . . . . . . . . . . . . . . . . . . . . . . . . . . . . . . . . . . . . . . . . . 20
SET TING RADIO PRESETS . . . . . . . . . . . . . . . . . . . . . . . . . . . . . . . . . . . . . . . . . . 20
RDS OPERATION . . . . . . . . . . . . . . . . . . . . . . . . . . . . . . . . . . . . . . . . . . . . . . . . . . . . 21
RDS MODE OPTIONS . . . . . . . . . . . . . . . . . . . . . . . . . . . . . . . . . . . . . . . . . . . . . . . 21
PROGRAM TYPE PT Y . . . . . . . . . . . . . . . . . . . . . . . . . . . . . . . . . . . . . . . . . . . . . . 21
REFERENCE
TROUBLESHOOTING . . . . . . . . . . . . . . . . . . . . . . . . . . . . . . . . . . . . . . . . . . . .22
NOTES ON DISCS . . . . . . . . . . . . . . . . . . . . . . . . . . . . . . . . . . . . . . . . . . . . . . . . 22
SPECIFICATIONS . . . . . . . . . . . . . . . . . . . . . . . . . . . . . . . . . . . . . . . . . . . . . . . . 23
ENGLISHFRANÇAISESPAÑOLITALIANODEUTSCHNEDERLANDSSVENSKAРУССКИЙ
THANK YOU FOR CHOOSING NAD
The C 717 DVD Receiver is a technologically advanced and highly capable
product - yet we have invested great eort in making it simple and easy to use.
The C 717 delivers a range of genuinely useful options for stereo listening using
powerful digital signal processing and superbly accurate digital-audio circuitry.
However, we have also been careful to ensure that the C 717 is as musically
transparent and spatially accurate as possible, incorporating much of what
we’ve learned from a quarter-century’s experience designing audio, video and
home-theatre components. As with all our products, NAD’s “Music First” design
philosophy guided the C 717’s design, such that it can condently promise you
both state-of-the-art surround home-theatre and audiophile-quality music
listening for years to come.
We encourage you to take a few minutes now to read right through this
manual. Investing a little time here at the outset might save you a good
deal of time later, and is by far the best way to ensure that you make the
most of your investment in the C 717, and get the most from this powerful
and exible home-theatre component.
One more thing: We urge you to register your C 717 ownership on the NAD
Worldwide Web site:
http://NADelectronics.com/warranty
For warranty information contact your local distributor.
5

INTRODUCTION
6
ENGLISH FRANÇAIS ESPAÑOL ITALIANO DEUTSCH NEDERLANDS SVENSKA РУССКИЙ
GETTING STARTED
UNPACKING AND SETUP
WHAT’S IN THE BOX
Packed with your C 717 you will nd:
• An AM loop antenna
• An FM lead-type antenna
• The SR 9 remote control with 2 (two) AAA batteries
• This owner’s manual
SAVE THE PACKAGING
Please save the box and all of the packaging in which your C 717 arrived.
Should you move or otherwise need to transport your C 717, this is by far
the safest container in which to do so. We’ve seen too many otherwise
perfect components damaged in transit for lack of a proper shipping
carton, so please: Save that box!
CHOOSING A LOCATION
Choose a location that is well ventilated (with at least several inches to both
sides and behind), and that will provide a clear line of sight, within 23 feet/7
meters, between the C 717’s front panel and your primary listening/viewing
position. This will ensure reliable infrared remote control communications.
The C 717 generates a modest amount of heat, but nothing that should
trouble adjacent components. It is perfectly possible to stack the C 717
atop other components, but the reverse usually should be avoided.
Nonetheless, it is generally preferable that the C 717 stands alone. It is especially
important that sucient ventilation be provided. If you are contemplating
locating the C 717 within a cabinet or other furniture, consult your NAD audio/
video specialist for advice on providing adequate airow.
QUICK START
In case you simply cannot wait to experience the performance of your new
NAD C 717 DVD Receiver, we provide the following “Quick Start” instructions
to get you underway. Before the steps below, connect your C 717 to a
TV/monitor.
Please make all the connections to your C 717 with the unit unplugged.
It is also advisable to power-down or unplug all associated components
while making or breaking any signal or AC power connections.
PLAY A CD OR DVD MOVIE
1 Connect the C 717’s “VIDEO OUT ” jack to your TV/monitor’s
corresponding input.
2 Connect your left and right front speakers to the C 717’s “L” and “R”
outputs. Make sure to connect red to red (“+”) and black to black (“-”)
with care to avoid stray wires or strands crossing between terminals. If
your system includes a powered subwoofer, connect the C 717’s “SUBW
OUT” jack to its line input.
3 Plug the AC mains plug into the AC outlet; The Standby LED on the
front panel will be illuminated amber indicating the C 717 is in standby
mode ready to accept commands from either the front panel Standby
switch or the SR 9 remote control.
4 Press the STANDBY button to turn ON the C 717. The Standby LED
indicator will turn from amber to blue and illuminate the Vacuum
Fluorescent Display (VFD).
5 To start playback of the internal DVD player; press “DVD” at the SR 9 remote’s
DEVICE SELECTOR section and then, press [OPEN/CLOSE] button.
6 Insert the media and press [ ] button to start playback. You should
hear stereo sound, and see an image on the TV/monitor. If one or the
other fails to appear, you may need to use either the C 717’s on-screen
menu system to check assignment of audio and video inputs (Refer also
to the item about VIDEO OUT under the USING THE C 717’s INTERNAL
DVD PLAYER - SETUP MENU section of the OPERATION page).
Enjoy the movie or music, but be sure to set aside time to read this manual
thoroughly, and to set up, calibrate, and congure your C 717 carefully and
completely.
ABOUT THE C 717
Though the C 717 is among the most technically sophisticated integrated
Stereo DVD receivers, we worked hard to make it one of the most musically
transparent home-theatre components available as well - this is what
we mean by NAD’s “Music First” design philosophy. Here are just a few
examples:
• High-performance components used throughout the C 717’s analog
audio circuits to maximize quality from all sources.
• The C 717 incorporates a high quality DVD player with exceptional
playability. It has support for DVD Video, DVD±R, DVD±RW, VCD/SVCD
with playback control (PBC), Audio CD and CD-R/CD-RW that contains
audio titles, DivX, MP3, WMA and JPEG les.
• Gold-surfaced connectors are employed throughout to ensure
maximum signal integrity.
EASE OF USE
Despite the eort NAD has invested in the C 717’s sonic performance, we
expended no less in making it powerfully easy to use. Its design is uniquely
simple for so sophisticated a component, and the SR 9 remote control is
equally understandable, as are the C 717’s own front panel and on-screen
displays (OSD).
DEALING WITH HUM AND NOISE
Hum and noise sometimes may prove a challenge in audio systems. Note
these considerations to help prevent hum and noise problems:
• Power all your system’s audio component from AC outlets originating
from the same circuit of your house wiring. As far as possible, power
all audio components from the same outlet, or adjacent outlets on the
same circuit. It may be useful to power video displays (and computers!)
from outlets on another circuit, especially if that circuit is supplied from
the other “leg” of the house wiring.
• Do not bundle analog audio cables with AC power cables, or with
coaxial digital-audio cables. It is best if they cross at right angles if they
must be in close proximity.
• Employ high-quality, well-shielded audio cable throughout, and ensure
that all connections are secure.
• A pencil-eraser can be used to burnish copper- and gold-plated
contacts to ensure good, low-resistance contact; specialized contactcleaners can also be useful. Avoid unnecessary unplugging and
re-plugging since the gold (or copper) contact plating of typical cable
connectors, even very high-quality ones, is very thin and easily worn.
Track down hum/noise problems one component at a time, working
backwards from the C 717. That is:
1 Connect the speakers to the C 717 only, and check for hum.
2 Then connect one component only (a CD player, for example) alone,
with no other components connected and check for hum.
3 Connect additional components, one at a time, to the C 717 and check
for hum.
At each stage, if hum/noise appears, examine the audio cabling and ACpower routing of the new component. In some cases, moving the new
component’s AC cord to a dierent outlet, or installing a ground-lift (3-to-2prong adapter) on its power cord, will eliminate the hum.
14 15
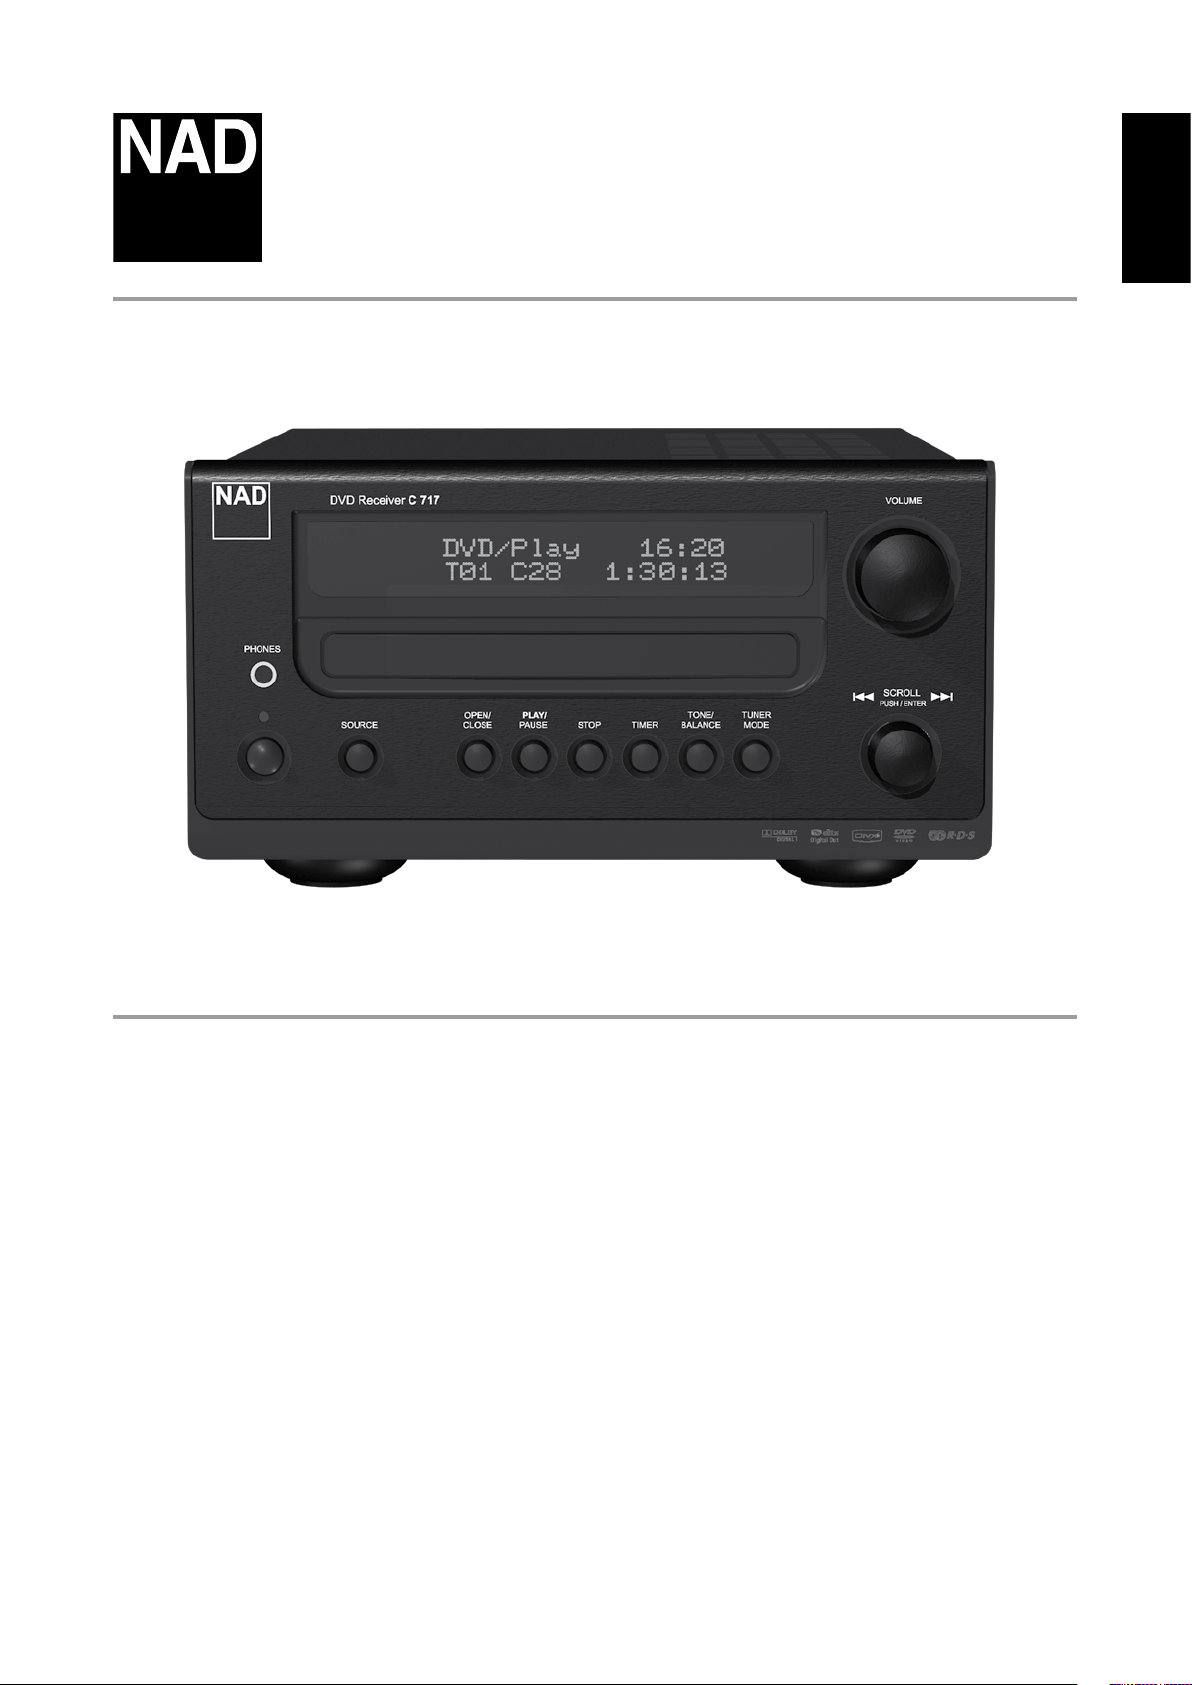
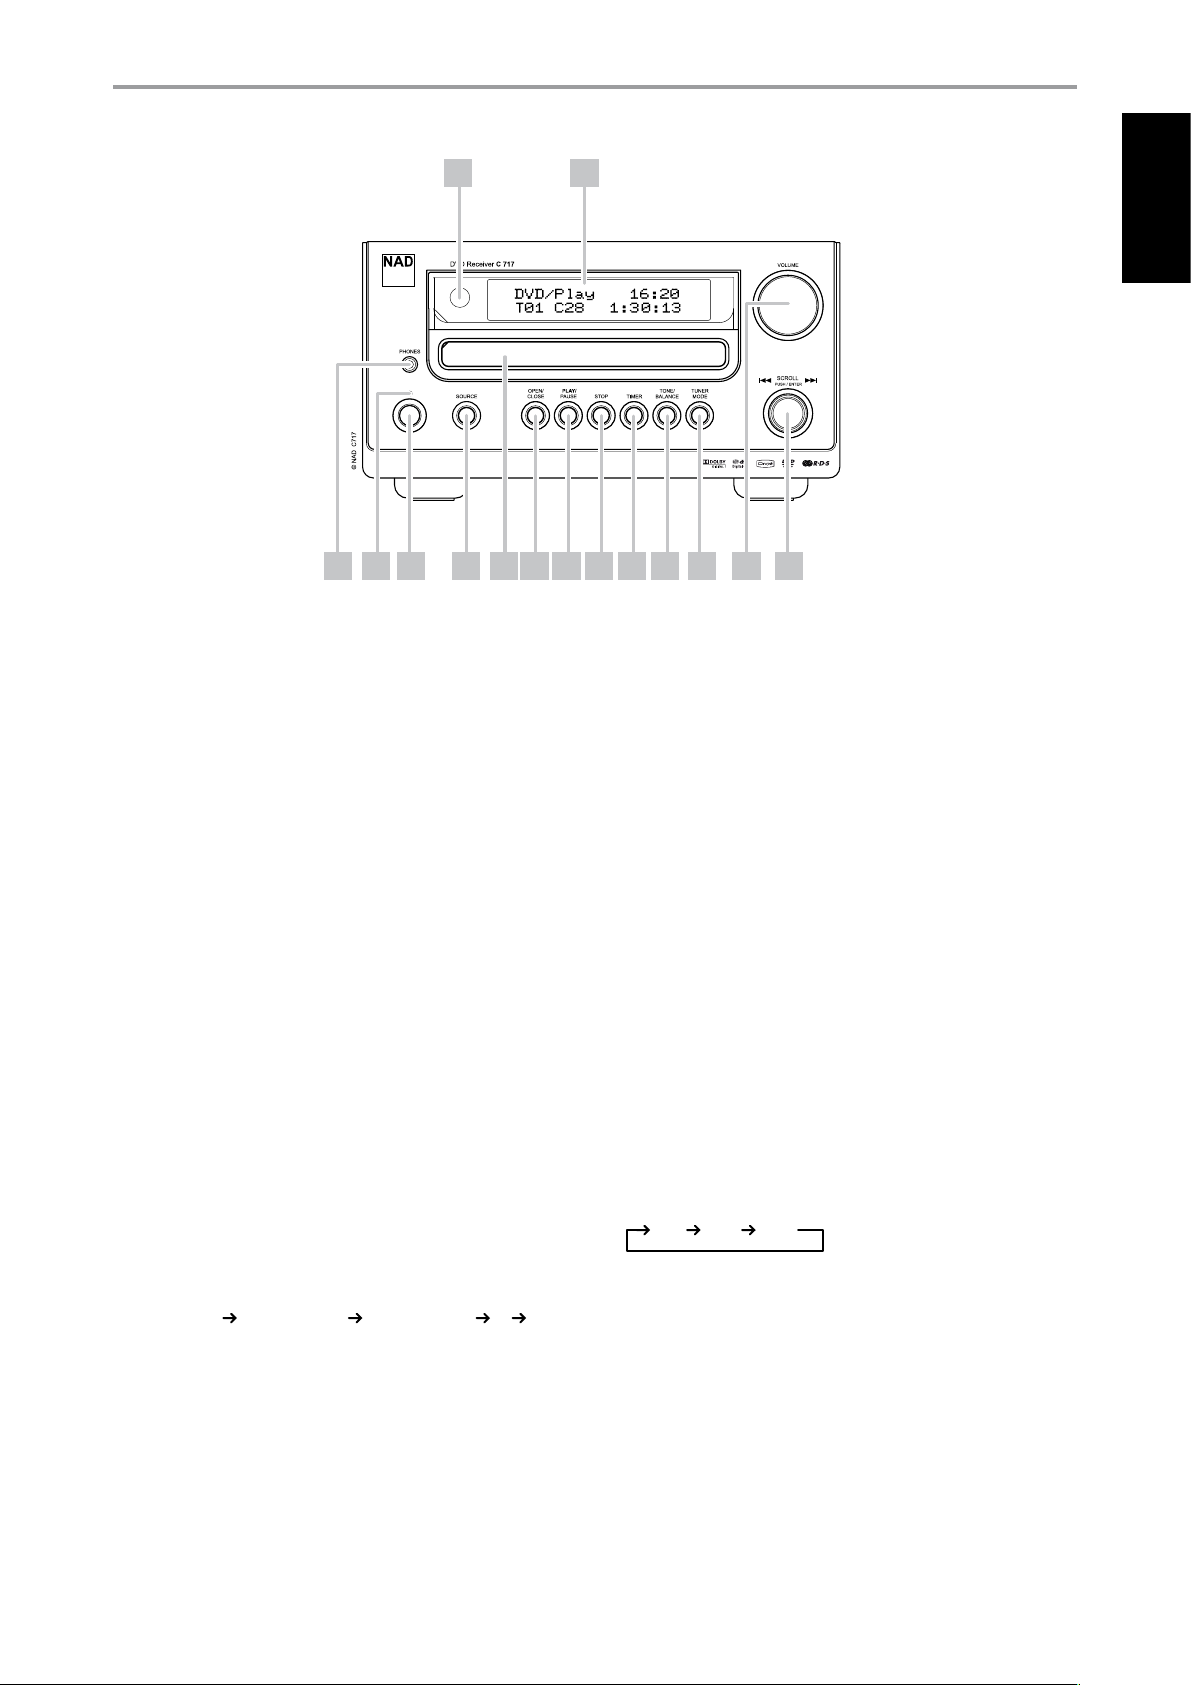
IDENTIFICATION OF CONTROLS
FRONT PANEL
ENGLISHFRANÇAISESPAÑOLITALIANODEUTSCHNEDERLANDSSVENSKAРУССКИЙ
131211101 2 3 4 5 6 7 8 9
1 PHONES: Accepts stereo headphone using a standard 1/8-inch stereo
phone plug. Plugging in your headphone automatically mutes output
from the speakers and subwoofer output (but not from the VCR OUT
jacks of the VCR). The VFD will show “H/P ON” when you headphone is
plugged in to this jack and “H/P OUT” when unplugged.
2 STANDBY LED: This indicator will light up amber when the C 717
is in standby state. When the C 717 is at ON state, this indicator will
illuminate blue. This indicator will extinguish itself when the power
cable is unplugged from the AC supply.
3 STANDBY: Press this button to switch ON the C 717. The Standby
LED indicator will turn from amber to blue and illuminate the Vacuum
Fluorescent Display (VFD). Pressing the Standby button again turns
the unit back to standby mode. It is usual (and perfectly acceptable)
to leave the C 717 in standby mode in between normal viewing and
listening sessions.
The C 717 can also be switched ON from standby mode by pressing
[OPEN/CLOSE] or [PLAY/PAUSE] buttons on the front panel as well as on
the remote control.
If the disc tray is open and the Standby button is pressed, the disc tray
will draw close and the C 717 goes to standby mode.
Note that when you do choose to switch o to standby mode using the
front panel Standby button, the C 717’s memory back-up system will
store tuner preset and other settings for several weeks while the unit is
switched o.
5 DISC TRAY: With the DISC TRAY open, insert a DVD, CD or other
compatible media disc face down onto the tray. If the disc is placed
upside down and it is a single sided disc or there is no disc loaded, “NO
DISC” appears on both the C 717’s VFD and the TV/Monitor screen.
6 OPEN/CLOSE: Press this button to open and close the disc tray and
simultaneously select the internal DVD player. When in standby mode,
this button will also power ON the C 717 and at the same time open the
disc tray.
7 PLAY/PAUSE: This dual-function button alternates between starting
and stopping playback. Press this button to toggle between Play and
Pause of a DVD, CD or other compatible media disc. Press to start play
or resume play after Pause. If the disc tray is open, press this button to
automatically close the tray and start playback if a disc is loaded.
During playback, press this button to stop playback temporarily,
keeping the optical pickup at its current position on the disc. To resume
playback at the exact point where it stopped, press [PLAY/PAUSE] again.
8 STOP: During playback, press this button to stop and at the same time
pause playback of disc – “PRESS PLAY TO CONTINUE” or “STOP” will be
briey displayed in the OSD and “RESUME” in the VFD. If [STOP] button is
pressed consecutively during playback, disc playback will fully stop.
9 TIMER: In combination with the [SCROLL/PUSH/ENTER] knob, toggle
this button to cycle through the following timer modes:
Time Timer SLEEP
4 SOURCE: Toggle to select desired Source as follows
Internal DVD Internal FM tuner Internal AM tuner TV VCR
then back to Internal DVD.
Refer also to the item about SELECTING SOURCES under the SETTING
UP THE C 717 section of the SETUP page.
Refer also to OPERATION - SETTING UP THE TIMER page.
7

IDENTIFICATION OF CONTROLS
8
ENGLISH FRANÇAIS ESPAÑOL ITALIANO DEUTSCH NEDERLANDS SVENSKA РУССКИЙ
FRONT PANEL
10 TONE/BALANCE: Toggle this button to adjust BASS, TREBLE and
BALANCE CENTER settings in combination with [SCROLL/PUSH/ENTER]
knob. Refer also to the item about ADJUSTING TONE AND BALANCE
CONTROLS under the SETTING UP THE C 717 section of the SETUP page.
11 TUNER MODE: In AM or FM mode and in combination with the
[SCROLL/PUSH/ENTER] knob, toggle this button to select “Preset Tune”
or “Manual Tune”. Refer also to the item about TUNER MODE at the
LISTENING TO AM/FM RADIO section of the OPERATION page.
13 SCROLL/PUSH/ENTER [ ]: In AM or FM mode and in
combination with [TUNER MODE] knob, use this knob to step up or
down stored presets or to manually tune AM/FM frequencies.
During disc playback, rotate this knob to skip UP/DOWN tracks, chapter
or les.
Use this knob in combination with [TIMER] button to setup Time, Timer
or SLEEP settings.
12 VOLUME: Turn clockwise to increase the volume setting; counter
clockwise to lower it. The VFD shows the VOLUME setting displayed as
increments between 01 through to 59. “VOLUME MIN” will be displayed
when volume setting is at its lowest level and “VOLUME MAX” when
volume is at its highest level.
14 REMOTE SENSOR: Point the SR 9 at the remote sensor and press the
buttons. Do not expose the remote sensor of the C 717 to a strong light
source such as direct sunlight or illumination. If you do so, you may not
be able to operate the C 717 with the remote control.
Distance: About 23 ft (7 m) from the front of the remote sensor
Angle: About 30° in each direction of the front of the remote sensor
15 VACUUM FLUORESCENT DISPLAY (VFD): Provides visual
information about the unit’s important modes, settings, functions,
status of the current source like disc playback time and other indicators.
 Loading...