


Moulinex approved accessory Service
centre
Stainless steel chip cutter disc (disc E)
Stainless steel grater disc (disc G)
Stainless steel parmesan shaving /
scraping disc (disc B/G)
Stainless steel thick slicing / grating
disc (disc C/H)
Stainless steel thin slicing / grating
disc (disc A/D)
Mini-chopper
Grinder
Blender
Blender with tap
Transparent bowl assembly
Metal blade
Plastic kneader
Whisk
Emulsifier
Citrus press
Maxipress (only for electronic
version)
Centrifugal juice extractor with
pouring spout
Centrifugal juice extractor with filter
basket
Spatula
Mincer assembly
• Geared reducer
• Cutter
• Discs
• Sausage funnel
• Biscuit nozzle
• Kebbé accessory
If you have any product problems or
queries please contact our Customer
Relations Team first on:
0845 602 1454 - UK
(01) 401 8448 - Ireland
or consult our website:
.moulinex.co.uk
www
30


Thank you for choosing a product
from the MOULINEX range,
exclusively designed for the
preparation of foodstuffs.
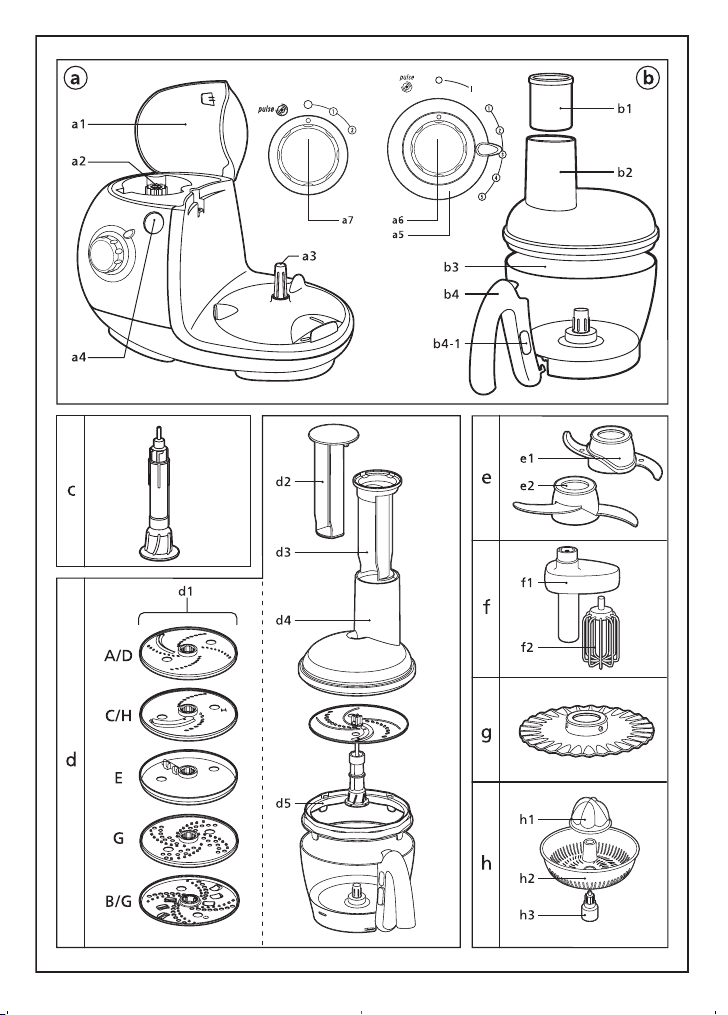
Description
a. Motor unit
a1.
upper drive cover
a2.
upper drive
a3.
lower drive
a4.
release button of the cover
and unclipping of the accessory on
the upper drive
a5.
electronic speed variator from 1 to
5 (depending on model)
a6.
knob for Operation/Stop and Pulse
(intermittent operation)
a7.
1-2 and Pulse speed selector
(a1)
Accessories depending on
model:
b. Bowl assembly
b1.
pusher-measure
b2.
lid with standard feed tube
b3.
bowl (see figure1)
b3-1.
drive rod
b3-2.
rubber seal
b3-3.
b4.
c. Spindle
d. Vegetable cutter
d1.
d2.
d3.
d4.
d5.
e. Cutters
e1.
e2.
f. Whisk
f1.
f2.
g. Emulsifying disc
h. Citrus press
h1.
h2.
h3.
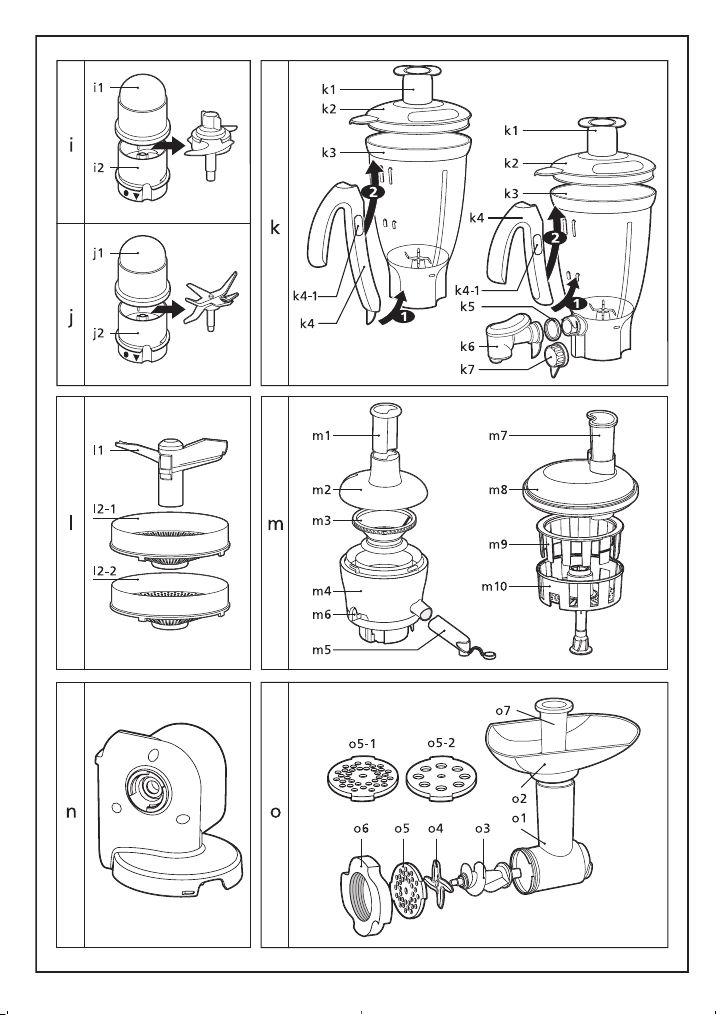
i. Mini-chopper
i1.
nut
removable handle
b4-1.
knob for unclipping the handle
discs
A/D:
fine slicing / grating
C/H:
thick slicing / grating
E:
chip cutter
G:
parmesan grater
B/G:
parmesan scraper / shaver
small food pusher
large food pusher
lid with large feed tube
disc support
metal blade
plastic kneader
drive housing
whisk
cone
filter basket
drive rod
lid
i2.
bowl
j. Grinder
lid
j1.
j2.
bowl
k. blender with or without tap
k1.
measuring cap
k2.
lid
k3.
jug
k4.
removable handle
k4-1.
handle
k5.
k6.
k7.
l. “Maxipress”
l1.
m. Centrifugal juice extractor with
pouring spout or filter basket
m1.
m2.
m3.
m4.
m5.
m6.
m7.
m8.
m9.
m10.
n. Geared reducer for mincer head
o. Mincer head
o1.
o2.
o3.
o4.
o5.
mincing
o6.
o7.
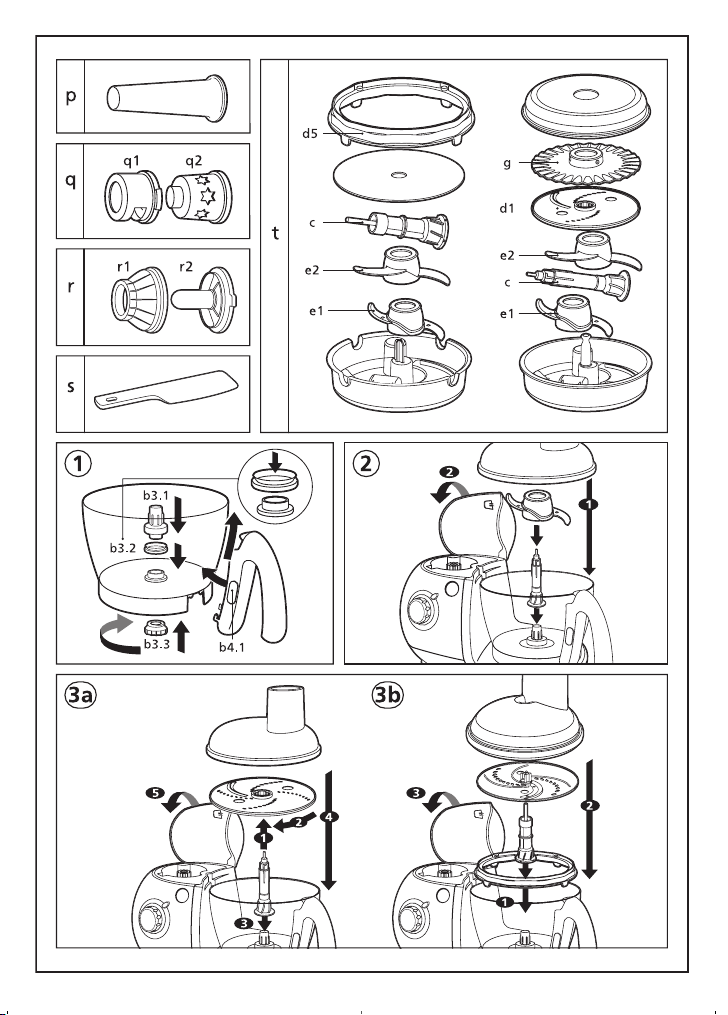
p. Sausage nozzle
q. Cake nozzle
q1.
q2.
r. Kebbe accessory
r1.
r2.
s. Spatula
t. Storage unit
The accessories supplied with the
model you have purchased are shown
on the label on the top of the
packaging.
knob for unclipping the
seal pour tap
tap
stopper
rotor blade
l2-1.
disc for purée
l2-2.
disc for coulis
food pusher
lid
rotary filter
pulp collector
pouring spout
locking lever
food pusher
lid
filter crown
filter basket
Body
Removable tray
Screw
4 blade cutter
Discs
o5-1.
Small hole disc: fine mincing
o5-2.
Large hole disc: coarse
Nut
Food pusher
Support
Mould
Ring
Nozzle
20

Safety instructions
- Read carefully the instructions for use
before using your appliance for the first
time: any use that does not respect the
instructions means that MOULINEX
cannot be held responsible for any
problems.
-
Do not leave the appliance
unattended when in operation,
especially when there are children or
handicapped persons present.
-
Check that the voltage of your
appliance matches that of your
electrical installation.
-
This product has been designed for
domestic use only. Any commercial use,
inappropriate use or failure to comply
with the instructions, the manufacturer
accepts no responsibility and the
guarantee will not apply.
- Your appliance is designed for
domestic use in the home.
- Unplug your appliance as soon as
you have finished using it (even if
there is a power cut) and when you
are cleaning it.
- Do not use your appliance if it is not
working correctly or if it has been
damaged.
- If it is damaged, take it to an
approved MOULINEX service centre
(see list in the service manual).
- Any operations other than the usual
cleaning and care by the customer
must be carried out by an approved
MOULINEX service centre (see list in
the service manual).
- Do not place the appliance, the power
cord or the plug in water or any other
liquid.
- Do not allow the power cord to hang
within the reach of children.
- The power cord must not be placed
close to or in contact with the hot
parts of your appliance, close to a
source of heat or over a sharp edge.
- If the power cord or the plug is
damaged, do not use the appliance.
In order to avoid any danger, have
them replaced by an approved
MOULINEX service centre (see list in
the service manual).
- Do not use the centrifugal juice
extractor if the rotary filter (m3) or the
assembly (m9+m10) are damaged.
- For your safety, only use MOULINEX
accessories and spare parts adapted
to your appliance.
- Switch off the appliance and unplug
it before changing the accessories or
contact with the parts which move
during operation.
- Only use one accessory at a time.
- Always use the food pushers to
guide the foodstuffs in the feed
tubes, never use your fingers, or a
fork, spoon, knife or other objects.
- Handle the metal cutter, the blender
cutter, the mini chopper, the grinder
and the vegetable cutter discs with
care: they are extremely sharp. You
must holding the metal cutter (e1) by
holding its spindle (c) before
emptying the contents from the bowl.
- Empty the contents of the bowl and
the blender before removing the
handle.
- Do not operate your appliance when
empty.
- Always use your blender with its
cover.
- Do not touch the moving parts, wait
until the appliance has stopped
completely before removing the
accessories.
- Ensure that long hair, scarves, ties,
etc. are kept away from the top of the
moving accessories.
- Do not use the accessories as
containers for (freezing – cooking –
hot sterilisation).
This appliance is not intended for use by
children or persons who may suffer from
a mental and/or physical impairment
unless they are adequately supervised in
its operation and use by an adult
responsible for their safety.
Children must be supervised to ensure
that they do not play with the appliance.
First use
Before using for the first time,
wash all of the parts in hot soapy
water. Rinse and dry.
-
Place the motor unit on a flat, clean
dry surface.
-
Plug in your appliance.
21

Starting your appliance
Electronic model:
- Pulse (intermittent operation):
the knob
By pressing successively for better
control of some preparations.
- Continuous operation:
(a6)
- Stop:
position.
- Speed variator (a5):
indicated or vary it during the
preparation.
Two-Speed Model:
- Pulse (intermittent operation):
the knob
by pressing successively for better
control of some preparations.
- Continuous operation:
(a7)
depending on the preparation
- Stop:
position.
- Using the upper drive (a2):
check that no accessories are
attached to the lower drive.
(a6)
to the "Pulse" position
to the "1" position.
turn the knob
(a7)
to the "1" or " 2 " position
turn the knob
(a6)
select the speed
to the "Pulse" position
(a7)
turn
turn the knob
to the "0"
turn
turn the knob
to the "0"
The functions of your food
processor
1
ASSEMBLING THE REMOVABLE
PARTS
- Fitting / removing the bowl
The bowl is used with the following
accessories (depending on model):
- Cutters
- If it is not already fitted, fit the seal
- Fit the drive rod
- Lock the assembly with the nut
- Dismantle the assembly and clean it
- Fitting / removing the handles (b4) of
- For easier cleaning and storage, the
- To fit the handle, position it opposite
(e)
whisk
(h)
filter basket
(b3-2)
bowl.The lip of the seal must be
facing upwards.
(b3-2)
until it locks.
after each use.
the bowl and (k4) the blender
handle of the bowl
blender
, vegetable cutters
(f)
, emulsifier
, centrifugal juice extractor with
(m10)
"Maxipress"
onto the bottom of the
.
(b3-1)
(k4)
can be removed.
(b4)
(b3)
(g)
, citrus press
onto the seal
and the
(d)
,
(l)
.
(b3-3)
the clips of the bowl.
- Slide the handle upwards until it
clicks into place.
- To remove the handle, press the
release knob
slide it downwards.
(Note: the lid of the blender must be
removed to allow the handle
be taken off.
The handle (b4) must be fitted to the
bowl so that the upper drive cover (a1)
may be locked
MIXING / BLENDING / MINCING /
2
KNEADING
ACCESSORIES USED
(depending on model)
- Bowl assembly
cutters
• metal blade
chopping.
• plastic kneader
mixing.
FITTING THE ACCESSORIES
Press the release button (a4) to open
the upper drive (a1) cover.
- Place the bowl
(a3)
.
- Place the spindle
(b3-1)
- Slide the metal blade
plastic kneader
(c)
, to the bottom of the bowl.
- Place the ingredients in the bowl.
- Fit the lid
- Close the upper drive cover
You should hear it "click" shut.
To release the cutters
spindle
- Place the assembly on a stable surface.
- Turn the spindle
direction while holding the cutter
the top.
(b4-1)
or
(k4-1)
(b)
:
(b2)
:
(e1)
(e2)
(b3)
(e2)
or
, spindle
for blending and
for kneading or
on the lower drive
(c)
on the bowl drive
(e1)
or the
onto the spindle
(d4)
onto the bowl.
(e)
from the
(c)
in a clockwise
(e)
.
(c)
Recommended speeds
Function
Mixing 3-4-5 1-2
Chopping 5-Pulse 2-Pulse
Kneading 5 2
Blending 5 2
Electronic
Model
22
and
(k4)
to
(c)
, and
(a1)
.
(e)
Two-Speed
Model
at

Tips
Blending
- You can blend up to 1 litre of stew,
soup, or purée in 20 s.
Chopping
- In 15 to 30 s, you can chop up to 600 g
of foodstuffs:
• hard foodstuffs: cheese, dry fruits,
certain vegetables (carrots, celery...).
• tender foodstuffs: certain vegetables
(onions, spinach...).
• raw or cooked meats (bones and
nerves removed and cut into cubes).
• raw or cooked fish...
Kneading / mixing
- With the kneading function, stop the
appliance as soon as you see the
ball of pastry form.
You can:
. knead up to 1.2 kg of heavy dough (rich
shortcrust, shortcrust, bread dough) in
approximately 60 sec.
. mix up to 1 litre of pancake or waffle
batter, etc. in 1 to 1 min.
. mix 1.5 kg of light mixture (biscuits,
cakes) in 1 to 3 min.
3
GRATING / SLICING
ACCESSORIES USED
- Bowl assembly
vegetable cutter
FITTING THE ACCESSORIES
Press the release button (a4)
To open the upper drive cover (a1).
- Place the bowl
drive
(a3)
With the discs
3a
Model with lid with standard feed tube
(b2) and food pusher (b1):
- Place the spindle
hole of the disc
turn clockwise to lock in place.
- Place the assembly onto the bowl
drive
(b3-1)
- Fit the cover
- Close the upper drive cover
You should hear it click shut.
- Insert the foodstuffs into the tube and
guide them with the food pusher
3b
Model with lid with large feed tube (d4)
and the (d2) and (d3) food pushers:
Place the disc support
bowl.
- Place the spindle
.
(b)
, spindle
(d).
(b3)
onto the lower
(d1)
:
(c)
(d1)
. You have to
.
(b2)
on the bowl.
(d5)
(c)
in the central hole of
(c)
in the central
(a1)
inside of the
and
.
(b1)
the disc
(d1)
to lock the spindle in place.
- Place the assembly onto the bowl
drive
rest on the disc support
- Fit the lid
- Close the upper drive cover
You should hear it click shut.
- Insert the foodstuffs into the tube
and guide them with the food
pushers
- To guide small vegetables (carrots,
courgettes…), place the large food
pusher
push the vegetables down with the
small food pusher
. You have to turn it clockwise
(b3-1)
, this assembly should
(d4)
on the bowl.
(d2)
or (
(d3)
inside the feed tube and
d3)
.
(d2)
(d5)
.
(a1)
.
Recommended speeds
Function
Electronic
Model
Two-Speed
Model
Grating 3-4-5 1-2
Slicing 2 1
Tips
You can prepare with the discs
(depending on model):
• thick slices
potatoes, onions, cucumbers, beetroot,
apples, carrots, cabbage...
• thick grating
celeriac, potatoes, carrots, cheese...
• chip cutter
• parmesan grater
• shavings
parmesan …
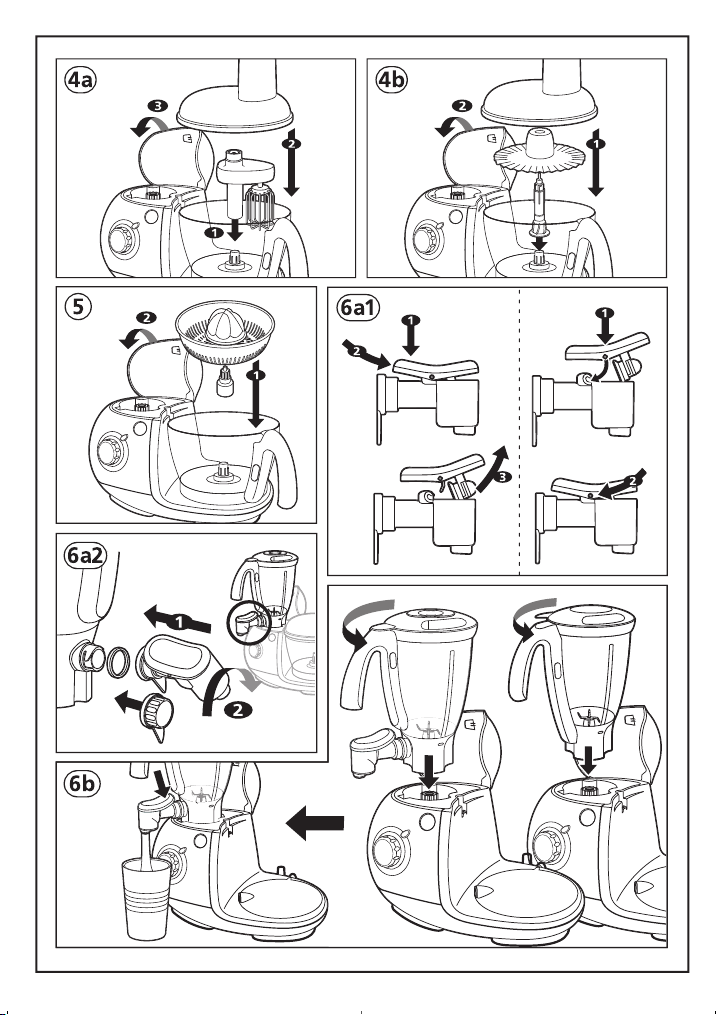
4
BEATING / WHISKING / EMULSIFYING
ACCESSORIES USED
(depending on model)
- Bowl assembly
or
- Bowl assembly
spindle
FITTING THE ACCESSORIES
.
Press the release button (a4) to open
the upper drive cover (a1).
- Place the bowl
drive
4a
With the whisk (f):
- Place it onto the bowl drive
4b
With the emulsifier(g):
(H)
/ thin slices
(C)
/ thin grating
(E)
: potato, chips
(G)
(B)
: carrots; courgettes,
(b)
(b)
(c)
.
(a3)
(b3)
.
(D)
:
(A)
:
: potatoes; parmesan …
and whisk
, emulsifier
(f)
(g)
and
onto the lower
(b3-1)
.
23

- Place the spindle
drive
(b3-1)
- Slide the emulsifier onto the spindle.
Then:
- Place the ingredients into the bowl.
- Fit the lid
- Close the upper drive cover
You should hear it click shut.
.
(b2)
or
(c)
(d4)
onto the bowl
on the bowl.
(a1)
Recommended speeds
Function
Beating /
Whisking /
Emulsifying
Tips
- Do not use these accessories to
knead heavy dough or to mix
sponges.
You can prepare: mayonnaise, aioli,
sauces, whisked egg whites (1 to 6),
whipped cream, Chantilly cream (up
to 0.5 litre).
SQUEEZING FRUIT JUICES
5
(depending on model)
ACCESSORIES USED
- bowl
FITTING THE ACCESSORIES
Press the release button (a4)
to open the upper drive cover (a1).
- Place the bowl onto the lower drive
(a3)
.
- Place the drive rod
press onto the bowl drive.
- Place the filter basket
bowl.
- Place the cone
filter basket.
- Close the upper drive cover
You should hear it click shut
Electronic
Model
1 to 5 1-2
(b3)
and citrus press
(h1)
Two-Speed
Model
(h)
.
(h3)
of the citrus
(h2)
on the
in the hole of the
(a1)
Recommended speeds
Function
Electronic
Model
Two-Speed
Model
Squeezing 1 1
Tips
- Place half a citrus fruit on the cone
(h1)
. You can make up to 1 litre of
juice without emptying the bowl.
6
SMOOTHIES / BLENDING / FINE
BLENDING
.
.
ACCESSORY USED
- blender (k).
FITTING THE ACCESSORY
Press the release button (a4)
to open the upper drive cover (a1).
6a
Direct Service Model with tap:
Cleaning the tap (k6)
6a1
To make the tap
can be dismantled into two parts:
Press " push ", and release the cover
(fig. 6a-1). Clean the tap
running water. Fit the cover by pressing
the middle of it, then clip on the metal
pin underneath the hooks (fig. 6a-1).
6a2
Fitting the tap (k6) onto the blender (k3)
Push the seal
onto the neck of the jug, then lock the
assembled tap (k6with a quarter
turn).
Tips
: this blender, fitted with its tap,
allows you to pour your preparation,
directly into glasses (cocktails), onto
plates or into bowls (soups) or into
the pan (pancakes). Speed 1 helps you
to serve thick preparations
(milkshakes or smoothies). Stop the
appliance as soon as it has finished.
Clean the assembled tap each time
after each use.
If you do not need the tap, you can
replace it with the stopper
6a-1), equipped with the seal
6b
For the two models:
- Place the ingredients in the blender
(k3)
, then lock the lid
- Place the blender assembly
the upper drive
You should hear a click.
(k6)
easier to clean, it
(k6)
(k5)
as far as possible
(k2)
(a2)
.
under
(k7)
onto the jug.
(see fig
(k5)
(k)
onto
.
Recommended speeds
Function
Smoothing /
mixing /
blending
Electronic
Model
1 to 5 - Pulse 1 to 2 - Pulse
Two-Speed
Model
24

Tips
You can add ingredients via the hole
of the cap
Always use your blender
cover
- Do not fill the blender with a boiling
liquid.
- Do not use the blender with dry
foodstuffs (walnuts, almonds,
peanuts…).
You can:
- prepare up to 1.5 litres of finely
blended stews or soups, creams,
purées, milk-shakes, cocktails.
- blend any liquid preparations
(pancakes, doughnuts, clafoutis).
- crush ice at max. speed
To remove the blender, hold it by the
handle and press the release button
(a4).
7
CENTRIFUGING FRUITS and
VEGETABLES
ACCESSORIES USED
Centrifugal juice extractor with pouring
spout
or
Bowl
extractor with filter basket
FITTING THE ACCESSORIES
7a
Direct Service Model with pouring
spout (m5)
Press the release button (a4)
to open the upper drive cover (a1).
Place the filter
the pulp collector
the lid
(m4)
the closed padlock position then fit
the assembly, onto the upper drive
(a2)
Slide the pouring spout
pulp collector
Tips
- Insert the foodstuffs into the tube
and press them down slowly using
the food pusher
- Chop the fruits into pieces and place
a large glass underneath the spout
(m5)
Do not process more than 0.5 kg of
fruits (apples, carrots, grapes) 5 times
consecutively, without allowing your
appliance to cool down completely.
(k1)
(k2)
during the preparation.
fitted.
(k)
(depending on model)
(m)
(b3)
and centrifugal juice
(m3)
in the centre of
(m4)
(m4)
(m1)
, turn and lock
(m5)
.
.
(m2)
onto the pulp collector
. Hold the locking lever
. You should hear a click.
.
with its
(m)
(m6)
onto the
- Grapes, quinces or redcurrants: to
obtain better results, clean the filter
after every 300g of ingredients.
- Important:
full, stop the appliance, and empty
the collector.
- Wait until the rotary filter has
completely stopped before removing
the assembly
To remove the centrifugal juice
extractor (m5), press the release
button (a4), and lift off the assembly.
The locking lever (m6) returns
automatically to the open padlock
position .
7b
Model with the filter basket (m10)
Press the release button (a4)
to open the upper drive cover (a1).
- Place the bowl
drive
(m10)
lower it into the filter basket to clip it
onto the assembly.
- Lower the filter basket assembly
(m9+m10)
- Fit the lid
- Close the upper drive cover
You should hear a click.
- Insert the foodstuffs into the tube and
slowly press down using the food
pusher
- Empty the waste regularly from the
filter - basket.
- Do not use more than 250 g of
ingredients (apples, carrots, grapes)
for each operation.
in
For the two models:
Recommended speeds
Function
When the pulp collector is
(b3)
(a3)
. Assemble the filter basket
with its filter crown
onto the bowl drive
(m8)
(m7)
onto the lower
onto the bowl.
.
Electronic
Model
(m9)
Two-Speed
:
(b3-1)
(a1)
.
Model
Centrifuging 5 2
Tips
- Peel fruits with thick skins; remove
stones and the core of pineapples.
- It is not possible to extract the juice
from certain fruits and vegetables:
bananas, avocado pears,
blackberries, etc...
- You can prepare juices with different
25

fruits and vegetables without having
to clean the centrifugal juice
extractor every time, the flavours
will not be mixed.
- Drink the juices immediately after
preparation or add lemon juice to
prevent them from browning for a
few hours.
8
FINELY CHOPPING SMALL
QUANTITIES
ACCESSORY USED
- Mini-chopper
FITTING THE ACCESSORY
Press the release button (a4)
to open the upper drive cover (a1).
Place the ingredients inside the bowl
(i2 or j2)
onto the bowl .
- Place the accessory on the upper
drive
If the lid is missing or incorrectly
fitted, the food processor will not
operate.
(depending on model)
(i)
or Grinder
, then lock the lid
(a2)
(you should hear a click).
(j)
(i1 or j1)
Recommended speeds
Function
Fine
chopping
Tips
With the mini-chopper you can:
• Chop in a few seconds: cloves of
garlic, fresh herbs, parsley, nuts,
bread, crackers for breadcrumbs,
ham, ...
• Prepare purées for baby.
Maximum quantity of nuts
(walnuts, almonds, ...): 80 g.
This mini-chopper is not designed for
hard foodstuffs such as tea, coffee.
With the grinder you can:
•
Grind
pepper, Cayenne peppers, dried
apricots,....
• Maximum quantity/time
dried apricots: 140 g / 10s.
dried figs: 90g / 8s
To remove the accessory, press the
release button
Electronic
Model
5 - Pulse 2 - Pulse
in a few seconds: coriander,
(a4)
.
Two-Speed
Model
9
PUREEING/ PRESSING / MASHING
(depending on model)
ACCESSORIES USED
- Bowl assembly
"Maxipress"
FITTING THE ACCESSORY
Press the release button (a4)
to open the upper drive cover (a1).
- Place the bowl
drive
(a3)
- Place the spindle
drive
.
(b3-1)
- Slide the desired disc
spindle
so that the slots under the disc come
to a stop against the inside ribs of
the bowl.
- Place the rotor
of the disc
clicks into place.
- Fit the lid
- Close the upper drive cover
You should hear a click.
(b)
, spindle
(l)
(b3)
.
(c)
whilst turning it slightly
(l2)
(b2)
onto the lower
(c)
.
on the bowl
(l2)
onto the
(l1)
in the central hole
and push it in until it
or
(d4)
onto the bowl.
(c)
,et
(a1)
.
Recommended speeds
Function Electronic Model
Pureeing / Pressing
/ Mashing
Tips
You can prepare with the disc:
• Large holes
of cooked fruits or vegetables):
potatoes, carrots, cauliflowers.
• Small holes(l2-2): coulis or compotes
with cored fruits (up to 500 g):
tomatoes, grapes, strawberries,
raspberries, redcurrants, apricots,
peaches.
Remark:
from the disc, check that you have
fitted the correct disc for the type of
preparation and that your food is fully
thawed or fully cooked.
10
CLEANING AND REMOVING THE
"MAXIPRESS"
- Remove the disc / rotor assembly
from the spindle
- Press the clips on either side of the
rotor to free the disc.
(l2-1)
: purées (up to 1 kg
If the rotor comes unclipped
(c)
1
.
26

11
MINCING HEAD(depending on model)
ACCESSORIES USED
- Geared reducer assembly
mincer head
BEFORE FIRST USE
- Wash the mincer head in hot soapy
water and dry it carefully
immediately.
USE
11a
Fitting the geared reducer onto the
food processor.
- Press the release button
the upper drive cover
- Place the geared reducer onto the
lower drive
- Close the upper drive cover
Assembling the mincer head:
11b
- Hold the body
the largest opening at the top.Next
insert the screw
first) into the body
- Fit the cutter
with the cutting edges towards the
outside.
- Place the selected disc
on the cutter
hooks with the slots.
- Tighten the nut
the body
direction, without jamming it.
- Check the assembly. The pin must
not have any play or be able to spin.
If this is not the case, repeat the
above operations.
Fitting the mincer head onto the
11c
appliance.
- Opposite the geared reducer (food
processor motor unit unplugged),
place the mincer head
tube angled towards the right. Insert
the mincer head completely into the
geared reducer
- Bring the tube back to the vertical
position until it is locked in place.The
mincer head (o) will automatically
lock onto the geared reducer (n), as
soon as it is operated.
- Insert the removable tray
the tube.
- Plug in the appliance.
USE
- Prepare the entire quantity of
foodstuffs to be minced.Remove the
(o)
.
(a3)
:
(o1)
(o3)
(o4)
(o4)
(o6)
(o1)
in a clockwise
(n)
onto the short pin
(n)
(a4)
(a1)
.
by the tube with
(longest pin
(o1)
.
(o5-1 or o5-2)
by aligning the
completely onto
(o)
with the
.
(o2)
and
to open
(a1)
.
onto
bones, nerves and cartilages.
- Cut the meat into pieces
(approximately 2 x 2 cm) and place
them on the tray (o2).
- Place a bowl underneath the mincer
head.
Recommended speeds
Function
Electronic
Model
Mincing 5 2
Tips
- Insert the meat into the tube piece
by piece using the food pusher
- Do not push with your fingers or any
other utensil.
- Do not use your appliance for more
than 15 minutes when you are
mincing meat.
- Check that the meat is fully thawed.
Tip :
at the end of the operation, you
can process a few small pieces of
bread to clear out all of the mince.
Cleaning the mincer head
- Before any cleaning operation,
unplug your appliance.
- Release the mincer head by tilting it
to the right to remove it from the
geared reducer unit.
- To remove the mincer head, remove
the tray
(o2)
unscrew the nut
disc
screw
- Handle all sharp parts with care.
- Wash all parts in hot soapy water,
Rinse them and dry them carefully.
- The disc
must remain oiled. Coat them with
oil.
- Do not allow water to enter the
geared reduced. Simply wipe it
using a soft cloth.
- Do not place the mincer head (o) in
the dishwasher, which is to say the
body (o1), the screw (o3), the cutter
(o4), the discs (o5) and the nut (o6).
12
SAUSAGE FUNNEL
(depending on model)
This accessory, which fits onto the
metal mincer head allows you to
from the tube, and
(o5)
, the cutter
(o3)
.
(o5)
(o6)
, remove the
(o4)
and the
and the cutter
27
Two-Speed
Model
(o7)
(o4)
.

make any kinds of sausages.
ACCESSORIES USED
- Sausage funnel
assembly
ASSEMBLY
- Fit the screws
of the mincer head metal.
- Place the funnel
and tighten fully.
- Place the assembled head onto the
geared reducer
Remark:
without a disc or cutter.
USE
This accessory is to be used once the
meat has been minced and you have
seasoned the mince to your taste.
- After leaving the sausage skin to
- Fill the tube with mince
- Stop the appliance.
- Make a knot 5 cm from the end of
- Start the operation again and
- When all of the mince has been used,
Tips
To avoid the skin being too tight, do
not make sausages that are too big.
- It is easier when working with
- Make the sausages as long as you
The speeds used are those of
paragraph 11.
this accessory is used
soak in warm water so that it
becomes elastic again, slide it onto
the funnel
approximately 5 cm overhang.
and press with the food pusher so as
to push the mince to the end of the
funnel.
the sausage skin. Slide it onto the
sausage funnel and push the knot
onto the end of the funnel to avoid
trapping air in the skin.
continue to supply the mince. The
skin fills up.
stop the appliance, and remove the
remaining skin from the funnel and
make a knot.
someone else: one supplies the
mince and the other holds the skin
while it fills up.
want by pinching and turning the
skin at the desired lengths.
(p)
(n)
, geared reducer
and mincer head
(o3)
to the body
(p)
then the nut
(n)
.
(p)
and leave
(o1)
(o)
(o1)
, start
.
(o6)
13
BISCUIT NOZZLE
(depending on model)
This accessory which fits onto the
metal mincer head allows you to
make small biscuits.
ACCESSORIES USED
- Biscuit nozzle
assembly
ASSEMBLY
- Fit the screws
of the metal mincer head.
- Place the mould
(q1)
.
- Align the two support hooks
with the two slots on the mincer
head
(o1)
- Tighten fully, without locking it, the
nut
(o6)
- Place this head assembly onto the
geared reducer
Remark:
without a disc or a cutter.
USE
- Prepare the biscuit dough (you will
obtain better results with a soft
dough).
- Choose the pattern by aligning the
arrow with the chosen shape.
- Process until you have obtained the
quantity of biscuits desired.
Tips
The speeds used are those of
paragraph 11.
14
KEBBE ACCESSORY
(depending on model)
ACCESSORIES USED
- Kebbe accessory
assembly
ASSEMBLY
- Fit the screws
of the metal mincer head.
- Place the nozzle
aligning the two hooks with the two
slots on the mincer head.
- Place the ring
then the nut
- Place this head assembly onto the
geared reducer
Remark:
without a disc or a cutter.
(q)
, geared reducer
(n)
and mincer head
(o3)
to the body
(q2)
in the support
.
onto the body
this accessory is used
(n)
and mincer head
(o3)
(r1)
(o6)
this accessory is used
(o1)
(n)
.
(r)
, geared reducer
to the body
(r2)
on the head
on the nozzle
and tighten fully.
(n)
.
28
(o)
(o1)
(q1)
.
(o)
.
(o1)
(r2)

Tips
The speeds used are those of
paragraph 11.
Cleaning
- Unplug the appliance.
- To make cleaning easier, rinse the
accessories quickly after use.
- Wash and dry the accessories, they
are all dishwasher proof except for:
• the whisk drive body
• the pulp collector of the
centrifugal juice extractor
• the mincer head assembly
For specific cleaning instructions
for the mincer head, refer to
paragraph
- Pour hot water and a few drops of
washing up liquid into the blender
Close the lid. Pulse a few times
using the pulse button. Unplug the
appliance. Rinse the bowl under
running water and leave to dry.
- The bowl
clean it, you can put it in the
dishwasher or wash it in hot water.
To fit the seal back onto the bowl,
check that the lip of the seal is always
facing upwards.
- To make cleaning and storage easier,
the handle of the bowl
of the blender
(they are dishwasher proof).
- In the event of your accessories
being stained by foodstuffs (carrots,
oranges...), wipe them with a cloth
dipped in cooking oil, then clean as
usual.
- Do not place the motor unit
whisk drive body
reducer
running water. Wipe them with a
damp sponge.
- The blades of the accessories are
very sharp. Handle them with care.
11c
.
(b3)
has a seal
(k4)
(n)
in water or under
(f1)
(m4)
(b3-2)
(b4)
can be removed
(f1)
and that
(a)
, or the geared
(o)
. To
, the
.
.
(k)
Storage
Your Odacio food processor is
equipped depending on the model:
- With a storage unit
housed inside the bowl assembly
You can store the vegetable cutter
discs
(d1)
the metal cutter
, the disc support
(t)
(e1)
, the plastic
, which is
(d5)
(b)
,
kneader
(e2)
- a cord storage recess inside the
motor unit: Store and adjust the
length of the power cord
to suit your requirements by pushing
or pulling the cord.
and the spindle
(c)
in it.
If your appliance will not
operate, what should you do?
- Check:
• it is plugged in correctly
• that the accessories are correctly
positioned on the motor unit.
• that the covers are correctly fitted.
• when the bowl assembly
mincer geared reducer
that the upper drive cover
correctly closed.
.
Your appliance will still not operate?
Contact an approved Moulinex service
centre (see list in the “Moulinex Service”
manual).
(b)
(n)
are used,
(a1)
or the
is
Disposal of packaging and
the appliance
The packaging is entirely
composed of materials that
are environmentally friendly,
compliance with the recycling
guidelines in force.
To dispose of the appliance, contact
the appropriate local council
department.
that may be disposed of in
Electronic or electrical
products to be disposed of
Help to protect the
environment!
Your appliance contains
a number of materials
that can be revalorized
or recycled.
Take them to a
collection point so that
they can be processed.
Accessories
.
You can personalise your appliance
and obtain from your usual dealer or
an approved MOULINEX service
centre the following accessories:
29

Ref. 0827818 / JPM-Interactive • COMMUNICATION/DESIGN GLOBAL/ORGANISATION/DEVELOPPEMENT • 03 80 56 28 11 • Juillet 2007
 Loading...