

Page 1

Digital Multi-service Data-capable Phone
@NNTN4759A@
NNTN4759A
Nextel
iDEN
i730 Phone User’s Guide
Page 2

Page 3

Contents
Getting Started........................................... 1
Removing the Battery Door .............................3
Locating Your SIM Card ..................................3
Battery .............................................................4
Powering On and Off .......................................6
Activating Service ............................................7
Enabling Over-the-Air Security ........................ 7
Finding Your Phone Number ........................... 7
Completing Setup ............................................8
Phone Basics.................................................10
SIM Card Security.......................................... 14
Locking the Keypad ....................................... 17
Accessories ................................................... 18
Wireless Local Number Portability: Bringing
Your PhoneNumber From Another Carrier ...18
®
Nextel
Customer Care................................. 18
Making Calls.............................................21
Receiving Calls.............................................. 22
Ways to Enter a Number ............................... 23
Missed Phone Calls ....................................... 25
Using Speakerphone ..................................... 25
Using Mute.....................................................26
Making Emergency Phone Calls....................26
Call Alerts ................................................ 29
Sending Call Alerts ........................................29
Receiving Call Alerts......................................29
Using the Call Alert Queue ............................29
Recent Calls............................................. 31
Storing Recent Calls to Contacts...................31
Deleting Recent Calls ....................................32
Entering Text ........................................... 33
Using Alpha Mode..........................................33
Using Word Mode..........................................33
Special Function Keys ...................................34
Using Numeric Mode .....................................35
Using Symbols Mode.....................................35
Contacts................................................... 37
Viewing Contacts...........................................38
Creating Entries .............................................39
Storing Numbers Faster.................................40
Editing Entries................................................41
Deleting Entries..............................................41
i
Page 4

Checking Capacity......................................... 41
Creating Pauses and Waits ........................... 41
International Numbers ................................... 42
Memo ........................................................43
®
Nextel
Voice Mail ...................................45
Setting Up Your Voice Mail Box.....................45
Playing Messages.......................................... 45
Changing Your Password .............................. 46
Recording Your Name ................................... 46
Recording Your Active Greeting .................... 46
Advanced Voice Mail Features ...................... 47
Messages .................................................53
Message Notifications.................................... 53
Voice Mail ......................................................54
Text and Numeric Messages ......................... 54
Net Alerts .......................................................55
Call Forwarding........................................57
Forwarding All Calls.......................................57
Turning Off Call Forwarding...........................57
Forwarding Missed Calls ............................... 58
ii
Viewing Call Forwarding Settings ..................58
Java Applications.................................... 59
Running Applications .....................................59
Suspending Applications................................59
Resuming Applications ..................................59
Ending Applications .......................................60
Downloading Applications..............................60
Installing Applications ....................................60
Deleting Applications .....................................60
Managing Memory .........................................61
Shortcuts on the Main Menu ..........................61
Java Applications and GPS Enabled .............62
Ring Tones............................................... 65
Setting Your Phone to Vibrate .......................65
Assigning Ring Tones to Contacts.................66
Ring and Vibrate ............................................66
Viewing Ring Tone Assignments ...................66
Downloading More Ring Tones......................66
Managing Memory .........................................67
Deleting Custom Ring Tones.........................67
Page 5

GPS Enabled ............................................69
IMPORTANT: Things to Keep in Mind........... 69
Making an Emergency Call............................70
Viewing Your Approximate Location..............71
Enhancing GPS Performance........................72
Updating Satellite Almanac Data................... 74
Setting Privacy Options ................................. 75
Using GPS with Map Software ...................... 76
Nextel Online®Services..........................79
NOL Services................................................. 79
Accessing NOL Services From Your Phone..79
Voice Records..........................................81
Creating Voice Records................................. 81
Playing Voice Records................................... 81
Labeling Voice Records.................................81
Deleting Voice Records ................................. 82
Locking Voice Records.................................. 82
Managing Memory ......................................... 82
Advanced Calling Features.....................83
Call Waiting.................................................... 83
Switching Between Calls ............................... 83
Putting a Call on Hold ....................................84
Calling 2 People.............................................84
Creating Pauses and WaitsWhile Dialing.....85
Making International Calls..............................85
Setting One Touch Direct Connect ................85
Setting Flip Actions ........................................86
Group Connect
Call Timers.....................................................87
Using Your Phone as a Modem.....................88
Making TTY Calls...........................................89
Special Dialing Codes....................................91
Additional Phone Features.............................91
TM
Calls..................................87
Datebook.................................................. 93
Viewing Datebook..........................................93
Creating Events .............................................94
Editing Events ................................................96
Deleting Events..............................................97
Receiving Reminders.....................................97
Making Calls From Datebook.........................98
Customizing Datebook Setup ........................98
iii
Page 6

Shortcuts................................................101
Creating a Shortcut...................................... 101
Using a Shortcut .......................................... 101
Editing a Shortcut ........................................ 101
Deleting Shortcuts ....................................... 102
Customizing Your Phone...................... 103
Setting the Volume ......................................103
Setting Your Phone to Vibrate ..................... 103
Using a Headset .......................................... 103
Changing the Look of Your Phone............... 104
Temporarily Turning Off Calls...................... 105
Using Settings.............................................. 105
Profiles ...................................................111
Viewing Profiles ........................................... 111
Switching Profiles ........................................ 111
How Changing Settings Effects Profiles ...... 111
Temporary Profiles ......................................112
Creating Profiles .......................................... 113
Editing Profiles............................................. 113
Deleting Profiles...........................................113
Setting Call Filtering..................................... 114
iv
Nextel®Customer Care ........................ 115
Domestic Customer Care............................. 115
Nextel Worldwid e
®
Customer Care..............116
Understanding Status Messages......... 117
®
Nextel
Conditions of Service ........................... 121
Terms and
Safety and General Information........... 133
RF Operational Characteristics....................133
Portable Radio ProductOperationandEME
Exposure......................................................133
Electro Magnetic Interference/Compatibility 136
Medical Devices...........................................136
Operational Warnings .................................. 137
Operational Cautions ...................................138
Accessory Safety Information ......................139
Page 7

MOTOROLA LIMITED WARRANTY ......141
Limited Warranty
Motorola Communication Products
(International).........................................145
Patent and Trademark Information ......149
Index .......................................................151
v
Page 8

vi
Page 9

DECLARATION OF CONFORMITY
Per FCC CFR 47 Part 2 Section 2.1077(a)
Responsible PartyName: Motorola, Inc.
Address: 8000 West SunriseBoulevard
Plantation, FL 33322 USA
Phone Number: 1 (800) 453-0920
Hereby declares that the product:
Product Name: i730
Model Number: H63XAN6RR4AN
Conforms to the following regulations:
FCC Part 15, subpart B, section 15.107(a),
15.107(d) and section 15.109(a)
Class B Digital Device
Note: Thisequipment hasbeentested and found
to comply with the limits for a Class B
digital device,pursuant to part 15 of the
FCC Rules. These limitsaredesigned to
provide reasonable protection against
harmful interferenceina residential
installation. This equipment generates,
uses and can radiate radio frequency
energy and, if not installed and used in
accordance with the instructions, may
cause harmful interference to radio
communications. However,there is no
guarantee that interference will not occur in
a particular installation.
If this equipmentdoes cause harmful
interference to radio or television reception,
which can be determined by turning the
equipment off and on, the user is encouraged
to try to correctthe interference by one or
more of the following measures:
• Reorient or relocate the receiving
antenna.
• Increasethe separation between the
equipment and receiver.
• Connect the equipment intoan outlet on a
circuit different from that to which the
receiver is connected.
• Consult the dealeroran experienced
radio/TV technicianfor help.
vii
Page 10

viii
Page 11
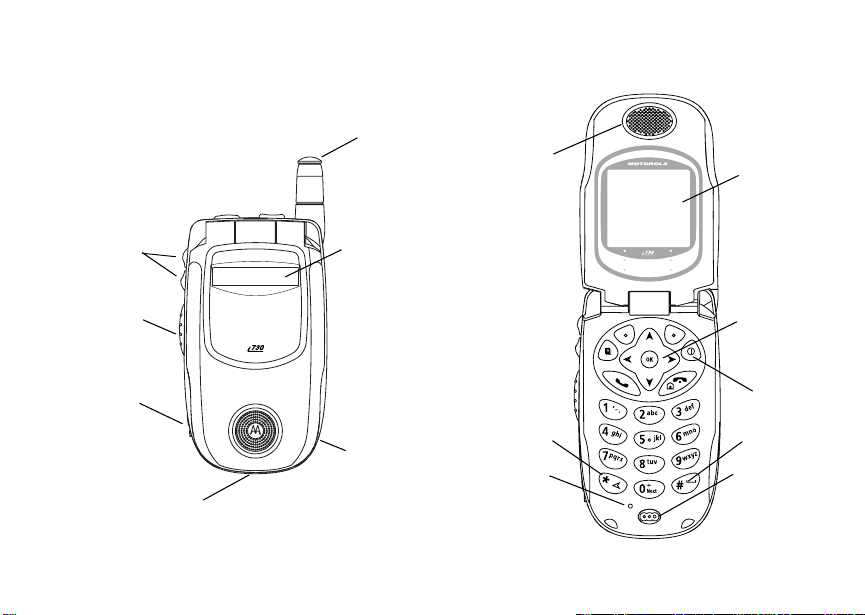
Getting Started
volume
controls
PUSHTO TALK
(PTTTM) button
audio jack
accessory connector
antenna
one-line
display
TM
speaker
(in back)
earpiece
back key
light sensor
full-sized
display
navigation
key
power
button
space key
microphone
1
Page 12

Getting Started
p Power button.
Navigation key — press the arrows to
scroll through menus and lists.
O OK key — selects highlighted item;
answers calls.
m Menu key — accesses context-sensitive
menus.
A Option key — selectsthe option appearing
above it on the display.
s Send key — places phonecalls.
e End key — ends phone calls; returns to
idle screen; in browser mode, returns to
Net mainmenu.
2
t Acts like s when the flip is closed; turns
Direct ConnectTM/ Group Connect
speakeron and off; usedwithvoice names
TM
and voice records.
. Acts like e when the flip is closed;
accessesrecent calls;sendsincomingcalls
to voice mail.
To start using your i730 phone:
• Make sure your SIM card is in place.
• Charge the battery.
• Activateyourservice.
• Enable over-the-air se curity.
Page 13

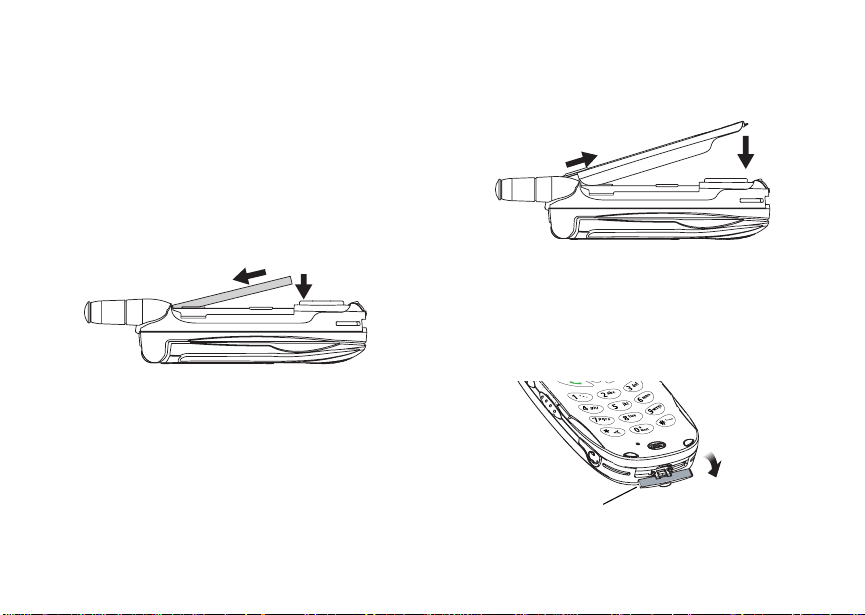
Removing the Battery Door
Removing the Battery Door
1 Make sure the phone is powered off. See
“Powering On and Off” on page 6.
2 Slidetherelease button back until it releases the
battery door.
speaker
3 Allow the battery door to pop up, slide it forward,
and removeit fromthebackof yourphone.
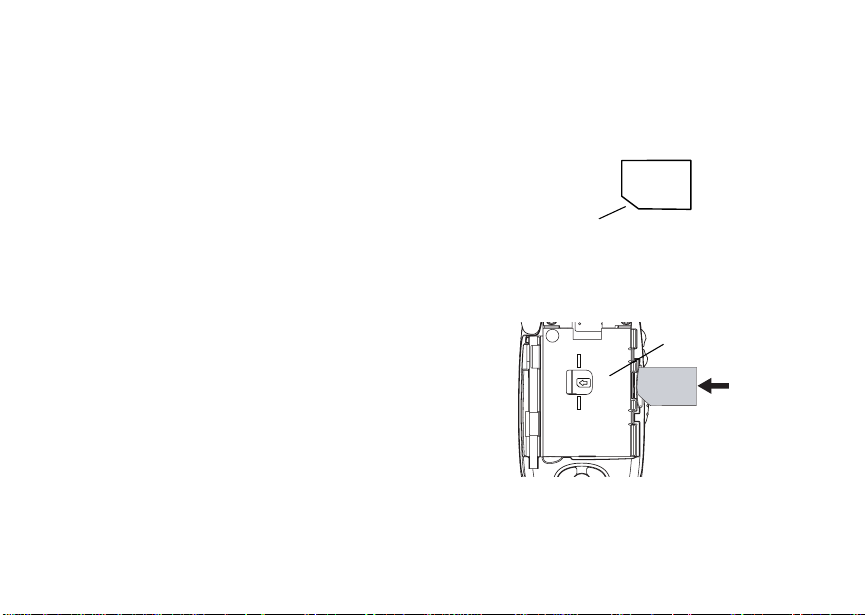
Locating Your SIM Card
Your SIM (Subscriber Identity Module) card is a
small piece of white plastic located in the SIM card
holderinthe back of your phone, underneath the
battery.
SIM card
If thereisnoSIMcard in yourphone, contactNextel
Customer Care at 1-800-639-6111.
3
Page 14
Getting Started
Battery
Inserting the Battery
Yourphone comes with a StandardLithium Ion
Battery.
1 With the phone powered off, remove the battery
door.
2 Insert the top of the battery into the battery area.
Press the bottom of the battery to secure it.
4
3 Replace the battery door and press it gently until
you hear a click.
Charging the Battery
Yourphone comes with a rapid travelcharger.
1 Plug the charger into an electrical outlet.
2 Open the connector cover.
connector
cover
Page 15
Battery
3 Plug theotherend of the charger into the
accessory connector.
ChargerAttached appears on the full-sized
display.
Tip: To remove the charger from the accessory
connector: Press the buttonsonthesidesof
theplug.Pulltheplugstraightout.
4 If you have purchased optional batteries or
chargers, see “Charging Times”.
Note: While the phone is charging, the keypad
backlight will not illuminate.
Charging Times
SeeyourLithiumIonbatteryandtravelchargerto
determine the appropriate charging times.
Recommended charging times:
Battery Charger
Rapid Standard
Standard
Lithium Ion
High
Capacity
Lithium Ion
For best results, charge the batteries within the
temperature rangeof50°Fto104°F(10°C to 40°C).
Prolonged charging is not recommended.
2 hours 4 hours
3hours 7hours
5
Page 16

Getting Started
Removing the Battery
1 With the phone powered off, remove the battery
door.
2 Remove the battery by pushing the battery toward
the antennaand lifting it out.
Battery Use and Maintenance
• The MotorolaiDEN ApprovedLithium Ion
chargers provide optimum performance.Other
chargers may not fully chargethe iDEN Lithium
Ion battery or may yield a reduced number of
lifetime charge cycles.
• Extreme temperatures degrade battery
performance. Do not store the battery where
temperatures exceed 140°F (60°C) or fall below
4°F (-20°C).
• LithiumIonbatterieshave a self dischargerate
and without use, lose about 1% of their charge
per day.
6
• The battery capacity is degraded if the battery is
stored for long periods while fully charged. If long
term storage is required, store at half capacity.
Powering On and Off
To power yourphone on:
1 Open the flip.
2 Press p.
As yourphone connects to the network, you willsee
a connecting message.Whentheidlescreen
appears, the phone is ready to use.
Page 17

Activating S erv ice
To power yourphoneoff:
1 Open theflip.
2 Pressandhold p.
Activating Service
The first time you power on your phone, your service
is activated.
A screen then appears prompting you to select Ok
to updateyourbrowser information. Thisscreen will
only appear during initial activation. See “Enabling
Over-the-Air Security”.
Enabling Over-the-Air Security
To receive Over-the-Air Radio Service Software
(OARSS)Securityyoumust enablesecurity thefirst
time you power on your phone or within 20 days of
first activation of your phone.
1 Press A under Ok.
Note: If you press A under Later, the idle screen
willappear.Thenexttime you select Net
from themainmenu, you will be prompted
to enable security before you can use
NextelOnline services.
2 You are prompted to enable security. Press A
under Yes. A seriesofscreens and then the
default homepage displays.
3 Press e to return to the idle screen.
Within 24 hours of enabling security, you will receive
a Net alert containing yourPersonal Telephone
Number (PTN), Nextel Customer Care number,
DirectConnect number,andTalkgrouplistsfor
Group Connectcalls.
Note: If you are transferring your phonenumber
to Nextelfromyourpreviouscarrier,that
number will be automatically programmed
into the Contacts list for all other handsets
that were part of your order. For more
information, go to www.nextel.com/WLNP.
1 When you receive a Net alert saying New
Browser Message - Receive Programming
Info,pressA under Goto.
2 Youare prompted to accept changes to your lists.
Press A under Ok.
3 You areprompted againto acceptchanges to
your lists. Press A under Ok.
4 A confirmation screendisplays.Press A under
Ok.
5 Press e to return to the idle screen.
Finding Your Phone Number
1 Press m to access the main menu.
2 Scroll to My Info.
7
Page 18

Getting Started
3 Press O.
4 Scroll to see yourinformation:
•Name— Enteryour name.See“Entering Text”
on page 33.
•Line1and Line 2 — your phone numbers for
phone lines 1 and 2. These are filled in when
you receiveyour first Net alert after enabling
over-the-air security on your phone.
• Direct Connect— YourDirect Connect
numberisthe numberthat others use to
contact you using DirectConnect service. It is
filledinwhenyoureceive yourfirstNetalert
after enabling over-the-air security on your
phone.
• Group ID — the number of the Talkgroup you
havejoined.
• Carrier IP — the IP address assigned to
Nextel. It is filled in when you registerfor
packetdata services.
•IP1Addressand IP2 Address —theIP
addresses assigned to you for using the
Internet with your phone.
•Ckt— Your circuit datanumber is the number
youuseifyouwanttouseyourphoneto
transfer circuitdata.See“Using YourP hone as
a Modem”onpage88.Youreceive thisnumber
from Nextel.
8
• ServiceStatus— This informationmaybe
used by Nextel Customer Care if there is a
problem with your phone’s services.
Completing S etup
Joining a Talkgroup
When you enable over-the-air security, you receive
a list of Talkgroups that have been set up for you if
you subscribe to this service. The Talkgroup list is
saved to Contacts.
To receive Group Connect calls made to any of
theseTalkgroups,youmustjoin the Talkgroup.
1 Press A underContcs. -or-
From the main menu,scroll to Contacts and
press O.
2 Scroll to the Talkgroup you want to join.
3 Press A underJoin.
Note: YouwillnowbeabletoreceiveGroup
Connect communications from this
Talkgroup only.Youcanonlymonitor one
Talkgroup at a time.
Page 19

Completing Se tup
Setting Up More Talkgroups
You can set up more Talkgroups in three ways:
• Using Group ConnectManagement on MyNextel
at www.nextel.com
• Contacting your Nextel Sales Representativeat
the time of activation
• Using Wireless Manager to create, manage, and
delete Talkgroups
When you createyour Talkgroups, you can select
your own Talkgroup numbers.
YoucanjoinanewTalkgroupbypressing# and
entering the number using thekeypad. Then press
A under Join.
Nextel®Voice Mail
You must set up your voice mail box before you can
retrieve messages. See “Setting Up Your Voice Mail
Box” on page 45.
Nextel Worldwide®Service
You can use your phoneto make calls
internationally in selectcities using otheriDEN
networksbycalling Customer Care to activate
international dialingon your account. Countries in
whichyoucan use your phoneinclude Argentina,
Brazil, Canada, Philippines,Israel, Mexicoand
Peru*.
* Credit approval may berequired. Other conditionsmay apply.
®
Customizing Features
You can control many features of your phone,
including the size of the text on the display, the way
youaccessmainmenuitems,andthevolumeof
incoming sound, rings, and other tones. See
“Customizing YourPhone” on page 103.
9
Page 20
Getting Started
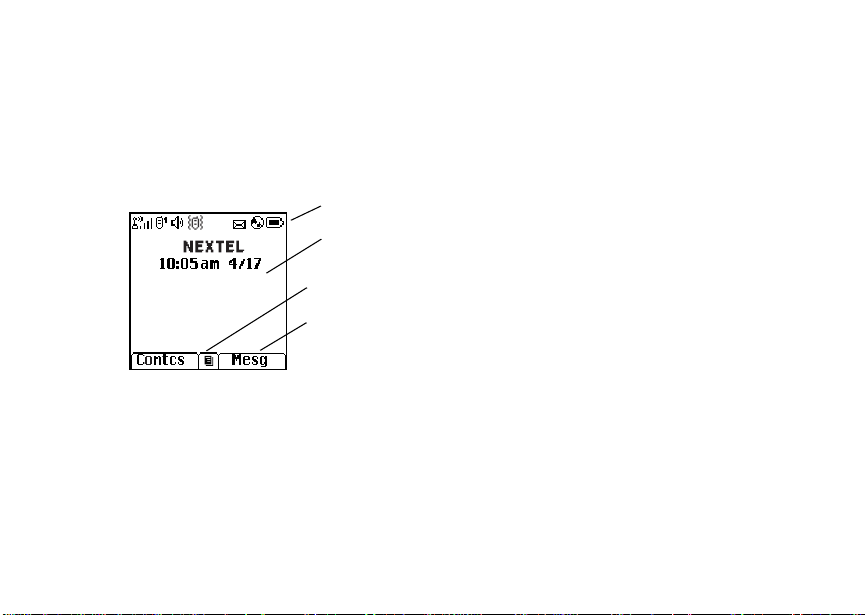
Phone Basics
Any time yourphoneispowered on, the display
provides you with information and options.
The one-line display shows a shortened version of
the full-sized display. To see more information, open
the phone cover.
The screen shown above is the idle screen. The idle
screen appears when yourphone is on, but not
engaged in any activity.
Text Area
This area displays menus, messages, names,
phone numbers, and otherinformation.
10
status icons
text area
menu icon
display options
Display Options
Two display options appear at the bottom of most
screens. Youselect a display optionbypressingthe
option key below it.
Menus and Lists
Yourphone’s features are arrangedin menus,
submenus, and lists.
Toaccesstheitemsinamenuorlist,scrollusing
the navigation key at the top of your keypad. This
key letsyou scroll up, down,left,or right. Holding
down the appropriate part of the navigation key
speeds up scrolling.
Inthisguide, thissymbol > tellsyoutoselectamenu
or listitem.Forexample, Settings > Security
means:
1 Scroll to Settings on the main menu.
2 Press O to see the Settings screen.
3 Scroll to Security.
4 Press O to see the Security screen.
Page 21

Phone Basics
Quick Access to Main Men u Items
Each arrow in the navigation key and O can be
used to access a main menu item from the idle
screen. Each of these keys is assigned to a main
menu item when your receive your phone. To assign
different main menu items,see“Personalize
Features” on page 107.
OK Key
Pressing O:
• Selects thehighlightedmenuitem orlistitem
• Sets options
• Confirmsactions
• Places and answercalls
• From the idle screen, accesses ring tones list.
This is the defaultsetting.You can assign a
different main menu item to O.
Menu Key
Many features provide context-sensitive menus that
let you access relate d features and actions.Them
icon appears any time a context-sensitive menu is
available. Pressm to access the menu.
Main Menu
All your phone’s features can be accessed through
the main menu. Youcanset the main menu to
appearasa list or as large icons (see“Setting the
Menu View”onpage 105).
Net Access to Nextel Online
a
Java Apps Java applications on your
q
Settings
b
Display/Info
Phone Calls
DC/GC Options
Personalize
Volume
Security
Advanced
Ring Tones
m
VibeAll
list of ring tones
Ring Tones menu
VoiceRecord Record and play audio
c
services. See page 79.
phone.Seepage 59.
Customize yourphone.
Seepage103.
Assignring tones and turn
ringer off. See page 65.
messages. See page 81.
11
Page 22

Getting Started
My Info View personal phone
j
n Downloads Provides a catalog of ring
GPS Find yourapproximate
l
12
information, including
phone numberand Direct
Connectnumber. See
page 7.
tones, wallpaper, games
and applications that you
can download directlyfrom
your phone.Browse
throughthecatalogtoadd
a new ring tone, a
wallpaper to serve as the
backgroun d imageon your
phone,a game for
entertainment, or an
applicationthat servesyour
business and productivity
needs. Items in these
catalogs change daily, so
check regularly for fresh
content.
geographical location. See
page 69.
Contacts
d
new contactform
list of contacts
Contacts menu
Messages
e
Voice Mail
Net Alert
TextMsgs
Call Forward Set callforwardingoptions.
f
Datebook
o
new event form
list of events
Datebook menu
Memo Store a number to access
g
Call Timers Phone usageinformation.
h
Recent Calls
i
list of calls
recentcallsmenu
Call Setup menu
Shortcuts Createshortcuts to
s
Create, view, store,edit
contacts. See page 37.
Access messages. See
page 53.
Seepage57.
Schedule appointments.
Seepage93.
later. See page 43.
Seepage87.
Lists recent calls. See
page 31.
screens.Seepage 101.
Page 23

Phone Basics
Profiles
p
new profileform
list of profiles
Profiles menu
Call Alert
k
list of call alerts
Call Alerts menu
Groupsof settingyouapply
together. See page111.
Lists callalerts.S ee
page 29.
Status Icons
Status icons appear at the top of the display. Some
appearatall times. Others appear only whenyour
phone is engagedin certain activitiesor when you
have activated certain features.
abcd
efgd
opqr
s
A
B
Battery S trength — A fuller battery
indicates a greater charge.
Signal Strength — More bars next
to the antenna indicate a stronger
signal.
Phone In Use — Your phone is
active on a phone call.
Direct Connect In Use —Your
phone is activeon a DirectConnect
call.
C
12
GL
IJ
HK
M Q
u
wxT
yz
DE
Talkgroup In Use — Your phone is
activeon a Group Connect call.
Active Phone Line —1indicates
phoneline 1 is readyto make calls;2
indicates phone line2 is ready to
make calls.
Call Forward — Your phone is set to
forwardcalls. See “Call Forwarding”
on page 57.
Ringer Off — Your phoneis setnot
to ring. See “Setting Your Phone to
Vibrate” on page 65.
Speaker Off — Sets DirectConnect
and Group Connectsound to come
through the earpiece rather than
through the speaker. Your phone
does not ring forDirect Connect and
Group Connect calls if Alert Type is
set to Silent or Vibrate.
Messages— Youhave one ormore
messages.See “Messages” on page
53.
Internet — You are ready to browse
the internet or are browsingthe
internet using a secure connection.
13
Page 24

Getting Started
U
YZ
N O
Airplane Mode — Your phone isset
to Airplane Mode. See “Temporarily
Turning Off Calls” on page 105.
Packet Data — You are ready to
transfer packet data or are
transferringpacket data.See “Using
Your Phone as a Modem” on page
88.
TTY — You are ready to use your
phonetomakecallsusinga
teletypewriter device.See “Making
TTY Calls”onpage 89.
SIM Card Security
Your SIM card stores all your Contacts and protects
your personal information. Since this information is
stored on your SIM card, not in your phone, you can
remove the information by removing your SIM card.
Note: Except for makingemergency calls,your
phonewillnotfunction without the SIM
card.
To prevent unauthorized use of your phone, your
SIM card is protected by a PIN that you enter each
time the phoneis powered on. You can changethe
PIN or turn off the requirement that it be entered.
14
Turning the PIN Requirement On and Off
When the SIM PIN requirement is off, your phone
can be used withoutentering a PIN.
Important: When the SIM PIN requirementis off, the
When the SIM PIN requirement is on, you are
prompted to enter yourPINeachtime you power on
your phone.
Note: If aSIMPIN isrequir ed, yourphone willnot
1 From themainmenu, select Settings > Security
>SIMPIN.
2 Select On or Off.
3 Enter the currentSIM PIN.
Note: Whenyoureceive yourphone, theSIM PIN
4 Press A underOk.
personal data on your SIM card is not
protected. Anyone can use your phone
and access your personal data.
function until the SIM PIN is entered,
exceptfor making emergency calls.
is 0000. Change your PIN to prevent
fraudulent use of t he SIM card(see
“Changing the PIN” on page 15).
Page 25

SIM Card Security
Entering the PIN
1 When the Enter SIM PIN Code screen appears
afteryou power on your phone, enter your SIM
PIN.
2 Press A under Ok.
The message SIM Unlocked displays.
Important: If you enter your PIN incorrectly 3 times,
your SIM card is blocked. To unblock
your SIM card, you must contact Nextel
Customer Care. See “Unblocking the
PIN”.
Changing the PIN
Note: The SIM PIN requirement must be turned
on in order to access this feature.
1 From the mainmenu,select Settings > Security
> Change Password > SIM PIN.
2 At the Enter Old SIM PIN screen, enter the
current SIM PIN.
3 Press A under Ok.
4 At the Enter New SIM PIN screen, enter the new
4- to 8-digit SIM PIN.
5 Press A under Ok.
6 At the Re-enter New SIM PIN screen, re-enter
the new SIM PIN to confirm.
7 Press A under Ok.
Changed: SIM PIN displays.
Unblocking the PIN
If you enter your PIN incorrectlythree times,your
SIM card is blocked. To unblockyour SIM card, you
must contact Nextel Customer Care to get a PIN
Unblock Code (PUK).
Important: If you unsuccessfully enter the PUK code
To unblockthePIN:
1 Press *#m1.
2 At your Nextel Customer Care representative’s
request, provide the information neededtogive
you a PUK code.
3 Select Unblock PIN.
4 Enter the PUK code.
5 Enteranew4-to8-digitSIMPIN.
6 Re-enter your SIM PIN.
Note: Thesestepsmustbe performed in quick
10 times, your SIM card is permanently
blocked and must be replaced. If this
happens, all data is lost. You will get a
message to contact Nextel Customer
Care. Except for making emergency
calls,your phone will not function with a
blocked SIM card.
succession.
15
Page 26
Getting Started
If you enteredthecodes properly, SIM Unlocked
appears on the display.
Inserting and Removing Your SIM Card
The SIM card is designedforoptimal Contacts
storage and feature use. For Nextel SIM card
compatibility information, visit www.nextel.com/sim.
If you remove your SIM card and use it with another
phone, or use another SIM card with your phone,
the following information is erased:
• The recent callslist
• Call forwarding settings
• Net ale rts
• InformationstoredinMemo
• 3 most recent GPS Enabled locations
• Voice records
• Voice names
• Datebook events
• Optionssetusing the Personalizemenu
Note: In some cases, Contacts may not be
accessible if you move your SIM card to
another phone. Contacts entries created
with your i730 phone are not readable by
an older iDEN SIM-based phone.
16
Inserting Your SIM Card
1 With your phone poweredoff, removethe battery
door and battery.
2 Hold your SIM card as shown.
cut corner
3 Carefully slide your SIM card into your phone until
it lines up with the marks above and below the
SIM card holder.
SIM c ard
holder
Page 27
Locking theKeypad
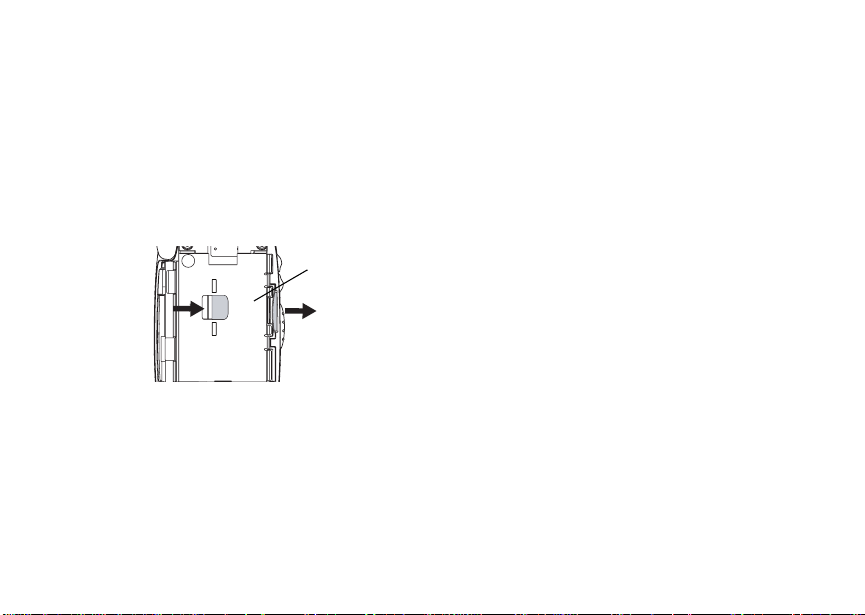
Removing Your SIM Card
Important: Toavoid loss or damage, do not remove
your SIM card fromyour phone unless
absolutely necessary.
1 With your phone powered off, remove the battery
door and battery.
2 While holding the tab down, slide your SIM card
out of the SIM card holder.
SIM card
holder
Note: Protectyour SIM card as you would any
delicate object. Store it carefully.
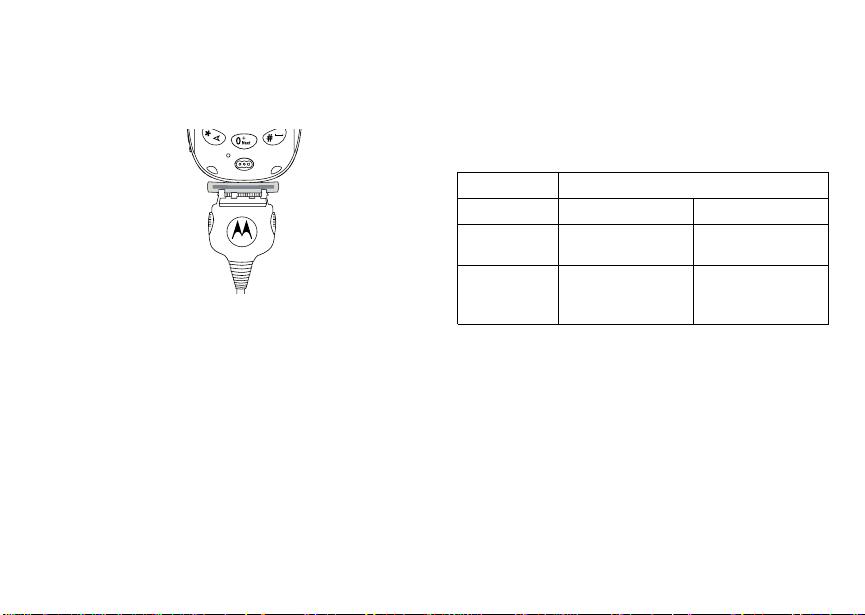
Locking the Keypad
Locking the phone’s keypadprevents its buttons
frombeing pressed.When thekeypad is locked,you
can only:
• Power the phone on and off
• Unlock the keypad
• Respond to incoming calls, messages, and alerts
Important: Emergency calls cannot be placedwhile
To lock the keypad:
1 From the idle screen, press m.
2 Press *.
If you press a key while the keypad is locked,
instructions for unlocking the keypad display briefly.
To unlock thekeypad:
1 From the idle screen, press m.
2 Press *.
While the keypadislocked, you can respond to
incomingcalls, messages,andalert s just as you do
when the keypad is not locked. When finished, press
e to returntothe idle screen.Thekeypad remains
locked.
the keypad is locked.
17
Page 28

Getting Started
You also havethe option of setting yourphone to
automatically lock the keypad if there has been no
activity for a specified time.
1 From the main menu, select Settings > Security
> Keypad Lock.
2 To lockthe keypad immediately, selectLock
Now. You will be given the option to press m and
* to lock and unlock the keypad.
3 To seta specifictimeforthekeypad to lock if
therehasbeen no activity, selectAuto Lock and
then select a time.
The keypad can be set to lockin 5, 10,15 or 20
minutes if the keypad is not touched during the
specified time. To turn the auto lock off, repeat
step 3 and select Off.
Accessories
Yourphone comes with a StandardLithium Ion
Battery, rapid travel charger,andholst er.
Various accessories are availableforuse with your
i730 phone, including cases, vehicle battery
charger, batteries, Hands-Free accessories and
more.
18
To order additional accessories, go to
www.nextel.com orcall 1-800-Nextel6.Youcanalso
contact your Nextel Authorized Sales
Representative or stop by any Nextel-owned Retail
Store. For information on Nextel retail store
locations, go to www.nextel.com.
Wireless Local Number Portability: Bringing Your Phone Number From Another Carrier
If you are bringing your phone number from another
carrier, there is additionalinformation aboutcertain
features on your Nextelphone that you need to be
aware of. Go to www.n extel.com/WLNP for more
details.
Nextel®Customer Care
NextelCustomer Care: 1-800-639- 6111 or dial 611
from your i730 phone.
NextelWorldwideCustomerCare: +1-360-662-5202
(toll-free from your i730 phone).
Page 29

i730 Phone Menu Tree
Net
Java Apps
Java Applications (if any)
Deinstall
Permissions
License Info
Java System
Reset System
Delete All
Settings
Display/Info
Phone Calls
DC/GC Options
Personalize
Volume
Security
Advanced
Ring Tones
VibeAll On/Off
Available Ring Tones
Vibrate
Silent
Assign To
Assign w/vibe
Overview
Memory Usage
Delete
VoiceRecord
[New VoiceRec]
VoiceRecords (if any)
Label
New
Lock
Add To
Memory
Delete
Delete All
My Info
Name
Line 1
Line 2
Direct Connect
Group ID
Carrier IP
IP1 Address
IP2 Address
CKT
Service Status
Downloads
GPS
Position
Privacy
Interface
Contacts
[New Contact]
Search
New
Capacity
Filter
Call Setup
Contacts (if any)
Edit
New
Search
Delete Contact
Delete Number
Capacity
Filter
Call Setup
Messages
Voice Mail
Net Alert
Text Msgs
Memory
Delete All
Call Forward
All Calls
-
-
-
Detailed
To
Status
If Busy
If No Answer
If Unreachable
Status
Datebook
[New Event]
Go To Today
Go To Date
Week View
Month View
Setup
Events (if any)
Edit
New
Go To Today
Go To Date
Week View
Month View
Setup
Delete
Copy
Call # in Event
Alert # in Event
Talkgroup
Memo
Store to Cntcs
Cancel
Delete
Call Timers
Last Call
Phone Reset
Phone Lifetime
DC/GC Reset
DC/GC Lifetime
Circuit Reset
Circuit Lifetime
Kbytes Reset
Nextel®CustomerCare
Recent Calls
Recent Calls (if any)
Store
Delete
Delete All
Call Alert Queue
Call Setup
Shortcuts
[New Entry]
Shortcuts (if any)
Edit
New
Reorder
Delete
Delete All
Profiles
[New Profile]
Profiles (if any)
View
Edit
New
Delete
Delete All
Setup
Call Alert
Call Alerts (if any)
Store
Delete
Delete All
Sort By
Recent Calls
19
Page 30

Getting Started
20
Page 31

Making Calls
Your i730 phone makes two types of calls: digital
cellular phone calls and Direct Connectcalls. With
Direct Connect calls, you use your phone as a
long-ra nge, digitalwalkie-talkie.
Phone Calls
With the Flip Open
1 Enter the number you want to call.
2 To place the call:
Press s. -or-
If you enteredthenumber fromthe idlescreen,
press O.
3 To end the call:
Press e. -or-
Closetheflip.
To end a call by closing the flip,you must havethe
Flip to End feature turned on (see “Setting Flip
Actions” on page 86).
With the Flip Closed
1 Select the number you want to call from the
recentcalls list and press t. -or-
Useavoice name to selectnumber andplacethe
call.
2 To end the call, press ..
Direct Connect Calls
1 If the flip is open, enter the Direct Connect
number you want to call. -or-
Iftheflipisclosed,selectthenumberasyou
wouldwhenmaking a phone call.
2 Pressand hold thePTTbutton ontheside of your
phone. Begin talking after your phone emits a
chirping sound.
3 ReleasethePTTbuttontolisten.
Tip: To let someoneknow you want to talk to him
or her on a Direct Connect call,send a call
alert.See“Call Alerts” on page 29.
Dialing Direct ConnectTMNumbers
EveryDirectConnect number has3 parts —anarea
ID, a network ID,anda memberID — with an
asterisk between each of these parts. For example:
999*999*9999.
21
Page 32

Making Calls
When you place a Direct Connectcall, you must
enterthe whole Direct Connectnumber including
the asterisks.
Tip: When you storea DirectConnect numberin
Contacts it is good practice to include the
whole Direct Connect number including the
asterisks in case you travel with yourphone,
or another Direct Connect user whom you
are trying to reach travels withtheir phone,
outside of your network.
Receiving Calls
Phone Calls
When you receiveaphonecall, your phonerings,
vibrates, or lightsupitsbacklight.
Answering
If the flip is closed, press t. -or-
Open the flip. -or-
Press s. -or-
Press O. -or-
Press A under Yes. -or-
Press any number key.
22
To answera callby opening the flip, you must have
theFliptoAnsfeatureturnedon(see“SettingFlip
Actions” on page 86).To answera callby pressing
any key on the keypad,youmusthavetheAnyKey
Ans feature turned on (see “Phone CallsFeatures”
on page 106).
Sending to Voice Mail
If the flip is closed, press .. -or-
Press e. -or-
Press A under No.
Ending
If the flip is closed, press ..
Press e. -or-
Close the flip.
Direct Connect Calls
When you receive a Direct Connect call, your phone
emits a chirping sound or vibrates.
1 Wait for the callerto finishspeaking.
2 Press and hold the PTT button on the side of your
phone.Begin talkingafter your phoneemits a
chirping sound.
3 ReleasethePTTbuttontolisten.
Page 33

Ways to Enter a Number
Ways to Enter a Number
• Use the numbers on the keypad
• Select the number from the recent calls list
• Select the numberfromContacts
• Select a number storedin Datebook
• Redial the last phonenumber called
• Say a voice name into your phone
• Use Speed Dial or Turbo Dial
• Use One Touch Direct Connectto make a Direct
Connectcall
• Use a TTY device — see“MakingTTYCalls” on
page 89
From the Keypad
To enter the numberyouwantto call,press the
numbers on the keypad.
Ifyoumakeamistake:
• To clear a digit, press A under Delete.
• To clearalldigits,pressand hold A under Delete.
• Toinsert or delete a digit anywhere in the string of
digits you have entered, scroll left or right.
• To cancel, pres s e.
®
From the Recent Calls List
The recent callslist stores the last 20 calls you
made or received.
With the Flip Open
1 From themain menu,select Recent Calls.
2 Scroll to the name or number you want to call.
With the Flip Closed
1 Press . to display the most recent call.
2 To view the rest of the recent calls list, press the
volume controls.
You can call the number displayedbypressing t.
From Contacts
If you have numbers stored in Contacts, you can
usethese numbersto makecalls. Forinformationon
entering numbers into Contacts, see “Creating
Entries” on page 39.
1 From themain menu,select Contacts.
2 Scroll to the name or number you want to call.
Tip: To find Contacts entries faster, usethe
keypad to enter the first letter of the name.
3 Place the call now.-or-
Scroll left or right to display the Contacts type for
the number you want to call.
23
Page 34

Making Calls
If you are making a Direct Connect call,yourphone
places the call to the Direct Connect number stored
in the Contactsentry, even if the Direct Connect
icon is not displayed.
If you are making a phone call:
• Your phone places the call to the phone number
assigned to the Contactstypedisplayed.
• If the Contacts type displayed is not a phone
number, yourphone places the call to the phone
numberstoredin the Contacts entry.
• If the Contacts type displayed is not a phone
number and you have more than one phone
number storedinthe Contacts entry, your phone
prompts you to select the phone number you want
to place the callto.
From Datebook
If you have numbers stored as part of events in
Datebook, you can use these numbers to make
calls. For information on storing events in Datebook,
see “Datebook” on page 93.
1 From the main menu, select Datebook.
2 Select thedayof the eventcontainingthe number
youwanttocall.
3 Highlight or select the event containing the
numberyouwantto call.
24
For details, see “Making Calls From Datebook” on
page 98.
Redialing the Last Number
Press and hold s to placea calltothelast phone
number you called.
Using a Voice Name
Ifyouhave created a voicename in Contactsfor the
number you want to call, say the voice name into
your phone to enter the number. See page 38 for
information on voice names.
You can use a voice name to enter a number with
the flipopenorclosed.
1 Press and hold t until a prompt appears telling
youtosaythevoicename.
2 Speaking into the microphone, say the voice
name assigned to the number you want to call.
Yourphone plays the name back to you.
If you are making a phone call, the call is placed
automatically.
Tip: To stop a phone call from being completed,
press . if the flip is closed or press e.
If you are makinga DirectConnect call,press and
hold the PTT button to place the call.
Page 35

Using Speed Dial and Turbo Dial
Each phonenumber stored in Contacts is assigned
a Speed Dial numberwhichyoucan use to enter
that number.
Speed Dial
1 Fromtheidlescreen, use the keypadtoenterthe
Speed Dial number assigned to the phone
numberyouwant to call.
2 Press #.
3 Press s.
Turbo Dial
From the idle screen, press and hold the Speed
Dialnumber (1 through 9) assigned to the phone
numberyouwant to call.
Using One Touch Direct Connect
One Touch Direct Connect sets your phone to call
the most recentDirect Connect numberonthe
recentcalls list, or a Direct Connectnumber you
choose,everytime you press the PTT button. See
“SettingOne TouchDirect Connect” on page 85.
®
TM
Missed Phone Calls
Missed Phone Calls
When you miss a call, this icon V and the number
of phone callsyou havemissed appear briefly.
With the Flip Open
Ifyouwanttodismissthemissedcallmessage,
press A under Back. -or-
If you want to view the missedcallon the recent
calls list, press A under View.
With the Flip Closed
Ifyouwanttodismissthemissedcallmessage,
press ..
If you want to view the missedcallon the recent
calls list, press . twice.
Using Speakerphone
Turning on speakerphone makes incoming sound
come out of the phone’s speaker insteadofthe
earpiece. Speakerphone is available whenever you
areonanactivephonecall.
With the Flip Open
To turn speakerphone on or off:
Press A under Spkr. -or-
Press t.
25
Page 36

Making Calls
With the Flip Closed
When you make a call with the flip closed,
speakerphone is always on.
Opening the flipturnsspeakerphone off.
Using M ute
Muting calls lets you listen to incoming sound
without transmitting sound. Mute is available
whenever you are on an active call.
To turn mute on:
Press A under Mute.
Whilemuteison, Unmute appears as a display
option.
To turn mute off:
Press A under Unmute.
Making Emergency Phone Calls
Your phone supports emergency calling.
Emergency phonecalls can be made even when
your SIMcardis blocked or not in your phone.
Dial 911 to be connected to an emergency response
center. If you are on an active call, you must end it
before calling 911.
26
When you make an emergency call, your phone’s
GPS Enabled feature can helpemergency service
personnel find you, if you are in a location where
your phone's GPS antenna has established a clear
viewofthe opensky and your localemergency
response center has the equipmentto process
location information.See“GPSEnabled” on page
69, and particularly “IMPORTANT: ThingstoKeep
inMind”onpage69and“MakinganEmergency
Call”on page70,formore information on the
limitations of this feature. Because of the limitations
of this feature, alwaysprovide your bestknowledge
of your location to the emergency response center
whenyou make an emergencycall.
Important: Emergency calls cannot be placed while
Important: If you have not registered on the
Important: If youarebringing your phone number to
the keypad is locked.
network, emergency calls cannot be
placed while your SIMcard is in your
phone.
Nextel from your previous carrier, you
may receive a temporary telephone
number while your Nextel phoneis being
programmedwith your permanent phone
number. If you make a call to 911 and the
callfails,the 911emergencyresponse
center will not be able to callyoubackon
Page 37

your Nextel phone ifin the meantime,
your Nextelphone has been
programmed withyour permanent
telephonenumber.
MakingEmergency Phone Calls
27
Page 38

Making Calls
28
Page 39

Call Alerts
Sendinga callalert letstherecipientknowyou want
to talk to him or her on a Direct Connectcall.
When you send a call alert, the recipient’s phone
emits a series of beeps and displays your name or
Direct Connect number.
The recipient can:
• Answer — begin a Direct Connect call with the
sender
• Queue — store the call alert to the call alert
queue, which is a list of call alerts
• Clear — dismiss and deletethecall alert
Sending Call Alerts
1 Enter the Direct Connect number you want to
send to, as you would when making a Direct
Connectcall.
2 Press A under Alert. Ready to Alert appears on
the display.
3 Pressthe PTTbutton untilAlert Successful
appears on the display.
Note: If the alert is not successful, this may mean
thepersonyouaretryingtoreachisona
callor has the phoneturned off.
Receiving Call Alerts
When you receivea callalert , you must answer,
queue,or clear it. Youcannot receive phonecalls or
Direct Connect calls until you do.
To answer a call alert:
Pressthe PTT button to make a Direct Connect
call to the sender.
To queue a call alert:
Press A under Queue.
To clear a call alert:
Press O. -or-
Press A under Clear. -or-
Iftheflipisclosed,press..
Note: The recentcalls listalsostores call alerts
you have received. They appear as Direct
Connect calls.Call alerts remain in your
recent calls list until you delete them or until
they reachtheendof thelist.
Using the Call Alert Queue
When you queue a call alert, it remains in the call
alertqueue until you make a Direct Connectcallto
the senderor delete it.
29
Page 40

Call Alerts
Viewing Call Alerts
1 From the main menu, select Call Alert.
2 Scroll through the list.
Viewing Date and Time
To view the date and time a call alert was received:
1 From the main menu, select Call Alert.
2 Select the call alert you want information on.
Responding to Call Alerts in t he Queue
After you queue a call alert, you can respond to it by
makinga DirectConnect call to the sender or
sending a call alert to the sender.
Making a Direct Connect Call to the Sender
1 From the main menu, select Call Alert.
2 Scroll to the call alert you want to respond to.
3 PressthePTTbuttontobeginthecall.
This removes the call alert from thequeue.
Sending a Call Alert to the Sender
1 From the main menu, select Call Alert.
2 Scroll to the call alert you want to respond to.
3 Press A under Alert. Ready to Alert appears on
the display.
30
4 Press the PTT button untilAlert Successfu l
appearsonthe display.
Deleting Call Alerts
To delete a call alert from the queue:
1 From the callalert queue,scroll to the call alert
you want to delete.
2 Press m.
3 Select Delete.
4 Press O or press A under Yes to confirm.
To delete all call alerts from the queue:
1 From the call alert queue,press m.
2 From the call alert menu, selectDelete All.
3 Press O or press A under Yes to confirm.
Sorting Call Alerts
Tip: You must have at least onecallalert in the
queue to access this feature.
To sort call alerts by the order they were received:
1 From the main menu, select Call Alert.
2 Press m.
3 Select Sort By.
4 Select First on Top or Last on Top.
Page 41

Recent Calls
The recentcalls list storesthenumbers of the 20
most recent callsyou have made and receive d.
If the number of a recent call is stored in Contacts,
the name associat ed with the number appears on
the recentcalls list.
An icon appears beside the name or number
indicating the Contacts type of the number used in
thecall.See“Contacts”onpage37.
For phone calls,aniconappears to the leftof the
name or number giving more information about the
call:
A call you made.
X
A call you received.
W
A missed call.Missed calls appear on the
V
recent calls list onlyif you have Caller ID.
Note: The recent calls list also stores call alerts
you have received. Theyappear as Direct
Connectcalls. Call alerts remain in your
recent calls list until you delete them or until
they reach the end of the list.
Viewing Recent Calls
With the Flip Open
1 From themain menu,select Recent Calls.
2 Scroll through the list.
To get more information on a recent call:
Fromthe recent calls list, selectthecall you want
information on.
This displays information such as the name
associated with the call,thenumber, the date,time,
and duration of the call.
With the Flip Closed
1 Press . to display the most recent call.
2 To view the rest the recent call list, press the
volume keys on the side of your phone.
3 Press . to dismiss the recentcalls list.
Tip: Press t to call the number displayed.
Storing Recent Calls to Contacts
1 From the recent calls list, scroll to the number you
wantto store.
31
Page 42

Recent Calls
2 Press A under Store. -or-
If Store is not one of your options: Press m.
Select Store.
Tip: If Store is not on this menu, the number is
already stored in Contacts.
3 To store the number as a new entry, select [New
Contact]. -or-
To store the number to an existing entry, select
the entry.
4 With the Contacts type field highlighted, scroll left
or right to display the Contacts type you want to
assignthenumber. For informationon Contacts
types,seepage 37.
5 If youwantto add more informationto theentry,
follow the applicable instructions in “Creating
Entries” on page 39.
6 Press A under Done.
Deleting Recent Calls
Todeleteacall:
1 From the recent calls list, scroll to the call you
want to delete.
2 Press A under Delete. -or-
If Delete is notoneof your options: Press m.
Select Delete.
32
3 Press O or press A under Yes to confirm.
To delete all calls:
1 From the recent calls list, pressm.
2 Select Delete All.
3 Press O or press A under Yes to confirm.
Page 43

Entering Text
You can enter textintoyourphone usingthe
traditionalmethodof pressing a key several times
for each character, or by pressing a key once for
each letter while words likely to be the one you want
are chosenfroma database. You can also enter
symbolsand numbers intoa text field.
In screens that require you to enter text, you see the
following icons. These icons tell you which text input
mode you are using:
Alpha — Pressa key severaltimes for each
l
characte r.
Word — Press a key once for each letter while
j
words likely to be the one you want are chosen
from a database.
Symbols — Enter punctuation and other
i
symbols.
Numeric — Enternumbers.
k
When you accessa screen thatrequires you to
entertext, you start in the mode last used.
To choose a text inputmode:
1 At a screen that requires you to enter text, press
m.
2 Selectthe text input mode you want to use. A
checkmark appear s next to thecurrent mode.
Using Alpha Mode
• Press any key on the keypad to enter the letters,
numbers, and symbols on that key. For example,
to enter the letter Y, press 9 three times.
• Typealetterthenscrolluptomakethatletter
uppercase, or type a letter then scroll down to
make that letter lowercase.
• See “Special Function Keys” on page34formore
information on adding spaces, capitalization, and
punctuation.
Using Word Mode
In Word mode,T9 TextInputanalyzestheletters on
the keypad button you press and arranges them to
create words.Asyoutype,T9 Text Inputmatches
your keystrokes to words in its database and
displaysthemostcommonlyusedmatchingword.
You can add you own words to this database.
Entering a Word
1 SelectWord as yourtextinput mode.
2 Typeawordbypressingonekeyforeachletter.
For example,totype“test” press 8378.
33
Page 44

EnteringText
The displayed wordmay change as you type it.
Do not try to correct the word as you go. Type to
the end of the word beforeediting.
3 If the word that appears is notthe desired word,
press 0 to change the word on the displayto
the next most likely word in the database.
Repeat until the desired word appears.
If the desiredword does not appear,youcanaddit
to the database.
Adding Words to the Database
1 Select Alpha as your text input mode.
2 Type the word using Alpha mode.
3 Select Word as your text inputmode.
4 Press #.
The word you typed in Alpha text entry mode is now
in the database.
Note: You cannot storealphanumeric
combinations, such as Y2K.
Choosing a Language
To changethelanguage of the database:
1 At a screenthatrequires you to enter text, press
m.
2 Select Languages.
34
3 Select the languageyouwantf or your database.
Special Function Keys
Some of the phone’s keys assume different
functions while in Alpha or Word mode.
Spaces
Press # for a space.
Capitalization
Press and hold # to make the nextletter typed
uppercase (shift), to make all subsequent letters
typeduppercase (caps lock), or to go back to
lowercase letters.
These icons appear in the top row of your display:
m or X
n or W
When neither of these icons appear, letters typed
are lowercase. Scrollingup aftertyping a letter
makes that letter uppercase.
Note: Your phone automatically makes the first
Shiftison.
Caps lock is on.
letter of a sentence uppercase.
Page 45

Punctuation
Press 1 or 0 to insert punctuation. Continue to
press the key to view the list of symbols available
through that key. Pause to select the symbol you
want.
Note: Additional punctuation symbols are
available in Symbols mode.
Using Numeric Mode
1 Select Numeric as your text input mode.
2 Pressthe numberbuttonson your keypad to
enter numbers.
Using Symbols Mode
1 SelectSymbols as your text input mode.
A rowofsymbols appears alongthe bottom ofthe
phone’s display. Scroll right to view the complete
row.
2 Press O to selectthehighlighted symbol.
Using Numeric Mode
35
Page 46

EnteringText
36
Page 47

Contacts
Contacts stores up to 600 numbers or addresses.
Each Contacts entrycanstoreseveral numbers or
addresses.
Information stored in Contacts is saved on your SIM
card.
A Contacts entry contains:
• A name — A name is required if your are storing
more than one numberor addresstotheentry;
otherwise,itis optional.Typically,thisis the name
of the person whose contact information is stored
in the entry.
• Aringtone—Youcanassignaringtonetoeach
entry. This is the sound your phone makes when
you receivephone calls or call alerts from any of
the numbers stored in the entry.
• A Contacts type — Each number or address
storedmust be assigned a Contacts type:
Mobile phone number
A
Direct
B
Connect #
Work1 phone number
C
Work2 phone number
D
Home phone number
E
Email emailaddress
F
Fax phone number
G
Pager phone number
H
Talkgroup Talkgroup number
I
IP IP address
J
Other phone number
K
• A number or address — Each Contacts entry
must contain a number or address. This may be
any type of phone number, Direct Connect
number, Talkgroup number, emailaddress, or IP
address.
Direct Connect number
37
Page 48

Contacts
Note: Youcanstorenumbersupto64digitslong,
but every 20 digits must be separated by a
pause or wait. See “Creating Pauses and
Waits” on page 41.
• A Speed Dial number — When you store a phone
number, it is assigned a SpeedDial number. You
can accept thedefault Speed D ial number or
change it.
• A voice name — If you createavoicenamefora
number, youcan thendial that number by saying
the voice name intoyourphone. This icon
appears
a voice name is assigned.
P to the left of the Contacts type icon if
Viewing Contacts
To access Contacts:
From the main menu, select Contacts. -or-
Ifyouareonacall:Pressm.SelectContacts.
To view entries:
1 From the Contacts list, scroll to the entry you want
to view.
2 If an entry has more than one number or address
3 Press O to viewtheentry.
38
<> surrounds the Contacts type icon.
stored,
Scrollleft orrighttoview theiconfor eachnumber
storedin the entry.
4 Scroll to view the other numbers and addresses
stored for the entry.
Tip: To viewmoreentri es, continue scrolling.
Searching for a Name
To search for a name in Contacts:
1 From the Contacts list, press A under Search.
-or-
If Search is not one of your options: Press m.
Select Search.
2 Enter the name you want to see. See “Entering
Text”onpage33.
3 Press O.
Yourphone finds the name you entered or the
nearest match.
Showing Only Direct Connect numbers and Talkgroups
To set Contacts to show only entries that contain
Direct Connect numbers and Talkgroupentries:
1 From the Contacts list, press m.
2 Select Filter.
3 Set this option to Show DC.
Page 49

Creating Entries
To set Contactsto show allentries:
1 From the Contacts list, press m.
2 Select Filter.
3 Set this option to Show All.
Creating Entries
A number or address and a Contacts type are
requiredforall Contactsentries. Otherinformationis
optional. You may enter theinformation in any order
by scrolling through the entry details.
After you haveentered the number or address,
Contacts type,andanyother information you want,
you can press A under Done to savetheentry to
Contacts.
To cancel a Contacts entry at any time press, e to
return to the idle screen.
To create a Contacts entry:
1 To access the entry details screen:
Select Contacts > [New Contact]. -or-
From theContacts list,pressm. Select New.
2 Ifyouwanttoassignanametotheentry:
Select Name.
Enterthename.See“Entering Text” on page 33.
When you are finished, press O.
Tip: Press A under Browse to select a name
already in Contacts.
3 Ifyouwanttoassignaringtonetothename:
Select Ringer.
Selecttheringtonetoyouwanttoassign.
4 To assign a Contactstypetothe numberor
address being stored:
SelecttheContacts type field.
SelecttheContacts type you want to assign.
5 To store a number or address:
Select the # field (or ID foranemail address,orIP
for an IP address).
Enterthenumber or address. For phone
numbers, use the 10-digit format. For email
addresses, see “Entering Text” on page 33.
Tip: Press A under Browse to select a number
or address from Contacts, the recent calls
list, or Memo.
When you are finished, press O.
6 If youwantto assign moreoptions to the number,
select [Options]. See “Assigning Options” on
page 40.
7 If you want to add more numbers or addresses to
the entry:
39
Page 50

Contacts
Scroll past the information you already entered.
Enter the additional information for the entry using
step 2 through step 6. You must assign a name to
the entry,ifyou have notalready.
8 Press A under Done.
Assigning Options
1 If you have not already, select [Options].
2 The default Speed Dial numberassigned to a
phonenumber is displayedinthe Speed # field.
Thisis alwaysthenext availableSpeedDial
location.
If you want to assign the phone numberto a
different SpeedDiallocation:
With the Speed # field highlighted, press O.
Press A under Delete to delete the current
Speed Dialnumber.
Enterthe new SpeedDialnumber usingthe
keypad.
When you are finished, press O.
3 Ifyouwanttocreateavoicenameforaphone
number, select Voice Name.
As directed by the screen prompts, say and
repeat the name you want to assign to the
number.Speakclearly into the microphone.
40
4 When you are finished, pressA under Back.
Storing Num bers Faster
To storenumbers to Contactsfromthe recent calls
list, see “StoringRecent CallstoContacts” on page
31.
To store numbers to Contacts from Memo, see
“Memo” on page 43.
To store numbers to Contacts from the idle screen:
1 Use thekeypad to enter the numberyouwant to
store.
2 Press m.
3 Select Store Number.
4 Tostorethenumber as a new entry, select [New
Contact]. -or-
To store the numberto an existingentry, select
the entry.
5 With the Contacts type field highlighted, scroll left
or right to display the Contacts type you want to
assign thenumber.
6 If youwanttoaddmoreinformation to the entry,
follow the applicable instructions in “Creating
Entries” on page 39.
7 Press A underDone.
Page 51

Editing Entries
Editing Entries
1 From the Contacts list, scroll to the entry you want
to edit.
2 Press A under Edit. -or-
If Edit is not one of your options: Press m. Select
Edit.
The entry details screen displays.
3 Follow the applicable instructions in “Creating
Entries” on page 39 to edit the various fields.
Deleting Entries
Delete an Entry
1 From the Contacts list, scroll to the entry you want
to delete.
2 Press m.
3 To delete the entireentry, select Delete Contact.
4 Press O or press A under Yes to confirm.
Delete a Number or Address
1 From the Contacts list, scroll to the entry that
contains the numberor address you want to
delete.
2 Scrollleft or right to displaytheContactstype for
the numberyouwantto delete.
3 Press m.
4 Select Delete Number.
5 Press O or press A under Yes to confirm.
Note: If an entry contains onlyonenumber or
address, deleting the number or address
deletes the entry.
Checking Capacity
To see how many numbers are storedin Contacts:
1 From theContacts list, press m.
2 Select Capacity.
Creating Pauses and Waits
When storing a number, you can program your
phoneto pauseor waitbetween digitswhile dialing.
A pause makes your phone pause for 3 seconds
beforedialingfurther.Await makesyour phone wait
for your response before dialing further.
This feature isusefulwhen using voicemail or other
automated phonesystems that require you to dial a
phone numberand then enter an access number.
To program a pause:
Pressandhold * until the letter P appears. The
P represents a 3-secondpause.
41
Page 52

Contacts
If you store 17035551235P1234, when you select
this numberandmakeacall, your phone dials the
first11 digits, pauses for 3 seconds,then dials the
last 4 digits.
If you want a pause longer than 3 seconds, press
and hold * more than once.EachP represents a
3-second pause.
To program a wait:
Press and hold * until theletterWappears. The
W means your phone waitsbefore dialing further.
If you store 17035551235W1234,whenyouselect
this numberandmakeacall, your phone dials the
first 11 digits and then waits. A message appears
asking if you want to send the rest of the digits.
Press A under Yes to dial the last 4 digits.
Tip: You can create pauses and waits while
dialing a number from the keypad. See
“Creating Pauses and Waits While Dialing”
on page 85.
International Numbers
When storing a number that you plan to use for
international calls, use Plus Dialing:
1 Press and hold 0 for two seconds. A “0”
appears,then changestoa “+”.
42
Note: The network translates the “+” into the
appropriate international accesscode
neededtoplacethecall.
2 Enter the country code, citycodeorareacode,
and phone number.
Forinformationabout makinginternationalcalls, see
“Making International Calls” on page 85.
Page 53

Memo
Memoletsyoustoreanumber,makeacalltothat
number, and save it to Contacts.
To create a memo:
1 From themainmenu, select Memo.
2 Enterthenumber usingyourkeypad.
3 Press O.
Toviewthememolater:
1 From themainmenu, select Memo.
To deletethe memo:
1 From themainmenu, select Memo.
2 Pressandhold A under Delete.
To edit the memo:
1 From themainmenu, select Memo.
2 Enterthe new number.
3 Press O.
To make a call to the memo number:
1 From themainmenu, select Memo.
2 Press s.
To store the memo numberto Contacts:
1 From themainmenu, select Memo.
2 Press m.
3 Select Store to Cntcs.
4 To store the number as a new entry, select [New
Contact]. -or-
To store the number to an existing entry, select
the entry.
5 WiththeContacts typefieldhighlighted, scrollleft
or rightto displayt he Contacts type you want to
assign the number.
6 Ifyouwanttoaddmoreinformationtotheentry,
followtheapplicable instructions in“Creating
Entries” on page 39.
7 Press A under Done.
43
Page 54

Memo
44
Page 55

Nextel®Voice Mail
Note: To receive voice mail messages, you must
firstsetup yourvoice mailbox.
Setting Up Yo ur Voi ce Mail Box
Using your i730 phone,dial your 10-digit Nextel
Personal Telephone Number(PTN). For example:
7035557777. Follow the system instructions to
createa new 4- to 7-digit password, recordyour
name, and record a greeting. When the system
says, “ThankyouforusingNextel VoiceMail,”your
mailbox is set up.
If you are calling froma phoneother thanyouri730,
dial your10-digit Nextel PTN. When you hear the
greeting, press the star key to access your voice
mail box. The system will prompt you to enter your
password. Enter the last seven digits of your Nextel
PTN. Forexample: 5557777.This is your temporary
password.
Youareinthemainvoicemailmenuwhenyouhear
the optionslisted below.
• To play your messages, press 1. (Thisoption
plays only if you have new or saved messages.)
• To record a message, press 2.
• To change yourgreeting, press 3.
• To access your personal options, press4.
If you press * while you are in a sub-menu, you
will go to the previous menu. If you press **,
youwillgotothemainvoicemailmenu.Fromthe
main voice mail menu, press # to exit voice mail.
At any time, you may end the call by pressinge.
Playing Messages
When you receivea new voicemailmessage, you
caneitherlistentoitimmediatelybypressingA
under Call, or later by pressing A under Exit.
These are options available while you are listening
to your messages:
• Backup — press 1.
• Rewind to beginning of message — press 11.
• Pause or continuethecurrent message— press
2.
• Fast forward — press 3.
• Fast forward to end of message — press 33.
• Play the date and time stamp — press 55.
Theseoptionsareavailablewhileamessageis
playing or after it has played:
• Forward the message to anothersubscriber —
press 6.
• Delete the message — press 7.
45
Page 56

Nextel®Voice Mail
• Reply to a message — press 8.
• Save the message — press 9.
• Skip to the next message — press #.
Messages that are not saved or deletedremainin
your mailbox as new messages. All messages are
automatically deleted after 30 days.
To retrieve deleted messages, press *3.This
option only applies to the current voice mail session.
Ifyouendthecall,themessageswillbe
permanently deleted.
Important: After exiting the voice mail session, you
cannot recover deleted messages.
Changing Your Password
1 From the main voice mail menu, press 4 to
accesspersonal options.
2 Press 4 to accesspersonal preferences.
3 Press 1 to modify password.
4 Enter your new password. It must be 4 to 7 digits
long.
Note: It is important that you choose a number
that is easy for you to remember, buthard
for someoneelse to guess. Passwords
using all the same digits, for example
4,4,4,4ora sequential series of digits,
1,2,3,4, will not be accepted.
46
5 Press ** to return to the main menu.
Note: If you forgetyourpassword, contact
Customer Care.
Recording Yo ur Name
When you send,reply to, or copy a message,your
nameresponse precedes themessage. To record
or re-record your name at any time:
1 From the main voice mail menu, press 4 to
accesspersonal options.
2 Press 4 to access personal preferences.
3 Press 3 toaccesstherecordyournameoption.
4 Press 2 to record your name.
5 Press ** to return to the main menu.
Recording Your Active Greeting
You may want to includeoneorallof the following
options in your greeting sothat callers will know they
are available.
• Press 1 to send a numeric message.
• Press 2 to send an operator-assisted message.
(Thisoption is availableonly if you area
subscriber of Operator AssistedMessaging.
Contact Nextel Customer Care for more
information.)
Page 57

Advanced Voice Mail Features
• Press # to skip the greeting and recorda
message immediately.
To record or alter your greeting at any time:
1 From the main voicemailmenu, press 3 to
changeyourgreeting.
2 Press 1 to play, press 2 to record or
re-record,or press7 to delete your active
greeting.
3 Recordyourgreeting and press # when you
have finished.
4 Press ** to return to the main menu.
Advanced Voice Mail Features
Multiple Greetings
You can create up to five different greetings and
designate which greeting willbe your activegreeting
at any given time. The greeting that was recorded
duringyour initial voicemail box setupisgreeting1.
This is your default active greeting.
To record additional greetings:
1 From the main voicemailmenu, press 3 to
access thegreetings menu.
2 Press 4 to modify greetings.
3 Enter the greeting number you wish to create or
modify.
4 Press 2 to record a greeting.
5 Record your greeting and press # when you
have finished.
6 Press ** to return to the main menu.
To select your activegreet ing:
1 From the main voicemailmenu, press 3 to
access the greetings menu.
2 Press 3 to select another greeting to be active.
3 Enter the number of the greeting that you would
liketobeactive.Thesystemwillconfirmyour
active greetingnumber.
4 Press 1 to play your active greeting.
5 Press ** to return to the main menu.
Greetings Schedule
You can chooseto have your greetings
automatically activatedbasedon a pre-determined
time schedule.Byactivating the GreetingSchedule,
Greetings 1, 2, and 3 will automatically play
according to the time schedule listedbelow.
Greeting 1 Evenings and
Weekends
5:00 pm – 7:59 am,
Monday– Friday
24-hours, Saturday
and Sunday
47
Page 58

Nextel®Voice Mail
Greeting 2 Weekday
Mornings
Greeting 3 Weekday
Afternoons
8:00 am – 11:59 am
Monday– Friday
Noon–4:59pm
Monday– Friday
To activate the greeting schedule:
1 From the main voice mail menu, press 3 to
access the greetings menu.
2 Press 9 to activateyour greetingschedule.
3 Press ** to return to the main menu.
Note: The greetingschedule,whenon,will
override any othergreeting that you may
setasactive. Ifagreetingisnot recorded,a
systemstandard greetingwillbeplayed.
Automatic Playback
By default, the playback mode of your voice mail
service is set to normal. This feature automatically
playsandsaves new messageswhen you log in.To
activate automatic playback:
1 From the main voice mail menu, press 4 to
accesspersonal options.
2 Press 4 to accesspersonal preferences.
3 Press 2 to access playback preferences.
4 Press 2 to switchbetween automatic and
normalplayback.
48
5 Press ** to return to the main menu. Changing the Playback Order of Messages
You canselect the orderinwhich you wantunheard
messages to be played. You may listento the last
received messagefirst, or you may listen to the first
received message first.Toselect the orderin which
new messages should be played:
1 From the main voice mail menu, press 4 to
accesspersonal options.
2 Press 4 to access personal preferences.
3 Press 2 to accessplayback preferences.
4 Press 1 to switch between the playback orders.
5 Press ** to return to the main menu.
Recording, Forwarding, and Replying to Messages
Thesefunctions allow you to record andsend,reply
to, or forward a message to an assigned destination
address or group list number. If you recorda
complete or partial message, but do not send it,
NextelVoice Mail service willrefer to this message
as an “in preparation” message.
To recordandsend a message:
1 From the main voice mail menu, press 2 to
record a message.
Page 59

Advanced Voice Mail Features
2 Recordyourmessage and press # to end the
message.
3 Press 9 at the prompt to indicate that you want
to send the messageor press5 for delivery
options.
4 Enterthemailbox number and/or grouplist
number(s). (A mailboxnumber is the 10-digit
NextelPTN of a Nextelcustomer. The Nextel
customer must be in your local callingarea. The
name of the recipient plays if it is recorded.)
5 Press # to send.
6 Press ** to return to the main menu.
Note: You can only send messagesusing this
method to Nextel customers in your home
market.
Delivery Options
After you have created a message, you can assign
themessage to a category before yousend it. Below
is a list of the options that can be applied to a
message:
•Urgent— Recipientwill hear this message
beforeother messages.
•Private—Recipient cannot copythemessage to
another mailbox or phone number.
• Notification of Non-Delivery — You will be
notified if the recipient has not listened to your
message by a certain dateand time.
• Future Delivery — You can specifya time and
date (up to three months in advance) for the
messagetobedelivered.
Note: All dates musthave digits in the MM/DD
format(2 digits for themonthand2 digits
for the date). For example,January 2nd
wouldbe0102.
Important: Once a message has been sent for future
delivery, it cannot beretrieved or deleted.
To set a special delivery option:
1 After recording your message, but before sending
it, press 5 for deliveryoptions.
2 Press the number that corresponds with the
desired delivery option:
• Press 1 for urgent.
• Press 2 for private.
• Press 3 for notification of non-delivery. At
prompt, specify time and date.
• Press 4 for future delivery of messages.At
prompt, specify time and date.
• Press 9 to send the message immediately.
49
Page 60

Nextel®Voice Mail
3 The list of options will be presented again.Select
an additional option or press 9 to send the
message.
4 Enter the destination mailbox or group list number
of the recipient(s).
5 Press # to send.
6 Press ** to return to the main menu.
Working With Group Lists
Thisfeature enables you to creat e a listandassignit
a unique name. Then, you can add mailbox
numbers, grouplists, or individuals. Once you
createa listyoucan send a voice messageto
everyone on the list by entering the group list
number.Youcanhaveupto40grouplists.Eachlist
canholdupto50addresses.
To set up a grouplist:
1 From the main voice mail menu, press 4 to
accesspersonal options.
2 Press 2 to access your Group Lists.
3 Press 2 to createa Group List.
4 Enter the1-or2-digit grouplist numberandpress
#.
5 Recordanameforthelistandpress#.
6 Select group members by mailbox number, group
list,orname.
50
7 Press # to save all entriesadded to the list.
8 Press ** to return to the main menu.
To modifya grouplist:
1 From the main voice mail menu, press 4 to
accesspersonal options.
2 Press 2 to access group lists.
3 Press 4 to modify a group list. Enter the number
of the group list you want to modify.
4 Press 1 to add a new recipient.
5 Press # to save your changes.
6 Press ** to return to the main menu.
Deleting a grouplist:
1 From the main voice mail menu, press 4 to
accesspersonal options.
2 Press 2 to access group lists.
3 Press 3 to delete a group list.
4 Enter the number of the group listyouwantto
delete.T he system will play the name of the
grouplist.
5 Press # to delete the list.
6 Press ** to return to the main menu.
Page 61

Message Forwarding
Note: You can only forward messages to Nextel
customers in your home market.
This feature allowsyouto program your phone to
automatically forward incomingmessages to
another mailbox.There are two typesofforwarding:
notified and silent. Notified forwarding prompts the
callerthat the message willbe forwarded. Silent
forwarding doesnotprompt the callerthatthe
message will be forwarded.
To modify forwarding options:
1 From the main voicemailmenu, press 4 to
access personal options.
2 Press 5 to modifyforwarding options.
3 Select the applicable option below:
• To create a forwarding number, press2.
• If you have already created a forwarding
number, press2 to modify thenumber.
• To enable or disable message forwarding,
press 3.
• To change the forwarding type,press 2.
4 Press ** to return to the main menu.
Advanced Voice Mail Features
51
Page 62

Nextel®Voice Mail
52
Page 63

Messages
To access your voice mail messages, text and
numericmessages, Net alerts, and any other types
of messages you are able to receive, go to the
messagecenter:
1 From themainmenu, select Messages.
2 Selectthetypeofmessage you want to access.
The messagecentershows how many messages
you have of each type. You can listen to, read, or
deletethese messages.
Note: In order for you to access voice mail
through the messagecenter, there must
already be a message in your voice mail
box. If there is no message, you must
accessvoice mailbydialing intoyourvoice
mail box using yourPTN.
Message Notifications
When you receive a message, your phone notifies
youwithtextonthedisplayandanotificationtoneor
vibration. You can access the message or dismiss
the notification.
If you dismiss the notification, the message is not
deleted.It can be accessed through the message
center.
If you are not on a phone call when you receivea
message, your phone soundsa notification tone
every 30 seconds until you access the messageor
dismiss the alert.
If you are on a call when you receive a message,
yourphone maysound a notificationtone during the
call or afteryouendthecall, depending on how you
set your notification options.
Setting Notification Options
To controlwhether yourphonesounds message
notification tones whileyou are on phone calls:
1 From themain menu,select Settings > Phone
Calls > Notifications.
2 Select the optionyouwant:
• Receive All — Tones sound duringcalls for all
types of messages.
• Msg Mail Only — Tones sound during calls for
mail messages; tonesfor allother types of
messages are held until you end calls.
•DelayAll— Tones for all types of messages
are held until you end calls.
Note: Delay All is the default setting.
Tip: Toset notification options during a call: Press
m. Select In Call Setup > Notifications.
53
Page 64

Messages
Voice Mail
When you receivea voicemailmessage, New
Voice Mail Message appears on the display.
Press A under Call.
To dismissthemessage notification:
If the flip is closed, press .. -or-
If the flip is open,pressO or press A under
Back,orclosetheflip.
Thisicon
you that you have a new message.
Sending Unanswered Calls to Voice Mail
To send a phone call to voice mail insteadof
answering it:
If the flip is closed, press .. -or-
Press e. -or-
Press A under No.
If thecaller leaves a message,thisicon
on the display, reminding you thatyouhavea new
message.
54
y appears on the display, reminding
y appears
Text and Numeric Messages
The phone’s display refers to text and numeric
messages as Text Messages.
Thesemessages can beup to 160 letterslong. You
can store up to 20 of these messages.Each
message is stampedwiththedate and time it was
left.
If your phoneis powered off when you receive a
message, yourphone notifiesyou thenexttime you
poweriton.If you are out of your coverage area,
your phone alerts you when you return to your
coverage area.
Yourphone attemptsto deliver these messages
forupto7days.
Tip: While reading a text and numeric message
thatcontainsa phonenumber,you can press
s to call that number.
Receiving a Message
When you receive a text and numeric message, this
icon
w appears on the display.
To view the message:
1 Press A underRead.
2 If the message fills more than one screen, scroll
to read it.
Page 65

NetAlerts
3 To keep themessage, pressO. -or-
To delete the message, scroll to the end of the
message, then press A under Delete.
To dismiss the message notification:
If the flip is closed, press . . -or-
If the flip is open, press A under Back or close
the flip.
This icon
you that you have a new message.
w appears on the display, reminding
Reading from the Message Center
1 From themainmenu, select Messages > Text
Msgs.
2 Selectthemessageyouwanttoread.
3 If the message fills more than one screen, scroll
to read it.
4 To keep themessage, pressO. -or-
To delete the message, scroll to the end of the
message, then press A under Delete.
Net Alerts
Net alertsarenotifications thatyouhave a text and
numericmessages sentfrom:
• An i730 phone
• www.nextel.com
• Any email application
Note: Your phone's SMS address is your
PTN@page.nextel.com. Your phone's
Two-Way Messaging addressisyour
PTN@messaging.nextel.com.
When youreceivea Net alert, a notificationappears
on the display.
If you dismissthenotification,thisicon
on the display,reminding you that you have a new
message.
When you delete a Net alert, the message is not
deleted, but it is no longer accessible throughthe
messagecenter. You can still accessthe message
through Nextel Online services.
T appears
55
Page 66

Messages
56
Page 67

Call Forwarding
Call forwarding sends calls to the phone numbers
you specify. You can forward all calls to one number
or forwardmissed callsto different numbers
depending on the reason you missed the call.
You can forward phone lines 1 and 2 independently.
Forwarding All Calls
When you set your phoneto forward all calls,an
icon appears in the top row of the display:
Phone line 1 is active; calls to phone line 1 are
G
being forwarded.
Phone line 1 is active; calls to phone line 2 are
I
being forwarded.
Phone line 1 is active; calls to phone lines 1
H
and 2 are being forwarded.
Phone line 2 is active; calls to phone line 1 are
J
being forwarded.
Phone line 2 is active; calls to phone line 2 are
L
being forwarded.
Phone line 2 is active; calls to phone lines 1
K
and 2 are being forwarded.
To forward all calls:
1 From themain menu,select Call Forward >
Forward > All Calls.
2 Select To.
If you specified a forwardingnumber for all calls
before, this numberdisplays.
Toforwardcalls tothisnumber, press and hold A
under Back.
To delete this number, press O,thenpressA
under Delete.
3 To enter the number you want to forward callsto:
Enterthenumber usingyourkeypad. -or-
Press A underSearch.SelectContacts, Recent
Calls,orMemo. Select the number you want to
enter.
4 Press O.
All your callsare nowforwar ded to the number you
specified.
Turning Off Call Forwarding
If you don’twantallyour calls forwarded, turn the
feature off:
1 From themain menu,select Call Forward > To.
2 Set thisoption to Off.
57
Page 68

Call Forwarding
All your callsarenow sent to your phone.
Calls you miss are forwarded according to the
options set for missed calls. By default, missed calls
are forwarded to voice mail.
Forwarding Missed Calls
You can specify a forwarding number for each type
of missed call:
•IfBusy— Your phone is on a callortransferring
data.
•IfNoAnswer— Y oudo not answer on the first 4
rings.
• If Unreachable — Yourphone is out of coverage
or poweredoff.
Note: If you want a type of missed call sent to
voicemail, the call forwarding number for
that typeof missedcallmust be your voice
mail access number. Your voice mail
accessnumber is your area code + first 3
digitsofyourPTN+ MAIL (6245).
Toforwardmissedcalls:
1 From the main menu, select Call Forward >
Forward > Detailed.
2 Select If Busy to specify a forwarding numberfor
callsreceived when your phone is busy.
58
3 If you specified a forwarding number for this type
of call before,this number displays.
To forward callstothisnumber, press A under
Back and go to step 6. -or-
To delete this number, press O, then pressand
hold A under Delete.
4 To enter the number you want to forward this type
of call to:
Enterthenumber using yourkeypad. -or-
Press A underSearch.SelectContacts, Recent
Calls,orMemo. Select the number you want to
enter.
5 Press O.
6 Repeat step 2 through step 5 for If No Answer
and If Unreachable.
7 When you are finished, pressA under Back.
Viewing Call Forwarding Settings
1 From the main menu, select Call Forward >
Forward > All Calls.
2 With To highlighted, pressA under Status.
Page 69

Java Applications
Your phone arrives with Java applications installed
and ready to run.You can download and install
more Java applications.
To download and install more Javaapplications, go
to www.nextel.com/idenupdate. You can also check
the Downloads menu optionon your phonefora
catalog of additional items available for purchase
and download.
Note: Using Java applications may cause your
phone to use up more battery power than
otherusesof yourphone.
Running Applications
Torunanapplicationthathasashortcutonthemain
menu:
1 From themain menu,select theappli cation or
suite of applications you want to run.
2 Ifyouh ave selecteda suite ofapplications,select
the application you want to run.
To run an application thatdoesnothave a shortcut
on the main menu:
1 From themainmenu, select Java Apps.
2 Select the application or suite of applications you
wantto run.
3 Ifyouhave selectedasuite of applications, select
the application you want to run.
Tip: If you don’t hear the soundsassociated with
the Java application, select Settings >
Volume and check the volumes of Java
Speaker and Java Earpiece.
Suspending Applications
When you suspendan application,itdoes not stop
running. It goes to the background so that you can
run another application in the foreground.
To suspend an application:
Press e or close the flip.
To view your suspendedapplications:
From theJavamenu, select Suspended Apps.
You can have up to 3 applications runningatone
time — 1 running in the foreground and 2 in the
background.
Resuming Applications
You can resume a suspended application at any
time. This brings it to the foreground.
1 From theJavamenu, select Suspended Apps.
2 Selectt he applicationyouwanttoresume.
59
Page 70

Java Applications
Ending Appl i c ations
To end an application:
1 From the main menu, select Java Apps.
2 If the application you want to end is part of a suite
of applications, select the suite.
3 Scroll to the application you want to end.
4 Press A under End.
To end all applications:
1 From the main menu, select Java Apps.
2 Scroll to Suspended Apps.
3 Press m.
4 Select End All.
5 If youwant to end all applications without letting
them exit, pressA under EndNow.
Tip: You can also end applications from the
Suspended Apps screen.
Downloading Applications
If you want to run more Java applications, you can
download them intoyourphone. Go to
www.nextel.com/idenupdate for a selection of Ja va
applications and downloading instructions.
60
Installing Applications
Before running most applicationsyouhave
downloaded, you must install them.
1 From the main menu, select Java Apps.
2 Select the application or suite of applications you
want to install.
Installation messages appear as the application
installs.
3 If you want to create a shortcut to the Java
application on the main menu: Press A under
Next.PressA under Yes. -or-
Ifyoudonotwanttocreateashortcut,pressA
under Done.
4 Press O.
5 Press A underDone.
Deleting Applications
To delete an application:
1 From the main menu, select Java Apps.
2 Scroll to the application you want to delete.
3 Press m.
4 Select Deinstall.
5 Press O or press A under Yes to confirm.
Page 71

Managing Memory
6 When your phone has finished deleting the
application, press A under Done.
To deleteall Java applications:
1 From themainmenu, select Java Apps.
2 Scroll to Java System.
3 Press m.
4 Select Delete All.
5 Press O or press A under Yes to confirm.
Managing Memory
To view the amount of memory available for Java
applications:
1 From themainmenu, select Java Apps > Java
System.
2 Press A under Next.
3 To see morememory information,press A under
Next again.
Deleting Java applications frees memory.
Note: Java application data is stored in your
phone using the same memory space used
to store voice records, ring tones, and
wallpaper images. Deleting some of these
other items frees memory space for Java
applications.
Shortcuts on the Main Menu
When you install an application, you can create a
shortcut to the application on the main menu.
Tocreateashortcuttoanapplicationthatisalready
installed:
1 From themain menu,select Settings >
Personalize > Menu Options > Add/Remove
Apps. -or-
From themainmenu: Press m. Select Main
Menu Setup > Add/Remove Apps.
2 Scroll to view the list of Java applications. Any
applicationthat has a shortcut on themainmenu
has a checkmarknext to it.
3 Scrolltotheapplicationyouwanttocreatea
shortcut for.
4 Press O.
5 Press A under Done.
To remove a shortcut:
1 From themain menu,select Settings >
Personalize > Menu Options > Add/Remove
Apps. -or-
From themainmenu: Press m. Select Main
Menu Setup > Add/Remove Apps.
61
Page 72

Java Applications
2 Scroll to view the list of Java applications. Any
application thathas a shortcut on the main menu
has a checkmark next to it.
3 Scroll to the application you want to remove the
shortcut for.
4 Press O.
5 Press A under Done.
Java Applications and GPS Enabled
Some Java applications can make use of your
phone’s GPS feature to determine the approximate
geographical locationof yourphone. (See “GPS
Enabled” on page 69 for more information on the
GPS feature.) However, for privacy reasons, you
may not always want Java applications to access
the location of your phone. Your phone protects your
privacy by giving you theoption to block allor some
Javaapplicationsfrom accessing the locationof
your phone.
Setting Privacy for All Java Applications
These options control the privacy of all Java
applicationsonyourphone:
62
• Restricted —NoJavaorsimilarsoftware
applicationsmayaccess the location of your
phone.However,location informationmaystill be
available to the phone’s owner,fleet manager, or
account administrator.
•Unrestricted— All Java applications may access
the location of your phone,without notifying you.
• By Permission — When aJava application
attempts to access the location of your phone,
you are promptedt o give permission. However,
location information may still be available to the
phone’s owner,fleet manager, or account
administrator.
See “Setting Privacy Options” on page 75 for
information on choosing these options.
Granting or Denying Permission
If you chooseBy Permission, you mustgrant or
denyeachJava application accessto the location of
your phone when the application requests access
for the first time. You may be required to grant or
denysubsequent requests fromthe same
application,depending on the privacysetting you
choose for the individual Java application (see
“Setting Privacy for Each Java Application” on page
63).
Page 73

Java Applications and GPS Enabled
When a Java application requestsaccesst o t he
locationof yourphone, a screen appearsinforming
you.
To deny this request:
1 Press A under Deny. The application does not
access the location of your phone.
2 Select the denying option you want:
• Always— If the application requests access to
the location of your phoneagain, therequest is
denied without notifying you.
• For this session — If the application requests
access to the location of your phone again
beforeyou poweroffyour phone, therequest is
denied without notifying you.
•OnlyOnce— If the application requests
access to the location of your phone again, you
are prompted to grant or deny permission.
To grant this request:
1 Press A under Grant. The application accesses
your phone’s location.
2 Selectthe grantingoption you want:
• Always— If the application requests access to
the location of your phoneagain, therequest is
grantedw ithout notifying you.
• For this session — If the application requests
accessto the location of your phoneagain
beforeyou poweroffyour phone,the requestis
granted withoutnotifying you.
•OnlyOnce— If the application requests
accesstothe location ofyourphone again,you
arepromptedtograntordenypermission.
Setting Privacy for Each Java Application
After a givenJavaapplicationrequestsaccess to
the location of your phone for the first time, you have
the opportunity to set the GPS privacy option for that
Java application.
1 From themain menu,select Java Apps.
2 Scroll to the application or suite of applications
you want to set the privacy option for.
If the application has requested access to the
location of your phone, m appearswhenyou
highlight the application.
3 Press m.
4 Select Permissions.
5 Selecttheprivacy optionyou want for this
application:
•Always— The application always has
permission to access the location of your
phone,without notifyingyou.
63
Page 74

Java Applications
•Ask— When the application requests access
tothelocationof your phone,you areprompted
to grant or deny permission (see “Granting or
Denying Permission” on page 62).
• Never — When the application requests
access to the location of your phone, the
requestis denied without notifyingyou.
64
Page 75

Ring Tones
To set the ring tone your phone makes when you
receive phone calls, message notifications, or call
alerts:
1 From the main menu, select Ring Tones.
2 Make sure VibeAll is set to Off.
3 Scroll through the list of ring tones and select the
oneyouwant toassign.Vibrate setsyour phoneto
vibrateinsteadofmakingasound;Silent setsyour
phone to neithervibrate nor make a sound.
Tip: Highlighting a ring tone lets you hear it.
4 Select the features you want to assign the ring
toneto.
5 When you are finished, press A under Done.
Setting Your Phone to Vibrate
You can set your phone to vibrate instead of making
a sound whenyou receive all phone calls, Direct
Connect calls, Group Connect calls, messages
notifications, and call alerts.
1 From the main menu, select Ring Tones >
VibeAll.
2 Set this option to On.
Tip: Pressing the volumecontrolstoturn down the
volumeas far as possiblesets VibeAll to On.
To set your phone to vibrate instead of making a
sound for some features but not others:
1 From themainmenu, select Ring Tones.
2 Make sure VibeAll is set toOff.
3 Select Vibrate fromthe list of ring tones.
4 Selectthe features you want to set to make no
sound.
5 When you are finished, press A under Done.
Note: To set ring options for Direct Connect calls
and GroupConnect calls, see “SettingYour
PhonetoVibrate”onpage103.
These icons indicate how the ringer is set.
Q The phone alwaysvibrates instead of ringing.
The phone does not ring for phone calls.
M
Group Connect calls and DirectConnect calls
u
are heard through the earpiece, not the
speaker.
These icons may appear at the same time.
65
Page 76

Ring Tones
Assigning Ring Tones to Contacts
You can set the ring toneyourphonemakes when
you receivephone calls or call alertsfrom someone
youhavestoredinContacts.
1 From the main menu, select Ring Tones.
2 Make sure VibeAll is set to Off.
3 Scroll through the list of ring tones and select the
one you want to assign.
4 SelectAContact.
5 SelecttheContactsentryyouwanttoassignthe
ring tone to.
Ring and Vibrate
To set your phone to ringand vibrate when you
receive phone calls or call alerts:
1 From the main menu, select Ring Tones.
2 Make sure VibeAll is set to Off.
3 Scroll throughthelist of ring tones and highlight
theoneyouwanttoassign.
4 Press m.
5 Select Assign w/Vibe.
6 Select the features you want to set to ring and
vibrate.
66
7 When you are finished, press A under Done.
This icon
S appears on the display.
Viewing Ring Tone Assignments
1 From themainmenu, select Ring Tones.
2 Make sure VibeAll is set to Off.
3 Highlight anyring tone.
4 Press m.
5 Select Overview.
6 Scroll to view ring tones assigned to features and
Contact entries.
Downloading More Ring Tones
If youwant to use otherring tones,you can download
them intoyourphonef or afee.Go to
www.nextel.com/idenupdateforaselectionof custom
ring tones and downloading instructions.
You can also check the Downloads menu optionon
your phonefor a catalog of additional items available
for purchase and download.
Note: Ring tonespurchased from this web site
may be downloaded only once. If you delete
a ring tone from yourphone, you must
purchase it again to download it again.
Page 77

Managing Memory
To view the amount of memory available for custom
ring tones:
1 From the main menu, select Ring Tones.
2 Make sure VibeAll is set to Off.
3 Highlight any ring tone.
4 Press m.
5 Select Memory Usage.
Deleting custom ring tones frees memory.
Note: Ring tones are storedinyourphone using
thesamememoryspaceusedtostorevoice
records, Java applications, and wallpaper
images.Deleting someoftheseother items
frees memory space for ring tones.
Deleting Custom Ring Tones
To deletea customring tone:
1 From the main menu, select Ring Tones.
2 Make sure VibeAll is set to Off.
3 Scroll to the ring tone you want to delete.
4 Press m.
5 Select Delete.
6 Press A under Yes to confirm.
Managing Memory
67
Page 78

Ring Tones
68
Page 79

GPS Enabled
Your phone’s GPS Enabled feature uses information
from Global Positioning System (GPS) satellites
orbiting the Earth to determine theapproximate
geographical location of your phone,expressed as
latitude and longitude.The availability and accuracy
of this location information (andthe amountoftime
that it takes to calculate it) will vary depending on
the environment in which you are using the GPS
feature. For example, GPS location fixes are often
difficult to obtain indoors, in covered locations,
betweenhigh buildings, or in other situations where
you have not establisheda clearbroadview of the
sky. SEE: “IMPORTANT: Things to Keep in
Mind”.
When you make a 911 emergency call, the GPS
feature of your phone can help emergency
personnel locate you if your phone has adequate
accessto GPS satellitesignalsand your emergency
response center is equipped to process such
information.
You can also use the GPS featureto view your
approximate location.Location informationappears
on the phone’s display.
Java applications loaded on your phone can also
request your location. If your phone is connected to
a laptop computer or similar device, software
running on that device can request your location. To
protectyourprivacy, you can contro l whether these
requests are granted.
IMPORTANT: Things to Keep in Mind
Ifyouareusing theGPS feature of your phonewhile
driving, please give full attention to driving and to the
road.
Where adequate signals from multiple satellites
are not available (usuallybecause your GPS
antennacannot establish a view of a wide area of
open sky), the GPS feature of your phone WILL
NOT WORK. Such situations include but are not
limited to:
• In underground locations
• Inside of buildings, trains, or other covered
vehicles
• Under any other metal or concrete roof or
structure
• Between tall buildings or under dense
tree-cover
• Near a powerful radio or television tower
69
Page 80

GPS Enabled
• When your GPS antenna is covered (for
example, by your hand or other object) or
facing the ground
• Intemperatureextremesoutside theoperating
limits of your phone
Walking or driving very slowly may also
substantially reduce GPS performance.
Even where location information can be
calculated in such situations, it may take much
longerto do so, and your location estimat e may
not be as accurate. Therefore, in any 911 call,
always report the location to the emergency
response centerif you can and if you cannot,
remain on your phone for as long as the
emergency response center instructs you.
Even where adequate signals from multiple
satellites are available, your GPS feature will
only provide an approximate location, often
within 150 feet (45 meters) but sometimes much
further from your actual location. Advice on how
to improve GPS performance is provided in
“Enhancing GPS Performance” on page 72.
While the GPS feature of your phone can be a
valuable navigati onal aid, it does not replace the
need forcareful navigating andgoodjudgment.
Never rely solely on one device for navigation.
Remember that the accuracy of the location
70
informationandthetimeneededtoobtainitwillvary
depending on circumstances, particularly the ability
to receive signals fromadequate numbersof
satellites.
On emergency calls,your phone uses assistance
informationfrom the phone network to improve the
speed andaccuracy of your phone’slocation
calculation:ifsuchassistance information becomes
unavailable, it may reduce the speed and accuracy
of the location calculation.
The satellites used by the GPS feature of your
phonearecontrolledbytheU.S. government and
are subject to changesimplementedinaccordance
with the Department of Defense GPS user policy
and the Federal Radionavigation Plan. These
changes may affect the performance of the GPS
feature of your phone.
Making an Emergency Call
Dial 911 to be connected to an emergency response
center.Ifyouareonanactivecall,youmustendit
before calling911.
Whenyoumakeanemergency911call,theGPS
feature of your phone begins to seek information to
calculate your approximate location. It will take the
GPS feature of your phone some time to
determine your approximate location. Even
where yourphone has good access to sufficient
Page 81

Viewing Your Approximate Location
GPSsatellitesignals andnetwork assist data,it may
take 30 seconds or more to determine the
approximate location. Thistime will increasewhere
thereis reduced access to satellite signals. When
your approximate location is determined, it is made
available to the appropriat e emergency response
center.
In some cases, yourlocal 911 emergency
response center may not be equipped to receive
GPS location information. For this reason,and
becausetheGPS location infor mation reported is
only approximate or may not be available in your
location(see “IMPORTANT: ThingstoKeep in
Mind” on page 69),always report your location to
the 911 operator you speak to when making an
emergency call,if able,just as you would when
using a phone without GPS capabilities.
Note: If you are concernedabout whether your
local911 emergency response center is
equipped to receive GPS location
information, contact your local authorities.
In general, if your phone has access to signals from
more GPS satellites, your locationwill be
determined faster and more accurately than if your
phone has accessto signals from fewerGPS
satellites.
If your phone doesnot haveadequate accessto
GPS satellites signals, the locationof the nearest
celltow er in contactwithyourphone is automatically
madeavailableto the emergency responsecenter,if
the center has the capability to receive such
information.
See “Enhancing GPS Performance” on page 72 for
information on how to help yourphone determine
your location.
Viewing Your Approximate
Location
1 From themain menu,select GPS > Position.
2 Scroll to view the entire screen.
This displays the following information about the last
time yourlocation was calculated:
• The time (as GreenwichMean Time) and date
that the location was last calculated
• The approximate location, expressed as latitude
and longitude
• The estimated accuracy of the calculated
location.Thisestimateofaccuracyisonlyavery
rough estimate and may vary substantially from
the actualaccuracy of the approximate location
information reported.
71
Page 82

GPS Enabled
• The number of satellites used to calculate the
location. In general, moresatellites make for
better accuracy.
To calculate your location again:
Press A under Rfrsh.
It may takeyourphone severalminutes to complete
theprocessofdetermining yourlocation.During this
time,a messageusually appears on your phone’s
display saying your phone is scanning for satellites.
For tips on getting the best location calculation, see
“Enhancing GPS Performance”.
The Position screendisplays the updated
information.
To cancel a location calculation before it is
completed:
Press A under Cancel to return to the Position
screen. -or-
Press e to return to the idle screen.
Each timeapproximate locationof yourphone is
calculated, the latest location information is stored in
your phone and remains there even when your
phoneis powered off. You will see thisinformation
the next time you view the Position screen.
72
Ifyoureceived a phone calloralertwhileattempting
to determine your location, the Position screen will
disappear, but your phone will continue attempting
to determine its location. If it is successful, the new
location information will be displayed the next time
you view the Position screen.
Enhanci ng GPS Per f ormance
Sometimes the GPS feature of your phone may be
unable to complete a location calculation
successfully. If this happens whenyouare making
an emergency call, the location of the nearest cell
tower in contact with your phone is made available
to the appropriate emergency response center if the
centerhas the capabilitytoreceive such
information. If this happens when you are trying to
view your location on the phone’s display, you will
see a message indicating that your phone cannot
accesssatel lites.
Page 83

Enhancing GPS Performance
To improve accuracy and increase your chances of
a successfulcalculation, do the followingw hile your
phone is determining your approximate location:
• Stay in the open. The GPS feature works best
wherethere is nothingbetween your phoneand a
largeamount of open sky. If possible, go outside,
away fromtall buildings andfoliage. While
performanceinabuildingisimprovedbymoving
closertowindows, glass with certainsun
shielding films may block satellite signals.
• Extend your phoneantenna.
• Hold your phone to enhance reception. Signals
from GPS satellites are transmitted to your GPS
antenna, which is in yourphoneantenna. Hold
your phone away from your body, giving the
antenna clear access to satellite signals. Do not
cover the antenna area with your fingers or
anything else.
GPS antenna
73
Page 84

GPS Enabled
• Stand still.If possible, stand stilluntil your phone
isfinished determiningyour location.Moving your
phone at a walkingpacewhile your phoneis
calculating yourapproximate locationmay
substantially decrease GPS performance.
• In a car. When using the GPS Enabled feature in
a car, position your phone so that the GPS
antennahas good accessto GPS signalsthrough
the car’s windows. Typically, the GPS antenna
has best accesstoGPS signals in a car when
placednear a window.
Note: Although moving your phone at a walking
pace decreases GPS performance, moving
it at the speed of a moving car does not.
• Stay in network coverage. Depending on who
your service provider is, the networkwillprovide
your phonewithinformation that helps determine
your location more quickly andaccurately.
74
Updating Satellite Almanac Data
Another waytokeepthe GPS feature ofyourphone
working well is to keep your satellite almanac data
up to date.
The United States government maintainsan
almanac of data about whereGPS satellites are as
they orbit the Earth.This information isavailable to
your phone. Keeping your satellite almanac up to
datehelps yourphonedetermineyour locationmore
quickly.
Thealmanac contains informationabout thelocation
of satellites, their operational status, and other
satellite information.Keeping this information
updated enhances the performance of your GPS
feature. In most cases, your phone willbe able to
get a fix in strong satellite signal conditions with
outdated almanac data, but it may take longer.
Note: When you make an emergency call, your
phone does not rely upon the almanac to
determine your location.
If your satellite almanac data is out of date, your
phone may prompt you to update it. Follow the
instructions that appear on the phone’s display. You
may be asked to go to a web site or call a customer
care number.
Page 85

Setting Privacy Options
Setting Privacy Options
Your phone’s GPS privacyoptions control whether
Java applications on your phone or other software
applicationsmay view thelocation of your
phone.Youmayset yourphone tooneof these GPS
privacy options.
Note: Privacy options do not applyto the
transmission of location information during
emergency 911 calls.
To set your GPS privacy options:
1 From themainmenu, select GPS > Privacy.
2 If yourGPS PIN security featureisenabled, enter
your GPS PIN. (See “Setting the GPS PIN
Security Feature” formoreinformation.)
3 Select the privacy option you want:
• Restricted — No Java or similar software
applicationsmay view thelocation of your
phone.However, locationinformation may still
be available to the phone’s owner, fleet
manager, or account administrator.
• Unrestricted — All applications may view the
locationof yourphone, without notifying you.
• By Permission —Whenanapplication
attempts to view the location of your phone,
youwillbepromptedtogivepermission.
However, location information may still be
available to the phone’s owner,fleet manager,
or account administrator.
Setting the GPS PIN Security Feature
To preventyour GPS privacy settings from being
altered without your knowledge, your GPS privacy
optioncanbe protected by a PIN.
When you receiveyourphone, the GPS security
feature is turned off, so you do not have to enter a
GPS PINtoaccessyourGPS privacy options. Ifyou
turn thisfeature on,youwillberequired to enter a
GPS PIN to access your GPS privacy options.
To turn the GPS Enabled security feature on or off:
1 Fromthe mainmenu,select Settings > Security
> GPS PIN.
2 Select On or Off.
3 Enter the current GPS PIN.
Note: When you receiveyour phone, your GPS
PIN is 0000.
4 Press A under Ok.
75
Page 86

GPS Enabled
To changeyourGPS PIN:
1 From the main menu, select Settings > Security
> Change Password > GPS PIN.
2 Enter the current GPS PIN.
Note: When you receiveyourphone, yourGPS
PIN is 0000.
3 Press A under Ok.
4 Enterthenew4-to8-digitGPSPIN.
5 Press A under Ok.
6 Enterthenew4-to8-digitGPSPINtoconfirm.
7 Press A under Ok.
Using GPS with Map Software
You can use the GPS feature of your phone to
provide approximate location data to a laptop
computer or similar device thatisrunning interactive
map software such as that made by DeLorme or
Microsoft. This way,ifyourphone has good access
to GPSsignals,your approximatepositionon amap
canbemadeavailableasyoutravelinavehicle.
To do this, connect your phone to your laptop (or
other device) with a data cable and set your phone
to transmit data (see “Getting Started” on page 77).
Your phone then provides your approximate location
to the device running the map software,which
76
displays your location on a map. Your phone
provides an updated locationevery second and the
mapsoftware displays yourchanginglocation on its
map.
See “Enhancing GPS Performance” on page 72 for
more details on obtaining good location information.
Note: Because your phone is continuously
determining your location, using the GPS
feature of your phone with map software
uses the phone’s battery power quickly.
Software Compatibility
Your phone sends location information to your
laptop or other deviceusing the standard National
MarineElectronics Association (NMEA)format.
Yourphone supports output messages in
NMEA-0183 format and supports the following
NMEA-0183 sentences: GGA, GLL, GSA, GSV,
RMC, and VTG.
Themapsoftwarerunningonyourlaptoporother
device must support NMEA 3.0.
Page 87

Using GPS with Map Software
Getting Started
To connect your phone to your laptop or other
device:
1 Open the connector cover.
connector
cover
2 Withthe phone’sdisplay facing up,insert thedata
cable’s connector into the accessory connector,
until you hear a click.
3 InsertthedataplugintotheCOMportofyour
laptop or other device.
Make sure no other application is using the COM
port selected.
Make sure the COM port settings of your laptop or
otherdevice are set to the following:
• Bits per second:4800
• Data bits: 8
• Parity: None
77
Page 88

GPS Enabled
• Stopbits: 1
• Flow control: Hardware
To set your phone to send location information to
your laptop or other device:
1 From the main menu, select GPS > Interface.
2 Set NMEA OUT to On.
Yourphone is now sending location data to your
laptop or other device.
To stop your phone from sending location data to
your laptop or other device:
Set NME A OUT to Off.
Each timeyoupoweryour phoneon,NMEA OUT is
automatically set to Off.
78
Page 89

Nextel Online®Services
You can use your phone’sNetfeature to accessa
suite of wireless data productsknown as Nextel
Online (NOL) services. Services include Two-Way
Messaging, Web and Premium Web, Address Book,
Mobile Email, and wireless access to AOL
Messenger
With the exception of the Two-Way Messaging
Expressservice, NextelOnline*services requirethe
activation of a Nextel Onlineservi ce plan. To order,
call 1-800-NEXTEL6or contact your Nextelsales
representative.
* Nextel Online isonly available in the continental United States.
TM
.
NOL Services
• Two-Way Messaging — Discretely sendand
receivetextmessages viayour Nextelphone, any
email addre ss, or www.nextel.com with Two-Way
Messaging.Forcustomerswho purchasedaFree
Incoming plan,there is a nominalchargeforeach
message sent and received. Or, customershave
the option of subscribing to a Two-Way
Messaging Premier package for enhanced
functionality and unlimited messaging.
• Web — access the wireless Internet from your
Nextelphone.
®
Instant
• Premium Web — access any site on the wireless
Internet, conduct topic and keyword searches,
bookmark sites and applications, and customize
your phone's browser menu.
• AddressBook — programyour Contacts fromthe
Internet.
• Mobile Email — access and send email from your
Nextelphone.
®
• AOL
Instant MessengerTM— send and receive
instant messages in real–time through a
handset-based interface.
Accessing NOL Services From Your Phone
You must firstenable securityon your phoneto
receive NOL services. See “Enabling Over-the-Air
Security” on page 7.
1 Press m toaccessthemainmenuandselect
Net.
YourNOL home pagedisplays.
2 Choosetheservice you want to access.
To access yourTwo-Way Messaging Service:
Selectthe Text Messagingapplication from the
Net menu.
79
Page 90

Nextel Online®Services
To access the Web:
Select Web Sites, Marketplace,orSearch
To access Address Book:
Select BusinessTools > Address Book
To access MobileEmail:
Select Email & More > Mobile Email
®
To access AOL
Instant MessengerTM:
Select Email & More > AIM
Note: Many screens will require you to enter text.
For information on entering text, see
“EnteringText” on page 33.
Navigation Keys
•Home—Presse to return to your home page.
Tip: Press e twicetoreturntoyourphone'sidle
screen.
•Back—Press* to return to a previous screen.
•Scroll— A scroll bar on the left of the phone’s
display indicates that additional text can be
viewed.Scroll using the navigation key.
80
Tip: While navigating through Nextel Online
screens, a number may appeartotheleft of
theapplicationortopicyouwanttoaccess.
Press the corresponding number on the
keypad for quickeraccessto thatapplication
or topic.
When transmitting highly personal or sensitive data,
such as a credit card number, this icon
E appears,
indicating thatthedata is encryptedduring
transmission.
Note: You may be askedto(re)enablesecurityas
Nextel adds new services or upon your
return to the U.S.aftertraveling.
For more information and multimedia demos, go to
www.nextel.com. You can also get one page
service-specific guides called Customer Quick Start
Guides and other instruction for NextelOnline
services at www.nextel.com.
Page 91

Voice Records
A voice recordis a recording you make with your
phone and can play back.You can recordnotes to
yourselforphone calls.
Your phone can storeupto 20 voice records.
Creating Voice Records
Torecordanotetoyourself:
1 From themainmenu, select VoiceRecord >
[New V oiceRec].
2 Say the messageyouwantto record into the
microphone.
Tip: To stop recording beforeyouare finished,
press A under Pause. To start recording
again,press A under Resume.
3 When you are finishedrecording, press O.
Toaddtotheendofvoicerecord:
1 From themainmenu, select VoiceRecord.
2 Scroll to the voice record you want to add to.
3 Press m.
4 Select Add To.
5 When you are finishedrecording, press O.
To record a phone call:
1 Whileonan active call, press m.
2 Select Record.
3 When you are finished recording, press O.
Note: Recording of phone callsis subject to
applicable laws regarding privacy and
recording of phone conversations.
Playing Voice Records
1 From themain menu,select VoiceRecord.
2 Select the voice record you want to play.
3 To stop the voice record while it is playing, press
O.
Tip: Tofast forward, scroll right. To rewind, scroll
left. To pause or resume, press any key.
Labeling Voice Records
When you create a voice record, it is labeled with
the time and date it was recorded. You can then
rename it with a custom label.
1 From themain menu,select VoiceRecord.
2 Scroll to the voice record you want to label.
3 Press A under Label.
4 Enterthelabel youwantto assign. See “Entering
Text” on page 33.
81
Page 92

Voice Records
5 Press O.
Deleting Voice Records
To delete a voice record:
1 From the main menu, select VoiceRecord.
2 Scroll to the unlocked voice record you want to
delete.
3 Press m.
4 Select Delete.
5 Press O or A under Yes to confirm.
To delete all voice records:
1 From the main menu, select VoiceRecord.
2 Scroll to any voice record.
3 Press m.
4 Select Delete All.
5 Press O or A under Yes to confirm.
Locking Voice Records
When you lock a voice record,itcannot be deleted
until you unlock it.
1 From the main menu, select VoiceRecord.
2 Scroll to the voice record you want to lock or
unlock.
3 Press m.
82
4 Select Lock to lock the message. -or-
Select Unl ock to unlock the message.
When a voice record is locked, this icon
next to it.
R appears
Managi ng Me mory
To view the amount of memory available for voice
records:
1 From the main menu, select VoiceRecord.
2 With [New VoiceRec] highlighted, press A under
Memory. -or-
With any voice record highlighted, press m.
Select Memory.
To free more memory by deleting all unlocked voice
records:
1 From the voice records memory screen, press A
under Delete.
2 Press O or A under Yes to confirm.
Note: Voice records are storedin your phone
using the samememoryspace used to
storeJava application data,ring tones,and
wallpaper images.Deleting someof these
otheritems frees memory spacefor voice
records.
Page 93

Advanced Calling Features
Call Waiting
Call Waiting lets you receive a second call while on
an active call. Call Waiting is always available,
unlessyou turnitoff for a specific call.
Ifyouareonacallandreceiveasecondcall,your
phone emitsa tone and displa ys a messagesaying
youarereceivingasecondcall.
To accept the secondcalland put the active call on
hold:
Press A under Yes.
To accept the secondcalland end the active call:
1 Press e.
Yourphone rings with the secondcall.
2 Answerthesecond call.
To declinethe secondcall:
Press A under No. If you subscribe to voice mail,
the call is forwarded to your voicemailbox,
unless you set Call Forward for If Busy to a
different number.
Turn Off Call Waiting
To turn off Call Waiting duringa call:
1 Press m.
2 Select In Call Setup > Call Waiting.
3 Set thisoption to Off.
Tip: Toturn Call Waiting back on while still on the
call, setthis option to On.
To turn offCall Waitingforthenext call you make or
receive:
1 From themain menu,select Settings > Phone
Calls > Call Waiting.
2 Set thisoption to Off.
CallWaitingisturnedbackonwhenyouendthe
call.
Switching Between Calls
Any time you have one call active and one call on
hold, to make the call on hold activeandputthe
active call on hold:
Press A under Switch. -or-
If Switchis not one of your options: Press m.
Select Switch.
83
Page 94

Advanced Calling Features
Putting a Call on Hold
1 Whileonanactivecall,pressm.
2 Select Hold.
If you want to make the call active again, press A
under Resume.
Calling 2 People
Putting a Call on Hold, Making a Second Call
1 Place or receive a phone call.
2 While the call is active, press m.
3 Select 2nd Call. This puts the callonhold.
4 Enter the second phone numberyouwanttocall.
Tip: For quick ways to enterthe number, press
m.
5 Press O or press s to place the call.
To end the second call and make the call on hold
active again:
Press e.
Tomakethecallonholdactiveandputtheactive
callon hold:
Press A under Switch.
84
Making a 3-Way Call
1 Placeorreceiveaphonecall.
2 While the call is active,press m.
3 Select 3Way. This puts the call on hold.
4 Enter the second phone number you want to call.
Tip: For quick ways to enterthe number, press
m.
5 Press O or press s to place the call.
6 Press A underJoin.
All 3 people in the call can speak to and hear each
other.
Merging 2 Calls into a 3-Way Call
You can combine 2 phone calls into a 3-way call any
time you havea call on hold and a call active:
1 Press m.
2 Select Join.
All 3 people in the call can speak to and hear each
other.
Page 95

Creating Pauses and Waits While Dialing
Creating Pauses and Waits
While D ialing
You can enter a pause or wait while dialing a
number. For more information on pauses and waits,
see “CreatingPauses and Waits” on page 41.
To create a pause whiledialing a phone number:
1 From the keypad, enter the digits you want to
occur before the pause.
2 Press m.
3 Select Insert Pause.
4 Enterthedigits youwanttooccur afterthepause.
To create a wait while dialing a phone number:
1 From the keypad, enter the digits you want to
occurbefore the wait.
2 Press m.
3 Select Insert Wait.
4 Enterthedigits you want to occur after the wait.
Making International Calls
Your service default is “International Calls
Restricted.”Contact NextelCustomerCare toobtain
international dialingaccess.
Calls placed between the United States and Canada
do not requirean international accesscode.
Plus Dialing lets you place an international call to
most countries without entering the local
internationalaccess code.
1 Press and hold 0 for two seconds. A “0”
appears, then changes to a “+”.
Note: The network translates the“+”intothe
appropriate international access code
needed to place the call.
2 Enterthecountry code,citycodeor areacode,
and phone number.
SettingOneTouchDirect Connect
One Touch Direct Connect sets your phone to call
the most recentDirect Connect number on the
recentcalls list, or a Direct Connectnumber you
choose,everytime you press the PTT button.
To set your phone to call the most recent Direct
Connect number on the recent calls list:
1 From themain menu,select Settings > DC/GC
Options > OneTouch DC.
2 Set thisoption to Last Call.
85
Page 96

Advanced Calling Features
To set your phone to call a Direct Connectnumber
you choose:
1 From the main menu, select Settings > DC/GC
Options > One Touch DC > Assigned Number.
2 To enter the Direct Connect number you want
your phone to call everytimeyoupressthe PTT
button:
Enter the numberusing your keypad. -or-
Press A under Search. SelectContacts, Recent
Calls,orMemo. Select the number you want to
enter.
Tip: IfyouareenteringaTalkgroup number, enter
# before the number.
3 Press O.
To turn off One Touch DirectConnect:
1 From the main menu, select Settings > DC/GC
Options > One Touch DC.
2 Set this option to Off.
86
Setting Flip Actions
For Answering Calls
To set your phoneto answercalls when you open
the flip:
1 From the main menu, select Settings > Phone
Calls > Flip Activation > Flip to Ans.
2 Set this option to On.
To set your phonenotto answer calls when you
open the flip:
Set Flip to Ans to Off in step 2.
For Ending Calls
To set your phoneto end callswhenyouclose the
flip:
1 From the main menu, select Settings > Phone
Calls > Flip Activation > Flip to End.
2 Set this option to On.
To set your phonenotto answer calls when you
open the flip:
Set Flip to End to Off in step 2.
Note: Ifyouareusingyourphonewithaheadset,
and you have the Flip to End option set to
On, closing your flip sends incoming sound
to the headsetanddoesnotend the call.
Page 97

Group ConnectTMCalls
Group ConnectTMCalls
A Group Connectcall is a callmadetoall members
of a Talkgroupat once.A Talkgroup is a
predetermined group of up to 25 Nextel customers.
Before you can makeor receive Group Connect
calls,a Talkgroup must be established.Afterthe
Talkgroup is established, you must join the
Talkgroup. See “Joining a Talkgroup” on page 8.
Making Group ConnectTMCalls
1 Press #. Then enter the Talkgroup number
using the keypad. -or-
Choose the Talkgroup name from Contacts or
recent calls list.
2 Proceed as if making a Direct Connect call.
Receiving Group ConnectTMCalls
To answer a Group Connect call:
Proceed as if answeringaDirect Connect call.
Only one person at a time may speak on a Group
Connectcall.
The DirectConnect number or name of the
personwho is speakingwill appearonthe display
below the Talkgroup number.
Turning off Group ConnectTMCalls
To set your phone to preventyou from hearing
Group Connect calls to your Talkgroup:
1 From themain menu,select Settings > DC/GC
Options > Tkgrp Silent.
2 Set thisoption On.
To set your phone to let you hear Group Connect
calls to your Talkgroup:
Set Tkgrp Silent to Off in step 2.
Call Timers
Call timers measure the duration of your phone
calls,Direct Connect or Group Connect calls, and
circuit data use, as well as the number of Kilobytes
sent and received by your phone:
•LastCall— displays theduration of your most
recentphone call.
• Phone Reset — keeps a running total of your
phonecall minutes,until you reset it.
• Phone Lifetime — displays the total minutes of
all your phone calls.
• DC/GC Reset — keepsa runningtotal of all of
your Direct Connect and Group Connect call
minutes, until you reset it.
87
Page 98

Advanced Calling Features
• DC/GC Lifetime — displaysthetotal minutes of
all your DirectConnect and Group Connect calls.
• Circuit Reset — keeps a running totalofallof
your circuit data use, until you resetit.
• Circuit Lifetime — displays the total minutesof
all of your circuitdata use.
• Kbytes Reset — keeps a running total of the
number of Kilobytes sent and received by your
phone,until you resetit.
To view or reset a timer:
1 From the main menu, select Call Timers.
2 Select the feature you want to view or reset.
3 Toview a feature withoutresetting:Press O when
you are finishedviewing. -or-
To reset a feature:Press A under Reset.Press
O or press A underYes to confirm.
Note: The values displayed by Call Timers should
not be used for billing. Call timers are
estimatesonly.
88
Using Your P hone as a Modem
To use your phone as a modem with a laptop,
handheld device, or desktop computer:
1 Open the connector cover.
connector
cover
Page 99

Making TTY Calls
2 With the phone’s display facing up, insert a data
cable’s connector into the accessory connector,
until you hear a click.
3 Insert the data plug into the COM port of the other
device.
Whenusedas a modem,your phone hasthese data
transfer modes:
• Circuit data — used for sending and receiving
faxes and for transferring large files
• Packet data — used for small file transfers such
as email
To use these services, you must install the iDEN
Wireless Data Services software (available
separately)andsubscribetoaNextel Wireless Web
accessplan. For more information on setting up
your computer and your i730 phone for packet and
circuit data calls, refer to the Nextel Online
Guide on www.nextel.com.
®
User's
Making TTY Calls
To use your phone to make phone calls using a
teletypewriter (TTY) device:
1 Connect one endofa 2.5mmcable intothe audio
jackon yourphone. Connect theotherend of the
cable to your TTY device.
2 Makesurethatyourphone’s TTY feature is on
and select the TTY mode you want to use.
3 Use your phone to enter phone numbers and
make calls.
When you make a TTY call, theseicons appear on
the phone’sdisplay:
Phone call is active.
N
Phone call is on hold.
O
89
Page 100

Advanced Calling Features
TTY device features such as Turbo-Code,
High-Speed,andInterruption are not supported by
your phone. These features must be turned off or
disabled to use your TTY device with your phone.
TurningOntheTTYFeature
Yourphone’s TTY feature must be on if you want to
make TTY calls, set the TTY mode, or change the
TTY baud rate. To make sure the TTY feature is on:
From the main menu, select Settings > Phone
Calls>TTY>UseTTY. This field must say On.
Choosing a Mode
Yourphone supportsthese TTY modes:
•TTY— You type and read text on your TTY
device.
•VCO(Voice-Carry-Over) — You spea k into your
phone and read textreplies on your TTY device.
• HCO (Hearing-Carry-Over) — You type text on
yourTTYdeviceandlistentovoicereplieson
your phonespeaker.
To changemodewhile not in a call:
1 From the main menu, select Settings > Phone
Calls>TTY>Type.
2 Select the TTY mode you want.
90
WhenyoumakeaTTYcall,thecallbeginsinthe
TTY mode you last selected.
To change mode during a call using your phone:
1 Press m.
2 Select In Call Setup > TTY > Type.
3 Select the mode you want.
To changemode during a call using your TTY
device, issue one of the following commands:
• “VCO please” — to select VCO mode
• “HCO please ” — to select HCO mode
• “HCO off please” — to turn off HCO mode
Important: When you are using HCO, the sound
comingfr om your phonespeaker may be
uncomfortably loud. Use caution when
putting the phoneto your ear. (For
information on setting the volumeof
your phone speaker,see “Setting the
Volume” on page 103.)
Changing the TTY Baud Rate
By default , your phone’s TTY baud rate is set to
45.45,thebaudraterequiredforTTYcallswithinthe
U.S. To make calls outside the U.S., set your TTY
baud rate to 50.0.
 Loading...