

Page 1

Table of contents
Keypad layout ............ 2,4
Phone overview ......... 3,5
Using this guide ............ 6
Key actions ....................... 6
Display Indicators ............. 7
Getting started ............. 8
Inserting SIM card ............. 8
Attaching battery .............. 9
Charging battery ............. 10
Changing faceplate G310 11
Basic phone operations 13
Turning on the phone ..... 13
Standby display .............. 13
Making a call .................. 13
Answering a call ............. 14
Ending a call ................... 14
Turning off the phone .... 14
Unanswered call, voice mail
and new SMS message
indicators ..................... 15
Safety information ..... 16
Care and maintenance .... 18
Security codes ................. 19
Emergency calls .............. 20
General features ......... 21
Dialing stored numbers .. 21
Speed dialing .................. 21
Silent alert mode ............ 22
Muting ............................ 22
Volume adjustment ........ 22
Sending DTMF tones ....... 23
Pause feature .................. 23
Options while Talking.. 24
Holding, retrieving a call . 24
Call waiting, swapping
and multi-party
conference calls ............ 24
Menu system ............... 26
Menu map ...................... 26
Entering text ................... 28
Network Services ............ 32
Voice Mail ....................... 32
Phone Book .................... 33
Storing numbers ......... 33
View, dial numbers ..... 35
Own number display .. 36
Fixed dialing numbers 36
Speed dialing .............. 37
Messages (SMS) .............. 38
Calls & Timers ................. 41
Call log ....................... 41
Call timers .................. 42
Call timer - reset ......... 43
Call costs .................... 44
Alternate line service .. 45
Services ........................... 46
Call forward ................ 46
Caller Line Identity ...... 47
Network ..................... 48
Broadcast - cell broadcast
(CB) messages .............. 52
Settings - customizing your
phone ........................... 55
Office Tools ..................... 64
Scratchpad ................. 64
Currency converter ..... 65
Alarm clock G340 ....... 66
Appendix ..................... 68
Accessories ..................... 68
Glossary .......................... 69
Troubleshooting ............. 70
Error messages ............... 71
Index ............................ 74
Warranty ...................... 79
1
Page 2
G310 Keypad layout
List of keys
Softkeys or selection keys.
Perform the functions indicated by the text above it.
End, On/Off key. Press and hold to turn the phone on or off.
Press to end or reject a call.
Press while in menus to go back to the standby display.
Send key. Press to make or answer a call.
Press in standby display recalls last dialed numbers.
Express Key.
Press left to view Phone Book entries or return to previous display.
Press right to enter main menu and/or select a feature from list.
In conversation, press up or down to adjust volume.
Press up to scroll up the menus. In standby, press to enter
volume control menu.
Press down to scroll down the menus. In standby, press to enter
alert tones setting.
Moves the cursor through the displayed text in Edit Mode.
Alphanumeric keys, 0 - 9, *, #.
Enters numbers, characters and punctuation marks.
key. Press and hold to call the voice mail number.
to keys. Press and hold to speed dial preferred numbers.
key. Press and hold to enter international + prefix, 'P' symbol
or '_' underscore wildcard.
key. Used with keypad lock softkey to lock/unlock the keypad
2
Page 3
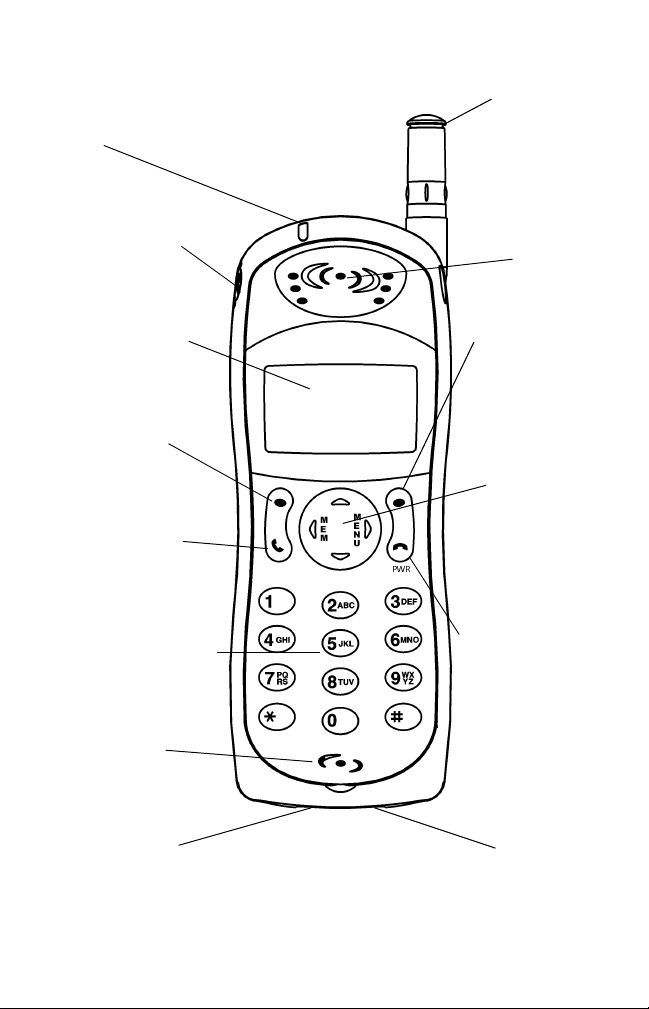
G310 Phone overview
LED
Call and
battery charge
indicator
Retractable
antenna
Extend the
antenna fully
when making or
receiving a call
Headset socket
Connect the
headset here
Graphic display
Telephone numbers,
menus, messages, etc.
are displayed here
Left softkey
Performs action
displayed on screen
directly above
Call/SEND key
Dials displayed
number or name
and answers calls
Alphanumeric keys
Enter text and
telephone numbers
Microphone
Earpiece
Right softkey
Performs action
displayed on
screen directly
above
Express Key
Navigates around
the memories and
menus. Press up
or down during
conversation to
adjust volume
On/Off, END key
Press and hold to
turn the phone on
or off. Press to end
a call or return to
standby display
AC Adapter socket
Accessories
socket
3
Page 4
G340 Keypad layout
List of keys
Programmable softkeys or selection keys.
Perform the functions indicated by the text above it.
End, On/Off key. Press and hold to turn the phone on or off.
Press to end or reject a call.
Press while in menus to go back to the standby display.
Send key. Press to make or answer a call.
Press in standby display recalls last dialed numbers.
Express Key
Press left to view Phone Book entries or return to previous display.
Press right to enter main menu and/or select a feature from list.
In conversation, press up or down to adjust volume.
Press up to scroll up the menus. In standby, press to enter
volume control menu.
Press down to scroll down the menus. In standby, press to enter
alert tones setting.
Moves the cursor through the displayed text in Edit mode.
Alphanumeric keys, 0 - 9, *, #.
Enters numbers, characters and punctuation marks.
, or press and hold to call the voice mail number.
to keys. Press and hold to speed dial preferred numbers.
key. Press and hold to enter international + prefix, 'P' symbol
or '_' underscore wildcard.
.key.Used with keypad lock softkey to lock/unlock the keypad
4
Page 5
G340 Phone overview
LED
Call and
battery charge
indicator
Headset socket
Connect the
headset here
Graphic display
Telephone numbers,
menus, messages, etc.
are displayed here
Left softkey
(programmable)
Performs action
displayed on screen
directly above
Call/SEND key
Dials displayed
number or name
and answers calls
Alphanumeric keys
Enter text and telephone
numbers
Retractable
antenna
Extend the
antenna fully
when making or
receiving a call
Earpiece
Right softkey
(programmable)
Performs action
displayed on screen
directly above
Express Key
Navigates around
the memories and
menus. Press up
or down during
conversation to
adjust volume
On/Off, END key
Press and hold to
turn the phone on
or off. Press to end
a call or return to
standby display
Microphone
Flip
Open when you want to
use the alphanumeric
keys
Opening or closing
✱
the flip does not answer
or end a call
Accessories
socket
AC Adapter
socket
5
Page 6

Using this guide
Your G300 series phone operates on the GSM network which provides
fraud protection, short message service (SMS), integrated voice mail,
superior voice quality and clear, static-free sound. One of the most
important GSM advantages is the removable SIM (subscriber identity
module), which holds user information such as phone numbers, missed
calls, voice mail notifications and text messages.
Some features are called network features and are supplied by service
providers. However, before you can use or even activate many of the
network features offered by the networks, you must subscribe to the
services. For a full list and explanation of network features please consult
with your service provider.
Some networks may provide you with Data & Fax services. To use these
special services the Contact Data kit is needed (see “Accessories list” on
page 68). For further information please refer to the instructions contained
in the Data & Fax kit and/or contact your service provider for details.
Key Actions
Left softkey
Right softkey
Right arrow on Express Key
Left arrow on Express Key
Up arrow on Express Key
Down arrow on Express Key
SEND key
END key
Function
Messages
Select
Press
Press softkey below the corresponding function name. For exam-
SMS means press the softkey under the word SMS.
ple,
Words in this format are the actual words seen in the display.
Use and on the Express Key to scroll to the desired item in
the menu and select by pressing .
For example, select
Phone Book and select by pressing .
Press the corresponding key.
Press means press the SEND key.
Phone Book means scroll to the menu item
6
Page 7
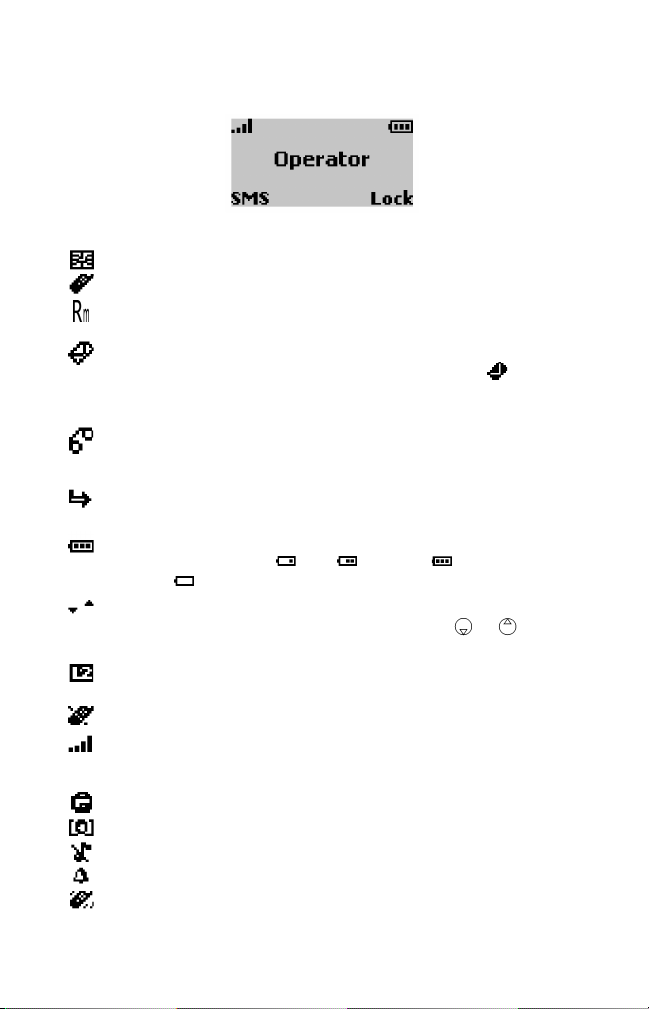
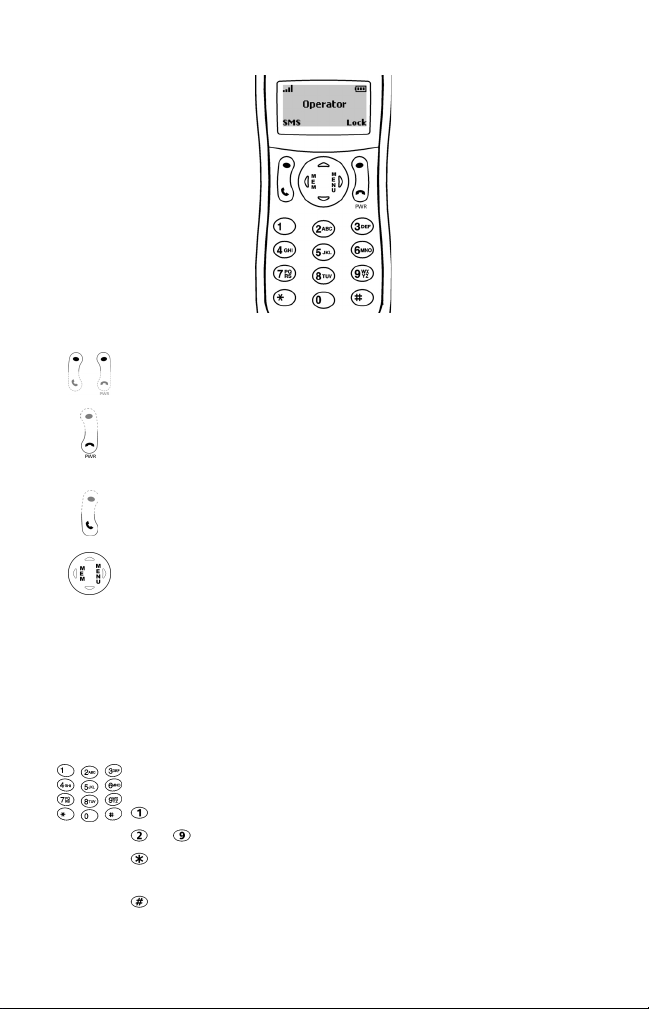
Display Indicators (Icons)
The display window can display up to four lines of characters plus one row
of special display indicators or icons. The display window in standby mode:
Special icons which appear in the display:
SIM memory in use
Phone memory in use.
Roaming. Displays when the phone is logged on to a network
different from its home network.
Short message service (SMS). Displays when one or many short
messages have been received but not read. It flashes
SMS message bank is full and cannot store new messages.
The availability of this feature is network dependent.
Voice mail. Displays when a voice mail message has been received
and stored by the network’s voice mail center.
The availability of this feature is network dependent.
Call forwarding. Indicates whether incoming calls are being
forwarded. The availability of this feature is network dependent.
Battery level indicator. Indicates the charge level of the battery.
Three levels are shown: low, medium, full.
It flashes when the battery is almost empty.
Arrow keys. These icons appear during menu operation to indicate
that more items in the menu can be displayed if or are
pressed. More than one arrow may show at any one time.
Line 2. Indicates the second line is in use.
The availability of this feature is network and subscription dependent.
Unanswered call. Displays when an incoming call is unanswered.
Signal strength level. Four levels indicate the strength of the
received signal. More bars indicate a stronger signal. If no network
is available the display remains blank.
Keypad lock. Keypad lock is on or off.
CUG. Indicates Closed User Group service is active.
Silent mode. All tones are off.
Alarm clock is set. Model G340 only
Silent Call alert. Set to a vibrate option for incoming call.
Model G340 only
when the
7
Page 8
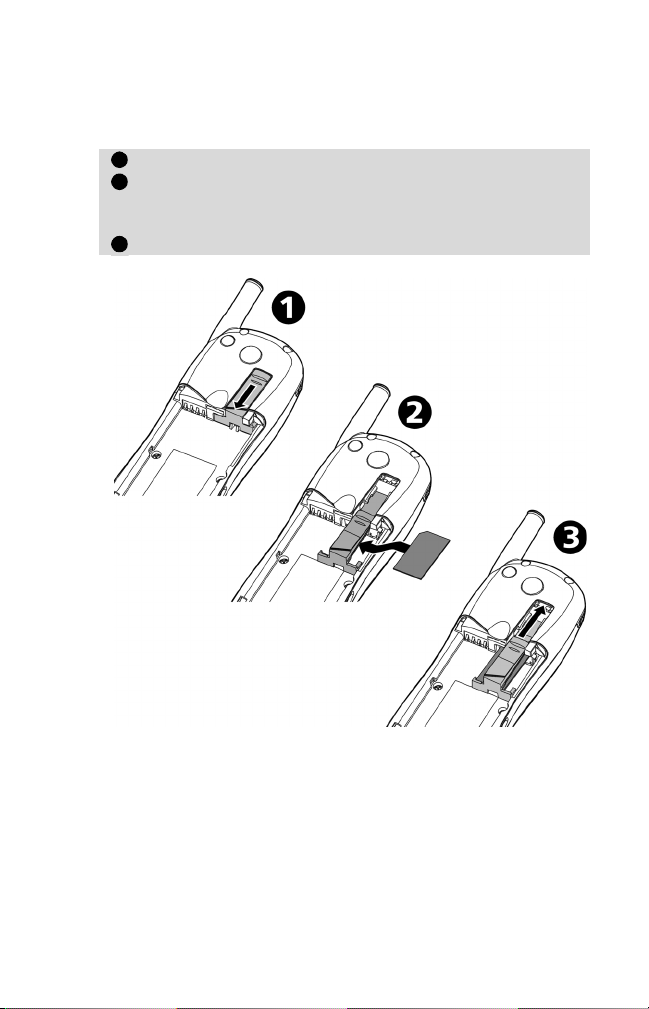
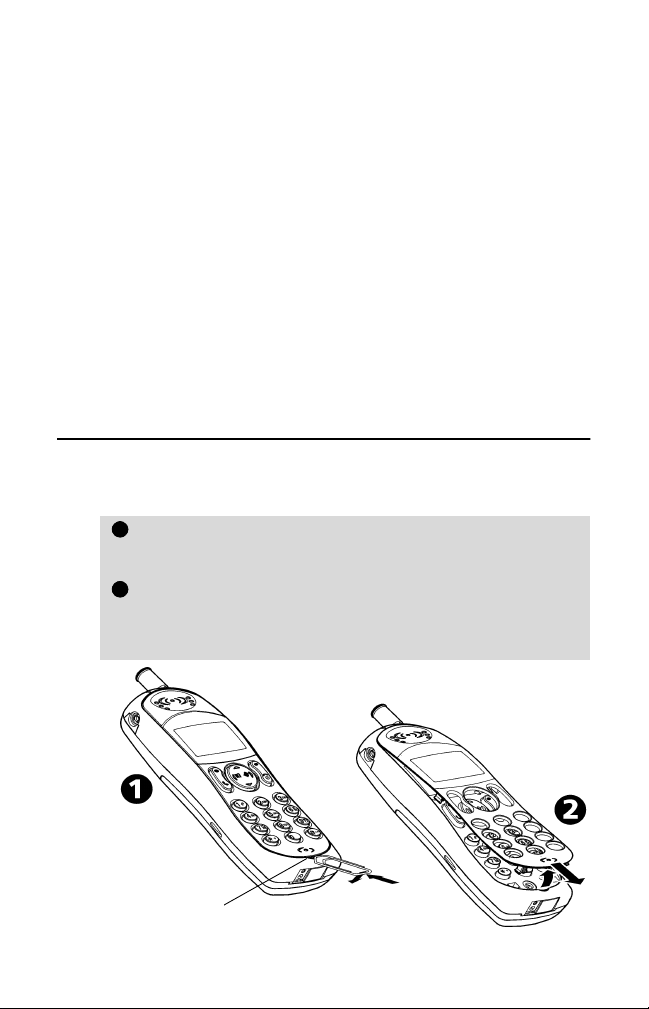
Getting started
Inserting the SIM card
Unpack the phone and insert the SIM card into the holder.
Open the SIM card holder as shown.
1
Insert the SIM card gently as shown with the gold contacts
2
facing down and the bevelled corner of the card at the top
left.
Push the SIM card holder back into position.
3
If the SIM card has been inserted the wrong way or is damaged, Check
SIM! will display. Remove the SIM card, check this illustration and re-insert
it as described.
8
Page 9
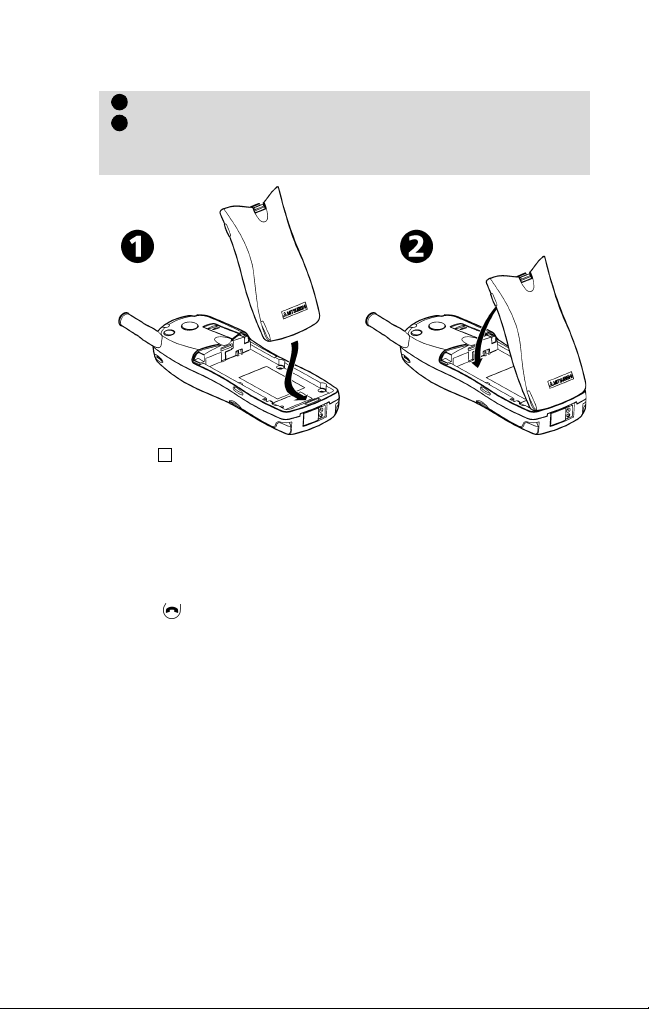
Attaching the battery
Position the battery onto the phone as shown
1
Push down the opposite end of the battery onto the phone
2
until the battery catch 'clicks' shut. Check that the battery is
securely in place.
✱
If there is not enough charge in the battery to power the phone, follow the instructions for battery
charging on page 10.
Low battery warning
When the battery power falls to its lowest level, the message Low Battery!
displays and a low battery warning tone sounds.
If you are on a call, end the call and turn off the phone by pressing and
holding down .
Recharge the battery as shown or replace it with a charged one.
Do not turn off the phone by removing the battery. Data that needs to
be saved by the SIM may be lost.
9
Page 10
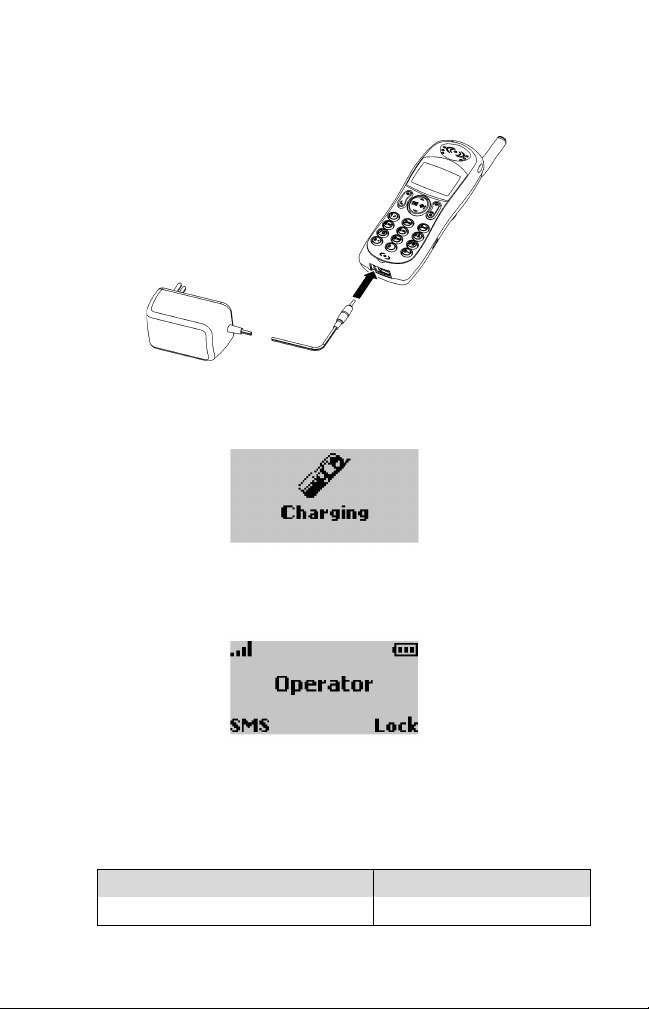
Charging
To extend the battery’s life, recharge it only when the Low Battery!
warning is displayed and the 'low battery' tone is heard.
Connect the AC Adapter to the phone as shown.
Plug the AC Adapter into a wall socket. The battery will start to charge.
The phone can be used while charging but it will increase the charging time.
Charging indicators when the phone is off
Charging message displays. The LED light will be red. When charging is
finished, Battery full displays and the LED light will change to green.
Charging indicators when the phone is on
During charging the battery icon will flash 1-2-3 bars continuously. When
charging is completed the battery indicator will show three solid bars. If a
call is received during charging the LED light will flash rapidly green.
It is normal for the battery to get warm during charging.
Typical charging times using the AC Adapter
Battery type Typical charging time
Small battery 2 hrs 30 min
10
Page 11
Battery use and safety information
When the operating time (standby and talk time) is noticeably shorter than
normal, it is time to buy a new battery.
• Do not leave batteries connected to a charger longer than necessary,
overcharging will shorten battery life.
• Disconnect battery chargers from the power source when not in use.
• Do not expose batteries to high temperatures or humidity.
• Do not dispose of the batteries in fire. They may explode.
• Avoid putting the batteries into contact with metal objects which may
short circuit the battery terminals (e.g. keys, paper clips, coins, chains etc).
• Do not drop or subject the batteries to strong physical shocks.
• If the battery terminals become soiled, clean them with a soft cloth.
• It is normal for batteries to become warm during charging.
• Old batteries must be returned to the place of purchase or to a place
where used batteries are properly disposed of. Do not dispose of old
batteries together with household waste.
Changing the faceplate - Model G310 only
Before changing the faceplate always turn off the phone and disconnect
from any charging device or car kit.
Removing the faceplate
Insert a small blunt instrument, for example a paper clip,
1
into the slot provided and gently but firmly lift up one end
of the faceplate.
Take hold of the raised end of the faceplate and carefully pull
2
up, unclipping it from the bottom of the phone. After the
bottom section is loose, gently slide the faceplate downward.
The faceplate will unhook from the phone and lift away.
Slot
11
Page 12
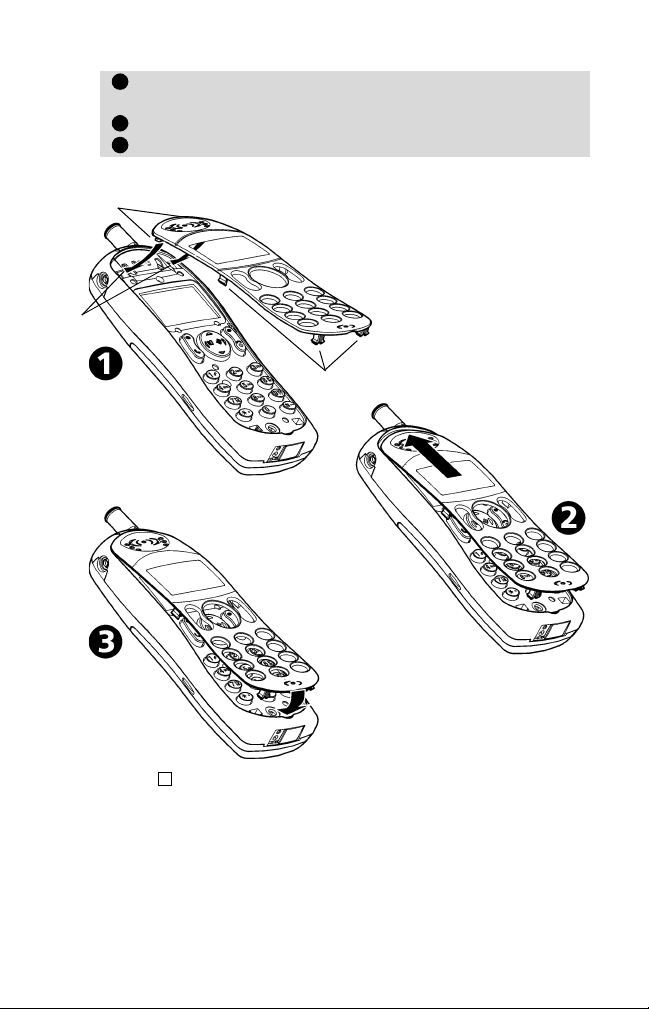
Replacing the faceplate
Locate the front faceplate hooks, into the hook slots at the
1
top of the phone.
Slide gently upwards.
2
Press the faceplate down firmly, clipping it into position.
3
Hooks
Hook
slots
Clips
12
✱
Do not use unnecessary force when changing the face plate. Avoid excessive bending. Do not leave
in direct sunlight. Always use the phone with the faceplate attached. Do not clean the phone with
alcohol, strong chemicals or solvents. Wipe it only with a soft, slightly dampened cloth. Read the
“Care and maintenance” instructions, page 19.
Page 13
Basic phone operations
Turning on the phone
Press and hold . A turn on tone sounds.
1
If the phone is locked, Enter lockcode will display. Enter
2
the 4 digit code and press OK .
If your SIM is PIN protected, Enter PIN will display.
3
Enter the PIN code and press OK .
✱
See pages 19 and 59 for more details on your PIN and lock codes.
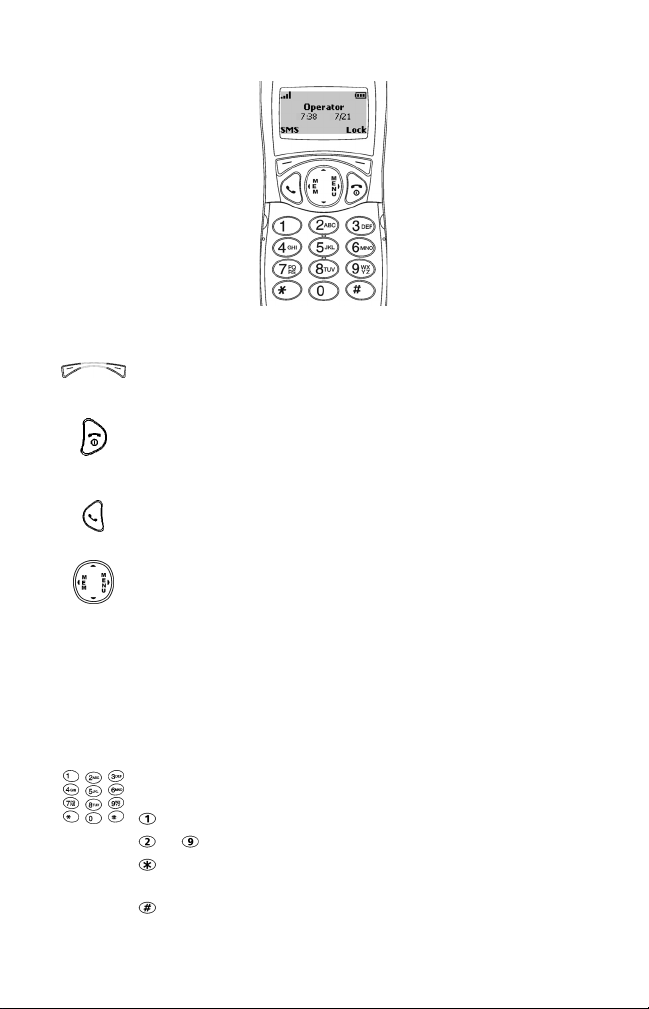
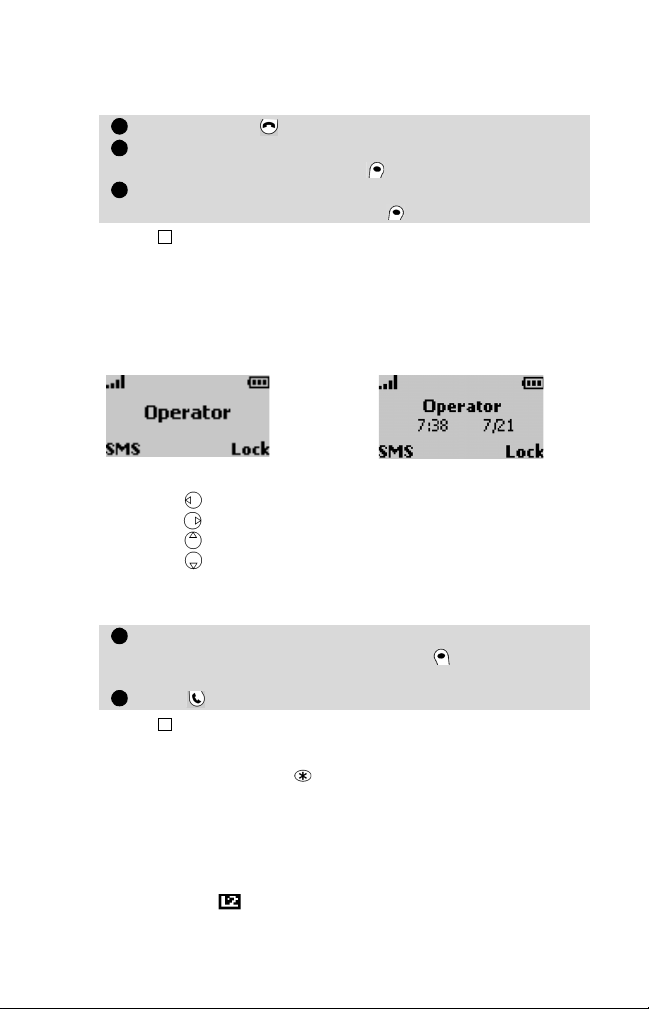
Standby display
A screen animation appears, followed by a registration tone, then the
name of the network and/or service provider displays together with signal
and battery level indicators and the SMS and Lock softkey functions.
This is the normal standby display:
Model G310
Press to go to your Phone Book (see page 33).
Press to go to the phone menu (see page 26).
Press to go to volume control (see page 56).
Press to silence the incoming ring tone.
For Model G340, see page 63 to set time and date.
Model G340
Making a call
Enter the telephone number you wish to dial.
1
Correct any mistakes by pressing Clear . Press and hold
this key to erase the entire entry.
Press to dial (send) the number .
2
✱
For best results use the antenna fully extended when making or receiving calls.
International calls can be prefixed either with 00 or +. To enter the + symbol
before a number, press and hold until + appears in the display.
When the call connects, the call timer displays.
• Busy Called party’s line is busy. If Auto Retry is on, the phone
will attempt to call again (see page 59 for details).
• Not allowed (fixed dialing) Number dialed is not authorized
by the FDN list (see page 36 for details).
• Line 2 icon ( ) appears when call connects (if active) indicating call was made using this line (see page 45 for details).
13
Page 14
Answering a call
When there is an incoming call, the phone rings. The LED light on the top
of the phone flashes green and a flashing icon appears. The backlight
also lights up if the phone was set to do so or if in silent mode.
To answer the call,
Press .
✱
If the ring tone volume is set to zero (off) or if the phone is in 'Silent mode' or 'Vibrate mode' on
Model G340, no audible sound will be heard.
Press Silence softkey to stop ring tone.
To send the call to voice mail,
Press .
Call display notes
• The caller’s number (if available) displays. If you have this
number in memory, the person’s name displays.
• If the caller’s number is not available, Unknown number
displays first, then Call 1 displays when you answer.
• If the caller has withheld their number, Withheld number
displays first, then Call 1 displays when you answer.
• When the call connects, the call timer appears.
• appears if the call is received on your Line 2 number.
See page 25 for details.
Volume adjustment during conversation
Press or on the Express Key to increase or decrease the
volume through eight levels.
Ending a call
Press .
✱
Model G340 - Closing the flip does not end a call.
Wait a few seconds or press Back softkey to return to the standby display.
Turning off the phone
Press and hold .
A turn off tone will sound. During turn off, an animation will be shown, then
the phone will turn off.
✱
Do not turn off the phone by removing the battery as data which may need to be saved in th e SIM
will be lost.
14
Page 15
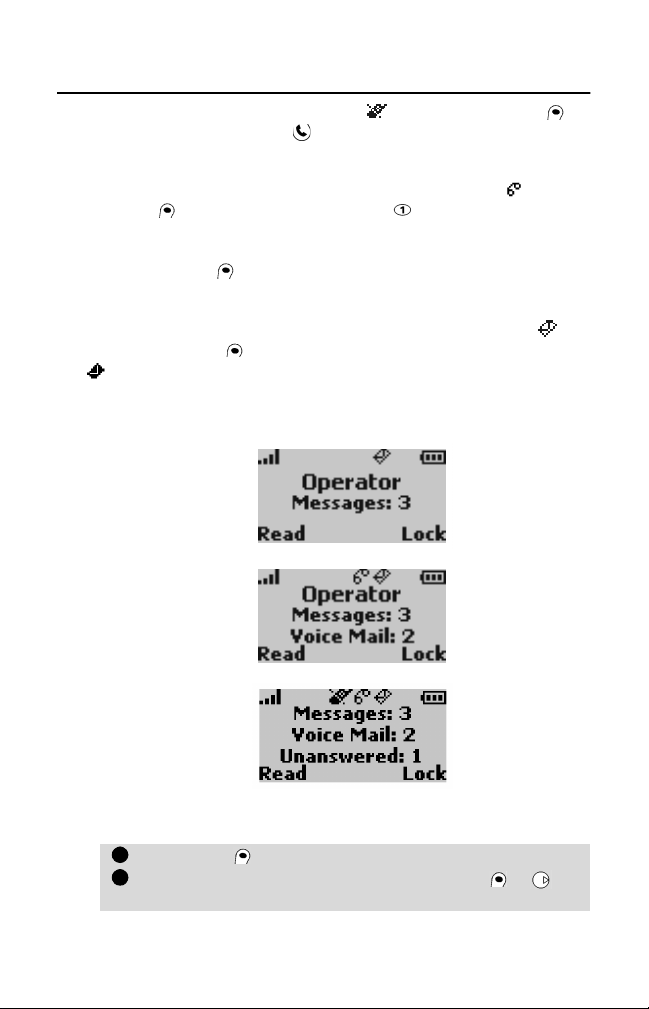
Unanswered call, voice mail and new SMS
message indicators
• If some received calls remain unanswered, displays. Press Read to
view numbers if available. Press to dial the number. Unanswered call
numbers will be stored in the unanswered call log (see page 41 for details).
• When you receive a voice message, an alert tone sounds and appears.
Press Read to view the message or press to speed dial your voice
mail message center (see pages 7 and 32 for details).
If more than one indicator (e.g. Messages:2 and Voice mail:1) is
shown, press Read for a menu allowing you to choose between
different items (in our example: Messages and Voice mail).
• When a new SMS message is received, an alert tone sounds and
appears. Press Read to view the SMS messages inbox.
If is flashing you will have to delete at least one old received message
to be able to receive new messages (see page 38 for details).
The display will show the quantity and type of messages:
Press Read to view each type of message to be read.
1
Scroll to the desired message and press Select or to
2
read the message.
15
Page 16

Safety information
EXPOSURE TO RADIO FREQUENCY SIGNALS
Your wireless handheld portable telephone is a low power radio
transmitter and receiver. When it is ON, it receives and also sends out radio
frequency (RF) signals.
In August 1996, the Federal Communications Commissions (FCC) adopted
RF exposure guidelines with safety levels for hand-held wireless phones.
Those guidelines are consistent with the safety standards previously set by
both U.S. and international standards bodies:
*ANSI C95.1 (1992)
*NCRP Report 86 (1986)
*ICNIRP (1996)
*American National Standards Institute; National Council on Radiation Protection and
Measurements; International Commission on Non-Ionizing Radiation Protection
Those standards were based on comprehensive and periodic evaluations of
the relevant scientific literature. For example, over 120 scientists,
engineers, and physicians from universities, government health agencies,
and industry reviewed the available body of research to develop the ANSI
Standard (C95.1).
The design of your phone complies with the FCC guidelines (and those
standards).
ANTENNA CARE
Use only the supplied or an approved replacement antenna. Unauthorized
antennas, modifications, or attachments could damage the phone and
may violate FCC regulations.
PHONE OPERATION
NORMAL POSITION: Hold the phone as you would any other telephone
with the antenna pointed up and over your shoulder.
TIPS ON EFFICIENT OPERATION: For your phone to operate most efficiently:
• Extend your antenna fully.
• Do not touch the antenna unnecessarily when the phone is in use.
Contact with the antenna affects call quality and may cause the phone
to operate at a higher power level than otherwise needed.
16
Page 17

DRIVING
Check the laws and regulations on the use of wireless telephones in the
areas where you drive. Always obey them. Also, if using your phone while
driving, please:
• Give full attention to driving - driving safely is your first responsibility.
• Use hands-free operation, if available.
• Pull off the road and park before making or answering a call if driving
conditions so require.
ELECTRONIC DEVICES
Most modern electronic equipment is shielded from RF signals. However,
certain electronic equipment may not be shielded against the RF signals
from your wireless phone.
Pacemakers
The Health Industry Manufacturers Association recommends that a
minimum separation of six (6”) inches be maintained between a
handheld wireless phone and a pacemaker to avoid potential
interference with the pacemaker. These recommendations are
consistent with the independent research by and recommendations of
Wireless Technology Research.
Persons with pacemakers:
• Should ALWAYS keep the phone more than six inches from their
pacemaker when the phone is turned ON
• Should not carry the phone in a breast pocket
• Should use the ear opposite the pacemaker to minimize the potential
for interference
• If you have any reason to suspect that interference is taking place,
turn your phone OFF immediately
Hearing Aids
Some digital wireless phones may interfere with some hearing aids. In
the event of such interference, you may want to consult your service
provider (or call the customer service line to discuss alternatives).
Other Medical Devices
If you use any other personal medical device, consult the manufacturer
of your device to determine if they are adequately shielded from
external RF energy. Your physician may be able to assist you in
obtaining this information.
Turn your phone OFF in health care facilities when any regulations
posted in these areas instruct you to do so. Hospitals or health care
facilities may be using equipment that could be sensitive to external RF
energy.
17
Page 18

Vehicles
RF signals may affect improperly installed or inadequately shielded
electronic systems in motor vehicles. Check with the manufacturer or
its representative regarding your vehicle. You should also consult the
manufacturer of any equipment that has been added to your vehicle.
Posted Facilities
Turn your phone OFF in any facility where posted notices so require.
AIRCRAFT
FCC regulations prohibit using your phone while in the air.
Switch OFF your phone before boarding an aircraft.
BLASTING AREAS
To avoid interfering with blasting operations, turn your phone OFF when
in a “blasting area” or in areas posted “Turn off two-way radio.” Obey all
signs and instructions.
POTENTIALLY EXPLOSIVE ATMOSPHERES
Turn your phone OFF when in any area with a potentially explosive
atmosphere and obey all signs and instructions. Sparks in such areas could
cause an explosion or fire resulting in bodily injury or even death.
Areas with a potentially explosive atmosphere are often but not always
clearly marked. They include fueling areas such as gasoline stations; below
deck on boats; fuel or chemical transfer or storage facilities; vehicles using
liquefied petroleum gas (such as propane or butane); areas where the air
contains chemicals or particles, such as grain, dust, or metal powders; and
any other area where you would normally be advised to turn off your
vehicle engine.
For Vehicles Equipped with an Air Bag
An air bag inflates with great force. DO NOT place objects, including both
installed or portable wireless equipment, in the area over the air bag or in
the air bag deployment area. If in-vehicle wireless equipment is improperly
installed and the air bag inflates, serious injury could result.
18
Page 19

Care and maintenance
This PCS telephone is the product of advanced engineering, design and
craftsmanship and should be treated with care. The suggestions below will
help you to enjoy this product for many years.
• Do not expose the phone to any extreme environment where the
temperature or humidity is high.
• Do not expose or store in cold temperatures. When the phone warms up
after turn on, to its normal temperature, moisture can form inside
where it may damage the electrical parts.
• Do not attempt to disassemble the phone. There are no serviceable
parts inside that you can replace.
• Do not expose the phone to water, rain or liquids. It is not waterproof.
• Do not abuse this phone by dropping, knocking or violent shaking.
Rough handling can damage it.
• Do not clean the phone with strong chemicals or solvents. Wipe it only
with a soft, slightly dampened cloth.
• Do not place the telephone alongside computer discs, credit or travel
cards or other magnetic media. The information contained on discs or
cards may be affected by the phone.
• Do not connect incompatible products. The use of third party equipment or accessories, not made or authorized by Mitsubishi Wireless
Communications Inc., may invalidate the warranty of your phone and
may be a safety risk.
• Do not remove the labels. The numbers on it are important for service
and other related purposes.
• Contact an authorized service center in the unlikely event of a defect.
Security codes
The phone and SIM card are delivered to you pre-programmed with codes
that protect the phone and SIM card against unauthorized use.
When requested to enter any of the codes, key in the numbers (appear as
* asterisks) and press OK .
Press Clear to erase mistakes. If you enter the wrong code, a warning
message appears.
PIN and PIN2 codes (4-8 digits)
All SIM cards are supplied with a PIN (Personal Identity Number) to
protect the card against unauthorized use.
Some SIM cards are supplied with a PIN2 code when another level of
secuirity is required for some features such as fixed dialing numbers.
19
Page 20

If Enter PIN appears, enter the PIN code and press OK .
If the wrong PIN code is entered three times in a row, SIM Blocked
appears and the SIM card is disabled. Contact provider also appears.
To unblock the SIM, you must enter the PUK (PIN Unblock Key) code,
available only from your service provider.
PUK and PUK2 codes (8 digits)
Also supplied with the SIM card is the PUK (PIN Unblock Key) code to
unblock a disabled SIM card.
When requested, enter the PUK code and press OK . Then you will be
asked to reset the PIN code. Follow the instructions in the display.
If the wrong PUK code is entered ten times in a row, the SIM card must
be replaced. Contact your service provider.
The PUK2 code must be used to unblock the PIN2 code.
See page 60 and 61 for more details.
Code supplied by the airtime service provider
Call barring password (4 digits)
This password is used to bar various types of calls from the phone.
See page 50 for more details.
Code supplied by the manufacturer
Phone lock code (4 digits)
This code is set to all zeros and can be reset. Once changed it cannot be
identified by the manufacturer over the phone. See page 60 for more
details.
It is strongly recommended that you remember and make yourself
familiar with the purpose and operation of these codes.
Emergency calls
In the U.S., provided the phone has GSM service, emergency calls can be
made by dialing 911. In Europe, provided the phone has GSM service,
emergency calls can be made by dialing 112, the European standard
emergency number. Emergency calls can even be made if the phone is PIN
or electronically locked or call barred. In some countries the phone may
have to contain a valid SIM card in order to use local emergency numbers.
✱
Mobile phones rely on wireless and landline networks which cannot be guaranteed in all
conditions. Therefore you should never rely solely on wireless phones for essential
emergency communications.
20
Page 21

General features
Dialing stored numbers
Any number stored in the SIM or the phone memory can be dialed in
several ways.
...from the Phone Book
Press to enter the Phone Book list.
1
2
Use or to scroll to the desired number.
3
Press to dial the number.
✱
See “Phone Book”, page 33.
...from the last dialed numbers list
The last 10 numbers dialed are stored in the phone.
Press to display the last numbers dialed.
1
Use or to scroll to the desired number.
2
Press to dial the number.
3
...from the Call log memory list
The last 10 numbers dialed, the last 5 unanswered call numbers (if
available) and the last 5 received answered numbers (if available)
are stored by the phone in the call log menu.
Press . Select Calls & Timers.
1
Select Call log.
2
Select Last dial, Unanswered or Received.
3
Use or to scroll to the desired number.
4
Press to dial the number.
5
✱
See “Calls & Timers”, page 41.
Speed dialing
Any number stored in the SIM, except Fixed Dialing Numbers (see page 36),
can be speed dialed using the 1-9 keys.
Press and hold the desired key (1 - 9). The number will be
recalled to the display and dialed.
By default, is always assigned to the voice mail number. See
page 37 for speed dialing set up.
21
Page 22
Silent alert mode
Controls whether the incoming ring, alert and key tones will be heard.
To activate silent alert mode.
Press .
1
Select Silent on Model G310.
2
Select Vibrate or Vibrate then Ring on Model G340.
is shown in Model G310 display when this feature is turned on.
is shown in Model G340 display when this feature is turned on.
To deactivate silent alert mode,
Press .
1
Select Ring.
2
1. If the ring tone volume is set to zero, the silent mode icon remains in the display as a warning.
✱
2. The silent mode setting is not saved when the phone is turned off.
See also “Tones - Alert mode”, page 55.
To turn off ring of current incoming call,
Press Silence .
Muting
While on a call, the microphone can be muted (turned off) to allow you to
confer privately with people nearby without being heard by the caller.
To mute the microphone during conversation,
Press Mute .
To unmute the microphone,
Press Unmute .
✱
The microphone is automatically restored when a new call comes in.
Volume adjustment during conversation
To adjust the caller’s audio level during conversation,
Press or on the Express Key to increase or decrease
1
the volume through eight levels.
Press Back or wait 2 seconds to return to previous display.
2
✱
See also “Volume adjustments”, page 56.
22
Page 23
Sending DTMF tones
DTMF tones are used to access answering machines, voice mail boxes and
computerized home banking, etc. These tones are a method to
communicate passwords and callback numbers.
Manually
To send individual DTMF tones directly from the keypad during
conversation,
Press the desired keys.
The tones will be heard in the earpiece and sent immediately.
Automatically
To send a consecutive string of DTMF tones during conversation,
Press Options .
1
Select Auto DTMF.
2
Enter the DTMF numbers either by using the keypad or from
3
a number stored in the Phone Book under Names .
Press OK . After the tones have been sent the normal
4
conversation display will be shown.
✱
DTMF tones cannot be sent when a call is on hold.
Pause feature
Telephone numbers and a sequence of DTMF tones can be entered or
stored in memory together provided they are separated by a 'pause'.
Press and hold . The symbol * appears first, then the symbol +,
then the letter p will appear in the display.
Any number of pauses can be stored together with a maximum of 20-46
characters (dependent upon the SIM and the phone’s memory capacity).
23
Page 24
Options while Talking
Holding and retrieving a call
To put a call on hold during conversation,
Press .
To retrieve a call,
Press or Unhold .
To make a second call when one call is on hold,
Enter a number in the display. Press to dial the number.
1
After the second call has been established press to swap
2
between the two calls.
To end either the current call or the held call, select End
3
active or End held call in the Options menu. The remaining
call is automatically retrieved.
Press to end the remaining call.
4
✱
Both calls can be ended at the same time by pressing .
Another way to hold, retrieve and make a second call during conversation
is to press Options to display an Options menu.
Scroll to the desired feature and press Select o r (see a lso Multi- par ty
or conference calls on page 25).
Call waiting, swapping and multi-party
conference calls
Call waiting
Call waiting is a network feature that allows you to put an existing call
'on hold' while you answer or make a second call.
To activate or cancel call waiting,
Press . Select Services.
1
Select Call Waiting.
2
Select Activate or Cancel. Requesting displays. The
3
network will confirm your request.
Press Back or to return to the standby display.
4
24
Page 25

Action when receiving a second call
When a second call comes in, you will hear a 'double beep'; and an
animated phone icon and the phone number (if available) will display.
Either press to answer the call and put the first call on hold or press
Reject to send the incoming call to voice mail. Press to swap
between the two calls. Press Replace to end the first call and take the
incoming call. See the previous page to end one or both calls.
Multi-party or conference calls
This feature allows you to make or receive between 2 to 5 calls at the same
time with all parties being able to hear and talk with each other.
1
Make and establish a call and press .
Enter another number and press . The first call will be put
2
on hold while the second call becomes active.
Press Options for these options:
3
Option
Auto-DTMF
Swap • Swaps between active and call on hold
Join
Mute/Unmute • • Turns on or off the microphone
Hold/Retrieve • Holds or retrieves the conference call
Private with •
End held • Ends the call on hold
End active •
End one
End all • • Ends all the calls
Throughout the call, the display confirms the actions you have selected.
Confer-
For alternate line service (ALS) subscribers, conference calls cannot be made between Line 1 and
✱
Line 2. For details, see Alternate line service on page 45.
ence
•
•
Non-con-
ference
•
Description
Al lows a D TMF string to b e enter ed
to the active call only
Joins active a nd call on hold to ma ke
a multi-party or conference call
Allows you to select and have a
private conversation with one of
the conference callers while
putting all the other calls on hold
Ends active call and connects with
call on hold
Allows you to select and end one
of the conference call participants
25
Page 26

Menu system
Use the Express Key to access the easy to use menu system, where all of the
phone’s features and function settings are stored. The menu is also used
for features you have requested from your service provider. Your SIM card
presents these features through the menu system.
Access to the menus
• Press to go to all stored telephone numbers in the Phone Book.
• Press to enter the main menu from the standby display.
• To navigate through the main menu items, press or .
• All other functions and features are then selected by pressing or
Select .
• To return to a previous menu, press or Back .
• To exit from the menus, press and hold Clear , or if no call is in
progress, press .
Menu map
Menu Item Options
Personal phone Network Serv. * •Applications *
list in the SIM and •Services *
the phone / •Information *
Voice Mail * •Call *
•Number *
/ •Alert *
26
Phone Book •Recall
•Store
•Remaining
/ •Own numbers
•Fixed dialing *
Messages •Inbox *
•Outbox *
•Write new
/ •Settings *
•Alert *
Page 27

Calls & Timers •Call log
•Call timers
•Call costs *
/ •Line selection *
Services * •Call forwarding *
•Call waiting *
•Sending my ID *
•Receiving caller ID *
/ •Network *
•Call barring *
•CUG *
Broadcast * •On/Off *
•Message types *
/ •Alert *
Settings •Keypad lock
•Language *
•Tones
•Display
•Keys
/ •Auto features
•Security
•Time & Date (G340)
•Default settings
Office Tools •Scratchpad
•Currency converter
•Alarm clock (G340)
* The availability and appearance of these features in the menu are
dependent upon your subscription and the services offered by your
network provider.
27
Page 28

Entering text
To write SMS text messages, store names in memory, or use the scratchpad,
you will enter and edit text in the display.
In the upper right corner of the display, the icon indicates lower case
alpha mode and the icon indicates upper case alpha mode is active.
Text and numbers can be now be entered or edited directly from the keypad.
Press to toggle between lower and upper case. Press and hold to type
entire words in all upper case. Press and hold again to type entirely in
lower case.
Press any key briefly to display the first character associated
1
with that key and show all the other available characters at the
top of the display.
To enter text, press the key with the desired character
2
repeatedly until it appears in the display.
3
To enter a number, press and hold the key with corresponding number.
If two characters are on the same key, wait for the display at
4
top of screen to clear or press before pressing the same
key again.
Press Clear to erase a character. Press and hold to delete
5
the entire entry.
Use , , or to locate the cursor in the text to
6
insert characters or make corrections.
Example
To enter 'Card' in the display,
• Press , then press twice to select Messages.
• Select Write new.
• Press to go to upper case mode,
briefly three times, C appears in the display.
• Wait for the cursor to move or press to move to the next position,
notice that
• Press briefly three times, r appears.
• Press briefly once, d appears.
The word Card will now be in the display.
• Press to exit from this example.
is displayed. Press briefly once, a appears.
icon is displayed. Press
28
Page 29

Available characters, which depend on the language selected for the
phone, are listed in the following chart.
Key Character
Lower case Upper case
1 1 . , - ' @ : ?
2 a b c 2 A B C 2
3 d e f 3 D E F 3
4 g h i 4 G H I 4
5 j k l 5 J K L 5
6 m n o 6 M N O 6
7 p q r s 7 P Q R S 7
8 t u v 8 T U V 8
9 w x y z 9 W X Y Z 9
0 00
Press to change next letter from upper to lower case or vice versa.
*
Press and hold to change remaining letters to upper or lower case.
Press to enter a space.
#
Press and hold to enter special characters:
( ) % ! ; " _ ¡ ¿ + # * / & = < > § ¥ $ £
Moves the cursor left, up, down or right.
Entering symbols
Press and hold to view symbols. Press to scroll to additional symbols.
To select and insert a symbol into the text:
The symbols are arranged as the 1 - 9 keys are arranged on the
keypad. To select and enter a symbol into your text, press the
number key corresponding to the desired symbol’s location on
the screen. For example, press to select ) and insert it directly
into the text.
You will be returned to the text entry screen and the symbol will
be in place.
29
Page 30

T9® Text Input method
T9® Text Input feature is available only from selected service
providers.
There are two methods for entering text characters and numbers. In the
conventional alpha method, you keep pressing each key until the desired
letter appears. This can be cumbersome when entering a lot of text. For a
quick text entry method, use T9
once to allow the T9 software to assemble the word for you. The T9 database
ranks words by common usage so one entry gives the choice of several
words.
When writing a new SMS message or using the scratchpad, the t9 icon
appears to indicate the T9 Text Input mode is ready. Press to toggle
between T9 Text Input and standard alpha mode.
To use T9 Text Input mode:
To enter a word, press each key containing the desired letters
1
only once.
Be sure to type the entire word first before editing.
Check to see if the desired word appears. If it does, press
2
to enter a space and continue entering text.
If the desired word is not displayed, press to cycle to
3
other word choices.
4
If the desired word doesn’t appear, press to change to
the alpha mode to enter the word.
Use to move the cursor to insert characters or make
5
corrections.
®
Text Input method to press each key just
Example
When you are at the write new SMS message or scratchpad screen, the T9®
Text Input mode is ready, indicated by the t9 icon.
Press keys corresponding to the letters you need, just as if the phone
keypad were a typewriter. Type for space and for period.
For example:
h e l l o w o r l d .
30
Page 31

T9® Text Input key actions
Key Action
Shift - upper/lower case
Press and hold to type entire words in all
upper case or all lower case.
Press briefly to automatically capitalize the
current letter.
Clear
Press and hold
number keys
Adding words to T9
Words that do not appear in T9 Text Input database can be added easily
using the alpha mode. In alpha mode, type the desired word into the text
of your message. The unknown word is automatically added to the
database so you can type it using T9 Text Input in the future.
For example, to enter “Jenna” to the T9
1. Press to go to alpha mode.
2. Press to capitalize, then press 5 key once to enter ‘J.’ Press 3
key twice to enter ‘e.’ Press 6 key twice to enter ‘n.’ Wait for
cursor to move then press 6 key twice to enter another ‘n.’ Press
2 key once to enter ‘a.’
3. Press to go to T9 Text Input mode to complete the message.
4. The name Jenna is automatically stored in the T9 database.
5. While entering names in the Phone Book or using the scratchpad,
the special name or word is stored in the T9 database if you go
back to T9 Text Input mode after entering the name or word.
Clear character or backspace
Press and hold to clear entire entry
Enter numbers
Enter space. Press and hold to view symbols.
Scroll to other word choices
Enters a period, --, or ... For other
punctuation, switch to alpha mode and press
repeatedly to enter 1 . , - ‘ @ : ?
Switch between T9 Text Input and standard
alpha mode
Press to move cursor between words
®
Text Input database
®
database,
T9® is a registered trademark of Tegic Communications, Inc.
31
Page 32

Network services
The menu item Network Serv. may appear at the beginning of the menu
if your network provider elects to offer certain value added services and
contact phone numbers. These services and phone numbers will be stored
in your SIM. Contact your network provider for details on these services.
There are three possible ways in which a service provider may present these
value added services and contact phone numbers:
SIM application tool kit
An automatic way to provide services related to your network and
not to your phone. These services are SIM dependent.
SDN numbers stored in the SIM
Up to 32 Service Dialing Numbers may be stored in the SIM which
cannot be changed.
Information numbers
A list or a menu to enable you to call network or information
services offered by your network.
Some providers can offer two of the above services on the same SIM, in
which case the Network Serv. item in the main menu will present two
menu items, Applications and Services or Information.
Voice mail
Your network provider may offer a voice mail service. Contact your service
provider for details.
Calling the voice mail center to check for messages
To dial the voice mail center directly after receiving a message,
Press and hold .
To dial the voice mail center using the menu,
Press . Select Voice Mail.
1
Select Call.
2
32
Page 33

Viewing your voice mail center number
To view your voice mail center number,
Press . Select Voice Mail.
1
Select Number. The phone number of your voice mail
2
center appears.
Press OK to return to the previous display or to return
3
to the standby display.
✱
If you subscribe to 'Line 2' service, you can view the voice mail center number the same way.
The voice mail number is automatically assigned to speed dial location Key 1.
See “Speed dialing” on page 37.
Voice mail alert tone
To hear a tone each time that a voice mail message arrives,
Press . Select Voice Mail.
1
Select Alert. Select On or Off.
2
Press Back to return to the previous display or to
3
return to the standby display.
Phone Book
The SIM and the phone have areas of memory used for storing names and
telephone numbers known as the Phone Book.
The phone can store up to 20 digits and 16 alphabet characters in each of
its 99 memory locations. The phone also supports SIM cards with up to 255
memories but the actual number and capacity is dependent upon the SIM
itself. The phone and SIM memory locations are interconnected, and both
are searched when you recall a name or number.
Storing names and telephone numbers
Names and numbers can be stored directly in the Phone Book or moved
from other stored areas such as from SMS messages, scratchpad (numbers
only) or last dialed number list, etc.
If you travel abroad, we recommend that you store numbers in
international format using the '+' prefix before the country code followed
by the telephone number. This will ensure that the number can be dialed
from within your home country as well as abroad. To enter the + symbol,
press and hold until + appears in the display.
See page 28 for instructions on entering text.
33
Page 34

There are three ways to store numbers into the Phone Book.
• Directly from the standby display
Enter the number. Press Store .
1
Select Phone names or SIM names.
2
Confirm the number by pressing OK .
3
Enter the name (if desired) and press OK . Confirmation of
4
your entry and the remaining locations will briefly display.
Press Back or to return to the standby display.
5
•Using the menu
Press . Select Phone Book.
1
Select Store. Select Phone names or SIM names.
2
Enter the number and press OK . Enter the name and
3
press OK . Confirmation of your entry and the remaining
locations will briefly display.
Press Back or to return to the standby display.
4
• From other stored locations
Numbers stored in the last dialed, received, unanswered, scratchpad (numbers only) and SMS message locations can all be stored in the Phone Book:
Display a number from one of the above, press Options .
1
Follow the display instructions starting in Step 2 above.
2
During number and name entry, press Clear
✱
erase the entire entry.
• The characters *, +, P (pause), # and _ can be stored together with
numbers.
• If the SIM or Phone Book is full, a warning message will display when
selecting the Phone Book.
Clear to erase the last character. Press and hold Clear
ClearClear
Clear to
ClearClear
Free space in the Phone Book
To see how many empty Phone Book spaces remain in the SIM or the phone,
Press . Select Phone Book.
1
Select Remaining and use or to display the remaining
2
available spaces in the phone or SIM
Press Back or to return to the standby display.
3
If available, the free memories in the FDN list will also be shown.
✱
.
34
Page 35
Viewing and dialing numbers in the Phone Book
Phone Book entries can be recalled into the display to be edited, deleted,
copied, moved or dialed from either the phone or SIM. There are two ways
to view and dial numbers stored in the Phone Book.
• Directly from the standby display
Press to display the Phone Book list.
•Using the menu
Press and select Phone Book.
1
Select Recall.
2
Either press OK or enter up to the first 3 initials of the
3
name desired and then press OK .
If no initial is entered, the display will show the first alphabetical entry in the Phone Book. The list of Phone Book entries will
be displayed in alphabetical order together with the telephone
number and whether stored in the SIM or the phone memory.
Press to dial the number.
4
Press or to scroll through the Phone Book.
To go directly to another entry, press the corresponding alphabet key. For example, to go directly to entries starting with 'N'
press twice.
Press Options to display the following menu:
Item Function
Edit Edits the name and number entry
Delete Deletes the entry
Copy Copies the entry to the SIM or the phone or vice
Move Moves the entry to another position.
Call Calls the number displayed
versa. Editing allowed before copying
Editing allowed before moving
Press Back or to return to the normal display.
5
35
Page 36

Own number display
You can view your own PCS number in the Phone Book. You can also view
your Line 2 PCS number (Alternate Line Service), as well as data and fax
numbers if you have a subscription for those services. All of these numbers
are stored in the SIM by your service provider.
To view your own number(s),
Press . Select Phone Book.
1
Select Own numbers. Your PCS number displays.
2
Use or to view Line 2, data and fax numbers
3
(if you have a subscription for them).
Press Back or to return to the standby display.
4
Fixed dialing numbers (FDN)
Fixed dialing restricts outgoing calls to 'fixed' numbers or 'prefixes'
contained in SIMs that support this feature. When turned on, dialing any
number that is not in the FDN list is not allowed. Call forwarding and
sending SMS messages to any number not in the FDN list is prevented. The
maximum number of FDN numbers that can be stored is dependent upon
the capacity of the SIM. PIN 2 code is required to turn on FDN or enter
numbers into the FDN list.
To turn on or off FDN operation,
Press . Select Phone Book.
1
Select Fixed Dialing. Select Status.
2
Select On or Off. If selecting On, enter the PIN2 code.
3
Press OK to confirm the setting.
4
To view the numbers in the list,
Press . Select Phone Book.
1
Select Fixed Dialing.
2
Select View and use or to view all the entries. Press
3
Options to edit, delete or copy numbers to phone or SIM.
To enter, edit or delete numbers in the FDN list,
Press . Select Phone Book.
1
Select Fixed Dialing.
2
Select Add New. Enter the PIN2 code if not entered yet. It is
3
now possible to add new numbers as well as edit, delete
and copy numbers to the phone or SIM.
✱
Wild card spaces can be used with the numbers stored in the FDN list. For example, the number
727 8_ _ 9 allows calls to all numbers between 727 8009 to 727 8999 to be dialed. When
recalled to the standby display, the number can be edited and dialed.
36
Page 37

Speed dialing
Phone Book numbers can be assigned to Keys 2 - 9 which when held down
will dial those numbers. Key 1 is reserved exclusively for the voice mail
center number. Numbers stored in the SIM and in the phone (except fixed
dialing numbers) can be selected.
To assign Phone Book numbers to the speed dialing keys,
1
Press . Select Settings.
Select Keys.
2
3
Select Speed dial.
4
Use or to scroll to the next Empty Key number.
Select Names to go to the Phone Book and scroll to the
5
desired entry.
Press Select . The Phone Book name will appear with the
6
assigned Key number.
Press Back or to return to the standby display.
7
If a number which has been assigned to a speed dial key is deleted from the Phone Book, the
✱
corresponding number is automatically deleted from the speed dial key.
To change or delete assigned speed dial keys,
1
Press . Select Settings.
Select Keys.
2
3
Select Speed dial.
4
Use or to scroll to the desired Key number.
Select Options . Select Names to go to the Phone Book
5
to replace current phone number. Scroll to desired Phone
Book entry and press Select
Book entry. The Phone Book name will appear with the
assigned Key number.
Select Delete to delete the current Phone Book Entry. The
6
Key screen will display ‘Empty.’
Press Back or to return to the standby display.
7
✱
Key 1 cannot be changed or deleted.
to replace with new Phone
37
Page 38

Messages (SMS)
SMS message service enables you to send or receive short text messages of
up to 160 characters to or from other PCS phones with the same capability.
The messages are not sent directly to the other mobile phone but go via
your service provider’s message center. You can also store, edit and
forward messages as well as saving any of the numbers they may contain.
Reading a new SMS message
When the phone receives an SMS message, an SMS message alert tone
sounds and displays. The message is automatically stored in the SIM.
If is flashing, there is no more space to store messages in the SIM.
Delete previous read and stored messages to make space for new ones.
Press Read to read all new received messages (Inbox).
Reading stored SMS messages
Press . Select Messages.
1
Select Inbox to display the first message header.
2
Press or select Options , then Read text to read the
3
message text.
• Use and to scroll between pages or between messages.
• indicates an unread message, indicates a previously read
message.
Managing received and stored SMS messages
After reading the SMS message, press Options for these options:
Item Function
Read text Displays the remainder of the text
Delete Deletes the message
Reply Reply to the sender of the message
Forward Forwards the message to another phone
Numbers
✱
The items of this menu may vary and are dependent upon the type of message received.
Stores or calls the number(s) contained in
the SMS header or text
38
Page 39

Set up to send SMS messages
You can write and send text messages to other similarly equipped PCS
phones. First, check to see that the network’s SMS message center number
is stored in the phone.
Press . Select Messages.
1
Select Settings.
2
Select Message center.
3
If a number already appears, your service provider supplied
the number. Press OK . If empty, call your service provider.
If desired, you can select and change the Validity period, Format,
Reply requested and request a message Delivery report. The
following default settings are in place unless you change them.
Option Description Default
Validity
Format
Reply
requested
Delivery
report
4
The phone is now ready to send SMS messages.
Time held at message center. 12 hrs,
1 day, 2 days or Maximum (defined by
service provider)
Selects format of message; Text, Voice,
Fax or Pager
You may pay for the reply to a message,
if a reply is sent by the addressee
Requests a delivery report. Must be
supported by your service provider
Press Back or to return to the standby display.
Maximum
Text
No
No
Sending a new SMS message
Press . Select Messages.
1
Select Write new.
2
Enter the message text. See Entering text on page 28. If
3
available, the entry screen will be in T9® Text Input mode
(see page 30). When finished, press OK .
Select Send or Store.
4
If you selected Send, enter the desired number or select
5
Names to choose a number from a Phone Book entry
and press to confirm. Press OK .
Sent confirmation will be given.
Select whether to Store or Send another message.
6
Press Back or to return to the standby display.
7
39
Page 40

Messages in the outbox
The outbox contains unsent draft messages and stored sent messages,
identified by their headers. These messages can be selected from the
outbox menu and can be modified and resent as new SMS messages.
To select an outbox message,
Press . Select Messages.
1
Select Outbox.
2
Use or to scroll to the desired message header.
3
Each message header is marked as either “sent” or
“to be sent” .
In the upper right corner, the header is numbered along with
the total number of messages.
Press Options for the following menu:
4
Item Action
Read text Displays the remainder of the text
Delete Deletes the message
*Status
Send
Edit Edits the message text
5
Use or to select and follow the display prompts.
Press Back or to return to the standby display.
6
Available only for sent messages. Requests
a status report. Must be supported by your
service provider
Sends the message; or if message was
already sent, sends to another number or
resends to same number
Message alert tone
To hear a tone each time an SMS message arrives,
Press . Select Messages.
1
Select
Alert
2
Press
3
. Select On or
Back or to return to the standby display.
Off
.
40
Page 41

Message templates
If your SIM can store message templates, then Msg. templates will appear
in the Messages - Settings menu. Each of these templates can be named
for easy identification and can be selected and used whenever needed.
To create a message template,
Press . Select Messages. Select Settings.
1
Select Msg. templates. Choose any blank [...] template
2
and press Edit
Enter the template Name, Msg Center number, Validity
3
period and Format.
• Default settings for Reply and Status are set to ‘No’ unless you change
them to ‘Yes.’
• If only one template is set, it is automatically used by default.
• If more than one is set, any one can be selected to write a new message.
.
Calls & Timers
Details of incoming and outgoing calls, duration of the last call, and
accumulated total of all calls made are stored in Calls & Timers menu.
Call log
The Call log stores details of the last 10 numbers dialed, the last 5 unanswered
calls, and the last 5 received (answered) calls. The call logs are common for both
Line 1 and Line 2.
To view or dial a number from the Call log,
Press . Select Calls & Timers.
1
Select Call log.
2
Select Last dial, Unanswered or Received.
3
Use or to scroll through the call lists.
4
• The most recent number dialed or received is displayed first.
• For unanswered and received calls, if the caller’s number is in your
Phone Book, the name is shown. If not, ‘Unknown number’ displays.
Press at a highlighted number to dial that number.
5
41
Page 42
To edit or delete Call log entries,
Press . Select Calls & Timers.
1
Select Call log.
2
Select Last dial, Unanswered or Received.
3
Select the desired entry.
4
Press Options to go to the following menu:
5
Item Action
Store Store number in Phone Book
Delete Delete the entry
Delete all Delete all the entries
Edit Edit the displayed number
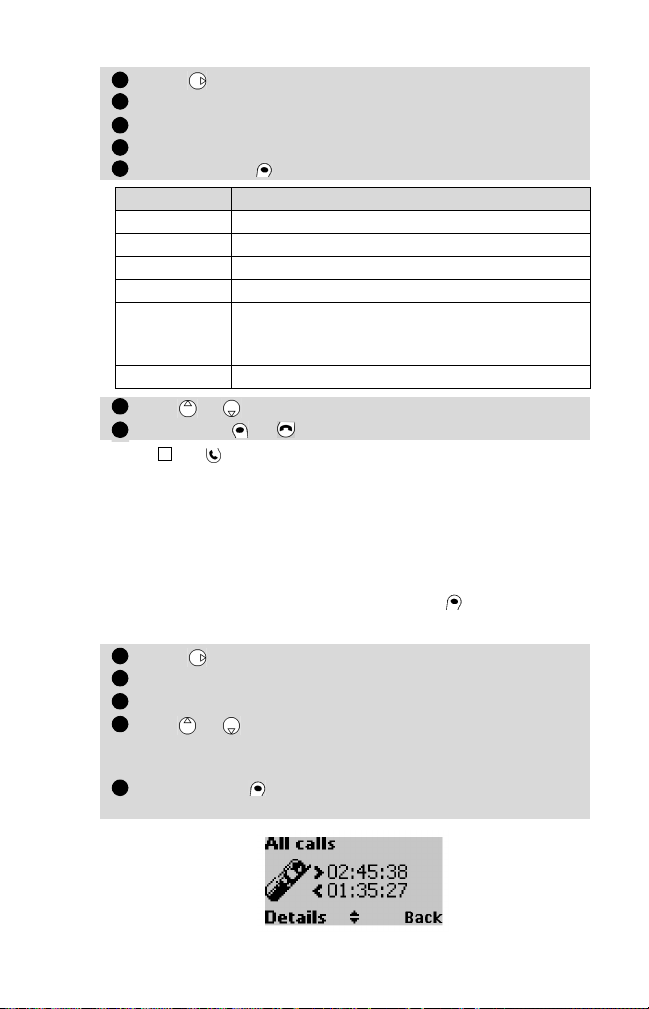
Details
Call Dial the number
Use or to select and follow the display prompts.
6
Press Back or to return to the standby display.
7
✱
Press in the standby display for 'One Touch' access to the 10 last dialed calls.
View the name, number, and call length of the
highlighted number. G340 includes time and
date of call
Call timers
The length of the last call, total accumulated time of all calls, and total time
of calls for Line 1 and Line 2 are stored.
Times for calls made and received through the home subscription network
and through other networks are displayed in Details
To view call timers,
Press . Select Calls & Timers.
1
Select Call timers.
2
Select Show.
3
Use or to view Last call, All calls, Calls L1, and
4
Calls L2. The top time (>) indicates time of outgoing calls
and the bottom time (<) indicates time of incoming calls.
Press Details for call times on My network, National
5
roaming, and International roaming calls.
.
42
Page 43

Balance information (subscription service only)
This subscription service provided by some networks enables you to ask for
your remaining airtime balance. This information is sent by the network.
Contact your service provider for details.
Press . Select Calls & Timers.
1
Select Call timers.
2
Select Balance information.
3
Select Call or Set number.
4
•If Call is selected and the balance information number is
entered, the balance information center is dialed.
• If a number has not been entered, select Set number and enter
the number. Press OK to store your number or to store
and dial the information center number.
Press when the call is ended.
5
Reminder - Call duration (Model G340 only)
A call duration reminder beeps to remind you of how long you have been
on a call. It can be set in 1 minute increments (1 - 59 mins).
Press . Select Calls & Timers.
1
Select Call timers.
2
Select Reminder. Select On (or Off to turn off).
3
Enter 2 digits (to signify 1 to 59 mins). Press OK .
4
Press Back or to return to the standby display.
5
Reset call timer
To reset all the call timers,
Press . Select Calls & Timers.
1
Select Call timers.
2
Select Reset.
3
Select Yes (or No to exit).
4
Enter your 4-digit phone lock code and press OK .
5
A confirm message will appear.
Press Back or to return to the standby display.
6
43
Page 44

Call costs - management (subscription service only)
Some networks offer an Advice of Charge (AoC) subscription service to see
the cost of the last call made, the accumulated total cost of all calls, and
the remaining balance in units or currency of any 'cost limit' set.
To display these costs in the currency of your choice, first select the
currency and cost per unit. If not selected, call costs in units will display.
To set currency and cost per unit,
Press . Select Calls & Timers.
1
Select Call costs.
2
Select Display cost type.
3
Select Currency. The present currency settings display.
4
Press Edit . Enter the PIN 2 code and press OK .
5
6
Enter the abbreviated letters of the currency. Press OK .
Enter the cost per unit in the selected currency.
7
Press OK to confirm. The display will confirm your selection.
Press Back or to return to the standby display.
8
To set call cost type to units,
Press . Select Calls & Timers.
1
Select Call costs.
2
Select Display cost type.
3
Select Units.
4
Press Back or to return to the standby display.
5
When the cost type is set to units, the credit limit and the remaining credit are shown in units.
✱
Setting the credit limit - in units or currency
After setting the currency and cost per unit, if desired and available in your
subscription, you can also set a credit limit in units or an amount in the
currency of your choice. When the credit limit is reached, the phone cannot
make or receive any chargeable calls. This does not prevent the phone from
making emergency calls.
Press . Select Calls & Timers.
1
Select Call costs.
2
Select Credit limit. Display shows the present credit limit.
3
Press Edit . Enter the PIN 2 code and press OK .
4
Enter the credit limit (use to enter a decimal point). Press
5
OK to confirm.
Press Back or to return to the standby display.
6
✱
When a credit limit is entered, the 'Credit Limit' selection will be Edit or Set No Limit.
44
Page 45
Show costs
If offered by your service provider, you can view the cost of your last call,
all calls, and your remaining credits.
Press . Select Calls & Timers.
1
Select Call costs.
2
Select Show.
3
Use or to display the cost of the Last Call, All Calls
4
and the Remaining credits.
Press Back or to return to the standby display.
5
✱
The remaining credit is shown in either units or currency as set by Cost Type menu above.
Call costs - resetting all costs to zero
To reset all the call costs to zero,
Press . Select Calls & Timers.
1
Select Call costs.
2
Select Reset.
3
4
Select Yes to reset the costs or No to exit.
If Yes is selected, enter the PIN 2 number and press OK .
All Costs Reset will briefly display.
Press Back or to return to the standby display.
5
Alternate line service - selecting line 2 (subscription service)
Some GSM 1900 operators offer the use of a second line. This is normally
a subscription service and allows, for example, separating incoming and
outgoing calls for business or private use. Line 2 has a separate PCS
number.
Press . Select Calls & Timers.
1
Select Line selection. The current line selection displays.
2
Use or to scroll to the desired line.
3
Press Select or .
Press Back or to return to the standby display.
4
45
Page 46
Services
Call forwarding (network service)
Call forwarding service forwards incoming calls, whether voice, fax or data,
to another number.
To set up call forwarding,
Press . Select Services.
1
Select Call forwarding for the following menu:
2
Forward options Action
All Voice calls
When not reachable
On no reply
When busy
All conditions
Cancel all Cancels all Forwards
All FAX calls
All DATA calls
Use or to select the desired forwarding condition,
3
then press .
Select Activate.
4
Select Names or Number.
5
If Names was selected, choose the number to forward your
6
incoming calls to from the Phone Book. If Number was
selected, enter a phone number. Press Select or OK .
Requesting displays. The network will confirm your request.
Press Back or to return to the standby display.
7
Forwards all incoming voice calls
unconditionally
Forwards all voice calls only when the
phone cannot be reached (out of service)
Forwards all voice calls only when the
phone does not answer
Forwards all voice calls only when the
phone is busy
Forwards all voice calls only during 3
conditions; When not reachable, On no
reply and When busy
Forwards all incoming fax calls
unconditionally
Forwards all incoming data calls
unconditionally
Call forwarding notes
• If the ‘On no reply’ option is selected, you must enter a delay period of
5, 15, or 30 seconds.
• Call forwards for Line 1 and 2 must be set for each line. During call
forward set up, only the line currently selected is affected. To choose a
call forward for the other line, you must select this other line first (see
Alternate line service on page 45).
46
Page 47

To cancel or check the status of individual call forwards,
Press . Select Services. Select Call forwarding.
1
Select the desired forward option and press .
2
Select Cancel or Status. Requesting displays. The network
3
will confirm your request.
Press Back or to return to the standby display.
4
To cancel all (multiple) call forwards,
Press . Select Services. Select Call forwarding.
1
Select Cancel all.
2
Select Cancel. Requesting displays. The network will
3
confirm your request.
Press Back or to return to the standby display.
4
✱
This action cancels all voice forwards (for voice, faxes and data calls) for the line currently in use.
To cancel call forwards for the other line you must select this other line first (see Alternate line
service on page 45).
Caller Line Identity - showing/hiding your PCS number
Most networks allow the Caller Line Identity feature (CLI) which shows the
incoming number (ID) while receiving a call. Select Receiving caller ID
to check if this is available from your network.
Receiving caller ID
To check if a network presents the ID of incoming calls,
Press . Select Services.
1
Select Receiving caller ID. Requesting displays.
2
The network will return either Calling user ID available or
Calling user ID unavailable.
Press Back or to return to the standby display.
3
On networks which allow caller line identity, to disable sending your own
number on a call by call basis,
Enter #31# before the number you are calling.
1
If your service provider has disabled sending your PCS number, then to
show your number on a call by call basis,
Enter *31# before the number you are calling.
1
47
Page 48
Standard network setting
Finding out your current ID setting
Press . Select Services.
1
Select Sending my ID.
2
Select Status. Requesting displays. The network will
3
respond with your current setting.
Press Back or to return to the standby display.
4
Hiding or showing your number
Press . Select Services.
1
Select Sending my ID.
2
Select My settings.
3
Select Hide my ID or Show my ID. Requesting displays.
4
The network will respond with an appropriate message.
Press Back or to return to the standby display.
5
To reset the standard network setting for sending your PCS number,
Press . Select Services.
1
Select Sending my ID.
2
Select My settings.
3
Select Preset. Requesting displays. The phone resets to
4
the network setting agreed to with your service provider.
Press Back or to return to the standby display.
5
Network
When the phone is turned on, it automatically searches for the last network
it was registered on (usually the home network). If this is not available, the
phone will automatically search and select a network from the preferred
network list contained in the SIM.
Editing the preferred list
The phone contains a list of networks which can be selected and
transferred to the preferred networks list stored in the SIM. While traveling,
you may wish to choose a particular network to use.
48
Page 49

To edit or change the order and name of the networks in the preferred
networks list,
Press . Select Services.
1
Select Network.
2
Select Preferred list. A Preferred list screen appears with
3
several [...] signifying empty lines.
The highlighted [...] will be filled with your choice. Press
4
Options .
Select one of these options:
5
Option Description
Modify by
list
Modify by
code
Delete
A list of networks displays. Scroll to your preferred network
6
and highlight it. Press Select to place your selection in
the preferred list.
To add more to the list, scroll to the next empty line [...]
7
and continue with step 4. To replace or delete an entry on
your preferred list, highlight the entry, press Options
and continue with step 5.
Press Back or to return to the standby display.
8
Displays the general list of all known
networks contained in the phone in
alphabetical order
Edits or enters a network number (MCC MNC)
if you know this information
Deletes an entry (appears only when network
name is already listed)
Your SIM may contain a forbidden list of networks which cannot be used.
The SIM also stores the home network name.
To view the forbidden list or show the home network,
Press . Select Services.
1
Select Network.
2
Select either Forbidden or Home network.
3
A list of forbidden networks or the home network displays.
Press Back or to return to the standby display.
4
49
Page 50

Selecting automatic search (normal default setting)
To perform an automatic search from the preferred list,
Press . Select Services.
1
Select Network.
2
Select Search.
3
Select Automatic. An automatic search is performed.
4
Press Back or to return to the standby display.
5
Selecting manual search
When you wish to select a specific network which has better coverage in
your current location, choose manual network search.
Press . Select Services.
1
Select Network.
2
Select Search.
3
Select Manual. Scanning for Networks displays, followed
4
by a list of the networks found.
Choose a network and press .
5
Requesting displays. The network will send a confirmation.
6
✱
You cannot delete a network from the forbidden list. This list automatically updates when the
manual network selection is performed.
Call barring (network service)
Call barring stops certain types of calls from being made or received. You
must use a call barring password available only from your service provider.
To put on a call bar,
Press . Select Services.
1
Select Call barring.
2
Select Outgoing calls or Incoming calls. Choose from:
3
50
Options Description
Outgoing - All outgoing All outgoing calls are barred
- Int'nal calls
- Int'nal excl.
- home
Incoming - All incoming All incoming calls are barred
- Roaming
- only
Only outgoing international
calls are barred
All outgoing international calls
except to other subscribers
within your home network
All incoming calls when not on
the home network
Page 51

Select the desired option. Press Select .
4
Select Activate. Enter the call barring password and press
5
Select .
The network will respond with a confirm message.
Press Back or to return to the standby display.
6
To remove or check the status of a call bar,
Press . Select Services.
1
Select Call barring.
2
Continue with step 3 above, then select Cancel to remove a
3
call bar or select Status and press .
If removing a call bar, the password is required.
Press Back or to return to the standby display.
4
To change the Call bar password,
Press . Select Services.
1
Select Call barring.
2
Select Change password.
3
Enter the old password. Enter the new password, then enter
it again to confirm. The network will confirm.
4
Press Back or to return to the standby display.
Closed user group, CUG (subscription service only)
This network service allows the phone to make or receive calls only from
selected groups of people. The groups, level of access, and if one of the
groups has preferential calling access is set up at the time of subscription.
This is mainly for businesses wishing to use closed, internal communications. This feature is not available for personal use.
Up to 10 groups may be set up. Unauthorized calls made or received from
numbers outside the group are not permitted.
To turn on and off CUG and select type of CUG service,
Press . Select Services.
1
Select CUG. The current CUG status displays.
2
Press Set to display these options:
3
51
Page 52
Options Description
No CUG
Partial CUG
CUG Only
4
Use or to select an option. Press . Follow the
display prompts.
Press Back or to return to the standby display.
5
✱
'No CUG' is the setting for normal use.
CUG is off. No groups active. Calls can be
made outside the group
Limited calls to and from users outside the
group and from users within the group
Only able to make and receive calls from
users within the group
Broadcast - cell broadcast (CB) messages
These are messages broadcast by the networks to all GSM customers. They
provide general information about local area dialing codes, weather
reports and traffic news, etc. Each type of message is coded so you can
choose the type of information you want to receive. Up to 5 different types
of messages can be stored in your selection list but only one can be
displayed at a time.
There are 16 standard message types stored in the phone. Choose up to 5
message types to receive. Contact your service provider for details on the
types of CB broadcast messages available.
Before you can turn on the broadcast service, you have to put at least one
message type in the Selected types list.
Enter a message type
Up to 5 message types can be stored in your ‘Selected types’ list.
Press . Select Broadcast.
1
Select Message types. Press Options .
2
Select Modify by list or Modify by code (if code number is
3
known).
Scroll to the desired message type. Press Select to add
4
the message type. The display confirms your choice.
To add more message types, press to highlight an empty
5
row [...]. Press Options and continue at Step 3.
Press Back or to return to the standby display.
6
52
Page 53

Change or delete a message type
Message types put into the ‘Selected types’ list can be changed or deleted.
Press . Select Broadcast.
1
Select Message types.
2
Scroll to the message type you wish to change or delete.
3
Press Options
To change a message type, select Modify by list or Modify
4
by code and continue with Step 4 in Enter a message type.
To delete a message type, select Delete.
5
Press Back or to return to the standby display.
6
Standard message type codes chart
Code
No.
000 Index 040 Weather Reports
010
020 Hospitals 052
022 Doctors 054 Operator Services
024 Pharmacies 056
030
032
034 Taxis 059
Description Code
Information
Flashes
Long distance
Road Reports
Local Road
Report
No.
050
057
058
Description
District Messages
(STD Codes)
Network
Information
Directory Services
(National)
Directory Service
(International)
Customer Care
(National)
Customer Care
(International)
To turn on or off CB broadcast service
Press . Select Broadcast.
1
Select On/Off.
2
Select On or Off.
3
Press Back or to return to the standby display.
4
When the broadcast service is turned on continuously, the battery standby time is reduced.
✱
53
Page 54

Reading broadcast messages
Broadcast messages are shown in the standby display only. They are
suppressed during conversation or menu operation. A message can be up
to 93 characters in length and cover several pages. Pages will scroll
automatically approximately every five seconds or press to scroll.
Options during message display
Press Clear
Press to dial the number shown within the message.
Press Options
Delete All Deletes all messages stored in the queue
Numbers
Broadcast Off Turns off cell broadcast
to clear the message currently displayed.
for these options:
Option Action
Delete Delete the current message
Displays all phone numbers in message
text. Option to dial or store in scratchpad
Broadcast message alert tone
To hear a tone each time a broadcast message arrives,
Press . Select Broadcast.
1
Select Alert.
2
Select On or Off.
3
Press Back or to return to the standby display.
4
Broadcast language
If provided, the cell broadcast language used is the same as the one
selected for use in the phone's menu.
54
Page 55

Settings - customizing your phone
Keypad lock
When keypad lock is activated, it prevents accidental key presses and menu
access. The key tones are also silenced.
Keypad lock is suspended during incoming calls and resumed when the
call ends. Emergency calls can still be made.
To activate or deactivate keypad lock,
Press Lock plus to activate keypad lock. displays.
1
Press Unlock plus to deactivate keypad lock.
2
✱
Keypad lock is cancelled when connected to the handsfree car kit.
To activate or deactivate keypad lock from the menu,
Press . Select Settings.
1
Select Keypad lock to activate keypad lock.
2
Press Unlock plus to deactivate keypad lock.
3
Language selection
If offered by your service provider, all the display messages can be shown
in one of three languages: English, French, or Spanish.
To select the language of your choice,
Press . Select Settings.
1
Select Language.
2
3
Use or to select a language from the list. Press .
Press Back or to return to the standby display.
4
✱
To reset the phone to the language of the SIM, enter *#0000#.
To reset the phone language to English, enter *#0044#.
Tones - Alert mode
There are two ways to turn off the incoming ring tone, key tones and all
alert tones and (Model G340) alarm tones. For Model G340, if either
'Vibrate' or 'Vibrate then ring' options are chosen, all alert and alarm tones
are replaced by the vibrating action.
Shortcut to turn alert tones on or off,
Press to display Ring or Silent (G310) or Ring, Vibrate,
1
Vibrate & ring, or Vibrate then ring (G340).
Scroll to desired setting. Press to select. If Silent is
2
selected, will display. For Model G340, if any of the
vibrate options are selected, the phone will vibrate briefly.
55
Page 56

To turn alert tones on or off from the menu,
Press . Select Settings.
1
Select Tones.
2
Select Alert tones.
3
Select Ring or Silent (G310) or Ring, Vibrate, Vibrate &
4
ring, or Vibrate then ring (G340).
Press Back or to return to the standby display.
5
✱
1. If Ring is selected but the ring tone volume is set to Off, the icon will display.
2. This setting is not saved when the phone is turned off.
3. When the phone is connected to either the Desk Top Charger, Handsfree Kit, CLA, or AC adapter,
the vibrator mode cannot work so the phone will ring instead.
4. The icon appears if any Vibrate options are selected. It takes precedence over the icon.
Ring tone selection
Choose the sound of the incoming ring tone from a stored selection.
To hear your chosen ring tone or melody, wait several seconds before
confirming your choice. The tone or the melody will play.
To select a ring tone,
Press . Select Settings.
1
Select Tones.
2
Select Ring tone.
3
Use or to scroll to the different ring tones. Wait
4
several seconds to hear the tone. After choosing a tone,
press to select the tone.
Press Back or to return to the standby display.
5
✱
Separate tones must be selected for Line 1 and Line 2.
Volume adjustments
Volume levels of the ring tone, key tones and incoming audio can all be
adjusted.
Shortcut to volume adjustment:
Press . Continue with step 4 below.
1
To adjust volume from the menu,
Press . Select Settings.
1
Select Tones.
2
Select Volume.
3
56
Page 57
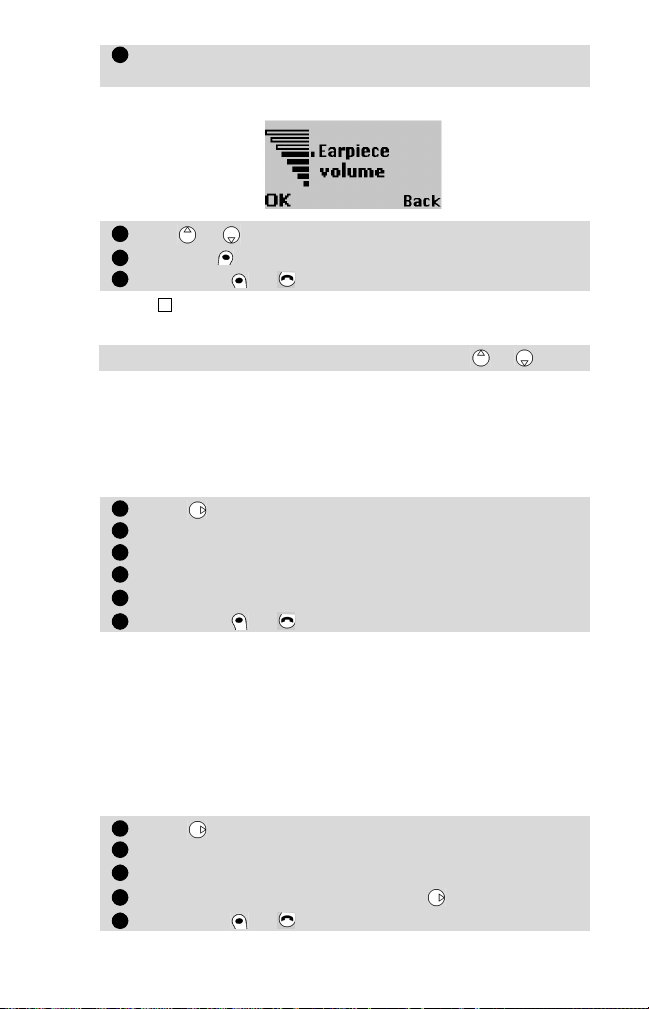
Select Ring, Ramping, Keys, Conversation or
4
Alarm tones (G340).
The display will name the volume type to be adjusted.
Use or to adjust the setting.
5
Press OK to confirm.
6
Press Back or to return to the standby display.
7
✱
For ring tone and key tone, the lowest setting is off.
During a call, you can adjust the volume by using or .
Ramping
Ramping causes the incoming ring tone to gradually increase to maximum
volume level if the call is not answered after the first ring.
Press . Select Settings.
1
Select Tones.
2
Select Volume.
3
Select Ramping.
4
Select On or Off.
5
Press Back or to return to the standby display.
6
Backlight - setting
This option controls the backlight during key entry or incoming ring tone.
There are two settings:
• On for 10 sec.: Display and key backlight stay on for
10 seconds after the last key press or incoming call.
• Off: Backlight stays off.
Press . Select Settings.
1
Select Display.
2
Select Backlight.
3
Select either of the two settings. Press to confirm.
4
Press Back or to return to the standby display.
5
57
Page 58

Display contrast
To modify the display contrast,
Press . Select Settings.
1
Select Display.
2
Select Contrast.
3
4
Adjust the contrast using or . Press OK to confirm.
Press Back or to return to the standby display.
5
Any key answer
This feature enables any key (except and Silence ) to be pressed to
answer an incoming call.
Press . Select Settings.
1
Select Keys. Select Any key answer.
2
Select On or Off.
3
Press Back or to return to the standby display.
4
Softkeys functions (Model G340 only)
The right and left softkey shortcut can be changed so your standby display
can have a shortcut to the menus of your choice. The options available are
shown in the menu during selection.
Shortcut to Softkeys functions:
Press and hold or .
1
Use or to scroll through the softkey option choices.
2
Press Select to select an option.
3
The screen will confirm your selection and return to the
4
standby display, which shows your new softkey function.
To change softkey functions from the menu:
Press . Select Settings.
1
Select Keys.
2
Select Softkey functions.
3
Select Left softkey or Right softkey.
4
5
Use or to scroll through the softkey option choices.
Press Select to select an option.
6
Press Back or to return to the standby display, which
7
shows your new softkey function.
If (......)
(......) appears, it means a previously SIM dependent or subscription service assigned to that
✱
(......)(......)
softkey is no longer available, for example, Line 2 selection.
58
Page 59

Speed dial
See Speed dialing on page 37 to set up Speed dialing.
Auto answer
When the phone is connected to a handsfree car kit or headset, the phone
will automatically answer an incoming call after approximately 5 seconds
without having to press any keys.
Press . Select Settings.
1
Select Auto features.
2
Select Auto-answer.
3
Select On or Off.
4
Press Back or to return to the standby display.
5
Auto retry
The phone will automatically redial the number of a failed call up to 10
times, due to a busy system or unavailable signal from the network.
Press . Select Settings.
1
Select Auto features.
2
Select Auto-retry.
3
Select On or Off.
4
Press Back or to return to the standby display.
5
When activated, Auto-retry appears each time a redial call attempt is
made, followed by a warning tone. If it is successful, proceed with the call.
Press Back or any key during Auto-retry to end dialing for that call.
Security features
The following security features protect your phone from unauthorized use.
Tips on using security codes:
• When requested, enter the code, which appear as asterisks (*), and
press OK .
• If you make a mistake, press Clear then enter the correct digit(s).
• Do not use codes such as emergency 911 to prevent accidently dialing
these numbers.
Keep a record of your codes and keep them in a safe place.
Failure to do so will cause you great inconvenience.
59
Page 60

Phone lock code
The phone lock code, supplied with the phone, prevents unauthorized
access to the phone.
The factory setting is 0000. We suggest that you reset this code and keep
it in a safe place, separate from the phone.
When Phone lock is turned on, the phone lock code must be entered each
time the phone is turned on. The phone lock code is also required to reset
the call timers.
To change the phone lock code,
Press . Select Settings.
1
Select Security. Select Phone lock.
2
3
Select Change code and follow the display prompts.
Press OK to confirm the new code.
4
Press Back or to return to the standby display.
5
To turn Phone lock on or off,
Press . Select Settings.
1
Select Security. Select Phone lock.
2
Select On or Off.
3
Enter the phone lock code to confirm your selection.
4
Press Back or to return to the standby display.
5
Emergency calls can still be made when Phone lock is turned on.
✱
PIN code
Your SIM is provided with a 4 to 8-digit PIN code to protect it from
unauthorized use. When PIN code lock is enabled, the PIN code must be
entered each time the phone is turned on. If you enter the wrong PIN code
three times in a row, your SIM card is blocked and you must enter the
8-digit PUK code supplied from your service provider (see page 61).
60
Page 61

To enable or disable the PIN code lock,
Press . Select Settings.
1
Select Security.
2
If already off, PIN enable will show.
If already on, PIN disable and PIN change will show.
Press Select and follow the display prompts.
3
Press OK to confirm.
4
PIN enabled or PIN disabled briefly displayed will confirm your action.
Press Back or to return to the standby display.
5
To change the PIN code (PIN lock must first be enabled),
Press . Select Settings.
1
Select Security.
2
Select PIN change and follow the display prompts.
3
Press OK to confirm your new PIN. Confirmation will display.
4
Press Back or to return to the standby display.
5
PIN2 code
The PIN2 code prevents unauthorized access to some features such as
turning on or off FDN operations, modifying the FDN Phone Book, setting
calls costs to zero, or modifying the costs display. It can be changed but
not turned on or off.
To change the PIN2 code,
Press . Select Settings.
1
Select Security.
2
Select PIN2 change and follow the display prompts.
3
Press OK to confirm your new PIN2 code.
4
Press Back or to return to the standby display.
5
PUK code
The PUK (PIN unblock key) 'unblocks' a PIN whose code has been entered
incorrectly three times. This 8-digit code, supplied by your network
provider, cannot be changed.
When requested, enter the PUK code and press OK . Then you must enter
a new PIN code. Follow the display prompts to reset the PIN code.
If you enter the wrong PUK code 10 times in a row, your SIM card cannot be used again.
✱
Contact your service provider for a new card.
61
Page 62

PUK2 code
The PUK2 unblocks a PIN2 whose code has been entered incorrectly three
times. This 8-digit code, supplied by your network provider, cannot be
changed.
When requested, enter the PUK2 code. Then you must enter a new PIN2
code. Follow the display prompts to reset the PIN2.
✱
If you enter the wrong PUK2 code 10 times in a row, you will be unable to use the features
requiring the PIN2 code. Contact your service provider for a new card.
Call barring password
The call barring password, supplied by your network provider, selects the
call barring levels listed in the Services - Call Barring menu (see page 50).
To change the Call barrring password,
1
Press . Select Services.
Select Call barring.
2
Select Change password and follow the display prompts.
3
Press OK to confirm.
4
Press Back or to return to the standby display.
5
Code/password entry summary
Password Length
Unlock code 4 digits Unlimited
PIN
PIN2
PUK 8 digits 10
PUK2 8 digits 10
Call barring
password
4-8
digits
4-8
digits
4 digits
Number of
tries allowed
3
3
Network
determined
If blocked or
forgotten
Return phone to
manufacturer
Unblocked by
PUK code
Unblocked by
PUK2
Contact your
service provider
Contact your
service provider
Contact your
service provider
62
Page 63

Time & Date setting - Model G340 only
To set the current time,
Press . Select Settings.
1
Select Time & date.
2
Select Set time.
3
Enter the time using the number keys. Enter 0 (zero) first for
4
single digit hours and minutes. In the standby display, the
zero before the hour digit will not appear. Use and to
move the cursor. Press OK to set.
Select am or pm.
5
Press Back or to return to the standby display.
6
To set the current date,
Press . Select Settings.
1
Select Time & date.
2
Select Set date.
3
Enter the date using the number keys. When entering date,
4
format is month/day/year. Enter 0 (zero) first for single digit
months and days. Enter all four digits of the year. Use
and to move the cursor.
In the standby display, the year and the zero before the
month and day will not appear.
Press OK to set.
5
Press Back or to return to the standby display.
6
• Time and date appear only while the phone is turned on.
The year will not appear.
• An internal battery maintains the date and time setting for up to 3
hours when the phone is turned off and without a battery, or with a
completely discharged battery attached. After this 3 hour period, you
may need to reset the clock when the phone is turned on again.
• An error message appears if you make an incorrect entry.
63
Page 64

Default (factory) settings
Use Default Settings to return the phone settings back to the factory
settings. This has no effect on the Phone Book entries or phone lock code.
Press . Select Settings.
1
Select Default settings.
2
Select Yes or No.
3
Press Back or to return to the standby display.
4
Factory default settings:
Feature Factory setting
Alert Tones Ring
Ring Tones Ring tone 1
Volume, Ring, Key, Conversation
Alarm (G340 only)
Backlight
Contrast
Any key answer, Auto-retry and
Auto-answer features
Ramping Off
Mid values
On for 10 sec.
Mid value
Off
Office Tools
Office Tools menu contains a scratchpad and currency converter.
Model G340 includes an Alarm clock feature.
Scratchpad
Scratchpad can store up to 5 separate entries of 20 characters each.
Press . Select Office Tools.
1
Select Scratchpad.
2
Select Read. Use or to scroll through the entries.
3
Select Write to make a new scratchpad entry. See Entering
text on page 28. If available, the entry screen will be in T9®
Text Input mode (see page 30). Press and hold desired key to
enter a number. When entering phone numbers, do not enter
spaces or dashes. The entry will be date and time stamped.
64
Page 65

Press Options for these options while in Read mode:
Item Action
Store * To save a number to the phonebook
Edit Modifies an entry
Delete Deletes an entry
Delete all Deletes all entries
Call * Calls the number displayed in the entry
* These items appear only if the scratchpad entry is a telephone number.
Currency converter
To use the currency converter, you must first set up the currencies and the
exchange rate. The conversion is calculated on the per unit exchange rate
of the second currency selected.
To select the currencies and the exchange rate,
1
Press . Select Office Tools.
Select Currency converter.
2
Select Settings.
3
4
Enter the first currency name (e.g. Dollar). Press OK .
Enter the second currency name (e.g. Yen). Press OK .
Enter the exchange rate using to enter a decimal point.
5
Press OK to confirm the entry.
6
Press Back or to return to the standby display.
✱
If you wish to use your Currency converter as a Euro converter for participating currencies to the
European Monetary Union ("Euroland currencies"), please enter the complete Euro exchange rate
with at least three significant figures. For example: 1 Euro = £ 1.52.
To calculate the conversion between the chosen currencies,
1
Press . Select Office tools.
Select Currency converter.
2
Select one of the two first options.
3
In our example: either Dollar->Yen or Yen->Dollar.
Enter the amount to be converted.
4
Press to insert a decimal point, if needed.
Press OK . The converted amount displays.
Press Back or to return to the standby display.
5
✱
Conversion from one Euroland currency to another, or to non-Euroland currencies, should normally
follow "triangulation" rules (i.e. conversion of local currency to Euro and then Euro to other local
currency). Your Currency converter cannot do this. Your result will be only a close approximation.
65
Page 66

Alarm clock - Model G340 only
You can set a daily 'Power On' or a daily 'Reminder alarm.'
Caution - Please remember to turn off the alarm feature when
boarding an aircraft where cellular phone use is not permitted.
You can also remove the battery after turning off the phone.
See the Safety warnings on page 16.
To set a time and turn on the alarm,
Press . Select Office Tools.
1
Select Alarm clock (If a previous alarm time was entered,
2
then that time displays).
Select On. Enter the alarm time using 0 (zero) for single
3
digit hours or minutes. Press OK .
Select am or pm and press Select .
4
Stored displays briefly.
Press Back or to return to the standby display.
5
icon appears on screen next to the current time.
✱
When set to On, the alarm will operate at the same time every day until turned Off.
When alarm time arrives, an alarm sounds for up to to 1 minute. Alarm
clock! and vibrating bell icon appear and the LED light flashes red.
Silence turns off the alarm tone only. Valid. validates the alarm
(that is, turns off the alarm until the next day). To clear (turn off) the alarm
permanently, you must select Off in the Alarm clock menu. See next page.
If the phone is off at alarm time, the phone will automatically turn on and
the alarm tone sounds and display messages appear.
To use as a Reminder or Snooze Alarm,
Press Silence , or any other key (except Valid. ) to stop the
alarm tone. The alarm icon and Alarm clock! warning remain on
screen. The alarm rings again 3 minutes later.
or
Press Valid. to validate the alarm (that is, turn it off until the
next day).
66
Page 67

Alarm clock notes
• If the phone is turned off and is locked or the PIN lock is set, the alarm
will turn on the phone. However, the phone remains blocked until you
enter the phone lock code or PIN code.
• If the alarm tone is turned off but Valid. softkey is not pressed, the
alarm indicators remain for up to 15 minutes. Then the phone reverts
back to the standby display.
• The alarm rings for 1 minute until any key (except Valid. softkey) is
pressed to stop the alarm tone. The alarm is still active, and it repeats
3 minutes later. If Valid. softkey is not pressed after the third alarm
tone, the alarm is not repeated but the phone remains turned on and in
the alarm display mode for up to 15 minutes. Then it reverts back to the
standby display.
• If the alarm time arrives during a call, an 'In Call' alert beep sounds every
20 seconds. Press Valid. softkey to turn off alarm.
• If the alarm time arrives while dialing or receiving a call, the alarm is
suspended until the call connects. An 'In Call' alert beep sounds every
20 seconds.
• If the phone is turned off when alarm time arrives, the phone will turn
on. If the alarm is not validated, the phone remains on for 15 minutes,
then turns off.
• If the battery is detached less than 15 minutes before alarm time, the
alarm sounds immediately. Press Valid. softkey to turn off the alarm.
If more than 15 minutes, only the visual indicators appear.
To turn off the alarm permanently,
1
Press . Select Office Tools.
Select Alarm clock.
2
Select Off. Confirmation displays.
3
4
Press Back or to return to the standby display.
67
Page 68

Appendix
Accessories list
Handsfree kits Part numbers
Headset (earphone + microphone) HDS-P2
Simple Holder with bracket (mounts in car to hold
phone)
Simple Handsfree Kit (with Simple Holder, Cigarette
Lighter Adapter base & microphone)
Batteries and Chargers Part numbers
Standard battery (NiMH-S) SBT-P10
Desktop Battery Charger (for phone + spare battery) QCK-P9
AC adapter 120V (for battery charging using wall
outlet)
Cigarette Lighter Adapter - plug one end into car
cigarette lighter, other end into phone jack to use
and charge phone in your car
Miscellaneous Part numbers
Faceplate Kit for Model G310 (available in a variety
of color combinations)
Leather Case (for Model G310) G310CSE
Leather Case (pouch type for Model G340) G340PCH
Belt Clip w/Button CLP-P6
Data and fax Part numbers
PC cable (RS232C) PCC-P2
Contact Data Kit (Software + PC cable)
To use data and fax numbers, refer to the instructions in the Contact Data kit and/or contact your
service provider for details.
Also allows you to create and download melodies,
manage abbreviated dial numbers, and perform
SMS functions on your PC.
HLD-P7
HFK-P10
ACP-P4
CIG-P7
FPLATE-Pvaries
PCM-P3
To purchase accessories, contact your service provider or shop online at
www.mitsubishiwireless.com.
68
Page 69

Glossary
Term Description
AC adapter Alternating Current adapter
Active call The call currently in conversation
ALS Alternate Line (Line 2) Service
AoC Advice of Charge - subscription service
CB Cell Broadcast
CLI Caller Line Identity - displays caller’s telephone number
Conversation mode When the phone is making or receiving a call
CUG Closed User Group - requires network support
DTMF Dual Tone Multifrequency Tones
FDN Fixed Dialing Number
Forwarding Forwards incoming calls to another number
GSM Global System for Mobile communications
IN Information Numbers of your service provider
LCD Liquid Crystal Display
LED Light Emitting Diode
PIN/PIN2 Personal Identification Number. Supplied by your
PUK/PUK2 PIN Unblocking Key. Used to unlock PIN and PIN2.
Roaming (Rm) The ability to use your telephone on networks other than
SDN Service Dialing Number of your service provider
SIM Subscriber Identity Module. Supplied by your network/
SMS Short Message Service
SR Status Report - relates to SMS messages
Standby mode When the phone is on, registered onto a network but not
network/service provider
Supplied by your network/service provider
your home network at home or abroad
service provider
making or receiving a call
69
Page 70

Troubleshooting
Problem Possible cause and solution
Phone will not turn on • Check that the battery is fully charged and correctly
Charging LED not lit
red and no flashing
battery Icon
Short standby and
talk times
Calls cannot be made
or received
Stored telephone
numbers cannot be
recalled
Numbers cannot be
entered in the display
Phone turns on but
there is no display
Battery icon not
flashing 1-2-3 during
charging
Flashing • There is not enough memory to store another SMS
connected to the phone
• Check wall outlet. Power may be out
• The AC/DC charger may be defective. Return it to
your dealer, try another Mitsubishi adapter
• Cell broadcast is permanently on, using more battery
power
• Phone is in a poor signal area and therefore always
on full power
• Incorrect charging and discharging. Always charge
and discharge your battery fully
• The battery is wearing out. Replace the battery
• Check that you have at least one signal strength bar
). Try in a stronger signal strength area
(
• If the name of a network is not displayed, check that
your SIM is OK, check registration with your service
provider
• Call barring option is turned on. Turn it off (see
page 50)
• Call cost limit is reached (see page 44)
• Fixed Dialed Number or Call Barring features are
turned on. Turn off the features (see pages 36
and 50)
• Keypad lock is on ( is displayed). Press Unlock
and to turn off
• Display contrast is turned down to low. Reset
contrast (see page 58)
• Indicates a charging or battery problem. Turn off and
disconnect the adapter. Reconnect and try again.
If the problem persists, contact your dealer.
message. You must delete one or more of the
existing stored messages.
70
Page 71

Error messages
Message Possible cause and solution
Allowed credit
reached!
Busy
Call failed
Cancelled. No type
selected
Cannot execute
command
Can't display
message
Check SIM!
Check your password
Check your request
Check your
subscription
CUG call failed
Error!
• Outgoing call fails because the allowed credit limit is
already reached
• The allowed credit limit is reached during an
outgoing call (the call is then cancelled).
• Outgoing call fails because the destination number
is being used
• Caller’s phone is turned off
• CUG is in use and the call is not allowed or not
recognized by the network
• Network cannot take the call due to busy system
• Number is out of order
• Number is unreachable
• Network does not answer
• Option to hide your phone number when calling is
not supported by the network
• Control and verification of CUG parameters not
confirmed, or CUG availability on network
• Cell broadcast activation has been requested but no
message type is selected
• Your request is impossible to execute in the current
call situation
• Short message text cannot be displayed
(characters not recognized, incorrect format, etc.)
• No SIM is present or the SIM is incorrectly inserted.
See page 8 for more details
• Call barring password was changed
• Call barring service status was changed
• Entered password is incorrect
• Your request for a service cannot be fulfilled
• Network service was requested but you have no
subscription for it. Check your subscription
regarding the related service use rights or access
• CUG (Closed user group) call is rejected by the
network because the network does not recognize
the CUG parameters
• Dialed number is not in the same CUG
• Dialed number has no CUG association
• Network cannot perform your request and issues an
error
71
Page 72

Failed
Incorrect entry
Invalid number
Locked! Press (Unlock)(#) to unlock
Low battery!
Network busy
Network not allowed
New PIN1 incorrect.
Try again
New PIN2 incorrect.
Try again
No action performed
No response
Not allowed
Not allowed (fixed
dialing)
Not Available
Number changed
PIN blocked
PIN2 blocked
PUK2 blocked
Reaching allowed
credit!
Ring volume Off
Service not available
• An SMS message cannot be sent
• Character string has a syntax error
• Call is rejected by the network because the network
does not recognize the phone number
• Phone number is too long to be stored in the
selected location
• Phone entry cannot be moved to location because
phone number is too long
• A key was pressed while keypad is locked
• Battery is too low and phone will soon turn off
automatically
• Call is rejected by the network due to overload
• When selecting network manual search, you have
selected a network that rejects the connection
• Second new PIN code entry is different than first
• Second new PIN2 code entry is different than first
• You tried to copy or move phone number or text to
the same location
• Call was made to a remote phone with no response
• Number or character entry is not allowed
• Call cancelled due to fixed dialing control (the
number dialed does not match any of the fixed
dialing numbers in memory)
• No more SIM storage available
• Called number has changed
• Wrong PIN code has been entered 3 times.
Enter PUK code
• Wrong PIN2 code has been entered 3 times.
Enter PUK2 code
• Wong PUK2 code has been entered 10 times.
The SIM services protected by the PIN2 code have
now been permanently disabled
• Cost l imit is about to be reached. Connected call will
end automatically when limit is reached.
• Ring volume is set to 0 (no volume)
• You have requested some services that are not
available on the network
72
Page 73

SIM blocked. Contact
provider
SIM fixed full
SIM names full
Phone names full
SMS memory locations
are full
Wrong code. Try
again
Wrong new code. Try
again
Wrong PIN, try again
Wrong PIN2, try
again
Wrong PUK, try again
Wrong PUK2, try
again
• Wrong PUK has been entered 10 times. The SIM card
has been permanently disabled and must be
replaced by a new one.
• Corresponding memory is full
• New message storage is full while writing a new SMS
• Wrong phone lock code has been entered
• New phone lock codes do not match
• Wrong code has been entered
73
Page 74

Index
A
Accessories ......................... 68
Alarm clock ......................... 66
Alert
CB message ................... 54
SMS message ................ 40
Voice mail ...................... 33
Alert mode .......................... 55
Alternate line service ........... 45
Any key answer ................... 58
Auto answer ....................... 59
Auto DTMF ......................... 23
Auto retry ............................ 53
Automatic search ................ 50
B
Backlight ............................. 57
Balance information ........... 43
Barring password, call ... 51, 62
Basic phone operations ...... 13
Battery
Attaching ........................ 9
Charging ........................ 10
Safety information ......... 11
Broadcast messages (CB)
Alert .............................. 54
Message types ............... 52
On/Off ........................... 53
Reading messages ......... 54
C
Call
Answering ..................... 14
Ending ........................... 14
Holding ......................... 24
Making .......................... 13
Multi-party conference .. 25
Retrieving ...................... 24
Call barring ......................... 50
password ........... 20, 50, 62
Call costs ....................... 44, 45
Call duration ....................... 43
Call forwarding ................... 46
Call timer, reset ................... 43
Call timers ........................... 42
Call waiting ......................... 24
Caller line identity ............... 47
Calls & Timers ...................... 41
Call costs ........................ 44
Call duration reminder.... 43
Call timers ...................... 42
Call log ........................... 41
Line selection ................. 45
Timers ............................ 42
Call log ................................ 41
Care and maintenance ........ 19
Cell broadcast messages ..... 54
Alert ............................... 54
Message types ............... 52
On/Off ............................ 53
Reading messages .......... 54
Changing faceplate ............. 11
CLI - Caller Line Identity ....... 47
Closed User Group (CUG) .... 51
Conference call .................... 25
Cost, call management ........ 44
Credit limit, setting ............. 44
CUG ..................................... 51
Currency converter .............. 65
D
Date/time setting ................. 63
Default settings ................... 64
Dialing from
Call log memory ............. 21
Last dialed numbers ....... 21
Phone Book .................... 21
Dialing, speed ............... 21, 37
Dialing stored numbers ....... 21
Display contrast ................... 58
Display indicators (icons) ....... 7
Display own number ........... 36
Display, standby .................. 13
DTMF tones ......................... 23
74
Page 75

E
Emergency calls .................. 20
End key ............................ 2 - 6
Ending a call ....................... 14
Entering text ....................... 28
Error messages ................... 71
Express key ...................... 2 - 6
F
Faceplate changing ............. 11
Factory settings .................. 63
FDN ..................................... 36
Fixed dialing numbers ......... 36
Forwarding, call .................. 46
G
General features ................. 21
Getting started ..................... 8
Glossary .............................. 69
Graphic display icons ............ 7
H
Holding a call ...................... 24
I
Icons (display indicators) ....... 7
Information numbers,
network ............................ 32
International calls ............... 13
K
Key actions ........................... 6
Keypad layout ................... 2, 4
Keypad lock ........................ 55
Lock, phone ......................... 60
Lock, keypad ....................... 55
Low battery warning ............. 9
M
Making a call ....................... 13
Menu map ........................... 26
Menu system ....................... 26
Message templates .............. 41
Messages, broadcast ........... 52
Messages, SMS .................... 38
Alert ............................... 40
Inbox .............................. 38
Msg. templates .............. 41
Outbox ........................... 40
Settings .......................... 39
Write new ...................... 39
Multi-party call .................... 25
Muting ................................ 22
N
Network .............................. 48
Editing list ...................... 48
Search ............................ 50
Network Serv. (services) ...... 32
Number, showing/hiding ..... 47
O
Office Tools ......................... 64
Alarm clock ..................... 66
Currency converter ......... 65
Scratchpad ..................... 64
On/Off key ....................... 2 - 5
Options while Talking .......... 24
Outbox ................................ 40
Own number display ........... 36
L
Language selection ............. 55
Last dialed numbers ............ 21
LED light ............... 3, 5, 10, 14
Line 1 or 2 selection ............ 45
P
Pause feature ...................... 23
Phone
Customizing ................... 55
Overview ...................... 3, 5
Settings .......................... 55
75
Page 76

Phone lock .......................... 60
Phone lock code .................. 60
Phone Book ........................ 33
Dialing numbers in ........ 35
Fixed Dialing Numbers ... 36
Free space ...................... 34
Own number display ..... 36
Recall ............................. 35
Remaining ..................... 34
Store names, numbers ... 33
Viewing numbers in ...... 35
Phone lock code ............ 20, 60
Phone overview ................ 3, 5
PIN code ....................... 19, 60
PIN2 code ..................... 19, 61
Problems ............................. 70
PUK code ...................... 20, 61
PUK2 code .................... 20, 62
R
Ramping ............................. 57
Reading an SMS message ... 38
Receiving Caller ID .............. 47
Reminder, call duration ....... 43
Retrieving a call .................. 24
Ring tone ............................ 56
S
Safety information
Battery ........................... 11
Phone ............................ 16
Scratchpad .......................... 64
SDN numbers ...................... 32
Second call ......................... 25
Security codes ..................... 19
Security features ................. 59
Call barring password .... 62
PIN, PIN2 code ......... 60, 61
Phone lock code ............ 60
PUK, PUK2 code ....... 61, 62
Send key .......................... 2 - 6
Sending an SMS message ... 39
Sending DTMF tones ........... 23
Services (GSM) .................... 46
Call barring .................... 50
Call forwarding .............. 46
CUG ............................... 51
Network ......................... 48
Receiving caller ID .......... 47
Sending my ID ................ 47
Settings ............................... 55
Alert mode ..................... 55
Any key answer .............. 58
Auto answer .................. 59
Auto retry ...................... 59
Backlight ........................ 57
Default settings .............. 64
Display contrast ............. 58
Keypad lock .................... 55
Keys ......................... 37, 56
Language ....................... 55
Ramping ........................ 57
Ring ............................... 55
Ring tone ....................... 56
Security .......................... 59
Silent .............................. 55
Softkeys .......................... 58
Speed dial ...................... 37
Time & date .................... 63
Vibrate ........................... 55
Volume adjustments ...... 56
Show costs .......................... 45
Silent alert mode ................. 22
SIM application tool kit ....... 32
SIM card ................................ 8
SMS messages
Alert tone ....................... 40
Indicator .................... 7, 15
Managing ...................... 38
Msg. templates .............. 41
Outbox ........................... 40
Reading .......................... 38
Sending .......................... 39
Set up ............................ 39
Softkeys ........................... 2 - 6
Softkeys functions ............... 58
Solutions ..................... 70 - 73
Solving problems ................. 70
Speed dialing ................ 21, 37
Standby display ................... 13
Storing names, numbers ..... 33
76
Page 77

T
T9® Text Input .................... 30
Text entry
Alpha ............................. 28
®
Text Input ............... 30
T9
Time/Date setting ................ 63
Tones
Alert tones ..................... 56
DTMF ............................. 23
Ramping ........................ 57
Ring Tone ...................... 56
Volume adjustment ....... 56
Troubleshooting ................. 70
Turning off phone ............... 14
Turning on phone ............... 13
U
Unanswered call ........... 15, 41
V
Vehicle safety ...................... 16
Vibrate .......................... 22, 55
Voice Mail
Alert tone ...................... 33
Call ................................ 33
Indicator .................... 7, 15
Number ......................... 32
Volume adjustment .. 2, 3, 4, 5
also...................... 14, 22, 56
W
Write new message ............ 39
77
Page 78

Notes
78
Page 79

ONE YEAR LIMITED WARRANTY
MODEL G310/G340
Mitsubishi Wireless Communications Inc.
3805 Crestwood Parkway, Suite 350
Duluth, GA 30096
800-888-9879
Mitsubishi Electric Sales Canada Inc.
4299 14th Avenue, Markham, Ont. L3R OJ2
Mitsubishi Wireless Communications, Inc. (MWCI) warrants to the original
purchaser (Purchaser) this product against defects in materials and
workmanship as set forth below. If ownership of the product is transferred,
this warranty is terminated. This warranty applies only to product
purchased or repaired in the United States or Canada.
For the period of time specified below from the date of first retail purchase,
MWCI shall at its sole and absolute opinion either repair or replace the
defective product or part with a new or comparable rebuilt product or part.
Mitsubishi brand accessories are covered under warranty for one year.
Batteries are covered under warranty for 90 days. Carrying cases are
covered under warranty for one year.
To obtain warranty service in the US, Purchaser shall contact MWCI at
1-800-888-9879 to obtain the nearest location of the MWCI authorized
service center. The Purchaser should contact that authorized service center
to make arrangements for repair or replacement. To obtain warranty
service in Canada, please contact Mitsubishi Electric Sales Canada, Inc.
(MESCA) at (905) 475-7728 or at the Canadian address above. Purchaser
must present proof of purchase in the form of a retail bill of sale, invoice
or other document that will show that the product is within the warranty
period. No charge will be made for parts or labor directly related to the
repair or replacement of the defective product or part. The repaired or
replaced product will be warranted for 90 days from the date of return
shipment or for the balance of the warranty, whichever is longer.
Corporate Service Division
(905) 475-7728
Repair or replacement, as provided under this warranty, is the only remedy
provided to the purchaser. MWCI SHALL NOT BE LIABLE FOR ANY
INCIDENTAL OR CONSEQUENTIAL DAMAGES CAUSED DIRECTLY OR
INDIRECTLY BY THE PRODUCT such as, but not limited to, interruption of
79
Page 80

service, loss of anticipated benefits or profits, or damage to any other
equipment resulting from the use or operation of the product, or arising
from breach of express or implied warranties on this product. MWCI SHALL
NOT BE LIABLE FOR DAMAGE TO TELEPHONE EQUIPMENT, VEHICLES, AND/
OR PERSONAL PROPERTY CAUSED BY IMPROPER INSTALLATION.
THIS WARRANTY DOES NOT COVER FUSES OR CLAIMS OF DAMAGE DUE TO
ALTERATION, ACCIDENT, MISUSE, ABUSE, NEGLECT, IMPROPER
INSTALLATION OR MAINTENANCE, CONNECTION TO AN IMPROPER
VOLTAGE SUPPLY, RECEPTION PROBLEMS CAUSED BY INADEQUATE
SIGNAL RECEPTION BY THE ANTENNA, LIQUID SPILLS, OR DAMAGE THAT IS
ATTRIBUTABLE TO ACTS OF GOD. REMOVAL AND INSTALLATION COSTS
ARE NOT COVERED BY THIS WARRANTY. COSMETIC DAMAGE, SUCH AS
MARS, SCRATCHES, CRACKS, BLEMISHES, AND THE WEARING OF PRINTED
LOGOS OR KEYS, IS NOT COVERED BY THIS WARRANTY. DAMAGE
RESULTING FROM THE USE OF ACCESSORIES THAT ARE NOT MITSUBISHI
BRAND ACCESSORIES IS NOT COVERED.
LOSS AND DAMAGE OCCURRING DURING TRANSIT ARE NOT COVERED BY
THIS WARRANTY. Products repaired or replaced under warranty will be
returned to the Purchaser transportation prepaid. Return shipping costs for
repaired products not covered by warranty, or for the return of a product
for which the Purchaser has not authorized non-warranty repairs, shall be
paid by the Purchaser.
ANY IMPLIED WARRANTY OF MERCHANTABILITY OR FITNESS FOR USE FOR
A PARTICULAR PURPOSE IS EXCLUDED EXCEPT WHERE PROHIBITED BY
LAW, AND WHERE PROHIBITED, IS LIMITED TO THE MAXIMUM PERIOD
PERMITTED BY SUCH LAW.
Some States or Provinces do not allow the exclusion or limitation of
incidental or consequential damages, or limitations on an applied
warranty, so the above limitations or exclusions may not apply to you. This
warranty gives you specific legal rights, and you may also have other rights
which vary from State to State, Province to Province.
80
 Loading...