

Page 1

6000 Managed Application Server
(MAS)
Technician's Handbook - Release 5.6
by Mitel Networks Corporation
Page 2

6000 Managed Application Server (MAS): Technician's Handbook Release 5.6
by Mitel Networks Corporation
Published October 2002
Copyright © 2002 Mitel Networks Corporation
The Mitel Networks logo is a trademark of Mitel Networks Corporation in the United States and other countries. Linux is a registered trademark
of Linus Torvalds. The terms "ssh" and "Secure Shell" are trademarks of SSH Communications Security Corp. Trend Micro is a registered trademark of Trend Micro Incorporated. All other trademarks are the property of their respective holders.
Page 3

Page 4

Table of Contents
1.Introduction...............................................................................................................................
1.1.About This Handbook .......................................................................................................1
1.1.1. Who This Handbook is Written For ........................................................................... 1
1.1.2. Where You Can Find More Information .....................................................................1
1.1.3. About Our Test Company: The Pagan Vegan .............................................................. 1
1.2.Aboutthe 6000 MAS ........................................................................................................ 1
1.2.1.The AMC .............................................................................................................2
1.3. Software Licensing Terms and Conditions ............................................................................3
1.4.What's New .....................................................................................................................3
1.4.1.Features ...............................................................................................................3
2.Software Blades .........................................................................................................................
2.1.Managing Blades .............................................................................................................4
3.Hardware Installation ..................................................................................................................
3.1. Hardware Requirements of the 6000 MAS Host Computer ....................................................... 7
3.1.1. Hardware Requirements for a Category 1 Server .......................................................... 7
3.1.2. Hardware Requirements for a Category 2 Server .......................................................... 8
3.1.3. Hardware Requirements for a Category 3 Server .......................................................... 9
3.1.4. Hardware Requirements for a Category 4 Server .......................................................... 9
3.2.Hardware Compatibility ....................................................................................................10
4.Purchasing and Registration ..........................................................................................................
4.1.Ordering Products ............................................................................................................11
4.2.Registering a Server ..........................................................................................................11
4.3.Registeringa Teleworker Server ......................................................................................... 12
4.4.EnablingAdditional ServiceLink Services ............................................................................ 13
4.5. Moving a Server or Deactivating Services ............................................................................. 14
5.SoftwareInstallation and Configuration ..........................................................................................
5.1.LicensingTerms and Conditions .........................................................................................15
5.2.RAID1Support (Disk Mirroring) ........................................................................................ 15
5.2.1.Software Mirroring ................................................................................................15
5.2.2.Hardware Mirroring ...............................................................................................16
5.3. Upgrading From A Previous Version ................................................................................... 16
5.4.Installing the Software ......................................................................................................17
5.5.Configuring your Server ....................................................................................................18
5.6.SettingYour Administrator Password ...................................................................................18
5.7. Configuring Your System Name and Domain Name ............................................................... 19
5.8.ConfiguringYour Local Network ........................................................................................19
5.8.1. Selecting Your Local Ethernet Adapter ......................................................................19
5.8.2.ConfiguringLocal Network Parameters .....................................................................19
5.9.Operation Mode ...............................................................................................................20
5.9.1. Option 1: Server and Gateway Mode ......................................................................... 20
5.9.2. Option 2: Private Server and Gateway ........................................................................ 20
5.9.3.Option3: Server-Only Mode .................................................................................... 20
5.10. Configuring Server and Gateway Mode ..............................................................................21
5.10.1. Server and Gateway Mode - Dedicated ..................................................................... 21
5.10.2. Server and Gateway Mode - Dialup Access ............................................................... 24
5.11.ConfiguringYour DHCP Server ........................................................................................26
5.11.1. Configuring the DHCP Address Range ..................................................................... 26
5.11.2. Important Issues About the DHCP Address Range ......................................................27
5.12.Further Miscellaneous Parameters ......................................................................................27
5.13.Usingthe Server Console .................................................................................................28
5.14.Usingthe Text-based Browser ...........................................................................................29
5.15. Accessing the Linux Root Prompt ...................................................................................... 30
5.16. On-going Administration Using the Server Manager ............................................................. 30
iv
Page 5

6000 Managed Application Server (MAS)
6.Server Administration ..................................................................................................................
6.1.Passwords .......................................................................................................................32
6.2.Remote Access ................................................................................................................32
6.2.1.RemoteAccess Using ssh ........................................................................................ 33
6.2.2.RemoteAccess Using SSL ......................................................................................34
6.2.3.PPTP (Client-to-Server VPNs) .................................................................................34
6.3.Local networks ................................................................................................................35
6.4. Setting the Date and Time .................................................................................................. 36
6.5.Directory ........................................................................................................................37
6.6.Printers ..........................................................................................................................37
6.7.Hostnames and addresses ...................................................................................................38
6.7.1.Creating New Hostnames ........................................................................................40
6.7.2. Reserving IP Addresses Through DHCP ....................................................................40
6.8.Virtual Domains...............................................................................................................41
6.9.E-mail ............................................................................................................................41
6.9.1.ConfiguringYour E-mail Application ........................................................................44
6.10.Backup or Restore ..........................................................................................................47
6.10.1.Backup To Desktop .............................................................................................. 48
6.10.2.Restore From Desktop .......................................................................................... 48
6.10.3.VerifyDesktop Backup File ...................................................................................48
6.10.4.Configure Tape Backup .........................................................................................49
6.10.5.Restore From Tape ...............................................................................................49
6.11.Reinstallation Disk..........................................................................................................49
6.12.Reboot or Shutdown ........................................................................................................ 50
6.13.Additional Server Administration ......................................................................................50
7. Configuring the Computers on Your Network ..................................................................................
7.1. What Order to do Things ...................................................................................................51
7.2. Configuring Your Desktop Operating System ........................................................................51
7.2.1.Automatic DHCP Service ........................................................................................52
7.2.2. Manual Entry For Computers Not Using DHCP Service ................................................ 53
7.2.3.MSWindows Workgroup Configuration .................................................................... 54
7.3.IMAPversus POP3 e-mail ................................................................................................. 54
7.4.ConfiguringYour E-mail Application ..................................................................................55
7.4.1.Configuring Outlook Express ...................................................................................55
7.4.2.Configuring Netscape .............................................................................................57
7.5.ConfiguringYour Web Browser .......................................................................................... 58
7.6. Choosing Your Web Browser Language ............................................................................... 58
7.7.ConfiguringYour Company Directory .................................................................................59
7.7.1.Configuring Outlook Express ...................................................................................60
7.7.2.Configuring Netscape .............................................................................................62
7.8.Workgroup .....................................................................................................................63
7.8.1. 6000 MAS as Domain Controller ..............................................................................64
8.Using the AMC ..........................................................................................................................
8.1.User Administration..........................................................................................................67
8.2.ActivatingAdditional ServiceLink Services .......................................................................... 68
8.3.Monitoring Server Status ...................................................................................................69
8.3.1.Performinga Manual Synchronization ....................................................................... 70
8.3.2.Changingthe Sync Frequency ..................................................................................70
8.4.Virus Protection ...............................................................................................................70
8.4.1.E-mail Virus Detection ...........................................................................................70
8.4.2.File Virus Protection ..............................................................................................71
8.5.Guaranteed E-mail Delivery ...............................................................................................71
8.6.Configuring Alerts ............................................................................................................72
8.7.DNS Services ..................................................................................................................73
8.8.IPSEC VPNs ...................................................................................................................74
8.8.1.Creatingan IPSEC VPN .........................................................................................75
8.8.2.IPSEC VPN Status .................................................................................................76
8.8.3.Editingan IPSEC VPN ........................................................................................... 77
v
Page 6

6000 Managed Application Server (MAS)
8.8.4.Deletingan IPSEC VPN .........................................................................................78
8.9.Maintaining Server Information .......................................................................................... 78
8.9.1.Server Information .................................................................................................79
8.9.2.Server Log ...........................................................................................................80
8.9.3.Company Details ...................................................................................................81
8.9.4.Services ...............................................................................................................81
8.10.Usingthe Reporting Forms ...............................................................................................82
8.10.1.One-Click Reports ................................................................................................82
8.10.2.Custom Report Wizard .......................................................................................... 84
8.10.3.E-mailing a Report ...............................................................................................84
8.10.4.Saving a Report ...................................................................................................84
8.10.5.Deleting a Report .................................................................................................85
9.Domain Name Services ................................................................................................................
9.1. The Role of the AMC in Providing Domain Name Services ...................................................... 86
9.2.Service Domains ..............................................................................................................87
9.3.Publishing Domain Names .................................................................................................88
9.4. Redelegating Domain Names to the AMC ............................................................................. 89
9.5.Registering New Domains .................................................................................................89
9.6.Unpublishing Domain Names .............................................................................................89
10.Webmail .................................................................................................................................
10.1. Enabling Webmail On Your System ...................................................................................91
10.2.Starting Webmail ............................................................................................................91
11.Troubleshooting ........................................................................................................................
11.1.MailLog File Analysis ....................................................................................................92
11.2.View Log Files ..............................................................................................................92
11.3.Review Configuration .....................................................................................................92
11.4.Technical Support ...........................................................................................................93
A. Integrating the 6000 MAS with the Mitel Networks 3100 ICP ............................................................
A.1. Integration of 3100 ICP and 6000 MAS using the DHCP server on the 6000 MAS ....................... 94
A.1.1. Connecting the 6000 MAS to the 3100 ICP LAN ethernet switch ................................... 94
A.1.2. Connecting the 6000 MAS to the 3100 ICP WAN ethernet port ..................................... 96
A.2. Integration of 3100 ICP and 6000 MAS using the DHCP server on the 3100 ICP ......................... 98
vi
Page 7

List of Tables
3.1. Definition of a Category 1 Server ................................................................................................ 7
3.2. Hardware Requirements for a Category 1 Server ............................................................................ 8
3.3. Definition of a Category 2 Server ................................................................................................ 8
3.4. Hardware Requirements for a Category 2 Server ............................................................................ 8
3.5. Definition of a Category 3 Server ................................................................................................ 9
3.6. Hardware Requirements of a Category 3 Server ............................................................................. 9
3.7. Definition of a Category 4 Server ................................................................................................ 9
3.8. Hardware Requirements of a Category 4 Server ............................................................................. 9
8.1.Status colors ............................................................................................................................69
vii
Page 8

Chapter 1. Introduction
1.1. About This Handbook
This handbook walks you step-by-step through the straightforward process of installing and configuring the 6000
MAS.
1.1.1. Who This Handbook is Written For
This handbook is for distributors and resellers of the Mitel Networks 6000 MAS.
1.1.2. Where You Can Find More Information
To access documentation from the Internet, follow these steps:
1. Go to http://www.mitel.com/.
2. From the Online Services selection menu, select "Mitel OnLine".
3. Log in using your Username and Password.
4. Click "Technical" and then click "Product Documentation" to access edocs.
Note
You must be a registered user to access documentation through Mitel OnLine.
1.1.3. About Our Test Company: The Pagan Vegan
In this handbook, we use examples of a catering and event-planning company, The Pagan Vegan or TPV, that configures, administers and makes use of the 6000 MAS. As far as we know, no company of this name exists.
1.2. About the 6000 MAS
The 6000 MAS is a managed Internet security and productivity solution for single-site and branch-based enterprises.
It combines award-winning software, Mitel Networks SME Server with ServiceLink, with a suite of managed services delivered from the Mitel Networks Applications Management Center (AMC). The 6000 MAS manages the
end-user's connection to the Internet by routing Internet data packets to and from the network (which allows all the
computers on the network to share a single Internet connection) and by providing security for the network, minimizing the risk of intrusions.
When one of the computers on the local network contacts the Internet, or is contacted by an outside machine on the
Internet, the 6000 MAS not only routes that connection, but seamlessly interposes itself into the communication.
This prevents a direct connection from being established between an external computer on the Internet and a computer on the local network, thereby significantly reducing the risk of intrusion onto the network.
The server also provides services - including e-mail, web access and a powerful file sharing and collaboration feature called "i-bays" - that allows users to communicate better internally and with the rest of the world using the Internet.
Throughout this handbook, SME Server refers to the server software component installed at the end-user's site. 6000
MAS refers to the total solution - the server software as well as applications and subscription services delivered from
the AMC.
1
Page 9
Chapter 1. Introduction
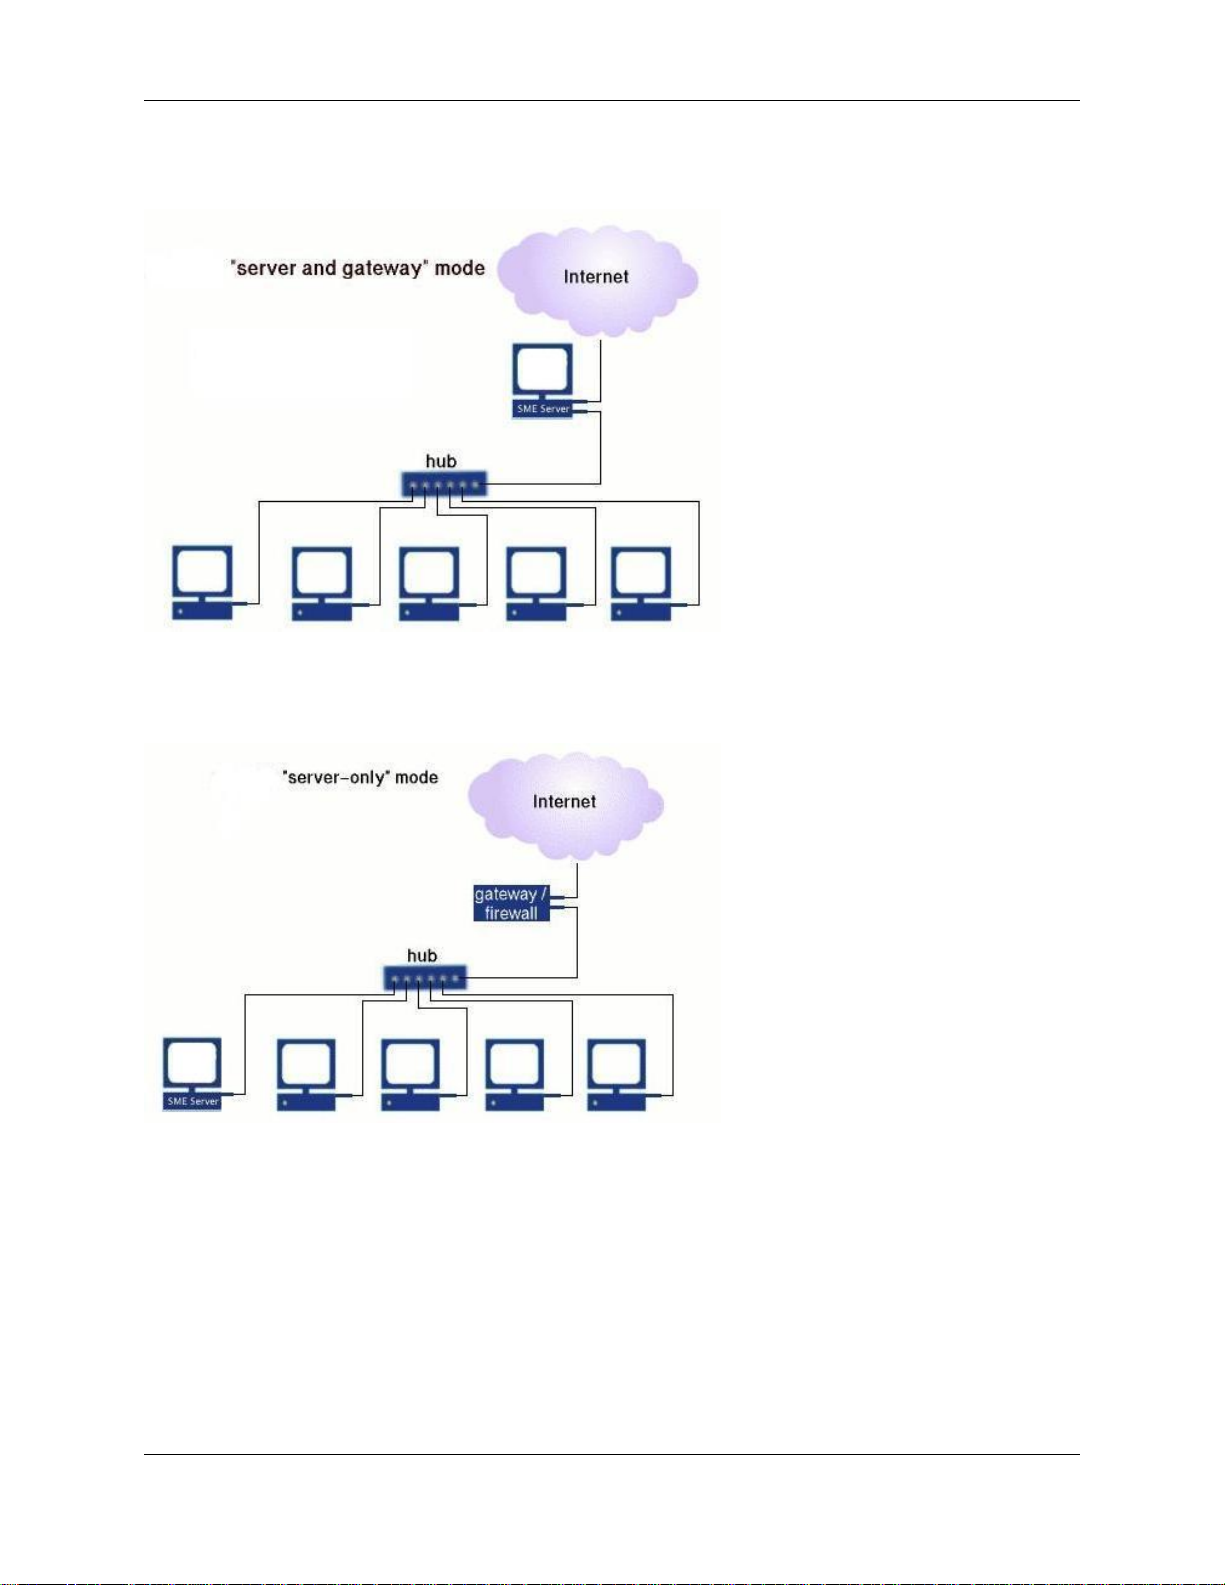
The word gateway is used to mean the computer that acts as the interface between the local, internal network and the
external world - typically the 6000 MAS itself.
If desired, the 6000 MAS can also be run in "server-only" mode. In "server-only" mode, the 6000 MAS provides the
network with services, but not the routing and security functions associated with the role of "gateway". Server-only
mode is typically used for networks already behind a separate firewall. In that configuration, the firewall fulfills the
role of gateway, providing routing and network security.
Once installed, the 6000 MAS can be configured and managed remotely. Routine administration is handled from the
administrator's desktop using a web-based interface, so only on rare occasions will a technician or administrator require direct access to the server computer. Once installation is complete, most customers put the server in an outof-the-way place such as a utility closet. If you wish, you can disconnect the keyboard and monitor. (Note that some
computers may not operate correctly without an attached keyboard.)
1.2.1. The AMC
With the 6000 MAS, Mitel Networks Corporation has developed a suite of integrated network services - ServiceLink
- that extend and enhance the functionality of the server. ServiceLink maximizes the security, performance and reliability of the server through real-time interaction with the Applications Management Center (AMC). Note that until
the 6000 MAS is registered for ServiceLink, the links to ServiceLink pages in the Server Manager will take you to
panels that are not active.
2
Page 10

Chapter 1. Introduction
Note
If your server is behind an additional firewall, that firewall will need to be configured to allow outbound
SSH packets on TCP port 22 in order for the server to communicate with the AMC.
1.3. Software Licensing Terms and Conditions
The 6000 MAS is licensed for an individual server under the terms of the End User License Agreement found on the
CD. Acceptance of this agreement and identification of the end-user accepting is required during the software installation.
If you have acquired the 6000 MAS by means other than purchasing a Mitel Networks commercial offering through
an authorized reseller, it is unsupported. For further information and help in contacting an authorized reseller in your
area, visit http://www.mitel.com/.
1.4. What's New
1.4.1. Features
The 6000 MAS release 5.6 provides many small enhancements, and in particular the following new features:
• Upgrade to Linux 2.4 kernel - The base 6000 MAS software (SME Server with ServiceLink) software has been
upgraded to the Linux 2.4 kernel. This upgrade enhances the reliability of the server and provides support for a
broader range of server hardware.
• Enhanced firewalling - With the upgrade to the Linux 2.4 kernel, the previous ipchains-based firewall rules have
been converted to iptables. This results in an even tighter firewall, using stateful packet inspection.
• Changes to ordering process - The 6000 MAS is a subscription-based product that is managed via the AMC.
With this release, changes have been made to the subscription ordering and activation process in order to simplify delivery of the product.
3
Page 11
Chapter 2. Software Blades
Clicking on "Blades" in the Server Manager's navigation menu will display a list of available software blades which
can be installed on your system. These blades may include 6000 MAS updates for your specific 6000 MAS release,
or new applications that extend the functionality to your 6000 MAS release.
This list of blades is downloaded from the AMC if more than 30 minutes have elapsed since the last blades request.
Otherwise the current cached list of blades is displayed (click "Update List" to immediately retrieve an updated list
from the AMC.
To download and install a blade, click "Install". Most blades create new menu items in the Server Manager navigation menu to allow you to configure the blade. Others provide their own configuration interface or do not require additional configuration. For details, consult the documentation provided with the blade.
2.1. Managing Blades
Blades are developed and made available by Mitel Networks Corporation, Mitel Networks Authorized Resellers or
by third-party developers.
Note
Each time a server is registered with the AMC, contact information must be entered so that Mitel Networks
can send notifications of software updates. However, it is good practice to periodically check the "Blades"
panel of the Server Manager for new update blades.
If you give your clients access (via the system password) to the Server Manager, you may not want them installing
blades onto the server without your knowledge, as you are probably the one providing support to them. To avoid this
problem, you can manage the list of available blades from the AMC and deny specific blades to some or all of your
servers.
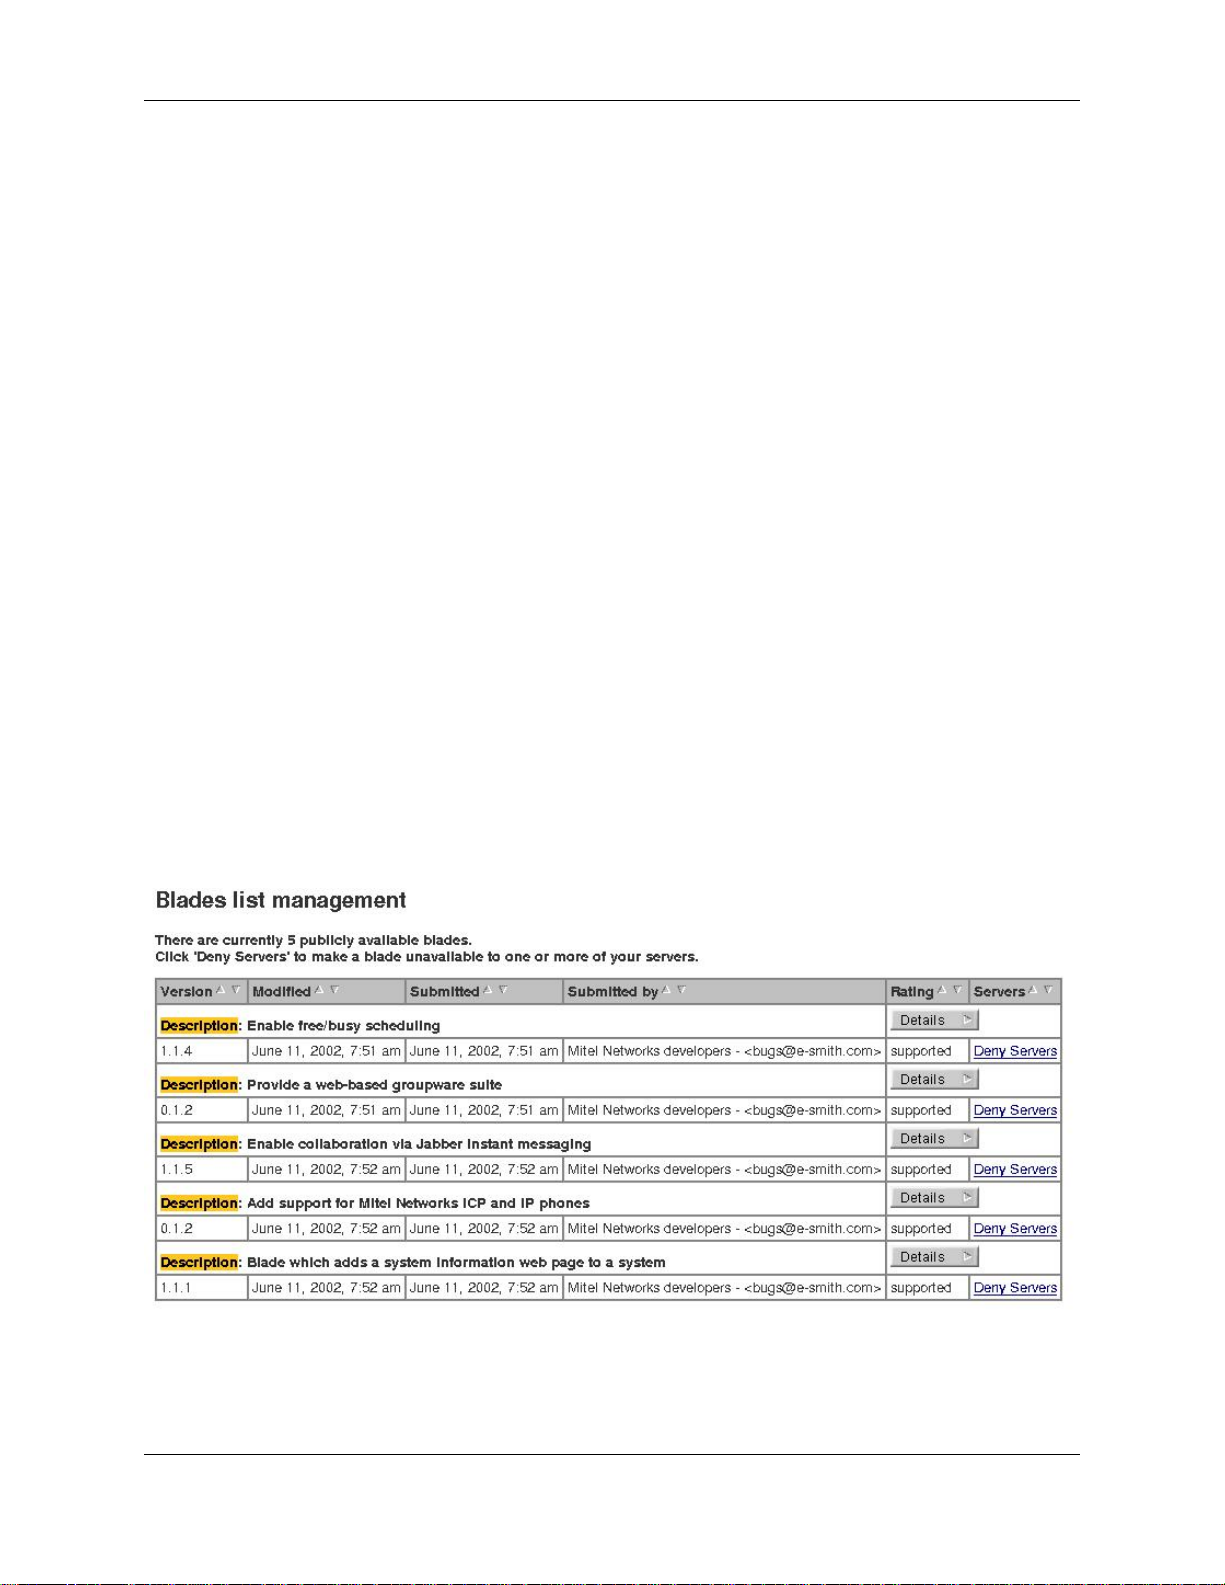
If you click on "Blades list management" in the navigation menu, you will see a screen similar to the image below
listing all currently available blades.
If you click "Deny Servers" in the end column, you will be presented with a screen such as the one below that will
allow you to deny access to this blade for all of your servers or for specific servers.
4
Page 12
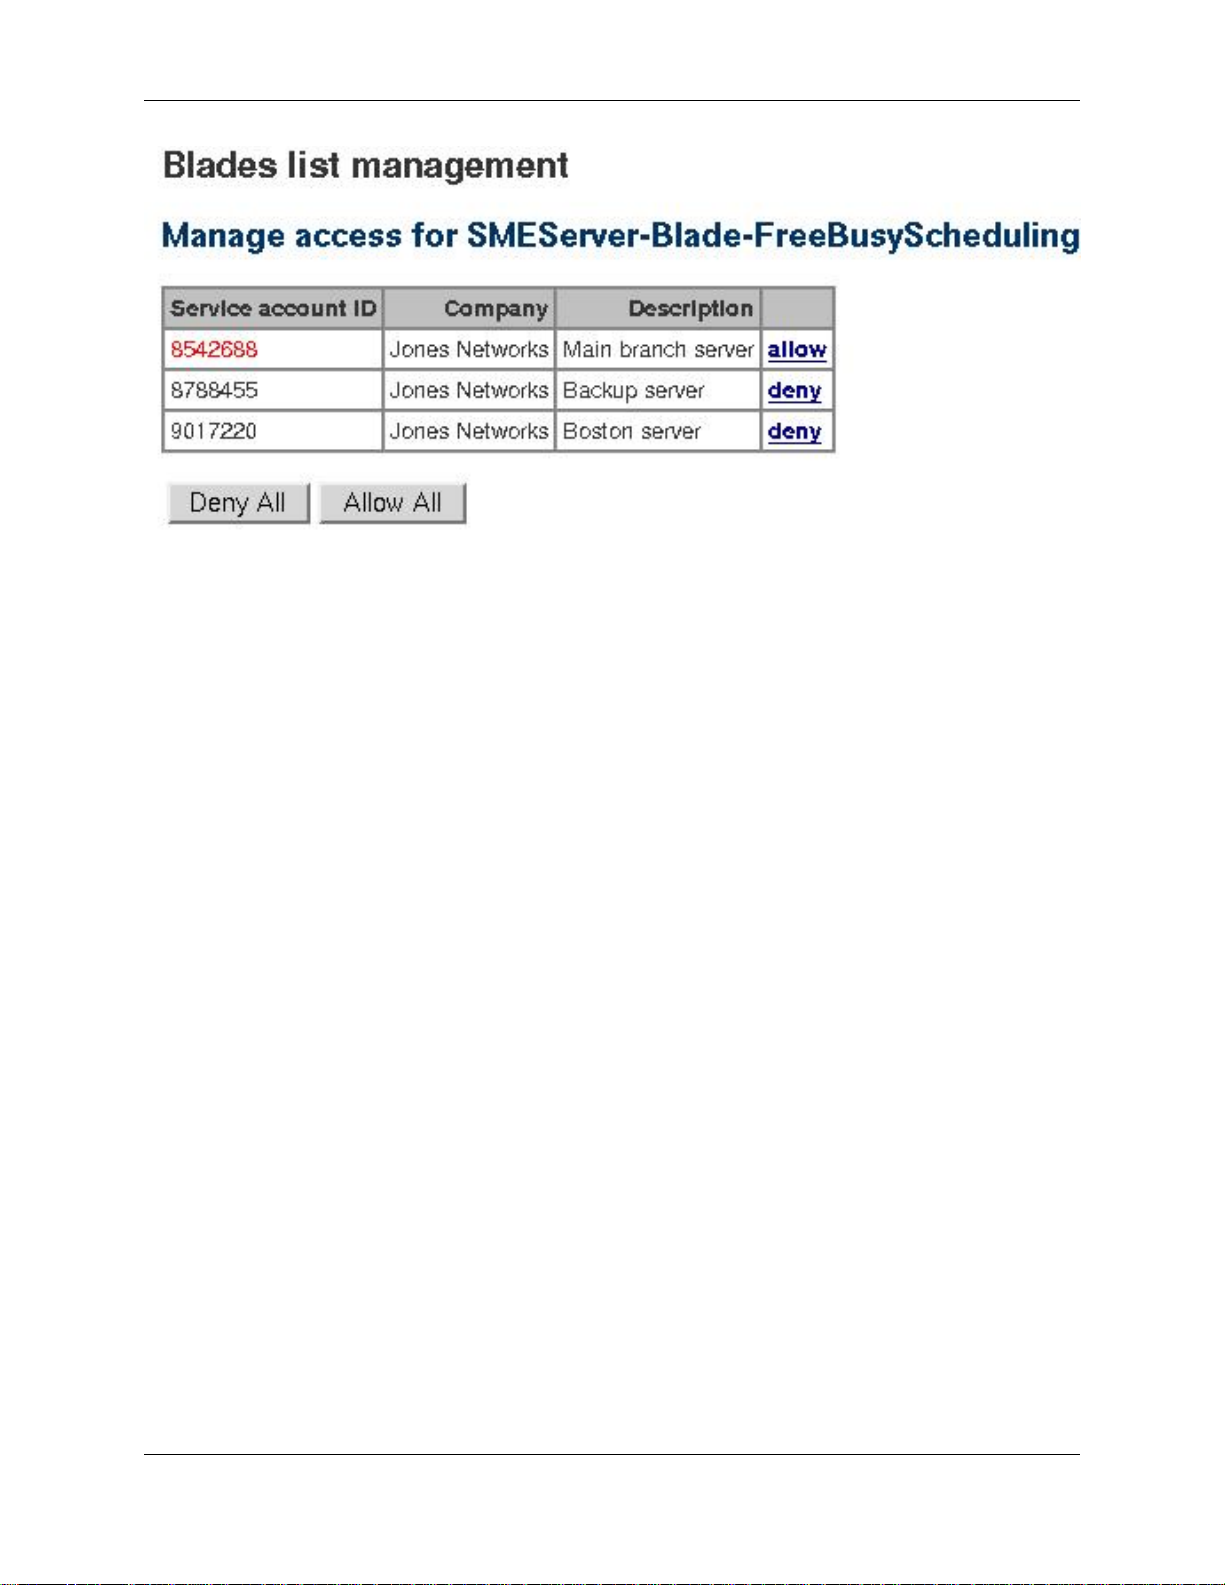
Chapter 2. Software Blades
This mechanism allows you to limit which blades your clients can see and therefore install.
Note
This assumes that your clients have access to the Server Manager. If you do not give your clients the system password, they cannot access the Server Manager and therefore cannot install any blades. However,
you would then have to perform all server administration tasks for the client.
Note
There are other restrictions that control visibility of blades, including the terms of the 6000 MAS subscription and the hardware platform.
The following is a list of blades currently available for downloading.
• Web Access Control
The Web Access Control Service allows you to filter the web sites available to users by blocking selected cate-
gories of sites. Potentially objectionable sites are grouped into categories, such as pornography, gambling, or
hacking sites. This "blacklist" of blocked web sites is updated regularly by the AMC. The service can block entire domains or specific URLs. Certain IP addresses (for example, the system administrator's workstation) can be
excluded from the filtering rules.
• Groupware Blade
This browser-based application allows calendar sharing and collaboration, including the ability to schedule
meetings between users, and maintain and share contact lists and to-do lists. This application does not integrate
with Microsoft Exchange Server but will provide similar functionality for an office that cannot afford the cost
and complexity of Exchange.
• Instant Messaging Blade
The Instant Messaging (IM) Blade allows instantaneous electronic conversations through the 6000 MAS instead
of using publicly available services such as MSN, AIM and Yahoo. Conference rooms (group chat) and a user
directory are also provided. The IM service can work across a ServiceLink IPSEC VPN, allowing your organization to have its own secure IM infrastructure. As well, the solution allows IM users on the server to communicate
with IM users on other services such as MSN and Yahoo.
5
Page 13

Chapter 2. Software Blades
• IP Phone Support Blade
This blade configures the 6000 MAS to support Mitel Networks IP phones, thus simplifying installation.
• Fax Server Blade
This feature allows the 6000 MAS to send faxes, with the use of an external fax modem.
• System Information Blade
This feature allows system administrators to view information about the server such as disk usage, CPU usage,
etc.
• Free/Busy Scheduling Blade
The Free/Busy Scheduling blade integrates with Outlook 2000 (also known as Outlook 9.0) and Outlook 98. It
allows Outlook users to publish their busy times and to view other users' busy times.
6
Page 14

Chapter 3. Hardware Installation
3.1. Hardware Requirements of the 6000 MAS Host Computer
Warning
The 6000 MAS software relies upon the host computer meeting the hardware standards noted in this section. Although these guidelines are intended to help in system configuration, compatibility cannot be assured. Mitel Networks Corporation reserves the right to limit support for hardware configurations that we
determine to be incompatible with the 6000 MAS software. Also, be aware that future voice-enabled applications from Mitel Networks may be certified and supported only on specific hardware platforms that can
provide the requisite speed and performance.
Before you consider the requirements defined below, please be aware of the following notes:
• The 6000 MAS ships with remote access services disabled by default. Enabling webmail will increase the resource requirements of the server, in particular the memory requirement. Other remote access services, such as
ssh and PPTP, are also processor-intensive. You should consider a fast processor speed if you intend to make
significant use of these services.
• The server should work with any Pentium, Celeron, AMD or Cyrix processor.
• The amount of available RAM is one of the most important considerations for server performance as it reduces
the load on the disks. If a tradeoff is required, extra RAM will usually be more beneficial than a faster CPU.
• For a dedicated connection in server and gateway mode, the server requires two ethernet adapters (also called
network adapters or network interface cards). For a dialup connection or server-only mode, one ethernet adapter
is needed.
• SCSI (Small Computer Systems Interface) is a system for adding peripherals to a computer which enhances performance, reliability and scalability. If you are using a SCSI system, you will need a specific adapter/driver
(installed similarly to an ethernet adapter) and will need to purchase SCSI-enabled peripherals. These tend to be
more expensive than their non-SCSI counterparts but the tradeoff is often worth it if the system will be under
heavy loads.
• The software supports most external modems; however, internal modems are generally not supported.
Note
The hardware recommendations below apply to servers with up to 500 users. The 6000 MAS can support
more than 500 users, but in such cases we suggest that you specify a custom system using our Category 4
requirements as the minimum starting point.
3.1.1. Hardware Requirements for a Category 1 Server
Following are the minimum hardware requirements for a basic file/print server and network gateway. Note that such
a system will not provide satisfactory performance for features such as webmail, remote access via PPTP and for
ServiceLink offerings such as automatic virus protection and IPSEC VPNs.
Table 3.1. Definition of a Category 1 Server
# of Users Up to 10
Usage Light (minimal use of remote access, file sharing and other disk-intensive activity. No
7
Page 15

Chapter 3. Hardware Installation
use of webmail, virus scanning or VPNs.)
Table 3.2. Hardware Requirements for a Category 1 Server
Architecture PCI-based Pentium-class processor
Processor speed 90 MHz (or better)
Minimum RAM 64 MB
Hard drive IDE or SCSI - at least 1 GB
SCSI adapter Refer to SCSI Adapter section below (only necessary for SCSI systems).
Ethernet adapters Refer to Ethernet adapter section below.
Modem (for dialup only) Only modems that are Linux-compatible may be used. WinModems are not supported.
CD-ROM drive ATAPI or SCSI
Floppy drive any
Monitor any
Graphics card any
Mouse none required
Sound card none required
3.1.2. Hardware Requirements for a Category 2 Server
Table 3.3. Definition of a Category 2 Server
# of Users Up to 40
Usage Light (moderate use of remote access, file sharing and other disk-intensive activity)
Table 3.4. Hardware Requirements for a Category 2 Server
Architecture PCI-based Pentium-class processor
Processor speed 400 MHz (or better)
Minimum RAM 128 MB
Hard drive IDE or SCSI - at least 6 GB
SCSI adapter Refer to SCSI Adapter section below (only necessary for SCSI systems).
Ethernet adapters Refer to Ethernet adapter section below.
Modem (for dialup only) Only modems that are Linux-compatible may be used. WinModems are not supported.
CD-ROM drive ATAPI or SCSI
Floppy drive any
Monitor any
Graphics card any
Mouse none required
Sound card none required
8
Page 16

Chapter 3. Hardware Installation
3.1.3. Hardware Requirements for a Category 3 Server
Table 3.5. Definition of a Category 3 Server
# of Users Up to 40
Usage Heavy (heavy use of remote access, file sharing and other disk-intensive activity)
Table 3.6. Hardware Requirements of a Category 3 Server
Architecture PCI-based Pentium-class processor
Processor speed 600 MHz (or better)
Minimum RAM 256 MB
Hard drive IDE or SCSI (SCSI highly recommended) - at least 10 GB
SCSI adapter Refer to SCSI Adapter section below (only necessary for SCSI systems).
Ethernet adapters Refer to Ethernet adapter section below.
Modem (for dialup only) Only modems that are Linux-compatible may be used. WinModems are not supported.
CD-ROM drive ATAPI or SCSI
Floppy drive any
Graphics card any
Mouse none required
Sound card none required
3.1.4. Hardware Requirements for a Category 4 Server
Table 3.7. Definition of a Category 4 Server
# of Users Up to 500
Usage Heavy
Table 3.8. Hardware Requirements of a Category 4 Server
Architecture PCI-based Pentium-class processor
Processor speed 700 MHz (or better)
Minimum RAM 256 MB
Hard drive SCSI - at least 20 GB (2 large SCSI drives using RAID1 strongly recommended)
SCSI adapter Refer to SCSI Adapter section below (only necessary for SCSI systems).
Ethernet adapters Refer to Ethernet adapter section below.
Modem (for dialup only) Only modems that are Linux-compatible may be used. WinModems are not supported.
CD-ROM drive ATAPI or SCSI
Floppy drive any
Monitor any
Graphics card any
9
Page 17

Chapter 3. Hardware Installation
Mouse none required
Sound card none required
3.2. Hardware Compatibility
Version 5.6 of the 6000 MAS software (SME Server with ServiceLink) is based on RedHat 7.3 and uses the 2.4 series Linux kernel. This combination supports a wide variety of hardware, but it is important that any hardware chosen for the server has been tested for compatibility before deployment. For convenience, Mitel Networks supplies a
bundled hardware-software solution that provides guaranteed compatibility.
We expect that all hardware which is marked as "Certified" or "Compatible" on the RedHat Hardware Compatibility
List http://hardware.redhat.com/hcl/ [http://hardware.redhat.com/hcl/] for Redhat 7.3 will function correctly with the
6000 MAS.
We do not recommend the user of server hardware which is not listed as "Certified" or "Compatible". Please contact
your support channel for further details of hardware compatibility.
10
Page 18

Chapter 4. Purchasing and Registration
4.1. Ordering Products
Important
This section only applies to you if you order your 6000 MAS products directly from Mitel Networks. If you
order from a distributor or from some other source, follow your distributor's traditional ordering process,
skip this section and proceed to Registering a Server.
To order services, follow these steps:
1. Connect to the AMC at https://mitel-amc.com/partners/.
2. Under Order Management, select "Order products".
3. Enter a Purchase Order Reference number. This reference number will be quoted on the invoice you receive
from Mitel Networks.
4. For each product that you wish to order, select the quantity from the drop-down list. You can select up to 10 of
each product.
5. Click "Next".
6. An order confirmation screen will appear. Verify your order and then click "Confirm".
This process electronically submits a purchase order to Mitel Networks for the requested products. For each
item that you ordered, an activation key will be created and credited to your AMC account. You will be billed
by Mitel Networks for the products you have ordered.
4.2. Registering a Server
Note
Use this procedure only if you are registering a new server. If you want to add services to an existing
server, go to Enabling Additional ServiceLink Services.
Note
If you are registering a new server to be part of a Teleworker VPN, skip this section and go to Registering a
Teleworker Server.
To register a server, follow these steps:
1. If you're not already logged in, connect to the AMC at https://mitel-amc.com/partners/.
2. Select "Register a server" from the AMC menu on the left side.
3. A form appears where you can identify the server to which you want to allocate services. Fill in the form with
the server's details. Ensure that the server description is unique as that field will subsequently be used to identify the server.
Tip
11
Page 19

Chapter 4. Purchasing and Registration
If you have previously registered a server for a client and now wish to register one or more additional
servers, you can choose the company name from the drop-down list, and press the Auto-Fill button to have
the company's information appear in the form. Note that you will still need to supply text for the Descrip"tion" field. If this is a new company, enter the company information.
4. Click "Submit".
5. You will see a screen asking you to confirm the activation of the server with these services. Click "Next" to
confirm, or click the "Back" button on your browser to return to the previous form to correct information.
6. You will be presented with a list of all product activation keys that are available to you as a result of your or-
ders. Choose an activation key by clicking "select" beside the product. You also have the option of manually
entering your product license key in the available field and then clicking "Next". Note that you can only select
BASE ServiceLink products during this registration step. If you have purchased any UPGRADE products, you
can add them to this server later.
7. A confirmation screen appears listing the products you selected. If desired, enter information into the Reference
field (i.e. a PO number). Click "Next".
8. You will now see a screen indicating that Step 1 of your server registration is complete. This page will also in-
dicate the Service Account ID, a number that uniquely identifies this server. We suggest you print out this page
for your records.
9. Log out of the AMC and log in to the Server Manager on the server you are registering.
10. Click "Status" (under ServiceLink in the Server Manager's navigation menu) and enter the Service Account ID.
11. Click "Activate".
The server will now connect to the AMC and synchronize with it. You will see a screen telling you that registration
was successful. The server registration process is now complete. (Note that the initial synchronization can take several minutes to complete.)
At any time in the future, you or your customer can view the status of ServiceLink services by clicking on "Status"
in the Server Manager's navigation menu.
Returning to the AMC, you can now see a list of registered servers by clicking on "Servers" in the AMC navigation
menu. Your newly-registered server should appear in this list.
For more information on the status of your server, read the section on Monitoring Server Status.
4.3. Registering a Teleworker Server
To register a server as part of a Teleworker VPN, follow these steps:
1. If you're not already logged in, connect to the AMC at https://mitel-amc.com/partners/.
2. Select "Register a server" from the AMC menu on the left side.
3. A form appears where you can identify the server to be added to the Teleworker VPN. Click on "Teleworker
Client" and then fill in the form with the server's details. Ensure that the server description is unique, as that
field will subsequently be used to identify the server.
Note
12
Page 20

Chapter 4. Purchasing and Registration
In order for the "Teleworker Client" button to be visible, you must already have a Teleworker VPN master
server configured. This master server must be subscribed to a ServiceLink package that includes IPSEC
VPN support, and must have less than the maximum number of teleworker nodes already added to the
VPN.
4. Click "Submit".
5. You will see a screen asking you to confirm the activation of the server with these services. Click "Next" to
confirm, or click the "Back" button on your browser to return to the previous form to correct information.
6. You will be presented with a screen where you can choose to add this server to an existing Teleworker VPN, or
to create a new VPN with another specified Teleworker server. Choose the appropriate option and then click
"Next".
7. A confirmation screen appears listing the products that will be applied to this server. If desired, enter informa-
tion into the Reference field (i.e. a PO number). Click "Next".
8. You will now see a screen indicating that your server registration is complete. This page will also indicate the
Service Account ID, a number that uniquely identifies this server. We suggest you print out this page for your
records.
9. Log out of the AMC and log in to the Server Manager on the server you are registering.
10. Click "Status" (under ServiceLink in the Server Manager's navigation menu) and enter the Service Account ID.
11. Click "Activate".
The server will now connect to the AMC and synchronize with it. You will see a screen telling you that registration
was successful. The server registration process is now complete. (Note that the initial synchronization can take several minutes to complete.)
At any time in the future, you or your customer can view the status of ServiceLink services by clicking on "Status"
in the Server Manager's navigation menu.
Returning to the AMC, you can now see a list of registered servers by clicking on "Servers" in the AMC navigation
menu. Your newly-registered server should appear in this list.
For more information on the status of your server, read the section on Monitoring Server Status.
4.4. Enabling Additional ServiceLink Services
During the initial registration of a server, you enabled services on that server through the registration process (see
Registering a Server). However, at some future point you may wish to enable additional services for this server. Alternatively, you may have a server where the services have expired and the customer now wishes to re-subscribe. In
either case you will follow the procedure outlined below.
To enable network services, follow these steps:
1. Use the "Order products" function to order whichever additional products you want.
2. Click on "Servers" in the AMC.
3. In the Services column, click on the link for the server you want to modify. (It will show not enabled if there
are no services, or will indicate how many services are available.)
4. In the details screen, follow the link to add new services. You will see a screen where you can allocate keys to
13
Page 21

Chapter 4. Purchasing and Registration
that server.
5. Choose a key by clicking "Select" beside the option. If you choose, you may manually enter your product li-
cense key in the available field and then click "Next".
6. A confirmation screen appears listing the products you selected. If you want, enter information into the Refer-
ence field (i.e. a PO number). Click "Next".
7. Following your confirmation, you will then be presented with the list of services that were enabled and the ex-
piration dates for those services.
8. If you return to the Servers screen, you will now see that the services column has been updated to reflect the
number of services each server has enabled.
Services will not actually be available on the server until the next synchronization. This should happen within the
hour, or you can perform a manual sync by clicking on "Status" in the Server Manager, then clicking the "Sync" button. After synchronizing, the status panel will show the subscribed services.
4.5. Moving a Server or Deactivating Services
If you have installed your 6000 MAS on new server hardware, or alternatively just want to deactivate services to a
particular server, follow this two-step process.
1. On the server, in the Server Manager, click on "Status" and then follow the link for deactivating services.
2. In the AMC, click on the server's ID to go into the detailed information for that Server. At the bottom of the
page, click on "Reset Signature" for that server.
Note
You must do both steps, in the Server Manager and on the AMC, for this to work. Either step in isolation
will not suffice.
If you are moving the server, you can now reinstall the software on the new system and follow the activation steps
described in steps 8-10 in Registering a Server, using the same Service Account ID you created for the server.
You do not need to re-enable or purchase new services when you change the underlying hardware for the server.
The services associated with the server continue to be enabled, even if they are not being used. When the new server
syncs to the AMC using the same Service Account ID as before, it will gain access to the same services that were
enabled previously and will continue to use those services until they expire.
Note
Be aware that there is no change in the expiration date of services if you temporarily de-activate a server.
The services will expire on that date, regardless of how often they have actually been used.
14
Page 22

Chapter 5. Software Installation and
Configuration
5.1. Licensing Terms and Conditions
In installing the 6000 MAS software, you are agreeing to the licensing terms and conditions associated with it. You
can read these terms and conditions in the introduction to this handbook under the title Software Licensing Terms
and Conditions.
Warning
The computer on which you install this software will be totally dedicated to being your 6000 MAS. The
hard drive of this computer will be erased and re-written with the Linux operating system - dramatically enhancing the reliability of your server over other operating systems. However, this means that while this
computer is acting as your server, you cannot use it for any other purpose.
Note
If you have previously installed and configured a server and are reinstalling the software, please be aware
that you must use the Upgrade option in order to preserve your existing configuration and data. Performing
a new installation (rather than an upgrade) will erase all previously existing user accounts, user directories,
i-bay contents and web site and configuration parameters. If you have not already done so, you may wish to
back up the contents of your server onto one of your desktop computers or to a tape drive. You can do so
easily by selecting "Backup or restore" from the Server Manager, as explained in the chapter describing ongoing administration of your server.
5.2. RAID1 Support (Disk Mirroring)
the 6000 MAS supports disk mirroring, also called RAID Level 1. Disk mirroring ensures that all data is written to
two separate hard disks installed in your server. Should the primary disk fail, the mirror disk will continue as if nothing had happened. All of the data will be protected.
Disk mirroring can be accomplished through either software or hardware .
5.2.1. Software Mirroring
To enable software RAID1 support, you must first have two disks that are the same size or capable of having partitions of the same size. They can be either SCSI or IDE drives. They must both be installed in your system prior to
installing the 6000 MAS software. Software RAID support can only be configured at the time you install the software. If you choose not to configure RAID support on your server, and later wish to do so, you will need to reinstall
the 6000 MAS software.
Once you have two disk drives, activating RAID support requires only a slight change in the software installation
process.
Note
The 6000 MAS does not support RAID Level 0 (disk striping), as that does not provide any protection of
your data whatsoever. It does not support RAID Level 5 (disk striping with parity) because of the poor performance and reliability of software implementations of RAID5. If you are seeking RAID5 support, Mitel
Networks Corporation recommends you consider one of the many hardware implementations which will
provide both protection and performance.
15
Page 23

Chapter 5. Software Installation and Configuration
5.2.2. Hardware Mirroring
With hardware mirroring, you use a special RAID disk controller to mirror across multiple disks. The performance
can be significantly faster than software mirroring. Additionally it can simplify configuration because to the operating system the entire RAID disk system looks like a single disk. You should be able to use any supported SCSI
hardware RAID controller.
If you are going to use hardware mirroring, you should NOT choose Install - Dual hard disk with software RAID-1
mirroring in the installation process. Instead, you should do a regular installation of the software.
Note
Using one of the supported hardware RAID controllers, you will be able to upgrade from an earlier version
of the 6000 MAS to version 5.6 using the standard upgrade process. You should back up all your data and
test carefully after installation.
5.3. Upgrading From A Previous Version
If you have previously installed a server and now wish to upgrade to version 5.6, you can do so while preserving
your configuration data. Follow the installation instructions and choose the upgrade option by typing upgrade after
your previous installation is detected.
As a precaution, we recommend that you back up your system prior to performing this upgrade.
Warning
During the upgrade process your server name for Windows networking will be set to the system name of
your server. If you previously used a different name for Windows networking, you will need to change
your server back to using this name on the Workgroup panel of the Server Manager once the upgrade has
completed.
Warning
You cannot change your primary domain name during an upgrade. If you change your primary domain
name after it has been set up, you will have to reboot your server and all of the client machines, and users
may have to manually modify items such as web browser bookmarks that point to your server.
Warning
It is not possible to use the Upgrade option to add software mirroring (RAID1) to an existing server.
If you enabled software mirroring with a previous version of the software, you should be able to upgrade
without any problems. However, if you are upgrading a previous version of the software that was not installed with software mirroring, and now wish to use software mirroring, you should follow these steps:
1. Perform a backup through the Server Manager.
2. Perform a fresh install selecting the software mirroring option.
3. Restore the backup through the Server Manager.
Warning
If your 6000 MAS was not shutdown cleanly before attempting an update, you may be presented with an
error message such as "One or more of the file systems for your Linux system was not unmounted cleanly".
16
Page 24

Chapter 5. Software Installation and Configuration
You will not be able to proceed with an upgrade, though you could proceed with a clean install. If you wish
to upgrade, thus keeping existing configuration data, you should terminate the current upgrade attempt, reboot the 6000 MAS, and cleanly shut it down. Only then should you attempt the upgrade.
5.4. Installing the Software
Note
If you are configuring your system with RAID1 support, notice that your step 4 below will be slightly different. If you skipped the previous section on RAID, it would be advisable to read it before proceeding.
Step 1: Insert the CD-ROM. If your computer is an older model that is unable to boot from CD-ROM, you will also
need to insert the boot floppy. Most modern computers do not need a boot floppy.
Step 2: Choose your preferred language from the list. This language will be used throughout the rest of the installation, and the 6000 MAS software will use this as the default language after installation.
Warning
The installation process formats and erases all attached hard drives. If you have multiple hard drives, be
sure to back them up prior to starting the installation process.
Step 2a: If you see a keyboard selection screen, choose your preferred keyboard from the list. Otherwise, skip to the
next step.
Step 3: Read the software licensing terms and indicate your acceptance of the license.
Step 3a: Enter the name, title and company of the person accepting the end-user license on behalf of the end-user's
company.
Step 4a: If an older version of the 6000 MAS software (SME Server with ServiceLink) is detected on your com-
puter, the software will assume that you are upgrading your previous system. Go to Step 5a.
Step 4b: If an older version of the 6000 MAS software (SME Server with ServiceLink) is not detected on your com-
puter, you will see a screen with two installation options. Choose whether you wish to "Install on a single hard disk
(or use hardware mirroring)" or "Install on dual hard disks using software mirroring (RAID1 support)". If an upgradable system is detected but you typed more options to get to this menu, you will also be able to choose
"Upgrade". If you choose "Upgrade", go to step 5a; otherwise, go to step 5b.
Step 5a: Read the screen offering a final warning about the upgrade. Type upgrade and hit enter or the "OK" button
to continue. The upgrade process will now automatically proceed. If you wish to perform a fresh install and overwrite your old installation, type more options, and return to step 4b. Otherwise, go on to step 6.
Step 5b: Choose a timezone from the list and press "enter".
Step 5c: Read the screen offering a final warning. Type install and hit enter or the "OK" button to continue. The
installation process will now automatically proceed to install the necessary packages.
Step 6: Indicate whether you wish to create an emergency boot diskette. This can be used in the future to boot the
system in the event that you are unable to boot from the hard disk. If you choose yes, you will be prompted to insert
a blank diskette. We recommend that you do create an emergency boot floppy and put it in a safe place where you
can easily retrieve it when necessary.
Step 7: Finishing the installation is automatic and takes only a few minutes. At the end of the process, you will be
prompted to remove the floppy diskette and CD and then to reboot your computer.
Warning
17
Page 25

Chapter 5. Software Installation and Configuration
The installation (or upgrade) process rewrites the boot sector on your hard drive. This may cause machines
with BIOS boot sector virus detection to not boot unattended. This detection should be disabled in your
system's BIOS.
5.5. Configuring your Server
Once your system has restarted (and is no longer booting from the installation CD), you are ready to configure your
system.
If your ISP provided you with a summary of your configuration choices and network information, we suggest that
you keep it handy while completing the screens in the configuration section of the server console.
There are several types of configuration parameters that must be entered into your server:
• the system password
• the type of ethernet adapters (network interface cards, or NICs) that will be used by your server to communicate
with the internal network and the Internet (or external network). Typically, the server software will detect this information automatically. (Note that if you are connecting to the Internet with a dialup connection, you only need
one ethernet adapter.)
• configuration for the internal (local) network - you must provide information about your internal network so that
your server can communicate with other machines on your local network.
• operation mode - you must select whether your server will operate in server and gateway mode or server-only
mode.
• configuration for the external network/Internet - you must configure your server so that it can communicate with
your ISP either by a dedicated connection or using a dialup connection (only for server and gateway mode).
• miscellaneous information - there are several final items to configure, such as whether to allow your users to use
a proxy server, whether to provide status reporting to Mitel Networks Corporation, and whether you wish to secure the server console so that it can only be accessed using the administrator's password.
As you select a given configuration parameter, you will be presented only with the screens necessary for your given
configuration. Each screen will provide you with a simple, detailed explanation of the required information.
Note: The "Keep" option
As you move through the configuration screens, you will notice that there is a "Keep" option that will allow
you to keep the choices you may have made previously. Obviously, when you are configuring your system
for the first time, many of these choices will not have been made, but if you later go back to re-configure
the system, this option can save time.
5.6. Setting Your Administrator Password
The first thing you will be asked to do is to set the system password. This is the password you will enter to access
the web-based Server Manager. Depending on how you configure the system, you may also need to enter this password to access the server console. It is extremely important that you choose a good password and keep that password
secret.
Anyone who gains access to this password has the power to make any change to your server!
After you enter the password once, you will be asked to type it again to confirm that the password was recorded cor-
rectly. The password will also be examined to determine its suitability from a security perspective. If it is found to
18
Page 26

Chapter 5. Software Installation and Configuration
be weak (for instance, a dictionary word), you will see an additional screen asking if you really want to use this
password. You will have the option to go back and change to a stronger password or to continue using the weaker
password.
Note
You can use any ASCII printable characters in the administrator password. A good password should contain mixed upper- and lower-case letters, numbers and punctuation, yet also be easy to remember. An example might be "IwmMNS!" as in "I want my Mitel Networks Server!" (Please don't use this example as
your password!).
5.7. Configuring Your System Name and Domain Name
The next step is to enter the primary domain name that will be associated with your 6000 MAS. This will be the default domain for your e-mail and web server. You can later configure other virtual domains.
Warning
Once you enter your primary domain name, you should not change it. If you change your primary domain
name after it has been set up, you will have to reboot your server and all of the client machines, and users
may have to manually modify items such as web browser bookmarks that point to your server.
Next you need to provide a system name for the server. Think carefully about this as changing it later may create additional work. (For instance, Windows client computers may be mapping drives to your server using its name. Those
clients would need to remap the drive using the new name.)
Tip
You should make the system name as unique as possible in case you someday decide to link your server to
another server using an IPSEC VPN. When you do, each server will need a unique name. Using some type
of theme, such as location names, can be an effective way to ensure unique names. The system name must
start with a letter and can be composed of letters, numbers and hyphens.
5.8. Configuring Your Local Network
5.8.1. Selecting Your Local Ethernet Adapter
You will need to select the appropriate driver for the ethernet adapter connected to your local network.
If you are using a PCI ethernet adapter that appears on the supported list, it is likely that you will be able to choose
option 1, "Use xxxx (for chipset yyyy)", where 'xxxx' and 'yyyy' are specific to your hardware. If the software fails
to detect it correctly, you can manually select the appropriate driver for your ethernet adapter from a list of drivers or
from a list of ethernet adapter models. After the appropriate driver is selected, select "Next" and proceed to the next
screen.
5.8.2. Configuring Local Network Parameters
Enter the local IP address for this server. If you have no reason to prefer one set of IP addresses over another for
your local network, your server will prompt you with default parameters that are probably appropriate in your situation. If your server is being installed into an existing network, you must choose an address that is not in use by any
other computer on this network.
Tip
If you are installing servers at multiple sites within your organization, you may find it useful for later trou-
19
Page 27

Chapter 5. Software Installation and Configuration
bleshooting to use different network addresses for each site. Additionally, if you ever want to establish an
IPSEC VPN between the servers, each server will need to use a different range of IP addresses.
If, however, you are operating your server in "server-only" mode and there are already servers on your network, you
will need to obtain an unused IP address for your local network.
Next, you will be prompted to enter the subnet mask for your local network. If you are adding your server to an existing network, you will need to use the subnet mask used by the local network. Otherwise, unless you have a specific need for some other setting, you can accept the default setting.
5.9. Operation Mode
After configuring your local network, proceed to the following screen to select the server's operation mode. If you
want this server to act as a gateway to the Internet, choose one of the server and gateway options. Otherwise, choose
server-only mode.
5.9.1. Option 1: Server and Gateway Mode
If you configure the server to operate in server and gateway mode, your server will require either of the following:
1. two ethernet adapters (one to communicate with the local network and the other to communicate with the exter-
nal network/Internet)
2. one ethernet adapter (for the local network) and a modem for a dialup connection
With server and gateway mode, there are a number of extra parameters that must be configured. These will be discussed in the next section.
5.9.2. Option 2: Private Server and Gateway
This mode is a variation of option 1 and provides the same functionality with the following differences:
• The web server is not visible to anyone outside of the local network.
• The mail server is not accessible outside the local network.
• Additional firewall rules are automatically configured to drop packets for various services (such as 'ping' requests).
All services are available on the internal network. The differences are entirely in how your server is seen by the external world.
5.9.3. Option 3: Server-Only Mode
Server-only mode is appropriate if you do not wish to use the gateway capabilities of your server. In this configuration, the server does not connect directly to the outside world (although it may connect indirectly through your firewall or another server).
Warning
Because the server "trusts" the local network to be secure in server-only mode, it must be behind a firewall
of some type.
20
Page 28
Chapter 5. Software Installation and Configuration
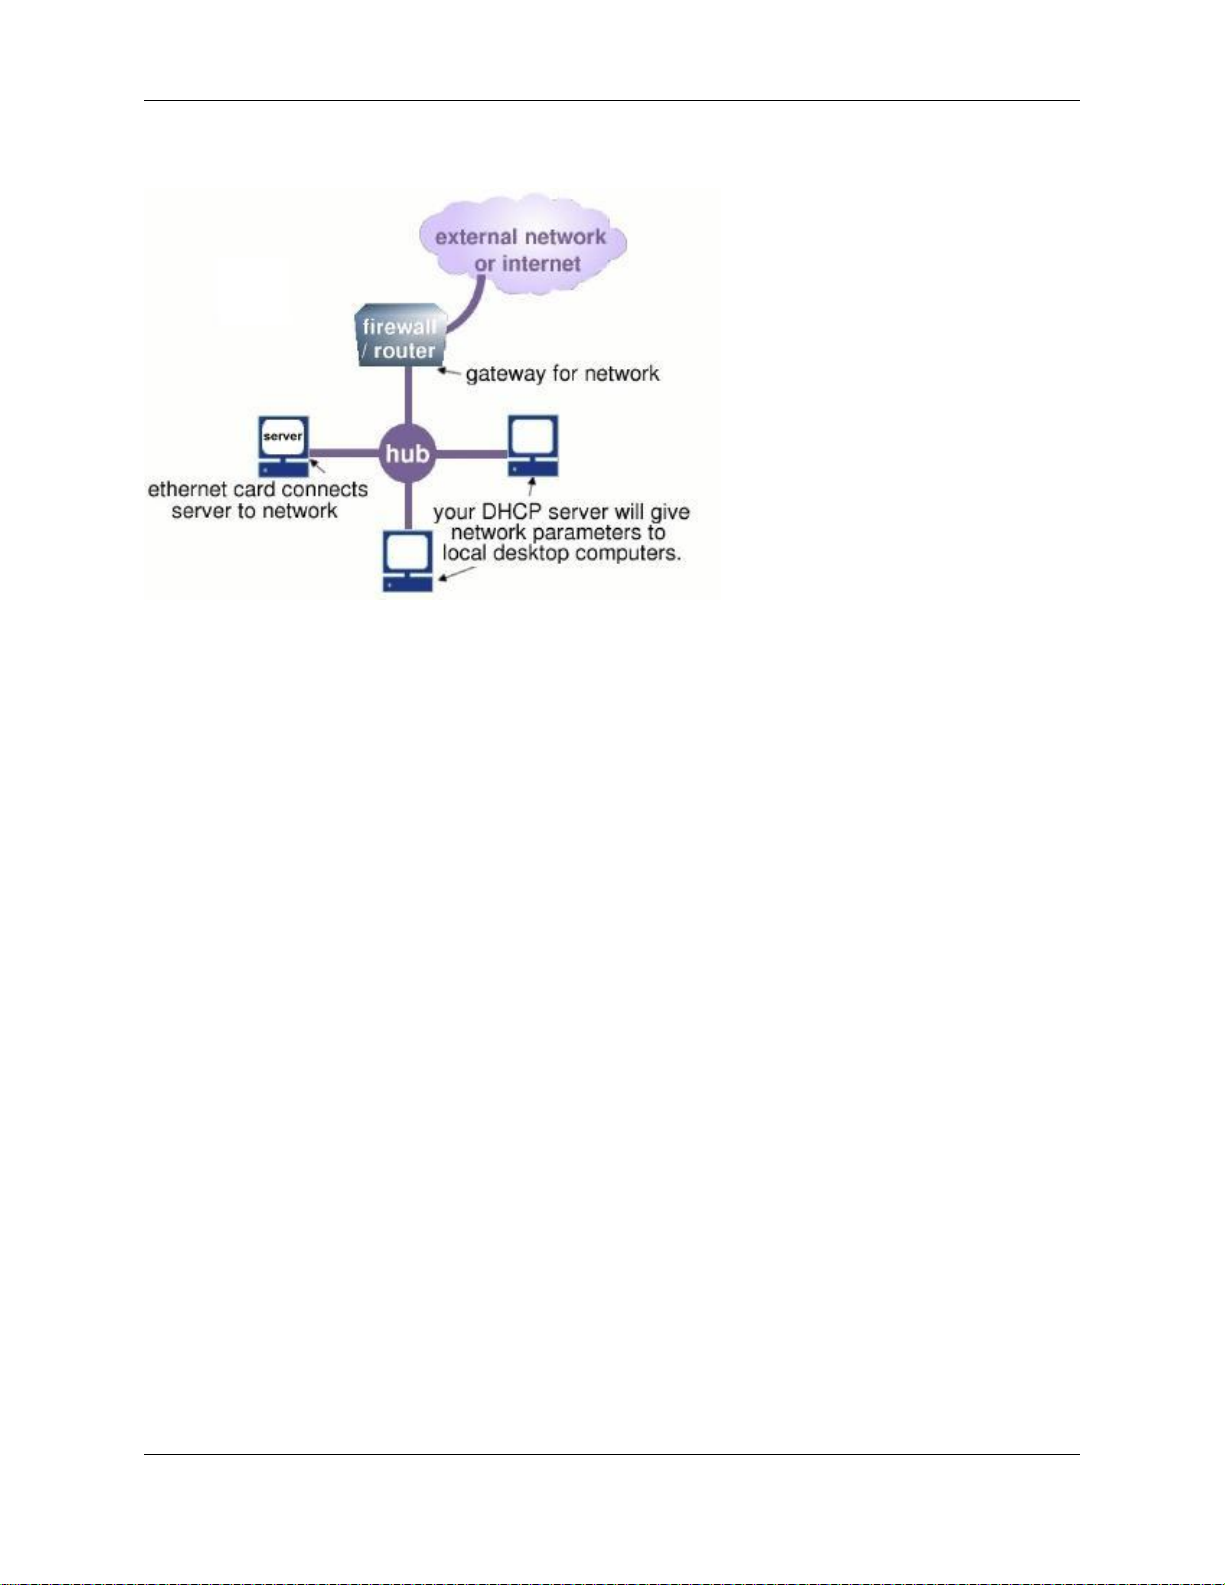
Your network will resemble the image below:
If you have a connection to the Internet by way of another gateway or corporate firewall, you can configure the
server to provide services (including e-mail, web services, file and print-sharing) to your network. In this instance,
you do not need your server to function as a gateway because that role is fulfilled by your firewall. If you select Option 3, "Server-only mode - protected network", your server will provide your local network with web, e-mail, file
and print-sharing.
On the next configuration screen, you should enter the IP address for the Internet gateway on your local network. If
you do not have an Internet connection, leave this screen blank.
5.10. Configuring Server and Gateway Mode
If you are configuring the server to operate in server and gateway mode, you must select one of the following two
Internet connection types:
• a dedicated connection - if you access the Internet via a router, a cable modem, or ADSL
• a dialup connection - if you access the Internet via a modem or ISDN connection
The next step is to enter the specific parameters representing that connection.
5.10.1. Server and Gateway Mode - Dedicated
How you configure your server's external interface depends on whether you are using a dedicated or a dialup connection. Therefore, if you configured your server for "server and gateway mode - dedicated connection" you will be
presented with very different configuration screens than if you configured the server for "server and gateway - dialup connection" (as discussed in the next section).
5.10.1.1. Configuring Your External Ethernet Adapter
As you did previously with the local ethernet adapter, you need to configure the driver for the external ethernet
adapter. As before, the software will attempt to detect the card. If it correctly identifies the card, you can proceed using Option 1, "Keep current driver". If it does not, you can manually select the driver - either by specifying the
model of your ethernet adapter or by directly choosing a driver.
21
Page 29

Chapter 5. Software Installation and Configuration
5.10.1.2. Assigning Your Ethernet Adapters to Network Connection
To communicate successfully, the server needs to know which ethernet adapter connects it to the internal network
and which adapter connects it to the external network/Internet. The server will make this designation automatically the first ethernet adapter (in position "eth0") will normally be assigned to the local, internal network and the second
ethernet adapter (in position "eth1") will normally be assigned to the external network/Internet. In the event that this
assumption is incorrect, this screen allows you to easily swap that designation.
Note
If you don't know which ethernet adapter is designated to eth0 and which is designated to eth1, leave it in
the default configuration while completing the rest of the screens. You will later have the opportunity to
"Test Internet Access" from the server console. If your test fails at that time, return to this screen, swap the
card assignment and retry the test.
Tip
If you are using two different network interface cards, you will see which driver is associated with eth0 and
which is associated with eth1. This information can help you determine which card is eth0 and which is
eth1. If you have two cards that use the identical driver you will see a screen such as the one above where
the actual driver is not listed.
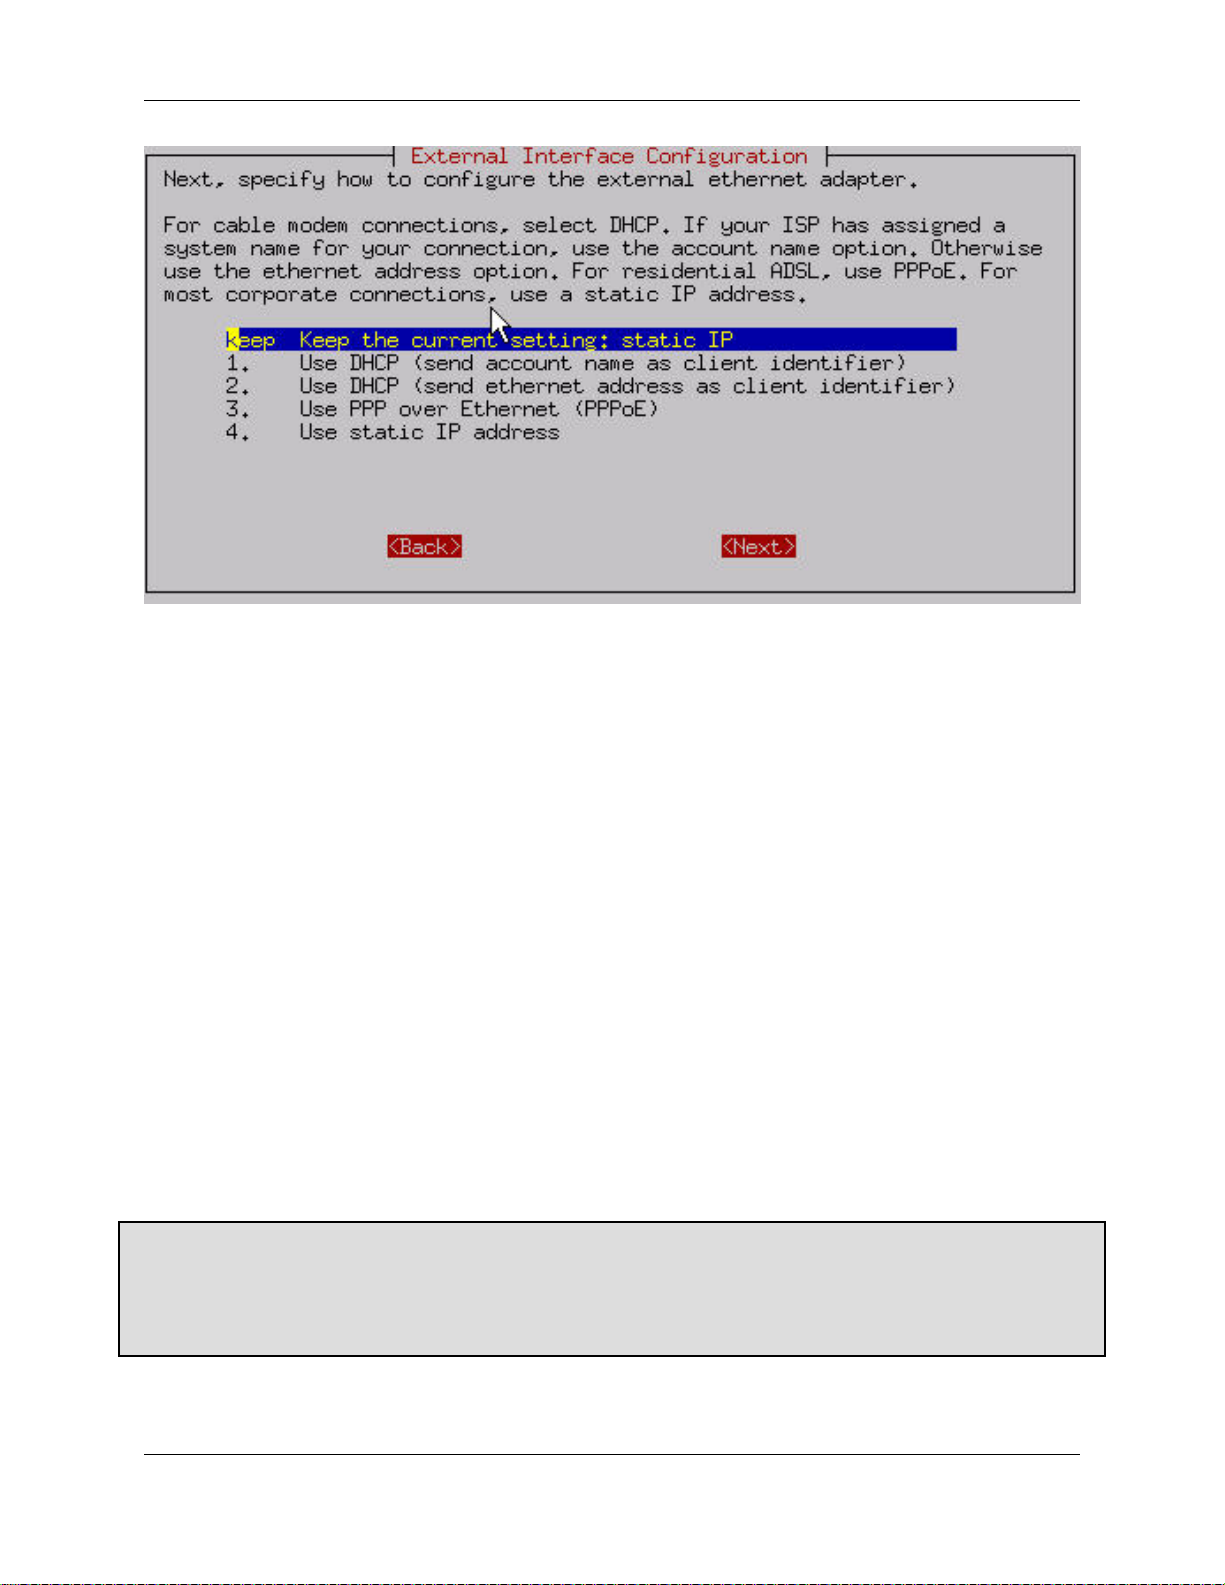
5.10.1.3. Configuring Your External Interface
With a dedicated connection in server and gateway mode, you will be presented with the following screen:
22
Page 30
Chapter 5. Software Installation and Configuration
Your server must know three additional things to communicate on the Internet:
• its own unique IP address so that Internet data packets can reach it.
• a subnet mask (also called a netmask) which looks like an IP address and allows other computers to infer your
network address from your IP address.
• the IP address of the external gateway for your server. This is the IP address of the router on your server's external network. It identifies the computer that your server should contact in order to exchange information with the
rest of the Internet.
Normally, you would need to know this information and enter it into the server console. However, most ISPs are capable of automatically assigning these configuration parameters to your server using a DHCP server or PPPoE.
If you have a static IP address and your ISP is configuring your server using DHCP or PPPoE, select Option 1, 2 or
3 depending upon how you will be connecting to your ISP. When you first connect to your ISP, your server will automatically be given its external interface configuration parameters.
If your ISP is providing you with a dynamic IP address, the ISP will configure this through DHCP or PPPoE and
your server will be re-configured automatically whenever your IP address changes. If you plan to use a Dynamic
DNS service, select Option 2. Otherwise, select Option 1.
If you are using ADSL and need PPP over Ethernet , choose Option 3. You will then be asked for the user name and
password you use to connect to your ISP. Note that some ISPs require you to enter their domain name as well as
your user name.
What is PPPoE?
PPPoE Point-to-Point Protocol over Ethernet is an implementation of the PPP protocol used for dialup connections
- only configured to run over an Ethernet connection. Many ISPs that provide ADSL connections use PPPoE as the
method of connecting their customers to the Internet over ADSL.
If you have a static IP address and your ISP does not offer DHCP or PPPoE, then your ISP will give you the static
23
Page 31

Chapter 5. Software Installation and Configuration
IP address, subnet mask (or netmask), and the gateway IP address of the device that your server should connect to in
order to communicate with the Internet. Assuming you have this information on hand, you can go ahead and select
Option 4. Successive screens will prompt you to enter each parameter.
5.10.1.4. Configuring Dynamic DNS
If you choose either of the DHCP options or PPPoE, you will be presented with an additional screen where you can
choose a dynamic DNS service.
Tip
6000 MAS users do not need a third-party dynamic DNS service as DNS service is typically included in the
ServiceLink subscription.
5.10.2. Server and Gateway Mode - Dialup Access
If you select dialup access, successive screens will ask you for the following information:
• information regarding the modem or ISDN connection with your ISP, such as the serial port your modem is connected to 1
• modem or ISDN initialization screen - most users can simply leave this blank, but with some particular modems
or ISDN cards, additional information may need to be entered here
• the dialup access phone number
• username
• password
• connection policy
This last item may be of special interest. As shown in the screen below, you can configure what type of policy you
1Your modem documentation may indicate which serial port is used by the modem. You may also be able to visually identify which port
your modem uses.
24
Page 32

Chapter 5. Software Installation and Configuration
wish to have in place during typical work hours. If you are in a small office and wish to share your phone line between your computer and phone or fax, you may wish to minimize the time you are online. This is also true if your
ISP charges a fee on a per-minute basis. On the other hand, if you have a separate phone line or unlimited time with
your ISP, you might want long connection times or a continuous connection.
Warning
If you are using a dial-on-demand link to your ISP, please be aware that you can incur high phone charges
due to dialup connection attempts to the ISP. If your carrier charges fees on a per-call or per-minute basis,
it is possible that a failed modem link at the ISP will result in phone charges. Customers are urged to check
their carriers' fee structure as well as the ISP's tariff to determine if charges will be incurred for failed dialup connections.
After configuring this policy for "work" hours, you can configure the policy for time outside of office hours and additionally for the weekend. Notice that you do have the choice of never, which would allow you to restrict your system from connecting on weekends or during off-hours.
The connection policy defines several choices including Short, Medium or Long. These specify how long the
server should wait before disconnecting the dialup connection. If your office only shares a single phone line, the
Short option minimizes the amount of connection time and frees up the phone line for later use. The down side to
this is that if someone is reading a long page on the web site or steps away from their computer for a brief moment,
when they want to then go to another web page, the server will probably have disconnected and will need to redial
and connect. On the other hand, setting the Long connection time will result in users experiencing fewer delays
while waiting for the server to reconnect. However, the phone line will be used for a larger amount of time.
There are two separate timeout values configured by each choice. One value is the length of time since the last
HTTP (web) packet went through the server. The other is a more general timeout for any other types of packets. The
difference exists because it is assumed that connecting to a service such as ssh or POP3 to an external server will be
more active than someone using a web browser. The timeout values are shown in the table below.
Choice HTTP Timeout Other Timeout
Short 3 minutes 30 seconds
Medium 10 minutes 5 minutes
Long 20 minutes 10 minutes
Note that there is also the option for a Continuous dial-up connection. Choosing this option is basically equivalent
25
Page 33

Chapter 5. Software Installation and Configuration
to creating a permanent or dedicated connection, but only doing so through the use of a dial-up connection and a
modem or ISDN adapter. One example of this use might be to set a Continuous connection policy during work
hours and then some variable policy during off-hours and the weekend. Assuming that your ISP approves of this arrangement and you can afford to do so financially, these settings would give your users the fastest response time as
the connection would always be online.
5.11. Configuring Your DHCP Server
You now will be prompted regarding DHCP service. Your 6000 MAS can be configured to provide DHCP service
to your internal network.
We recommend configuring your server to use DHCP to configure all of your network clients. You should not do
this if there is an existing DHCP server on your network as there should typically be only one DHCP server per network.
5.11.1. Configuring the DHCP Address Range
Before the DHCP server is able to assign IP addresses to the computers on your network, you need to tell it what
range of IP addresses it can safely distribute. As above, this section is pre-configured with defaults that are appro-
priate in most situations. If you have fewer than 180 machines on your local network and no reason to prefer one
range of IP addresses over another, you can accept the defaults for these screens.
If the defaults are not appropriate to your situation, you may need a bit of background to understand how to configure this range. For example, if you entered the server address of 192.168.1.1 and subnet mask of 255.255.255.0 (the
default settings), the configuration script will infer that your "network" is 192.168.1.0 and that valid addresses are
from 192.168.1.1 to 192.168.1.254. If you entered some number such as 192.168.100.1 for the server, the script will
infer that your valid addresses will be 192.168.100.1 through 192.168.100.254.
If you enter the number "192.168.202.65" as the "beginning of DHCP address range", as shown below, the first
computer served by the DHCP server would receive the IP address of 192.168.202.65. The second computer would
receive the IP address of 192.168.1.66, and so on.
26
Page 34

Chapter 5. Software Installation and Configuration
If you specify that the end of the range is "192.168.202.250", as shown below, then the last computer able to receive
DHCP service would be assigned the IP address 192.168.202.250. Once all the available IP addresses within that
range are assigned, your DHCP server will no longer serve IP addresses to new computers.
5.11.2. Important Issues About the DHCP Address Range
The usual range maximum is 254: Normally the "end of DHCP address range" cannot exceed "254". If you have
more than 253 computers on your network and would like to exceed this range maximum, you can use a Class B or
Class A non-routable address for your network. In this case the number entered in the "end of range" field needs to
be calculated and entered a little differently. If you fall into this category, we recommend you contact Mitel Networks Corporation or an authorized reseller for assistance. Note that the default range maximum is 250.
The local IP address assigned to the server must fall outside of this range: In other words, you should not assign the
server a non-routable IP address that is also assignable by the DHCP service to another computer on your network.
If your server is assigned the IP address of "192.168.1.1" then the lowest possible number in the DHCP range should
be "2".
We recommend that you leave a small pool of IP addresses that can be manually assigned: Some of the computers
(or devices such as network printers) on your network may not be able to accept DHCP service. Therefore, it is
preferable to exclude some IP addresses from the DHCP range so they are available to be assigned manually to those
computers. For example, using the 192.168.1.0 block of addresses, the default "beginning of DHCP address range"
is "192.168.1.65". This ensures that non-routable IP addresses "192.168.1.2" through "192.168.1.64" are available to
you if any computers on your network cannot accept DHCP service. Additionally, the default end of "192.168.1.250
leaves addresses "192.168.1.251" through "192.168.1.254" available.
5.12. Further Miscellaneous Parameters
There are a few, final connectivity-related parameters that must be entered into your 6000 MAS.
Master DNS server: The first option is for a master (or primary) DNS server. You should only configure this value if
your server is behind a firewall and cannot perform direct queries to Internet DNS servers. Most installations should
leave this setting blank. You do not need to configure your server to use your ISP's DNS servers.
Note
27
Page 35

Chapter 5. Software Installation and Configuration
Your 6000 MAS contains a fully functional caching DNS server and in almost all cases you will not need
to enter the address here for a DNS server. However, some corporate firewalls restrict DNS queries from
internal DNS servers. If that is the case, you will need to supply the address for an external DNS server.
External proxy server: The next screen allows you to configure your server so that the computers on your network
will use a proxy server outside of your own network. Some Internet Service Providers may require this. Additionally,
if your server is behind another firewall, it may need to use the external proxy server. In most environments you can
leave this blank.
Status reporting: You will be asked to decide whether to enable status reporting to Mitel Networks Corporation.
Through status reporting, Mitel Networks, tracks the performance of its servers worldwide. Every day, your server
would send a small packet of data containing up-time information to Mitel Networks. The information sent is minimal and is not shared with any other organization.
Console mode: Next, as shown below, you select whether users will require a password to access the server console.
If you choose the default, "auto", the server console will be displayed on your server monitor. In many small office
or home office situations, this is perfectly acceptable. However, doing so allows anyone with physical access to your
server monitor and keyboard to make system-wide changes. If security is a concern, you may wish to choose "login.
This setting prevents users from accessing the server console unless they log in as "admin" with the system password you set earlier in the process. Note that this setting controls access to the server console only. It does not control whether you (or anyone else) can administer your server using the web interface.
Contact e-mail address: Finally, you will have the option of providing a contact e-mail address and name. If you
would like to be notified of security updates or new versions of software, we strongly encourage you to provide at
least your e-mail address. As the screen indicates, we will only send you notices of updates and no other information. Your contact information will not be shared.
The last screen asks you to confirm your changes. After the changes take effect, you will see other services starting
up. When that is finished, the server should be fully operational!
Test your Internet access using the test option in the server console. If you chose "auto" earlier, the server console
remains permanently "up" on your server. Otherwise you would need to login as "admin". Most routine administration (for example, adding or deleting e-mail addresses) is done from your desktop computer using the web-based
Server Manager (reviewed in a later chapter). Therefore, once it is up and running, most users put their server in an
out-of-the-way place and turn off the monitor.
Congratulations - you have configured your 6000 MAS!!
5.13. Using the Server Console
When installation is complete and if you set server console mode to "auto", the opening screen of the 6000 MAS
server console will appear:
28
Page 36

Chapter 5. Software Installation and Configuration
If you set the server console mode to "login", you will see a login prompt. After you enter the user name "admin"
and your system password, you will see the server console screen above.
Note
Any time that you login to your system as the "admin" user you will see the server console. This is true
even when connecting to the server remotely using a tool such as ssh (discussed later in the chapter on Remote Access).
The server console provides you with basic, direct access to your server. From the server console you can get the
following information and perform the following tasks:
Option 1: Provides you with uptime information about your server.
Option 2: Allows you to view and modify the configuration information you entered during the original installation
(ethernet cards, IP address information, DHCP, DNS, domain names, etc.).
Option 3: Provides a summary of the configuration parameters entered into your server.
Option 4: Allows you to test your Internet access by sending a small test packet of information to a server on the In-
ternet (located at Mitel Networks).
Option 5: Allows you to smoothly reboot or shut down your server.
Option 6: Provides access to the web-based Server Manager using a text-based browser. This is the same interface to
which you can connect from another system using a normal graphical browser. This option merely allows you to
perform these functions directly from the server console.
Option 7: Displays the licensing terms governing the distribution and use of 6000 MAS software and information on
how to contact Mitel Networks Corporation for support.
5.14. Using the Text-based Browser
For Option 6, Access Server Manager with text-mode browser, the server uses a text-based browser called lynx to allow you to access the web-based Server Manager from the server console. Navigation is primarily with the arrow
keys - up and down to move through the page, right arrow to follow a link, left arrow to go back. Lynx has a wide
range of other commands which you can learn about through the online help available at
http://www.lynx.browser.org/ [http://www.lynx.browser.org/]. Note that for security reasons some regular features
of lynx are disabled when you are browsing from the server console (such as the ability to specify an external URL).
29
Page 37

Chapter 5. Software Installation and Configuration
Type 'q' (for 'quit') to exit the text-based browser.
5.15. Accessing the Linux Root Prompt
If you are an expert user and would like to do advanced modifications to the configuration of your server, you can
access the Linux operating system underlying the 6000 MAS software by logging in as the user "root". If your
server is displaying the server console and not a login prompt, you can press Alt-F2 to switch to another screen with
a login prompt. To switch back, press Alt-F1. Always ensure that you log out from the root account when you are
finished and before you switch back to the server console.
Warning
Please be aware that making changes and customizations to your server from the Linux command prompt
may invalidate your support agreement. Please contact your Mitel Networks authorized reseller before
making any such customizations.
The password for the "root" user is whatever password is currently set for the administrator of the server. Note that
this is the same password as that used by the "admin" user account.
Be aware that this ability to switch between the server console and a login prompt is only available when you have
physical access to the server. If you connect in remotely as the "admin" user and see the server console, you will not
be able to switch to a login prompt in that window. (You can, however, open another remote connection to your
server and login as the "root" user.) Note that remote administrative access is disabled by default and must be
specifically enabled through the Remote Access panel of the Server Manager.
Note
If you are not familiar with working from the Linux prompt, you may be interested in trying a file management tool called Midnight Commander. It allows you to perform many file operations through a menudriven interface. Simply type mc at the command prompt. Press the function key "F1" for help and "F10" to
quit.
5.16. On-going Administration Using the Server Manager
The Server Manager is a simple control panel that allows you to administer your network. Using the Server Manager, you perform such tasks as adding or deleting e-mail addresses, setting the system date and time, and creating a
starter web page. The Server Manager is accessed through a web browser on the local network by visiting the URL
http:// www.yourdomain.xxx/server-manager or more simply http:// www/server-manager.
Note
Remote access to the server manager is only possible via an encrypted connection using tools such as ssh,
PPTP or SSL (https).
30
Page 38

Chapter 5. Software Installation and Configuration
When you arrive at the correct URL, you'll be asked to enter your user name (which is always "admin") and the
password you created during the installation process. Enter that information and click "OK" to be taken to the Server
Manager. It will look like the screen shown above.
In the Server Administration chapter, we'll explain each of the administrative functions.
31
Page 39

Chapter 6. Server Administration
6.1. Passwords
To change the admin password, follow these steps:
1. Type the new password in the first field.
2. Verify the new password by entering it again in the second field. (Your password can be any combination of
printable characters, including upper- and lower-case letters, numbers, and punctuation marks.)
Note
If you make a mistake, click the "Back" button on your browser and try again. Whenever you change your
password, the system will prompt you for the revised password as soon as you attempt to access another
feature. When you get the "Authorization Failed" message, click "OK", enter the new password and press
"Enter".
6.2. Remote Access
If you're an advanced user, the 6000 MAS provides several different ways to access the underlying operating system, either from a computer on your internal network or from a computer outside your site on the Internet. Additionally, you have the ability to access the local network securely from a remote computer. All of these operations are
configured from the screen shown below in the Server Manager.
32
Page 40

Chapter 6. Server Administration
Each of these remote access methods is described below.
6.2.1. Remote Access Using ssh
If you need to connect directly to your server and login from a remote system belonging to you, we strongly encourage you to use ssh instead of telnet. In addition to UNIX and Linux systems, ssh client software is now also available for Windows and Macintosh systems. (See the section below.)
If you do not have any reason to allow remote access, we suggest you set this to No access.
ssh (secure shell)
ssh (secure shell) provides a secure, encrypted way to login to a remote machine across a network or to copy files
from a local machine to a server. Many people do not realize that many programs such as telnet and ftp transmit
your password in plain, unencrypted text across your network or the Internet. ssh and its companion program scp
provide a secure way to login or copy files. The ssh protocol was originally invented by SSH Communications Security which sells commercial ssh servers, clients, and other related products. The protocol itself has two versions SSH1 and SSH2 - both of which are supported by most clients and servers today. For more information about SSH
Communications Security and its commercial products, visit http://www.ssh.com/.
33
Page 41

Chapter 6. Server Administration
OpenSSH, included with the 6000 MAS, is a free version of the ssh tools and protocol. The server provides the ssh
client programs as well as an ssh server daemon and supports both the SSH1 and SSH2 protocols. For more information about OpenSSH, visit http://www.openssh.com/ [http://www.openssh.com/].
Once ssh is enabled, you should be able to connect to your server simply by launching the ssh client on your remote
system and ensuring that it is pointed to the external domain name or IP address for your server. In the default configuration, you should next be prompted for your user name. After you enter admin and your administrative password, you will be in the server console. From here you can change the server configuration, access the Server Manager through a text browser or perform other server console tasks.
If you do enable ssh access, you have two additional configuration options:
• Allow administrative command line access over ssh - This allows someone to connect to your server and login as
"root" with the administrative password. The user would then have full access to the underlying operating system. This can be useful if someone is providing remote support for your system, but in most cases we recommend setting this to No.
• Allow ssh using standard passwords - If you choose Yes (the default), users will be able to connect to the server
using a standard user name and password. This may be a concern from a security point of view, in that someone
wishing to break into your system could connect to your ssh server and repeatedly enter user names and passwords in an attempt to find a valid combination. A more secure way to allow ssh access is called RSA Authenti-
cation and involves the copying of an ssh key from the client to the server.
Note
By default, only two user names can be used to login remotely to the server: admin (to access the server
console) and root (to use the Linux shell). Regular users are not permitted to login to the server itself. If
you give another user the ability to log in remotely to the server, you will need to access the underlying
Linux operating system and manually change the user's shell in /etc/passwd.
6.2.1.1. ssh clients for Windows and Macintosh systems
A number of different free software programs provide ssh clients for use in a Windows or Macintosh environment.
Several are extensions of existing telnet programs that include ssh functionality. Two different lists of known clients
can be found online at http://www.openssh.com/windows.html [http://www.openssh.com/windows.html] and
http://www.freessh.org/.
A commercial ssh client is available from SSH Communications Security at:
http://www.ssh.com/products/ssh/download.html [http://www.ssh.com/products/ssh/download.html]. Note that the
client is free for evaluation, academic and certain non-commercial uses.
6.2.2. Remote Access Using SSL
It is also possible to specify specific hosts or entire subnets from which to allow access. At the bottom of this Remote Access screen, entries can be added to a table that lists those subnets that have been given access. The user
simply provides the network IP address and the appropriate subnet mask to grant this additional access. Note that the
new information is not saved until the user actually clicks the "Save" button.
You can now simply connect to the server manager using a URL such as
https://www.mydomain.xxx/server-manager. You will be prompted for the admin user name and password.
6.2.3. PPTP (Client-to-Server VPNs)
34
Page 42

Chapter 6. Server Administration
The Point-to-Point Tunneling Protocol (PPTP) is used to create client-to-server Virtual Private Networks (VPNs)
and was developed by the PPTP Forum, an industry group which included Microsoft and several other companies.
If you wish to enable VPN access, you must decide how many individual PPTP clients you will allow to connect to
your server simultaneously, and enter that number here. The simplest method is to enter the total number of remote
PPTP clients in your organization. Alternatively, if you have a slow connection to the Internet and do not want all of
those PPTP clients to connect at the same time, you can enter a lower number here. For instance, if you have five
users who from time to time use PPTP to connect remotely, entering 5 here would allow all of them to connect at
any time. Entering 2 would only allow two users to connect at any given time. If a third user tried to connect, he or
she would receive an error message and would not be able to connect until one of the other users disconnected. If, on
the other hand, you entered 0 , no PPTP connections would be allowed.
After you enter a number and press Save, the server should be ready to accept PPTP connections.
To connect using PPTP, the protocol must be installed on each remote Windows client. Typically, this is done
through the Network Control Panel (you may need to have your original Windows installation CD available). After
it is installed (a reboot of your Windows system may be needed), you can create new connections through the DialUp Networking panel by entering the external IP address of the server you wish to connect to. Once you're finished,
you should be able to initiate a PPTP connection by double-clicking the appropriate icon in the Dial-Up Networking
window. When you then open up your Network Neighborhood window, you should see your server workgroup
listed there.
Note
Your connection to the Internet needs to be established first before you initiate the PPTP connection. This
may involve double-clicking one Dial-Up Networking icon to start your Internet connection, then doubleclicking a second icon to start the PPTP connection. To shut down, disconnect your PPTP connection first,
then disconnect from your ISP.
Warning
To protect your network, the 6000 MAS enforces the use of 128-bit encryption for PPTP connections,
rather than the 40-bit encryption provided in earlier versions of Microsoft's PPTP software. If you are unable to establish a PPTP connection to your server, you should visit http://windowsupdate.microsoft.com/
[http://windowsupdate.microsoft.com/] and download the appropriate update. The contents of the page will
appear differently depending upon the version of Windows you are using. You may need to search for Vir-
tual Private Networking or a Dial Up Networking 128-bit encryption update. You may need to install the
40-bit encryption update first, and then install the 128-bit encryption update. Note that with Microsoft's Ac-
tiveUpdate process, if you are not presented with the choice for this update, it is most likely already installed in your system.
6.3. Local networks
Your 6000 MAS provides services to machines on the local network and it gives machines on that network special
privileges and access. For example, only machines connected to the local network can access the mail server on your
server to send mail. When you configured your server, you provided it with sufficient information to deduce its own
local network. Machines on the network are automatically identified by the server as being eligible for these privileges and access.
If your company only has one network that is being serviced by the server, you do not need to add any information
here.
Some users may wish to extend privileges to more than one network of computers. If you would like your server to
identify one or more additional networks for those privileges, you will be asked to enter those network IDs and the
subnet mask for each network here.
Note that depending on the architecture of your network infrastructure, the instructions for configuring the client
35
Page 43

Chapter 6. Server Administration
machines on that additional network may be different than the instructions outlined in the chapter in this handbook.
If you have questions regarding adding another network, you may wish to contact Mitel Networks or a Mitel Networks authorized reseller for technical support.
6.4. Setting the Date and Time
Accessing the Date and Time panel within the Server Manager allows you to set the system date and time either
manually or using a network time server. Pull-down menus for month and time zone ensure accurate entry. The
Server Manager will reset the time automatically during daylight savings time. There are worldwide time zones with
multiple selections for countries with multiple time zones. (including standard time zones, states/provinces and even
cities). This ensures that regional variations in time zones and daylight savings time are accurately reflected.
Instead of setting the time manually, you can use a network time server. A time server is a device on the Internet that
keeps accurate time and is able to communicate the time to other computers over the Internet using the Network
Time Protocol (NTP). Many organizations around the world provide Internet time servers for free.
Warning
After you start using a network time server, you should NOT set the time or date manually. If you do so, the
network time synchronization will no longer function.
This screen in the Server Manager allows you to configure your server to connect regularly to a time server and synchronize the clock on the server with the time provided by the time server. To do this, simply check the box for En"able NTP Service", add the domain name or IP address of the time server in the space provided and click "Save
NTP Settings". Using a time server is optional but doing so can greatly increase the accuracy of your system.
For more information about using a network time server, visit http://www.ntp.org/. You can also find a list of publicly available time servers at http://www.eecis.udel.edu/~mills/ntp/servers.htm
[http://www.eecis.udel.edu/~mills/ntp/servers.htm]. You should always use a secondary time server (also called a
stratum 2 server) to lighten the load on the primary time servers.
36
Page 44

6.5. Directory
Your 6000 MAS provides an easy mechanism for creating a company directory. Each time you create or delete an email account, your directory will be automatically updated with the new information.
Chapter 6. Server Administration
In this section of the Server Manager, you specify the default directory information for new accounts - the user's department, company, street address, city and phone number. Each time you create an e-mail account, the fields will
contain the information entered here as the default. If you wish, you can change the information for each user.
At any time in the future, you can change the default information and have the new information apply to all new
users or to all existing users as well. The field to do this is located near the bottom of the screen. Choosing "update
with new defaults" is a convenient one-click method of revising your directory when, for example, your company
has moved to a new address.
6.6. Printers
Your 6000 MAS enables all users on your network to easily share a printer. The printer can be either locally attached to a parallel or USB port on the server or a network printer. All the server needs is some basic information:
the printer name (which can be anything you want, as long as it starts with a lower-case letter and consists only of
lower-case letters and numbers, with no spaces), a brief description (for example, "the printer down the hall") and
the location of the printer - whether it's on the network or directly connected to your server through a parallel or
USB port.
37
Page 45

Chapter 6. Server Administration
If you choose "Network printer", you will see an additional screen that will ask for the hostname or IP address and
the network printer name. Enter that information where requested. For the network printer name, you can use the default setting, raw, unless you have some reason to do otherwise. (raw is the name used by most network printers for
their main print queues.)
Note
For maximum flexibility in making changes later, we suggest that you enter the hostname for a network
printer here and enter the IP address of the printer through the Hostnames and addresses panel of the Server
Manager. This allows you to have one central location listing IP addresses and allowing you to make
changes. Note that many modern network printers can be configured automatically. To do so, enter their
hostname, IP address and Ethernet address in the Hostnames and addresses panel.
Note also that the server printing system does not perform any filtering and passes the print requests directly from
the client computers to the printer in the "raw" or "pass-through" machines. For this reason, the 6000 MAS does not
have a list of "supported printers". Most printers are supported as long as the appropriate driver is installed in the operating system on your client computers.
However, there are some newer printers that only have a Windows driver available and rely heavily on that operating system to perform their print functions. These printers cannot be used on the server. If you are concerned about
whether your printer will work with your server, you can visit Red Hat's Hardware Compatibility List
[http://hardware.redhat.com/redhatready/html/us/static-hcl/intel-input-output.html] or explore the information found
at LinuxPrinting.org [http://www.linuxprinting.org/].
As a final item, you should be aware that in order to use the printers available through your server a user must be
logged in to their client system with a user name and password that is valid on the server. For instance, if a user is
logged in as tturtle on their Windows desktop and that user account does not exist on the server, the user will not
be able to print to the printers managed by the server. Either the user will have to logout and log back in as a valid
user or the tturtle account will need to be created on the server.
6.7. Hostnames and addresses
When you installed your 6000 MAS, you were asked to provide a name for your system. That name and several
other "standard" names are automatically configured in your system's host table during the installation process. This
host table is consulted as part of the name resolution process. The "Hostnames and address" web panel allows you to
modify this table and specify different host "names" for each domain on your system, as well as to control how those
names resolve both for systems on your local network and also for systems on the larger Internet.
For instance, when someone tries to connect to "www.mycompany.xxx", they will be taken to wherever "www" has
been set to point to. As seen in the image below, this screen in the Server Manager allows you to view these default
settings, and also to modify the configuration.
38
Page 46

Chapter 6. Server Administration
Using the Hostnames Panel with ServiceLink
Throughout the screens linked to from the Hostnames panel, you will find the text "Publish globally?" with a checkbox next to it. 6000 MAS subscribers have the option of publishing these records through the AMC. If you select
this option, the hostname and IP address information that you enter will be uploaded to the AMC and, if desired,
published through the global DNS system.
Suppose, for example, your company's web site was hosted on your ISP's web servers. If you wanted
"www.mycompany.xxx" to point to your ISP's server, you would modify the entry here by clicking the "Modify..."
link next to "www". The image below shows the screen in which you would perform the task:
You would first change the location to "Remote" and then enter the IP address of your ISP's server in the field
marked "Global IP".
39
Page 47

Chapter 6. Server Administration
6.7.1. Creating New Hostnames
Creating new hostnames simply involves selecting one of the links at the top of the Hostnames and addresses panel
and filling out the appropriate fields. As mentioned previously, 6000 MAS subscribers can check "Publish globally?
and the changes will be propagated to the global DNS system automatically.
Note that if the system is configured with any virtual domains, you will have the choice of the domain in which you
want to create the hostname. This allows you, for instance, to have "www.tofu-dog.com" pointing to one IP address
and "www.mycompany.xxx" pointing to a completely separate IP address.
Note
Beyond your primary domain and any virtual domains you may have configured, 6000 MAS subscribers
also have the option of adding hostnames in the special e-smith.net domain.
The hostnames you can create on this panel fall into three categories:
Additional names for your server: For instance, you might want to set up "intranet.mycompany.xxx" to point to the
server. Simply enter the hostname and, if appropriate, choose the domain for the hostname.
Remote hosts: As mentioned in the example above, you might want to point a hostname such as "www" to a remote
system. While "www" is created by default, you can create other names such as "home", "research", or any other appropriate name. In the form, enter the hostname, choose the domain, and enter the remote IP address.
Local hosts: This screen is a bit more complicated because you have more options. At a basic level, you can create a
hostname in a domain that points to another computer on your local network. To do this, type in the hostname and
enter the IP address in the "Local IP" field. For instance, you might want "research" to point to a computer system
inside your network.
Where this gets complicated is when you want "research.mycompany.xxx" to be accessible both inside and outside
your local network. The challenge is that your local IP addresses are only accessible inside your network. For that
reason, the target computer system will need to have two network interface cards - one connected to the internal network and one connected to the external network. You would then enter both IP addresses in this screen in the "Local
IP" and "Global IP" fields. Note that this will only work if the server is currently covered by ServiceLink subscription that includes DNS services as the server alone can not update public DNS information.
Note
The "Ethernet address" field when creating a hostname pointing to a local host is only used for reserving IP
addresses through DHCP as mentioned in the next section.
6.7.2. Reserving IP Addresses Through DHCP
Another task you can perform through this panel is to reserve an IP address for a given system based on its Ethernet
address. For instance, you might have another intranet web server within your company that you want to always
have the same IP address. One method of assigning that address is to manually configure the client machine to have
a static IP address. The negative aspect of doing this is that if you later want to change the network settings for that
machine, you must manually go and configure that machine. An example would be if one of your DNS servers
changed its IP address. Additionally, you have to keep track somewhere of the fact that you have assigned a specific
IP address to that machine.
Rather than configuring the machine manually, you can reserve an IP address from the DHCP server for that specific machine. This has the same result as manually configuring a static IP address, but offers two benefits. First, you
have one location to keep track of all assigned static address. Second, through the DHCP server you will provide
network settings. If you wish to change those settings, the change can be simply done on your server. All DHCP
clients will then receive those updated changes when they renew their DHCP-provided addresses.
To reserve an IP address, you must first determine the Ethernet address of your client system. Windows NT/2000
40
Page 48

users can type the command ipconfig /all. Windows 95/98 users can run the command winipcfg. Linux/
UNIX users can type ifconfig.
Once you have determined the client's Ethernet address, click on the link to create a new hostname for a local host.
Add the hostname of the target system, the Ethernet address along with the desired IP address into the web panel.
From this point on specified IP address will only be provided to a client system with the matching Ethernet address.
6.8. Virtual Domains
When you are supporting multiple domains on a single server, each domain being served is referred to as a virtual
domain. (The strict definition of virtual domain is when a single IP address is shared between multiple domains.)
When you create a virtual domain using this section of the Server Manager, your 6000 MAS will be able to receive
e-mail for that domain and will be able to host a web site for that domain.
To create a virtual domain, fill in the domain name and a description of the site. You then tell the server where to
find the content for that domain - it can be the same as your primary web site, or you can create a new set of web
pages and store them in one of your i-bays. Clicking the arrow in the "Content" field will show you a list of your
current i-bays and allow you to make a selection. This feature allows you to host multiple web sites from a single
server.
Be aware that you can point the virtual domain to either the primary web site or to one of the i-bays. You cannot
point a virtual domain to a subdirectory that you simply create inside of the primary web site file area. You need to
use an i-bay instead.
Chapter 6. Server Administration
Note
When you are entering the name for the virtual domain, you should supply the fully qualified domain name.
This is the full name of the domain, including any extensions such as ".com", but without any prefixes such
as "www" or "ftp". For instance, you can create a virtual domain by entering "tofu-bird.com", but not by
entering "tofu-bird" or "www.tofu-bird.com".
Once you have created a virtual domain, your server will be automatically configured to answer to web requests for
www.domainname.xxx and will accept e-mail for your virtual domain as well.
Important
In order for users on the Internet to successfully connect to the 6000 MAS using the virtual domain, the ap-
propriate DNS entries must point to the IP address of your server. This service is performed automatically
for 6000 MAS subscribers.
6.9. E-mail
The E-mail Retrieval panel of the Server Manager allows you to specify the protocol used to retrieve e-mail from
your ISP and configure other settings regarding the retrieval of e-mail.
41
Page 49

Chapter 6. Server Administration
Your choice of e-mail retrieval mode will depend on the arrangements you made with your Internet service provider:
• If you have a dedicated connection, set E-mail retrieval mode to "Standard".
• If you arranged "ETRN" support with your ISP, choose that setting and then scroll down to the field that asks for
the IP address or hostname of your ISP's secondary mail server. This secondary mail server will provide temporary e-mail storage when your server is not connected to the Internet.
• If you arranged "multi-drop" mail service from your ISP, choose "multi-drop" and then scroll down to the field
that asks for the IP address or hostname of your ISP's secondary mail server. This secondary mail server will receive all e-mail for your domain and store it in a single POP mailbox. Further down the screen, you will need to
specify the user account and password assigned by your ISP for this POP mailbox. Your server will periodically
fetch this mail and distribute it to individual POP mailboxes on the server. (Note that due to problems receiving
mail for mailing lists, we strongly encourage people to NOT use multi-drop e-mail.)
• If you are a ServiceLink subscriber, choose "Guaranteed e-mail" in order to activate the guaranteed e-mail ser-
vices.
If you want to forward e-mail to another mail server for processing, enter the mail server IP address in the box
marked Delegate mail server. A common use for this is if your server is receiving inbound e-mail from the Internet,
but you would like to pass that mail to a different mail server on your internal network.
42
Page 50

Chapter 6. Server Administration
If you have a dialup connection, the server allows you to control how frequently it fetches e-mail from your ISP.
This is particularly useful in situations where you incur phone or Internet charges each time your system contacts
your ISP. The default settings are every 15 minutes during standard office hours and every hour outside normal office hours on weekdays or on weekends. The fields allow you to customize those settings.
Finally, if you have "multidrop" mail service you need to select the sort method used by the server to decide which
user each message should be delivered to. Your server has a default method for this (it examines various headers
such as "To" and "Resent-To") which works in most circumstances but is not suitable for certain purposes such as
mailing list messages. Some ISPs add a header to each e-mail message which can help your server determine the
correct recipient. If your ISP does not add a header to multidrop e-mail, select the "Default" sort method and ignore
the "select sort header" field. If your ISP does add a header to multidrop e-mail, then select "Specify below" and enter the header tag provided by your ISP. Because you will experience problems with mailing-lists when using multidrop e-mail, we strongly recommend that you work with your ISP to have a special header added to each message.
The "Default" sort method should be only used as a last resort.
The Other E-Mail Settings panel presents you with additional options for controlling how your system handles email.
• Forwarding address for administrative notices: The default address for administrative notices (i.e. undeliverable
mail, backup notifications and other status/error messages) is "admin". If you'd like those messages to be sent
elsewhere, enter the address here.
Note
Be aware that all messages sent to postmaster, root or mailer-daemon at your domain are sent to ei-
ther admin or the address that you enter in this field.
• E-mail to unknown users: This field allows you to choose whether incoming messages to unknown users are
bounced back to the sender or forwarded to the system administrator. Some users prefer the latter setting because
it allows them to catch and reroute e-mail that was incorrectly addressed.
43
Page 51

Chapter 6. Server Administration
Note
If you choose to have messages forwarded to the system administrator, they will be sent to either "admin"
or the e-mail address specified in the forwarding address field mentioned above.
• Internet provider's SMTP server: Normally the server will send outgoing messages directly to their intended des-
tination. If, however, you have an unreliable connection or are using a residential Internet service, it may be advisable to route e-mail via your provider's SMTP server. In that case, you should enter the SMTP server's hostname or IP address here.
In fact, if you have a temporary dial-up connection to the Internet, you may find that you need to use your ISP's
mail server in order to deliver mail to some locations. As a reaction to the huge volume of unsolicited commercial e-mail ("spam"), many Internet sites are refusing direct SMTP connections from IP addresses that are known
to be temporary dial-up accounts. For this reason, you may need to use your ISP's mail server since it will have a
permanent connection to the Internet.
• POP and IMAP server access: The options are "Private" and "Public". The former allows access only from your
local network. The latter allows access from anywhere on the Internet. Think about this carefully. On the positive side, choosing "Public" access allows any of your users to retrieve their e-mail via POP/IMAP from anywhere on the Internet. The negative side is that when you do this, you are reducing your level of security, as you
will now have two more services (POP and IMAP) that are listening for connections across the Internet. Both
protocols also involve transmitting your password across the Internet in plain, unencrypted text, opening up the
possibility that someone could intercept the packets and learn your username and password. Allowing such access can be a great convenience to your users, but if security is a concern you should consider using encrypted
webmail instead.
IMPORTANT
Even with POP and IMAP configured for public access, users outside your local network are not able to
send e-mail using your server as their SMTP host. Allowing this would open your server to abuse by spam-
mers as a mail relay. Users who are travelling should either: a) use the STMP server of their local ISP; b)
use PPTP to connect to your internal network; or c) use webmail to read their mail. Webmail provides your
users with secure access to both read and send mail via the 6000 MAS.
• Enable/Disable Webmail: With this option you can enable or disable the webmail component of the server. More
information can be found in the Webmail chapter.
6.9.1. Configuring Your E-mail Application
Each user's e-mail application requires information about that user's account, where to send outgoing e-mail and
pick up incoming e-mail. This information is usually entered in the "preferences" or "options" section. Most e-mail
applications require you to enter the following information:
User's e-mail address: The user's e-mail address is the user account as created in the Server Manager plus the
@domain name. Typically it will be in the form of username@yourdomain.xxx (e.g. afripp@tofu-dog.com).
E-mail server or outgoing e-mail SMTP server: This is the name of the e-mail server from the server. Normally you
should just enter mail here. If you prefer, you should also be able to use the full domain name of
mail.yourdomain.xxx (e.g. mail.tofu-dog.com).
E-mail account name or user name: this is the name before the @ in the e-mail address. For example, the username
for "afripp@tofu-dog.com" is "afripp".
If you choose POP3 e-mail service:
Enable POP3 protocol: Typically, to enable the POP3 protocol for incoming e-mail, you click on the POP3 check-
44
Page 52

Chapter 6. Server Administration
box or select POP3 from a pull-down menu in the section of your e-mail application dedicated to the incoming email server.
Disable IMAP protocol: To disable the IMAP protocol for outgoing mail (not all e-mail applications have IMAP
protocol) click the IMAP checkbox "off".
Delete read e-mail from server: We recommend you configure your e-mail application so e-mail that has been read
is not left on the server. To do this, click off the checkbox marked "leave mail on server" or click on the checkbox
marked "delete mail from server".
If you select IMAP e-mail:
Enable IMAP protocol: Typically, to enable the IMAP protocol for incoming e-mail (note that not all e-mail appli-
cations offer IMAP support) you click on the IMAP checkbox or select IMAP from a pull down menu in the section
of your e-mail application dedicated to the incoming e-mail server.
Disable POP3 protocol: To disable the POP3 protocol for outgoing mail, click the POP3 checkbox "off".
6.9.1.1. Configuring Outlook Express
This section provides a step-by-step overview of configuring the Outlook Express e-mail client to access the 6000
MAS e-mail server. Steps for Outlook, or alternative e-mail clients, will be similar.
When the e-mail client is opened for the first time, the following screen is displayed. Enter the full name of the user
and click "Next".
The next screen is where the user's e-mail address is entered. E-mail addresses are in the same format as the user's
logon ID. The system also supports aliases of the form "firstname.lastname" and "firstname_lastname".
Enter the e-mail address (checking the domain name spelling) of the user and click "Next". You will see the screen
below:
45
Page 53

Chapter 6. Server Administration
In the next screen, select "IMAP" as the server type, and enter "mail" as the server name in both fields. Click "Next".
You will see the screen below:
In the next screen, enter the password (the same as the network password) and go to the final screen. Click "Finish".
The program will ask if you want to synchronize folders. Click "Yes", and then "OK" to exit.
6.9.1.2. Configuring Netscape
The images below show you the sequence in Netscape. First you choose Preferences from the Edit menu and click
on Mail Servers, as shown in the following image:
46
Page 54

Chapter 6. Server Administration
If you have not configured a mail server yet, you will need to press the Add... button and enter information about
your server. Otherwise, you will select the default mail server listed and click on the Edit... button. This will bring
up a screen where you enter the user name and choose whether you are using IMAP or POP3:
Netscape should now be ready to send and receive e-mail.
6.10. Backup or Restore
You can easily back up the contents of your 6000 MAS using one of two methods - to your local desktop or to a tape
drive. Both are controlled through the web panel shown below.
47
Page 55

Chapter 6. Server Administration
You have four actions you can perform, each of which is described in the following sections.
6.10.1. Backup To Desktop
The first type of backup allows you to save a snapshot of your server configuration onto your desktop computer.
This will save all user accounts, user directories, i-bay contents and web content, as well as the configuration parameters entered using the server console and the Server Manager. The web panel shows you the size of the backup file
so that you can verify whether sufficient space exists on your desktop machine.
When you choose Backup to desktop, a browser window will appear that will allow you to name the file and select
the location on your desktop where the file will be saved.
Warning
The Backup to Disk process saves all of your data to a single, large compressed file and is therefore limited
by the maximum file size of the client operating system. For example, if you are backing up data to a Win-
dows client that uses the FAT file system (the default for many versions of Windows), you are limited to a
maximum file size of 2 GB. Other file systems may have a larger limit. If the Backup to Disk process cre-
ates a compressed file larger than this limit, it will not be able to be properly restored. Use the Verify Desk-
top Backup File option in the action drop-down list to ensure the backup was successful.
6.10.2. Restore From Desktop
If you ever need to restore the original configuration and files to your server, simply select Restore from desktop and
a browser window will prompt you to select the backup file from your desktop. Restoration of the information is automatic.
Warning
Ideally you should use Restore from desktop on a freshly installed server. Therefore, if you are planning to
do a restore, you should first re-install the 6000 MAS software and then perform the "Restore from desktop
command.
6.10.3. Verify Desktop Backup File
48
Page 56

Chapter 6. Server Administration
This option allows you to verify that the backup to disk was completed successfully. From the drop-down list under
Backup Configuration and Status, select "Verify desktop backup file".
6.10.4. Configure Tape Backup
The second type of backup involves configuring your system to perform a daily full system backup to a tape drive
using a software package called flexbackup. If you wish to activate this option, check the box next to Enable Tape
Backup and then specify the time at which you wish the backup to occur and the time at which reminder notices
should be sent.
Be aware that you must use a supported tape drive and that a tape must be inserted in the drive for the backup to
work.
Note
Reminder e-mail messages for tape backups are automatically sent to the e-mail address that is configured
to receive administrative notices. This is normally the user admin, but you can change this by going to the
Other e-mail settings screen in the Server Manager.
6.10.5. Restore From Tape
If you are performing regular backups, you can also restore user data and configuration settings by using the Restore
From Tape option. After you press the Perform button, the system will read the files from tape and overwrite any
currently existing files. You must reboot your system after the restore for the changes to take effect. Note that in order to restore data from tape, you must have first checked off Enable Tape Backup and scheduled nightly backups. If
you have not done this, you will not be able to restore from tape using the Server Manager.
Warning
Note that this restore procedure only restores user data and configuration information. It does not restore
system files. If you experienced a serious system crash, you should first re-install the 6000 MAS software
and then perform a restore from tape.
6.11. Reinstallation Disk
Using this section of the Server Manager, you can create a reinstallation diskette which will aid in the recovery process if you encounter a system failure and are required to reinstall the software. The reinstallation diskette will
record system and network configuration data for your current system so that you will not need to re-enter that information when you reinstall.
Warning
49
Page 57

Each time you alter your system configuration, you MUST make a new reinstallation disk (or overwrite
your old one). Otherwise, your existing reinstallation disk will not contain your updated configuration data
- which means that after reinstalling the software, you will not automatically see your most recent data.
Note
Be aware that when you are performing this task, the diskette must be in the server diskette drive, NOT the
diskette drive of your local desktop computer.
Note that this reinstallation disk serves a different purpose than the "emergency boot disk" you created as part of the
original software installation process. The emergency boot disk allows you to boot your server if you are unable to
boot from the hard disk for some reason. For instance, this could occur due to a hardware error or through a misconfiguration of the LILO boot loader during an advanced customization procedure. The emergency boot diskette
does not change your software or make any other adjustments to your system.
The reinstallation disk, on the other hand, will boot your system directly into the software installation process and
will completely reinstall the 6000 MAS software. It will, however, save you the steps of entering all the network
configuration data and allow you to simply move through the configuration screens using the "Keep" option.
6.12. Reboot or Shutdown
If you need to shut down or reboot your server, using this screen will ensure that the shutdown sequence occurs
gracefully, preserving all configuration and information on your server. There is a similar function in the server console as well. Note that this screen initiates the shutdown or reboot immediately after you click the "Perform" button.
Chapter 6. Server Administration
6.13. Additional Server Administration
Accessing administrative areas of your server via Windows file sharing: To access administrative areas of your
server using Windows file sharing, you must be logged into your network as "admin" with the server system password. This applies particularly to the Primary share (where the main web site is stored) and any i-bays that are
writable only by the user admin.
50
Page 58

Chapter 7. Configuring the Computers on
Your Network
7.1. What Order to do Things
For efficiency, we recommend you configure your desktop computers in the following order:
Step 1: First, configure one of your desktop computers to work with TCP/IP (using the information in this chapter).
Step 2: With TCP/IP up and running on one of your computers, you can now access the Server Manager over the
web and create your employees' user accounts. The chapters On-going Administration Using the Server Manager
and Server Administration explain this process.
Step 3: Once e-mail accounts are created, you can ensure that all the computers on your network are configured for
TCP/IP, e-mail, web browsing and LDAP (using the information in this chapter).
This chapter helps you configure software and hardware supplied by other companies and for that reason is not as
specific as the rest of this handbook. Given the wide range of computers, operating systems and software applications, we cannot accurately explain the process of configuring each of them. If your computers and applications
came with manuals, they might be useful supplements to this chapter. Technical problems encountered in networking your desktop computers and applications are best resolved with the vendors who support them for you.
Important
This chapter demonstrates only one of the many possible ways to configure your client computers and is
provided here as an example. You should consult with your authorized reseller to determine the most ap-
propriate ways to configure your client computers.
7.2. Configuring Your Desktop Operating System
The dialog box where you configure your desktop differs from operating system to operating system and version to
version. As an example, in Microsoft Windows 95 or 98, client configuration occurs in the "Properties" dialog box
associated with the TCP/IP protocol for your ethernet adapter. To get there, go to the "Control Panel" and select
"Network". If a TCP/IP protocol is not yet associated with your ethernet adapter, you may need to add one before
you can configure its properties with the following information.
Item Description What to enter
enable TCP/IP protocol
All your computers must communicate on
the network using the TCP/IP protocol.
disable non-TCP/IP protocols
enable DHCP service See section below In Windows, enable "Obtain an IP address
Unless an application relies on a non- TCP/
IP protocol, disable all other protocols.
Note
We strongly recommend that you configure all clients machines using DHCP rather than manually using
static IP addresses. Should you ever need to change network settings or troubleshoot your network later,
you will find it much easier to work in an environment where addresses are automatically assigned.
In Windows you add a TCP/IP protocol. In
Apple, open TCP/IP Control Panel.
Turn "off" other networking protocols (e.g.
NetBeui, etc.)
service automatically". In Apple, select
"DHCP server".
51
Page 59

Chapter 7. Configuring the Computers on Your
Network
On a Windows 95/98 system, the window will look like the image below:
7.2.1. Automatic DHCP Service
Your server provides a DHCP server that assigns each of the computers on your network an IP address, subnet
mask, gateway IP address and DNS IP address(es). For a more detailed explanation of DHCP, consult the Config"uring Your DHCP Server" section.
Note
In rare cases, you may want to use a static IP address for a particular client machine. The typical approach
is to manually enter this IP address into the network properties of the specific machine. The negative side
of this approach is that you cannot easily change or alter network settings without having to go in and mod-
ify the information on the client machine. However, it is possible to provide this static IP address directly
through DHCP rather than manually configuring the client computer. To do so, you will first need to deter-
mine the Ethernet address of the client computer (usually through the network properties). Next you will go
to the Hostnames and addresses web panel of the Server Manager and enter the information there.
Only One DHCP Server
It is imperative that no other DHCP server is on your network. If a former DHCP server configured your computers,
you should remove that DHCP server from your network. Leave DHCP enabled, and reboot each computer. New IP
addresses, netmasks, gateway IP addresses and DNS addresses will be assigned automatically by the DHCP server
on the 6000 MAS.
52
Page 60

Chapter 7. Configuring the Computers on Your
Network
7.2.2. Manual Entry For Computers Not Using DHCP Service
As noted above, we strongly recommend that you perform all your client configuration using DHCP. It is even possible to assign a static IP address through the Hostnames and addresses web panel of the Server Manager that will be
distributed through your DHCP server.
However, if your computers do not support DHCP, you must manually enter the following information into your
TCP/IP properties:
Item Description What to enter
IP address Manually enter this information (see para-
graph below).
subnet mask (or netmask) Manually enter this number. The default subnet mask (or netmask) is
gateway IP address Enter the IP address for the server or, in the
case of server-only mode, enter the IP address for your network's gateway (e.g. the
firewall or network router).
IP addresses of your domain name servers
Manually enter this information. Normally you would just add the IP address
You must assign a different, unique IP address to computers not accepting DHCP
(see note below).
"255.255.255.0".
If you are running in server and gateway
mode, your server is your local network's
gateway. Enter its IP address here: the default is "192.168.1.1". If you are running in
server-only mode, enter the IP address for
the device interfacing with your external
network.
for your server - the default used in the
server console is "192.168.1.1". If you have
a firewall other than your server that restricts internal queries to Internet DNS
servers, you may need to enter additional
DNS servers here.
It is critical that every computer on your network has a unique IP address and that you don't assign two computers
the same address. In enabling DHCP service in the server console, you designated a range of IP addresses for DHCP
assignment. You also allocated a block of IP addresses for manual assignment. If you accepted the defaults preconfigured into the server console, IP addresses 192.168.1.2 through 192.168.1.64 will have been set aside for manual entry. To avoid duplication, use only those IP addresses when manually assigning IP addresses to your computers.
53
Page 61

Chapter 7. Configuring the Computers on Your
Network
After configuring the TCP/IP parameters, you may need to reboot your desktop computer to implement the configuration changes. (For example, most Windows systems need to be rebooted after the TCP/IP configuration has been
changed.) Once the settings take effect, your computer will be connected to the server and to the Internet.
7.2.3. MS Windows Workgroup Configuration
If you are using a Microsoft operating system, you must ensure that your workgroup is the same as the workgroup
name of your server. (The default workgroup name is your domain name. In a subsequent chapter, we'll explain how
this can be changed using the web-based Server Manager.) If you are using the default name, go to the Control
Panel, select "Network" and then select "Identification". In the field for "Workgroup", type your domain name.
7.3. IMAP versus POP3 e-mail
There are two common standards for e-mail management, IMAP and POP3.
POP3 is the earlier protocol. POP3 was designed to permit on-demand retrieval to a single client machine. E-mail is
stored on the mail server until you retrieve it, at which time it is transferred over the network to your desktop machine and stored in your e-mail box there.
Benefits of POP3 Drawbacks of POP3
Even when you are not connected to your network, you
have access to the e-mail stored on your desktop.
POP3 was not originally intended to support users accessing and managing their e-mail from remote systems.
Because your e-mail is stored on your desktop, setting up
remote access of your e-mail when you are at a different
54
Page 62

Chapter 7. Configuring the Computers on Your
Network
Benefits of POP3 Drawbacks of POP3
computer can be complex.
IMAP e-mail, in contrast, is designed to permit interactive access to multiple mailboxes from multiple client machines. You manage your e-mail on the mail server over the network. You read your e-mail over the network from
your desktop, but the e-mail is not stored on your desktop machine - rather, it is permanently stored and managed on
the server.
Benefits of IMAP Drawbacks of IMAP
You can access all of your new and stored e-mail from
any machine connected to a network.
Because all employee e-mail is stored on the server,
backup of e-mail is easily accomplished.
If you are not connected to a network, new and stored email messages are not available to you.
7.4. Configuring Your E-mail Application
Each user's e-mail application requires information about that user's account, where to send outgoing e-mail and
pick up incoming e-mail. This information is usually entered in the "preferences" or "options" section. Most e-mail
applications require you to enter the following information:
User's e-mail address: The user's e-mail address is the user account as created in the Server Manager plus the
@domain name. Typically it will be in the form of username@yourdomain.xxx.
E-mail server or outgoing e-mail SMTP server: This is the name of the e-mail server from the server. Normally you
should just enter mail here. If you prefer, you should also be able to use the full domain name of
mail.yourdomain.xxx.
E-mail account name or user name: this is the name before the @ in the e-mail address. For example, the username
for "afripp@tofu-dog.com" is "afripp".
If you choose POP3 e-mail service:
Enable POP3 protocol: Typically, to enable the POP3 protocol for incoming e-mail, you click on the POP3 check-
box or select POP3 from a pull-down menu in the section of your e-mail application dedicated to the incoming email server.
Disable IMAP protocol: To disable the IMAP protocol for outgoing mail (not all e-mail applications have IMAP
protocol) click the IMAP checkbox "off".
Delete read e-mail from server: We recommend you configure your e-mail application so e-mail that has been read
is not left on the server. To do this, click off the checkbox marked "leave mail on server" or click on the checkbox
marked "delete mail from server".
If you select IMAP e-mail:
Enable IMAP protocol: Typically, to enable the IMAP protocol for incoming e-mail (note that not all e-mail appli-
cations offer IMAP support) you click on the IMAP checkbox or select IMAP from a pull down menu in the section
of your e-mail application dedicated to the incoming e-mail server.
Disable POP3 protocol: To disable the POP3 protocol for outgoing mail, click the POP3 checkbox "off".
7.4.1. Configuring Outlook Express
55
Page 63

Chapter 7. Configuring the Computers on Your
Network
This section provides a step-by-step overview of configuring the Outlook Express e-mail client to access the 6000
MAS e-mail server. Steps for Outlook, or alternative e-mail clients, will be similar.
When the e-mail client is opened for the first time, the following screen is displayed. Enter the full name of the user
and click "Next".
The next screen is where the user's e-mail address is entered. E-mail addresses are in the same format as the user's
logon ID. The system also supports aliases of the form "firstname.lastname" and "firstname_lastname".
Enter the e-mail address (checking the domain name spelling) of the user and click "Next". You will see the screen
below:
In the next screen, select "IMAP" as the server type, and enter "mail" as the server name in both fields. Click "Next".
You will see the screen below:
56
Page 64

Chapter 7. Configuring the Computers on Your
Network
In the next screen, enter the password (the same as the network password) and go to the final screen. Click "Finish".
The program will ask if you want to synchronize folders. Click "Yes", and then "OK" to exit.
7.4.2. Configuring Netscape
The images below show you the sequence in Netscape. First you choose Preferences from the Edit menu and click
on Mail Servers, as shown in the following image:
If you have not configured a mail server yet, you will need to press the Add... button and enter information about
your server. Otherwise, you will select the default mail server listed and click on the Edit... button. This will bring
up a screen where you enter the user name and choose whether you are using IMAP or POP3:
57
Page 65

Chapter 7. Configuring the Computers on Your
Network
Netscape should now be ready to send and receive e-mail.
7.5. Configuring Your Web Browser
Most browsers are configured using a dialog box called "preferences", "network preferences" or "options". Some
browsers need to be configured to access the Internet either directly or via a proxy server. When required, most
desktop applications, your web browser included, should be configured as though they were directly accessing the
Internet. Although the server uses a security feature known as IP masquerading, thereby creating an indirect connection to the Internet, this is a transparent operation to most of your desktop applications. Hence, you should ensure
that the "Direct connection to the Internet" check box is clicked "on" in your web browser.
Your 6000 MAS includes a proxy server that caches all web pages that your users request. As a result, users may
perceive that network performance is much faster when browsing the web. You do not need to do anything to configure your client web browsers to use the caching proxy server. It is automatically enabled and is transparent to
your users.
7.6. Choosing Your Web Browser Language
The Server Manager has built-in support for any language that uses the Roman alphabet and reads left to right. Currently, however, the user interfaces are available only in English and Canadian French. Contact your authorized reseller for more information regarding other translations.
Your browser language setting will determine which language the Server Manager will display. For example, if the
browser language is set to "en" or "en_US", the Server Manager panels will be displayed in English. If the browser
language is set to "fr-ca", the Server Manager panels will be displayed in Canadian French. Choosing any other language for which the translations have not been installed will result in defaulting to English ("en").
Example: How to configure your Netscape browser to display the Server Manager in French.
1. Open your browser. Click "Edit/Preferences/Navigator/Languages".
2. Choose "Add" to add a new language.
58
Page 66

Chapter 7. Configuring the Computers on Your
Network
3. Select "French/Canada [fr-ca]" and then click "OK".
4. To make French the first choice language, select it and then use "Move Up" until it is at the top of the choices.
5. Connect to https://www.yourdomain.xxx/server-manager and it should now display in Canadian French.
Note
You must choose "French/Canada [fr-ca]". Choosing "French [fr]" will still result in the pages being dis-
played in US English.
Note
It is possible to install in Canadian French and have the console displayed in French, but have two opera-
tors displaying web pages in their chosen languages - English and Canadian French.
Example: How to configure your Internet Explorer browser to display the Server Manager in French.
1. Open your browser. Click "Tools/Internet Options". Choose the "General" tab, and click "Languages".
2. Choose "Add" to add a new language.
3. Select "French/Canada [fr-ca]" and then click "OK".
4. To make French the first choice language, select it and then use "Move Up" until it is at the top of the choices.
5. Connect to https://www.yourdomain.xxx/server-manager and it should now display in Canadian French.
Note
You must choose "French/Canada [fr-ca]". Choosing "French [fr]" will still result in the pages being dis-
played in US English.
Note
It is possible to install in Canadian French and have the console displayed in French, but have two opera-
tors displaying web pages in their chosen languages - English and Canadian French.
7.7. Configuring Your Company Directory
Your 6000 MAS will automatically create a company directory and update it as you maintain your e-mail accounts.
The Directory chapter explains how to configure this service. Any client program that uses LDAP (Lightweight Directory Access Protocol), such as the address book in Outlook or Netscape Communicator, will be able to access the
directory.
When configuring the company directory you will need to enter the following information:
• Enter the name you wish to give your company directory - any name will do.
• The LDAP server is the name of your 6000 MAS web server, in the form www.yourdomain.xxx.
• The Server Root information can be found on the "Directory" screen in your Server Manager (more information
on this is available in the Directory chapter). The usual form, assuming your domain is yourdomain.xxx, is
dc=yourdomain,dc=xxx. (No spaces should be entered between the "dc=" statements.)
59
Page 67

Chapter 7. Configuring the Computers on Your
• The Port Number is always 389.
7.7.1. Configuring Outlook Express
On the Outlook menu, select "Tools" and then "Accounts". Select "Add", then "Directory Service...". The following
screen appears:
Network
Enter the full URL of your 6000 MAS web server and then click "Next". The following screen appears:
Select "Yes", then "Next", and then "Finish". After closing this screen, the following screen appears:
60
Page 68

Chapter 7. Configuring the Computers on Your
Select "Properties" to display the next screen:
Network
In the General tab, type your desired directory name in the first field, then select the "Advanced" tab. You will see
the screen below:
61
Page 69

Chapter 7. Configuring the Computers on Your
Network
In the "Search base" field, enter the domain name, broken down per the tofu-dog.com example:
dc=tofu.dog,dc=com .
7.7.2. Configuring Netscape
With Netscape, in the "Communicator" menu, select "Address Book". Then, in the "File" menu, select "New Directory". You will see a dialog box similar to the one shown below:
62
Page 70

Chapter 7. Configuring the Computers on Your
Network
Once the address book has been created, Netscape can display a list of all e-mail accounts if you type an asterisk
into the search field and press "Enter".
Click "OK" to commit the changes. The LDAP configuration is now complete.
7.8. Workgroup
If you are using a computer on a local network and you wish to access the server via Windows file sharing, it is important that you are logged onto the same workgroup as your 6000 MAS. This screen allows you to enter the name
of the Windows workgroup the server should appear in. If you wish you can change the workgroup name to correspond with an existing workgroup. Macintosh users need only enter a Server Name or accept the defaults.
The Server Name is the name by which the server will be known on the Windows clients, and should be left at its
default unless there are very good reasons to change it. In order that you may later connect multiple locations using
IPSEC VPNs, we suggest that you ensure a different name is used for each server.
63
Page 71

Chapter 7. Configuring the Computers on Your
Network
7.8.1. 6000 MAS as Domain Controller
On the same panel shown in the preceding section, you can specify whether the server should be the domain master
for your Windows workgroup. Most sites should choose "Yes" unless you are adding a server to an existing network
which already has a domain master.
Note
Once you join the domain, you do not need to create local accounts on each NT/2K/etc. box. When you
first log in after joining the domain you will need to manually select the Domain of the 6000 MAS rather
than the default (which is to log in locally on the NT machine). You can also join when you install the
client's system.
If you do configure your system to be the domain master, a special Windows share called NETLOGON is created with
a DOS batch file called netlogon.bat. This batch file is executed by Windows clients that have been configured
to "Logon to domain". The netlogon.bat file we provide by default does very little, but advanced users can, if they
wish, modify this script to set environment variables for their clients or provide automatic drive mappings.
As the NETLOGON share is only writable by the "admin" user, you modify the netlogon.bat script by logging on to
a Windows system as "admin", connecting to the share and then modifying the script using a Windows text editor.
Be aware that the NETLOGON share will not be visible in Network Neighborhood or other similar tools. As the
"admin" user, you will need to connect to the share or map a drive to it, by using the specific path:
\\servername\NETLOGON\
The sample file contains a few examples of setting the system time for each machine and also for mapping a common drive for all Windows client.
The sections below define the steps that must be executed on various Windows versions to join domains.
7.8.1.1. Windows 9x
To join a Windows 9x machine to the domain, follow these steps:
1. Navigate to the Network section of the Control Panel (Start->Settings->Control Panel->Network).
64
Page 72

2. Select the Configuration tab.
3. Highlight "Client for Microsoft Networks", and then click "Properties".
4. Check "Log onto Windows NT Domain", and enter the domain name in the text field.
5. Click all the "OK" buttons and reboot.
7.8.1.2. Windows NT 4
To join a Windows NT 4 machine to the domain, follow these steps:
1. Navigate to the Network section of the Control Panel (Start->Settings->Control Panel->Network).
2. Select the Identification tab.
3. Click "Change" and then enter the computer name and the domain name. Click "Create a Computer Account in
this Domain", enter "admin" as the user name and then enter its password.
4. Click "OK".
5. After a short pause (0-10 seconds), you should be greeted by a "Welcome to DOMAIN" message and asked to
reboot.
Chapter 7. Configuring the Computers on Your
Network
6. Log in on a domain account.
7.8.1.3. Windows 2000
To join a Windows 2000 machine to the domain, follow these steps:
1. Navigate to the Network section of the Control Panel (Start->Settings->Control Panel->Network and Dial-up
Connections).
2. Click "Network Identification".
3. Click "Properties", enter your computer name and domain name, and then click "OK".
4. You will be prompted for a user account with rights to join a machine to the domain. Use "admin" as the user
name, and enter the password.
5. After a short pause (10-30 seconds), you should be greeted by a "Welcome to DOMAIN" message and asked to
reboot.
6. Log in on a domain account.
7.8.1.4. Windows XP Professional Edition
To join a Windows XP machine to the domain, follow these steps:
1. Navigate to the Network section of the Control Panel (Start->Settings->Control Panel).
2. Click "Network and Internet Connections".
65
Page 73

Chapter 7. Configuring the Computers on Your
Network
3. Click "Network Connections".
4. Select "Advanced" -> "Network Identification".
5. On the Computer Name tab, click "Change".
6. Select "Domain" and then enter your domain name.
7. Enter "admin" and the password.
66
Page 74

Chapter 8. Using the AMC
8.1. User Administration
With the AMC, each authorized reseller is assigned one master user account which allows access to the AMC. However, once logged in as that account, you can create additional user accounts for other people within your company.
For instance, you could give each support technician at your company his or her own user name and password. In
this way, should one of those technicians ever leave the company, you will not need to change the master password.
All user accounts associated with your server see all the servers your company has registered, so all technicians
would be able to access the records of any server.
When you click on the "User Administration" link in the AMC, you will first see two menu choices:
These choices are only visible when you are logged in with the master account. The "Change user password..."
choice will change the password for your master account. The "Show user listing" choice will give you a screen similar to the following:
The account of user type partner-admin is your master account. The other users have been added. You can edit information about the user or disable the account. You can also change user passwords.
If you want to add a new user, you would click the appropriate link and then fill out the screen shown below.
67
Page 75

Chapter 8. Using the AMC
Note that by default new users will have to change their password at the first login (unless you clear the checkbox
while creating the user account).
At this time, user accounts cannot be deleted but may be disabled by clicking "disable" next to the username in the
user list.
8.2. Activating Additional ServiceLink Services
During the initial registration of a server, you enabled services on that server through the registration process (see
Registering a Server). However, at some future point you may wish to enable additional services for this server. Alternatively, you may have a server where the services have expired and the customer now wishes to re-subscribe. In
either case you will follow the procedure outlined below.
To enable network services, follow these steps:
1. Use the "Order products" function to order whichever additional products you want.
2. Click on "Servers" in the AMC.
3. In the Services column, click on the link for the server you want to modify. (It will show not enabled if there
are no services, or will indicate how many services are available.)
4. In the details screen, follow the link to add new services. You will see a screen where you can allocate keys to
68
Page 76

Chapter 8. Using the AMC
that server.
5. Choose a key by clicking "Select" beside the option. If you choose, you may manually enter your product li-
cense key in the available field and then click "Next".
6. A confirmation screen appears listing the products you selected. If you want, enter information into the Partner
Reference field (i.e. a PO number). Click "Next".
7. Following your confirmation, you will then be presented with the list of services that were enabled and the ex-
piration dates for those services.
8. If you return to the Servers screen, you will now see that the services column has been updated to reflect the
number of services each server has enabled.
Services will not actually be available on the server until the next synchronization. This should happen within the
hour, or you can perform a manual sync by clicking on "Status" in the Server Manager, then clicking the "Sync" button. After synchronizing, the status panel will show the subscribed services.
8.3. Monitoring Server Status
The "Servers" screen indicates the status of each server by the icon in the left-hand column. The image below shows
three possibilities.
Table 8.1. Status colors
Grey Unknown (Typically a server that has not yet synced
with the AMC)
Green Synchronization OK
Yellow Missed one synchronization
69
Page 77

Chapter 8. Using the AMC
Red Missed more than one synchronization
If a server's status indicates that it has not recently completed a sync, it may mean that the server has lost network
connectivity.
If you have alerts switched on for this server, the designated recipient will receive a notification by e-mail if the
server misses two or more scheduled synchronizations.
8.3.1. Performing a Manual Synchronization
There are two main reasons to perform a manual sync. The first is to check that connectivity between the server and
the AMC has been restored after a network problem, and the second is to immediately send updated information between the server and the AMC without waiting for the usual hourly synchronization.
The procedure for performing a manual sync is as follows:
1. Log in to the Server Manager on the server.
2. Click "Status" under "ServiceLink" in the navigation menu.
3. Click "Sync".
4. After a period of time, it should report "The sync completed successfully".
8.3.2. Changing the Sync Frequency
By default, each server will sync with the AMC every hour, at a random minute in the hour. To change the sync frequency to a different number of hours, issue the following two commands from the Linux root prompt on the
server2:
/sbin/e-smith/db configuration setprop sync SyncFreq hourly_value
/sbin/e-smith/expand-template /etc/cron.d/sync
where hourly_value is a whole number between 1 and 24. For example, a value of 3 will make the sync occur every three hours. Note that in almost all cases the frequency should be left in the default setting.
8.4. Virus Protection
8.4.1. E-mail Virus Detection
When a virus is detected by the server in an e-mail message (body or attachment), several things will happen:
• The infected e-mail is "quarantined" in a special mail folder for the server administrator to examine or destroy
2When viewing the server console on the actual server machine, press Alt+F2 to switch to a login prompt where you login as root with the
system password. Type exit to logout when you are finished. To access the command prompt remotely, refer to the chapter on Remote Access
in this handbook.
70
Page 78

• Notification is sent about the virus. For an inbound message, the recipient at the site, the original sender, and the
server administrator are notified. For an outbound message, only the sender and the server administrator are notified
• The virus is reported in the AMC
• If you have virus alerts switched on for this server, the designated recipient will also receive a notification by e-
mail
The administrator of the server can review all quarantined e-mail by choosing the "Virus Protection" menu item under "ServiceLink" and clicking the link to manage quarantined email. This will display a list of all virus-laden email, sorted by date. The administrator can choose to view individual e-mails, delete an e-mail, or delete them all. If
the administrator chooses view, the e-mail and attachment will be displayed as text and the administrator will then
have the option to delete, or to forward the e-mail to the administrator. If forwarded the e-mail subject line will be
prefixed with "VIRUS QUARANTINED EMAIL".
In almost all cases, the appropriate response will be to delete the virus-ridden e-mail. In the event that the e-mail carries an important message, the text should be copied (using cut-and-paste from webmail or simply retyped) and a
clean copy sent to the intended recipient.
8.4.2. File Virus Protection
Chapter 8. Using the AMC
In addition to scanning e-mail, you can enable the nightly scanning of all files in your user home directories and information bays. This scanning is disabled by default. To enable the scanning of files, go to the Virus Protection
panel in the Server Manager and check the box next to the areas that you want scanned.
Each night the system will scan the designated areas. If infected files are found, an e-mail message will be generated
to the administrator e-mail address. The files are not automatically disinfected or moved. Rather the administrator is
notified and can decide on the appropriate action.
8.5. Guaranteed E-mail Delivery
If guaranteed e-mail is turned on for a server, any e-mail which cannot be delivered directly to the server will be
stored at the AMC.
Reports of e-mail stored at the AMC are available on the AMC by clicking "Guaranteed mail" in the menu. A list of
servers that have guaranteed e-mail is shown, and clicking on "Details" will bring up the Guaranteed Mail Report for
that server.
This report shows summary information about the e-mail stored at the AMC, including date, sender, recipient and
size. If e-mail is being stored at the AMC it indicates that there is a problem with the network connection or the mail
server running on the customer's server, which you should probably investigate.
71
Page 79

If you have guaranteed e-mail alerts switched on for this server, the designated recipient will receive a notification
by e-mail if the AMC starts receiving e-mail instead of the server itself.
Note
If Mitel Networks is not the authority for your domain, the AMC cannot accept mail for that domain or
control DNS publication for that domain. To use the Guaranteed E-mail service the domain must be 're-
delegated' to Mitel Networks.
To request that Mitel Networks be the authority for a domain, change the DNS configuration in the AMC
from "not requested" to "requested-partner". See DNS Services for a more complete description.
8.6. Configuring Alerts
Alerts allow you to receive automatic notifications by e-mail when problems are detected with a server's network
services.
1. Click on "24x7 Alerts" in the AMC menu. You will see a summary of registered servers.
Chapter 8. Using the AMC
The Alerts column shows how many different types of alerts are enabled. The Action column allows you to review delivered alerts.
2. Click "Enabled" or "Disabled" to go to a screen where you can select (or review) which alerts you wish to en-
able for a given server. You can choose to be alerted for:
• failed synchronizations
• viruses detected
• e-mail non-delivery
You must specify an e-mail address to which alerts should be sent. You can specify different e-mail addresses
for each alert.
3. If you click "Details", you can then generate a report of alerts that have been delivered for this server, by select-
72
Page 80

Chapter 8. Using the AMC
ing the appropriate filters in the "View alert information" fields.
You will see a screen like the one below:
8.7. DNS Services
During the ServiceLink subscription process, your server will be enabled to publish DNS records through the AMC.
As shown below, this panel in the Server Manager reports which domains you are publishing under the header "DNS
Services".
Note
The AMC can publish domains in the top-level domains of .com, .org and .net. Other top-level domains
may be possible for an additional charge. Note that DNS services are included in most 6000 MAS subscrip-
tion packages. The service includes the publication of two domains. Additional domains can be published
for an extra charge.
73
Page 81

Chapter 8. Using the AMC
With ServiceLink, changes you make in the Hostnames and addresses panel of the Server Manager will automatically be published to the global Internet. A checkbox is available for each hostname that asks " Publish globally?".
If you check that box, the record will be transferred to the AMC and from there published out to the larger Internet.
If, as shown in the screen above, there are domains that indicate they are not currently being published, you can use
the AMC to configure those domains to start publishing the information. Be aware that it may require several business days for some domains to be registered and published.
The top part of the panel allows you to configure a service domain that is available to you after ServiceLink activation. This domain takes the form of yourdomain .e-smith.net and allows you to immediately start receiving email and connecting to your server using that domain.
If you wish to change the service domain name, you can do so by entering your new name and clicking "Update". If
the domain you want is not available, you will be notified and can choose another name. Service domain changes
take effect immediately after the next synchronization with the AMC.
Warning
The change of service domain takes place upon the next synchronization of your server with the AMC and
your previous service domain will be completely removed. This includes entries for any hosts that you may
have been publishing for the previous service domain.
Mitel Networks does not guarantee the availability of a domain name and reserves the right to refuse to register any
domain name. All ServiceLink users publishing DNS domains must adhere to regulations and rules provided by
ICANN and our registrar.
Refer to the chapter on Domain Name Services for more information on configuring DNS services.
8.8. IPSEC VPNs
IPSEC VPNs can be created between any two or more 6000 MAS servers. The only limit is that each 6000 MAS can
only be a member of one VPN at any given time.
74
Page 82

Warning
Be aware that it is possible to create a VPN between two servers from different companies, inadvertently
exposing internal information from one company to another. Be careful to check which servers you are se-
lecting when establishing the VPN.
8.8.1. Creating an IPSEC VPN
To set up a VPN between subscribed servers, follow these steps:
1. Go to the AMC.
2. Click on "IPSEC VPN Service".
3. Click "create" to create a new VPN.
4. You will be shown a list of servers which have VPN services enabled. If you have no servers in this list, you
will need to enable the service as described earlier in this document. Choose a primary server for the VPN from
the drop-down list.
Chapter 8. Using the AMC
5. An ID number is generated for this virtual private network.
6. Add a description of the network (e.g., "Sales offices") by filling in the field below the ID number.
7. Check the box next to each server you wish to participate in the network.
75
Page 83

Chapter 8. Using the AMC
8. Click "Update".
9. Your VPN has now been created. The next time they sync with the AMC, the designated servers will establish
the appropriate links.
After all servers have synchronized with the AMC and the VPN has been established, you should be able to access
services on remote servers as though you were on their local networks. For instance, you should be able to log in to
the Server Manager on a remote server. Windows users who open up Network Neighborhood (or "My Network
Places") will see the other servers and will be able to access files on those servers.
8.8.2. IPSEC VPN Status
When you click on "IPSEC VPN service" in the AMC navigation menu, you will see a list of all of the VPNs you
have created. An example with only 1 VPN is shown below:
76
Page 84

Chapter 8. Using the AMC
When you click on the VPN ID, you will see a list of all of the servers that are part of that VPN and their current status, as seen in the image below:
8.8.3. Editing an IPSEC VPN
If you want to add or remove any 6000 MAS servers from a VPN, click the "Edit" button next to the VPN in the status list. You will see a screen similar to the one below that will list all servers in your VPN and also all other servers
you have registered that are not part of some other VPN. To remove a server from the VPN, uncheck its box. To add
a server, check the box next to it.
77
Page 85

Chapter 8. Using the AMC
As each server syncs with the AMC (either automatically or as a result of a manual sync), it will be added or removed from the VPN. Note that the "primary" server associated with the VPN cannot be removed. To remove the
primary server, you will need to delete the VPN and then re-create it with a new server as the primary server.
8.8.4. Deleting an IPSEC VPN
To delete an IPSEC VPN, click on the "Delete" button, as shown in the image below:
8.9. Maintaining Server Information
When you log into the AMC, the first thing you see will be the Servers screen. You can return to this page at any
time by clicking "Servers" in the navigation menu.
78
Page 86

From this screen, you can view and update information about registered servers and the clients they belong to. This
screen shows only the servers that your company has registered.
8.9.1. Server Information
To view server details, click the server's ID. To change any of these details, click the link next to the information.
Chapter 8. Using the AMC
79
Page 87

Chapter 8. Using the AMC
Notice that along the top of the details page there is a row of buttons labelled "Server Info", "Services", etc. (shown
below). These allow you to switch quickly between details screens for a given server, without having to go back to
the "Servers" page.
8.9.2. Server Log
80
Page 88

In the server details, you will notice a link for a "Server Log". This is a section of the AMC that allows you to write
notes that are associated with a specific server. For instance, you might want to note when you performed service on
the server, or what you did to resolve an outage. Server log entries are only visible to you and other user accounts
associated with your company.
8.9.3. Company Details
To view company details for your client, click on the company name on the screen that appears. To change any of
these details, click the "Edit" button which appears below the company details.
8.9.4. Services
Chapter 8. Using the AMC
To view the status of network services on a server, click "enabled" or "not enabled" in the Services column on the
Servers screen. A subscribed server will show information similar to that in the image below. You can add additional services by clicking the link and purchasing products.
81
Page 89

Chapter 8. Using the AMC
8.10. Using the Reporting Forms
8.10.1. One-Click Reports
1. Access the one-click report feature by clicking the "Reports" link in the navigation menu.
82
Page 90

Chapter 8. Using the AMC
2. Select which report you would like to view. You can choose from any one of the following:
• Monthly Partner Report
This consists of summary configuration information about each of a company's servers, as well as informa-
tion concerning ServiceLink-related activities in the defined time period.
• ServiceLink Activity Report
This report provides summary server configuration data, and a comprehensive listing of all ServiceLink-re-
lated activity for the defined time period.
• Configuration Snapshot
This report provides detailed configuration information for a company's servers.
• Any saved custom reports are accessible in this list as well.
83
Page 91

3. Select one or more companies to report on.
4. Select an output format. You can choose between HTML, formatted text and Excel-compatible CSV formats.
5. Optionally, select which month's data you would like to see.
8.10.2. Custom Report Wizard
1. From the one-click report page, click "Create a custom report".
2. Select which report category you would like to use. Your options are:
• Configuration Snapshot
• ServiceLink Activity
• Company Accounts and Billing
3. Select an output format. You can choose between HTML, formatted text and Excel-compatible CSV formats.
Chapter 8. Using the AMC
4. Optionally, select which month's data you would like to see.
(Note that the month selected will not be saved with the report, should you choose to save it. Nor will the report
format.)
5. Click "Next".
6. Select which component(s) you would like to view, then click "Next".
7. Select one or more companies, then click "Next".
8. Select one or more servers belonging to the selected company or companies, then click "Next".
Your report is generated and displayed. Three links appear at the top of the page, leading to an area which al-
lows you to save or e-mail the report, or to view it in a more printer-friendly layout.
8.10.3. E-mailing a Report
1. Generate a report, either by using the one-click page or the custom reporting wizard.
2. Enter the recipient's e-mail address in the "Enter e-mail address" field at the bottom of the report, and then click
"E-mail". (Clicking the "E-mail" link at the top of the page will take you directly to the bottom of the report.)
8.10.4. Saving a Report
1. Generate a report, either by using the one-click page or the custom reporting wizard.
2. In the "Enter report name" field at the bottom of the report, type the name of the report you would like to save.
Each saved report must have a unique name. (Clicking the "Save" link at the top of the page will take you directly to the bottom of the report.)
84
Page 92

In the future, you can now access your saved reports directly via the one-click page.
8.10.5. Deleting a Report
To delete a saved report, click the "Delete" link beside the name of the saved report you want to delete.
Chapter 8. Using the AMC
85
Page 93

Chapter 9. Domain Name Services
9.1. The Role of the AMC in Providing Domain Name Services
Most businesses using the 6000 MAS will want to register a domain name reflecting their business, and will need a
DNS host to make this domain name accessible to the world.
The 6000 MAS DNS Service allows you to publish domain name records for your customers via the AMC.
Note
The Security Plus and E-mail Plus packages include support for two such public domains, one set as the
primary domain and another as a virtual domain. These domains must be in .com, .org and .net. Other
top-level domains and support for more than two domains are possible for an additional charge.
To view DNS information for all your registered servers, click "DNS Services" in the AMC. You will see a summary of all of your servers, domains, and the state of those domains, including whether they are being published by
the AMC.
To view DNS information for a specific server, follow these steps:
1. In the Servers panel, click the server number of the server you want to administer.
2. Click "DNS" in the button bar at the top of the panel.
The domain name list is determined by the domains on your server that are configured through your console, as well
86
Page 94

Chapter 9. Domain Name Services
as the Virtual Domains panel of your Server Manager. Each synchronization event updates the domain name list on
the AMC
Domain names may be requested and published via the AMC.
To request a public domain (primary or virtual) to be published, follow these steps:
1. In the DNS panel, click "Details" beside the domain you want to request for publishing.
2. Click "Change".
3. The status will change to Requested - partner.
Mitel Networks staff will attempt to register the domain on your behalf as part of the DNS service, subject to the following:
• Mitel Networks does not guarantee the availability of a domain name and reserves the right to refuse to register
any domain name.
• All users publishing DNS domains must adhere to regulations and rules provided by ICANN and our registrar.
• Domains deemed inappropriate will not be published.
• The number of domains which may be registered as part of the subscription package is limited to two domains
per server. Additional domains can be registered but at an additional charge.
• Domains outside .com, .org and .net may be available but may incur additional charges.
• Domain requests will take one to two business days to be processed under normal circumstances.
• Any previously registered domain will need to be redelegated to the AMC.
Switching from the AMC to your local 6000 MAS, the Server Manager shows information about the DNS domains
for which your server has been configured:
If, as shown in the screen above, there are domains that indicate they are not currently being published, you can use
the AMC to configure those domains to start publishing your information. Be aware that it may require several business days for some domains to be registered and published.
Once the AMC has begun publishing your domain(s), changes you make in the "Hostnames and addresses" panel of
the Server Manager will automatically be published to the global Internet. A checkbox is available for each hostname that asks " Publish globally?". If you check that box, the record will be transferred to the AMC and from there
published out to the larger Internet. For example, to publish the host "www.tofu-dog.com" you must check the Pub"lish Globally" box next to that hostname and resynchronize the server with the AMC.
9.2. Service Domains
The top part of the Server Manager DNS Services panel allows you to configure a service domain that is available to
you after ServiceLink activation. This domain takes the form of yourdomain.e-smith.net and allows you to immediately start receiving e-mail and connecting to your server using that domain.
Warning
The service domains (e.g., yourdomain.e-smith.net) should never be specified as the primary domain or as
a virtual domain.
87
Page 95

Chapter 9. Domain Name Services
If you wish to change the service domain name, you can do so using this panel by entering your new name and
clicking "Update". If the domain you want is not available, you will be notified and will be able to choose another
name.
Tip
Another way to find out if a name is available within e-smith.net is to use the DNS services panel inside
of the AMC. The top section of that panel includes a search box which will query the DNS servers for the
domain. After you have determined a name is available, you can then enter it into the Server Manager on
your client's 6000 MAS.
Service domain changes take effect immediately after the next synchronization with the AMC.
Warning
The change of service domain takes place upon the next synchronization of your server with the AMC and
your previous service domain will be completely removed. This includes entries for any hosts that you may
have been publishing for the previous service domain.
9.3. Publishing Domain Names
In addition to the Service Domain, the ServiceLink DNS service allows the AMC to also publish other domain
names on your behalf as configured from the server.
Mitel Networks staff will take all requests to publish domain names through the AMC interface, subject to the terms
outlined in The Role of the AMC in Providing Domain Name Services. You can request publication of domain
names that you already own and are publishing through a different registrar, or you can request that Mitel Networks
register a new, unallocated domain name on your behalf. The first case would result in Domain Name Redelegation
(see section Redelegating Domain Names to the AMC for details), while the latter, called Domain Registration,
would be handled automatically by Mitel Networks (see Registering New Domains for details).
To request a public domain for publishing, follow these steps:
1. Ensure that the domain has been added to your server, either through the console (for your primary domain) or
through the Virtual Domains panel of your Server Manager (for additional domains). If the domain you wish to
have published on the AMC is already configured and synchronized with the AMC, you can skip to Step 3.
2. Re-synchronize your server with the AMC, either by waiting for the automatic hourly update or by clicking the
"Sync" button on the Status panel of your Server Manager.
3. In the DNS services panel at the AMC, click "Details" beside the domain that you want to request for publishing.
4. Click "Change".
5. The status will change to "Requested-partner".
Note
You can unrequest this domain by re-clicking "Change".
Tip
You should also ensure that any hosts you want publishing for this domain have their "Publish Globally?"
box checked as well in order to save a step later.
88
Page 96

Chapter 9. Domain Name Services
9.4. Redelegating Domain Names to the AMC
After you have selected your domain name for publishing, Mitel Networks will determine whether the requested domain requires redelegation or registration. If you already own the domain and are publishing from a different registrar, you will receive further instructions from Mitel Networks outlining your required involvement in the Redelegation process.
After completing the tasks outlined in the redelegation instructions, the AMC will immediately start publishing your
domain, including any hosts that were selected to "Publish Globally". The domain state will remain as pending"redelegation" in the DNS Services panel until redelegation is complete. The AMC will continue to publish any domains in this state.
9.5. Registering New Domains
To request a domain for registration by Mitel Networks on your behalf, follow these steps:
Click the "Change" button in the DNS Services panel of the AMC next to the domain that you wish to have regis-
tered on your behalf.
Note
If the desired domain is not in your listing then you will need to add it in the 6000 MAS through the Virtual
Domains panel.
The Mitel Networks staff will then register the domain on your behalf with our registrar, provided that all other
terms and conditions have been met regarding the ServiceLink DNS agreement.
Note
When the domain is registered on your behalf Mitel Networks will be the contact for billing, technical, and
administrative notices related to your domain.
If the domain is not available or cannot be registered (i.e., it is already taken by someone else, or is not in one of the
.com, .org and .net TLDs), the state for the domain will be updated on both the Server Manager and AMC panels
indicating the nature of the problem.
9.6. Unpublishing Domain Names
If you no longer want your domain name to be published by the AMC follow one of these procedures:
1. Contact your Mitel Networks support staff to report that you want to stop using the ServiceLink DNS service
for your domain. Mitel Networks will then change the state to "Not requested" and the AMC will immediately
stop publishing for that domain.
2. You can also perform some steps to disable the publishing of the domain by yourself:
• Remove the domain from your 6000 MAS (by deleting it from the Virtual Domains panel or by changing
your primary domain).
• Resynchronize the server to the AMC. This updates the list of domains on the AMC, thereby removing it
from your list and subsequently stopping its publishing by the AMC.
Note
89
Page 97

Chapter 9. Domain Name Services
In addition to stopping the AMC from publishing your domain, you will need to redelegate the domain
back to the registrar of your choice by changing the name server records that publish your domain.
Warning
If you want to stop publishing a domain that Mitel Networks has registered on your behalf, you will need to
contact Mitel Networks support and could be liable to pay an additional charge in order to complete the redelegation.
90
Page 98

Chapter 10. Webmail
If you wish, you can configure your 6000 MAS so that users can access their e-mail via a web interface. Once webmail is enabled, users will be able to access their e-mail from the local network or anywhere in the world via the Internet using any standard web browser (provided it supports Javascript and tables, which almost all browsers do).
For added security, the server supports the use of Secure Socket Layer (SSL) connections. When your users connect
using SSL, all communication between their browser and your web server is securely encrypted to prevent eavesdropping.
If you intend to enable webmail, you should consider whether your users will use webmail exclusively or will use
webmail part of the time (for example, when traveling) and a different e-mail client the rest of the time. If they plan
to use webmail as well as another client, they should make sure that the other client uses the IMAP protocol. If they
use POP3, their e-mail messages will be pulled down from the server into their local e-mail client and will therefore
not be visible when the user logs into webmail. If IMAP is enabled on the local client, the messages will remain on
the server and will be visible both from the local client and via webmail. (For more information on IMAP and POP3,
read IMAP and POP3.)
10.1. Enabling Webmail On Your System
To enable the use of webmail, perform the following steps:
1. Connect to the Server Manager and login as the admin user.
2. Click on Other e-mail settings and scroll down to the section where you have the option to Enable/Disable
Webmail. You now have two options:
• Enabled (secure HTTPS access only) - Allows users to connect only through a secure SSL connection. This is
strongly recommended because a regular HTTP connection transmits your mail account password across the network (or Internet) in plain, unencrypted text.
• Enabled (HTTP or HTTPS) - Allows your users to connect through a secure or an insecure web connection.
After you perform these steps, your users should be able to connect and use webmail.
10.2. Starting Webmail
To use webmail, a user first needs a valid user account and password on the server. Next, the user opens up a web
browser and points it to your server using an address resembling the following URL:
https://www.tofu-dog.com/webmail/
The https in the URL indicates this connection uses SSL encryption and provides a secure communication session.
Note that if your server is behind another firewall, that firewall will need to allow traffic through on TCP port 443
for SSL connections.
91
Page 99

Chapter 11. Troubleshooting
11.1. Mail Log File Analysis
If you are using your 6000 MAS to send and receive e-mail, reports are available to help analyze your system's performance. The default setting provides basic statistics; a menu provides other options. If you suspect that there is a
problem with the delivery of your e-mail, you can use these reports to see how your system is operating. The information can also help you decide how best to optimize your system.
11.2. View Log Files
This panel allows you to view system log files. As shown in the image below, you select the log file that you want to
view and press the "View Log File" button. Without any filter options, you will see the entire log file.
The log file that is generally of most interest is messages, as this is where most of the system services write log
messages. If you enter any text in the "Filter Pattern" box, only lines of the log file containing that text will be displayed. If you enter any text in the "Highlight Pattern" box, that text will be shown in bold. Both options can be
used together. Be aware that the filter is case-sensitive.
As an example, if you were interested in messages relating to DHCP, you could examine the log file messages with
a filter pattern of DHCP. This will show you all DHCP-related messages. If you further add a highlight pattern of
DHCPACK, the messages relating to DHCP acknowledgements will appear in bold.
11.3. Review Configuration
This section of the Server Manager summarizes how your server is configured. This is the data that you entered during the installation process and possibly changed later through the server console or the Server Manager. As you can
see from the screen below, this is essentially a report that you can print out for your records. You do not have the
ability to make changes from this screen.
92
Page 100

Chapter 11. Troubleshooting
11.4. Technical Support
If you are a Mitel Networks authorized reseller and require support. please call +1-613-271-7614 (in the United
States and Canada, call 1-866-472-9999) and ask for technical support or e-mail us at smesupport@mitel.com. You
can also visit our web site http://www.mitel.com/. Please have your server registration number ready when you contact support.
If you are having difficulty configuring another vendor's hardware or software, we recommend you refer to the manual or contact the vendor for that product.
93
 Loading...