

Page 1

6000 Managed Application Server
(MAS)
Administrator's Guide - Release 5.6
by Mitel Networks Corporation
Page 2

6000 Managed Application Server (MAS): Administrator's Guide Release 5.6
by Mitel Networks Corporation
Published October 2002
Copyright © 2002 Mitel Networks Corporation
The Mitel Networks logo is a trademark of Mitel Networks Corporation in the United States and other countries. Linux is a registered trademark
of Linus Torvalds. The terms "ssh" and "Secure Shell" are trademarks of SSH Communications Security Corp. Trend Micro is a registered trademark of Trend Micro Incorporated. All other trademarks are the property of their respective holders.
Page 3

Page 4

Table of Contents
1.Introduction...............................................................................................................................
1.1.About This Guide .............................................................................................................1
1.1.1. Who This Guide is Written For .................................................................................1
1.1.2. About Our Test Company: The Pagan Vegan .............................................................. 1
1.2. Welcome to your 6000 MAS .............................................................................................. 1
1.2.1.Aboutthe 6000 MAS .............................................................................................. 1
1.2.2.The AMC .............................................................................................................2
1.3.About ServiceLink ...........................................................................................................3
1.3.1.ServiceLink Architecture .........................................................................................3
1.3.2.24x7Monitoring and Alerts ..................................................................................... 3
1.3.3.Virus Protection ....................................................................................................4
1.3.4.Guaranteed E-mail .................................................................................................4
1.3.5.DNS Services ........................................................................................................4
1.3.6.IPSEC VPN Service ...............................................................................................5
1.3.7.Software Blades ....................................................................................................5
1.4.What's New .....................................................................................................................6
1.4.1.Features ...............................................................................................................6
1.5. Software Licensing Terms and Conditions ............................................................................6
2.The Server Console .....................................................................................................................
2.1.Usingthe Server Console ...................................................................................................7
2.1.1.Usingthe Text-based Browser .................................................................................. 7
2.1.2. Accessing the Linux Root Prompt ............................................................................. 8
2.2. On-going Administration Using the Server Manager ............................................................... 8
3.Configuration .............................................................................................................................
3.1.SetDate and Time ............................................................................................................ 10
3.2. Configuring Your Desktop Operating System ........................................................................10
3.2.1.Automatic DHCP Service ........................................................................................12
3.2.2. Manual Entry For Computers Not Using DHCP Service ................................................ 12
3.2.3.MSWindows Workgroup Configuration .................................................................... 13
3.3.Workgroup .....................................................................................................................13
3.3.1. 6000 MAS as Domain Controller ..............................................................................14
3.4.Remote Access ................................................................................................................16
3.4.1.RemoteAccess Using ssh ........................................................................................ 17
3.4.2.RemoteAccess Using SSL ......................................................................................18
3.5.Directory ........................................................................................................................18
3.5.1. Configuring Your Company's Directory on Clients ....................................................... 18
3.6.Printers ..........................................................................................................................23
3.7.Hostnames and addresses ...................................................................................................24
3.7.1.Creating New Hostnames ........................................................................................26
3.7.2. Reserving IP Addresses Through DHCP ....................................................................26
3.8.Virtual Domains...............................................................................................................27
3.9.E-mail ............................................................................................................................27
3.9.1.ConfiguringYour E-mail Application ........................................................................30
3.10.ConfiguringYour Web Browser ........................................................................................33
3.11. Choosing Your Web Browser Language ............................................................................. 34
3.12.Backup or Restore ..........................................................................................................35
3.12.1.Backup To Desktop .............................................................................................. 35
3.12.2.Restore From Desktop .......................................................................................... 35
3.12.3.VerifyDesktop Backup File ...................................................................................36
3.12.4.Configure Tape Backup .........................................................................................36
3.12.5.Restore From Tape ...............................................................................................36
3.13.Review Configuration .....................................................................................................37
4.Collaboration .............................................................................................................................
iv
Page 5

6000 Managed Application Server (MAS)
4.1.User Accounts .................................................................................................................38
4.1.1.Disabling User Accounts .........................................................................................38
4.1.2.Changing User Passwords ....................................................................................... 39
4.2.Groups ...........................................................................................................................39
4.3.Quota Management ..........................................................................................................39
4.4.Pseudonyms ....................................................................................................................40
5.Information Bays (i-bays) .............................................................................................................
5.1.i-bay Directories ..............................................................................................................43
5.2.Accessing i-bays ..............................................................................................................43
5.3.Creating an i-bay ..............................................................................................................44
5.4.Modifying an i-bay ........................................................................................................... 46
5.5. An i-bay Used as a Customer Site: The Miles Gabriel Art Exposition ......................................... 46
5.6. An i-bay Used as a Shared Network Drive ............................................................................ 47
5.7. An i-bay Used as an Intranet: The Pagan Vegan "Vegemite" ..................................................... 49
5.8. An i-bay Used to Expedite Processes: Samson's Farms ............................................................50
5.9. An i-bay Used as Your Customer Download Site .................................................................... 52
6.Webmail ...................................................................................................................................
6.1. Enabling Webmail On Your System .....................................................................................54
6.2.Starting Webmail .............................................................................................................54
6.3.Logging In ......................................................................................................................55
6.4.Viewing The Inbox ...........................................................................................................55
6.5.LoggingOut of Webmail ...................................................................................................55
6.6.Composing Messages ........................................................................................................56
6.7.Reading Messages ............................................................................................................57
6.8.Deleting Messages ............................................................................................................58
6.9.Usingthe Address Book ....................................................................................................59
6.10.Changing Webmail Options .............................................................................................. 60
7.Server Administration ..................................................................................................................
7.1. Administration of Your Server Via Windows File Sharing ....................................................... 62
7.2.CreateStarter Web Site .....................................................................................................62
7.3. User File Storage on the 6000 MAS ..................................................................................... 62
7.3.1.Windows..............................................................................................................62
7.3.2.Macintosh ............................................................................................................64
7.4.Reinstallation Disk ...........................................................................................................66
7.5.Reboot or Shutdown .........................................................................................................66
8.Technical Support .......................................................................................................................
A. Introduction to the Ethernet Local Area Network (LAN) ....................................................................
B.Additional Software ....................................................................................................................
v
Page 6

Chapter 1. Introduction
1.1. About This Guide
This Administrator's Guide walks you step-by-step through the straightforward process of configuring your 6000
Managed Application Server (MAS) and its Windows or Macintosh clients. The Appendices at the end of the guide
provide background information on subjects related to networking and the Internet and are intended to supplement
chapters in the main section of the guide.
1.1.1. Who This Guide is Written For
This guide is for administrators of the 6000 MAS. For more information, contact your Mitel Networks authorized reseller.
1.1.2. About Our Test Company: The Pagan Vegan
In this guide, we use examples of a catering and event-planning company, The Pagan Vegan or TPV, that configures, administers and makes use of the 6000 MAS. As far as we know, no company of this name exists.
1.2. Welcome to your 6000 MAS
Congratulations on choosing the 6000 MAS as your network and communications server!
Companies all over the world are using the Internet to communicate more effectively and efficiently to a broader au-
dience. The 6000 MAS is founded upon state of the art technologies - such as the Linux operating system - which
have been mainstays in the infrastructure of larger organizations for several years. Mitel Networks Corporation has
customized these technologies to make them straightforward to use, while still giving you local control over your Internet services. The result is a cost-effective Internet infrastructure that will reliably serve your organization as it
grows and as its use of the Internet evolves.
1.2.1. About the 6000 MAS
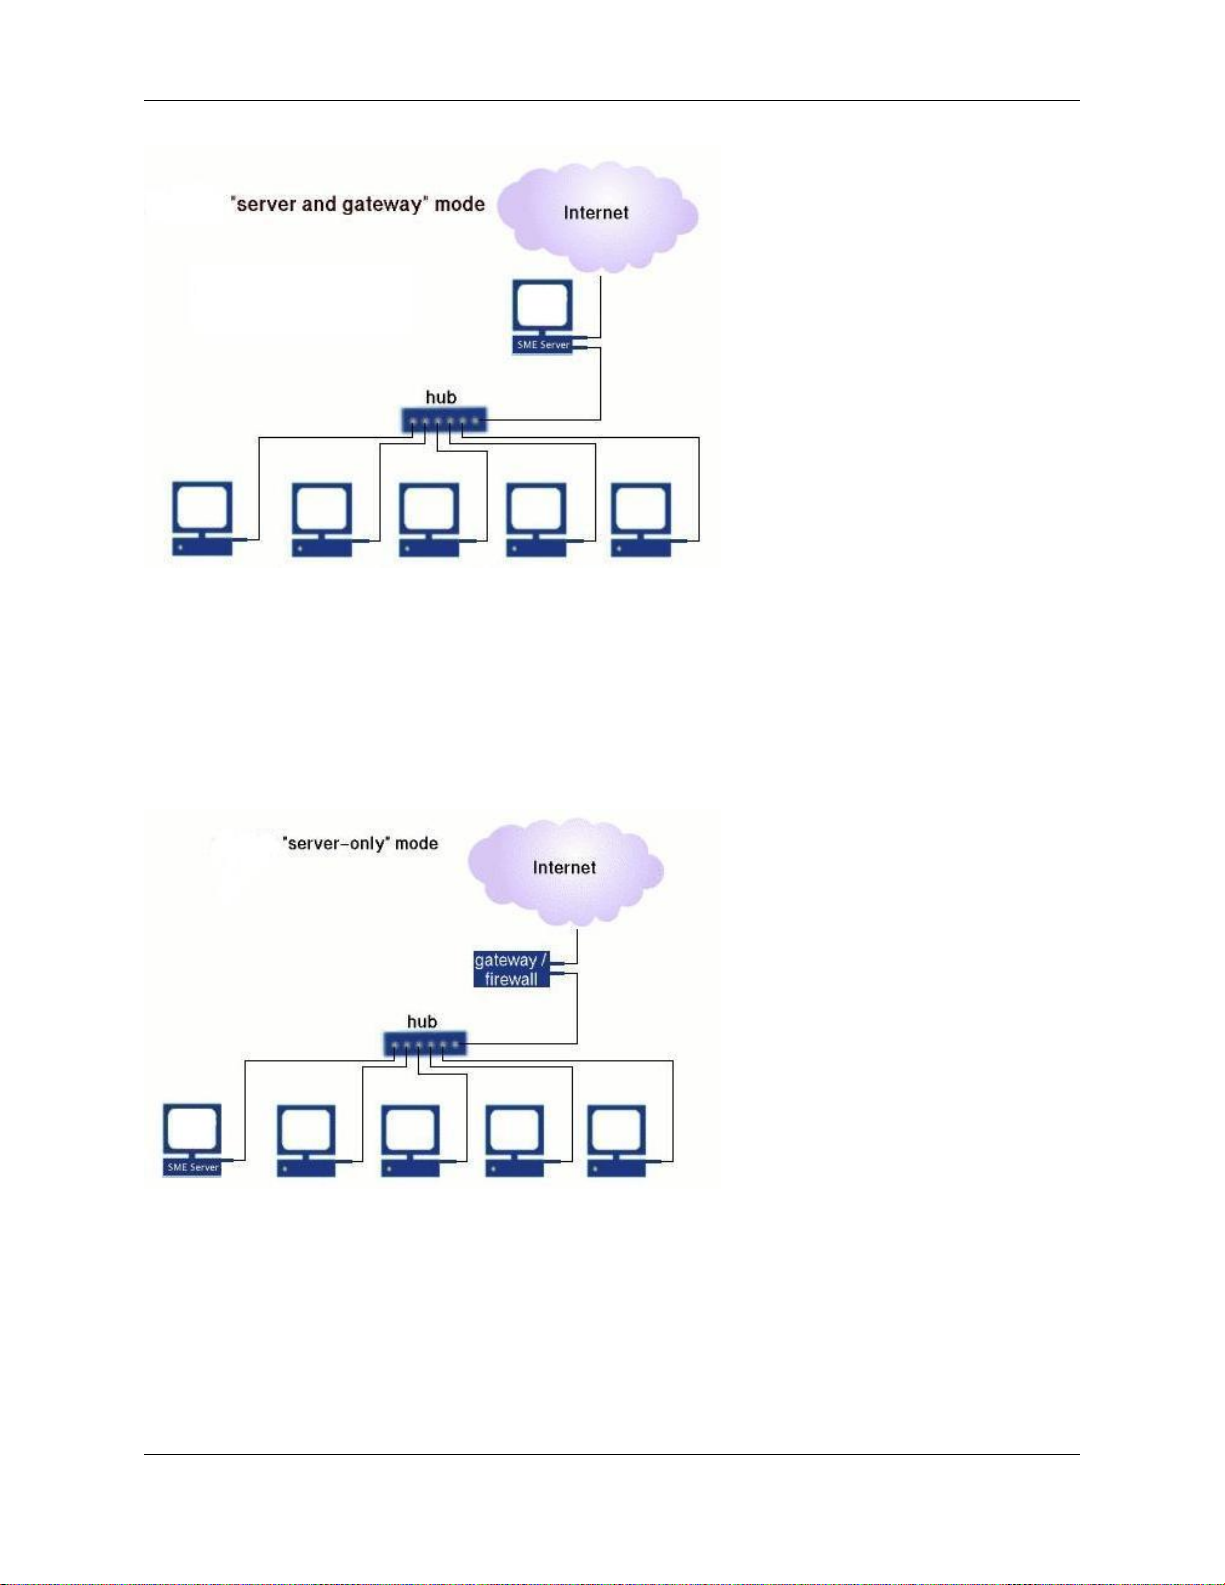
The 6000 MAS is a managed Internet security and productivity solution for single-site and branch-based enterprises.
It combines award-winning software, Mitel Networks SME Server with ServiceLink, with a suite of managed services delivered from the Mitel Networks Applications Management Center (AMC). The 6000 MAS manages your
connection to the Internet by routing Internet data packets to and from the network (which allows all the computers
on the network to share a single Internet connection) and by providing security for the network, minimizing the risk
of intrusions.
When one of the computers on the local network contacts the Internet, or is contacted by an outside machine on the
Internet, the 6000 MAS not only routes that connection, but seamlessly interposes itself into the communication.
This prevents a direct connection from being established between an external computer on the Internet and a computer on the local network, thereby significantly reducing the risk of intrusion onto the network.
The server also provides services that allow users to communicate better internally and with the rest of the world using the Internet.
Throughout this guide, SME Server refers to the server software component installed at the end-user's site. 6000
MAS refers to the total solution - the server software as well as applications and subscription services delivered from
the AMC.
The word gateway is used to mean the computer that acts as the interface between the local, internal network and the
external world - typically the 6000 MAS itself.
1
Page 7
Chapter 1. Introduction
If you prefer, you can also run your 6000 MAS in "server-only" mode. In "server-only" mode, your server provides
your network with services, but not the routing and security functions associated with the role of "gateway". Serveronly mode is typically used for networks already behind a firewall. In that configuration, the firewall fulfills the role
of gateway, providing routing and network security.
Once installed, your 6000 MAS can be configured and managed remotely. Routine administration is handled from
your desktop using a web-based interface, so only on rare occasions will you require direct access to the server computer. Once installation is complete, most customers put the server in an out-of-the-way place like a utility closet. If
you wish, you can disconnect the keyboard and monitor. (Note that some computers may not operate correctly without an attached keyboard.)
1.2.2. The AMC
Mitel Networks has developed a suite of integrated network services - ServiceLink - that extend and enhance the
functionality of the 6000 MAS. ServiceLink maximizes the security, performance and reliability of the server
through real-time interaction with the Mitel Networks Applications Management Center (AMC). Note that until the
server is registered for ServiceLink, the links to ServiceLink pages in the Server Manager will take you to panels
that are not active.
Note
2
Page 8

If your server is behind an additional firewall, that firewall will need to be configured to allow outbound
SSH packets on TCP port 22 in order for the server to communication with the AMC.
1.3. About ServiceLink
ServiceLink is a set of network services built into the 6000 MAS.
The services available include:
• 24x7 Monitoring and Alerts
• Virus Protection
• Guaranteed E-mail
• DNS Services
• IPSEC VPN Service
These services are centrally managed by the Mitel Networks Applications Management Center (AMC)
[https://mitel-amc.com/].
Chapter 1. Introduction
An additional feature of the 6000 MAS is the ability to quickly and easily download software "blades" from the
AMC. Blades can consist of updates to the server software, or entire applications that add new functionality to your
network.
Note
Each time a server is registered with the AMC, contact information must be entered so that Mitel Networks
can send notifications of software updates. However, it is good practice to periodically check the "Blades"
panel of the Server Manager for new update blades.
The following sections give more detail.
1.3.1. ServiceLink Architecture
As soon as your 6000 MAS is registered for ServiceLink services, it begins to communicate with the AMC on a regular basis. It performs a "synchronization" once an hour, during which it will report its status to the AMC and may
also receive updated information from the AMC.
The information sent by a newly registered 6000 MAS consists of a few vital support statistics collected from the
server configuration database. When ServiceLink services are enabled, additional information may be sent to the
AMC for use in reports accessible to the reseller who registered the server. All information is transmitted through a
secure, encrypted channel using the ssh protocol. (See http://www.openssh.com/ for more information about ssh.)
1.3.2. 24x7 Monitoring and Alerts
This service provides round-the-clock monitoring of your server and Internet connection. By default, each server
will synchronize with the AMC once each hour (the interval can be customized). Your reseller can configure the
AMC to send a designated technical contact an alert via e-mail if the server fails to check in. This ensures that your
reseller is notified in the event of an outage.
In addition, the AMC can provide monthly reports summarizing all ServiceLink activity. These reports include such
details as network performance, e-mail delivery problems and viruses detected. This information can help you assess
the reliability and quality of your Internet connection. It can also assist in analyzing the security of your network.
3
Page 9

1.3.3. Virus Protection
Viruses and worms which propagate via e-mail are becoming increasingly common. The most popular way of detecting these viruses is to use virus-scanning software. However, in order to be effective, virus-scanning software
must be updated regularly with information on existing viruses in. One of the most common reasons for failure in
virus software is that the user has not downloaded and installed the latest virus pattern files. The virus protection service provided by the 6000 MAS eliminates this problem.
This service provides automatic setup and configuration of virus-scanning services on the 6000 MAS. When the
virus scanning service is enabled, the virus-scanning software will be enabled on the server and the latest virus pattern files will be downloaded from the AMC on an ongoing basis. The service is entirely automated.
Warning
The number of users for whom virus protection is provided is limited by your 6000 MAS subscription. You
will not be able to configure the server for more than the supported number of users. If you do attempt to
add additional users beyond the number included in your subscription, you will receive a warning message.
The service can, however, be upgraded to support a higher number of users. Contact your Mitel Networks
authorized reseller for more information on upgrades.
Any e-mail delivered to the 6000 MAS will be examined against the latest virus patterns. If a virus is discovered
within a message (body or attachment, the message is quarantined in a special area. The administrator can then examine the message and determine what to do with it.
Chapter 1. Introduction
You also have the option of scanning all files found in user directories or information bays on a nightly basis. When
an infected file is found, an e-mail message is sent to the administrator of the system.
1.3.4. Guaranteed E-mail
One of the risks of running a mail server on the Internet is that network difficulties may result in undelivered e-mail.
When this occurs, people who attempt to send e-mail to you will receive a message indicating that delivery failed,
and they will not be able to contact you until network connectivity is restored. The Guaranteed E-mail service is Mitel Networks Corporation's answer to this problem.
If for any reason a subscribed 6000 MAS is unable to receive e-mail, the AMC will automatically step in and collect
mail on behalf of that server. Mail received by the AMC is securely cached until connectivity is restored, at which
point the server will initiate a sync connection to the AMC. The AMC will then automatically download the queued
mail to your 6000 MAS. The entire transaction is transparent to end-users.
In addition to storing the e-mail and forwarding it at the earliest opportunity, the AMC provides notification and reporting. This allows you to identify potential server or network outages.
1.3.5. DNS Services
Most businesses using the 6000 MAS will want to register a domain name reflecting their business, and will need a
DNS host to make this domain name accessible to the world.
The ServiceLink DNS Service automates this process, allowing you to publish domain name records for your server
via the AMC.
Note
The Security Plus and E-mail Plus subscription packages include support for two domains, one set as the
primary domain and another as a virtual domain. These domains must be in .com, .org or .net. Other
top-level domains and support for more than two domains are possible for an additional charge.
Each 6000 MAS is also entitled to a name within the e-smith.net domain, e.g. "mycompany.e-smith.net". This is
provided as a convenience for customers who do not have - or do not intend to register - another domain. Regardless
4
Page 10

of whether you have registered a domain, you will always have the option of using your service domain as a way to
access your server from the Internet, e.g. "www.mycompany.e-smith.net".
The service domain feature can be found on the DNS Services panel of the Server Manager. If the service domain
you request is not available, you will be notified through the interface and will be invited to choose a different domain. Changes you make will be uploaded to the AMC during the server's next synchronization.
1.3.6. IPSEC VPN Service
You can securely link together 6000 MAS servers in different physical locations to make one seamless Virtual Private Network (VPN). Information sent via this network is encrypted to prevent eavesdropping by others on the Internet.
The 6000 MAS uses the industry standard IPSEC protocol to encrypt network traffic between sites. This system uses
an encryption technique called "public key cryptography". This requires each server to know the "public key" for
other servers on the network. It then uses that public key to encrypt data intended for that server. A "private key" on
the receiving server is used to decrypt the data.
One of the traditional difficulties in setting up a VPN is securely exchanging the keys required to set up the VPN, as
each server must have the keys for all the other participating servers. With the 6000 MAS this process of configuration is automated by the AMC.
When you create a VPN, you designate one 6000 MAS as the "primary", together with one or more "secondary"
servers. The primary server is the one whose user accounts will be accessible via the VPN, while secondary servers
will act as gateways for the users on their local networks.
Chapter 1. Introduction
1.3.7. Software Blades
Blades allow you to easily install software modules via the Server Manager. Once your 6000 MAS has been registered, your server will be regularly updated with a list of available blades, which can then be installed by clicking on
the desired items in the Server Manager.
Note
Blades are developed and made available by Mitel Networks Corporation, Mitel Networks Authorized Resellers or
by third-party developers.
The following is a list of blades currently available for downloading. Note that your ability to "see" and download
these blades depends upon the specific terms of your 6000 MAS subscription.
• Web Access Control
The Web Access Control Service allows you to filter the web sites available to users by blocking selected cate-
gories of sites. Potentially objectionable sites are grouped into categories, such as pornography, gambling, or
hacking sites. This "blacklist" of blocked web sites is updated regularly by the AMC. The service can block entire domains or specific URLs. Certain IP addresses (for example, the system administrator's workstation) can be
excluded from the filtering rules.
• Groupware Blade
This browser-based application allows calendar sharing and collaboration, including the ability to schedule
meetings between users, and maintain and share contact lists and to-do lists. This application does not integrate
with Microsoft Exchange Server but will provide similar functionality for an office that cannot afford the cost
and complexity of Exchange.
• Instant Messaging Blade
5
Page 11

Chapter 1. Introduction
The Instant Messaging (IM) Blade allows instantaneous electronic conversations through the 6000 MAS as a
more secure alternative to publicly available services such as MSN, AIM and Yahoo. Conference rooms (group
chat) and a user directory are also provided. The IM service works across a ServiceLink IPSEC VPN, allowing
your organization to have its own secure IM infrastructure. As well, the solution allows IM users on the server to
communicate with IM users on certain other services, including MSN and Yahoo.
• IP Phone Support Blade
This blade configures the 6000 MAS to support Mitel Networks IP telephones, in conjunction with a Mitel Net-
works Integrated Communications Platform.
• Fax Server Blade
This application allows users to send faxes, with the use of an external fax modem.
• System Information Blade
This feature allows system administrators to view information about the 6000 MAS such as disk usage, CPU us-
age, etc.
• Free/Busy Scheduling Blade
The Free/Busy Scheduling blade integrates with Outlook 2000 (also known as Outlook 9.0) and Outlook 98 to
provide two services: users may publish their busy times to the 6000 MAS, and users may see another user's
busy times from within Outlook.
1.4. What's New
1.4.1. Features
The 6000 MAS release 5.6 provides many small enhancements, and in particular the following new features:
• Upgrade to Linux 2.4 kernel - The base SME software has been upgraded to the Linux 2.4 kernel. This upgrade
enhances the reliability of the server and provides support for a broader range of server hardware.
• Enhanced firewalling - With the upgrade to the Linux 2.4 kernel, the previous ipchains-based firewall rules have
been converted to iptables. This results in an even tighter firewall, using stateful packet inspection.
• Changes to ordering process - The 6000 MAS is a subscription-based product that is managed via the AMC.
With this release, changes have been made to the subscription ordering and activation process in order to simplify delivery of the product.
1.5. Software Licensing Terms and Conditions
The 6000 MAS is licensed for an individual server under the terms of the End User License Agreement found on the
CD. Acceptance of this agreement and identification of the end-user accepting is required during the software installation.
If you have acquired the 6000 MAS by means other than purchasing a Mitel Networks commercial offering through
an authorized reseller, it is unsupported. For further information and available options, please contact an authorized
reseller. To locate an authorized reseller near you, please visit http://www.mitel.com/.
6
Page 12
Chapter 2. The Server Console
2.1. Using the Server Console
Basic configuration of the 6000 MAS is performed using the server console. The server console can be accessed using a keyboard and monitor directly connected to the server, or remotely using the ssh protocol. Please contact your
reseller for details.
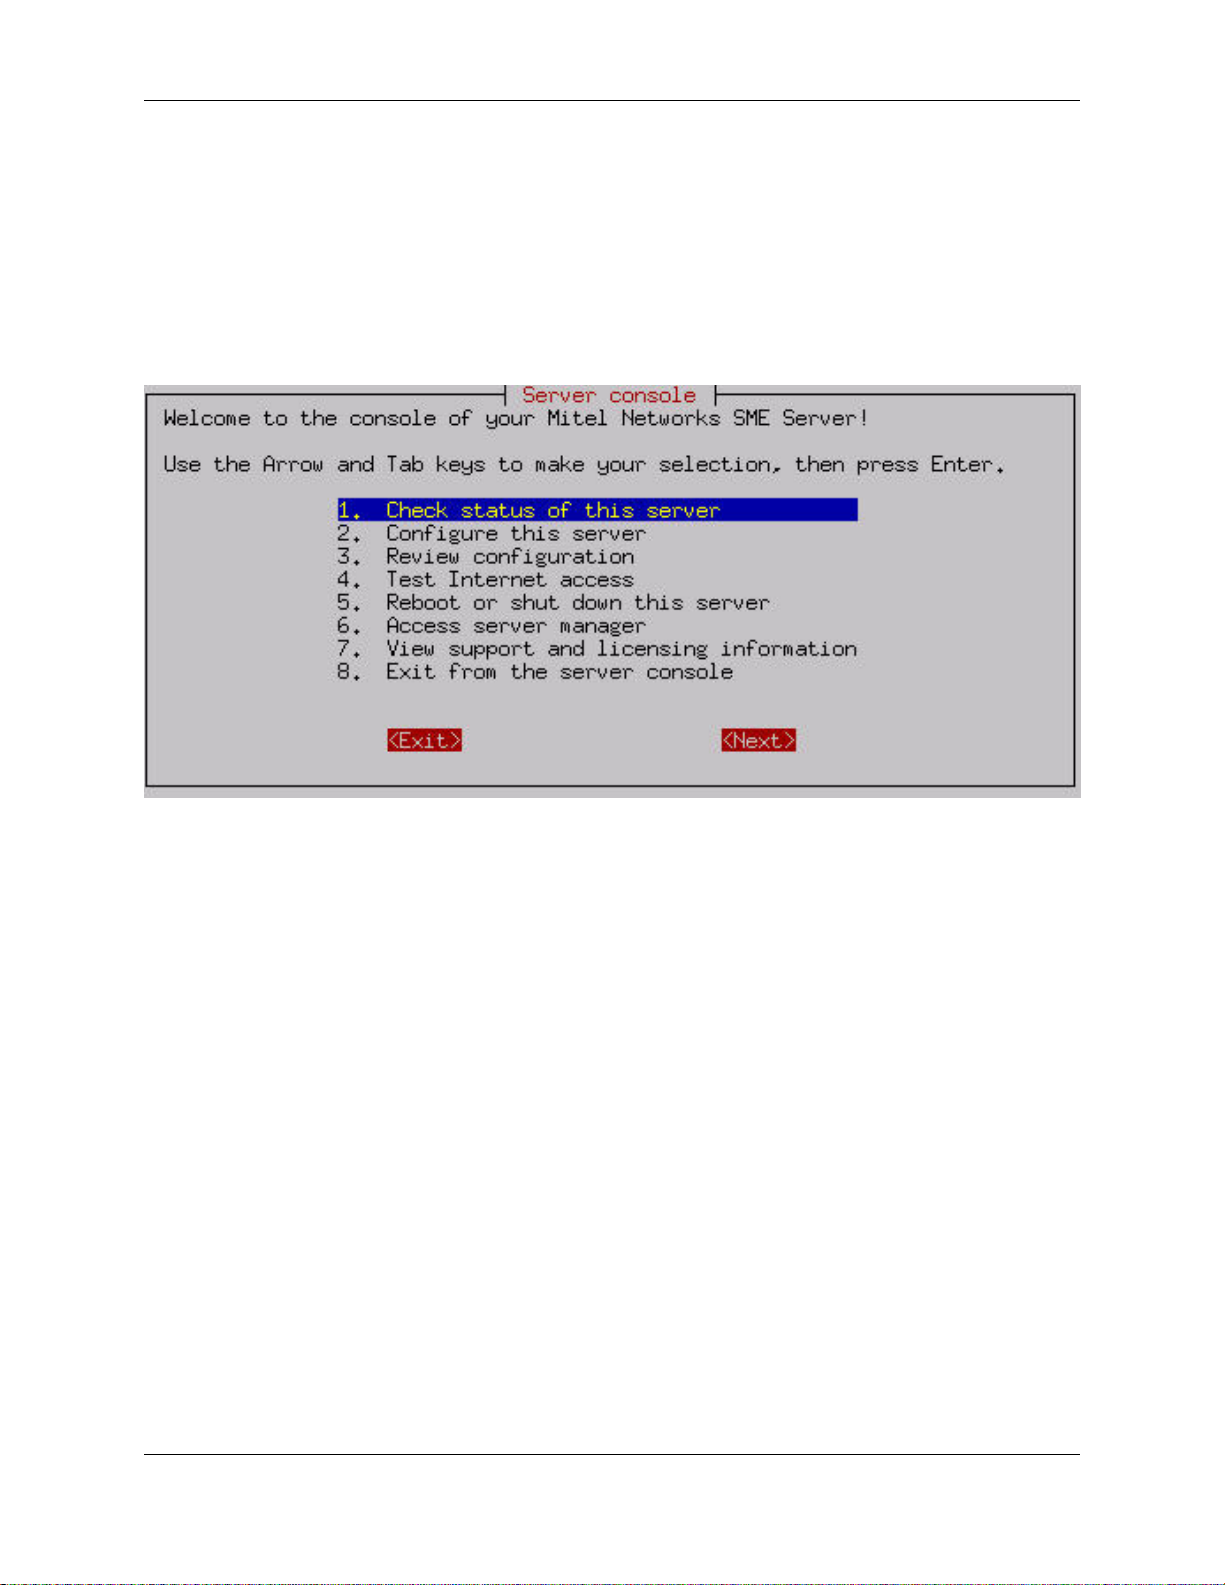
If the server console mode has been set to "auto", the opening screen of the server console will appear:
If the server console mode is set to "login", you will see a login prompt. You must then log in using the user name
"admin" and the system password.
The server console provides you with basic, direct access to your server. From the server console you can get the
following information and perform the following tasks:
Option 1: Provides you with uptime information about your 6000 MAS.
Option 2: Allows you to view and modify the configuration information entered during the original installation
(ethernet cards, IP address information, DHCP, DNS, domain names, etc.).
Option 3: Provides you with a summary of the configuration parameters entered into your server.
Option 4: Allows you to test your Internet access by sending a small test packet of information to a server on the In-
ternet (located at Mitel Networks Corporation).
Option 5: Allows you to smoothly reboot or shut down your server.
Option 6: Provides access to the web-based Server Manager using a text-based browser. This is the same interface to
which you can connect from another system using a normal web browser. This option merely allows you to perform
these functions directly from the server console.
Option 7: Displays the licensing terms governing the distribution and use of 6000 MAS software and information on
how to contact Mitel Networks for support.
2.1.1. Using the Text-based Browser
For Option 6, Access Server Manager with text-mode browser, the server uses a text-based browser called lynx to al-
7
Page 13

Chapter 2. The Server Console
low you to access the web-based Server Manager from the server console. Navigation is primarily with the arrow
keys - up and down to move through the page, right arrow to follow a link, left arrow to go back. Lynx has a wide
range of other commands which you can learn about through the online help available at
http://www.lynx.browser.org/ [http://www.lynx.browser.org/]. Note that for security reasons some regular features
of lynx are disabled when you are browsing from the server console (such as the ability to specify an external URL).
Type 'q' (for 'quit') to exit the text-based browser.
2.1.2. Accessing the Linux Root Prompt
If you are an expert user and would like to do advanced modifications to the configuration of your server, you can
access the Linux operating system underlying the 6000 MAS software by logging in as the user "root". If your
server is displaying the server console and not a login prompt, you can press Alt-F2 to switch to another screen with
a login prompt. To switch back, press Alt-F1. You should always ensure that you log out from the root account
when you are finished and before you switch back to the server console.
Warning
Please be aware that making changes and customizations to your server from the Linux command prompt
may invalidate your support agreement. Please contact your Mitel Networks Authorized Reseller before
making any such customizations.
The password for the "root" user is whatever password is currently set for the administrator of the server. Note that
this is the same password as that used by the "admin" user account.
Be aware that this ability to switch between the server console and a login prompt is only available when you have
physical access to the server. If you connect in remotely as the "admin" user and see the server console, you will not
be able to switch to a login prompt in that window. (You can, however, open up another remote connection to your
server and login as the "root" user.) Note that remote administrative access is disabled by default and must be
specifically enabled through the Remote Access panel of the Server Manager.
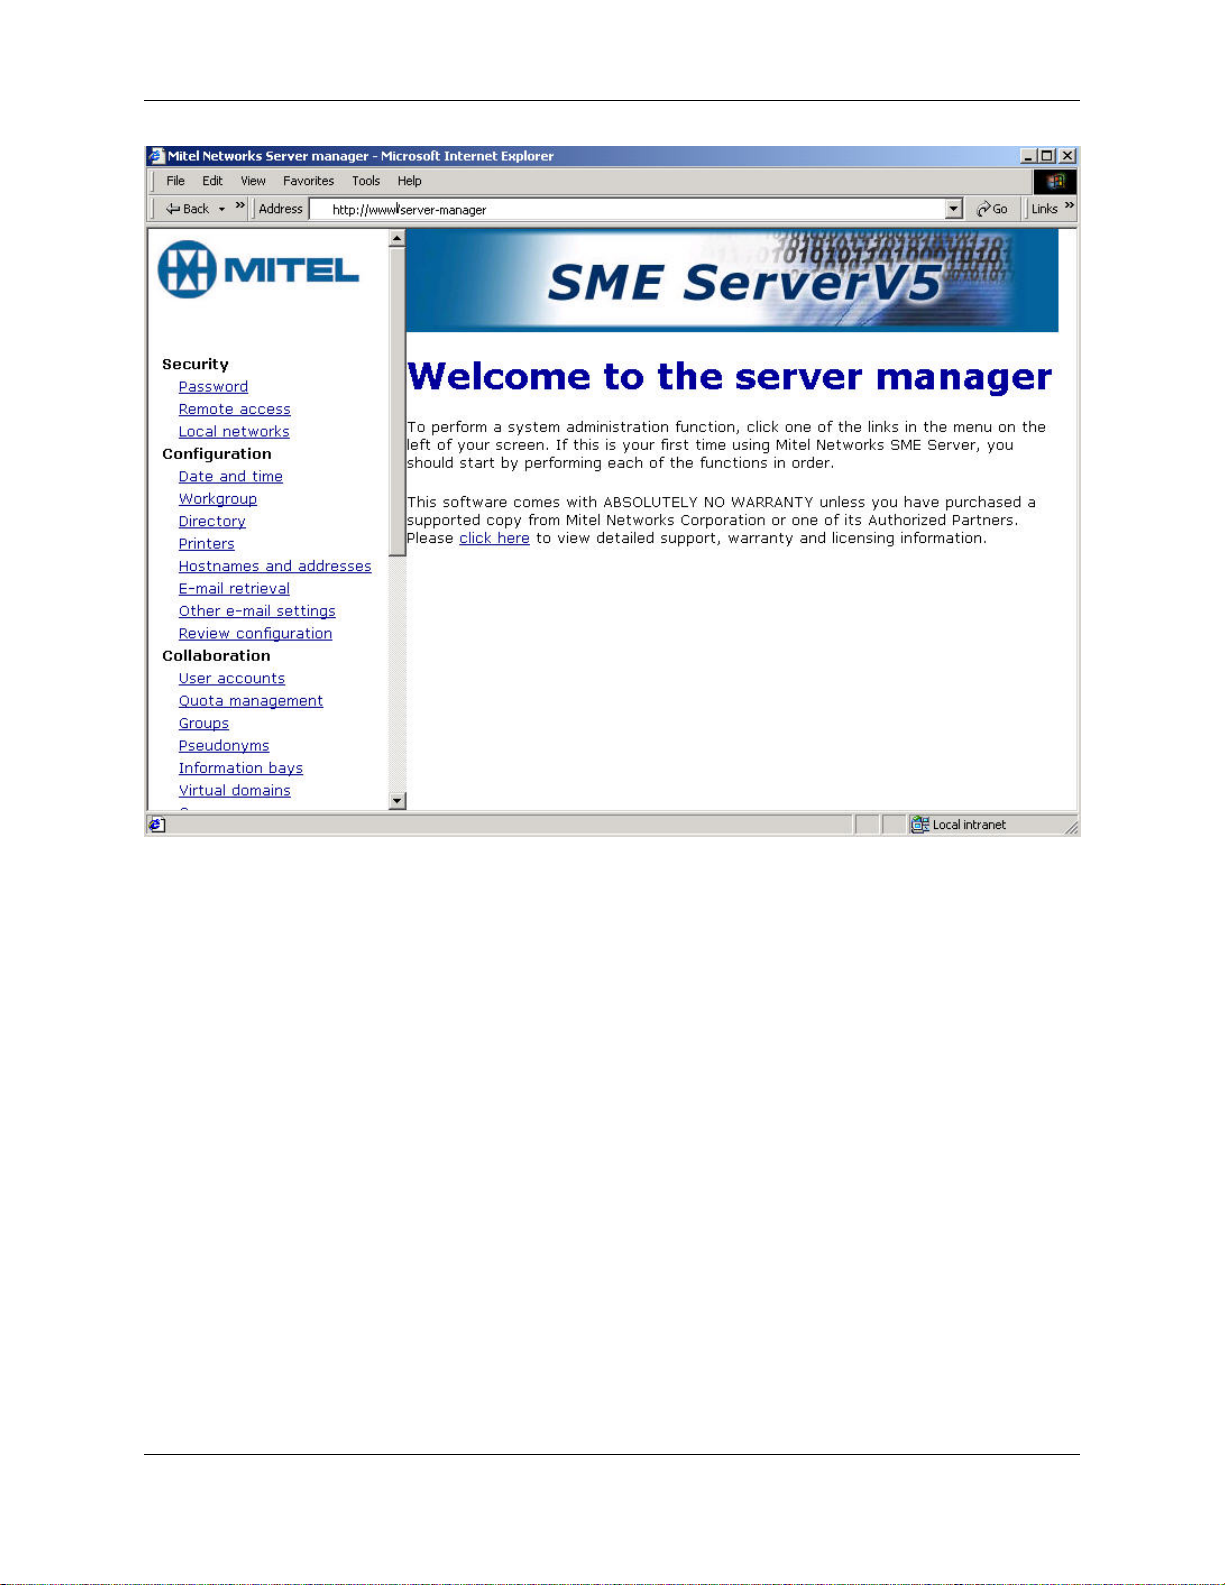
2.2. On-going Administration Using the Server Manager
The Server Manager is a simple web-based control panel that allows you to administer your network. Using the
Server Manager, you perform such tasks as adding or deleting e-mail addresses, setting the system date and time,
and creating a starter web page. The Server Manager is accessed through a web browser by visiting the URL http://
www.yourdomain.xxx/server-manager or more simply http:// www/server-manager. We recommend you bookmark
this address so that you can return to it when desired.
Note
For security reasons, you are only able to access the Server Manager through a web browser on the local
network. Remote access is only possible using remote access tools such as ssh and PPTP.
8
Page 14
Chapter 2. The Server Console
When you arrive at the correct URL, you'll be asked to enter your user name (which is always "admin") and the
password you created during the installation process. Enter that information and click "OK" to be taken to the Server
Manager. It will look like the screen shown above.
9
Page 15
Chapter 3. Configuration
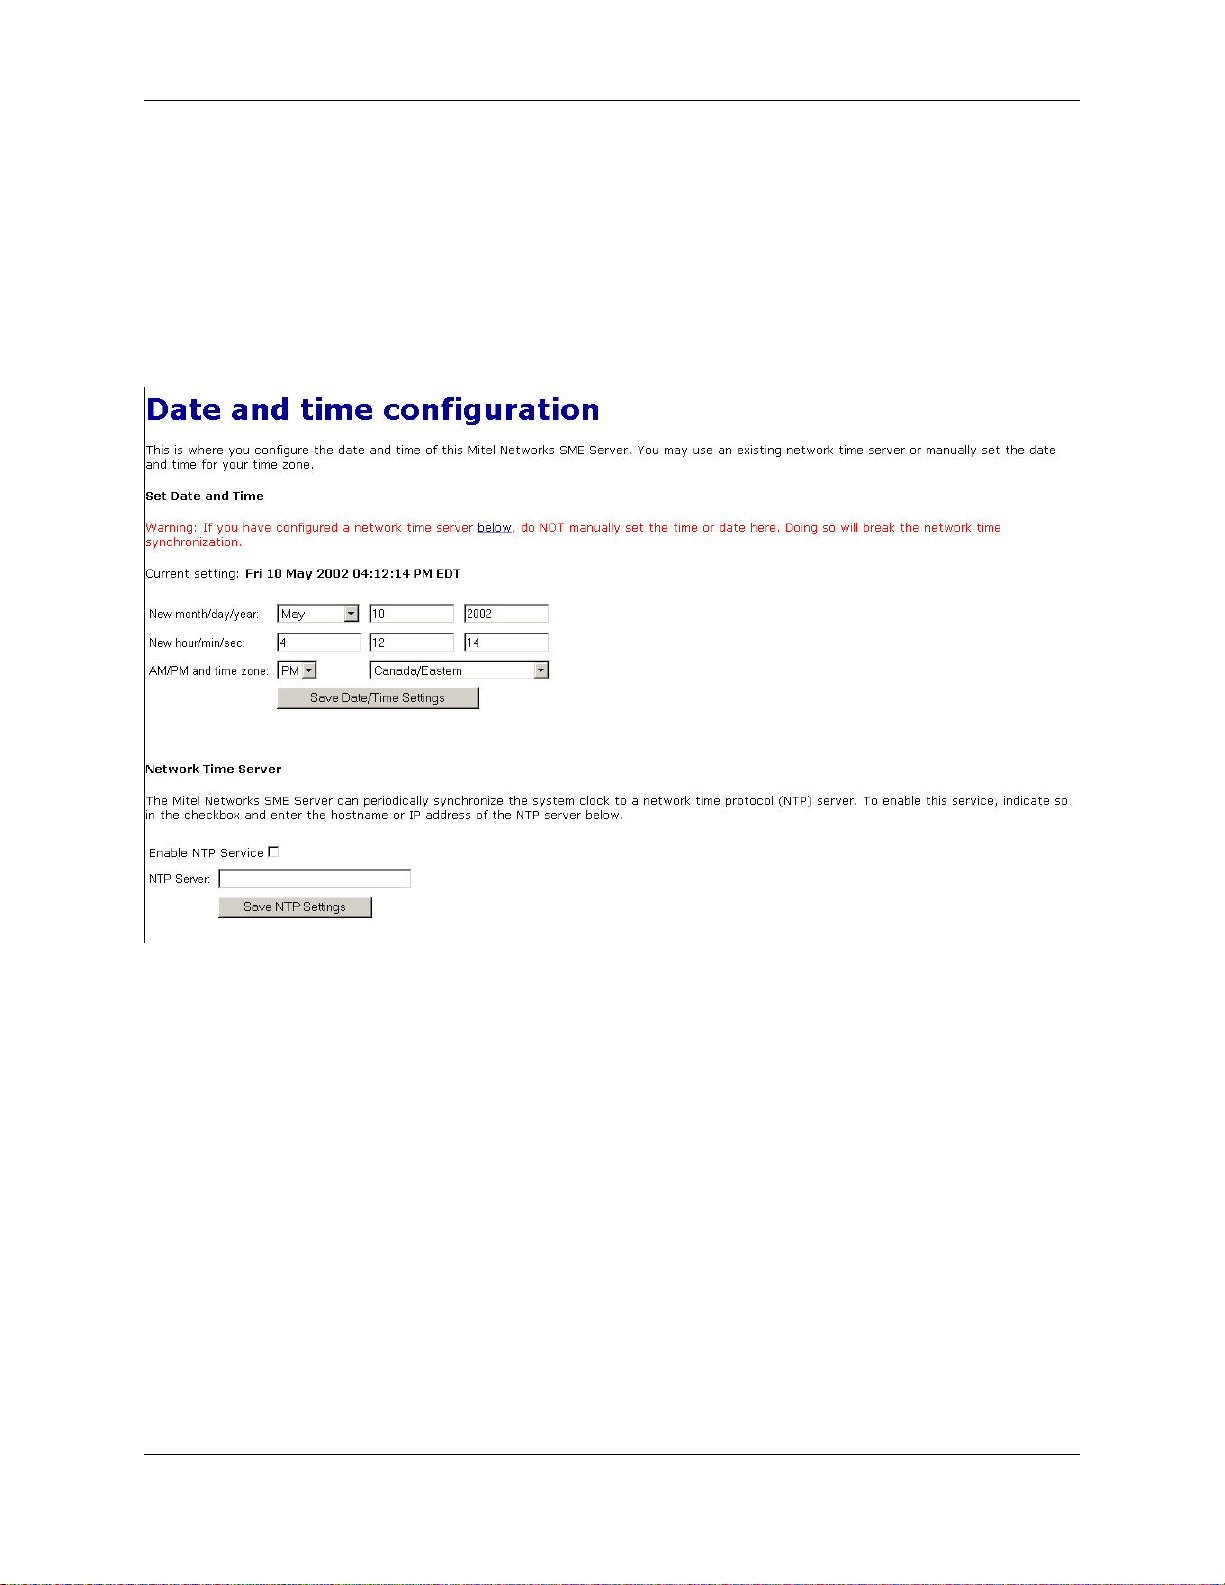
3.1. Set Date and Time
Accessing the Date and Time panel within the Server Manager allows you to set the system date and time either
manually or using a network time server. Pull-down menus for month and time zone ensure accurate entry. The
Server Manager will reset the time automatically during daylight savings time. There are worldwide time zones with
multiple selections for countries with multiple time zones. (including standard time zones, states/provinces and even
cities). This ensures that regional variations in time zones and daylight savings time are accurately reflected.
Instead of setting the time manually, you can use a network time server. A time server is a device on the Internet that
keeps accurate time and is able to communicate the time to other computers over the Internet using the Network
Time Protocol (NTP). Many organizations around the world provide Internet time servers for free.
Warning
After you start using a network time server, you should NOT set the time or date manually. If you do so, the
network time synchronization will no longer function.
This screen in the Server Manager allows you to configure your server to connect regularly to a time server and synchronize the clock on the server with the time provided by the time server. To do this, simply check the box for En"able NTP Service", add the domain name or IP address of the time server in the space provided and click "Save
NTP Settings". Using a time server is optional but doing so can greatly increase the accuracy of your system.
For more information about using a network time server, visit http://www.ntp.org/. You can also find a list of publicly available time servers at http://www.eecis.udel.edu/~mills/ntp/servers.htm
[http://www.eecis.udel.edu/~mills/ntp/servers.htm]. You should always use a secondary time server (also called a
stratum 2 server) to lighten the load on the primary time servers.
3.2. Configuring Your Desktop Operating System
10
Page 16
Chapter 3. Configuration
The dialog box where you configure your desktop differs from operating system to operating system and version to
version. As an example, in Microsoft Windows 95 or 98, client configuration occurs in the "Properties" dialog box
associated with the TCP/IP protocol for your ethernet adapter. To get there, go to the "Control Panel" and select
"Network". If a TCP/IP protocol is not yet associated with your ethernet adapter, you may need to add one before
you can configure its properties with the following information.
Item Description What to enter
enable TCP/IP protocol
All your computers must communicate on
the network using the TCP/IP protocol.
disable non-TCP/IP protocols
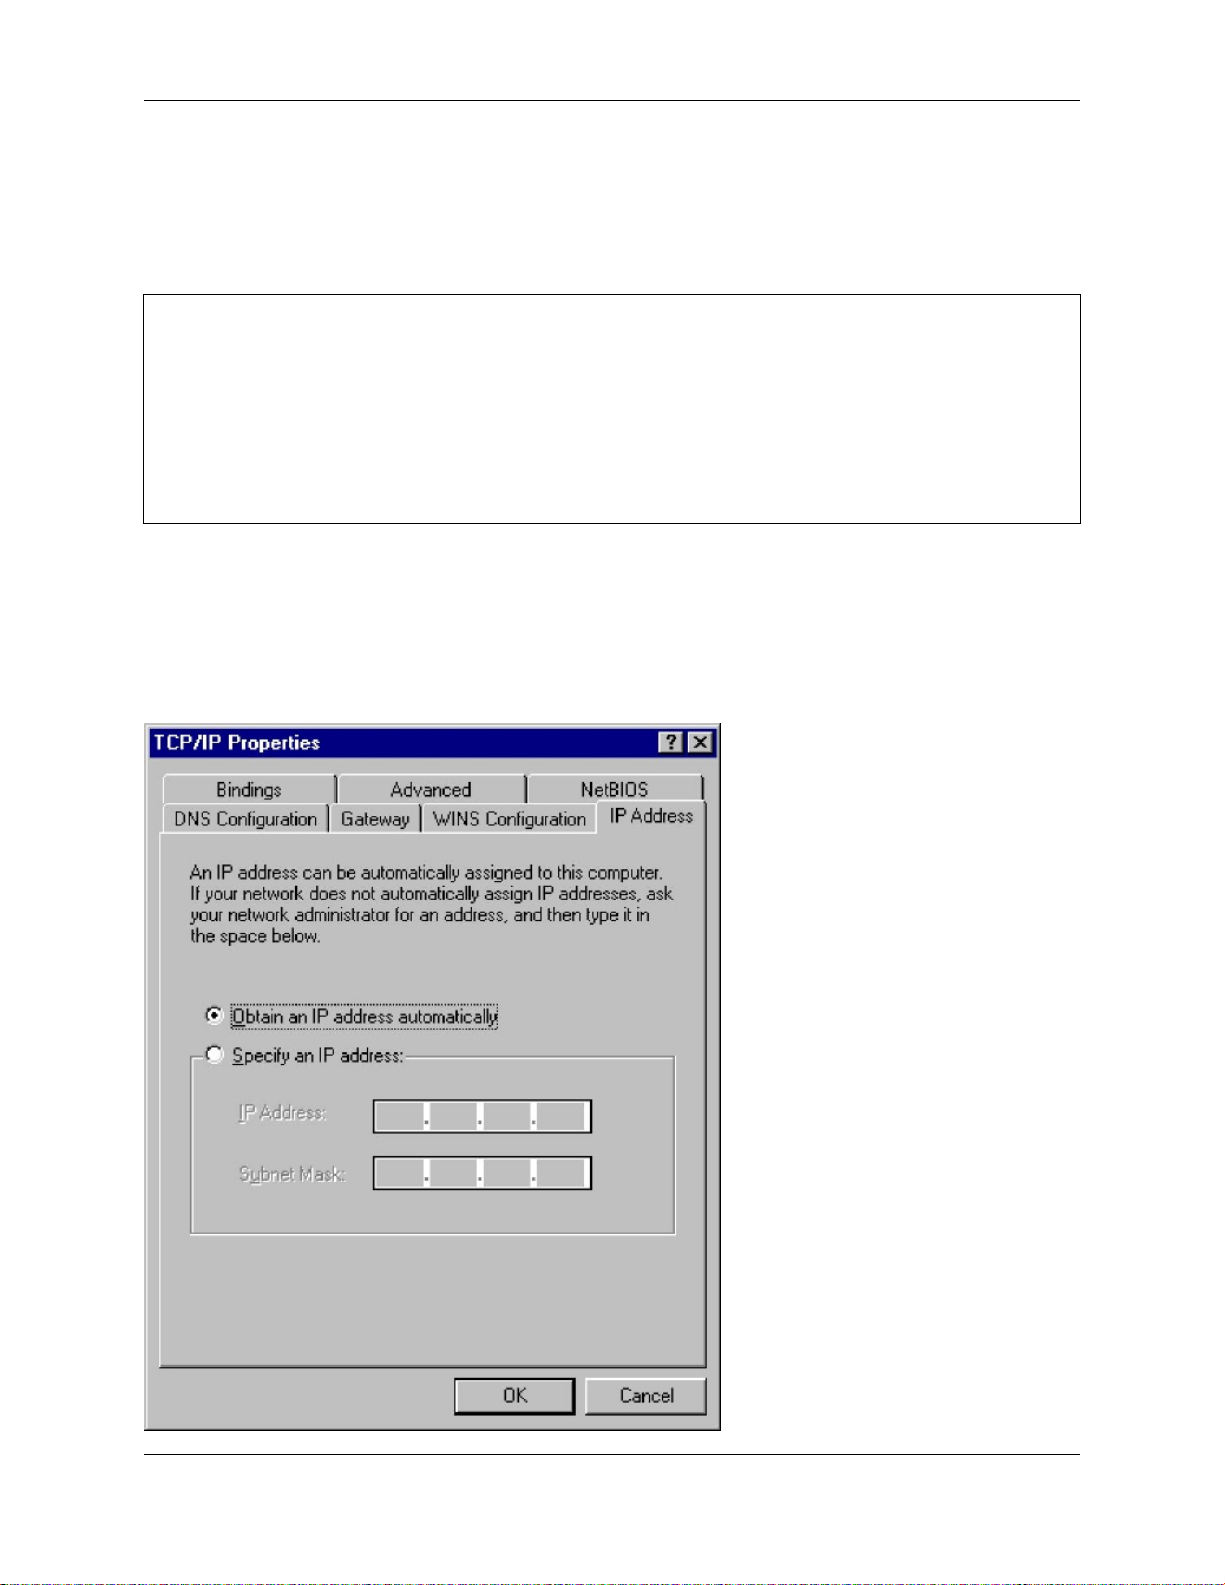
enable DHCP service See section below In Windows, enable "Obtain an IP address
Unless an application relies on a non- TCP/
IP protocol, disable all other protocols.
In Windows you add a TCP/IP protocol. In
Apple, open TCP/IP Control Panel.
Turn "off" other networking protocols (e.g.
NetBeui, etc.)
service automatically". In Apple, select
"DHCP server".
Note
We strongly recommend that you configure all clients machines using DHCP rather than manually using
static IP addresses. Should you ever need to change network settings or troubleshoot your network later,
you will find it much easier to work in an environment where addresses are automatically assigned.
On a Windows 95/98 system, the window will look like the image below:
11
Page 17
3.2.1. Automatic DHCP Service
Your server provides a DHCP server that assigns each of the computers on your network an IP address, subnet
mask, gateway IP address and DNS IP address(es).
Note
In some rare cases, you may want to use a static IP address for a particular client machine. The typical approach is to manually enter this IP address into the network properties of the specific machine. The negative side of this approach is that you cannot easily change or alter network settings without having to go in
and modify the information on the client machine. However, it is possible to provide this static IP address
directly through DHCP rather than manually configuring the client computer. To do so, you will first need
to determine the Ethernet address of the client computer (usually through the network properties). Next you
will go to the Hostnames and addresses web panel of the Server Manager and enter the information there.
Only One DHCP Server
It is imperative that no other DHCP server is on your network. If a former DHCP server configured your computers,
you should remove that DHCP server from your network. Leave DHCP enabled, and reboot each computer. New IP
addresses, netmasks, gateway IP addresses and DNS addresses will be assigned automatically by the 6000 Managed
Application Server (MAS) DHCP server.
Chapter 3. Configuration
3.2.2. Manual Entry For Computers Not Using DHCP Service
As noted above, we strongly recommend that you perform all your client configuration using DHCP. It is even possible to assign a static IP address through the Hostnames and addresses web panel of the Server Manager that will be
distributed through your DHCP server.
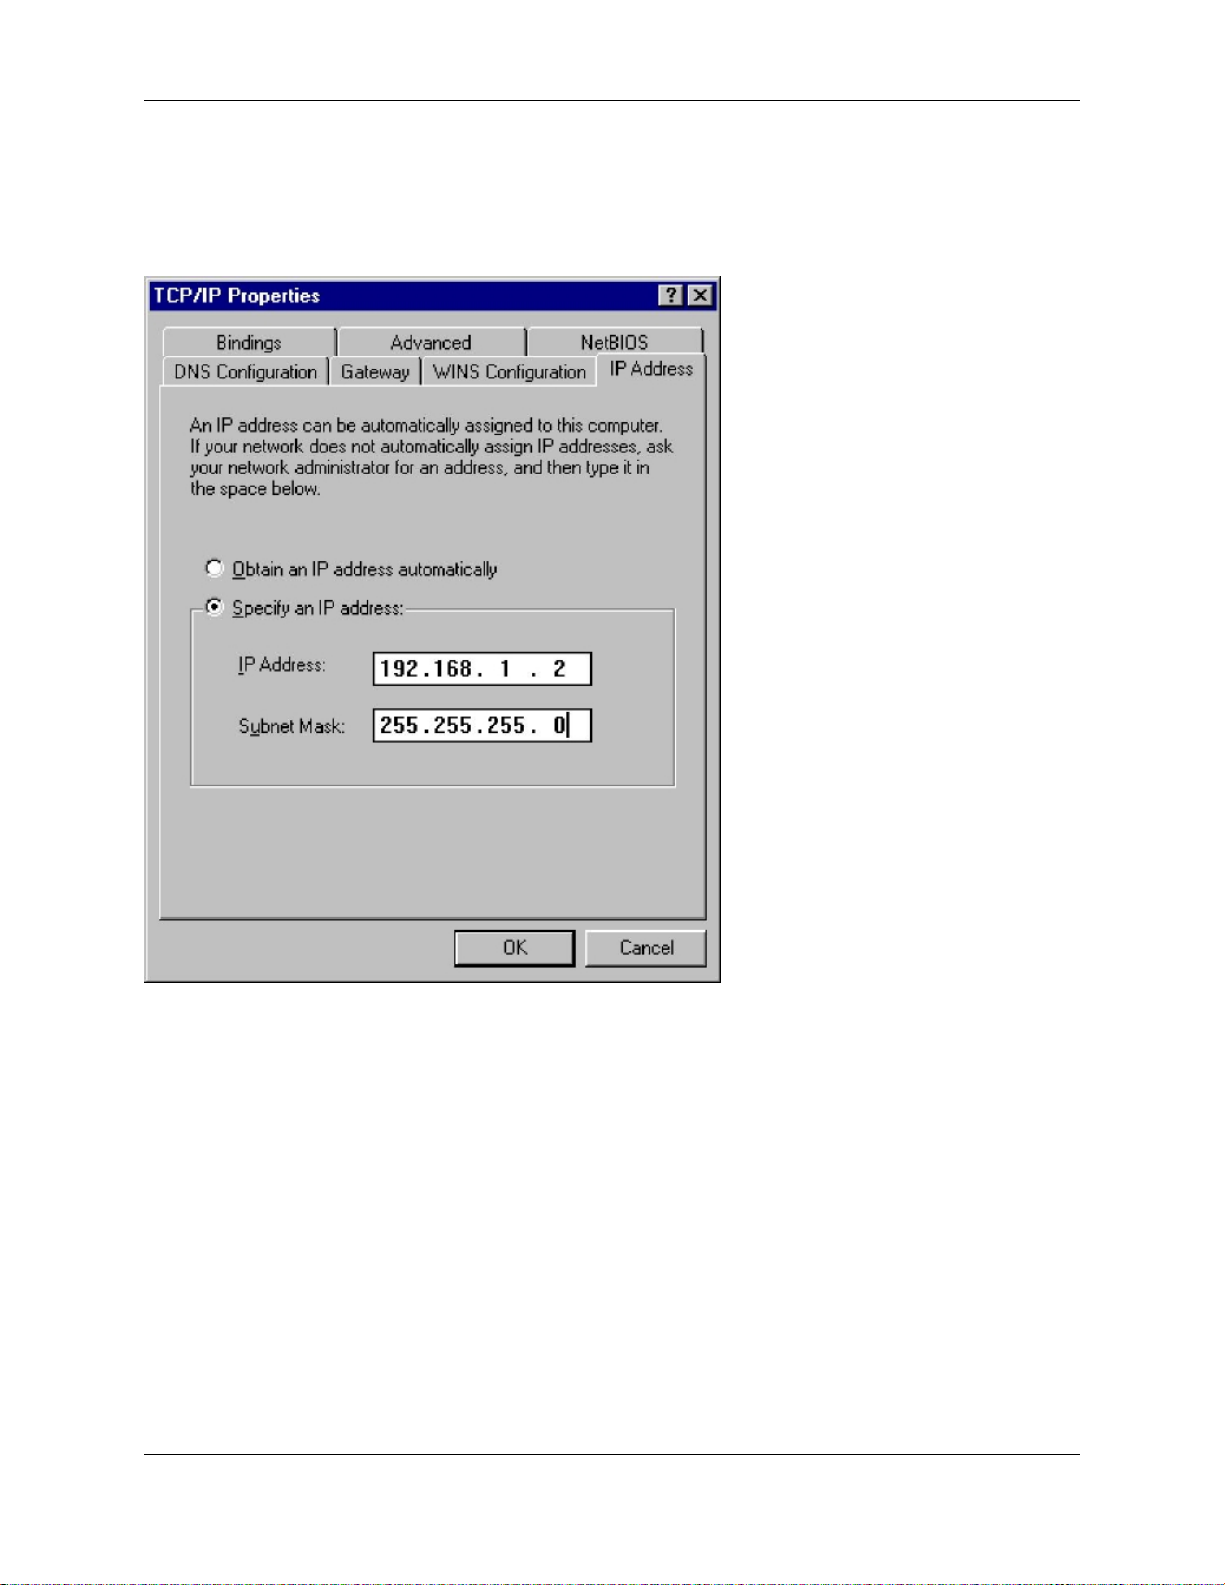
However, if your computers do not support DHCP, you must manually enter the following information into your
TCP/IP properties:
Item Description What to enter
IP address Manually enter this information (see para-
graph below).
subnet mask (or netmask) Manually enter this number. The default subnet mask (or netmask) is
gateway IP address Enter the IP address for the server or, in the
case of server-only mode, enter the IP address for your network's gateway (e.g. the
firewall or network router).
IP addresses of your domain name servers
Manually enter this information. Normally you would just add the IP address
You must assign a different, unique IP address to computers not accepting DHCP
(see note below).
"255.255.255.0".
If you are running in server and gateway
mode, your server is your local network's
gateway. Enter its IP address here: the default is "192.168.1.1". If you are running in
server-only mode, enter the IP address for
the device interfacing with your external
network.
for your server - the default used in the
server console is "192.168.1.1". If you have
a firewall other than your server that restricts internal queries to Internet DNS
servers, you may need to enter additional
DNS servers here.
It is critical that every computer on your network has a unique IP address and that you don't assign two computers
12
Page 18
Chapter 3. Configuration
the same address. In enabling DHCP service in the server console, you designated a range of IP addresses for DHCP
assignment. You also allocated a block of IP addresses for manual assignment. If you accepted the defaults preconfigured into the server console, IP addresses 192.168.1.2 through 192.168.1.64 will have been set aside for manual entry. To avoid duplication, use only those IP addresses when manually assigning IP addresses to your computers.
After configuring the TCP/IP parameters, you may need to reboot your desktop computer to implement the configuration changes. (For example, most Windows systems need to be rebooted after the TCP/IP configuration has been
changed.) Once the settings take effect, your computer will be connected to the server and to the Internet.
3.2.3. MS Windows Workgroup Configuration
If you are using a Microsoft operating system, you must ensure that your workgroup is the same as the workgroup
name of your server. (The default workgroup name is your domain name. In a subsequent chapter, we'll explain how
this can be changed using the web-based Server Manager.) If you are using the default name, go to the Control
Panel, select "Network" and then select "Identification". In the field for "Workgroup", type your domain name.
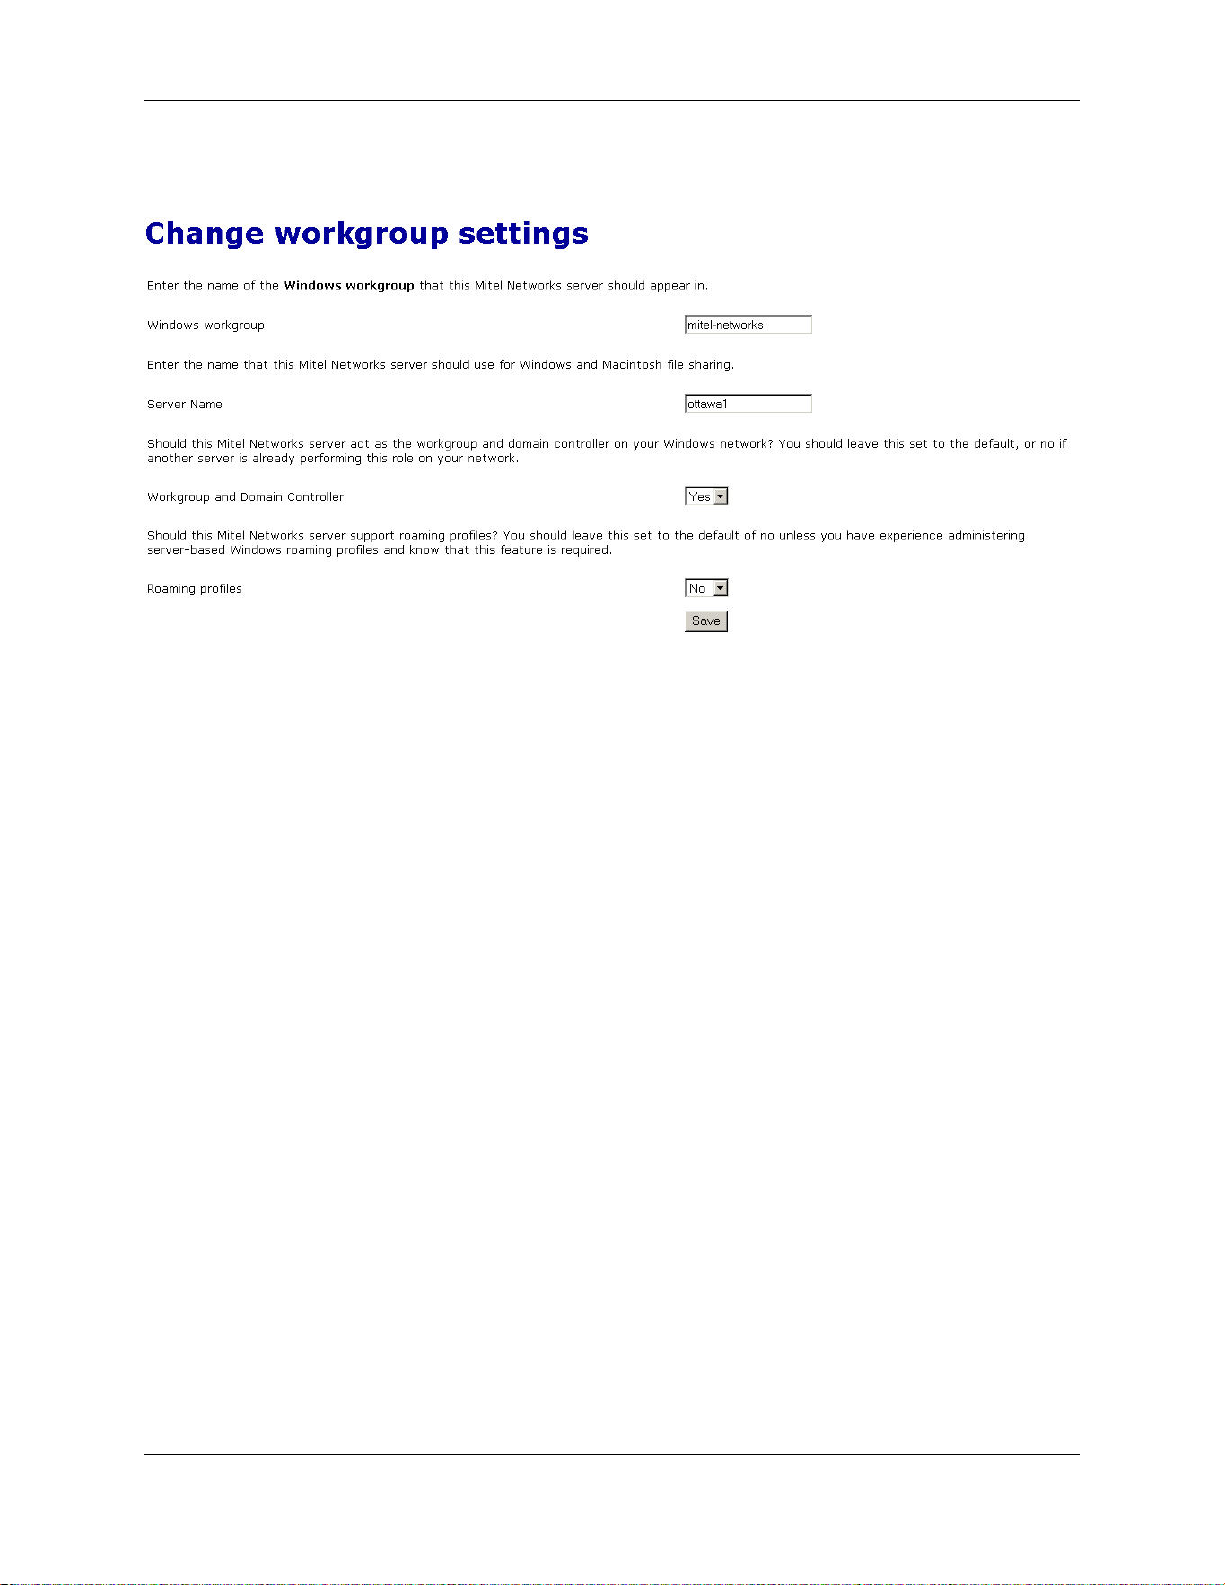
3.3. Workgroup
If you are using a computer on a local network and you wish to access the server via Windows file sharing, it is important that you are logged onto the same workgroup as your 6000 MAS. This screen allows you to enter the name
of the Windows workgroup the server should appear in. If you wish you can change the workgroup name to correspond with an existing workgroup. Macintosh users need only enter a Server Name or accept the defaults.
The Server Name is the name by which the server will be known on the Windows clients, and should be left at its
13
Page 19
Chapter 3. Configuration
default unless there are very good reasons to change it. In order that you may later connect multiple locations using
IPSEC VPNs, we suggest that you ensure a different name is used for each server.
3.3.1. 6000 MAS as Domain Controller
On the 6000 MAS panel shown in the preceding section, you can specify whether the server should be the domain
master for your Windows workgroup. Most sites should choose "Yes" unless you are adding a server to an existing
network which already has a domain master.
Note
Once you join the domain, you do not need to create local accounts on each Windows NT/2000 box. When
you first log in after joining the domain you will need to manually select the Domain of the 6000 MAS
rather than the default (which is to log in locally on the NT machine). You can also join when you install
the client's system.
If you do configure your system to be the domain master, a special Windows share called NETLOGON is created with
a DOS batch file called netlogon.bat. This batch file is executed by Windows clients that have been configured
to "Logon to domain". The netlogon.bat file we provide by default does very little, but advanced users can, if they
wish, modify this script to set environment variables for their clients or provide automatic drive mappings.
As the NETLOGON share is only writable by the "admin" user, you modify the netlogon.bat script by logging on to
a Windows system as "admin", connecting to the share and then modifying the script using a Windows text editor.
Be aware that the NETLOGON share will not be visible in Network Neighborhood or other similar tools. As the
"admin" user, you will need to connect to the share or map a drive to it, by using the specific path:
\\servername\NETLOGON\
The sample file contains a few examples of setting the system time for each machine and also for mapping a common drive for all Windows client.
The sections below define the steps that must be executed on various Windows versions to join domains.
3.3.1.1. Windows 9x
To join a Windows 9x machine to the domain, follow these steps:
14
Page 20

1. Navigate to the Network section of the Control Panel (Start->Settings->Control Panel->Network).
2. Select the Configuration tab.
3. Highlight "Client for Microsoft Networks", and then click "Properties".
4. Check "Log onto Windows NT Domain", and enter the domain name in the text field.
5. Click all the "OK" buttons and reboot.
3.3.1.2. Windows NT 4
To join a Windows NT 4 machine to the domain, follow these steps:
1. Navigate to the Network section of the Control Panel (Start->Settings->Control Panel->Network).
2. Select the Identification tab.
3. Click "Change" and then enter the computer name and the domain name. Click "Create a Computer Account in
this Domain", enter "admin" as the user name and then enter its password.
4. Click "OK".
Chapter 3. Configuration
5. After a short pause (0-10 seconds), you should be greeted by a "Welcome to DOMAIN" message and asked to
reboot.
6. Log in on a domain account.
3.3.1.3. Windows 2000
To join a Windows 2000 machine to the domain, follow these steps:
1. Navigate to the Network section of the Control Panel (Start->Settings->Control Panel->Network and Dial-up
Connections).
2. Click "Network Identification".
3. Click "Properties", enter your computer name and domain name, and then click "OK".
4. You will be prompted for a user account with rights to join a machine to the domain. Use "admin" as the user
name, and enter the password.
5. After a short pause (10-30 seconds), you should be greeted by a "Welcome to DOMAIN" message and asked to
reboot.
6. Log in on a domain account.
3.3.1.4. Windows XP Professional Edition
To join a Windows XP machine to the domain, follow these steps:
1. Navigate to the Network section of the Control Panel (Start->Settings->Control Panel).
15
Page 21
2. Click "Network and Internet Connections".
3. Click "Network Connections".
4. Select "Advanced" -> "Network Identification".
5. On the Computer Name tab, click "Change".
6. Select "Domain" and then enter your domain name.
7. Enter "admin" and the password.
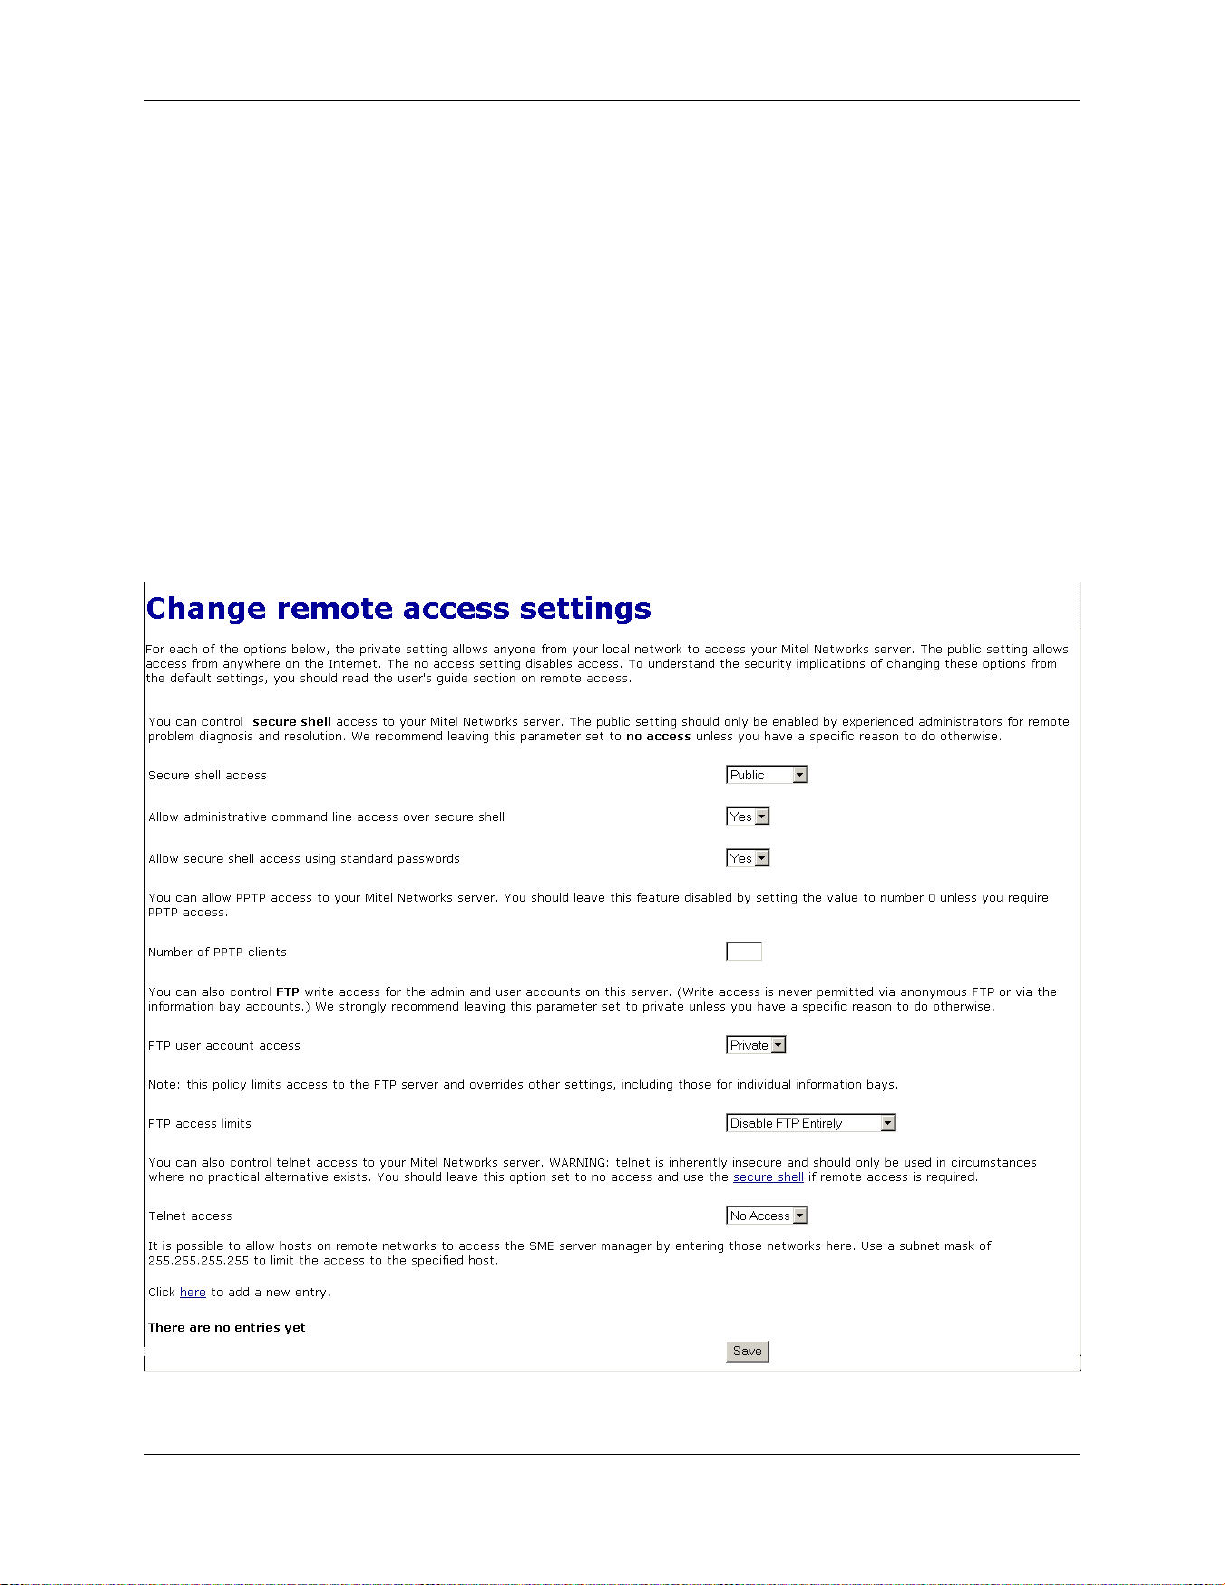
3.4. Remote Access
If you're an advanced user, the 6000 MAS provides several ways to access the underlying operating system, either
from a computer on your internal network or from a computer outside your site on the Internet. Additionally, you
have the ability to access your computer network securely from a remote computer. All of these operations are configured from the screen shown below in the Server Manager.
Chapter 3. Configuration
Each of these remote access methods is described below.
16
Page 22
3.4.1. Remote Access Using ssh
If you need to connect directly to your server and login from a remote system belonging to you, we strongly encourage you to use ssh instead of telnet. In addition to UNIX and Linux systems, ssh client software is now also available for Windows and Macintosh systems. (See the section below.)
If you do not have any reason to allow remote access, we suggest you set this to No access .
ssh (secure shell)
ssh (secure shell) provides a secure, encrypted way to login to a remote machine across a network or to copy files
from a local machine to a server. Many people do not realize that many programs such as telnet and ftp transmit
your password in plain, unencrypted text across your network or the Internet. ssh and its companion program scp
provide a secure way to login or copy files. The ssh protocol was originally invented by SSH Communications Security which sells commercial ssh servers, clients, and other related products. The protocol itself has two versions SSH1 and SSH2 - both of which are supported by most clients and servers today. For more information about SSH
Communications Security and its commercial products, visit http://www.ssh.com/.
OpenSSH, included with the 6000 MAS, is a version of the ssh tools and protocol. The server provides the ssh client
programs as well as an ssh server daemon and supports both the SSH1 and SSH2 protocols. For more information
about OpenSSH, visit http://www.openssh.com/ [http://www.openssh.com/].
Chapter 3. Configuration
Once ssh is enabled, you should be able to connect to your server simply by launching the ssh client on your remote
system and ensuring that it is pointed to the external domain name or IP address for your server. In the default configuration, you should next be prompted for your user name. After you enter admin and your administrative password, you will be in the server console. From here you can change the server configuration, access the Server Manager through a text browser or perform other server console tasks.
If you do enable ssh access, you have two additional configuration options:
• Allow administrative command line access over ssh - This allows someone to connect to your server and login as
"root" with the administrative password. The user would then have full access to the underlying operating system. This can be useful if someone is providing remote support for your system, but in most cases we recommend setting this to No.
• Allow ssh using standard passwords - If you choose Yes (the default), users will be able to connect to the server
using a standard user name and password. This may be a concern from a security point of view, in that someone
wishing to break into your system could connect to your ssh server and repeatedly enter user names and passwords in an attempt to find a valid combination. A more secure way to allow ssh access is called RSA Authenti-
cation and involves the copying of an ssh key from the client to the server.
Note
By default, only two user names can be used to login remotely to the server: admin (to access the server
console) and root (to use the Linux shell). Regular users are not permitted to login to the server itself.
3.4.1.1. ssh clients for Windows and Macintosh systems
A number of different free software programs provide ssh clients for use in a Windows or Macintosh environment.
Several are extensions of existing telnet programs that include ssh functionality. Two different lists of known clients
can be found online at http://www.openssh.com/windows.html [http://www.openssh.com/windows.html] and
http://www.freessh.org/.
A commercial ssh client is available from SSH Communications Security at:
http://www.ssh.com/products/ssh/download.html [http://www.ssh.com/products/ssh/download.html]. Note that the
17
Page 23
Chapter 3. Configuration
client is free for evaluation, academic and certain non-commercial uses.
3.4.2. Remote Access Using SSL
It is also possible to specify individual remote hosts or entire subnets from which access is permitted. At the bottom
of this Remote Access screen, entries can be added to a table that lists those subnets that have been given access.
Simply provide the network IP address and the appropriate subnet mask to grant this additional access.
You can now connect to the server manager using the regular URL of https://www.mydomain.xxx/server-manager.
You will be prompted for the admin user name and password.
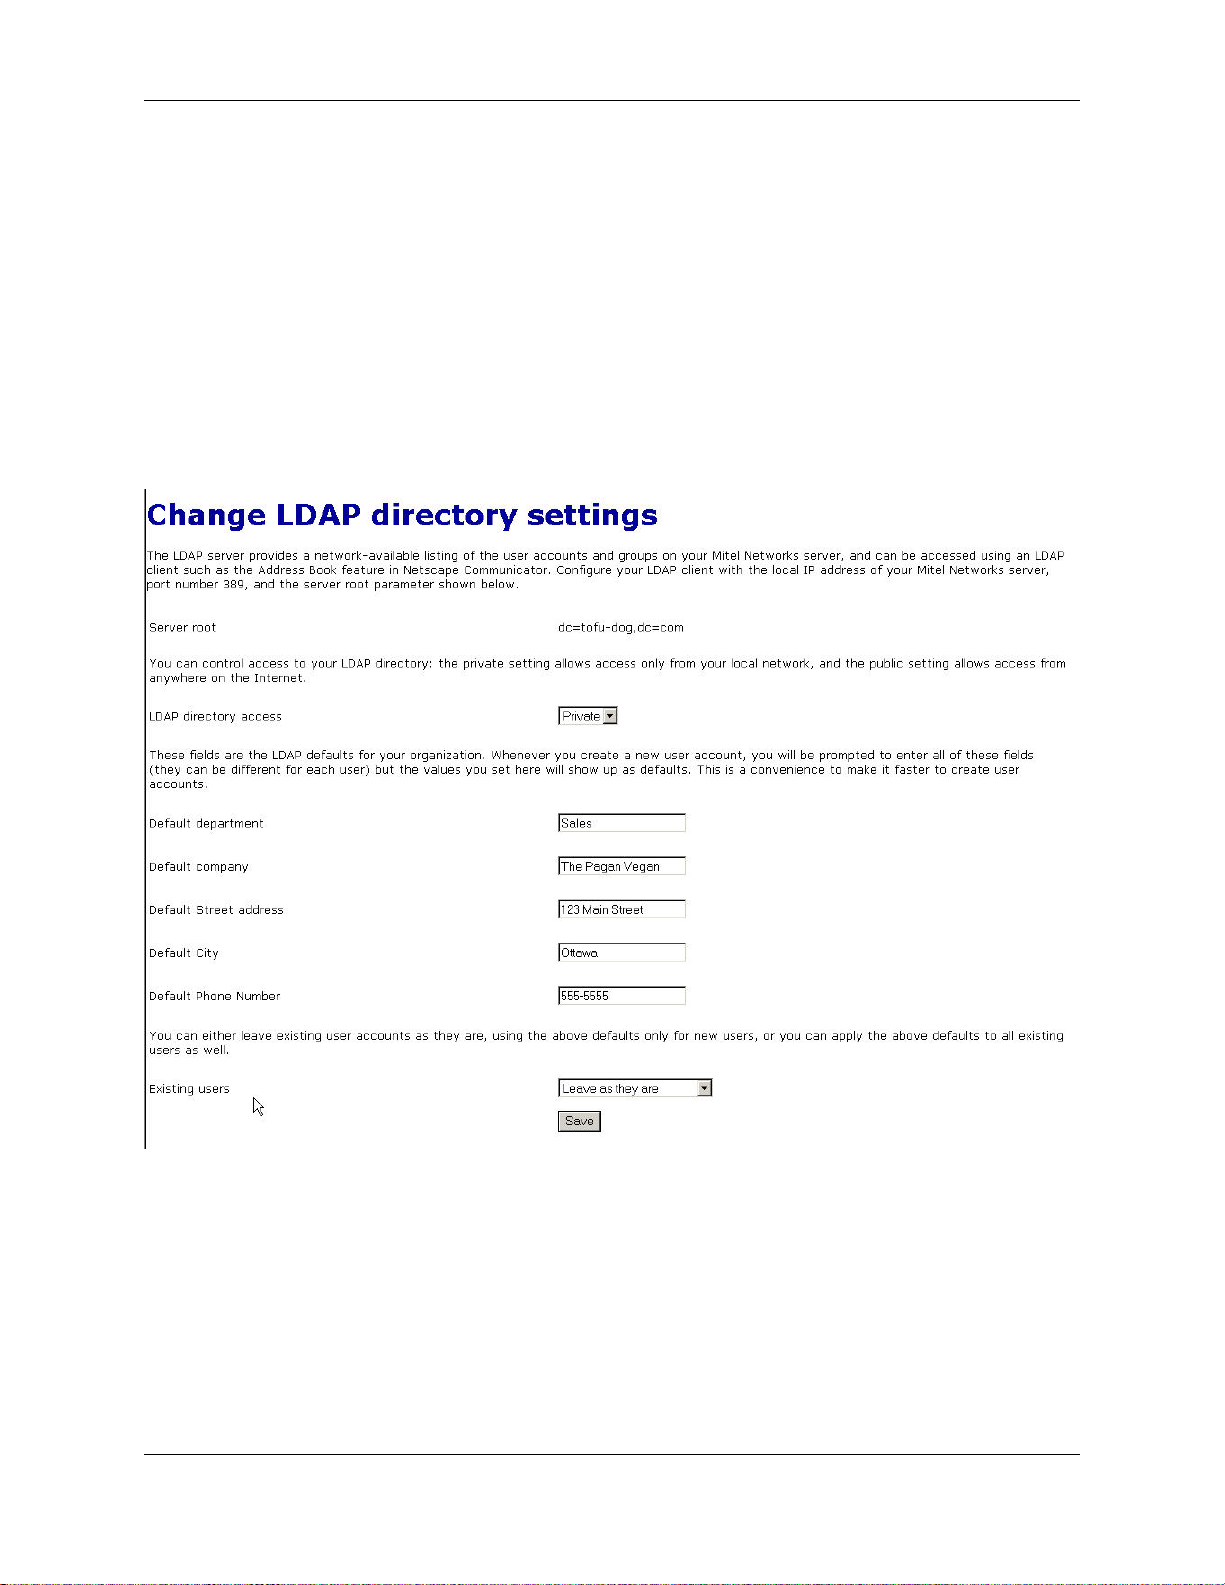
3.5. Directory
Your 6000 MAS provides an easy mechanism for creating a company directory. Each time you create or delete an email account, your directory is automatically updated.
In this section of the Server Manager, you specify the default directory information for new accounts - the user's department, company, street address, city and phone number. Each time you create an e-mail account, the fields will
contain the information entered here as the default. If you wish, you can modify the default information for each
user.
At any time, you can change the default information and choose whether to apply this new information to all new
users or to all existing users as well. The field to do this is located near the bottom of the screen. Choosing "update
with new defaults" is a convenient one-click method of revising your directory when, for example, your company
has moved to a new address.
3.5.1. Configuring Your Company's Directory on Clients
18
Page 24

The 6000 MAS directory can be accessed using any client program that supports LDAP (Lightweight Directory Access Protocol). This includes Outlook Express, Netscape Communicator and Eudora.
To configure the company directory, enter the following information:
• The name you wish to give your company directory - any name will do.
• The name of the LDAP server. This is the same as the name of your 6000 MAS web server, in the form
www.yourdomain.xxx.
• Server Root information. This can be found on the "Directory" screen in your Server Manager. The usual form,
assuming your domain is yourdomain.xxx, is dc=yourdomain,dc=xxx. (No spaces should be entered between the
"dc=" statements.)
• Port Number, which is always 389.
3.5.1.1. Configuring Outlook Express
On the Outlook menu, select "Tools" and then "Accounts". Select "Add", then "Directory Service...". The following
screen appears:
Chapter 3. Configuration
Enter the full URL of your 6000 MAS web server and then click "Next". The following screen appears:
19
Page 25

Chapter 3. Configuration
Select "Yes", then "Next", and then "Finish". After closing this screen, the following screen appears:
Select "Properties" to display the next screen:
20
Page 26

Chapter 3. Configuration
In the General tab, type your desired directory name in the first field, then select the "Advanced" tab. You will see
the screen below:
21
Page 27

Chapter 3. Configuration
In the "Search base" field, enter the domain name, broken down per the tofu-dog.com example:
dc=tofu.dog,dc=com .
3.5.1.2. Configuring Netscape
In the "Communicator" menu, select "Address Book". Then, in the "File" menu, select "New Directory". You will
see a dialog box similar to the one shown below:
22
Page 28

Chapter 3. Configuration
Once the address book has been created, Netscape can display a list of all e-mail accounts if you type an asterisk
into the search field and press "Enter".
Click "OK" to commit the changes. The LDAP configuration is now complete.
3.6. Printers
Your 6000 MAS enables all users on your network to easily share a printer. The printer can be either locally attached to a parallel or USB port on your server or can be a network printer. All the server needs is some basic information: the printer name (which can be anything you want, as long as it starts with a lower-case letter and consists
only of lower-case letters and numbers, with no spaces), a brief description (for example, "the printer down the
hall") and the location of the printer - whether it is on the network or directly connected to your server through a parallel or USB port.
23
Page 29

Chapter 3. Configuration
If you choose "Network printer", you will see an additional screen that will ask for the hostname or IP address and
the network printer name. Enter that information where requested. For the network printer name, you can use the default setting, raw, unless you have some reason to do otherwise. (raw is the name used by most network printers for
their main print queues.)
Note
For maximum flexibility in making changes later, we suggest that you enter the hostname for a network
printer here and enter the IP address of the printer through the Hostnames and addresses panel of the Server
Manager. This allows you to have one central location listing IP addresses and allowing you to make
changes. Note that many modern network printers can be configured automatically. To do so, enter their
hostname, IP address and Ethernet address in the Hostnames and addresses panel.
Note also that the server printing system does not perform any filtering and passes the print requests directly from
the client computers to the printer in the "raw" or "pass-through" machines. For this reason, the 6000 MAS does not
have a list of "supported printers". Most printers are supported as long as the appropriate driver is installed in the operating system on your client computers.
However, be aware that some newer printers have only a Windows driver and rely heavily on that operating system
to perform their print functions. These printers cannot be used on the 6000 MAS. If you are concerned about
whether your printer will work with your server, please consult you Mitel Networks authorized reseller.
As a final item, you should be aware that in order to use the printers available through your server a user must be
logged in to their client system with a user name and password that is valid on the server. For instance, if a user is
logged in as tturtle on their Windows desktop and that user account does not exist on the server, the user will not
be able to print to the printers managed by the server. Either the user will have to logout and log back in as a valid
user or the tturtle account will need to be created on the server.
3.7. Hostnames and addresses
When your 6000 MAS was installed, a name was assigned to the server. That name and several other "standard"
names are automatically configured in your system's host table during the installation process. This host table is consulted as part of the name resolution process. The "Hostnames and address" web panel allows you to modify this table and specify different host "names" for each domain on your system, as well as to control how those names resolve both for systems on your local network and also for systems on the larger Internet.
For instance, when someone tries to connect to "www.mycompany.xxx", they will be taken to wherever "www" has
been set to point to. As seen in the image below, this screen in the Server Manager allows you to view these default
settings, and also to modify the configuration.
24
Page 30

Chapter 3. Configuration
Using the Hostnames Panel with ServiceLink
Throughout the screens linked to from the Hostnames panel, you will find the text "Publish globally?" with a checkbox next to it. 6000 MAS subscribers have the option of publishing these records through the ServiceLink DNS
Configuration and Hosting service. If you select this option, the hostname and IP address information that you enter
will be uploaded to the AMC and published through the global DNS system.
Suppose, for example, your company's web site was hosted at some other location, such as on your ISP's web
servers. If you wanted "www.mycompany.xxx" to point to your ISP's server, you would modify the entry here by
clicking the "Modify..." link next to "www". The image below shows the screen in which you would perform the
task:
You would first change the location to "Remote" and then enter the IP address of your ISP's server in the field
marked "Global IP".
25
Page 31

3.7.1. Creating New Hostnames
Creating new hostnames simply involves selecting one of the links at the top of the Hostnames and addresses panel
and filling out the appropriate fields. As mentioned previously, if you are a 6000 MAS subscriber you can check
"Publish globally?" and your changes will be propagated to the global DNS system automatically.
Note that if your system is configured with any virtual domains, you will have the choice of the domain in which
you want to create the hostname. This allows you, for instance, to have "www.tofu-dog.com" pointing to one IP address and "www.mycompany.xxx" pointing to a completely separate IP address.
Note
Beyond your primary domain and any virtual domains you may have configured, 6000 MAS subscribers
also have the option of adding hostnames in the special e-smith.net domain.
The hostnames you can create on this panel fall into three categories:
Additional names for your server: For instance, you might want to set up "intranet.mycompany.xxx" to point to your
server. All you do here is enter the hostname and, if appropriate, choose the domain for the hostname.
Remote hosts: As mentioned in the example earlier, you might want to point a hostname such as "www" to a remote
system. While "www" is created by default, you can create other names such as "home", "research", or any other appropriate name. In the form, you simply enter the hostname, choose the domain, and enter the remote IP address.
Chapter 3. Configuration
Local hosts: This screen is a bit more complicated because you have more options. At a basic level, you can create a
hostname in a domain that points to another computer on your local network. To do this, just type in the hostname
and enter the IP address in the "Local IP" field. For instance, you might want "research" to point to a computer system inside your network.
Where this gets complicated is when you want "research.mycompany.xxx" to be accessible both inside and outside
your local network. The challenge is that your local IP addresses are only accessible inside your network. For that
reason, the target computer system will need to have two network interface cards - one connected to the internal network and one connected to the external network. You would then enter both IP addresses in this screen in the "Local
IP" and "Global IP" fields. Note that this will only work if you are a 6000 MAS subscriber as the server alone does
not update public DNS information.
Note
The "Ethernet address" field when creating a hostname pointing to a local host is only used for reserving IP
addresses through DHCP as mentioned in the next section.
3.7.2. Reserving IP Addresses Through DHCP
Another task you can perform through this panel is to reserve an IP address for a given system based on its Ethernet
address. For instance, you might have another intranet web server within your company that requires a consistent IP
address. One method of assigning that address is to manually configure the client machine with a static IP address.
The drawback is that if you later want to change the network settings for that machine, you must manually configure
that machine. Additionally, you have to keep track of the fact that you have assigned a specific IP address to that
machine.
Rather than configuring the machine manually, you can reserve an IP address from the DHCP server for that specific machine. This has the same result as manually configuring a static IP address, but offers two benefits. First, you
have one location to keep track of all assigned static address. Second, through the DHCP server you will provide
network settings. If you wish to change those settings, the change can be done from your server. All DHCP clients
will then receive those updated changes when they renew their DHCP-provided addresses.
To reserve an IP address, you must first determine the Ethernet address of your client system. Windows NT/2000
users can type the command ipconfig /all. Windows 95/98 users can run the command winipcfg. Linux/
26
Page 32

UNIX users can type ifconfig.
Once you have determined the client's Ethernet address, click the link to create a new hostname for a local host. Add
the hostname of the target system, the Ethernet address along with the desired IP address into the web panel. From
this point on specified IP address will only be provided to a client system with the matching Ethernet address.
3.8. Virtual Domains
When you are supporting multiple domains on a single server, each domain being served is referred to as a virtual
domain. (The strict definition of virtual domain is when a single IP address is shared between multiple domains.)
When you create a virtual domain using this section of the Server Manager, your 6000 MAS will be able to receive
e-mail for that domain and will be able to host a web site for that domain.
To create a virtual domain, fill in the domain name and a description of the site. You then tell the server where to
find the content for that domain - it can be the same as your primary web site, or you can create a new set of web
pages and store them in one of your i-bays. Clicking the arrow in the "Content" field will show you a list of your
current i-bays and allow you to make a selection. This feature allows you to host multiple web sites from a single
server.
Be aware that you can point the virtual domain to either the primary web site or to one of the i-bays. You cannot
point a virtual domain to a subdirectory that you simply create inside of the primary web site file area. You need to
use an i-bay instead.
Chapter 3. Configuration
Note
When you are entering the name for the virtual domain, you should supply the fully-qualified domain name.
This is the full name of the domain, including any extensions like ".com", but without any prefixes like
"www" or "ftp". For instance, you can create a virtual domain by entering "tofu-bird.com", but not by en-
tering "tofu-bird" or "www.tofu-bird.com".
Once you have created a virtual domain, your server will be automatically configured to answer to web requests for
www.domainname.xxx and will accept e-mail for your virtual domain as well.
Important
In order for users on the Internet to connect to your 6000 MAS using the virtual domain, the appropriate
DNS entries must point to the IP address of your server. If your 6000 MAS subscription includes DNS Ser-
vices, this can be done automatically. Please contact your Mitel Networks authorized reseller for assistance.
3.9. E-mail
The E-mail Retrieval panel of the Server Manager allows you to specify the protocol used to retrieve e-mail from
your ISP and to configure other settings related to the retrieval of e-mail.
27
Page 33

Chapter 3. Configuration
Your choice of e-mail retrieval mode will depend on the arrangements you made with your Internet service provider:
• If you have a dedicated connection, set E-mail retrieval mode to "Standard".
• If you arranged "ETRN" support with your ISP, choose that setting and then scroll down to the field that asks for
the IP address or hostname of your ISP's secondary mail server. This secondary mail server will provide temporary e-mail storage when your server is not connected to the Internet.
• If you arranged "multi-drop" mail service from your ISP, choose "multi-drop" and then scroll down to the field
that asks for the IP address or hostname of your ISP's secondary mail server. This secondary mail server will receive all e-mail for your domain and store it in a single POP mailbox. Further down the screen, you will need to
specify the user account and password assigned by your ISP for this POP mailbox. Your server will periodically
fetch this mail and distribute it to individual POP mailboxes on the server. (Note that due to problems receiving
mail for mailing lists, we strongly encourage people to NOT use multi-drop e-mail.)
If you want to forward e-mail to another mail server for processing, enter the mail server IP address in the box
marked Delegate mail server. A common use for this is if your server is receiving inbound e-mail from the Internet,
but you would like to pass that mail to a different mail server on your internal network.
If you have a dialup connection, the server allows you to control how frequently it fetches e-mail from your ISP.
This is particularly useful in situations where you incur phone or Internet charges each time your system contacts
your ISP. The default settings are every 15 minutes during standard office hours and every hour outside normal of-
28
Page 34

Chapter 3. Configuration
fice hours on weekdays or on weekends. The fields allow you to customize those settings.
Finally, if you have "multidrop" mail service you need to select the sort method used by the server to decide which
user each message should be delivered to. Your server has a default method for this (it examines various headers
such as "To" and "Resent-To") which works in most circumstances but is not suitable for certain purposes such as
mailing list messages. Some ISPs add a header to each e-mail message which can help your server determine the
correct recipient. If your ISP does not add a header to multidrop e-mail, select the "Default" sort method and ignore
the "select sort header" field. If your ISP does add a header to multidrop e-mail, then select "Specify below" and enter the header tag provided by your ISP. Because you will experience problems with mailing-lists when using multidrop e-mail, we strongly recommend that you work with your ISP to have a special header added to each message.
The "Default" sort method should be only used as a last resort.
The Other E-Mail Settings panel presents you with additional options for controlling how your system handles email.
• Forwarding address for administrative notices: The default address for administrative notices (i.e. undeliverable
mail, backup notifications and other status/error messages) is "admin". If you want those messages to be sent
elsewhere, enter the address here.
Note
Be aware that all messages sent to postmaster, root or mailer-daemon at your domain are sent to ei-
ther admin or the address that you enter in this field.
• E-mail to unknown users: This field allows you to choose whether incoming messages to unknown or non-
existent users are bounced back to the sender or forwarded to the system administrator. Some users prefer the
latter setting because it allows them to catch and reroute e-mail that was incorrectly addressed.
Note
29
Page 35

Chapter 3. Configuration
If you choose to have messages forwarded to the system administrator, they will be sent to "admin" or to
the e-mail address specified in the forwarding address field mentioned above.
• Internet provider's SMTP server: Normally the server will send outgoing messages directly to their intended des-
tination. If, however, you have an unreliable connection or are using a residential Internet service, it may be advisable to route e-mail via your provider's SMTP server. In that case, you should enter the SMTP server's hostname or IP address here.
If you have a temporary dial-up connection to the Internet, you may find that you need to use your ISP's mail
server in order to deliver mail to some locations. In order to crack down on the huge volume of unsolicited commercial e-mail ("spam"), many Internet sites are refusing direct SMTP connections from IP addresses that are
known to be temporary dial-up accounts. For this reason, you may need to use your ISP's mail server since it will
have a permanent connection to the Internet.
• POP and IMAP server access: The options are "Private" and "Public". The former allows access only from your
local network. The latter allows access from anywhere on the Internet. Think about this carefully. On the positive side, choosing "Public" access allows any of your users to retrieve their e-mail via POP/IMAP from anywhere on the Internet. The negative side is that when you do this, you are reducing your level of security, as you
will now have two more services (POP and IMAP) that are listening for connections across the Internet. Both
protocols also involve transmitting your password across the Internet in plain, unencrypted text, opening up the
possibility that someone could intercept the packets and learn your username and password. Allowing such access can be a great convenience to your users, but if security is a concern you should consider using encrypted
webmail instead.
IMPORTANT
Even with POP and IMAP configured for public access, users outside your local network are not able to
send e-mail using your server as their SMTP host. Allowing this would open your server to abuse by spam-
mers as a mail relay. Users who are traveling should use PPTP to connect to your internal network; or use
webmail to read their mail. Webmail provides your users with secure access to read and send mail via your
server.
• Enable/Disable Webmail: With this option you can enable or disable the webmail component of your server.
More information can be found in the Webmail chapter.
3.9.1. Configuring Your E-mail Application
Each user's e-mail application requires information about that user's account, where to send outgoing e-mail and
pick up incoming e-mail. This information is usually entered in the "preferences" or "options" section. Most e-mail
applications require you to enter the following information:
User's e-mail address: The user's e-mail address is the user account as created in the Server Manager plus the
@domain name. Typically it will be in the form of username@yourdomain.xxx (e.g. afripp@tofu-dog.com).
E-mail server or outgoing e-mail SMTP server: This is the name of the e-mail server from the server. Normally you
should just enter mail here. If you prefer, you should also be able to use the full domain name of
mail.yourdomain.xxx (e.g. mail.tofu-dog.com).
E-mail account name or user name: this is the name before the @ in the e-mail address. For example, the username
for "afripp@tofu-dog.com" is "afripp".
If you choose POP3 e-mail service:
Enable POP3 protocol: Typically, to enable the POP3 protocol for incoming e-mail, you click on the POP3 check-
box or select POP3 from a pull-down menu in the section of your e-mail application dedicated to the incoming email server.
30
Page 36

Disable IMAP protocol: To disable the IMAP protocol for outgoing mail (not all e-mail applications have IMAP
protocol) click the IMAP checkbox "off".
Delete read e-mail from server: We recommend you configure your e-mail application so e-mail that has been read
is not left on the server. To do this, click off the checkbox marked "leave mail on server" or click on the checkbox
marked "delete mail from server".
If you select IMAP e-mail:
Enable IMAP protocol: Typically, to enable the IMAP protocol for incoming e-mail (note that not all e-mail appli-
cations offer IMAP support) you click on the IMAP checkbox or select IMAP from a pull down menu in the section
of your e-mail application dedicated to the incoming e-mail server.
Disable POP3 protocol: To disable the POP3 protocol for outgoing mail, click the POP3 checkbox "off".
3.9.1.1. Configuring Outlook Express
This section provides a step-by-step overview of configuring the Outlook Express e-mail client to access the 6000
MAS e-mail server. The process is similar for Outlook and other e-mail clients.
When the e-mail client is opened for the first time, the following screen is displayed. Enter the full name of the user
and click "Next".
Chapter 3. Configuration
The next screen is where the user's e-mail address is entered. E-mail addresses are in the same format as the user's
logon ID. The system also supports aliases of the form "firstname.lastname" and "firstname_lastname".
Enter the e-mail address (checking the domain name spelling) of the user and click "Next". You will see the screen
below:
31
Page 37

Chapter 3. Configuration
In the next screen, select "IMAP" as the server type, and enter "mail" as the server name in both fields. Click "Next".
You will see the screen below:
In the next screen, enter the password (the same as the network password) and go to the final screen. Click "Finish".
The program will ask if you want to synchronize folders. Click "Yes", and then "OK" to exit.
3.9.1.2. Configuring Netscape
The images below show you the sequence in Netscape. First you choose Preferences from the Edit menu and click
on Mail Servers, as shown in the following image:
32
Page 38

Chapter 3. Configuration
If you have not configured a mail server yet, you will need to press the Add... button and enter information about
your server. Otherwise, you will select the default mail server listed and click on the Edit... button. This will bring
up a screen where you enter the user name and choose whether you are using IMAP or POP3:
Netscape should now be ready to send and receive e-mail.
3.10. Configuring Your Web Browser
Most browsers are configured using a dialog box called "preferences", "network preferences" or "options". Some
browsers need to be configured to access the Internet either directly or via a proxy server. When required, most
desktop applications, your web browser included, should be configured as though they were directly accessing the
Internet. Although the server uses a security feature known as IP masquerading, thereby creating an indirect connec-
33
Page 39

Chapter 3. Configuration
tion to the Internet, this is a transparent operation to most of your desktop applications. Hence, you should ensure
that the "Direct connection to the Internet" check box is clicked "on" in your web browser.
Your 6000 MAS includes a proxy server that caches all web pages that your users request. As a result, users may
perceive that network performance is much faster when browsing the web. You do not need to do anything to configure your client web browsers to use the caching proxy server. It is automatically enabled and is transparent to
your users.
3.11. Choosing Your Web Browser Language
The Server Manager supports any language that uses the Roman alphabet and reads left to right. However, the user
interfaces are currently available only in English and Canadian French. Contact your authorized reseller for more information regarding translations into other languages.
Your browser language setting will determine which language the Server Manager will display. For example, if the
browser language is set to "en" or "en_US", the Server Manager panels will be displayed in English. If the browser
language is set to "fr-ca", the Server Manager panels will be displayed in Canadian French. Choosing any other language for which the translations have not been installed will result in defaulting to English ("en").
Example: How to configure your Netscape browser to display the Server Manager in French.
1. Open your browser. Click "Edit/Preferences/Navigator/Languages".
2. Choose "Add" to add a new language.
3. Select "French/Canada [fr-ca]" and then click "OK".
4. To make French the first choice language, select it and then use "Move Up" until it is at the top of the choices.
5. Connect to https://www.yourdomain.xxx/server-manager . It should now display in Canadian French.
Note
You must choose "French/Canada [fr-ca]". Choosing "French [fr]" will still result in the pages being dis-
played in US English.
Note
It is possible to install in Canadian French and have the console displayed in French, but have two opera-
tors displaying web pages in their chosen languages - English and Canadian French.
Example: How to configure your Internet Explorer browser to display the Server Manager in French.
1. Open your browser. Click "Tools/Internet Options". Choose the "General" tab, and click "Languages".
2. Choose "Add" to add a new language.
3. Select "French/Canada [fr-ca]" and then click "OK".
4. To make French the default language, select it and then use "Move Up" until it is at the top of the choices.
5. Connect to https://www.yourdomain.xxx/server-manager and it should now display in Canadian French.
Note
You must choose "French/Canada [fr-ca]". Choosing "French [fr]" will still result in the pages being dis-
34
Page 40

played in US English.
Note
It is possible to install in Canadian French and have the console displayed in French, but have two opera-
tors displaying web pages in their chosen languages - English and Canadian French.
3.12. Backup or Restore
You can easily back up the contents of your 6000 MAS to a local desktop or to a tape drive. Both are controlled
through the web panel shown below.
Chapter 3. Configuration
You have four actions you can perform, each of which is described in the following sections.
3.12.1. Backup To Desktop
The first type of backup allows you to save a snapshot of your server configuration onto your desktop computer.
This will save all user accounts, user directories, i-bay contents and web content, as well as the configuration parameters entered using the server console and the Server Manager. The web panel shows you the size of the backup file
so that you can verify whether sufficient space exists on your desktop machine.
When you choose Backup to desktop, a browser window will appear that will allow you to name the file and select
the location on your desktop where the file will be saved.
Warning
The Backup to Disk process saves all of your data to a single, large compressed file and is therefore limited
by the maximum file size of the client operating system. For example, if you are backing up data to a Win-
dows client that uses the FAT file system (the default for many versions of Windows), you are limited to a
maximum file size of 2 GB. Other file systems may have a larger limit. If the Backup to Disk process cre-
ates a compressed file larger than this limit, it will not be able to be properly restored. Use the Verify Desk-
top Backup File option in the action drop-down list to ensure the backup was successful.
3.12.2. Restore From Desktop
35
Page 41

Chapter 3. Configuration
If you ever need to restore the original configuration and files to your server, simply select Restore from desktop and
a browser window will prompt you to select the backup file from your desktop. Restoration of the information is automatic.
Warning
Ideally you should use Restore from desktop on a freshly installed server. Therefore, if you are planning to
do a restore, you should first re-install the 6000 MAS software and then perform the "Restore from desktop
command.
3.12.3. Verify Desktop Backup File
This option allows you to verify that the backup to disk was completed successfully. From the drop-down list under
Backup Configuration and Status, select "Verify desktop backup file".
3.12.4. Configure Tape Backup
The second type of backup involves configuring your system to perform a daily full system backup to a tape drive. If
you wish to activate this option, check the box next to Enable Tape Backup and then specify the time at which you
wish the backup to occur and the time at which reminder notices should be sent.
Be aware that you must use a supported tape drive and that a tape must be inserted in the drive for the backup to
work.
Note
Reminder e-mail messages for tape backups are automatically sent to the e-mail address that is configured
to receive administrative notices. This is normally the user admin, but you can change this by going to the
"Other e-mail settings" panel in the Server Manager.
3.12.5. Restore From Tape
If you are performing regular backups, you can restore user data and configuration settings by using the Restore
From Tape option. The system will then read the files from tape and overwrite any currently existing files. You must
reboot your system after the restore for the changes to take effect. Note that in order to restore data from tape, you
must have first checked Enable Tape Backup and scheduled nightly backups. If you have not done this, you will not
be able to restore from tape using the Server Manager.
Warning
Note that this restore procedure only restores user data and configuration information. It does not restore
system files. If you experienced a serious system crash, you should first re-install the 6000 MAS software
36
Page 42

and then perform a restore from tape.
3.13. Review Configuration
This section of the Server Manager summarizes how your server is configured. This is the data that you entered during the installation process and possibly changed later through the server console or the Server Manager. As you can
see from the screen below, this is essentially a report that you can print out for your records. You do not have the
ability to make changes from this screen.
Chapter 3. Configuration
37
Page 43

Chapter 4. Collaboration
4.1. User Accounts
User accounts should be set up for each person in your organization. A user account includes separate, passwordprotected e-mail and file storage areas.
If this is the first time you are setting up user accounts for your organization, you will need to establish your naming
convention. Let's assume you've decided that the account name should consist of first initial and last name. So, if
you have an employee named Fred Frog, Fred's user account would be "ffrog". Assuming your domain name is tofudog.com, Fred's e-mail address would be "ffrog@tofu-dog.com". Fred's file directory on the server would also be
named "ffrog". There are some basic rules built into the server as to what constitutes a valid account name. The account name must contain only lower-case letters and numbers and should start with a lower-case letter (not a number).
User account names are limited to twelve characters to maintain consistency with various versions of Windows.
Longer names can be created for e-mail through the Pseudonyms panel. Note that pseudonyms of first"name.lastname" and "firstname_lastname" are automatically created for each account.
In the User Accounts section of the Server Manager, you will see a list of your current accounts. If you haven't already created any accounts, select "Click here" and fill in the requested information - the account name (the part of
the e-mail address that comes before "@"), the person's name, address, department, company and phone number. As
a convenience, the defaults that you entered in the Directory section of the Server Manager appear each time you
create a new account. You can, if necessary, modify the information for each user as you create the account.
From the list of user accounts, you can easily modify or remove a user account (by clicking on "modify" or "remove
next to the user name) or set the user's password. User accounts are locked out and cannot be used until you set the
initial password for each account. As a reminder of this, user accounts appear in red until the password is changed.
(In the example shown here, the administrator has not yet changed the password for user "Sally Salmon").
Note
If you want someone to have an e-mail address at your company, but want the messages forwarded to an-
other external e-mail address, you can create the user account but set the e-mail delivery option in the user
account to Forward to address below and enter the external address. If you leave the user account locked
out, the user will not be able to access services on your server, but the e-mail will be delivered to the exter-
nal e-mail address.
4.1.1. Disabling User Accounts
There may be times when you do not wish to delete a user account but instead merely want to disable it. For instance, when an employee leaves the company, you may want to immediately remove their access to the server, but
still keep their files or e-mail address active until the information can be examined. To disable any user account on
your server, click the "Lock Account" link on the User Accounts web panel. As soon as you click the link, the account will be locked out. The user will no longer be able to retrieve e-mail or connect to any files or other resources
38
Page 44

Chapter 4. Collaboration
on the server.
When an account is disabled, e-mail will still be received for that user name, but the user will be unable to retrieve
the e-mail. As noted above, if a user account is set to forward e-mail to an external e-mail address, the e-mail will be
forwarded to that external address. To prevent this, you will need to modify the properties for that user account.
To re-enable the user account, you need to reset the password using the link on the User Accounts web panel.
4.1.2. Changing User Passwords
Once users have an active account, they can set their own passwords by accessing the user-password URL. They
do this by pointing their web browsers at www.yourdomain.xxx/user-password (where "www.yourdomain.xxx" is
the web server name you entered into the server console). The staff at The Pagan Vegan would visit the URL
www.tofu-dog.com/user-password.
To make the change, a user would enter his or her account name (the characters before "@"), the old password and
the new password (to ensure accuracy, the screen asks for the new password twice). Note that changing the password for a user in the Server Manager overrides any previous password entered by your user. Therefore, when a user
forgets his password, simply reset it in the Server Manager.
Note
There is no way for the administrator to recover a forgotten password for a user. Instead, set a new pass-
word for the user.
Windows NT/2K/XP users can set their passwords from the Windows client, if your 6000 MAS is configured to be
the domain controller for your domain. (This is configured on the Workgroup panel in the Server Manager). To set a
user password, press Ctrl/Alt/Delete, then click Change Password.... Enter the old and new passwords.
4.2. Groups
This screen allows you to create, remove or change user groups, which are lists of people with a shared interest - for
example, they work in the same department or are collaborating on a project. The user group function serves two
purposes: it permits e-mail to be sent conveniently to a group of users, and it allows the system administrator to associate groups of users with a single information bay (or i-bay; for more information, see I-bays).
Creating a new group is a simple three-step process. Enter the group name (as with account names, these should begin with a lower-case letter and consist only of lower-case letters and numbers), followed by a brief description. Finally, check the boxes next to the names of users who should be associated with that group.
Warning
When you create a group, you are required to assign at least one user to that group. If you fail to do so, the
group will not be created and you will receive an error message.
After you add (or remove) a user account from a group, the user must log out and log back in for those changes to
take effect. Until the user does so, he or she will still have their old group membership information. For instance, say
that you create a new group "sales" and assign user "ffrog" (Fred Frog) to that group. You then create a new i-bay
called "salesinfo" that only the "sales" group can access. Fred Frog is still logged into a Windows PC and now tries
to connect to the new i-bay through Windows Explorer. He will receive a permission-denied error. He must log out
of Windows (there is no need to shut down or reboot) and login again. Now he should be able to go through Windows Explorer and access the "salesinfo" i-bay without any problem.
4.3. Quota Management
By default, there is no size limit on the files a user may store on the server or the amount of e-mail he or she may receive. If you wish to limit the disk space a particular user account can use, you may do so on the "Quota manage-
39
Page 45

Chapter 4. Collaboration
ment" panel in the Server Manager. As shown in the image below, you will see a list of user accounts, the actual
disk space they are using and the quotas, if any, set for that user account.
Warning
Note that the quotas apply to all files that a user stores on the server. This includes not just their home di-
rectory, but also all files that they may put into any of the i-bays.
There are two quotas that can be applied to each user account:
• Limit with grace period - when a user's disk usage exceeds this limit, an e-mail warning message will be sent to
the user account each night until the disk usage is brought back under the limit.
• Absolute limit - when a user's disk usage hits this limit, the user will no longer be able to save files to the server
or receive e-mail.
Note that if the user account exceeds the "Limit with grace period" for seven consecutive days, the account will be
treated as if it exceeded the absolute limit and will no longer be able to save files or receive e-mail.
Important
E-mail for the user account is not lost! It is held in the delivery queue and will be delivered to the user
when their disk usage drops back below their absolute limit (or the "limit with grace period" if they were
locked out due to seven days above that limit).
By selecting "Modify..." you are able to set a quota (in Megabytes) for a particular user account. Note that you do
not have to set both limits for a user account and can choose to set only one of the limits.
If you later wish to disable the quota for a given user account, all you need to do is set the limit to "0".
4.4. Pseudonyms
Any user who has an account on your 6000 MAS will be able to receive e-mail sent to that user ID. For instance, if
you have a user named Fred Frog with the user account "ffrog", his primary e-mail address will be
"ffrog@mycompany.xxx".
Likewise, when you create a group account, that group account name functions as an e-mail alias, so that messages
addressed to the group ID (coming from internal or external) will be sent to all members of the group. If, for example, you create a group called "sales", messages to "sales@mycompany.xxx" will be distributed automatically to all
members of that group. As you add and remove members to the group, your server automatically updates the e-mail
alias.
40
Page 46

Chapter 4. Collaboration
In addition to user and group accounts, however, your server also automatically creates several pseudonyms . For instance, for each user account, the server creates two separate pseudonyms using the first and last names of the user.
These two pseudonyms are in the form of "firstname.lastname" and "firstname_lastname".
Additionally, your server creates a special pseudonym called "everyone" that includes all user accounts on the system. Two other pseudonyms, "postmaster" and "mailer-daemon" are created pointing to the "admin" user.
If you wish to modify or remove any of these pseudonyms, or create new ones, you can use the web panel found under the Collaboration section, as shown below.
Note
The special pseudonyms of "everyone", "postmaster" and "mailer-daemon" will only be visible after you
have either added a user account to the system or have added a custom pseudonym. Until that time, these
three pseudonyms are there, but will not be visible on the Pseudonyms web panel.
As noted on the screen below, there are some restrictions on the text content of the names. Pseudonyms can be
linked to existing user or group accounts. In the example shown, a pseudonym for webmaster is being set to point to
ffrog.
41
Page 47

Chapter 5. Information Bays (i-bays)
Information bays, or i-bays, are a unique feature built into your 6000 MAS. I-bays are a powerful, simple, flexible
mechanism for creating distinct information-sharing sites. The network administrator can define several characteristics for each new i-bay they create:
• write access: the administrator can control access to the i-bay by associating the i-bay with a group. All groups
previously created in the groups section of the Server Manager will appear in the drop-down menu under "group
in this section. In addition, two default groups will always appear - "administrator" and "everyone" (meaning all
users, whether on the local network or on the Internet).
• user access via file-sharing or FTP: The administrator can also control who has the ability to save a file into or
modify the contents of the files in the i-bay (write access) and who has the ability to view the contents of the ibay (read access). The administrator can specify whether the entire group can write to the i-bay or whether the
administrator alone has the power to save files to the i-bay. Similarly, the administrator can control whether
group members only can read the contents of the i-bay or whether the contents can be read by anyone.
• password protection: the administrator can specify whether a password is required to access an i-bay from the
Internet and what that password will be.
Note
If you select Password Required, users who connect to the i-bay via FTP or HTTP will be prompted to sup-
ply that particular i-bay's username and password. The user name is always the name of the i-bay and the
password is whatever the administrator assigns to that i-bay - not the individual user's password. Note that,
as with user accounts, i-bay accounts are locked out by default. If a password is required, users will not be
able to access the i-bay until the administrator sets the password.
I-bays are simple to create and manage. The "Information bays" section of the Server Manager shows all current i-
bays, the name of each i-bay and a description of its contents. In this section, you can delete an i-bay (which will
delete all contents of the i-bay directory) and, if the i-bay requires a password, you can set it here. As with your user
account directory, any i-bay that requires a password will appear in red until that password has been changed from
"default" (the i-bay for Samson's Farms in the following image is an example of this).
A note about i-bay names
When you create an i-bay, the name may be up to 12 characters long1 and may contain only lower-case let-
ters, numbers, periods and underscores. The i-bay name should also start with a lower-case letter. For ex-
ample, johnson, sales and client3.prj8 are all valid names, while 3associates, John Smith and
Bus-Partner are not. Finally, an i-bay cannot use the same name as an existing user or group account. It
must be unique. Note that there are five special names, common, icons, files, primary and public, which are
in use by the system and cannot be used for an i-bay name.
1This 12-character restriction ensures that the i-bay can be shared correctly to all Windows machines.
42
Page 48

5.1. i-bay Directories
Chapter 5. Information Bays (i-bays)
Each i-bay has three directories - html, files and cgi-bin. Each directory is briefly outlined below:
• cgi-bin: This directory is set aside to hold "CGI scripts" used for that i-bay's web pages. CGI scripts are tools
used in advanced web site creation and are not discussed here.
• files: This directory holds files that can be accessed either locally only or publicly. It can be used for such things
as a company download site, a company-wide file sharing server, or a document sharing site for a specific customer. When someone connects to the i-bay using FTP, they will see the files in this directory.
• html: When an i-bay is accessed using a web browser (via http), the user will enter the html directory and the
web browser will automatically open the index file (usually index.html or index.htm) in that i-bay. In other
words, it will display the web page associated with that i-bay. This means you can have different web sites running on your server, each associated with a specific i-bay. This can be very powerful and useful, as you will see
in the upcoming examples.
Generally, you can think of the html directory as the place to put all files, images and documents that you would
like to be accessible through the web. The files directory is for all files that you want people to access through
FTP or regular file sharing. Note that you can have as many subdirectories as you wish underneath either html or
files but you cannot create additional directories at the top level of the i-bay.
Note
If an i-bay is set for no public access via web or anonymous ftp, users connecting to the i-bay through Win-
dows or Macintosh file sharing will see only the contents of the files directory. However, if the i-bay set-
tings are later changed to allow public access through web or anonymous ftp, users will then see the top-
level directory of the i-bay with the three subdirectories of html, files and cgi-bin. The items they
were accustomed to seeing before will now be found in the files directory.
5.2. Accessing i-bays
You can access the contents of an i-bay using a web browser, Windows file sharing / AppleTalk, or FTP.
43
Page 49

Chapter 5. Information Bays (i-bays)
• accessing an i-bay using a web browser (via http): To view an i-bay using a browser, enter
"www.yourdomain.xxx/i-bayname". For example, the URL for Samson's Farms i-bay is
"www.tofu-dog.com/samfarms". Assuming you are entitled to access this i-bay, you will see the index.html page
in the html directory in the Samson's Farms i-bay. If a password is required to see the contents of the i-bay, a
password dialog box will appear before the contents of the i-bay are served to the web browser. Use the i-bay
name as the login ID.
• accessing an i-bay via Windows file sharing and AppleTalk: To access the i-bay using Windows file sharing or
AppleTalk, simply navigate to the server over your network browser (in Windows, this would be via "Network
Neighborhood") and select the i-bay you want to enter from those appearing. You can only access an i-bay in
this way if you are on the local network.
• accessing an i-bay via the FTP server: To access the i-bay using FTP, you use your FTP client to connect to
your server and use the i-bay name as the login id. If the i-bay requires a password, you will need to enter the i-
bay password as well. If you are using a command-line or graphical FTP client, you will usually be prompted for
the login username and password. If you are using a web browser, you will need to enter a FTP URL. This will
be in one of the following forms, depending on whether or not a password is required:
ftp://ibayname@ftp.domainname
ftp://ibayname:password@ftp.domainname
Warning
Be aware that FTP transmits all passwords in the clear without encryption and can therefore be a security
risk. If you are concerned about security, we suggest you consider the scp "secure copy" command associ-
ated with ssh as an alternative to FTP.
Note that users accessing the i-bay via FTP in this manner are not able to upload files to the i-bay. They can only
download files from the i-bay to their client.
It is possible to upload files using FTP, but to do so you must login to the server with a valid user name, not the
i-bay name. That user account must be a member of the group that has been given write permission for the i-bay
(configured on the i-bay screen). You would then change to the i-bay directory (using the ftp command "cd
../../ibays/ibayname"). You will now be able to upload files from your FTP client to the appropriate directories.
In the next few sections, we will take a look at some examples of i-bays that have been created by our hypothetical
catering and event-planning company, The Pagan Vegan, to demonstrate their capabilities.
5.3. Creating an i-bay
No matter how you are going to use an i-bay, the process of creating an i-bay starts by clicking on the "Click here"
link at the top of the Information Bays panel in the Server Manager. You will be presented with the form shown in
the image below.
44
Page 50

Chapter 5. Information Bays (i-bays)
You now need to fill out the form providing the information and making the choices described below. Note that the
ftp access described below can be overridden by the FTP access limits setting on the Remote Access panel of the
Server Manager. If you choose to "Disable public FTP access" there, ftp access for individual i-bays will not be allowed, even though you will appear to be able to enable it from the i-bay configuration screen.
• Information bay name: This is the short name of the i-bay (subject to the 12-character length restriction men-
tioned earlier). The i-bay name will be what users will enter in the URL after the hostname to access the i-bay
from the web. For instance, if public access is enabled, an i-bay named 'intranet' can be accessed by the Pagan
Vegan staff at 'http:// www.tofu-dog.com/intranet/'.
• Brief description: This text will appear in various administrative screens and can be a useful reminder of the i-
bay content.
• Group: Ownership of the i-bay content is assigned to an existing group. The group ownership plays a role in the
next setting for user access.
• User access: You need to decide who will be able to add and modify content in the i-bay and who will be able to
read the content.
• Public access: Here you set what type of public access you wish to have for the i-bay. If the i-bay is just to be
used by a small group of users, you can leave public access set to the default of None. If you want others to be
able to access the i-bay via web or anonymous ftp, you can choose to allow access to just the local network or
the wider Internet. You also can choose whether or not you wish to require a password.
Note
If you choose one of the modes of Public access via web or anonymous ftp that requires a password, public
access will not be available until you set the i-bay password from the main information bay panel in the
Server Manager. Once you do so, users can access the i-bay through their web browser or ftp by using the
i-bay name and i-bay password, rather than their own user name and password.
• Execution of CGI scripts: If you want to use CGI scripts to add functionality to your web site, you can execute
those scripts from the cgi-bin directory of your i-bay. However, for security reasons you must first choose en-
abled here to allow such scripts to be executed.
After filling out the form, click the Create button and the Server Manager will create your i-bay. If you wish to
change these settings at any later point, you can click Modify... next to the i-bay name in the information bays panel
45
Page 51

of the Server Manager.
5.4. Modifying an i-bay
At any point in time you can modify the attributes of an i-bay (except for its name) by clicking on the "Modify..."
link next to the i-bay name on the "Information bays" panel of the Server Manager. For instance, you can easily
change the description, group ownership, and access methods.
There are, however, a few items to be aware of when modifying i-bays:
• If an i-bay is set for no public access via web or anonymous ftp, users connecting to the i-bay through Windows
or Macintosh file sharing will see only the contents of the files directory. However, if the i-bay settings are
later changed to allow public access through web or anonymous ftp, users connecting through file sharing will
then see the top-level directory of the i-bay with the three subdirectories of html, files and cgi-bin. The
items they were accustomed to seeing before will now be found in the files directory. This may disrupt Windows shortcuts and configuration settings. (The good news is that simply changing the public access setting back
to "None" will return i-bay file sharing access to its previous configuration.)
• After an i-bay is modified, all Macintosh users will be disconnected from the i-bay and will need to reconnect.
All Macintosh users will receive an alert stating that they will be disconnected in 5 minutes.
Outside of those concerns, you can modify the i-bay as often as you wish. If you wish to change the actual name of
the i-bay, you will need to remove the i-bay and create it again. (Note that this will delete the contents of the i-bay,
so make sure you have backed up the i-bay data before you remove it.)
Chapter 5. Information Bays (i-bays)
5.5. An i-bay Used as a Customer Site: The Miles Gabriel Art Exposition
"The Pagan Vegan" (TPV) has found that customers like having access to a customized web page which summarizes
all of the information pertaining to their particular event. The company finds it reduces the risk of miscommunication and improves its image and reputation. The ".html" files in the i-bay's html directory are based on a template
that TPV uses for each customer. Creating each web site is a straightforward, fill-in-the-blanks process.
TPV has chosen a naming convention for i-bays that customers can easily remember - first initial, last name. Because it contains important customer information, only the site administrator can save files into this i-bay. To prevent others from accessing the customer's i-bay, a password is required to enter the site. (TPV created individual
passwords and securely provided them to their customers.)
46
Page 52

Chapter 5. Information Bays (i-bays)
Miles Gabriel has contacted The Pagan Vegan to cater an art exposition. The Pagan Vegan has created an i-bay
specifically for Mr. Gabriel's account called "mgabriel". Mr. Gabriel accesses the site with the URL
www.tofu-dog.com/mgabriel. As you can see, Mr. Gabriel has access to a summary of his event information. He can
check at any time to ensure the arrangements are correct. For example, at midnight tonight he can access his i-bay to
show his spouse the design used for his invitations!
5.6. An i-bay Used as a Shared Network Drive
Having a shared network drive can be very helpful as a way of storing and sharing documents company-wide. TPV
uses an i-bay for a company-wide network drive to hold documents to which all employees should have access. All
employees can read and write files to this directory.
The i-bay is accessed via Windows file sharing, AppleTalk or FTP. To access using file sharing, simply access the
server over the network (via Network Neighborhood) and open the appropriate i-bay . You will see the files located
in the files directory and can then open them or copy them to your system.
Note
This is only true if the i-bay has been set to allow public access via web or anonymous ftp. If an i-bay is set
for no public access via web or anonymous ftp, users connecting to the i-bay through Windows or Macin-
tosh file sharing will simply see the contents of the files directory. However, if the i-bay settings are later
changed to allow public access through web or anonymous ftp, users will then see the top-level directory of
the i-bay with the three subdirectories of html, files and cgi-bin. The items they were used to seeing
before will now be found in the files directory.
As an example, when the staff of The Pagan Vegan goes into their Network Neighborhood (or "My Network
Places"), they double-click on their server's icon.
47
Page 53

Chapter 5. Information Bays (i-bays)
They will then see a list of i-bays accessible through Windows file sharing. When they click on one of them called
"sharedfiles", they see the three folders inside of the i-bay:
When they go inside of files, they will then see the list of documents provided there:
As you can see in this example, The Pagan Vegan has several files in this directory for company use. Providing a
centralized location for company documents (such as expense report templates) ensures that everyone always has ac-
48
Page 54

Chapter 5. Information Bays (i-bays)
cess to these documents and uses the most up-to-date version.
5.7. An i-bay Used as an Intranet: The Pagan Vegan "Vegemite"
The Pagan Vegan has created an i-bay for its company newsletter / intranet. The company has found this to be a
good way for employees to express themselves and share information.
In keeping with TPV's culture, the newsletter is very casual. The company has a high degree of trust in its employees, and, as a result, employees are given full access to the contents of the intranet so anyone on staff can revise it. A
more typical company might want the intranet to be created by a particular staff member and "checked in" by the administrator (write access "administrator only").
The intranet is, of course, viewable only from the internal network. No password is required. To access the intranet,
TPV employees use their web browsers to access the URL www.tofu-dog.com/intranet.
49
Page 55

Chapter 5. Information Bays (i-bays)
This particular newsletter was created using a desktop office application called StarOffice (similar to Microsoft Office). The files were created as typical word processing documents, saved into ".html" format and then transferred
into the html directory of the "intranet" i-bay using Windows file sharing. Starting with just a blank document, it
took only about an hour to create the main page and the other pages that make up this newsletter.
5.8. An i-bay Used to Expedite Processes: Samson's Farms
Samson's Organic Farms delivers fresh produce to The Pagan Vegan every week. Samson's and TPV use an i-bay to
improve the ordering and delivery process. TPV has created an i-bay for Samson's called "samfarms". It is accessible to the external Internet but password-protected so that only staff at TPV and Samson's Farms can read it. Anyone
on TPV's local network can write to it.
50
Page 56

Chapter 5. Information Bays (i-bays)
Here's how the process works:
• Each week, Mr. Samson updates his online order sheet to include only produce that will be ripe and ready for the
next delivery date. He saves it in ".html" format and e-mails it to The Pagan Vegan's administrator.
• Upon receiving the e-mail, TPV's administrator saves the file directly into the html directory of the "samfarms"
i-bay.
• The chef accesses the samfarms i-bay, reviews what produce will be available, and plans menus.
• The chef's assistant then reviews the menus, checks against existing inventory and determines what should be or-
dered. The assistant enters TPV's order directly onto the order sheet in the samfarms i-bay using an HTML editor.
• The day before delivery, the chef reviews his assistant's order (as shown in the image below) using a web
browser and makes any last minute adjustments.
51
Page 57

Chapter 5. Information Bays (i-bays)
• On the day of delivery, Samson's shipping staff accesses the i-bay over the Internet, prints out TPV's order from
the samfarms i-bay, and fills it.
5.9. An i-bay Used as Your Customer Download Site
When customers hire The Pagan Vegan to plan events, they need to review a great deal of information - menu options, catalogues from various vendors for event stationary, table-setting rentals, etc. Often customers want several
days to review it all. TPV has only a limited number of catalogues for loan, so it decided to provide customers with
access to this information online. To accomplish this, TPV created a download i-bay, called "menus", where customers can download the catalogue files themselves and view the contents on their desktop machines.
52
Page 58

Chapter 5. Information Bays (i-bays)
TPV set the i-bay for Administrator-only write access, viewable over the entire Internet, with no password required.
A customer accesses the site using the FTP client in their web browser to login as the i-bay user name by entering
the URL ftp://menus@ftp.tofu-dog.com. This is what the customer sees:
When the cursor is placed over a file name, the full name of the file appears. To download a particular file, the customer simply clicks on the file name. A browser window allows the customer to select a destination directory for the
file on his or her local hard drive.
53
Page 59

Chapter 6. Webmail
You can configure your 6000 MAS so that users can access their e-mail from the local network or anywhere in the
world via the Internet using any standard web browser (provided it supports Javascript and tables, which almost all
browsers do).
For added security, the server supports the use of Secure Socket Layer (SSL) connections. When your users connect
using SSL, all communication between their browser and your 6000 MAS web server is securely encrypted to prevent eavesdropping.
If you intend to enable webmail, you should consider whether your users will use webmail exclusively or will use
webmail part of the time (for example, when traveling) and a different e-mail client the rest of the time. If they plan
to use webmail as well as another client, they should make sure that the other client uses the IMAP protocol. If they
use POP3, their e-mail messages will be pulled down from the server into their local e-mail client and will therefore
not be visible when the user logs into webmail. If IMAP is enabled on the local client, the messages will remain on
the server and will be visible both from the local client and via webmail.
6.1. Enabling Webmail On Your System
To enable the use of webmail, perform the following steps:
1. Connect to the Server Manager and login as the admin user.
2. Click on Other e-mail settings and scroll down to the section where you have the option to Enable/Disable
Webmail. You now have two options:
• Enabled (secure HTTPS access only) - Allows users to connect only through a secure SSL connection. This is
strongly recommended because a regular HTTP connection transmits your mail account password across the network (or Internet) in plain, unencrypted text.
• Enabled (HTTP or HTTPS) - Allows your users to connect through a secure or an insecure web connection.
After you perform these steps, your users should be able to connect and use webmail.
6.2. Starting Webmail
To use webmail, a user first needs a valid user account and password on your server. Next, the user opens up a web
browser and points it to your server using an address resembling the following URL:
https://www.tofu-dog.com/webmail/
The https in the URL indicates this connection uses SSL encryption and provides a secure communication session.
Note
The exact address used in the URL will depend on how you have configured your server. In the example
above, www.tofu-dog.com points to the server located at The Pagan Vegan and https indicates that they are
using secure communication using SSL encryption. If you choose to provide insecure access, which we do
not recommend, the URL would begin with http instead of https.
Note that if your server is behind another firewall, that firewall will need to allow traffic through on TCP port 443 in
order for SSL connections to take place.
54
Page 60

6.3. Logging In
Once connected, a user will see a login screen similar to that shown in the screen below. From this screen you can
read the help menu (by clicking New User Introduction at the top of the page) or login with your normal network
user ID and password. Note that the webmail application supports a wide variety of languages.
6.4. Viewing The Inbox
Once logged in, you will see your inbox, as shown in screen below.
Chapter 6. Webmail
Let's take a quick tour of the Inbox window.
On the top left side is a navigation menu allowing you to jump directly to your inbox, compose
new messages, create folders, modify preferences, search, access help, modify contacts or logout
of the webmail system.
In the top right corner is a pop-up menu that shows the list of your available mail folders. In your
first webmail session, the only folder choice will be INBOX. As soon as you send an e-mail message, a folder called sent-mail will be created and available in the menu. You can also create additional mail folders at any time.
Immediately below this is a status message indicating the number of new and total messages in
that folder.
In the main part of the window are the actual messages. Each message has an icon denoting its status at the far left, the date/time of the message, who it is from, the subject and the size. Messages
may be sorted by clicking on the column heading. You can read a message simply by clicking on
the subject or sender of a specific message. The envelope/arrow icon that you can see in the status
area of the second message in the image above indicates that this message is new.
We will describe the various functions in greater detail later in this chapter, but this should be enough to get you
started.
6.5. Logging Out of Webmail
55
Page 61

Before we discuss the features of webmail, it is important to emphasize that you must always click "Logout" when
you are finished using webmail. If you do not do so, anyone else who uses your web browser on your computer
(until you exit your web browser or logout of/shutdown your computer) will be able to read your messages and send
messages from your account. After a successful logout, you will see the webmail login screen with a message at the
top of the screen indicating that your logout was successful.
6.6. Composing Messages
To compose a new message, click "Compose" in the menu on the left. You should see a screen similar to that below.
Chapter 6. Webmail
At the top of the compose screen, your available options are to cancel, save a draft or send the message.
If you choose to save a draft, your message will be saved in a folder called drafts . You may later retrieve this mes-
sage by using the popup menu in the upper right corner to switch to the drafts folder.
Directly below the subject line are another four options allowing the user to expand names, run spell check on the
body of the message, access special characters, or jump to the attachments area of the screen.
56
Page 62

Below that are the familiar e-mail fields for you to fill out.
Note that when adding attachments to your e-mail, be sure to click "Attach" after you have browsed and found the
attachment.
At the bottom of the page, the menu of commands is repeated for your convenience.
6.7. Reading Messages
To read a message, click the "From" or "Subject" fields of the message. You should see a screen similar to the one
below.
Chapter 6. Webmail
You now have several options. You can:
• Delete the message.
• Reply only to the sender.
• Reply to all of the original recipients.
• Forward the message to someone else.
• Redirect the message to another person (similar to "Forward" but without providing you the opportunity to com-
ment). 2
• Blacklist sets up filters to automatically delete or file e-mail messages.
• Save As saves the message to a text file.
• Print the message.
By clicking "Reply", you will be able to enter a reply window such as that shown below. Notice that the original
message text is "quoted" with a ">" character in front of it. At this point, you can type more text or edit existing text,
add or delete recipients, spell-check the message and do anything else that you could do in a normal compose window. Again, you can choose to cancel the message, save a draft or send the message.
2In fact, the redirect command will send the message on to a third-party without indicating that you were the one forwarding it. So if "ffrog"
sent a message to the "sales" group (of which you are a member) and you then redirected it to another user, that user would see the message
coming from "ffrog" and going to "sales", but your name would not appear anywhere in the visible headers. Compare that to a "forward"
command where the recipient knows you are the person forwarding the message.
57
Page 63

Chapter 6. Webmail
6.8. Deleting Messages
You can delete a message while reading it, as mentioned previously, or you can delete a message - or a group of
messages - from the Inbox view.
To do so, check the box next to each message you wish to delete. After that, click the "Delete" link directly above or
58
Page 64

below the list of messages on the left side. You will now see a trash icon next to the checkbox and a line through the
messages.
As an example, in the image above, our user (ffrog) wants to delete the second and third messages. He can click on
the checkbox next to each message and then click "Delete". This will produce a screen such as that below.
If you do not want to see the deleted messages, you have two choices. If you click on the "Hide Deleted" text button
on the right side, the messages will be hidden from view, but will still be there and could be recovered with the Un"delete" button. If you choose Purge Deleted, the messages will be permanently deleted.
6.9. Using the Address Book
The 6000 MAS webmail application provides address book functionality to allow you to keep track of personal contact e-mail addresses and other contact information. You can view and edit this address book by selecting the appropriate link from the top menu bar on the main webmail screen. You can then add new entries to the address book, or
search the address book for existing entries.
Chapter 6. Webmail
To search for an existing contact, choose the Search option or the Advanced Search option. The Search option will
bring you to the following screen:
From this screen, the user chooses to search by contact name or e-mail address, enters a matching string to search
for, and chooses to search by either My Address book or the local LDAP 3 repository (i.e. the company directory).
Selecting Search will populate the area below with the list of matching address book entries. Note that subsequent
searches will add to the list rather than replace the contents of the list. To clear the list, select "Clear List".
To view all entries in the address book, leave the Matching field blank and click "Search". This will bring you to a
screen such as the following:
The Advanced Search option allows you to search against any field for which information is stored in the address
book.
Once contacts have been found and appear in the search list, the user can click the selection boxes to the left of the
3The search is called an LDAP search because the directory is queried using the Lightweight Directory Access Protocol (LDAP), one of the most
common protocols used on the Internet for searching directories.
59
Page 65

Chapter 6. Webmail
entries to initiate an e-mail to the chosen contacts. Select the "To", "CC", or "BCC" boxes for each desired address,
and then click "Send Message" to launch the Compose window with the addresses filled in.
To add a new entry, click "Add" from the top menu bar. You will be presented with the screen below, and you can
then enter information for the desired fields. Click "Save" to add the information to your Address Book.
To update contact information, click the contact#s name (in the Name column) from the search results list. You will
then be able to edit the contact#s information by selecting "Edit", or delete the contact completely by selecting
"Delete".
6.10. Changing Webmail Options
By clicking the Options link on the navigation menu, you can modify preferences for your webmail session, as
shown in the screen below.
There are many categories of preferences that may be tailored for your specific needs:
• Personal Information - Change the name, address, and signature that people see when they read your e-mail.
• Server Information - Change your mail server and folder information.
• Language - Set the language for menu items, explanations, and help.
• Time Zone - Set the current time zone.
60
Page 66

Chapter 6. Webmail
• Filters - Create filtering rules to organize your incoming mail, sort it into folders, and delete spam.
• Message Viewing - Set preferences for filtering messages for unwanted content.
• Deleting and Moving Messages - Set preferences for what happens when you move and delete messages.
• Maintenance Operations - Customize maintenance operations run when you log in to the webmail application.
• Display Options - Change display options such as how many messages you see on each page and how messages
are sorted.
• Message Composition - Customize how you send mail and where drafts are saved.
• Login Tasks - Customize tasks to run when logging in to webmail.
• New Mail - Control when new mail will be checked for, and whether or not to notify you when it arrives.
• Address books - Select address book sources for adding and searching for addresses.
61
Page 67

Chapter 7. Server Administration
7.1. Administration of Your Server Via Windows File Sharing
To access administrative areas of your server using Windows file sharing, you must be logged into your network as
"admin" with the server system password. This applies particularly to the Primary share (where the main web site is
stored) and any i-bays that are writable only by the user admin.
7.2. Create Starter Web Site
If you already have a customized web site, you should not use this section, since it will overwrite your index.htm
file.
If you do not have a customized web site and wish to create your starter home page, fill out the appropriate fields.
This will create a basic home page that you can visit by entering your domain name for your site, http://
www.yourdomain.xxx, in your web browser. On your local network, you can use "http://www/" (or just "www") to
view your starter web site.
At any point in the future, you can replace or revise your starter web page by replacing or revising the files in the
html directory on your server. The html directory for your web site can be accessed using Windows file sharing.
Ensure you are logged onto your network using the admin name and password and then use file sharing to go to the
server. Select the "primary" share and then select the "html" directory.
7.3. User File Storage on the 6000 MAS
When you create a user account on your server, the 6000 MAS creates both an e-mail account and a file directory
for that user. This directory is reserved for files that the user would like to store on the server hard drive. It can only
be accessed by the user. To access the directory, the user would navigate to the server via Windows file sharing or
AppleTalk.
7.3.1. Windows
Using Windows, a user would open "Network Neighborhood" (or "My Network Places") and then click on the Network directory to see all machines accessible to you on your network. If the 6000 MAS isn't viewable, you may not
be logged onto your network under the correct name/password (see the section below on this) or your client machine
may not belong to the same workgroup as the 6000 MAS.
When you click on the server, you will see all i-bays and directories available to you. You will also see the Primary
directory (which houses the company web page information). In the example below, Kate Hedges is logged onto her
local network as khedges (her account name) with her correct password. When she enters the server, she can see all
the i-bays (mgabriel, samfarms, sharedfiles, menus and intranet), as well as her own user directory.
62
Page 68

Chapter 7. Server Administration
By clicking on her own user directory, "khedges", she can see all of the work and personal files she has chosen to
store on the server, as shown in the image below.
Note that for users who are on a Windows network, the user must be logged onto the network with the name and
password associated with the server user account.
To do so, open the "Start" menu.
1. Select "Shut down".
63
Page 69

2. Select "Close all programs and log in as a new user".
3. Enter the username (in our example, above, it would be "khedges").
4. Enter the current password for that user on the server.
If you change the password on your server, you must also change the password for "admin" on your PC. To do this
follow these steps:
1. Use the File Manager to search for the file "admin.pwl".
2. Delete this file and log into Windows networking as above.
7.3.2. Macintosh
To use file sharing from a Macintosh computer, you must be set up to use AppleTalk over Ethernet, and to communicate using IP over Ethernet.
Chapter 7. Server Administration
The first step is to choose your Ethernet adapter (usually "Built-in Ethernet" or just "Ethernet") from the AppleTalk
Control Panel. If everything is plugged in correctly, the panel should quickly say that no zones were found. If this
takes a while, the network cable or network card may not be working properly, and you should see an Apple technician.
To use AppleShare over IP it is best that your Mac's network settings are configured via DHCP. To enable it on your
Mac, choose "DHCP Server" in the TCP/IP control panel. If the control panel asks for a Client ID, type in any
unique title, such as "Design G4" or "Reception".
Note
AppleShare will work without TCP/IP, but will be slower than AppleShare over IP.
The next step is to choose a server to connect to over AppleShare. Click on the Chooser icon in your Apple Menu to
bring up a list of file servers to connect to.
Click the AppleShare icon in the Chooser window. Then, double-click on the server to log in. Use your server user
64
Page 70

Chapter 7. Server Administration
name and password to connect.
Next, a list of all the volumes available for you to connect to will be displayed. Note that some will be displayed
whether or not you have sufficient privileges to use them. Your screen should now look like the following image:
The "Primary" volume is your default area set up by your server for sharing files and the company web site, while
"Home Directory" points to the specific user's (i.e. in our example, Tracy) home directory, viewable only by that
user. While other i-bays may appear, you may not be able to use them unless you have permission.
The highlighted volumes are those you want to connect to. You should only select the checkboxes beside the volume
name if you want your Mac to connect to the volume automatically every time you boot your Mac. If you want to
save passwords in a key chain (Mac OS 9.0 or above), you should read the tutorial available from the help menu on
your Mac.
Your desktop should now have icons for each successful volume. Notice the wire at the bottom of each icon, denoting a network volume.
65
Page 71

Chapter 7. Server Administration
Clicking on one of these icons should show you a window similar to the one below. While you cannot add files or
folders to this window, you may do so in the files, html or cgi-bin folders (permissions allowing).
Note
Some programs may not work correctly when run from a mounted volume, or when opening files on a
mounted volume. Programs such as MYOB (multi-user accounting software) and Quark Xpress rely on cer-
tain Macintosh-specific features when accessing files. Test your applications before relying on their ability
to open files on a mounted volume, or copy the files to the local hard drive before working on them.
7.4. Reinstallation Disk
Using this section of the Server Manager, you can create a reinstallation diskette which will aid in the recovery process if you encounter a system failure and are required to reinstall the software. The reinstallation diskette will
record system and network configuration data for your current system so that you will not need to re-enter that information when you reinstall.
Warning
Each time you alter your system configuration, you MUST make a new reinstallation disk (or overwrite
your old one). Otherwise, your existing reinstallation disk will not contain your updated configuration data
- which means that after reinstalling the software, you will not automatically see your most recent data.
Note
Be aware that when you are performing this task, the diskette must be in the server diskette drive, NOT the
diskette drive of your local desktop computer.
Note that this reinstallation disk serves a different purpose than the "emergency boot disk" you created as part of the
original software installation process. The emergency boot disk allows you to boot your server if you are unable to
boot from the hard disk for some reason. The emergency boot diskette does not change your software or make any
other adjustments to your system.
The reinstallation disk, on the other hand, will boot your system directly into the software installation process and
will completely reinstall the 6000 MAS software. It will, however, save you the steps of entering all the network
configuration data and allow you to simply move through the configuration screens using the "Keep" option.
7.5. Reboot or Shutdown
If you need to shut down or reboot your server, using this screen will ensure that the shutdown sequence occurs
66
Page 72

Chapter 7. Server Administration
gracefully, preserving all configuration and information on your server. There is a similar function in the server console as well. Note that this screen initiates the shutdown or reboot immediately after you click the "Perform" button.
67
Page 73

Chapter 8. Technical Support
If you are a 6000 MAS subscriber and are having technical difficulty, please contact your Mitel Networks authorized reseller for support. If you are having difficulty configuring another vendor's hardware or software, we recommend you refer to the manual or contact the vendor for that product.
68
Page 74

Appendix A. Introduction to the Ethernet
Local Area Network (LAN)
A local area network (LAN) is the system of wires and other hardware that connects the computers within your office and allows them to communicate with one another. An ethernet LAN is the most common type. Ethernet refers
both to a kind of connection and to a protocol for how Internet data packets travel around your network.
The hub, a common component of an ethernet, serves as a point of interface between computers on the network.
Each computer on your network is connected to the hub using an ethernet network cable. Different hubs operate at
different speeds: slower hubs, operating at 10 MB/sec, are suitable for small networks; faster hubs, operating at 100
MB/sec, are suitable for larger networks. Switching 10/100 MB hubs can operate at either speed, and provide a good
way to upgrade your network gradually.
An ethernet adapter, also called an ethernet card or network interface card (NIC), connects each computer to the
ethernet LAN. A server with a dedicated Internet connection requires two ethernet adapters; one connects it to your
LAN and the other connects it to the external network that leads to your ISP. If your server connects to your ISP using a modem or ISDN adapter, it only requires one ethernet adapter.
A router ensures that Internet data packets (e.g. e-mail, web page information, etc.) reach the appropriate computers
on your network. Routing is one of the functions performed by the server in server and gateway mode.
69
Page 75

Appendix B. Additional Software
While Mitel Networks Corporation does not provide direct technical support for the following additional software,
its availability on the server may be of benefit to advanced users.
Warning
Use of this software is at your own risk and should not be attempted unless you know what you are doing!
Mitel Networks Corporation does NOT provide support for this software.
MySQL MySQL is an open source database management system. It provides a fully functional
relational database similar to that provided by many commercial database vendors. We
use it as the back-end for the webmail application. More information about MySQL
can be obtained at http://www.mysql.com/.
PHP PHP is a web scripting language that has become popular because it allows developers
to easily create dynamically generated web pages. Additionally, it includes commands
that allow for easy interaction with databases, particularly MySQL. The PHP language
resembles C or perl and is actually embedded in the actual HTML pages on the web
server. If you are familiar with Microsoft's Active Server Pages, PHP works in a similar manner. PHP is installed on the server because it is needed for the webmail application. To learn how to use PHP in your own web pages, please read the PHP FAQ at
http://www.php.net/FAQ.php [http://www.php.net/FAQ.php] and the manual at
http://www.php.net/manual/ [http://www.php.net/manual/].
Procmail procmail is an open source mail processing tool that can run on the server to prepro-
cess incoming mail messages by, for example, filtering them into folders. More information about procmail can be found at: http://www.procmail.org/.
Taper taper is a open source tape backup program provided for those who wish an alternative
to the flexbackup program used by default in the Server Manager. More information
about taper can be found at: http://www.e-survey.net.au/taper/.
70
 Loading...