

Page 1

MITEL
3300 IP Communications Platform
IP-DECT Solution (Global)
5602 Wireless Handset User Guide
Page 2

NOTICE
The information contained in this document is believed to be accurate in all respects but is not warranted
®
by Mitel Networks™ Corporation (MITEL
). The information is subject to change without notice an d should
not be construed in any way as a commitment by Mitel or any of its affiliates or subsidiaries. Mitel and its
affiliates and subsidiaries assume no responsibility for any errors or omissions in this document. Revisions
of this document or new editions of it may be issued to incorporate such changes.
No part of this document can be reproduced or transmitted in any form or by any means - electronic or
mechanical - for any purpose without written pe rmission from Mitel Networks Corporation.
Trademarks
Mitel is a trademark of Mitel Networks Corporation.
Other product names mentioned in this document may be trademarks of their respective companies and
are hereby acknowledged.
5602 Wireless Handset
User Guide
June 2008
®,™ Trademark of Mitel Networks Corporation
© Copyright 2008, Mitel Networks Corporation
All rights reserved
ii
Page 3

Table of Contents
About Your Phone . . . . . . . . . . . . . . . . . . . . . . . . . . . . . . . . . . . . . . . . . . . . . . . . . . . . . . . . . . . . 1
Elements of Your Handset . . . . . . . . . . . . . . . . . . . . . . . . . . . . . . . . . . . . . . . . . . . . . . . . . . . . . .1
Features and Functions . . . . . . . . . . . . . . . . . . . . . . . . . . . . . . . . . . . . . . . . . . . . . . . . . . . . . . . .2
Contacting Emergency Services . . . . . . . . . . . . . . . . . . . . . . . . . . . . . . . . . . . . . . . . . . . . . .2
Tips for your Comfort and Safety . . . . . . . . . . . . . . . . . . . . . . . . . . . . . . . . . . . . . . . . . . . . . . 2
Frequency Range . . . . . . . . . . . . . . . . . . . . . . . . . . . . . . . . . . . . . . . . . . . . . . . . . . . . . . . . . .3
Exposure to Radio Frequency Signals . . . . . . . . . . . . . . . . . . . . . . . . . . . . . . . . . . . . . . . . . .3
Environmental Requirements . . . . . . . . . . . . . . . . . . . . . . . . . . . . . . . . . . . . . . . . . . . . . . . . .3
Chemical Resistance . . . . . . . . . . . . . . . . . . . . . . . . . . . . . . . . . . . . . . . . . . . . . . . . . . . . . . .3
Icons and Text in the Display . . . . . . . . . . . . . . . . . . . . . . . . . . . . . . . . . . . . . . . . . . . . . . . . .3
Keys and Buttons . . . . . . . . . . . . . . . . . . . . . . . . . . . . . . . . . . . . . . . . . . . . . . . . . . . . . . . . . . . . . 7
Volume button . . . . . . . . . . . . . . . . . . . . . . . . . . . . . . . . . . . . . . . . . . . . . . . . . . . . . . . . . . . .7
Off hook, and YES key . . . . . . . . . . . . . . . . . . . . . . . . . . . . . . . . . . . . . . . . . . . . . . . . . . . . . .7
On hook, NO, and On/Off key . . . . . . . . . . . . . . . . . . . . . . . . . . . . . . . . . . . . . . . . . . . . . . . .8
C (Clear), and MUTE key . . . . . . . . . . . . . . . . . . . . . . . . . . . . . . . . . . . . . . . . . . . . . . . . . . . .8
MENU Key . . . . . . . . . . . . . . . . . . . . . . . . . . . . . . . . . . . . . . . . . . . . . . . . . . . . . . . . . . . . . . . 8
R/Message Key . . . . . . . . . . . . . . . . . . . . . . . . . . . . . . . . . . . . . . . . . . . . . . . . . . . . . . . . . . .8
Handsfree Key . . . . . . . . . . . . . . . . . . . . . . . . . . . . . . . . . . . . . . . . . . . . . . . . . . . . . . . . . . . .8
Navigation Key . . . . . . . . . . . . . . . . . . . . . . . . . . . . . . . . . . . . . . . . . . . . . . . . . . . . . . . . . . . .8
Enter Text and Numbers . . . . . . . . . . . . . . . . . . . . . . . . . . . . . . . . . . . . . . . . . . . . . . . . . . . .9
Customizing Your Phone. . . . . . . . . . . . . . . . . . . . . . . . . . . . . . . . . . . . . . . . . . . . . . . . . . . . . . 10
Volume/Mute Control . . . . . . . . . . . . . . . . . . . . . . . . . . . . . . . . . . . . . . . . . . . . . . . . . . . . . . . . .10
Adjust the Volume During a Call . . . . . . . . . . . . . . . . . . . . . . . . . . . . . . . . . . . . . . . . . . . . . .10
Mute the Microphone During a Call . . . . . . . . . . . . . . . . . . . . . . . . . . . . . . . . . . . . . . . . . . .10
Turn Loudspeaking Function On/Off . . . . . . . . . . . . . . . . . . . . . . . . . . . . . . . . . . . . . . . . . .10
Turn the Ring Signal On/Off . . . . . . . . . . . . . . . . . . . . . . . . . . . . . . . . . . . . . . . . . . . . . . . . .10
Lock/Unlock the keypad . . . . . . . . . . . . . . . . . . . . . . . . . . . . . . . . . . . . . . . . . . . . . . . . . . . . . . .10
Change the Dialing Mode . . . . . . . . . . . . . . . . . . . . . . . . . . . . . . . . . . . . . . . . . . . . . . . . . . . . .10
Send a Dial Tone Pause . . . . . . . . . . . . . . . . . . . . . . . . . . . . . . . . . . . . . . . . . . . . . . . . . . . .11
Making and Answering Calls. . . . . . . . . . . . . . . . . . . . . . . . . . . . . . . . . . . . . . . . . . . . . . . . . . . 12
Make a Call . . . . . . . . . . . . . . . . . . . . . . . . . . . . . . . . . . . . . . . . . . . . . . . . . . . . . . . . . . . . . . 12
Receive/end a call . . . . . . . . . . . . . . . . . . . . . . . . . . . . . . . . . . . . . . . . . . . . . . . . . . . . . . . .12
Call Handling. . . . . . . . . . . . . . . . . . . . . . . . . . . . . . . . . . . . . . . . . . . . . . . . . . . . . . . . . . . . . . . . 13
Hold . . . . . . . . . . . . . . . . . . . . . . . . . . . . . . . . . . . . . . . . . . . . . . . . . . . . . . . . . . . . . . . . . . .13
Transfer . . . . . . . . . . . . . . . . . . . . . . . . . . . . . . . . . . . . . . . . . . . . . . . . . . . . . . . . . . . . . . . .13
Conference . . . . . . . . . . . . . . . . . . . . . . . . . . . . . . . . . . . . . . . . . . . . . . . . . . . . . . . . . . . . . .13
Call Park . . . . . . . . . . . . . . . . . . . . . . . . . . . . . . . . . . . . . . . . . . . . . . . . . . . . . . . . . . . . . . . . . .14
Call Forward . . . . . . . . . . . . . . . . . . . . . . . . . . . . . . . . . . . . . . . . . . . . . . . . . . . . . . . . . . . . .14
iii
Page 4

5602 Wireless Handset User Guide
Call Pickup . . . . . . . . . . . . . . . . . . . . . . . . . . . . . . . . . . . . . . . . . . . . . . . . . . . . . . . . . . . . . . . . .15
Do Not Disturb . . . . . . . . . . . . . . . . . . . . . . . . . . . . . . . . . . . . . . . . . . . . . . . . . . . . . . . . . . . . . .15
Paging . . . . . . . . . . . . . . . . . . . . . . . . . . . . . . . . . . . . . . . . . . . . . . . . . . . . . . . . . . . . . . . . . . . .15
Music on Hold . . . . . . . . . . . . . . . . . . . . . . . . . . . . . . . . . . . . . . . . . . . . . . . . . . . . . . . . . . . . . .15
Mobile Extension . . . . . . . . . . . . . . . . . . . . . . . . . . . . . . . . . . . . . . . . . . . . . . . . . . . . . . . . . . . .15
Menu Operation. . . . . . . . . . . . . . . . . . . . . . . . . . . . . . . . . . . . . . . . . . . . . . . . . . . . . . . . . . . . . . 17
Navigate the Menu . . . . . . . . . . . . . . . . . . . . . . . . . . . . . . . . . . . . . . . . . . . . . . . . . . . . . . . . . . .17
Standby Menus . . . . . . . . . . . . . . . . . . . . . . . . . . . . . . . . . . . . . . . . . . . . . . . . . . . . . . . . . . . . .17
The Phonebook Tab . . . . . . . . . . . . . . . . . . . . . . . . . . . . . . . . . . . . . . . . . . . . . . . . . . . . . .18
Message Tab . . . . . . . . . . . . . . . . . . . . . . . . . . . . . . . . . . . . . . . . . . . . . . . . . . . . . . . . . . . .19
Call info Tab . . . . . . . . . . . . . . . . . . . . . . . . . . . . . . . . . . . . . . . . . . . . . . . . . . . . . . . . . . . . .19
Toolbox Tab . . . . . . . . . . . . . . . . . . . . . . . . . . . . . . . . . . . . . . . . . . . . . . . . . . . . . . . . . . . . .20
Messaging . . . . . . . . . . . . . . . . . . . . . . . . . . . . . . . . . . . . . . . . . . . . . . . . . . . . . . . . . . . . . . . . . . 21
Receive a Text Message . . . . . . . . . . . . . . . . . . . . . . . . . . . . . . . . . . . . . . . . . . . . . . . . . . .21
Read a Stored Text Message . . . . . . . . . . . . . . . . . . . . . . . . . . . . . . . . . . . . . . . . . . . . . . . .21
Write and Send a Text message . . . . . . . . . . . . . . . . . . . . . . . . . . . . . . . . . . . . . . . . . . . . .21
Delete a Text Message . . . . . . . . . . . . . . . . . . . . . . . . . . . . . . . . . . . . . . . . . . . . . . . . . . . . .21
Reply to a Text Message . . . . . . . . . . . . . . . . . . . . . . . . . . . . . . . . . . . . . . . . . . . . . . . . . . .21
Confirm a Manual Acknowledge Request . . . . . . . . . . . . . . . . . . . . . . . . . . . . . . . . . . . . . . .22
Forward a Text Message to Another Telephone . . . . . . . . . . . . . . . . . . . . . . . . . . . . . . . . .22
Call the Sender of the Text Message . . . . . . . . . . . . . . . . . . . . . . . . . . . . . . . . . . . . . . . . . .22
Call a telephone number included in a Text Message . . . . . . . . . . . . . . . . . . . . . . . . . . . . .22
Read the next Text Message . . . . . . . . . . . . . . . . . . . . . . . . . . . . . . . . . . . . . . . . . . . . . . . .22
Voice Mail . . . . . . . . . . . . . . . . . . . . . . . . . . . . . . . . . . . . . . . . . . . . . . . . . . . . . . . . . . . . . . . . .23
Receive a Voice mail . . . . . . . . . . . . . . . . . . . . . . . . . . . . . . . . . . . . . . . . . . . . . . . . . . . . . .23
Check the Voice Inbox . . . . . . . . . . . . . . . . . . . . . . . . . . . . . . . . . . . . . . . . . . . . . . . . . . . . .23
One Key Voice Mail Access . . . . . . . . . . . . . . . . . . . . . . . . . . . . . . . . . . . . . . . . . . . . . . . . .23
Phonebook . . . . . . . . . . . . . . . . . . . . . . . . . . . . . . . . . . . . . . . . . . . . . . . . . . . . . . . . . . . . . . . . .23
Add a New Entry . . . . . . . . . . . . . . . . . . . . . . . . . . . . . . . . . . . . . . . . . . . . . . . . . . . . . . . . . .23
Edit Name/Number . . . . . . . . . . . . . . . . . . . . . . . . . . . . . . . . . . . . . . . . . . . . . . . . . . . . . . . .23
Delete Name/Number . . . . . . . . . . . . . . . . . . . . . . . . . . . . . . . . . . . . . . . . . . . . . . . . . . . . . .24
Calculator . . . . . . . . . . . . . . . . . . . . . . . . . . . . . . . . . . . . . . . . . . . . . . . . . . . . . . . . . . . . . . . . . .24
Sound and Alert Settings . . . . . . . . . . . . . . . . . . . . . . . . . . . . . . . . . . . . . . . . . . . . . . . . . . . . . .24
Adjust the Ringer Volume . . . . . . . . . . . . . . . . . . . . . . . . . . . . . . . . . . . . . . . . . . . . . . . . . . .24
Turn the Vibrator on/off . . . . . . . . . . . . . . . . . . . . . . . . . . . . . . . . . . . . . . . . . . . . . . . . . . . . .24
Set different Ring Signals for Internal Call, External Call and Call Back . . . . . . . . . . . . . . .25
Set Alarm Signal . . . . . . . . . . . . . . . . . . . . . . . . . . . . . . . . . . . . . . . . . . . . . . . . . . . . . . . . . .25
Set different Message Alerts for Mail and Voice Messages . . . . . . . . . . . . . . . . . . . . . . . . .25
Set the Key Sound . . . . . . . . . . . . . . . . . . . . . . . . . . . . . . . . . . . . . . . . . . . . . . . . . . . . . . . .25
iv
Page 5

Table of Contents
Display Settings . . . . . . . . . . . . . . . . . . . . . . . . . . . . . . . . . . . . . . . . . . . . . . . . . . . . . . . . . . . . .25
Backlight . . . . . . . . . . . . . . . . . . . . . . . . . . . . . . . . . . . . . . . . . . . . . . . . . . . . . . . . . . . . . . . .25
Contrast . . . . . . . . . . . . . . . . . . . . . . . . . . . . . . . . . . . . . . . . . . . . . . . . . . . . . . . . . . . . . . . .26
Enable/Disable Popup Info . . . . . . . . . . . . . . . . . . . . . . . . . . . . . . . . . . . . . . . . . . . . . . . . . .26
Time & Date Settings . . . . . . . . . . . . . . . . . . . . . . . . . . . . . . . . . . . . . . . . . . . . . . . . . . . . . . . . .26
Set Time Format . . . . . . . . . . . . . . . . . . . . . . . . . . . . . . . . . . . . . . . . . . . . . . . . . . . . . . . . . .26
Set Date Format . . . . . . . . . . . . . . . . . . . . . . . . . . . . . . . . . . . . . . . . . . . . . . . . . . . . . . . . . .27
Phone Lock settings . . . . . . . . . . . . . . . . . . . . . . . . . . . . . . . . . . . . . . . . . . . . . . . . . . . . . . . . .27
Activate the Phone Lock . . . . . . . . . . . . . . . . . . . . . . . . . . . . . . . . . . . . . . . . . . . . . . . . . . . .27
Deactivate the Phone Lock . . . . . . . . . . . . . . . . . . . . . . . . . . . . . . . . . . . . . . . . . . . . . . . . . .27
Select Answering Mode . . . . . . . . . . . . . . . . . . . . . . . . . . . . . . . . . . . . . . . . . . . . . . . . . . . . . . .27
Change the Menu Language . . . . . . . . . . . . . . . . . . . . . . . . . . . . . . . . . . . . . . . . . . . . . . . . . . .28
In Charger Mode . . . . . . . . . . . . . . . . . . . . . . . . . . . . . . . . . . . . . . . . . . . . . . . . . . . . . . . . . . . .28
Master Reset . . . . . . . . . . . . . . . . . . . . . . . . . . . . . . . . . . . . . . . . . . . . . . . . . . . . . . . . . . . . . . .28
Registration. . . . . . . . . . . . . . . . . . . . . . . . . . . . . . . . . . . . . . . . . . . . . . . . . . . . . . . . . . . . . . . . . 29
Over Air Registration . . . . . . . . . . . . . . . . . . . . . . . . . . . . . . . . . . . . . . . . . . . . . . . . . . . . . .29
Operation Notice. . . . . . . . . . . . . . . . . . . . . . . . . . . . . . . . . . . . . . . . . . . . . . . . . . . . . . . . . . . . . 31
Accessibility and Voice Quality . . . . . . . . . . . . . . . . . . . . . . . . . . . . . . . . . . . . . . . . . . . . . . . . .31
Maintenance . . . . . . . . . . . . . . . . . . . . . . . . . . . . . . . . . . . . . . . . . . . . . . . . . . . . . . . . . . . . . . . . 32
Charge the Battery . . . . . . . . . . . . . . . . . . . . . . . . . . . . . . . . . . . . . . . . . . . . . . . . . . . . . . . . . . .32
Desktop Charger . . . . . . . . . . . . . . . . . . . . . . . . . . . . . . . . . . . . . . . . . . . . . . . . . . . . . . . . .32
Replace the Battery . . . . . . . . . . . . . . . . . . . . . . . . . . . . . . . . . . . . . . . . . . . . . . . . . . . . . . .33
Attach the Hinge-type Clip . . . . . . . . . . . . . . . . . . . . . . . . . . . . . . . . . . . . . . . . . . . . . . . . . . . . .33
Attach the Swivel-type Clip . . . . . . . . . . . . . . . . . . . . . . . . . . . . . . . . . . . . . . . . . . . . . . . . . . . .34
v
Page 6

5602 Wireless Handset User Guide
vi
Page 7
About Your Phone
The Mitel 5602 Cordless Handset is a feature-rich handset designed to operate in conjunction
with a DECT base station and the 3300 ICP. It is ideal for users who need mobile voice and
messaging functions.
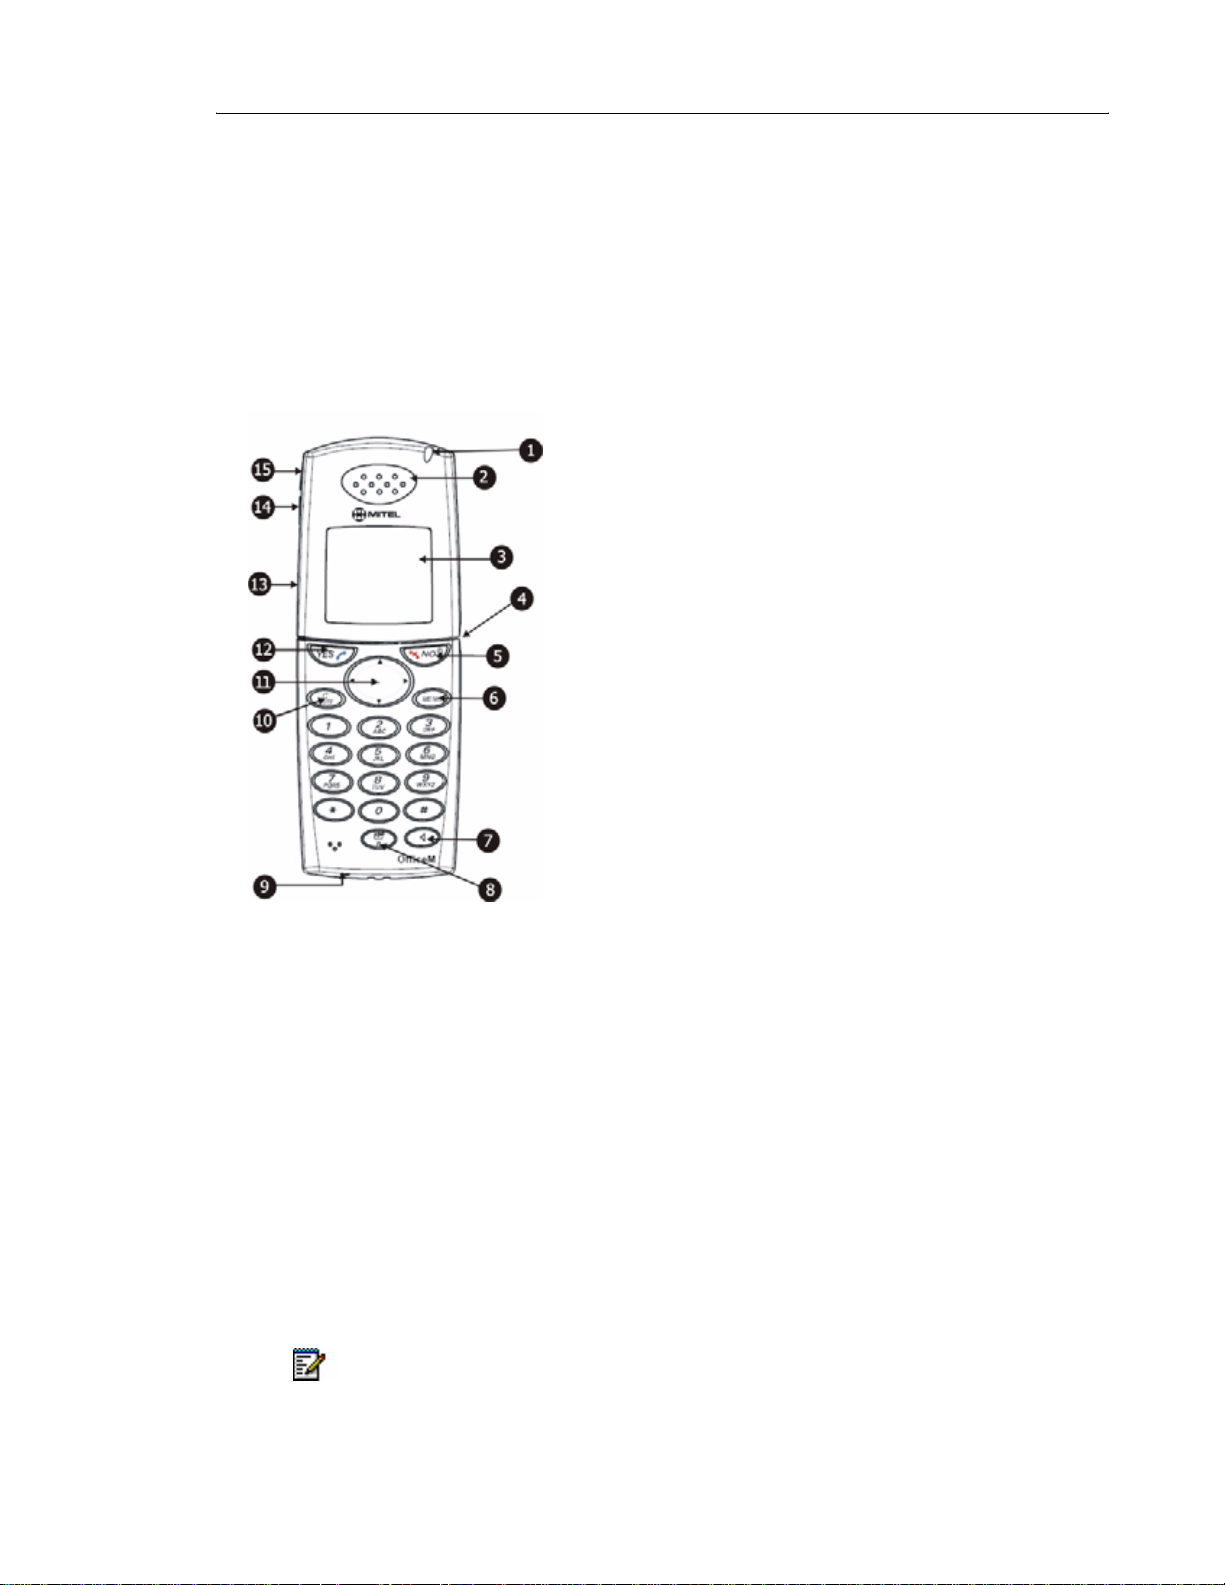
Elements of Your Handset
About Your Phone
1 LED
2 Earpiece
3 Display
4 Headset Connector
9 Microphone
10 Mute / C Key
11 Navigation Key
12 YES Key
13 Loudspeaker (on back of handset)
14 Volume Down
15 Volume Up
5 On/Off, On hook, and NO Key
6 Menu Key
7 Handsfree Key
8 R / Message Key
To turn the phone On or Off, press and hold the NO key for 3 seconds.
Note: The handset may ret ain small magnetic objects aro und the mouth cap or ear cap
region.
1
Page 8

5602 Wireless Handset User Guide
Features and Functions
The 5602 Cordless Handset provides the following features and functions:
Antenna: The antenna is integrated inside the phone.
Display: The full graphic type display is 101 pixels wide and 80 pixels high. The display has
white backlighting that can be switched on/off manually or autom atically. Display contrast can
also be changed. See “Display Settings” on page 25.
Loudspeaker: A separate loudspeaker on the back of the phone p rovides the speaker function.
Microphone: The microphone is on the bottom of the phone.
Headset Connector: The headset connector is used for:
• connecting headsets.
• connecting a data cable for downloading software and other data.
Clip: The belt clip on the back side of the cordless phone, can either be a hinge-type clip
(standard) or a swivel-type clip. See “Attach the Hinge-type Clip” on page 33, or “Attach the
Swivel-type Clip” on page 34. Use the clip to attach the phone to a belt or similar.
Battery: The battery is a rechargeable Li-Ion battery and is fully charge d within four hours. See
“Replace the Battery” on page 33.The battery is not intended to be charged outside the
telephone or to be frequently exchanged.
Note: When a battery is connected to the 5602, a full charging cycle is always required.
Failure to do so results in a very early low battery warning.
Contacting Emergency Services
This handset, like any wireless phone, communicates using radio signals. As with any wireless
phone, you may not be able to establish a connection und er all conditions, therefore, you should
not rely solely on a wireless telephone for essential, emergency communication. Th e key lock
feature disables the handset keyp ad and prevent s the accid enta l dialing of numbers that may
result in nuisance calls. It also prevents accidental calls to emergency services numbers like
911, 999, or 112.
To disable the key lock feature, press the key and then press YES.
Currently, mobile IP phones do not support Enhanced 911 (E911) operation. If emergency
services are required, it is necessary to keep the system a dministrator and loca tion dat a base
up-to-date.
Tips for your Comfort and Safety
Don't cradle the handset!
Prolonged use of the handset can lead to neck, shoulder, or back discomfort, especially if you
cradle the handset between your ear and shoulder. If you use your phone a lot, you may find
2
Page 9

About Your Phone
it more comfortable to use a headset. See the section o n headset usage elsewhere in this guide
for more information.
Protect your hearing
Y our phone has a control for a djusting the volume of the handset receiver or headset. Because
continuous exposure to loud sounds can contribute to hearing loss, keep the volume at a
moderate level.
Frequency Range
The handset is a radio transmitter and receiver. When it is on, it receives and sends out radio
frequency (RF) energy. The handset operates on different frequency ranges depending on
market and employs commonly used modulation techniques:
•EU: 1880 - 1900 MHz
•USA: 1920 - 1930 MHz
•LA: 1910 - 1930 MHz
Exposure to Radio Frequency Signals
This device complies with FCC SAR limit of 1.6 W/kg. The maximum SAR value measured
when used at the ear is 0.067 W/kg. The telephone has also been tested when worn on the
body using belt clip, maximum measured SAR value in this configuration is 0.04 W/kg.
Environmental Requirements
• Only use the handset in temperatures between 0C to +40C (32F to 140F).
• Avoid exposing the handset for direct sunlight or close to other heat sources.
• Keep the handset away from excessive heat and moisture.
• Do not expose the handset to open flame.
• Keep the handset away from strong electromagnetic fields.
Chemical Resistance
The alpha and numeric characters printed on the exterior of the handset have been tested and
found resistant to chipping, fading or wearing off when the handset is treated with common
cleaners and disinfectants or per spiration. The following chemicals have shown no harmful
effect:
• 3% Hydrochloric Acid
• M-alcohol (70% Methylated Ethanol)
• 60% Chlorhexidin 0.5mg/ml
Acetone can be damaging to the plastic casing of the handset and should not be used.
Icons and Text in the Display
All functions and settings available to the user are shown as icons and text in the display. For
more information about menu navigation, see “Menu Operation” on page 17.
3
Page 10
5602 Wireless Handset User Guide
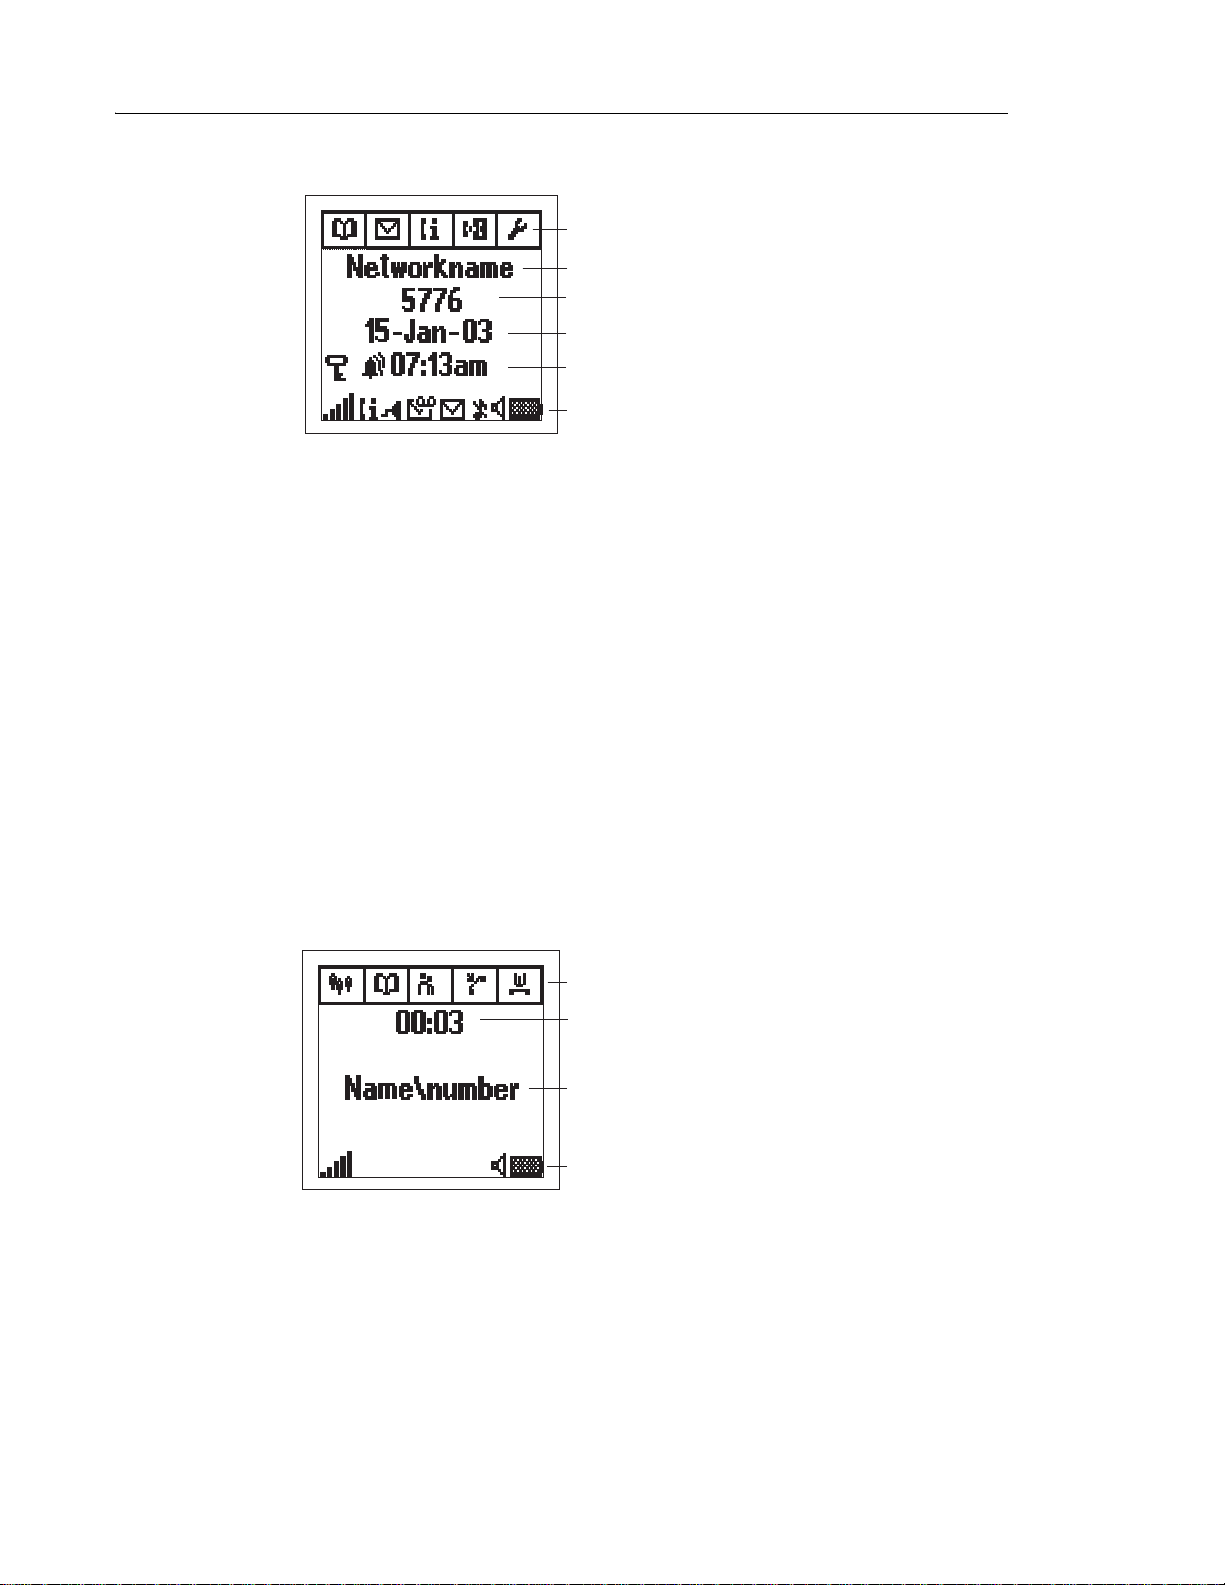
In standby mode
The top line displays the available menu tabs. In standby mode, the tabs are:
• Phonebook
• Message
• Call Info
• Call Service
• Toolbox
Menu-tabs in standby mode
System information
User identity
(name and/or number)
Date
Key lock, Alarm icon,
and current time
Info row
003
The next four lines are used for information such as the name of the system to which the
cordless phone is connected, the user identity (if supported by the network), and the curren t
date and time (if NTP settings are configured).
The bottom line (Info row) displays icons that give the user information such as signal strength,
new messages, missed calls, and battery status. For more information see “Icons” on page 5.
Off hook
The following illustrations are examples of display information during a call.
Menu-tabs when off hook
Duration time
Calling party identity
Info row
004
4
Page 11
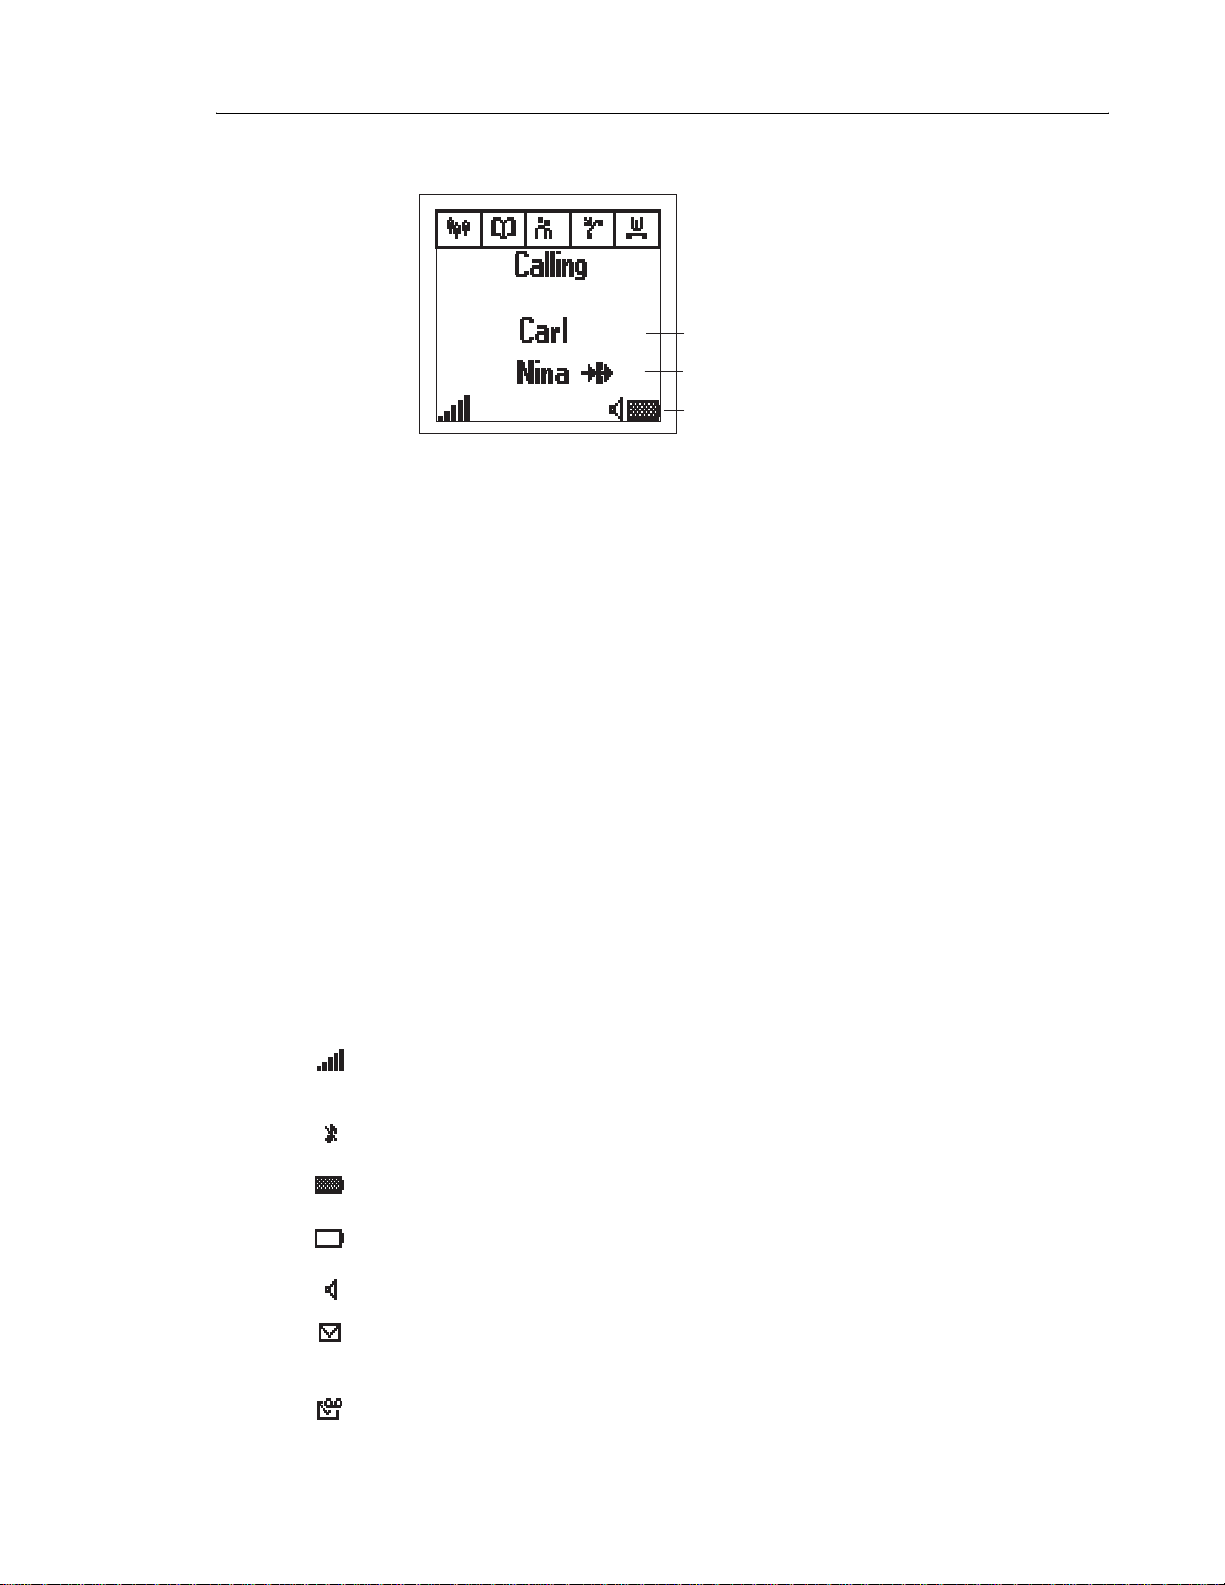
Called party identity
Redirected caller identity
About Your Phone
Info row
008
The top line displays the available menu tabs. When the phone is Off hook, the tabs are:
•3rd party
• Phonebook
• Ongoing Call
• User Busy
• Call Waiting
The Phonebook and Ongoing Call tabs are always available; the other tabs are
system-dependent. For more information see “Menu tabs” on page 7.
The subsequent rows show information such as call duration time and the name and/o r number
of the incoming caller (if supported by the network). If redirected line information is available,
the redirected caller identity followed by the “redirected call” icon are displayed.
The bottom line (info row) displays icons that give the user information as shown in the following
chart:
Icons
Icon Title Description
Signal Strength - visible when the cordless phone is connected to a system. The
number of bars shown in the display depends on the signal
strength.
RIng SIgnal Muted - shown when the MUTE key is pressed and “Mute ringer?” is
selected.
Battery - always shown in the display in standby mode. When the level is low
it is time to charge the battery.
Low Battery - shown when the battery has 10% of its capacity left. The icon
flashes when the battery capacity is less than, or equal to, 5%.
Speaker - shown when the loudspeaker is activated.
New message "- indicates that one or more ew text messages have arrived. The
icon remains in the display until all new messages in the inbox are
read.
Voice message - shown when a voice message is waiting.
5
Page 12

5602 Wireless Handset User Guide
Icon Title Description
Confirm Message - prompts you to accept or decline a received message.
Old message - indicates that a message has been read.
Keys locked - indicates a locked keypad.
Headset - indicates that a headset is connected to the phone.
Microphone muted - indicates a silenced microphone. This means that the other part in
Redirected call - indicates that all voice calls and SMS messages are redirected
Outgoing call - added to all outgoing calls in the call list.
Answered call - added to all answered calls in the call list.
Missed Call "- added to all missed calls in the call list.
Call info - indicates that there are new missed calls in the call list. The icon
Datacable - visible when a datacable is connected to the headset connector on
Search phonebook - visible when it is possible to press the key and search for a
an ongoing call with you cannot hear you.
when the phone is placed in the charger. The redirected caller
identity is displayed beside the icon.
remains in the display until the calls are checked and either called
back or deleted.
the phone.
name/number in the phonebook.
6
Page 13

Menu Tabs
About Your Phone
Menu
tabs
Description
The Phonebook menu contains all names/numbers in the personal and the company
phonebook. It is also possible to access a central phonebook from this menu.
The Message menu contains all message handling such as reading, writing, and sending
messages.
The Call info menu contains call lists and call time.
The Call service* menu contains absent handling, and diversion of calls and messages to
another phone.
The Toolbox menu contains a calculator, alarm clock, and personal phone settings such
as changing the ringer volume, selecting language, etc.
The 3rd party* menu contains all functions for calls where a third (or more) part is involved.
The Ongoing call menu contains short-cuts to the message menu and to the call list, and
possibility to change to DTMF signalling mode etc.
In the User busy* menu a call waiting can be initiated if the called person is busy, or a call
back when the called line no longer is busy. This can only be done on internal calls.
In the Call waiting* menu information of the caller can be found if call waiting is initiated
by another party (if this information is available). A call that is waiting can be picked up on
another line while maintaining the first connection.
* Not supported on Mitel systems.
Keys and Buttons
Some keys have different functions depending on the st ate of the phone, o r the length of time
that you press a key.
Short press = Press and release the key in less than one second.
Long press = Press and hold down the key for longer than one second and then release.
V olum e button
The two buttons on the upper left side of the cordless phone (see “Elements of Your Handset”
on page 1) are used for increasing/decreasing the earpiece and speaker volume.
Off hook, and YES key
This key is used for connecting calls and as a confirmation key. A short press in
standby mode opens the call list. Pressing the key for more than 2 seconds calls
the Voice Activated Assistance (VAA) routine if this feature is available.
Always press YES to confirm choices when in menu mode.
7
Page 14

5602 Wireless Handset User Guide
On hook, NO, and On/Off key
This key is used to disconnect calls and to return to previous screens when working in
menu mode. Press the key for more than three seconds to turn the phone on/off.
C (Clear), and MUTE key
Press this key in standby mode to mute the ringer signal.
Press this key during a call to mute the microphone.
Press C (Clear) to erase characters entered by mistake.
MENU Key
Press this key in standby mode to open the Phonebook menu.
Press this key when off hook to open the “3rd party” menu.
When you exit a menu using the MENU key, the last-used menu is stored.The next time
the MENU key is pressed, the stored menu opens.
R/Message Key
Press this key when the “voice message” icon is displayed to enter your messaging
system and retrieve the voice message.
Note: Use of this feature depends on the network.
Handsfree Key
Press the Handsfree key to turn the loudspeaker on/off during a call. The key is also
used for connecting an incoming or outgoing call in loudspeaking mode.
Navigation Key
Use this key to navigate through menus and when working in text mode. When offhook
and in standby mode, press the Right and Left navigation keys( and to access
menu tabs.)
Press the Up and Down navigation keys ( and ) for moving through menu lists.
8
Page 15

Enter Text and Numbers
About Your Phone
γ
D E F d e f è é 3 õ
J K L j k l 5
M N O m n o ñ ö ø ò 6
W X Y Z w x y z 9
T U V t u v ü ù 8
#
Handsfree key
θ ξ ω
Λ λ
006
Space 9 ? ! , . : ; " \ < = > ( ) _ 1
G H I g h i ì 4
P Q R S p q r s ß 7
π σ
A B C a b c å ä æ à ç 2
R/Message key
+ & @ / ¤ % $ £ ¥ § \ ¿ ¡ 0
In standby, and number input mode
• A short press on a key enters the digits “0” - “9” and the characters and #.
• To enter “+” in number input mode, long press key 0.
• T o enter a pause in nu mber input mode, long press the -key. The pause is displayed
as a “-”.
• To delete a character, short press the C key.
• To delete all characters, long press the C key.
In text input mode
• Press keys 0-9, , or #, to display the first available character on that specific key.
The marked character is selected after a time-out, or when another key is pressed.
• To change to upper/lower case, press the -key before entering the character .
• To add space in the text, short press key 1.
• The first character entered in a message, or when adding/editing a name in the phonebook, will be an upper level character followed by lower level characters unless the
key is pressed before entering the character.
• To delete a character, short press the C key.
• To delete all characters, long press the C key.
9
Page 16

5602 Wireless Handset User Guide
Customizing Your Phone
Volume/Mute Control
Adjust the Volume During a Call
• Press the "Volume up" button to increase the volume, and the "Volume down" button to
decrease the volume. The phone stores the new volume level.
Mute the Microphone During a Call
• Press the Mute button to disconnect/connect the microphone.The Microphone muted icon
( ) is displayed when the microphone is muted.
Turn Loudspeaking Function On/Off
• Press the "Handsfree key" to turn on/off the loudspeaker. This is possible either before
dialing a number, or during an ongoing conversation.
Turn the Ring Signal On/Off
1. In stand-by mode press the Mute key. You are prompted to Mute/Unmute.
2. Press YES to toggle between ring signal on/off. The “Ring signal muted” icon indicates a
silenced telephone.
Lock/Unlock the keypad
To prevent accidentally pressing keys and making a call, the keys can be blocked by locking
the keypad.
1. In the Toolbox menu, see “Toolbox Tab” on page 20, select Locks and then press YES.
2. Select Key lock and then press YES.
3. Set to Automatic to lock the keyp ad and confirm the choice by pressing YES. When a call
is received the keys will automatically unlock and be locked again 30 seconds after the call
is ended.
Unlock the keypad by pressing the key and then pressing YES.
Change the Dialing Mode
10
If your system normally uses pulse dialing you can switch b etween long and short DTMF tones
if required. For some services the standard tone s sent by the cordless handset are too short.
In this case the handset must be switched to “Long DTMF”.
Switch to long DTMF tones
1. While calling, select the Ongoing call tab.
Page 17

2. Select Long DTMF and then press YES.
Switch to short DTMF tones
1. While calling, select the Ongoing call tab.
2. Select Short DTMF and press YES.
Send a Dial Tone Pause
A long press on the -key adds a pause. It is displayed as “-”.
Customizing Your Phone
11
Page 18

5602 Wireless Handset User Guide
Making and Answering Calls
Make a Call
Dial a number
• Dial the call number and press YES. The name of the called party is displayed if connecting
line information is available.
Call a number from the call list (internal calls only)
1. Press YES to open the call list.
2. Step with the Down navigation key and select one of the twenty last received, dialed or
missed calls. If a number occurs more than once, the last time stamp together with the tot al
number of occurrences, is shown. (Note: Time stamp is dependent upon Network Time
Protocol setup. See your administrato r for mo re info rm a tio n. )
3. Press YES to dial. The call list can also be accessed via the Call Info menu.
Note: On ly internal numbers calls can be called from the call list. External numbers must
be dialed.
Quick call by a name in the phonebook
1. Press and hold the key that contains the first character in the name. Use short presses on
the same key to step between the chara cters, an d use the Down na vigation key to select
the desired name. For example, to dial the name "Eva", press key 3 (DEF) twice; the first
press shows all names starting with "D" and the second press shows all names sta rting
with "E". Scroll with the Down navigation key to find the name.
2. Press YES to dial.
Call by a name in the phonebook
1. Enter Phonebook in the menu.
2. Select Call and then press YES.
3. Enter the first character(s) or the whole name (or scroll with the Down navigation key to
find the name).
4. Press YES to dial.
Receive/end a call
• When the signal sounds press YES to answer the call, or press the Handsfree key to
answer the call in speaker mode. The name/number of the calling party is displayed if calling
line information is available.
• Press NO to end the call. Call duration is shown in the display.
12
Page 19

Call Handling
Your system may be programmed to access "in call" features in one of two ways:
• using the handset buttons (device-based)
• using feature access codes programmed in the 3300 ICP (system-based)
Depending upon this programming, features may be accessed in different ways. Where
necessary, instructions are provided for both device-based and system-based deployments.
Hold
1. During a call, press the R key to put the call on hold.
2. Press the R key again to retrieve the call.
Transfer
System-based
1. During the call, press the R key to put the call on hold.
Call Handling
2. Dial the number to which you want to transfer the call.
3. Press NO to transfer the call. (Note: Supervised transfer is not supported).
Device-based
1. During the call, press the R key to put the call on hold.
2. Dial the number to which you want to transfer the call.
3. Do one of the following:
• to make a blind transfer, press NO to hang up and connect the other two parties
• to make a supervised transfer, wait for an answer, announce the transfer, and then
press NO to hang up and connect the other two parties.
• to terminate the transfer and return to the he ld call, press the R key and then press 1.
Conference
System-based
To conference with another party during an active call:
1. Put the active call on hold. (Press the R key.)
2. Dial the number of the third party with whom you want to conference.
3. Press the R key to put the third party on hold.
4. Enter the feature access code for Conference Call.
5. Press the R key again to start the conferenced call.
13
Page 20

5602 Wireless Handset User Guide
Device-based
Conference is not supported in device-base d mo d e.
Call Park
System-based
The Call Park feature allows you to place a call in a special hold state.You can then retrieve
the call from any extension in the system.
To park an active call:
1. Press the R/Message key to place the call on hold.
2. Dial the Call Park feature access code immediately followed by the directory number on
which to park the call and then press YES.
3. Inform the called party of the waiting call.
To retrieve a parked call:
1. Press YES to go off hook.
2. Dial the Call Park - Retrieve feature access code immediatel y followed by the directory
number on which the call is parked, and then press YES.
Device-based
Call Park is not supported in device-based mode.
Call Forward
To set Call Forwarding:
1. Press YES to go offhook.
2. Enter the feature access code for the Call Forwarding mode you want to use, followed
immediately by the extension number to which you want to forward. (For example, if *62*
is your FAC for Call Fwd - Busy, and you want to forward calls to extension 1234, then
press *62*1234.)
3. Press YES.
To cancel Call Forwarding:
1. Enter the feature access code for Call Forwarding - Cancel and then press YES.
2. When you hear a dial tone, press NO to hang up. Forwarding is cancelled.
14
Page 21

Call Pickup
To answer a call that is ringing at another station in your Pickup Group:
1. Dial the feature access code for Call Pickup-Dialed and then press YES.
2. Answer the call.
To answer a call that is ringing at a extension not in your Pickup Group:
1. Dial the feature access code for Call Pickup-Directed, followed by the numbe r of the
ringing extension, and then press YES.
2. Dial the number of the ringing extension.
Do Not Disturb
To activate Do Not Disturb:
1. Dial the Do Not Disturb feature access code and then press YES.
2. When you hear a dial tone, press NO to hang up. Do Not Disturb is activated.
Call Handling
To deactivate Do Not Disturb:
1. Dial the Do Not Disturb-Cancel feature access code and then press YES.
2. When you hear a dial tone, press NO to hang up. Do Not Disturb is deactivated
Paging
Direct Paging allows you to page another telephone over its built-in speaker. Group Paging
pages two or more telephones at the same time. Incoming pages are not supported.
To initiate a direct page:
1. Dial the feature access code for Direct Page, followed by the e xtension number you want
to page, and then press YES.
2. Wait for ringback and announce the page.
Music on Hold
Music on Hold is supplied by the ICP. See your system administrator.
Mobile Extension
Mitel Mobile Extension is a software solution that enables you to twin your desk phone with an
external PSTN-connected phone (your cell pho ne, for example). Calls arriving at the desk phone
ring the cell phone simultaneously, until one or the other is answered, or if unanswered, are
forwarded to voice mail. You can use the 5602 wireless handset as a destination (twinned)
device for your desk phone. For information about using your handset for Mobile Extension,
15
Page 22

5602 Wireless Handset User Guide
refer to the Mobile Extension documentation available at www.mitel.com or contact your
Administrator.
16
Page 23

Menu Operation
Navigate the Menu
Menu Operation
Off hookConfirm key
Left
C (Clear )and MUTE key
Up
Down
On hook- Backand On/Off key
Right
MENU key
005
Enter/Exit the menu
Enter Menu mode by pressing the Menu key or the Left or Right navigation keys. Use Left
or Right to move between tabs. The selected tab is shown with inverted colors. On each tab,
a heading is shown and the first alternative is highlig hted. Use the Up or Down navigation
keys to move through the list of alternatives. Press YES to select an alternative. Press NO to
go back one step in the menu. Confirm your alternative/setting with a press on YES.
To exit Menu mode (and return to standby mode), press the Menu key, or press and hold the
NO key for more than one second.
Note: When you exit by pressing the Menu key , the last used menu tab setting is saved. When
you press the Menu key again the saved menu is opened.
Standby Menus
The following diagrams illustrate the menus for each tab.
Note: Some options are system-dependent and may not appear on your phone.
17
Page 24

5602 Wireless Handset User Guide
The Phonebook Tab
• Call ——>
• Add contact —>
• Edit contact —>
• Delete contact —>
• Open central* —>
* System dependent
• Name:
Albert E.
Bert A.
Christine
David
Eva
Fred C.
(All entries are shown
in alphabetic order)
• New
• From Call list
• Name:
Christine
David
Eva
(All entries in the local
phonebook are shown
in alphabetic order)
• Name:
(Search entries
in the central phonebook)
010
18
Page 25

Message Tab
Menu Operation
*
Call info Tab
• Voice* ——>
• Inbox ——>
• Send ——>
System dependent
Figure 1.
• Missed calls —>
Access to your
voice mailbox
Message 1 ——>
Message 2
Message 10
• Unsent
• New
• Outbox
7629 03:31
7682 05:26
7845 23-Sep-03
7629 20-Sep-03
• Remove
• Reply
• Confirm
• Forward
• Call sender
• Call (No. in text)
• Read next
011
7891 01:30
• Call list ——>
7629 03:31
7827 03:35
7682 05:26
7845 20-Oct-03
The 20 last calls are
shown
Total:
• Call time —>
03:47:06
Last call:
00:00:07
• Dev services*
* Not visible for the normal user
Note: Some options may not be available on your handset
012
19
Page 26

5602 Wireless Handset User Guide
Toolbox Tab
• Bluetooth —>
• Alarm clock —>
• Calculator
• Sound & Alerts —>
• Display ———>
• Network ——>
• Time & Date —>
• Enable/Disable
• Headset
• Set
• Clear
• Ringer volume —>
• Vibrator alert —>
• Ring signals —> –>
• Alarm signal ——————————>
• Message alert —> –>
• Key sound ——>
• Backlight ——>
• Contrast
• Popup info ——>
• Subscribe
• Select
• Priority
• Rename subs
• Unsubscribe
• Time format
• Date format
• No 1
—>
• Add new
• Voice
• Mail
• Alarm
• On
• On when silent
• Off
• Internal
• External
• Call Back
• Mail
• Voice
• Silent
• Click
• Tone
• On
• Off
• Automatic
• Enable
• Disable
—>
Remove
Edit Name
Connect
Low 1
Low 2
Medium 1
Medium 2
High 1
High 2
Mix 1
Mix 2
Melody 1
Melody 6
User 1
User 10
None
Click
Tone
Low 1
Low 2
Medium 1
Medium 2
High 1
High 2
Mix 1
Mix 2
Melody 1
Melody 6
User 1
User 8
20
• Locks ————>
• Answering mode –> ——>
• Language —>
• In charger mode –>
• Master reset ——>
• Key lock ——>
• Phone lock —>
• Any key
• Auto answer —>
Dansk, Nederlands,
English, etc.
• On
• Off
• Redirect
• Settings only
• All
• Automatic
• Off
• On
• Off
• On
• Off
014
Page 27

Messaging
Receive a Text Message
When a text message is received, the LED flashes and the message alert signal sounds. If a
message is received during a call, a beep notifies the user and the message is stored in the
message list. The “New message“ icon is shown in the display. The icon remains in the display
until all new messages are opened.
Read a Stored Text Message
1. In the Message menu, select Inbox and press YES.
2. Use the Down navigation key to find the message, and then press YES to view the message.
Write and Send a Text message
1. In the Message menu, select Send and press YES.
2. Select New and press YES.
3. Type the message. Keys 0-9, or # can be used. The "0" and "1" keys contain special
characters, see “Enter Text and Numbers” on page 9 for more information.
Messaging
Note: Some characters require more storage room and may cause the message to truncate
before the 160 character maximum.
The first character entered will be an uppercase character followed by lowercase characters
unless the -key is pressed before entering the character. When pressing a key, the first
available character on that specific key is displayed (see “Enter Text and Numbers” on p age 9).
To type any of the other characters on that key, press the key until that character appears in
the display. For example, to type the letter "E", press key "3" twice. "E" appears in the display
and is selected after a timeout or when another key is pressed.
4. Press YES and then enter the number to call.
5. Press YES to send the message.
Delete a Text Message
1. In the Message tab, select Inbox and press YES.
2. Select the message to delete.
3. Scroll with the Down navigation key to Remove and then press YES. The message is
deleted.
Reply to a Text Message
1. In the Message tab, select Inbox and press YES.
2. Select the message to which you want to reply.
3. Scroll with the Down navigation key to Reply and then press YES.
4. Write the reply and then press YES to send.
21
Page 28

5602 Wireless Handset User Guide
Confirm a Manual Acknowledge Request
If you receive a message with manual acknowledgement, the message m ust be confirmed with
the handset.
1. In the Message menu, select Inbox and press YES.
2. Select the message and press YES to open it. The message appears with the question
“Confirm?”.
3. Press YES to confirm.
4. Press YES again when the question “Confirm msg?” pops up.
5. Select Accept and press YES. (Or select Decline to decline the acknowledgement.)
Forward a Text Message to Another Telephone
1. In the Message tab, select Inbox and then press YES.
2. Select the message you want to forward.
3. Scroll with the Down navigation key to Forward and then press YES.
4. Write additional text if required and then press YES to forward the message.
Call the Sender of the Text Message
1. In the Message tab, select Inbox and then press YES.
2. Select the message from the appropriate sender.
3. Scroll with the Down navigation key to Call sender and press YES.
4. Press YES twice to call the sender.
Call a telephone number included in a Text Message
If the sender has included a telephone number in the message it is possible to call the numbe r
without dialing it.
1. In the Message tab, select Inbox and then press YES.
2. Scroll with the Down navigation key to Call (No. in text) and press YES.
3. Press YES twice to call the number in the message.
Read the next Text Message
After you have read a stored text message, you can read the next message in the list.
1. From the current message, press YES.
2. Scroll with the Down navigation key to Read next and then press YES.
22
Page 29

Voice Mail
Receive a Voice mail
A new voice mail is indicated by the Voice mail icon in the display. Information is stored in
the Voice inbox, (see “Message Tab” on page 19).
Check the Voice Inbox
• In the Message tab, select Voice and then press YES. The voice mail icon is displayed
followed by the total number of new voice mails in the users mailbox.
One Key Voice Mail Access
If the mailbox extension number is downloaded to the phone , press the R key in standby mode
to call the mailbox.
Phonebook
The 5602 Wireless Handset has a personal pho nebook with 100 entr ies, to which names and
numbers can be added, deleted, and edited by the user. In addition, a company phonebook
with up to 1000 entries can be downloaded to the phone. The co mpany phoneb ook name and
numbers cannot be edited or deleted by users. Both phonebooks list names in alphab etical
order . Both personal and company listings appear in the display with company names ind icated
by a “Keys locked” icon.
Messaging
It is also possible to access a central phonebook (see “The Phonebook Tab” on page 18). Enter
the first few characters of a name or number and the messaging server re turns a list of names
and numbers that matches your search.
Add a New Entry
1. On the Phonebook tab, select Add contact and then press YES.
2. Do one of the following:
•Select New and then press YES. Enter the name, press YES, and enter the call number ,
(see “Enter Text and Numbers” on page 9).
OR
•Select From call list, and then select the appropriate name.
3. Press YES to save the new entry.
Edit Name/Number
1. On the Phonebook tab, select Edit con tact and then press YES. The names in the phonebook are shown in alphabetical order.
2. To search the list, enter the first character(s) in the name, or step with .
3. Use the C key to edit the name/number and then press YES to save the entry.
23
Page 30

5602 Wireless Handset User Guide
019
Delete Name/Number
1. On the Phonebook tab, select Delete contact and press YES. The names in the phonebook are shown in alphabetical order. T o se arch the l ist, en te r the first char acter (s) in the
name, or step with .
2. Press YES. You are prompted to “Delete <name>?”.
3. Press YES to delete the entry.
Calculator
The phone has a calculator that supports general arithmetic functions (addition, subtraction,
multiplication and division).
1. On the Toolbox tab, (see “Toolbox Tab” on page 20), select Calculator and press YES.
2. Enter digit(s). To switch between “+”, “-”, “x”, and “/” press the # -key. Enter next digit(s)
and then press YES to calculate.
Sound and Alert Settings
Adjust the Ringer Volume
1. In the Toolbox menu, select Sound & Alerts and then press YES.
2. Select Ringer volume.
3. Select desired setting for Voice, Mail, or Alarm clock. Step with to increase the volume
and with to decrease it.
4. Press YES to save the setting.
Turn the Vibrator on/off
1. In the Toolbox menu, select Sound & Alerts and then press YES.
2. Select Vibrator alert, press YES.
3. Select one of the following settings:
• On: to enable vibrator alert
• On when silent:. to enable vibrator only when the ringer is muted
• Off: to disable vibrator alert
24
4. Press YES to save the setting.
Page 31

Messaging
Set different Ring Signals for Internal Call, External Call and Call Back
1. In the Toolbox menu, select Sound & Alerts and then press YES.
2. Select Ring signals and then press YES. You can set different signals for internal calls,
external calls and call back. The cordless phone has 14 dif ferent ring signals. T en additional
ring signals can be downloaded to the phone.
3. Press and to scroll through the list and then press YES to select.
4. Press YES to save the setting.
Set Alarm Signal
1. In the Toolbox menu, select Sound & Alerts and then press YES.
2. Select Alarm signal and then press YES. The cordless phon e has 14 alarm signals. Ten
additional signals can be downloaded to the phone.
3. Press and to scroll through the list and then press YES to select.
4. Press YES to save the setting.
Set different Message Alerts for Mail and Voice Messages
1. In the Toolbox menu, select Sound & Alerts and then press YES.
2. Select Message alert and then press YES. Different message alerts for the two types of
messages can be selected. The cordless phone has 14 different message alerts by default.
Ten additional message alerts can be downloaded to the phone.
3. Press and to scroll through the list and then press YES to select.
4. Press YES to save the setting.
Set the Key Sound
This feature provides a sound tone each time a key is pressed.
1. In the Toolbox menu, select Sound & Alerts and then press YES.
2. Select Key sound and then press YES.
3. Select the sound to associate with key presses: Silent, Click, or Tone.
4. Press YES to save the setting.
Display Settings
Backlight
1. In the Toolbox menu, select Display and then press YES.
2. Select Backlight and then press YES.
3. Select one of the following settings:
• On: to turn backlight on
• Off: to turn backlight off
25
Page 32

5602 Wireless Handset User Guide
• Automatic: to turn backlight on automatically for example, when a key is pressed or
when an incoming call is received. The backlight turns off approximately five seconds
after the phone has been used.
4. Press YES to save the setting.
Contrast
1. In the Toolbox menu, select Display and then press YES.
2. Select Contrast and then press YES.
3. St ep with to increase the contrast, and with to decrease it and then press YES to save
the setting.
023
Enable/Disable Popup Info
The system will send information in a popup window when working in menu mode during a call.
For example, if searching for a call number in the phonebook during a call and the other part
ends the call, the text "Hung up" will popup in a separate window.
1. In the Toolbox menu, select Display and then press YES.
2. Select Popup info and then press YES.
3. Select Enable or Disable.
4. Press YES to save the setting.
Time & Date Settings
Set Time Format
Network Time Protocol settings must be configured before time and date settings can be
displayed by the handset. See your administrator for more information.
1. In the Toolbox menu, select Time & Date and then press YES.
2. Select Time format and then press YES.
3. Select 12 hour or 24 hour time format.
26
4. Press YES to save the setting.
Page 33

Set Date Format
1. In the Toolbox menu, select Time & Date and then press YES.
2. Select Date format and then press YES.
3. Select a date format. (Choices are: DD-MMM-YY, MM/DD/YY, DD-MM-YY, or YYMMDD.)
4. Press YES to save the setting.
Phone Lock settings
Activate the Phone Lock
You can activate the Phone Lock feature to protect the phone from unauthorized use. When
this feature is activated, you need to enter a PIN code at power on. The default phone lock
code (0000) can be changed to any four digit personalized code.
1. In the Toolbox menu, select Locks and then press YES.
2. Select Phone lock, press YES.
3. Select On and then press YES.
4. Enter the old PIN code and press YES.
5. Enter the new PIN code and press YES
6. Enter the new PIN code again and press YES to save the setting.
Messaging
If you forget your PIN code, it can be removed by your distributor.
Deactivate the Phone Lock
1. In the Toolbox menu, select Locks and then press YES.
2. Select Phone lock, press YES.
3. Select Off.
4. Enter the PIN code and then press YES.
Note: To activate the Keypad lock see “Lock/Unlock the keypad” on page 10.
Select Answering Mode
The phone can be set to automatically answer a call, or to answer a call by pressing any key.
Note: Automatic answer mode is only relevant when a headset is connected.
1. In the Toolbox menu, select Answering mode and then press YES.
2. Select Any key to allow call answering by key press or select Auto answer to automatically
answer calls.
3. Select On.
4. Press YES to save the setting.
27
Page 34

5602 Wireless Handset User Guide
Change the Menu Language
1. In the Toolbox menu, select Language and then press YES.
2. Select a language from the list: Dansk (Danish), Nederlands (Dutch), English, Soumi
(Finish), Français (French), Deutsch (German), Italiano (Italian), Norska (Norwegian),
Português (Portuguese), Español (Spanish), and Svenska (Swedish). These are the
default languages. One additional language can be downloaded to the phone.
3. Press YES to save the setting.
In Charger Mode
Redirect Calls and Messages when placed in Charger
Calls can be redirected to another extension when the cordless phone is placed in the char ger .
This function is automatically cancelled when the phone is removed from the charger.
1. In the Toolbox menu, select In charger mode and then press YES.
2. Select Redirect and press YES to save the setting.
Detach from system while charging
When the cordless phone is placed in the charger , the phone can be det ached from the system
but still be switched on and charging.
1. In the Toolbox menu, select In charger mode and then press YES.
2. Select Off and then press YES to save the setting.
Master Reset
The phone settings can be reset to default. You can reset user settings only (such as ringer
volume and vibrator alert) or you can reset all settings, including user settings, SMS messages,
voice call list and all personal phone book entries.
1. In the Toolbox menu, select Master reset and then press YES.
2. Select one of the following settings:
• Settings only: to reset User settings only
• All: to reset all settings
3. If the phone lock is activated, enter the PIN code at the promt.
4. Press YES.
28
Page 35

Registration
Over Air Registration
The 5602 wireless handset can subscribe up to eight different base station systems. To
subscribe a new system, you need to know the “Park:” ( Port able Access Righ t Key code ) and
“Ac:” (Authentication code) related to the system to which you want to log on. Contact your
system administrator for more informa tion .
Caution: The master LDAP server must be running when you register a new handset.
Do not register a new handset when the master LDAP server is down even if you have
a standby LDAP server . Han dsets t hat are registered to a st andby LDAP server mu st be
re-registered with the master LDAP server when it comes back into service.
1. In the Toolbox menu, select Network and press YES.
2. Select Subscribe and then press YES.
3. Enter the Park: code, press YES.
Registration
4. Enter the Ac: code and then press YES.
5. Enter the new system name and then press YES.
6. If the new system is to be protected, select Yes. Y ou ca n switch between the Yes and No
settings using the Left and Right navigation keys.
7. Press YES to save the setting.
8. Press YES again.
9. If the handset is new to the network, do the following:
- dial the number assigned to the handset
- when you receive a busy signal, press NO to hang up
10. To complete registration, you must go offhook and then back onhook. Press YES, select
Offhook, and then press YES. Press NO to go back onhook.
Select Base Station
1. In the Toolbox menu, select Network and press YES.
2. Press Select and then press YES.
3. Select a specific system from the list or select Automatic to let the phone select a system
according to the priority list. See “Priority for the Base Systems” on page 30.
4. Press YES.
5. At the “Connect to XXX” prompt, press YES again. You are prompted to wait while the
phone selects the network.
29
Page 36

5602 Wireless Handset User Guide
Priority for the Base Systems
The default order of priority is the order of entered subscriptions. This means that the first
subscribed base station system has the highest priority. This list can be edited.
1. In the Toolbox menu, select Network and press YES.
2. Select Priority and then press YES.
3. Edit the priority list as required.
4. Press YES to save the setting.
Unsubscribe a Base Station
1. In the Toolbox menu, select Network and press YES.
2. Select Unsubscribe and then press YES.
3. Select the system you want to delete and press YES. A confirmation screen appears.
4. Press YES to confirm delete.
Note: It is not possible to delete a protected subscription.
30
Page 37

Operation Notice
Accessibility and Voice Quality
The base network is not always available. If you cannot get in contact with your system, cont act
your system administrator. For best voice quality, avoid positioning near computer, radio or
similar equipment.
Operating Area
Y ou can only use yo ur wireless handset in the area that is covered by your system. Out side of
this area you lose contact with the system. The signal strength icon disappea rs and “No network”
is displayed.
Out of Range
When you leave the system's coverage area a short beep sounds and the text “No System”
appears in the display.
Operation Notice
When re-entering the coverage area it may take a couple of minutes before the phone
automatically registers into the system.
31
Page 38

5602 Wireless Handset User Guide
007
Maintenance
Charge the Battery
Place the telephone in the desktop charger. When the green LED on the charger is on or
flashing, the battery is being charged. An animated battery icon is also shown in the handset
display indicating charging by starting with its current charge and ending with the full charge.
A filled Battery icon indicates a fully charged battery.
Use only the recommended desktop charger for charging. Always charge th e battery for at least
one hour after connecting it to the handset. Do not charge the batter y outside the handset.
Desktop Charger
The desktop charger is used for both charging and for storing your phone. The charger is
delivered with a plug-in power supply and is connected into an ordinary wall socket.
Note: Only use the charger within the temperature range of 5 - 40 º C.
32
Page 39

Maintenance
022
021
Replace the Battery
If the standby time for the cordless handset beco mes too low, the battery should be replaced.
Please contact your system administrator or your supplier for information about new batteries.
Insert the battery as described in the illustration below.
Note: After replacing the battery, the “Battery” icon may show an empty battery even
though it is fully charged. Charge the battery for at least one hour to get the correct
reading.
Note: Do not disconnect the battery unless it needs to be replaced.
Attach the Hinge-type Clip
Attach the hinge clip as described in the illustration below.
33
Page 40

5602 Wireless Handset User Guide
020
Attach the Swivel-type Clip
Attach the swivel clip as described in the illustration below.
Figure 2.
34
Page 41

 Loading...