


MAGTURBO ERGO INSTRUCTION MANUAL
Please read this instructions carefully before use.
Thank you for purchasing Minoura Magturbo Ergo trainer.
This is the best cost-performance stationary indoor bicycle trainer with completely re-designed patented magnetic resistance device that allows you to feel real road ride feel even in your house or garage.
This trainer fits between 24” to 27” (700c) wheels with adjusting the roller position.
If you want to ride MTB on this trainer, we strongly recommend to replace the rear tire from knobby one to a slick one in order to avoid vibration and noise problem caused by the tire pattern.
Enjoy your workout with Minoura Magturbo trainer.

IMPORTANT NOTES
•Read all instructions carefully before use.
•Some assembly required.
•Keep the manual handy at all times. Lost instruction materials can be replaced through Minoura or your local dealer.
•Do NOT use trainer for any other purpose than instructed.
•The trainer is manufactured to precise standards. You may not disassemble or rebuild it.
•"Magturbo" is the trademarks of Minoura and may not be copied.
WARNING Please obey warning signs.
!Use two-wheeled bicycles only. Tandems may be used if balanced correctly.
!Remove all oils and moisture from the drive roller before use.
Keep both hands on handlebars at all times and maintain a normal riding
!position.
Check the couplings supporting the rear hub for damage
!and cracks. Accidents may occur from cracked or damaged couplings.
!When using the trainer, place it on a flat surface for safe training.
Do not over tighten the hub-clamp handles. Over-tightening may cause
!damage to the trainer or bicycle frame. The clamp handles should be a snug and secure fit. Do not force!
!Keep away from small children.
!Before use, make sure all bolts and nuts are securely fastened.
!Keep hands and feet away from spinning rollers and wheels at all times.
-2 -
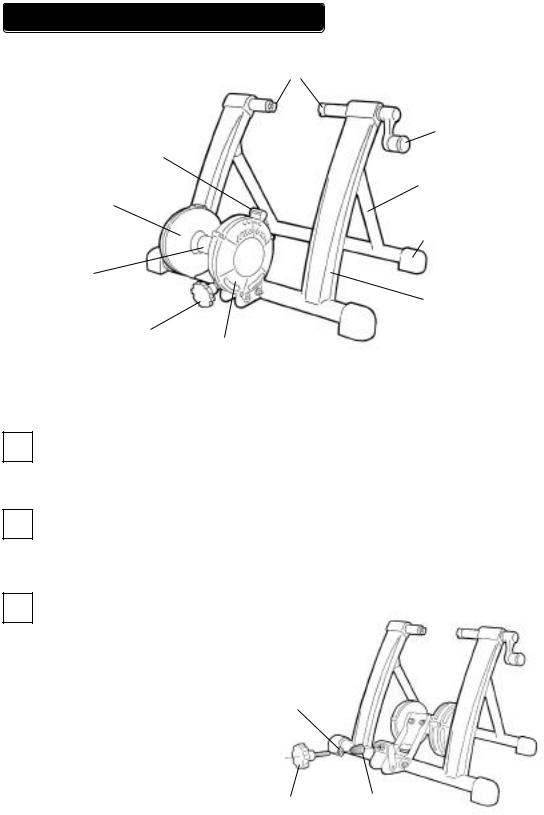
ASSEMBLING YOUR TRAINER
Coupling
Hub Handle
|
Adjust |
|
Lever |
|
U-Leg |
Flywheel |
|
Housing |
Foot Cap |
|
|
Drive |
|
Roller |
|
|
Frame |
Micro Adjust |
Mag Resistance |
(Fig. A) |
|
Knob |
|||
Unit |
|
||
|
|
1
2
3
Open the Frame and U-Leg and place on level floor.
Tighten the Micro Adjust Knob Bolt with a spring and a flat washer. (see Fig. B)
That’s all. Now you are ready to install your bike on the trainer.
Flat
Washer
Knob Bolt |
Spring |
|
(Fig. B) |
- 3 - |
|
 Loading...