


e-HyperRim ALU series indoor bicycle trainer
instructions manual
- 1 -

SCHEMATIC
ER-16
ER-1
ER-7
ER-8
ER-2
Screw-L
ER-17
ER-18
Screw-S
ER-9
ER-6
|
F-4 |
F-2 |
F-4 |
|
F-8 |
|
|
|
HF-2 |
F-9 |
F-1 |
|
|
|
|
Screw-M |
SR-13 |
|
F-7 |
|
|
|
SR-12
HF-4
ER-10
SR-12
M8-3
SR-5
ER-12
SR-7
SR-8
ER-14
ER-11 |
ER-13 |
Screw w/ washer
ER-15
Screw-M
<Remote Version>
F-1 |
: |
Coupling (Right) |
ER-1 : |
Upper Case |
F-2 |
: |
Coupling (Left) |
ER-2 : |
Lower Case |
F-4 |
: |
Coupling Cover (move side) |
ER-6 : |
Spring Holder |
F-7 |
: |
Hub Handle (3/8” thread) |
ER-7 : |
Flywheel, Alloy Rotor & Axle |
F-8 |
: |
Wheel Position Adjust Knob |
ER-8 : |
Magnet |
F-9 |
: |
Hub Nut Protector (Grommet) |
ER-9 : |
Spring |
HF-4 : |
Rubber Foot Cap (35mm) |
ER-10 : |
Main Arm |
|
M8-3 : |
Rubber Frame Cap (38.1mm) |
ER-11 : |
Sub Arm |
|
SR-5 : |
V-Belt (K-16) |
ER-12 : |
Pulley Arm |
|
SR-7 : |
Drive Roller Pulley |
ER-13 : |
Assistant Pulley Holder |
|
SR-8 : |
Assistant Roller Pulley |
ER-14 : |
Tension Lever |
|
SR-12 : |
Cap Bolt (M6x12) |
ER-15 : |
Remote Bracket & Cable |
|
SR-13 : |
Reinforcement Plate |
ER-16 : |
Top Cover (yellow) |
|
|
|
|
ER-17 : |
Magnet Guide Ring (yellow) |
|
|
|
ER-18 : |
Dial Lever (yellow) |
- 2 -
IMPORTANT NOTES
•Read all instructions carefully before use.
•Some assembly required.
•Keep the manual handy at all times.
•Do NOT use trainer for any other purpose than instructed.
•The trainer is manufactured to precise standards. You may not disassemble or rebuild it.
•"Magturbo" and “RDA” are the trademarks of Minoura Co.,Ltd. and may not be copied.
WARNINGS
!Use two-wheeled bicycles only. Tandems may be used if balanced correctly.
Replace your quick release skewer with the one supplied and install the coupling protector cap on
!to the right side coupling of the trainer. Otherwise the stability will not be guaranteed.
!Remove the coupling protector cap when you use your own quick release skewer.
!Remove all oils and moisture from the drive roller and the tire before use.
!Keep both hands on handlebars at all times and maintain a normal riding position.
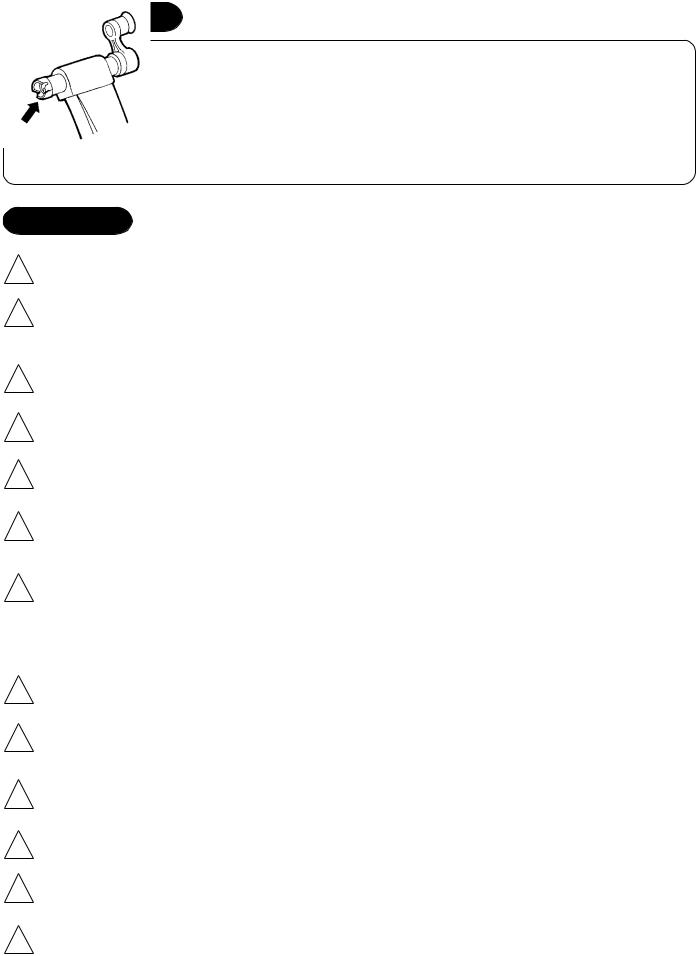
Check the couplings supporting the rear hub for damage and cracks.
!Accidents may occur from cracked or damaged couplings. (Fig. A)
! |
You should not tighten the wheel axle by tightening the left side knob. |
(Fig. A) |
|
This is for pre-adjusting the wheel position to the exactly center of the |
|||
|
|
||
|
drive roller only. Securley tightening your bike to the trainer should be |
|
|
|
done with the right side hub handle only. |
|
!When using the trainer, place it on a flat surface for safe training.
Do not over tighten the hub-clamp handles. Over-tightening may cause damage to the trainer or
!bicycle frame. The clamp handles should be a snug and secure fit. Do not force!
!Before use, make sure all bolts and nuts are securely fastened.
Keep away from small children, and keep hands and feet away from spinning rollers and wheels at
!all times.
!Open the legs fully to get maximum stability.
!Wipe all oil and moistures out from the rim surface everytime you use the trainer to keep necessary brake performance of your bicycle.
-3 -
 Loading...