


OWNER'S MANUAL
RADIO BOOST CD

Notes on this Owner's Manual
So that you can start enjoying your car radio right away, you will find an overview in the first chapter about the displays and controls.
>In the chapter called "Settings," you will find all general information about the radio and compact disc (CD)
>You will find specific information for listening to the radio in the chapter "Reception"
>In the chapter called "Playing," you will find specific information on playing CDs.
The fastest way to find certain topics is by using the index at the end.
Should you sell your MINI at a later date, please remember to pass this Owner's Manual on to the next owner – it is a legal element of the vehicle.
Symbols used
Identifies precautions that must be followed precisely in order to avoid
the possibility of personal injury and serious damage to the vehicle or the car radio.<
Contains information that will assist you in gaining the optimum benefit from your car radio and enable you to care
more effectively for your car radio.<
< Marks the end of a specific item of information.
* Indicates special equipment, countryspecific equipment and optional extras.
If you have additional questions, please consult the experts at your MINI center for information and advice.
Editorial notice
The advanced technological features and high quality standard of MINI equipment are maintained by an ongoing development process. This may lead to discrepancies between the information in this Owner's Manual and the actual equipment installed in or on the vehicle. Nor can errors and omissions be entirely ruled out. You are therefore asked to appreciate that no legal claims can be entertained on the basis of the data, illustrations or descriptions in this manual.
© 2001 Bayerische Motoren Werke Aktiengesellschaft
Munich, Germany
Reprints, including excerpts, only with written consent of BMW AG, Munich.
Order No. 01 41 0 156 490 US English XI/01
Printed in Germany
Printed on environmentally friendly paper (bleached without chlorine, suitable for recycling).
2

OVERVIEW
SETTINGS
RECEPTION
PLAYING
INDEX
OVERVIEW
SETTINGS
RECEPTION
PLAYING
INDEX
3
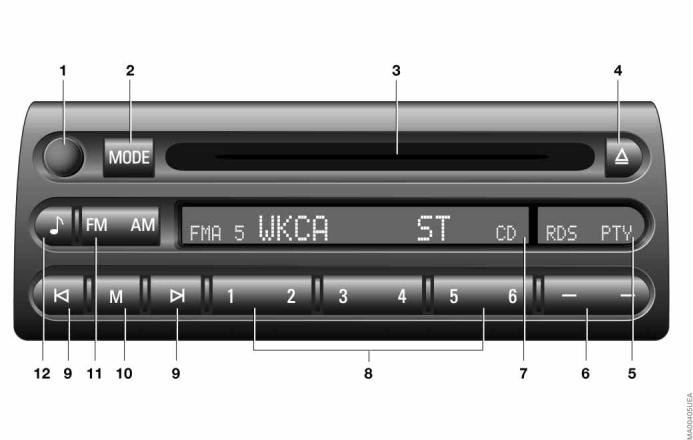
THE CAR RADIO AT A GLANCE
4

THE CAR RADIO AT A GLANCE
Displays and controls
1On/Off, volume control 10 Setting values
>Speed-dependent volume control 10
>Volume for navigation* 11
>Sound quality 13
>Harman Kardon* 14
2Audio source, changeover to
>Radio 27
>CD changer* 25
>CD 25
3 Compact disc slot 27
4 Ejecting the compact disc 27
5Display of the function key (display for RDS, PTY, Harman Kardon and random sequence of music tracks)
6Function key for controlling the functions RDS, PTY, Harman Kardon, regional programs and random sequence of music tracks
7Display (display for reception range/ memory level, station with RDS station, program, frequency, MD and CD changer functions and sound setting and Harman Kardon)
8Station keys for
>Radio 23
>CD changer 33
9 Station/track search
> Selecting the station 19 20
>Music selection search CD 28
CD changer 33
10Manual station selection 19 Scanning
>Station 21
>CD track 28, 34
11FM and AM reception range/ memory levels 18, 23
12Note symbol
>Speed-dependent volume control 10
>Volume for navigation 11
>Sound quality adjustment 13
>Harman Kardon 14
OVERVIEW
SETTINGS
RECEPTION
PLAYING
INDEX
5

CARE INSTRUCTIONS
Cleaning the unit
For cleaning, use a dampened cloth only.
Do not use chemical or household cleaners. Never allow moisture or
liquids to come into contact with the unit. They could damage surfaces and electrical components.<
Handling CDs
Although CDs have a protective coating on both sides, you should still remember to observe the following precautions:
>Always hold CDs at the outer edge, and avoid fingerprints or dust, scratches or moisture on the reflective scanning side of the CD
>Do not write on CDs or affix labels to them
>If necessary, wipe the reflective (data) side of the CD with a suitable cleaning cloth (commercialy available), wiping in straight lines from the center outward
>CDs which have condensed moisture on them (from large temperature differences, for instance) may not function properly when they are played.
Never attempt to clean with solvents, abrasive cleansers, or cleaning products and antistatic sprays intended for vinyl
records.<
6

ANTI-THEFT PROTECTION |
RADIO PASS |
The device has automatic anti-theft protection. It is not necessary to enter a security code manually.
The radio pass is a document. Please store this pass in a safe place, because in the event your radio unit is stolen, the data entered therein has to be reported both to your insurance and the police.
OVERVIEW
SETTINGS
RECEPTION
PLAYING
INDEX
7
8
|
|
|
|
|
OVERVIEW |
OVERVIEW |
|
|
SETTINGS |
SETTINGS |
|
|
|
|
|
|
|
|
|
RECEPTION
PLAYING
RECEPTION
PLAYING
INDEX
INDEX
9
TURNING THE UNIT ON/OFF VARYING THE VOLUME
Adjusting the volume
Press the knob.
The unit will select the audio source that was last used (radio, CD changer or CD).
Listening to the radio with the ignition shut off
The audio sources can still be accessed for up to 20 minutes after the ignition has been shut off (with the ignition key in position 0 or removed).
When the ignition is shut off, the unit shuts off as well.
Switch the unit back on
Press the knob.
To save on the battery, you should always turn the radio off when
leaving the vehicle.<
Turn the knob.
As soon as you begin talking on the phone or accept a call, the radio
switches to mute.<
Adjusting the speed-dependent volume
To compensate for increasing noise in the passenger compartment with increased vehicle speed, your unit is equipped with a speed-dependent volume control (Speed Volume). This function will increase volume as speed likewise increases.
You can set the volume increase in 6 levels. The higher the level you choose, the greater the increase in volume.
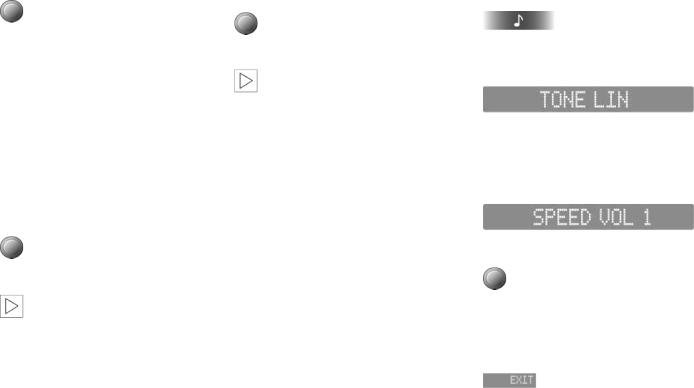
1.Call up the current setting
Press and hold the key.
The display changes to the operating display for TONE LIN:
2. 
press repeatedly until the display changes to the operating display for SPEED VOL, e.g.:
3.Select level
Turn the knob.
The selected level will be indicated in the display
4.Exit operating display
10
VARYING THE VOLUME
Adjusting the volume for navigation*
If your vehicle is equipped with a navigation system, you can adjust the minimum volume for announcements of this system with the NAVI MIN function. You can select a level between –9 and +9, where the level 0 corresponds a moderate volume.
As the individual levels are fixed volumes, you will hear all announcements, regardless of how soft you have set the current volume for the radio, CD changer or CD.
1.Call up the current setting
Press and hold the key.
The display changes to the operating display for TONE LIN:
2. 
press repeatedly until the display changes to the operating display for NAVI MIN, e.g.:
3.Make adjustment
Turn until the desired volume is reached.
The selected level will be indicated in the display
The selected minimum volume is retained for all navigation announce-
ments.
If you have set the current volume for the radio, CD changer or CD louder than the NAVI MIN volume, then the volume does not change during an announcement.<
The volume of an announcement can be adjusted in each individual case with the volume knob. You can, for example, decrease the volume if you have set a very loud basic volume for the radio, CD changer or CD, or if you increase it when, for example, you have opened a window and the interior noise level is very high.
Turn during a navigation announcement until the desired volume is set.
4. Exit operating display
OVERVIEW
SETTINGS
RECEPTION
PLAYING
INDEX
11

 VARYING THE VOLUME
Resetting the settings
The volume for navigation and the speeddependent volume can be reset to the midrange setting.
The volume for navigation and the speed-dependent volume cannot be
individually reset. When "RESET?" is confirmed, the settings are reset or deactivated.<
1.Call up the current setting
Press and hold the key.
The display changes to the operating display for TONE LIN
2. 
press repeatedly until "RESET?" appears in the display
3.Reset the setting
The volume for navigation is reset to level 0 and the speed-dependent volume to level 3.
12
 Loading...