

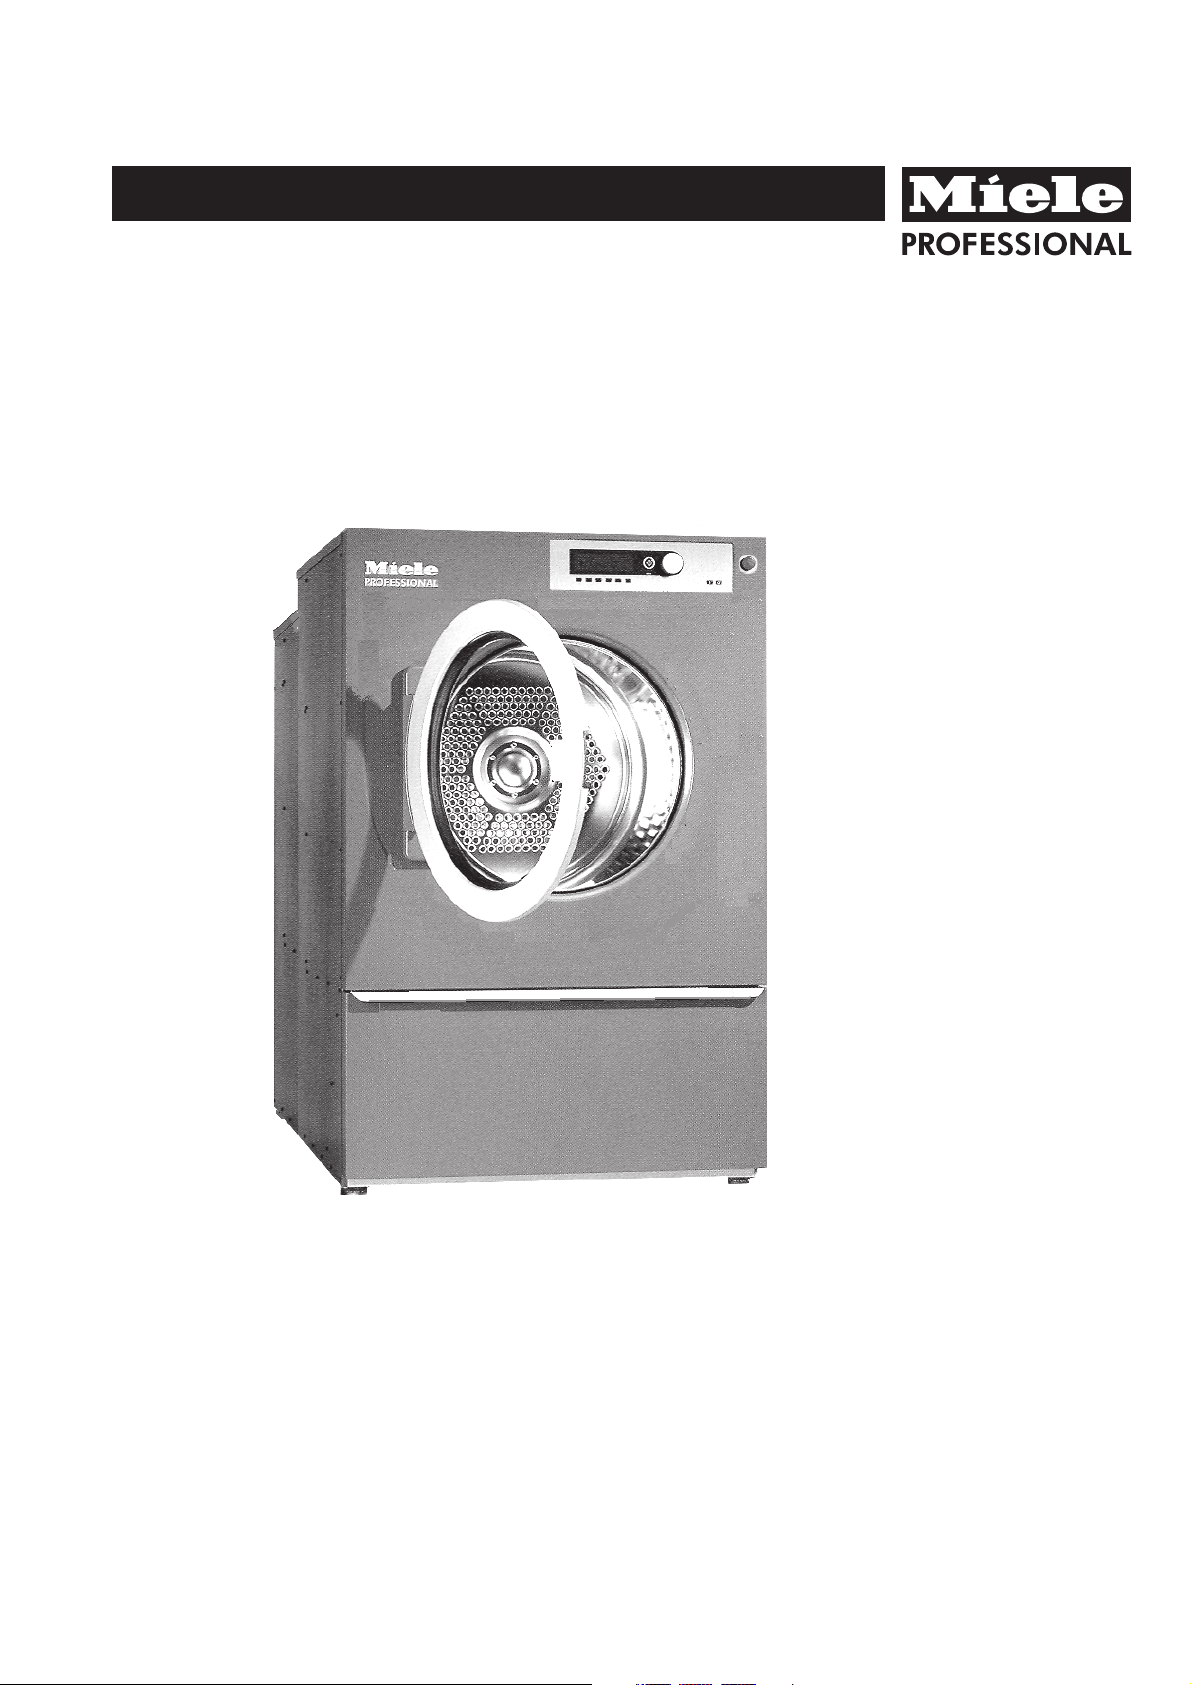
Operating and Installation Instructions
PT 8257 WP
PT 8337 WP
To prevent accidents
and machine damage
read these instructions
before installing or use.
en-US
M.-Nr. 09 390 530

2

Contents
IMPORTANT SAFETY INSTRUCTIONS ..........................................................4
Caring for the environment ...................................................................7
General description of the appliance ...........................................................8
Operating panel .............................................................................9
Drying....................................................................................11
Before first use .............................................................................11
Preparing the laundry ........................................................................11
1. Turn on the dryer .........................................................................12
2. Load the laundry..........................................................................12
3. Select a program .........................................................................13
4. Select [ "Blockplus" (if desired) ............................................................13
5. Adjust the program (if desired)...............................................................14
6. Select Delay Start (if desired) ................................................................15
7. Start a program...........................................................................16
8. End of program...........................................................................16
Extra features .............................................................................17
Skip or repeat program sequences .............................................................17
Program stop ..............................................................................17
Canceling a program ........................................................................17
K Information ...............................................................................18
Program ..................................................................................19
Estates ...................................................................................19
Program guide.............................................................................21
Basic programs ............................................................................21
Comforters ................................................................................23
Cleaning Contractors ........................................................................23
Fire Department ............................................................................24
Professional cleaners ........................................................................24
Chip card use / Coin mechanism .............................................................26
Drying using the coin mechanism C 4060 / C 4065 / C 4070 .........................................26
Cleaning and care ..........................................................................27
Cleaning the lint filter ........................................................................27
Dryer .....................................................................................27
Heat exchangers ...........................................................................28
Frequently asked questions .................................................................29
Fault messages.............................................................................29
IMPORTANT SAFETY INSTRUCTIONS .........................................................32
Installation ................................................................................33
Install dryer and heat pump ...................................................................34
Leveling the dryer ...........................................................................35
Installation on an elevated base ................................................................35
Coin mechanism ............................................................................35
Communication module XKM RS232 ............................................................35
Electrical connection ........................................................................36
Intake air, ambient air ........................................................................36
Condensate drain ...........................................................................36
Technical Data.............................................................................37
Quick Guide...............................................................................39
3
IMPORTANT SAFETY INSTRUCTIONS
Explanation of safety instructions and
warnings on the machine
Read the operating instructions.
Read all the instructions, e.g. the installation
instructions.
Caution, hot surfaces.
Caution, voltage up to 1000 volts.
Grounding
READ AND SAVE THESE INSTRUCTIONS
,
Proper use of the dryer
The dryer is only intended for drying fabrics that were
~
washed in water. Check fabric care labels to verify that the
articles can be machine dried.
To prevent fire, do not dry the following (with the
~
exception of the textiles permitted in the special programs):
Articles containing foam rubber, rubber or rubber-like
–
materials.
Articles that have been treated with flammable cleaning
–
agents.
Articles that have been contaminated with styling
–
creams, hair spray, nail polish remover, etc.
Articles that may be greasy, oily or that may contain
–
other residues, e.g. kitchen or salon laundry.
Mops, floor cloths, etc. if they contain substances such
–
as wax or chemical cleaning agents.
Damaged padded or filled fabrics such as jackets or
–
cushions.
Articles that are not sufficiently clean and are soiled with
–
grease or oil. Wash very dirty articles (e.g. work clothing)
with a special detergent. For information in this regard,
consult a cleaning agent retailer.
Keep these operating instructions in a safe place and
pass them on to any future user.
Read all instructions before installation or use of the
dryer to prevent injury and machine damage.
Installation, repair and maintenance work should be
performed by a Miele authorized service technician.
Work by unqualified persons could be dangerous
Improper use of the appliance can lead to personal
injury and material damage.
All personnel working with this machine must be fully
trained in all aspects of its use and safety.
– With these critical fabrics the laundry may
spontaneously combust. Immediately remove the
laundry at the end of the drying program and after a
power failure.
Keep a fire extinguisher near the dryer.
The laundry must not be removed from the dryer until
~
the cooling down phase has been completed.
If hot laundry items are stacked or packed they could
spontaneously combust.
Empty all pockets so that no flammable items such as
~
lighters, matches, candles and cosmetics end up in the
dryer.
If the dryer is operated in an area accessible to the
~
public, the operator must ensure that the appliance can be
used safely.
This dyer is not intended for outdoor use.
~
4

IMPORTANT SAFETY INSTRUCTIONS
Technical and electrical safety
The dryer must be installed and tested by Miele's
~
Technical Service Department or an authorized dealer.
The electrical safety of this appliance is only assured if it
~
is connected to a grounding system. Is is very important to
make sure that this essential safety requirement is met. If in
doubt have the house wiring system checked by a qualified
electrician. The manufacturer will not be held liable for
damage caused by a missing or improperly connected
ground wire.
The dryer is disconnected from the power supply only
~
when it is unplugged or when the main breaker or the
dryer's breaker at the building's electrical service panel is
switched off.
Unprofessional repairs may create unforeseeable risks
~
for the user, for which Miele assumes no liability. Repairs
should be carried out only by authorized Miele technicians
- otherwise, associated damage will not be covered by the
warranty.
Defective components must be replaced with genuine
~
Miele spare parts only. Only with these parts can we
guarantee that the safety requirements of our appliances
are met.
Do not operate the dryer in a room where cleaning
~
machines operate with solvents containing CFC. Vapors
from combustion turn into hydrochloric acid which
damages laundry and dryer. When operated in a separate
room, there must be no air exchange.
Make sure the dryer is supplied with clean fresh air only,
~
not air containing chlorine, fluorine or other solvent vapors.
The cool air intake opening is located on the back of the
~
dryer, while the exhaust air opening is located on the
cover. Never block these openings. Therefore, do not cover
the top of the dryer with any type of blankets, sheets or
boxes (see installation instructions).
Never use or store gasoline, petroleum-based
~
substances or other easily flammable substances near the
machine. Fire and explosion hazard!
The dryer needs timely and professional maintenance to
~
prevent performance loss, malfunctions and the risk of fire.
Use of the appliance
The dryer is only intended for drying fabrics that
,
were washed with water as a cleaning agent.
Operate the dryer only if an exhaust air duct is
~
connected and the room is adequately ventilated.
The dryer may be operated only if the heat pump
~
module is hooked up and connected to the dryer.
Sufficient ventilation must be ensured (see the installation
instructions).
Make sure that the heat pump is correctly connected to
~
the dryer without any gaps. It must not be possible to reach
between the two machines - risk of injury!
Persons who lack physical, sensory or mental abilities,
~
or experience with the appliance should not use it without
supervision or instruction by a responsible person.
Do not let children play in, on or near the dryer. Do not
~
let them play with the controls or operate the unit.
Make sure that no unattended children can access the
~
machine. There is a potential danger that children can be
trapped in the drum. This may cause major injuries or the
death of the child.
Do not operate the appliance if the control panel, wires
~
or cables are damaged.
Do not damage, remove, or bypass any of the safety
~
features and controls of the dryer.
Do not operate the dryer when housing parts have been
~
removed and the moving or electrical parts are exposed
and accessible.
High temperatures occur at the window and frame of
~
the drum door, and the laundry is extremely hot if it is
removed too soon.
Always make sure the drum is stationary before
~
reaching in to remove laundry. Never put your hand into a
drum that is still moving.
Take care not to pinch or cut your fingers on the hinges
~
of the drum door or lint flap and on the maintenance cover
on the back of the dryer. Use the handles and quick
release fasteners. Beware of any potential hazardous areas
when installing the dryer and heat pump.
The area necessary to open the drum door completely
~
must not be obstructed by doors or other structures.
5

IMPORTANT SAFETY INSTRUCTIONS
Do not use the dryer without the built-in lint filter in
~
place. Fire hazard!
If the lint filter is damaged it must be replaced immediately.
A build-up of lint will block the airflow and heating,
which will impair the efficiency of the dryer.
Disinfection and cleaning agents often contain chlorine
~
compounds. If these agents dry on stainless steel, the
chlorides may attack the stainless steel and cause it to rust.
To protect the dryer from rusting, use only chlorine-free
disinfection and cleaning agents for laundering and
disinfecting, and for cleaning the stainless steel surfaces. If
in doubt about a cleaning agent, contact the manufacturer.
If an agent containing chlorine is spilled, wash it off with
water and dry with a soft cloth.
Do not use a power washer or water jet to clean the
~
dryer. Only the heat exchangers and the space between
the maintenance flap (access via quick release fasteners
on the back of the dryer) may be rinsed out with a jet of
water (max. 4 bar).
Following operation, refrigerant lines and the
~
neighboring components may pose hazards in the form of
hot or cold surfaces and pressurized parts. Do not open
any cover parts until the system has had sufficient time to
cool down.
Using accessories
Only accessories expressly allowed by Miele may be
~
installed. Adding or installing other parts will void any
warranty and/or product liability claims.
Disposing of the appliance
If you are disposing of an old dryer (scrap metal
~
collection), destroy the door latch. This will prevent children
from accidentally locking themselves in, which would place
them at risk of death.
SAVE THESE
INSTRUCTIONS
Precautionary measures for dealing with a loss of
refrigerant
The heat pump refrigeration circuit contains a non-toxic,
~
odorless refrigerant (R134a) that quickly evaporates when
released. In vapor form it is heavier and air and poses a
suffocation hazard in unventilated rooms!
If you notice any damage to the copper lines on the
~
heat pump, do not operate the machine and exit the room.
–
Notify any other persons present of the danger.
–
Please refer to the safety data sheet for further
information on handling refrigerant.
6

Caring for the environment
Disposal of packing materials
The packing materials are intended to protect the
machine from damage during shipping. They have
been selected for environmental compatibility and
efficient disposal and can therefore be recycled.
Returning packaging to the materials cycle saves raw
material and reduces waste. The packing materials
can be returned to your dealer.
Keep packing materials such as shrink wrap
,
and plastic bags away from children
because of the danger of suffocation.
Disposal of the appliance
Appliances may contain materials that can be
recycled. Please contact your local recycling
authority about the possibility of recycling these
materials.
Please make sure that you dispose of your old
appliance in accordance with regional disposal
regulations and prevent an uncontrolled release of
refrigerant into the environment.
Ensure that the appliance presents no danger to
children while being stored for disposal. Before
discarding an old appliance, unplug it from the outlet,
cut off its power cord, remove any doors to prevent
hazards. and store appliance on side to prevent
tipping. For more information see the "IMPORTANT
SAFETY INSTRUCTIONS".
Information on saving energy
You have purchased a heat pump dryer featuring the
latest technology. This dryer uses 50% less energy
than conventional dryers with electric heating. The
following tips will help you further lower your energy
consumption:
Wash your laundry on maximum spin cycle speed.
This will reduce drying time and energy consumption.
If the washing machine's last rinse cycle is with warm
water, a shorter drying time will be required due to
the lower residual moisture and the residual heat in
the laundry, which in turn saves energy.
Sort fabrics:
- by fiber/weave,
- by desired drying level,
- by residual moisture.
Only dry full loads, if possible. Under-loading is not
cost efficient. Overloading provides poor drying
results and has an adverse effect on fabrics. Optimal
energy consumption is relative to the total amount of
laundry.
A free lint filter and clean heat exchangers increase
the efficiency of the system and the drying process,
thereby reducing runtime and energy required.
Ensure sufficient room ventilation.
7
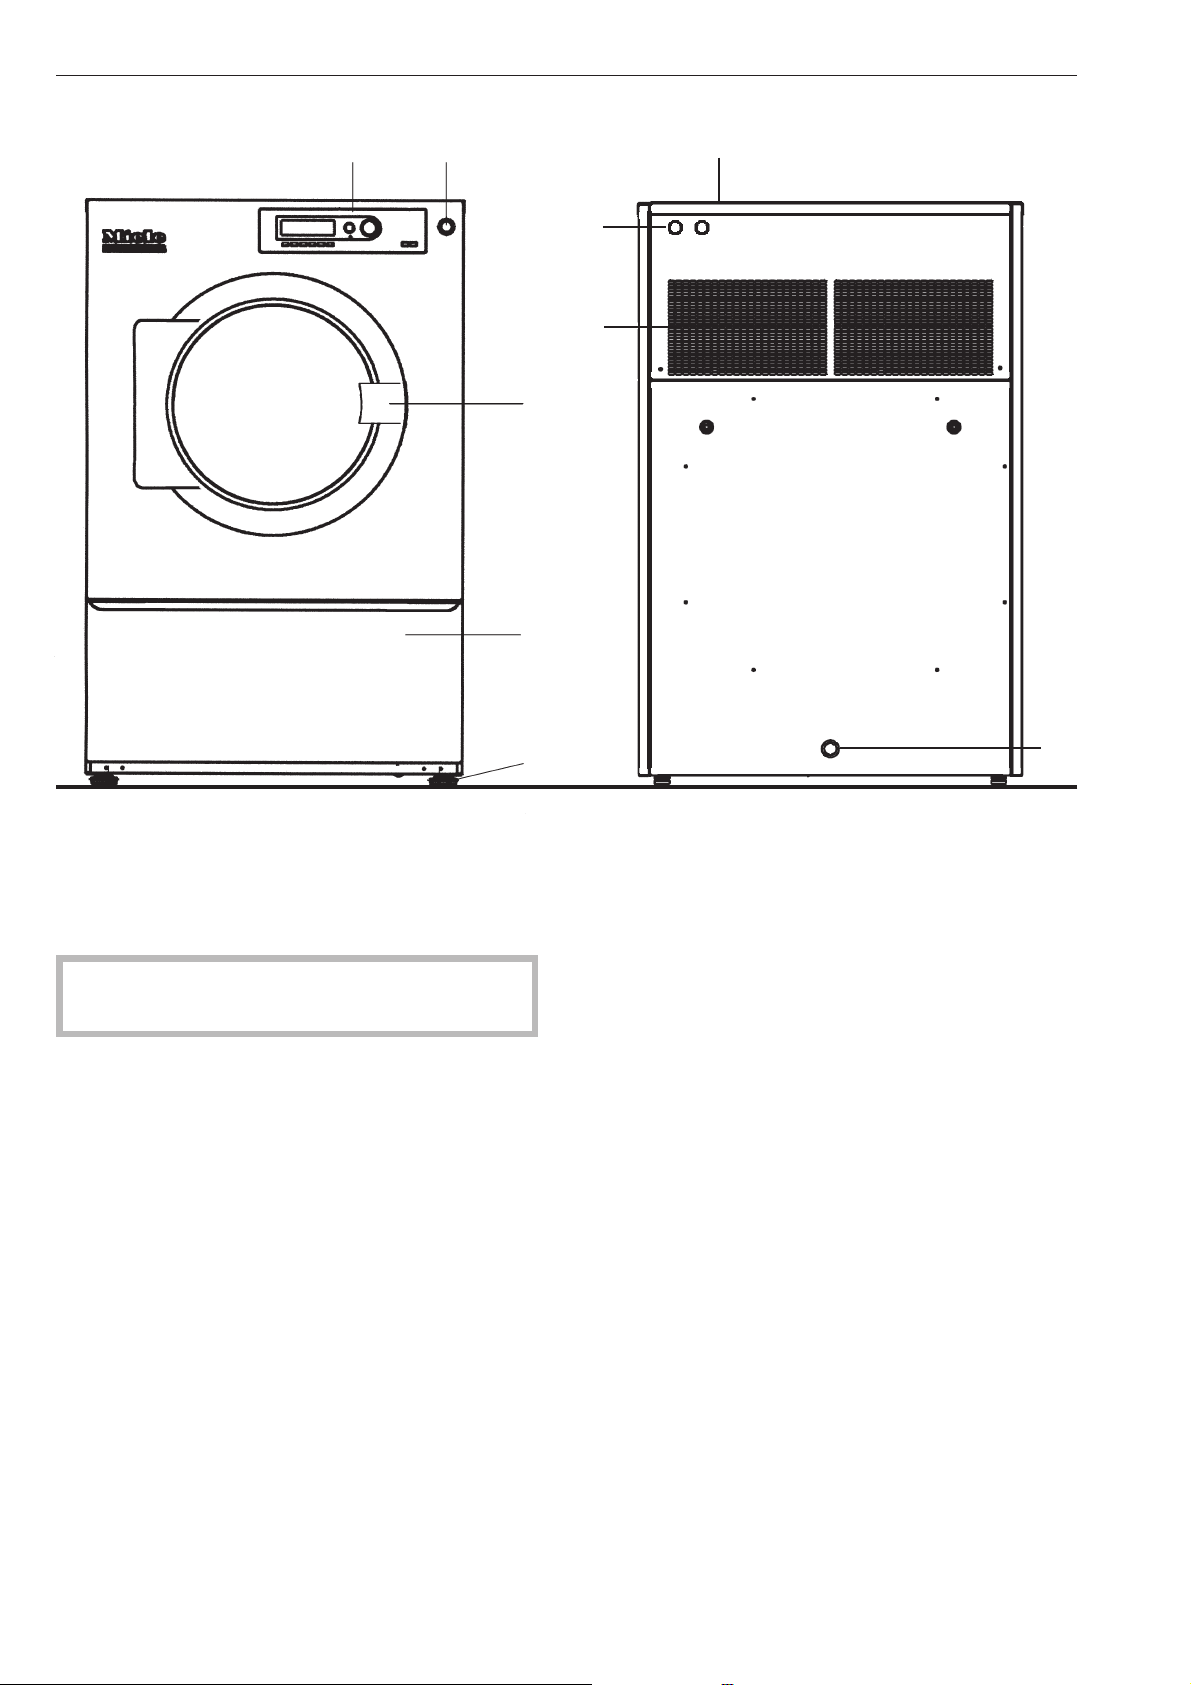
General description of the appliance
ab
g
f
h
c
d
a Emergency Stop button
Use only in case of an emergency.
After the problem has been eliminated, unlock the the
switch by turning the dial to the right.
Do not use the Emergency Stop switch to switch
off the dryer during normal operation!
b Control panel
c Drum door
Pull the door handle to open the drum door.
d Lint filter flap
Pull the handle to open the lint filter flap.
e 4 adjustable feet
e
i
f Electrical connection
g Exhaust air opening
h Air intake opening
i Condensation drain
8
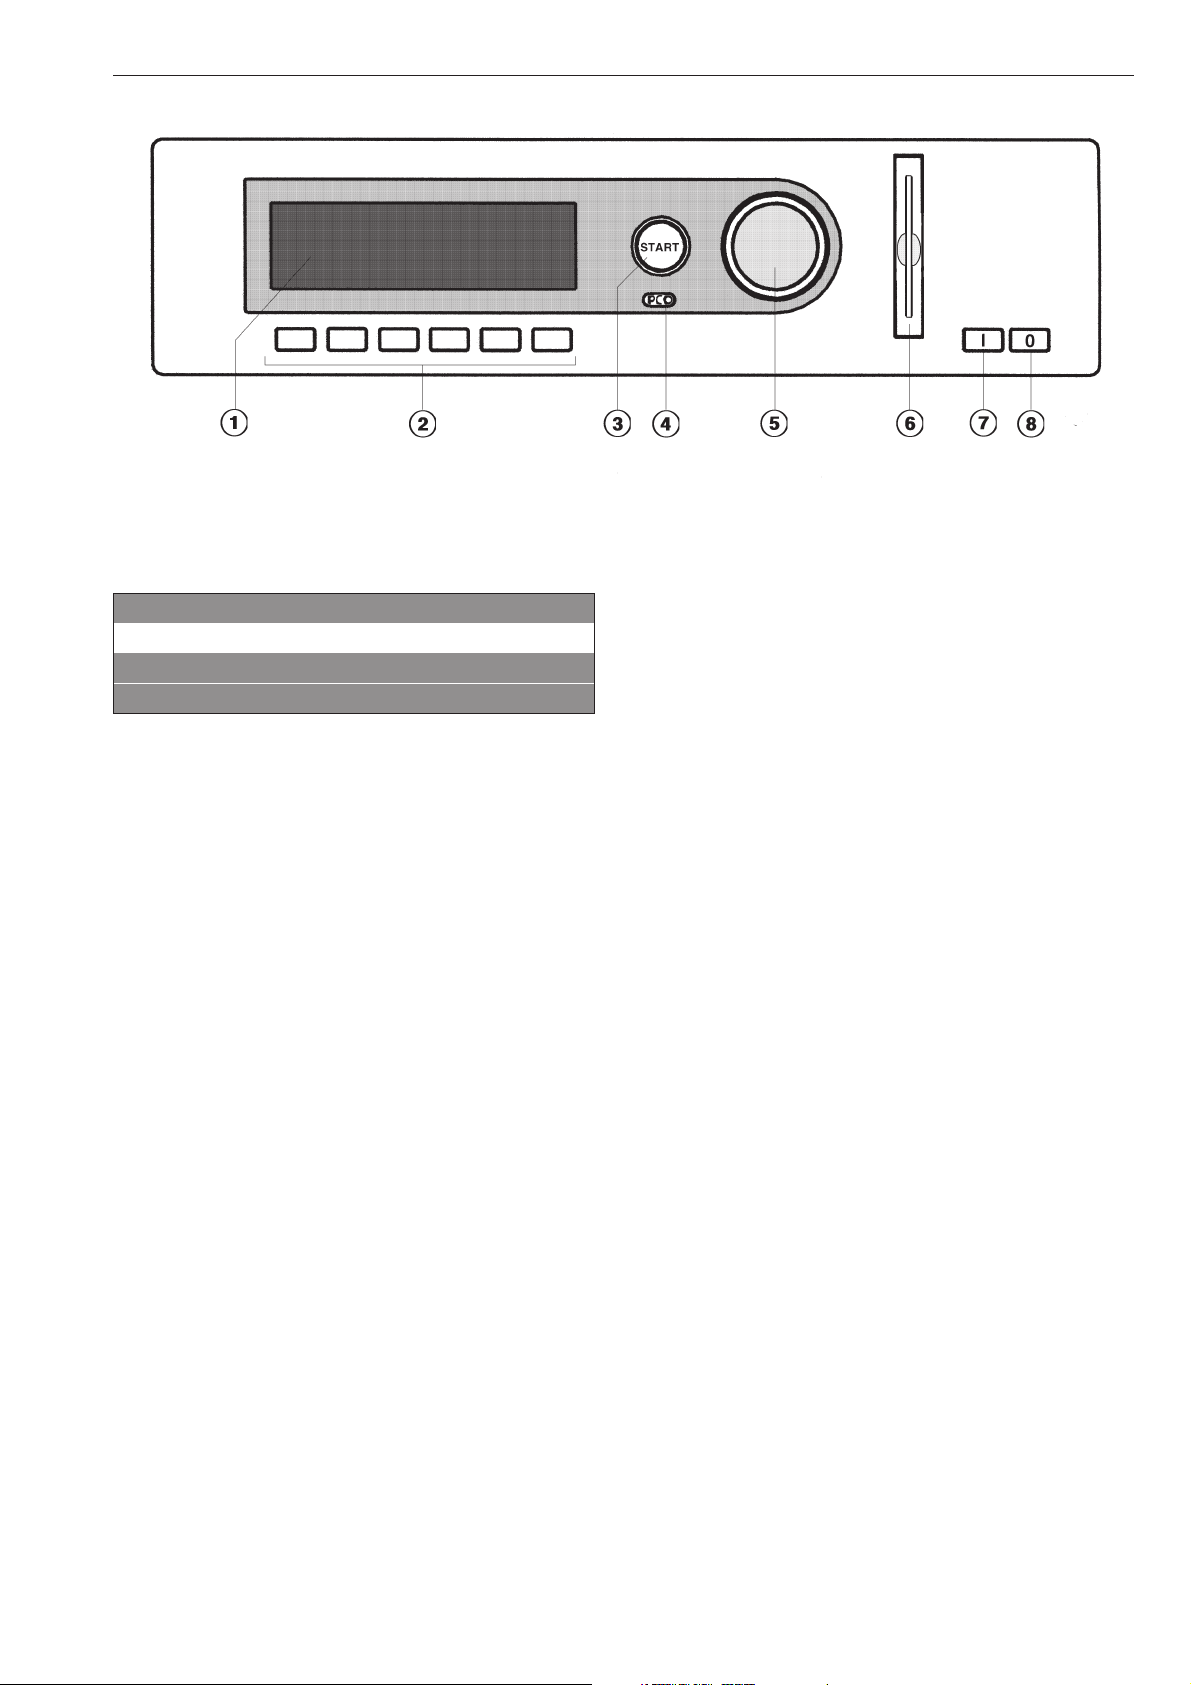
General description of the appliance
Operating panel
a Display*
1 White Cottons 0%
2 Cottons 0%
3 Cottons Hot Wash 0%
FC A
After turning on, the "Welcome" display will appear for
a short time followed by the program list. The most
recently used program is highlighted.
b Function keys
The keys have different functions depending on the
appliance status. The functions are shown in the
display above the buttons.
c Start button
The light ring flashes if a selected program can be
started or a selection can be made.
Once a program has started the Start button can be
pressed to show the original display.
d Optical PC interface
For data transfer between the machine’s controls and
a PC.
e Jog shuttle
Turn the jog shuttle for display selections and input
fields.
Press the jog shuttle to confirm display selections or
changes.
f Card reader
If the machine has been programmed for card
operation, you can only use those programs stored
on the card to dry laundry.
g I On button
h 0 Off button
* Contents in the display will vary with program
offering.
9
General description of the appliance
Control keys
f Stop / End
Press to stop a selected program or end an already
stopped program.
[ Block plus
The respective program block (e.g. pre-drying) will
be added to the program.
FC Functions
Press this key to temporarily select another language
and/or access the Supervisor level.
mDelay start
Press this key to select a start time in the display.
K Information
To show program information
ü Skip
Cycles of a program in progress can be skipped or
repeated.
A Back to the previous display
e/- Next or previous line
S Save
See the Programming Manual
Operator card
No programs are saved on this card. To transfer the
data from the control to the card and vice versa see
the Programming Manual.
30 programs with 6 blocks each can be saved on the
card.
The back of the card can be labeled.
Insert the card, arrow first.
$ Program locked
If a program has a "locked" status it cannot be
stopped or ended with the Off-button after one
minute.
% Program unlocked
\ Operating data
Data transfer
10

Drying
Before first use
Wipe the interior of the drum with a soft dry cloth
^
Preparing the laundry
Not all fabrics are suitable for drying in a
,
tumble dryer. Check the manufacturer’s
instructions on the fabric care label.
q = Dry at normal temperature
r = Dry at low temperature
s = Do not tumble dry
Sort the laundry by fabric type and color. This will
^
ensure even drying results and will prevent
damage to fabrics.
To prevent fire, do not dry the following
,
(with the exception of the textiles permitted in the
special programs):
Articles containing foam rubber, rubber or
rubber-like materials.
Articles that have been treated with flammable
cleaning agents.
Articles that have been contaminated with hair
spray, nail polish remover, etc.
Articles that may be greasy, oily or saturated with
other residues, e.g. kitchen or salon laundry.
Important drying information:
Articles made from pure wool and wool mixtures
–
may become matted. Dry these with the Woolens
program only.
Pure linen may become rough with tumble drying.
–
Consult the manufacturer’s instructions before
drying.
Items with metal buckles, hooks, snaps, zippers,
–
etc. should be put into the dryer in a cloth bag
(e.g. pillow case) to protect the drum from
scratches and dents.
Articles with closed metal zippers may cause a
–
short at the sensor electrodes on the drum ribs, so
that the drying process ends too late or does not
end at all. These items should be dried with the
zippers open.
Loop knit materials tend to shrink. Over-drying
–
increases this effect. Do not use the highest dry
program for such fabrics.
Starched laundry can be tumble dried. Select a
–
program with a suitable residual moisture for
ironing by hand or machine.
Sort the laundry according to the level of dryness
required. It is not necessary to sort according to
size.
– Pillow cases and duvet covers should be buttoned
to prevent smaller items from getting caught inside
them.
– For cost efficiency, only dry full loads. Overloading
provides poor drying results and has an adverse
effect on fabrics.
Mops, floor cloths, etc. if they contain substances
such as wax or chemical cleaning agents.
Damaged padded or filled fabrics, like jackets or
cushions.
Articles that are not sufficiently clean and are
soiled with grease or oil. Wash very dirty articles
(e.g. work clothing) with a special detergent.
–
If the washing machine's last rinse cycle is with
warm water, a shorter drying time will be required
due to the lower residual moisture and the residual
heat in the laundry.
11

Drying
1. Turn on the dryer
Turn on the power main (on site).
^
Press the l "On" button to turn the dryer on.
^
The Welcome screen shows.
PROFESSIONAL
PT 8xx7
Welcome
The program list is displayed. The program last
started is highlighted.
1 White Cottons 0%
2 Cottons 0%
3 Colors 0%
FC A
2. Load the laundry
Open the drum door.
^
^ Load the laundry loosely into the drum.
Maximum laundry weight
PT 8257 PT 8337 PT 8407 PT 8507
Drum volume
66 gal
(250 l)
86 gal
(325 l)
106 gal
(400 l)
132 gal
(500 l)
Cottons
22-29 lb
(10-13 kg)
29-35 lb
(13-16 kg)
35-44 lb
(16-20 kg)
44-55 lb
(20-25 kg)
Wrinkle-free
11 lb
(5 kg)
14.6 lb
(6.6 kg)
17.6 lb
(8 kg)
22 lb
(10 kg)
Woolens
8.8 lb
(4 kg)
11.5 lb
(5.2 kg)
14 lb
(6.4 kg)
17.6 lb
(8 kg)
Delicates/Synthetics
4.4 lb
(2 kg)
5.7 lb
(2.6 kg)
7lb
(3.2 kg)
8.8 lb
(4 kg)
Hot/Cool air
22-29 lb
(10-13 kg)
29-35 lb
(13-16 kg)
35-44 lb
(16-20 kg)
44-55 lb
(20-25 kg)
Check that there are no foreign objects in the
drum, e.g. wash dosage containers, coins, etc.
^ Close the drum door.
To prevent fabric damage, check that laundry will
not be caught in the closed door.
Proofing, Outerwear
11-14.5 lb
(5-6.6 kg)
13.2-19.8 lb
(6-9 kg)
17.6-24.3 lb
(8-11 kg)
22-28.7 lb
(10-13 kg)
See "Adjust the program - Laundry weight" for more
information.
12

Drying
3. Select a program
The dryer uses an electronic sensor system which
monitors the residual moisture in the laundry and a
timer for extra safety.
Once the required level of dryness has been reached
the laundry is cooled and the drying program will
end.
1 White Cottons 0%
2 Cottons 0%
3 Colors 0%
FC A
Select a program by turning the jog shuttle (e.g.
^
Program 2 Hot Wash / Cottons dry).
See the "Program Guide" for more information on
the standard programs.
4. Select [ "Blockplus" (if desired)
(Not available for standard programs)
Confirm the selected program by pressing the jog
^
shuttle.
22 Hot Wash / Cottons dry 22.0 / 22.0 lb
15 % Drying 176 °F
Cool down e
[ m A
Press the [ "Blockplus" button to select a
^
program block, e.g. pre-drying if desired.
22 Hot Wash / Cottons dry 22.0 / 22.0 lb
24 % Pre-drying
0 % Drying e
[ m A
The field [ is highlighted.
The function can be deselected by pressing the
button again.
If you do not need to make any other changes to the
program:
^ Press the "START" button and the drying program
will begin.
13

Drying
5. Adjust the program (if desired)
To change program settings before starting the
program:
Confirm the selected program by pressing the jog
^
shuttle.
2 Cottons 22.0 / 22.0 lb
0 % Drying 176°F
Cool down e
m A
The maximum laundry weight is shown on the right
side in the display.
Laundry weight
The laundry weight can be manually selected.
2 Cottons 22.0 22 lb
0 % Drying 176°F
Cool down e
m A
Residual moisture
In 1 % steps from -4 to 40 %.
Turn the jog shuttle to "Residual moisture" (0 %)
^
and press to confirm the selection.
2 Cottons 22.0 lb
0% Drying 176°F
Cool down
m A
Turn the jog shuttle to the desired percentage and
^
press it to confirm the selection.
Press the "Start" button to begin the program.
^
The program sequence is shown in the display after
the start of the program.
2 Cottons
0 % Drying >40 %{
Cool down Finish at 12:35
mKf
^ Turn the jog shuttle until "Laundry weight" is
highlighted and press to confirm the selection. Turn
the jog shuttle to the desired laundry weight and
press to confirm the selection.
Temperature
In 1 °F or °C steps from 86 °F / 30 °C to max. 203 °F /
95 °C.
^ Turn the jog shuttle to "Temperature" and press to
confirm the selection.
2 Cottons 22.0 lb
0 % Drying 176°F
Cool down e
m A
^
Turn the jog shuttle to the desired temperature and
press it to confirm the selection.
In the second display line, next to "Drying", the actual
residual moisture is shown (>40%) and if the heating
{ is active. The third line shows the following program
block.
The "Finish at 12:35" on the right side shows the end
time of the program.
The "Finish at" display has a self learn function.
Several program cycles are necessary for an exact
display.
14

Drying
6. Select Delay Start (if desired)
Use the m "Delay start" button to start a program at a
later time.
Setting the delay start
Select a program.
^
Press m "Delay Start".
^
2 Cottons 22.0 lb
Start time: 2 :10 pm Start date: 2.13.2006
After setting the delay start press Start.
m A
The display shows the current time of day and date.
The hour entry field is highlighted.
Turn the jog shuttle to the "Hours" entry field. Press
^
the jog shuttle to select the hour. Turn the jog
shuttle to the desired hour and press it to confirm
the selection.
Turn the jog shuttle to the "Minutes" entry field.
^
Press the jog shuttle to select the minutes. Turn the
jog shuttle to the desired minutes and press it to
confirm the selection.
The program will start at the selected time.
2 Cottons 22.0 lb
0 % Drying
2:07pm -2.13.2006 Start: 2:10pm-2.13.2006
m A
The display shows the current time of day, date and
the start time.
If the door is opened before the delay start time
^
has elapsed, press the "Start" button again.
Canceling the Delay Start
Press the m "Delay Start" or A "Back" button to
^
cancel the delay start function.
^ Turn the jog shuttle to the "Start date" entry field.
Press the jog shuttle to select the start date. Turn
the jog shuttle to the desired date and press it to
confirm the selection.
^ Press the "Start" button.
15

Drying
7. Start a program
Press the "Start" button to begin the program.
^
8. End of program
2 Cottons
Program end
Anti-crease Finish at 12:35
m FC Kf
The program end is shown in the display and the
buzzer sounds.
Open the drum door.
^
Remove the laundry.
^
If the laundry is not removed from the machine at the
end of the program an anti-crease cycle will
automatically start. The drum turns in intervals to
minimize creasing in the laundry.
The laundry must not be removed from the
,
dryer before the drying program has finished. The
cooling down phase must be completed.
If hot laundry items are stacked or packed they
could spontaneously combust.
^ Check the lint filter and clean if necessary.
Close lint filter flap, trip hazard.
2 Cottons
Program end
Caution: Lint filter is clogged
A
A reminder will appear in the display when the filter
needs to be cleaned.
^
Clean the lint filter immediately after the program
ends.
^
Close the drum door.
^
Press the 0 "Off" button to turn off the machine.
^
Turn off power at the power mains (on site).
16

Extra features
Skip or repeat program sequences
Sequences of a program in progress can be skipped
or repeated.
Press the f "End" button to stop the program.
^
2 Cottons
Program stop
Press Start.
ü f
Press the ü "Skip/Repeat" button.
^
The display shows the current program segment. See
"Program structure" in the Programming Manual.
Skip/Repeat -> 2 Cottons
Program stop
Area 1: Drying e
S A
Area 1: Drying
Block 1: Pre-drying
-
S A
Program stop
Press the f "End" button to stop the program.
^
2 Cottons
Program stop
Press Start.
ü f
Press the "Start" button to continue the program.
^
Canceling a program
To cancel a program, press the f "End" button twice.
^ Turn the jog shuttle to "Area" and press it to confirm
the selection.
Area: Select 1 Drying or 2 Cooling and confirm.
^ Turn the jog shuttle to "Block" and press it to
confirm the selection.
Block: Select Drying 1-10 or Cooling 1-10 and
confirm.
^
Press the S "Save" and "Start" button to skip the
program cycles.
^
To go back without skipping program cycles:
Press the A "Back" to go back to the program
stop.
17

Extra features
K Information
Press the K "Information" button during the program
^
to see program information.
Examples:
2 Cottons
Delay start: 10.7.2003
Start time: 9:47 e
m K f
Time after Start:0h23min
Time left:0h11min
Program end time: 10:21 pm e
Area 1: Drying
Block 1: Pre-drying
Actual exhaust air temp.: 138 °F e
Peak load: No
Anti-crease: 3s./87s./60min
Recirculation/vent flap: Recirculation e
Language
The display language can be temporarily changed
with the flag symbol.
1 White Cottons 0%
2 Cottons 0%
3 Colors 20%
FC A
Press the FC function button.
^
Settings Back <Main menu Language
Programming level
FC A
Press the jog shuttle to select "Language".
^
Settings svenska
Language english (USA)
Back <-
FC A
2 Cottons
Block end signal: Yes -
^ Press the A "Back" button to get back to the
program sequence.
A
^ Turn the jog shuttle to select the desired language
and press to confirm the selection.
When the selection is confirmed the display switches
to the selected language.
The language is set back to its original setting:
– if no activity was carried out for 5 minutes.
– 5 minutes after the program has ended.
when the door is opened.
18

Estates
Program Fabric Type max. load
White Cottons White items made of cottons, linens
Program
Cottons White or colored items made of cottons, linens or mixed fabrics
Colors Colored items made of cottons, linens or mixed fabrics
Darks Dark items made of cottons, linens or mixed fabrics
Wrinkle Free Items made of synthetic fabrics, mixed fabrics PT 8257 11 lb
Delicates Items made of synthetic fabrics, mixed fabrics PT 8257 4.4 lb
Dry to 20% residual moisture
600+TC Sheets Hot Bed linens high thread count sheet
made of cottons, mixed fabrics
600+TC Sheets
Warm
Silk and Rayon
Bed Linens
Bed linens high thread count sheet
made of cottons, mixed fabrics PT 8257 11 lb
Bed linens made of silk, rayon, satin
PT 8257 22-29 lb
(10-13 kg)
PT 8337 29-35 lb
(13-16 kg)
(5.0 kg)
PT 8337 14.6 lb
(6.6 kg)
(2 kg)
PT 8337 5.7 lb
(2.6 kg)
PT 8257 22-29 lb
(10-13 kg)
PT 8337 29-35 lb
(13-16 kg)
(5.0 kg)
PT 8337 14.6 lb
(6.6 kg)
Down Comforters &
Pillows
See load size in "Covers" section
Washable
Bedspreads
See load size in "Covers" section
Linen Tablecloths Tablecloths, napkins made of cottons, linens PT 8257 22-29 lb
Mixed Fiber
Tablecloths
Down comforters, duvet covers made of down
Blankets, covers made of synthetic fabrics
Tablecloths, napkins
made of synthetic fabrics, mixed fabrics
PT 8257 22 lb
(10 kg)
PT 8337 28.7 lb
(13 kg)
(10-13 kg)
PT 8337 29-35 lb
(13-16 kg)
PT 8257 11 lb
(5.0 kg)
PT 8337 14.6 lb
(6.6 kg)
19
Program
Program Fabric Type max. load
Outerwear Coats and jackets made of mixed fabrics PT 8257 11-14.6 lb
(5-6,6 kg)
PT 8337 14.6-19.8 lb
(6,6-9 kg)
Hand wash Silks Blouses, dresses, pants, skirts, coats, evening gowns,
wedding gown, faux furs made of silk, rayon, satin, acetate,
viscose
Hand wash Woolens Woolens and mixed woolens
Waterproofing Drying of waterproofed outdoor items PT 8257 11-14.6 lb
Hot air Drying small loads or finish drying single items PT 8257 22-29 lb
Cool air Airing/Fluffing items
PT 8257 8.8 lb
(4 kg)
PT 8337 11.5 lb
(5.2 lb)
(5-6,6 kg)
PT 8337 14.6-19.8 lb
(6,6-9 kg)
(10-13 kg)
PT 8337 29-35 lb
(13-16 kg)
Smoothing
Reduces wrinkles after the being washed. Remove items immediately after program
end and allow to air dry.
Denim / Jeans
(Machine iron)
Dress Shirts
(Machine iron)
Towels Multi-layer fabrics and towels.
Outerwear Plus Outdoor clothing suitable for drying in a tumble dryer.
Automatic Mixed loads of fabrics for the Cottons and Wrinkle-free
Cotton and linen fabrics
Items made of denim
Shirts and blouses
Towels, wash cloths, bath robes, etc.
The fibers are straightened, improving water-repellency.
programs.
PT 8257 11 lb
(5.0 kg)
PT 8337 14.6 lb
(6.6 kg)
PT 8257 22-29 lb
(10-13 kg)
PT 8337 29-35 lb
(13-16 kg)
PT 8257 11-14.6 lb
(5-6,6 kg)
PT 8337 14.6-19.8 lb
(6,6-9 kg)
PT 8257 11 lb
(5.0 kg)
PT 8337 14.6 lb
(6.6 kg)
20
Program guide
The following programs are available upon request. Please contact Miele for more
information.
Basic programs
Program Fabric Type max. load
1 Hot Wash / Cottons extra dry 0%
(Normal+)
2 Hot Wash / Cottons - dry 0%
(Normal)
3 Hot Wash / Cottons - damp 20 %
(Machine iron)
4 Hot Wash / Cottons - damp 25%
(Machine iron)
5 Hot Wash / Cottons - damp 40 %
(Machine iron)
6 Wrinkle Free dry 0 %
(Normal)
Multilayered or very thick fabrics made of
cotton and linen which do not completely
dry when using the "Hot wash / Cottons
dry" program.
Single and multilayered cotton and linen
laundry
PT 8257 22-29 lb (10-13 kg)
PT 8337 29-35 lb (13-16 kg)
Cotton and linen fabrics which are to be
machine ironed
7 Wrinkle Free moist 10 %
(Machine iron)
8 Wrinkle Free moist 20 %
(Machine iron)
9 Woolens 5 min. To fluff pre-dried woolens PT 8257 8.8 lb (4 kg)
10 Delicates 20 % Sensitive items made of synthetic, cotton
Synthetic, cotton or mixed fabrics PT 8257 11 lb (5.0 kg)
PT 8337 14.6 lb (6.6 kg)
PT 8337 11.5 lb (5.2 lb)
PT 8257 4.4 lb (2 kg)
or mixed fabrics
PT 8337 5.7 lb (2.6 kg)
21

Program guide
Program Fabric Type max. load
11 Timed drying - cool air 15 min. To air fluff items
12 Timed drying - warm air 20 min. Drying small loads or finish drying single items
PT 8257 22-29 lb
(10-13 kg)
PT 8337 29-35 lb
(13-16 kg)
13 Waterproofing
(Normal)
This program includes an additional step for water-proofing. Water-proofed items must
only be treated with a water repellent that is "Suitable for membrane textiles". These
products are fluoride compound based. Fire hazard! Do not dry fabrics which were
treated with agents containing paraffin!
14 Outerwear Outdoor clothing suitable for drying in a tumble
For drying fabrics that can be machine-dried,
e.g. micro fibers, ski and outdoor clothing, thin
dense cottons (poplin), table cloths.
dryer.
PT 8257 11-14.6 lb
(5-6,6 kg)
PT 8337 14.6-19.8 lb
(6,6-9 kg)
22

Program guide
Comforters
Program Fabric Type max. load
Down Comforters Feather or down comforters and pillows PT 8257 1 cover or 2 pillows
Drying to 0% residual moisture, Additional drying, Cooling
Synthetic Comforters Synthetic covers and pillows
Drying to 0% residual moisture, Additional drying, Cooling
Wool Comforters Natural fiber covers and blankets
Drying 3 minutes, Cooling
Natural fiber covers should not be completely dried in the dryer or it will
felt. A brief drying is recommended.
PT 8337 3 pillows or
These values are approximate and
may vary depending on size and
thickness of the items.
Cleaning Contractors
Laundry that has not been adequately cleaned and contains residues (wax or chemicals) is a fire hazard!
,
Wash particularly dirty laundry thoroughly: Use sufficient detergent and wash at a high temperature. If in doubt,
wash these items several times.
22 lb (10 kg)
1 pillow + 1 cover
28.7 lb (13 kg)
Program Fabric Type max. load
Mops Cotton mops
Drying to 0% residual moisture, Cooling
Microfiber mops Micro fiber mops
Drying to 0% residual moisture, Cooling
Cleaning cloths Micro fiber cloths, dust cloths PT 8257 12.3 lb (5.6 kg)
Drying to 0% residual moisture, Cooling
PT 8257 22 lb (10 kg)
PT 8337 28.7 lb (13 kg)
PT 8337 15.4 lb (7 kg)
23

Program guide
Fire Department
Program Fabric Type max. load
Face masks Protective mask with head harness max. Fasteners / Masks
Dry 45 min., Cooling.
Protective masks may only be dried is they are locked with special
mounting plates (optional accessory) in the drum.
Protective clothing Fire department uniforms e.g. Nomex
jackets, pants
Drying to 0% residual moisture, Additional drying, Cooling
For optimum drying results turn the garments inside out.
Fire gear waterproofing Items treated with a proofing agent
®
,
PT 8257 4 8
PT 8337 4 12
PT 8257 approx.1-2Uniforms
(1 Jacket + 2 Pants or 2 Jackets)
PT 8337 approx. 2 Uniforms
(or 3 Jackets)
Drying to 0% residual moisture, Additional drying, Cooling
Water-proofed items must only be treated with a water repellant that is
"Suitable for membrane textiles". These products are fluoride compound
based.
Fire hazard! Do not dry fabrics which were treated with agents containing
paraffin!
PT 8257 11-14.6 lb (5-6.6 kg)
PT 8337 14.6-19.8 lb (6.6-9 kg)
Professional cleaners
Program Fabric Type max. load
WetCare Sensitive Non-washable items PT 8257 approx. 8.8-11 lb (4-5 kg)
Fluffing 3 minutes, Cooling
WetCare Silk Non-washable items which crease easily PT 8257 approx. 8.8-11 lb (4-5 kg)
Drying to 15% residual moisture, Cooling
WetCare Intensive Washable items PT 8257 approx. 11-14.6 lb (5-6.6 kg)
Drying to 0% residual moisture, Cooling
PT 8337 approx. 11-14.6 lb (5-6.6 kg)
PT 8337 approx. 11-14.6 lb (5-6.6 kg)
PT 8337 approx. 14.6-19.8 lb (6.6-9 lb)
24

Equestrian
To protect the drum from damage, metal buckles, hooks and eyes must be covered.
,
Program Fabric Type max. load
Horse blankets Horse blankets, saddle cloths, tendon boots, bandages, cloth
halter
Drying to 0% residual moisture, Additional drying, Cooling
Wool horse blankets Horse blankets with a high wool content
Drying 5 min., Cooling
Type
PT 8257 7 2 1
Saddle
cloths
Program guide
PT 8257 22 lb (10 kg)
PT 8337 28.7 lb (13 kg)
Load size
Summer
blankets
Winter
blankets
PT 8337 9 2 - 3 1 - 2
11 2-3 1-2
12 3 2
25

Chip card use / Coin mechanism
If the machine is programmed for card operation,
only the drying programs on the card can be used.
Cards containing a program are programmed for a
machine type. Empty cards can be programmed for
any machine type.
Press l "On" to turn the dryer on.
^
The Welcome screen appears.
If the card was inserted the wrong way
Card fault
§
Insert the card properly into the card reader.
^
If the card is not suitable for this type of machine
Card operation
Card programs are only applicable
for machine type PT 7251.
Insert a card suitable for this machine type.
^
Reinsert card correctly in card reader.
Continue: Press Start.
ü f
A
Drying using the coin mechanism C 4060 /
C 4065 / C 4070
Follow the instructions strictly or the money / token
will be lost.
^ Insert the card, arrow first.
The display shows the list of programs on the card.
Card operation
17 Drying Protect. Clothing 113 °F
18 Wrinkle-free 140 °F
FC A
^
Turn the jog shuttle to select a program. Press it to
confirm the selection.
^
Press the "Start" button.
^
Remove the card from the card reader. When the
program is finished it will be erased from the
machines memory.
,
Do not insert any other items into the card
reader.
1. Load the laundry and close the drum door.
2. Press the l "On" button.
3. Select a program.
4. Insert money or tokens.
5. Press the "Start" button.
26

Cleaning and care
Cleaning the lint filter
Clean the lint filter at least once a day and
,
when the "Clean lint filter" display shows. A
clogged filter is a fire hazard!
Dryer
Before cleaning or servicing, disconnect the dryer
from the power supply by shutting off the power main
or tripping the circuit breaker.
Do not use a high pressure cleaner or water jet
,
to clean the machine.
Use a mild solution of warm water and liquid dish
^
soap applied with a soft cloth to clean the housing,
the control panel and the plastic parts, then dry
with a soft cloth.
After drying starched laundry, clean the drum with
^
a soft, moist cloth.
Never use abrasive cleaners, scouring pads, steel
wool or caustic cleaners. They will damage the
surface.
Check the gasket and lock of the drum door and the
lint filter flap.
The air intake opening is located on the back of the
dryer. Never block this opening. Do not cover the
dryer top with any blankets or cloths.
^ Open the lint filter flap.
^ Do not remove the lint filter.
^ Wipe the lint off the filter with your hand (do not use
any sharp objects). Scoop out the lint and be
careful not to damage the filter.
,
Do not use the machine without the built-in
filter in place.
This is a fire hazard.
If the lint filter is damaged it must be replaced
immediately.
A build-up of lint could block the airflow, heating
and ventilation, and may impair the efficiency of
the machine.
Keep the area surrounding the dryer, especially
around the air intake opening, clear of lint to ensure
clean air intake. Lint will settle in the dryer and cause
malfunctions.
Have Miele Technical Service check for lint deposits
and clean the following once a year:
– The entire interior of the dryer
–
The exhaust air blower wheel
27

Cleaning and care
Heat exchangers
Regular and professional maintenance preserves the
high efficiency of the system and helps increase
component life.
During operation, lint as well as detergent residues
and other substances contained in water vapor
collect on the heat exchangers. Soiling of the heat
exchangers decreases the transfer of heat to air,
thereby reducing system efficiency. Heat exchangers
should therefore be cleaned annually, or more
frequently in the case of heavy lint soiling or high
volume of use, by Miele Technical service.
Turn off the system and disconnect from power
–
supply!
Open the maintenance cover on the rear side of
–
the heat pump. Put the maintenance cover in a
safe place (trip and injury hazard).
Before the start of the rinsing process, remove the
–
collecting basin and rid it of coarse particles. This
prevents the drain from becoming clogged. Then
put back the collecting basin before starting the
rinsing process.
Seal off the heat exchangers by closing the
–
maintenance cover before returning the system to
operation.
Before turning on the power supply, make sure that
–
no electrical parts have come into contact with
rinsing water.
To protect the fins, avoid direct contact and wear
–
gloves to prevent cuts.
Only the heat exchangers (area behind the
,
maintenance cover) may be cleaned with water.
Water must not be used to clean the dryer and
other parts. Danger of fatal electric shock!
The dryer needs timely and professional
,
maintenance to prevent performance loss,
malfunctions and the risk of fire.
–
Thoroughly rinse out the heat exchangers with a
water jet (max. 4 bar) for several minutes. Using
pressure washers as well as detergents containing
chlorine, sand, soda or acid is prohibited. As an
alternative cleaning method, the heat exchangers
can be vacuumed or brushed off. Make sure not to
bend or damage the fins. Water must enter only
the described area of the heat exchangers.
–
To prevent flooding the dryer or the room in which
it is located, ensure that the cleaning water drains
sufficiently.
–
Remove all soiling that is not rinsed out.
–
Clean the collection basin and check the water
drain for possible clogs.
28

Frequently asked questions
Fault messages
Repairs to electrical, gas or steam appliances
,
should only be carried out by a Miele authorized
technician in accordance with local and national
safety regulations. Unauthorized repairs could
cause injury or machine damage. The
manufacturer cannot be held responsible for
unauthorized work.
After turning the machine on at the mains or if the
program list was selected the control carries out a
system analysis. All modules and their sensors, data
from the operating system, drying programs and
languages are checked.
If an error occurred in a program or language, they
are marked with § and can not be selected (here "3
Cottons Hot Wash 0%" and "English").
1 White Cottons 0%
2 Cottons 0%
3 Colors 0% §
f
Faults that occur before or after the start of a program
will flash in the display.
If the following error messages cannot be fixed with
five restarts, a general message will show:
System fault
§
Contact Technical Service
if restart w/o success.
f
If the display remains off, the dryer has no power.
Check the plug, the main switch and the fuses
^
on-site.
Settings Back <Language Deutsch
English §
FC A
If an error occurs in an already selected language the
following will show:
Data fault
§
Limited function.
Language defect.
f
Fan fault
§
Program stop. Press Start.
Motor temperature too high.
^ Allow motor to cool.
Machine fault
§
Contact Technical Service
if restart does not work.
^
Contact Technical Service.
Drive motor fault
m
Program stopped. Press Start. Motor
overheated due to overloading.
f
f
f
Allow motor to cool.
29

Frequently asked questions
Power failure
y
Program stop.
Press Start.
Press "START" to continue the program.
^
Card fault
§
Reinsert card correctly in card
reader.
Insert the card properly into the card reader.
^
f
A
Escaping condensation
If condensation escapes from an undesired place in
the system, check if the collection basin is resting
correctly in the drain and the drain is free of soiling.
These parts are accessible via the rear maintenance
cover in the floor area.
Decreasing system efficiency
This system is designed to operate at a room
temperature of up to 113°F (45 °C). Occasional
operation above this temperature should not cause
any problems. However, if temperatures continuously
exceed 113°F (45 °C), an external cool air supply
must be ensured. You can additionally reduce strain
on the system by keeping the heat exchangers free of
lint accumulation and other soiling. This reduces wear
and tear, thereby increasing the life of your system.
Check the system for the following should it lose
efficiency over time and require clearly longer drying
times:
Soiling of the dryer lint filter
–
Soiling of the heat exchangers in the heat pump
–
– Tightness of the connection between the dryer and
heat pump
– Heat pump air intake and and exhaust vent
– External fresh air and ventilation ducting is
recommended if room temperature frequently
exceeds 113°F (45 °C)..
After-sales service
^
In the event of a fault which you cannot correct
yourself, please contact Technical Service.
^
When contacting Technical Service please quote
the model, serial number (SN) and part number
(M.-Nr.) of the machine.
They can be found on the data plate located at the
top of the door opening (when drum door is open) or
on the back of the machine at the top.
30
^
When contacting Technical Service report the fault
in the display.
Only use original Miele spare parts when performing
maintenance or repairs on this machine. When
ordering please quote the model, serial number (SN)
and part number (M.-Nr.) of the machine.

Installation instructions

IMPORTANT SAFETY INSTRUCTIONS
WARNING - Risk of Fire
Any installation, service or repair work is to be done by
~
a Miele Service Technician. Any work done by an
unauthorized person could be dangerous.
Installation must conform with all local and national
~
codes and regulations.
Before installation, disconnect the dryer from the
~
electrical supply by shutting off the power, unplugging the
power cord or tripping the circuit breaker. Do not restore
power until installation is complete.
Be certain your appliance is properly installed and
~
grounded by a qualified technician.
For electrical safety this appliance must be grounded
~
z in accordance with local codes. It is imperative that this
basic safety requirement be met. If there is any doubt, have
the electrical system of the house checked by a qualified
electrician.
Do not damage, remove or bypass the safety
~
components, fixtures and control elements of this machine.
CAUTION: Label all wires prior to disconnection when
~
servicing controls. Wiring errors can cause improper
operation.
Ensure that there is adequate ventilation for operation in
~
the room where it is installed.
Do not operate the dryer in a room where cleaning
~
machines operate with solvents containing CFC. Vapors
turn into salt acid which may damage the laundry and
machine. When operated in adjoining rooms, there should
be no air exchange possible.
CAUTION: An unvented dryer produces combustible
~
lint. Exhaust outdoors!
No filters or louvers should be built into the exhaust
~
duct.
The connection between the exhaust ducting and the
~
dryer must be airtight.
Protect exhausts ducted into the open air against the
~
weather by a 90° downward angle.
To facilitate cleaning of the duct, cleaning flaps or
~
covers should be fitted on the bends wherever possible.
With upward sloping exhaust ducting a condensate
~
drain must be made at the lowest point.
Use only genuine Miele spare parts to replace faulty
~
components.
The minimum dimensions and distance required from
~
the wall, as shown in the installation diagram, must be
observed to allow service to be performed and the data
plate to be viewed.
Do not install the dryer where it is exposed to water
~
and/or the weather.
Install the dryer with adequate clearances for servicing
~
and proper operation.
See the "Installation - Exhaust, Air intake, Ventilation
~
cross sections and Steam" manual for more information.
SAVE THESE
INSTRUCTIONS
The exhaust must not be led into a chimney used by
~
another gas, coal or oil heated appliance. It must not be
connected to any gas vent, chimney, wall, ceiling, or
concealed space of a building. It should be directed by the
shortest route into the open air or into a suitable venting
duct. The duct must be designed and installed to
accommodate the high air throughput (as few bends and
as short a duct as possible and well shaped, leakproof
joints).
32
The dryer must be installed and tested by Miele's
Technical Service Department or an authorized
dealer.
This appliance must be installed in accordance with
the applicable regulations and may be used only in
rooms with adequate ventilation.
Read the instructions prior to installation and use of
this appliance.
Do not put the dryer in rooms where the temperature
may drop below freezing.
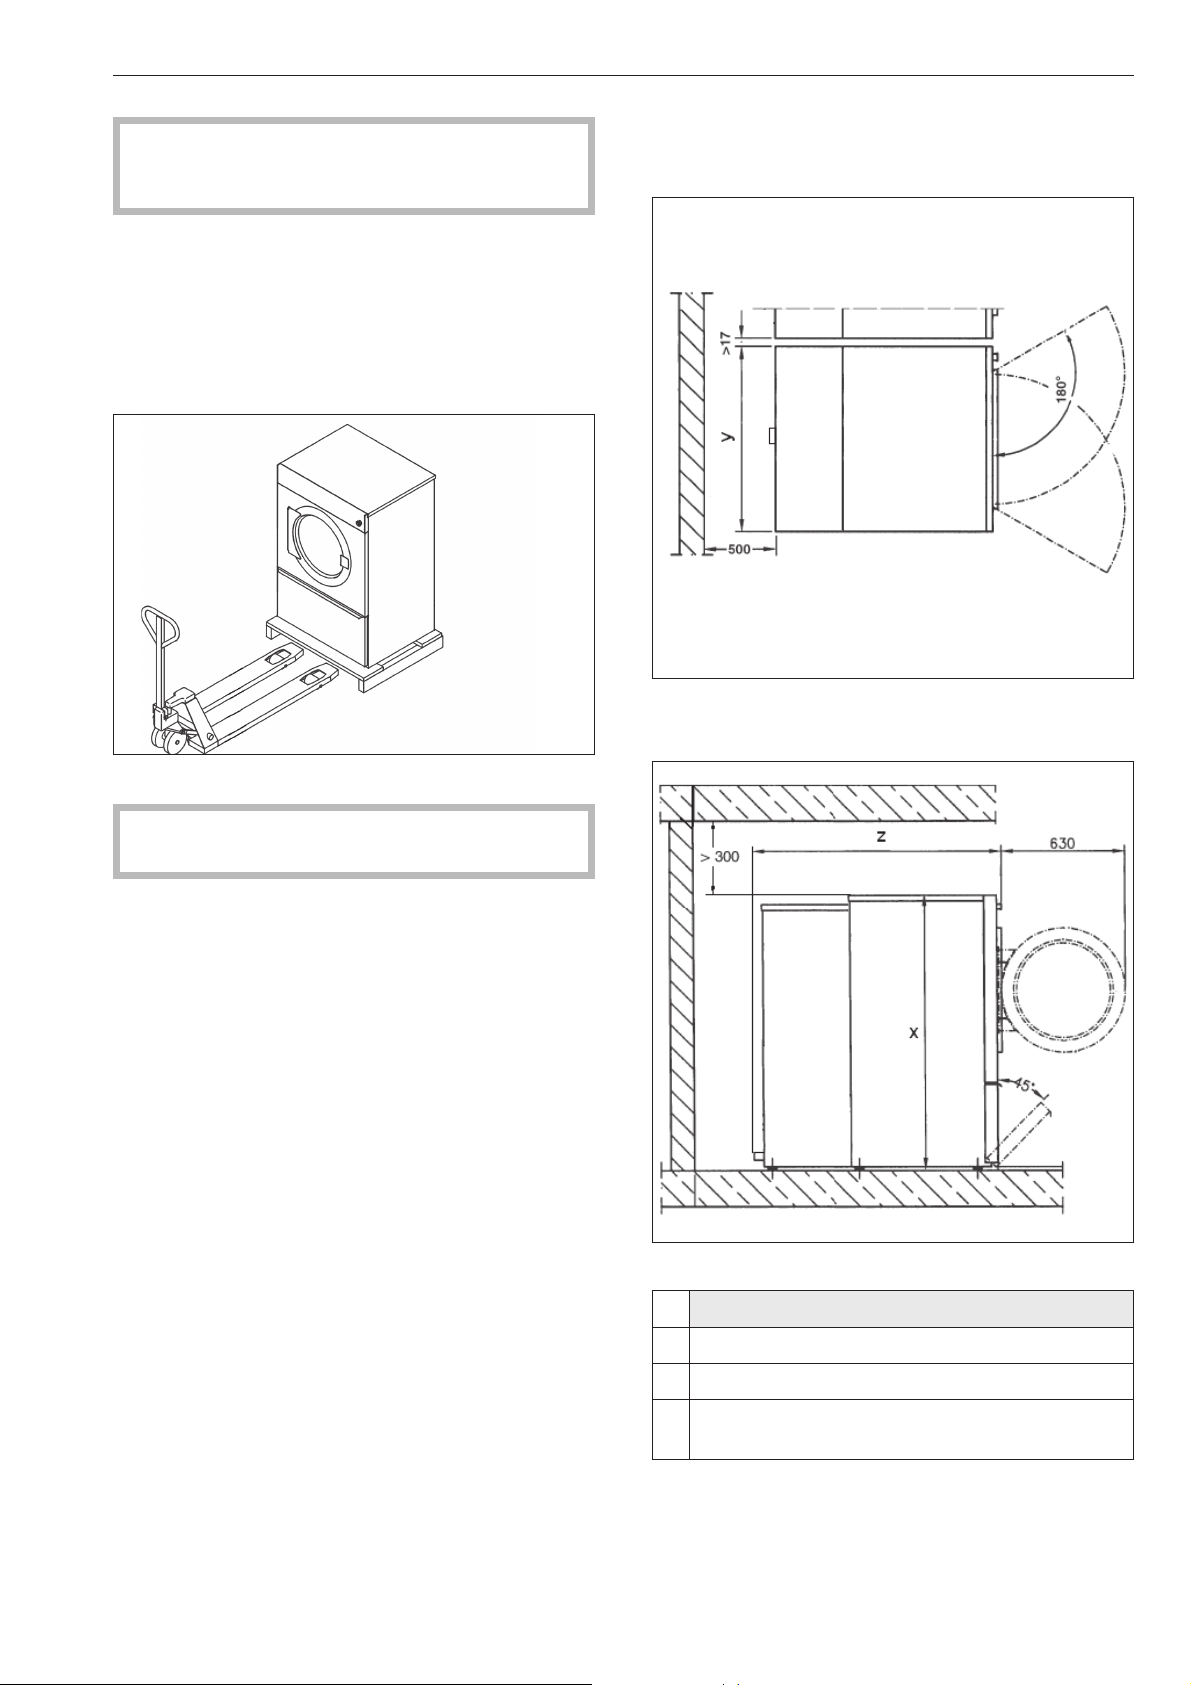
Installation
For ease of maintenance and servicing, the minimum
dimensions and distance to the wall with passage
must be observed.
The dryer and the heat pump must not be
,
transported without a shipping pallet.
The dryer and heat pump modules must be
separated when being transported even over short
distances. Transporting these modules as a single
unit is not permitted and may result in damage.
The system may be transported only using suitable
transport aids.
Avoid tilting the heat exchanger more than 30°.
Following transport, the heat pump should rest for
one hour before being activated. The resting phase
should be extended up to 24 hours following any
heavy shaking or tilting beyond 30°.
At the installation location, lift the dryer and the heat
pump from the shipping pallet using appropriate
lifting equipment.
Minimum distance to the wall and accessibility of the
maintenance passage 19 11/16" (500 mm).
PT 8257 / 8337
x 55 1/8" (1400 mm)
y 35 11/16" (906 mm)
7
z 47
/16" (1205 mm) /
13
54
/16" (1393 mm)
33
Installation
Install dryer and heat pump
Remove dryer cover.
Rout the connection line through the heat pump and
connect to dryer (see electrical connection).
Insert the heat pump-dryer connection line, plug into
the socket on the dryer.
The dryer is placed in front of the air openings of the
heat pump. Using the adjustable feet, level the dryer
and heat pump and align them parallel to one
another .
Tilt the heat pump slightly so that the bottom lug fits
over the bottom profile edge on the dryer. Return the
heat pump to level position so that it is not possible to
shift the dryer forward.
The clamping lug of the heat pump must clamp
beneath the dryer cover. Screw on dryer cover.
Ensure that there is no air leakage between the dryer
and heat pump.
34
Leveling the dryer
The dryer and the heat pump do not need to be
installed on a base. However, adjustments must be
made to compensate for any unevenness in the floor.
The dryer and the heat pump must be level for proper
operation.
Level the dryer and the heat pump by adjusting the
dryer’s four adjustable feet (A).
Once leveled, the discs (B) must be screwed tight to
the dryer’s base plate.
Installation
b Drill holes for retaining clips
Coin mechanism
The dryer can be equipped with a coin mechanism*.
This requires an adapter*. The necessary
reprogramming of the dryer must be performed by a
Miele Service Technician.
Prior to initial startup, the system must be adapted
to ambient temperature and remain still for at least
one hour.
Installation on an elevated base
The dryer can be installed on an elevated concrete
base.
,
If installing the heat pump dryer on an existing
concrete base, it must be secured with retaining
clips. Otherwise, the heat pump dryer may fall off
the base.
Empty the coin box on a daily basis. This prevents
the coins and tokens from accumulating and causing
a malfunction.
* can be ordered from Miele.
Communication module XKM RS232
(where available)
The communication module makes it possible to
connect the dryer to a PC (personal computer) via a
serial interface.
The outlet for the module is located on the back of the
dryer.
This requires a special Editor Program which is
available from the Miele Professional Department.
^
Secure the front feet of the dryer with the retaining
clips provided.
35

Installation
Electrical connection
The electrical connections must be carried out by a
certified electrician in accordance with all the national
regulations.
Observe the enclosed wiring diagram.
Before installation, make sure that the voltage and
frequency listed on the data plate correspond with
the site’s electrical supply.
Intake air, ambient air
(EA) exhaust air, (IA) intake air, (CD) condensate
drain
(EL) Electrical connection, (SLA) Peak load cutout
If the appliance is hard wired, a multiple-pole
separator must be installed. Separators with a
contact gap of more than 1/8" (3 mm) are valid as
separators. All components have to bear CSA or UL
approval.
The plug connection or the separator must be
accessible at all times.
You must be able to lock the separator or monitor it at
all times in case the appliance has to be
disconnected from the power supply.
When the dryer has been connected, check the
rotation direction of the compressor.
,
An incorrect phase connection will result in a
loud, chattering noise. Incorrect compressor
rotation direction will damage the system and must
be stopped immediately.
The dryer may be operated only if there is a supply of
adequately cool fresh air. If ambient temperature
frequently exceeds 113°F (45°C), the cooling circuit
of the heat pump must be connected to an external
intake and exhaust air line.
Condensate drain
The dryer with heat pump operates according to the
principle of condensation. The appearing
condensation water must be drained separately via a
floor drain.
The C 1 3/16" (30 mm) condensation water drain is
located on the rear of the water pump and can be
routed to the floor drain via a hose or downward
sloping pipe.
,
Once the system has been installed, replace
all the outer housing parts that were removed.
36

Technical Data
PT 8257 WP PT 8337 WP
Height 4' 7 1/8" (1400 mm) 4' 7 1/8" (1400 mm)
Width 2' 11 11/16" (906 mm) 2' 11 11/16" (906 mm)
Depth 3' 11 7/16" (1205 mm) 4' 6 13/16" (1393 mm)
Depth with door open 6" 1/4" (1835 mm) 6" 7 5/8" (2023 mm)
Weight 696 lb (315.5 kg) 724 lb (328.5 kg)
Drum volume 66 gal (250 l) 86 gal (325 l)
Max. dry laundry weight 28.7 lb (13 kg) 35.3 lb (16 kg)
Connected voltage see data plate
Rated load see data plate
Fuse rating see data plate
Certificates see data plate
Max. installed floor load in N
Noise pressure level < 70 dB (A)
Noise power level < 80 dB (A)
PT 8257 WP PT 8337 WP
37

38

Quick Guide
1.Sort the laundry
Not all fabrics are suitable for drying in a tumble dryer. Pay attention to the manufacturer’s
instructions on the wash care label.
q = Dry at normal temperature
r = Dry at low temperature
s = Do not tumble dry
Sort the laundry by fabric and color
^
2.Turn on the dryer and load the laundry
Press the l "On" button to turn the dryer on.
^
Open the drum door and load the laundry loosely into the drum.
^
3.Turn the jog shuttle to select a program
Programs may vary depending on the offerings of your machine.
1 White Cottons 0% 14 Outerwear 0%
2 Cottons 0% 15 Hand wash Silks 16%
3 Colors 0 % 16 Hand wash Woolens
4 Darks 0% 17 Waterproofing 0%
5 Wrinkle Free 0% 18 Hot air 20 Min.
6 Delicates 20% 19 Cool air 15 Min.
7 600+TC Sheets Hot 0% 20 Smoothing
8 600+TC Sheets Warm 0% 21 Denim / Jeans 2%
9 Silk and Rayon Bed Linens 16% 22 Dress Shirts 2%
10 Down Comforters & Pillows 0% 23 Towels 0%
11 Washable Bedspreads 0% 24 Outerwear Plus 0%
12 Linen Tablecloths 25% 25 Automatic 0%
13 Mixed Fiber Tablecloths 25%
4.Press the "Start" button to start the program
5.The buzzer sounds when the program is finished
^
Open the drum door and remove the laundry.
2 Cottons
Program end
Anti-crease Finished 12:35
m FC A
6.After drying
^
Close the drum door.
^
If necessary, clean the lint filter.
39

40

41

Alteration rights reserved / 1612
M.-Nr. 09 390 530 / 00
 Loading...