

Page 1

p
K
Operating instructions
Lab washers
PLW 6011
PLW 6111
Read the operating instructions carefully before
installing and using the machine. This will help
protect users from personal injury and help
revent damage to the machine.
en – U
Page 2

Page 3
CONTENTS
Contents
1. GENERAL RULES ..................................................................................................... 6
1.1Limitation of liability ............................................................................................................... 6
1.2Validity, content and storage ................................................................................................ 6
2. PRODUCT INFORMATION ....................................................................................... 7
2.1Appropriate use ...................................................................................................................... 8
2.2Safety instructions and warnings ......................................................................................... 9
Appropriate use .................................................................................................................... 9
Risk of injury ......................................................................................................................... 9
Quality assurance ............................................................................................................... 11
Safety with children ............................................................................................................ 12
Using accessories .............................................................................................................. 13
Disposing of your old appliance ......................................................................................... 13
Warning signs ..................................................................................................................... 13
2.3Technical data ...................................................................................................................... 14
2.4Recommendations for proper operation ........................................................................... 15
2.5Training .................................................................................................................................. 16
User profiles ........................................................................................................................ 16
3. INSTALLATION ....................................................................................................... 17
3.1Water connection ................................................................................................................. 17
Water quality ....................................................................................................................... 17
Information: ......................................................................................................................... 18
3.2Electrical connection ........................................................................................................... 19
4. BUILT-IN WATER SOFTENER (OPTIONAL) .......................................................... 20
4.1Salt refill indicator ................................................................................................................ 20
4.2Refilling the salt .................................................................................................................... 21
5. DISPENSING ........................................................................................................... 22
5.1Fill level sensor ..................................................................................................................... 22
5.2Dispensing quantity control ................................................................................................ 22
5.3Refilling process chemicals ................................................................................................ 22
5.4Caution! ................................................................................................................................. 23
6. OPERATION ............................................................................................................ 24
6.1Checking consumption ........................................................................................................ 24
6.2Opening and closing the door ............................................................................................. 24
Emergency release ............................................................................................................. 25
6.3Switching on ......................................................................................................................... 26
6.4Preparation ........................................................................................................................... 26
Checks after a programme ................................................................................................. 27
7. CONTROL PANEL AND SYMBOLS USED ............................................................ 28
7.1Control panel ........................................................................................................................ 28
REV.0.01_COD.650138_A4
Page 3
Page 4
CONTENTS
7.2Buttons .................................................................................................................................. 29
Buzzer ................................................................................................................................. 29
7.3Display ................................................................................................................................... 30
8. PROGRAMMES ....................................................................................................... 33
8.1Programme blocks ............................................................................................................... 34
8.2Programme overview ........................................................................................................... 35
8.3Starting the programme ...................................................................................................... 39
9. MACHINE STATUS ................................................................................................. 40
9.1Ready for operation ............................................................................................................. 40
9.2Programme ........................................................................................................................... 40
9.3Malfunctioning ...................................................................................................................... 40
9.4Power failure ......................................................................................................................... 41
9.5Reset ...................................................................................................................................... 41
10. MENU ....................................................................................................................... 42
10.1Accessing the menu ............................................................................................................. 42
10.2Parameter settings ............................................................................................................... 43
10.3Parameter list ....................................................................................................................... 43
11. CLOCK ..................................................................................................................... 44
12. BUZZER ................................................................................................................... 44
13. HISTORICAL DATA (batch protocols) ................................................................... 44
13.1Outputting batch protocols retrospectively ...................................................................... 44
External software ................................................................................................................ 44
14. WARNINGS AND EVENTS LIST ............................................................................. 45
14.1Warnings list ......................................................................................................................... 45
14.2List of display messages ..................................................................................................... 47
15. USB port (optional) ................................................................................................. 48
16. Process documentation ......................................................................................... 49
16.1Serial interface ...................................................................................................................... 49
16.2User administration .............................................................................................................. 49
16.3USB port ................................................................................................................................ 49
17. MAINTENANCE ....................................................................................................... 50
17.1General recommendations on maintenance ..................................................................... 50
Machine status ................................................................................................................... 50
Safety systems ................................................................................................................... 50
Procedure ........................................................................................................................... 50
Decontamination procedures ............................................................................................. 50
17.2Maintenance reminder ......................................................................................................... 51
17.3Routine maintenance ........................................................................................................... 51
17.4Table of routine maintenance tasks ................................................................................... 51
17.5Drying air filtration ................................................................................................................ 56
17.6Special maintenance ............................................................................................................ 56
REV.0.01_COD.650138_A4
Page 4
Page 5

CONTENTS
Table of special maintenance work .................................................................................... 56
18. PROBLEMS – CAUSES – Remedy ......................................................................... 57
18.1Introduction ........................................................................................................................... 57
18.2Problem (P) – Cause (C) – Remedy (R) ............................................................................... 57
19. DISPOSING OF YOUR OLD MACHINE ................................................................. 58
REV.0.01_COD.650138_A4
Page 5
Page 6

GENERAL RULES
1. GENERAL RULES
The washer-disinfector is generally referred to as “the machine” in these operating instructions.
Reprocessable laboratory glassware and utensils are referred to as “load items” if they are not
more closely defined.
1.1 Limitation of liability
The manufacturer shall not be held liable for faults or problems which arise due to tampering or
incorrect or improper use/operation of the machine.
The operator must comply with all instructions set forth in the operating instructions, most
notably:
Always consider the intended use of the machine
Always carry out the required maintenance work
Use of the machine should be limited to persons who have been properly trained and
instructed on the use of the machine
Use only original spare parts
Any modifications, adaptation or similar which may be made to machines which are subsequently
placed on the market do not oblige the manufacturer to intervene on previously supplied
machines, nor to consider the related operating instructions lacking and inadequate.
The operating instructions on the following pages are designed to guarantee the longevity and
functionality of your machine.
The instructions in this manual do not replace, but rather supplement employer requirements to
adhere to current legislation on standards of prevention and safety.
1.2 Validity, content and storage
It is important to keep this instruction manual with the machine for future reference.
If the machine is sold or transferred, the manual must be handed over to the new owner or users
so that they can become acquainted with its functioning and the relevant safety instructions and
warnings.
Read the warnings carefully before installing and using the machine.
REV.0.01_COD.650138_A4
Page 6
Page 7
2. PRODUCT INFORMATION
Before starting work, the user must be completely familiar with the functions and proper operation
of the machine. The user must know the precise functions of all command and control devices of
the machine.
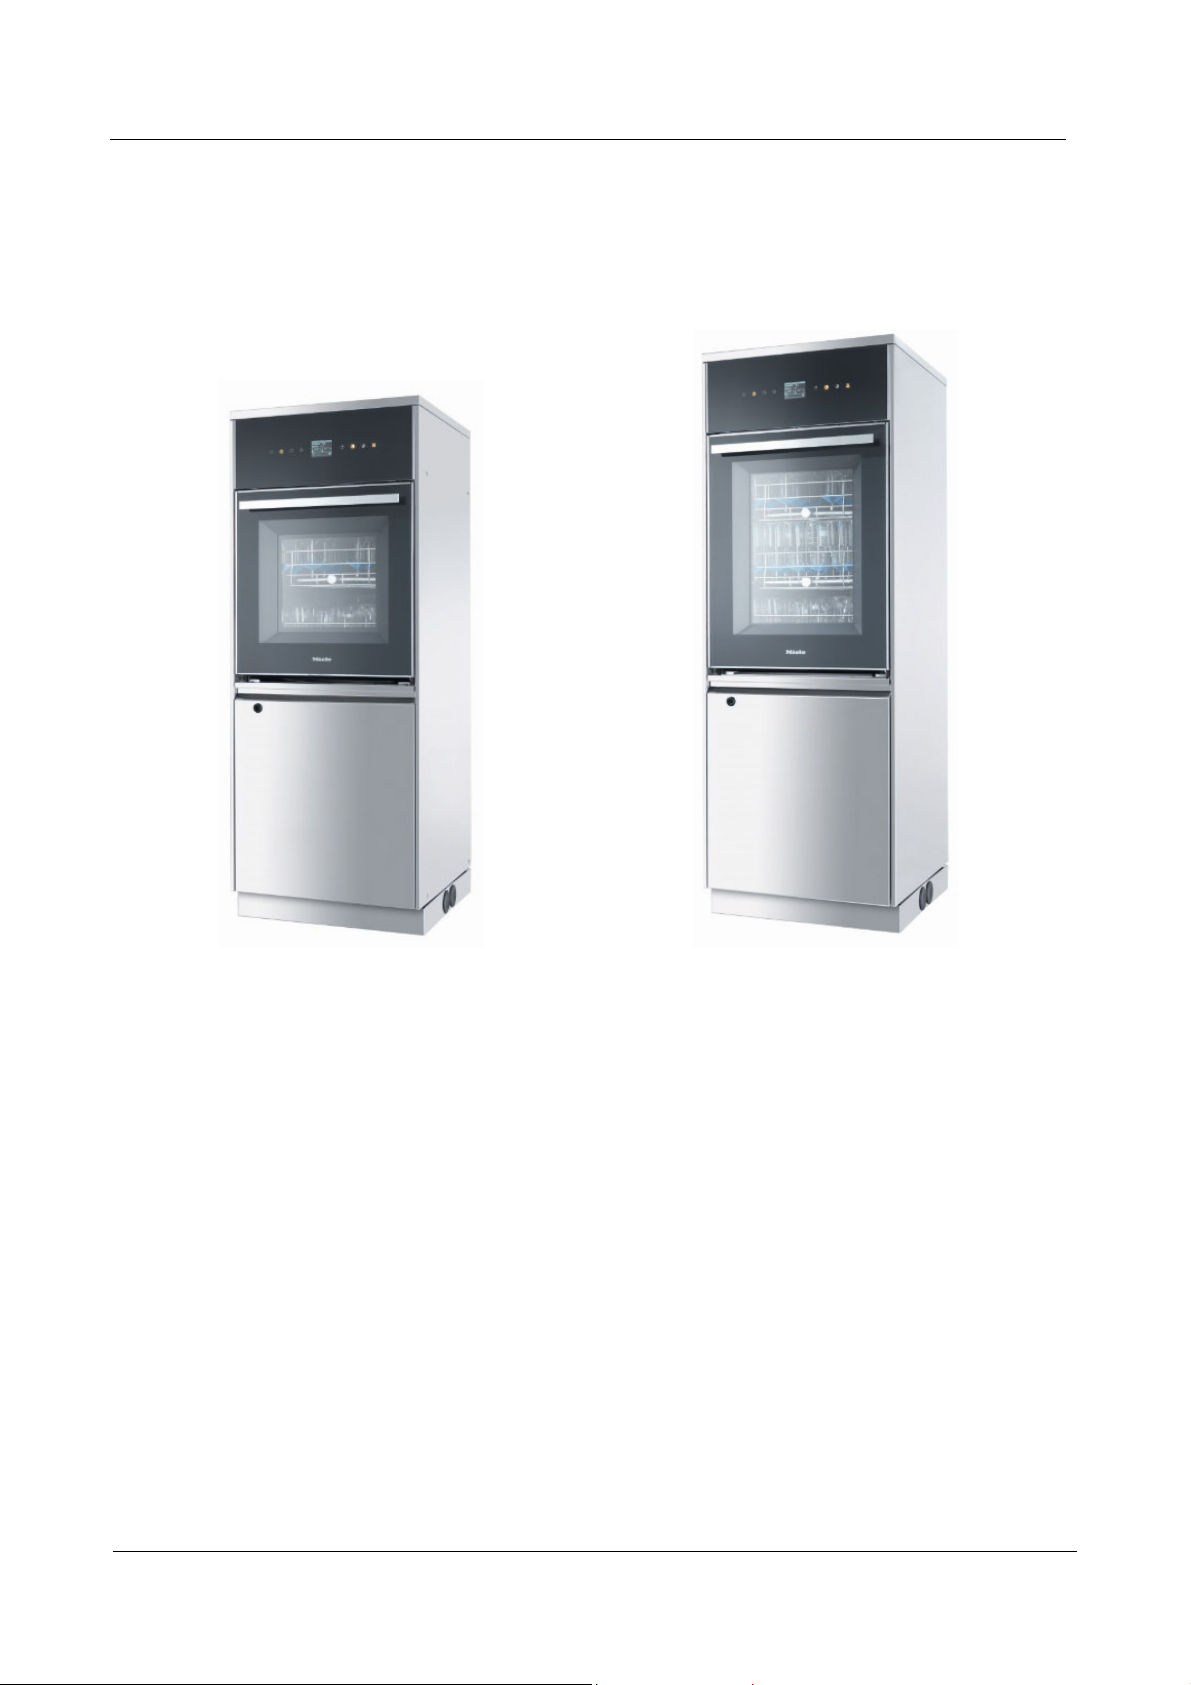
PRODUCT INFORMATION
PLW 6011 PLW 6111
REV.0.01_COD.650138_A4
Page 7
Page 8
PRODUCT INFORMATION
2.1 Appropriate use
This machine is used to reprocess laboratory glassware and laboratory utensils using water. The
process includes cleaning, rinsing and, where required, disinfection and drying. Due to the wide
variety of laboratory glassware and laboratory utensils on the market, it may be necessary in some
cases to establish whether the item is suitable for reprocessing in a washer-disinfector.
This will depend on its use and the type of soiling present as well as the disinfection parameters.
Please refer to the information provided by the manufacturer of the laboratory glassware and
laboratory utensils.
Laboratory glassware and laboratory utensils suitable for reprocessing include:
Vessels such as test tubes, beakers, flasks, cylinders, etc.
Measuring vessels such as measuring cylinders, pipettes, volumetric flasks, etc.
Dishes such as Petri dishes, watch glasses, etc.
Plates such as slides, sequencing plates, etc.
Small items such as lids, spatulas, magnetic stirring rods, stoppers, etc.
Other items such as funnels, pipe/hose pieces, etc.
EXAMPLES OF APPLICATION AREAS:
Laboratories in schools, colleges and universities
Research, quality assurance, development, technology and production
Different areas of inorganic, organic, analytical and physical chemistry
Biology, microbiology and biotechnology
Hospital laboratories
Reprocessing conditions must be suitable for the load and for the type of soiling. Process
chemicals must be suitable for the type of soiling and for methods of analysis being used.
The use of a suitable load carrier (mobile unit, basket, module, insert, etc.) is important to ensure
adequate reprocessing of the load.
The machine can be qualified for process validation.
The machine fulfils the requirements of the EU Machinery Directive 2006/42/EC.
REV.0.01_COD.650138_A4
CAUTION
Inappropriate use can lead to personal injury and damage to property.
Miele cannot be held liable for damage caused by improper or incorrect use or
operation of the machine.
Page 8
Page 9
2.2 Safety instructions and warnings
This machine complies with all statutory safety requirements. Inappropriate use can lead to
personal injury and damage to property.
Read the operating instructions carefully before using this machine. This will prevent both
personal injury and damage to the machine.
Keep these instructions in a safe place where they are accessible to users at all times.
Appropriate use
Use of the machine is only approved for the applications stated in the operating instructions.
Alterations or conversion of the machine, or using it for purposes other than those for which it was
intended, are not permitted and could be dangerous.
The cleaning and disinfection processes are only designed for laboratory glassware and utensils
which are designated as reprocessable by the manufacturer. The information provided by the
manufacturer of the load items must be observed.
Miele cannot be held liable for damage caused by improper or incorrect use or operation of the
machine.
This machine is intended for indoor use only.
PRODUCT INFORMATION
Risk of injury
Please pay attention to the following notes to avoid injury
Customer Service Department or a suitably qualified service technician. A Miele service contract
is recommended to ensure full compliance with GLP guidelines. Incorrect repairs can cause
considerable danger to users.
conditions.
furniture and fittings that are designed for use in commercial environments.
protective gloves when transporting and setting up the machine.
essential that this standard safety requirement is observed and regularly tested. If in any doubt,
please have the electrical installation inspected by a qualified electrician. Miele cannot be held
liable for the consequences of an inadequate earthing system (e.g. electric shock).
or leaking machine immediately and contact the Miele Customer Service Department.
Untrained personnel must not be allowed access to the machine or its controls.
application. The manufacturer of the process chemicals is liable for any negative influences on the
material of the load and the machine.
toxic.
The relevant safety regulations and safety data sheets issued by the process chemical
manufacturers must be observed.
Wear gloves and protective goggles.
The machine may only be installed, commissioned, repaired and maintained by the Miele
Do not install the machine in an area where there is any risk of explosion or of freezing
In order to reduce the risk of water damage, the area around the machine should be limited to
With some metal parts, there is a risk that you may be injured or cut. Wear cut-resistant
The electrical safety of the machine can only be guaranteed when it is correctly earthed. It is
A damaged or leaking machine can pose a threat to your safety. Always switch off a damaged
Machine operators must be instructed on the use of the machine and trained regularly.
Only use process chemicals which have been approved by their manufacturer for the relevant
Take care when using process chemicals. Some chemicals may be caustic, irritating and
REV.0.01_COD.650138_A4
Page 9
Page 10

PRODUCT INFORMATION
The machine is only designed for use with water and appropriate process chemicals. The use
of organic solvents or inflammable liquids is not permitted.
This could cause an explosion or damage rubber or plastic components in the machine and cause
liquids to leak out.
The water in the wash chamber must not be used as drinking water.
Do not lift the machine by protruding parts such as the door handle or the opened service flap
as these could be damaged or torn off.
Do not sit or lean on the opened door. This could cause the machine to topple over and
become damaged or cause you an injury.
Be careful when sorting items with sharp, pointed ends. Position them in the machine so that
you will not hurt yourself or create a danger for others.
Broken glass can result in serious injury when loading or unloading. Broken glass items must
not be processed in the machine.
Please be aware that the machine may be operating at high temperatures. Deactivating the
lock to open the door can result in a risk of burning or scalding, or contact with corrosive
substances. Where disinfectant is in use, there is also a risk of inhaling toxic vapours.
Should personnel accidentally come into contact with toxic vapours or process chemicals,
follow the emergency instructions given in the manufacturer's safety data sheets.
Load carriers such as baskets, mobile units and inserts must be allowed to cool down before
they are unloaded. Any water remaining in containers could still be very hot. Empty this water into
the wash chamber before removing items.
Never clean the machine or near vicinity with a water hose or a pressure washer.
The machine must be disconnected from the power supply before any maintenance or repair
work is carried out.
REV.0.01_COD.650138_A4
Page 10
Page 11

Quality assurance
The following points should be observed to assist in maintaining quality standards when
reprocessing laboratory glassware and utensils and to avoid damage to the loads being
cleaned.
Only authorised personnel may interrupt a programme in exceptional circumstances.
It is the responsibility of the operator to demonstrably ensure reprocessing standards in
routine operation. Process results must be inspected and documented on a regular basis.
For thermal disinfection, use temperatures and temperature holding times to achieve the
required infection prophylaxis in accordance with current health and safety regulations.
Only reprocess undamaged and suitable items. When washing plastic items, ensure that they
are thermally resistant. Nickel-plated items and items made of aluminium require special
procedures and are not generally suitable for machine reprocessing. Ferrous materials that can
rust or corrode must not be introduced into the wash chamber as wash items or soiling.
Under certain circumstances, process chemicals may damage the machine. Users are urged
to follow the recommendations issued by manufacturers of process chemicals. Contact Miele in
the event of damage and any suspicion of material incompatibility.
Cleaning agents containing chlorine can damage the elastomers of the machine.
If cleaning agents containing chlorine have to be used, a maximum temperature of 70 °C in the
“Main wash” programme blocks is recommended (see programme chart).
Abrasive substances should not be introduced into the machine as these could cause
damage to mechanical components in the water circuit. Abrasive residues on the load must be
removed completely before reprocessing.
Pre-treatment with cleaning or disinfecting agents, some types of stains and the interaction of
certain process chemicals can create foam. Foam can have an adverse effect on the disinfection
and cleaning result.
Reprocessing should not result in foam being discharged from the chamber. Foam discharge
can compromise the operation of the machine.
The process used must be monitored on a regular basis by the operator to check foaming
levels.
Even when a process chemical, e.g. detergent, is recommended, Miele takes no responsibility
for the effect of such chemicals on the load items. Please note that changes in product
formulation, storage conditions, etc., which are not announced by manufacturers of process
chemicals may impair the quality of cleaning results.
Always follow the relevant manufacturer's instructions on storage and disposal of process
chemicals.
In critical applications where very stringent requirements have to be met, it is strongly
recommended that all the relevant factors for the process, such as detergents, water quality, etc.,
are discussed with Miele.
If the cleaning result is subject to particularly stringent requirements (e.g. chemical analysis),
regular quality control should be carried out by the operator to ensure that required standards of
cleanliness are being achieved.
Load carriers such as mobile units, baskets and inserts which hold the load must be used only
as intended.
Lumened items must be thoroughly cleaned, internally and externally.
Secure small and light items with cover nets or place in a mesh tray for small items, so that
they do not block the spray arms.
Empty any containers or utensils before loading them.
The amount of residual solvents on items going into the wash chamber should be minimal.
There should be no more than a trace of any solvents with a flash point of below 21 °C.
PRODUCT INFORMATION
REV.0.01_COD.650138_A4
Page 11
Page 12
PRODUCT INFORMATION
Chloride solutions, in particular hydrochloric acid, or ferrous materials that can rust or corrode
must not be placed in the chamber.
Ensure that solutions or steam containing chlorides or hydrochloric acid do not come into
contact with the stainless steel outer casing of the machine in order to avoid any damage through
corrosion.
After any plumbing work, the water pipework to the machine will need to be vented. If this is
not done, machine components can be damaged.
The gaps between a built-in machine and adjacent cabinetry must not be sealed, e.g. with
silicone sealant, as this could compromise ventilation of the circulation pump.
Follow the installation instructions in the operating and installation instructions.
Safety with children
Children should be supervised in the vicinity of the machine. Do not allow children to play with
the machine. There is a danger that children might shut themselves in the machine.
Children must not use the machine.
Keep children away from process chemicals. These contain irritant and corrosive ingredients
which can cause burning in the eyes, mouth and throat, or inhibit breathing. It is therefore
important to keep children away from the machine when the door is open. There could still be
residual process chemicals in the machine. Observe the safety data sheets for the process
chemicals and seek medical advice immediately if a child has swallowed process chemicals or
got them in their eyes.
REV.0.01_COD.650138_A4
Page 12
Page 13
Using accessories
Only use genuine Miele original spare parts and accessories suitable for the application they
are required for. Model designations are available from Miele.
Only use Miele load carriers, such as mobile units, baskets, modules and inserts. Using
mobile units, baskets and inserts made by other manufacturers or making modifications to Miele
accessories can result in an unsatisfactory cleaning and disinfection result. Any resultant damage
would not be covered by the warranty.
Disposing of your old appliance
Please note that the machine may contain contamination from blood and other bodily fluids,
pathogens, facultative pathogens, genetically modified material, toxic or carcinogenic substances,
heavy metals, etc., and must be decontaminated before disposal.
For environmental and safety reasons, dispose of all process chemical residues in accordance
with safety regulations. Wear gloves and protective goggles.
Make the door lock inoperable, so that children cannot accidentally shut themselves in. Then
make appropriate arrangements for safe disposal of the machine.
PRODUCT INFORMATION
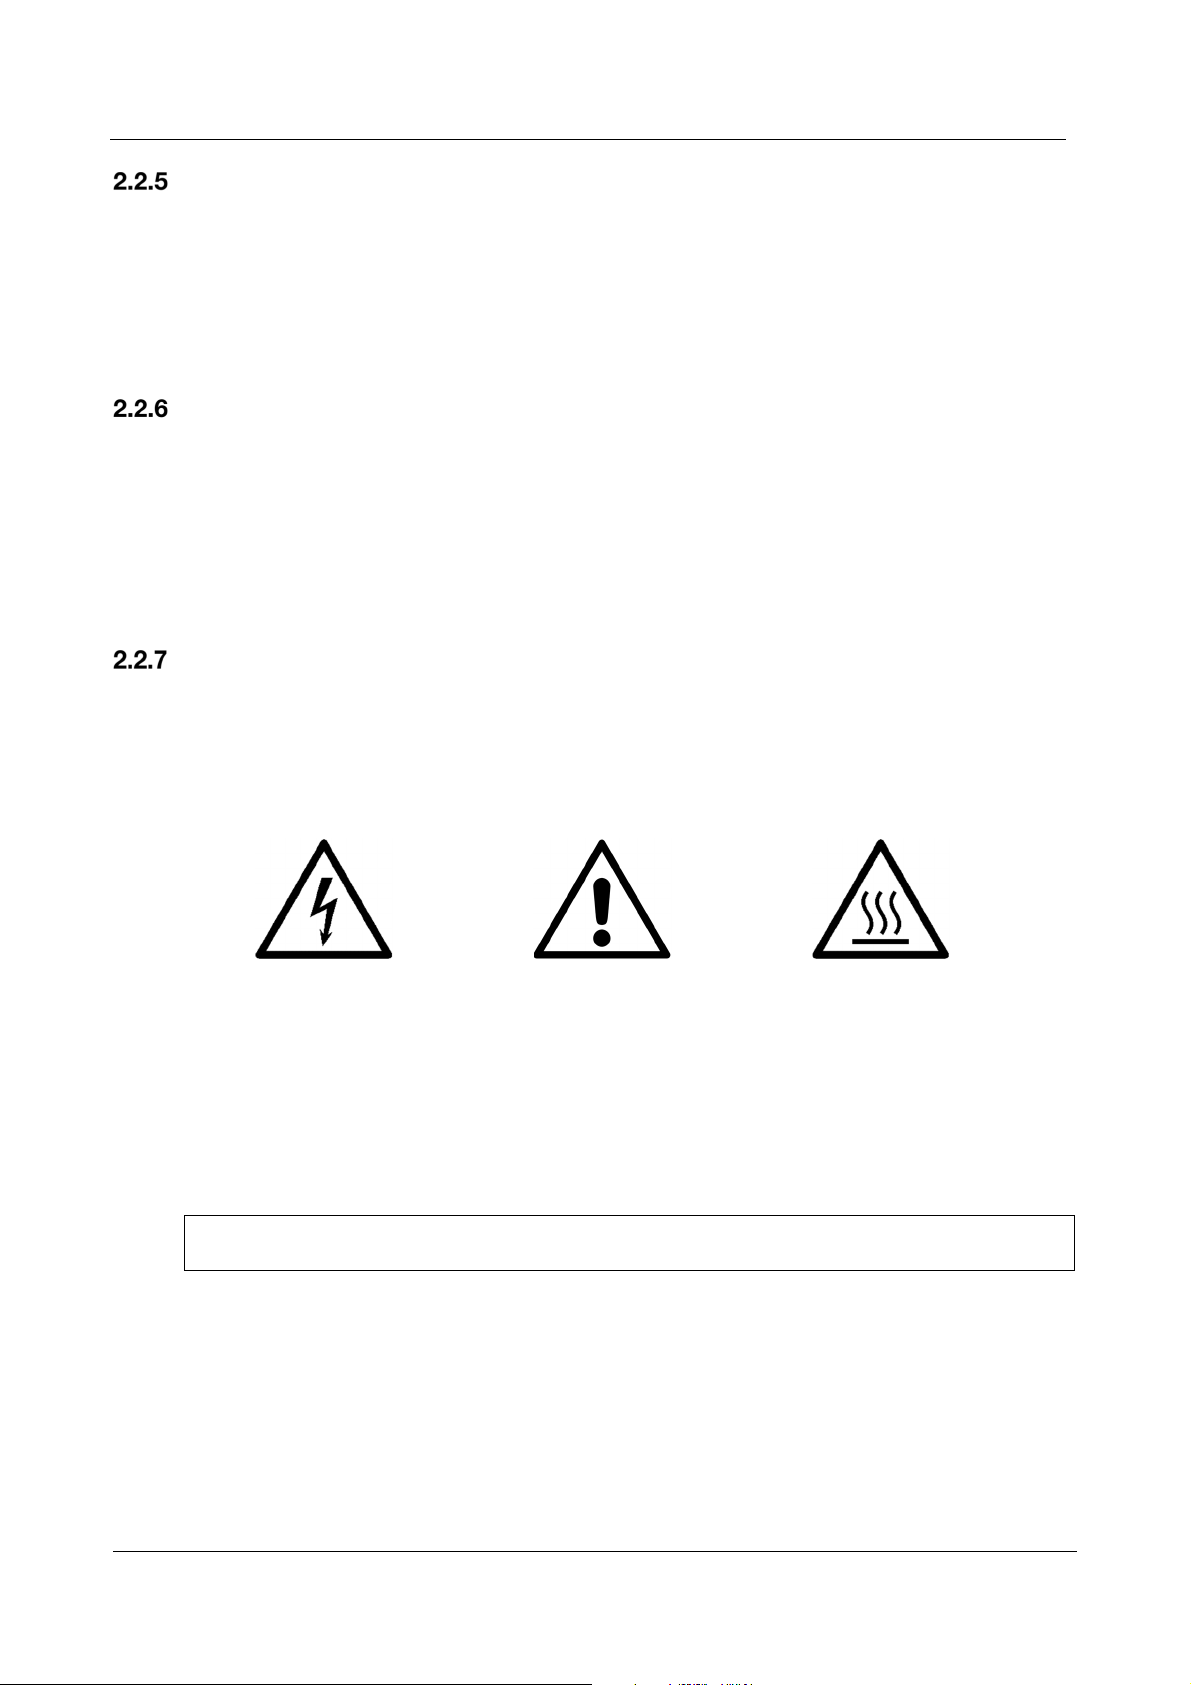
Warning signs
To inform operating personnel of their obligations and to warn of residual risks, the machine is
equipped with safety labels in accordance with the relevant legislation.
General warning signs
Caution!
Danger of electric shock!
Observe the operating
The evaluation of risks for the health and safety carried out on-site, as well as the evaluation of
residual risks, determine the safety equipment which the supervisor must provide for the user.
Miele cannot be held liable for damage or injury caused by non-compliance with the safety
instructions and warnings.
Caution!
instructions!
Caution!
Hot surfaces!
REV.0.01_COD.650138_A4
Page 13
Page 14
PRODUCT INFORMATION
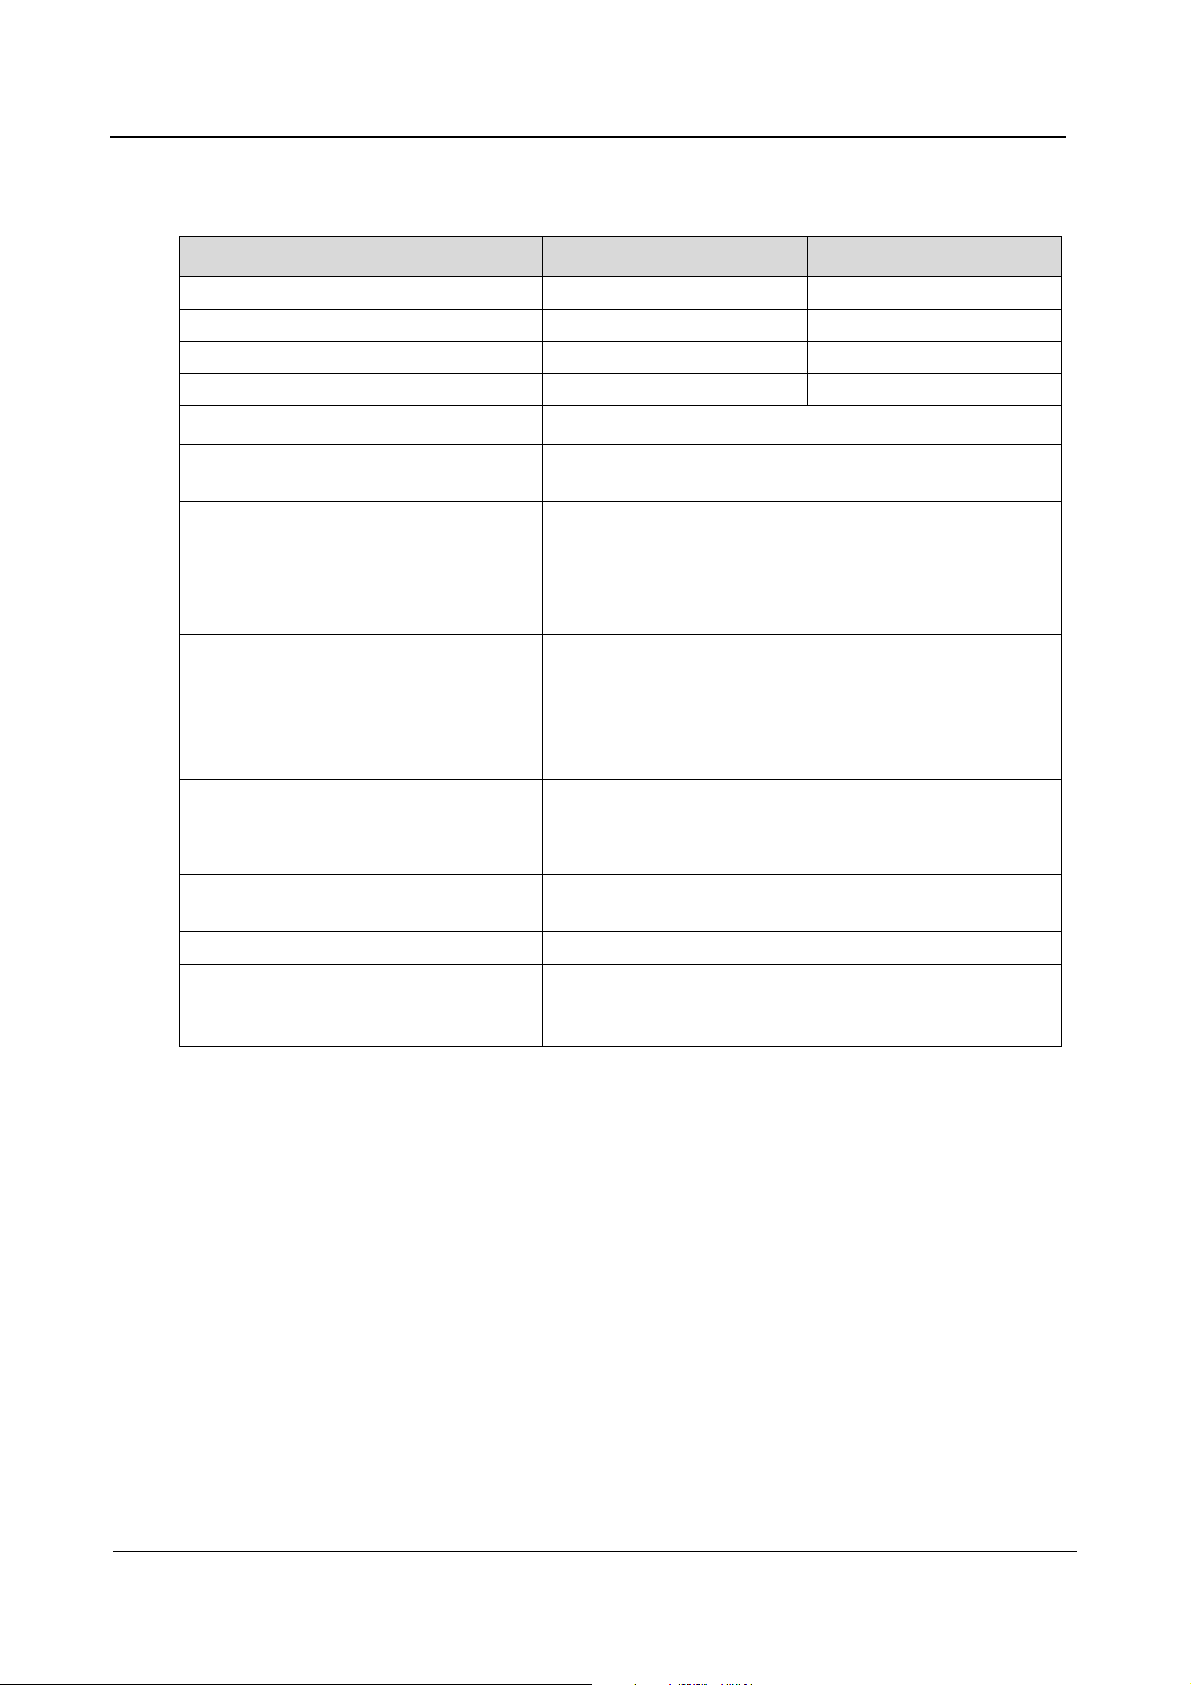
2.3 Technical data
Width (mm) 650 650
Depth with closed door (mm) 660 687
Height (mm) 1685 1840
Total weight (kg) 185 236
Average sound pressure level < 70 dB(A)
PLW 6011 PLW 6111
Protection rating (according to
IEC 60529)
Backflow preventer
(according to EN 1717)
Operation Temperature range +5 to +40 °C
Storage and transportation conditions -5 ... +50 °C
Overvoltage category
(according to IEC EN 60664)
CE mark 2006/42/EC Machinery Directive
Manufacturer address Steelco S.p.A
IP 21
The hexagonal symbol indicates that the equipment is
provided with a backflow preventer; the two letters
inside the hexagon indicate the protection family and the
protection type of that family. (EN 1717)
AA – Air gap not limited
Relative humidity range 20 to 90 % without
condensation
Maximum altitude: 2000 m (special versions of the
device are available for higher altitudes)
20 % to 90 % without condensation
500 hPa to 1060 hPa
II
Via Balegante, 27
31039 Riese Pio X (TV), Italy
REV.0.01_COD.650138_A4
Page 14
Page 15

PRODUCT INFORMATION
2.4 Recommendations for proper operation
The user must supervise the machine during operation.
Only use process chemicals which have been approved by their manufacturer for the
relevant application. The manufacturer of the process chemicals is liable for any negative
influences on the material of the load and the machine.
To prevent contact with contaminated material, appropriate personal protective equipment
must be worn during reprocessing.
Do not reprocess items containing substances which, in accordance with the current
legislation, must not be discharged into the sewage system. These substances must be
disposed of separately.
Recommending process chemicals does not render the manufacturer responsible for any
damage to processed materials and objects.
Follow the manufacturer’s instructions (in compliance with EN ISO 17664) as well as
national requirements and guidelines relating to the machine-based reprocessing of load
items.
The machine is designed for use with water and process chemicals.
The use of organic solvents or inflammable liquids is not permitted as there is a risk of
explosion. Such substances can result in premature wear on components.
Solvent residues, chloride solutions and acids, particularly hydrochloric acid, can damage
steel components and must not be introduced into the wash chamber.
Do not use powder cleaning agents.
Do not use domestic detergents.
Accessories which are not approved by the manufacturer may compromise reprocessing
results as well as user safety.
The user must carry out a general check-up and clean the appliance regularly as indicated
in the maintenance instructions.
Carry out a visual check of the load for cleanliness.
The on-site stopcock must be easily accessible so that the inlet can be turned off when not
in use.
REV.0.01_COD.650138_A4
Page 15
Page 16

PRODUCT INFORMATION
2.5 Training
Instructions for use of the machine will be provided by the Miele Customer Service Department or
an authorised service technician during machine commissioning.
It is the duty of the supervisor to ensure that users are sufficiently trained and instructed.
User profiles
User profiles are identified as follows:
SERVICE Service technician:
The machine may only be installed, commissioned, repaired and maintained by the
Miele Customer Service Department or an authorised service technician.
ADMIN Responsible for the machine in the workplace:
More advanced tasks, e.g. interrupting or cancelling a programme, require more
detailed knowledge of machine reprocessing of laboratory glassware and utensils.
Alterations or adaptations of the machine, e.g. to accessories used or on-site
conditions, require additional specific knowledge of the machine.
Validation processes assume specialist knowledge about machine reprocessing of
laboratory glassware and utensils, the processes involved and applicable standards
and legislation.
User User:
Users must be instructed in operating and loading the machine and trained
regularly to guarantee safe daily use.
They require knowledge of machine reprocessing of laboratory glassware and
utensils.
REV.0.01_COD.650138_A4
Page 16
Page 17
3. INSTALLATION
3.1 Water connection
Water quality
The quality of the water used in all the cleaning stages is essential in achieving good results.
The water must be compatible with the material from which the machine is made.
The water must be compatible with process chemicals.
The water must be compatible with process requirements for the various stages of the
process.
In order to achieve good reprocessing results, the machine requires a supply of soft water with a
low calcium content. Hard water results in the build-up of calcium deposits on the load and in the
machine.
Water with a hardness level higher than 0.7 mmol/l (4 °dH – German scale) must be softened. This
occurs automatically during a programme sequence on machines with a built-in water softener
(option ex works). The water softener must be set to the exact hardness of the water supply.
The water softener must be reactivated at regular intervals. This requires the use of special
reactivation salt. Reactivation is carried out automatically during a programme sequence.
Softened water must be provided on site for machines without a built-in water softener.
INSTALLATION
Note: The water hardness is set by the Miele Customer Service Department.
CAUTION
Water from the chamber is not suitable for drinking!
The machine must be connected to the water supply in strict accordance with local regulations.
The water used must comply with European regulations for drinking water quality as a minimum. If
the water supply has a high iron content, there is a danger of corrosion occurring on items being
cleaned in the machine, as well as the machine itself. If the chloride content of the water exceeds
100 mg/l, the risk of corrosion to the load in the machine will be further increased.
In certain regions (e.g. mountainous areas), the water composition may cause precipitates to form,
requiring the use of softened water in the steam condenser.
The machine is supplied as standard for connection to cold water (blue coded hose) and hot
water up to max. 60 °C (red coded hose). Connect the inlet hoses to the valves for cold and hot
water.
If no hot water supply is available, the red coded inlet hose for the hot water connection must also
be connected to the cold water supply.
The minimum flow pressure for cold water, hot water and DI water connections is 100 kPa.
The recommended flow pressure is ≥ 200 kPa for the cold and hot water connections and
≥ 200 kPa for the DI water connection in order to avoid excessively long water intake times.
The maximum permissible static water pressure is 800 kPa.
A booster pump is required if the flow pressure is below 100 kPa. If the pressure is higher than
800 kPa (8 bar), a pressure reducer must be installed.
If water pressure is not within the specified range, contact the Miele Customer Service
Department or an authorised service technician for advice.
REV.0.01_COD.650138_A4
Page 17
Page 18
INSTALLATION
A stopcock valve with a ¾” male threaded union must be provided on site. The valve should be
easily accessible, since the water supply should be shut off whenever the machine is not in use.
CAUTION
Do not overtighten the threaded unions on the hoses.
Information:
If no hot water supply is available, the red coded inlet hose for the hot water connection
must also be connected to the cold water supply.
A Y-piece can be used to connect both hoses to the cold water supply.
Miele cannot be held liable for damage or injury caused by non-compliance with the safety
instructions and warnings.
Non-compliance with the above conditions will render the warranty invalid.
CAUTION
When the machine is not in operation, always close the stopcocks.
REV.0.01_COD.650138_A4
Page 18
Page 19

3.2 Electrical connection
CAUTION
Only qualified, skilled personnel may connect the machine to the power
supply.
It is recommended that the machine is connected to the mains electrical supply via a
suitably rated plug and socket that complies to all local and national standards.
The machine must only be operated with the voltage, frequency and fuse rating shown on
the data plate.
The power supply voltage must not differ from its nominal value by more than
+/-10 %.
The frequency of the power supply must not differ from its nominal value by more than
1 %.
The electrical safety of the machine can only be guaranteed when it is correctly earthed.
Equipotential bonding is required.
Make sure that the electrical systems are properly earthed.
INSTALLATION
The earth conductor is to be connected to the earth terminal
identified by the standard symbol.
If the machine is hard-wired to the power supply, it must be
connected via a power switch with all-pole isolation. The power
switch must be designed to operate at the rated current.
It is recommended that the machine is connected to the mains
electrical supply via a suitably rated plug and socket.
For increased safety, it is recommended to protect the machine with a suitable residual
current device (RCD) with a trip current of 30 mA (DIN VDE 0664).
The machine should be disconnected from the power supply when not used for a longer
period of time.
The electrical connection and fuse rating must comply with local and national regulations.
CAUTION
Please refer to the installation plan provided.
REV.0.01_COD.650138_A4
Page 19
Page 20

BUILT-IN WATER SOFTENER (OPTIONAL)
4. BUILT-IN WATER SOFTENER (OPTIONAL)
The built-in water softener is designed to prevent residues from the water supply in the machine.
Salt consumption depends on the water hardness.
French scale
(°fH)
0–10 0–1.01 0–5.60 Value 10
11–15 1.11–1.51 6.16–8.40 Value 15
16–20 1.61–2.02 8.96–11.20 Value 20
21–25 2.12–2.52 11.76–14.00 Value 25
26–30 2.62–3.03 14.56–16.80 Value 30
31–35 3.13–3.53 17.36–19.60 Value 35
36–40 3.64–4.04 20.16–22.40 Value 40
41–45 4.14–4.55 22.96–25.20 Value 45
46–50 4.65–5.05 25.76–28.00 Value 50
51–55 5.15–5.56 28.56–30.80 Value 55
56–60 5.66–6.06 31.36–33.60 Value 60
Water hardness
(mmol/l)
German scale
(°dH)
Parameter setting
4.1 Salt refill indicator
If the salt level in the salt container is low, the following reminder will appear in the display: “salt
loading”.
REV.0.01_COD.650138_A4
Page 20
Page 21

4.2 Refilling the salt
Use only special, coarse-grained dishwasher salt or other pure evaporated salt for reactivation.
Never use any other kind of salt, e.g. table salt, animal feed salt or de-icing salt. Other salts may
contain insoluble additives which can impair the functioning of the water softener.
The following prompt reminds the user to refill the salt container:
“salt loading”
The container for dishwasher salt is located in the base of the wash chamber inside the machine.
Open the door.
Remove the load carrier.
Unscrew the plastic cap on the container.
Fill the funnel with salt.
Raise the funnel by the handle and place it on the container.
Release the handle. The salt then passes from the funnel into the container.
Repeat the process until the container is visibly full.
BUILT-IN WATER SOFTENER (OPTIONAL)
The supply container contains approx. 780 g of salt.
CAUTION!
The container must always be completely filled. If filled to less than full, the
water softening capacity is reduced and limescale deposits may occur on the
load and on wash chamber surfaces.
Refit the plastic cap on the salt container and screw tight.
Place the load carrier in the machine.
Start the “Rinse” programme.
CAUTION!
Always run the “Rinse” programme after refilling the salt. This removes and
dissolves spillages of salt and brine. Excess salt and brine which has
overflowed can cause corrosion damage if they are not rinsed away.
CAUTION!
During reactivation, the following appears on the display: “regeneration”.
REV.0.01_COD.650138_A4
Page 21
Page 22

DISPENSING
5. DISPENSING
The dispensing system for process chemicals comprises:
1 dispenser pump (DOS1) for cleaning agent
1 dispenser pump for neutralising agent
Fill level sensor
The system is equipped with flow meters.
Additional dispenser pumps can be fitted by the Miele Customer Service Department or an
authorised service technician.
5.1 Fill level sensor
Each dispenser pump is fitted with a fill level sensor that monitors the fill level in the process
chemical canisters. A lack of product is indicated on the display.
5.2 Dispensing quantity control
Each dispenser pump is monitored by a flow meter. This electronic device monitors the volume of
product dispensed.
5.3 Refilling process chemicals
Replace an empty container as follows:
Have a new container with process chemicals ready.
Open the door in the plinth of the machine.
Remove the siphon and place it on a chemical-resistant and easy-to-clean surface.
Insert the siphon into the new container.
Place the container in the plinth of the machine.
Close the door in the plinth.
Start the appropriate programme for venting the DOS pump (see the “Fill DOS (1–4)”
programme table).
CAUTION
Only use process chemicals designed specifically for use in the machine and
follow the chemical manufacturer's instructions.
Take care when using process chemicals. Some agents may be corrosive
and irritant. The relevant safety regulations and safety data sheets issued by
the process chemical manufacturers must be observed. Wear protective
gloves and goggles.
The chemical compartment in the plinth of the machine is accessed using a
key. The compartment may only be accessed by authorised personnel.
REV.0.01_COD.650138_A4
Page 22
Page 23

5.4 Caution!
Consult the relevant manufacturer's instructions for the maximum amount of process
chemical permitted for each programme.
To ensure the efficiency of the dispensing system, maintenance as described in the
“MAINTENANCE” chapter must be performed regularly.
Only use liquid cleaning agents. Do not use powder cleaning agent.
Always follow the relevant manufacturer's instructions on storage and disposal of process
chemicals.
Check that the process chemical is suitable for the programme used.
DISPENSING
CAUTION
The machine must be completely emptied before you carry out maintenance
work or move/relocate the machine.
This is necessary to prevent contact with chemicals and to protect machine
components which may suffer damage.
REV.0.01_COD.650138_A4
Page 23
Page 24

OPERATION
6.
OPERATION
6.1 Checking consumption
Check consumption regularly by checking the fill levels in the supply containers and replace
containers in good time to avoid the dispensing system being sucked completely dry.
Wear protective gloves and goggles.
Follow the instructions for dispensing chemicals.
CAUTION
Take care when using process chemicals. Some agents may be corrosive
and irritant. The relevant safety regulations and safety data sheets issued by
the process chemical manufacturers must be observed. Wear protective
gloves and goggles.
6.2 Opening and closing the door
Open and close the door using the door handle.
The door is locked electronically and cannot be opened while a programme is running.
There is a risk of burning if contact is made with the door glass while a programme is running.
PLW 6011 PLW 6111
REV.0.01_COD.650138_A4
Page 24
Page 25

Emergency release
The emergency release may only be used when it is no longer possible to open the door normally,
e.g. in the event of a power cut.
OPERATION
CAUTION
Hold the door during opening and closing. Jerking the door open or
slamming it shut may break the glass.
Insert baskets into the chamber slowly to avoid breaking the glass.
Before opening the door, check that the door area is free of obstacles.
CAUTION
If the emergency release is operated during a programme sequence, hot
water and process chemicals can escape.
The load, the load carrier and the wash chamber may be very hot.
Danger of scalding, burning and chemical burns. Where disinfecting agents
are used, there is also a danger of inhaling toxic fumes.
In the event of a power cut or if the door lock is damaged, the door can be opened as follows:
1. An emergency release device is located between the door and the
cover plate and is identified by a sticker (see image).
2. Insert the tool contained in the accessory kit into the emergency
release opening.
3. Push the tool to the left until you hear the door open.
4. To close the door, continue to press in the tool as described in point
3.
REV.0.01_COD.650138_A4
Page 25
Page 26

OPERATION
6.3 Switching on
The machine is switched on and off using the power switch.
Take note of any fault or warning messages on the display when starting the machine.
6.4 Preparation
Follow the manufacturer's instructions for reprocessing.
Make sure that the items are suitable for reprocessing in a cleaning machine and check the
compatibility with the chemicals used during the wash programmes.
Place the items carefully into the load carriers.
Make sure that load items are not shielded or concealed by other items.
Position load items in such a way that fluids can drain off freely.
Tall or heavy items should be placed towards the middle of the basket if possible to
facilitate washing.
Make sure that items do not block the spray arms and that the arms can turn freely.
Distribute the load evenly across the baskets.
The mobile units, baskets, modules and inserts that hold the load must be used only as
intended.
Empty any containers or utensils before loading them.
Take apart any items which can be dismantled according to the manufacturer's
instructions and process the individual parts separately from each other.
Do not place items to be cleaned inside other items where they may be concealed. Do not
place items so close together that cleaning is hampered.
Arrange the load so that water can access all surfaces.
Only reprocess small items and micro components in special inserts, mesh trays with lids
or mesh inserts.
Plastic items must be thermally resistant.
REV.0.01_COD.650138_A4
CAUTION
Connectors that are not in use must be closed using the caps provided.
New caps are available from Miele.
Page 26
Page 27

OPERATION
CAUTION
The maximum load for each cycle is 35 kg (incl. basket).
Never operate the machine without a load carrier in place.
Before starting to use the machine, make sure that all the routine checks have been carried out.
Check the spray arm rotation.
The list below provides examples of load carriers and inserts which may be used when
reprocessing laboratory glassware and utensils:
Other accessories are available from Miele.
Upper basket with nozzles Upper basket with spray arm
Lower basket with nozzles Lower basket for pipettes
Insert for glassware Insert for Petri dishes
Checks after a programme
Carry out a visual check of the load for cleanliness.
Are all lumened instruments still attached to the appropriate nozzles?
Are the lumens free from obstructions?
REV.0.01_COD.650138_A4
CAUTION
Any lumened items which have become disconnected during reprocessing
must be reprocessed.
Page 27
Page 28

CONTROL PANEL AND SYMBOLS USED
7. CONTROL PANEL AND SYMBOLS USED
7.1 Control panel
The control panel is used to operate the machine.
A
B
C
D
Display
E
F
G
H
REV.0.01_COD.650138_A4
Page 28
Page 29

7.2 Buttons
The buttons on the display are touch-sensitive and backlit (LED). There are 8 buttons available
with the following functions:
BUTTON DESCRIPTION
A
B
CONTROL PANEL AND SYMBOLS USED
Press once to interrupt a programme.
“NO DISINFECTION” appears on the display. The
door remains locked. An additional warning appears
STOP
Press twice to cancel a programme.
(cancel) For cancelling a process in the user interface.
START For starting the programme.
(confirm) For selecting or confirming entries in the user interface.
at a chamber temperature of more than 65 °C.
Continue the programme by pressing the START
button. The current wash phase is then repeated.
The programme is cancelled and the door unlocked.
C
D
P+ For accessing the list of all additional programmes.
The menu incorporates all relevant functions.
PRG
P1 Universal programme
During standby: Press the button for 5 seconds to access
the menu.
E
(down) For navigating in the user interface.
P2 Standard programme
F
(up) For navigating in the user interface.
G
H
P3 Intensive programme
Drying function.
DRY
The drying function can be activated or deactivated before
starting a programme.
Buzzer
The machine has an integrated buzzer. An audible signal sounds each time a button is pressed. If
the machine develops a fault, a warning signal sounds (see “Warning and safety instructions”).
REV.0.01_COD.650138_A4
Page 29
Page 30

CONTROL PANEL AND SYMBOLS USED
7.3 Display
1
2
3
4
5
6
7
FIG. 1
The following information may appear on the display:
1. Date and time
2. Selected programme
3. Current wash phase
4. Temperature in wash chamber (sensor 1) with A0 value
5. Target temperature for current programme phase
6. Remaining time
7. Instructions and error messages
8. Cycle counter
9. Temperature in wash chamber (sensor 2) with A0 value
When the machine is ready for operation, the last selected programme, the temperature, the date
and the time are displayed.
When one of the programme buttons (P1 , P2 or P3 ) is pressed, the display shows
the programme linked to that button and the following message appears in the bottom left: “press
start” or “open door” (see 7).
By pressing the P+ button, it is possible to scroll through all the available programmes.
8
9
REV.0.01_COD.650138_A4
Page 30
Page 31

CONTROL PANEL AND SYMBOLS USED
FIG. 2
The temperature and pressure values can be
displayed while a programme is running by
pressing the PRG button (Fig. 2).
FIG. 3
Press the PRG button twice to display warning
messages (Fig. 3).
FIG. 4
In the event of a fault, a window appears indicating
the fault code and a brief description
(Fig. 4).
In the event of an error which does not lead to the programme being interrupted (e.g. lack of
salt), a message is shown in the bottom left of the display (see Figs. 1 to 6) or can be called
up by pressing the PRG button (see Fig. 3).
REV.0.01_COD.650138_A4
Page 31
Page 32

CONTROL PANEL AND SYMBOLS USED
FIG. 5
At the end of the programme, a window appears
(Fig 5).
FIG. 6
Fig. 6.A
If a programme was cancelled, a window appears
indicating that disinfection did not take place (Fig.
6.A).
Fig. 6.B
If the temperature in a cancelled programme was
65 °C or lower, the message shown in Fig. 6.A is
displayed.
If the temperature was above 65 °C, the message
shown in Fig. 6.B is displayed.
REV.0.01_COD.650138_A4
Page 32
Page 33

8. PROGRAMMES
Programme Button Application
PROGRAMMES
Quick wash
Universal
Standard
Intensive
Inorganic
Organic
Short programme for lightly soiled items and loads that do not
require intensive cleaning.
For removing organic residues and certain inorganic residues.
For standard applications and analyses, light to medium levels of
soiling and medium rinse requirements.
Simple programme for a range of soiling.
For light soiling and low final rinse requirements:
Not suitable for denaturing and acid-soluble residues such as
proteins, metallic salts and amines.
For removing organic residues and certain inorganic residues.
For standard applications and analyses, medium to heavy soiling
and medium to high final rinse requirements.
For removing inorganic residues.
General programme for analysis and water analysis, and for
water-based cultures with acid-soluble metallic salts such as
2+
and Mg2+, etc., for light to medium levels of soiling and
Ca
medium to high rinse requirements.
For organic residues, e.g. heavy soiling or after sterilisation;
partially suitable for fats and waxes.
Not suitable for acid-soluble residues such as metallic salts and
amines.
For medium to heavy soiling and medium rinse requirements.
Connection to hot water and demineralised water
recommended.
Plastic
Pipettes
Oil
Disin 93/10
Cold water
rinse
REV.0.01_COD.650138_A4
For heat-sensitive loads such as plastic flasks (temperature
resistance: at least 55 °C).
For standard applications and analyses, light to medium levels of
soiling and medium rinse requirements.
For pipettes
For heavy oil soiling such as crude oil, synthetic oils/lubricants,
fuels and partially natural oils. The programme can also be used
for removing fats and waxes.
Connection to hot water and demineralised water
recommended.
For cleaning and thermal disinfection at 93 °C with 10 minutes'
temperature holding time.
Cold water rinse, holding time: 1 minute. For flushing out saline
solution, rinsing heavily soiled loads, e.g. for preliminary removal
of soiling, residual disinfecting agent, or to prevent residues from
drying on and forming incrustations before running a full load.
Page 33
Page 34

PROGRAMMES
Programme Button Application
AD rinse
Drying
Drain
Fill DOS1
Fill DOS2
Fill DOS3
Fill DOS4
8.1 Programme blocks
Drain
Drains water from the chamber.
Pre-wash
A pre-wash removes coarse soiling and substances which may cause foaming.
Main wash
Depending on the load, cleaning generally occurs at temperatures between 45 °C and
93 °C with the addition of appropriate cleaning agent (process chemicals).
Interim rinse
In the interim rinse stages, process chemicals from the previous phases are rinsed off and
neutralised.
Final rinse
To avoid deposits on the load and to reduce process chemical residues, demineralised
water should preferably be used, if available, for the final rinse.
Drying
Adequate drying reduces the risk of corrosion through residual moisture on the load.
Rinse with demineralised water (DI water, (ultra)pure water),
holding time: 3 minutes.
Additional drying after the end of a programme.
For draining wash water, e.g. after a programme cancellation.
Primes the cleaning agent dispensing system after replenishing
or replacing the container.
Primes the additional liquid agent dispensing system after
replenishing or replacing the container.
Primes the neutralising agent dispensing system after
replenishing or replacing the container.
Primes the additional liquid agent dispensing system after
replenishing or replacing the container.
REV.0.01_COD.650138_A4
Page 34
Page 35

60
s
60
s
8.2 Programme overview
PROGRAMMES
Drying
Washing
Washing
Washing
Washing
Drying
Final
rinse
2
rinse
Interim
1
rinse
Interim
sation
Neutrali-
*)
120 °C
1800 s
120 °C
1800 s
120 °C
1800 s
120 °C
1800 s
DI
60 s
60 °C
DI
70 °C
60 s
DI
75 °C
DI
DI
75 °C
1800 s
120 °C
60 s
70 °C
DI
60 s
DI
60 s
HW
HW
60 s
120 s
DOS 3
HW
120 s
DOS 3
HW50
HW
60 s
CW50
60 s
DI
60 s
120 s
DOS 3
HW
120 s
DOS 3
HW
120 s
DOS 3
Main
Washing
wash 3
Main
Washing
Washing
wash 2
Main
wash
Washing
Pre-wash
Function
HW
60 °C
DOS 1
Button
180 s
HW
HW
180 s
75 °C
DOS 1
70 °C
DOS 1
75 °C
DOS 1
CW50
HW
180 s
HW
180 s
60 s
CW50
180 s
80 °C
DOS 1
CW50
60 s
120 s
50 °C
DOS 3
Phase
REV.0.01_COD.650138_A4
Programme
Quick wash
Standard
Universal
Intensive
Inorganic
Page 35
Page 36

PROGRAMMES
Drying
Washing
Washing
Washing
Washing
Drying
Final rinse
2
rinse
Interim
1
rinse
Interim
sation
Neutrali-
*)
DI
HW50
HW
120 °C
1800 s
60 °C
1800 s
100 °C
1800 s
1800 s
120 °C
60 s
75 °C
60 s
DI
DI50
60 s
55 °C
60 s
DI
DI
CW50
60 s
70 °C
60 s
60 s
DI
HW50
DI
60 s
75 °C
HW
60 s
120 s
DOS 3
CW50
120 s
DOS 3
HW
120 s
DOS 3
HW
HW
DOS 3
120 s
1800 s
120 °C
60 s
75 °C
60 s
120 s
DOS 3
3
Main
Washing
wash
HW
85 °C
DOS 1
180 s
Main
Washing
wash 2
Main
Washing
wash
HW
HW
85 °C
DOS 1
65 °C
DOS 1
180 s
180 s
55 °C
CW50
DOS 1
HW
65 °C
DOS 4
DOS 1
HW
180 s
70 °C
DOS 1
180 s
HW
45 °C
DOS 4
DOS 1
120 s
60 s
CW50
600 s
93 °C
DOS 1
Washing
Pre-wash
Function
CW50
60 s
CW50
60 s
Button
Phase
REV.0.01_COD.650138_A4
Programme
Organic
Plastics
Pipettes
Oil
Disin 93/10
Page 36
Page 37

PROGRAMMES
Drying
*)
Drying
1800 s
120 °C
Washing
Washing
Final rinse
2
rinse
Interim
1
rinse
Washing
Washing
Washing
Interim
ation
Neutralis
3
Main wash
HW
10 s
Washing
Washing
Washing
Phase
Main
wash 2
Main
wash
Pre-
wash
Function
Drain pump/valve is activated without the circulation pump.
HW
DOS 1
10 s
CW
120 s
DI
120 s
Button
Programme
Cold water
rinse
AD
rinse
Drying
Drain
Fill DOS1
REV.0.01_COD.650138_A4
Page 37
Page 38

PROGRAMMES
Drying
Washing
Washing
Washing
Washing
Drying
Final rinse
2
rinse
Interim
1
rinse
Interim
tion
Neutralisa
*)
HW
10 s
HW
10 s
HW
10 s
Main
Washing
Washing
wash 3
Main
wash 2
Washing
Washing
Main wash
Pre-
wash
HW
10 s
DOS 2
Function
Button
HW
DOS 3
10 s
HW
DOS 4
10 s
Phase
REV.0.01_COD.650138_A4
Programme
Fill DOS2
Fill DOS3
Fill DOS4
CW = Cold water
HW = Hot water
DI = (Ultra)pure water, demineralised water (DI)
CWxx = CW proportion in mixed water (CW + HW) as percentage (CW50 = 50 % CW + 50 % HW)
HWxx = HW proportion in mixed water (HW + DI) as percentage (HW50 = 50 % HW + 50 % DI)
DIxx = DI proportion in mixed water (DI + CW) as percentage (DI50 = 50 % DI + 50 % CW)
DOS 1 = Cleaning agent
DOS 2 = Additional liquid agent
DOS 3 = Neutralising agent
DOS 4 = Additional liquid agent (e.g. emulsifier, defoamer, etc.)
s = Holding time in s
*) Drying plus 120 s cooling down time
Page 38
Page 39

8.3 Starting the programme
To start, proceed as follows:
Select a programme.
Press the START button.
PROGRAMMES
REV.0.01_COD.650138_A4
Page 39
Page 40

MACHINE STATUS
9. MACHINE STATUS
9.1 Ready for operation
The machine is ready for operation. The diagnostics are active.
9.2 Programme
When the machine is ready for operation and the door is closed, it is possible to press the
START button.
The programme performs a defined series of phases. The diagnostics and regulators are active.
The user interface provides information on the phase in progress and the temperature in the
chamber.
The display indicates if the door is open and issues warning messages, e.g. lack of salt.
9.3 Malfunctioning
The diagnostics function has detected a fault which causes the programme to be cancelled. The
door remains locked.
The fault is indicated via the display. The machine can be made ready for use again using the
reset function (see “Reset”).
REV.0.01_COD.650138_A4
Page 40
Page 41

9.4 Power failure
In the event of a brief power failure while a programme is running, the current wash phase is
repeated and the programme continued.
9.5 Reset
In the event of a malfunction while a programme is running, the door remains closed and locked.
To acknowledge an error message, proceed as follows:
1. Press STOP and START together and hold for 5 seconds.
2. The display indicates the button combination.
3. Press the P2 button followed by the P1 button.
4. The reset is complete. The machine is once again ready for use and the door can be
opened.
Note:
If the fault persists, e.g. due to a defective component, the machine will remain locked.
If this is the case, contact the Miele Customer Service Department or an authorised service
technician.
MACHINE STATUS
REV.0.01_COD.650138_A4
Page 41
Page 42

MENU
10. MENU
The menu incorporates all administrative processes and settings.
Access to other sections of the menu is password-protected. The user password will be provided
during commissioning by the Miele Customer Service Department or an authorised service
technician.
Access to programming and the menu are protected by different passwords:
First level: The user (USER) and supervisor (ADMIN) password provides access to
programmes and time settings.
Second level: The technician (SERVICE) password allows unhindered access to all menus
and machine settings.
If the password is lost, contact the Miele Customer Service Department or an authorised service
technician.
10.1 Accessing the menu
To enter the menu, hold the PRG button for 5 seconds.
Press P1 and P2 to scroll through the menu.
Press START to confirm selection.
Press STOP to exit the menu and return to “Ready for use” or “Malfunction” mode.
Main menu
Standard programmes
View and copy programmes.
Customer programmes
Create new customer programmes.
Programme selection
Activate and deactivate programmes.
Settings
Access programming.
REV.0.01_COD.650138_A4
Page 42
Page 43

10.2 Parameter settings
Access to the programming mode is password-protected.
To select parameters, proceed as follows:
When setting parameters, a password will be requested, which is inserted using the
P1 and P2 buttons. If an incorrect password is entered, the menu is closed
immediately.
You can scroll through the parameters using the P1 and P2 buttons.
Press START to change a parameter.
Use the P1 and P2 buttons to increase or decrease the various parameter values.
To exit the programming mode, press the STOP button for 5 seconds.
10.3 Parameter list
MENU
CATEGORY
DESCRIPTION
MIN.
UDM
MAX.
SECTION
PARAMETER
SYSTEM DATA
MACHINE 1 01 User name (16 characters) ‚ ~ CHAR_STR
Graphic printout at the end of a
PRINTOUT 1 04
PRINTOUT 1 05
KEYBOARD 1 07
KEYBOARD 1 08
KEYBOARD 1 09
KEYBOARD 1 13 Show A0 value in display; 0=OFF 1=ON 0 1 SEL
programme
(0: no printout, 1: graphic printout 2: table
printout, 3: printout on USB)
Printout results of current programme;
0=OFF 1=ON
Buzzer volume – infeed side
(0=buzzer OFF)
Buzzer volume – end of programme (infeed
side)
Buzzer alarm volume – infeed side
(0=buzzer OFF)
0 3 NUM
0 1 SEL
0 50 NUM
0 50 NUM
0 50 NUM
MACHINE DATA
KEYBOARD
KEYBOARD
2 04
2 07
Select language 0=OFF 1=ON 0 7 SEL
Font types (0=European,
1=European+Japanese,
2=European+Cyrillic)
0 2 NUM
REV.0.01_COD.650138_A4
Page 43
Page 44

CLOCK
11. CLOCK
The controls have a real-time clock.
Times are saved to historical data.
12. BUZZER
The buzzer sounds when a button is pressed. In the event of a serious fault, a continuous tone will
sound depending on the settings for parameters P1.7, P1.8 and P1.9. The volume can be set
using the parameters.
13. HISTORICAL DATA (BATCH PROTOCOLS)
During a programme, operating data is recorded.
The internal memory is able to save up to 200 programmes. If the memory is full, the oldest data is
overwritten.
13.1 Outputting batch protocols retrospectively
Internally stored protocols can be output retrospectively from the machine.
The following options are available for documentation:
To open the menu, press and hold the PRG button for 5 seconds.
Scroll through the menu using the P1 and P2 buttons and select “History”.
Confirm your selection by pressing the START button.
Select the “Print” option using the P1 and P2 buttons and start the printout by
pressing the START button. “Printing in progress” is shown on the display.
Press the STOP button to cancel the printout. The menu will be exited.
External software
Data can be retrieved directly via the documentation software.
REV.0.01_COD.650138_A4
Page 44
Page 45

A
A
WARNINGS AND EVENTS LIST
14. WARNINGS AND EVENTS LIST
Messages and warnings may appear on the display during operation.
A warning remains on display until the underlying cause is dealt with. A warning interrupts the
current programme.
14.1 Warnings list
Warning Display message Description
1 power fail Power failure during programme
2 open load. door
4 load.door fail. Loading door locked but open.
7 unblock.door 1 Door fault.
9 unlocking 1fail. Door release timeout
11 no cold water Cold water impulse reading from flow meter
12 no hot water Cold water impulse reading from flow meter – timeout
13 no demin. water Cold water impulse reading from flow meter – timeout
14 no c.+hot water Cold and hot water level – timeout
15 no c.+demi water Cold and DI water level – timeout
16 no h.+demi water Hot and DI water level – timeout
17 no chemical 1 Lack of process chemicals (DOS1)
18 no chemical 2 Lack of process chemicals (DOS2)
19 no chemical 3 Lack of process chemicals (DOS3)
20 no chemical 4 Lack of process chemicals (DOS4)
21 heating element1 Fault with heating element 1
23 drain problem Minimum tank level during draining – timeout
24 fan problem Fan switch ON, pressure switch open
25 drying min°C
26 prewash max°C
27 tank probe lim°C
28 dryingprobelim°C
29 boilerprobelim°C
30 tank probe Chamber temperature sensor 1 fault
31 tank probe 2 Chamber temperature sensor 2 fault
32 drying probe Drying temperature probe fault
33 boiler probe Boiler temperature probe fault
Loading door open and/or unlocked during a
programme.
ir temperature does not reach the specified value
during drying.
Tank temperature exceeds specified value during prewash.
Chamber temperature exceeds 102 °C. (= max. setting
95 °C + safety level 7 °C)
(Tank heating switch or tank sensor defective)
ir temperature exceeds 162 °C. (= max. setting
150 °C + safety level 12 °C)
(Drying heating switch or air sensor defective)
Tank 1 temperature exceeds 100 °C. (= max.
setting 80 °C + safety level 20 °C)
(Tank 1 heating switch or tank 1 sensor defective)
REV.0.01_COD.650138_A4
Page 45
Page 46

WARNINGS AND EVENTS LIST
A
V
Warning Display message Description
34 check temp.
35 Serial connect.1
36 Serial connect.2
37 CANserialconnec. No connection between master and slave (CANbus).
39 no tank heating
40 no boilerheating Problem with boiler heating.
41 no boilerheating Problem with boiler heating.
42 magnetothermic Steam heating fault
43 Phase sequence Phase sequence is incorrect.
44 levels steamcond Steam condenser fault
45 pump steam cond. Min. and max. level active drain pump fault.
46 pump
47 flowmeter fail.1 DOS1 dispenser fault
48 flowmeter fail.2 DOS2 dispenser fault
49 flowmeter fail.3 DOS3 dispenser fault
50 flowmeter fail.4 DOS4 dispenser fault
51 flow.cold water Water intake fault (cold water).
52 flow.warm water Water intake fault (hot water).
53 flow.demi water Water intake fault (demineralised water).
54 airfilter obstr.
55 conduc. probe Conductivity sensor fault.
56 conductivity Conductivity exceeds maximum threshold.
58 no tank heating No temperature increase during allocated time.
59 no boilerheating No temperature increase during allocated time.
60 TIME Maximum time exceeded in main wash phase
72 DRYING
73 DRYING
74 boilerprobelim°C The boiler temperature is too high.
75 boiler probe Boiler probe 2 defective
76 BOILER
77 BOILER
78 BOILER
Temperature difference between the two sensors is
greater than 1 °C.
No connection between main PCB and loading
controller
No connection between the expansion board and the
keyboard (unloading side).
No heating in wash chamber. No temperature increase
during allocated time.
Circulation pump on; pressure switch closed.
Circulation pump is rotating in the wrong direction.
ir filter is obstructed. Change the air filter.
acuum switch defective. No compressed air available
(check compressed air supply).
Exhaust air pressure: fault when opening or closing
exhaust air valve.
Exhaust air pressure: exhaust air limit switch (open and
close both active at the same time).
The max. level on tank 3 is active and the min. level is
inactive.
The max. level on tank 1 is active and the min. level is
inactive.
The max. level on tank 2 is active and the min. level is
inactive.
REV.0.01_COD.650138_A4
Page 46
Page 47

A
14.2 List of display messages
WARNINGS AND EVENTS LIST
Display
Description
message
press start Programme can be started.
no chemical 1
no chemical 2
no chemical 3
no chemical 4 Lack of product in DOS 4.
salt loading Refill the dishwasher salt container.
pump steam
cond.
pressure probe Wash pump pressure monitoring fault
Lack of product in DOS 1.
Lack of product in DOS 2.
Lack of product in DOS 3.
Steam condenser activated for a specified time to bring the amount of condensate
below the max. level.
- open door - Door is open and not locked.
wait General reminder to wait before next input.
close door! Close the door.
ON PRINT
NO DISINFECTION
ppears when an attempt is made to start a programme with the START button
during printing.
Programme interrupted. Load not disinfected.
REV.0.01_COD.650138_A4
Page 47
Page 48

USB PORT (OPTIONAL)
15. USB PORT (OPTIONAL)
Testing and transmission point for the Miele Customer Service Department.
REV.0.01_COD.650138_A4
Page 48
Page 49

PROCESS DOCUMENTATION
16. PROCESS DOCUMENTATION
16.1 Serial interface
The RS232 interface is intended for connecting devices such as a PC or printer as per the RS232
standard protocol, in accordance with EN/IEC 60950.
Printers are connected as described below:
Interface: RS232
Baud rate: 2400 bps
Data length: 8 bits/chr
Parity: None
Handshake: XON/XOFF 40 COLUMNS
The format of the protocol is as follows:
Information on
programme phases.
Number of samples
16.2 User administration
Several user profiles can be created and managed in the controls. For further information, please
contact the Miele Customer Service Department or an authorised service technician.
Information on
programme
phases.
Data value.
Sing.samp.time
16.3 USB port
Testing and transmission point for the Miele Customer Service Department.
REV.0.01_COD.650138_A4
Page 49
Page 50

MAINTENANCE
17. MAINTENANCE
17.1 General recommendations on maintenance
Maintenance for the machine described in this manual can be divided into routine maintenance
and special maintenance.
Machine status
The machine must be completely switched off. The person performing the task must ensure that
the safety of others in the vicinity is not compromised.
Safety systems
The machine should only be operated in compliance with valid standards and regulations relating
to the use of disinfectants (cf. data sheets for individual products). Rules relating to contact with
machine parts potentially contaminated with pathogens also apply. Personal protective gear must
be worn.
Procedure
If possible, run a disinfection programme for the wash chamber. Open the wash chamber door
and wipe with a suitable disinfectant.
Wipe all internal parts as well as any baskets and their contents.
Leave the disinfectant to act for the required amount of time (see the product data sheet or safety
data sheet for the disinfectant in question).
When performing maintenance on parts of the machine which have not been reached by the
disinfectant, take appropriate precautions and use suitable safety gear.
Decontamination procedures
Before making repairs or replacing mechanical parts (e.g. drain pump, heating elements, etc.) in
cases where disinfection has not been completed, the disinfection procedure must first be carried
out in order to eliminate any pathogenic residues.
REV.0.01_COD.650138_A4
Page 50
Page 51

17.2 Maintenance reminder
The machine displays the “Maintenance” reminder after a specified time or after a specified
number of operating hours. This warning does not affect the normal use of the machine.
17.3 Routine maintenance
Routine maintenance includes all work aimed at keeping various parts of the machine clean and
functional. Such work must be performed on a regular basis or when it is considered necessary.
Since these are simple cleaning tasks, they are normally performed by the machine operators at
their own risk. The following table shows the various routine maintenance tasks, their frequency
and who is to perform them.
Each task is described in more detail on the following pages.
17.4 Table of routine maintenance tasks
CLEANING AND MAINTENANCE WORK
MAINTENANCE
FREQUENCY TASK PERSON
RESPONSIBLE
DAILY – Clean the filters in the wash chamber.
User
– Check the fill level of the containers on a
regular basis, at least once a day.
WEEKLY – Check that the spray arms can rotate freely.
User
Open caps and rinse inside the spray arms.
Check and clean nozzles.
Note:
Routine maintenance tasks must be performed at the intervals specified in the table and in
accordance with the daily checklists.
However, we recommend performing work as and when needed and not to wait until the next
scheduled maintenance.
CAUTION
Never clean the machine or near vicinity with a water hose or a pressure washer.
REV.0.01_COD.650138_A4
Page 51
Page 52

MAINTENANCE
Responsible
person: User
PROCEDURE:
Use a damp cloth to clean the machine casing. Use only pH-neutral detergents. Do not
use abrasive detergents, solvents and/or thinners.
CLEANING THE CONTROL PANEL:
Clean the control panel with a damp cloth and washing-up liquid. Do not use abrasive
detergents, solvents and/or thinners.
Responsible
person: User
PROCEDURE:
The machine must always be empty when descaling is carried out. Add 50 ml of
descaling agent directly to the wash chamber. Start a cleaning programme and allow to
run until completion.
CLEANING THE MACHINE CASING
Frequency: Daily
DESCALING
Only required for machines without an internal water softener.
Frequency: Weekly; daily with high water consumption or hard
water.
REV.0.01_COD.650138_A4
Page 52
Page 53

MAINTENANCE
CLEANING FILTERS IN THE WASH CHAMBER
Responsible
person: User
PROCEDURE: Clean the drain filters in the chamber as follows:
Open the wash chamber door and remove the filter insert.
Frequency: Daily
Attention:
Hot surfaces
Remove the filter combination from the wash chamber.
Unscrew the threaded pin and remove the filter basket cover.
Clean the drain filter insert. Remove residues.
Remove any deposits from the wash chamber drain and clean.
REV.0.01_COD.650138_A4
Page 53
Page 54

MAINTENANCE
Replace the clean filter.
Replace the cover. Secure with the threaded pin.
Replace the filter combination.
CLEANING THE THERMOSTAT PROBE IN THE WASH
CHAMBER
Responsible
person: User
PROCEDURE: Clean the thermostat probe in the chamber as follows:
Open the wash chamber door and remove the filter insert.
Frequency: Every 6 months
Visually check the thermostat probe in the chamber.
If there are incrustations, clean the thermostat probe using a damp cloth and an appropriate
detergent.
Take care not to damage or move the probe.
REV.0.01_COD.650138_A4
Page 54
Page 55

MAINTENANCE
CLEANING THE SPRAY ARMS
Responsible
Frequency: Every week
person: User
PROCEDURE: Clean the spray arms as follows:
Open the wash chamber door and remove the filter insert.
Attention:
Hot surfaces
Unscrew the fastening pins of the two spray arms and remove the spray arms.
Unscrew the seal on the rear of the nozzle and remove it.
Remove any incrustations from the washing nozzle and clean using an appropriate cleaning
agent.
Replace the end caps.
Make sure the seal is properly positioned and in good condition. Exchange it if necessary.
Refit the spray arms.
Secure with the fastening pins.
REV.0.01_COD.650138_A4
Page 55
Page 56

MAINTENANCE
17.5 Drying air filtration
The machines are equipped with an air filter (class 5) in accordance with EN 779 as well as a
HEPA H14 filter in accordance with EN 1822 as standard. The filters will be replaced during
maintenance by a Miele service technician.
17.6 Special maintenance
Special maintenance work should only be performed by qualified, skilled personnel.
If your machine requires special maintenance to resolve a fault, please contact the Miele
Customer Service Department.
Table of special maintenance work
CLEANING AND CHECKING OPERATIONS
FREQUENCY
Special
maintenance tasks
must be carried out
by the Miele
Customer Service
Department after
1000 operating
hours or every 12
months at the
latest.
ACTION
Filters in valves: Check, clean and replace as
necessary.
Change the pre-filter.
Change the HEPA filter.
Maintenance of dispensing systems.
Check the temperature sensor.
Safety thermostat: check the sensor.
Solenoid valves: check for leaks.
Drain pump: check for leaks.
Check the pressure switches.
Check piping and seals.
OPERATOR
SERVICE
REV.0.01_COD.650138_A4
Page 56
Page 57

PROBLEMS – CAUSES – REMEDY
18. PROBLEMS – CAUSES – REMEDY
18.1 Introduction
This chapter includes possible problems which may occur during machine operation, along with
their causes and solutions.
If the problems persist or become a more regular occurrence even after having carried out the
instructions in this chapter, please contact the Miele Customer Service Department.
18.2 Problem (P) – Cause (C) – Remedy (R)
P. MACHINE DOES NOT START:
C. Circuit breaker deactivated.
R. Check the power supply.
P. WASH PROGRAMME DOES NOT START:
C. Door not closed correctly.
R. Check door closure.
C. Lack of process chemicals.
R. Replace the chemical container and select “Fill DOSx”.
P: MACHINE DOES NOT REACH SET TEMPERATURE FOR THE SELECTED PROGRAMME:
C. Deposits on thermostat probe in wash chamber.
R. Clean the thermostat probe in the wash chamber as described under “Maintenance”.
P. MACHINE DOES NOT PROPERLY RUN WASH PROGRAMME:
C. Nozzles are clogged by deposits or limescale.
R. Clean the nozzles or spray arms as described under “Maintenance”.
C. Lack of water.
R. Ensure sufficient water pressure and remove blockages.
C. Insufficient water supply for the relevant programme.
R. Shut off the water supply and clean the inlet filters (SERVICE).
P. INCORRECT DISPENSING:
C. Chemical dispenser pump is not working properly.
R. Perform routine maintenance and contact the Miele Customer Service Department or an
authorised and trained service technician.
P: MACHINE DOES NOT DRY:
C. Air filter of drying system is dirty or clogged.
R. Contact the Miele Customer Service Department to replace the filter.
C. The fan of the drying system does not work.
R. Contact the Miele Customer Service Department or an authorised and trained service
technician.
REV.0.01_COD.650138_A4
Page 57
Page 58

DISPOSING OF YOUR OLD MACHINE
19. DISPOSING OF YOUR OLD MACHINE
Please note that the machine may contain contamination from blood and other bodily fluids,
pathogens, facultative pathogens, genetically modified material, toxic or carcinogenic substances,
heavy metals, etc., and must be decontaminated before disposal.
For environmental and safety reasons, dispose of all process chemical residues in accordance
with safety regulations. Wear gloves and protective goggles.
Make the door lock inoperable, so that children cannot accidentally shut themselves in the
machine. Then make appropriate arrangements for safe disposal of the machine.
Old electrical and electronic appliances often contain valuable materials. However, they also
contain harmful substances which were essential for their correct functioning and safety. These
could be hazardous to human health and to the environment if disposed of with general waste or if
handled incorrectly. Please do not, therefore, dispose of your old appliance with general waste.
Make use of local waste collection/recycling centres for electrical and electronic devices. Consult
your dealer if necessary. National legislation may require the deletion of personal data saved on
the machine before disposal. Please ensure that your old appliance poses no risk to children while
being stored prior to disposal.
REV.0.01_COD.650138_A4
Page 58
Page 59

Page 60

United Kingdom
Miele Co. Ltd.
Fairacres, Marcham Road
Abingdon, Oxon, OX14 1TW
Professional Sales, Tel: 0845 365 6608
E-mail: professional@miele.co.uk
Internet: www.miele.co.uk/professional
Australia
Miele Australia Pty. Ltd.
ACN 005 635 398
ABN 96 005 635 398
1 Gilbert Park Drive, Knoxfield, VIC 3180
Tel: 1300 731 411
Internet: www.miele-professional.com.au
E-mail: info@miele-professional.com.au
China
Miele (Shanghai) Trading Ltd.
1-3 Floor, No. 82 Shi Men Yi Road
Jing' an District, 200040 Shanghai, PRC
Tel: +86 21 6157 3500, Fax: +86 21 6157 3511
E-mail: info@miele.cn, Internet: www.miele.cn
Miele (Hong Kong) Limited
41/F - 4101, Manhattan Place
23 Wang Tai Road
Kowloon Bay, Hong Kong
Tel: (852) 2610 1025, Fax: (852) 3579 1404
Email: customerservices@miele.com.hk
Website: www.miele.hk
India
Miele India Pvt. Ltd.
Ground Floor, Copia Corporate Suites
Plot No. 9, Jasola
New Delhi – 110025
Tel: 011-46 900 000, Fax: 011-46 900 001
E-mail: customercare@miele.in,
Internet: www.miele.in
Ireland
Miele Ireland Ltd.
2024 Bianconi Avenue
Citywest Business Campus, Dublin 24
Tel: (01) 461 07 10, Fax: (01) 461 07 97
E-Mail: info@miele.ie, Internet: www.miele.ie
Manufacturer: Steelco S.p.A.
Via Balegante, 27 31039 Riese Pio X (TV) - Italy
Malaysia
Miele Sdn Bhd
Suite 12-2, Level 12
Menara Sapura Kencana Petroleum
Solaris Dutamas No. 1, Jalan Dutamas 1
50480 Kuala Lumpur, Malaysia
Phone: +603-6209-0288
Fax: +603-6205-3768
New Zealand
Miele New Zealand Limited
IRD 98 463 631
Level 2, 10 College Hill
Freemans Bay, Auckland 1011, NZ
Tel: 0800 464 353
Internet: www.miele-professional.com.au
E-mail: info@miele-professional.com.au
Singapore
Miele Pte. Ltd.
163 Penang Road
# 04 - 03 Winsland House II
Singapore 238463
Tel: +65 6735 1191, Fax: +65 6735 1161
E-Mail: info@miele.com.sg
Internet: www.miele.sg
South Africa
Miele (Pty) Ltd
63 Peter Place, Bryanston 2194
P.O. Box 69434, Bryanston 2021
Tel: (011) 875 9000, Fax: (011) 875 9035
E-mail: info@miele.co.za
Internet: www.miele.co.za
United Arab Emirates
Miele Appliances Ltd.
Gold & Diamond Park
Office No. 6-217, Sheikh Zayed Road
P.O. Box 11 47 82 – Dubai
Tel. +971 4 3044 999,
Fax. +971 4 3418 852 800-MIELE (64353)
E-Mail: info@miele.ae, Website: www.miele.ae
All rights reserved/Creation date: 2019-08-26
 Loading...