Miele PG 8583 CD Operating instructions

0 (0)

Operating Instructions

Laboratory Glassware Washer for

Laboratory Glassware and Utensils

PG 8583 CD

To prevent accidents and machine dam-

en - US

age, read these instructions before in-

stallation or use.


M.-Nr. 10 607 862

2


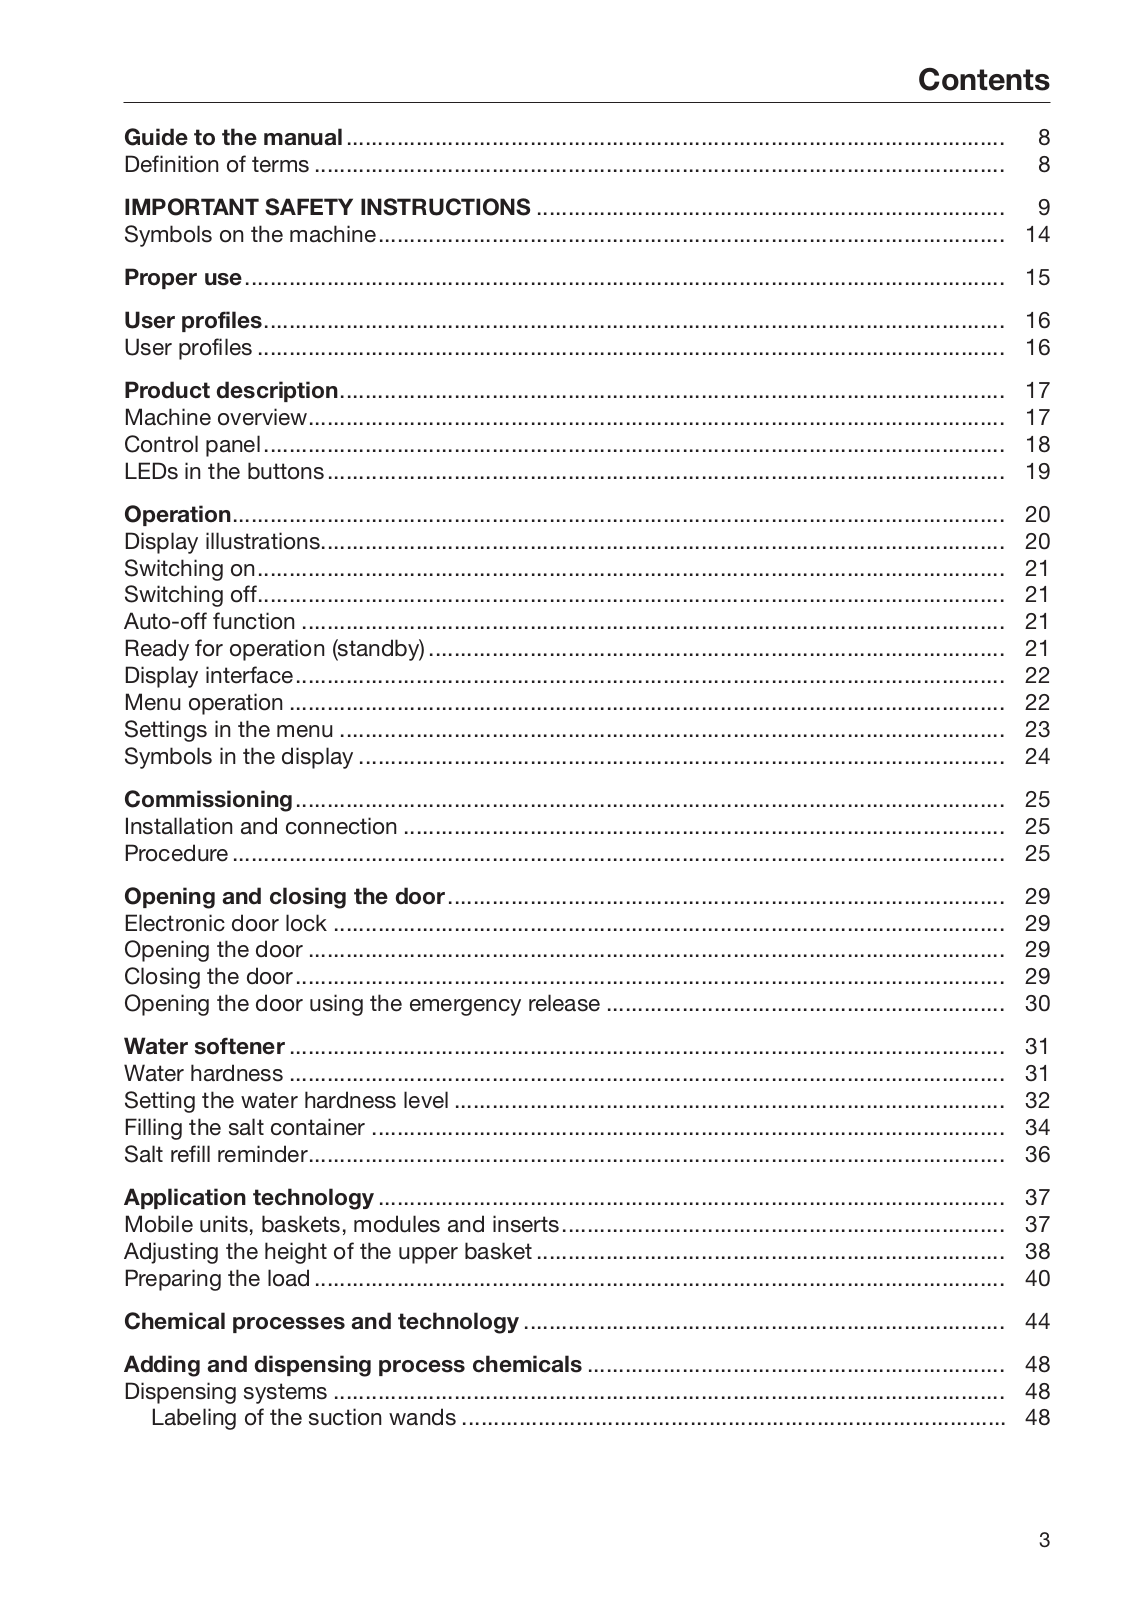
Contents

Guide to the manual ........................................................................................................

8

Definition of terms .............................................................................................................

8

IMPORTANT SAFETY INSTRUCTIONS ..........................................................................

9

Symbols on the machine...................................................................................................

14

Proper use........................................................................................................................

15

User profiles.....................................................................................................................

16

User profiles ......................................................................................................................

16

Product description.........................................................................................................

17

Machine overview..............................................................................................................

17

Control panel.....................................................................................................................

18

LEDs in the buttons...........................................................................................................

19

Operation..........................................................................................................................

20

Display illustrations............................................................................................................

20

Switching on......................................................................................................................

21

Switching off......................................................................................................................

21

Auto-off function ...............................................................................................................

21

Ready for operation (standby) ...........................................................................................

21

Display interface................................................................................................................

22

Menu operation .................................................................................................................

22

Settings in the menu .........................................................................................................

23

Symbols in the display ......................................................................................................

24

Commissioning................................................................................................................

25

Installation and connection ...............................................................................................

25

Procedure ..........................................................................................................................

25

Opening and closing the door........................................................................................

29

Electronic door lock ..........................................................................................................

29

Opening the door ..............................................................................................................

29

Closing the door................................................................................................................

29

Opening the door using the emergency release ...............................................................

30

Water softener .................................................................................................................

31

Water hardness .................................................................................................................

31

Setting the water hardness level .......................................................................................

32

Filling the salt container ....................................................................................................

34

Salt refill reminder..............................................................................................................

36

Application technology ...................................................................................................

37

Mobile units, baskets, modules and inserts......................................................................

37

Adjusting the height of the upper basket ..........................................................................

38

Preparing the load .............................................................................................................

40

Chemical processes and technology ............................................................................

44

Adding and dispensing process chemicals ..................................................................

48

Dispensing systems ..........................................................................................................

48

Labeling of the suction wands ......................................................................................

48

3

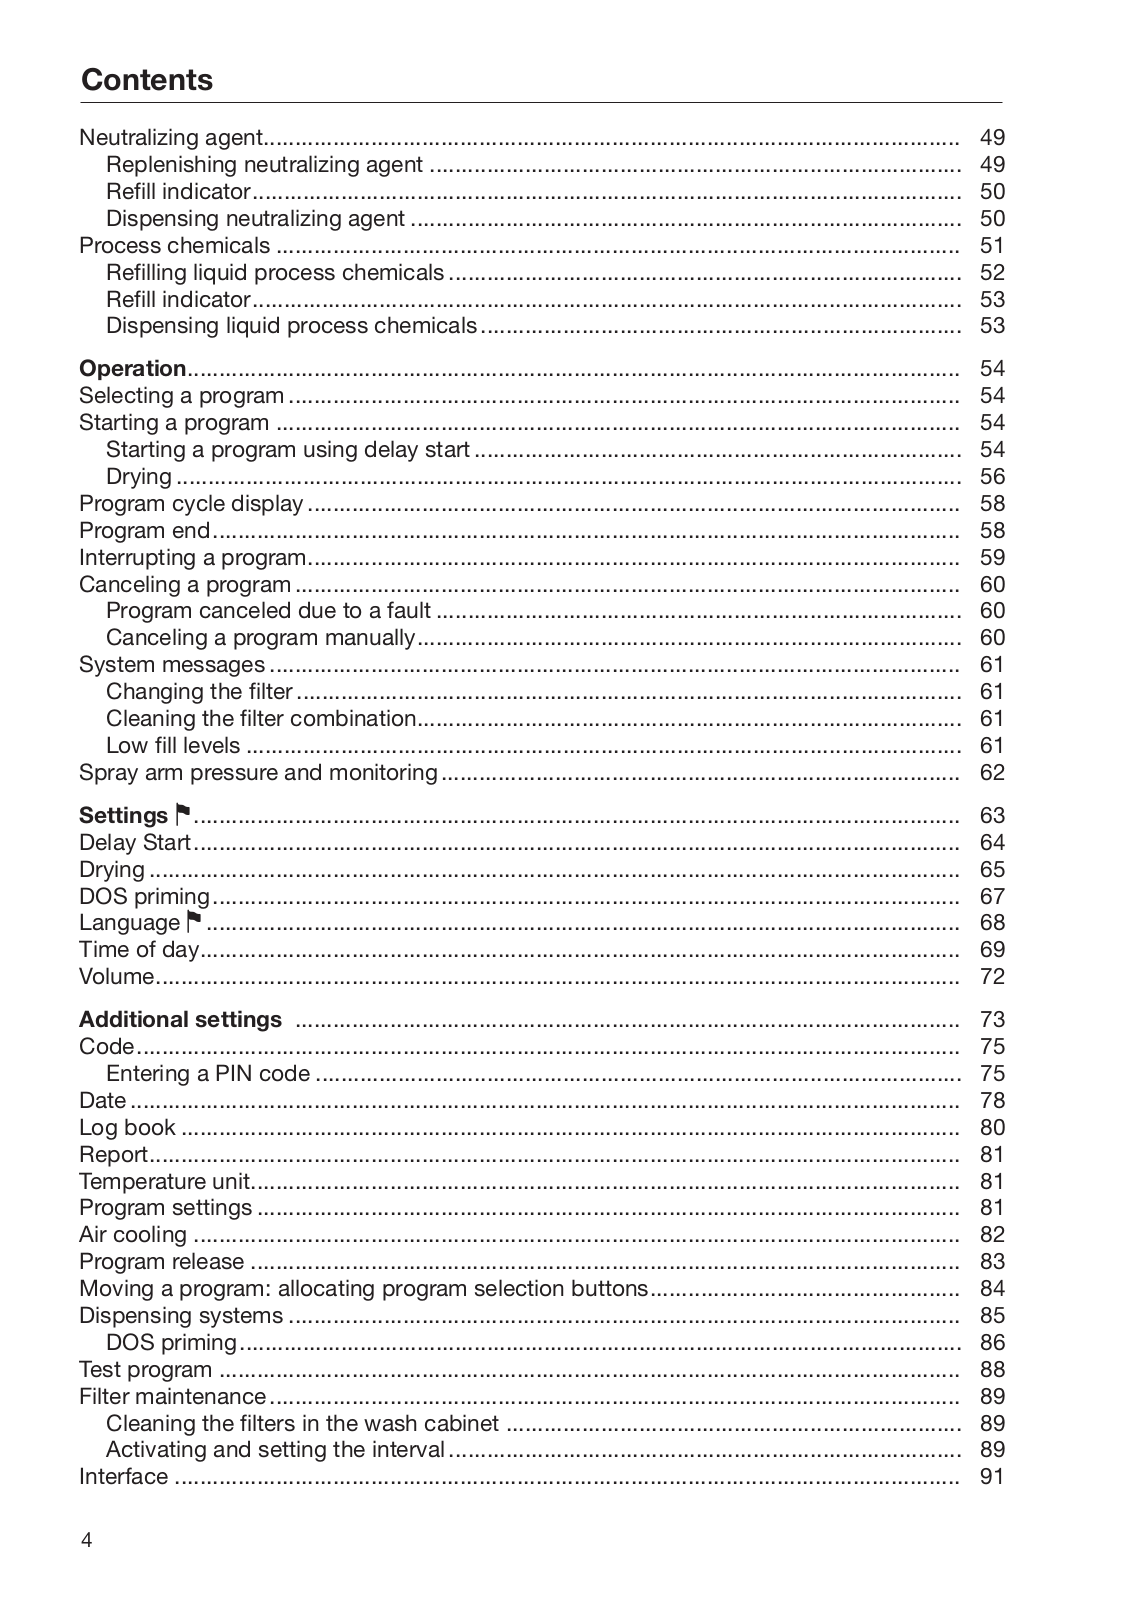
Contents


Neutralizing agent..............................................................................................................

49

Replenishing neutralizing agent ....................................................................................

49

Refill indicator................................................................................................................

50

Dispensing neutralizing agent .......................................................................................

50

Process chemicals ............................................................................................................

51

Refilling liquid process chemicals .................................................................................

52

Refill indicator................................................................................................................

53

Dispensing liquid process chemicals ............................................................................

53

Operation..........................................................................................................................

54

Selecting a program ..........................................................................................................

54

Starting a program ............................................................................................................

54

Starting a program using delay start .............................................................................

54

Drying ............................................................................................................................

56

Program cycle display .......................................................................................................

58

Program end......................................................................................................................

58

Interrupting a program.......................................................................................................

59

Canceling a program .........................................................................................................

60

Program canceled due to a fault ...................................................................................

60

Canceling a program manually......................................................................................

60

System messages .............................................................................................................

61

Changing the filter .........................................................................................................

61

Cleaning the filter combination......................................................................................

61

Low fill levels .................................................................................................................

61

Spray arm pressure and monitoring ..................................................................................

62

Settings .........................................................................................................................

63

Delay Start.........................................................................................................................

64

Drying ................................................................................................................................

65

DOS priming......................................................................................................................

67

Language .......................................................................................................................

68

Time of day........................................................................................................................

69

Volume...............................................................................................................................

72

Additional settings .........................................................................................................

73

Code..................................................................................................................................

75

Entering a PIN code ......................................................................................................

75

Date ...................................................................................................................................

78

Log book ...........................................................................................................................

80

Report................................................................................................................................

81

Temperature unit................................................................................................................

81

Program settings ...............................................................................................................

81

Air cooling .........................................................................................................................

82

Program release ................................................................................................................

83

Moving a program: allocating program selection buttons.................................................

84

Dispensing systems ..........................................................................................................

85

DOS priming..................................................................................................................

86

Test program .....................................................................................................................

88

Filter maintenance .............................................................................................................

89

Cleaning the filters in the wash cabinet ........................................................................

89

Activating and setting the interval .................................................................................

89

Interface ............................................................................................................................

91

4


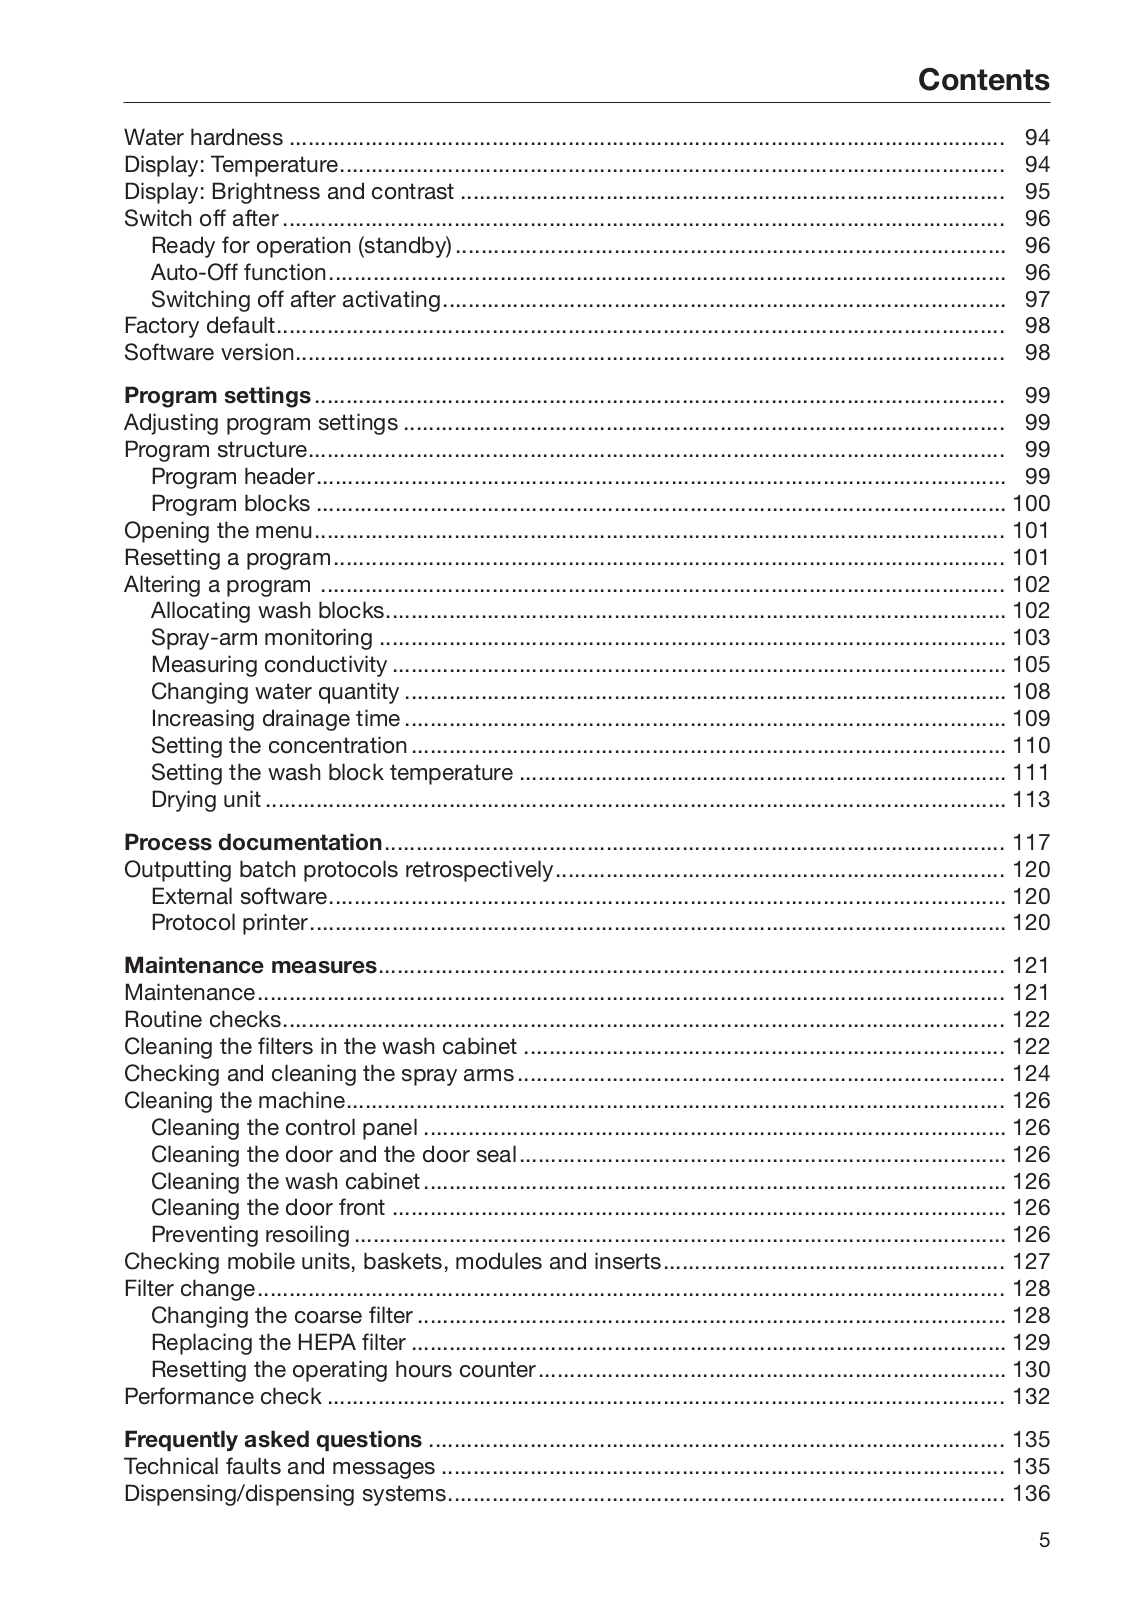
Contents

Water hardness .................................................................................................................

94

Display: Temperature.........................................................................................................

94

Display: Brightness and contrast ......................................................................................

95

Switch off after ..................................................................................................................

96

Ready for operation (standby) .......................................................................................

96

Auto-Off function...........................................................................................................

96

Switching off after activating.........................................................................................

97

Factory default...................................................................................................................

98

Software version................................................................................................................

98

Program settings .............................................................................................................

99

Adjusting program settings ...............................................................................................

99

Program structure..............................................................................................................

99

Program header.............................................................................................................

99

Program blocks .............................................................................................................

100

Opening the menu.............................................................................................................

101

Resetting a program..........................................................................................................

101

Altering a program ............................................................................................................

102

Allocating wash blocks..................................................................................................

102

Spray-arm monitoring ...................................................................................................

103

Measuring conductivity .................................................................................................

105

Changing water quantity ...............................................................................................

108

Increasing drainage time ...............................................................................................

109

Setting the concentration ..............................................................................................

110

Setting the wash block temperature .............................................................................

111

Drying unit .....................................................................................................................

113

Process documentation..................................................................................................

117

Outputting batch protocols retrospectively.......................................................................

120

External software...........................................................................................................

120

Protocol printer..............................................................................................................

120

Maintenance measures...................................................................................................

121

Maintenance......................................................................................................................

121

Routine checks..................................................................................................................

122

Cleaning the filters in the wash cabinet ............................................................................

122

Checking and cleaning the spray arms .............................................................................

124

Cleaning the machine........................................................................................................

126

Cleaning the control panel ............................................................................................

126

Cleaning the door and the door seal.............................................................................

126

Cleaning the wash cabinet ............................................................................................

126

Cleaning the door front .................................................................................................

126

Preventing resoiling .......................................................................................................

126

Checking mobile units, baskets, modules and inserts......................................................

127

Filter change......................................................................................................................

128

Changing the coarse filter .............................................................................................

128

Replacing the HEPA filter ..............................................................................................

129

Resetting the operating hours counter..........................................................................

130

Performance check ...........................................................................................................

132

Frequently asked questions ...........................................................................................

135

Technical faults and messages .........................................................................................

135

Dispensing/dispensing systems........................................................................................

136

5

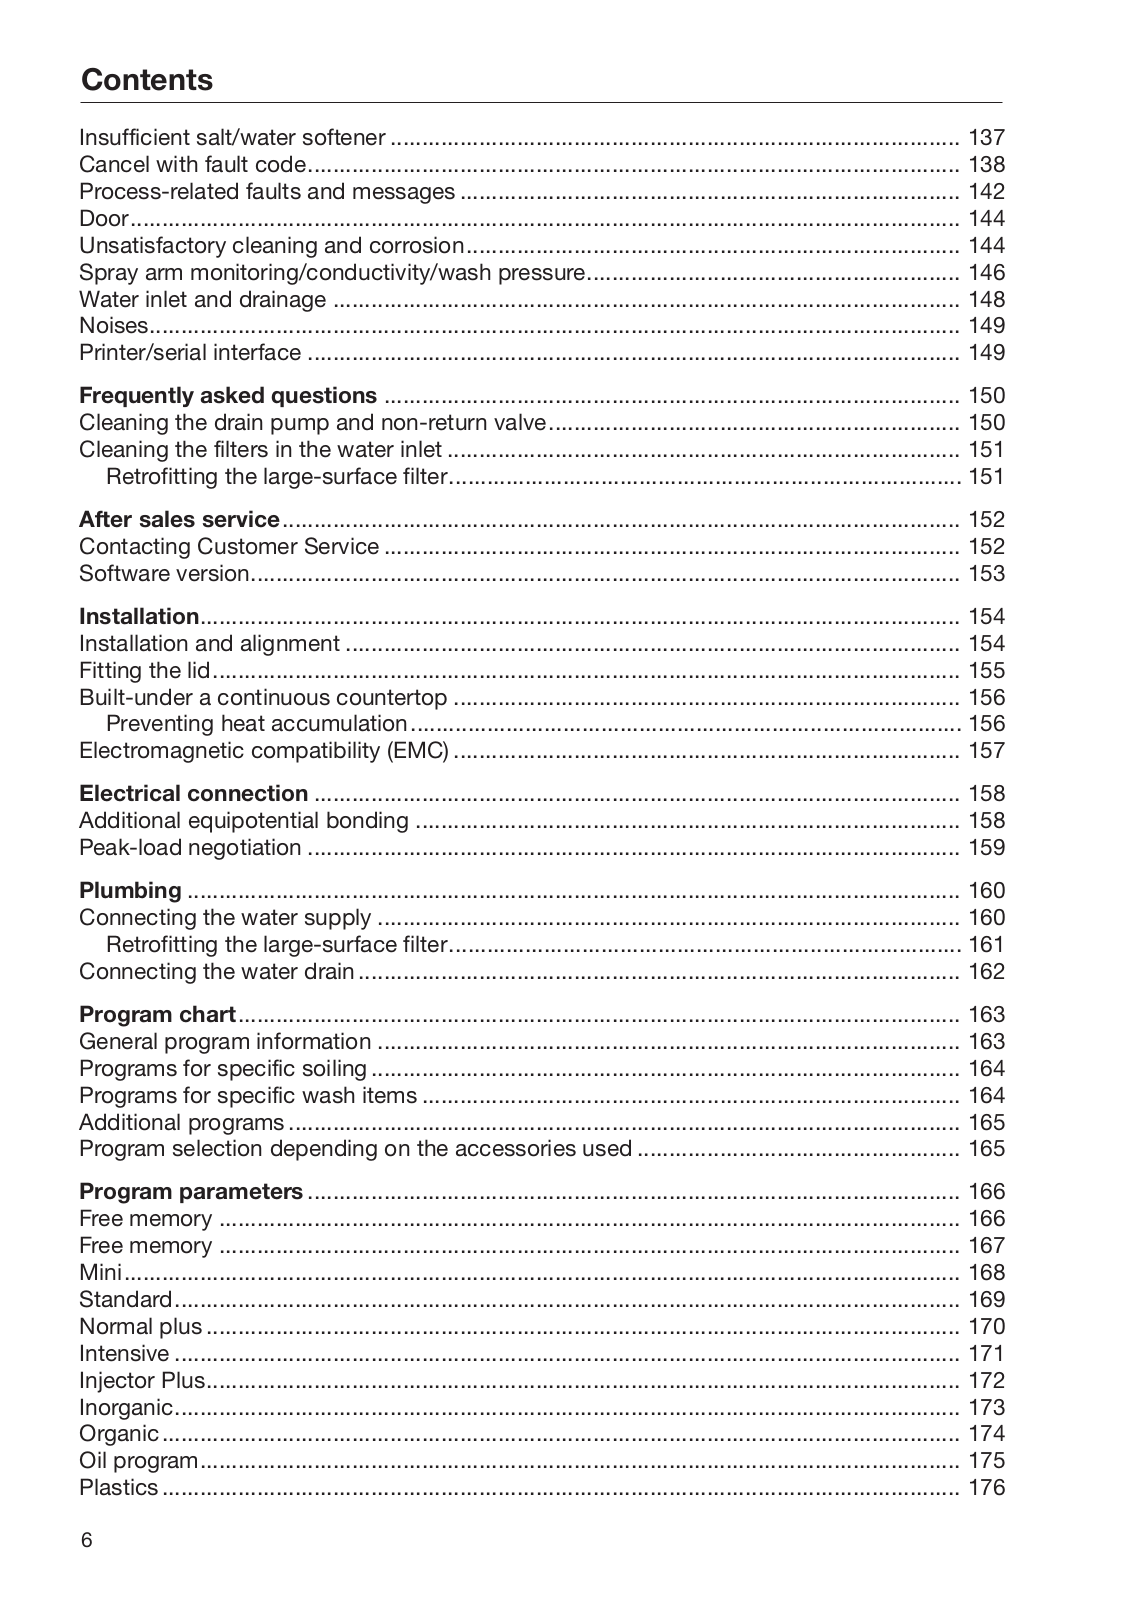
Contents


Insufficient salt/water softener ..........................................................................................

137

Cancel with fault code.......................................................................................................

138

Process-related faults and messages ...............................................................................

142

Door...................................................................................................................................

144

Unsatisfactory cleaning and corrosion..............................................................................

144

Spray arm monitoring/conductivity/wash pressure...........................................................

146

Water inlet and drainage ...................................................................................................

148

Noises................................................................................................................................

149

Printer/serial interface .......................................................................................................

149

Frequently asked questions ...........................................................................................

150

Cleaning the drain pump and non-return valve.................................................................

150

Cleaning the filters in the water inlet .................................................................................

151

Retrofitting the large-surface filter.................................................................................

151

After sales service...........................................................................................................

152

Contacting Customer Service ...........................................................................................

152

Software version................................................................................................................

153

Installation........................................................................................................................

154

Installation and alignment .................................................................................................

154

Fitting the lid......................................................................................................................

155

Built-under a continuous countertop ................................................................................

156

Preventing heat accumulation.......................................................................................

156

Electromagnetic compatibility (EMC) ................................................................................

157

Electrical connection ......................................................................................................

158

Additional equipotential bonding ......................................................................................

158

Peak-load negotiation .......................................................................................................

159

Plumbing ..........................................................................................................................

160

Connecting the water supply ............................................................................................

160

Retrofitting the large-surface filter.................................................................................

161

Connecting the water drain ...............................................................................................

162

Program chart..................................................................................................................

163

General program information ............................................................................................

163

Programs for specific soiling .............................................................................................

164

Programs for specific wash items .....................................................................................

164

Additional programs ..........................................................................................................

165

Program selection depending on the accessories used ...................................................

165

Program parameters .......................................................................................................

166

Free memory .....................................................................................................................

166

Free memory .....................................................................................................................

167

Mini....................................................................................................................................

168

Standard............................................................................................................................

169

Normal plus .......................................................................................................................

170

Intensive ............................................................................................................................

171

Injector Plus.......................................................................................................................

172

Inorganic............................................................................................................................

173

Organic..............................................................................................................................

174

Oil program........................................................................................................................

175

Plastics ..............................................................................................................................

176

6


Contents

Pipettes .............................................................................................................................

177

Special 93°C-10' ...............................................................................................................

178

Technical details..............................................................................................................

179

Caring for the environment ............................................................................................

180

Disposal of packaging material ........................................................................................

180

7

Guide to the manual

Warnings

Information which is important for safety is highlighted in a thick framed box with a warning symbol. This alerts you of potential danger of injury to people or damage to property.

Read these warning notes carefully and observe the instructions and codes of practice described.

Notes

Notes contain information that is particularly important to follow.

They are highlighted by a thickly framed box.

Additional information and comments

Additional information and comments are contained in a simple frame.

Operating steps

Operating steps are indicated by a black square bullet point.

Example:

Select an option using the arrow buttons and save your choice with

OK.

Display

Certain functions are shown in display messages using the same font as used for the function itself in the display.

Example:

Menu Settings .


Definition of terms

Machine

In these operating instructions, the Laboratory Glassware Washer is


referred to as “the machine”.

Wash items

The term “wash items” is used wherever the items to be reprocessed


are not defined in any further detail.

Wash water

The term “wash water” is used for the mixture of water and process


chemicals.

8

IMPORTANT SAFETY INSTRUCTIONS

This machine complies with all statutory safety requirements. However, inappropriate use can lead to personal injury and material damage.

Read these instructions carefully before using the machine for the first time to avoid the risk of accidents and damage to the machine. Keep these instructions in a safe place where they are accessible to users at all times.

Proper use

Use of the machine is only approved for the applications stated in the operating instructions. Conversions, modifications, and any other use are not permitted and could be dangerous.

The cleaning and disinfection processes are only designed for laboratory glassware and utensils which are designated as reprocessable by the manufacturer. The information provided by the manufacturer of the wash items must be observed.

This machine is intended for indoor use in a stationary location only.

Risk of injury

Please pay attention to the following notes to avoid injury.

The machine should only be installed, commissioned, repaired, and maintained by a Miele authorized technician. A Miele service contract is recommended to ensure full compliance with the normative and regulatory provisions. Incorrect repairs can cause considerable danger to users.

Do not install the machine in an area where there is any risk of explosion or of freezing conditions.

In order to reduce the risk of water damage, the area around the machine should be limited to furniture and fittings that are designed for use in commercial environments.

Some metal parts pose a risk of injury/being cut. Wear cut-resis- tant protective gloves when transporting and setting up the machine.

If the machine is built under a countertop, it must only be installed under a continuous countertop run which is firmly secured to adjacent units to improve stability.

The electrical safety of this machine can only be guaranteed if it is grounded properly. It is essential that this standard safety requirement is met. If in any doubt, please have the on-site wiring system tested by a qualified electrician. Miele cannot be held liable for the consequences of an inadequate grounding system (e.g. electric shock).

A damaged or leaking machine could be dangerous and compromise your safety. Disconnect the machine from the electrical supply immediately and contact Miele Service.

9

IMPORTANT SAFETY INSTRUCTIONS

Label machines which have been taken out of operation and lock them to prevent them being switched on again without authorization. The machine may only be put back into operation once it has been successfully repaired by Miele a Miele authorized technician.

As standard, the drain water of the machine will reach temperatures greater than 160 °F (70 °C). At this temperature, drain water can potentially damage the drain system. In order to reduce damage to the drain system, Miele offers an optional drain water cool-down kit.

Personnel operating the machine should be trained regularly. Untrained personnel must not be allowed access to the machine or its controls.

Only use process chemicals which have been approved by their manufacturer for the relevant application. The manufacturer of the process chemicals is liable for any negative influences on the material of the wash items and the machine.

Use caution when handling process chemicals. These may contain irritant, corrosive or toxic ingredients.

Please observe the process chemical manufacturer's safety instructions and safety data sheets.

Wear protective gloves and goggles.

The machine is designed for operation with water and recommended additive process chemicals only. Organic solvents and flammable liquid agents must not be used as this could cause an explosion, damage rubber or plastic components in the machine and cause liquids to leak out of it.

The water in the wash cabinet is NOT safe to drink!

Do not lift the machine by protruding parts such as the control panel or the opened service flap as these could be damaged or torn off.

Do not sit or lean on the opened door. This could cause the machine to tip and get damaged or cause injury.

Be careful when sorting wash items with sharp, pointed ends. Position them in the machine so that you will not hurt yourself or create a danger for others.

Broken glass can result in serious injury during loading or unloading. Broken glass items must not be processed in the machine.

When operating the machine, beware of the high temperatures involved. If you bypass the electrical lock to open the door, there is a risk of scalding or chemical burns.

Should personnel accidentally come into contact with toxic vapors or process chemicals, follow the emergency instructions given in the manufacturer's safety data sheets.

10

IMPORTANT SAFETY INSTRUCTIONS

Mobile units, baskets, modules, inserts and the load must be allowed to cool down before they are unloaded. Any water remaining in containers could still be very hot. Empty them into the wash cabinet before taking them out.

Never clean the machine with a water hose or a pressure washer.

The machine must be disconnected from the electrical supply before any maintenance or repair work is carried out.

Quality assurance

The following points should be observed to assist in maintaining quality standards when processing laboratory glassware and utensils and avoid damage to the loads being cleaned.

If it is necessary to interrupt a program, as an exception only, this may only be done by authorized personnel.

The cleaning standard must be routinely confirmed by the user. The process should be validated on a regular basis, and checked against documented control results.

For thermal disinfection, use temperatures and temperature holding times to achieve the required infection prophylaxis in accordance with current health and safety regulations.

Make sure items being washed are suitable for machine reprocessing and are in good condition. Plastic items must be thermally stable. Nickel plated items and aluminum items can be machine processed using special procedures only.

Items containing iron, and soiling containing residual rust must not be placed in the cabinet.

Process chemicals can, in certain circumstances, cause damage to the machine. Always follow the recommendations of the process chemical manufacturer.

In case of damage or doubt about compatibility, please contact Miele.

Cleaning detergents containing chlorine can damage the elastomers of the machine.

If the use of process chemicals containing chlorine is required, a maximum temperature of 167°F (75°C) in the “Cleaning” program phases is recommended (see program chart).

In machines equipped with special oil-resistant elastomers (from the factory) for oil and grease applications, cleaning detergents containing chlorine may not be used!

Abrasive substances must not be placed in the machine as they could cause damage to the mechanical components of the water supply. Any residues of abrasive substances on items to be washed must be removed without trace before reprocessing in the machine.

11

IMPORTANT SAFETY INSTRUCTIONS

Pre-treatments with cleaning agents can create foam, as can certain types of soiling and process chemicals. Foam can have an adverse effect on the cleaning result.

Processes must be set up such that foam cannot escape from the wash cabinet. It would hinder the correct functioning of the machine.

The process used must be monitored on a regular basis by the supervisor to check foaming levels.

To avoid the risk of damage to the machine and its accessories caused by process chemicals, soiling, and any reaction between the two, please read the notes in “Chemical processes and technology”.

Even when a process chemical is recommended on technical application grounds, it does not imply that the manufacturer of the machine accepts liability for the effect of the chemical on the items being cleaned.

Please be aware that changes in formulation, storage conditions etc. which may not be publicized by the chemical manufacturer, can have a negative effect on the cleaning result.

When using process chemicals, always consult the instructions issued by individual manufacturers. Process chemicals must only be used for the purpose they are designed for by the manufacturer to avoid any material damage or the occurrence of very strong chemical reactions, such as an oxyhydrogen explosion.

Always follow the manufacturer's instructions on storage and disposal of process chemicals.

In critical applications where very stringent requirements have to be met, it is strongly recommended that all the relevant factors for the process, such as process chemicals, water quality, etc., are discussed with Miele.

If the cleaning result is subject to particularly stringent requirements, e.g., in chemical analysis, regular quality control should be carried out by the operator to ensure that required standards of cleanliness are being achieved.

The mobile units, baskets, modules and inserts that hold the wash load must be used only as intended.

Hollow items must be thoroughly cleaned, internally and externally.

Secure small and light items with cover nets or place in a mesh tray for small items, so that they do not block the spray arms.

Empty any containers or utensils before loading them.

The amount of residual solvents and acids on items going into the cabinet should be minimal.

There should be no more than a trace of any solvents with a flash point of below 70°F (21°C).

12

IMPORTANT SAFETY INSTRUCTIONS

Chloride solutions, in particular hydrochloric acid, must not be placed in the cabinet.

Ensure that solutions or steam containing chlorides or hydrochloric acid do not come into contact with the stainless steel outer casing of the machine in order to avoid any damage through corrosion.

After any plumbing work, the water pipework to the machine will need to be primed. If this is not done, components can be damaged.

The gaps between a built-in machine and adjacent cabinetry must not be filled with silicone sealant as this could compromise the ventilation to the circulation pump.

Follow the installation instructions in the operating and installation instructions.

Children in the vicinity

Children must be supervised in the vicinity of the machine. Do not allow children to play with the machine. They could get locked inside it.

Children must not use the machine.

Keep children away from process chemicals. These can cause burning in the mouth, nose and throat if swallowed, or inhibit breathing. Keep children away from the machine when the door is open. There could still be residual process chemical in the cabinet. Observe the safety data sheets for the process chemical and seek medical advice immediately if a child has swallowed chemical agent or got it in the eyes.

13

IMPORTANT SAFETY INSTRUCTIONS

Using components and accessories

Only Miele accessories should be connected to this machine. They must be suitable for the application they are used for. Consult Miele for details on the type of accessories that can be used.

Only use Miele mobile units, baskets, modules and inserts with this machine. Using mobile units, baskets, modules and inserts made by other manufacturers, or making modifications to Miele accessories can cause unsatisfactory cleaning results, for which Miele cannot be held liable. Any resulting damage will not be covered by the warranty.

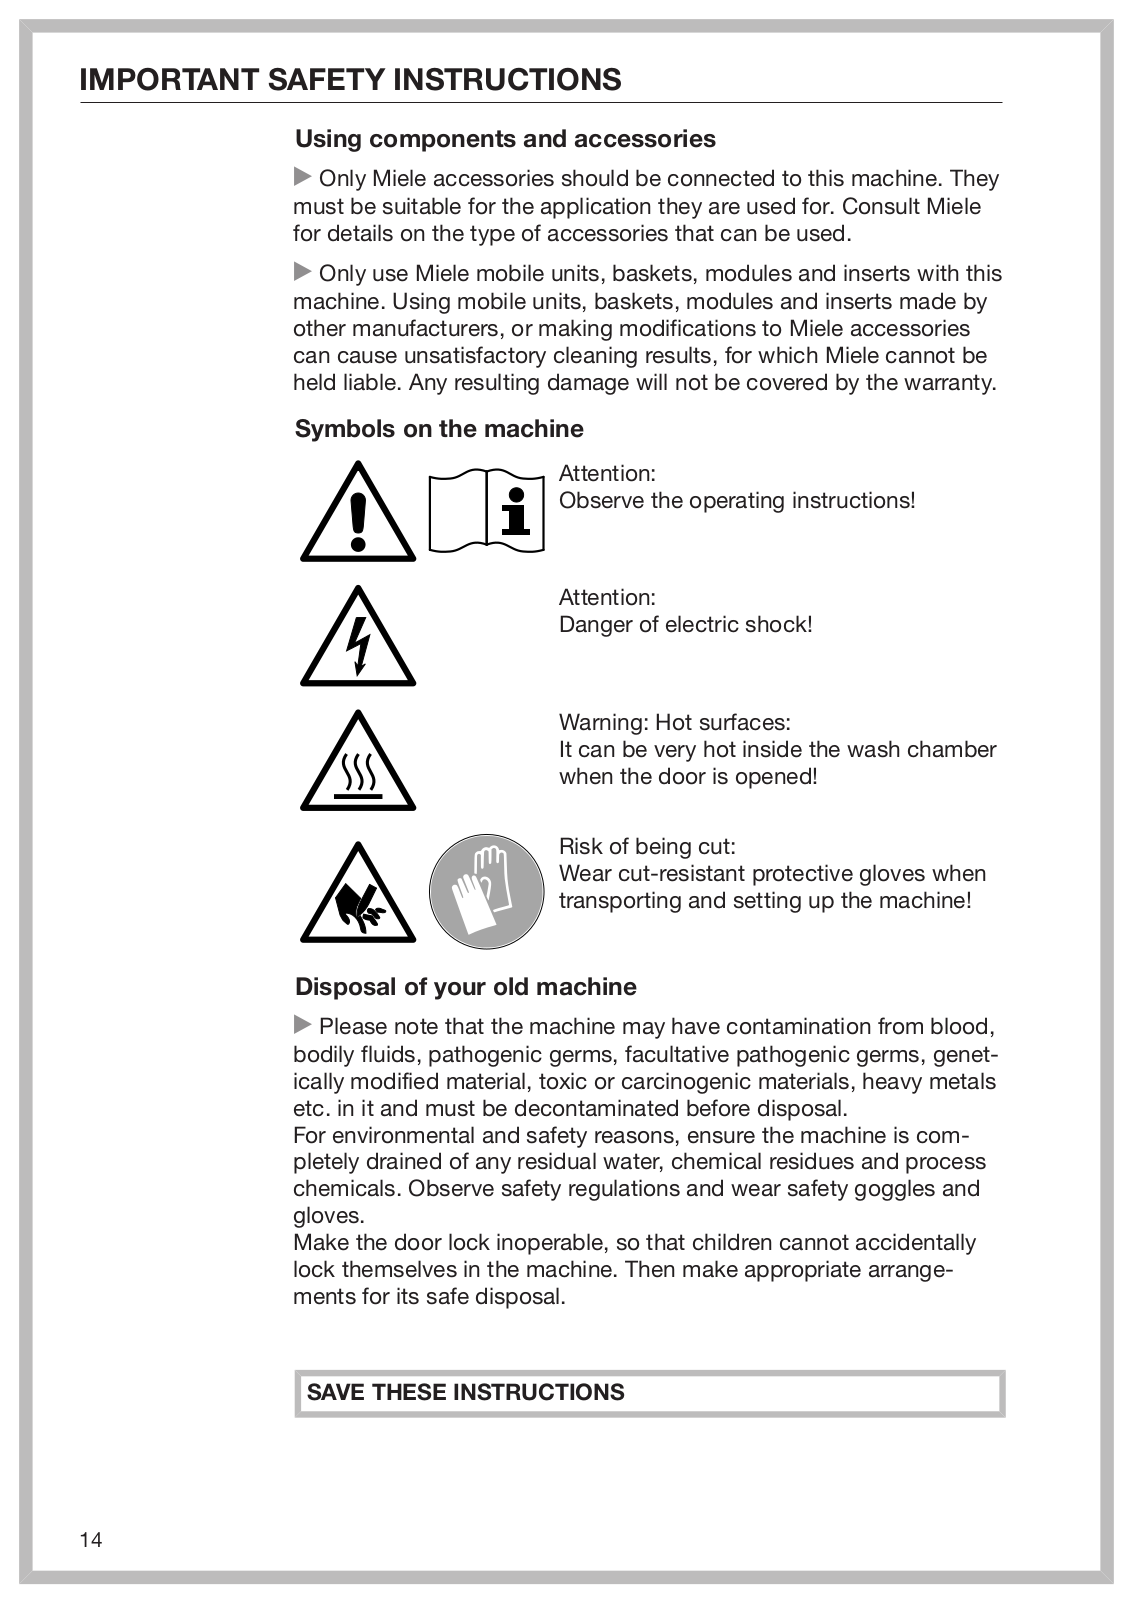
Symbols on the machine

Attention:

Observe the operating instructions!

Attention:

Danger of electric shock!

Warning: Hot surfaces:

It can be very hot inside the wash chamber when the door is opened!

Risk of being cut:

Wear cut-resistant protective gloves when transporting and setting up the machine!

Disposal of your old machine

Please note that the machine may have contamination from blood, bodily fluids, pathogenic germs, facultative pathogenic germs, genetically modified material, toxic or carcinogenic materials, heavy metals etc. in it and must be decontaminated before disposal.

For environmental and safety reasons, ensure the machine is completely drained of any residual water, chemical residues and process chemicals. Observe safety regulations and wear safety goggles and gloves.

Make the door lock inoperable, so that children cannot accidentally lock themselves in the machine. Then make appropriate arrangements for its safe disposal.

SAVE THESE INSTRUCTIONS

14

Proper use

This Laboratory Glassware Washer is designed to reprocess laboratory glassware, utensils, and similarly categorized components using water-based media. These include:

-vessels such as beakers, flasks, cylinders, and test tubes

-measuring vessels such as measuring cylinders, volumetric flasks, and pipettes

-dishes such as petri dishes and watch glasses

-plates such as slides and sequencing plates

-small items such as lids, magnetic stirring rods, spatulas, and stoppers

-other items such as boxes, plastic flasks and containers, metal parts, pipe and hose pieces, and funnels

Reprocessing encompasses the cleaning, rinsing, thermal disinfection (where necessary), and drying of the laboratory glassware, utensils, and components listed above.

Reprocessing is carried out in conjunction with:

-process chemicals which are tailored to the result of the reprocessing

-load carriers which are tailored to the wash items

Observe the information issued by the manufacturer of the wash items.

The Laboratory Glassware Washer is designed for use in laboratories (e.g., chemical and biological laboratories in universities, research institutes, and industry) as well as laboratory-type applications in the industrial sector.

Inappropriate use

The Laboratory Glassware Washer may not be used for any purposes other than the appropriate use described. This applies in particular to:

-the reprocessing of medical devices suitable for reprocessing

-use in the restaurant industry

-residential or household use

15

User profiles

User profiles

Daily operators Daily operators must be instructed how to properly operate and load the machine and trained regularly to guarantee safe daily use. They require knowledge of machine reprocessing of laboratory glassware and utensils.

Tasks for daily routine operation are located in the Settings menu. This menu is freely accessible to all users.

Administration More advanced tasks, e.g. interrupting or canceling a program, require more detailed knowledge of the machine.

Alterations or adaptations to the machine, e.g. accessories used or on-site conditions require additional specific knowledge of the machine.

Validation processes assume specialized knowledge of the machine processes involved and of applicable standards and legislation.

Administrative processes and settings are allocated to the Additional settings. This section is protected from unauthorized access by a

code.

16

Product description

Machine overview

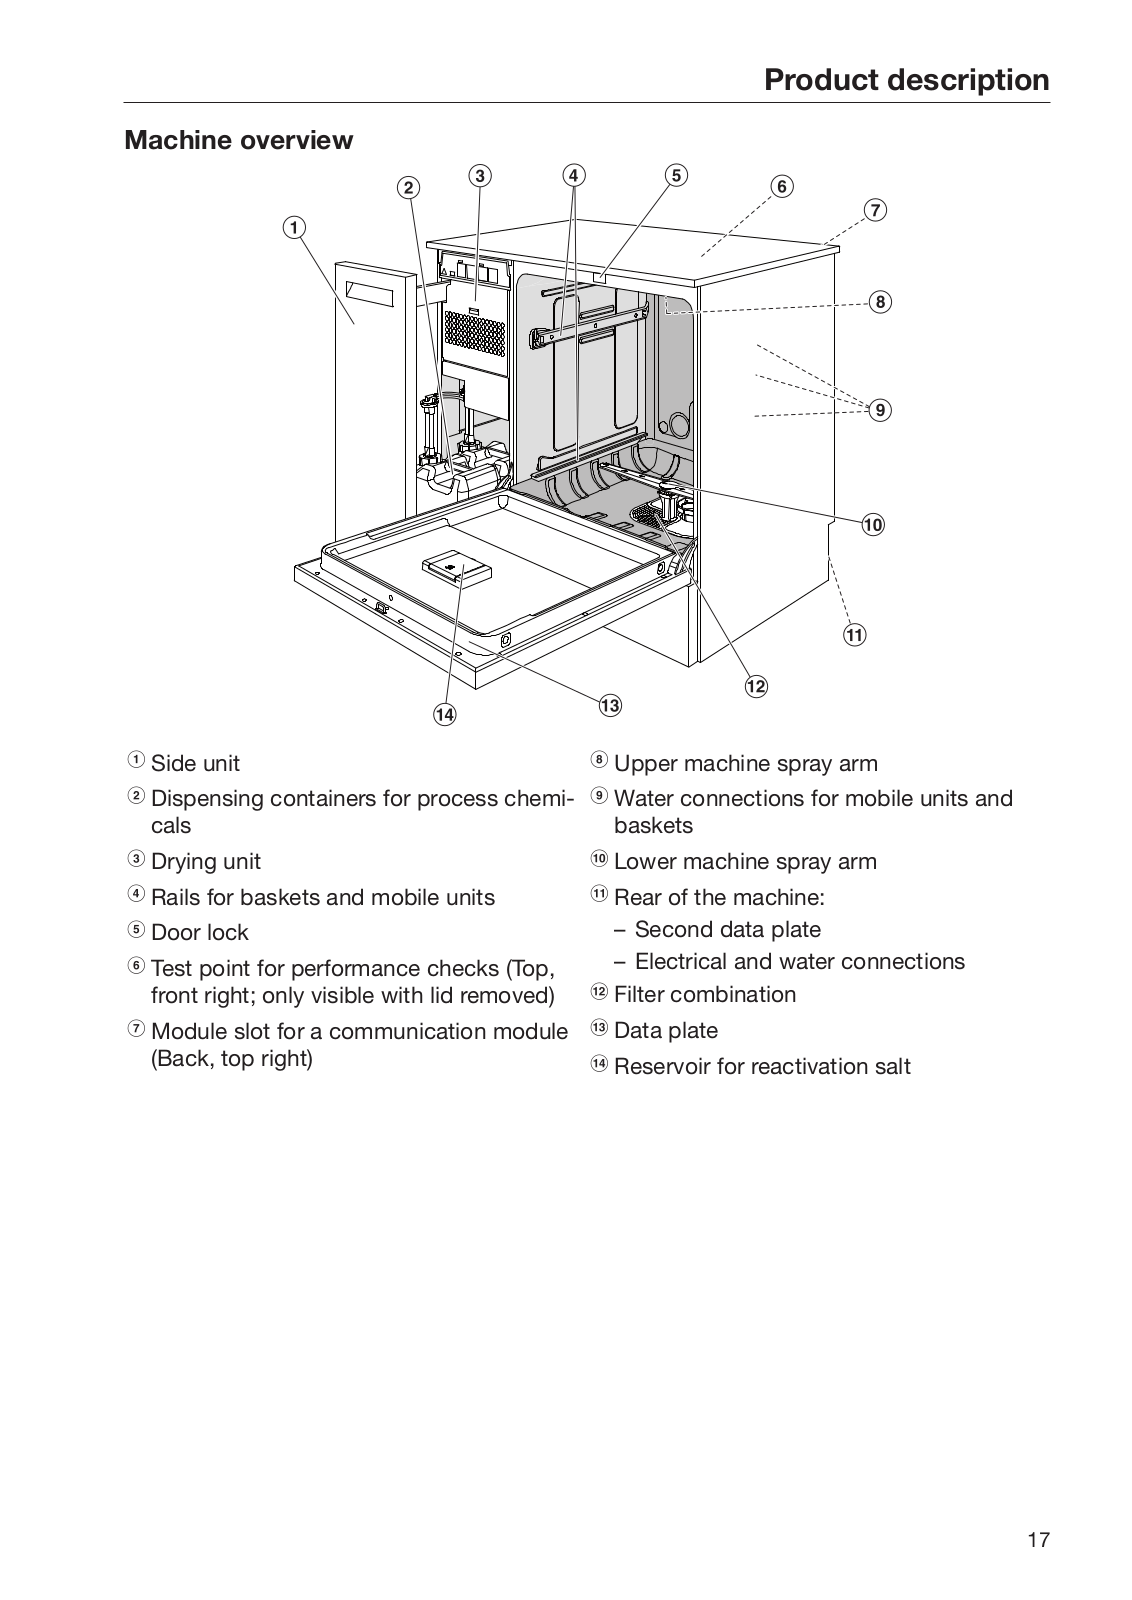
aSide unit

bDispensing containers for process chemicals

cDrying unit

dRails for baskets and mobile units

eDoor lock

fTest point for performance checks (Top, front right; only visible with lid removed)

gModule slot for a communication module (Back, top right)

hUpper machine spray arm

iWater connections for mobile units and baskets

jLower machine spray arm

kRear of the machine:

Second data plate

Electrical and water connections

lFilter combination

mData plate

nReservoir for reactivation salt

17

Product description

Control panel

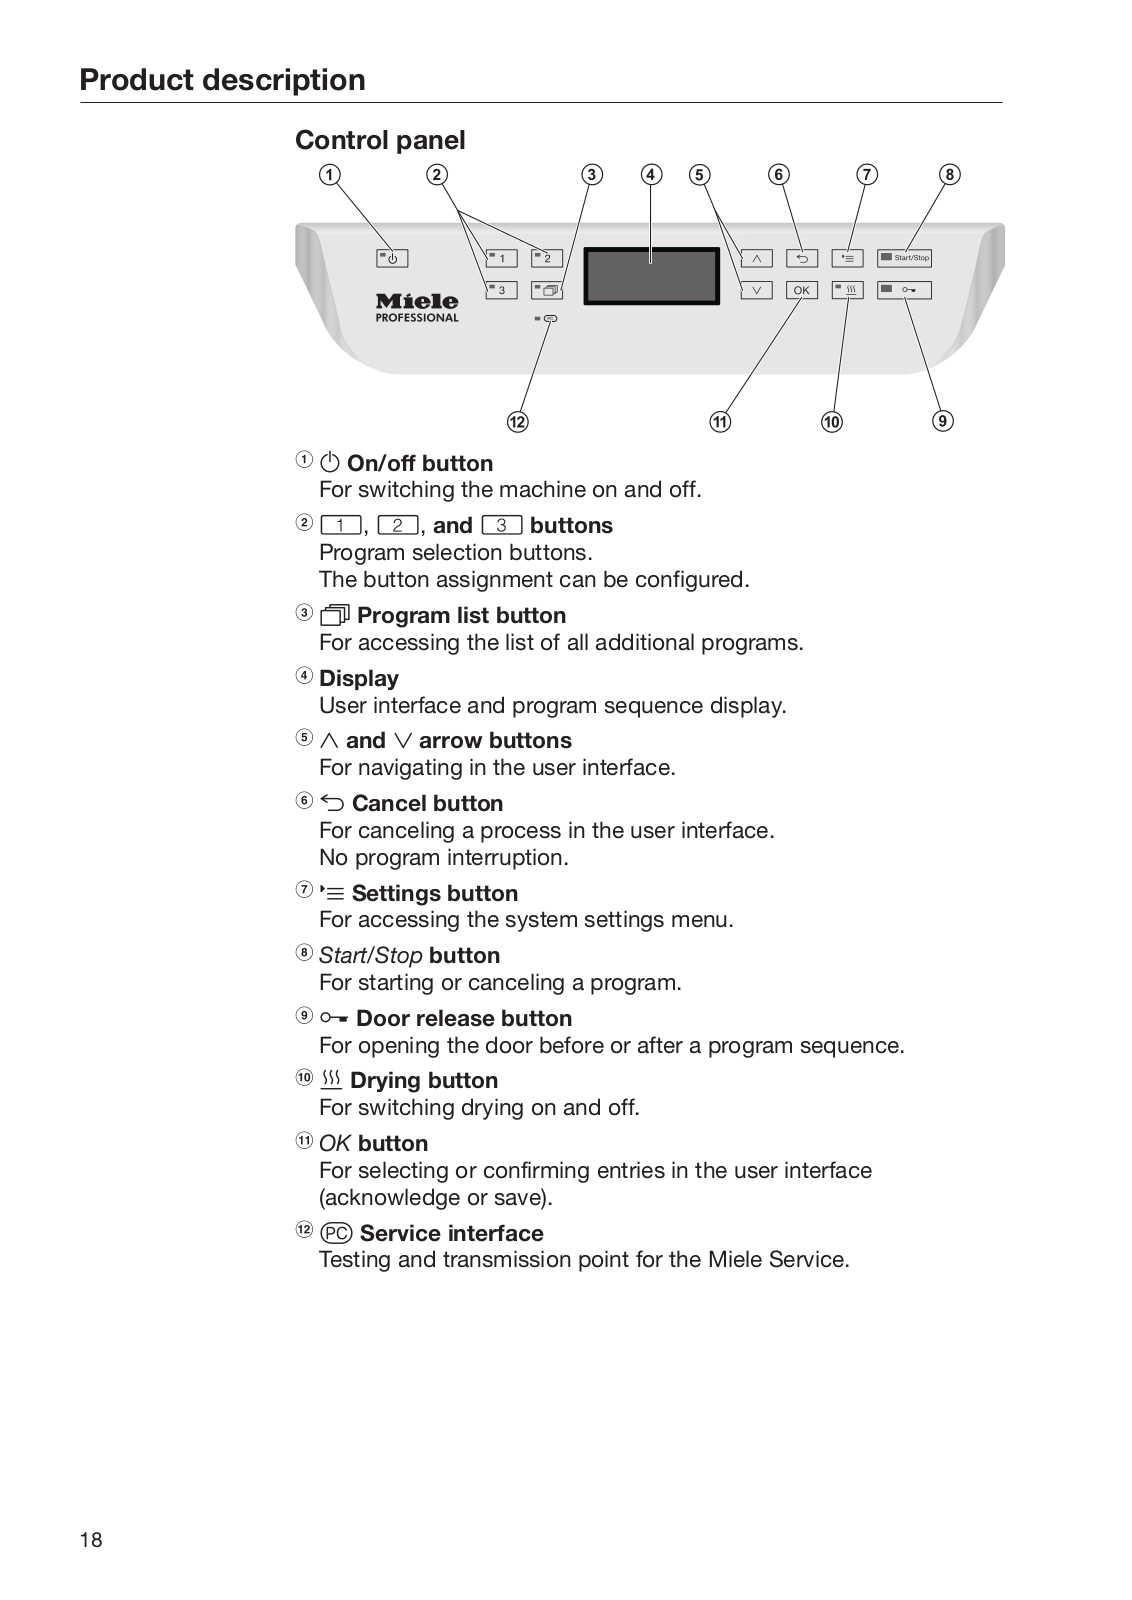
aOn/off button

For switching the machine on and off.

b, , and buttons

Program selection buttons.

The button assignment can be configured.

cProgram list button

For accessing the list of all additional programs.

dDisplay

User interface and program sequence display.

eand arrow buttons

For navigating in the user interface.

fCancel button

For canceling a process in the user interface. No program interruption.

gSettings button

For accessing the system settings menu.

hStart/Stop button

For starting or canceling a program.

iDoor release button

For opening the door before or after a program sequence.

jDrying button

For switching drying on and off.

kOK button

For selecting or confirming entries in the user interface (acknowledge or save).

lService interface

Testing and transmission point for the Miele Service.

18

Product description

LEDs in the buttons

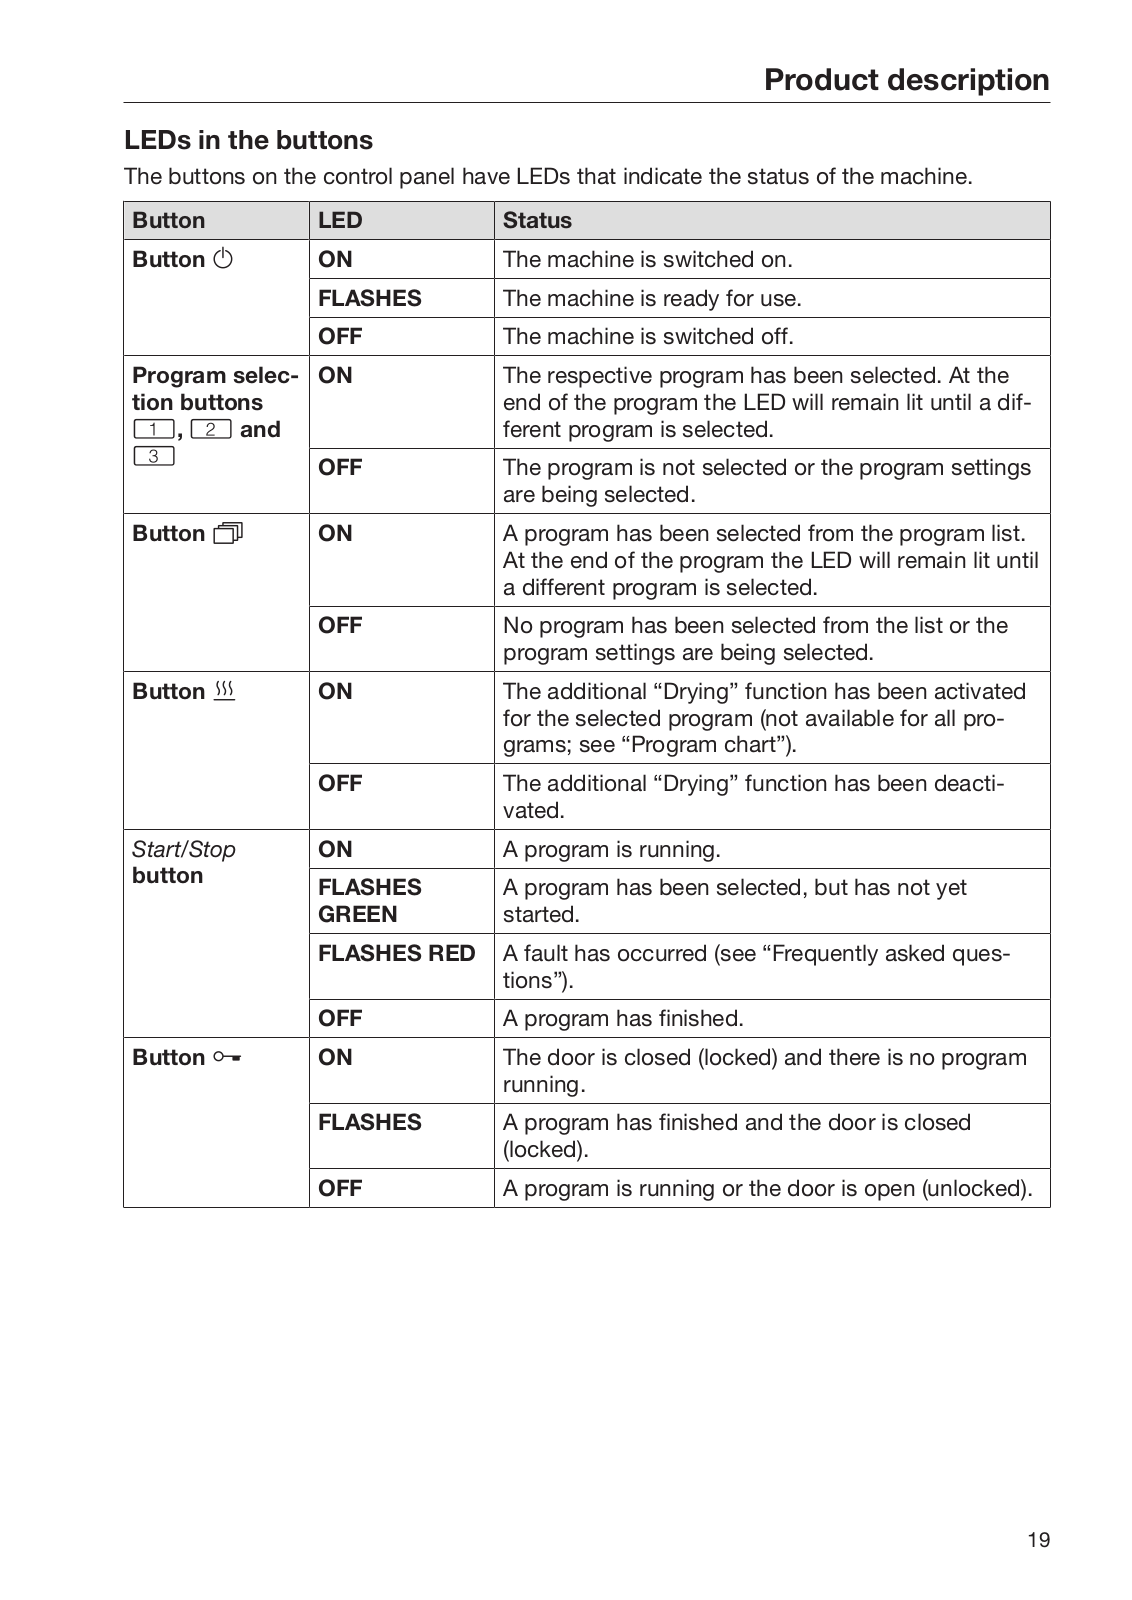
The buttons on the control panel have LEDs that indicate the status of the machine.

Button

LED

Status

Button

ON

The machine is switched on.


FLASHES

The machine is ready for use.


OFF

The machine is switched off.


Program selec-

ON

The respective program has been selected. At the

tion buttons


end of the program the LED will remain lit until a dif-

, and


ferent program is selected.


OFF

The program is not selected or the program settings


are being selected.


Button

ON

A program has been selected from the program list.


At the end of the program the LED will remain lit until


a different program is selected.


OFF

No program has been selected from the list or the


program settings are being selected.


Button

ON

The additional “Drying” function has been activated


for the selected program (not available for all pro-


grams; see “Program chart”).


OFF

The additional “Drying” function has been deacti-


vated.


Start/Stop

ON

A program is running.

button


FLASHES

A program has been selected, but has not yet


GREEN

started.


FLASHES RED

A fault has occurred (see “Frequently asked ques-


tions”).


OFF

A program has finished.


Button

ON

The door is closed (locked) and there is no program


running.


FLASHES

A program has finished and the door is closed


(locked).


OFF

A program is running or the door is open (unlocked).


19

Operation

Control panel

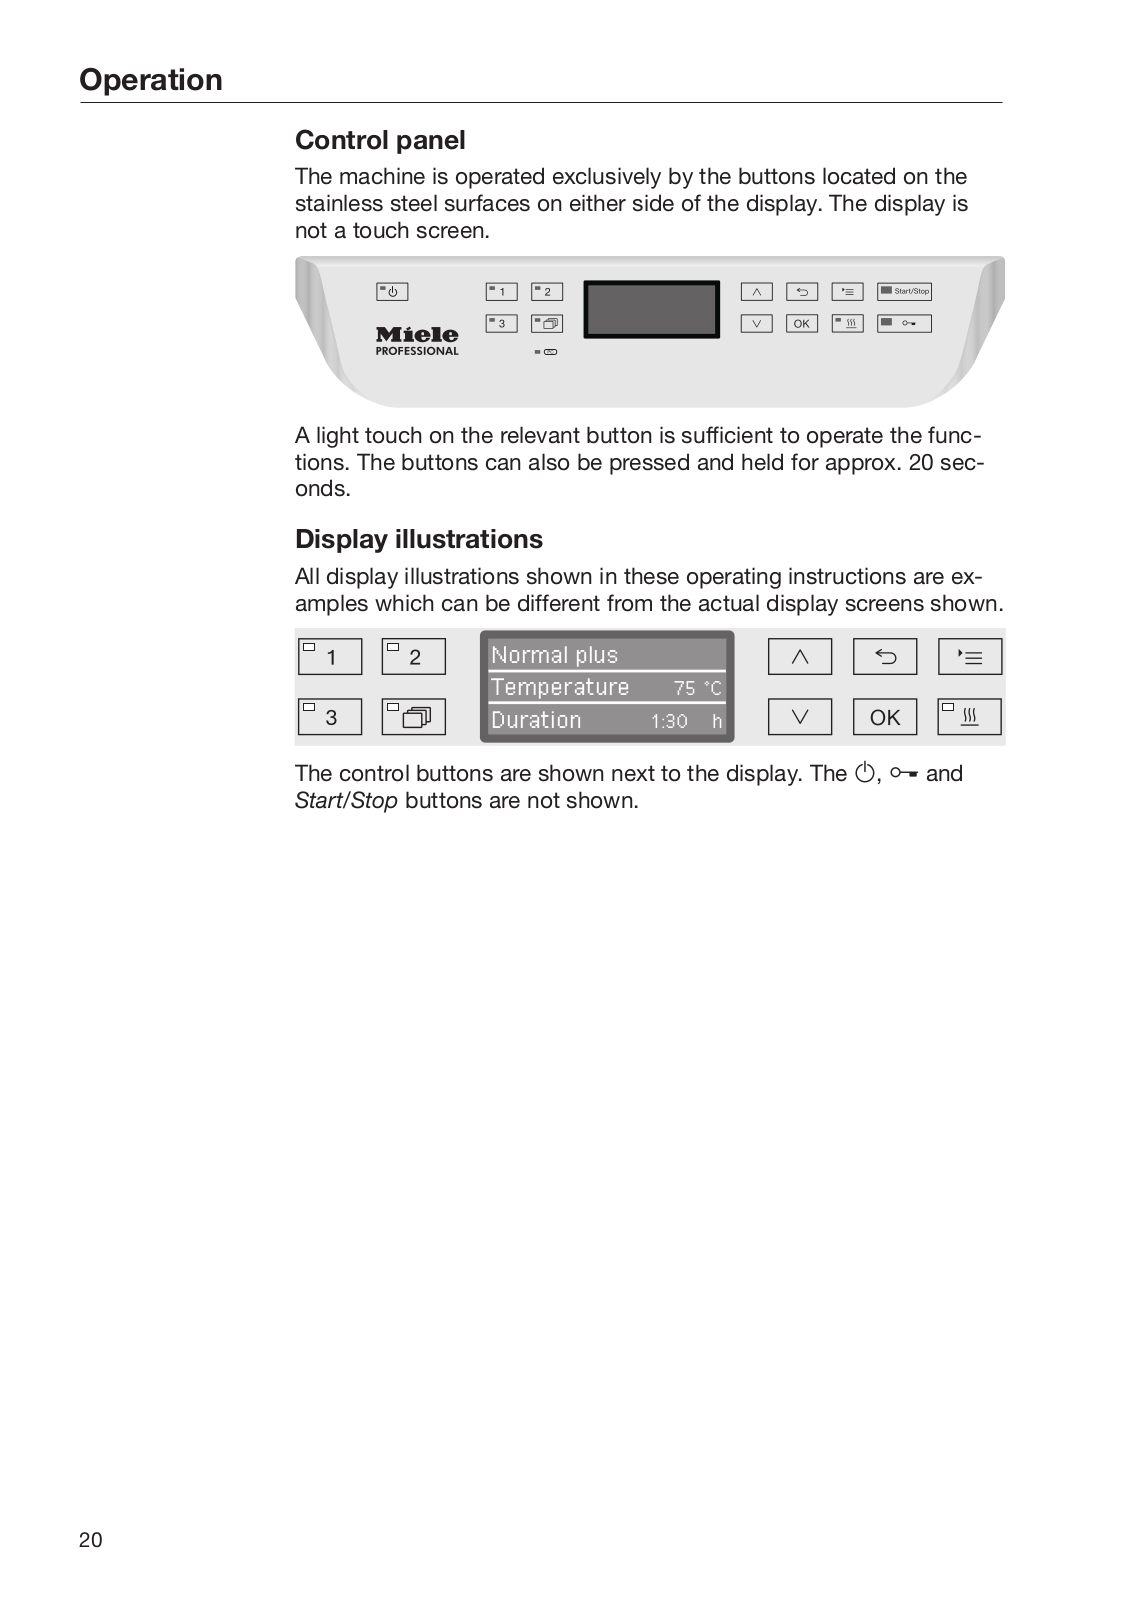
The machine is operated exclusively by the buttons located on the stainless steel surfaces on either side of the display. The display is not a touch screen.

A light touch on the relevant button is sufficient to operate the functions. The buttons can also be pressed and held for approx. 20 seconds.

Display illustrations

All display illustrations shown in these operating instructions are examples which can be different from the actual display screens shown.

Normal plus


Temperature

75 °C


Duration

1:30 h


The control buttons are shown next to the display. The , and

Start/Stop buttons are not shown.

20

Operation

Switching on

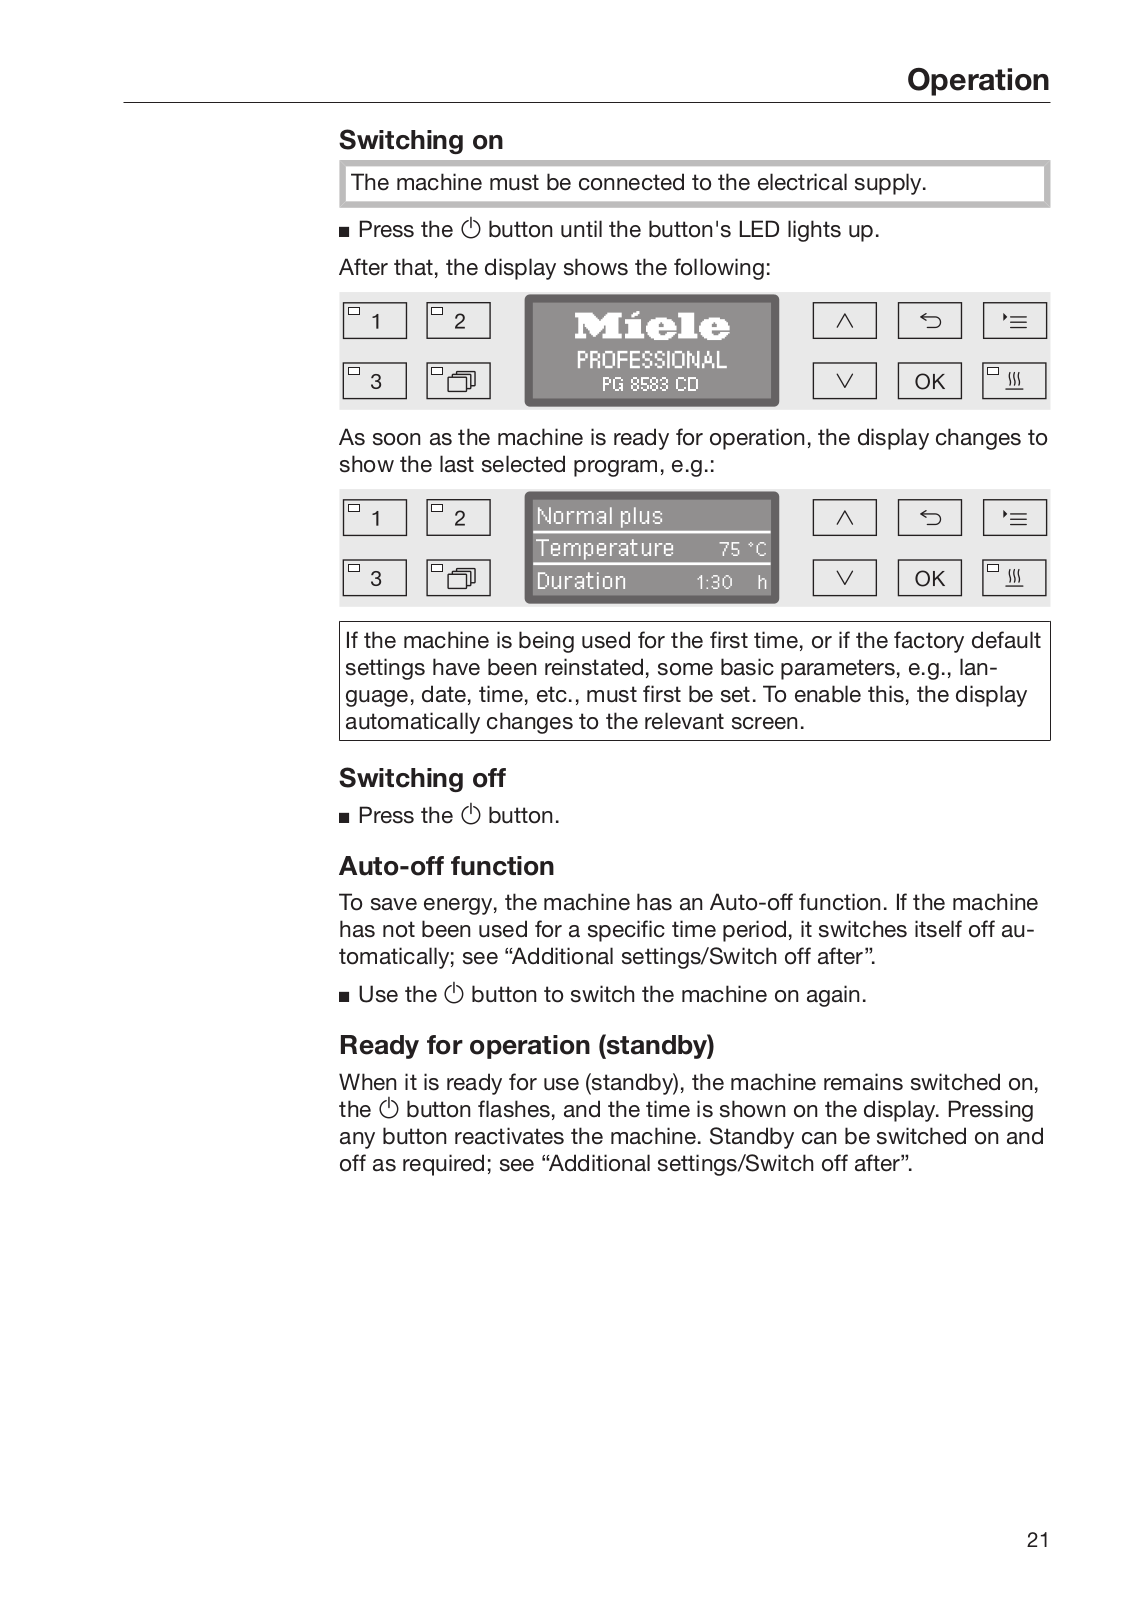
The machine must be connected to the electrical supply.

Press the button until the button's LED lights up.

After that, the display shows the following:

PG 8583 CD

As soon as the machine is ready for operation, the display changes to show the last selected program, e.g.:

Normal plus


Temperature

75 °C


Duration

1:30 h


If the machine is being used for the first time, or if the factory default settings have been reinstated, some basic parameters, e.g., language, date, time, etc., must first be set. To enable this, the display automatically changes to the relevant screen.

Switching off

Press the button.

Auto-off function

To save energy, the machine has an Auto-off function. If the machine has not been used for a specific time period, it switches itself off automatically; see “Additional settings/Switch off after”.

Use the button to switch the machine on again.

Ready for operation (standby)

When it is ready for use (standby), the machine remains switched on, the button flashes, and the time is shown on the display. Pressing any button reactivates the machine. Standby can be switched on and off as required; see “Additional settings/Switch off after”.

21

Operation

Display interface

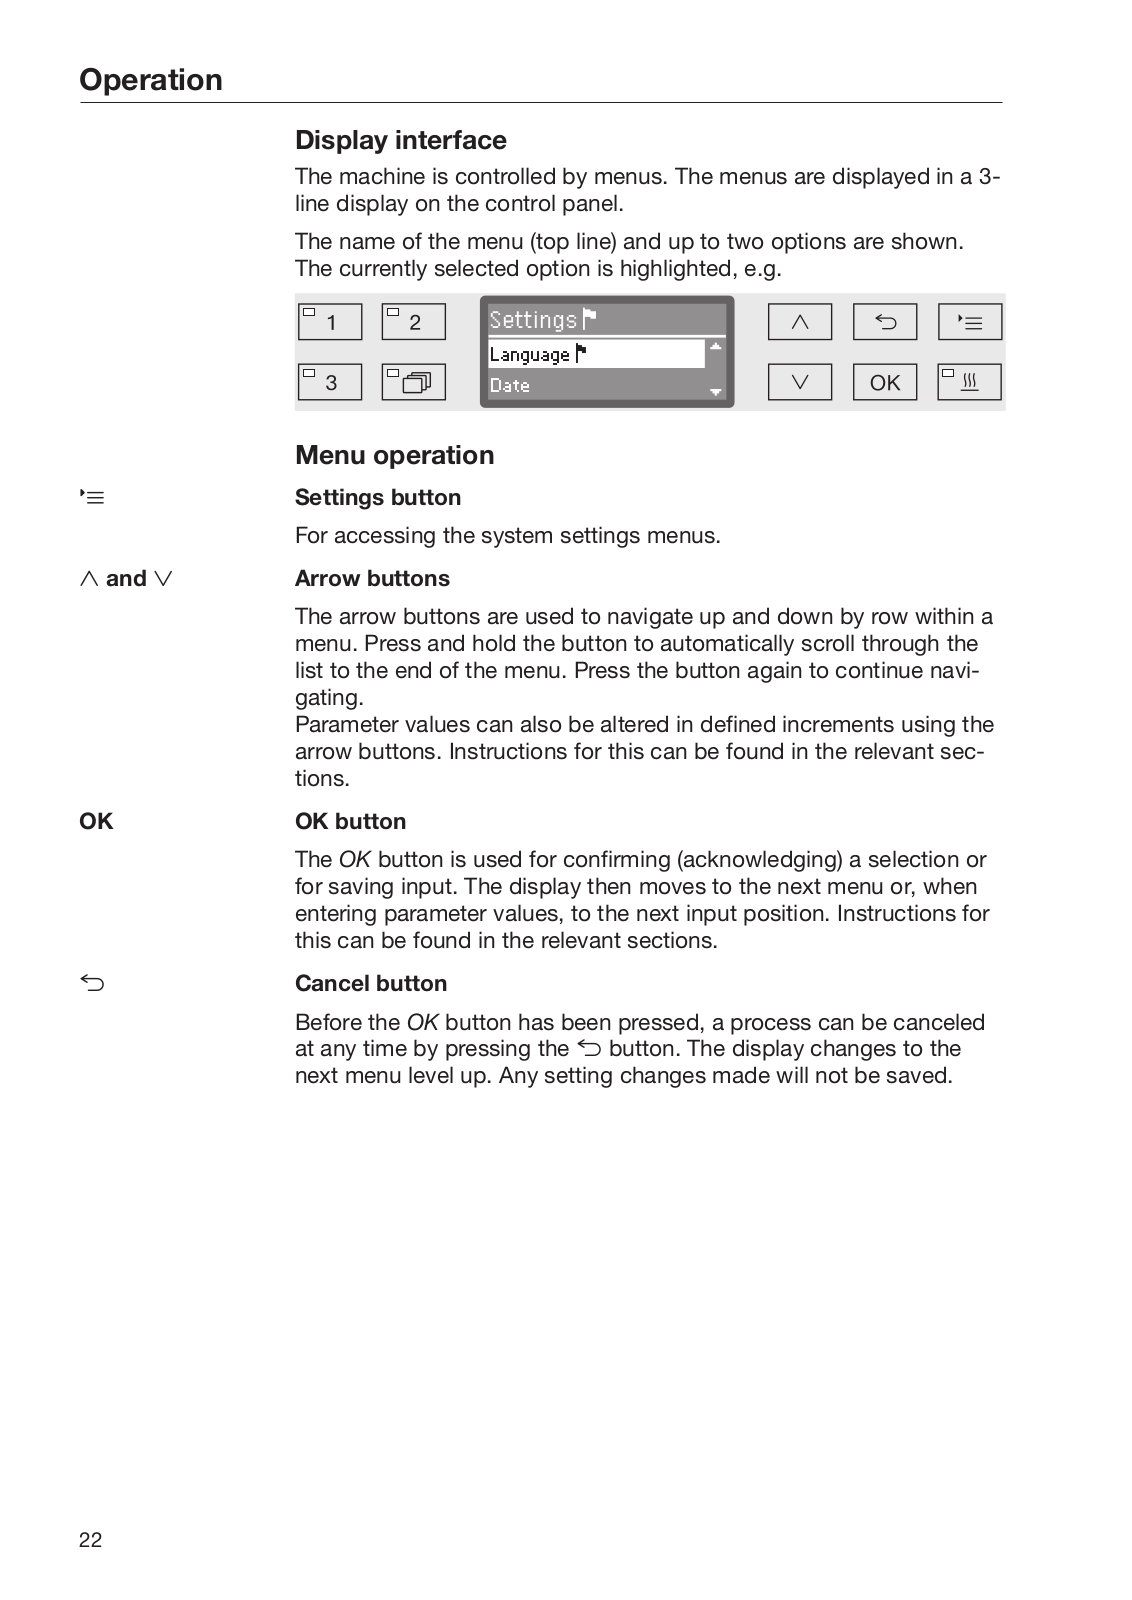
The machine is controlled by menus. The menus are displayed in a 3- line display on the control panel.

The name of the menu (top line) and up to two options are shown.

The currently selected option is highlighted, e.g.

Settings

Language

Date


Menu operation


Settings button


For accessing the system settings menus.

and

Arrow buttons


The arrow buttons are used to navigate up and down by row within a


menu. Press and hold the button to automatically scroll through the


list to the end of the menu. Press the button again to continue navi-


gating.


Parameter values can also be altered in defined increments using the


arrow buttons. Instructions for this can be found in the relevant sec-


tions.

OK

OK button


The OK button is used for confirming (acknowledging) a selection or


for saving input. The display then moves to the next menu or, when


entering parameter values, to the next input position. Instructions for


this can be found in the relevant sections.


Cancel button


Before the OK button has been pressed, a process can be canceled


at any time by pressing the button. The display changes to the


next menu level up. Any setting changes made will not be saved.

22

Operation

Settings in the menu

All menu descriptions in these operating instructions are structured as follows:

Input procedure The input procedure describes the complete sequence required to reach a particular menu level. The menu options shown must be selected individually using the arrow buttons and then confirmed with

OK.

Example:

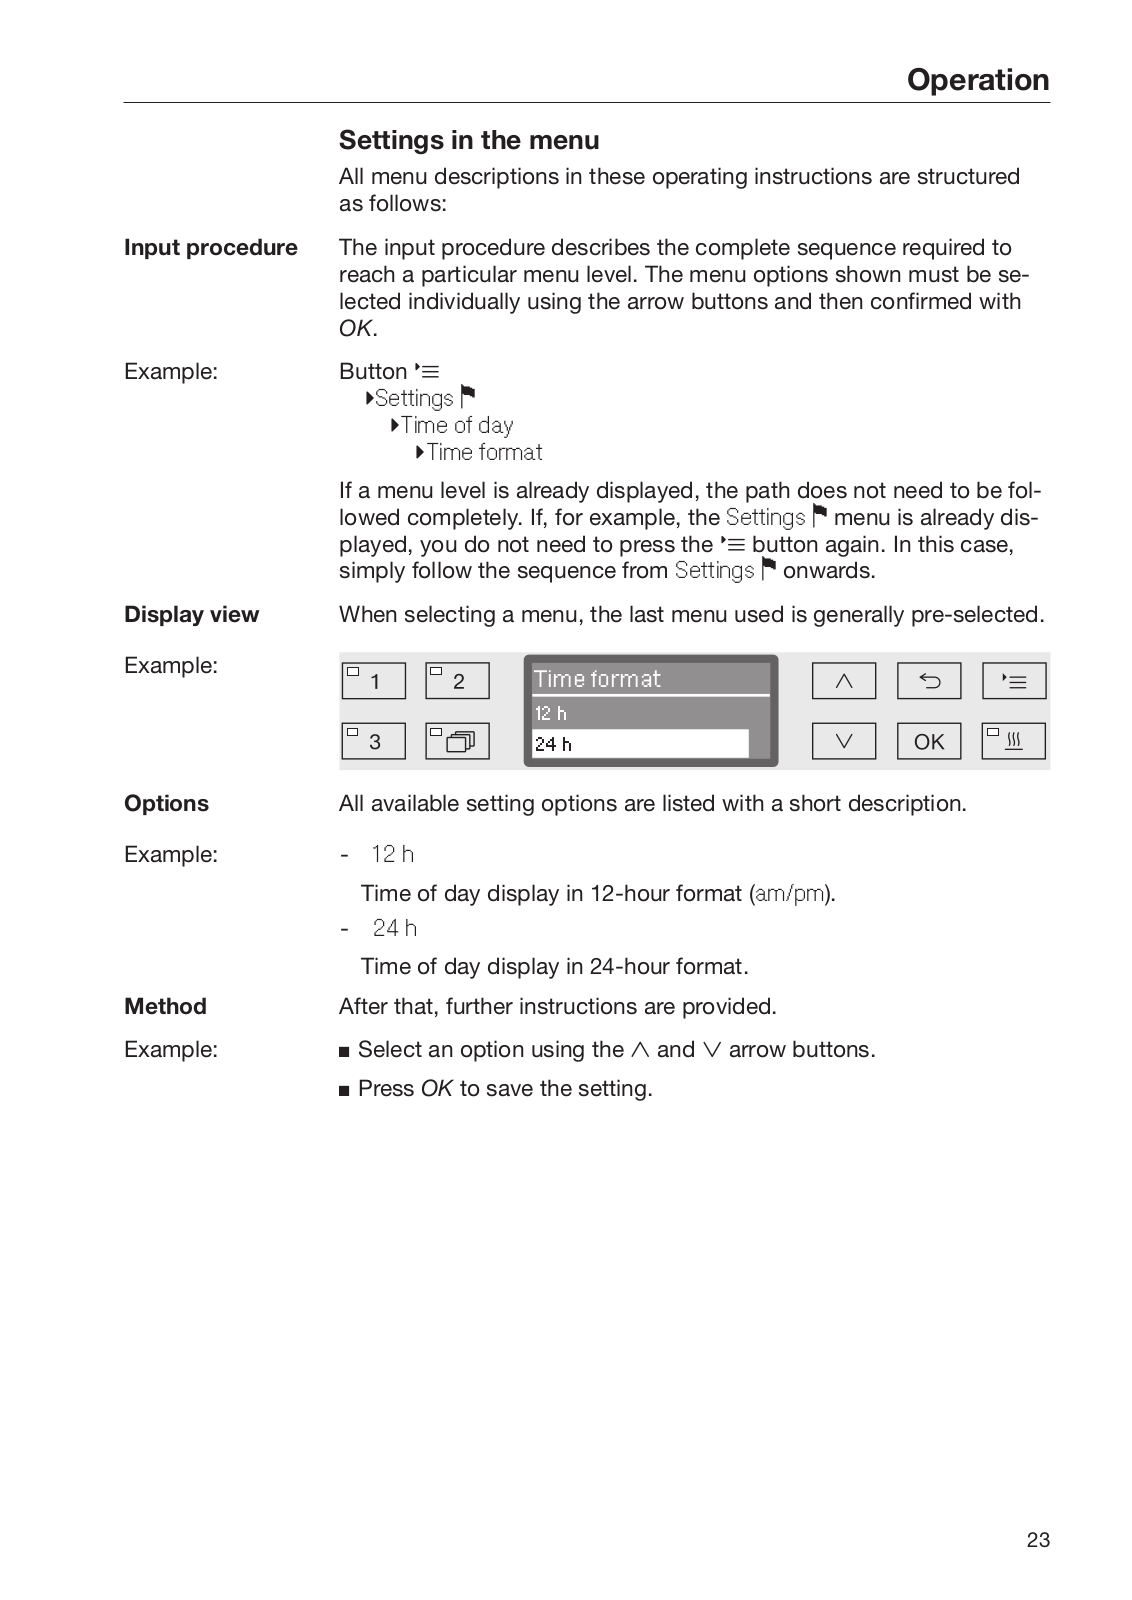
Display view

Example:

Button

Settings

Time of day

Time format

If a menu level is already displayed, the path does not need to be followed completely. If, for example, the Settings menu is already displayed, you do not need to press the button again. In this case, simply follow the sequence from Settings onwards.

When selecting a menu, the last menu used is generally pre-selected.

Time format

12 h

24 h

Options

All available setting options are listed with a short description.

Example:

-

12 h


Time of day display in 12-hour format (am/pm).


-

24 h


Time of day display in 24-hour format.

Method

After that, further instructions are provided.

Example:

Select an option using the and arrow buttons.


Press OK to save the setting.

23

Operation


Symbols in the display


Navigation arrows


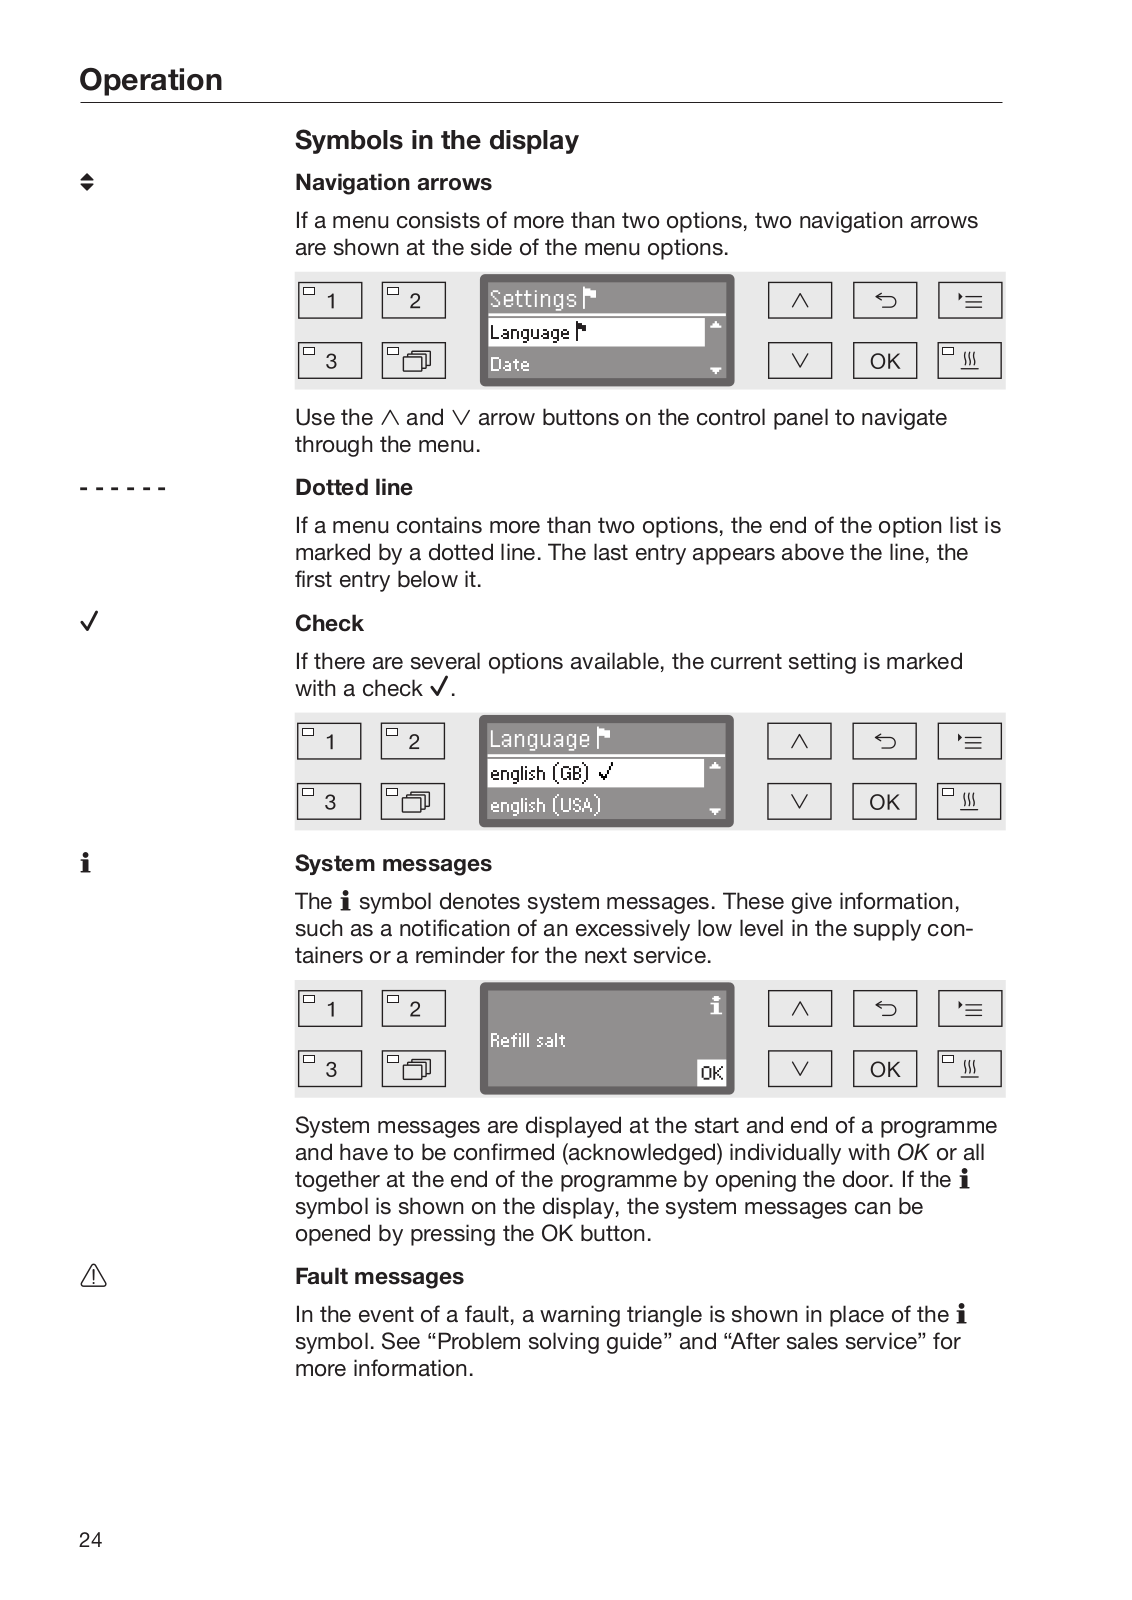
If a menu consists of more than two options, two navigation arrows


are shown at the side of the menu options.


Settings


Language


Date


Use the and arrow buttons on the control panel to navigate


through the menu.

- - - - - -

Dotted line


If a menu contains more than two options, the end of the option list is


marked by a dotted line. The last entry appears above the line, the


first entry below it.


Check


If there are several options available, the current setting is marked


with a check .


Language


english (GB) (


english (USA)


System messages


The symbol denotes system messages. These give information,


such as a notification of an excessively low level in the supply con-


tainers or a reminder for the next service.


Refill salt


System messages are displayed at the start and end of a programme


and have to be confirmed (acknowledged) individually with OK or all


together at the end of the programme by opening the door. If the


symbol is shown on the display, the system messages can be


opened by pressing the OK button.


Fault messages


In the event of a fault, a warning triangle is shown in place of the


symbol. See “Problem solving guide” and “After sales service” for


more information.

24

Settings
Additional settings

Commissioning

Installation and connection

Before commissioning, the machine must be securely installed, and the water inlet and drain hoses and the power cord correctly connected. See “Installation,” “Water connection,” and “Electrical connection” and the installation plan supplied.

Procedure

During commissioning, a set procedure is followed which must not be interrupted, e.g. by opening the door. The display will automatically guide you through the process.

All settings, except for selecting the water connections, can be retro-

spectively altered via the and menus.

The settings made during the commissioning process are only adopted after a complete program has been run.

If the program is interrupted or if no program is started or the machine is switched off, the commissioning process must be carried out again.

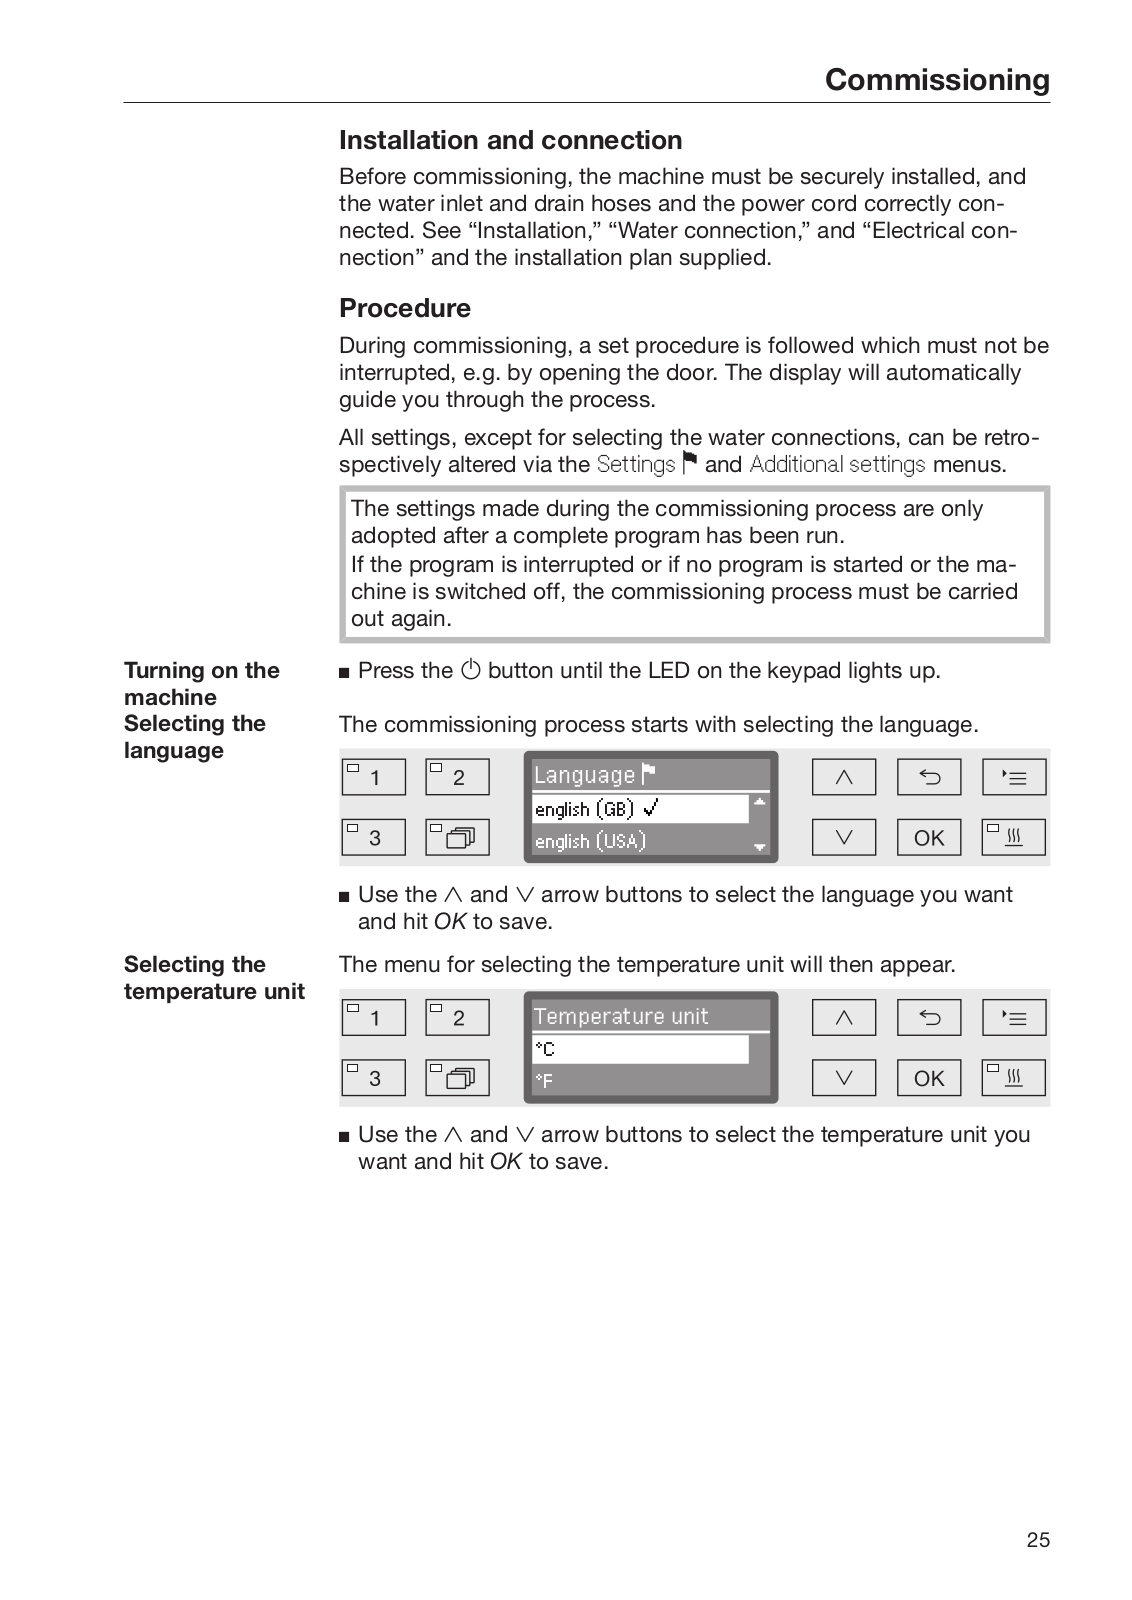
Turning on the Press the button until the LED on the keypad lights up. machine

Selecting the The commissioning process starts with selecting the language.

language

Language

english (GB) (

english (USA)

Use the and arrow buttons to select the language you want and hit OK to save.

Selecting the The menu for selecting the temperature unit will then appear.

temperature unit

Temperature unit

°C

°F

Use the and arrow buttons to select the temperature unit you want and hit OK to save.

25

Miele PG 8583 CD Operating instructions

Commissioning

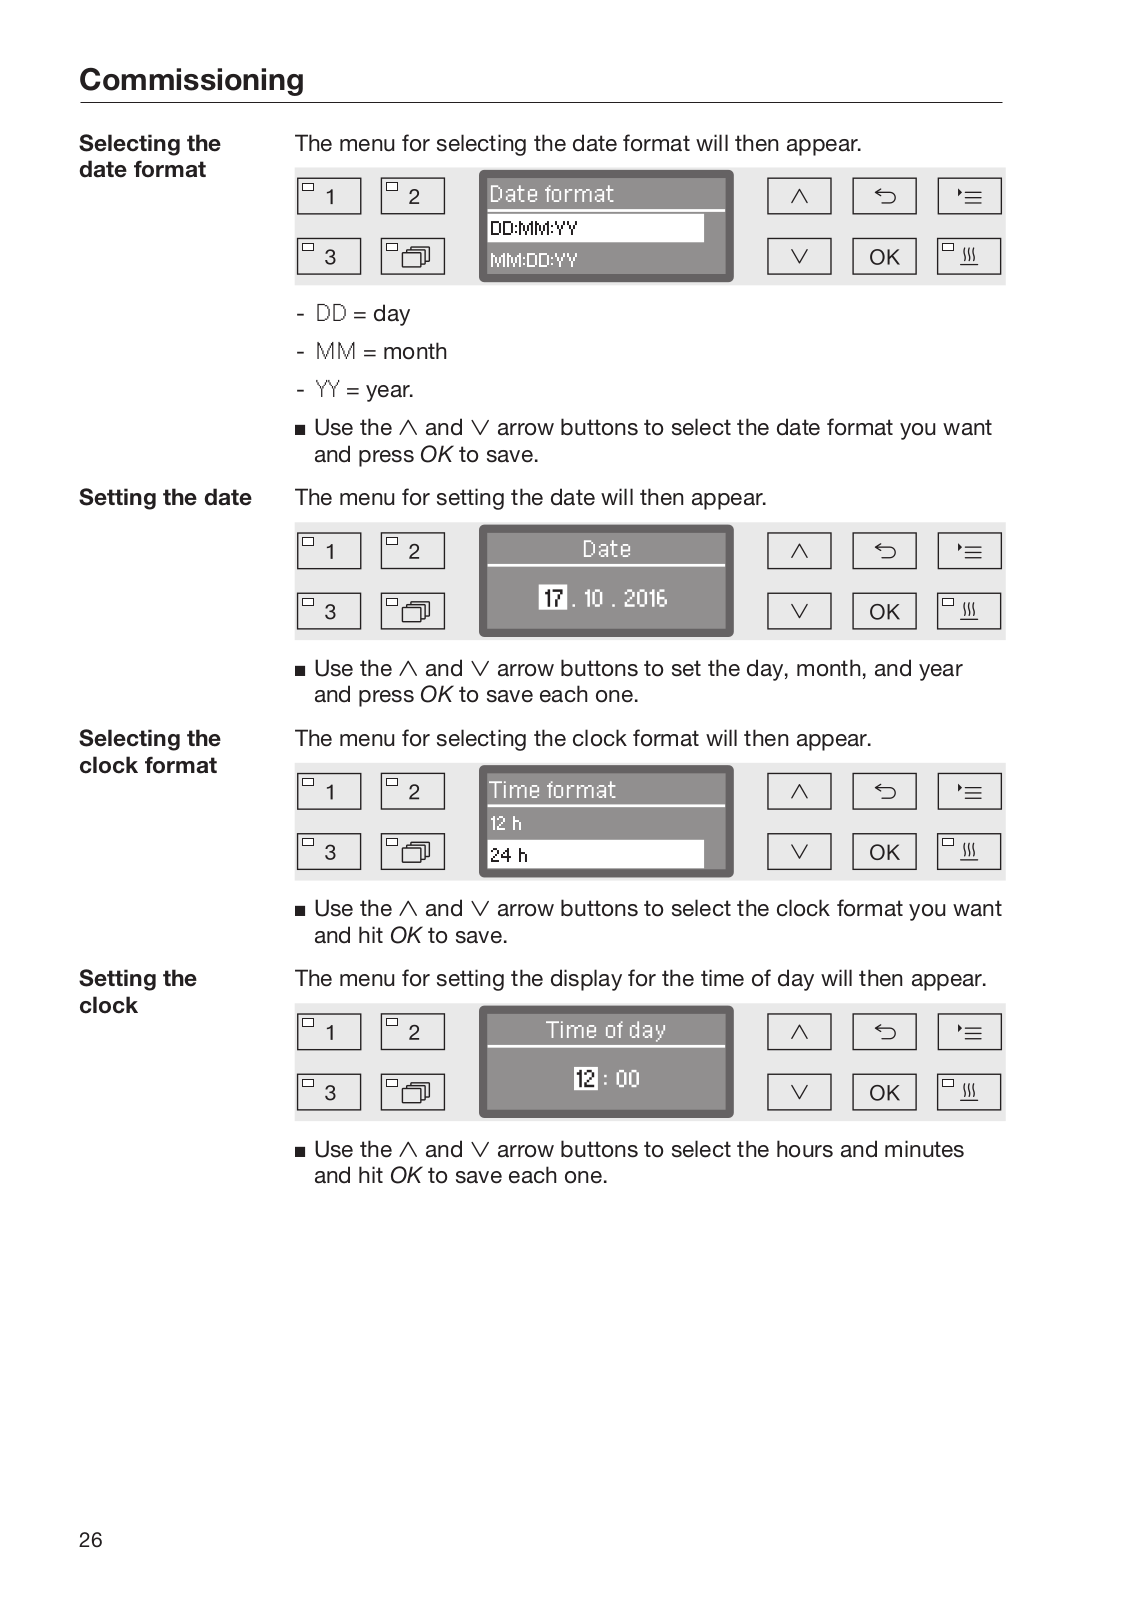
Selecting the The menu for selecting the date format will then appear.

date format

Date format

DD:MM:YY

MM:DD:YY

-DD = day

-MM = month

-YY = year.

Use the and arrow buttons to select the date format you want and press OK to save.

Setting the date The menu for setting the date will then appear.

Date

Use the and arrow buttons to set the day, month, and year and press OK to save each one.

Selecting the The menu for selecting the clock format will then appear.

clock format

Time format

12 h

24 h

Use the and arrow buttons to select the clock format you want and hit OK to save.

Setting the The menu for setting the display for the time of day will then appear.

clock

Time of day

Use the and arrow buttons to select the hours and minutes and hit OK to save each one.

26


Commissioning

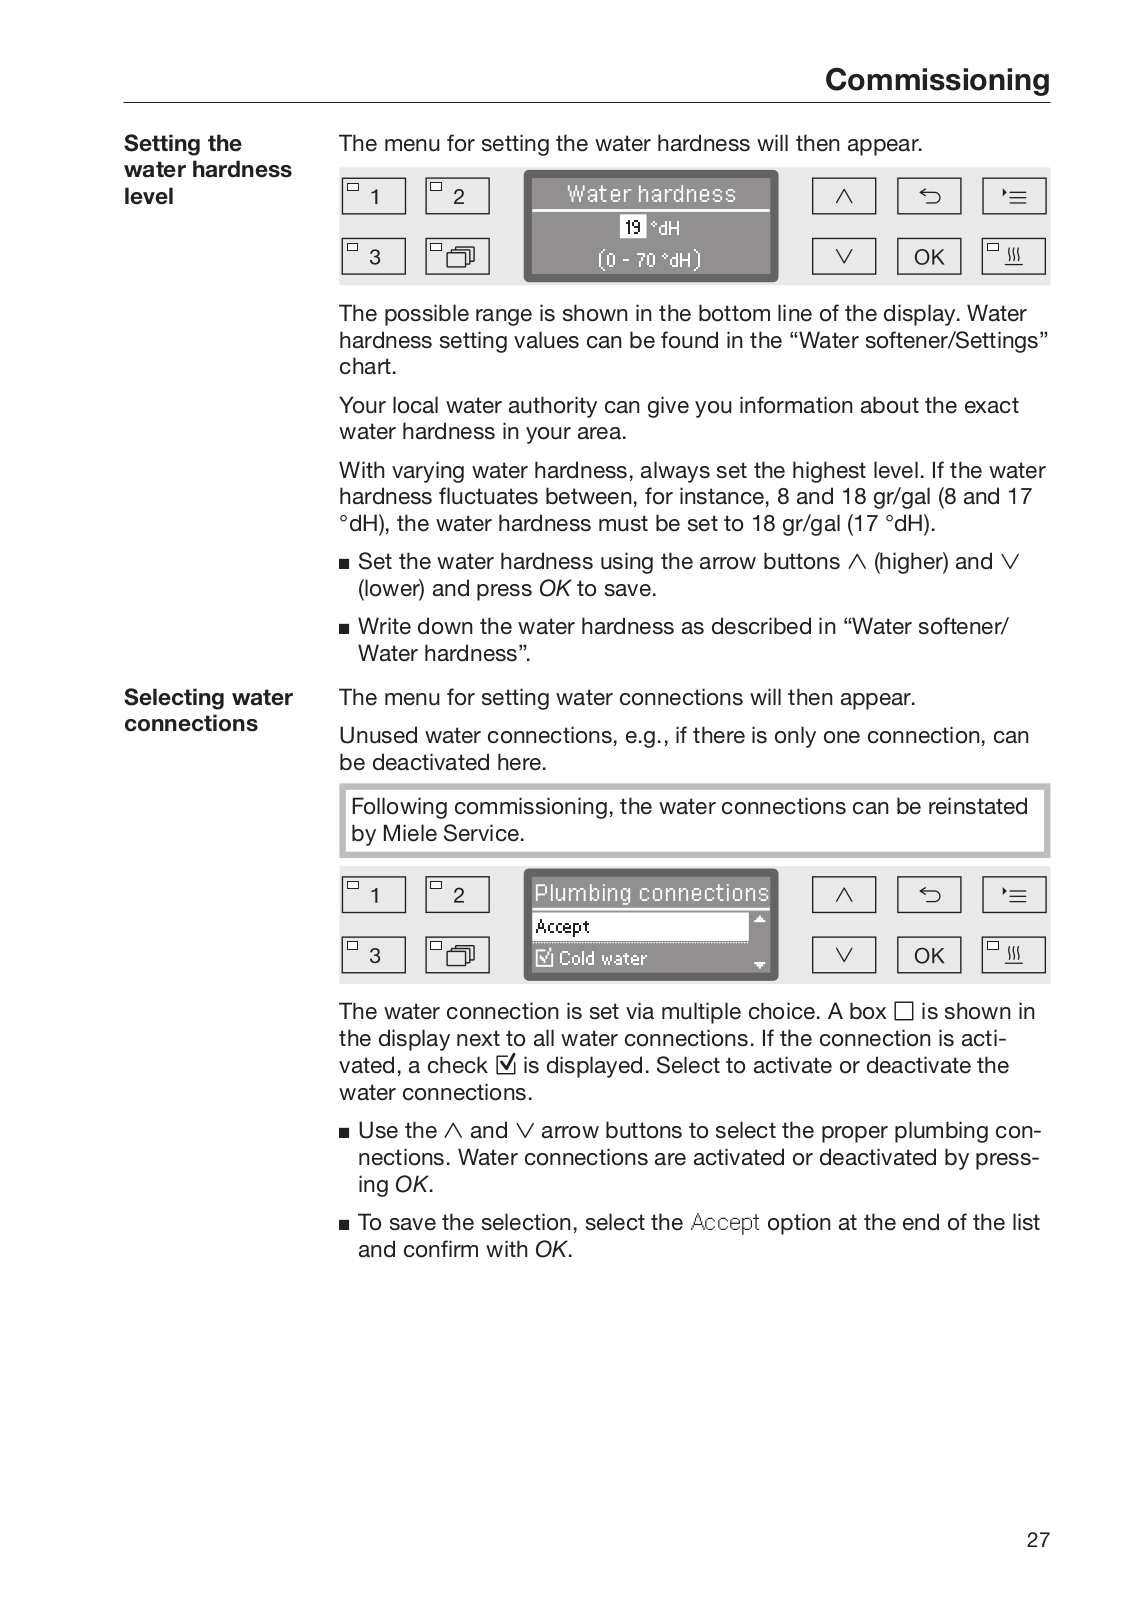
Setting the

The menu for setting the water hardness will then appear.

water hardness


Water hardness


level


19

°dH


(0 - 70 °dH)


The possible range is shown in the bottom line of the display. Water


hardness setting values can be found in the “Water softener/Settings”


chart.


Your local water authority can give you information about the exact


water hardness in your area.


With varying water hardness, always set the highest level. If the water


hardness fluctuates between, for instance, 8 and 18 gr/gal (8 and 17


°dH), the water hardness must be set to 18 gr/gal (17 °dH).


Set the water hardness using the arrow buttons (higher) and


(lower) and press OK to save.


Write down the water hardness as described in “Water softener/


Water hardness”.

Selecting water

The menu for setting water connections will then appear.

connections

Unused water connections, e.g., if there is only one connection, can


be deactivated here.


Following commissioning, the water connections can be reinstated


by Miele Service.


Plumbing connections


Accept


Cold water


The water connection is set via multiple choice. A box is shown in the display next to all water connections. If the connection is activated, a check is displayed. Select to activate or deactivate the water connections.

Use the and arrow buttons to select the proper plumbing connections. Water connections are activated or deactivated by pressing OK.

To save the selection, select the Accept option at the end of the list and confirm with OK.

27

Commissioning

Commissioning Commissioning is completed when the following message is discompleted played.

Set up successful

Confirm the message with OK. The machine is now ready for use.


Normal plus


Temperature


75 °C


Duration

1:30 h


The settings made during the commissioning process are only


adopted after a complete program has been run.


Select any program, e.g.: Drain.


Press the Start/Stop button to start the program.


After commissioning, every program starts with reactivation of the


water softener.


Fault 420


If the program is canceled using Fault 420, all the plumbing connec-


tions are deactivated.


Confirm the error message with OK.


Use the button to switch the machine off.


Wait approximately 10 seconds before switching the machine on


again with the button.


The commissioning procedure starts again.


Perform commissioning and activate at least one plumbing connec-


tion; e.g. for cold water.

28

Opening and closing the door

Electronic door lock

The machine is equipped with a Comfort door lock. When the door is closed, the Comfort door lock automatically pulls the door into the correct position, electronically locking the door.

Opening the door

An electronically locked door can only be opened if:

-the machine is connected to the electrical supply and is switched on (the LED for the button is lit up)

-there is no program running

-the temperature in the wash cabinet is less than 140°F (60°C)

-the LED is lit up.

Press the button to open the door.

The Comfort door lock opens the door slightly. The LED goes out as soon as the door is unlocked.

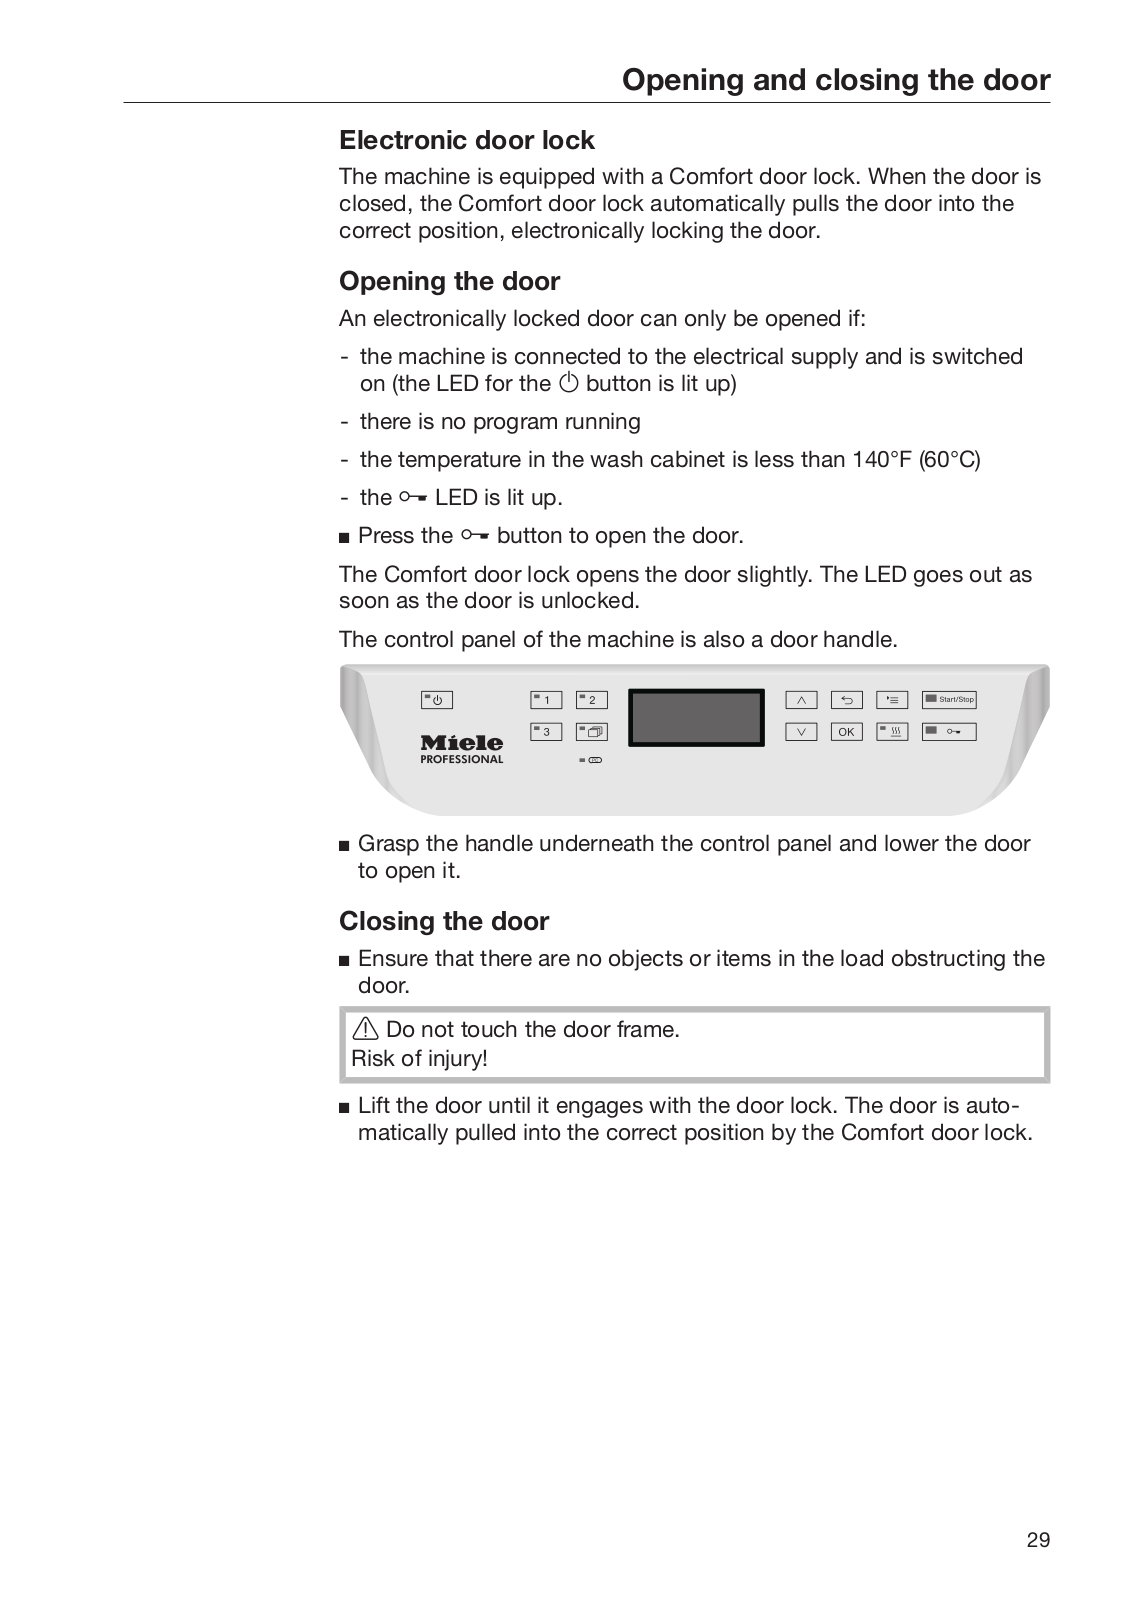
The control panel of the machine is also a door handle.

Grasp the handle underneath the control panel and lower the door to open it.

Closing the door

Ensure that there are no objects or items in the load obstructing the door.

Do not touch the door frame.

Risk of injury!

Lift the door until it engages with the door lock. The door is automatically pulled into the correct position by the Comfort door lock.

29

Opening and closing the door

Opening the door using the emergency release

The emergency release may only be used when it is no longer possible to open the door normally, e.g. in the event of power loss.

If the emergency release is operated during a program cycle, hot water and cleaning agents can escape.

Risk of scalding, burning and chemical burns.

Push against the door so that less force is needed to operate the emergency release.

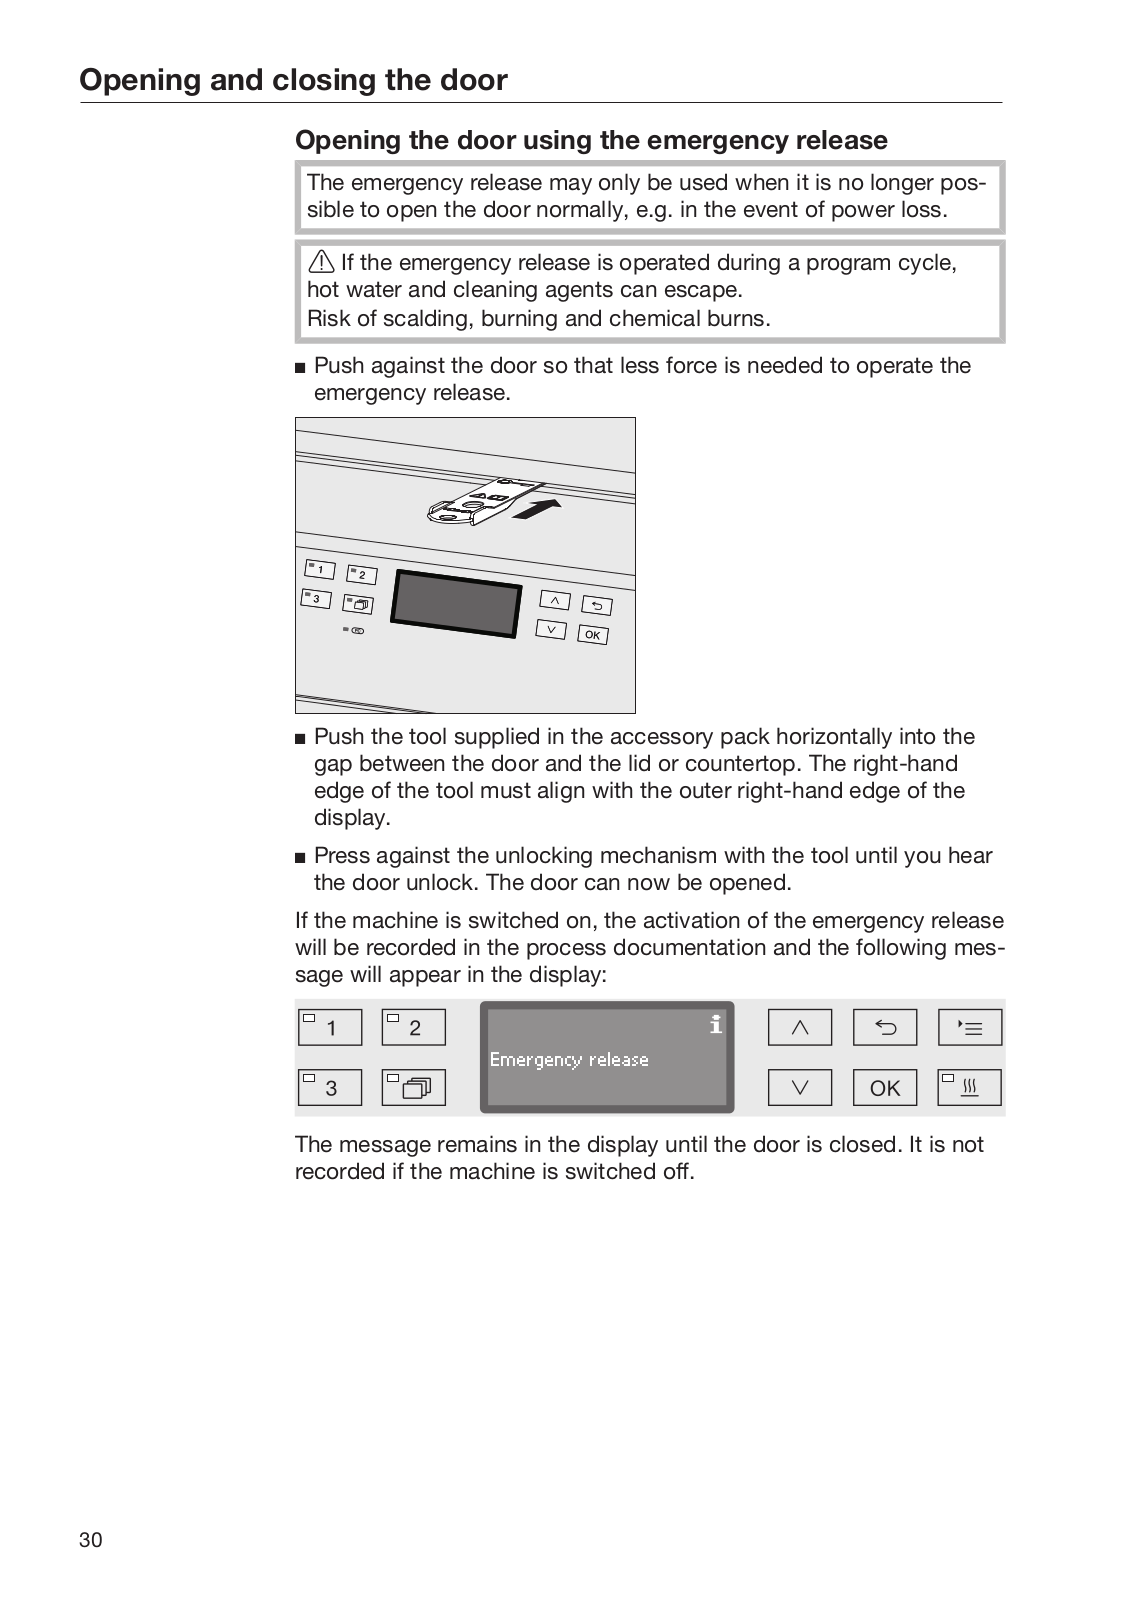
Push the tool supplied in the accessory pack horizontally into the gap between the door and the lid or countertop. The right-hand edge of the tool must align with the outer right-hand edge of the display.

Press against the unlocking mechanism with the tool until you hear the door unlock. The door can now be opened.

If the machine is switched on, the activation of the emergency release will be recorded in the process documentation and the following message will appear in the display:

Emergency release

The message remains in the display until the door is closed. It is not recorded if the machine is switched off.

30

Loading...
+ 154 hidden pages