Miele PG 8535 OXIVARIO Operating instructions

0 (0)

Operating instructions

Washer-disinfector

PG 8535 OXIVARIO

To avoid the risk of accidents or

en - GB, AU, NZ

damage to the machine it is


essential to read these instructions


before it is installed, commissioned


and used for the first time.

M.-Nr. 10 317 961

Contents

Warning and Safety instructions . . . . . . . . . . . . . . . . . . . . . . . . . . . . . . . . . . . . . 5 Correct application . . . . . . . . . . . . . . . . . . . . . . . . . . . . . . . . . . . . . . . . . . . . . . . 5 Symbols on the machine . . . . . . . . . . . . . . . . . . . . . . . . . . . . . . . . . . . . . . . . . . 9

Intended Use . . . . . . . . . . . . . . . . . . . . . . . . . . . . . . . . . . . . . . . . . . . . . . . . . . . . 11 User profile . . . . . . . . . . . . . . . . . . . . . . . . . . . . . . . . . . . . . . . . . . . . . . . . . . . . . . 13

Description of the machine . . . . . . . . . . . . . . . . . . . . . . . . . . . . . . . . . . . . . . . . . 14 Controls . . . . . . . . . . . . . . . . . . . . . . . . . . . . . . . . . . . . . . . . . . . . . . . . . . . . . . . . . 15 Display . . . . . . . . . . . . . . . . . . . . . . . . . . . . . . . . . . . . . . . . . . . . . . . . . . . . . . . . . . 17 An example of a selected list . . . . . . . . . . . . . . . . . . . . . . . . . . . . . . . . . . . . . . 17 An example of a programme sequence display . . . . . . . . . . . . . . . . . . . . . . . 18

Context menu . . . . . . . . . . . . . . . . . . . . . . . . . . . . . . . . . . . . . . . . . . . . . . . . . . . . 19 Change display language . . . . . . . . . . . . . . . . . . . . . . . . . . . . . . . . . . . . . . . . . . . 20 Changing operating level . . . . . . . . . . . . . . . . . . . . . . . . . . . . . . . . . . . . . . . . . . . 21 Delay start . . . . . . . . . . . . . . . . . . . . . . . . . . . . . . . . . . . . . . . . . . . . . . . . . . . . . . . 23 Current faults . . . . . . . . . . . . . . . . . . . . . . . . . . . . . . . . . . . . . . . . . . . . . . . . . . . . . 25 Remove Salt. . . . . . . . . . . . . . . . . . . . . . . . . . . . . . . . . . . . . . . . . . . . . . . . . . . . . . 25

Opening and closing the door . . . . . . . . . . . . . . . . . . . . . . . . . . . . . . . . . . . . . . 26 Electric door lock . . . . . . . . . . . . . . . . . . . . . . . . . . . . . . . . . . . . . . . . . . . . . . . . . . 26 To open the door with the emergency release . . . . . . . . . . . . . . . . . . . . . . . . . . . 26

Water softener . . . . . . . . . . . . . . . . . . . . . . . . . . . . . . . . . . . . . . . . . . . . . . . . . . . 27 Programming the water softener . . . . . . . . . . . . . . . . . . . . . . . . . . . . . . . . . . . . . . 28 Salt refill display . . . . . . . . . . . . . . . . . . . . . . . . . . . . . . . . . . . . . . . . . . . . . . . . . . . 28 Filling the salt reservoir . . . . . . . . . . . . . . . . . . . . . . . . . . . . . . . . . . . . . . . . . . . . . 28

Automatic mobile unit recognition. . . . . . . . . . . . . . . . . . . . . . . . . . . . . . . . . . . 30

Spray arm monitoring . . . . . . . . . . . . . . . . . . . . . . . . . . . . . . . . . . . . . . . . . . . . . 31

Areas of application. . . . . . . . . . . . . . . . . . . . . . . . . . . . . . . . . . . . . . . . . . . . . . . 32 Protein test . . . . . . . . . . . . . . . . . . . . . . . . . . . . . . . . . . . . . . . . . . . . . . . . . . . . . . . 32 Loading the machine . . . . . . . . . . . . . . . . . . . . . . . . . . . . . . . . . . . . . . . . . . . . . . . 33 Water connection spring adapter . . . . . . . . . . . . . . . . . . . . . . . . . . . . . . . . . . . . . 34 Height adjustable top basket. . . . . . . . . . . . . . . . . . . . . . . . . . . . . . . . . . . . . . . . . 34 Surgical instruments (OP) . . . . . . . . . . . . . . . . . . . . . . . . . . . . . . . . . . . . . . . . . . . 35 Ophthalmology . . . . . . . . . . . . . . . . . . . . . . . . . . . . . . . . . . . . . . . . . . . . . . . . . . . 36 Anaesthetic instruments (AN) . . . . . . . . . . . . . . . . . . . . . . . . . . . . . . . . . . . . . . . . 37 Baby bottles (BC) . . . . . . . . . . . . . . . . . . . . . . . . . . . . . . . . . . . . . . . . . . . . . . . . . 38 Operating theatre shoes . . . . . . . . . . . . . . . . . . . . . . . . . . . . . . . . . . . . . . . . . . . . 39 Laboratory glassware (LG) . . . . . . . . . . . . . . . . . . . . . . . . . . . . . . . . . . . . . . . . . . 40

2

Contents

Chemical processes and technology. . . . . . . . . . . . . . . . . . . . . . . . . . . . . . . . . 42

Dispensing liquid chemical agents . . . . . . . . . . . . . . . . . . . . . . . . . . . . . . . . . . 47 Dispensing systems. . . . . . . . . . . . . . . . . . . . . . . . . . . . . . . . . . . . . . . . . . . . . . . . 48 "Fill DOS [X] container" message . . . . . . . . . . . . . . . . . . . . . . . . . . . . . . . . . . . 48 Fill the containers with the relevant agent . . . . . . . . . . . . . . . . . . . . . . . . . . . . 48

Connecting the H2O2 solution container. . . . . . . . . . . . . . . . . . . . . . . . . . . . . . 49 "Check dispensing system [X]". . . . . . . . . . . . . . . . . . . . . . . . . . . . . . . . . . . . . 49

Venting the dispensing system. . . . . . . . . . . . . . . . . . . . . . . . . . . . . . . . . . . . . 49

Operation . . . . . . . . . . . . . . . . . . . . . . . . . . . . . . . . . . . . . . . . . . . . . . . . . . . . . . . 50 Switching on . . . . . . . . . . . . . . . . . . . . . . . . . . . . . . . . . . . . . . . . . . . . . . . . . . . . . 50 Reset button . . . . . . . . . . . . . . . . . . . . . . . . . . . . . . . . . . . . . . . . . . . . . . . . . . . 50 Starting the programme . . . . . . . . . . . . . . . . . . . . . . . . . . . . . . . . . . . . . . . . . . . . . 50 Programme sequence . . . . . . . . . . . . . . . . . . . . . . . . . . . . . . . . . . . . . . . . . . . . . . 51 At the end of the programme. . . . . . . . . . . . . . . . . . . . . . . . . . . . . . . . . . . . . . . . . 51 Switching off . . . . . . . . . . . . . . . . . . . . . . . . . . . . . . . . . . . . . . . . . . . . . . . . . . . . . 51 Cancelling a programme . . . . . . . . . . . . . . . . . . . . . . . . . . . . . . . . . . . . . . . . . . . . 52 Interrupting a programme . . . . . . . . . . . . . . . . . . . . . . . . . . . . . . . . . . . . . . . . . . . 53

Process documentation . . . . . . . . . . . . . . . . . . . . . . . . . . . . . . . . . . . . . . . . . . . 54

Maintenance . . . . . . . . . . . . . . . . . . . . . . . . . . . . . . . . . . . . . . . . . . . . . . . . . . . . . 55 Periodic checks . . . . . . . . . . . . . . . . . . . . . . . . . . . . . . . . . . . . . . . . . . . . . . . . . . . 55 Process validation . . . . . . . . . . . . . . . . . . . . . . . . . . . . . . . . . . . . . . . . . . . . . . . . . 55 Routine checks . . . . . . . . . . . . . . . . . . . . . . . . . . . . . . . . . . . . . . . . . . . . . . . . . . . 55 Cleaning the filters in the wash cabinet . . . . . . . . . . . . . . . . . . . . . . . . . . . . . . . . . 56

Cleaning the coarse filter . . . . . . . . . . . . . . . . . . . . . . . . . . . . . . . . . . . . . . . . . 56 Cleaning the coarse, flat and micro-fine filters . . . . . . . . . . . . . . . . . . . . . . . . . 57 Cleaning the spray arms . . . . . . . . . . . . . . . . . . . . . . . . . . . . . . . . . . . . . . . . . . . . 58 Cleaning the control panel. . . . . . . . . . . . . . . . . . . . . . . . . . . . . . . . . . . . . . . . . . . 59 Cleaning the front of the machine . . . . . . . . . . . . . . . . . . . . . . . . . . . . . . . . . . . . . 59 Cleaning the wash cabinet . . . . . . . . . . . . . . . . . . . . . . . . . . . . . . . . . . . . . . . . . . 59 Cleaning the door seals . . . . . . . . . . . . . . . . . . . . . . . . . . . . . . . . . . . . . . . . . . . . . 59 Mobile units, baskets and inserts . . . . . . . . . . . . . . . . . . . . . . . . . . . . . . . . . . . . . 60 Drying unit (TA) - Maintenance . . . . . . . . . . . . . . . . . . . . . . . . . . . . . . . . . . . . . . . 61 Changing the coarse filter . . . . . . . . . . . . . . . . . . . . . . . . . . . . . . . . . . . . . . . . 61 Changing the fine filter . . . . . . . . . . . . . . . . . . . . . . . . . . . . . . . . . . . . . . . . . . . 62

3

Contents

Problem solving . . . . . . . . . . . . . . . . . . . . . . . . . . . . . . . . . . . . . . . . . . . . . . . . . 63 Thermal cut-out . . . . . . . . . . . . . . . . . . . . . . . . . . . . . . . . . . . . . . . . . . . . . . . . . . . 63 Cleaning the filters in the water inlet . . . . . . . . . . . . . . . . . . . . . . . . . . . . . . . . . . . 64 Cleaning the drain pump and non-return valve . . . . . . . . . . . . . . . . . . . . . . . . . . . 65

After sales service . . . . . . . . . . . . . . . . . . . . . . . . . . . . . . . . . . . . . . . . . . . . . . . . 66

Installation . . . . . . . . . . . . . . . . . . . . . . . . . . . . . . . . . . . . . . . . . . . . . . . . . . . . . . 67

Electrical connection . . . . . . . . . . . . . . . . . . . . . . . . . . . . . . . . . . . . . . . . . . . . . 69

Plumbing. . . . . . . . . . . . . . . . . . . . . . . . . . . . . . . . . . . . . . . . . . . . . . . . . . . . . . . . 70 Connection to the water inlet . . . . . . . . . . . . . . . . . . . . . . . . . . . . . . . . . . . . . . . . . 70 AD water connection (pressurised) 60 - 1000 kPa over pressure . . . . . . . . 71 Optional AD water connection (without pressure) 8.5 - 60 kPa. . . . . . . . . . . . 71 IMPORTANT Australia and New Zealand . . . . . . . . . . . . . . . . . . . . . . . . . . . . . . . 72 Drainage . . . . . . . . . . . . . . . . . . . . . . . . . . . . . . . . . . . . . . . . . . . . . . . . . . . . . . . . 73

Technical data . . . . . . . . . . . . . . . . . . . . . . . . . . . . . . . . . . . . . . . . . . . . . . . . . . . 74

Disposal of your old machine . . . . . . . . . . . . . . . . . . . . . . . . . . . . . . . . . . . . . . . 75

4

Warning and Safety instructions

This washer-disinfector complies with all relevant local and national safety requirements. Please note that incorrect use can lead to personal injury and damage to property.

To avoid the risk of accidents and damage to the washer-disinfector, please read these instructions carefully before starting to use it. Keep these instructions in a safe place for reference, and pass them on to any future user.

Correct application

This washer-disinfector is designed for use with the applications described in these Operating Instructions only.

Alterations or conversions to the machine, or using it for purposes other than those for which it was designed, are not permitted and could be dangerous.

This machine must only be used for cleaning and disinfecting instruments, medical devices and laboratory equipment if the manufacturer has stated that they are suitable for machine reprocessing. Manufacturer's cleaning and maintenance instructions for instruments etc. must also be observed.

Miele cannot be held liable for damage caused by improper or incorrect use or operation of the machine.

This washer-disinfector is intended for stationary, indoor use only.

Please pay attention to the following notes to avoid injury and damage.

This washer-disinfector should be commissioned and then maintained by a Miele authorised and trained service technician only. A Miele service contract is recommended to ensure compliance with GLP Guidelines and the Medical Device Directive. Unauthorised repairs could be dangerous and jeopordise the personal safety of the operator.

Do not install the wahser-disinfector in an area where there is any danger of explosion or of freezing conditions.

The electrical safety of this

washer-disinfector can only be guaranteed when correctly earthed. It is most important that this basic safety requirement is observed and regularly tested, and where there is any doubt, the on-site wiring system should be inspected by a qualified electrician. The manufacturer cannot be held liable for damage or injury caused by the lack of or inadequacy of an effective earthing system (e.g. electric shock).

A damaged or leaking washer-disinfector could be dangerous and compromise your safety. Disconnect the machine from the mains immediately and call the Miele Service Department.

Personnel operating the machine should be trained regularly. Untrained personnel and children must not be allowed access to the machine or its controls.

5

Warning and Safety instructions

Take care when handling chemical agents such as cleaning agent, neutralising agent, rinsing agent etc. These may contain irritant or corrosive ingredients.

Please follow the manufacturer's safety instructions. Wear protective gloves and goggles. With all chemical agents, the manufacturer's safety instructions and safety data sheets must be observed.

This washer-disinfector is designed for operation with water and recommended additive chemical agents only. Organic solvents and flammable liquid agents must not be used in this machine.

These could cause an explosion, damage rubber and plastic components in the machine, and cause liquids to leak out of the machine.

The water in the cabinet must not be used as drinking water.

Do not sit or lean on an open door. The machine could tip up and be damaged or cause an injury.

Be careful when sorting items with sharp pointed ends and positioning them in the machine that you do not hurt yourself or create a danger for others. Sharp knives etc. should be placed in baskets with the pointed ends facing downwards.

Please be aware that the washer-disinfector may be operating at high temperatures. If the door is opened with the emergency release cord there is a danger of burning, scalding or chemical burning or if disinfecting agents are being used, a danger of inhaling toxic vapours.

Where there is a risk of toxic or chemical substances occuring in the suds solution (e.g. aldehyde in the disinfecting agent), it is essential to regularly check door seals and make sure that the steam condensor is functioning correctly.

Opening the machine door during a programme interruption carries particular risks in such circumstances.

Should personnel accidentally come into contact with toxic vapours or chemical agents, follow the emergency instructions given in the manufacturer's safety data sheets.

Mobile units, modules, inserts and the load must be allowed to cool down before unloading the machine. Any water remaining in containers could still be very hot. Empty them into the wash cabinet before taking them out.

After using the hot air drying unit, open the door to allow everything in the cabinet from the load itself to the mobile units, modules and inserts to cool down.

6

Warning and Safety instructions

Do not touch the heating elements if you open the door during or directly after the end of a programme; you could burn yourself. They remain hot for some time after the end of the programme.

Never clean the machine or near vicinity with a water hose or a pressure washer.

The washer-disinfector must be disconnected from the mains electricity supply before any maintenance or repair work is carried out. Do not reconnect it until the maintenance or repair work has been successfully completed.

The following points should be observed to assist in maintaining quality standards for processing medical devices and sensitive laboratory glassware, and to avoid injury to patients or damage to equipment.

If the washer-disinfector is being used for disinfection in accordance with official regulations on the control of epidemics, the steam condenser and its connections to and from the wash cabinet must be cleaned and disinfected whenever any repairs are carried out or parts replaced.

If it is necessary to interrupt a programme in exceptional circumstances, this may only be done by authorised personnel.

The standard of cleaning and disinfection in the disinfection programmes for medical devices must be routinely confirmed by the user. The

process must be thermo-electrically validated on a regular basis, and checked against documented control results. Chemical disinfecting procedures must also be validated using chemical or bio indicators.

For thermal disinfection, use temperatures and temperature holding times to achieve the required infection prophylaxis in accordance with current health and safety regulations.

Medical devices should be reprocessed by thermal disinfection. Items which are not heat-resistant, e.g. operating theatre (OP) shoes, can be cleaned with the CHEM-DESIN programme with the addition of a chemical disinfection agent.

The range of effective disinfection is based on claims made by the producer of the disinfecting agent, Their instructions on handling, use and effectiveness must be observed. This type of chemo-thermal procedure is not suitable for reprocessing medical devices.

Chemical agents could, under certain conditions, cause damage to the washer-disinfector. Follow the recommendations of the chemical agent manufacturer. In the event of any damage or material deterioration please contact Miele.

H2O2 solution must only be used in the special containers and adapters provided by the Ecolab or Dr. Weigert companies.

Important: observe the manufacturer's safety instructions as given on their safety data sheets.

7

Warning and Safety instructions

Be especially careful when handling H2O2 solution. It is an irritant chemical. Observe all current safety instructions pertaining to its use.

Wear protective gloves and goggles.

Empty containers must be disposed of in accordance with the manufacturer's instructions.

H2O2 solution must not be mixed with other chemicals. This could cause a serious chemical reaction, e. g. the release of harmful vapours or gases.

Pre-treatments with cleaning or disinfecting agents can create foam, as can certain types of soiling and chemical agents. Foam can have an adverse effect on the disinfection and cleaning result.

Foam must not be able to escape from the wash cabinet. It would hinder the correct functioning of the machine.

Check the process used regularly to monitor foaming levels.

To avoid the risk of damage to the washer-disinfector and any accessories used with it caused by chemical agents, soiling and any reaction between the two please read the notes in "Chemical Processes and Technology".

Where a chemical additive is recommended on technical application grounds (e.g. a cleaning agent), this does not imply that the manufacturer of the machine accepts liability for the effect of the chemical on the items being cleaned.

Please be aware that changes in formulation, storage conditions etc. which may not be publicised by the chemical manufacturer, can have a negative effect on the cleaning result.

When using cleaning agents and specialised products it is essential that the manufacturer's instructions are followed. Chemicals must only be used for the purpose they are designed for and in the situation specified, to the exclusion of other chemicals, to avoid such dangers as chemical reactions (e.g. explosive gas reaction) and material damage.

In critical applications where very stringent requirements have to be met, it is strongly recommended that all the relevant factors for the process, such as chemical agents, water quality etc. are discussed with Miele.

If the cleaning and rinsing results are subject to particularly stringent requirements (e.g. chemical analysis), a regular quality control test should be carried out by the user to ensure that required standards of cleanliness are being achieved.

Mobile units, baskets and inserts should only be used for the purpose they are designed for.

Hollow instruments must be thoroughly cleaned, internally and externally.

8

Warning and Safety instructions

Empty any containers or utensils before arranging them in the machine.

The amount of residual solvents and acids on items going into the cabinet should be minimal. This applies in particular to hydrochloric acid or chloride solutions and to items containing iron that an rust or corrode. The presence in soilng of any solvents should be minimal, (especially those in hazard class A1).

Ensure that solutions or steam containing hydrochloric acid do not come into contact with the steel outer casing of the machine, to avoid any corrosion damage.

After carrying out any work on the mains water system, the water supply system to the washer-disinfector must be vented.

Otherwise, the components in the machine may become damaged.

In areas which may be subject to infestation by cockroaches or other vermin, pay particular attention to keeping the appliance and its surroundings in a clean condition at all times. Any damage which may be caused by cockroaches or other vermin will not be covered by the guarantee.

Please follow the advice on installation in these instructions and the separate Installation Instructions.

Using accessories

Only use genuine Miele original accessories with this machine and only use them for the purposes they are designed for. Consult Miele on the type and application of such equipment.

Only use Miele mobile units, baskets and inserts in this machine. Using accessories, mobile units and inserts made by other manufacturers, or making modifications to Miele accessories, can result in unsatisfactory cleaning and disinfecting results, for which Miele cannot be held liable. Any resultant damage would also invalidate the machine guarantee.

Only use chemical agents which have been approved by their manufacturer for use in the application you are using. The chemical agent manufacturer is responsible for any negative influences on the material the load is made from and for any damage they may cause to the machine.

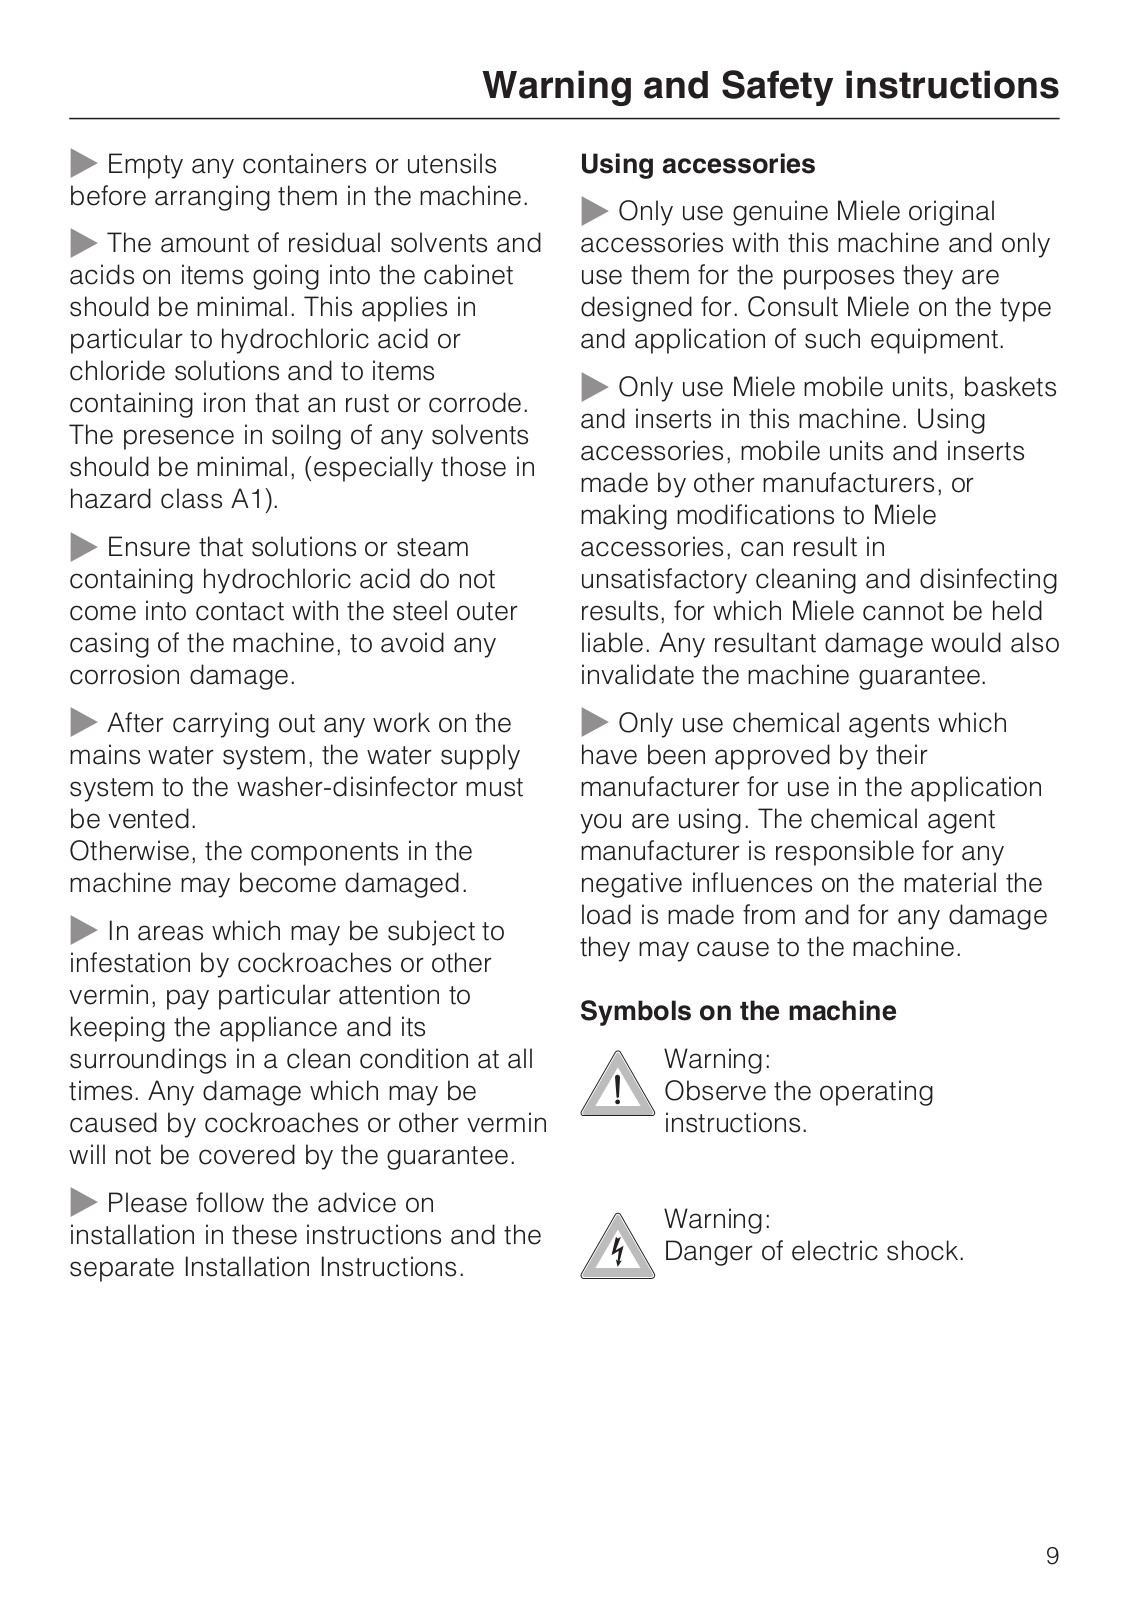
Symbols on the machine

Warning:

Observe the operating instructions.

Warning:

Danger of electric shock.

9

Warning and Safety instructions

Disposing of your old machine

Please note that the machine may have contamination from blood or other bodily fluids in it and must be decontaminated before disposal.

For environmental and safety reasons ensure the machine is completely drained of any residual water, chemical residues and cleaning agent. Observe safety regulations and wear safety goggles and gloves.

Make the door lock inoperable, so that children cannot accidentally shut themselves in. Then make appropriate arrangements for its safe disposal.

For tank system machines ensure that any water is emptied out of the tank.

The manufacturer cannot be held liable for damage caused by non-compliance with these Warning and Safety instructions.

10

Intended Use

Re-usable medical devices, laboratory equipment and accessories can be cleaned, rinsed, disinfected and dried in this Miele washer-disinfector. Follow the medical device and laboratory equipment manufacturer's instructions (according to EN ISO 17664) and local and national regulations and guidelines, on how to reprocess their items by machine.

Examples of application areas:

surgical instruments,

with the Vario-TD programme: minimally invasive instruments can be processed immediately after being used,

anaesthetic and intensive care instruments,

baby bottles and teats,

operating theatre shoes,

or

laboratory equipment used in research and development,

laboratory equipment used in areas of analysis and specimen taking,

laboratory equipment used in micro-biology and biotechnology.

The type of laboratory equipment which can be processed ranges from evaporating dishes to centrifugal test tubes.

Reprocessing medical devices and laboratory equipment by machine achieves reproducible results, and should be used in preference to reprocessing them by hand.

Where disinfection is required for the protection of staff and/or patients, carry out thermal disinfection using e.g. the DESIN vario TD programme.

- Except for operating theatre (OP) shoes which are not heat-resistant, for which the CHEM-DISIN programme should be used.

The parameters for thermal disinfection according to EN ISO 15883-1 (A0 concept) vary depending on the disinfection standard required. They are 80 °C (+ 5 °C, - 0 °C) with a 10 min holding time (A0 600) or 90 °C (+ 5 °C, - 0 °C) with a 5 min holding time (A0 3000). An A0 value of 3000 is suitable for deactivating the HBV virus.

National health and safety regulations regarding disinfection must also be observed (CfPP 01-01, Part D and Harmonised EU Norm EN 15883-2 in the UK).

The cleaning programme as well as any chemical agents must be chosen according to the type of soiling and load being processed.

The agents used for processing the products should be selected to suit the level of cleaning required as well as the method of analysis used.

11

Intended Use

The cleaning result must ensure that instruments can be disinfected correctly, that no residues are left behind, that subsequent sterilisation can be carried out and that the instruments can be used again safely. Medical devices are best processed using the DESIN vario TD programme, or the OXIVARIO programme where applicable.

Programmes OXIVARIO PLUS and OXIVARIO are available for the OXIVARIO process.

The DOS 2 dispensing system is used for dispensing the H2O2 solution.

These cleaning processes use hydrogen peroxide under alkaline conditions to oxidise and remove protein soiling. The cleaning agent used must be tenside free and have a pH value of between 11 and 11.5.

The OXIVARIO procedure has an alkaline main wash making it particularly suitable for the processing of surgical instruments where existing procedures are not satisfactory. It is also suitable for reprocessing instruments used in high frequency surgery, orthopaedic surgery and for instruments that cannot be processed immediately after use.

The OXIVARIO PLUS programme is recommended for preventing the iatrogenic spread of CJD.

The cleaning process is gentle enough for instruments used in minimally invasive surgery, including fibre optics, where the manufacturer has declared that they are suitable for processing with an alkaline cleaning agent.

It is not suitable for anodised aluminium.

Be aware that items made from alloys containing titanium such as some implants, do not always state the material's compatibility. Processing such items can result in colour changes, rendering any coding on them ineffective. If in doubt please consult the manufacturer of the item.

Due to the high efficacy of the Oxivario process it is important to lubricate joints and contact parts on instruments pre sterilisation. Please refer to the instrument manufacturer for guidance.

The use of a suitable carrier (mobile unit, module, insert etc.) is important to ensure the adequate cleaning of the load. Examples are given in the section "Areas of application".

The washer-disinfector is programmed to carry out the final rinse with mains water or with processed water of a quality to suit the application (e.g. aqua destillata, purified water, de-ionised water, demineralised water).The water quality is of particular importance for applications requiring analytically clean laboratory glassware.

This machine complies with EN ISO 15883 for validation purposes.

Optional:

- DOS 4 for retro-fitting

12

Intended Use

User profile

Daily operatives

Operatives using the machine daily should be familiar with the basic functions of the machine and its loads and trained on a regular basis. They require basic knowledge about how to reprocess medical devices by machine.

Generally they would be using the machine in Operating levels A and C.

Supervisory level

More advanced functions such as interrupting or cancelling a programme requires more in-depth knowledge about machine reprocessing of medical devices.

This level of functionality is carried out in Operating level B.

Service and Administration

Changes to processing methods and alterations to the washer-disinfector, e.g. concerning the type of accessories used in it or the conditions in which the machine is used requires additional knowledge about the machine. Validation also requires additional knowledge about how to reprocess medical devices, which procedure to use and any Standards and regulations that may apply.

Service and validation work is carried out using Operating level D.

13

Miele PG 8535 OXIVARIO Operating instructions

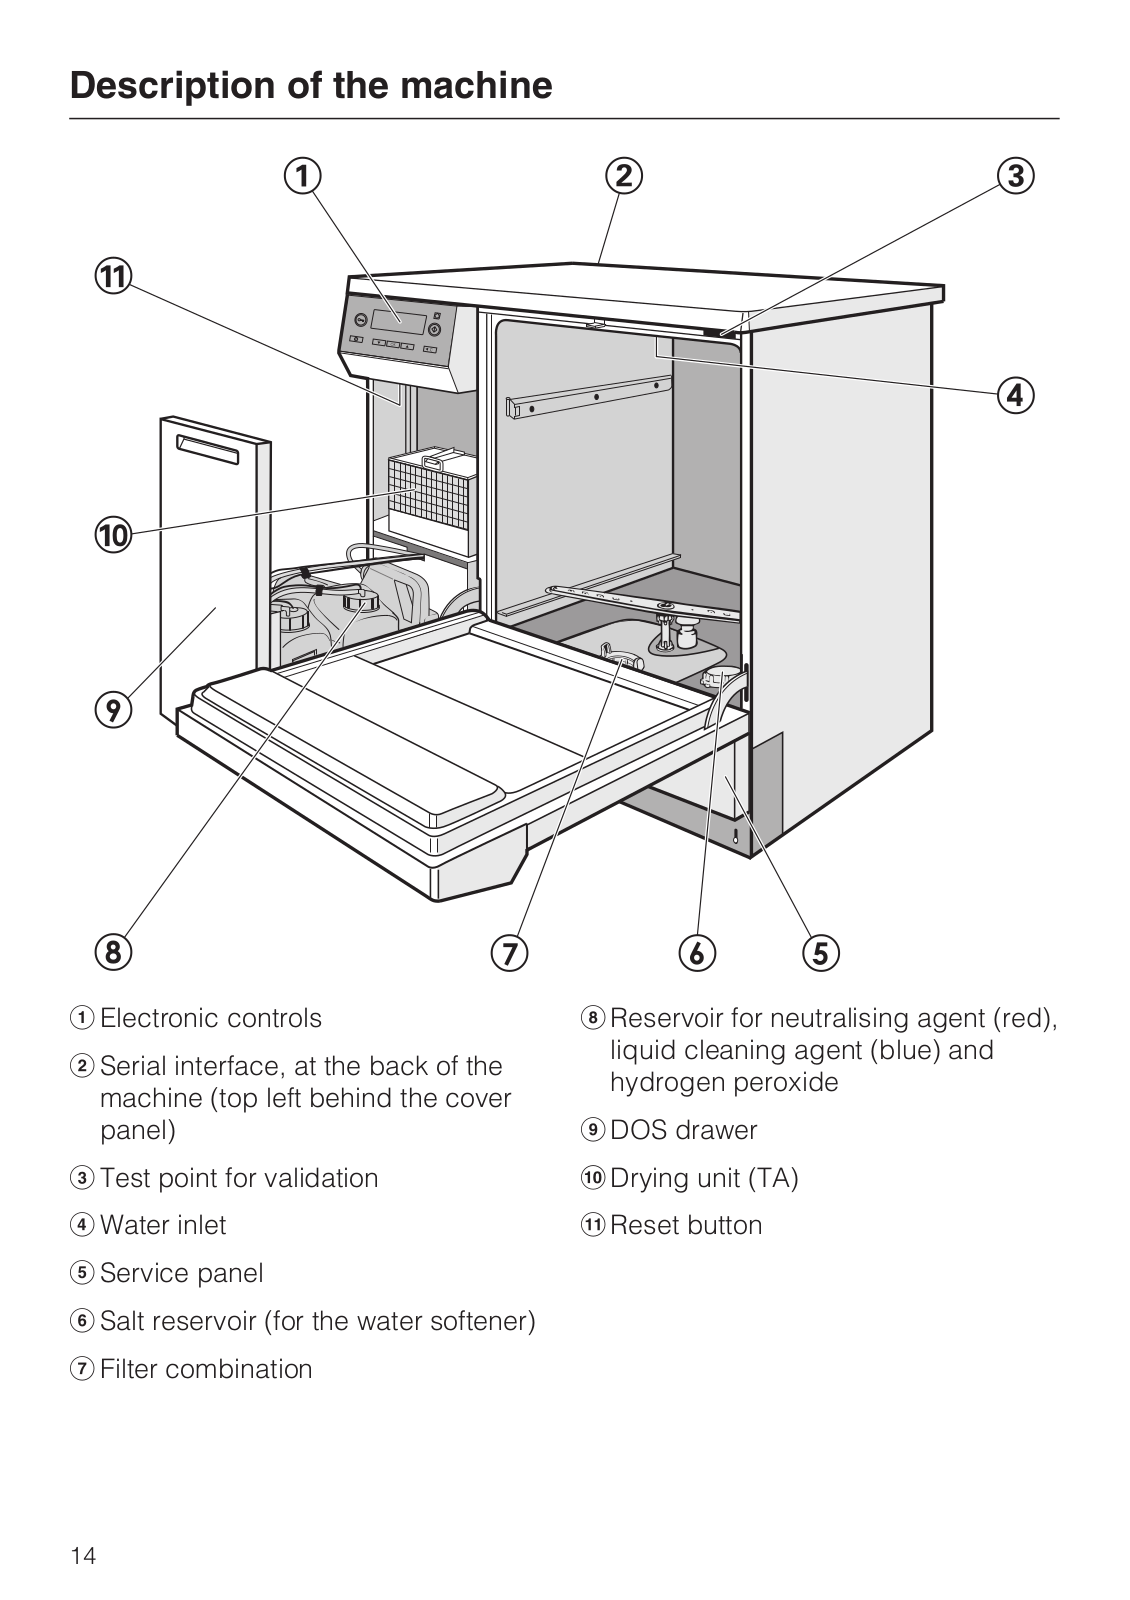
Description of the machine

Electronic controls

Serial interface, at the back of the machine (top left behind the cover panel)

Test point for validation

Water inlet

Service panel

Salt reservoir (for the water softener)

Filter combination

Reservoir for neutralising agent (red), liquid cleaning agent (blue) and hydrogen peroxide

DOS drawer

Drying unit (TA)

Reset button

14

Description of the machine

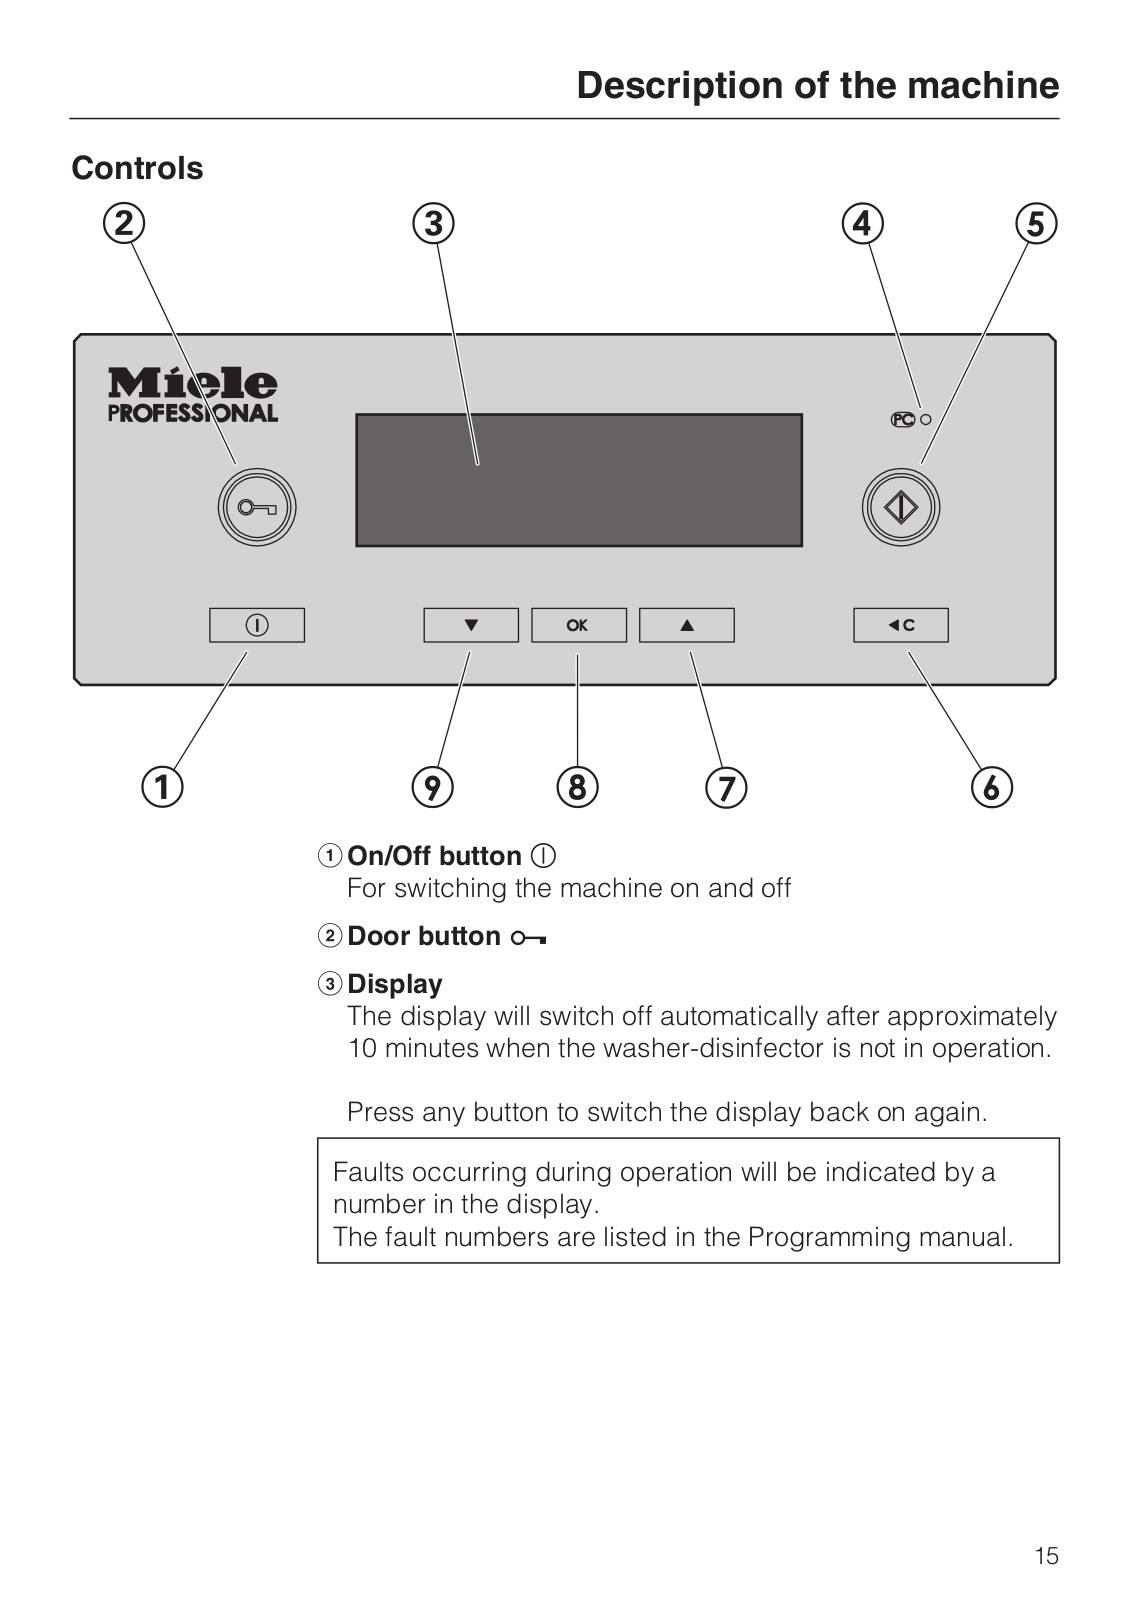
Controls

On/Off button

For switching the machine on and off

Door button

Display

The display will switch off automatically after approximately 10 minutes when the washer-disinfector is not in operation.

Press any button to switch the display back on again.

Faults occurring during operation will be indicated by a number in the display.

The fault numbers are listed in the Programming manual.

15

Description of the machine

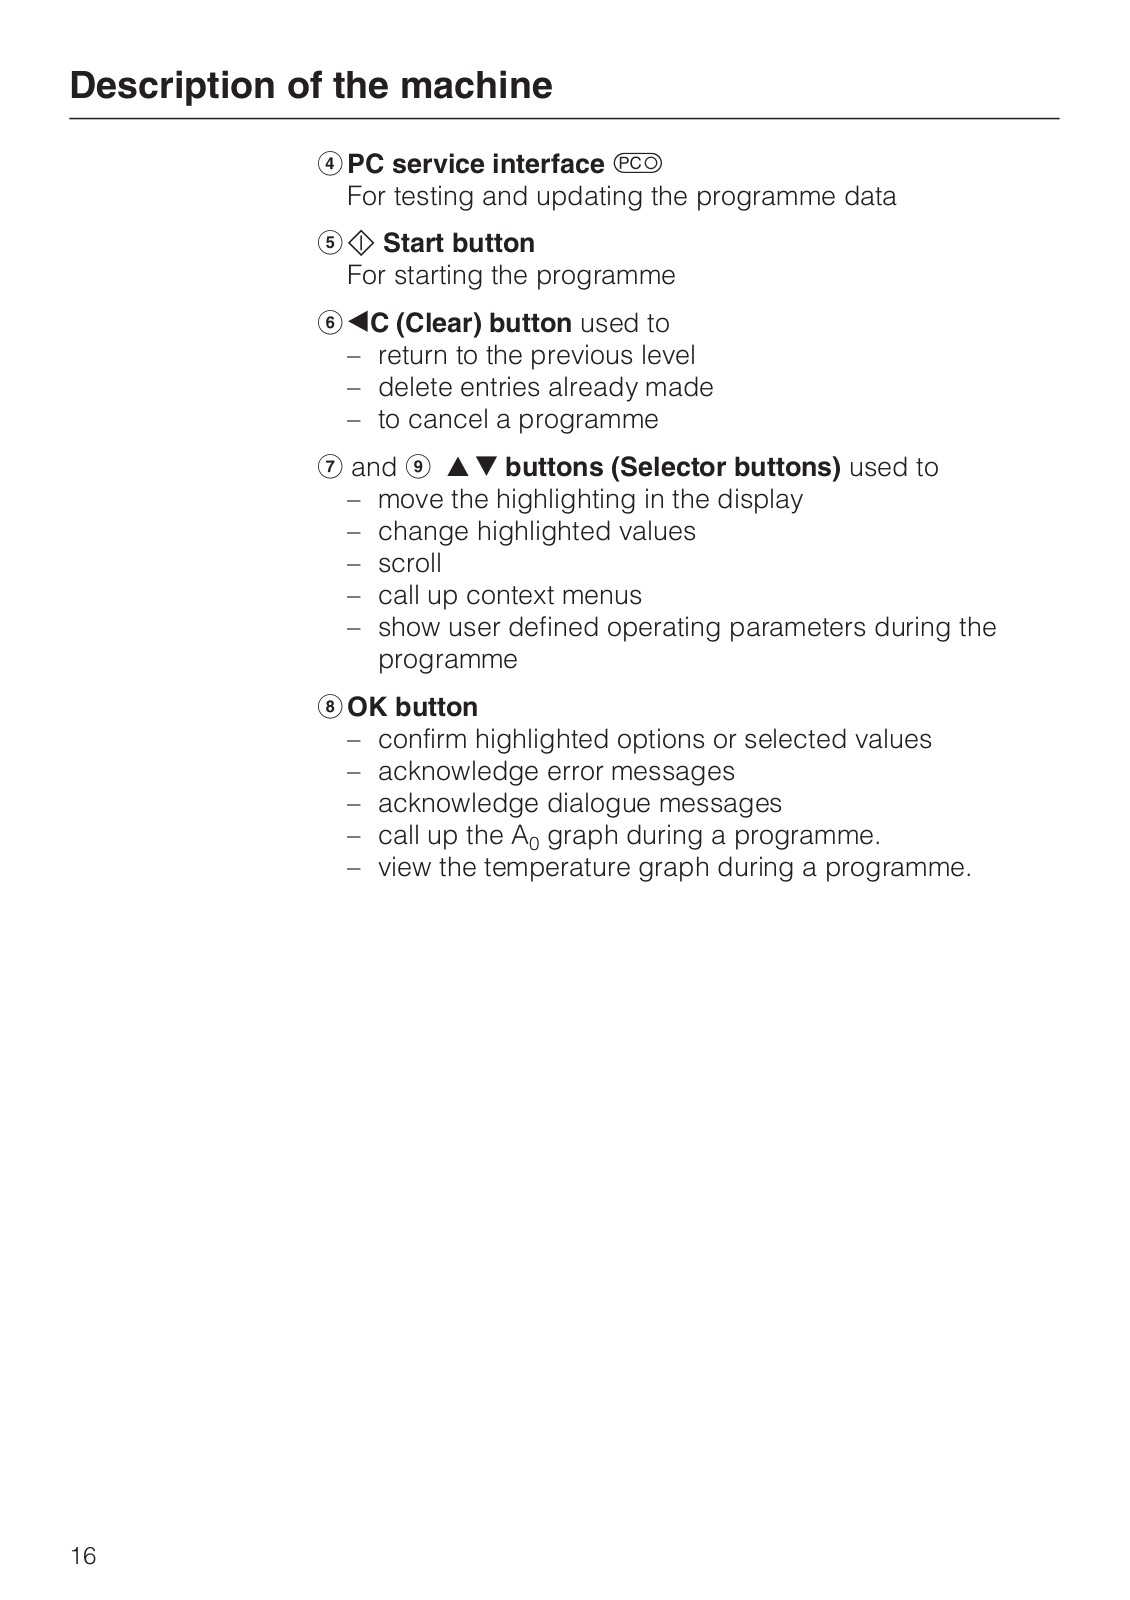
PC service interface

For testing and updating the programme data

Start button

For starting the programme

C (Clear) button used to

return to the previous level

delete entries already made

to cancel a programme

and buttons (Selector buttons) used to

move the highlighting in the display

change highlighted values

scroll

call up context menus

show user defined operating parameters during the programme

OK button

confirm highlighted options or selected values

acknowledge error messages

acknowledge dialogue messages

call up the A0 graph during a programme.

view the temperature graph during a programme.

16

Description of the machine

Display

The display can show the following, depending on the operating level:

the programme / programme overview

the programming menu

the Settings menu

The Settings menu is used to alter the washer-disinfector's profitronic controls to suit different requirements. See the Programming manual for more details.

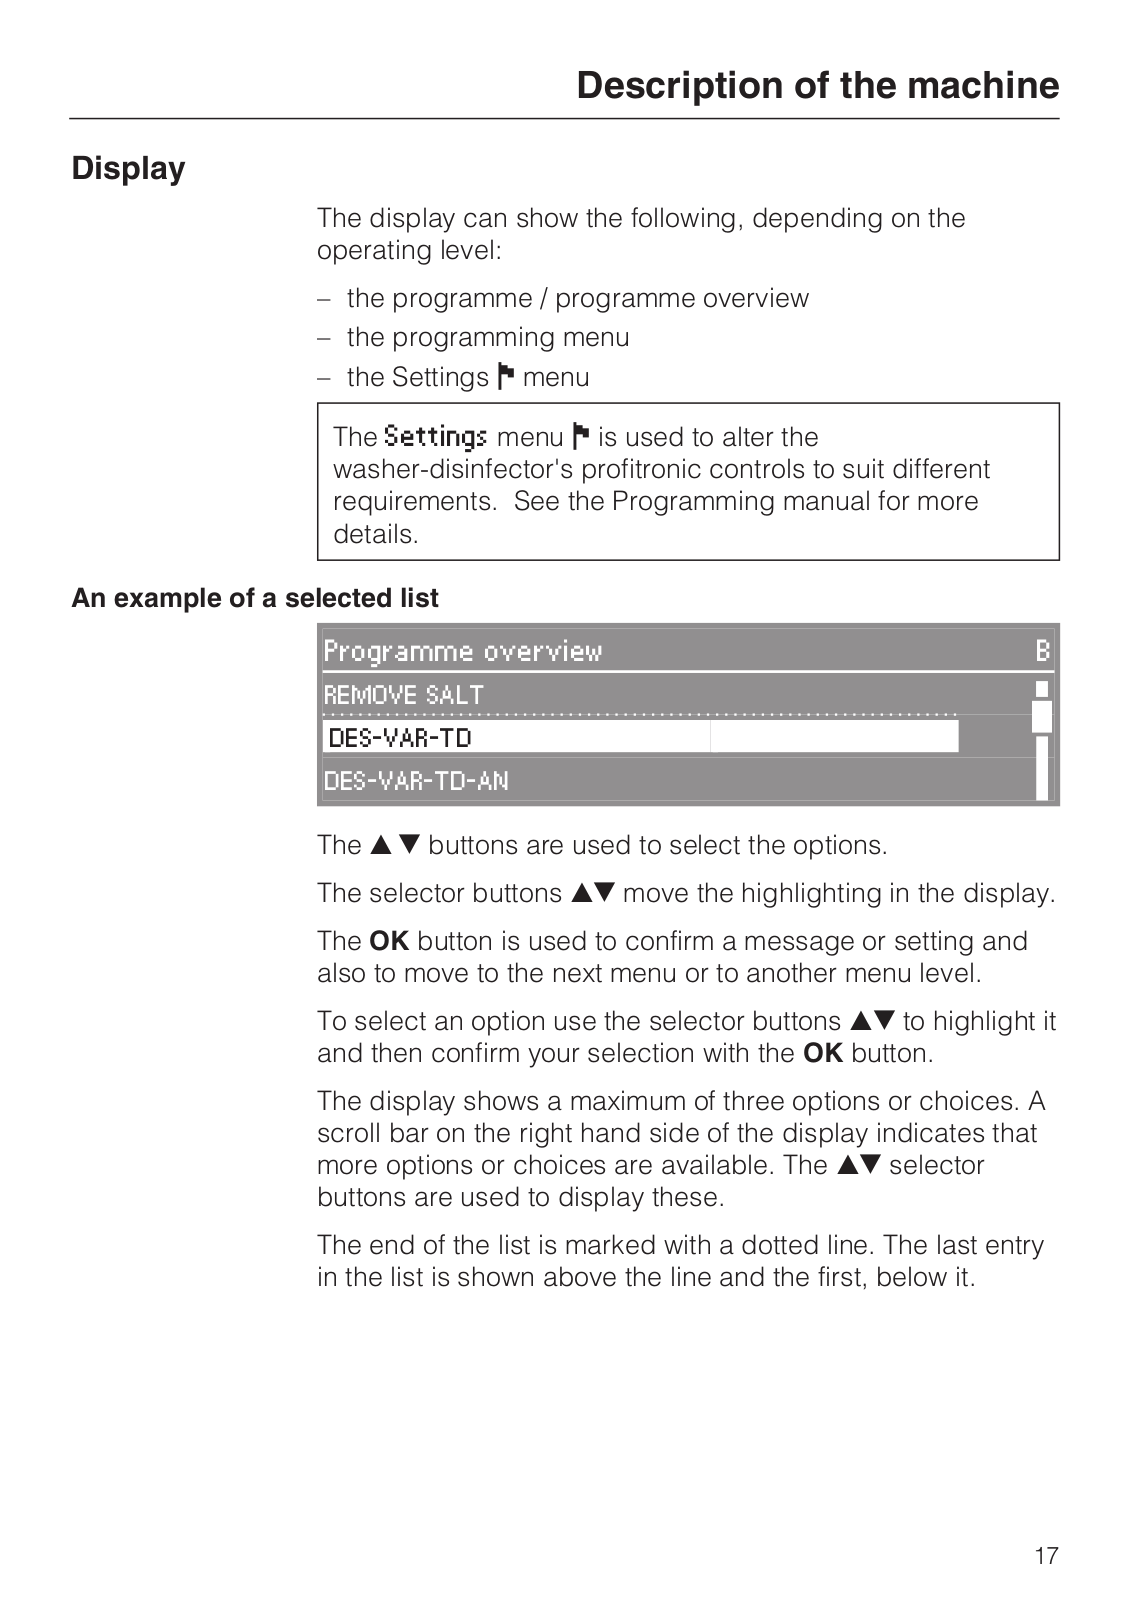
An example of a selected list

Programme overview

B

REMOVE SALT

DES-VAR-TD

DES-VAR-TD-AN

The buttons are used to select the options.

The selector buttons move the highlighting in the display.

The OK button is used to confirm a message or setting and also to move to the next menu or to another menu level.

To select an option use the selector buttons to highlight it and then confirm your selection with the OK button.

The display shows a maximum of three options or choices. A scroll bar on the right hand side of the display indicates that more options or choices are available. The selector buttons are used to display these.

The end of the list is marked with a dotted line. The last entry in the list is shown above the line and the first, below it.

17

Description of the machine

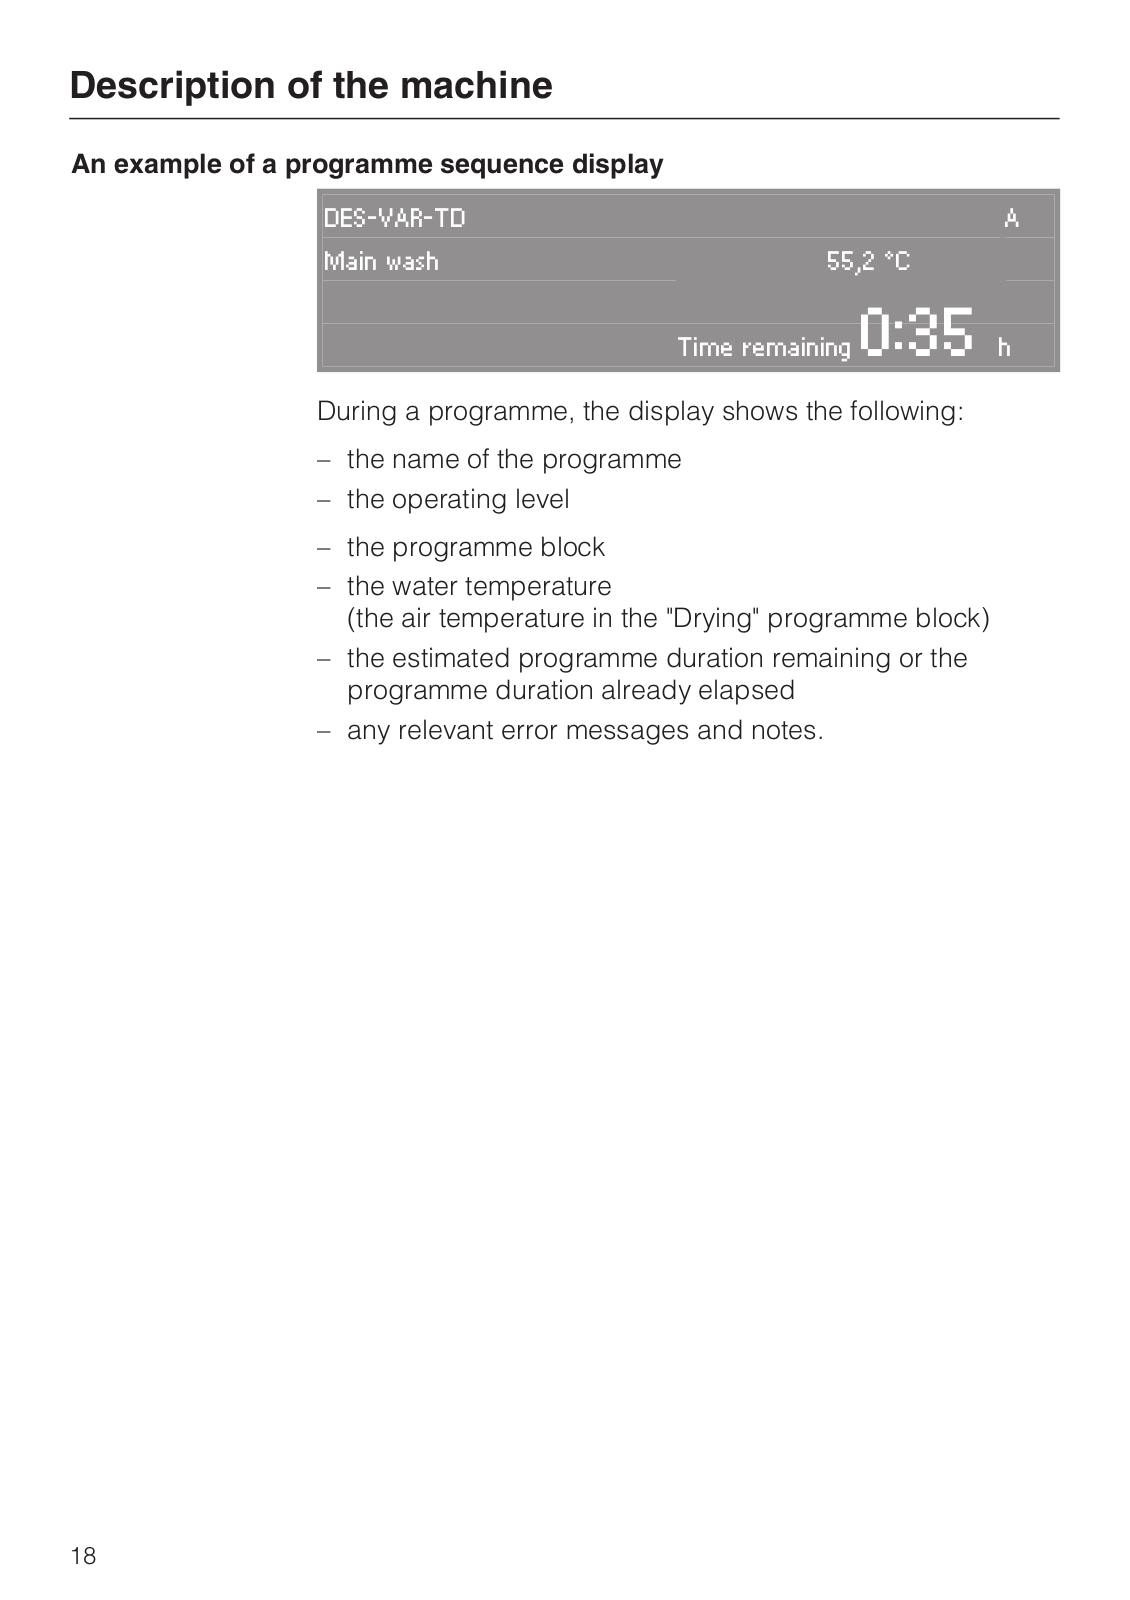
An example of a programme sequence display

DES-VAR-TD


A

Main wash

55,2 °C


Time remaining 0:35 h


During a programme, the display shows the following:

the name of the programme

the operating level

the programme block

the water temperature

(the air temperature in the "Drying" programme block)

the estimated programme duration remaining or the programme duration already elapsed

any relevant error messages and notes.

18

Context menu

Some functions can be called up at any time via a context menu, irrespective of the operating level:

Change display language,

Change operating level,

Enter delay start,

In addition, no current fault messages will be displayed in operating level D (if applicable).

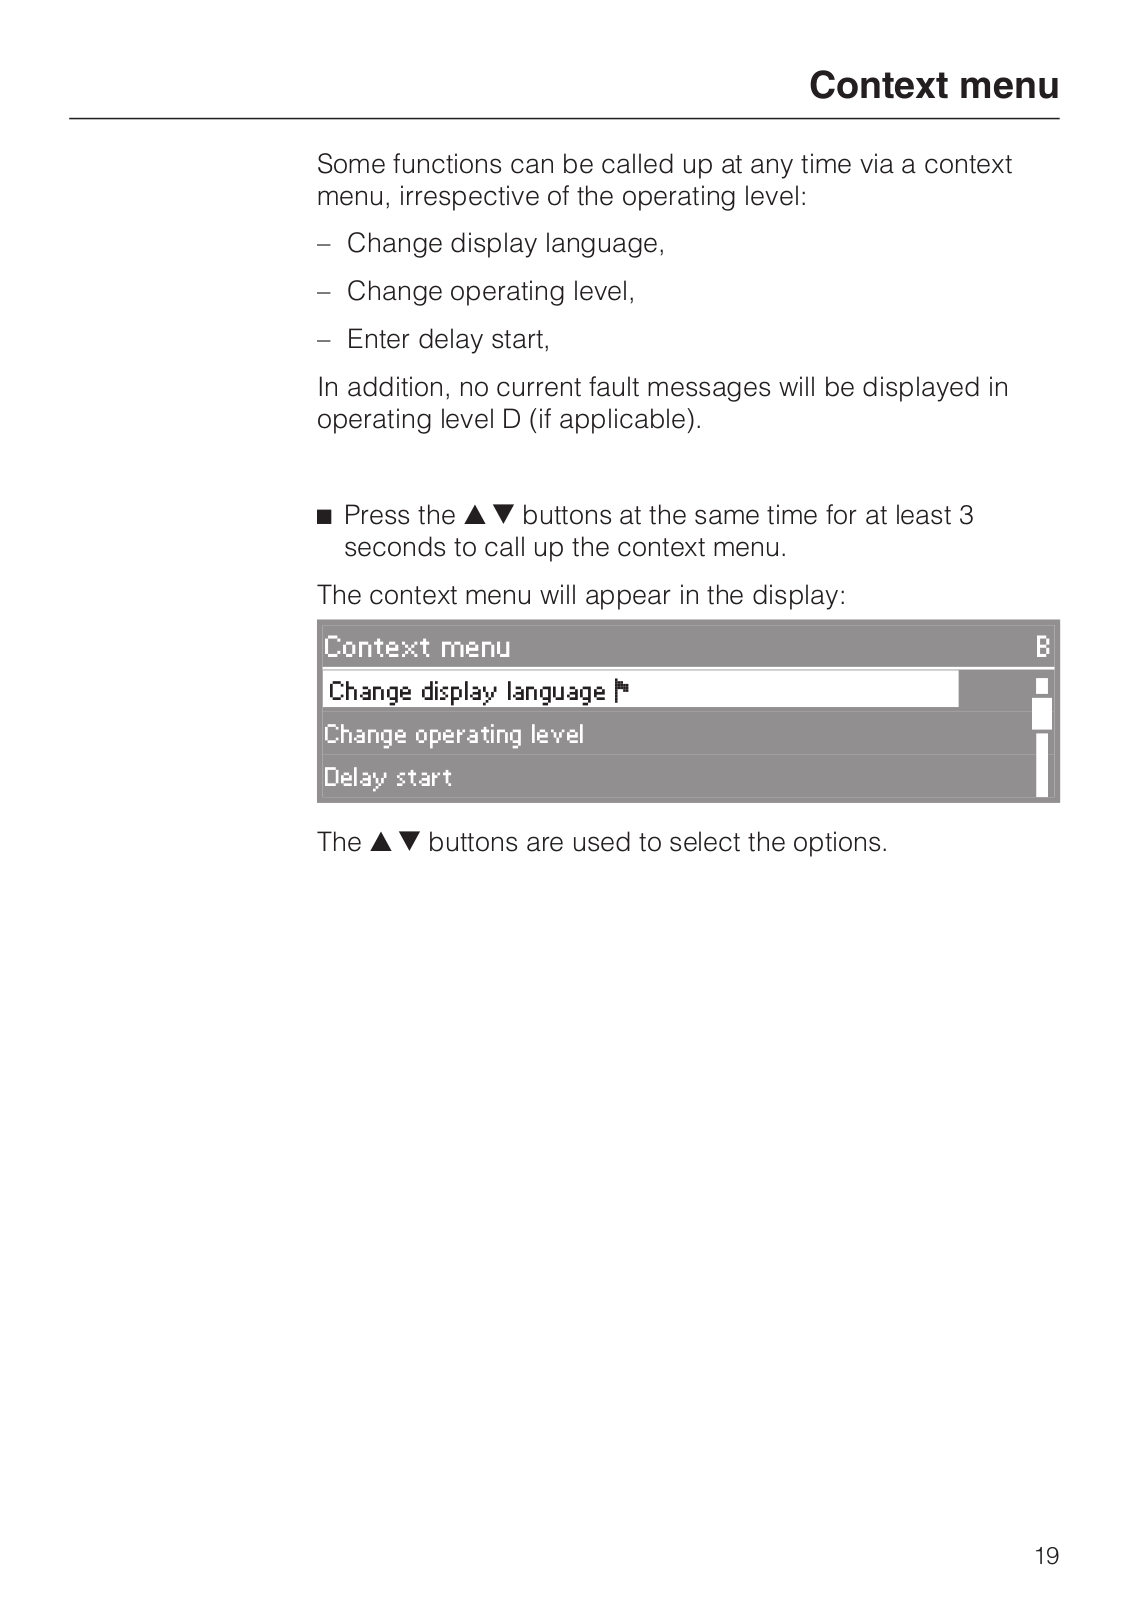
Press the buttons at the same time for at least 3 seconds to call up the context menu.

The context menu will appear in the display:

Context menu

B


Change display language


Change operating level


Delay start


The buttons are used to select the options.


19

Context menu

Change display language

You can change the language in which the display is currently being shown via the context menu.

This setting will remain active until the washer-extractor is switched off with the button.

N.B. The language set in the Settings / Language menu will not be changed and all reports and print-outs will continue to be printed in this "Settings" language.

Select the Change display language option with and activate your selection with OK.

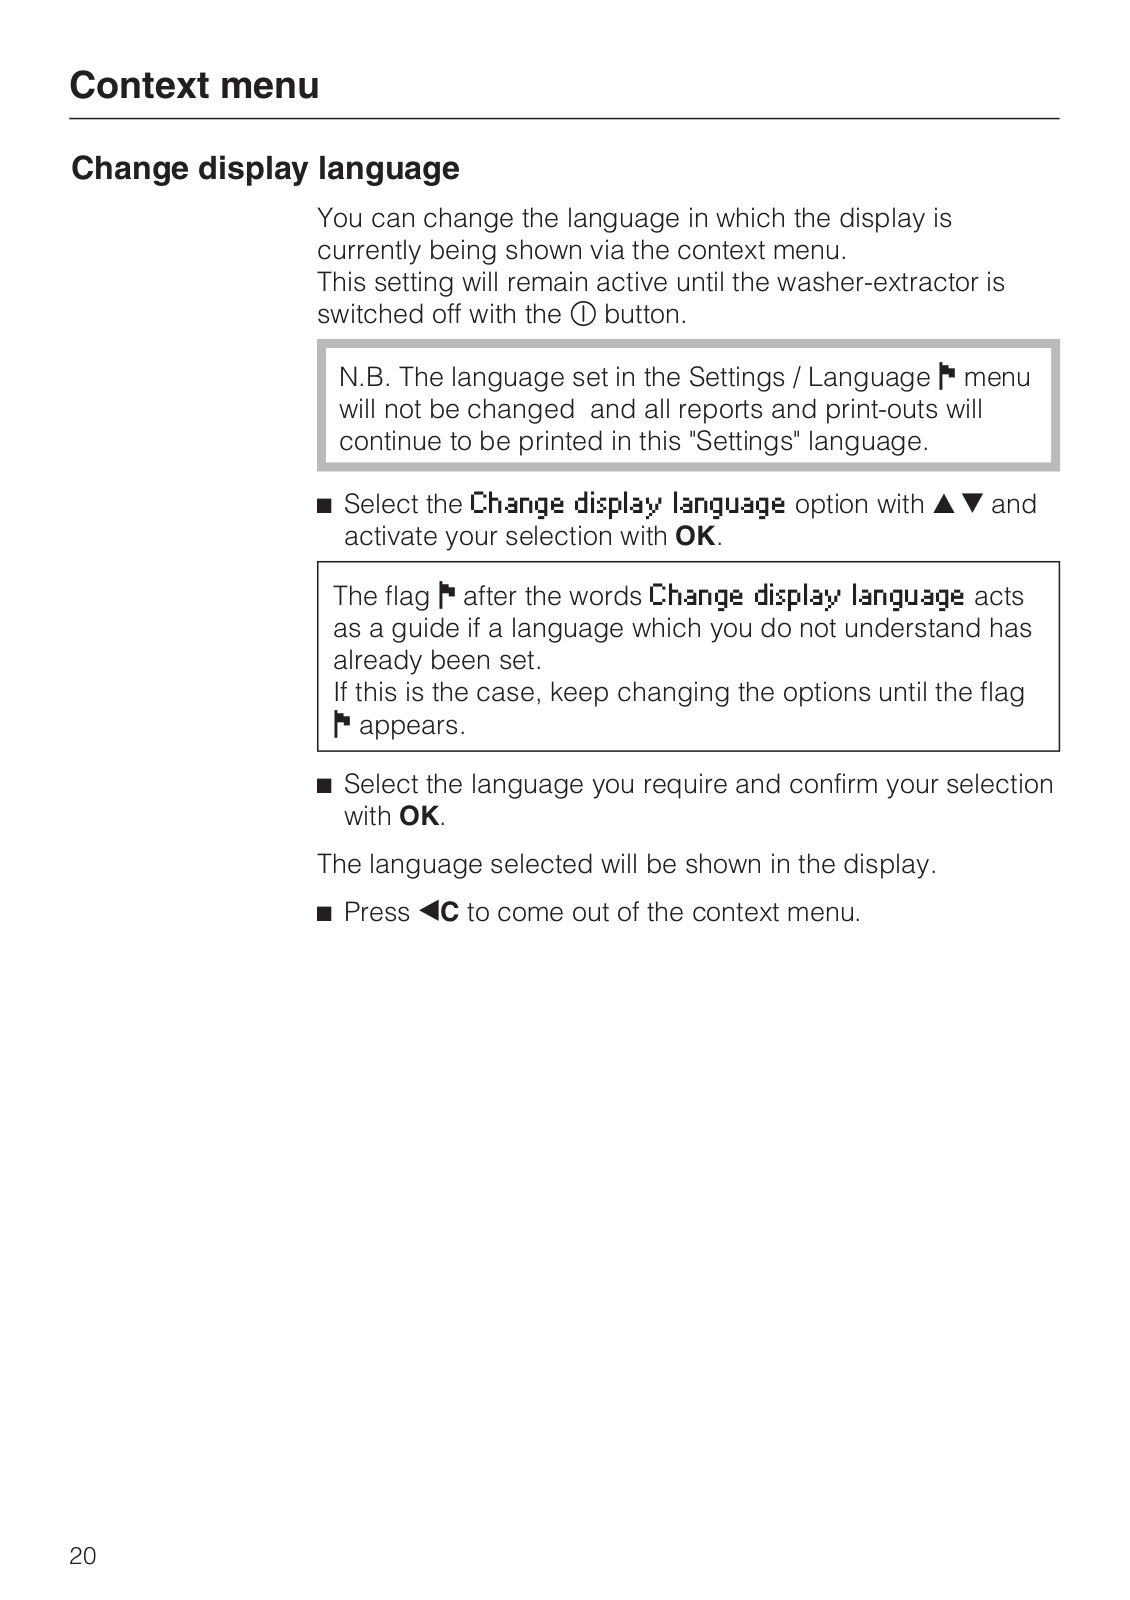
The flag after the words Change display language acts as a guide if a language which you do not understand has already been set.

If this is the case, keep changing the options until the flag

appears.

Select the language you require and confirm your selection with OK.

The language selected will be shown in the display.

Press C to come out of the context menu.

20

Context menu

Changing operating level

There are four operating levels available on this washer-disinfector:

Operating level

Access authorisation for

A and B

Selection from a list of specified


programmes.


C

Automatic programme selection via mobile


unit coding.


D

Free programme selection in the


Programme overview, Programming and


Settings .

You can switch between the operating levels via the context menu.

To prevent unauthorised access to the settings, you will be asked for a code when changing to another operating level.

You must be signed on as the administrator, to be able to change the codes of the various operators or to install new operators. The Administrator operator is set by a Miele Service technician.

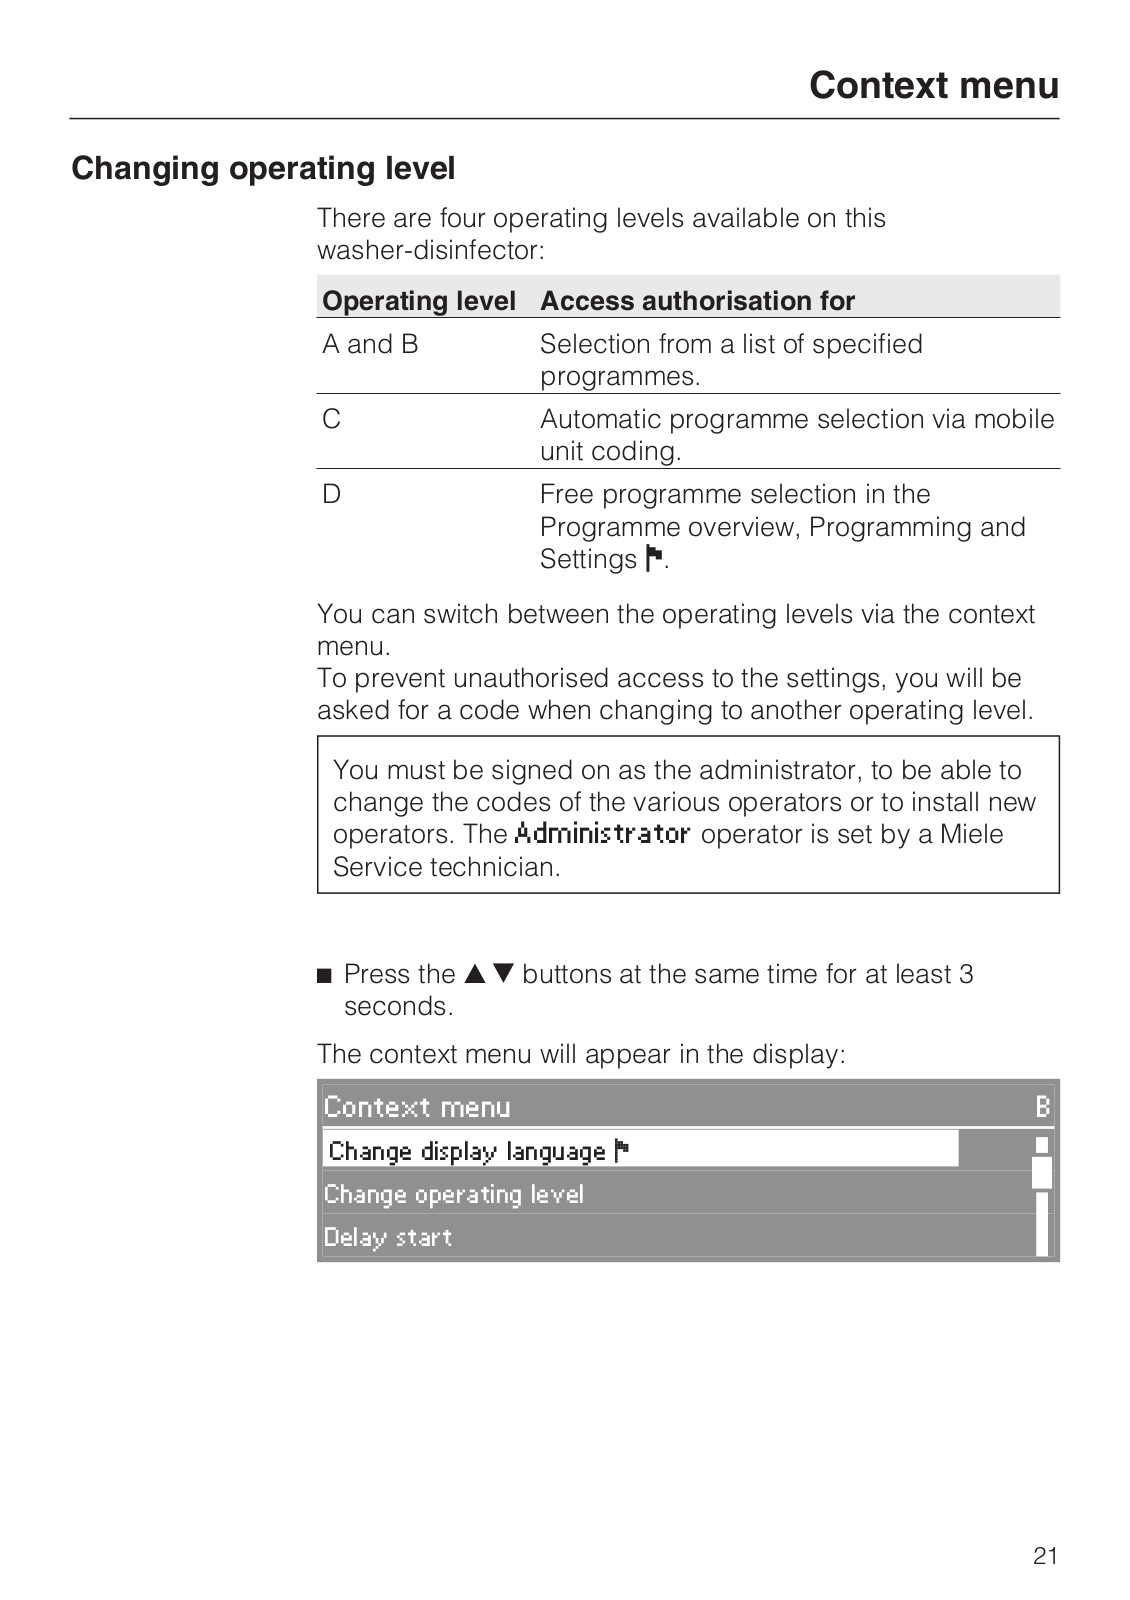
Press the buttons at the same time for at least 3 seconds.

The context menu will appear in the display:

Context menu

B


Change display language


Change operating level


Delay start


21

Context menu

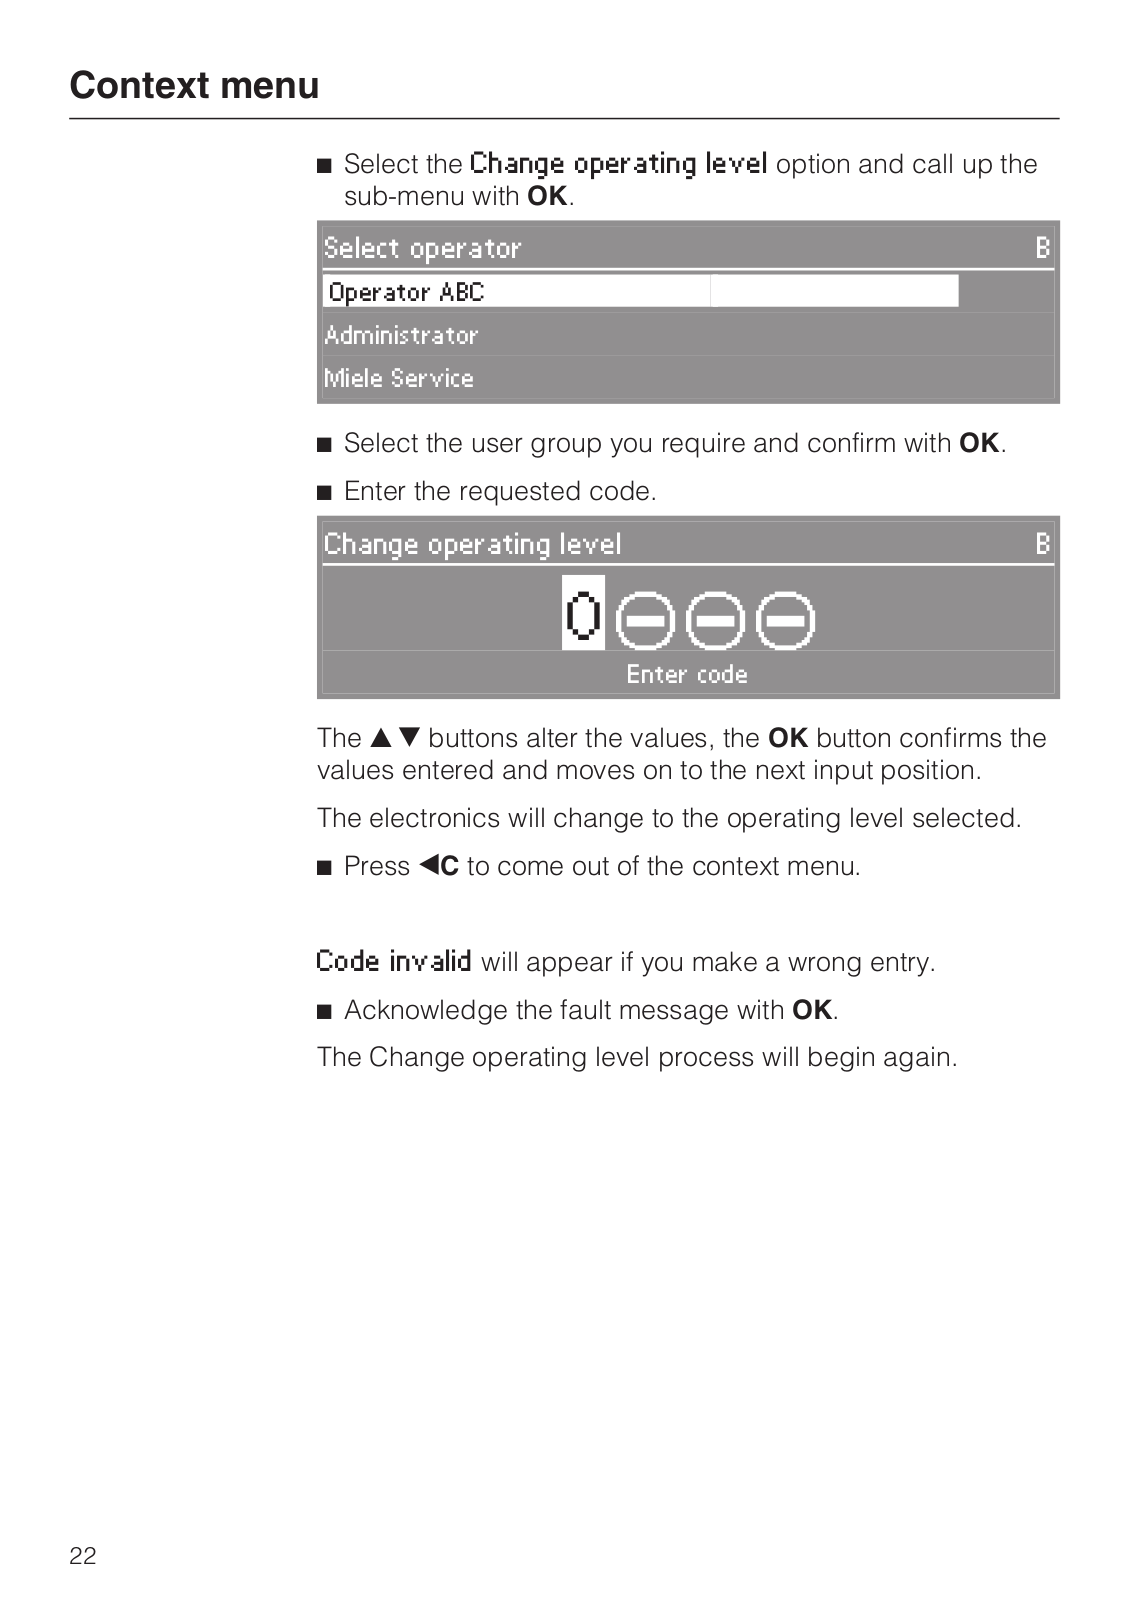
Select the Change operating level option and call up the sub-menu with OK.

Select operator

B

Operator ABC

Administrator

Miele Service

Select the user group you require and confirm with OK.

Enter the requested code.

Change operating level

B

0


Enter code

The buttons alter the values, the OK button confirms the values entered and moves on to the next input position.

The electronics will change to the operating level selected.

Press C to come out of the context menu.

Code invalid will appear if you make a wrong entry.

Acknowledge the fault message with OK.

The Change operating level process will begin again.

22

Context menu

Delay start

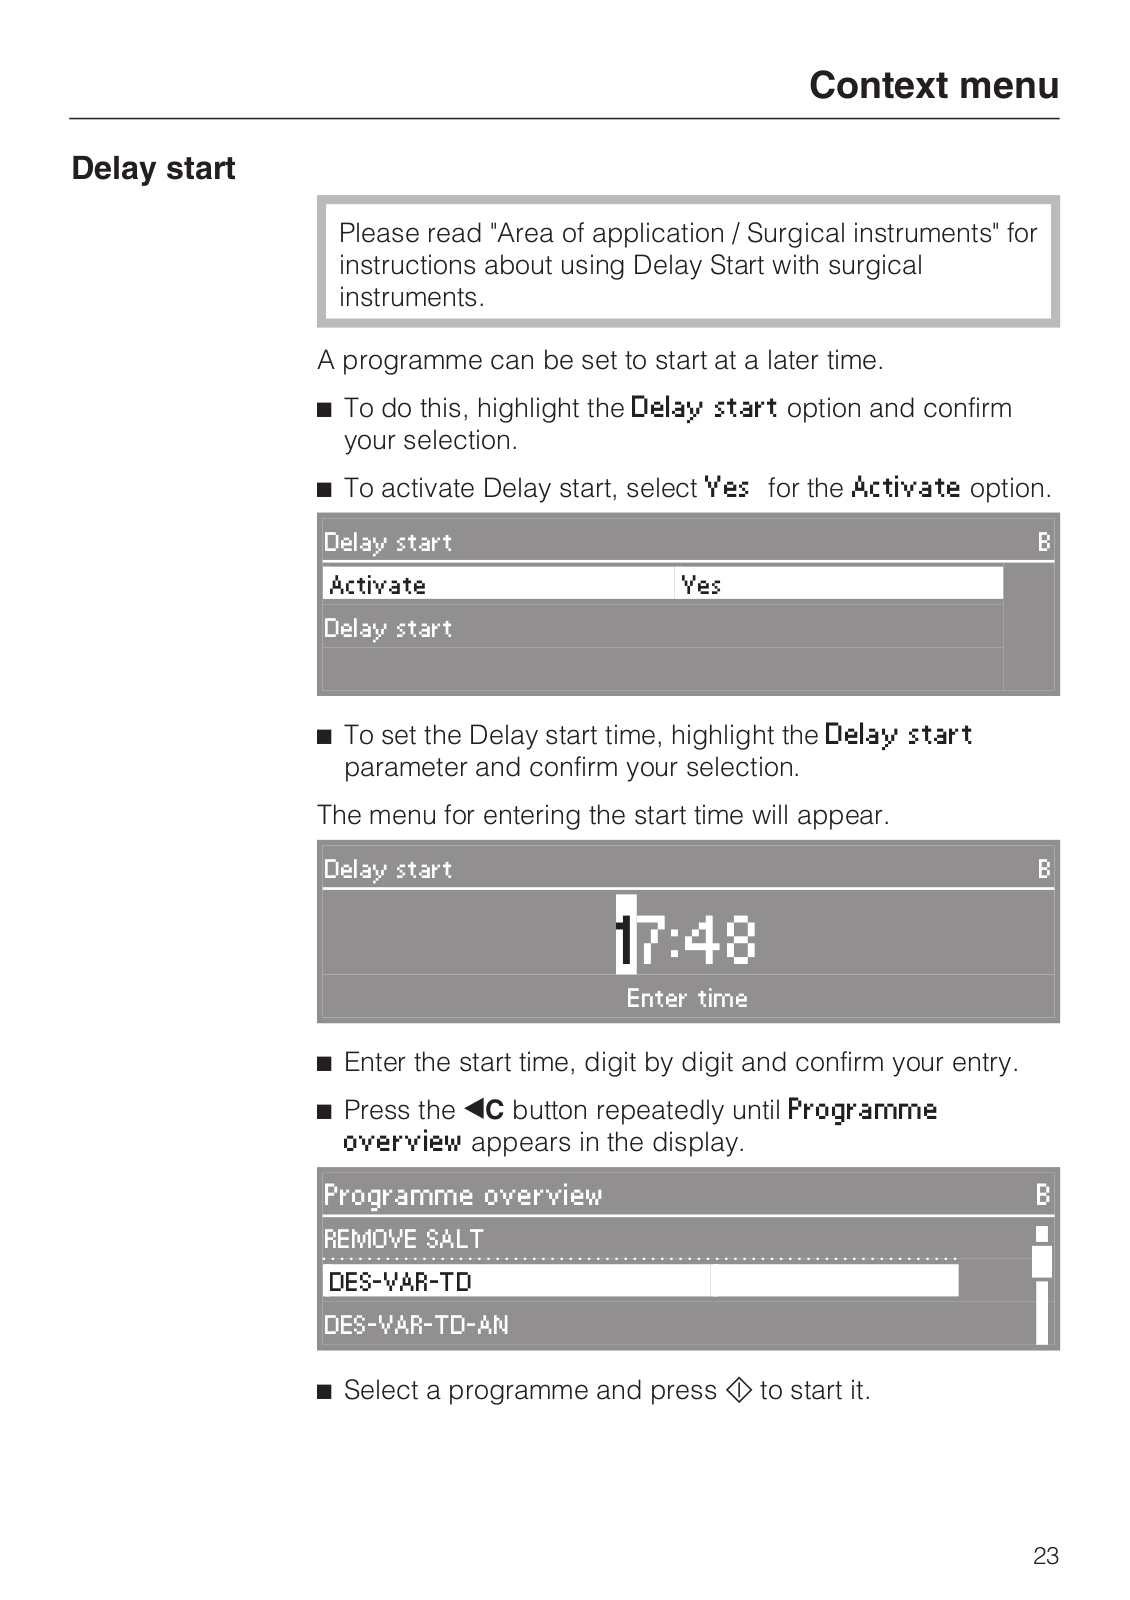
Please read "Area of application / Surgical instruments" for instructions about using Delay Start with surgical instruments.

A programme can be set to start at a later time.

To do this, highlight the Delay start option and confirm your selection.

To activate Delay start, select Yes for the Activate option.


Delay start


B


Activate

Yes


Delay start


To set the Delay start time, highlight the Delay start parameter and confirm your selection.

The menu for entering the start time will appear.

Delay start

B

17:48

Enter time

Enter the start time, digit by digit and confirm your entry.

Press the C button repeatedly until Programme overview appears in the display.

Programme overview

B

REMOVE SALT

DES-VAR-TD

DES-VAR-TD-AN

Select a programme and press to start it.

23

Loading...
+ 53 hidden pages