


Miele H6500, H6600BM Operating And Installation Instructions

Operating and Installation Instructions
Speed Oven
To prevent accidents and machine damage, read these instructions
befor
e installation or use.
en - US, CA M.-Nr. 09 786 900

Contents
2
IMPORTANT SAFETY INSTRUCTIONS................................................................. 7
Guide to the Speed Oven ...................................................................................
19
Control panel........................................................................................................
20
Sensor buttons....................................................................................................... 21
Display ................................................................................................................... 23
Symbols............................................................................................................ 24
Features ................................................................................................................
25
Model numbers ..................................................................................................... 25
Data plate .............................................................................................................. 25
Items included........................................................................................................ 25
Standard and optional accessories ....................................................................... 25
Glass Tray ......................................................................................................... 26
Wire rack with non-tip safety notches .............................................................. 26
Speed Oven controls ............................................................................................ 29
Oven safety features.............................................................................................. 29
System lock ..................................................................................................
29
Safety switch-off............................................................................................... 29
Cooling fan........................................................................................................ 29
PerfectClean treated surfaces ............................................................................... 29
Before using for the first time.............................................................................
31
General settings..................................................................................................... 31
Heating the oven.................................................................................................... 33
Settings.................................................................................................................
34
Accessing the "Settings" menu ............................................................................. 34
Changing and saving settings .......................................................................... 34
Settings overview................................................................................................... 35
Language ............................................................................................................
37
Time of day ............................................................................................................ 37
Display .............................................................................................................. 37
Clock format ..................................................................................................... 37
Setting............................................................................................................... 37
Date........................................................................................................................ 37
Lighting .................................................................................................................. 38
Display brightness ................................................................................................. 38
Acoustic information.............................................................................................. 38
Melody .............................................................................................................. 38
Solo tone........................................................................................................... 38
Keypad tone........................................................................................................... 39

Contents
3
Units of measurement............................................................................................ 39
Weight............................................................................................................... 39
Temperature...................................................................................................... 39
Quick MW .............................................................................................................. 40
Popcorn.................................................................................................................. 40
Keeping Warm ....................................................................................................... 41
Cooling fan............................................................................................................. 41
Default temperatures.............................................................................................. 42
Recommended settings......................................................................................... 42
Safety..................................................................................................................... 43
System lock ..................................................................................................
43
Sensor lock ...................................................................................................... 43
Calibrate temperature ............................................................................................ 44
Voltage................................................................................................................... 44
Showroom program ............................................................................................... 45
Demo Mode ...................................................................................................... 45
Factory default settings.......................................................................................... 45
Timer ..................................................................................................................... 46
Setting the timer..................................................................................................... 46
Resetting the timer................................................................................................. 47
Canceling the timer................................................................................................ 47
Guide to the modes..............................................................................................
48
Solo Modes............................................................................................................ 48
Microwave (Solo) .............................................................................................
49
Combination Modes .............................................................................................. 50
Microwave power.................................................................................................
52
How it works .......................................................................................................... 52
Microwave power levels......................................................................................... 52
Selecting cookware .............................................................................................
53
Containers suitable for microwave use.................................................................. 53
Unsuitable containers for microwave use.............................................................. 55
Testing dishes for their suitability........................................................................... 56
Placing the dish in the Speed Oven....................................................................... 57
Lid .......................................................................................................................... 57
Energy saving tips................................................................................................
59
Solo modes...........................................................................................................
60
Quick Guide ........................................................................................................... 60
Cooling fan ............................................................................................................ 60

Contents
4
Additional functions ............................................................................................... 61
Changing the oven mode ................................................................................. 61
Changing the temperature ................................................................................ 62
Rapid PreHeat................................................................................................... 63
Using the "Crisp" function (moisture reduction)............................................... 64
Setting additional durations.............................................................................. 65
Microwave (Solo) ...........................................................................................
68
Quick Guide ........................................................................................................... 68
Cooling fan ............................................................................................................ 68
Additional functions ............................................................................................... 69
Changing the microwave power level............................................................... 69
Changing the cooking time............................................................................... 69
Changing the oven mode ................................................................................. 69
Setting additional durations.............................................................................. 70
Combi Modes ....................................................................................................... 72
Quick Guide ........................................................................................................... 72
Cooling fan ............................................................................................................ 73
Additional functions ............................................................................................... 73
Changing the microwave power level............................................................... 74
Changing the temperature ................................................................................ 74
Using the Crisp function (Moisture Reduction)................................................. 74
Changing the oven mode ................................................................................. 74
Setting additional durations.............................................................................. 74
MasterChef ...........................................................................................................
75
List of food types ................................................................................................... 75
Using the MasterChef programs............................................................................ 75
Notes on using these programs........................................................................ 76
Favorites ...............................................................................................................
77
Creating a Favorite................................................................................................. 77
Starting a Favorite.................................................................................................. 78
Changing Favorites ................................................................................................ 79
Changing cooking stages ................................................................................. 79
Changing the name........................................................................................... 80
Deleting a Favorite ................................................................................................. 80
Minute + ................................................................................................................
81
Popcorn.................................................................................................................
82
Bake ......................................................................................................................
83

Contents
5
Roast .....................................................................................................................
85
Roast Probe ........................................................................................................... 87
How the roast probe works .............................................................................. 87
When to use the roast probe ............................................................................ 87
Important notes regarding the roast probe....................................................... 88
Using the roast probe ....................................................................................... 88
Time left display................................................................................................ 89
Using residual heat ........................................................................................... 90
Slow Roasting ......................................................................................................
91
Using the "Slow Roasting" special mode.............................................................. 92
Adjusting the Slow Roasting temperature ............................................................. 93
Broil .......................................................................................................................
94
Microwave: Defrosting/Reheating/Cooking......................................................
97
Tables for defrosting, reheating and cooking food using Microwave (Solo) ........
101
Table for defrosting food................................................................................. 102
Table for reheating food.................................................................................. 103
Table for cooking food.................................................................................... 104
Special Modes....................................................................................................
105
Defrost ................................................................................................................. 106
Dehydrate............................................................................................................. 107
Reheat.................................................................................................................. 108
Warm-up Cookware............................................................................................. 108
Proof..................................................................................................................... 109
Pizza..................................................................................................................... 109
Sabbath Program................................................................................................. 110
Gentle Bake ......................................................................................................... 111
Canning................................................................................................................ 112
Preparation...................................................................................................... 112
Frozen food .......................................................................................................... 115
Cleaning and care..............................................................................................
116
Unsuitable cleaning agents.................................................................................. 116
Tips ...................................................................................................................... 117
Normal soiling ...................................................................................................... 117
Roast Probe.................................................................................................... 118
Stubborn soiling................................................................................................... 119
Lowering the Browning / Broiling element ........................................................... 120
Frequently asked questions ..............................................................................
121

Contents
6
Technical Service ...............................................................................................
126
Caring for the environment...............................................................................
127
Electrical connection.........................................................................................
128
Installation diagrams ......................................................................................... 129
Appliance and cut-out dimensions...................................................................... 129
Installation into a tall cabinet .......................................................................... 129
Undercounter installation................................................................................ 130
Installation in a tall cabinet in combination with an oven ............................... 131
Front dimensions ................................................................................................. 132
Installation .......................................................................................................... 133

IMPORTANT SAFETY INSTRUCTIONS
7
When using the appliance, follow basic safety precautions, including the
following:
Read all instructions before installation and use of the oven to prevent
accidents and machine damage.
This appliance complies with current safety requirements.
Impr
oper use of the appliance can lead to personal injury and
material damage.
Read all instructions before installing or using the oven for the first
time. Only use the appliance for its intended purpose.
Keep these operating instructions in a safe place and pass them
on to any future user.
Use
This appliance
is intended for residential use only. Use only as
described in these operating instructions.
This applianc
e is not intended for outdoor use.
The ove
n is intended for domestic use only: cooking, baking,
roasting, broiling, canning, defrosting and reheating of food.
Only use this appliance for its intended purpose.
Risk of fir
e! Do not use the speed oven to store or dry items which
could ignite easily.
If such items were dried in the Speed Oven, the moisture in the item
would evaporate causing it to dry out and even self-ignite.
P
ersons who lack physical, sensory or mental abilities, or
experience with the appliance should not use it without supervision
or instruction by a responsible person.

IMPORTANT SAFETY INSTRUCTIONS
8
Children
Chil
dren should not be left alone or unattended in an area where
an oven is in use. Never allow children to operate, sit or stand on
any part of the oven. Caution: Do not store items of interest to
children in cabinets above an oven. Children climbing on the oven to
reach these items could be injured.
Burn Hazar
d - Do not allow children to use the oven.
As w
ith any appliance, close supervision is necessary when used
by children.
Dange
r of suffocation! Ensure that any plastic wrappings, bags,
etc. are disposed of safely and kept out of the reach of children.
Danger of burns. The oven gets hot at the oven door glass, the
vapor vent, the handle and the oper
ating controls. Do not allow
children to touch or play in, on or near the oven.
Technical safety
This applianc
e must be installed and connected in compliance
with the installation instructions.
Installatio
n, repair and maintenance work should be performed by
a Miele authorized service technician in accordance with national
and local safety regulations and the provided installation
instructions. Contact Miele’s Technical Service Department for
examination, repair or adjustment. Repairs and other work by
unauthorized persons could be dangerous and may void the
warranty.
Maint
enance by the user: Never repair or replace any part of the
appliance unless the instructions specifically recommend doing so.
Service work may only be performed by a qualified technician.
Befor
e installing the oven, check for externally visible damage. Do
not operate a damaged appliance.

IMPORTANT SAFETY INSTRUCTIONS
9
Reliable
and safe operation of the oven can only be guaranteed if
it is connected to the public power supply.
Op
erating a damaged appliance can result in microwave leakage
and present a hazard to the user. Do not use the appliance if:
– the door is warped,
– the door hinges are loose,
– holes or cracks are visible in the housing, the door, the door seal
or the o
ven interior walls.
T
o guarantee the electrical safety of this appliance, continuity
must exist between the appliance and an effective grounding
system. This appliance must be grounded. Connect only to properly
grounded outlet. See "Electrical connection - GROUNDING
INSTRUCTIONS". It is imperative that this basic safety requirement
be met. If there is any doubt, have the electrical system of the house
checked by a qualified electrician.
P
roper installation: Make sure that your appliance has been
installed correctly and that it has been grounded by a qualified
technician.
Before installation, make sure that the voltage and frequency
listed on the data plate correspond with the household electrical
supply. This data must correspond to prevent injury and machine
damage. Consult a qualified electrician if in doubt.
Befor
e installation or service, disconnect the power supply to the
work area by
– removing the fuse,
– "tripping" the circuit breaker, or
– unplugging the unit. Pull the plug not the cord.
Ext
ension cords do not guarantee the required safety of the
appliance (e.g. danger of overheating). Do not use an extension cord
to connect this appliance to electricity.

IMPORTANT SAFETY INSTRUCTIONS
10
The ove
n is not to be operated until it has been properly installed
within cabinetry.
Danger of electric shock!
Under no ci
rcumstances open the outer casing of the appliance.
This appliance must not be used in a non-stationary location (e.g.
on a ship).
Do not r
epair or replace any part of the appliance unless
specifically recommended in the operating instructions. All other
servicing should be referred to a qualified technician.
Defective co
mponents should be replaced by Miele original parts
only. Only with these parts can the manufacturer guarantee the
safety of the appliance.
In or
der for the oven to function correctly, it requires an adequate
supply of cool air. Ensure that the air flow is not impaired (e.g.
insulation in the cabinetry). Also be sure that the cool air supply is
not heated by other sources nearby.
If
the oven is installed behind a cabinet door, do not close the
door while the oven is in operation. Heat and moisture can build up
behind the closed door and cause damage to the oven, cabinetry
and flooring. Do not close the door until the oven has completely
cooled down.
Proper use
Danger of burns!
The Speed Oven becomes hot when in use.
De
pending on the mode selected, you could burn yourself on the
heating elements, oven interior, cooked food or oven accessories.
Wear pot holders when placing food in or removing food, or when
making adjustments in the hot Speed Oven.

IMPORTANT SAFETY INSTRUCTIONS
11
C
aution: Heating elements may be hot even though they are not
glowing. Interior surfaces of an oven become hot enough to cause
burns. External parts of the oven such as the door glass, vents, and
the control panel can become hot. During and after use, do not
touch, or let clothing or other flammable materials come into contact
with heating elements or interior surfaces of the oven until they have
had sufficient time to cool.
Do not let foo
d sit in the oven for more than one hour before or
after cooking. Doing so can result in food poisoning or sickness.
It
is important that the heat is allowed to spread evenly
throughout the food being cooked.
This can be achieved by stirring and/or turning the food, and
observing a sufficiently long standing time, which should be added
to the time needed for cooking, reheating or defrosting.
Use onl
y dry, heat-resistant potholders. Moist or damp potholders
used on hot surfaces may result in steam burns. Do not let
potholders come in contact with oil or grease. Do not substitute dish
towels or other bulky items for potholders. Do not let potholders
touch hot heating elements.
L
oose fitting or hanging garments present a fire hazard. Wear
proper apparel while operating the appliance.
Do not hea
t unopened containers of food in the oven, pressure
may cause the containers to burst and result in injury.
T
o prevent burns, always place oven racks at their desired height
while the oven is cool. If the rack must be moved while the oven is
hot, do not let pot holders touch hot heating elements.
Op
en the door carefully to allow hot air or steam to escape before
placing or removing food.
T
o prevent burns, allow the heating elements to cool before
cleaning by hand.

IMPORTANT SAFETY INSTRUCTIONS
12
Do not leave the oven door open unnecessarily as someone may
trip over it or be injur
ed by it.
Never leave
the appliance unattended when cooking with oil or
fat. They can ignite if overheated. Do not use the oven for frying.
Do not use water on grease fires. Turn off the Speed Oven
immediately and suffocate the flames by keeping the door closed.
Never st
ore flammable liquids and materials in, above or under an
oven, or near cooking surfaces.
T
o avoid fueling any flames, do not open the Speed Oven door if
smoke occurs inside the appliance. Interrupt the process by turning
the appliance off and disconnecting it from the power. Do not open
the door until the smoke has dissipated.
Do not use the o
ven to heat the room. The high temperatures
radiated could cause objects near the oven to catch fire.
W
ARNING
NEVER use this appliance as a space heater to heat or warm the
r
oom. Doing so may result in carbon monoxide poisoning and
overheating of the oven.
W
ARNING
NEVER use this appliance as storage space. Doing so may result
i
n carbon monoxide poisoning and overheating of the oven.
W
ARNING
NEVER cover any slots, holes or passages in the oven bottom or
co
ver an entire rack with materials such as aluminum foil. Doing
so blocks air flow through the oven and may cause carbon
monoxide poisoning. Aluminum foil linings may also trap heat,
causing a fire hazard.

IMPORTANT SAFETY INSTRUCTIONS
13
Please be awar
e that durations for using microwave power are
often considerably shorter when cooking, reheating and defrosting
than when using modes without microwave power. Excessively long
cooking times can lead to food drying out and burning or could even
cause it to catch fire.
Be sure you keep to recommended broiling times when using the
"Broil" mode. Do not use the "Microwave" mode for dehydrating
items such as flowers, herbs, bread, or rolls. Never use "Broil"
modes for pre-baked products such as bread or rolls or for drying
flowers or herbs. Use "Convection Bake" for these items and
monitor the process carefully.
Use cautio
n when using alcohol in your recipes. Alcohol
evaporates at high temperatures but may, in rare circumstances,
combust on the hot heating elements.
Dishes with ho
llow knobs or handles are not suitable for use with
microwave modes. Moisture which has gathered in the hollow
recesses can cause pressure to build up and the item can explode.
Fir
e hazard! Using Microwave or Microwave combination
modes with plastic dishes which are not microwave safe can cause
them to melt and damage the appliance.
Do not use any containers or cutlery made from or containing metal,
aluminum foil, lead, crystal glassware, temperature-sensitive
plastics, wooden utensils or cutlery, metal clips or plastic or paper
covered wire ties. Do not use plastic containers with the foil lid only
partially removed (see "Containers suitable for microwave use").
F
or modes without microwave power: Plastic containers which
are not suitable for use in an oven can melt at high temperatures and
can even damage the oven or catch fire.
Only use containers which are declared by the manufacturer as
being suitable for use in an oven. Follow the manufacturer's
instructions on use.

IMPORTANT SAFETY INSTRUCTIONS
14
Do not lea
ve the microwave oven unattended when reheating or
cooking food in disposable containers made of plastic, paper or
other inflammable materials.
Before using single-use containers, make sure they are suitable for
use in microwave ovens (See "Containers suitable for microwave
use - Plastics").
Do not r
eheat food in the oven in heat-retaining bags which are
intended for use in normal ovens.
These heat-retaining bags usually contain a thin layer of aluminum
foil which reflects microwaves.This reflected energy can, in turn,
cause the outer paper covering to become hot and ignite.
The Speed O
ven can be damaged when using Microwave or
Microwave Combination modes if it is empty or incorrectly loaded.
For this reason please do not use modes with microwave power to
pre-heat cookware or to dry herbs.
Instead use Convection Bake or Surround for these
procedures.
When using
residual heat to keep food in the oven warm, the high
humidity and amount of condensation in the Speed Oven can cause
corrosion. The control panel, the countertop or the cabinetry can
also suffer damage.
Always cover food when using Microwave . Once food is cooked
through, use a lower power for continued cooking to reduce the
amount of steam produced from the food. When using residual heat
do not turn the Speed Oven off. Instead set the temperature to the
lowest setting and leave the oven on the selected mode. The fan will
then remain on automatically and dissipate the moisture.
It
is recommended to cover all cooked food that is left in the oven
to be kept warm. This will prevent moisture from condensing on the
interior of the oven.

IMPORTANT SAFETY INSTRUCTIONS
15
A b
uild-up of heat can cause damage to the coating on the floor
of the oven.
When using Convection Bake do not line the floor of the Speed
Oven with anything, e.g. aluminum foil or oven liners. Universal trays
and glass trays should not be placed directly on the oven floor.
The door can
support a maximum weight of 33 lbs (15 kg). Do not
sit on or lean against an open door, and do not place heavy objects
on it. Also make sure that nothing can get trapped between the door
and the oven cavity. The oven could get damaged.
When heatin
g food and drinks, remember that the heat is created
in the food itself, and that the container will normally be cooler. The
dish is only warmed by the heat of the food. The temperature of the
container is not an indication of the temperature of the food or liquid
in it.
Check the food for the desired temperature after removing it. This is
particularly important when preparing food for babies. Shake or
stir baby milk and food thoroughly after heating, and try it for
temperature to ensure that it will not scald the baby.
The Speed O
ven is not suitable for cleaning or disinfecting items.
Items can get extremely hot and there is a danger of burning when
the item is removed from the appliance.
Do not coo
k or reheat food or liquids in sealed containers, jars or
bottles. With baby bottles, the screw top and nipple must be
removed.
Otherwise pressure will build up which can cause the bottle or
container to explode. Risk of injury.
IMPORTANT SAFETY INSTRUCTIONS
16
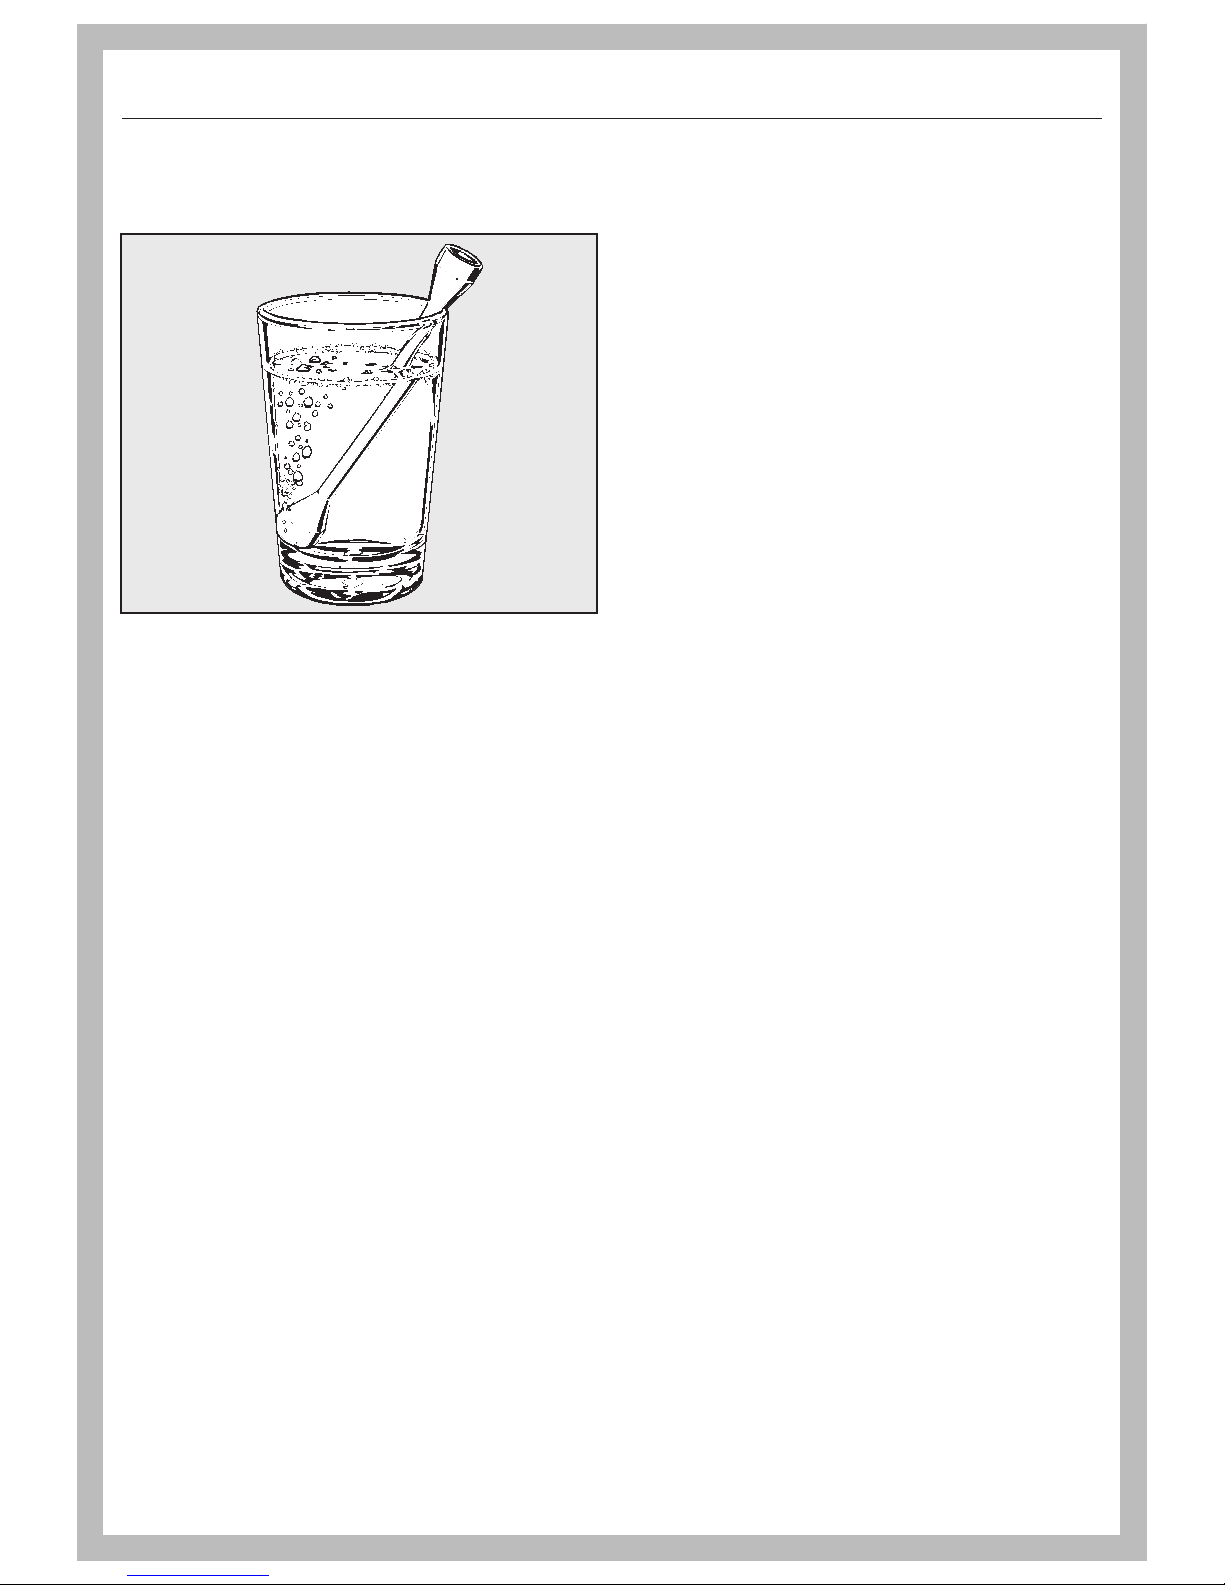
The boil
ing wand ensures that the liquid heats up evenly with
bubbles forming at the right time.
When reheating liquids, always place the boiling wand supplied into
the cup or glass. When boili
ng and in particular when reheating
liquids, milk, sauces etc, using microwave power without the boiling
wand, the boiling point of the liquid may be reached without the
production of typical bubbles. The liquid does not boil evenly
throughout. This so-called "superheating" can cause a sudden build
up of bubbles when the container is removed from the oven or
shaken. This can lead to the liquid boiling over suddenly and
explosively. Danger of scalding and burning! The formation of
bubbles can be so strong that the pressure forces the oven door
open, with a danger of injury and damage. The user could be injured
and the appliance damaged.
Ensure you use only the boiling wand supplied with your appliance.
Eggs can be cook
ed without their shells using microwave power
only if the yolk membrane has been punctured several times first.
The pressure could otherwise cause the egg yolk to explode.
Eggs in their
shells will explode if cooked with microwave power,
even after taking them out of the oven.
They can only be cooked in their shells using microwave heat in a
specially designed egg-boiling device available from specialist
shops. Hard-boiled eggs must not be reheated in the microwave
oven either as they too will explode.

IMPORTANT SAFETY INSTRUCTIONS
17
F
ood with a thick skin or peel, such as tomatoes, sausage,
potatoes and eggplant, should be pierced or cut in several places to
allow steam to escape and prevent the food from bursting.
T
o check food temperature, first interrupt the cooking process.
Only use a thermometer specifically approved for food use to
measure the temperature of the food. Do not use a thermometers
containing mercury or liquid as these are not suitable for use with
very high temperatures and break very easily
Do not use the o
ven to heat up heating pads filled with grains, gel,
etc.
These pads can ignite even after they have been removed from the
Speed Oven.
This oven must only be used for cooking food. Fumes, vapors or
heat given off by glues, plastics or flammable liquids and materials
could be hazardous. Do not use it as a dryer, kiln, dehumidifier, etc.
Do not obstruct the flow of combustion and ventilation air.
Do not let metal objects (aluminum foil, pans) come in contact
with the heating element.
Mak
e certain that the power cords of small appliances do not
come in contact with or get caught in the oven door.
Cleaning and care
Do not use a st
eam cleaner to clean this oven.
Steam could penetrate electrical components and cause a short
circuit.
Only clean par
ts listed in these Operating and Installation
Instructions.
Scratches on the door glass can cause the glass to break.
Do not use abrasive cleaners, hard sponges, brushes or sharp metal
tools to clean the door glass.

IMPORTANT SAFETY INSTRUCTIONS
18
T
o avoid corrosion on the stainless steel surfaces of the Speed
Oven, remove any splashes on the interior walls of the oven from
food or liquids containing salt.
Do not use ove
n cleaners. Commercial oven cleaners or oven
liners of any kind should not be used in or around any part of the
oven.
Accessories
Use only ge
nuine original Miele parts. If parts or accessories from
other manufacturers are used, the warranty will become void.
Only use the Miele
roast probe supplied with this oven. If it is
faulty, it must only be replaced with a Miele genuine roast probe.
V
ery high temperatures can damage the roast probe and cause
the silicon to melt. Do not keep the roast probe in the oven. Do not
use the roast probe in Broil modes (except for Convection Broil).
SAVE THESE INSTRUCTIONS AND REVIEW THEM PERIODICALLY

Guide to the Speed Oven
19
a
Control panel
b
Connection socket for the roast probe
c
Browning / Broiling element
d
3 Shelf levels for the glass tray and rack
e
Front frame with data plate
f
Door

Control panel
20
a
Recessed On / Off button
Turns the oven on and off
b
Sensor buttons
To select operating modes, settings and menu items
c
Display
To display time of day and information for operation
d
Sensor buttons 0-9
Numeric keypad to enter values
e
"Timer" sensor button
To set the timer
f
"Light" sensor button
To turn the oven cavity lighting on and off
g
"Back" sensor button
To go back one step at a time
h
"Popcorn" sensor button
To start the "Popcorn" function
i
"Minute +" sensor button
To start the "Minute +" function
j
Optical interface
(for service technician use only)

Control panel
21
Sensor buttons
The sensors react to touch. Each touch is confirmed with an audible tone. This
t
one can be turned off (see "Settings – Keypad tone").
Sensor
b
utton
Function Notes
For selecting
options and
scr
olling through
the list of options.
A menu items can be selected by touching the
illuminated sensor button next to it.
0–9 Numerical keypad
for setting values
The numerical keypad is used to set values, e.g.
temperatures and durations.
Timer To set the timer If a list of options is showing in the display or if a
cookin
g process is running, a timer duration (e.g.,
when boiling eggs) can be set at any point.
If the time of day display is turned off, the "Timer"
butt
on will not react until the oven is turned on.
Light For turning the
oven int
erior
lighting on and off
If a list of options is showing in the display or if a
cookin
g process is running, touching "Light" will
turn the oven interior lighting on or off.
If the time of day display is turned off, the "Light"
sensor butt
on will not react until the oven is turned
on.
The oven interior lighting turns off after 15
seconds during co
oking or remains constantly
turned on, depending on the setting selected.

Control panel
22
Sensor
b
utton
Function Notes
Back To go back a step
Popcorn "Popcorn" function The microwave starts at power level 6 and a
cookin
g time of 3 minutes (see the "Popcorn"
chapter).
This function can only be used when no other
cookin
g procedures are in progress.
Minute+"Minute +" function The microwave mode starts at maximum power
(1000 W)
and a cooking time of 1 minute (see
"Minute +"). Touching the sensor button
repeatedly increases the cooking time.
This function can only be used when no other
cookin
g procedures are in progress.

Control panel
23
Display
The display is used for showing the
time of day or information about
modes, t
emperatures, cooking
durations, MasterChef programs and
settings. Information or a list of options
is shown on the display depending on
the function selected.
After turning the oven on with the
On/Off
sensor button , the main
menu will appear:
If a cooking process is running,
selecting Change will call up a list of
options which can be set or changed
for the coo
king process in progress.
– Temperature
– Core Temperature (only when using
the r
oast probe)
– Duration
– Ready at
– Start at (only if Duration / Ready at has
been set)
– PreHeating (depending on model)
– Crisp function
(Moisture reduction)
– Change Mode
A menu it
em can be selected by
touching the illuminated sensor
next to the menu item.
Options can then be accessed by
t
ouching the illuminated sensor
next to OK.

Control panel
24
Symbols
The following symbols may appear in the display:
Symbol Description
Timer
Allocates an illuminated Sensor button t
o an option and
indicates that the option can be selected.
If more than four options are available a bar will appear on the
right-h
and side of the display. Use the allocated sensors to scroll
through the list.
The end of a list is indicated by a dotted line. By scrolling down
fur
ther, you will reach the beginning of the list again.
Some settings, e.g. display brightness and buzzer volume, are
select
ed using a bar chart.
A check indicates the currently active setting. will not be
disp
layed and the corresponding sensor will not be illuminated.
This symbol indicates that there is additional information and
advice about using
the oven. Select OK to access the
information.
The system lock or sensor lock is active (see "Settings - System
L
ock "). The oven cannot be operated.
Program finished
Core temperature when using the roast probe

Features
25
Model numbers
A list of the ovens described in these
oper
ating instructions can be found on
the back page.
Data plate
The data plate located on the front
fr
ame of the oven is visible when the
door is open.
Printed on the data plate are the model
number
, serial number and the
connection data (voltage/frequency/
maximum rated load) of the oven.
Have this information available when
conta
cting Miele Technical Service.
Items included
The following items are included with
this appliance:
– The operating and installation
instructions for using the Speed
Oven
– Screws for securing your appliance
int
o the cabinetry
– Various accessories
Standard and optional
accessories
This Speed Oven is supplied with a
glass tr
ay and rack.
All accessories and cleaning and care
pr
oducts in these instructions are
designed to be used with Miele ovens.
They can be ordered from the
Miel
eusa.com website or Miele.
When ordering, please have ready the
model number of your oven and of the
desir
ed accessories.

Features
26
Glass Tray
The glass tray is suitable for use with all
oper
ating modes.
Always use the gl
ass tray when
using Microwave (Solo) .
Do not place items weighing more
than 17.5 lbs (8 kg) on it.
Do not place the hot glass tray on a
cold surface, such as a tiled or
granite countertop. The glass tray
could get damaged. Use a suitable
heat-resistant mat or pot rest.
Wire rack with non-tip safety notches
The rack is only suitable for cooking in
Combination modes and modes that do
not use mic
rowave. It is not suitable
for cooking in the Microwave (Solo)
mode.
Danger of burns! The rack gets hot
during
the cooking process.
Use pot holders when placing food
in and taking food out of a hot oven.
Use of the rack with the Microwave
(Solo) mode can cause damage
to the oven and rack due to possible
sparking. The rack should be used
on a shelf level. Do not place it on
the floor of the oven.
Do not place items weighing more
than 17.5 lbs (8 kg) on the rack.
The rack has non-tip safety notches
which pr
event it being pulled
completely out when it only needs to be
pulled out partially.
When pushing the rack back in,
always ensu
re that the safety
notches are at the back of the oven.

Features
27
T
o remove the rack, lift it upwards
slightly at the front when the safety
notches connect with the sides of the
oven.
W
e recommend using the rack
together with the glass tray when
cooking items on the rack which
might drip.
Boiling wand
The boiling wand helps liquids heat
evenly.
When r
eheating liquids, place the
boiling wand into the cup or glass.
Roast Probe
Using the roast probe enables you to
accur
ately monitor the temperature
during the cooking process (see
"Roasting - Roast probe").

Features
28
Round Baking Form HBF 27-1
Microwave modes will damage the
Round Baking F
orm.
Do not use the round baking form
when
using Microwave (Solo) or
Combi modes.
This circular form is suitable for cooking
fr
esh or frozen pizzas, flat cakes, tarts
and baked goods.
Place the round baking form on the
r
ack.
The surface has been treated with
PerfectClean enamel.
Miele Oven Cleaner
Miele oven cleaner is suitable for
r
emoving stubborn soiling. It is not
necessary to preheat the oven before
use.

Features
29
Speed Oven controls
The oven controls enable you to use
the vario
us cooking modes to bake,
roast, broil and reheat.
It also allows you to access:
– the time of day display,
– a timer,
– a timer to automatically turn cooking
pr
ograms on and off,
– the MasterChef programs,
– the creation of a Favorite program,
– settings that can be customized.
Oven safety features
System lock
The system lock prevents the oven from
being use
d unintentionally (see
"Settings - System lock").
The system lock will remain activated
even aft
er a power failure.
Safety switch-off
A mo
de without Microwave can be
started without specifying a cooking
time. To prevent continuous use and
avoid the risk of fire, the Speed Oven
will turn itself off automatically after a
time between 1 hour and 12 hours
depending on the function and
temperature chosen.
If a Combi Mode is followed in quick
succession
by another program using
microwave power, the magnetron
(which produces the microwaves)
cannot be turned on again until approx.
10 seconds have elapsed. Therefore
wait a short time before starting the
second process.
Cooling fan
The cooling fan comes on automatically
when a co
oking program is started. The
cooling fan mixes hot air from the oven
cavity with cool room air before venting
it out into the kitchen through vents
located between the appliance door
and the control panel.
The cooling fan will continue to run for
a whil
e after a cooking process to
prevent moisture building up in the
oven, on the control panel or on the
surrounding cabinetry. It will turn itself
off automatically after a while.
PerfectClean treated surfaces
The revolutionary PerfectClean enamel
i
s a smooth, non-stick surface that
cleans easily with a sponge.
Food and soiling from baking and
r
oasting can be easily removed from
these surfaces.

Features
30
Do not use ceramic knives as these
will scratch the PerfectClean surface.
Follow the instructions in the "Cleaning
and Care" section of this manual so the
anti-stick and easy cleaning properties
are retained.
The oven compartment and the rack
have a P
erfectClean finish.