

Page 1
Operating and Installation
Instructions
Convection microwave oven
H 4044 BM
To prevent accidents
and machine damage
read these instructions
before
installation or use.
en - US, CA
M.-Nr. 07 979 370
Page 2

Contents
IMPORTANT SAFETY INSTRUCTIONS. . . . . . . . . . . . . . . . . . . . . . . . . . . . . . . . . 4
Guide to the oven. . . . . . . . . . . . . . . . . . . . . . . . . . . . . . . . . . . . . . . . . . . . . . . . . 10
Guide to the display. . . . . . . . . . . . . . . . . . . . . . . . . . . . . . . . . . . . . . . . . . . . . . . 11
Function selector ..................................................11
Temperature selector ..............................................11
Touch controls ....................................................12
Display ..........................................................12
Oven accessories . . . . . . . . . . . . . . . . . . . . . . . . . . . . . . . . . . . . . . . . . . . . . . . . 14
Safety and energy saving features. . . . . . . . . . . . . . . . . . . . . . . . . . . . . . . . . . . 16
Settings % . . . . . . . . . . . . . . . . . . . . . . . . . . . . . . . . . . . . . . . . . . . . . . . . . . . . . . 18
Selecting cookware . . . . . . . . . . . . . . . . . . . . . . . . . . . . . . . . . . . . . . . . . . . . . . . 20
Before using the oven . . . . . . . . . . . . . . . . . . . . . . . . . . . . . . . . . . . . . . . . . . . . . 24
Enter time of day ..................................................24
Cleaning the appliance .............................................25
Heating the oven ..................................................25
Using the oven . . . . . . . . . . . . . . . . . . . . . . . . . . . . . . . . . . . . . . . . . . . . . . . . . . . 26
Microwave .......................................................26
Combi functions...................................................27
Solo functions ....................................................28
Temperature indicator 3 ............................................28
Rapid Heat.......................................................28
End of a cooking process ...........................................29
Selecting cooking times . . . . . . . . . . . . . . . . . . . . . . . . . . . . . . . . . . . . . . . . . . . 30
Automatic shut-off .................................................30
Delay start with automatic shut-off.....................................31
Timer . . . . . . . . . . . . . . . . . . . . . . . . . . . . . . . . . . . . . . . . . . . . . . . . . . . . . . . . . . . 33
Setting the timer...................................................33
Canceling the timer ................................................33
2
Page 3

Contents
Functions . . . . . . . . . . . . . . . . . . . . . . . . . . . . . . . . . . . . . . . . . . . . . . . . . . . . . . . 34
Solo functions ....................................................34
Combi functions...................................................34
Microwave. . . . . . . . . . . . . . . . . . . . . . . . . . . . . . . . . . . . . . . . . . . . . . . . . . . . . . . 35
Baking . . . . . . . . . . . . . . . . . . . . . . . . . . . . . . . . . . . . . . . . . . . . . . . . . . . . . . . . . . 36
Convection bake ..................................................36
Combination bake .................................................36
Broiling . . . . . . . . . . . . . . . . . . . . . . . . . . . . . . . . . . . . . . . . . . . . . . . . . . . . . . . . . 37
Convection broil...................................................37
Combination broil..................................................37
Maxi Broil ........................................................38
Micro Broil .......................................................38
Defrost . . . . . . . . . . . . . . . . . . . . . . . . . . . . . . . . . . . . . . . . . . . . . . . . . . . . . . . . . 39
Defrost / Heat and Cook . . . . . . . . . . . . . . . . . . . . . . . . . . . . . . . . . . . . . . . . . . . 40
Cleaning and Care . . . . . . . . . . . . . . . . . . . . . . . . . . . . . . . . . . . . . . . . . . . . . . . . 41
Interior ..........................................................41
Inside of door with door seal .........................................43
Front of appliance .................................................43
Accessories ......................................................44
Frequently asked questions . . . . . . . . . . . . . . . . . . . . . . . . . . . . . . . . . . . . . . . . 45
Changing the light bulb .............................................47
Technical Service. . . . . . . . . . . . . . . . . . . . . . . . . . . . . . . . . . . . . . . . . . . . . . . . . 48
Installation instructions . . . . . . . . . . . . . . . . . . . . . . . . . . . . . . . . . . . . . . . . . . . 49
Electrical connection. . . . . . . . . . . . . . . . . . . . . . . . . . . . . . . . . . . . . . . . . . . . . . 50
Installation . . . . . . . . . . . . . . . . . . . . . . . . . . . . . . . . . . . . . . . . . . . . . . . . . . . . . . 51
Appliance front dimensions ..........................................54
Installation .......................................................55
3
Page 4
IMPORTANT SAFETY INSTRUCTIONS
When using electrical appliances always observe basic safety precautions,
including the following:
WARNING - To reduce the risk of
burns, electric shock, fire, injury to
persons, or exposure to excessive
microwave energy:
Read all instructions before installing
or using the oven.
Read and follow the specific,
"PRECAUTIONS TO AVOID
POSSIBLE EXPOSURE TO
EXCESSIVE MICROWAVE ENERGY".
This appliance is intended for
residential use only. Only use the
appliance for its intended purpose.
This appliance complies with current
safety requirements. Improper use
of the appliance can lead to
personal injury and material
damage.
Keep these operating instructions in
a safe place and pass them on to
any future user.
SAVE THESE INSTRUCTIONS
Use
The appliance is intended for
~
domestic use only: defrosting, heating,
cooking, baking, roasting and broiling
of food.
It is not designed for industrial or
laboratory use.
Do not use the appliance to store or
~
dehydrate flammable materials. This is
a fire hazard.
Persons who lack physical, sensory
~
or mental abilities, or experience with
the appliance should not use it without
supervision or instruction by a
responsible person.
Children
Children should not be left
~
unattended in an area where the
appliance is in use. Never allow
children to operate, hang or lean on
any part of the appliance.
Burn Hazard - Do not allow children
~
to use the microwave function or any
other modes of operation. Failure to do
so can result in severe burns or serious
injury.
Do not allow children to touch or
~
play in, on or near the oven. The oven
gets hot at the oven door glass, the
vapor vent, the handle and the
operating controls. Danger of burns.
4
Page 5

IMPORTANT SAFETY INSTRUCTIONS
Technical Safety
Installation, repair and maintenance
~
work should be performed by a Miele
authorized service technician in
accordance with national and local
safety regulations and the provided
installation instructions. Contact Miele’s
Technical Service Department for
examination, repair or adjustment.
Repairs and other work by unauthorized
persons could be dangerous and may
void the warranty.
Before installation, make sure that
~
the voltage and frequency listed on the
data plate correspond with the
household electrical supply. This data
must correspond to prevent injury and
appliance damage. Consult a qualified
electrician if in doubt.
To guarantee the electrical safety of
~
this appliance, continuity must exist
between the appliance and an effective
grounding system. It is imperative that
this basic safety requirement be met. If
there is any doubt, have the electrical
system of the house checked by a
qualified electrician.
Before installing the oven, check for
~
externally visible damage. Do not
operate a damaged appliance.
This appliance must not be installed
~
or operated outdoors.
Do not install this appliance near
~
water, e.g. sink, wet basement,
swimming pool, etc.
Do not use an extension cord to
~
connect this appliance to electricity.
Extension cords do not guarantee the
required safety of the appliance.
The appliance must only be
~
operated after it has been correctly
installed into cabinetry.
Under no circumstances open the
~
outer casing of the appliance.
While the appliance is under
~
warranty repairs should only be
performed by an authorized service
technician. Otherwise the warranty is
void.
Before servicing, disconnect the
~
appliance from the main power supply.
Defective components should be
~
replaced by Miele original spare parts
only. Only with these parts can the
manufacturer guarantee the safety of
the appliance.
Do not operate any appliance with a
~
damaged cord or plug, or if the
appliance has been damaged in any
manner. Contact Miele’s Technical
Service Department.
This appliance is not designed for
~
maritime use or for use in mobile
installations such as recreational
vehicles or aircraft. However, under
certain conditions it may be possible for
installation in these applications. Please
contact the Miele Technical Service
Department with specific requirements.
5
Page 6

IMPORTANT SAFETY INSTRUCTIONS
Safety
Do not use corrosive chemicals or
~
vapors in this appliance.
Do not use the oven to heat the
~
room. Due to the high temperatures
radiated, objects left near the oven
could catch fire.
Times for cooking, heating and
~
defrosting food in the convection
microwave oven are shorter than that of
traditional food preparation methods.
Extensive microwaving could dry out
food and cause possible ignition. This
is a fire hazard
Do not use the microwave function
~
to dry bread, flowers, herbs, etc. Use
the Convection Bake function.
Do not heat cushions filled with
~
herbs, gel, etc. with the microwave
function. The cushions could ignite,
even once removed from the oven after
heating. This is a fire hazard.
Do not use full power when warming
~
empty dishes or drying herbs. The lack
or minimal amount of food could cause
damage to the appliance.
Do not use for cleaning and
~
disinfecting utensils and cookware.
There is a risk of burns from the high
temperatures from the utensil when it is
taken out of the oven. This is a fire
hazard.
Supervise cooking with grease or
~
oils. Oils and grease could ignite.
Never heat undiluted alcohol in the
~
microwave oven, it can easily ignite.
If materials inside the oven ignite,
~
keep the oven door closed to avoid
fueling any flames. Turn the function
selector to "Off" and disconnect the
power supply.
If smoke occurs in the oven, to avoid
~
fueling any flame, do not open the oven
door. Turn the function selector to "Off"
and disconnect the power supply. Do
not open the oven door until the smoke
has dispersed.
To avoid corrosion damage from
~
condensation:
– Cover meals when cooking with the
Microwave Solo function.
– When using residual heat to keep
food warm leave the selected
function on and select the lowest
temperature. Do not turn the oven
off. Condensation from food and
drinks could cause damage at the
machine or the countertop and
cabinetry. Leaving the machine on
will keep the fan running to aid in
dissipating the condensation.
–
Cover food stored in the oven
interior. Condensation from food and
drinks could cause corrosion
damage. It also prevents the food
from drying out.
6
Page 7
IMPORTANT SAFETY INSTRUCTIONS
Only use accessories approved by
~
Miele for use with this machine. Use of
other accessories may cause damage
and void the warranty.
Do not lean, sit or place heavy items
~
on the open oven door. The machine
may be damaged. The door can hold a
max. of 17.5 lbs (8 kg).
Do not cover or block any opening
~
on the appliance.
Microwave function
PRECAUTIONS TO AVOID
POSSIBLE EXPOSURE TO
EXCESSIVE MICROWAVE
ENERGY
Do not attempt to operate this oven
with the door open since open-door
operation can result in harmful
exposure to microwave energy. It is
important not to damage or tamper
with the safety interlocks.
Do not place any object between the
oven front and the door or allow soil
or cleaner residue to accumulate on
sealing surfaces.
Do not operate the oven if it is
damaged. It is particularly important
that the oven door closes properly
and that there is no damage to the:
(1) door (bent), (2) hinges and
latches (broken or loosened),
(3) door seals and sealing surfaces.
The oven should not be adjusted or
repaired by anyone except properly
qualified service personnel.
Do not operate the convection
~
microwave oven empty! The oven will
be damaged.
Be sure to use cookware suitable for
~
the function being used. See "Selecting
cookware".
The provided combi rack is specially
designed for use in this oven.
7
Page 8

IMPORTANT SAFETY INSTRUCTIONS
Do not leave the appliance
~
unattended when heating food in
disposable, e.g. plastic, paper or other
flammable materials.
See "Selecting cookware".
Do not use the oven to heat food in
~
heat retaining packaging, e.g. take-out
food bags.
This packaging contains a thin layer of
aluminum foil which reflects the
microwaves. This reflected energy can
cause the paper layer to ignite.
Before serving food allow a
~
sufficient standing time. Always check
the temperature of the food itself after
taking it out of the microwave oven. Do
not judge by the plate temperature. The
heat is created in the food, the dishes
may stay cool to the touch.
Always check the temperature
~
before serving heated baby food.
Use a food thermometer to measure
~
the foods temperature. Do not use
thermometers containing mercury or
liquids, they are not suitable for high
temperatures and break easily.
Never cook or reheat food and
~
liquids in sealed containers or bottles.
Remove the nipple or lid before heating
in the microwave oven. Built-up
pressure may cause them to burst.
Danger of injuries.
When heating liquids, the provided
~
boiling wand should be placed into the
container.
When heating liquids, milk, sauces,
etc., in the oven without the boiling
wand, the boiling point of the liquid may
be reached without the production of
bubbles. The liquid will not boil evenly.
This "boiling delay" can cause a sudden
build up of steam bubbles, when the
container is removed from the oven or
shaken. This can lead to the liquid
boiling over suddenly and explosively.
Danger of burning!
The built-up pressure may force the
oven door open. This could result in
injury or damage. The boiling wand
ensures that the liquid boils evenly and
that steam bubbles form at an early
stage.
Always check that food is sufficiently
~
heated. The time required varies
depending on a number of factors,
such as initial temperature, quantity,
type and consistency of the food, and
changes in the recipe. Germs present
in the food are killed off only at a
sufficiently high temperature (> 158°F /
70°C) and after a sufficiently long time
(> 10 Min.). Select a longer cook time if
you are unsure if food is thoroughly
heated. To ensure temperature is
distributed evenly, stir and rotate food
occasionally time before serving.
8
Page 9

IMPORTANT SAFETY INSTRUCTIONS
Eggs must only be cooked in their
~
shells in the microwave oven in a
specially designed egg-boiling device.
Hard-boiled eggs should not be
reheated in the microwave oven. The
eggs may burst, even once they have
been removed from the oven.
Eggs can be cooked without their
~
shells in the microwave oven only if the
yolk membrane has been punctured
first. The pressure could otherwise
cause the egg yolk to explode. Danger
of injuries.
Food with a thick skin or peel, such
~
as tomatoes, sausages and potatoes
should be pierced in several places
before cooking to allow steam to vent
and prevent the food from bursting.
Do not use dishware with hollow
~
handles or lid knobs. Moisture can get
into the hollow parts. (The hollow parts
of some dishware can be vented).
Danger of built-up pressure and the
explosion of the hollow parts may
cause injuries.
Solo functions:
Rapid Heat, Convection Bake, Maxi
Broil, Convection Broil
Caution! Danger of burns!
When using solo functions the oven
interior gets very hot.
Be sure to use cookware suitable for
~
the function being used. See "Selecting
cookware".
Use pot holders when working with
~
a hot appliance. Especially the upper
heating element gets extremely hot
when using any broil function. Danger
of burning!
SAVE THESE INSTRUCTIONS
AND REVIEW THEM
PERIODICALLY
9
Page 10
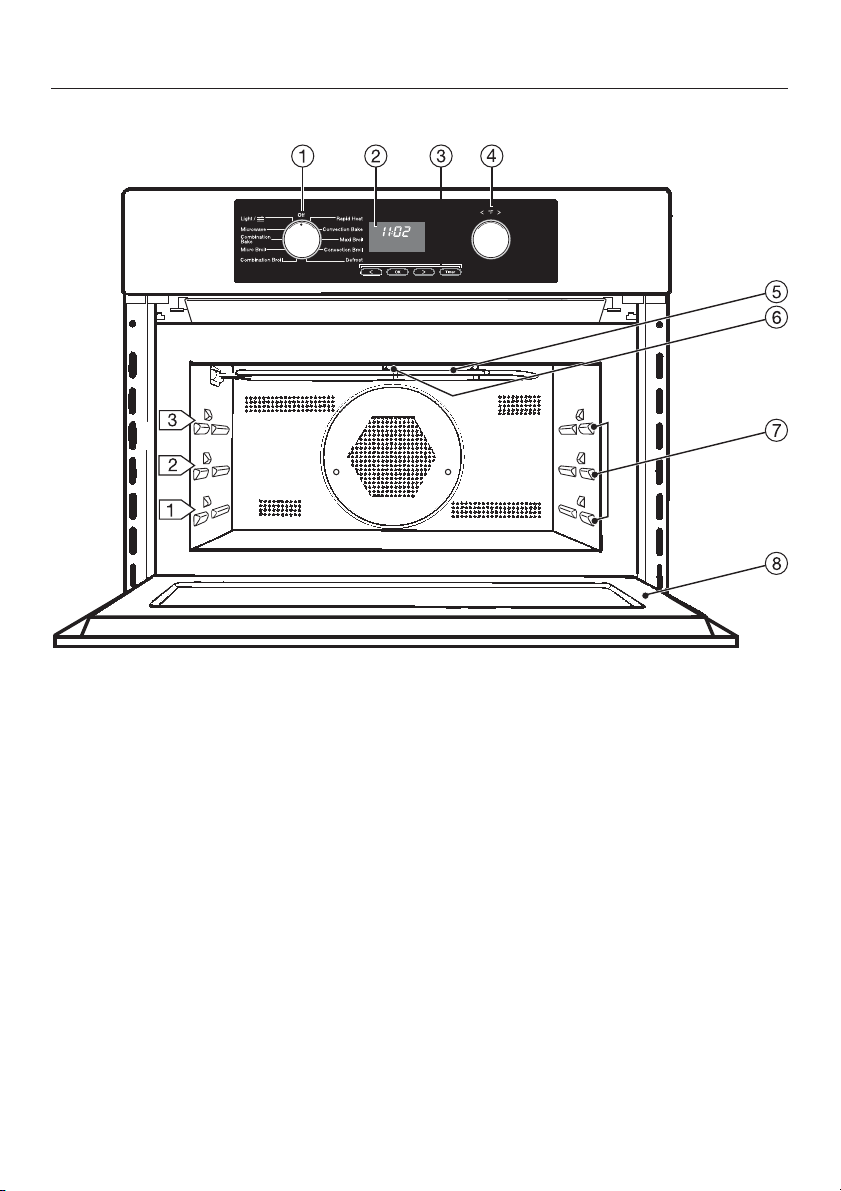
Guide to the oven
a Function selector
b Display
c Touch controls V, OK, W, Timer
d Temperature selector
e Heating element
f Light
g Three level runners
h Oven door
10
Page 11
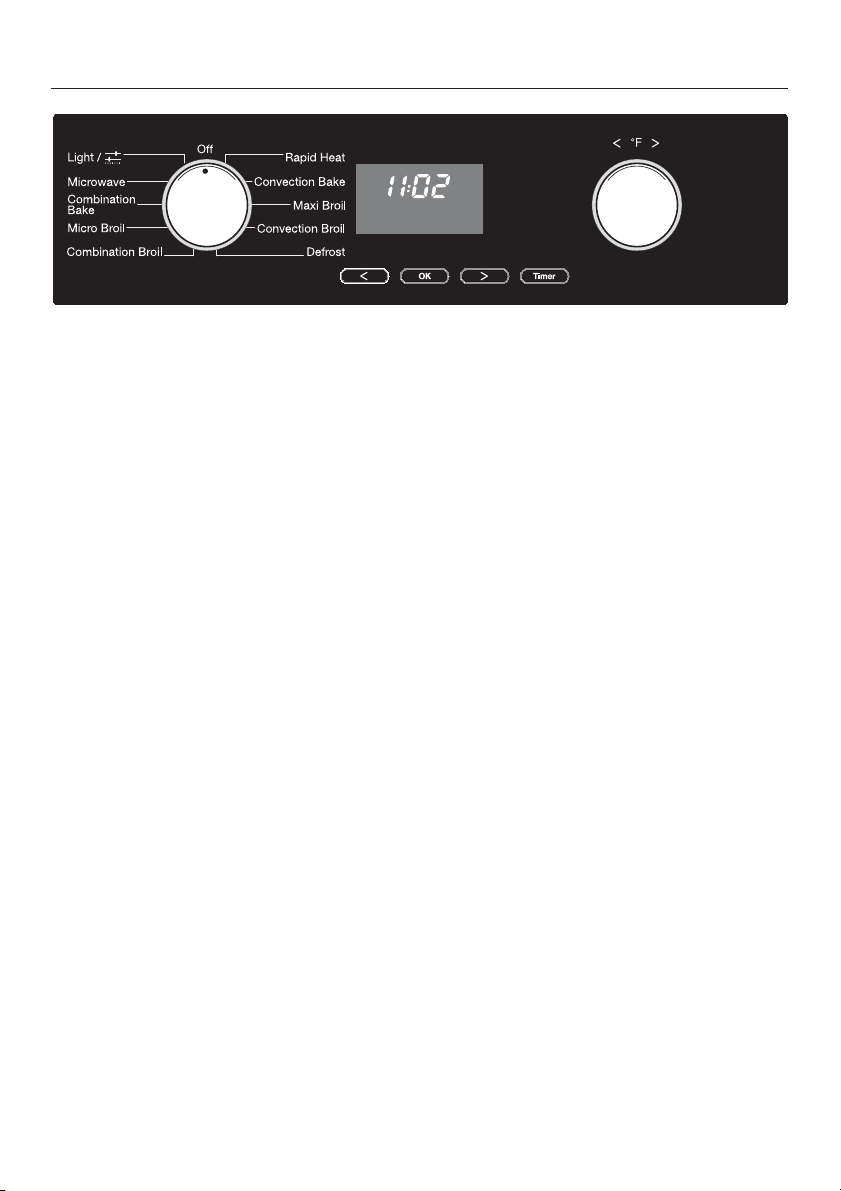
Guide to the display
Function selector
The left-hand selector is used to select
the function.
It can be turned clockwise or counter
clockwise.
– Microwave
– Combination Bake
– Micro Broil
– Combination Broil
– Rapid Heat
– Convection Bake
– Maxi Broil
–
Convection Broil
–
Defrost
–
Light
For switching on the oven light
independently. This can be useful
when cleaning the oven.
–
Settings
For altering the settings of the
appliance.
Temperature selector
The right-hand selector V °F W is used
to
select the temperature.
–
– enter times (as an alternative to using
the V or W touch controls).
It can be turned clockwise to increase
the value or counter clockwise to
reduce the value.
The temperature can be displayed in °F
or °C, see "Settings - P7".
11
Page 12

Guide to the display
Touch controls
The microwave oven is operated by
electronic sensor controls which react
to the touch of a finger. Every touch of
the controls is confirmed by a tone.
The tone can be turned off.
See "Settings % – P4"
Use
OK
V
W
Timer To enter a short cooking time,
Each time V or W is pressed, the
following changes are made:
For selecting an entry.
–
A triangle V appears under
the selected symbol.
To confirm an entry.
–
Moves triangle V in the
–
display to the left or right.
– Increases or reduces the
microwave power setting /
time entered.
– For selecting the Setting P
and changing the Status S.
such as for eggs.
Display
3
N
I2:00
_ 6 m TS 0
h
min
Start
V
Depending on the position of the
function selector and/or pressing of a
touch control, the following symbols
appear:
_ Microwave power output
6 Temperature
m Time
T Duration
S End
0 Safety lock
Start Start microwave
3 Temperature indicator
N Set timer
h Hours
min Minutes
–
Time T Microwave (Solo) in
10-second increments,
–
Time T in 1-minute increments,
–
End S in 1-minute increments,
–
Short time N in 5-second
increments, followed by 1-minute
increments.
Press and hold the touch controls to
quickly move through the display.
12
Page 13

Triangle V in the display
When the triangle lights up V below
a symbol in the display, the
corresponding function is indicated.
If the triangle flashes V below a
symbol, the function has been
selected and can be changed.
The triangle V flashes for about
15 seconds.
The setting can be changed using
V or W only while it is flashing.
If this entry time elapses, you must
once again call up the desired
symbol with "OK".
325
6 m TS
V
Guide to the display
When one of the touch controls is
pressed, depending on the position of
the function selector, the symbols of
the settings that can be entered light
up in the display.
^
Press V or W until the triangle V
stops underneath the desired
symbol.
^
Select "OK" to confirm.
The triangle V flashes.
13
Page 14
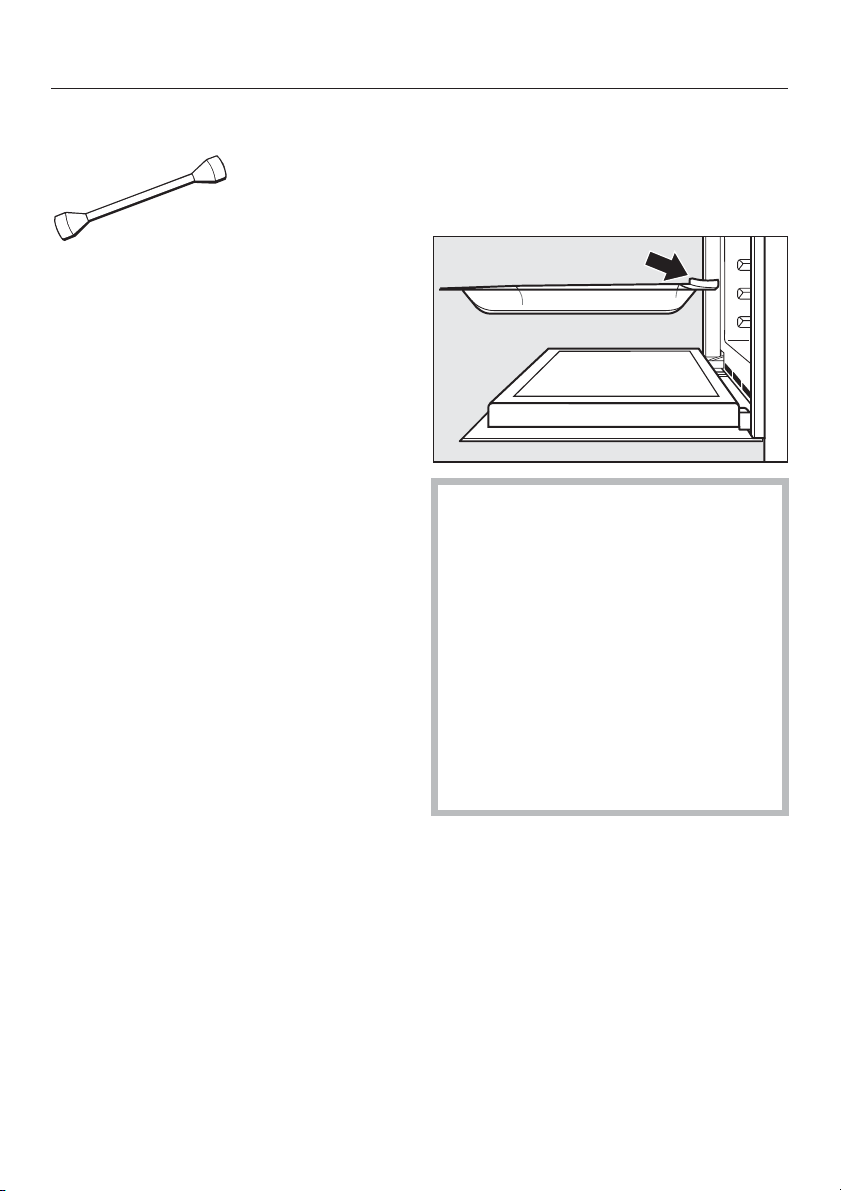
Oven accessories
Boiling wand
When heating liquids, the provided
boiling wand should be placed into the
container. It results in even boiling of
the liquid.
Glass tray with non-tip safety
notches
This tray is suitable for all microwave
oven functions.
Always use the glass tray when
using the Microwave (Solo) function.
When inserted the safety notches
should face the rear.
The glass tray can hold a max. of
17.5 lbs (8 kg).
14
Never place the hot glass tray
directly on a cold surface, such as a
tiled or granite countertop. The glass
tray may crack.
The tray has non-tip safety notches
which prevents it from being pulled out
completely.
The glass tray must be lifted to be
taken out of the oven.
Page 15

Combi rack
The combi rack is specially designed
for microwaves and can be used with
programs that use microwave power
(combi programs).
It should not be set on the bottom of
the oven and do not use it with the
Microwave (Solo) function.
This could cause arcing which could
damage the oven.
The combi rack can hold a max. of
17.5 lbs (8 kg).
The combi rack becomes very hot
during use. Use caution.
Oven accessories
When inserting a rack, always check
that the safety notches are at the
rear of the oven.
The rack can only be removed by
raising it upwards and then pulling out.
During certain functions, it is
recommended to use the combi rack
along with the glass tray.
15
Page 16

Safety and energy saving features
System lock
The oven can be locked 0 to prevent
unauthorized use.
Turn the function selector to "Off".
^
0
m 0
V
Continue pressing W until V is below
^
the 0 symbol.
^ Press "OK".
I
0
V
^ As long as the triangle V below the
0 symbol is flashing, you can use V
or W to toggle between "I" and "0".
Automatic Safety Shut-off
A function without Microwave can be
started without a duration set. To
prevent a run-on operation and a fire
hazard the oven shuts off
automatically. Depending on the
temperature and function selected, the
oven will turn off 1 to 10 hours after the
last operation was selected.
When the microwave is turned off after
one operation but will be used for a
second cooking function right away,
you must wait 10 seconds before the
power can be turned on again.
"0" The system lock is deactivated.
"I" The system lock is activated.
^
Select "OK" to confirm the setting.
The symbol 0 acts as a reminder that
the lock is activated.
The oven will remain locked after a
power failure.
16
Page 17

Safety and energy saving features
Door contact switch
If the door is opened during a function
without microwave, the heat will
automatically turn off but the fans will
remain on. The function will continue
again once the door is closed.
If the door is opened during a function
with microwave, the heat and fan will
both turn off automatically. After closing
the door, the operation must be
restarted.
Switching off time display
The display darkens when the function
selector is in "Off" position. The time will
continue to run in the background
(see “Settings % – Time display”).
17
Page 18

Settings %
The default oven settings can be changed in the function "Settings %".
In this function you can customize the oven to suit your preferences.
Setting Status (* Factory setting)
PI
Time
display
S0 The time display is turned off.
The display is dark when the function selector is
in the "0ff" position. The time runs in the
background.
SI* The time display is turned on and visible.
P2
Duration
signal tone
P3
Timer
signal tone
P4
Key tone
P5
Volume
signal tones
P6
Time format
P7
Temperature
unit
S0 When a set duration time expires, no signal
sounds.
SI* (long) When a set duration time expires, a signal
S2(short)
S0 When the timed period ends, no signal sounds.
SI* (long) When the timed period ends, a signal sounds.
S2(short)
S0 The key tone is turned off.
SI* The key tone is turned on.
S0*–S30 If the settings "P2– S2" and "P3– S2" are
i2 * The current time appears as a 12 hour display.
24 The current time appears as a 24 hour display.
°F * Temperature is displayed in °F.
°C Temperature is displayed in °C.
sounds.
You can choose between two signal sounds.
You can choose between two signal sounds.
selected the volume of the short signal tones can
be adjusted using S0*–S30.
If the settings "P2– SI" and "P3– SI" are
selected the volume of the long signal tone
cannot be changed.
18
Page 19

Changing the status of a
setting
Turn the function selector to
^
Light / %.
Select "OK".
^
PI
"PI" appears in the display.
The settings "PI"to"P7" can be
changed individually.
^ Press V or W until the desired setting
number appears in the display.
^ Select "OK".
Settings %
The settings will remain saved in the
case of a power failure.
S0
The current status of the setting "S"
(example) appears in the display.
^
Use V or W to change the setting
status (see table).
^
Select "OK".
The status change is stored in memory.
"P" and the number of the setting
appear again in the display.
Other settings can also be changed at
this time as long as the function
selector is not turned to "Off".
19
Page 20

Selecting cookware
Microwaves:
are reflected by metal,
–
– pass through glass and chinaware,
Material and shape
The material and shape of containers
used affect cooking results and times.
Circular and oval containers work best.
The food will heat more evenly than in a
square container.
Containers and lids which
,
contain hollow handles or knobs are
not suitable for use in the oven. The
handles or knobs could collect
moisture if not adequately vented.
Without vent holes pressure can
build up, causing the container to
crack or shatter. Danger of injury.
Metal
Do not use metal containers,
,
aluminum foil, cutlery or dishes with
metal decor during the
microwave-solo function. Metal
reflects the microwaves which
hinders the cooking process. Sparks
may occur.
–
are absorbed by the food.
20
Do not use plastic cups with
incompletely removed aluminum lids
(such as cream cups). The remnants
of the lids can lead to sparking.
Page 21

Selecting cookware
Exceptions:
The enclosed combi rack is only
suitable for combi functions not the
microwave solo function. Do not set
it on the oven floor.
Metal baking dishes are suitable for
–
baking with a combination
microwave baking method. However
they are not recommended, metal
reflects the microwaves causing
longer cooking times. In addition, the
use of metal pans could cause
sparking.
– Pre-cooked meals in aluminum foil
containers can be defrosted and
reheated in the oven. Important:
Remove the lid before heating the
food.
The food is heated only from above.
To heat the food evenly place it in a
container suitable for microwaving.
When using aluminum foil
containers, crackling and sparking
may occur, do not place them on the
combi rack.
Metal meat skewers or clamps
–
should only be used if they are small
in comparison to the size of the
meat.
Glassware
Heat-resistant glass or ceramic
glassware are ideal for use in the oven.
Crystal contains lead and is
unsuitable.
Porcelain (china)
Porcelain (china) is suitable for use in
the oven.
Do not use porcelain with gold or
silver edging or items with hollow
knobs or handles, insufficient
ventilation may cause damage.
Earthenware
Decorated earthenware is only suitable
if the decoration is beneath the glaze.
Earthenware can get very hot and
may crack.
–
For even defrosting and to avoid
overcooking unevenly shaped cuts
of meat, poultry or fish, small pieces
of aluminum foil may be used to
mask wing-tips or other thin parts for
the last few minutes of the process.
Make sure that the aluminum foil is
at least 1 inch (2.5 cm) from the
oven walls at all times. It must not
touch the walls.
Glazes and colors
Some glazes and colors contain
metallic substances. They are not
suitable for the oven.
Wood
Wood containers are not suitable.
The water from the wood evaporates
during the cooking process causing
it to dry out and crack.
21
Page 22

Selecting cookware
Plastics
Use plastic dishes only for
Microwave - Solo. They must be
heat resistant up to 230°F (110°C)
otherwise the plastic may melt into
the food.
Special plasticware, designed for use
in microwave ovens is available in retail
outlets.
Plastic boiling bags can be used for
cooking and reheating.
They should be pierced beforehand
so that steam can escape. This
prevents a build-up of pressure and
reduces the risk of the bag bursting.
Disposable containers
Only those plastic disposable
containers specified under "Plastics"
are suitable for use in the oven.
Do not leave the oven unattended
when reheating or cooking food in
disposable containers made of
plastic, paper or other flammable
materials.
Disposable containers are not always
microwave safe.
Roasting bags
These bags can be used in the oven.
Please follow the manufacturers’
instructions.
,Do not use metal clips, plastic
clips with metal parts, or twist ties
containing wire. They could ignite
when heated.
22
Page 23

Covering the food
Use a cover only during the
Microwave function. Plastics are
only heat-resistant up to 230°F
(110°C). Higher temperatures
(Broiling, Convection Bake, etc.) can
cause the cover to melt into the
food.
The cover should not completely
seal the container. This may prevent
steam from escaping causing the
cover to melt.
A cover:
– prevents most of the steam from
escaping, especially when cooking
foods which needs longer to cook,
such as potatoes.
– shortens and evens out the cooking
process.
– prevents the food from drying out.
–
prevents soiling of the oven interior.
Selecting cookware
Cover the food with a glass or plastic
^
lid suitable for ovens. They are
available in retail stores.
Plastic wrap suitable for microwaving
can also be used.
,
Do not heat food in closed
containers e.g. glass baby food
containers. Vent the container
before heating.
Do not use a lid or cover if cooking food
in which a crisp finish is desired e.g.
breaded chicken, garlic bread, etc.
23
Page 24

Before using the oven
Enter time of day
Turn the function selector to "Off".
^
The symbol m lights, the time flashes
and the triangle V below the symbol
m.
I2:00
m
V
Use the temperature selector or the
^
V or W touch controls to enter the
hour.
^ Select "OK" to confirm the selection.
^ Use the temperature selector or the
V or W touch controls to enter the
minutes.
^ Select "OK".
The time setting is confirmed.
Change time of day
Press the "OK" touch control twice.
^
Use the temperature selector or the
^
V or W touch controls to enter the
hour.
Select "OK" to confirm the selection.
^
Use the temperature selector or the
^
V or W touch controls to enter the
minutes.
Select "OK".
^
The time has been changed and saved
into memory.
If the power is cut off for more than
24 hours the clock will have to be
reset.
24
Page 25

Before using the oven
Cleaning the appliance
Remove the protective film from the
appliance front (if present).
Wipe the interior with a solution of
^
warm water and liquid dish soap. Dry
with a soft cloth.
Leave the door open until the interior
is completely dry. Otherwise odors
and corrosion may occur.
Wash the accessories.
^
See "Cleaning and care" for more
information.
Heating the oven
New ovens may have a slight odor
during the first use. To eliminate the
odor quickly, the oven should be
operated at a high temperature for at
least 1 hour.
Before heating the oven, remove all
accessories and labels.
Make sure the room is well
ventilated during this process.
Turn the function selector to
^
"Convection Bake".
The factory-suggested temperature of
325°F (160°C) is indicated.
^ Using the temperature selector, set
the maximum temperature, 475°F
(250°C).
^ Heat the empty unit for at least one
hour.
To automatically end this procedure;
see "Selecting cooking times".
^
Allow the appliance to cool to room
temperature.
^
Clean the oven with warm water and
a mild cleaning agent and dry it with
a clean cloth.
Close the door when the oven interior is
completely dry.
25
Page 26

Using the oven
For a description of each function see
the "Functions" section of these
operating instructions.
Microwave
Turn the function selector to
^
Microwave.
The oven specifies the "Default" power
level.
HI
_
V
^ To select a lower power level, while
the triangle V is flashing, use V to
change the setting.
^ Confirm the setting by pressing "OK",
or simply wait a few seconds.
The following appears in the display:
0:00
T
V
^
While the triangle V is flashing, use
the temperature selector or the W
touch control to enter the desired
duration in minutes:seconds (e.g.,
1:30 minutes).
min
Confirm the setting by pressing "OK",
^
or simply wait a few seconds.
The following appears in the display:
I:30
_ m T
min
Start
V
Select "OK" to start the function.
^
The countdown of the duration will
being in the display.
As soon as the function is
interrupted or the door is opened the
microwave function will stop.
At the end of the microwave
function:
– the T symbol flashes.
– the cooling fan continues to run.
– if the signal tone is turned on, a
signal tone is heard (see "Settings
%"). Press any touch control to
interrupt the tone.
–
The current time appears in the
display.
–
The oven lighting shuts off.
26
Page 27

Using the oven
Combi functions
Combination Bake,
Combination Broil, Micro Broil
Select the desired function.
^
The oven specifies a "Default" power
level, "HI". You may also select a lower
power level, "LO".
HI
_
V
^ To select a lower power level, while
the triangle V is flashing, use V to
change the setting.
^ Confirm the setting by pressing "OK",
or simply wait a few seconds.
The following appears in the display:
h
Confirm the setting by pressing "OK", or
simply wait a few seconds.
The following appears in the display:
h
I:30
_ 6 m T
If the desired temperature does not
correspond to the default temperature:
Use the temperature selector to set
^
the desired temperature (except with
the Micro Broil function).
The following appears in the display:
Start
V
h
I:30
_ 6 m T
^ Select "OK" to start the function.
Start
V
0:00
T
V
^
While the triangle V is flashing, use
the temperature selector or the V or
W touch controls to enter the desired
duration in minutes:seconds (e.g.,
1:30 minutes).
Depending on the power level selected,
you can enter a time of up to 2 hours.
The countdown of the duration will
being in the display.
At the end of the combi function:
–
the oven heating automatically turns
off.
–
the cooling fan continues to run.
–
the T symbol flashes.
–
if the signal tone is switched on, a
signal will sound (see "Settings %").
^
Turn the function selector to "0".
All signals turn off.
27
Page 28

Using the oven
Solo functions
Functions without microwave
Place food in the oven.
^
Select the desired function
^
(e.g., Convection Bake).
The display will show:
3
325
6 m
V
– the default temperature "325",
– Temperature indicator 3,
– the triangle V below the 6 symbol.
The heating, lighting and cooling fan
turn on simultaneously.
Once the selected temperature is
reached, the temperature indicator
goes out and a signal sounds.
^
After the cooking process, turn the
function selector to "Off" and remove
the food from the oven.
Cooling fan
The cooling fan will continue running for
some time so that moisture cannot
condense in or around the oven.
Temperature indicator 3
In addition to the temperature, the
Temperature indicator 3 also appears
in the display. It will always light when
the oven heating is turned on.
When the selected temperature is
reached,
the oven temperature goes out.
–
the temperature indicator 3 goes
–
out.
if the signal tone is turned on, a
–
signal sounds (see "Settings %").
Should the temperature fall below the
value set, the oven heating and
temperature indicator will turn on again.
Rapid Heat
Default temperature ....325°F (160°C)
Rapid Heat can be used to pre-heat the
oven.
^
Select "Rapid Heat".
^
Set the required temperature using
the temperature selector.
Oven heating begins.
^
After the temperature indicator 3
goes out and the signal sounds,
select the desired function and place
the food in the oven.
It will turn off automatically once the
oven has cooled down to a factory set
temperature.
28
Page 29

Using the oven
End of a cooking process
After the Duration elapses:
the oven heating automatically turns
–
off.
the cooling fan remains running after
–
a function with microwave.
the T symbol flashes.
–
if the signal tone is turned on, a
–
signal sounds (see "Settings %").
Turn the function selector to "0".
^
Tips:
Most foods can be placed directly in
–
the cold oven, so heat used during
the heating phase can be used to
begin cooking.
To avoid too-rapid browning, do not
–
use Rapid Heat for pizza and/or
sensitive doughs like biscuit or
cookie.
Not suitable for most baking
–
processes, i.e. batters may dry out,
yeast will deactivate, etc.
29
Page 30

Selecting cooking times
The oven can be programmed to turn
on and off automatically.
Duration T
Enter the time required for the process.
When this time has elapsed, the oven
automatically shuts off.
The maximum duration that can be set
depends on the function / power level
selected.
When using a function with
microwave, a duration must always
be set.
End time S
With this function you can set the oven
to turn off automatically.
Automatic shut-off
To have a cooking function
automatically turn off, enter a
Duration T or End time S.
Example: Enter "Duration"
Place food in the oven.
^
Select a function and temperature.
^
The heating, lighting and cooling fan
turn on simultaneously.
h
0:00
6 m TS
V
^ Continue pressing W until the triangle
V is below T (Duration).
"0:00" appears in the display.
^ Select "OK".
^ While the triangle V is flashing,
enter the duration in hours:minutes
using the temperature selector or the
W touch control.
30
^
Select "OK" to confirm the setting (or
simply wait a short time).
The countdown of the duration will
appear in the display.
Page 31

Selecting cooking times
Delay start with automatic
shut-off
To have a cooking process
automatically turn off, enter a Duration
T or End time S.
Example:
The current time is 10:45 a.m.;
a roast with a duration of 90 min. needs
to be ready around 1:30 p.m.
Place the food in the oven.
^
Select a function and temperature.
^
The heating, lighting and cooling fan
turn on simultaneously.
^ Enter the Duration:
h
I0:45
6 m TS
V
^ Continue pressing W until the triangle
V is below T (Duration).
"0:00" appears in the display.
^
Select "OK".
Now change the End time:
I2:I5
6 m TS
V
Press W until the triangle V is below
^
S (End).
The display shows the current time plus
the Duration entered
(10:45 + 1:30 = 12:15 p.m.).
Select "OK".
^
h
I3:30
S
V
^ While the triangle V is flashing,
move the end time using the
temperature selector or the W touch
control to the desired time
(1:30 p.m.).
^
Select "OK" to confirm the setting (or
simply wait a short time).
h
I:30
T
V
^
While the triangle V is flashing, enter
the duration in hours:minutes (1:30)
using the temperature selector or the
W touch control.
^
Select "OK".
Oven heating, lighting and cooling fan
turn off.
End time is in the display, as long as
the triangle is not moved under another
symbol.
As soon as the start time
(1:30 p.m. - 1:30 = 12:00 p.m.) is
reached, the oven heating, lighting and
cooling fan will turn on.
31
Page 32

Selecting cooking times
Verify and/or change times entered
You can verify or change the times
entered for a process at any time by
selecting the relevant symbol with
V or W.
To change
Select OK and, while the triangle V
^
is flashing, change the setting with
the temperature selector or the
V or W touch controls.
Delete times entered
^ Turn the function selector to "0".
32
Page 33

Timer
The timer can be used to time any
activity in the kitchen and can be set
independently of a cooking function.
The timer can be set from 5 seconds to
99 minutes 55 seconds.
Setting the timer
Select "Timer".
^
N
0:00
^ While N is flashing, enter the time
using the temperature selector or the
W touch control.
With each press the time changes, first
in 5 second increments, followed by
1-minute increments.
^ Select "OK" to confirm the setting (or
simply wait a short time).
min
At the end of the timed period:
the symbol N will flash.
–
if the signal tone is turned on, a
–
signal will sound (see "Settings %").
the time that had passed since the
–
time set had expired appears in the
display.
Select "OK".
^
Canceling the timer
Select "Timer".
^
If desired, while N remains flashing
^
reset the timer to "0:00" using the
temperature selector or the V touch
control.
^ Select "OK" to confirm the setting (or
simply wait a short time).
The timer display will count down in
one-second-increments.
33
Page 34

Functions
Solo functions
Microwave
–
To defrost, reheat and cook in a
microwave oven is quicker than
using traditional oven methods.
Rapid Heat
–
The oven is pre-heated to the
desired temperature as rapidly as
possible. Once the temperature has
been reached the temperature light
goes out and a signal sounds. The
function selector must then be turned
to the desired function.
– Convection Bake
A stream of hot air is generated and
then fanned throughout the interior
for even cooking.
Two runner can be cooked on
simultaneously.
– Maxi Broil
This operating mode is ideal for
grilling flat food items and for
browning casseroles or similar
dishes.
Combi functions
Micro Broil
–
Combination Bake
–
Combination Broil
–
For a combination of the microwave
function with a solo function. These
functions allow for fast heating, cooking
and browning of food.
Do not cover the food in combi
functions. The food will not get a
crisp finish.
Convection Bake is usually the most
suitable. Since the heat immediately
gets to the food, the time and energy
efficiency is greatest.
–
Convection Broil
Lower temperatures as used than for
"Maxi Broil".
This mode is used for grilling food
items of greater diameter, such as
rolled meats and poultry.
–
Defrost
This function enables frozen food
and baked goods to be gently
thawed, by circulating oven air by
fans at room temperature.
34
Page 35

Do Not Operate the Microwave
Oven empty! The oven will get
damaged.
Microwave cooking offers speed,
convenience and nutritional benefits
when food does not require browning
or crisping.
Microwave
The Microwave solo function is
recommended for cooking casseroles,
rice pudding, etc.
Any microwave-safe cookware is
suitable for use.
Set the cookware in the middle of the
^
glass tray on the 1
the bottom.
st
level runner from
The moisture content of food will affect
the speed at which it is cooked.
Heat is produced directly in the food,
therefore:
– food can generally be cooked
without adding much liquid or
cooking oil.
– defrosting, reheating and cooking in
a convection microwave oven is
quicker than using traditional oven
methods.
– nutrients, such as vitamins and
minerals, are generally retained.
–
color, texture and taste of food are
not impaired.
Set a duration and power level.
^
There are six microwave power levels
available: HI----LO
When using a function with microwave,
a duration must always be set.
Microwave tips
– Food with a thick skin or peel, such
as potatoes and sausage, should be
pierced several times before cooking
to allow steam to vent and prevent
the food from bursting.
– Boil eggs in shell only in a specially
designed microwave egg boiling
device, otherwise the eggs may
burst even once taken from the oven.
–
Eggs can be cooked without their
shells in the oven only if the yolk has
been punctured. The pressure could
otherwise cause the egg yolk to
explode.
–
Do not cover the food when using
combination functions.
–
Add a little water when cooking
vegetables that are not fresh in the
oven. Fresh vegetables cook quicker.
–
Food from the fridge needs a longer
cooking time than food at room
temperature.
35
Page 36

Baking
Convection bake
Default temperature ....325°F (160°C)
Recommended for cookies, quick
batters, pastry, phyllo, and strudel.
Any heat-resistant cookware is suitable,
e.g. casserole dish, china,
earthenware. However shiny, thin pans
are not recommended.
Recommended runner levels:
Cakes ........1strunner from bottom
Flat items .....2ndrunner from bottom
(cookies, pastries, etc).
Baking on 2 runners ....1stand3rdor
...............2ndand3rdrunners
...................from the bottom
. . . depending on the height of the food
Baking tips
Combination bake
Default temperature ....325°F (160°C)
This function is suitable for baking
items with a longer bake time
e.g. dough, cake, cheesecake, etc.
This function combines the functions
Microwave and Convection Bake. Heat
reaches the food immediately
shortening cooking times while still
achieving a browned finish.
Heat-resistant glass or ceramic
bakeware is suitable so microwaves
can get through the material.
Metal cake pans are not recommended
with this function. Metal pans reflect
microwaves causing longer cooking
times. In addition, the use of metal pans
could cause sparking.
Place the pan on the glass tray so that
it does not touch any of the appliance
walls. If sparks continue to form, do not
use that pan again for combination
mode.
–
You can also program a duration
(see "Selecting cooking times").
However items should not be
prepared too far in advance, the
dough will dry out and the leavening
agent will lose its effectiveness.
–
Place rectangular or square cake
pans with the longer side across the
width of the oven. The heat will better
distribute.
36
^
Set the cake pan in the middle of the
glass tray on the 1
the bottom. Be sure that the pan
does not touch the walls.
The baking time is shortened.
^
Set the microwave to "LO" for the
entire duration of baking.
st
level runner from
Page 37

Broiling
Convection broil
Default temperature ....400°F (200°C)
The function Convection Broil is
designed for broiling food in which a
brown crust is desired like shish
kebabs, roasts and poultry.
Roasting pans and heat-resistant glass
pans are suitable for use with this
function.
The cookware must have
heat-resistant handles.
^ Select a duration and/or temperature
if desired.
If possible allow the oven to preheat for
5 minutes.
^ Place the combi rack on the glass
tray and place the food on it.
^ Depending on the size of the food
insert the glass tray on the 1
level runner from the bottom.
st
or 2
nd
Combination broil
Default temperature ....400°F (200°C)
This function combines the functions
Microwave and Convection Broil
allowing a microwave power level to be
selected as well as a temperature.
Use only microwave-safe, heat-resistant
cookware, no metal lids.
Select a duration, power level and/or
^
temperature if desired.
If possible allow the oven to preheat for
5 minutes before adding the microwave
function.
The following microwave levels are
recommended for broiling:
meat and fish ...................HI
poultry ........................LO
^ Confirm with "OK".
^ Place the combi rack on the glass
tray and place the food on it.
^ Depending on the size of the food
insert the glass tray on the 1
level runner from the bottom.
st
or 2
nd
37
Page 38

Broiling
Maxi Broil
Maxi Broil is done at a fixed
temperature and cannot be changed.
This function is designed for browning
and searing large quantities of meat,
such as ribs or chops, or for browning
large dishes.
Depending on the size of the food
^
insert the glass tray on the 1
st
or 2
nd
level runner from the bottom.
Micro Broil
Micro Broil is done at a fixed
temperature and cannot be changed.
This function combines the programs
Microwave and Broil allowing a power
level to be selected.
^ Place the combi rack on the glass
tray and place the food on it.
^ Insert the glass tray on the 2
runner from the bottom. The 3
runner level can be selected for very
flat food.
nd
level
rd
Broiling tips
Slices should be cut evenly so that
–
the broiling time is the same.
Before placing food onto the combi
–
rack baste it with oil, to avoid
sticking.
Turn the food at the half-way stage.
–
^
Select the power level desired.
^
Confirm with "OK".
^
Select a duration.
^
Press "Start".
38
Page 39

Defrost
The defrost function allows you to
defrost food at a consistent
temperature.
Room-temperature air is distributed
over the food by the fan on the rear wall
of the oven.
Shelf levels
Remove the frozen food item from the
^
packaging, and place it on the glass
tray or in a bowl.
Depending on the size of the food
^
item, select the 1
the bottom.
The time it takes to defrost the food
depends on its type and weight. The
temperature at which it was deep
frozen will also make a difference.
st
or 2ndrunner from
Defrosting tips
During the defrosting time turn, stir or
–
separate the food several times. As a
reminder a tone sounds and a
message is displayed.
Remove frozen food items from the
–
packaging and place them in a dish.
Meat and poultry should be fully
–
thawed before cooking. Do not use
the defrosting liquids.
Fish does not need to be fully
–
defrosted before cooking. Defrost so
that the surface is soft enough to
absorb seasonings.
– Cook food immediately after
defrosting.
39
Page 40

Defrost / Heat and Cook
To defrost, heat and cook at the same
time use the function Microwave or a
combination function.
Microwave solo
This function is suitable for frozen food,
which does not require browning.
Frozen meals can be defrosted and
then reheated or cooked. Consult the
manufacturer’s instructions.
Remove the food from its packaging
^
and place in a covered microwave
safe dish on the 1
st
level runner.
^ Select a duration and power level.
^ Select "OK".
For combination functions
This function is recommended for
pre-cooked dishes, which require
heating and browning.
^ Place the frozen food in a microwave
safe container and set it on the glass
tray.
^
Set the glass tray in the 2
nd
runner
level. Do not cover the food.
During thawing, heating, cooking
Items should be stirred several times
^
during the process.
Separate and turn slices of meat
half-way through the program.
After defrosting / heating and
cooking
Let the food stand for a few minutes
^
at room temperature so that it can
take on a more uniform temperature
throughout the dish.
After heating foods, especially baby
food, always stir or shake, then test the
temperature before serving. This
reduces the danger of scalding.
Use caution when removing dishes
from the appliance.
Frozen foods in an aluminum trays
must be set directly on the glass
tray.
^
Select a duration and power level.
^
Adjust the temperature if necessary.
^
Select "OK".
40
Page 41

Let the oven cool before
,
cleaning the interior, the inside door
and the gasket. Danger of burns!
Cleaning and Care
Interior
The revolutionary PerfectClean enamel
is a smooth, nonstick surface that
cleans easily with a sponge.
Do not use a steam cleaner to clean
the appliance. Pressurized steam
could cause permanent damage to
the surface and to components of
the oven.
Clean the oven after every use,
accumulated soiling makes cleaning
difficult and could damage the
appliance.
Never use abrasive cleaners,
scouring pads or steel wool on any
part of the oven. They will damage
the surfaces.
Do not use caustic (oven) cleaners.
Do not spray oven cleaners into any
openings
Do not use the Microwave function if
the door or gasket is damaged. Call
Technical Service.
Clean spills on PerfectClean surfaces
as soon as possible to prevent stains.
Clean the interior, the inside of the
^
door and gasket with a sponge and a
solution of warm water and nonabrasive liquid detergent.
Avoid using too much water, this
could penetrate the openings.
Dry with a soft cloth.
^
^ Check the door and gasket at regular
intervals for any sign of damage.
Cleaning tips
Juices and cake mixtures
Soiling such as spilled juices and cake
mixtures are best removed while the
oven or tray is still warm. Spilled fruit
juices may cause lasting discoloration
of the surfaces but will not affect the
performance of the oven.
Hard-to-clean spills
Place a heat-resistant cup of water in
the oven and bring it to a boil. The
steam will condensate on the interior
walls making it easier to clean.
Neutralizing odors
Place a heat-resistant cup of water and
lemon juice in the oven and simmer for
a few minutes.
41
Page 42

Cleaning and Care
To avoid permanent damage to
PerfectClean treated surfaces, avoid:
scouring cleansers such as scouring
–
powder, scouring liquid, and pumice
stones
ceramic stove-top cleaners
–
steel wool
–
scouring pads, such as pot
–
scrubbers, or used sponges that still
contain abrasive cleanser residue
oven spray on PerfectClean surfaces
–
at high temperatures or long
application times
Interior ceiling
To clean the interior ceiling, the upper
heating element can be lowered.
Wait for the upper heating element
to cool before lowering it. Danger of
burns.
^ Unscrew the nut.
42
^
Lower the upper heating element.
Do not use force! It may cause
damage.
^
After cleaning move the upper
heating element back to its original
position. Tighten the nut.
Page 43

Cleaning and Care
Inside of door with door seal
The inside of the door remains
,
hot after use. Danger of burns!
Clean the inside of the door and the
door seal with a clean sponge cloth,
dish liquid and warm water, or a clean,
damp microfiber cloth. Then, dry with a
soft cloth
Inspect the door and the door
,
seal for damage. In the event of any
damage, do not use the microwave
function of the appliance until it has
been repaired by a customer
service technician.
Glass surfaces are vulnerable to
scratching. Scratches can lead to
shattering of the glass surface.
Front of appliance
Remove spills as soon as possible.
Otherwise the soiling may become
hard to remove.
If spills are allowed to sit for an
extended period of time or if
unsuitable cleaning agents are used
the surfaces may discolor or
change.
Clean the front of the appliance with
^
a clean sponge or cloth, dish liquid
and warm water, or a clean, damp
microfiber cloth. Then dry with a soft
cloth.
Glass cleaners may be used to
clean the exterior. However do not
allow them to sit or "puddle", this can
cause damage to the surface.
Remove the cleaner promptly.
To better maintain your appliance avoid
the following:
–
cleaners containing soda, ammonia,
thinners, or chlorides
–
cleaners containing descaling
agents or lime removers,
–
abrasive cleaners,
–
stainless steel cleaners,
–
dishwasher soap (powder),
–
caustic (oven) cleaners,
–
scouring pads, steel wool, hard
brushes,
–
metal scrapers.
43
Page 44

Cleaning and Care
Accessories
Combi rack
The combi rack has been treated with
PrefectClean. Do not wash in the
dishwasher.
Wash the combi rack using a sponge
^
and a solution of warm water and
non- abrasive liquid detergent.
Dry with a soft cloth.
^
Glass tray
Clean the glass tray in the
^
dishwasher or wash it by hand.
Do not use abrasive cleaning agents,
they will damage the surface.
Boiling wand
The boiling wand can be washed in the
dishwasher or by hand.
44
Page 45

Frequently asked questions
Repairs should only be carried out by a qualified and trained person in
accordance with local and national safety regulations. Unauthorized repairs
could cause personal injury or machine damage.
Why is the display dark?
Possible fault Solution
The appliance is not correctly plugged
in.
The circuit breaker has tripped. Check the breaker.
The display setting is set to "Off". See "Settings %".
What is a function does not work?
Possible fault Solution
The door is not closed properly. Be sure the door is closed properly,
A power level and duration have not
been set for the microwave function.
A power level, time and/or temperature
has not been set for a combi function.
Why is there no noise when the oven door is opened?
This is normal. If the door is opened during operation, a safety contact switch
causes the heating elements and the fan to shut off.
Check the plug.
otherwise the oven will not function.
For a microwave function, ensure that a
power level and duration have been
set. See "Using the oven - Microwave".
During a combi function, a power level,
time and a temperature must be set.
See "Using the oven - combi functions".
45
Page 46

Frequently asked questions
Why is a noise heard after turning the oven off?
This is normal. The fan will continue to run for a short time to cool the oven. When
the oven has cooled sufficiently, the fan will turn off automatically.
The fan will stop if the door is opened during the cooling phase. The fan will
continue when the door is closed again until the cooling phase is complete.
Why are there strange noises when the microwave oven is being used?
Possible fault Solution
Sparks are created by the use of
dishware with a metallic finish.
The food is covered with aluminum
foil.
Why does the oven operate but the light is off?
The light bulb is bad. See "Frequently asked questions - Changing a light bulb".
Fault messages "F XX" appear in the display.
Contact Miele's Technical Service Department.
Why is there uneven browning?
Possible fault Solution
Oven temperature too high. Use a lower cooking temperature.
Shiny or thin pans were used. See "Selecting cookware".
See "Selecting cookware".
Remove the aluminum foil.
46
Page 47

Changing the light bulb
To reduce the risk of electric
,
shock, disconnect this appliance
from the power supply by shutting
off the power main or tripping the
circuit breaker.
The bulb cover is comprised of two
parts: a glass cover and a frame.
Hold the bulb cover firmly so it does
not fall. As a precaution, place a
dish towel on the floor of the oven
and the open door.
Frequently asked questions
Only use the following light bulb:
12 V, 10 W, 572 °F (300 °C) heat
resistant, socket G4, type 64418
made by Osram.
Do not touch the new light bulb with
your fingers; touching the bulb will
reduce its life. Follow the bulb
manufacturer’s instructions.
Insert a new halogen bulb.
^
Place the glass cover into the frame
^
and fasten the bulb cover: Insert the
tip of the frame into the recess in the
oven ceiling. Press the frame into the
oven ceiling and tighten the screw.
^ Restore power to the appliance.
^
Unscrew the bulb cover with a Torx
screwdriver (T20) and remove the
cover.
^
Pull out the halogen bulb.
47
Page 48

Technical Service
In the event of a fault which you cannot
easily fix yourself, please contact the
Miele Technical Service Department at
the phone number on the back of this
booklet.
When contacting Technical Service
please quote the serial number and
model of your oven. This information is
visible on the silver data plate along the
right side of the oven.
MieleCare
(USA only)
MieleCare, our Extended Service
Contract program, gives you the
assurance of knowing that your
appliance investment is covered by
5 years of worry free ownership.
MieleCare is the only Extended Service
Contract in the industry that guarantees
repairs by a Miele Authorized Service
Provider using genuine Miele parts.
Only genuine Miele parts installed by
factory trained professionals can
guarantee the safety, reliability, and
longevity of your Miele appliance.
Please note that unless expressly
approved in writing by Miele’s Service
department, Extended Service
Contracts offered by other providers for
Miele products will not be recognized
by Miele. Our goal is to prevent
unauthorized (and untrained) service
personnel from working on your Miele
products, possibly doing further
damage to them, you and/or your
home.
48
To learn more about MieleCare
Extended Service Contracts, please
contact your appliance dealer or visit
us online at:
http://mieleusa.com/mielecare
Page 49

Installation Instructions
Information is subject to change. Please refer to our website to obtain the most
current product specification, technical & warranty information.
Page 50

Electrical connection
CAUTION: Before servicing,
,
disconnect the power supply by
either removing the fuse, shutting off
the power main or manually
"tripping" the circuit breaker.
Installation work and repairs should
only be performed by a qualified
technician in accordance with all
applicable codes and standards.
Repairs and service by unqualified
persons could be dangerous.
Power supply
The oven comes equipped with a 5.7 ft.
(1.7 m) power cord with a
NEMA 14-30 P molded plug ready for
connection to a:
120/240V, 20 A, 60 Hz power supply.
or
120/208V, 20 A, 60 Hz power supply.
WARNING: THIS APPLIANCE
MUST BE GROUNDED
Before connecting the appliance to
the power supply, make sure that
the voltage and frequency listed on
the data plate correspond with the
household electrical supply. This
data must correspond in order to
prevent machine damage. Consult
an electrician if in doubt.
Only operate the appliance after it
has been installed into cabinetry.
The appliance must be plugged into
an appropriate outlet that is installed
and grounded in accordance with all
local codes and ordinances.
Installer:
Please leave these instructions with the
consumer.
50
Page 51

Installation
Miele appliances can be installed flush or proud. Discuss your installation
requirements with your architect, designer and installer.
Installation options
The appliance is designed for installation under a countertop, in a tall cabinet or in
a tall cabinet in combination with an oven.
Installation under a countertop
When installed under a cooktop regard the installation instructions and
dimensions of the cooktop.
* Appliances with glass front
** Appliances with metal front
51
Page 52

Installation
Installation in a tall cabinet
* Appliances with glass front
** Appliances with metal front
52
Page 53

Installation in a tall cabinet in combination with an oven
Installation
* Appliances with glass front
** Appliances with metal front
53
Page 54

Installation
Appliance front dimensions
A7/8"
(Appliances with glass front: 22 mm / Appliances with metal front: 23 mm)
B H 4044 BM: 2
C Appliances with glass front:
Appliances with metal front:
54
3
/16" (55 mm)
1
/16'' (1.5 mm)
1
/32" (0.5 mm)
Page 55

Installation
Do not use the appliance until it
,
has been properly installed.
Connect the oven to the electrical
^
supply.
Set the oven into the cabinet niche,
^
push it all the way in and align.
Installation
^
Open the oven and secure the
appliance with the two supplied
screws at the side panels of the
cabinet.
Do not use the appliance until it has
been properly installed.
55
Page 56

Alteration rights reserved / 3813
(H 4044 BM)
INFORMATION IS SUBJECT TO CHANGE. PLEASE REFER TO OUR WEBSITE TO OBTAIN THE MOST
CURRENT PRODUCT SPECIFICATIONS, TECHNICAL & WARRANTY INFORMATION.
M.-Nr. 07 979 370 / 02
 Loading...