

Page 1
Operating and installation instructions
Built-in coffee machine
To avoid the risk of accidents or damage to the appliance, it is essential
to read these instructions before it is installed and used for the first time.
en – AU, NZ M.-Nr. 10 499 930
Page 2
Packaging material / Disposal of old machine
Disposal of the packing
material
The transport and protective packing
has been selected from materials which
are environmentally friendly for
disposal, and can normally be recycled.
Recycling the packaging reduces the
use of raw materials in the
manufacturing process and also
reduces the amount of waste in landfill
sites. Ensure that any plastic
wrappings, bags etc. are disposed of
safely and kept out of the reach of
babies and young children. Danger of
suffocation.
Disposing of your old
appliance
Electrical and electronic appliances
often contain materials which, if
handled or disposed of incorrectly,
could be potentially hazardous to
human health and to the environment.
They are, however, essential for the
correct functioning of your appliance.
Therefore, please do not dispose of
your old appliance with your household
waste.
Please dispose of it at your local
community waste collection / recycling
centre.
Ensure that your old appliance presents
no danger to children while being
stored for disposal.
2
Page 3

Contents
Packaging material / Disposal of old machine .................................................. 2
Warning and Safety instructions.......................................................................... 6
Guide to the appliance ....................................................................................... 16
Controls and display ...........................................................................................18
Accessories ......................................................................................................... 19
Using for the first time ........................................................................................ 20
Before using for the first time................................................................................ 20
Switching on for the first time ............................................................................... 20
Water hardness ..................................................................................................... 21
Operating principles............................................................................................ 23
Filling the water container.................................................................................. 24
Filling the coffee bean container .......................................................................25
Switching the coffee machine on and off .........................................................26
Adjusting the central spout to the correct cup height..................................... 27
Making drinks ...................................................................................................... 28
Making a coffee drink............................................................................................ 28
Dispensing a double portion ................................................................................. 29
Cancelling preparation .......................................................................................... 29
Preparing several cups of coffee - Coffee pot ...................................................... 30
Drinks made with ready ground coffee ................................................................. 30
Drinks with milk ..................................................................................................... 32
Preparing hot water............................................................................................... 33
Preparing User profile drinks................................................................................. 34
After a drink has been prepared............................................................................ 34
Coffee the way you like it ................................................................................... 35
Grinder setting....................................................................................................... 35
Amount of coffee, brew temperature and pre-brewing ......................................... 36
Amount of coffee..............................................................................................36
Brewing temperature ........................................................................................ 37
Pre-brewing ground coffee............................................................................... 37
Portion size .......................................................................................................... 38
3
Page 4

Contents
User profiles......................................................................................................... 40
Calling up User profiles ......................................................................................... 40
Creating a User profile......................................................................................40
Selecting a User profile .................................................................................... 41
Changing a name ............................................................................................. 41
Deleting a profile ..............................................................................................41
Changing a User profile.................................................................................... 42
Settings ................................................................................................................ 43
Calling up the "Settings" menu ............................................................................. 43
Changing and saving settings ............................................................................... 43
Overview of available settings............................................................................... 44
Language............................................................................................................... 46
Time of day............................................................................................................ 46
Date ....................................................................................................................... 46
Timer ..................................................................................................................... 46
Eco mode .............................................................................................................. 48
Lighting.................................................................................................................. 49
Info (display information) ....................................................................................... 49
Locking the coffee machine (System lock) ....................................................... 50
Water hardness ..................................................................................................... 50
Display brightness................................................................................................. 50
Volume................................................................................................................... 50
Factory default....................................................................................................... 51
Showroom programme (Demo mode)................................................................... 51
Cleaning and care ............................................................................................... 52
Quick guide ........................................................................................................... 52
Cleaning by hand or in the dishwasher ................................................................. 53
Drip tray................................................................................................................. 55
Drip tray cover....................................................................................................... 56
Water container ..................................................................................................... 56
Waste container .................................................................................................... 57
Central spout......................................................................................................... 57
Maintenance of the milk valve............................................................................... 59
Milk flask with lid ................................................................................................... 60
Interior and appliance door ................................................................................... 61
Central spout connector........................................................................................ 62
Brew unit ............................................................................................................... 62
Removing and cleaning the brew unit by hand................................................62
Maintenance programmes..................................................................................... 64
Opening the "Maintenance" menu ................................................................... 64
Rinsing the appliance............................................................................................ 64
4
Page 5

Contents
Rinsing the milk pipework ..................................................................................... 65
Cleaning the milk pipework ................................................................................... 65
Degreasing the brew unit ...................................................................................... 67
Descaling the machine ....................................................................................... 69
Problem solving guide ........................................................................................72
Messages in the display........................................................................................ 72
Unusual performance of the coffee machine ........................................................ 75
Unsatisfactory results............................................................................................ 79
Problems when heating up or frothing milk........................................................... 80
Replacing the angled connector ........................................................................... 82
After sales service and warranty .......................................................................84
Saving energy ...................................................................................................... 85
Electrical connection ..........................................................................................86
Installation............................................................................................................ 87
Building-in and combination options .................................................................... 87
Ventilation.............................................................................................................. 88
Building in the coffee machine .............................................................................. 89
Adjusting the door hinges ..................................................................................... 90
5
Page 6

Warning and Safety instructions
This coffee machine conforms to current safety requirements.
Improper use of the appliance can, however, present a risk of both
personal injury and material damage.
To avoid the risk of accidents and damage to the appliance,
please read these instructions carefully before installation and
before using it for the first time. They contain important notes on
the installation, safety, operation and care of the appliance.
Miele cannot be held liable for damage caused by non-compliance
with these Warning and Safety instructions.
Keep the instructions in a safe place and pass them along to any
future owner.
6
Page 7

Warning and Safety instructions
Correct application
This appliance is designed for domestic use and for use in similar
environments by guests in hotel or motel rooms, bed & breakfasts
and other typical living quarters. This does not include common/
shared facilities or commercial facilities within hotels, motels or bed
& breakfasts.
The coffee machine is not suitable for outdoor use.
The machine is intended only for the preparation of coffee based
drinks such as espresso, cappuccino, latte macchiato etc. Any other
usage is at the owner's risk.
This appliance is not intended for use by persons (including
children) with reduced physical, sensory or mental capabilities, or
lack of experience and knowledge, unless they have been given
supervision or instruction concerning its use by a person responsible
for their safety, and are able to recognise the dangers of misuse.
7
Page 8

Warning and Safety instructions
Safety with children
Caution! Danger of burning and scalding on the dispensing
spouts.
Children's skin is far more sensitive to high temperatures than that
of adults.
Ensure children do not touch hot surfaces of the coffee machine or
place parts of their body under the dispensing spouts.
Install the coffee machine out of reach of children.
Young children must not be allowed to use this appliance.
Older children may only use the coffee machine unsupervised if
they have been shown how to use it safely and recognise and
understand the consequences of incorrect operation.
Children should be supervised when they are near the coffee
machine. Do not allow them to play with it or to use the controls.
Cleaning may only be carried out by older children under the
supervision of an adult.
Remember that coffee and espresso are not suitable drinks for
children.
Risk of suffocation!
Children may be able to wrap themselves in packing material or pull
it over their heads with the risk of suffocation. Keep children away
from any packing material.
8
Page 9

Warning and Safety instructions
Technical safety
Repairs and installation work by unqualified persons could be
dangerous. The manufacturer cannot be held liable for unauthorised
work. Installation work and repairs to electrical appliances must only
be carried out by a Miele approved service technician.
A damaged appliance is dangerous. Check it for any visible
damage. Never install or attempt to use a damaged appliance.
Before connecting the appliance to the mains supply, make sure
that the rating on the data plate corresponds to the voltage and
frequency of the household supply. This data must correspond in
order to avoid the risk of damage to the appliance. Consult a
qualified electrician if in any doubt.
The electrical safety of this appliance can only be guaranteed
when continuity is complete between it and an effective earthing
system. It is most important that this basic safety requirement is
present and tested regularly and, where there is any doubt, the
household wiring system should be inspected by a qualified
electrician.
Reliable and safe operation of the coffee machine can only be
guaranteed if it is connected to the mains electrical supply.
Do not connect the machine to the mains electricity supply by a
multi-socket adapter or an extension lead. These do not guarantee
the safety of the appliance (e.g. danger of overheating).
This appliance must not be installed and operated in mobile
installations (e.g. on a ship).
For safety reasons, this appliance may only be used when it has
been built in.
If the coffee machine is to be built in above another appliance,
there must be a full-width, closed shelf between them (except in
combination with a built-in Miele plate warming drawer).
9
Page 10

Warning and Safety instructions
Only use the coffee machine in rooms where the ambient
temperature is between +10°C and +38°C.
Do not cover or block the ventilation gaps.
This would prevent adequate ventilation. Condensation can damage
the coffee machine or the furniture housing unit.
Ensure that there is sufficient ventilation around the coffee
machine. Otherwise condensate may form and the appliance or the
furniture unit may be damaged. The ventilation cut-out area in the
furniture unit and the space underneath the ceiling must amount to
at least 200
cm2.
If the coffee machine is installed behind a kitchen furniture door, it
may only be used with the furniture door open. This will prevent the
formation of heat and humidity and subsequent damage to the
appliance and/or furniture unit. Do not close the furniture door while
the coffee machine is in use. Ensure the coffee machine has cooled
down completely before closing the furniture door.
Repairs may only be carried out by a Miele authorised service
technician. Repairs by unqualified persons can cause considerable
danger to the user.
Before any repair work is carried out, the appliance must be
completely disconnected from the electricity supply.
The appliance is only completely isolated from the electricity supply
when:
– the mains fuse is disconnected, or
– it is switched off at the circuit breaker, or
– the mains connection cable is disconnected from the power
supply.
Pull the plug, not the cord, to disconnect the appliance from the
power supply.
10
Page 11

Warning and Safety instructions
The manufacturer's warranty will be invalidated if the appliance is
not repaired by a Miele approved service technician.
Faulty components must only be replaced by genuine Miele
Original spare parts. The manufacturer can only guarantee the safety
of the appliance when Miele replacement parts are used.
Never open the outer casing of the machine. Tampering with
electrical connections or components and mechanical parts is highly
dangerous to the user and can cause operational faults or electric
shock.
Use only Miele Original spare parts. If spare parts or accessories
from other manufacturers are used, the warranty will be invalidated,
and Miele cannot accept liability.
11
Page 12
Warning and Safety instructions
Correct use
The dispensing spouts present a danger of burning or
scalding.
The liquids and steam dispensed are very hot.
Please note:
– Keep well away from the area underneath the spouts when hot
liquids and steam are being dispensed.
– Heating surfaces have residual heat after use. Do not touch hot
components.
– Hot liquid or steam could spatter from the nozzles. Ensure that
the central spout is clean and fitted correctly.
– Water in the drip tray can also be very hot. Take care when
emptying it.
Never look directly at the lighting or use optical instruments to
look at it.
Please note the following regarding water:
– Fill the water container only with fresh, cold tap water. Hot or
warm water or other liquids could damage the coffee machine.
– Change the water every day to prevent a build-up of bacteria.
– Do not use mineral water. Mineral water will cause serious
limescale deposits to build up in your machine and damage it.
– Do not use water from reverse osmosis units. The machine could
be damaged.
Only fill the bean container with roasted espresso/coffee beans.
Do not fill the bean container with coffee beans which have been
treated with additives or with ground coffee.
Do not fill the bean container with any type of liquid.
12
Page 13

Warning and Safety instructions
Do not use green (unroasted) coffee beans or mixtures of coffee
beans which contain green coffee beans. Green coffee beans are
very hard and still contain a certain amount of residual moisture.
These can damage the coffee machine grinder as soon as grinding
begins.
Do not use coffee beans which have been treated with caramel,
sugar or other substances. Sugar will damage the coffee machine.
Only add ground coffee or cleaning tablets to the ground coffee
chute.
Do not use any caramelised ready ground coffee. The sugar in the
coffee will stick to and block the brew unit of the coffee machine.
The cleaning tablets for degreasing the brew unit will not remove this
type of deposit.
Only use milk without additives. Additives in milk usually contain
sugar and this will stick to the milk pipework.
If using cow's milk, only use pasteurised milk to prevent a build-
up of bacteria in the appliance.
Do not place any alcohol mixtures which are alight underneath the
central spout. The flames could ignite plastic components and cause
them to melt.
Do not swing from or hang anything on the appliance door when it
is open as this could damage the hinges on the coffee machine.
The seal on the central spout connector is lubricated with silicone
grease. Try to avoid getting this grease on your clothing when
removing and inserting containers or other components.
The machine must not be used for cleaning objects.
13
Page 14

Warning and Safety instructions
Cleaning and care
It is important to switch off the coffee machine before any
cleaning or maintenance.
Clean the coffee machine and the milk flask before using for the
first time (see "Cleaning and care").
All parts of the milk system need to be cleaned thoroughly and
regularly. Milk contains bacteria which proliferate rapidly with
inadequate cleaning.
Do not clean the machine with a steam cleaner or immerse it in
water as this will damage the machine. Steam or water could reach
the electrical components and cause a short circuit.
Avoid spillage on appliance connectors.
Descale the coffee machine regularly depending on the water
hardness level in your area. Descale the machine more frequently in
areas with very hard water. Miele cannot be held liable for damage
arising from insufficient descaling, the use of incorrect descaling
agent or the use of descaling agent which is not of the appropriate
concentration.
Degrease the brew unit regularly with Miele cleaning tablets.
Depending on the natural oil content of the coffee used, the brew
unit can become blocked quite quickly.
Used coffee grounds should be disposed of with the organic
rubbish or on the compost heap. Do not empty them down the sink,
as they could block it.
14
Page 15

Warning and Safety instructions
The following applies to appliances with stainless steel surfaces:
Do not adhere stickers, adhesive tape or any other adhesive
materials to stainless steel surfaces. The coating on the stainless
steel surfaces will become damaged and lose its protective
properties against soiling.
Stainless steel scratches very easily and even magnets can cause
damage to the surface.
15
Page 16
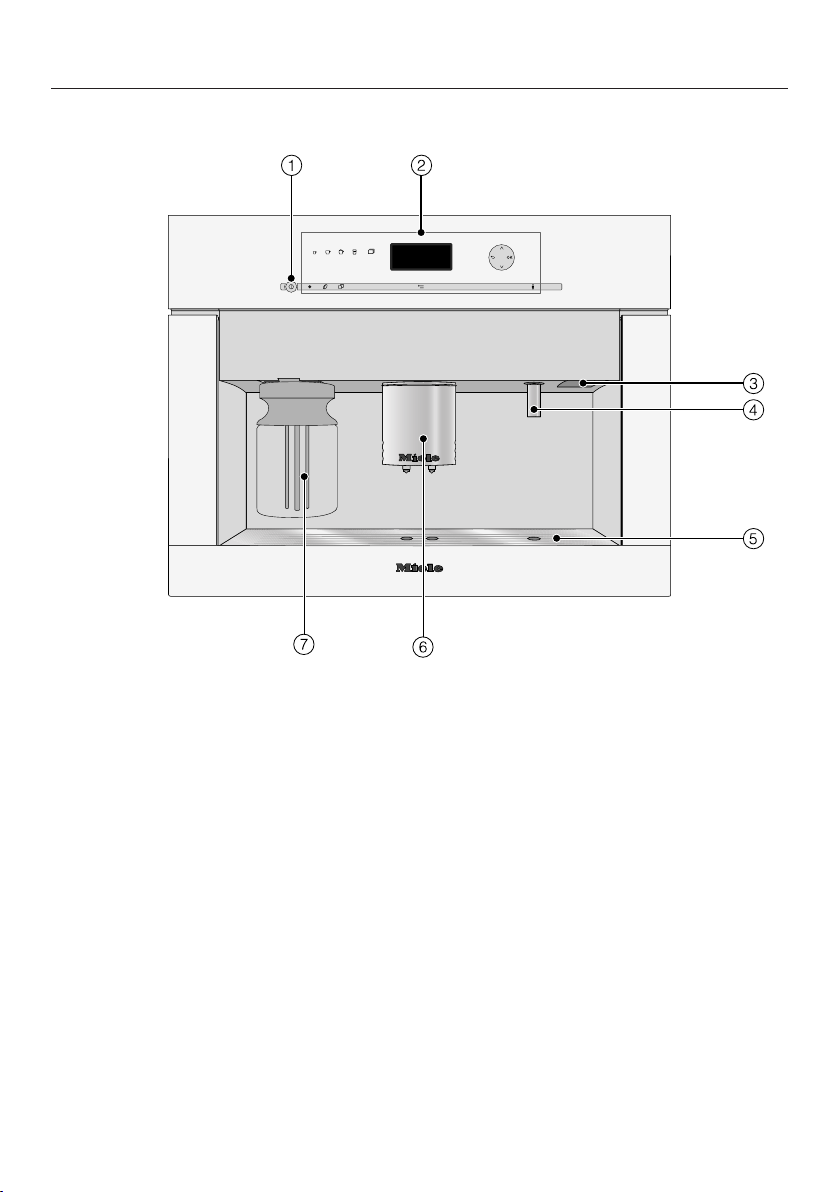
Guide to the appliance
Exterior view
a
On/Off sensor
b
Controls and display
c
Door handle
d
Steam and hot water spout
e
Drip tray cover
f
Height-adjustable central spout with lighting
g
Milk flask with lid
16
Page 17
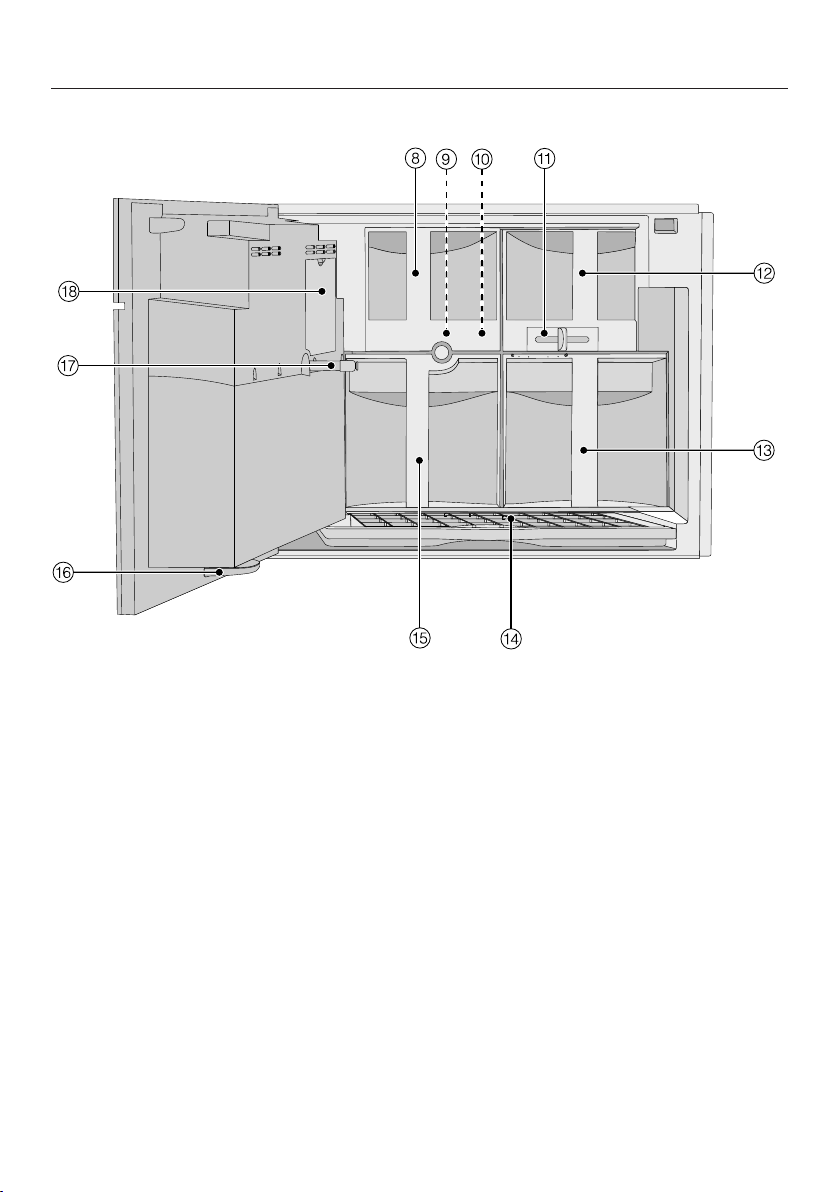
Interior view
Guide to the appliance
h
Ground coffee chute cover
i
Brew unit
j
Ground coffee chute
k
Slide control for the grinder setting
l
Coffee bean container
m
Water container
n
Drip tray with grid
o
Waste container
p
Drip tray inside machine door
q
Central spout connector
r
Service flap
17
Page 18
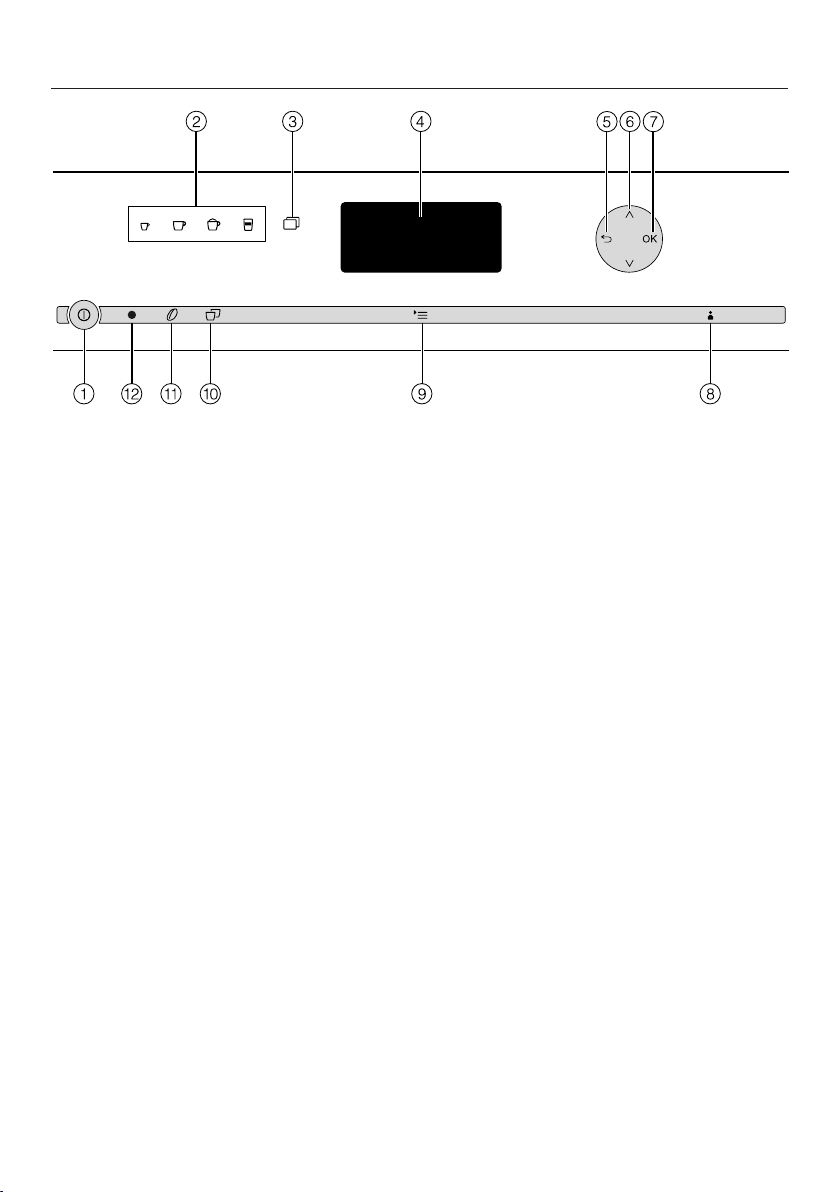
Controls and display
a
On/Off sensor
Switching the coffee machine on and
off
b
Drink sensors
For making Espresso, Coffee,
Cappuccino or Latte macchiato
c
Further programmes
More drinks such as Long coffee,
Cafè latte, hot milk, milk froth and hot
water,
Maintenance menu
d
Display
Shows information on current activity
or status
e
Back
For returning to the previous menu,
cancelling unwanted actions
f
Arrow sensors
For showing more selection options
in the display and highlighting a
selection
g
OK sensor
For confirming display messages and
saving settings
h
User profiles
Save and manage User profiles
i
Settings
Change settings, show or check
information, see which settings are
currently active
j
Double portion
For dispensing two portions of a
drink
k
Parameters
Settings for checking or altering
coffee preparation
l
Optical interface
(for service technician use only)
18
Page 19

Accessories
These products and other useful
accessories can be ordered via the
Miele webshop or directly from Miele
(see back cover for contact details).
Accessories supplied
– Measuring spoon
For ground coffee
– Milk flask with lid
For storing milk and preparing drinks
with milk
– Cleaning agent for milk pipework
For cleaning the milk system (starter
set)
– 2 cleaning containers (large and
small)
For cleaning and maintenance of the
machine
– Descaling tablets
For descaling the water pipework
(starter set)
– Test strips
For determining the water hardness
level
– Silicone grease
For lubricating the seal on the central
spout connector
Optional accessories
Miele also offers a range of optional
accessories, as well as cleaning and
conditioning products for your coffee
machine.
– Original Miele all purpose
microfibre cloth
For removing finger marks and light
soiling
– Milk flask with lid
For storing milk and preparing drinks
with milk
– Compact lid
For storing the milk flask in the
refrigerator
– Cleaning agent for milk pipework
For cleaning the milk system
– Descaling tablets
For descaling the water pipework
– Cleaning tablets
For degreasing the brew unit
– Silicone grease
For lubricating the seal on the central
spout connector
– Cleaning brush
For cleaning the milk pipework
– Central spout connector cap
Spare part
– Milk pipework elbow connector
Spare part
19
Page 20

Using for the first time
Before using the coffee machine for
the first time, please read these
instructions and make yourself
familiar with the appliance and its
controls.
Before using for the first time
Install the coffee machine and
connect it to the electricity supply
(see "Electrical connection" and
"Installation").
Remove any protective foil from the
front of the machine.
Clean the appliance thoroughly
before filling it with water and coffee
beans (see "Cleaning and care").
Switching on for the first time
When the coffee machine is switched
on for the first time, you will be asked to
set the following settings:
– Language and country
Selecting a language
Use the arrow sensors to
highlight the required language.
Then touch OK.
Use the arrow sensors to
highlight the required country.
Then touch OK.
The setting is now saved.
Setting the time of day
Touch the arrow sensors until the
time of day appears.
Then touch OK.
The setting is now saved.
Set the date
Use the arrow sensors until the
current date is set.
Touch OK to confirm the year, month
and day.
The setting is now saved.
– Date
– Time of day
– Display (time display)
Touch the On/Off sensor.
"Miele - Willkommen" appears briefly in
the display.
20
Page 21
Using for the first time
Display
You can choose one of the following
options:
– On: The time and date are always
visible in the display when the
appliance is switched off.
– Off: The display is dark when the
machine is switched off.
– Night dimming: The date and the time
are only displayed between the hours
of 5:00 and 23:00.
Use the arrow sensors to
highlight the required language.
Touch OK.
Depending on the setting selected, the
coffee machine may use more energy.
A message will appear in the display
to inform you of this.
The coffee machine is now successfully
set up for use.
Fill the water container with fresh,
cold tap water.
Water hardness
The water hardness level indicates how
much calcium is dissolved in the water.
The higher the calcium content, the
harder the water, and the harder the
water, the more often the coffee
machine will need to be descaled.
The coffee machine measures the
amount of water and steam used.
Depending on the level of water
hardness set, more or fewer drinks can
be dispensed before the appliance
needs to be descaled.
Programme the coffee machine to the
water hardness level of your area so
that it functions correctly and does not
get damaged. At the correct time a
prompt will then appear in the display
to descale the appliance.
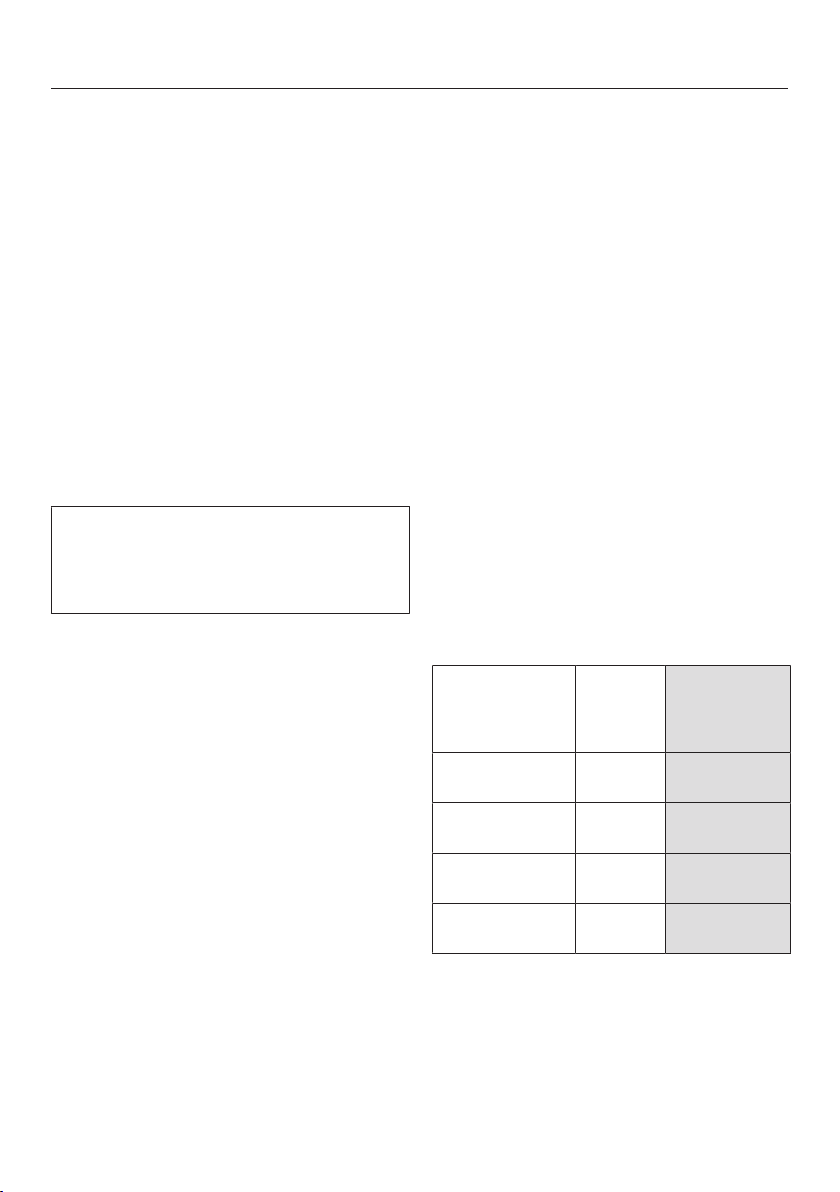
The machine has four programmable
levels:
Water hardness Water
0 - 8.4 °dH
(0 -1.5 mmol/l)
8.4 - 14 °dH
(1.5 - 2.5 mmol/l)
14 - 21 °dH
(2.5 - 3.7mmol/l)
> 21°dH
(> 3.7mmol/l)
hardness
level in
your area
Soft Soft 1
Medium Medium 2
Hard Hard 3
Hard Very hard 4
Setting (water
hardness
level)
The machine is programmed ex-works
to hardness level 3.
21
Page 22
Using for the first time
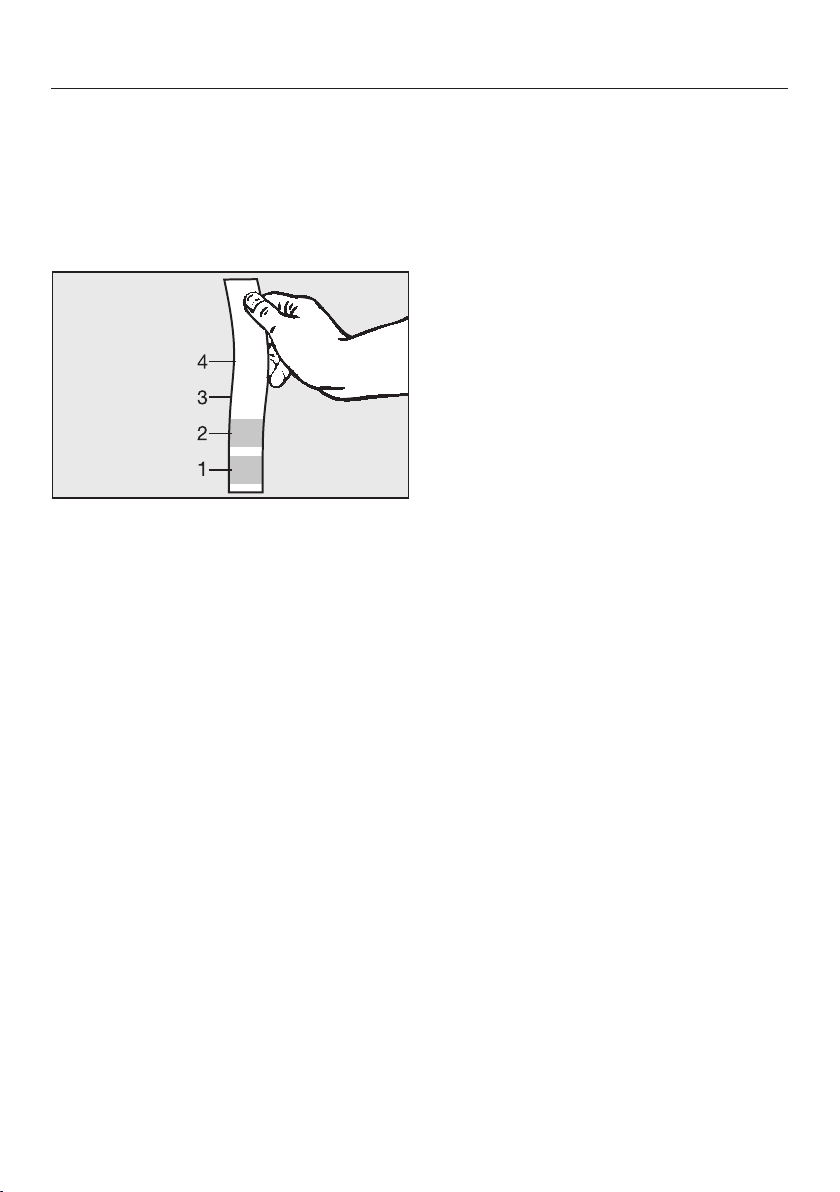
Measuring water hardness
You can measure the water hardness
yourself using the enclosed test strip.
Alternatively, your local water authority
will be able to tell you the hardness of
water in your area.
Dip the test strip in your drinking
water for approximatelyonesecond,
then shake off any excess water. The
result will be evident after about
aminute.
Setting the water hardness level
Touch .
Use the arrow sensors to select
Water hardness and touch OK.
Use the arrow sensors to
highlight the required water hardness.
Then touch OK.
The setting is now saved.
22
Page 23

Operating principles
Miele
Select drink
Settings
Time
Date
Language
To operate the coffee machine, touch
the sensors with your finger.
When the following appears in the
display, you are in the drinks menu:
To prepare a drink, select a coffee blend
and touch one of the drink sensors.
You can find more drinks in the Further
programmes menu.
Selecting a menu and navigating within a menu
To select a menu, touch the relevant
sensor. You will then be able to start an
action or change settings in the menu.
Touch the OK sensor to confirm your
selection.
Leaving the menu or cancelling an action
To exit the current menu, touch "Back"
.
A bar on the right-hand side indicates
that further options or text are available.
Use the arrow sensors to show
these.
The setting which is currently selected
will have a tick beside it.
If you want to select an option, touch
the arrow sensors until the option
you want is highlighted.
23
Page 24
Filling the water container
Change the water every day to
prevent a build-up of bacteria.
Only use cold, fresh tap water to fill
the water container.
Hot or warm water or other liquids
can damage the coffee machine.
Do not use mineral water. Mineral
water will cause serious limescale
deposits to build up in your machine
and damage it.
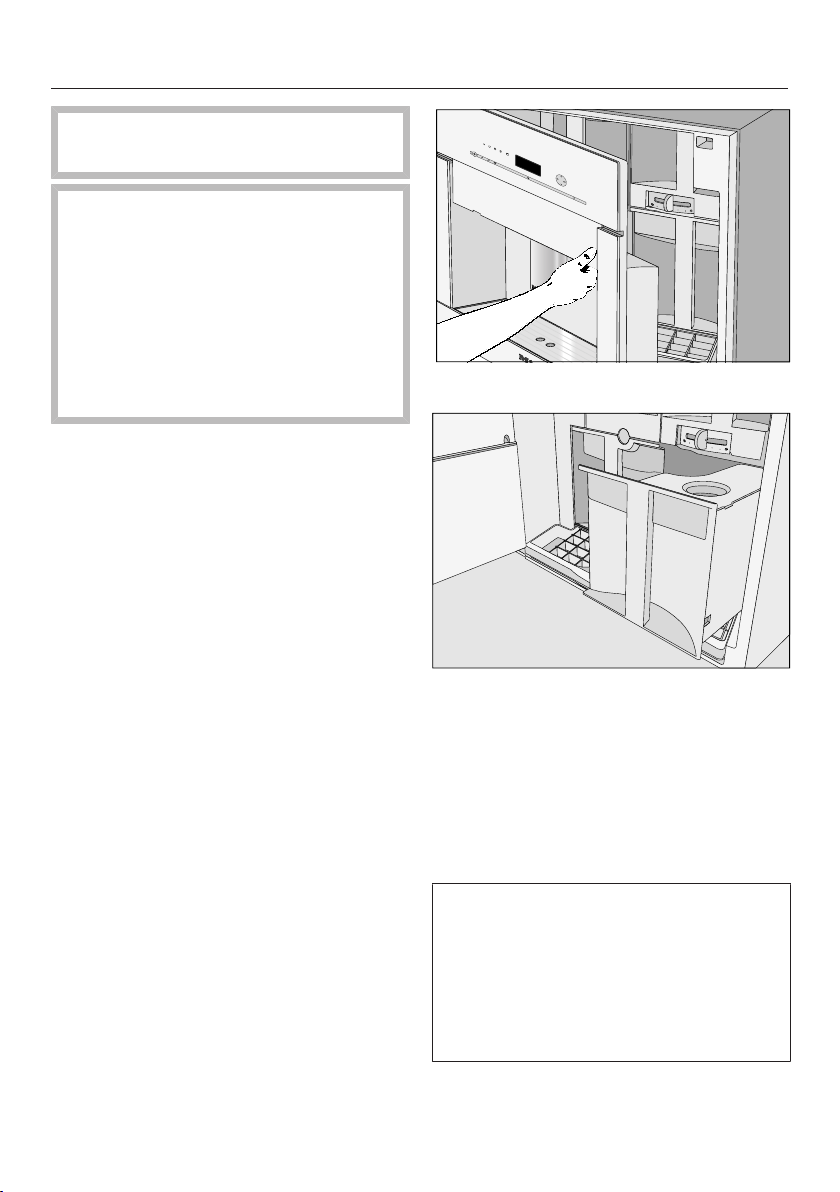
Open the appliance door.
24
Pull the water container out to
remove it.
Remove the lid and fill the water
container with fresh, cold tap water
up to the "max." marker.
Push the water container into the
machine until it clicks into place.
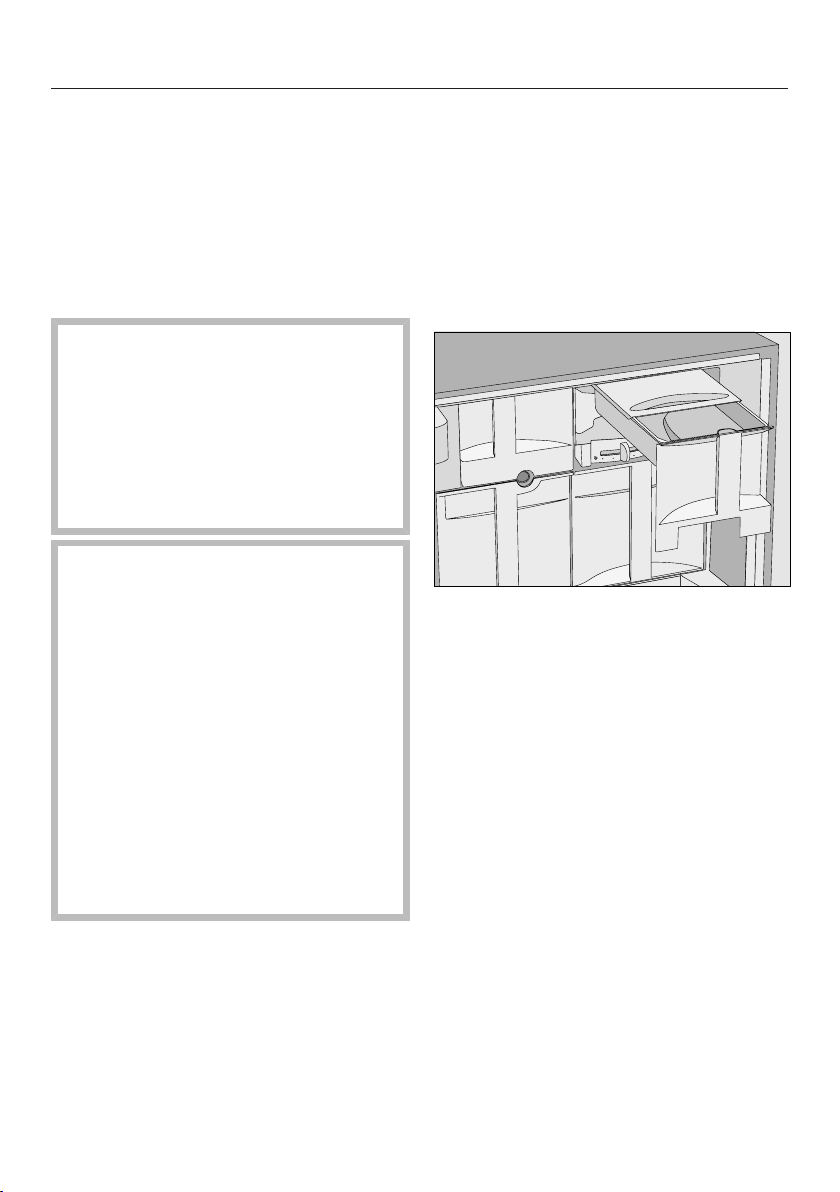
If the water container is a little high or
not pushed in all the way, check
whether the surface that the water
container sits on is dirty. If the water
container is not sitting correctly, the
drainage valve will not be sealed.
Clean the surface if necessary.
Page 25
Filling the coffee bean container
Fill the coffee bean container with
roasted coffee or espresso beans if you
want to use freshly ground coffee beans
for each cup of espresso or coffee.
Alternatively, you can make coffee or
espresso with ready ground coffee (see
"Making coffee or espresso using ready
ground coffee").
Important! Risk of damage to the
grinder.
Only put roasted coffee or espresso
beans in the container. Anything
else, including ground coffee, will
damage the grinder.
Do not fill the bean container with
any type of liquid.
Important! Sugar damages the coffee
machine.
Do not use coffee beans that have
been treated with sugar, caramel, or
other substances and do not put
liquids containing sugar in the coffee
bean container.
Do not use green (unroasted) coffee
beans or mixtures of coffee beans
which contain green coffee beans.
Green coffee beans are very hard
and still contain a certain amount of
residual moisture. These can
damage the coffee machine grinder
as soon as grinding begins.
Useful tip: You can use a nut or seed
grinder to grind green coffee beans.
These types of grinder generally have a
rotating stainless steel blade. You can
then add the ground green coffee
portion by portion to the ground coffee
chute and make the desired coffee
drink (see "Making drinks with ready
ground coffee").
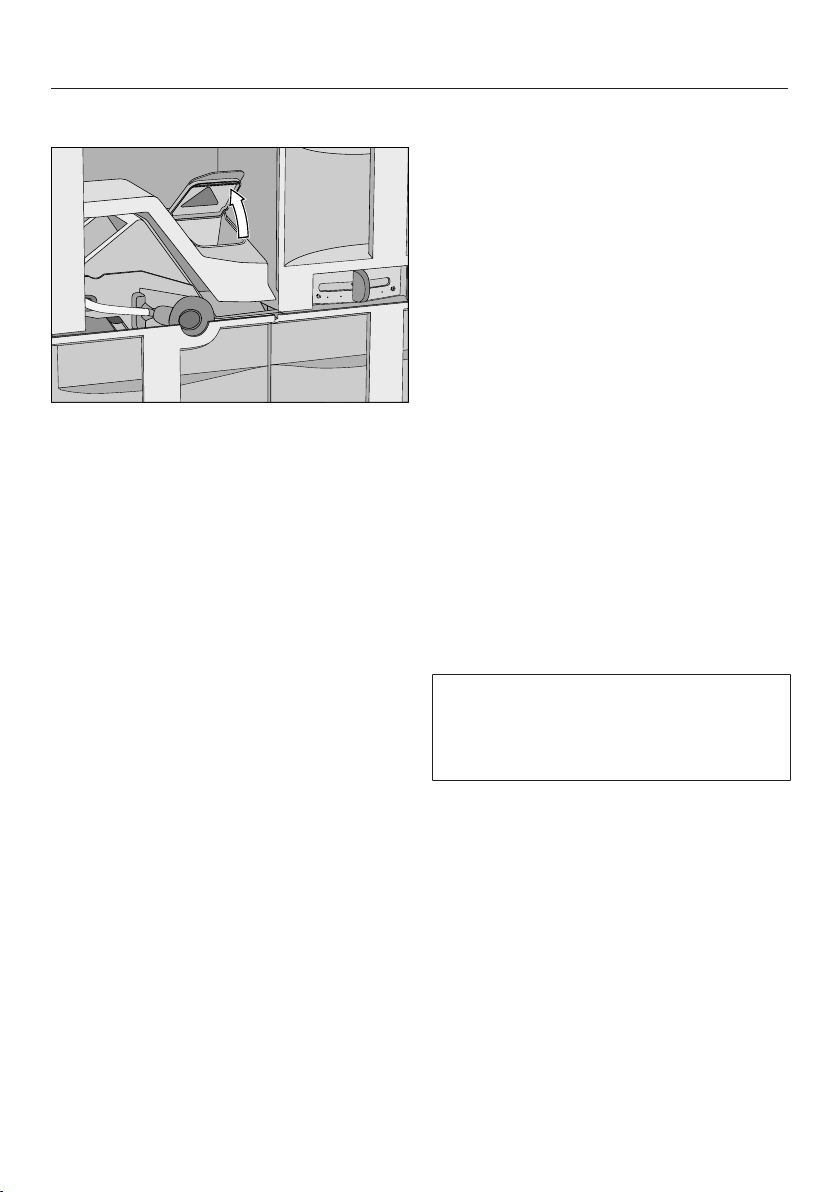
Pull out the coffee bean container.
Push back the lid and fill the
container with coffee beans.
Slide the lid back into place.
Push the coffee bean container back
into the coffee machine and close the
appliance door.
25
Page 26
Switching the coffee machine on and off
Switching on
When the coffee machine is switched
on, it heats up and rinses the pipework.
This not only cleans the pipework, but
also warms it before coffee is prepared.
If the coffee machine still has an
operating temperature which is higher
than 60°C, rinsing will not take place.
Touch the On/Off sensor.
The appliance will begin rinsing after
the heating-up phase. Hot water will
come out of the central spout.
You can now prepare drinks.
Useful tip: Tip: If you do not want the
water from the rinsing process to flow
into the drip tray, place a suitable
container (e.g. the small cleaning
container) underneath the central spout
before preparing the first coffee of the
day.
Switching off
Touch the On/Off sensor.
If coffee has been dispensed, the coffee
machine will rinse the coffee pipework
automatically before switching off.
Switching off for longer periods of time
If the coffee machine is not going to be
used for a longer period of time, e.g.
whilst on holiday:
Empty the drip tray, the waste
container and the water container.
26
Clean all components thoroughly,
including the brew unit, the central
spout connector and the small drip
tray located inside the door.
Switch off the appliance.
If the appliance door is to be left
open for a long time, it is advisable
to switch off at the wall or the fuse to
save energy.
Page 27

Adjusting the central spout to the correct cup height
You can adjust the central spout to suit
the height of the cup you are using so
that the coffee or espresso will not cool
down as quickly and the crema will
have a better consistency.
Pull the central spout down until it is
at the same level as the rim of the
cup.
Alternatively, push the central spout
up until there is enough room to fit a
larger cup or mug underneath.
27
Page 28

Making drinks
The dispensing spouts present a
danger of burning or scalding.
The liquids and steam dispensed are
very hot.
Keep well away from the area
underneath the spouts when hot
liquids and steam are being
dispensed.
Do not touch hot components.
The following drinks can be made:
– Espresso is a strong, aromatic
coffee with a thick hazelnut brown
coloured layer of froth - known as the
crema - on top.
When making espresso, use
espresso roasted coffee beans.
– Coffee differs from espresso by
the increased amount of water and
the roast of the beans.
Use coffee beans of the correct roast
to make coffee.
– Long coffee is a coffee with
considerably more water.
Making a coffee drink
Place a cup under the central spout.
Touch the sensor for the drink you
want:
Espresso
Coffee
in Further programmes: Long coffee
The coffee or espresso will be
dispensed from the central spout into
the cup.
To ensure that any coffee residues
from the factory testing process are
removed from the brewing system,
please throw away the first two cups
of coffee when using the coffee
machine for the first time.
28
Page 29

Making drinks
Dispensing a double portion
You can dispense two portions of
espresso or coffee at once either into
one cup or two separate cups.
To fill two cups at the same time:
Place one cup under each of the
coffee spouts.
Touch .
The sensor will light up.
Touch the sensor for the drink you
want.
Cancelling preparation
Drink preparation can be cancelled
while Stop is visible in the display.
Touch OK.
When making two portions at once,
touching the OK sensor once will only
stop the first drink.
To stop both drinks, touch OK for
longer.
Two portions of the desired drink will be
dispensed from the central spout.
If, after a while, you have not touched
one of the drinks sensors, the "Double
portion" option will revert back to
single portions.
29
Page 30

Making drinks
Preparing several cups of coffee - Coffee pot
You can make several cups of coffee
one after the other automatically with
the Coffee pot function (max. 1litre). Up
to eight cups can be made in this way.
You can use the Coffee pot function
twice in a row. After this the coffee
machine will need a longer cooling
down time of an hour in order to avoid
it being damaged.
Place a sufficiently large container
under the central spout.
Touch .
Use the arrow sensors to
highlight Coffee pot.
Touch OK.
Use the arrow sensors to
highlight the number of cups you
want (3to8). Touch OK.
Follow the instructions in the display.
The coffee machine will recognise
automatically that ready ground coffee
has been added to the ground coffee
chute.
Only one portion can be prepared at a
time when using ready ground coffee or
espresso.
Adding ready ground coffee
Do not add more than one level
scoop of ground coffee to the coffee
chute. If too much is added, the
brew unit will not be able to process
the coffee.
The coffee machine will use all the
ground coffee which has been added to
the chute to make the next coffee.
Use the measuring spoon supplied so
that the correct amount is used.
Each portion will be ground, brewed
and dispensed individually. The display
will inform you about the progress.
You can cancel the process at any time
by:
Touching OK or .
Drinks made with ready ground coffee
To make espresso or coffee using ready
ground coffee, add a portion of ground
coffee to the ground coffee chute.
This gives you the option of preparing a
cup of decaffinated coffee, for example,
even though the coffee bean container
is filled with roasted coffee beans.
30
Page 31
Making drinks
Open the appliance door.
Remove the coffee chute cover and
open the lid of the coffee chute.
Add one level scoop of ready ground
coffee to the chute.
Close the lid, push the coffee chute
cover into the machine and close the
appliance door.
Prepare ground coffee? appears in the
display.
Making drinks with ready ground coffee
If you want to make a drink with ready
ground coffee:
Select Yes with the arrow
sensors. Touch OK.
You can now select which type of drink
you would like to make with ready
ground coffee.
Place a cup under the central spout.
Select the type of coffee you want.
The coffee machine will now prepare
the desired drink.
If you do not want to use ground coffee to make the drink:
Select No with the arrow
sensors. Touch OK.
The ground coffee will be directed into
the waste container.
If no drink is selected
within15seconds, the ground coffee
will be directed into the waste
container.
31
Page 32

Making drinks
Drinks with milk
Danger of burning and scalding
on the central spout.
The liquids and steam dispensed are
very hot.
Do not use milk with additives. Most
additives contain sugar which will
adhere to the milk pipework and
damage the machine.
If using cow's milk, only use
pasteurised milk to prevent a buildup of bacteria in the appliance.
The following drinks with milk can be
made:
– Cappuccino consists of approx.
2/3 milk froth and 1/3 espresso.
– Latte macchiato consists of 1/3
each of hot milk, milk froth and
espresso.
– Caffè latte consists of hot milch
and espresso.
Hot milk or milk froth can also be
made.
Notes on the milk flask
Milk is not cooled in the milk flask.
Therefore, place the milk flask in the
refrigerator if you are not going to use
milk for a while. Good milk froth can
only be achieved when cold milk
(below 10 °C) is used.
a
Lid
b
Milk sensor
c
Milk suction tube
d
Glass milk flask
Fill the milk flask up to max.2cm
below the rim. Seal the milk flask with
the lid.
32
It is important to keep the opening
and neck of the milk flask clean
(whilst filling it and carrying it). Any
soiling can lead to a malfunction of
the flask in the machine.
Page 33

Making drinks
Preparing hot water
Danger of burning and scalding on
the hot water spout. The water
dispensed is very hot.
Please note that the water prepared
by the machine is not boiling and is
therefore not suitable for preparing
tea.
Push the milk flask into the coffee
machine.
Preparing drinks with milk
Place a suitable vessel underneath
the central spout.
Touch the sensor for the drink you
want:
Cappuccino
Latte macchiato
in Further programmes: Caffè Latte,
hot milk, milk froth
The coffee machine will now prepare
the selected drink.
Place a suitable vessel underneath
the hot water spout.
Touch .
Touch the arrow sensors until Hot
water is highlighted. Touch OK.
Hot water will be dispensed into the
vessel under the hot water spout.
To cancel preparation:
Touch OK.
The preparation of hot water will be
cancelled.
33
Page 34

Making drinks
Preparing User profile drinks
If you have already created a specific
User profile, you can select this before
you make a drink.
Touch .
Touch Select profile.
Touch the arrow sensors until the
User profile you want is highlighted.
TouchOK.
The name of the User profile selected
will be shown in the top left-hand
corner of the display.
You can now prepare the drink you
want.
After a drink has been prepared
If you have made a drink with milk, Start
the rinsing programme will appear in the
display after a while.
Touch OK.
The milk pipework will now be rinsed.
Even if you do not touch OK, the milk
pipework will automatically be rinsed
after some time.
Useful tip: Remove the milk flask and
rinse the lid under running water. Then
fit the small lid to the milk flask and
store the flask in the fridge until it is
needed again.
You can only achieve good quality milk
froth with milk which is cold (<10°C).
The small milk flask lid is available to
order from Miele.
34
Page 35

Coffee the way you like it
In order to customise the coffee
machine to the type of coffee being
used, you can
– change the grinder setting,
– change the amount of coffee,
– set the brewing temperature, or
– pre-brew the coffee powder.
Grinder setting
When the beans are ground correctly,
the coffee or espresso will flow evenly
into the cup with a good crema.
The crema should have an even
nutbrown colour.
The grinder setting you select will be
used for all coffee drinks.
There are various ways to tell whether
the coffee grinder is set correctly.
The coffee has been too coarsely
ground if:
– Espresso or coffee flows into the cup
too quickly.
To avoid damaging the grinder,
please note the following:
Only adjust the grinder one setting at
a time.
Grind the coffee beans again if you
want to adjust the grinder to the next
setting.
Open the appliance door.
Push the slide control one setting to
the left (for finer grinding) or one
setting to the right (for coarser
grinding).
Close the appliance door.
– The crema is very pale and uneven.
Set a finer grinder setting.
The coffee has been too finely ground
if:
– Espresso or coffee only trickles into
the cup.
– The crema is dark brown.
Set a coarser grinder setting.
Dispense a coffee.
Then you can adjust the grinder setting
with the slide control again.
The altered grinder setting will not be
used until after the second coffee has
been dispensed.
35
Page 36

Coffee the way you like it
Amount of coffee, brew temperature and pre-brewing
You can adjust the amount of coffee,
the brew temperature and pre-brewing
individually for each coffee drink. To do
this, first select the drink in the
Parameters menu, then the drink
parameters can be adjusted.
Touch .
Select the drink you want and touch
OK.
The current settings for the amount of
coffee, brewing temperature and prebrewing will be displayed for this drink.
Select Amount of coffee, Brew
temperature or Pre-brewing.
Select the setting you want and touch
OK.
The setting is now saved.
Amount of coffee
The coffee machine can grind and brew
6-14g of coffee beans per cup. The
greater the quantity, the stronger the
coffee.
– Espresso or coffee only trickles into
the cup.
– The crema is dark brown.
– The espresso or coffee tastes bitter.
Decrease the amount of coffee so that
less ground coffee is brewed.
Select Amount of coffee and touch OK.
Use the arrow sensors to change
the amount. Then touch OK.
The setting is now saved.
Useful tip: If the coffee is too strong for
you or it tastes bitter, try a different type
of bean.
There are various ways to tell whether
the amount of coffee is set correctly.
The amount of coffee is too low if:
– Espresso or coffee flows into the cup
too quickly.
– The crema is very pale and uneven.
– The espresso or coffee lacks body.
Increase the amount of coffee so that
more ground coffee is brewed.
The amount of coffee is too high if:
36
Page 37

Coffee the way you like it
Brewing temperature
The ideal brewing temperature will
depend on
– the type of coffee being used,
– whether an espresso or a coffee is
being prepared, and
– the altitude of the region.
If the coffee machine is located at more
than 2000 metres above sea level, the
brewing temperature needs to be set
lower due to the change in pressure.
This is because the boiling point for
water at a high altitude above sea level
is lower than the boiling point for water
at sea level.
Useful tip: Not all types of coffee can
withstand a high temperature. Certain
types are too delicate - the crema on
top would not be as good and the taste
would be impaired.
The coffee machine has five brewing
temperatures.
Select Brew temperature and touch
OK.
Pre-brewing ground coffee
When the pre-brewing function is
switched on, the freshly ground coffee
is first moistened with a little hot water.
Then the remaining water is forced
through the moistened coffee at high
pressure. This helps release the flavour
of the coffee.
You can set pre-brewing for a normal
length of time or an extra long length of
time. Alternatively, you can switch off
the "Pre-brewing" function.
The machine is supplied with the "Prebrewing" function switched off.
Touch the arrow sensors until
Pre-brewing is highlighted. Touch OK.
The pre-brewing option which is
currently selected will be marked with a
tick.
Touch the arrow sensors until the
setting you want is highlighted. Touch
OK.
The setting is now saved.
Select the required temperature and
touch OK.
The setting is now saved.
37
Page 38

Portion size
The flavour of the coffee produced
depends on the type of coffee, how
finely the beans are ground and the
quantity of water used.You can
programme the quantity of water
according to the size of your cups and
the type of coffee you are using.
For coffee drinks that use milk you can
also set the amount of milk or milk froth
to be dispensed with these drinks.
Additionally, you can set the portion
sizes for hot milk and milk froth alone.
Each type of drink has a maximum
portion size that can be programmed
into the machine. The coffee machine
halts preparation of the coffee once this
portion size has been reached. The
maximum possible portion size for this
type of drink is then saved in the
machine.
The changed portion size is always
saved in the current User profile. The
name of the current User profile
appears in the top-left of the display.
Changing the portion size during drink preparation
You can change and save the portion
size for Espresso, Coffee,
Cappuccino and Latte macchiato
while making these drinks.
Place a cup under the central spout.
Touch the sensor for the drink you
want until Change appears in the
display.
The desired drink will be made and Save
will appear in the display.
When the cup is filled up to the level
you want, touchOK.
If you want to change the portion size
for coffee specialities made with milk
(e.g. Cappuccino), the ingredients
(components) which make up the drink
will be saved one after the other while
the drink is being made.
When the quantity for each ingredient
reaches the level you want, touch OK.
There are two ways of initiating the
programming of the portion size:
– By touching the drink sensor when
you are preparing a coffee; or
– By selecting Portion size in the
Parameters menu.
Useful tip: You can cancel portion size
programming while Stop is visible in the
display.
If the water container becomes empty
during the preparation of a drink, the
programming of the portion size will
be cancelled. The portion size will not
be saved.
38
The combination programmed in and
the total portion size will now be
dispensed every time that particular
drink is selected.
Page 39

Portion size
Changing the portion sizes in
the Parameters menu
You can only change the portion sizes
for Long coffee, Caffè Latte, hot
milk and milk froth via the
"Parameters" menu.
Place a suitable vessel underneath
the central spout.
Touch .
Select the drink you want.
Select Portion size and touch OK.
From this point onwards the procedure
is identical to programming the portion
size during drink preparation.
Changing the portion size for different User profiles
You can set the portion size for
individual drinks for each User profile.
Touch .
Select the User profile you want.
The name of the current User profile is
shown in the top left of the display.
You can now change the portion size of
the individual drinks as described
previously.
39
Page 40

User profiles
In addition to the Miele profile, you can
enter individual profiles to cater for
different tastes and preferences.
For each profile you can adjust the
settings for drinks individually (portion
size, grinder setting, brew temperature
and pre-brewing).
The name of the current User profile is
shown in the top left of the display.
Calling up User profiles
Touch .
You can now create a User profile.
If you have allocated a profile in
addition to the Miele standard profile,
you have the following options:
– Select profile from the User profiles
that have already been allocated.
– Change name if the name of a User
profile needs to be changed.
– Delete profile if you want to delete a
User profile.
– Change profile to set whether the
coffee machine automatically always
reverts to the Miele standard profile
or retains the last selected profile.
Useful tip: Touch or to return to
the main menu.
Creating a User profile
Select Create profile with the arrow
sensors and touch OK.
Letters will appear in the display that
you can select with the arrow sensors.
You can use the arrow sensors to select
from numbers, upper case and lower
case letters.
Touch the arrow sensors to
select the first character and then
touch OK.
The character will then appear in the
line above.
Repeat the process until the required
name appears in the display line
above.
Useful tip: If you make a mistake,
select the sensor to delete the last
character.
When you have finished entering a name and want to save it,
use the arrow sensors to
highlight the tick and touch the OK
sensor.
If you do not want to save what you have entered,
touch and hold until all characters
have been deleted and the coffee
machine jumps back to the previous
menu.
40
The last created profile is selected as
the current profile.
Page 41

User profiles
Selecting a User profile
This selection is only possible if a
profile has been allocated in addition
to the Miele standard profile.
Touch the arrow sensors until
Select profile is highlighted. Touch OK.
Select the required User profile with
the arrow sensors and touchOK.
The name of the current User profile is
shown in the top left of the display.
Changing a name
This selection is only possible if a
profile has been allocated in addition
to the Miele standard profile.
Touch the arrow sensors until
Change name is highlighted and
touchOK.
Proceed the same as with "Create
profile":
– Select to delete a character.
Deleting a profile
This selection is only possible if a
profile has been allocated in addition
to the Miele standard profile.
Touch the arrow sensors until
Delete profile is highlighted and
touchOK.
Use the arrow sensors to select the
profile you want to delete.
Touch OK.
A tick will appear after the name and
the profile will be deleted after a short
time.
– To enter new characters, select the
relevant character and confirm with
OK.
– Save the new name by selecting in
the display and touching OK.
41
Page 42

User profiles
Changing a User profile
You can programme the coffee machine
so that it changes back to the Miele
standard profile automatically after each
drink is dispensed, so that the Miele
profile is always active when the
machine is switched on or so that it
retains the most recently selected
profile.
Select Change profile and touch OK.
You now have the following options:
– Manually: The selected User profile
remains active until you select
another User profile.
– After each use: The machine will
change back to the Miele standard
profile automatically after a drink is
dispensed.
– When switched on: Each time the
machine is switched on it will
automatically select the Miele
standard profile regardless of which
User profile was set before the
machine was last switched off.
Select the required option and touch
OK.
42
Page 43

Settings
Calling up the "Settings" menu
Touch .
You can now check or change the
settings.
Options which are currently selected
will have a tick next to them.
Touch if you want to access the
previous menu.
Touch to return to Select drink.
Useful tip: If you have switched on the
time of day display or selected Night
dimming, you can alter settings without
switching the coffee machine on by
touching .
Changing and saving settings
Touch .
Select the setting you wish to change
with the arrow sensors and
touch OK.
Use the arrow sensors to
highlight the required option. Then
touch OK.
The setting is now saved.
43
Page 44

Settings
Overview of available settings
The factory default for each option is indicated by *.
Menu option Available settings
Language deutsch* and other languages
Country
Time Show
– Off* / On / Night dimming
Clock format
– 12 h / 24 h*
Set
Date Set
Timer Timer 1
– Set : Switch on at / Switch off after (00:30)* / Switch off at
– Days of the weekAllocate day of the week: Monday /
Tuesday / Wednesday / Thursday / Friday / Saturday /
Sunday
– Activate : Switch on at (Yes / No*) / Switch off at (Yes /
No*)
Timer 2
– Set : Switch on at / Switch off at
– Allocate day of the week: Monday / Tuesday /
Wednesday / Thursday / Friday / Saturday / Sunday
– Activate : Switch on at (Yes / No*) / Switch off at (Yes /
No*)
Eco mode On* / Off
Lighting Brightness
Switch off after
44
Page 45
Menu option Available settings
Info Number of drinks
– Total no. of drinks / Espresso / Coffee / Long coffee /
Cappuccino / Latte macchiato / Caffè latte / Milk froth / Hot
milk / Hot water
No. of portions until appliance needs descaling:
No. of portions until brew unit needs degreasing:
System lock On / Off*
Water hardness Soft
Medium
Hard*
Very hard
Display brightness Set the brightness
Volume Buzzer tones
Keypad tone
Showroom programme Demo mode (On / Off*)
Settings
Factory default Do not reset
Reset
45
Page 46

Settings
Language
You can select a language and country
for all display texts.
Useful tip: If you select the wrong
language by mistake, you can find the
"Language" option by following the flag
symbol .
Time of day
You can set the display for when the
time of day appears after switching off
the appliance, the clock format and the
time.
Display (time display)
You can choose one of the following
options:
– On: The time and the date will appear
in the display all the time, even when
the coffee machine is switched off.
– Off: The time and the date will not
appear in the display when the coffee
machine is switched off.
– Night dimming: The date and time are
displayed from 5:00 to 23:00.
Depending on the setting selected, the
coffee machine may use more energy.
A message will appear in the display
to inform you of this.
Clock format
You can select:
– 24-hour display (24 h)
– 12-hour display (12 h)
Setting the time of day
Use the arrow sensors to set the
hours and minutes.
Date
Use the arrow sensors to set the
year, month and day.
Timer
There are two timers with the following
timer functions:
The coffee machine
– switches on at a particular time, e.g.
in the morning for breakfast (Switch on
at).
– switches off at a particular time
(Switch off at).
– switches off after a particular length
of time if none of the sensors has
been touched or a drink has not been
made (Switch off after; Timer 1 only).
You can allocate the timer functions to
individual days of the week.
46
For Switch on at and Switch off at, the
timer must be activated and at least
one day of the week allocated.
Page 47

Settings
Selecting a timer
You can select:
– Timer 1: Switch on at, Switch off at,
Switch off after
– Timer 2: Switch on at, Switch off at
Switch on at
Please note that the coffee machine
will not switch on at the required time
if you have activated the system lock.
Use the arrow sensors to set the
hours and minutes.
If the coffee machine has switched itself
on three times via the Switch on at timer
function and no drinks have been
dispensed, the machine will not switch
itself on again automatically. This
prevents the coffee machine from
switching itself on unnecessarily, for
example, whilst you are away on
holiday.
The programmed times will, however,
remain in memory and will be
reactivated after manually switching the
machine on again.
Switch off after
The Switch off after timer function is
only available in Timer 1.
If none of the sensors has been pressed
or no drink has been prepared, the
coffee machine will switch itself off after
30 minutes to save energy.
You can change this pre-setting using
the arrow sensors to a time of
between 15minutes and 9hours.
Allocating days of the week
Select the day of the week you want.
The selected day of the week will be
marked by .
When all required days of the week are
marked:
Touch the arrow sensor repeatedly
until Accept is highlighted. Touch the
OK sensor.
Switch off at
Use the arrow sensors to set the
hours and minutes.
In the event of a longer absence the
programmed times will remain in
memory and will be reactivated after
manually switching the machine on
again.
47
Page 48

Settings
Activating and deactivating the timer
For the time display, you have selected
On or Night dimming:
If the timer for Switch on at has been
activated, the symbol and the
desired switch-on time appear in the
display 23:59 hours ahead of time.
When the system lock is activated, the
Switch on at option for the timer cannot
be selected.
Select the required timer function. The
selected timer function will be marked
by .
Touch the arrow sensor repeatedly
until Accept is highlighted. Touch the
OK sensor.
Eco mode
Eco mode is an energy-saving mode.
The steam system heats up when a
coffee drink or steam for hot milk / milk
froth is requested.
If Eco mode is switched off, milk froth
and hot milk, as well as coffee and
espresso, can be made one after
another. The steam system remains
heated up and much more energy is
used.
The coffee machine will indicate that
the energy consumption has been
altered.
48
Page 49

Settings
Lighting
The following options are available:
– Set the brightness of the lighting
when the appliance is switched on.
– Set the brightness of the lighting
when the appliance is switched off.
– You can specify when the lighting
should switch off (Lighting: Switch off
after).
Setting the brightness
First select:
– Appliance switched on
– Appliance switched off
Change the brightness using the arrow
sensors.
To switch off the lighting,
touch the arrow sensor until all of
the segments are empty, and
Switched off appears.
Info (display information)
In the Info option you can choose to
display the number of prepared
portions for each type of drink.
You can also see whether more than
50portions can be dispensed before
the machine needs to be descaled or
before the brew unit needs to be
degreased (No. of portions until ...).
To return to the previous display:
Touch OK.
Setting the switching off time for the lighting (Switch off after)
You can adjust the length of time that
the coffee machine remains lit up after
switching off.
Use the arrow sensors to set the
hours and minutes.
While the appliance is switched on, the
lighting will remain on for 10 minutes
after the last activity. This time cannot
be changed.
49
Page 50

Settings
Locking the coffee machine
(System lock)
You can lock the coffee machine to
prevent it being used without your
knowledge, by children, for example.
Activating and deactivating the
system lock
When the system lock is activated, the
Switch on at option for the timer is
deactivated. The coffee machine will
not switch on at the time set.
Overriding the system lock
While the message Touch the OK sensor
for 6 seconds to unlock is in the display,
touch the OK sensor for 6 seconds.
As soon as you switch the coffee
machine off, the system lock will be
activated again and the coffee
machine is locked once more.
Water hardness
See "Setting up and using the coffee
machine" for information about water
hardness.
Display brightness
Change the display brightness using
the arrow sensors.
Volume
You can set the volume of buzzer and
keypad tones using the arrow
sensors.
To switch off the tones,
touch the arrow sensor until all of
the segments are empty, and
Switched off appears.
50
Page 51

Settings
Factory default
You can reset the settings back to the
ones which were set when the coffee
machine was delivered - the factory
default settings.
The number of drinks and the appliance
status (No. of portions until appliance
needs descaling, ... brew unit needs
degreasing) cannot be reset.
Please refer to the "Overview of
available settings" chart for the factory
settings which are shown in bold.
The following settings will not be
reset:
– Language
– Time of day
– Date
Showroom programme (Demo mode)
Do not activate this function for
domestic use.
The appliance can be presented in
Miele Centers or retail stores with the
Showroom programme function. The
lighting will come on but drinks cannot
be dispensed and other actions cannot
be carried out.
If you activate the Demo mode, you
cannot switch the appliance off with
the On/Off sensor.
51
Page 52

Cleaning and care
Clean the coffee machine regularly to avoid a build-up of bacteria.
Quick guide
Recommended frequency What do I need to clean / maintain?
Every day
(at the end of the day)
Once a week
(more often if heavily soiled)
Once a month Lubricate the cap on the central spout connector
When prompted Milk pipework (with the Original Miele cleaning agent for
Milk flask and lid
Water container
Waste container
Drip tray and drip tray cover
Central spout
Sensor cover
Clean the milk valve with the cleaning brush
Interior
Drip tray inside the machine door
Brew unit
Appliance front (especially important straight after
descaling)
Coffee bean container
milk pipework)
Brew unit (degrease with the cleaning tablets)
Descaling the machine
52
Page 53

Cleaning and care
Cleaning by hand or in the dishwasher
The following components must only
be cleaned by hand:
– Central spout cover
– Brew unit
– Bean container and lid
– Service flap
Some components of the coffee
machine are dishwasher safe.
However, cleaning these in the
dishwasher frequently can cause
them to become discoloured due to
regular contact with food residues
(e.g. tomatoes) in the dishwasher.
The surface of these components
can also become damaged.
The following components are
dishwasher safe:
– Drip tray and lid
Danger of burning and scalding
on hot components or by hot liquids.
Always allow the coffee machine to
cool down before cleaning it.
Caution: Water in the drip tray can be
very hot.
Do not use a steam cleaner to clean
this machine. Steam could reach the
electrical components and cause a
short circuit.
It is important to clean the machine
regularly as the used coffee grounds
will soon go mouldy. Milk residue can
spoil and the milk pipework can
become blocked.
The central spout connector cap is
lubricated with silicone grease.
Take care not to get this on your
clothes when removing or replacing
the containers or other components.
– Drip tray and grid
– Drip tray cover
– Water container
– Waste container
– Central spout (without stainless steel
cover)
– Milk flask with lid
– Drip tray inside machine door
53
Page 54

Cleaning and care
All external surfaces are susceptible
to scratching. Scratches on glass
surfaces could even cause a
breakage. Contact with unsuitable
cleaning agents can discolour the
external surfaces. Wipe up any
spillages or splashes of descaling
agent immediately.
To avoid damaging the surfaces of
your appliance, do not use:
– cleaning agents containing soda,
ammonia, acids or chlorides,
– solvent-based cleaning agents,
– cleaning agents containing descaling
agents,
– stainless steel cleaning agents,
– dishwasher cleaner,
– glass cleaning agents,
– oven cleaner,
– abrasive cleaning agents, e.g.
powder cleaners and cream cleaners,
– hard, abrasive sponges, e.g. pot
scourers, brushes or sponges which
have been previously used with
abrasive cleaning agents,
– dirt erasers,
– sharp metal tools.
54
Page 55

Drip tray
Danger of burning!
If the rinsing process has just
finished, wait a while before
removing the drip tray as the water
used for rinsing will run out of the
coffee spouts.
Clean the drip tray every day to avoid
unpleasant smells and mildew.
A prompt will appear in the display
when the drip tray is full and needs to
be emptied. Empty the drip tray at the
latest when this prompt appears.
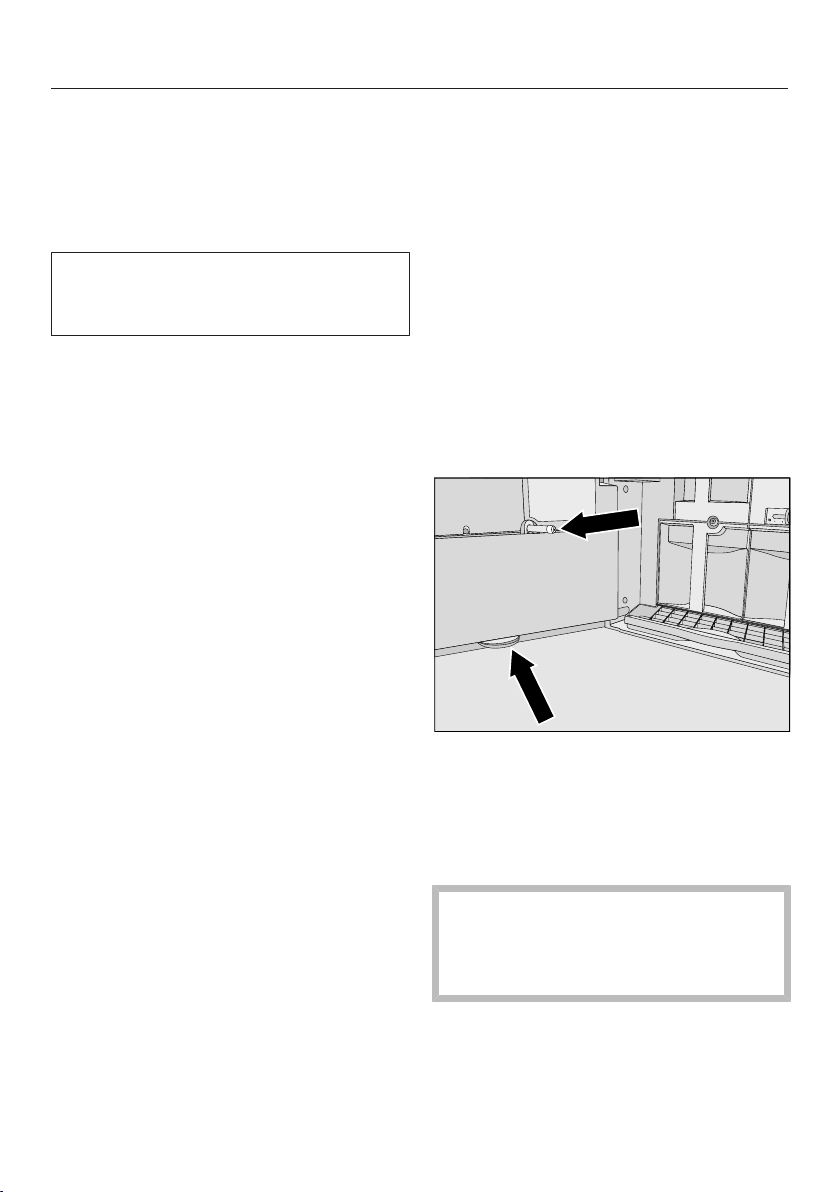
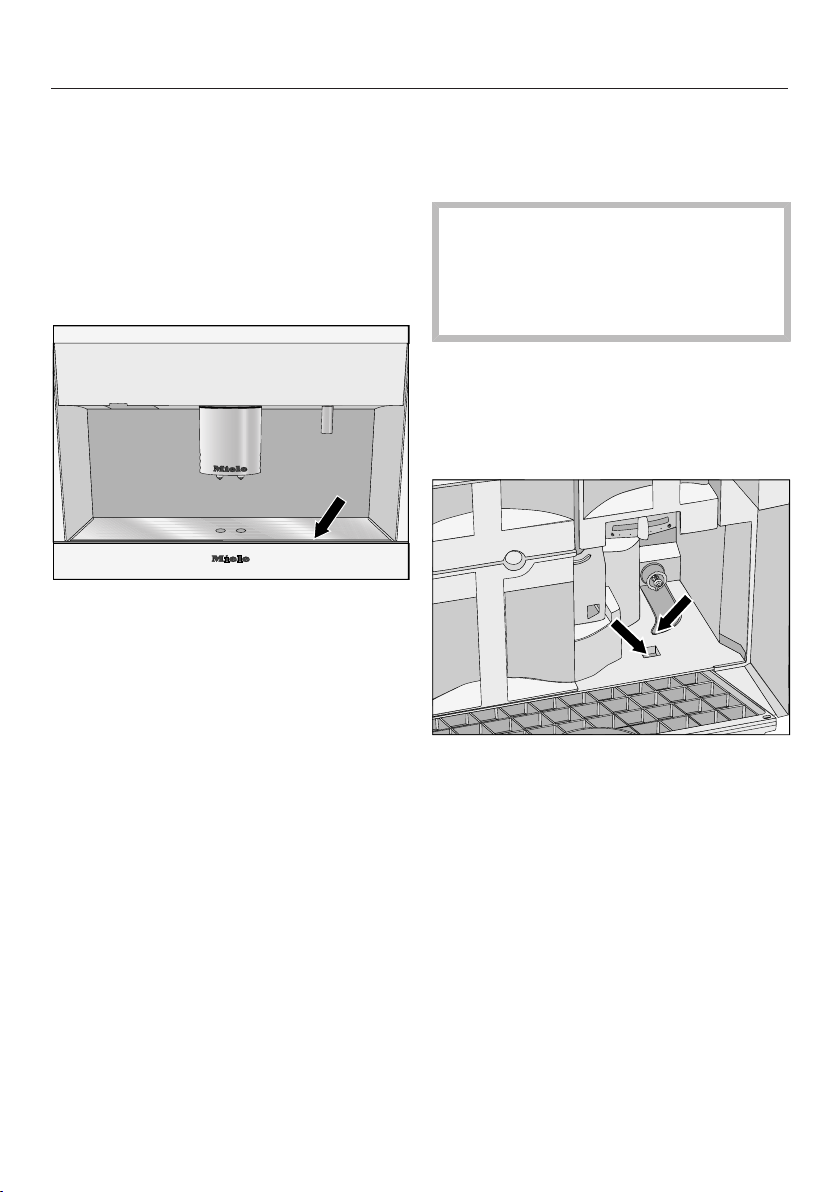
Cleaning and care
Clean the metal contact discs and the
space between them carefully. Dry
everything thoroughly.
The discs will not be able to detect
that the drip tray is full if they are
damp or dirty.
Check this area once a week, if
necessary.
Clean the area underneath the drip
tray.
Open the machine door and carefully
remove the drip tray from the
machine.
The grid in the drip tray prevents the
water from spilling out of the tray
when it is being carried.
Clean the drip tray and the grid with
hot water and a little washing-up
liquid applied a soft cloth, or in the
dishwasher, and dry with a cloth.
Push the drip tray back into the
coffee machine.
Make sure that the drip tray is
pushed right into the coffee machine
as far as it will go.
55
Page 56
Cleaning and care
Drip tray cover
Remove the drip tray cover.
The drip tray cover can be cleaned in
the dishwasher, or by hand using hot
water and a little washing-up liquid
applied with a soft cloth
Dry the drip tray thoroughly.
Refit the cover in the drip tray. Make
sure the drip tray cover sits flush at
the front.
Water container
Change the water every day to prevent
a build-up of bacteria.
Make sure that the valve, the
underside of the water container and
the surface the water container sits
on are clean. Otherwise the water
container will not sit correctly.
The water container can be cleaned
in the dishwasher, or by hand using
hot water and a little washing-up
liquid applied with a soft cloth. After
cleaning, dry the water container.
56
Carefully clean and dry the surface
the water container sits on,
particularly the slots.
Page 57

Cleaning and care
Waste container
After a certain period of time a reminder
to empty the waste container will
appear in the display. The waste
container must be cleaned when this
message appears.
However, it is better to clean the waste
container every day to prevent coffee
grounds from turning mouldy.
There will probably also be some water
in the waste container left over from the
rinsing process.
Clean the waste container with hot
water and a little washing-up liquid or
in the dishwasher, and dry with a soft
cloth.
Also thoroughly clean the now
accessible area in the machine where
the waste container sits.
Central spout
With the exception of the stainless steel
cover, all parts of the central spout
should be cleaned in the dishwasher at
least once a week. This will remove
coffee deposits effectively.
Clean the stainless steel central spout
cover by hand only using warm water
and a little washing-up liquid, applied
with a soft cloth.
Push the central spout right down
and remove the cover by pulling it off
towards you.
Press the catch upwards, grasp
the dispensing unit by the handle and
pull this forwards and off .
57
Page 58

Cleaning and care
Hold the unit at the sides and pull it
forwards to release it.
Useful tip: Place the dispensing unit
vertically in the upper basket of the
dishwasher. Place the connecting
pieces and the dispensing spouts in the
cutlery tray.
Turn the top connection piece and
pull it upwards to remove it. Remove
the lower connection piece in the
same way.
Remove the dispensing spouts.
The Y-shaped piece should not be
removed.
Clean all parts thoroughly.
58
Clean the surfaces of the central
spout with a damp cloth.
Page 59

Reassemble the spout unit in the
reverse order. Make sure the top
connection piece engages with a
click. Firmly push the spout jets
onto the spout unit.
Refit the spout unit in the central
spout.
Then refit the cover.
Cleaning and care
Maintenance of the milk valve
To ensure the milk used to prepare
drinks is always of the highest quality,
the milk valve should be conditioned
once a week.
Touch .
Use the arrow sensor to select
Maintenance. Touch OK.
Select Condition milk valve and touch
OK.
The milk valve will move into the
maintenance position.
Important: You must remove the
cleaning brush before confirming
Leave maintenance position with OK.
Otherwise the coffee machine will be
damaged.
Insert the brush in the milk valve and
move it back and forth.
Touch OK.
The milk valve will move into the initial
position and the milk pipework will be
rinsed.
59
Page 60

Cleaning and care
Milk flask with lid
Soiling can cause a fault in the
machine.
It is important to keep the neck and
flange of the flask clean (whilst filling
it and carrying it).
Clean the milk flask holder on the
coffee machine with a damp cloth.
Clean the glass milk flask in the
dishwasher or by hand using hot
water and a little washing-up liquid
applied with a soft cloth. Dry the milk
flask thoroughly.
Before placing the lid of the milk flask in the dishwasher:
Dismantling the milk flask lid and cleaning it with the cleaning brush
Milk fat deposits can collect in the milk
flask lid. These will cause the milk to
sputter when milk froth is being made.
Pull the milk suction tube out of the
milk flask lid. Make sure you remove
the seal as well.
Clean both parts under warm running
water.
Insert the cleaning brush supplied in
the stainless steel tube and move it
back and forth until all milk residues
have been removed.
Rinse the milk pipework in the lid
under running water.
If water does not run out of the milk
pipework,
dismantle the milk flask lid and clean
it with the cleaning brush supplied.
60
Page 61

Also use the cleaning brush to clean
the milk pipework in the lid from
above and below.
To reassemble the lid:
First insert the seal in the lid.
Cleaning and care
Interior and appliance door
First take out all removable parts and
then clean the interior and the
machine door with a mild solution of
hot water and washing-up liquid.
Useful tip: Use your vacuum cleaner to
remove dry ground coffee residues.
A small drip tray is located inside the
lower part of the machine door.
Remove the drip catcher and clean it
in the dishwasher or by hand using
warm water and a little washing-up
liquid applied with a soft cloth.
Make sure you do not fit the slanted
end of the milk intake tube into the
seal. This would damage it.
Fit the milk intake tube into the seal.
Do not forget to refit this small drip
tray.
61
Page 62

Cleaning and care
Central spout connector
The part which connects the brew unit
and the central spout is located on the
inside of the machine door.
Clean this connection regularly with a
damp cloth, taking care not to wipe
the grease off the cap.
Lubricate the cap at least once a
month with the silicone grease
supplied.
Brew unit
Removing and cleaning the brew unit by hand
Clean the brew unit by hand only
using warm water. Do not use
washing-up liquid.The moving parts
of the brew unit are lubricated.
Washing-up liquid will damage the
brew unit.
The brew unit can be removed for
cleaning.
It should be cleaned once a week.
Open the appliance door.
Remove the water container, waste
container and the coffee chute cover.
62
Press the button under the handle of
the brew unit and, whilst doing so,
turn the handle clockwise .
Press the catch in front of the brew
unit downwards, and pull the brew
unit carefully out of the machine.
Carefully pull the brew unit out of the
coffee machine.
Page 63

Cleaning and care
If you cannot remove the brew unit or
can only do so with difficulty, the brew
unit is not in the correct position (See
"Problem solving guide").
When you take the brew unit out of
the machine, do not change the
position of the brew unit handle, as
this would cause the brew unit to be
out of alignment and you will not be
able to push it back into the coffee
machine.
Clean the brew unit by hand under
warm running water without using
washing-up liquid.
To refit the brew unit:
Proceed in the reverse order: push
the brew unit back into the coffee
machine, making sure it goes in
straight.
Press the button under the handle of
the brew unit and, whilst doing so,
turn the handle to the anticlockwise.
Close the appliance door.
Wipe any remaining coffee off the two
filters. One filter is located in the
funnel and the other to the left of the
funnel.
Dry the funnel to prevent ground
coffee sticking to it the next time a
coffee is prepared.
Clean the inside of the coffee
machine. Use your vacuum cleaner to
remove dry coffee grounds.
63
Page 64

Cleaning and care
Maintenance programmes
The coffee machine has the following
maintenance programmes:
– Rinsing the appliance
– Rinsing the milk pipework
– Cleaning the milk pipework
– Degreasing the brew unit
– Descaling the machine
Carry out the relevant maintenance
programme when the prompt to do so
appears in the display. Please see the
following pages for more information.
Opening the "Maintenance" menu
Touch .
SelectMaintenance with the arrow
sensor. TouchOK.
You can now select a maintenance
programme.
Rinsing the appliance
You can rinse the milk pipework
manually.
After a coffee has been dispensed, the
machine is rinsed before it switches
off. This removes any residual coffee
grounds.
Touch .
Touch the arrow sensor until
Maintenance is highlighted. Touch OK.
Touch the arrow sensors until Rinse
appliance is highlighted. Touch OK.
The pipework will now be cleaned.
64
Page 65

Cleaning and care
Rinsing the milk pipework
The milk pipework can become blocked
with milk residue. If you have prepared
a drink using milk, the coffee machine
will automatically rinse the milk
pipework after a few minutes.
You can also rinse the milk pipework
manually.
Useful tip: Place a suitable vessel
underneath the central spout.
Touch .
Touch the arrow sensor until
Maintenance is highlighted. Touch OK.
Select Rinse milk pipework and touch
OK.
The pipework will now be rinsed
through. The water used for rinsing
process will run out of the central spout.
Cleaning the milk pipework
The milk pipework must be cleaned at
least once a week.
The coffee machine will prompt you at
the correct time. Days until "Clean milk
pipework": will appear in the display
three days before the coffee machine is
due to be cleaned. Each time the coffee
machine is switched on the number of
days until the milk pipework needs to
be cleaned will appear in the display.
Confirm the message with OK.
When the number of days remaining
reaches 0, Clean milk pipework will appear
in the display. You cannot make drinks
with milk until cleaning has been carried
out.
You can then only prepare espresso,
coffee, long coffee and hot water. You
can only prepare drinks containing milk
after the milk pipework has been
cleaned.
Confirm the message with OK.
65
Page 66

Cleaning and care
Carrying out the milk pipework cleaning process
The cleaning process cannot be
cancelled once it has started. The
process has to be completed
through to the end.
The Clean milk pipework maintenance
programme lasts for
approx.13minutes.
Touch .
Touch the arrow sensor until
Maintenance is highlighted. Touch OK.
Touch the arrow sensors until Clean
milk pipework is highlighted. Touch OK.
The process begins and various
messages appear in the display.
Follow the instructions in the display.
When Fill the water container with cleaning
agent and lukewarm water up to the symbol
and replace appears in the display,
proceed as follows.
Making a cleaning solution
We recommend using the Miele
cleaning agent for milk pipework for
cleaning the milk pipework.
This has been specially developed for
use with Miele coffee machines and
prevents subsequent damage.
The milk pipework cleaning agent is
available to order from Miele or via the
internet at www.miele-shop.com
(depending on country).
Add one sachet of the cleaning agent
for milk pipework to the water
container.
66
Fill the water container to the
marker with lukewarm water and
stir the solution.
Please adhere to the mixing ratio. It
is important that you do not fill the
water container with too little water,
otherwise cleaning will be
incomplete.
Insert the water container and close
the appliance door.
Follow the instructions in the display.
Page 67

Cleaning and care
When prompted to by the display:
Carefully rinse the water container
with clean water. Ensure that no
cleaning agent residue remains in the
water container. Then fill the water
container with fresh tap water.
The cleaning process is finished when
Process finished appears in the display.
Degreasing the brew unit
Depending on the natural oil content of
the coffee used, the brew unit can
become blocked quite quickly. It must
be degreased regularly in order to
ensure aromatic coffee and trouble-free
operation of the coffee machine.
We recommend using Miele cleaning
tablets to clean the brew unit. These
have been specially developed for use
with Miele coffee machines and prevent
subsequent damage.
Miele cleaning tablets can be ordered
via the Miele webshop or directly from
Miele (see back cover for contact
details).
The maintenance programme for
degreasing the brew unit lasts for
approx.11minutes.
After 200 portions have been
dispensed, Degrease the brew unit will
appear in the display.
Touch OK.
This message will not go out until the
brew unit has been degreased.
Carrying out the "Degrease the brew unit" process
Switch the machine on with the On/
Off sensor.
Touch .
Select Maintenance with the arrow
sensor and touchOK.
Select Degrease the brew unit and
touch OK.
67
Page 68

Cleaning and care
The cleaning process cannot be
cancelled once it has started. The
process has to be completed through
to the end.
Touch OK.
Follow the instructions in the display.
When Place a cleaning tablet in the ground
coffee chute and close the chute appears
in the display:
Remove the coffee chute cover and
open the lid of the coffee chute.
Place a cleaning tablet in the coffee
chute.
Close the lid, replace the coffee chute
cover and close the machine door.
Follow the further instructions given
in the display.
When Process finished appears in the
display:
Touch OK.
The brew unit is now degreased.
68
Page 69

Descaling the machine
Important! When descaling the
machine, cover delicate surfaces and
natural flooring to prevent damage
from splashes of descaling solution.
Ensure that any splashes of
descaling solution are wiped up
immediately.
Limescale builds up in the coffee
machine through use. How often the
appliance needs to be descaled will
depend on the water hardness level in
your area. The machine should be
descaled regularly to ensure that it
functions correctly.
The appliance will guide you through
the descaling process. Various
messages will appear in the display,
e.g. you will be prompted to empty the
drip tray or fill the water container.
The descaling process is essential and
takes approx.20minutes.
The coffee machine prompts you when
it needs to be descaled. No. of portions
until appliance needs descaling: 50
appears in the display. Each time a
drink is prepared, the coffee machine
displays the number of portions
remaining until descaling must be
carried out.
Confirm the message with OK.
When the number of remaining portions
reaches0, the appliance will lock out.
Descaling after prompt appears in the display
Descale appliance appears in the display.
The descaling programme cannot be
cancelled once you have touched OK.
The programme has to be completed
through to the end.
Touch OK.
The process will start.
Follow the instructions in the display.
When Fill the water container with descaling
agent and lukewarm water up to the symbol
and replace appears in the display,
proceed as follows.
Creating the descaling solution
We recommend using Miele descaling
tablets for optimum results.
These have been specially developed
for use with Miele coffee machines and
prevent subsequent damage.
Other descaling agents, which
contain other acids besides citric
acid and/or other undesirable
substances, such as chlorides for
example, could damage the coffee
machine. Moreover, the descaling
effect required could not be
guaranteed if the descaling solution
was not of the appropriate
concentration.
You can switch off the coffee machine if
you do not want to descale it at this
point in time. However, you will be able
to prepare drinks only after descaling
has been carried out.
Miele descaling tablets are available to
order via the Miele webshop or directly
from Miele (see back cover for contact
details).
69
Page 70
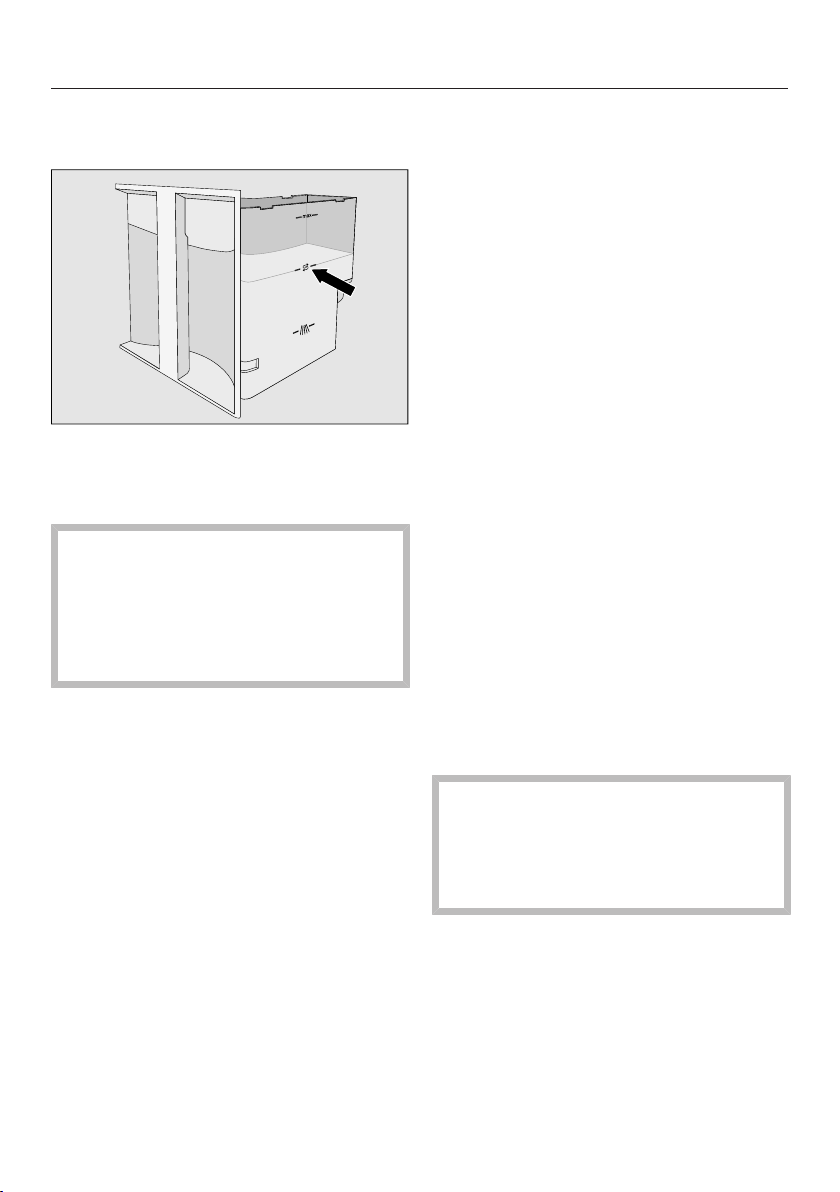
Descaling the machine
You will need 2 descaling tablets for the
descaling process.
Fill the water container to the
marker with lukewarm water.
Drop 2 descaling tablets in the water.
Follow the instructions for the mixing
ratio carefully. It is important that you
do not fill the water container with
too much or too little water.
Otherwise the descaling process will
be cancelled prematurely.
Carrying out descaling
Insert the water container and close
the appliance door.
Follow the further instructions given
in the display.
When Rinse the water container and fill with
fresh tap water up to the descaling symbol
appears in the display:
Carefully rinse the water container
with clean water. Ensure that no
descaling solution residue remains in
the water container. Fill the water
container to the marker with fresh
tap water.
The cleaning process is finished when
rinsing has finished.
Touch OK.
The coffee machine is now free of
limescale and drinks can be prepared
again.
The water container and the drip tray
should be cleaned carefully after
descaling in order to remove any
descaling residue.
70
To protect the machine and
surrounding surfaces from damage,
make sure you wipe up any spillages
or splashes of descaling agent
immediately.
Page 71

Descaling when not prompted by a message
Touch .
Select Maintenance and touch OK.
Select Descale appliance.
The descaling programme cannot be
cancelled once you have touched OK.
The programme has to be completed
through to the end.
Touch OK.
The descaling programme will begin.
Descaling the machine
71
Page 72
Problem solving guide
Most problems that occur during daily use can be easily corrected. With the help
of the following guide, you will be able to find the causes of problems and rectify
them.
Important! Never open the casing of the appliance.
Unauthorised or incorrect repairs could cause personal injury or damage to the
appliance.
Repairs should only be carried out by technicians approved by Miele.
If you can't remedy the problem yourself, please call Miele. Please note that a callout charge will be applied to unnecessary service visits where the problem could
have been rectified as described in these operating instructions.
Messages in the display
Error messages must be confirmed with OK, otherwise the message can
reappear in the display even though the problem has been remedied.
Follow the instructions which appear in the display to remedy the problem.
If the fault message appears in the display again, contact Miele.
Message Possible cause and remedy
F1, F2, F3, F4,
F80, F81, F82, F83
F74, 77
F225, F226
F235, F236
There is a fault inside the appliance.
Switch the machine off with the On/Off sensor.
Wait for 1hour before switching it back on again.
There is a fault inside the appliance.
Switch the machine off with the On/Off sensor.
Wait for 2minutes before switching it back on
again.
72
Page 73

Problem solving guide
Message Possible cause and remedy
F73 or
Check the brew unit
The brew unit cannot be positioned correctly, or it is
dirty and the coffee cannot be processed.
Check whether you can remove the brew unit (see
"Cleaning and care - Brew unit").
Clean the brew unit if it can be removed (see
"Cleaning and care – Brew unit").
Push the coffee ejector of the brew unit into the
correct position (see diagram).
Push the waste container and the water container
back in the machine. Do not insert the brew unit.
Close the door and switch the machine on with the
On/Off sensor.
This will initialise the brew unit motor and put it back
into the start position.
When Insert the brew unit appears in the display,
open the door and refit all parts in the machine.
Close the door.
If the brew unit cannot be removed:
Switch the machine off with the On/Off sensor.
Wait for approx.2minutes before switching it back
on again.
73
Page 74

Problem solving guide
Message Possible cause and remedy
Too much ground coffee There is too much ground coffee in the coffee chute.
If more than one level scoop of ground coffee is
added to the coffee chute, the brew unit cannot
process the coffee. The ground coffee will be directed
into the waste container and the fault message will
appear in the display.
Switch the machine off with the On/Off sensor.
Remove and clean the brew unit (see "Cleaning
and care – Brew unit").
Remove the ground coffee inside the coffee
machine, e.g. with a vacuum cleaner.
Use the coffee spoon supplied to add ground
coffee to the ground coffee chute. Add only one
portion of ground coffee to the chute.
Push the water container in
until it engages
The water container is not in the correct position.
Remove the water container and push it back in
again.
This fault message also appears if the water container
was not correctly filled and fitted for descaling.
Fill the water container to the descaling symbol
and restart the descaling programme.
74
Page 75

Problem solving guide
Unusual performance of the coffee machine
Problem Possible cause and remedy
The display remains
dark when the coffee
machine is switched on
using the On/Off
sensor.
The lighting remains off
after the coffee
machine is switched on.
The coffee machine
switches off suddenly.
The coffee machine is
switched on. The
lighting switches off
suddenly.
The sensors do not
react to touch.
The appliance cannot
be operated.
The On/Off sensor was not touched for long
enough.
Touch the On/Off sensor for at least 3seconds.
The plug is not correctly inserted into the socket.
Insert the plug into the socket correctly.
The mains fuse has tripped because the coffee
machine, mains voltage or another appliance is
defective.
Switch off at the wall socket and remove the plug.
Contact a qualified electrician or Miele.
The lighting has been switched off.
Switch the lighting on (see "Settings - Lighting").
The lamp needs to be replaced.
Call Miele.
The switch-off time programmed using the timer has
been reached.
If required, you can select a new switch-off time
(see "Settings - Timer").
The plug is not correctly inserted into the socket.
Insert the plug into the socket correctly.
The lighting switches off 10minutes after the coffee
machine was last used.
There is a fault inside the appliance.
Open the appliance door.
The process currently running will be stopped.
Disconnect the electricity supply by switching off
at the wall socket and withdrawing the plug, or
switching off the mains circuit breaker.
75
Page 76

Problem solving guide
Problem Possible cause and remedy
The coffee machine
does not switch itself
on, although the Switch
on at setting has been
activated for the timer.
The display is hard to
see or not able to be
read.
Push the water container in
until it engages appears
after switching on even
though the container is
filled and fitted in the
machine.
The appliance does not
rinse.
Empty the drip tray
appears in the display,
even though the drip
tray is empty.
The system lock has been activated.
You need to deactivate the system lock (see
"Settings - System lock").
A day of the week has not been selected.
Check the timer settings and change them if
required (see "Settings - Timer").
The machine was not used after being switched on
automatically three times in succession.
Switch the machine on and dispense a drink.
The display brightness has been set too low.
Change this setting (see "Settings").
The coffee machine needs descaling.
Switch the machine off with the On/Off sensor.
Wait approx.1hour.
Then switch the machine on again. As soon as
Heating-up phase appears in the display, touch
and select Descale appliance.
Descale the coffee machine. You may need to
repeat the descaling process.
The drip tray doesn't sit correctly in the appliance.
Push the drip tray all the way into the appliance.
The sensors on the drip tray are not working properly.
The contacts are dirty.
76
Clean the contacts and dry them thoroughly (see
"Cleaning and care - Drip tray").
Page 77

Problem solving guide
Problem Possible cause and remedy
The machine door will
not close.
The door is difficult to
open and close.
The coffee machine
does not rinse itself
when turned on.
The containers are not pushed all the way in.
Check the containers.
The door hinges are not correctly aligned.
Adjust the door hinges (see "Installation -
Adjusting the door hinges").
The cap on the central spout connector has either not
been lubricated or is not lubricated sufficiently.
Check the silicone cap for damage. If necessary,
replace it with the extra cap supplied.
Lubricate the cap with the silicone grease
supplied.
Lubricate the cap on the central spout connector
regularly once a month.
This is not a fault.
If the coffee machine still has an operating
temperature higher than 60°C, rinsing will not take
place.
77
Page 78

Problem solving guide
Problem Possible cause and remedy
When rinsing, no water
or noticeably less water
than usual runs out of
the central spout.
No coffee or noticeably
less coffee than usual is
dispensed from the
central spout. The
display and the noise
when coffee is being
made remain the same.
There is noticeably
more "coffee water" in
the waste container.
The descaling
programme was started
by mistake.
The central spout is not fitted correctly.
Check whether the central spout has been
assembled as described (see "Cleaning and care –
Central spout").
The cap is no longer securely fitted to the central
spout connector (see "Guide to the appliance").
Check the cap on the central spout connector.
Lubricate the cap with the silicone grease
supplied.
The cap on the central spout connector is damaged
or missing.
Replace the cap with the extra cap supplied.
Lubricate the cap with the silicone grease
supplied.
The descaling programme cannot be stopped once
the OK sensor has been touched.
Descaling must be continued through to completion.
This is a safety precaution to make sure the machine
is descaled correctly. This is important for the
longevity and functional efficiency of your coffee
machine.
Loud noises are heard
during the descaling
programme.
The display lights up
but the coffee machine
does not heat up and no
drinks are made.
78
Descale the coffee machine (see "Descaling").
This is not a fault.
These noises occur when water is flushed through
the machine at a high pressure.
The Demo mode of the coffee machine for Miele
Centers or Chartered Agents has been activated.
Deactivate the Demo mode (see "Settings - Demo
mode").
Page 79

Problem solving guide
Unsatisfactory results
Problem Possible cause and remedy
The coffee is not hot
enough.
The heating-up time is
getting longer, the
amount of water being
dispensed is incorrect
and the coffee machine
is not performing
properly.
Coffee is not being
dispensed from both
spouts evenly. Milk may
be sputtering when
being heated up.
The coffee grinder
makes a louder noise
than usual.
The coffee flows too
quickly into the cup.
The cup has not been pre-heated.
The smaller the cup and the thicker its walls, the more
important it is to pre-heat it.
Pre-heat the cup, for example, with hot water.
The brewing temperature has been set too low.
Set a higher brewing temperature (see "Brewing
temperature").
The filters in the brew unit are blocked.
Remove and clean the brew unit by hand (see
"Cleaning and care – Brew unit").
Degrease the brew unit (see "Cleaning and care -
Brew unit").
The coffee machine needs descaling.
Descale the coffee machine.
Coffee deposits in the central spout are obstructing
dispensing.
Dismantle the central spout and clean the
components – with the exception of the stainless
steel cover – in the dishwasher (see "Cleaning and
care – Central spout").
The central spout should be cleaned once a
week.
The coffee bean container has become empty during
the grinding process.
Fill the container with fresh beans.
There may be stones in amongst the coffee beans.
Switch the coffee machine off immediately. Call
Miele.
The coffee is too coarsely ground.
Set the grinder to a finer setting (see "Setting the
coffee grinder").
79
Page 80

Problem solving guide
Problem Possible cause and remedy
The coffee trickles too
slowly into the cup.
The crema on the
coffee or espresso is
not as it should be.
Problems when heating up or frothing milk
Problem Possible cause and remedy
The milk sputters when
it is dispensed. Hissing
noises can be heard
when milk is being
heated up or frothed.
Although the milk
should be frothed, only
hot milk is dispensed
from the central spout.
The coffee is too finely ground.
Set the grinder to a coarser setting (see "Setting
the coffee grinder").
The grinder setting is not correct.
Set the grinder to a finer or coarser setting (see
"Setting the coffee grinder").
The brewing temperature is too high for this type of
coffee.
Set a lower brewing temperature (see "Brewing
temperature").
The coffee beans are no longer fresh.
Add fresh coffee beans to the coffee bean
container.
The milk temperature is too high. Good milk froth can
only be achieved when cold milk (<10°C) is used.
Check the temperature in the milk flask.
The milk flask has not been fitted correctly and so air
as well as milk is being sucked in.
Push the milk flask in until it clicks into position.
The central spout is not fitted correctly.
Check whether the central spout has been
assembled correctly.
The milk pipework in the milk flask lid is dirty.
Dismantle the milk flask lid and clean it with the
cleaning brush (see "Cleaning and care – Milk
flask").
Clean the central spout and the milk valve with the
cleaning brush (see "Central spout" and
"Maintenance of the milk valve").
The angled connector is blocked and must be
replaced.
Replace the angled connector (see "Replacing the
angled connector").
80
Page 81

Problem solving guide
Problem Possible cause and remedy
Fill and insert milk flask
appears in the display
even though the milk
flask has been filled and
inserted in the machine.
The milk flask lid could be dirty. Therefore, the
sensing mechanism doesn't function correctly.
Clean the milk flask lid and the milk flask
thoroughly. Dismantle the lid and clean it with the
cleaning brush supplied (see "Cleaning and care –
Milk flask and lid").
81
Page 82

Problem solving guide
Replacing the angled connector
If, instead of being frothed, the milk is
only being heated up, check the
following first:
– Is the milk in the milk flask cold
(<10°C)?
– Have the central spout and the milk
flask lid been cleaned carefully?
– Is the central spout correctly fitted?
If after checking the above, milk still
cannot be frothed, replace the angled
connector as follows.
You will need the replacement angled
connector supplied with the coffee
machine.
Do not use a needle or similar
implement. This would damage the
components.
First pull the air intake tube out of
the opening. Then pull off the
elbow connector.
Pull both tubes out of the elbow
connector.
Clean the air intake tube under
running water with the cleaning brush
supplied. "Blowing through" can help
to dislodge blockages.
Insert the brush in the milk tube.
Move the brush back and forth as far
as possible until all milk residues
have been removed.
Open the service flap on the back of
the appliance door.
82
Take the new angled connector (You
can dispose of the old angled
connector with normal household
waste).
Page 83

Push the tubes onto the angled
connector and fit it in the coffee
machine. Make sure that the crosspiece on the angled connector is
facing downwards.
Re-insert the air intake tube in the
opening.
Replace the service flap and close
the door.
Problem solving guide
83
Page 84

After sales service and warranty
After sales service
In the event of a fault which you cannot
correct yourself, please contact Miele.
The contact details for Miele are given
at the back of these instructions.
When contacting Miele, please quote
the model and serial number of your
coffee machine.
These are visible on the data plate
inside the machine.
Warranty
This appliance has a manufacturer's
warranty period of 2 years.
For further information, please refer to
your warranty booklet.
84
Page 85

If the settings of the following functions
are altered from the factory default,
energy consumption will increase:
– Eco mode
– Lighting
– Time of day display
– Timer
Saving energy
85
Page 86

Electrical connection
Before connecting the appliance to the
mains supply, make sure that the
connection data on the data plate
corresponds to the voltage and
frequency of the household supply. This
data must correspond in order to avoid
the risk of damage to the appliance.
Consult a qualified electrician if in any
doubt.
The necessary connection information
is given on the data plate inside your
appliance.
Danger of injury! All electrical work
should be undertaken by a suitably
qualified and competent person.
Installation, repairs and other work by
unqualified persons could be
dangerous. Miele cannot be held liable
for unauthorised work. Ensure power is
not supplied to the appliance until after
installation or repair work has been
carried out. The appliance is supplied
with a mains connection cable and plug
for connection to AC50Hz, 230V.
in the system can cause the safety
switch off mechanism to be triggered.
This can damage the electronic unit.
The machine must not be used with socalled energy saving plugs either.
These reduce the amount of energy
supplied to the machine causing it to
overheat.
The fuse rating must be at least 16A.
Connection should be made via a fused
plug and suitable switched socket
which is easily accessible after
installation. If the mains socket is not
accessible after the appliance has been
built in, a separator for each terminal
must be present. There must be an allpole contact gap of at least 3mm in the
switch (including switch, fuses and
relays according to EN60335).
Do not connect the machine to an
inverter such as those used with an
autonomous energy source e.g. Solar
power. When switched on, peak loads
86
Page 87

Building-in and combination options
The appliance is designed to be built into a tall unit.
Installation
It can also be combined with other Miele built-in appliances. If the coffee machine
is to be built in above another appliance, there must be a full-width, closed shelf
between them. Exception: When built in above a warming drawer.
87
Page 88

Installation
Ventilation
Condensate can damage the coffee
machine or the housing unit.
The ventilation gaps given must be
observed.
Do not cover or block the ventilation
gaps.
Dust the ventilation gaps regularly.
Steam which is created when water is
heated up can condense on the interior
and the inside of the front of the coffee
machine.
During installation, ensure there is
sufficient ventilation at the rear of the
appliance so that steam and warm air
are able to escape without hindrance.
The housing unit should be configured
as follows:
– A ventilation gap of at least 40mm
depth must be allowed for behind the
appliance for air to circulate.
– The ventilation cross-sections in the
plinth, housing unit and above the
appliance must amount to at least
200cm2 to ensure that air can
circulate without hindrance.
Top ventilation cross-section
The top ventilation cross-section can be
achieved in various ways:
– Air intake occurs via the plinth at
the bottom of the machine and the air
escapes at the top at the rear of
the housing unit.
88
a
directly above the coffee machine
with a ventilation grille (free air flow
of at least 200cm2)
b
in between the housing unit and the
ceiling
c
through a suspended ceiling.
Page 89

Installation
Building in the coffee machine
Before installation make sure that
there is no power supply to the
machine. This also applies should it
ever need to be taken out of its
housing unit.
The machine may only be operated
when built-in and in an ambient
temperature range between +10°C
to +38°C.
You will need two Allen keys (size 3
and 5) for installing the machine.
To align the machine front with the
furniture front, ensure that there is a
sealing strip provided all the way
around the building-in niche or around
the coffee machine.
Useful tip: We recommend providing a
place to sit the coffee machine which is
the same height as the building-in
niche. This will make it easier to
connect the machine to the electricity
supply.
Using the large allen key, unscrew all
four feet out by about 2mm.
The feet can be unscrewed by up to
approx. 10mm.
Connect the appliance to the
electricity supply.
If the housing unit niche is not fitted
with a sealing strip, you should fit a
Miele sealing strip to the machine
before installing it. This is fitted from
the back of the machine.
The sealing strip is available to order
from Miele.
Ensure the mains connection cable
doesn't get damaged when pushing
the appliance into the niche.
Push the coffee machine all the way
into the building-in niche.
Check the height of the coffee
machine to make sure that it is sitting
centrally in the niche and that it is
level. If this is not the case, realign
the machine using the four feet.
89
Page 90

Installation
The appliance comes with four M5
socket screws to help you align and
secure it in the building-in niche.
Open the appliance door, and
partially tighten the side socket
screws.
Carefully turn the lower socket
screws to centre the machine in the
niche.
Tighten both upper socket screws by
hand to secure the machine in the
unit. Do not overtighten them.
Adjusting the door hinges
If the appliance door becomes difficult
to open or close after installation, you
can adjust the hinges to realign it
(TX20):
Tighten the screw to align it flush
with the furniture front.
Tighten the screw to align the door
horizontally and vertically.
90
Page 91

www.miele.com.au
Miele Experience Centre and
Head Office Melbourne:
1 Gilbert Park Drive
Knoxfield, VIC 3180
Miele Experience Centre South Melbourne:
206-210 Coventry Street
South Melbourne, VIC 3205
Miele Experience Centre and Office Sydney:
3 Skyline Place
Frenchs Forest, NSW 2086
Miele Experience Centre and Office Brisbane:
39 Harvey Street North
Eagle Farm, QLD 4009
Miele Experience Centre and Office Perth:
83-85 Sir Donald Bradman Drive
Hilton, SA 5033
205-207 Stirling Highway
Claremont, WA 6010
Miele Experience Centre and Office Adelaide:
Miele Australia Pty. Ltd.
Miele New Zealand Limited
Level 2, 10 College Hill
Freemans Bay, Auckland 1011
Miele Experience Centre
Auckland:
8 College Hill
Freemans Bay, Auckland 1011
Telephone:
0800 464 353 (0800 4 MIELE)
www.miele.co.nz
Miele Global Headquarters
Germany
Miele & Cie. KG
Carl-Miele-Straße 29
33332 Gütersloh
Federal Republic of Germany
Head Office:
IRD 98 463 631
ACN 005 635 398
ABN 96 005 635 398
Miele Experience Centre Gold Coast:
131 Ferry Road
Southport, QLD 4215
Page 92

CVA 6401
M.-Nr. 10 499 930 / 00en – AU, NZ
 Loading...