


M24 S
Table of contents
 Loading...
Midland M24-S
Midland M48-S
Midland M99-S
” Manuale d’uso
” User manual
” Bedienungsanleitung
” Manual de instrucciones
” Manuel d’utilisation
” Manual de instruções
” Οδηγίες Χρήσης
” Gebruikershandleiding
” Bruksanvisning
” Käyttöopas


” ITALIANO
” ENGLISH
” DEUTSCH
” ESPAÑOL
” FRANÇAIS
” PORTUGUÊS
” ΕΛΛΗΝΙΚΆ
” NEDERLANDS
” SVENSKA
” SUOMI

Sommario
Caratteristiche principali: 4
Dotazione modello M24-S 5
Dotazione modello M48-S 5
Dotazione modello M99-S 5
Copertura/portata 5
Batterie e vano batteria 6
Ed ora, pronti a comunicare! 6
Accensione 6
Selezione canali 6
Parlare (trasmettere) 6
Ascoltare (ricezione) 7
Regolazione volume 7
Funzione CALL 7
Tasto funzione “menu” 7
Attivazione funzione VOX e sensibilità 7
Disattivazione funzione VOX 7
Roger Beep: Tonalità di conferma fine conversazione 8
Impostazione canali 8
Impostazione toni CTCSS 8
Visualizzazione dei toni CTCSS sul display 8
Funzione Monitor 9
Tasto “ /S” 9
Blocco tastiera 9
Funzione SCAN 9
Manuale d’uso Midland M24/48/99-S | 1

Illuminazione display 10
Ricarica 10
Modello M24-S 10
Modello M48-S 10
Modello M99-S 10
Auto power save 11
Utilizzo degli accessori 11
2 | Manuale d’uso Midland M24/48/99-S

Grazie per aver scelto i prodotti Midland! Gli apparati M24-S, M48-S e M99-S sono ricetrasmettitori
PMR 446 che si possono utilizzare senza licenza, in
tutta Europa. Per ulteriori informazioni, consultate la tabella “Restrizioni all’uso”.
Come previsto da dl 259 del 01/08/2003 aggiornato con DL 70 del
28/05/2013 e da nota 101C del PNF, gli apparati PMR446 sono soggetti
ad una dichiarazione di possesso e ad un contributo annuo. Per ottenere
la modulistica e le modalità di ottenimento dell’autorizzazione generale
per l’utilizzo di apparecchiature PMR446, contattate l’Ispettorato Territoriale nel vostro capoluogo di regione o visitate il sito web del Ministero
delle Comunicazioni (www.sviluppoeconomico.gov.it).
L’utilizzo dell’apparato è consentito solamente dopo aver inviato la pratica all’Ispettorato Territoriale. Raccomandiamo di conservare una copia
di tale pratica.
Manuale d’uso Midland M24/48/99-S | 3

SPK
MIC
CHG
S
MENU
SPK
MIC
CHG
PTT MIC/CGH
MENU
S
CHG
Caratteristiche principali:
• Frequenza: 446.00625 – 446.09375
• Canali:
M24-S: 24 canali (8+16 pre-programmati)
M48-S: 48 canali (8+40 pre-programmati)
M99-S: 99 canali (8+91 pre-programmati)
• 38 toni CTCSS
• Potenza: 500mW ERP
• Vox incorporato regolabile su 2 livelli
• Display LCD alfanumerico
• Tasto di chiamata
• Funzione “scan”
• Autonomia tipica fino a 12 ore
• Temperatura di funzionamento da -20° a +55°
• Peso: 103 gr (batterie escluse)
• Dimensioni: 60x103x25mm
• Presa accessori MC/CHG: 2 pin per accessori audio / caricatore da
muro
Le funzioni e le specifiche sono soggette a modifiche senza preavviso.
SPK
MIC
4 | Manuale d’uso Midland M24/48/99-S

Dotazione modello M24-S
• 2 ricetrasmettitori 24 canali
• 2 ganci per cintura
• 8 batterie tipo AAA
• Guida rapida
Dotazione modello M48-S
• 2 ricetrasmettitori 48 canali
• 2 ganci per cintura
• 2 pacchi batterie 800mAh ricaricabili
• Caricatore da muro a due vie
• Guida rapida
Dotazione modello M99-S
• 2 ricetrasmettitori 99 canali
• 2 ganci per cintura
• 2 pacchi batterie 800mAh ricaricabili
• 2 caricatori da tavolo
• 2 adattatori da muro singoli
• 2 auricolari
• Guida rapida
Copertura/portata
Le prestazioni dei ricetrasmettitori dipendono dalle condizioni ambientali ed atmosferiche. Fattori ambientali quali alture, edifici, alberi, fogliame possono diminuire la copertura. Le prestazioni ottimali si ottengono
in campo aperto mentre la portata si potrà ridurre, per esempio all’interno di un’automobile o di un edificio. Tipicamente la copertura in città, in
presenza di edifici è di 1 o 2 Km. In campo aperto, ma con presenza di
alberi, case, fogliame, la copertura è di 4-6 Km. In campo aperto, a vista
e senza nessun tipo di interferenza, come per esempio in montagna, la
copertura può essere anche superiore ai 10 Km.
Manuale d’uso Midland M24/48/99-S | 5
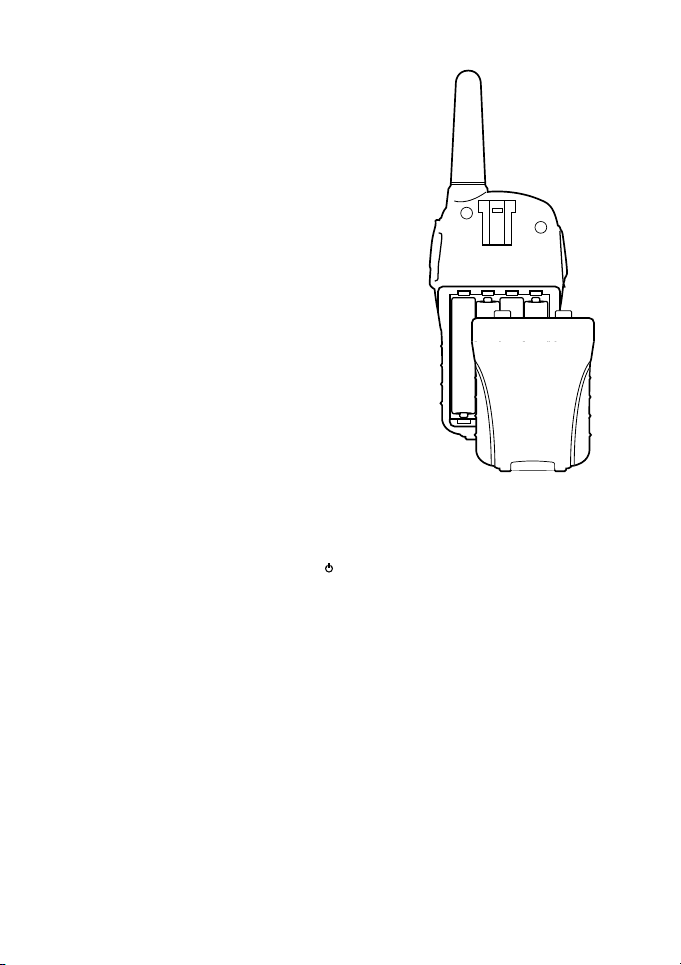
Batterie e vano batteria
E’ possibile utilizzare il pacco batteria ricaricabile fornito con gli apparati (solo nei
modelli M48-S o M99-S) oppure 4 batterie AAA alcaline o ricaricabili. Per aprire il
vano batteria, spingere la linguetta verso
il basso, e rimuovere il coperchio sollevandolo. Dopo aver inserito il pacco batteria
o le batterie richiudere il vano batteria e
riportate la linguetta nella posizione di
chiusura.
Attenzione
Nel caso si utilizzi il pacco batteria ricaricabile è opportuno porre le radio in ricarica
prima dell’utilizzo (vedi la sezione “Ricarica”).
Ed ora, pronti a comunicare!
Accensione
Premere e tenere premuto il tasto per circa 3 secondi.
Selezione canali
Premere una volta il tasto “menu” e di seguito i tasti p/q per selezionare
il canale desiderato. Premere PTT per confermare la selezione effettuata.
Attenzione entrambe le radio devono essere sullo stesso canale per poter
comunicare.
Parlare (trasmettere)
Tenere premuto il tasto PTT. Parlare ad una distanza di circa 4/10cm, con
un tono di voce normale. Il display visualizza ‘ Tx ’. Rilasciare il tasto PTT al
termine della conversazione, una nota di fine trasmissione (Roger Beep)
sarà inviata al vs interlocutore (per disabilitare la funzione vedi paragrafo
‘Roger Beep’).
6 | Manuale d’uso Midland M24/48/99-S

Ascoltare (ricezione)
Al rilascio del tasto PTT la radio rimane in modalità di ascolto. La ricezione
di un segnale verrà indicata con la scritta ‘RX’.
Regolazione volume
Per regolare il volume al livello ottimale, premere i tasti p/q finché si
ottiene il livello desiderato.
Funzione CALL
Invio segnale audio
Premendo rapidamente 2 volte il tasto PTT, verrà inviato un segnale sonoro di avviso di chiamata a tutti gli utenti sullo stesso canale.
Tasto funzione “menu”
Le seguenti funzioni si selezionano premendo il tasto “menu”:
• Funzione VOX
• Abilitazione/disabilitazione Roger Beep
• Impostazione canali
• Impostazione toni CTCSS
• Funzione Monitor
Attivazione funzione VOX e sensibilità
La funzione VOX permette di attivare la trasmissione via voce, senza dover premere il tasto PTT. E’ possibile scegliere tra due livelli di sensibilità:
• HI: alta sensibilità (per ambienti non molto rumorosi o se parlate con
un tono di voce basso)
• LO: bassa sensibilità (per luoghi in cui il rumore di fondo è alto o se
parlate con tono di voce alto). Premere 3 volte il tasto “menu”; sul display lampeggia la scritta ‘VOX’. Tramite i tasti p/q selezionare uno
dei due livelli di sensibilità disponibili e premere il tasto PTT per confermare la scelta. Sul display comparirà quindi la scritta “VOX”.
Disattivazione funzione VOX
Premere 3 volte il tasto “menu”. Sul display lampeggia la scritta ‘VOX’.
Tramite i tasti pq selezionare ‘OF’ e premere il tasto PTT per confermare
la scelta
Attenzione
Per utilizzare il VOX con l’auricolare fornito con il modello M99-S, spostate
Manuale d’uso Midland M24/48/99-S | 7

la levetta presente sull’auricolare in posizione “VOX”. Riportate la levetta in
posizione “PTT” quando non utilizzate il VOX.
Roger Beep: Tonalità di conferma fine conversazione
Al rilascio del tasto PTT, quindi alla fine di ogni trasmissione, viene
emessa una tonalità che indica al vostro interlocutore che può iniziare
a parlare. Questa funzione è attivata di default ed è indicata sul display
dall’icona .
Disattivazione:
1. Premere il tasto “menu” finchè sul display compare “RB” ed il sim-
bolo
2. Con i tasti p/q selezionare “oF”.
3. Premere il tasto PTT per confermare la scelta
Impostazione canali
Premere una volta il tasto “menu” e di seguito i tasti p/q per selezionare
il canale desiderato. Premere PTT per confermare la selezione effettuata.
Impostazione toni CTCSS
I toni CTCSS sono dei codici (da 1 a 38) che possono essere aggiunti ai canali per creare un proprio canale personale. Possono essere aggiunti fino
a 38 codici diversi, agli 8 canali identificati da P1 a P8, per creare fino a
308 canali personalizzati. Per esempio se aggiungete al canale P3 il tono
CTCSS 27 otterrete il canale P327 che potrà comunicare solo con quelle
radio che avranno impostato lo stesso canale e tono.
Procedimento per attivazione 38 toni CTCSS:
1. Accendere l’apparato.
2. Sezionare il canale desiderato da P1 a P8, premendo il pulsante
“menu” e i tasti p/q
3. Premere 2 volte il tasto “menu” finchè il display mostra il canale sele-
zionato (da P1 a P8) con l’attuale tono CTCSS lampeggiante.
4. Selezionare il tono CTCSS premendo i tasti p/q (da 1 a 38).
5. Per confermare l’impostazione, premere PTT.
6. Ora la radio trasmette e riceve utilizzando il tono CTCSS impostato.
Se si vuole togliere il tono CTCSS, ripetete la stessa procedura e selezionare “oF” come tono CTCSS.
Visualizzazione dei toni CTCSS sul display
Se avete aggiunto i toni CTCSS ai canali da P1 a P8, questi saranno visualizzati direttamente sullo schermo LCD affianco al canale. Tutti gli altri
8 | Manuale d’uso Midland M24/48/99-S

canali dal 9 in poi, hanno i toni CTCSS pre-programmati e “nascosti”.
E’ possibile visualizzare momentaneamente quale canale e quale tono è
stato pre-programmato mantenendo premuto il tasto “Menu” per più di
3 secondi.
Funzione Monitor
Questa funzione se attivata permette la ricezione di qualsiasi segnale radio anche se molto basso e debole. In questo modo se la conversazione è
al limite della portata, attivando il “monitor” è possibile estendere la portata della radio. La controindicazione di questa funzione è che vengono
ricevuti anche notevoli rumori di fondo.
Attivazione /Disattivazione:
1. Premere il tasto “menu” finchè sul display compare il simbolo
2. Con i tasti p/q selezionare “On” per attivare la funzione.
3. Premere il tasto PTT per confermare la scelta
Per disattivare la funzione monitor ripetere la procedura e selezionare
“oF”.
Tasto “ / S”
Blocco tastiera
Questa funzione risulta molto comoda per evitare che i tasti siano premuti accidentalmente. Mantenere premuto il tasto “ /S” per più di 3 secondi.
Il simbolo indica che il blocco tastiera è stato attivato. Solo i tasti PTT e
rimangono attivi.
Per disattivarlo, premerlo nuovamente per più di 3 secondi.
Funzione SCAN
SCAN esegue la scansione di tutti i canali e in presenza di un segnale su
un canale (quindi di una conversazione), si arresta. La scansione riprenderà dopo 5 secondi dal cessare del segnale. Questa funzione è utile per
controllare quali canali sono liberi.
Attivazione funzione SCAN
Premere il tasto “ /S”: sul display viene visualizzata la scritta SCAN.
Disattivazione funzione SCAN
Premere il tasto “ /S” o PTT.
Manuale d’uso Midland M24/48/99-S | 9

Illuminazione display
Alla pressione del tasto e di uno dei 5 tasti frontali, il display si illumina
per circa 10 secondi. (solo per i modelli M48-S e M99-S)
Ricarica
Quando le batterie o il pacco batteria è scarico, l’icona inizia a lampeggiare sul display: occorre quindi procedere, il prima possibile, alla sostituzione delle batterie o alla loro ricarica. Se la radio è spenta l’icona non
viene visualizzata.
Attenzione
• Le batterie alcaline non possono essere ricaricate.
• Non porre le radio in carica senza aver inserito le batterie ricaricabili
o il pacco batteria.
• La prima volta è opportuno caricare il pacco batteria per 8 ore complete (solo per i modelli M48-S e M99-S).
Modello M24-S
Questo modello è fornito di 8 batterie alcaline, non ricaricabili. Una volta
scariche, vanno sostituite.
Modello M48-S
Dopo aver inserito il pacco batteria, utilizzate il caricatore da muro presente nella confezione inserendolo nella presa laterale MIC/CHG dell’apparato. Il caricatore da muro è del tipo a “doppia presa”, quindi può ri-
caricare entrambe le radio contemporaneamente. Se le radio sono state
poste in carica accese, l’icona lampeggerà indicando che la fase di ricarica è attiva. Questa segnalazione non dipende dallo stato della carica e
non si spegne se le batterie sono completamente cariche.
Modello M99-S
Nella confezione del modello M99-S trovate 2 caricatori da tavolo e 2 caricatori da muro. Collegate i caricatori da muro nella presa presente sul retro dei caricatori da tavolo. Dopo aver inserito il pacco batteria nelle radio,
posizionate le due radio nei caricatori da tavolo. Se la radio è stata inserita
correttamente il LED rosso di segnalazione si accenderà. Se le radio sono
state poste in carica accese, l’icona lampeggerà indicando che la fase di
ricarica è attiva. Il LED rosso posto sui caricatori da tavolo identifica solo
10 | Manuale d’uso Midland M24/48/99-S

l’inserimento della radio e l’attivazione della fase di ricarica, ma non lo
stato della carica. Queste segnalazioni (LED rosso e l’icona ) non dipendono dallo stato della carica, quindi non si spengono quando le batterie
sono completamente cariche.
Auto power save
Tutti i modelli sono dotati del dispositivo automatico di risparmio batterie che consente di ridurre i consumi delle batterie fino al 50%. Quando
la radio non riceve alcun segnale per più di 10 secondi la funzione di risparmio energia viene attivata.
Utilizzo degli accessori
Tutti i modelli sono dotati della presa laterale MIC/CHG per l’utilizzo di
accessori, quali microfoni ed auricolari. Questa presa è compatibile
con gli eventuali accessori già presenti nella confezione e con tutti gli
accessori Midland a presa “2 pin”.
Per utilizzare l’auricolare fornito insieme al modello M99-S,
verificate che la levetta sia in posizione corretta:
PTT per uso manuale
VOX per trasmissione via voce (una volta attivata la funzione
su menu)
Manuale d’uso Midland M24/48/99-S | 11

12 | Manuale d’uso Midland M24/48/99-S

Summary
Main features: 4
Content model M24-S 5
Content model M48-S 5
Content model M99-S 5
Coverage 5
Battery and battery compartment 6
LET’S COMMUNICATE! 6
To turn radio on/off 6
Channel selection 6
Transmission 6
Reception 6
Volume adjustment 6
CALL function 7
“Menu” button 7
VOX function and its sensitivity 7
Roger Beep: end transmission tone 7
Channel setting 8
CTCSS-sub-tone setting 8
Show the CTCSS-sub-tone on the LCD 8
Monitor function 8
/S” button 9
Keypad lock 9
SCAN-mode 9
Midland M24/48/99-S User manual | 1

Display backlight 9
Recharging 9
M24-S model 10
M48-S model 10
M99-S model 10
Automatic power save 10
Accessories 11
2 | Midland M24/48/99-S User manual

Congratulations on your purchase!
M24-S, M48-S and M99-S are PMR 446 transceivers which may be used, without license, all over
Europe. Please consult the “Restrictions on the
use” charts for information regarding country
specific limitations.
Midland M24/48/99-S User manual | 3

SPK
MIC
CHG
S
MENU
SPK
MIC
CHG
PTT MIC/CGH
MENU
S
Main features:
• Freq. 446.00625 ÷ 446.09375 MHz
• Channels;
M24-S: 24 channels (8+16 pre-programmed)
M48-S: 48 channels (8+16 pre-programmed)
M99-S: 99 channels (8+16 pre-programmed)
• 38 CTCSS-Sub-Tones
• Power: 500 mW ERP
• VOX sensitivity adjustable in 2 levels
• Battery pack: 800mAh 4,8V NiMH
• Alphanumeric LCD Display
• Battery life up to 12 hours
• Operating temperature –20° +55°
• Weight 103 gr (batteries excluded)
• Size 60x103x25 mm
• Jack MIC CHG: 2 pins for audio accessories, wall charger
CHG
SPK
MIC
Specifications are subject to change without notice.

Content model M24-S
• 2 transceivers with 24 channels
• 2 belt clips
• 8 batteries AAA type
• Quick Guide
Content model M48-S
• 2 transceivers with 48 channels
• 2 belt clips
• 2 800mAh rechargeable battery packs
• 2-way wall adaptor
• Quick Guide
Content model M99-S
• 2 transceivers with 99 channels
• 2 belt clips
• 2 800mAh rechargeable battery packs
• 2 single wall chargers
• 2 single desktop chargers
• 2 headsets
• Quick Guide
Coverage
The maximum range depends on terrain condition and is obtained during use in an open space.
The only limitation to maximum possible range are environmental factors
such as blockage caused by trees, buildings, or other obstructions. Inside
a car or a metallic constructions, the range can be reduced. Normally the
coverage in the city, with buidings or other obstructions is about 1 or 2
Km. In open space but with obstructions like trees, leafs or houses the
maximum possible range is about 4-6 Km. In open space, without obstructions and in sight, like for example in mountain, the coverage can
be more that 10 Km.
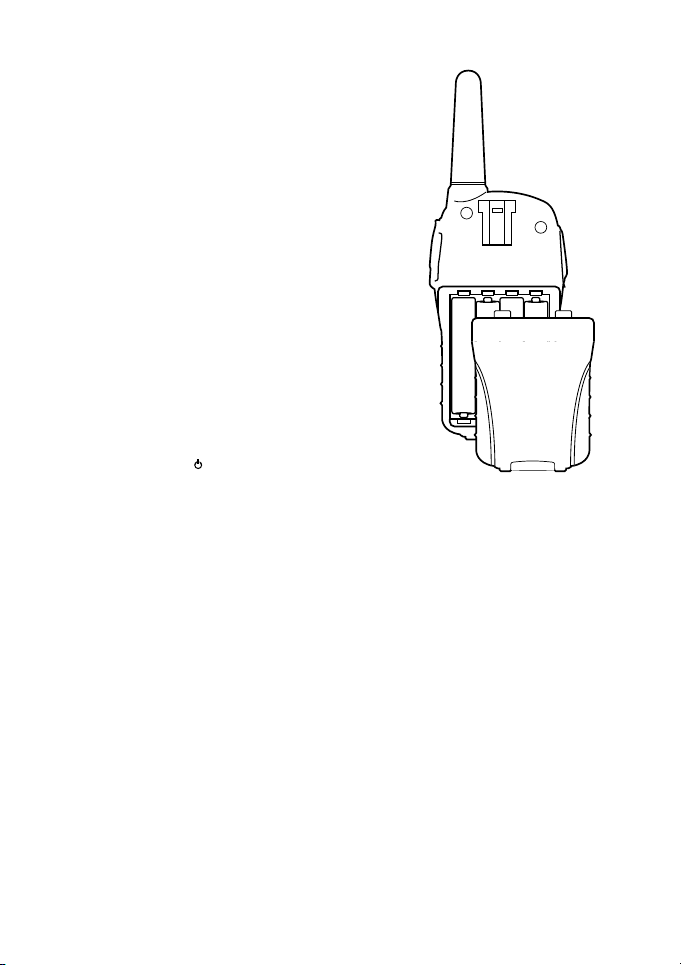
Battery and battery compartment
The transceiver accepts the rechargeable
battery pack (included only in the M48-S
and M99-S models) or 4AAA alkaline/ rechargeable batteries. To open the battery
compartment, hold the unit face down and
unhook the battery holder in the lower part
of the radio and gently slide the cover.
Attention
The battery pack provided with the M48-S
and M99-S models, must be recharged before the first use (see the section “Recharging”
for more info).
LET’S COMMUNICATE!
To turn radio on/off
Hold down the for 3 seconds.
Channel selection
Press once the “menu” button and then select the desired channel by the
p/q buttons. Press PTT to confirm the selection. Remember in order to
communicate, both radios must be set on the same channel.
Transmission
Keep the PTT button pressed and speak into the unit. Hold the radio
4/10cm away from your mouth. The display shows ‘TX’. When the PTT is
released, the radio beeps to confirm to other users that your transmission
has finished (Roger beep. See the paragraph).
Reception
Simply release the PTT button. When you receive a signal, ‘RX’ is displayed.
Volume adjustment
Use the p/q buttons to adjust the volume to the desired level.

CALL function
Sending audio signal
By pressing rapidly the PTT button twice, you will send an audio signal to
other users on the same channel.
“Menu” button
Following functions can be selected by pressing the “menu” button:
• VOX
• Roger Beep activation
• Channel setting
• CTCSS Tones setting
• Monitor
VOX function and its sensitivity
The VOX function lets you open the transmission by voice without the
use of the PTT button. To get the most use from the VOX feature you
must first determine what sensitivity (noise level) is needed to activate
the VOX.
Push the “menu” button for three times; ‘VOX’ blinks on the display. Select the desired VOX level (HI or LO) by means of the p/q buttons and
then press the PTT button to confirm.
VOX can be adjusted in 2 positions:
• HI: high sensitivity (normal voice with no background noise)
• LO: low sensitivity (useful in very noisy areas or if you talk loudly)
To disable the VOX mode
Press the “menu” button for three times. ‘VOX’ blinks on the display. Select ‘OF’ by means of the p/q buttons and then push PTT to confirm.
Attention
To use the VOX with the headset provided with the M99-S model, move
the small switch of the headset to the VOX position. Move it back to PTT
position if you don’t use the VOX function.
Roger Beep: end transmission tone
When PTT is released the radio will beep to confirm to other users that
your transmission has finished. This feature is enabled by default and it is
displayed with the icon.
Midland M24/48/99-S User manual | 7

To disable the Roger Beep
1. Push the “menu” until the display shows “RB” and the symbol
2. Select ‘OF’ by means of the p/q buttons
3. Confirm the selection by pushing the PTT button.
Channel setting
Press once the “menu” button and then select the desired channel by the
p/q buttons. Press PTT to confirm the selection.
CTCSS-sub-tone setting
The CTCSS sub-tones, are code numbers (from 1 to 38) to be added to
the first 8 channels in order to create a new private channel. You can add
up to 38 codes to the channels named from P1 to P8, that means you can
create up to 308 new channels. For example if you add the CTCSS subtone “27” to the channel “P3” you will obtain the new channel “P327” that
will be able to communicate to other transceivers only if they will be set
on the same channel and sub tone.
To activate 38 different CTCSS sub-tones follow these steps:
1. Turn on the radio.
2. Press the “Menu” button and select with the p/q buttons one of the
8 channels (from P1 to P8).
3. Press twice the “menu” button until the display shows the selected
channel with the flashing two digits CTCSS sub-tone (on the right of
the channel)
4. Select with the p/q buttons the desired CTCSS sub-tone (from 1 to
38).
5. To confirm the setting press PTT.
Now the radio transmits and receives using the programmed CTCSS
sub-tone. If you don’t want to use any CTCSS tone, select “oF”.
Show the CTCSS-sub-tone on the LCD
When you activate a CTCSS sub-tone, from P1 to P8, the tone is visible
just on the right side of the channel. For the other channels (from 9 up)
the CTCSS sub-code is pre-programmed and then “hidden”. To temporary show a pre-programmed channel and his CTCSS sub-tone, press the
“menu” button for more than 3 seconds.
Monitor function
This feature if activated, allows the possibility to receive very low and
weak radio signals. This is very useful when you need to talk but the di-
8 | Midland M24/48/99-S User manual

stance is as far as the maximum range possible. The disadvantage of this
feature is the receipt of loud background noise.
Activation/Disactivation
1. Push the “menu” until the display shows the symbol
2. To activate, select ‘On’ by means of the p/q buttons
3. Confirm the selection by pushing the PTT button.
4. To switch off the monitorrepeat the same procedure but select “oF”.
/S” button
Keypad lock
This feature is very useful to avoid pressing the buttons by chance. Press
and hold the “ /S” button for more than 3 seconds. The icon confirms
that the keypad lock is activated. Only PTT and will still be active. Repeat the same procedure to unlock the keypad.
SCAN-mode
The SCAN mode monitors the busy channels.
It is used to check the traffic radio on all the channels before transmitting and allows the unit to stop on a channel that someone is talking on.
When the radio stops on a busy channel, the scan will resume after about
5 seconds.
To activate the SCAN function
Press the “ /S” button and you will see ‘SCAN’ on the display.
To deactivate it:
Push the “ /S” or PTT button.
Display backlight
When you push or one of the 5 controls on the front side, the display
lights up for approx. 10 seconds (only on the M48-S and M99-S models).
Recharging
When the battery pack or the batteries are discharged, the icon
starts blinking: it is necessary to change the batteries or to recharge
it as soon as possible.
The icon blinks only if the radio is turned on.
Midland M24/48/99-S User manual | 9

Attention
• Alkaline batteries cannot be recharged.
• Do not recharge the radio without the rechargable batteries or without the battery pack. Please note that only the supplied battery
pack can be charged with the desktop charger.
• For the very first recharge of the battery pack allow not less than 8
hours (only for M48-S and M99-S models).
M24-S model
This model is provided with 8 alkaline batteries: they cannot be recharged, therefore, when they are completely discharged, they must be replaced with new ones.
M48-S model
This model is provided with battery packs and wall adapter. Insert the
battery packs and plug the wall adapter into the MIC/CHG jack on the
side of the transceiver. The wall adapter is a double plug type, so you
can recharge both transceivers at the same time. Only if the transceiver
is left on during the charging, the icon on the LCD display will blink
indicating that the radio is being charged. This indication will not turn off
when the batteries are fully charged.
M99-S model
This model is provided with battery packs, 2 single desktop chargers and
wall adapters. Insert the battery packs, connect the wall adapters plug
to the back of the desktop chargers and insert the transceivers into the
desktop chargers cradles. If the transceivers have been inserted correctly,
the red LED light on the desktop chargers will turn on, indicating that the
radio is charging. Only if the transceiver is left on during the charging,
the icon on the LCD display will blink indicating that the radio is being
charged. Both indications will not turn off when the batteries are fully
charged.
Automatic power save
All the models are supplied with an automatic current economy circuit.
If the transceiver receives no signal for more than 10 seconds, the “power
save function” automatically activates. The battery life may increase by
up to 50 %.
10 | Midland M24/48/99-S User manual

Accessories
All the models are provided with the MIC/CHG jack for connection to
accessories such as mikes and headsets. This plug is a “2 pin type” and is
compatible with all the Midland’s range of accessories.
To use the headset provided with M99-S model, be sure the
micro-switch is in the correct position:
PTT: for manual activation
VOX: for voice activation
Midland M24/48/99-S User manual | 11

12 | Midland M24/48/99-S User manual

Inhalt
Die wichtigsten Eigenschaften: 4
Lieferumfang M24-S 5
Lieferumfang M48-S 5
Lieferumfang M99-S 5
Funkreichweite 5
Batteriebestückung und Batteriefach 6
So geht’s los! 6
Funkhandy ein / ausschalten 6
Kanalwahl 6
Senden 6
Empfang 7
Lautstärke einstellen 7
Rufmelodie aussenden 7
“Menu” Taste 7
VOX Sprachsteuerung / Freisprechen 7
Roger Beep: Übergabeton am Ende einer Sendung 8
Kanal auswählen 8
CTCSS-Tonsquelch (Pilotton) einstellen 8
Anzeige der Subtöne im Display 9
Monitor Funktion 9
/S” Taste 9
Tastensperre 9
SCAN-Suchlauf 9
Bedienungsanleitung Midland M24/48/99-S | 1

Display Hintergrundbeleuchtung 10
Akkus aufladen 10
M24-S 10
M48-S 10
M99-S 11
Automatische Stromsparschaltung 11
Zubehör 11
2 | Bedienungsanleitung Midland M24/48/99-S

Mit unseren Geräten haben Sie eine gute Wahl
getroffen!
Die Funkgeräte unserer Serien M24-S, M48-S und
M99-S sind nach dem PMR 446 Funkstandard
überall in Europa (EU und EWR) anmelde- und
gebührenfrei benutzbar. Bitte lesen Sie auch
unsere Informationen zu evtl. Einschränkungen.
Bedienungsanleitung Midland M24/48/99-S | 3
Loading...