

Microtek ScanMaker 3800, ScanMaker 3700, ScanMaker 3840, ScanMaker 4600, ScanMaker 4700 Tutorial
...Page 1

Microtek Scanner
Step-by-Step
TUTORIAL
Page 2

Copyright
2002 by Microtek International, Inc.
All rights reserved.
Trademarks
Microtek®, ScanMaker
TM
, and ScanWizardTM are trademarks or registered trademarks of Microtek
International, Inc. Windows® is a registered trademark of Microsoft Corporation. Adobe® and Acrobat® are
registered trademarks of Adobe Systems Incorporated. Ulead®, PhotoImpact®, and iMiraTM are trademarks
or registered trademarks of Ulead Systems, Inc. ASFTM, Applied Science FictionTM, the ASF logo, Digital
ICETM for Photo Prints are trademarks or registered trademarks of Applied Science Fiction, Inc. All other
products or name brands are trademarks of their respective holders.
Important
Documents that you scan may be protected under copyright law. The unauthorized use of such documents
could be a violation of the rights of the copyright holder . Microtek bears no responsibility for the
unauthorized use of copyrighted materials.
T o obtain optimal results fr om the Microtek scanning software and user's manual, you should be familiar
with such Windows concepts as pointing, clicking, dragging, and selecting from menus and dialog boxes.
If these things are new to you, refer to your Microsoft Windows User's Guide.
I49-003418 A
August 2002
Page 3
Scanning the Easy Way
Step into ScanWizard 5’s tutorial guide because we’ve
made each task short and simple. There are several
different scanning activities, with no more than 8 easy
steps for each project. All of the projects concentrate on
the basic scanning functions of ScanWizard 5.
Part APart A
Part APart A
Part A c ontains the basic features and functions of the
buttons and tools included in the Standard Control Panel
and the Advanced Control Panel.
Part BPart B
Part BPart B
Part B is a t u t o ria l t hat covers the following tasks:
scanning photographs and documents, doing multiple
scans, and using the Advanced Image Correction tools.
Before you begin, you may want to go through the
Quick Reference Guide as well as the Online help and
familiarize yourself with ScanWizard 5. Happy scanning !
Page 4

Inside Step-by-Step Tutorial
Part A Functions of ScanWizard 5
1 Using the Standard Control Panel
2 Using the Advanced Control Panel
Part B T utorials
4 How to scan a photo
5 How to copy
6 How to scan a photo, film or slide
for E-mail attachment
7 How to scan a photo for your desktop wallpaper
8 How to scan for OCR
Converting scanned documents for editing
9 How to scan and instantly upload images to the web
10 How to scan printed material and insert it into a Microsoft
Office application
11 How to scan and store multiple images
12 How to adjust color in an image
Page 5
Microtek Scanner Step-by-Step Tutorial 1
Part A
Performs the final scan, and
delivers the output to a
selected application. Click
and hold the mouse to
activate the options menu.
When you click any of these
tool buttons, a text box and its
current default will appear
which allows you to select
your own scan settings.
Scan frameScan frame
Scan frameScan frame
Scan frame
Lets you set the area to be
scanned.
Switch iconSwitch icon
Switch iconSwitch icon
Switch icon
Allows you to change to
the Advanced Control
Panel.
Scanner iconScanner icon
Scanner iconScanner icon
Scanner icon
Shows the scanner type,
model, and status.
Help iconHelp icon
Help iconHelp icon
Help icon
Contains the online help
and follow-me tutorial.
Minimize iconMinimize icon
Minimize iconMinimize icon
Minimize icon
Minimizes ScanWizard 5.
Exit iconExit icon
Exit iconExit icon
Exit icon
Closes
ScanWizard 5ScanWizard 5
ScanWizard 5ScanWizard 5
ScanWizard 5.
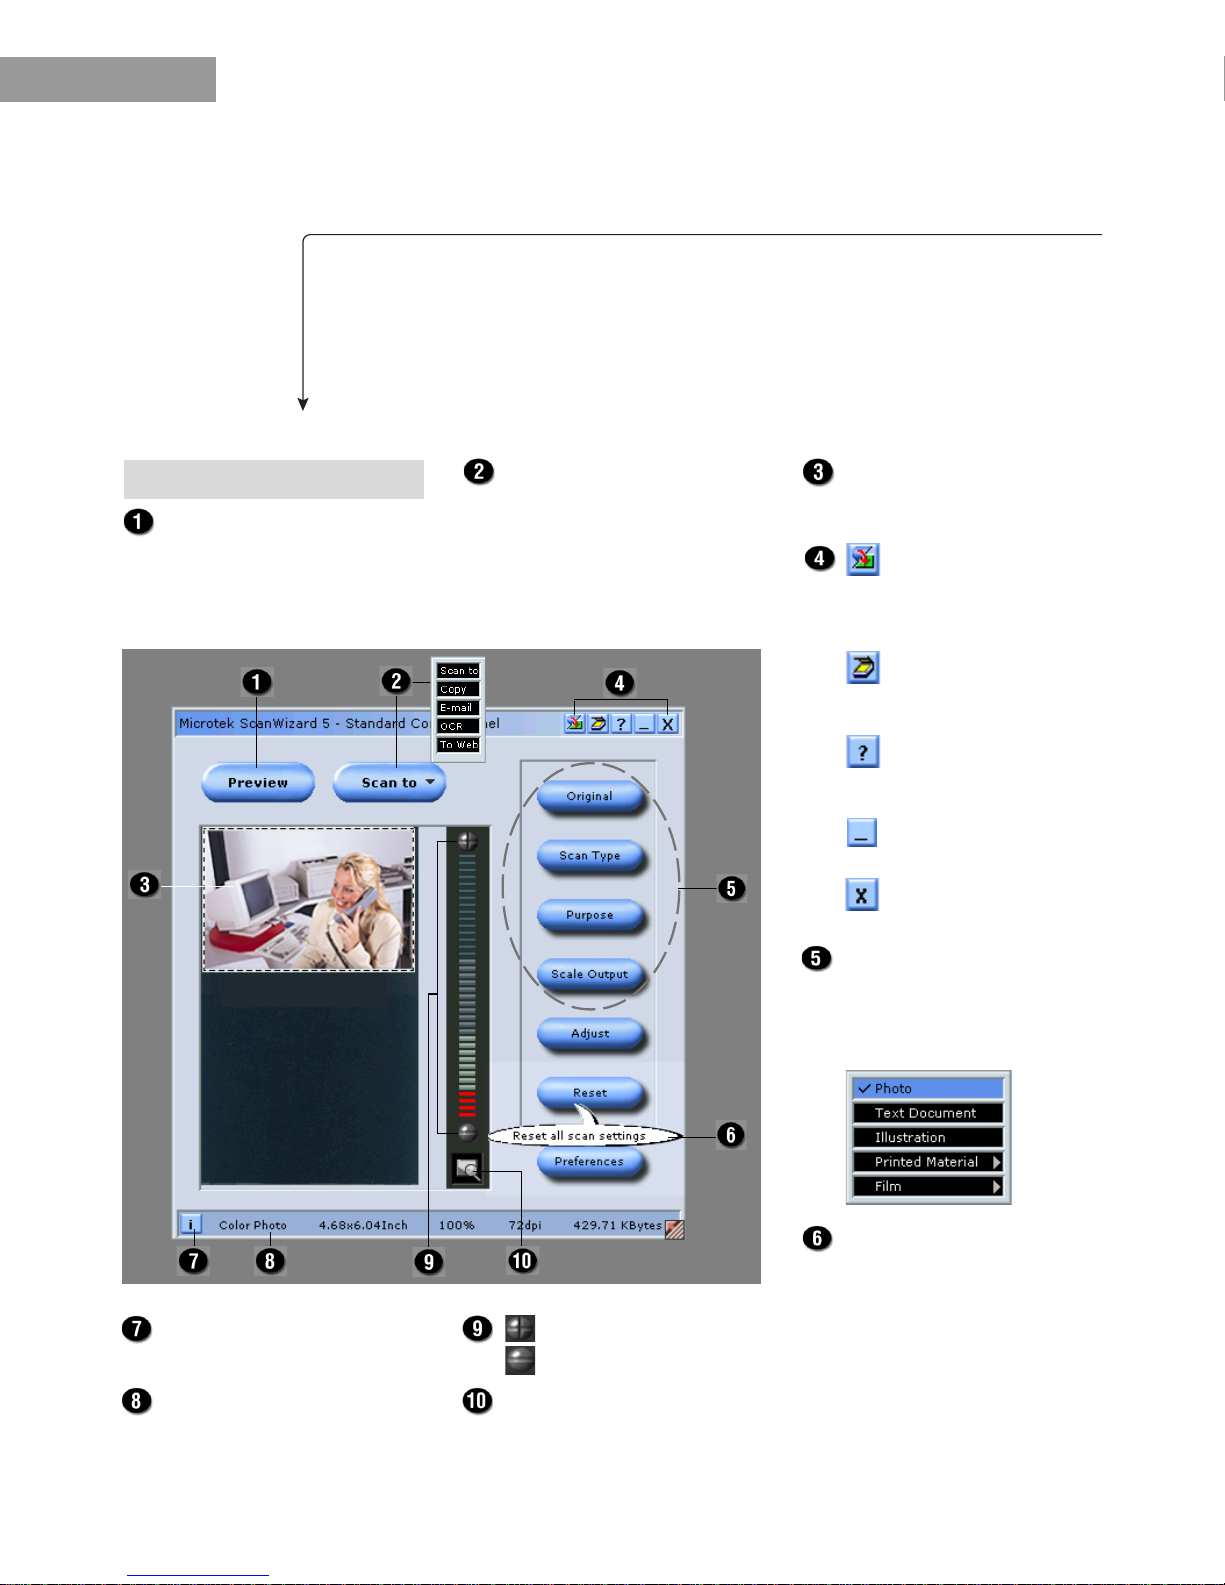
Using the Standard Control P anel
The
ScanWizard 5 - Standard Control PanelScanWizard 5 - Standard Control Panel
ScanWizard 5 - Standard Control PanelScanWizard 5 - Standard Control Panel
ScanWizard 5 - Standard Control Panel offers a simple and easy way to complete a scanning
session. It has a tutorial that can guide you through the actual steps to help you accomplish your first
scan. To find out more about the functions behind the Standard Control Panel, explore and navigate the
panel below.
Prescans and previews your
material before final scanning.
Automatic previewAutomatic preview
Automatic previewAutomatic preview
Automatic preview of the scan
material is shown whenever
ScanWizard 5 is launched.
When you point and leave
your cursor on any button on
the panel, a balloon help will
pop up on the screen giving
you hints and tips about its
function.
Preview window
Zoom in Zoom in
Zoom in Zoom in
Zoom in and
Zoom out Zoom out
Zoom out Zoom out
Zoom out controls.
Info icon Info icon
Info icon Info icon
Info icon shows detailed settings
and status of current scan job.
Status bar Status bar
Status bar Status bar
Status bar shows the current
settings, and becomes a
ProgressProgress
ProgressProgress
Progress
bar bar
bar bar
bar during the scanning process.
Panning toolPanning tool
Panning toolPanning tool
Panning tool
Pans or moves around a
magnified area.
Page 6

2 Microtek Scanner Step-by-Step Tutorial
Part A
TT
TT
T
ool buttonsool buttons
ool buttonsool buttons
ool buttons:
Scan fScan f
Scan fScan f
Scan f
rame toolrame tool
rame toolrame tool
rame tool
Lets you define a scan
frame area.
Zooming toolZooming tool
Zooming toolZooming tool
Zooming tool
Provides zoom in and
zoom out controls.
Pan toolPan tool
Pan toolPan tool
Pan tool
Pans or moves around
a magnified area.
Dropper toolDropper tool
Dropper toolDropper tool
Dropper tool
Lets you highlight or
isolate the Black & White
points of a selected area.
Menu barMenu bar
Menu barMenu bar
Menu bar
Allows various options on
customizing the scanner,
software, image adjustment
tools, and access to help.
Overview Overview
Overview Overview
Overview shows a preview of
the image(s) on the entire
scanning bed.
Prescan Prescan
Prescan Prescan
Prescan gives a high-resolution
view of the area selected by the
Scan frame tool.
Scan to buttonScan to button
Scan to buttonScan to button
Scan to button
Starts the final scan and
delivers the output to a
specified application.
Scan material iconScan material icon
Scan material iconScan material icon
Scan material icon
Provides options for selecting
the type of material being
scanned (reflective, negative
or positive).
Switch iconSwitch icon
Switch iconSwitch icon
Switch icon
Takes you back to the
Standard Control Panel.
Exit buttonExit button
Exit buttonExit button
Exit button
Closes ScanWizard 5.
Minimize buttonMinimize button
Minimize buttonMinimize button
Minimize button
Minimizes ScanWizard 5.
Scan frameScan frame
Scan frameScan frame
Scan frame
Allows you to set the area to
be scanned.
Status barStatus bar
Status barStatus bar
Status bar
Provides hints and tips when
you click any button.
Unit of measurementUnit of measurement
Unit of measurementUnit of measurement
Unit of measurement
Allows you to change the unit
type of the ruler. Options
include inch, cm, mm, point,
pixel, and pica.
Preview window
Using the Advanced Contr ol Panel
The
ScanWizard 5 - Advanced Control PanelScanWizard 5 - Advanced Control Panel
ScanWizard 5 - Advanced Control PanelScanWizard 5 - Advanced Control Panel
ScanWizard 5 - Advanced Control Panel provides users the power to control, correct, and
improve the image at the scanning stage. Acquiring the best possible scans should not require a lot of
hard work, and you only need to understand the basic functions behind the Advanced Control Panel to
work like a pro.
Page 7

Microtek Scanner Step-by-Step Tutorial 3
The Advanced
Control Panel, Settings, Info, and Scan Job Queue windows appear whenever the
Advanced Control Panel is activated. Otherwise, click the
VV
VV
V
iewiew
iewiew
ie w menu in the Preview window, then
select
Bring Settings WBring Settings W
Bring Settings WBring Settings W
Bring Settings W
indow to Frindow to Fr
indow to Frindow to Fr
indow to Fr
ont ont
ont ont
ont or
Show Scan Job Queue W Show Scan Job Queue W
Show Scan Job Queue W Show Scan Job Queue W
Show Scan Job Queue W
indowindow
indowindow
indow.
Zoom Level DisplayZoom Level Display
Zoom Level DisplayZoom Level Display
Zoom Level Display
Lets you increase or reduce the magnification level.
Mouse Cursor PositionMouse Cursor Position
Mouse Cursor PositionMouse Cursor Position
Mouse Cursor Position
Displays position of the mouse
along the x and y coordinates of the image.
Color Meter OptionsColor Meter Options
Color Meter OptionsColor Meter Options
Color Meter Options
Lets you select color info and area of the sample
size.
Color Output MeterColor Output Meter
Color Output MeterColor Output Meter
Color Output Meter
Displays the output pixel values in the selected
area of the overview or prescan image.
Sample Display AreaSample Display Area
Sample Display AreaSample Display Area
Sample Display Area
Shows pixelized display of area in the overview/
prescan image where mouse cursor rests.
Info window
Scan Job Queue window
Up/Down ArrowsUp/Down Arrows
Up/Down ArrowsUp/Down Arrows
Up/Down Arrows
Lets you change the order of the
scan job in the list.
One-pass Scan for Multiple JobsOne-pass Scan for Multiple Jobs
One-pass Scan for Multiple JobsOne-pass Scan for Multiple Jobs
One-pass Scan for Multiple Jobs
Reduces your scanning time.
Image
type type
type type
type and
color mode color mode
color mode color mode
color mode.
appears whenever a job has been prescanned.
Check sign Check sign
Check sign Check sign
Check sign indicates job will be scanned when you click any
of the
Scan Scan
Scan Scan
Scan,
E-mail E-mail
E-mail E-mail
E-mail or
CopyCopy
CopyCopy
Copy buttons.
Function Function
Function Function
Function buttons for
controlling scan jobs.
- Duplicate
- New
- Delete
- Check
- Load/Save
Image sizeImage size
Image sizeImage size
Image size in Kilobytes.
Current scan job Current scan job
Current scan job Current scan job
Current scan job is
highlighted
..
..
.
Shows the current scan job
selected in the
Scan Job QueueScan Job Queue
Scan Job QueueScan Job Queue
Scan Job Queue
window
Scan frame Scan frame
Scan frame Scan frame
Scan frame and
Scale Scale
Scale Scale
Scale
outputoutput
outputoutput
output
controls
Scan frameScan frame
Scan frameScan frame
Scan frame options
Advanced Image CorrectionAdvanced Image Correction
Advanced Image CorrectionAdvanced Image Correction
Advanced Image Correction
(AIC) (AIC)
(AIC) (AIC)
(AIC) tools
::
::
:
- White/Black Points
- Tone Curve
- Brightness and Contrast
- Color Correction
- Filter
- Descreen
Settings window
Fast JPEG/Digital ICEFast JPEG/Digital ICE
Fast JPEG/Digital ICEFast JPEG/Digital ICE
Fast JPEG/Digital ICE
For scanners implementing
either Fast JPEG or Digital ICE.
Page 8

4 Microtek Scanner Step-by-Step Tutorial
Part B
The scanner will automatically
detect, configure, scan, and
show a preview of your
material, enclosed in a “
scanscan
scanscan
scan
frameframe
frameframe
frame”.
Always check the
InfoInfo
InfoInfo
Info icon
located at very bottom of the
panel to make sure that the
configuration has been set
correctly to match your
material.
If your intended scan does not
comply with the material type
and other settings, click any of
these
buttons to configure
the
settings accordingly.
Place a color photograph face
down on your
scanner bed.
How to scan a photo
Double-click the
ScanWizard ScanWizard
ScanWizard ScanWizard
ScanWizard
55
55
5 icon on your desktop. This
will launch the ScanWizard 5 Standard Control Panel.
Microtek scanners provide quick entry into a world of “picture perfect” patterns and textures. With your
Microtek scanner, you can pull out all those photographic memorabilia out of the closet and scan them
for E-mail attachment, desktop wallpaper, digital photo albums, and more. Your first scanning
expedition awaits you below.
The
Scan T Scan T
Scan T Scan T
Scan T
o: Save Aso: Save As
o: Save Aso: Save As
o: S av e As dialog
box will appear. Store the
image in your preferred
folder, key in the file name,
and use
.bmp.bmp
.bmp.bmp
.bmp or
.jpg .jpg
.jpg .jpg
.jpg as the
recommended file format.
Click
SaveSave
SaveSave
Save to complete your
first scan.
When scanning a colored
photograph, the configuration
is normally set to the
following default settings.
When you are ready to save
the scanned image, click the
Scan toScan to
Scan toScan to
Scan to button.
Page 9

Microtek Scanner Step-by-Step Tutorial 5
Part B
Position the document that
needs to be printed (“copied”)
on the scanner bed.
Double-click the
ScanWizard 5ScanWizard 5
ScanWizard 5ScanWizard 5
ScanWizard 5 icon
on your desktop.
The
ScanWizard 5 - StandardScanWizard 5 - Standard
ScanWizard 5 - StandardScanWizard 5 - Standard
ScanWizard 5 - Standard
Control PanelControl Panel
Control PanelControl Panel
Control Panel appears. Check
the
InfoInfo
InfoInfo
Info icon whether any
configuration changes need to
be made, then proceed to the
next step. If not, go to
Step 6Step 6
Step 6Step 6
Step 6.
ScanWizard 5 will auto-detect
and configure the settings of
your scan material.
You can increase or reduce
the size of any material by
clicking the
Scale OutputScale Output
Scale OutputScale Output
Scale Output
button. Normally
100%100%
100%100%
100% will
suffice for copying purposes.
Click the
Scan toScan to
Scan toScan to
Scan to button and
hold down the mouse for
about 3 seconds until the
options menu appears.
Select
CopyCopy
CopyCopy
Copy to send the
scanned material directly to
your printer (Notice that the
Scan toScan to
Scan toScan to
Scan to button transforms to
CopyCopy
CopyCopy
Copy).
How to copy
Transform your scanner and printer into a convenient copy station. Whether you are in the office,
home or school, you can easily print or copy handouts, memos, research papers, assignments,
photographs-- almost anything within your reach. This module shows you how.
When the
CopyCopy
CopyCopy
Copy dialog box
appears, select your default
printer or any alternative
printer from the options, then
specify the number of copies
to be made. When you are
ready to print, click
OKOK
OKOK
OK.
Page 10

6 Microtek Scanner Step-by-Step Tutorial
Part B
How to scan a photo, film or slide
for E-mail attachment
Click the
Scan to Scan to
Scan to Scan to
Scan to button, then hold down
your mouse for about 3 seconds. When the
options menu appears, select
E-mailE-mail
E-mailE-mail
E-mail.
When the
E-mail: Save AsE-mail: Save As
E-mail: Save AsE-mail: Save As
E-mail: Save As dialog box
appears, save the image to your preferred
folder, key in a file name and choose
.jpg.jpg
.jpg.jpg
.jpg as
your file format. Click
SaveSave
SaveSave
Save to deliver it
directly to your system default E-mail.
Your default
E-mail applicationE-mail application
E-mail applicationE-mail application
E-mail application launches
with your scanned image attached to it. Fill
in the E-mail address, subject, and
message, then click the
Send Send
Send Send
Send icon to send
your E-mail with the scanned image.
Share you images over the Internet! Just got back from your vacation and want to share your experience?
or want to send photos to your family and friends just to keep in touch? Don’t just write traditional
E-mail! Add a little zest by including scanned images.
To activate
ScanWizard 5ScanWizard 5
ScanWizard 5ScanWizard 5
ScanWizard 5,
click the icon on your desktop.
If you are scanning a film or
slide, click
OriginalOriginal
OriginalOriginal
Ori gi nal, then
select from the menu
Positive Positive
Positive Positive
Positive
(for slides) or
NegativeNegative
NegativeNegative
Negative (for
negative film from cameras).
If you are scanning a normal
photograph select
PhotoPhoto
PhotoPhoto
Photo,
then click
Scan TScan T
Scan TScan T
Scan T
ype ype
ype ype
ype to select
the appropriate color mode.
If you wish to enhance the
look of your image before
attaching it to your E-mail,
click the
AdjustAdjust
AdjustAdjust
Adjust button.
Experiment with the various
controls (Brightness, Contrast,
Color, Sharpness or
Saturation) until you are
pleased with the result.
If JPEG is selected,If JPEG is selected,
If JPEG is selected,If JPEG is selected,
If JPEG is selected,
it will reduce theit will reduce the
it will reduce theit will reduce the
it will reduce the
storage space bystorage space by
storage space bystorage space by
storage space by
compressing the filecompressing the file
compressing the filecompressing the file
compressing the file
size, and it is ansize, and it is an
size, and it is ansize, and it is an
size, and it is an
extremely popularextremely popular
extremely popularextremely popular
extremely popular
image format used onimage format used on
image format used onimage format used on
image format used on
web pages andweb pages and
web pages andweb pages and
web pages and
E-mail attachments.E-mail attachments.
E-mail attachments.E-mail attachments.
E-mail attachments.
Properly position your photo,
filmstrip or slide on the
scanner bed.
To scan transparent materials,
you should install the
Transparent Media Adapter
before positioning your
material and launching
ScanWizard 5 (Refer to other
documentation on installing
the appropriate accessory).
Page 11

Microtek Scanner Step-by-Step Tutorial 7
Part B
Launch
ScanWizard 5ScanWizard 5
ScanWizard 5ScanWizard 5
ScanWizard 5.
From the
Standard ControlStandard Control
Standard ControlStandard Control
Standard Control
PanelPanel
PanelPanel
Panel, click the
SwitchSwitch
SwitchSwitch
Swi tch button
(located on the upper right
corner) to change to the
Advanced Control PanelAdvanced Control Panel
Advanced Control PanelAdvanced Control Panel
Advanced Control Panel.
Place a photo that you wish to
scan for your desktop
wallpaper on the scanner bed.
Before you start scanning,
check the resolution of your
Display Screen area Display Screen area
Display Screen area Display Screen area
Display Screen area from the
Control Panel’s Display
Properties.
From the
SettingsSettings
SettingsSettings
Settings window,
change the unit system to
pixelspixels
pixelspixels
pix el s instead of
inchesinches
inchesinches
inches; Key
in the resolution of your
Screen area Screen area
Screen area Screen area
Screen area in the
OutputOutput
OutputOutput
Output
box, then select the
FixedFixed
FixedFixed
Fixed
Output Size Output Size
Output Size Output Size
Output Size and
KeepKeep
KeepKeep
Keep
ProportionProportion
ProportionProportion
Proportion check boxes. Crop
the image to the desired area
that you want to show for
your output.
When the
Scan TScan T
Scan TScan T
Scan T
o: Save Aso: Save As
o: Save Aso: Save As
o: Save As
dialog box appears, save your
image under:
C:\WindowsC:\Windows
C:\WindowsC:\Windows
C:\Windows or
your preferred folder, key in
your file name and use
.bmp.bmp
.bmp.bmp
.bmp
as the recommended file
format.
Right-click the mouse
to any free space on
your desktop. When
a shortcut dialog box
appears, select
PropertiesProperties
PropertiesProperties
Properties, then click
the
Background Background
Background Background
Background tab.
From the
WallpaperWallpaper
WallpaperWallpaper
Wallpaper list, select the
scanned image that you have
just saved.
To finish, click
ApplyApply
ApplyApply
Apply, then
OKOK
OKOK
OK to launch your new
wallpaper background.
How to scan a photo
for your
desktop wallpaper
Create your own unique desktop wallpaper! Check the steps below -- it’s
not that complicated! Before you begin though, check the resolution of
your screen area and write this down. You will need this information so
that your image fits on the entire screen.
Click
Prescan Prescan
Prescan Prescan
Prescan to view the
adjustments, then click the
Scan toScan to
Scan toScan to
Scan to button when you’re
all ready to save your image.
Page 12

8 Microtek Scanner Step-by-Step Tutorial
Part B
Select the check box “
SendSend
SendSend
Send
document to application afterdocument to application after
document to application afterdocument to application after
document to application after
savingsaving
savingsaving
saving” to automatically send it
to the specified application for
editing, or viewing purposes.
The built-in OCR (Optical Character Recognition) engine instantly converts a
scanned document into text that can be edited from any word processing
application. Save files as
.rtf .rtf
.rtf .rtf
.rtf and
.xls .xls
.xls .xls
.xls for use in common word processing and
spreadsheet applications. For web page viewing, use
.htm .htm
.htm .htm
.htm or
.pdf .pdf
.pdf .pdf
.pd f for viewing
on any platform.
How to scan for OCR
Converting scanned documents for editing
Place a text document
on the scanner bed,
and then launch
ScanWizard 5ScanWizard 5
ScanWizard 5ScanWizard 5
ScanWizard 5.
ScanWizard 5 will
automatically detect and
configure your scan material.
If you wish to specify your
own scan setting, manually
click any of the tool buttons on
the Standard Control Panel,
and choose the settings from
options menu.
Select
OCROCR
OCROCR
OC R from the options
menu.
The default language for OCR
is
EnglishEnglish
EnglishEnglish
English. If you wish to
change the language, select
your preferred language from
the
OCR Language OCR Language
OCR Language OCR Language
OCR Language options.
When the
OCR: Save AsOCR: Save As
OCR: Save AsOCR: Save As
OCR: Save As
dialog box appears, select a
folder, key in your preferred
file name or use the default
file name “
DocumentDocument
DocumentDocument
Document”.
Select your required file
format from the options.
See the additional notesSee the additional notes
See the additional notesSee the additional notes
See the additional notes,
before choosing a specific filebefore choosing a specific file
before choosing a specific filebefore choosing a specific file
before choosing a specific file
formatformat
formatformat
format.
Click the
SaveSave
SaveSave
Save button to start
scanning your documents,
automatically save and launch
the selected application for
viewing or editing your
document.
Take note of the following file formats:
File Format Purpose Best Results
.RTF
Create documents with a combination
of text, graphics, and tables.
Docume nts wi th text images
and/or tables.
.X LS
Crea te spre adshe ets wit h text and
graphics.
Spr eadsheets
.TXT Create documents with text only.
Text files whe re la yout and
formatting is not needed.
.PDF
Compact col or document files with t ext
that graphics that can be ready by
Acrobat Reader.
Sh aring c olo r docume nts over a
ne twor k or arc hiv ing pu rpo se s.
.HTM
Color document files with text and
graphics to be viewed in all web
browsers.
For use in web sites or other
programming applications.
Page 13

Microtek Scanner Step-by-Step Tutorial 9
Part B
Place the material that
you wish to post on the
web, and then launch
ScanWizard 5ScanWizard 5
ScanWizard 5ScanWizard 5
ScanWizard 5.
The default scan setting under
the
PurposePurpose
PurposePurpose
Purpose menu has been set
to
Onscreen ViewingOnscreen Viewing
Onscreen ViewingOnscreen Viewing
Onscreen Viewing.
For fastest
uploading,
select
OnscreenOnscreen
OnscreenOnscreen
Onscreen
ViewingViewing
ViewingViewing
Viewing. Or you
can also modify
the settings to suit
your needs.
Make sure
that you are
connected to the
Internet Internet
Internet Internet
Internet before you
activate the
TT
TT
T
o Wo W
o Wo W
o W
ebeb
ebeb
eb
button from the options
menu.
The
Scan to WScan to W
Scan to WScan to W
Scan to W
ebeb
ebeb
eb dialog box
will appear. Click the
Account Account
Account Account
Account
Manager Manager
Manager Manager
Manager button to manage
your photo-sharing account.
To register for a new photosharing account, from the
Account Manager Account Manager
Account Manager Account Manager
Account Manager window
click
Create a new accountCreate a new account
Create a new accountCreate a new account
Create a new account,
and then follow the given
instructions as you register.
After completing the
registration process; close the
browser and return to the
Account ManagerAccount Manager
Account ManagerAccount Manager
Account Manager window.
How to scan and instantly upload
images to the web
It’s easy and fun to instantly upload images onto a free
photo-sharing website. Scan, upload and share them
with your family and friends across the globe or even
across town.
To activate a registered
account, click the
AddAdd
AddAdd
Ad d button,
key in your
usernameusername
usernameusername
username and
passwordpassword
passwordpassword
password, click
CloseClose
CloseClose
Close, and
then carry on to the next step.
Check box option:
“
Open my web album afterOpen my web album after
Open my web album afterOpen my web album after
Open my web album after
scanningscanning
scanningscanning
scanning”
Enable this check box when
you are up to your last image
to efficiently upload them in
one batch.
Click the
Save Save
Save Save
Save button to
save/store your images to a
default folder as JPEG format
and automatically upload
them to your photo-sharing
album on the Internet. If you
wish to change the name of
the file and folder location,
you can do so in the
FileFile
FileFile
File
name/Save inname/Save in
name/Save inname/Save in
name/Save in box.
It is recommended that you
use
JPEGJPEG
JPEGJPEG
JPEG as your file fomat -this is the standard image
format widely used on the
web.
Page 14

10 Microtek Scanner Step-by-Step Tutorial
Part B
Click
Overview Overview
Overview Overview
Overview to
view the
entire image, make any
necessary changes you wish,
then click
PrescanPrescan
PrescanPrescan
Prescan for a
higher-resolution view of the
image. When you are satisfied
with the adjustments, click
the
Scan toScan to
Scan toScan to
Scan to button to deliver
the scanned material directly
to your chosen Microsoft
Office application.
Position the printed material
(magazine or newspaper) to
be scanned on the scanner
bed.
Open your
MicrMicr
MicrMicr
Micr
osoft Wosoft W
osoft Wosoft W
osoft W
oror
oror
or
dd
dd
d,
PowerPointPowerPoint
PowerPointPowerPoint
PowerPoint, or
ExcelExcel
ExcelExcel
Excel, then
set the cursor in a specific
area where you want to
position the image that you
are about to scan. (Here we
have opened MicroSoft
PowerPoint 2000).
The
Insert PictureInsert Picture
Insert PictureInsert Picture
Insert Picture dialog box
will appear. Choose
DeviceDevice
DeviceDevice
Device
(Microtek ScanWizard 5)(Microtek ScanWizard 5)
(Microtek ScanWizard 5)(Microtek ScanWizard 5)
(Microtek ScanWizard 5),
then click the
Custom InsertCustom Insert
Custom InsertCustom Insert
Custom Insert
button.
ScanWizard 5 ScanWizard 5
ScanWizard 5 ScanWizard 5
ScanWizard 5 will
launch automatically.
From the toolbar, click
InserInser
InserInser
Inser
tt
tt
t.
When the
InsertInsert
InsertInsert
Insert options
menu appears, select
Picture Picture
Picture Picture
Picture,
and choose
FrFr
FrFr
Fr
om Scannerom Scanner
om Scannerom Scanner
om Scanner.
How to scan printed material and insert
it into a Microsoft Office application
After a few seconds, the
scanned material should
automatically appear as an
inserted image.
Switch to the
AdvancedAdvanced
AdvancedAdvanced
Advanced
Control Panel Control Panel
Control Panel Control Panel
Control Panel to set the
DescreenDescreen
DescreenDescreen
Descreen function. This will
remove visible moire patterns
that result when you scan from
magazines or newspapers.
From the Settings menu, select
TT
TT
T
ypeype
ypeype
yp e, then choose the color
mode to match your material.
Now select
DescreenDescreen
DescreenDescreen
Descreen under
the
AIC AIC
AIC AIC
AI C tools, then select
ArtArt
ArtArt
Art
MagazineMagazine
MagazineMagazine
Magazine (This will depend
on the type of material you are
scanning).
Add a special touch of creativity to any of your school
projects, certificates, resumés, brochures, press releases,
product launches, etc. You can send your scanned
image(s) directly to any of your Microsoft Office
applications to strengthen your presentation.
Page 15

Microtek Scanner Step-by-Step Tutorial 11
Part B
How to scan and store multiple
images
If you wish to change the
parameters for each image, key
in your preferences in the
Settings Settings
Settings Settings
Settings window.
Once you have set the changes,
highlight all the items from the
Scan Job QueueScan Job Queue
Scan Job QueueScan Job Queue
Scan Job Queue window, then
click
PrescanPrescan
PrescanPrescan
Prescan to scan all the
images continuously. “
PP
PP
P”
appears on every scan job and
a preview of each photo is
shown whenever an image has
been pre-scanned.
Highlight all your
scan jobs, then click
the
Scan toScan to
Scan toScan to
Scan to button if you are
ready to store all your scanned
images at the same time. The
scanner will scan all your
images continuously, without
you having to click the
ScanScan
ScanScan
Scan
toto
toto
to button for every image.
Check the “
One-pass Scan forOne-pass Scan for
One-pass Scan forOne-pass Scan for
One-pass Scan for
Multiple JobsMultiple Jobs
Multiple JobsMultiple Jobs
Multiple Jobs” option, and all
the selected jobs (same image
type) can be performed in a
one-pass scan.
You can store and deliver the
images all at once. When the
Scan TScan T
Scan TScan T
Scan T
o: Save Aso: Save As
o: Save Aso: Save As
o: Save As dialog box
appears, key in one file name
and save it to your preferred
folder. You can
Rename Rename
Rename Rename
Rename each
image(s) when you open your
folder.
Place several photos carefully
on your scanner bed for
continuous scanning.
Create a new folder under
C:\Windows\DesktopC:\Windows\Desktop
C:\Windows\DesktopC:\Windows\Desktop
C:\Windows\Desktop, or any
preferred folder to serve as a
storage for your scanned
images.
If you are currently in the
Standard Control PanelStandard Control Panel
Standard Control PanelStandard Control Panel
Standard Control Panel,
switch to the
AdvancedAdvanced
AdvancedAdvanced
Advanced
Control PanelControl Panel
Control PanelControl Panel
Control Panel, then click the
OverviewOverview
OverviewOverview
Ove rv ie w button to preview
the entire scanning bed with
all your images.
To scan stacks of photographs or documents
continuously, switch to the Advanced Control Panel,
and follow these simple steps. Also, it’s always a good
idea to create a special folder as a storage specifically
for all your scanned images. That way, you can easily
locate, browse, and retrieve them at any time.
Crop the first image to the
desired area. Click
New New
New New
New from
the
Scan Job Queue Scan Job Queue
Scan Job Queue Scan Job Queue
Scan Job Queue window,
give the second image a title,
select the image with the Scan
Frame tool, and crop as
necessary. Do this for all
remaining images.
If you have saved the images
under
C:\Windows\DesktopC:\Windows\Desktop
C:\Windows\DesktopC:\Windows\Desktop
C:\Windows\Desktop,
you can double-click your
“folder” icon to view and
retrieve your photo storage
directly from the desktop, or
simply create a shortcut icon
for your folder.
Page 16

12 Microtek Scanner Step-by-Step Tutorial
Part B
How to adjust color in an image
To adjust color images, use the
AICAIC
AICAIC
AI C tools. These tools can be
accessed in the Advanced
Control Panel through the
SettingsSettings
SettingsSettings
Set tings window, or through
the Correction menu in the
preview window.
Color CorrectionColor Correction
Color CorrectionColor Correction
Color Correction allows you
to add or remove a particular
color cast from an image by
using the dotted pointer in the
center of the color wheel. See
the difference in the image
from the “
BeforeBefore
BeforeBefore
Before”
and
“
AfterAfter
AfterAfter
After”
thumbnails (in real time).
To adjust the saturation of an
image, drag the slider to the left
(to decrease saturation) or to the
right (to increase saturation).
The
PickerPicker
PickerPicker
Picker allows you to select a
color from a particular area of
the image and apply a color cast.
Click
OKOK
OKOK
OK to apply the current
adjustments or
CancelCancel
CancelCancel
Cancel to ignore
changes.
Click
FilterFilter
FilterFilter
Filter from the
SettingsSettings
SettingsSettings
Settings
window, then choose from the
options to see the different
effects when a filter is applied:
Original Photo
When the
Color wheelColor wheel
Color wheelColor wheel
Color wheel is
adjusted, the
AngleAngle
AngleAngle
Angle and
RadiusRadius
RadiusRadius
Radius is calculated
automatically, and the result
may look like this:
Original Photo
The After Effect
BlurBlur
BlurBlur
Blur
EmbossEmboss
EmbossEmboss
Emboss
Edge EnhancementEdge Enhancement
Edge EnhancementEdge Enhancement
Edge Enhancement
For further enhancements,
use the other
AICAIC
AICAIC
AI C tools as
necessary.
The Advanced Image Correction (AIC) tools in ScanWizard 5
features several powerful controls for image adjustment and
enhancement, with “Before” and “After” thumbnails. All changes
are shown in real time on the resizable Preview window. Tools
include: White/Black Points, Tone Curve, Brightness/Contrast,
Color Correction, Filter, and Descreen. Use these tools to get the
desired effect for your images.
After Color wheel adjustment
“Before” and “After” thumbnails“Before” and “After” thumbnails
“Before” and “After” thumbnails“Before” and “After” thumbnails
“Before” and “After” thumbnails
 Loading...