

Page 1
D
BE
MTC - MEDION Technologie Center
D - 45467 Mülheim / Ruhr
Hotline: 01805 - 633 466
(0,14 Euro/Minute innerhalb des deutschen Festnetzes)
Fax: 01805 - 654 654
www.medion.de/service
CH
MEDION Service Center
Rütistraße 28
CH - 8952 Schlieren
Hotline 0848 - 33 33 32
service-switzerland@medion.com
E
MEDION Service Center Visonic S.A.
Alejandro Sanchez 95-97
E - 28019 Madrid
Hotline 90251448
Fax 914604772
service-spain@medion.com
I
MEDION Service Center
John F. Kennedylaan 16a
NL - 5981 XC Panningen
Hotline 022006198
Fax 022006199
www.medion.com/nl
AT
MEDION Service Center
Franz-Fritsch-Str. 11
AT - 4600 Wels
Hotline: 0810 - 001048
Fax: 07242 - 93967592
www.medion.de/service
F
MEDION France
CS 90180
F - 72207 La Fleche Cedex
Indigo no. 0825 81 1000
pc-support-fr@medion.com
UK
Wireless LAN
INTERNET RADIO
MEDION Service Center
Service on site S.P.A.
Via Kennedy 21
I - 20023 Cerro Maggiore (MI)
Hotline: 199 309077
service-italy@medion.com
NL
MEDION Service Center
Antwoordnummer 4015
NL - 5980 ZX Panningen
Hotline: 0900 - 633 4660
Fax 0900 - 654 6540
www.medion.com/nl
07/07
120 Faraday Park, Faraday Road, Dorcan
MEDION Electronics Ltd.
UK - Swindon SN3 5JF, Wilts
Hotline 0870 7270370
Fax 01793 715716
www.medion.co.uk
Service Provider
DK- 2600 Glostrup
Hotline: (+45) 70212024
Fax: (+45) 70212029
service-denmark@medion.com
www.medion.com
DK
Naverland 31
MD 85651
Schnellstartanleitung
Quick Start Guide
Instructions de démarrage rapide
Guida rapida
Manual de inicio rápido
Snelstarthandleiding
Lynstartvejledning
Page 2
Wireless LAN
INTERNET RADIO
MD 85651
INSTRUCTION MANUAL
07/07
Page 3

TABLE OF CONTENTS
Safety instructions . . . . . . . . . . . . . . . . . . . . . . . . . . . . . . . . . . . . . . . . . . . . . . . . . . . .2
Preparation . . . . . . . . . . . . . . . . . . . . . . . . . . . . . . . . . . . . . . . . . . . . . . . . . . . . . . . . . . .4
Unpacking the device . . . . . . . . . . . . . . . . . . . . . . . . . . . . . . . . . . . . . . . . . . . . . . . . . . . . . . . . . . . . . . . .4
Inserting the batteries into the remote control . . . . . . . . . . . . . . . . . . . . . . . . . . . . . . . . . . . . . . . . . . . . .4
Connections . . . . . . . . . . . . . . . . . . . . . . . . . . . . . . . . . . . . . . . . . . . . . . . . . . . . . . . . . . . . . . . . . . . . . . .4
Overview . . . . . . . . . . . . . . . . . . . . . . . . . . . . . . . . . . . . . . . . . . . . . . . . . . . . . . . . . . . . . 5
W-LAN Radio . . . . . . . . . . . . . . . . . . . . . . . . . . . . . . . . . . . . . . . . . . . . . . . . . . . . . . . . . . . . . . . . . . . . . . .5
Remote Control . . . . . . . . . . . . . . . . . . . . . . . . . . . . . . . . . . . . . . . . . . . . . . . . . . . . . . . . . . . . . . . . . . . . .6
Menüstruktur . . . . . . . . . . . . . . . . . . . . . . . . . . . . . . . . . . . . . . . . . . . . . . . . . . . . . . . . .9
Installation . . . . . . . . . . . . . . . . . . . . . . . . . . . . . . . . . . . . . . . . . . . . . . . . . . . . . . . . . . 11
Network Setup . . . . . . . . . . . . . . . . . . . . . . . . . . . . . . . . . . . . . . . . . . . . . . . . . . . . . . . . . . . . . . . . . . . .11
Configuration as a Wireless Client . . . . . . . . . . . . . . . . . . . . . . . . . . . . . . . . . . . . . . . . . . . . . . . . . . . . .12
Configuration as a Wired Client . . . . . . . . . . . . . . . . . . . . . . . . . . . . . . . . . . . . . . . . . . . . . . . . . . . . . . .14
Configuration as a Wireless Access Point (AP) . . . . . . . . . . . . . . . . . . . . . . . . . . . . . . . . . . . . . . . . . . . .16
Using the IP Radio as a Media Client . . . . . . . . . . . . . . . . . . . . . . . . . . . . . . . . . . . . . . . . . . . . . . . . . . . .18
Listening to Music . . . . . . . . . . . . . . . . . . . . . . . . . . . . . . . . . . . . . . . . . . . . . . . . . . . . 19
Listening to Internet Radio . . . . . . . . . . . . . . . . . . . . . . . . . . . . . . . . . . . . . . . . . . . . . . . . . . . . . . . . . . .19
Listening to FM Radio . . . . . . . . . . . . . . . . . . . . . . . . . . . . . . . . . . . . . . . . . . . . . . . . . . . . . . . . . . . . . . .21
Listening to the music in your computer . . . . . . . . . . . . . . . . . . . . . . . . . . . . . . . . . . . . . . . . . . . . . . . 23
Listening to the Music on your USB drive . . . . . . . . . . . . . . . . . . . . . . . . . . . . . . . . . . . . . . . . . . . . . . . 25
The Playback Screen . . . . . . . . . . . . . . . . . . . . . . . . . . . . . . . . . . . . . . . . . . . . . . . . . . . . . . . . . . . . . . . 26
EN
Alarm . . . . . . . . . . . . . . . . . . . . . . . . . . . . . . . . . . . . . . . . . . . . . . . . . . . . . . . . . . . . . . . 27
Clock . . . . . . . . . . . . . . . . . . . . . . . . . . . . . . . . . . . . . . . . . . . . . . . . . . . . . . . . . . . . . . . . . . . . . . . . . . . 27
Alarm settings . . . . . . . . . . . . . . . . . . . . . . . . . . . . . . . . . . . . . . . . . . . . . . . . . . . . . . . . . . . . . . . . . . . . 28
Snooze . . . . . . . . . . . . . . . . . . . . . . . . . . . . . . . . . . . . . . . . . . . . . . . . . . . . . . . . . . . . . . . . . . . . . . . . . . 30
Miscellaneous Setup Functions . . . . . . . . . . . . . . . . . . . . . . . . . . . . . . . . . . . . . . . . . 31
Backlight Settings . . . . . . . . . . . . . . . . . . . . . . . . . . . . . . . . . . . . . . . . . . . . . . . . . . . . . . . . . . . . . . . . . .31
Language Choice . . . . . . . . . . . . . . . . . . . . . . . . . . . . . . . . . . . . . . . . . . . . . . . . . . . . . . . . . . . . . . . . . . .31
Equalizer Settings . . . . . . . . . . . . . . . . . . . . . . . . . . . . . . . . . . . . . . . . . . . . . . . . . . . . . . . . . . . . . . . . . .31
Reset to Factory Default Settings . . . . . . . . . . . . . . . . . . . . . . . . . . . . . . . . . . . . . . . . . . . . . . . . . . . . . . 32
Clear Favorites . . . . . . . . . . . . . . . . . . . . . . . . . . . . . . . . . . . . . . . . . . . . . . . . . . . . . . . . . . . . . . . . . . . . 32
Check Firmware Version . . . . . . . . . . . . . . . . . . . . . . . . . . . . . . . . . . . . . . . . . . . . . . . . . . . . . . . . . . . . 32
Software Update . . . . . . . . . . . . . . . . . . . . . . . . . . . . . . . . . . . . . . . . . . . . . . . . . . . . . . . . . . . . . . . . . . 32
Appendix . . . . . . . . . . . . . . . . . . . . . . . . . . . . . . . . . . . . . . . . . . . . . . . . . . . . . . . . . . . . . 33
Care and Maintenance . . . . . . . . . . . . . . . . . . . . . . . . . . . . . . . . . . . . . . . . . . . . . . . . . . . . . . . . . . . . . 33
Problems . . . . . . . . . . . . . . . . . . . . . . . . . . . . . . . . . . . . . . . . . . . . . . . . . . . . . . . . . . . . . . . . . . . . . . . . 33
Technical Data . . . . . . . . . . . . . . . . . . . . . . . . . . . . . . . . . . . . . . . . . . . . . . . . . . . . . . . 35
Disposal . . . . . . . . . . . . . . . . . . . . . . . . . . . . . . . . . . . . . . . . . . . . . . . . . . . . . . . . . . . . .36
Restricted Warranty . . . . . . . . . . . . . . . . . . . . . . . . . . . . . . . . . . . . . . . . . . . . . . . . . . 37
MD 85651 EN-1
Page 4

SAFETY INSTRUCTIONS
About these instructions
Please read these instructions carefully before using the device. Note the warnings on the device
and in the operating instructions
Always keep the operating instructions close to hand. If you sell
ensure that you also pass on these instructions.
Keep electrical equipment out of reach of children
Children can be injured by electrical devices. Never allow children to use electrical appliances unattended.
Keep plastic packaging out of the reach of children. There is a risk of suffocation.
Setting the appliance up safely
Place the device on a sturdy, level surface. It is not designed for use in rooms that are very humid (e.g.
bathrooms).
Ensure that ventilation is adequate. The ventilation unit should not be obstructed by placing objects such
as newspapers, table cloths, curtains, etc. on the vents.
Do not place the device near heat sources (e.g. heaters) that could affect the unit.
Do not place the unit in direct sunlight.
Avoid contact with water droplets or spray and do not place
Never set up the appliance near magnet fields.
(e.g. television sets or speakers).
Naked flames, such as lit candles, must not be placed on or near the device.
Please observe the following installation conditions:
vases or anything containing water on the unit.
or give the unit away, please
EN
Power connection
Only connect the appliance to a power socket (230 V ~ 50 Hz) that is easy to reach and is close to the place
where you have set up the appliance. The power socket must be freely accessible so that you can unplug the
appliance quickly, if necessary.
Do not use the device if the mains plug, cable or device itself has been drop ped. If the plug, cable or appliance
is damaged, immediately remove the plug from the power supply.
Ensure the mains cable is out of harms way and will not trip people up. There should be no kinks or folds in
the power cable.
Do not connect the device immediately to the mains if the unit has been moved from a cold to a warm room.
Any condensation which forms could damage the unit. The device can be operated as soon as the unit has
reached room temperature.
Thunder storms
Unplug the device if you are away for a long period of time or there is a storm.
MD 85651 EN-2
Page 5

Never undertake your own repairs
Never try to open and/or repair the device yourself. There is a risk of electric shock! Do not interfere
with the unit’s power cable.
If there is a fault contact our Service Centre or other suitable specialist workshop.
Headphones
Listening to the unit at a high volume with headphones or ear phones can damage your hearing.
Lower the volume before putting on head/earphones. Your hearing can be damaged if you listen at high
volumes over a long period or if the volume is increased too suddenly.
Safe handling of batteries
The remote control is battery operated. Please note the following:
Keep the batteries out of reach of children. They can be fatal if swallowed. If a battery is swallowed, please
obtain immediate medical assistance.
Do not throw batteries into a fire, do not short-circuit them and do not dismantle them.
If necessary clean the battery and device contacts before insertion.
Always change all batteries at the same time.
Only use batteries of the same type. Do not use different types of batteries; do not use a mix of used and
new batteries.
Please take note of the polarity (+/-) when inserting the batteries.
Remove the batteries if the unit is not going to be used for long periods.
Remove the empty batteries immediately from the unit! There is an increased risk of leakage.
Do not expose batteries to extreme conditions; for example, do not place the unit on top of radiators. There
is an increased risk of leakage.
Never try to recharge non-rechargeable batteries. There is a risk of an explosion!
Remove leaking batteries from the device immediately. Clean the contacts before inserting new batteries.
There is a risk of skin irritations from battery acid!
If battery acid leaks out it is essential to avoid contact with the skin, eyes and mucous membranes! If the
acid does come into contact with skin, immediately rinse the affected areas with plenty of clear water and
contact a doctor immediately.
EN
MD 85651 EN-3
Page 6
PREPARATION
Unpacking the device
Remove all packaging materials including the film on the front of the unit..
WARNING!
Do not let children play with the plastic wrapping. There is a risk of suffocation!
Package contents
IP radio device
WiFi antenna (2 dBi)
FM antenna (cable with 2.5 mm plug)
Power adapter (CD 5V/3A)
Remote control
2 x batteries 1,5 V (size AAA/R03)
CD-ROM with the Media Server application Twonky Vision and the user manual
Quick Start Guide
EN
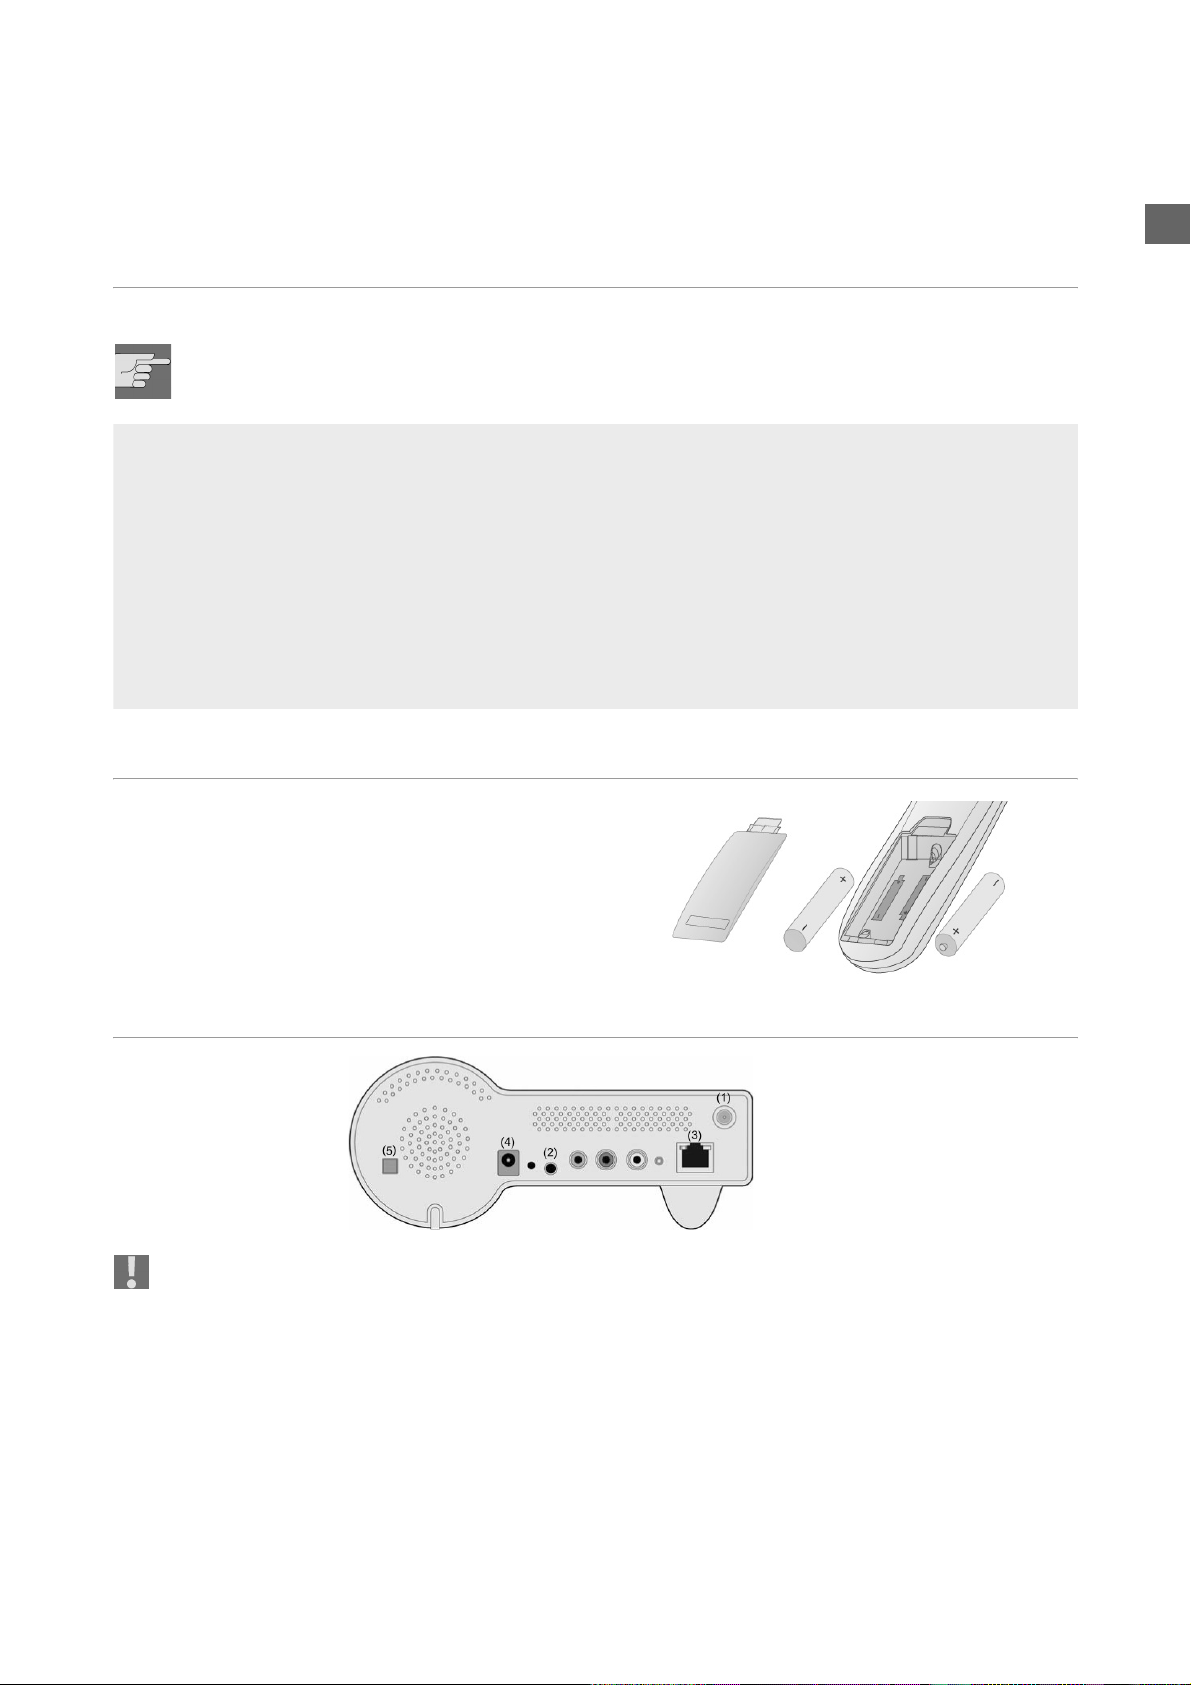
Inserting the batteries into the remote control
Insert tow 1.5 V batterie (AAA size ) in the supplied remote
control. Observe the polarity (+/–) as shown in the illustration: the negative end is placed next to the springs
Close the battery compartment before using the remote
control.
Connections
Back of the device
Before connecting any devices, switch off the IP Radio (ON/OFF switch (5) at the back of the device).
W-LAN-mode operation or Access Point-Mode: Schrauben Sie die mitgelieferte WiFi-Antenne in die
Buchse LAN auf der Rückseite des Geräts (1).
Betrieb im LAN-Modus: Schließen Sie ein Ethernet-Kabel an den RJ 45-Port an (3).
Betrieb des UKW-Radios: Stecken Sie die mitgelieferte UKW-Antenne in die Buchse FM-ANT (2).
Netzadapter: Verbinden Sie den Gerätestecker des mitgelieferten Netzadapters mit dem Anschluss PO-
WER und den Netzstecker mit einer Steckdose 230 V ~ 50 Hz.
MD 85651 EN-4
Page 7
OVERVIEW
W-LAN Radio
EN
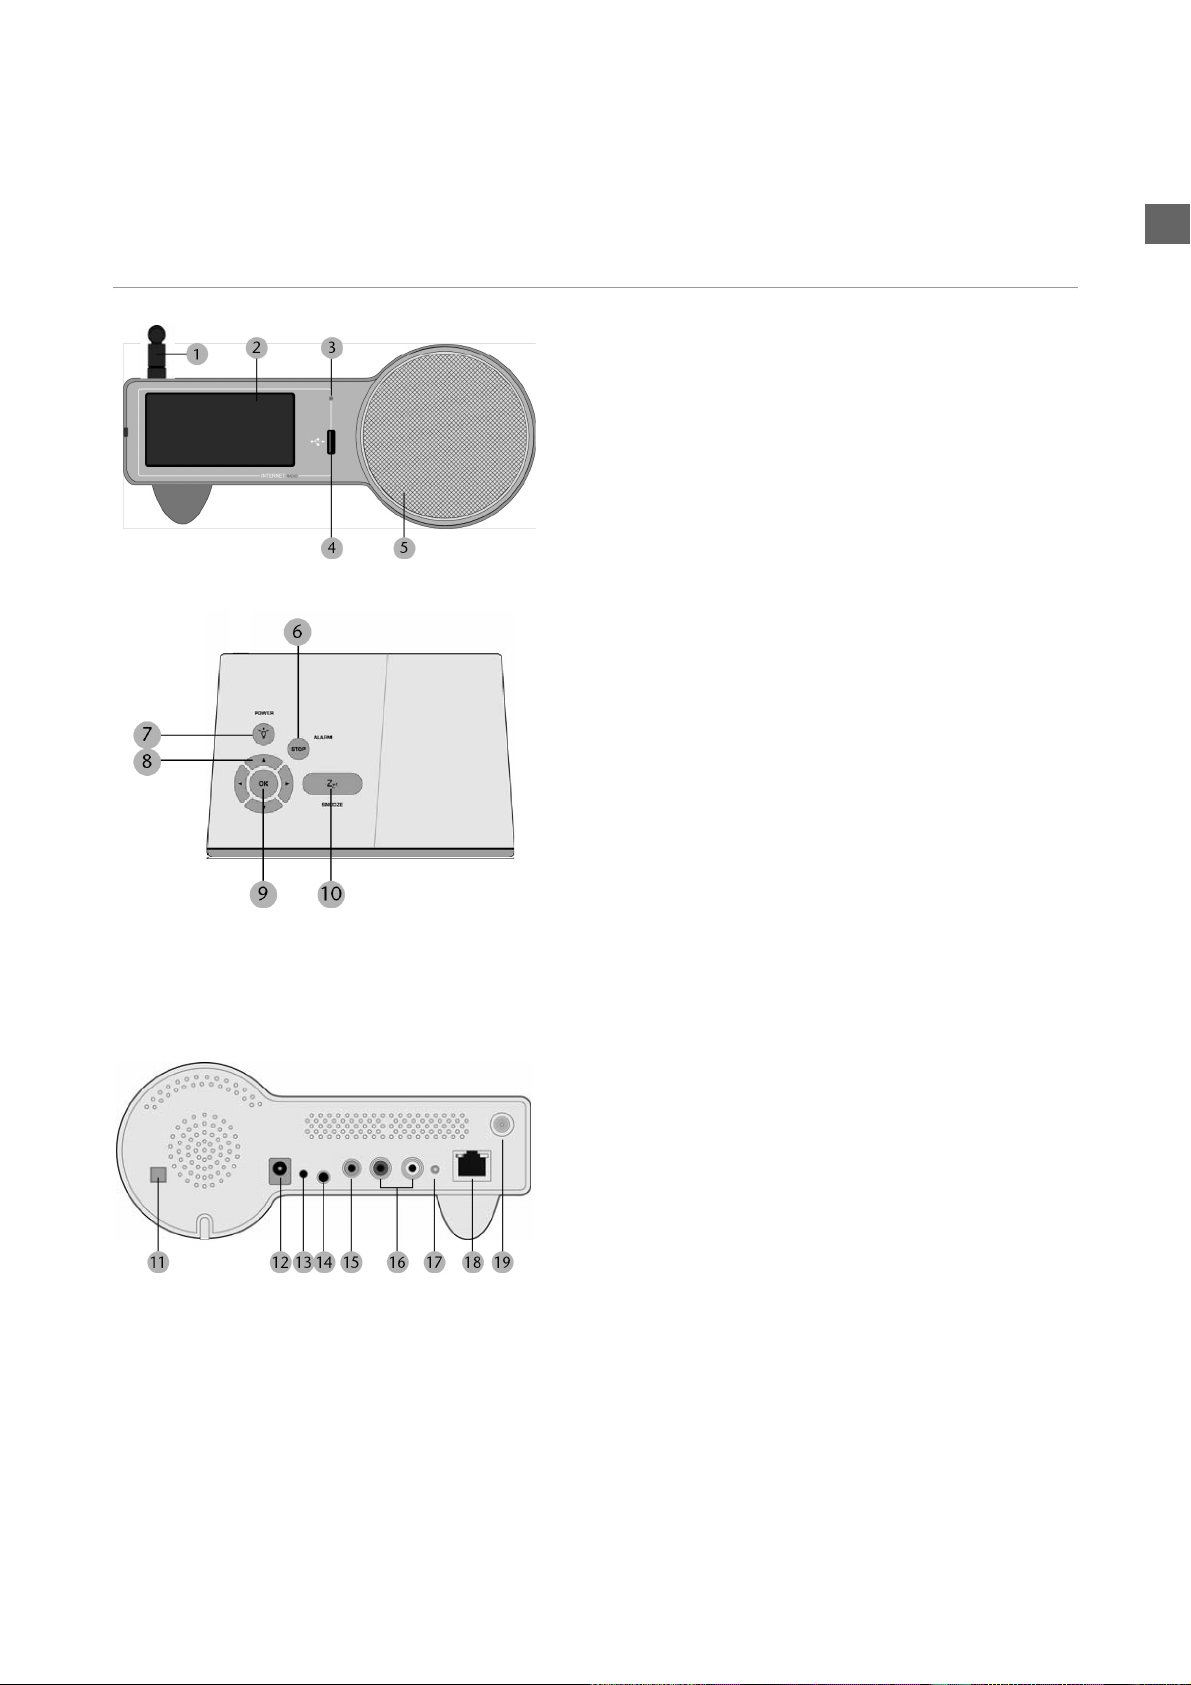
Front
1.WiFi antenna (if connected)
2.Display
3.Infrared sensor for the remote control
4.USB port
5.Speaker
Buttons on the top
6. STOP/ALARM:
Open main menu / stop playback /
switch off the alarm
7. POWER / LIGHT:
press briefly: switch background light on and off;
press and hold: switch device to standby mode
8. Arrow buttons
W: back to the previous selection
X: to the next selection
S: during playback: volume up /
in a menu: selection upwards
T: during playback: volume down /
in a menu: selection downward
9.OK: confirm selection
10.SNOOZE: in the alarm mode: repeat alarm after 10
minutes /
iduring playback: set the switch off timer
Rear
11. ON/OFF: switch on/off
12.POWER: socket for DC adapter
13.RESET: press the area with a pointed object in order to
reset the device
14. FM ANT.: socket for FM antenna
15. Socket for headphone (3.5 mm)
16. LINE OUT: audio out for the connection to an external
audio device (suche as a stereo system or loudspeakers)
17.STATUS: status LED (flashes when no cable is connec-
ted; lights up permanently when an Ethernet cable is con-
nected)
18.Socket for Ethernet cable (RJ45)
19.Socket for W-L AN antenna
MD 85651 EN-5
Page 8
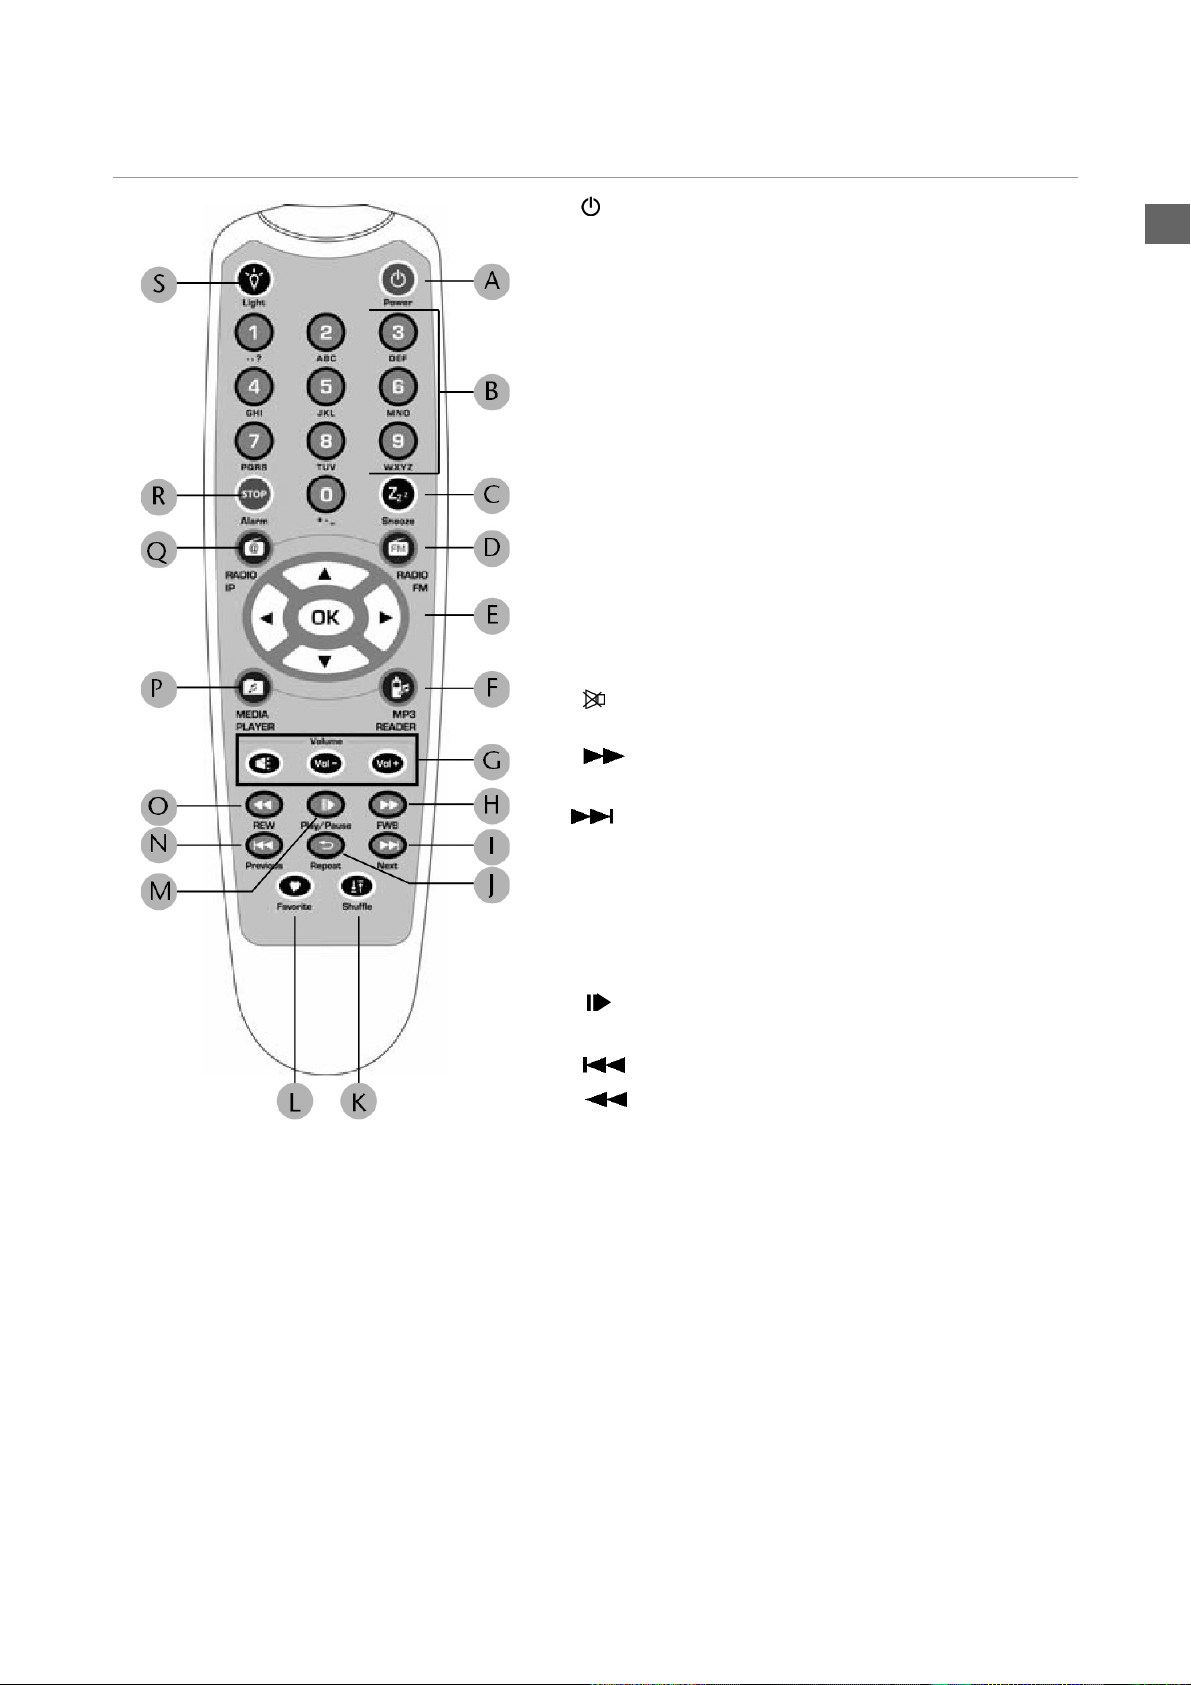
Remote Control
A POWER:
switch device into standby mode and on again
B Numberic buttons; to enter numbers and charactes,
press repeatedly until the desired character appears.
C SNOOZE:
during alarm mode: repeat alarm every 10 minutes;
during playback: set switch off timer
D FM RADIO: select FM radio operation
E Arrow buttons:
W: back to the previous selection
X: to the next selection
S: during playback: volume up /
in a menu: selection downward
T: during playback: volume down /
in a menu: selection downward;
OK: confirm selection
F MP3 READER: Select device connected to the USB port
G mute:
VOL–: volume down; VOL+: volume up
H FWB: during playback of audio titles:
fast forward
EN
I Next: select next radio station or title
J Repeat: during playback of audio titles:
repeat function
K Shuffle: during playback of audio titles:
shuffle function (random playback)
L Favorite: select radio station for the list of Favorites
M Play/Pause: during playback of audio titles:
start and interrrupt playback
N Previous: select previous station or title
O REW: during playback of audio titles:
fast backward
P MEDIA PLAYER: select Media Player operation
Q RADIO IP: select IP Radio operation
R STOP: open main menu;
during playback of audio titles: stop playback
S Light: switch display light on and off
MD 85651 EN-6
Page 9
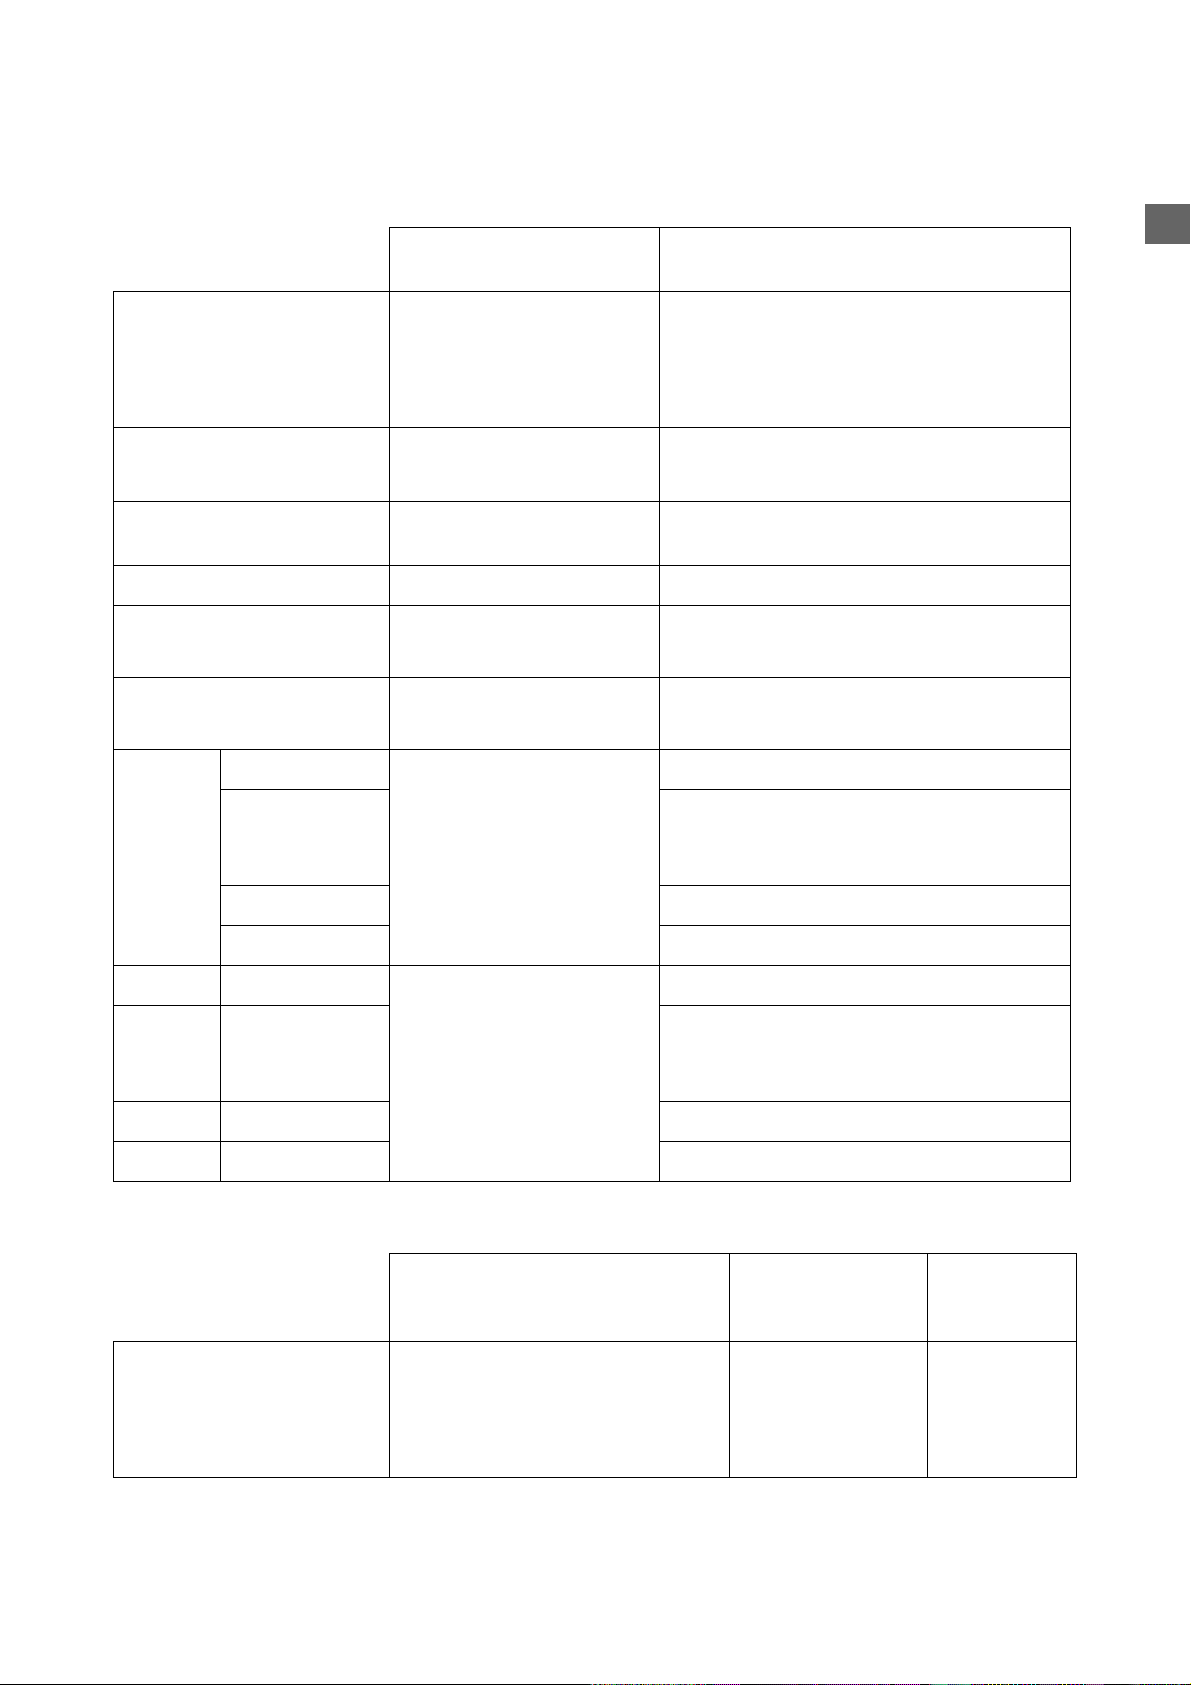
Function of the remote control in detail
A) For the Selection Screen & Playback screen
Select Screen
(Screen with menu list)
SNOOZE No function Launches the timer for 15, 30, 45, or 60 min
Playback Screen
(Screen with name of station / song)
(stops the current music source after time
selected) - Information screen displayed for
3s. - Goes back to stand by scr een wit h time r
icon ON.
EN
STOP STOP MUSIC.
Go back to main menu.
POWER Put the device in Standby
mode.
OK Select the function. Goes to option screen.
UP Move to previous item. Volume up.
DOWN Move to next item. Volume down.
LEFT Radio IP Goes back to the previous
Radio FM If radio FM (direct access) :
Media Server Goes back to the song list.
MP3 Player Goes back to song list.
RIGHT Radio IP Goes back to the next
Radio FM If radio FM (direct access) :
menu.
menu.
Identical.
Identical.
After 2s goes back to playback screen.
After 2s goes back to playback screen.
Goes back to radio list.
Goes back to the menu list.
Otherwise: Goes back to radio list.
Goes back to radio list.
Goes back to the menu list.
Otherwise: Goes back to radio list.
Media Server Goes back to the song list.
MP3 Player Goes back to song list.
(B) For the Idle screen (clock screen)
Standby screen
& Music Playing
SNOOZE Launches 15, 30, 45, or 60 min
timer to stop current music source
(Goes back to clock screen with
timer icon ON).
Standby Screen
& Alarm Music
STOPS the
music (Goes back
to clock screen &
reactivates alarm
after 10 min.).
Standby
Screen &
No Music
No function
MD 85651 EN-7
Page 10

STOP STOPS MUSIC and goes back to
main menu.
POWER Put the device in Standby mode. Identical. Identical.
OK Displays playback screen. Identical. Main menu
STOPS the music &
Goes back to
standby screen (No
reactivation of
alarm).
Alarm menu
displayed.
displayed.
EN
UP Volume up (after 2s goes back to
playback screen).
DOWN Volume down (a fter 2s g oes back to
playback Screen).
LEFT Radio IP First press:
Goes back to Station radio screen.
Second press:
Goes back to radio list.
Radio FM First press:
Goes back to Station radio screen.
Second press:
If radio FM (direct access) : Goes
back to the menu list.
Otherwise: Goes back to radio list
Media
Server
MP3 Player
RIGHT Radio IP Goes back to Station radio screen. Identical. Main menu
Radio FM First press:
First press:
Goes back to song playing screnn.
Second press:
Goes back to songs list.
Goes back to Station radio screen.
Second press:
If radio FM (direct access) : Goes
back to the menu list.
Otherwise: Goes back to radio list.
Identical. Main menu
displayed.
Identical. Main menu
displayed.
Identical. Main menu
displayed.
Goes back to radio
list.
Identical
Goes back to radio
list.
displayed.
Media
Server
MP3 Player
First press:
Goes back to song playing screnn.
Second press:
Goes back to songs list.
Identical.
MD 85651 EN-8
Page 11
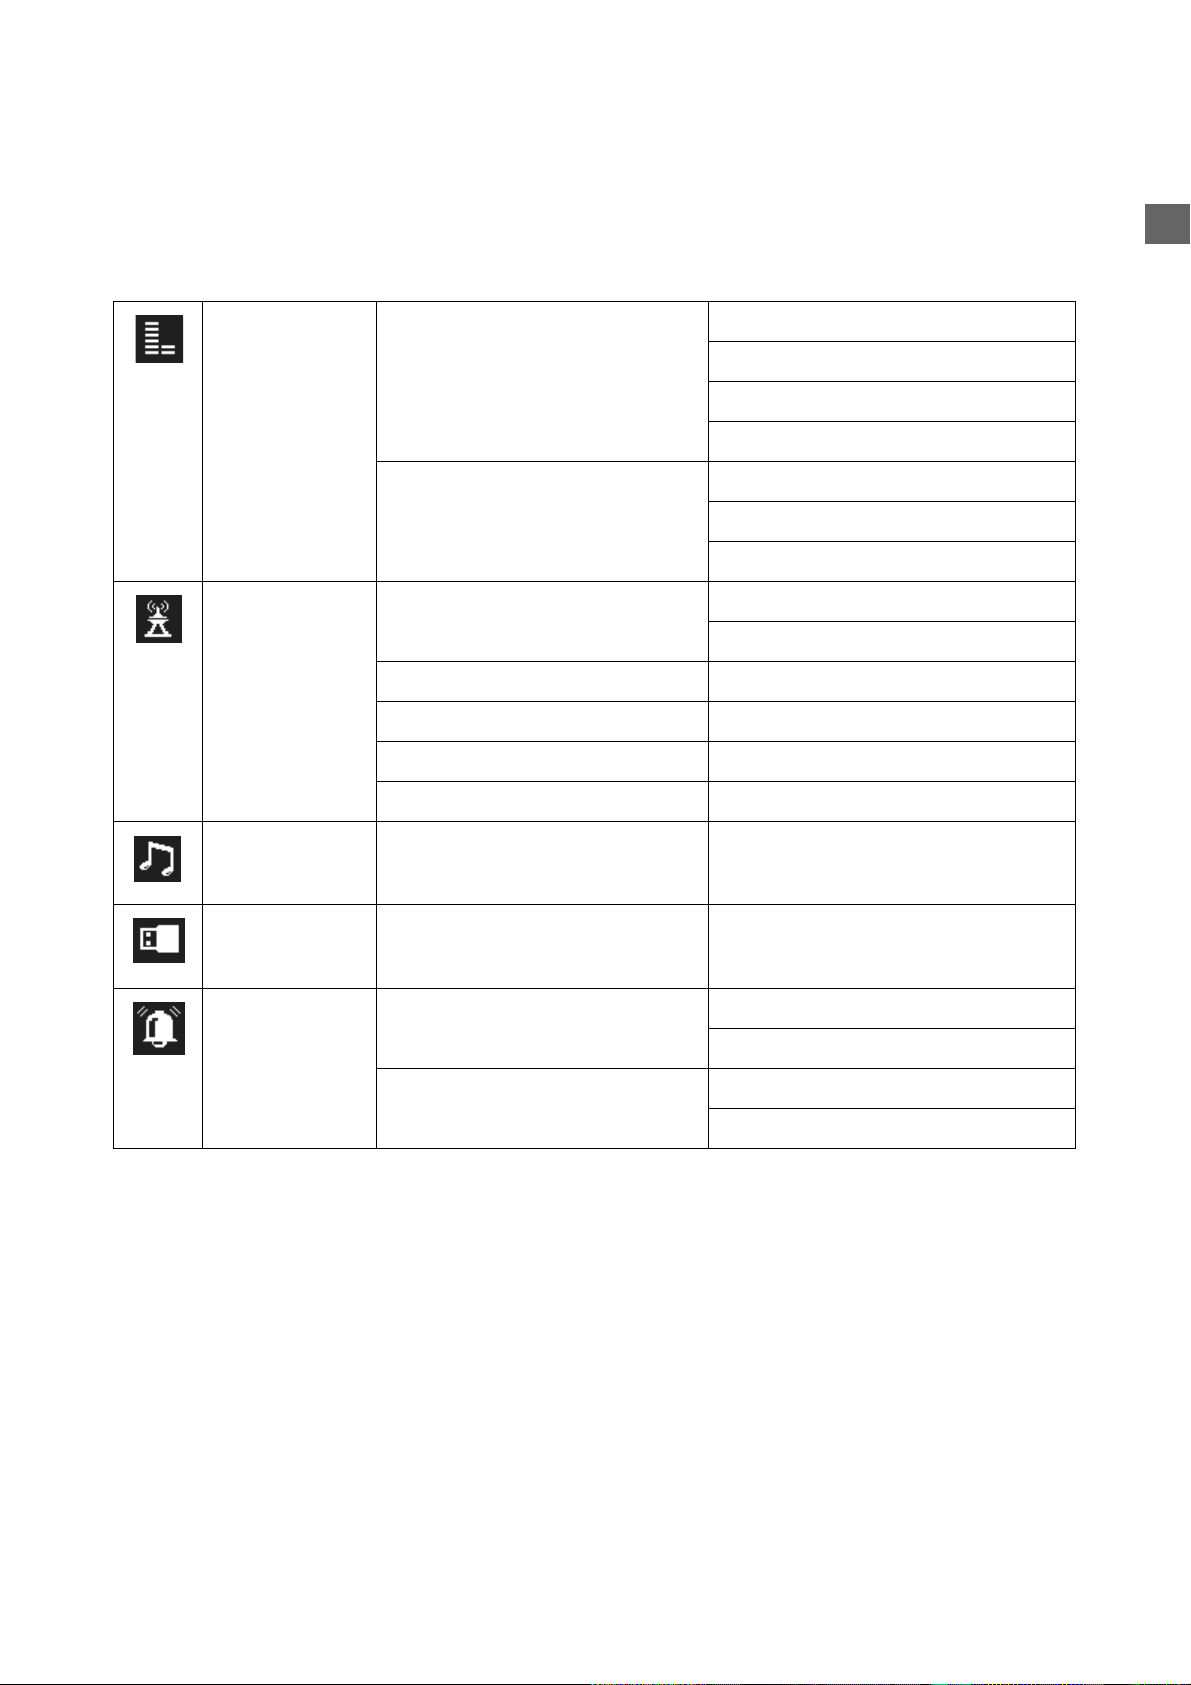
MENÜSTRUKTUR
Das Radio hat folgende Menüstruktur:
Internet Radio Station List Location
Favorite Stations All
FM Radio FM Sensitivy High
Station List
Favorite Stations
EN
Genres
New Stations
Popular Stations
Genre
Location
Low
Update List
Direct Access
Media Server
MP 3 Player
Alarm Alarm 1 OFF
ON
Alarm 2 OFF
ON
MD 85651 EN-9
Page 12
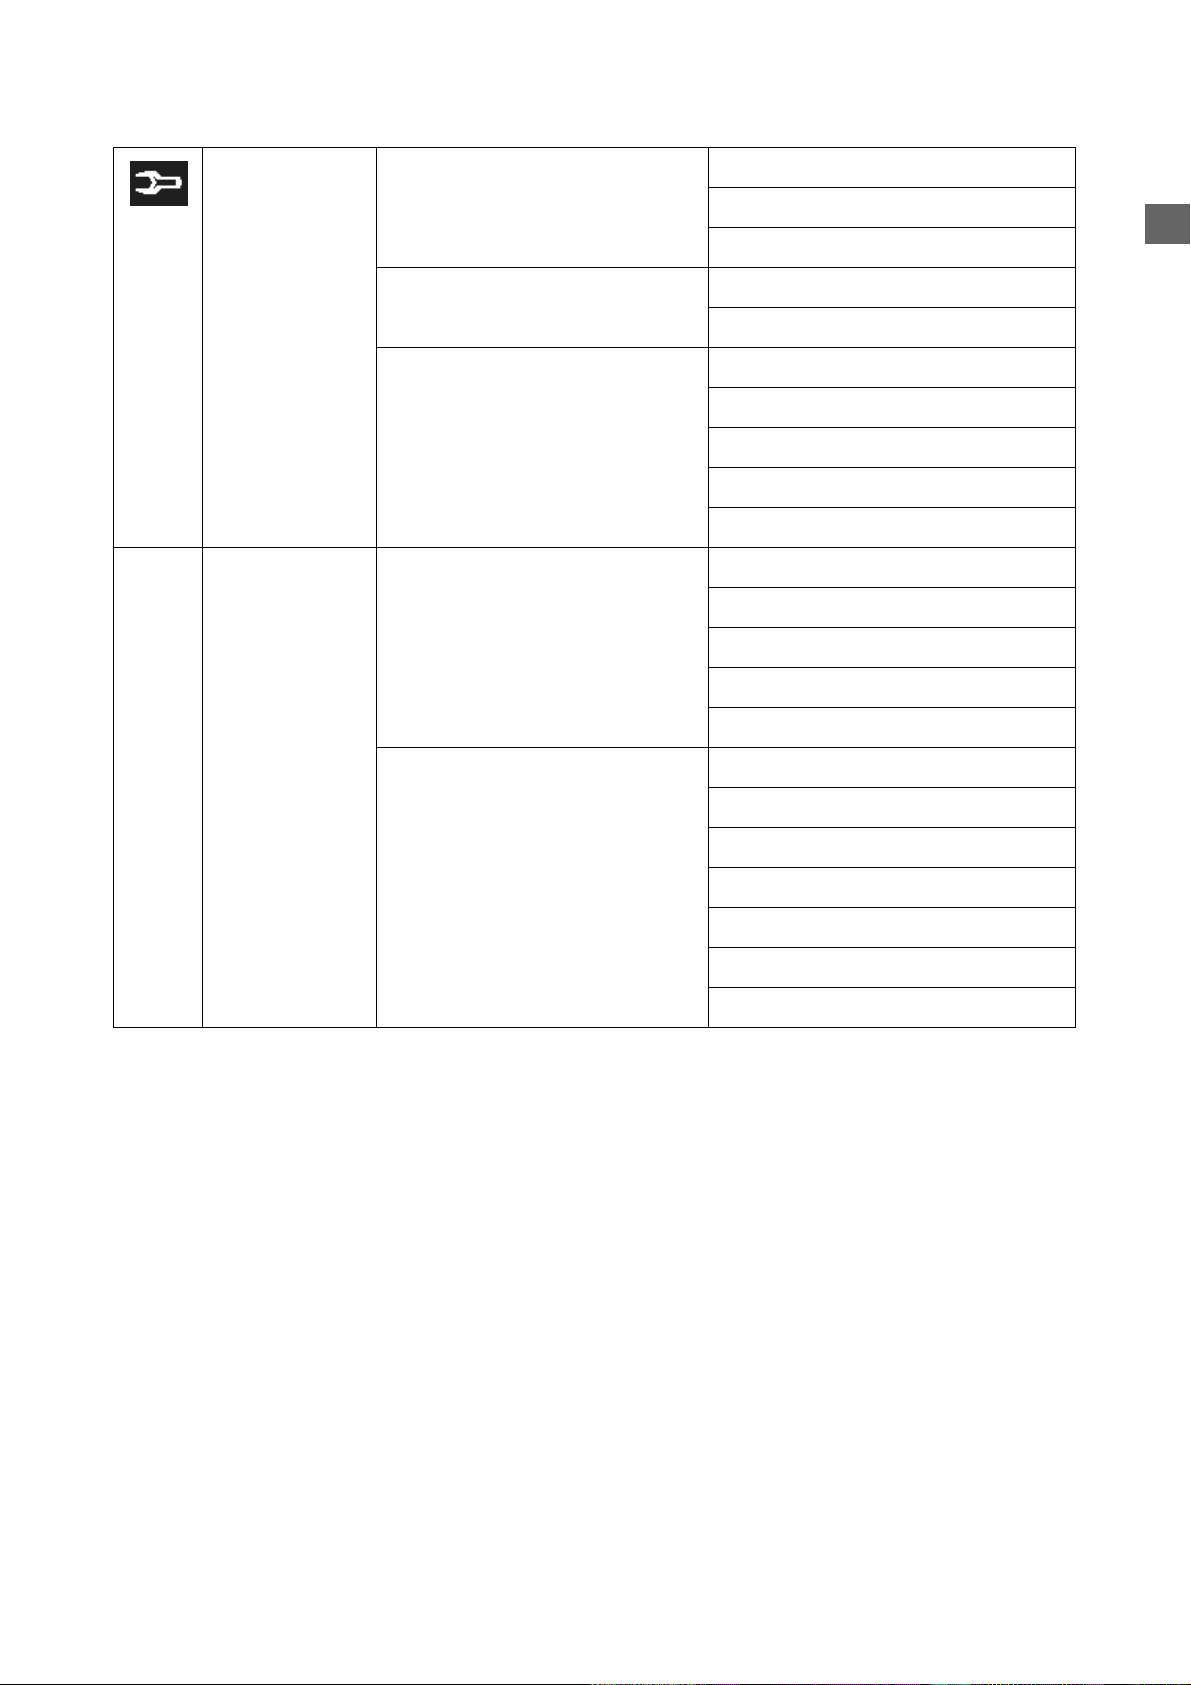
Setup Clock Current Time
Set Manually
Auto-Sync (NTP)
Language Main Language
vTuner Language
Backlight Always ON
1 Minute
3 Minutes
10 Minutes
30 Minutes
Equalizer Normal
Classic
Rock
Jazz
Pop
Advanced Setup Network Setup
EN
Configure Network
Reset to Default
Clear Favorites
Device MAC Address
Firmware Version
F/W Upgrade (thru. USB).
MD 85651 EN-10
Page 13

INSTALLATION
Network Setup
Basic Requirements
For the Wi-Fi IP Radio device to work properly under your existing network environment, your network must
feature the following:
You must have a router device with an enabled DHCP server function, so that it can automatically assign the
IP address to your computer or another network device.
If you already have a router device in your home, it will be easy to setup the Wi-Fi IP Radio device with your
existing network environment. If you don't know what you have on your home network, the following FAQ
will help you to troubleshoot before operating your Wi-Fi IP Radio device.
The minimum streams to receive Radio IP are :
192 kB/s for a normal quality,
640 kB/s for an upper quality.
How does your computer or Notebook PC access the Internet?
The answer might be one of the following:
Case I
I have to plug an Ethernet cable to the computer, and ...
... 1. I have to execute a dial-up program from my computer to link to the ISP service, and I can then access
the Internet.
EN
` You need to purchase a (wireless) broadband router.
... 2. No extra dial-up program is executed in my computer, but I set a fixed IP address in my computer.
... 3. No extra dial-up program is executed in my computer, and I set a dynamic IP address in my computer.
` There is a router device in your home. You can configure the Wi-Fi IP Radio device in wired client mode to
operate it with your home network.
Case II
I use wireless connection, and ...
... 1. I have to execute a dial-up program from my computer to link to the ISP service, and I can then access
the Internet.
` There is no router device in your home. You need to purchase a new router device to upgrade your home
network.
... 2. No extra dial-up program is executed in my computer, but I set a fixed IP address in my computer.
` If the IP address is provided by your ISP supplier, there is probably no DHCP service in your home network.
You need to buy a new router device.
` If the IP address is a virtual IP, such as 192.168.xxx.xxx, you should have a router device. Therefore, the Wi-
Fi IP Radio device will function with your home network.
... 3. No extra dial-up program is executed in my computer, and I set the dynamic IP address in my computer.
` ... 3. There is a wireless router device in your home, the Wi-Fi IP Radio device will be able to operate with
your home network.
Moreover, the Wi-Fi IP Radio allows to play the music loaded in your PC, this one being connected to the same
router.
MD 85651 EN-11
Page 14

Configuration as a Wireless Client
There are three network configuration modes available for the Wi-Fi IP Radio device: simple wireless client,
wired client, or wireless access point (AP).
The factory default mode is the client mode. If an Ethernet cable is available, the device will automatically
select a suitable client mode to operate. Users can also manually change the network configuration settings
via the Setup menu "Setup/Advanced Setup/Configure Network".
If you have a 802.11b/g wireless network in your home, this mode is the most straightforward means of
connecting the Wi-Fi IP Radio device to the existing network.
Simply power the device, without connecting an Ethernet cable, and the device will automatically switch to
the wireless client mode and detect all available wireless APs (Access Points). The first time the device is set to
the wireless client mode, you need to determine which AP to connect to and enter the encryption key. Once
the settings have been established, the device will remember the settings and attempt to connect to the
designated AP when it is switched on. However, if you encounter any difficulty in connecting to the
designated AP, the device will display the AP list for you to configure the device once again.
(A) Using the device for the first time, without an Ethernet cable connection:
Screen on the
right
1 Initial screen
Screen Next screen Comment
EN
2 Device run as a Wireless Client.
3 "OK" button Select the MMI language.
4 "OK" button Select the Internet radio menu
language.
5 Scanning for available APs.
6"" button
(once)
"" button
or "OK" button
Select the AP that you can
connect to your router device.
7Numeric key
pads
"OK" button Enter the encryption key if
the AP is encrypted.
MD 85651 EN-12
Page 15

8 "OK" button Confirm the settings above.
9 Apply new settings.
10 The device is now in wireless
client mode.
11 The device is already connected
to your network.
(B) Manually set to the Wireless Client Mode:
EN
Screen on the
right
1 "OK" button Initial screen
2"" button
(4 times)
3"" button
(once)
4"" button
5 Scanning for available APs.
Screen shot Next screen Comment
"" button
or "OK" button
"" button
or "OK" button
Manually select the wireless client
or "OK" button
mode.
MD 85651 EN-13
Page 16

6"" button
(once)
7 Numeric key pad "OK" button Enter the encryption key if
8 "OK" button Confirm the settings above.
9 Apply new settings.
10 The device is now in wireless
"" button
or "OK" button
Select the AP that you can
connect to your router device.
the AP is encrypted.
client mode.
EN
11 The device is already connected
to your network.
Configuration as a Wired Client
If there is no 802.11b/g wireless network in your home, and only a wired 802.3 network is available, the WiFi IP Radio device can connect to the wired network via an Ethernet cable.
In this case, before powering the device, you need to plug the Ethernet cable into the RJ45 connector. The
device will automatically switch to the wired client mode when it detects a link status via the Ethernet
connection.
(A) Using the device for the first time, without an Ethernet cable connection:
If the radio is switched on after a reset, wireless client mode will be chosen, even if Ethernet cable has already
been plugged in.
Screen on the
right
Screen shot Next screen Comment
1 Initial screen
MD 85651 EN-14
Page 17

2 Device run as a Wired Client.
EN
3"" button
or "OK"
button
4"" button
or "OK"
button
5 The device is now in wired client
(B) Manually set to the Wired Client Mode:
Screen on the
right
1 "OK" button Initial screen
Screen Next screen Comment
Select the MMI language.
Select the Internet radio menu
language.
mode.
It is already connected to your
network.
2"" button
(4 times)
3"" button
(once)
4"" button
(once)
5"" button
(once)
"" button
or "OK"
button
"" button
or "OK"
button
"" button
or "OK"
button
"" button
or "OK"
button
Manually select the wired client
mode.
Select the DHCP for auto
configured IP address.
MD 85651 EN-15
Page 18

6 "OK" button Confirm the settings above.
7 Apply new settings.
8 The device is now in wired client
mode.
9 The device is already connected to
your network
EN
Configuration as a Wireless Access Point (AP)
If you wish to extend your wireless network coverage range, you need to add new access points to specific
locations in your home. This will enable other wireless notebook PCs and network devices to access the
extended wireless network. The Wi-Fi IP Radio device can also be configured as a wireless AP. With this feature,
you can easily extend your wireless coverage without having to purchase another AP.
To configure the Wi-Fi IP Radio device as an AP, you need to setup the device manually via the MMI menu
"Setup/Advanced Setup/Configure Network/AP mode". You then need to enter the IP address, the SSID, the
channel number and the AP encryption. Once these settings have been established, the device will
automatically reboot and function as an AP.
Manually set to the Wireless AP Mode:
Screen on the
right
1 "OK" button Initial screen
2"" button
(4 times)
Screen Next screen Comment
"" button
or "OK" button
3"" button
(once)
"" button
or "OK" button
MD 85651 EN-16
Page 19

4"" button (2
times)
"" button
or "OK" button
Manually select the AP mode.
EN
5"" button
(once)
6 Numeric key pad "OK" button Enter the Identifier (name) for this
7 Numeric key pad "OK" button Select the wireless channel to be
8"" button
(once)
9 Numeric key pad "OK" button Enter the encryption key if
"" button
or "OK" button
"OK" button Select one of the security
Select the DHCP for auto
configured IP address.
AP.
allocated to this AP.
functions.
the AP is encrypted.
10 "OK" button Confirm the settings above.
11 Apply new settings.
12 The device is in wireless AP mode
now.
13 The device is already connected
to your network and can now
operate.
MD 85651 EN-17
Page 20

Using the IP Radio as a Media Client
The IP Radio is compliant with the UPnP protocol, and the IP Radio works with any UPnP-based server software
installed on your computer.
Installing Twonky Vision
The supplied CD-ROM contains the Media Server Software Twonky Vision. Select the software for installation.
In the first step, you select the language.
This selections applies both to the language for installation and for the
installed software.
Follow the futher steps in the installation wizard.
Connection between Wi-Fi IP Radio and Media Server
Establish the connection between the Wi-Fi IP Radio device and the media server.
On the Wi-Fi IP Radio device, select the "Media Server" function in the main menu (or press the "Media Player"
hot key on the remote controller). The Wi-Fi IP Radio device will then initiate the server detection process. After
a few seconds, it will detect a server and display "PC_Hostname: Server Name"
EN
This is the Media Server that you installed.
Press the 'OK' button to try to connect to the server.
The Wi-Fi IP Radio screen will read "Connecting…." and will then display the following list:
You can browse the "Music" list and play the music of your choice.
MD 85651 EN-18
Page 21

LISTENING TO MUSIC
The Wi-Fi IP Radio device is a high-performance audio player that can play music from various types of source.
You can use it to listen to Internet radios all over the world, local FM broadcasting services, music files in your
computer, and even music files in portable MP3 players.
The following part of this manual explains how to listen to the music using the Wi-Fi IP Radio device.
Listening to Internet Radio
Commands from the remote control:.
Back to station list.
Vol -, Decrease the hearing level.
Vol +, Increase the hearing level.
Add (or cancel) the song from (to the) list of favourites.
To listen to music or programs on Internet radio stations, select the "Internet Radio" function in the main menu
and then press the "OK" button to activate the Internet Radio function.
Go to preview/next station.
EN
The first screen of the Internet Radio function displays a choice of 2 items:
"Station List": Retrieves the Internet radio station lists from the Internet server.
"Favorite Stations": Retrieves the favorite station lists stored in the device.
Press the "OK" button or the "" button to retrieve the Station List.
The device will then try to connect to the Internet radio server to retrieve the Internet radio stations. The
following screen should be displayed:
It takes few seconds to get the list from the Internet. The next screen is as follows.
It means the Wi-Fi IP Radio has successfully connected to the Internet server and has retrieved information
from the server.
MD 85651 EN-19
Page 22

However, if the following screen is displayed, it means that the device has encountered a problem in retrieving
the list from the Internet server.
Please refer to the troubleshooting chapter to identify the problem and solve it step by step.
The following screen shots illustrate the sequence used to browse the radio station "FM PLUS" in France and
play back music from it.
EN
Screen on the
right
1 Initial screen
2.
3"" button (4
times)
4"" button (15
times)
Screen shot Next screen Comment
."" button
or "OK" button
."" button
or "OK" button
5."" button
or "OK" button
6""button . "" button
or "OK" button
7 . Try to connect to the radio
Press the "" button to add the
current station to the list of
favorites for quick access in
future.
station.
MD 85651 EN-20
Page 23

8 . Buffering the music from the
radio station.
9 . Music playing…
When the complete list of
available radios is selected , an
alphabetical research may be
used by selecting on the remote
control the first letter of the
radio to be choosen, and the
first radio starting with this
letter is then displayed.
Listening to FM Radio
To listen to music or programs on local FM radio stations, select the "FM Radio" function in the main menu
and then press the "OK" button to activate the FM Radio function.
EN
The first screen of the FM Radio function displays a choice of 5 items:
"FM Sensitivity":
"High“: Finds all available FM stations, even those with a weak signal;
"Low“: Only searches for FM stations with strong signals.
"Station List": Retrieves the tuned radio station lists stored in the device.
"Favorite Stations": Retrieves the favorite station lists stored in the device.
"Update List": Activates the auto scan procedure to detect all available FM stations, and stores the tuned
stations in the memory.
"Direct Access": Enables you to fine-tune the station frequency or switch to the previous / next FM station
manually.
Commands from the remote control:
Frequency choice mode:
Back to menu.
Vol -, Decrease the volume.
Vol +, Increase the volume.
Add (or remove) the station (to the) from favourites.
Forward/backward in frequency range (step of 0.05Mhz).
Auto scanning to previous/next.
MD 85651 EN-21
Page 24

Mode normal (station list, favourites):
Back to station list.
Vol -, Decrease the volume.
Vol +, Increase the volume.
Add (or remove) the station (to the) from favourites.
When using the FM Radio function for the first time, remember to plug the FM antenna plug into the FM
antenna connector on the rear panel. Stretch out the antenna cable as far as you can.
Once the antenna cable is properly connected, activate the "Update List" function to scan the available FM
stations. It takes few seconds to perform the scan operation. After that, you can tune into the stations.
The following screen shots illustrate the sequence used to pre-set the FM stations and tune into a radio station
98.70 MHz and listen to a program broadcast from it.
Previous/nest in station list.
EN
Screen on the
right
1."" button
2:
3"" button
(2 times)
4 Pre-setting the FM station list
Screen shot Next screen Comment
Initial screen
or "OK" button
"" button
or "OK" button
according to the signal
reception quality.
5 There are 15 stations tuned.
6""button "" button
or "OK" button
7 Tuned to station and music
Press the "" button to add
the current station to the list
of favorites for quick access in
future.
playing…
MD 85651 EN-22
Page 25

Listening to the music in your computer
To listen to the music stored in your own computer, you need to install and activate the media server utility
for the computer in which your digital music is stored. Please refer to the section describing installation of the
Media Server.
Once you have installed and activated the media server, you can enjoy listening to the music via the Wi-Fi IP
Radio device.
Commands from the remote control:
Pause / Play.
Vol -, Decrease the volume.
Vol +, Increase the volume.
Add (or remove) the song from (to the) list of favourites.
Select the "Media Server" function in the main menu and then press the "OK" button to activate the stream
from the Media Server function.
Fast forward/backward in the file (10 S step).
Previous/Next file.
Shuffle ON / OFF: Random research.
repeat: OFF / ALL / SINGLE.
EN
The following message will be displayed while the device is detecting all available media servers on your
network. It takes a few seconds to complete.
The screen will then list all of the available media servers that you are able to select.
If no server is detected, the list will be empty.
Please check to ensure you have activated the media server on your computer. If, after that, there are still no
media servers on the list, please refer to the troubleshooting chapter to identify the problem and solve it step
by step.
MD 85651 EN-23
Page 26

The following screen shots illustrate the sequence used to connect to a media server and browsing to the
music album "Chimene Badi" to play the songs on this album.
Screen on the
right
1"" button
2
3"" button
(once)
4"" button
5""button
(6 times)
Screen shot Next screen Comment
or "OK" button
"" button
or "OK" button
or "OK" button
"" button
or "OK" button
EN
Initial screen
6""button
(4 times)
7"" button
8 Wait until end
9 Next song playing.
Once the music starts, you can use the playback buttons, as you would with a traditional stereo or CD player.
"" button
or "OK" button
or "OK" button
of song,
or press ""
for next song.
Press the "" button to add the
current station to the list of
favorites for quick access in future.
Music playing.
MD 85651 EN-24
Page 27

Listening to the Music on your USB drive
Supported audio formats are: *.mp3, *.wma, *.wav.
To listen to the music on your USB drive or portable MP3 player, connect the USB drive to the USB connector
on the Wi-Fi IP Radio device. Next, select the "MP3 Player" function in the main menu and press the "OK"
button to activate the MP3 player function.
The first screen of the MP3 Player function shows the root folder content of the attached USB drive.
If the following "NO DEVICE" screen is displayed, there may be a problem in accessing the USB device. Unplug
the USB device and then plug it in again.
EN
To play back songs stored in the USB drive, simply browse the folder of the music album of your choice and
then press "Play".
Commands from the remote control:
Pause / Play.
Vol -, Decrease the volume.
Vol +, Increase the volume.
Add (or remove) the song from (to the) list of favourites.
The following screen shots illustrate the sequence used to listen to the music in the folder "Diamonds Love
Song" in the attached USB drive.
Screen on the
right
1"" button
Fast forward/backward in the file (10 S step).
Previous/Next file.
Shuffle ON / OFF: Random research.
repeat: OFF / ALL / SINGLE.
Screen shot Next screen Comment
Initial screen
or "OK" button
MD 85651 EN-25
Page 28

2.
EN
3""button
(2 times)
4""button
(Once)
5."" button
6.
Warning ! :The interface of MP3 reader must be USB2. USB1 is not guaranteed.
Warning ! :Before disconnecting the MP3 player, go to the setup menu and choose "Remove MP3 player".
Select "Yes" to confirm.
."" button
or "OK" button
."" button
or "OK" button
or "OK" button
Select the music folder to browse
and play back.
Select the music folder to browse
and play back.
The Playback Screen
When the music starts, the screen will display playback information. This includes the title of the song / station,
the album & artist, and the music progression. There is also a status line at the bottom of the screen. This
shows the current state of the wireless signal, the connection quality, the connection status, and the playback
status. This information can help with troubleshooting if you encounter problems while listening to the music.
MD 85651 EN-26
Page 29

ALARM
In addition to the music playback function, the Wi-Fi IP Radio Device also provides a simple alarm function.
There are two different alarms, one to wake you up in the morning, and another used to remind you of
important times of day, or dates.
Clock
Before setting the alarm, you need to set the clock on the Wi-Fi IP Radio device.
First, select the Setup function in the Main Menu.
In the setup menu, the first item, "Clock", is used to set the date and time. Press the "OK" or "" button to set
the clock.
EN
There are 3 items in the clock menu. The first displays the current date and time; the second is used to set the
date and time, and the third is the auto-Sync function (to automatically synchronize with the network server
time). If you select the "Auto-sync" function, the device will periodically synchronize with the server to
maintain the exact time. This is recommended.
There is also a battery in the device, so even when you switch the device OFF, the clock will keep ticking. This
means you only need to set the clock once.
Setting the Clock Manually
If you decide to set the clock manually, press the "OK" or the "" button to access the date and time screen.
You can use the four directional buttons and the OK button to set the time.
a.Use the "" and "" buttons to switch between the items to be altered. The selected item will flash.
b.Use the "" and "" buttons to alter the value selected.
c.Press the "OK" button to confirm.
MD 85651 EN-27
Page 30

Setting the Clock Automatically
If you choose to set the clock automatically, access the "Auto-Sync (NTP)" menu, and select your time zone.
The device will then alter the date and time automatically.
The following screen shows an example of the Time Zone screen.
Alarm settings
To enable an alarm setting, you need to set the time and alarm music. The following table illustrates a typical
alarm setting procedure. It sets Alarm 1 to generate an alarm (play music) at 7:00 AM, and to use the Internet
radio station "4U Classical Rock" as the source of alarm music.
EN
Screen on the
right
1 "OK" button Initial screen
2"OK" button
3""button
(Once)
4 "OK" button Use the 4 directional buttons to
Screen shot Next screen Comment
"OK" button Enable alarm 1.
set the time;
5"" button
or "OK" button
Set Internet radio as alarm source.
MD 85651 EN-28
Page 31

6 "OK" button Select the station from your
Favorites.
7 Alarm information, displayed for
3~5 seconds
8 The alarm is set.
Once you have set and activated the alarm, a bell icon will be added to the clock screen.
EN
When it is time for the alarm, the device will activate the alarm and play back the specified music. As with
traditional clock alarms, the Wi-Fi IP Radio device also provides a SNOOZE function for you to stop the alarm,
and request it to be activated 10 minutes later. You can press the "STOP" button to switch the alarm and music
off completely.
In rest position, there is no icon displayed to indicate that alarm is on.
MD 85651 EN-29
Page 32

Snooze
This function is used to stop the radio after a preprogrammed time.
This function is available from the following menus : Radio Internet, FM, media server and MP3 reader.
You are listening to a radio station (IP radio / FM) or a file (on PC /MP3 reader):
Screen on the
right
1 "OK" button Initial screen
2""button ""
3""button ""
Screen shot Next screen Comment
"OK" button
Countdown
"OK" button
EN
4 ""
"OK" button
You can also press the "SNOOZE" key on the remote control repeatedly.
MD 85651 EN-30
Page 33

MISCELLANEOUS SETUP FUNCTIONS
There are other useful setup functions to ensure optimum use of the device.
Backlight Settings
You can adjust the backlight ON / OFF settings.
Z
The default setting is always ON. You can set the backlight to be turned OFF when the device is idle (no keys
pressed) after a specified amount of time.
You may also activate/deactivate the screen brightness by using the key of the remote control.
EN
Language Choice
V-Tuner is a base recording the radio stations on Internet.
You may choose the IP radio and V-tuner languages.
Choice of main language (IP radio):
Z
Choice of V-Tuner language:
Z
Equalizer Settings
Z
You can adjust the equalization from Radio, media server and MP3 menus. Once the selected station screen,
or file is selected, press OK.
MD 85651 EN-31
Page 34

Reset to Factory Default Settings
Z
When you reset the device to its factory default settings, your Internet radio and FM radio favorites settings
will be stored in the device.
Clear Favorites
Z
Caution! This is not recommended.
Check Firmware Version
EN
Z
Software Update
This function will allow you to proceed the software updating by mean of an USB2 key containing the
programm file.
Z
Check the MEDION website to see whether there is any new firmware for this device to upgrade it. If any new
firmware has been released, download it and follow the upgrade procedure below to upgrade the firmware
on your device.
Upgrading the Firmware on your Device:
Step 1: Uncompress the new F/W file (e.g. the file "20070315_ShrekW_R102C7.zip") and copy the uncom-
pressed file "ShrekW.BIN" to the ROOT folder of a USB key or USB MP3 player.
Note: DO NOT rename it! Otherwise the Wi-Fi IP Radio will not be able to find the new F/W.
Step 2: Turn on the Wi-Fi IP Radio and then plug the USB key into the front USB port of the Wi-Fi IP Radio.
Step 3: Operate the Wi-Fi IP Radio to access the F/W upgrade menu ("Setup\Advanced Setup\ F/W Upgrade
(thru. USB)"), then press the "OK" button to activate the F/W upgrade function.
The messages "F/W Upgrading", and "Don't Power Off!!" messages should be displayed. After few seconds,
once the upgrade procedure has been completed, the device will reboot automatically.
Step 4: You can check whether the Wi-Fi IP Radio upgrade has been has been successful by checking the F/W
version in the menu "Setup\Advanced Setup\Firmware Version". In this case, the version should be R1.02C7.
If a different version number is shown, there may have been a problem during the upgrade.
Check to ensure the file "ShrekW.bin" in the USB key is the correct one.
MD 85651 EN-32
Page 35

APPENDIX
Care and Maintenance
Switch off your IP Radio. Use a smooth and dry cloth to wipe it. Do not use a rough cloth, powerful liquid
cleaners, thinner painting, alcohol nor other solvents to clean it. These products can damage your IP Radio.
Problems
Refer to the table below in case of an operational malfunction:
Problems Remedies
EN
The remote control does not
function.
The screen is switched off. Make sure that :
Choosen station can not be heared. To hear the station, you must confirm your selection by pressing
No clear sound The frequency FM is disturbed by parasites. Deploy the FM antenna
Access denied to the Internet Radio. Check the Wi-Fi router or the line.
Access denied to the radio from a
personal computer as an access
point (Media Server).
Check that the batteries are introduced correctly.
Check that you too are not too far from the radio (7 meters max.)
and that the infra-red sensor is not blocked.
Make sure that the remote control is well pointed towards the sen-
sor.
the power adapter is properly connected to a power socket.
the power connector is properly plugged into the radio.
OK.
Make sure that your radio is not set to MUTE .
Check the volume level.
Check the network configuration.
Check if the ear-phones are connected; they mute the speaker.
jack until you get a clear signal.
Check that your radio is not encoded.
In this case you need the encoding key to access.
The alarm does not ring. Check that the alarm source is configurated correctly.
Problem of the connexion to the
router.
Not able to get IP Address. DNS no response. Please ping the IP address of the DNS to check
No DHCP server enabled. Please check the setting of your router.
Wrong WiFi encryption key is entered. Please double confirm the
key and re-enter via the remote controller.
Trouble in the RJ45 port or WiFi module.
if this is the case.
DNS doesn't have the record of the vTuner server or radio station
that you are trying to connect.
MD 85651 EN-33
Page 36

The connection between the radio
and the vTuner is not OK.
Traffic jam for the internet access. Please try later.
vTuner server is out of service or heavily loaded to reply in time.
The authorization process is failed. vTuner server reject the access
request.
The streaming service of the radio station is unavailable or heavy
loaded.
The IP Radio doesn't support the service type of the radio station.
There is some buffering trouble on the internet. The available
bandwidth is not good enough to have the stable streams from
the radio station.
EN
The IP Radio is booted normally but
it doesn't get an IP address.
In case of non receiving on Internet, refer to the following table.
What has been done with success What could be the trouble?
The IP Radio is booted normally.
BUT
NO BAR IN THE RADIO STATION
LOGO (the logo with 5 bars between
a radio and a computer).
The network interface of the IP ra-
dio is good.
The connection between IP Radio
and router was OK.
The IP Radio already got an IP
address.
BUT: ONLY ONE BAR IN THE RADIO
STATION LOGO
No DHCP server enabled. Please check the setting of your router.
Wrong WiFi encryption key is entered. Please double confirm the
key and re-enter via the remote controller.
The network interface has trouble.
The IP Radio doesn't get an IP address.
No DHCP server enabled. Please check the setting of your router.
Wrong WiFi encryp tion key is enter ed. Please double co nfirm the
key and re-enter via the remote controller.
The network interface has trouble.
Can't access the vTuner server.
The DNS lookup for the IP address of the radio station failed.
Can't access the router or internet.
Connection between IP Radio and
vTuner server is OK.
BUT: ONLY TWO BARS IN THE RADIO STATION LOGO
Connection between IP Radio and radio station is OK.
BUT: ONLY THREE BARS IN THE
RADIO STATION LOGO
The connection between IP radio
and the radio station was OK.
BUT: ONLY FOUR BARS IN THE RADIO STATION LOGO
Can't access the radio station.
The radio station rejected the connection request.
The streaming service of the radio station is unavailable or hea-
vily loaded.
The IP Radio doesn't support the service type of the radio station.
There is some buffering trouble on the internet. The available bandwidth is not good enough to have the stable streams from the radio
station.
MD 85651 EN-34
Page 37

TECHNICAL DATA
DC adapter
Input voltage: 100 V-240 V ~ 50-60 Hz 0,4 A
Output: 5 V 3 A, , 15 W
Remote Control
Batteries: 2 x 1,5 V - R03/LR03 „AAA“
Device
Power consumption: 11 W
Standby power consumption: 6 W
CPU: AMRISC 10020
Memoryr: 1 MB Flash, 2 MB SD-RAM
Speakers: 4 W
Connections
DC IN: 5 V DC, 3 A
Ethernet Port RJ 45
WiFi antenna: 2dBi, external
FM antenna: 3,5 mm socket
LINE OUT: AV cinch sockets, stereo
Head phone: 3,5 mm socket, stereo
USB connection: 2.0
EN
Readable audio formats:
*.mp3, *.wma, *.wav
Subject to technical changes!
MD 85651 EN-35
Page 38

DISPOSAL
Packaging
Your device is wrapped in packaging to protect it from damage during transport. Packaging is a raw
material and can be re-used or added to the recycling system.
Appliance
At the end of its life, the device must not be disposed of in household rubbish. Seek the advice of
your local authority on correct, environmentally-friendly disposal. Dispose of the unit and the
batteries separately.
Batteries
Do not put used batteries in the household rubbish. Batteries should be deposited at a collection
point for used batteries.
EN
MD 85651 EN-36
Page 39

RESTRICTED WARRANTY
I.General Conditions of Warranty
1.General
This warranty covers defects relating to workmanship and manufacture in MEDION products. The period during which this warranty is valid and during which claims against the warranty can be made to MEDION must
be in accordance with the following terms in order to be considered eligible:
Is effective from the date of purchase or receipt of the MEDION product from an authorised seller of ME-
DION products; and
expires at the end of the warranty period specified on the warranty card provided with the product.
For the warranty to be valid, you must:
provide suitable evidence of purchase, a copy of the original purchase receipt from an authorised seller of
MEDION products is preferred; or
register your product within 28 days of purchase either online at www.MEDION.co.uk or by com pleti ng and
returning the pre-paid registration card included with the product.
Please keep the original purchase receipt and the warranty card in a safe place. MEDION and its authorised
sellers reserve the right to refuse a repair under warranty or a warranty confirmation if a proof of purchase [or
registration of purchase] cannot be established, or has not been, submitted.
EN
When it is necessary to return your product for repair please ensure that your product is suitably packed for
transportation.
Provided that your product is still within warranty (please check the duration of the warranty period as described above) and is eligible for repair or replacement under the terms of the warranty, to return your product,
please telephone MEDION on the service hotline number. You will be sent a pre-paid transportation box suitable for returning your product to MEDION. PLEASE MAKE SURE THAT YOU HAVE A BACKUP COPY OF ALL
DATA ON THE PRODUCT BEFORE RETURNING THE PRODUCT TO MEDION. MEDION shall bear the costs of
postage and packaging for returning the product and the transportation risk. However, if following examination of the defective product in question, MEDION, in its reasonable opinion, considers that the defect has
been caused by:
your operating and/or using the product other than as instructed in the accompanying documentation;
damage caused in transit as a result of your negligence in packaging of the product; and/or
otherwise than in accordance with the terms of this warranty;
This warranty shall be void and you may be required by MEDION to reimburse MEDION for the reasonable
costs of postage and packaging before MEDION will return the product to you. If so and you would still like
MEDION to repair or replace the product, MEDION may do so but you will be charged MEDION's standard
rates for repair and replacement for this service.
Before returning the product, please contact MEDION via the service hotline or via the internet (www.MEDION.co.uk). You will receive a reference number (RMA No.) on the warranty card. Please mark the outside of
your package to ensure that this reference number is clearly visible. Please submit a letter containing as much
detailed information as possible and, a full description of the defect or fault.
This should include:
a description of the fault;
when it occurred, how long it has been evident and how frequently it occurs ;
any errors message(s) displayed when using the product;
MD 85651 EN-37
Page 40

a description of the circumstance(s) and conditions in which the fault occurs; and
whether it is an intermittent or persistent fault;
This will greatly assist MEDION in identifying the defect, when submitted together with the defective product.
Unless otherwise instructed by a MEDION representative in all cases, the product must be returned complete
with all parts which were included with the original product. Incomplete contents of the returned package
may lead to a delay in the repair or replacement. MEDION does not accept any liability for any additionally
submitted material(s) which were not supplied with the original MEDION product.
This warranty does not affect your statutory rights in any way and is subject to the applicable legal statutes of
the country where the product was sold to you by an authorised MEDION seller.
2.Scope
Subject to any exclusions set out within this warranty, where there is a defect in your MEDION product covered by this warranty, MEDION will repair or replace the MEDION product. The decision whether to repair
or replace the product will be made solely at the discretion of MEDION. MEDION may, in its own discretion,
replace the product returned for repair under warranty with a replacement product that is either identical or,
in the event that such product(s) are no longer available, a product of equal or superior specification and quality.
No warranty is given for batteries or rechargeable batteries or for consumable materials subject to wear and
tear, i.e. for parts which have to be replaced periodically during the normal use of the product, such as videoprojector lamp.
Non critical failures that fall within industry specified tolerances e.g. noise, LCD pixels are not covered by this
warranty. Please consult the appropriate section in your user or instruction manual for this product for exact
specifications and tolerances.
EN
To the extent which is permitted under law, MEDION will accept no liability for burnt-in images on plasma or
LCD products as a result of normal wear and tear during the operation of the product. Please refer to your user
or instruction manual for this product for detailed operating instructions for your plasma or LCD product.
The warranty does not cover errors relating to the playback of data media in an incompatible format or created
with unsuitable software.
If it is found during repair or assessment that the defect concerned is not covered under warranty, MEDION
reserves the right to invoice you for all reasonable costs incurred by MEDION. These costs will be in relation
to the return of the product, including reasonable administration costs, plus reasonable costs for materials
used and labour provided when repairing or replacing the product. This is subject to MEDION providing you
with an estimate for carrying out such work prior to costs being incurred and that you have accepted the estimate.
You are entitled to seek independent advice or consultation relating to your product or any of MEDION's findings. MEDION will not be liable for any costs incurred to you when doing so.
3.Exclusion from warranty
To the extent permitted by law, this warranty shall be void in the event that defects or loss caused by:
a. failure and damage resulting from the operation of the product in an environment other than that re-
commended in the accompanying user or instruction manual (e.g. in direct sunlight or in a damp
room);
b. accidental damage;
c. use other than in accordance with the accompanying user or instruction manual;
d. modifications, conversions, expansions, maintenance and/or repairs made to the MEDION product by
unauthorised repairers or use of unauthorised third party parts;
e. negligence;
f. virus attack or software errors; or
MD 85651 EN-38
Page 41

g. improper transportation or packaging during return of the product.
This warranty will also be considered void if labels or serial numbers of the product or of a component of the
product are modified or made illegible.
To the extent permitted by law, MEDION shall; only be responsible for losses which are a reasonably foreseeable consequence of the relevant defect in the product; MEDION will not be responsible for any costs incurred
in relation to software configuration; economic loss; loss of opportunity; loss of income; or loss of data or software arising out of its repair or replacement of a MEDION product under this warranty
4.Service Hotline
Before returning the product to MEDION you must contact us using the service hotline or via the internet
(www.MEDION.co.uk). You will receive further instructions for making your claim under warranty when you
call.
The service hotline is available on 362 days in the year, including Sundays and bank holidays but excluding
Christmas day, New Years Day and Easter day. The service hotline is subject to [national rate] telephone call
charges. These charges are subject to change. The price of your call will be stated at the beginning of the call.
II.Special warranty conditions for MEDION PC, notebook, pocket PC (PDA) and navigation devices (PNA)
The following terms apply to MEDION PC, notebook, desktop, pocket PC and laptop products and optional
items included with such products. If one of these items has a fault, you also have a warranty claim for its repair
or replacement, from MEDION. The warranty covers the costs of materials and labour for repairing or replacing the defective MEDION product or the optional item in question.
Hardware connected to your product that was not produced or marketed by MEDION can invalidate the warranty if MEDION can reasonably demonstrate that damage to the MEDION product or of the optional item
included with the delivery was caused by such hardware. You are entitled to seek independent advice or consultation relating to your product or any of MEDION's findings. MEDION will not be liable for any costs incurred to you when doing so.
This warranty is restricted in relation to any pre-installed operating system as well as to application programme software that is included with the MEDION product in question. This warranty is restricted as follows:
For pre-installed operating system as well as to application programme software included in the MEDION product, MEDION only guarantees the data media (e.g. the diskettes and CD-ROMs) upon which this software is
delivered and warrants that such data media shall be free from material and processing defects for a period of
90 days from the date of purchase of the MEDION product from an authorised seller of MEDION. MEDION will
replace defective data media free of charge.
Any claims in respect of defective pre-installed operating system as well as to application programme software
are hereby expressly excluded and you should contact the relevant licensor or copyright owner of the defective software in question. MEDION does not guarantee that any sof tware suppli ed with ME DION p roduct s will
function without interruption, will be free from errors or that it will fulfil your requirements. MEDION does
not guarantee the 100% accuracy of the maps provided with the Navigation device.
It may be necessary to delete all data in the product in order to repair the MEDION product. PLEASE MAKE
SURE THAT YOU HAVE A BACKUP COPY OF ALL DATA ON THE PRODUCT BEFORE RETURNING THE PRODUCT
TO MEDION. To the extent permitted by law, MEDION excludes all liability for loss of data and MEDION recommends in all cases that you back up all data on your MEDION product before returning the product to
MEDION.
EN
MD 85651 EN-39
Page 42

III.Special warranty conditions for repair on site or replacement on site
If a claim for repair or replacement on site is included within the terms of the warranty card provided with the
product, the special warranty conditions for repair or replacement of your MEDION product on site apply.
The following provisions must be made by you for carrying out repairs or replacements on site:
MEDION or its authorised personnel must have unrestricted, safe and immediate access to the products.
Telecommunication facilities required by MEDION or its authorised personnel for proper execution of your
order, for testing and diagnostic purposes and for remedying faults are provided by you at your own expense.
You are responsible yourself for restoring the application software after the repair services have been carried
out by MEDION or its authorised personnel.
You must take all other necessary steps to enable MEDION or its authorised personnel to carry out your or-
der properly.
You are responsible yourself for connecting and configuring any existing external peripheral products after
MEDION or its authorised personnel have carried out their repairs.
The free cancellation period for repairs or replacements on site is 24 hours, thereafter our reasonable costs
resulting from late or missing cancellation shall be invoiced at your expense.
EN
MD 85651 EN-40
Page 43

D
BE
MTC - MEDION Technologie Center
D - 45467 Mülheim / Ruhr
Hotline: 01805 - 668 466
Fax: 01805 - 654 654
(0,14 Euro/Minute innerhalb des deutschen Festnetzes)
www.medion.de/service
CH
MEDION Service Center
Rütistraße 28
CH - 8952 Schlieren
Hotline 0848 - 33 33 32
service-switzerland@medion.com
E
MEDION Service Center Visonic S.A.
Alejandro Sanchez 95-97
E - 28019 Madrid
Hotline 90251448
Fax 914604772
hotline@visonic.es
MEDION Service Center
John F. Kennedylaan 16a
NL - 5981 XC Panningen
Hotline 022006198
Fax 022006199
www.medion.com/nl
AT
MEDION Service Center
Franz-Fritsch-Str. 11
AT - 4600 Wels
Hotline: 0810 - 001048
Fax: 07242 - 93967592
www.medion.de/service
F
MEDION France
ZAC de la Bertraie, Route de Sablé
F - 72270 Villaines sous Malicorne
Indigo no. 0825 81 1000
pc-support-fr@medion.com
I
MEDION Service Center
Service on site S.P.A.
Via Kennedy 21
I - 20023 Cerro Maggiore (MI)
Hotline: 199 309077
service-italy@medion.com
NL
MEDION Service Center
Antwoordnummer 4015
NL - 5980 ZX Panningen
Hotline: 0900 - 633 4660
Fax 0900 - 654 6540
www.medion.com/nl
UK
MEDION Electronics Ltd.
120 Faraday Park, Faraday Road, Dorcan
UK - Swindon SN3 5JF, Wilts.
Hotline 0870 7270370
Fax 01793 715716
www.medion.co.uk
DK
Medion Service Center
Meterbuen 6-12, Bygning 8
DK- 2740 Skovlunde
Hot-Line: 70212024
Fax: 70212029
hotline@compare-support.dk
www.medion.com
 Loading...