

Page 1

Contents
Safety instructions ..................................................................................... 3
General information........................................................................................................ 3
Battery instructions ......................................................................................................... 3
Cleaning .............................................................................................................................. 3
Product Description .................................................................................. 4
Operation .................................................................................................. 4
Inserting batteries............................................................................................................ 4
Settings after battery replacement............................................................................ 4
Protection against unexpected battery discharging........................................... 4
The display .................................................................................................. 5
Overview ............................................................................................................................. 5
Default readouts in the display ................................................................................... 5
Standard display – time ...................................................................5
Date..................................................................................................5
Select mode or device .....................................................................5
Navigating the menus ............................................................................. 6
Cancel function.................................................................................................................6
Setting time and date .............................................................................. 7
Setting clock time ............................................................................................................ 7
Setting the date ................................................................................................................7
Backlight ....................................................................................................... 8
RESET – factory settings .......................................................................... 9
Programming device codes .................................................................10
Device types and code groups.................................................................................. 10
Assigment to code groups.............................................................11
Programming options .................................................................................................. 11
Opens programming mode........................................................................................11
Select device code in the display.............................................................................. 11
Entering the device code according to the code list .........................................12
Manual code search ......................................................................................................13
Code searching by brand name................................................................................ 14
Code identification........................................................................................................ 15
Normal operation ....................................................................................16
Operating individual devices ..................................................................................... 16
SHIFT function.................................................................................................................16
Recordings........................................................................................................................ 16
EPG – Electronic Programme Guide.........................................................................17
Operating combined devices.....................................................................................17
Combined devices with two device codes ....................................17
Combined devices with one device code......................................17
ALL OFF function............................................................................................................18
Set timer .....................................................................................................19
Helpline No. UK/ North Ireland 0871 37 61 020 Rep. Ireland 1-800-992 508
Web Support www.medion.co.uk
Model Number: 83388
1
Page 2

TV sleep-timer .................................................................................................................19
Set sleep-timer...............................................................................19
Switch off sleep-timer ....................................................................19
Command timer .............................................................................................................20
Program the command timer .........................................................20
Delete command timer...................................................................21
Learn function ......................................................................................22
Notes on learn function ...............................................................................................22
Program commands......................................................................................................23
Delete commands.......................................................................................................... 24
Deleting commands for only one mode key ..................................24
Deleting commands for all mode keys ..........................................24
Macros .....................................................................................................25
Programming macros................................................................................................... 25
Incorporating delays ......................................................................26
Executing macros........................................................................................................... 26
Deleting macros .............................................................................................................26
Universal functions (“Punch Through”) ...........................................27
Playback functions......................................................................................................... 27
Volume/mute ..................................................................................................................27
Programming the VOL/MUTE universal functions to another device
type ................................................................................................28
Switching off the VOL/MUTE universal function for a specific
device.............................................................................................29
Restoring the VOL/MUTE universal function factory settings
...........30
Error recovery ...........................................................................................31
Disposal .....................................................................................................32
Packaging .........................................................................................................................32
Device.................................................................................................................................32
Batteries.............................................................................................................................32
Technical data ...................................................................................... 32
Helpline No. UK/ North Ireland 0871 37 61 020 Rep. Ireland 1-800-992 508
Web Support www.medion.co.uk
Model Number: 83388
2
Page 3

Safety instructions 1
Please read these instructions carefully before operating the remote control.
Keep the instructions in a safe place for future reference or in case you need to
pass them on to someone else.
General information
• Do not attempt to repair the remote control yourself.
• The universal remote control contains an infrared laser class 1 diode. The device has a
safety system that prevents the emission of dangerous laser rays escaping from the
device during normal use. In order to avoid injury to the eyes, never interfere with or
damage the unit's security system.
• Do not subject your remote control to dust, strong sunlight, moisture, high temperatures
or strong vibrations.
Battery instructions
• Keep children away from the batteries. Seek medical attention immediately in the event
of a battery being swallowed.
• Before inserting the batteries, check whether the contacts in the device and batteries are
clean and, if necessary, clean them.
• Only use new batteries. Never use old and new batteries together.
• Do not use a combination of battery types.
• Please note the polarity (+/-) when inserting the batteries.
• WARNING! There is a risk of explosion if batteries are incorrectly replaced. Replace the
batteries only with the same or equivalent type.
• Never try to recharge non-rechargeable batteries. There is a risk of an explosion!
• Store batteries in a cool, dry location. Direct strong heat can damage the batteries. For
that reason do not expose the device to any sources of strong heat.
• Never short-circuit the batteries.
• Never throw batteries into a fire.
• If the appliance is not going to be used for long periods, remove the batteries.
• Immediately remove leaking batteries from the device. Clean the contacts before
inserting new batteries. There is a risk of corrosion due to battery acid!
• Also remove dead batteries from the device.
Cleaning
Clean the device with a dry or lightly dampened, lint free cloth. Do not use any corrosive
or aggressive cleaning products.
Helpline No. UK/ North Ireland 0871 37 61 020 Rep. Ireland 1-800-992 508
Web Support www.medion.co.uk
Model Number: 83388
3
Page 4
Product Description 2
This universal remote control has eight mode keys and therefore can replace up to eight
normal remote controls ("8 in 1 function“). These may be remote controls for practically
every type of remote-controlled consumer electronics (see the supplied code list).
The labels "TV" "VCR" "DVD" "CD" "ASAT" "CBL" "AUX" "DSAT" on the mode keys are for
overview purposes. With the exception of the TV key, you can assign any key to any
device (“Flex Mode”). To program in codes see “Programming device codes” on page 10.
Operation 3
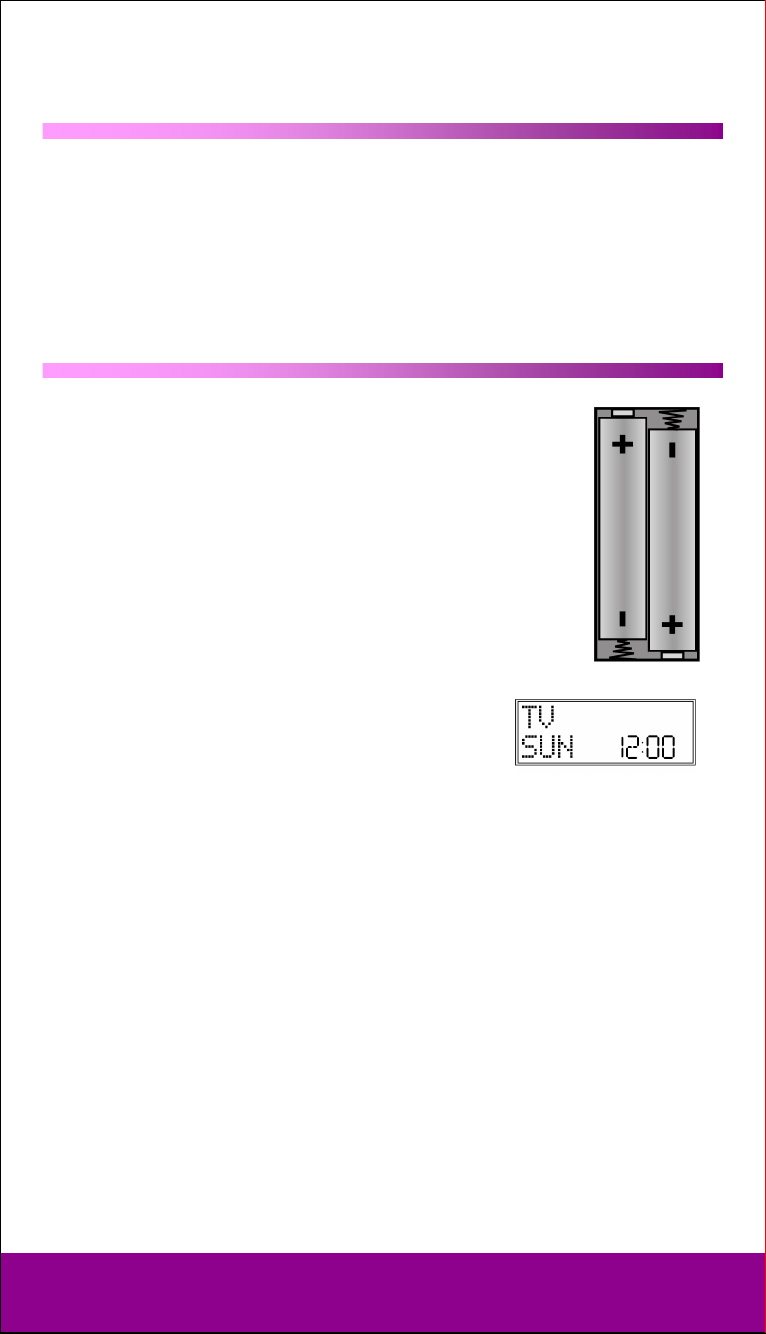
Inserting batteries
2 LR03 AAA micro batteries are supplied.
Remove the battery compartment cover by pushing it downwards.
Insert both batteries into the compartment while observing the +/polarity.
Replace the cover.
Settings after battery replacement
If the batteries have been inserted correctly, the factory setting is
displayed. It shows the active mode ("TV"), the day of the week and
the time.
` Please read “Setting time and date” on page 7 for more
information on setting the time and date.
After new batteries have been inserted, the mode, time,
date and backlight time are reset to the factory settings.
However, codes that have already been programmed in as well as programmed learn
functions and macros are retained when batteries are changed.
Protection against unexpected battery discharging
If a key remains pressed down by accident (because something is lying on the remote
control for example), the remote control sends 255 infrared signals (for approximately 30
seconds) and this ends the transmission. This prevents the batteries from discharging
accidentally.
Helpline No. UK/ North Ireland 0871 37 61 020 Rep. Ireland 1-800-992 508
Web Support www.medion.co.uk
Model Number: 83388
4
Page 5
The display 4
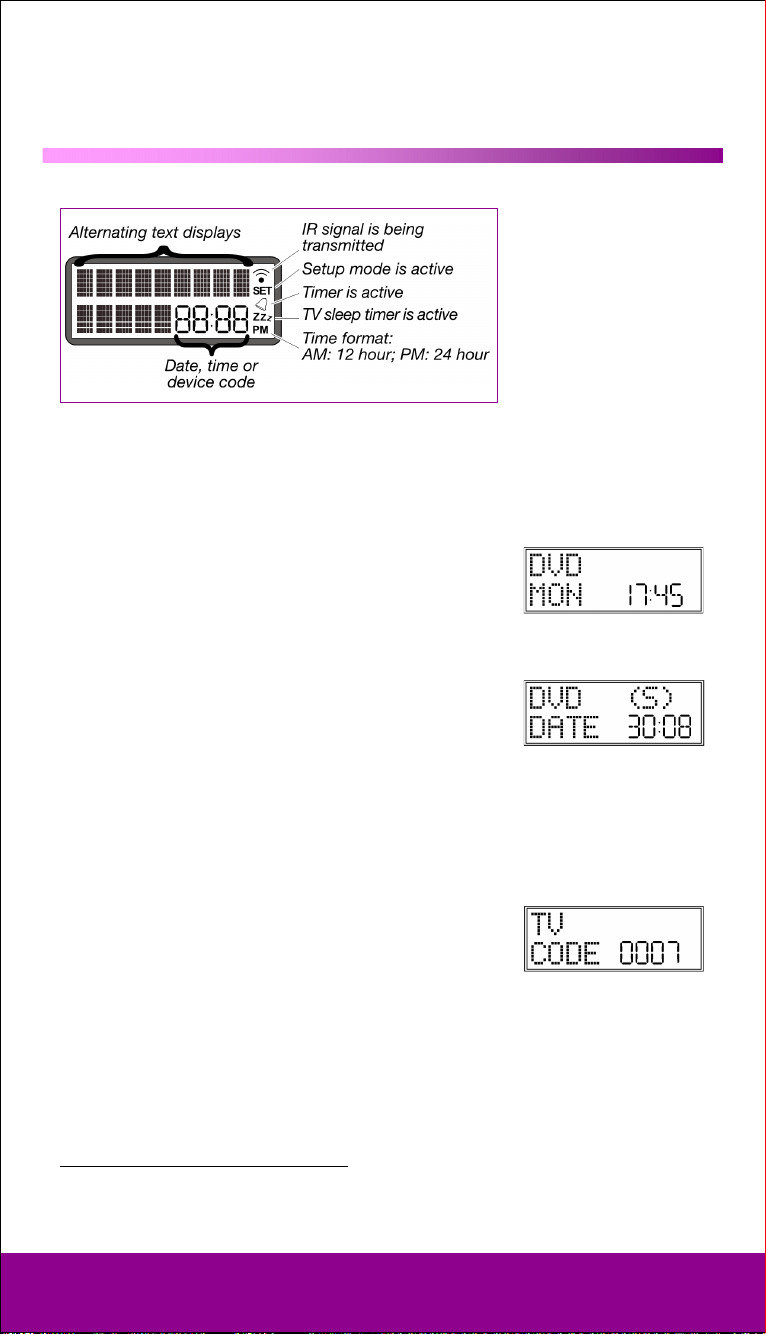
Overview
Default readouts in the display
Standard display – time
In the standard display
• the active mode appears in the first column (device type).
• the day of the week and time appears in the second column.
Date
Press the Setup key briefly to show:
• the symbol for the activated SHIFT function
column;
• the date in the second column.
Please read “Setting time and date” on page 7 for more information on setting the time
and date.
1
(S) in the first
Select mode or device
Use a mode key to select the mode or the device that was programmed to this mode key.
In the display:
• the name of the mode key appears in the first column;
• this device's programmed code appears in the second
column.
Please refer to “Programming device codes” on page 10 for
more information on programming the device code.
1
Most keys can be assigned two functions (cf. Page 16). You can access the second function by first
activating the SHIFT function.
Helpline No. UK/ North Ireland 0871 37 61 020 Rep. Ireland 1-800-992 508
Web Support www.medion.co.uk
Model Number: 83388
5
Page 6
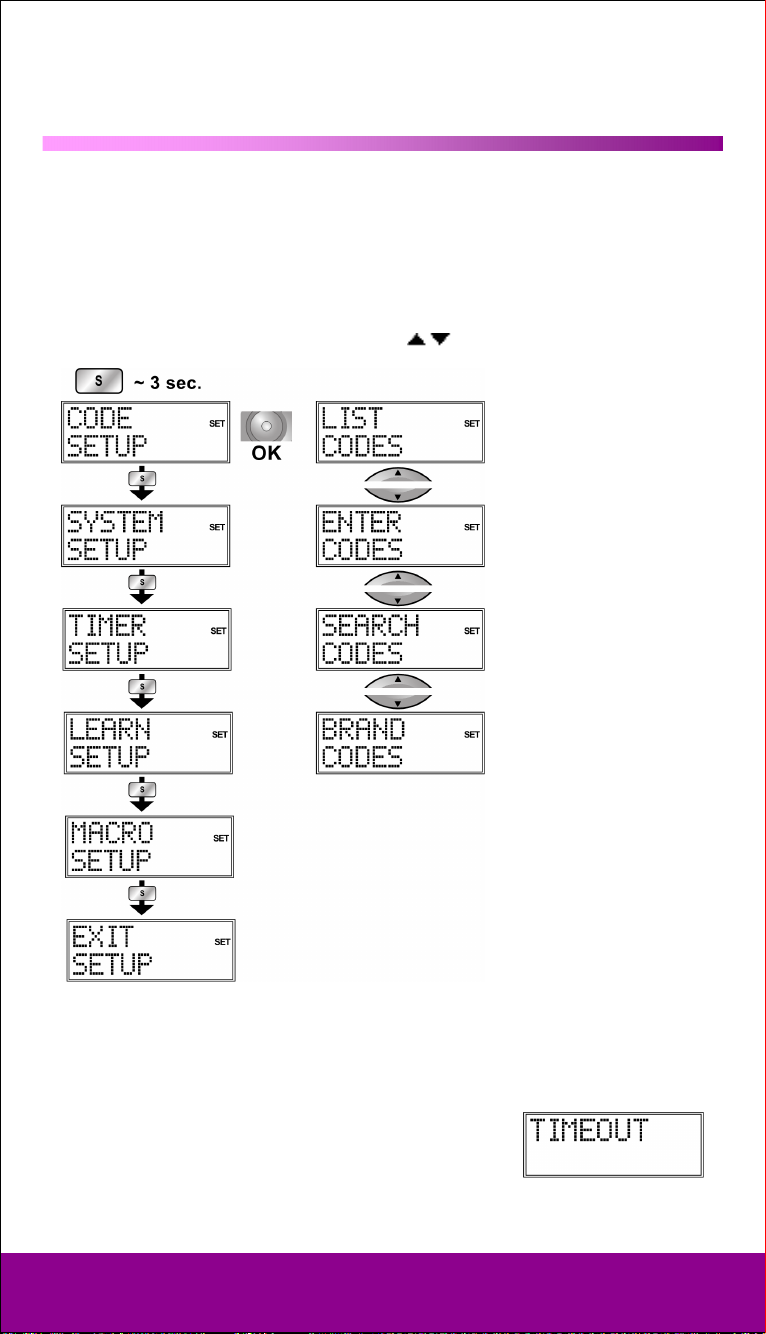
Navigating the menus 5
To open the Setup menu, press and hold the Setup key until CODE SETUP appears along
with the "
If the display shows
menus:
CODE SETUP > SYSTEM SETUP > TIMER SETUP > LEARN SETUP > MACRO SETUP > EXIT
SETUP
Press OK to open a menu.
Press the arrows to switch between sub-menus
SET" symbol in the display.
CODE SETUP continue to press the Setup key to access the other
.
.
` To exit the Setup menu, press the EXIT key and confirm the EXIT SETUP display with
OK.
Cancel function
If you wish to cancel a process, wait approx. 30 seconds. The
Setup menu closes automatically and the TIMEOUT message
appears.
Helpline No. UK/ North Ireland 0871 37 61 020 Rep. Ireland 1-800-992 508
Web Support www.medion.co.uk
Model Number: 83388
6
Page 7
Setting time and date 6
In the standard display, the day and time appear in the lower column.
Press the Setup key briefly to show the date in the lower column for approx. 30 seconds.
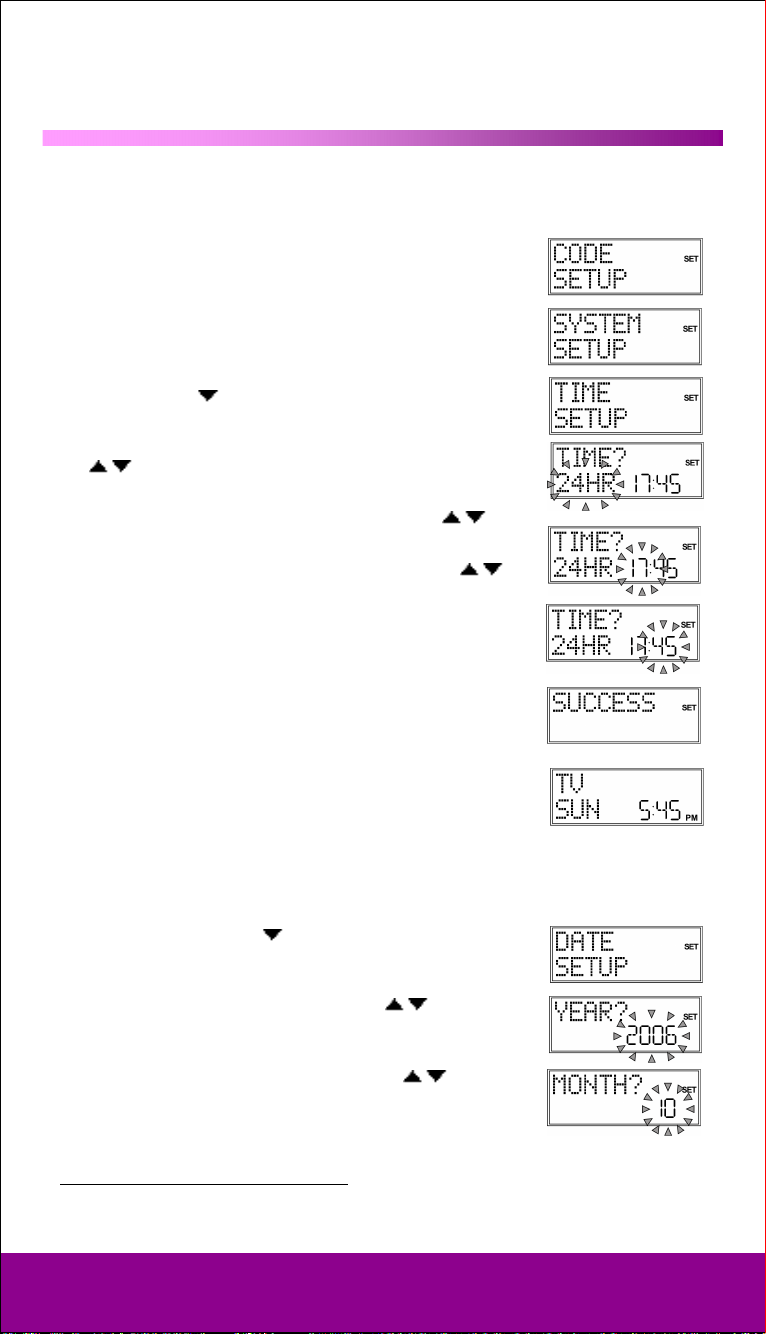
Setting clock time
1. Keep the Setup key pressed down for approx. 3 seconds,
CODE SETUP appears.
until
2. Press Setup again briefly to open the
3. Confirm with OK. The
4. Use the arrows
with OK.
5. The current time format flashes. Use the arrows to select
the 12 or 24 HR time format ) and confirm with OK
(see the end of the section).
6. The hour display flashes. Use the arrows to select
hour and confirm by pressing OK.
7. The minute display flashes. Use the arrows to select
the number of minutes and confirm by pressing OK.
8. The message SUCCESS appears and the display returns to
VOL/MUTE SETUP
to select the TIME SETUP and confirm
CODE SETUP.
If you choose
PM symbols.
12 HR format, the time is displayed with the AM or
SYSTEM SETUP.
2
is displayed.
the
Setting the date
1. Open SYSTEM SETUP as described in "Setting clock time".
2. Confirm with OK. The VOL/MUTE SETUP is displayed.
3. Use the arrows to select
and confirm with OK.
4. The year flashes. Use the arrows to select
and confirm by pressing OK.
5. The month flashes. Use the arrows to select
month and confirm by pressing OK.
the DATE SETUP (press twice)
the year
the
2
The VOL/MUTE SETUP is explained on page 27, Universal Functions („Punch Through“)
Helpline No. UK/ North Ireland 0871 37 61 020 Rep. Ireland 1-800-992 508
Web Support www.medion.co.uk
Model Number: 83388
7
Page 8
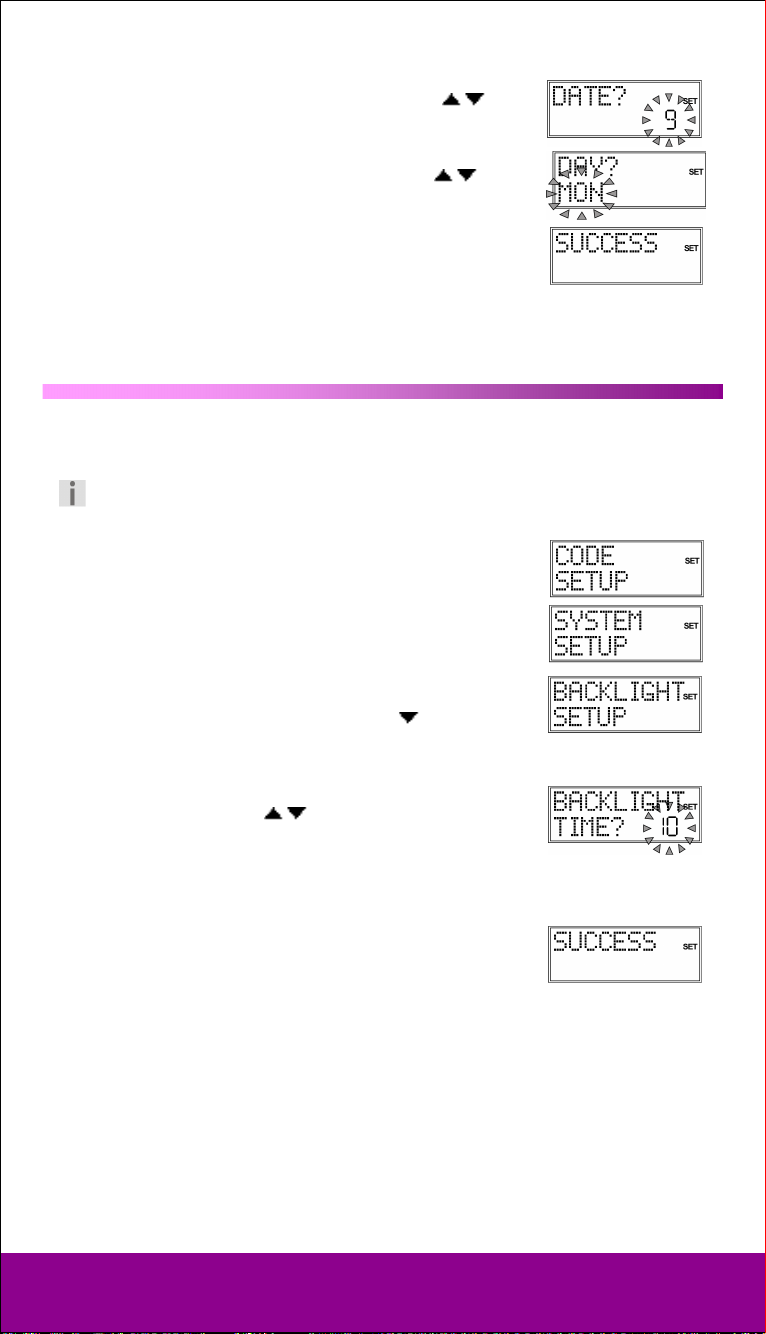
6. The day ("DATE") flashes. Use the arrows to select the
day and confirm by pressing OK.
7. The day ("DAY") flashes. Use the arrows to select the
day of the week and confirm by pressing OK.
8. The message
SUCCESS appears and the display returns to CODE SETUP.
Backlight 7
The display's backlight comes on each time the button is pressed. The backlight's factory
setting is for 10 seconds. You can switch off the backlight or extend it to 60 seconds.
Please note that the backlight uses up additional battery life.
1. Keep the Setup key pressed down for approx. 3 seconds,
until CODE SETUP appears.
2. Press Setup again briefly to open
3. Confirm with OK. The
4. Use the arrows (press three times) to select
VOL/MUTE SETUP is displayed.
BACKLIGHT SETUP and confirm with OK.
5. The current set time flashes (factory setting is for 10 seconds).
Use the arrows to select
five second intervals.
In order to switch the backlight off, select “00“ seconds.
Confirm with OK.
6. The confirmation message
returns to CODE SETUP.
SYSTEM SETUP.
the
the required time span in
SUCCESS appears and the display
Helpline No. UK/ North Ireland 0871 37 61 020 Rep. Ireland 1-800-992 508
Web Support www.medion.co.uk
Model Number: 83388
8
Page 9
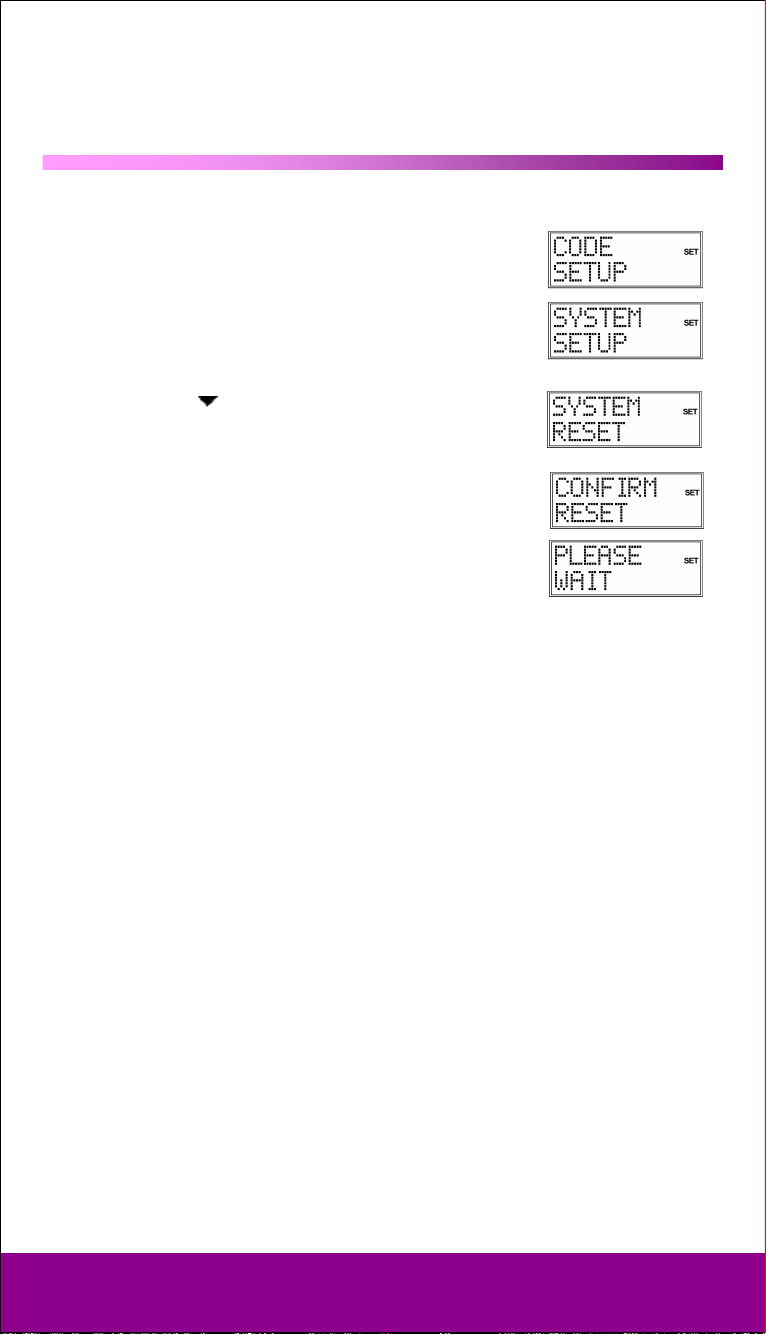
RESET – factory settings 8
Use Reset to restore all device settings to the factory settings. Codes that have been
programmed in, learn functions and macros are therefore deleted.
1. Keep the Setup key pressed down for approx. 3 seconds,
CODE SETUP appears.
until
2. Press Setup again briefly to open
3. Confirm with OK. The
4. Use the arrows (press four times) to select SYSTEM RESET
and confirm with OK.
5. The message
to reset the settings.
6. While the factory settings are being restored,
appears in the display.
CONFIRM RESET is displayed. Confirm with OK
VOL/MUTE SETUP is displayed.
SYSTEM SETUP.
PLEASE WAIT
Helpline No. UK/ North Ireland 0871 37 61 020 Rep. Ireland 1-800-992 508
Web Support www.medion.co.uk
Model Number: 83388
9
Page 10

Programming device codes 9
For every device that you would like to operate using the universal remote control, you
must program a four-digit device code to a mode key (TV, VCR, DVD, CD, ASAT, CBL,
AUX, DSAT). The names on the keys are only for reminder purposes. With the exception
of the TV key you can assign any key to any device (“Flex Mode”).
The TV mode key can only be assigned to TV device codes.
Your universal remote control is pre-programmed with proprietary codes from Tevion
devices and its most important functions can be used with proprietary Tevion devices
without requiring any extra programming.
Device types and code groups
You can choose between the following device types when programming in codes:
TV: TV set, projector, plasma screen, LCD;
VCR: Video recorder;
LD: Laser disc player;
DVD: DVD player;
DVR: Digital video recorder;
HDD: Hard disk drive;
SAT: Satellite receivers (analogue, digital);
CABLE: Cable box, Pay TV decoder;
DVBT: DVB-T receivers;
STB: Set top box;
AUDIO: Audio device;
AMP: Amplifier;
RECR: Receiver (combined radio and amplifier);
HTIB: Home Cinema;
MP3: MP3 player;
CD: CD player;
TAPE: Cassette players;
TUNER: Radio;
PHONO: Record player.
Helpline No. UK/ North Ireland 0871 37 61 020 Rep. Ireland 1-800-992 508
Web Support www.medion.co.uk
Model Number: 83388
10
Page 11

Assigment to code groups
Each type of device is assigned to a group of device codes. When you select a device type,
the appropriate code group is searched to find a device code. Device types are assigned
as follows:
Device type Code group
TV TV
VCR, LD, DVD, DVR, HDD, HTIB VCR/DVD
SAT, CABLE, DVB-T, STB, CBL/SAT
AUDIO, AMP, RECR, MP3, CD, TAPE, TUNER, PHONO, HTIB
(some)
CD/AUDIO
Programming options
The following sections describe the different methods for finding a device code:
• by selecting a code for a certain device type in the display,
• according to the enclosed Code List,
• by running a search,
• by brand name.
For combined devices (e.g. TV set with video recorder, TV set with DVD player, DVD and
video recorder) it is often necessary to assign two mode keys with the respective code for
each part of the device (e.g. the TV mode key for TV functions and a different mode key for
the VCR or DVD functions). However, there are also combined devices with only one code
for both device parts (see also “Operating combined devices” on page 17).
Opens programming mode
` To open the programming mode, press and hold the Setup
key until CODE SETUP appears along with "SET" in the display.
Select device code in the display
1. Switch on the device to be controlled.
2. Keep the Setup key pressed down for approx. 3 seconds,
CODE SETUP appears.
until
3. Press OK. The
4. Press OK. The
5. Press the required mode key (TV, VCR, DVD, CD, ASAT, CBL,
AUX, DSAT). In the display you see the words
6. Use the arrows to select the device type to be
programmed on this mode key. (If you select "
type because only TV codes can be programmed on the TV mode key.)
LIST CODES menu is displayed.
MODE KEY display appears.
DEVICE? TV.
TV" it is not possible to select a device
Helpline No. UK/ North Ireland 0871 37 61 020 Rep. Ireland 1-800-992 508
Web Support www.medion.co.uk
Model Number: 83388
11
Page 12

Please refer to the list and table above.
7. Press OK.
the device group that contains the previously selected
device type are now scanned in order of brand name (cf. the
enclosed code list). The first entry is displayed in alphabetical
order with the first code.
8. Use the arrows to select
device. The first code is shown.
9. Use the arrows to select a device code for this brand name.
10. Now try the universal remote control with your device. To do this, (depending on the
device type) use the following keys POWER
Video text as well as the six playback keys.
If the device does not respond as expected, select a different
code.
11. When you have found a suitable device code, press OK to
save the code.
PLEASE WAIT appears in the display. The codes for
the brand name of your
, 0 – 9, VOL, PROG, AV, Mute ,
PLEASE WAIT appears again in the display, followed by the
confirmation message
The remote control returns to normal operation.
SUCCESS.
Entering the device code according to the code list
The codes of the corresponding devices can be found in the code list enclosed with these
operating instructions.
1. Switch on the device to be controlled.
2. Keep the Setup key pressed down for approx. 3 seconds,
CODE SETUP appears.
until
3. Press OK.
4. Use the arrows to select
5. Press OK. The
6. Press the required mode key (TV, VCR, DVD, CD, ASAT,
CBL, AUX, DSAT). The mode key label is displayed with the
current code.
LIST CODES now appears in the display.
the ENTER CODES menu.
MODE KEY display appears.
Helpline No. UK/ North Ireland 0871 37 61 020 Rep. Ireland 1-800-992 508
Web Support www.medion.co.uk
Model Number: 83388
12
Page 13

7. Use the number keys to select the preferred code from the
code list. After you enter the fourth digit, the confirmation
message
The remote control returns to normal operation.
If an incorrect code is entered, the error message
appears. – The universal remote control then switches to normal
operation.
SUCCESS is displayed.
CODE ERROR
Manual code search
You can use the manual code search to find all of a device's codes, including those that
are not shown in the code list.
1. Switch on the device to be controlled.
2. Keep the Setup key pressed down for approx. 3 seconds,
until CODE SETUP appears.
3. Press OK. LIST CODES now appears in the display.
4. Use the arrows
menu.
5. Press OK" The MODE KEY display appears.
6. Press the required mode key (TV, VCR, DVD, CD, ASAT, CBL,
AUX, DSAT). The
7. Use the arrows to select the device type to be
programmed on this mode key. (If you select "
possible to select a device type because only TV codes can be programmed on the TV
mode key.)
(press twice) to select the SEARCH CODES
DEVICE TV display appears.
TV" it is not
Please refer to the list and table above.
8. Press OK. The SEARCH KEY display appears.
9. Perform the function test now by pressing the PROG+,
or PLAY (VCR only) keys (up to 350 times) until the device
changes channels, switches off or responds accordingly.
The code search begins with the code that is currently
stored. While the search is running, the word
device type) is displayed.
If you miss the code, you can go back step by step with the PROG– key.
10. When the device responds accordingly each time a key is
pressed, press OK to save the code. The SUCCESS
confirmation message appears.
The remote control returns to normal operation.
SEARCHING (along with the selected
Helpline No. UK/ North Ireland 0871 37 61 020 Rep. Ireland 1-800-992 508
Web Support www.medion.co.uk
Model Number: 83388
13
Page 14

When all codes for the selected device type are shown, the
following message appears:
SEARCH END.
Code searching by brand name
This function gives you the option of searching by brand name. You can find the brand
name in the code list under "Code Search by Brand Name".
1. Switch on the device to be controlled.
2. Keep the Setup key pressed down for approx. 3 seconds,
CODE SETUP appears.
until
3. Press OK.
4. Use the arrows (press three times) to select the BRAND
CODES
5. Press OK. The
6. Press the required mode key (TV, VCR, DVD, CD, ASAT,
CBL, AUX, DSAT). The
7. Use the arrows to select
programmed on this mode key. (If you select "
type, because only TV codes can be programmed on the TV mode key.)
Please refer to the list and table above.
8. Press OK. The
9. Press a number key for a required manufacturer according to
the following overview:
Key 1 = Medion, Tchibo
Key 2 = Philips, Radiola, Philco, Erres, Pye
Key 3 = Sony, Akai, Panasonic, JVC, Sharp, Toshiba,
Daewoo
Key 4 = Thomson, Brandt, Fergusson
Key 5 = Saba, Nordmende, Telefunken
Key 6 = Grundig, Blaupunkt
Key 0 = all brands.
10. Press OK. The
11. Perform the function test now by pressing the PROG+,
or PLAY keys (VCR only) until the device changes channel,
switches off or responds accordingly.
The code search begins with the code that is currently stored.
While the search is running, the word
type) is displayed.
If you miss the code, you can go back step by step with the PROG– key.
LIST CODES now appears in the display.
menu.
MODE KEY display appears.
DEVICE TV display appears.
the device type to be
TV" it is not possible to select a device
BRAND KEY? query appears.
SEARCH KEY? display appears.
SEARCHING (along with the selected device
Helpline No. UK/ North Ireland 0871 37 61 020 Rep. Ireland 1-800-992 508
Web Support www.medion.co.uk
Model Number: 83388
14
Page 15

12. When the device responds accordingly each time a key is
pressed, press OK to save the code. The
confirmation message appears.
The remote control returns to normal operation.
SUCCESS
Code identification
If you want to know which code is saved on a particular mode
key, simply press this key. The selected device type and device
code appear.
Helpline No. UK/ North Ireland 0871 37 61 020 Rep. Ireland 1-800-992 508
Web Support www.medion.co.uk
Model Number: 83388
15
Page 16

Normal operation 10
Operating individual devices
After you have finished programming your remote control for your audio/video devices,
the remote control will work in the common main functions just like the original remote
control for the respective device.
Point your remote control at the desired device and press the
relevant mode key. The mode key label is displayed with the
programmed in code. [For the universal functions – see
Universal functions (“Punch Through”) on page 27 – you do not
need to press the mode key in advance.]
Activate the functions by pressing the corresponding function
key on your universal remote control. The symbol for infrared
transmission appears each time you press a key.
Each time a key is pressed the display backlight switches on for between 10 and 60
seconds (to set this duration please read: “Backlight” on page 8).
Please note:
In certain circumstances, not every function of your original remote control may be
directly available on the universal remote control.
Especially for newer devices, it might be possible that the functions are stored to
different keys than expected or may not even be available at all.
In these cases you can use the learn function to transfer the functions of your
original remote control to the desired keys of the universal remote control (see
“Learn function” on page 22).
SHIFT function
After you program a device code, the universal remote control keys can have double
functions (with the exception of the S_(Setup) and MACRO keys).
` To use the second function, briefly press the Setup key and then (within 15-20
seconds) press one of the secondary function or number keys.
Try out which additional functions a key has for a particular device code.
Recordings
The (Record) key for recording (e.g. on video recorder, DVD, or cassette recorder)
must be pressed twice. This acts as a protection from accidental recordings.
Helpline No. UK/ North Ireland 0871 37 61 020 Rep. Ireland 1-800-992 508
Web Support www.medion.co.uk
Model Number: 83388
16
Page 17

EPG – Electronic Programme Guide
The EPG ("Electronic Programme Guide") key has various functions depending on which
code has been used:
• For TV and satellite codes (e.g. SAT-TV or DVB-T), the button opens the electronic
programme guide.
• For DVD codes the button opens the title menu.
• For VCR codes you can use the button for programming, if your video recorder has a
Showview function.
If the device has both an EPG and a Showview function, the EPG function is given priority.
Operating combined devices
Combined devices are for example a TV set with an integrated video recorder, a TV set
with a DVD player or a DVD recorder with a video recorder. Several controlling options are
available to combined devices.
Combined devices with two device codes
Some combined devices (e.g. TV set with video recorder) require two device codes - one
for each device part. Program the correct TV code on the TV mode key and the video
recorder code on the other mode key. The combined device is then controlled like two
separate devices.
Combined devices with one device code
Other combined devices only require one code. In this case, you must first select the
device part you would like to operate.
Example: The device is a combined DVD recorder/video recorder. The device code was
stored on the DVD mode key.
Now activate the DVD part in the combined device by holding down the DVD mode key
for longer than one second.
To activate the video recorder in the combined device, first briefly press the Setup key for
the SHIFT function, then the DVD mode key.
If your combined unit only requires one code but you would like to operate it with two
mode keys, then proceed as follows:
Programme the device code to two mode keys.
Operate one of the unit parts with one of the two mode keys.
Use the learn function (see “Learn function” on page 22) to transfer the desired functions
of the other unit part to the other mode key.
Helpline No. UK/ North Ireland 0871 37 61 020 Rep. Ireland 1-800-992 508
Web Support www.medion.co.uk
Model Number: 83388
17
Page 18

ALL OFF function
You can switch off all pre-programmed devices at the same time. This is done as follows:
1. Press the ALL OFF key twice in rapid succession and keep it pressed down after the
second time for approx. 3 seconds.
2. When you release the key,
are switched off.
Some devices can be switched on and off with the ALL OFF key Devices switched off in
such a way will, if they were switched off, be switched back on when you perform the ALL
OFF function.
ALL OFF appears and the devices
Helpline No. UK/ North Ireland 0871 37 61 020 Rep. Ireland 1-800-992 508
Web Support www.medion.co.uk
Model Number: 83388
18
Page 19

Set timer 11
The universal remote control has two timer functions:
• a sleep-timer for the TV (automatic switch off after 1 to 90
minutes);
"Zzz" appears in the display:
• four additional times for customisable commands (e.g. switching
to another programme); the bell symbol appears in the display.
TV sleep-timer
Set sleep-timer
1. Keep the Setup key pressed down for approx. 3 seconds,
until
CODE SETUP appears.
2. Press Setup briefly twice more to open TIMER SETUP.
3. Press OK" The
4. Press OK" The
5. Press OK" The number of minutes flash in the display.
6. Use the arrows
device should switch itself off automatically.
7. Press OK" The SUCCESS confirmation message appears
along with the TV timer symbol "Zzz".
8. Lay the universal remote control down so that it is pointing
towards the device and is not obstructed.
TV SLEEP SETUP menu is displayed.
TV SLEEP SET display appears.
to enter the time after which the TV
Switch off sleep-timer
If a sleep-timer is on ("Zzz" appears in the display)
instead of
above.
1. Perform steps 1 to 4 as described above. The TV SLEEP
2. Press OK" The message
3. Press OK" The SUCCESS confirmation message appears.
TV SLEEP SET when you perform the steps described
CLEAR
display appears.
CONFIRM CLEAR is displayed.
TV SLEEP CLEAR appears in the display
Helpline No. UK/ North Ireland 0871 37 61 020 Rep. Ireland 1-800-992 508
Web Support www.medion.co.uk
Model Number: 83388
19
Page 20

Command timer
The clock must be set for this timer.
You can use the command timer to program a function that is to run automatically at a
particular time within the next 24 hours. The command series can contain up to four
commands, the first command must always be the selection of a mode key.
The following keys are not available for the remaining three commands: the mode keys,
the joystick (arrows and OK), MACRO, SETUP, EXIT.
You can create four command timers (Timer 1, Timer 2, Timer 3, Timer 4).
When the command is run this timer is automatically deleted.
Program the command timer
Example: This is how to program a command timer to control a recording on a DVD
recorder.
1. Keep the Setup key pressed down for approx. 3 seconds,
until
CODE SETUP appears.
2. Press Setup briefly twice more to open TIMER SETUP.
3. Press OK" The
4. Use the arrows to select
5. Press OK" The TIMER 1 SET display appears.
6. Press OK" The time when the command will be run appears.
The hours flash.
7. Use the arrows to set
pressing OK.
The minutes flash.
8. Use the arrows to set
pressing OK.
9. The
TIMER 1 MODE? display prompts you to enter the
command. Use the mode key to select the device on which
the command should be performed.
In our example, DVD if the DVD recorder was programmed
on this key.
10. Press OK. You are prompted to make the first entry
. Enter the first command.
KEY1
In our example: Use the number keys to select the
programme.
If no other input is needed, press OK or EXIT.
SLEEPTIMER TV menu is displayed.
the TIMER 1 SETUP menu 3.
the hour and confirm by
the minutes and confirm by
TIMER 1
3
If a command timer has already been entered, then TIMER 2, 3 or 4 appears here.
Helpline No. UK/ North Ireland 0871 37 61 020 Rep. Ireland 1-800-992 508
Web Support www.medion.co.uk
Model Number: 83388
20
Page 21

11. The TIMER 1 KEY2 display appears. Enter the second
command.
In our example: Press the Record key.
12. The TIMER 1 KEY3 display appears after the second command.
In our example, press the Record key again.
13. The
SUCCESS confirmation message appears along with the
bell symbol after the third command.
14. Lay the universal remote control down so that it is pointing
towards the device and is not obstructed.
You can cancel programming at any time by pressing EXIT.
Delete command timer
If a command timer is set (the bell symbol appears in the display), TIMER 1 CLEAR appears
in the display instead of TIMER 1 SET in the steps described above.
1. Perform steps 1 to 5 as described above. The TIMER 1 CLEAR
display appears.
2. Press OK" The message
3. Press OK" The SUCCESS confirmation message appears.
CONFIRM CLEAR is displayed.
Helpline No. UK/ North Ireland 0871 37 61 020 Rep. Ireland 1-800-992 508
Web Support www.medion.co.uk
Model Number: 83388
21
Page 22

Learn function 12
You can manually save the functions of an original remote control to your universal
remote control. Commands are saved to the mode key on which the device of the
original remote control was programmed.
The universal remote control can “learn” up to 150 commands.
Notes on learn function
• Use new batteries for both remote controls.
• If you start programming from the start
– especially after the first operation – delete all saved commands first of all (see
“Deleting commands for all mode keys” on page 24).
• Only one original remote control can be programmed on each mode key.
• If you would like to program an original remote control to a mode key, first delete the
commands on this mode key (see Deleting commands for only one mode key on page
24).
LEARN ERROR message is displayed if the memory is full. If this happens, delete saved
• The
commands.
• Programming each key can take approx. 3 seconds. Do not release the key to be learned
before the SUCCESS or LEARN ERROR message appears.
• The following keys cannot be assigned to functions: Setup, MACRO and all mode keys.
• Some original remote controls (for DVD, video recorder, SAT) can themselves be
programmed with the device codes of some TV brands to carry out basic TV set
functions (volume, mute, channel search).
Do not attempt to transfer the functions of an original remote control that has been
programmed with the code of a different TV set to your universal remote control. This
could cause programming errors.
• First try to program two or three commands and then test them.
• Before programming in your commands, first delete all existing commands (see “Deleting
commands for all mode keys” on page 24).
Do not execute the learn function under a low-energy lamp. Such lamps (e.g.
fluorescent lamps) can contain infrared light components that could influence the
learn function.
Helpline No. UK/ North Ireland 0871 37 61 020 Rep. Ireland 1-800-992 508
Web Support www.medion.co.uk
Model Number: 83388
22
Page 23

Program commands
To programme, proceed as follows:
1. Place the remote controls with the infrared diodes facing each other spaced 15 to 50
mm apart on the table. The infrared diodes must be pointing directly at each other.
2. Keep the Setup key pressed for approx. 3 seconds until
CODE SETUP appears.
3. Press Setup briefly three more times to open the
menu.
SETUP
4. Press OK to open the learn mode.
5. Confirm once again with OK.
6. Now select the mode key on which the device of the
original remote control was programmed.
7. The
LEARN KEY prompt appears. Now select the key on the
universal remote control that is to be assigned to the
original remote control function (not: Setup or MACRO).
8. In the display you now see
the universal remote control whose function should be
assigned to the universal remote control. Keep this key
pressed until either the
appears.
9. The following query appears: LEARN MORE?. If you want to
perform additional learn functions, confirm with OK. The
LEARNING. Now select the key on
SUCCESS or LEARN ERROR message
LEARN KEY prompt appears again. Proceed as described in
point 7.
If you want to end the learn function, press EXIT.
The remote control returns to normal operation.
LEARN
Helpline No. UK/ North Ireland 0871 37 61 020 Rep. Ireland 1-800-992 508
Web Support www.medion.co.uk
Model Number: 83388
23
Page 24

Delete commands
Deleting commands for only one mode key
Open the learn mode as described in the previous section, steps
2 to 4. Proceed as follows:
5. Use the arrows to select
6. Now select the mode key whose commands are to be
deleted.
7. Confirm the additional CONFIRM CLEAR prompt by pressing
OK. If this message does not appear then the mode key
does not have any commands associated with it.
8.
PLEASE WAIT appears again in the display, followed by the
confirmation message SUCCESS.
The remote control returns to normal operation.
Deleting commands for all mode keys
Open the learn mode as described in the section above, steps 2
to 4. Proceed as follows:
5. Use the arrows
CLEAR
mode.
6. Press OK" The
7. Confirm once again with OK. PLEASE WAIT appears again in
the display, followed by the confirmation message
The remote control returns to normal operation.
(press twice) to select the ALL LEARN
CONFIRM CLEAR prompt appears.
the delete mode and press OK.
SUCCESS.
Helpline No. UK/ North Ireland 0871 37 61 020 Rep. Ireland 1-800-992 508
Web Support www.medion.co.uk
Model Number: 83388
24
Page 25

Macros 13
Using a macro, you can save a chain of commands, meaning that several functions can be
executed consecutively. You can program three macros and store them on the number
keys 1, 2 and 3.
These three number keys have the additional labels TV, VCR,
DVD, so that you can assign macros accordingly.
Each macro can include up to ten key commands. A macro can
include different devices. In this way you could, for example, switch on the TV set, the
desired channel, the video recorder and the recording function by simply pressing the
MACRO key and the selected number key 1, 2 or 3.
The Setup and MACRO keys cannot be used for a macro.
If you would like to interrupt macro programming prematurely, press Setup. In this case,
the macro is not saved.
Programming macros
1. Keep the Setup key pressed for approx. 3 seconds, until CODE
appears.
SETUP
2. Press Setup briefly four more times to open the
menu.
SETUP
3. Press OK to open the MACRO SET mode.
4. Confirm once again with OK.
5. Now select the number key 1, 2 or 3 where the macro is to
be saved.
6. The query
corresponds to the previously selected number key.) Press a
mode key for the device where the command is to start.
7. The input query
02 for the second step). Now carry out the function that you
(
would like to save as a macro. You can press up to 9 other
keys and you can also change devices via the mode keys.
8. When the series of steps is finished, press the
save the macro.
The macro is saved automatically after step 10.
9. The
MACRO 1 MODE? appears. (The number
MACRO 1 KEY? appears with the step number
SUCCESS confirmation message appears.
MACRO
MACRO key to
Helpline No. UK/ North Ireland 0871 37 61 020 Rep. Ireland 1-800-992 508
Web Support www.medion.co.uk
Model Number: 83388
25
Page 26

Incorporating delays
It can be useful to incorporate a time delay before a command step in order to take the
warm-up phase of the TV set into consideration, for example. The standard delay between
the infrared signals is equal to half a second.
1. While entering the steps (see Point 7 above) press the PAUSE
key at the point where the time delay should be
incorporated.
DELAY TIME? query appears.
The
2. Press a number key corresponding to the seconds by which
you would like to delay (e.g. “3” for a 3-second delay). The
maximum delay is 9 seconds.
Executing macros
1. To execute a macro, briefly press the MACRO key once in
normal mode. The following message appears:
KEY?
.
2. Then press the number key where the macro was saved
within 20 seconds (1, 2 or 3).
While the macro is running,
with the transmission symbol.
If no macro is saved under the selected numberkey, the
message MACRO 1 VOID appears.
MACRO 1 (or 2 or 3) appears along
MACRO
Deleting macros
Perform steps 1 to 3 as described in section “Programming
macros on page 25. The
4. Use the arrows
5. Press OK" The following message appears:
6. Press the number key where the macro is stored for the
macro that you would like to delete.
7. The
CONFIRM CLEAR prompt appears.
8. Confirm once again with OK.
the display, followed by the confirmation message SUCCESS.
The remote control returns to normal operation.
Helpline No. UK/ North Ireland 0871 37 61 020 Rep. Ireland 1-800-992 508
Web Support www.medion.co.uk
Model Number: 83388
MACRO SET display appears.
to select the MACRO CLEAR mode.
MACRO KEY?.
PLEASE WAIT appears again in
26
Page 27

Universal functions (“Punch Through”) 14
The universal functions (also called “Punch Through” functions) enable you to carry out
certain functions on a different device type than the programmed one. These are the
volume, mute and playback functions.
Playback functions
If the remote control is in TV, SAT or cable mode (devices without playback function), the
PLAY, STOP, PAUSE, FAST FORWARD/BACK, and in some cases RECORD keys will
control a connected video recorder, DVD player or video recorder. The DVD or VCR mode
keys do not need to be pressed in advance. The last selected device is activated.
This Punch Through control does not work if the programmed TV, SAT or cable code has
its own video recorder function (for example in the case of a combined TV-video recorder
device).
Volume/mute
Image transmitting devices connected to a TV (e.g. TV, DVD, VCR, SAT, CBL) often do not
have their own volume control.
When the universal remote control is controlling this type of device and the VOL
(Volume) or (
You can modify this basic device setting (cf. both sections below).
The volume/mute functions are referred to in the shortened form VOL/MUTE below.
) (Mute) keys are pressed, the volume control is transferred to the TV.
Helpline No. UK/ North Ireland 0871 37 61 020 Rep. Ireland 1-800-992 508
Web Support www.medion.co.uk
Model Number: 83388
27
Page 28

Programming the VOL/MUTE universal functions to another device type
You can program the remote control so that the universal functions VOL/MUTEwill control
a device type other than the TV set. Of course this device must have a volume control.
1. Keep the Setup key pressed down for approx. 3 seconds,
CODE SETUP appears.
until
2. Press Setup again briefly to open
3. Press OK" The VOL/MUTE SETUP is displayed.
4. Press OK again. The following menu is displayed
. All VOL/MUTE commands are programmed on a device
SET
type that you select in the next step.
5. Press OK again. The ALL VOL MODE? query appears.
6. Use a mode key to select the device type to which the
VOL/MUTE control is to be applied.
7.
PLEASE WAIT appears again in the display, followed by the
confirmation message
If you selected the wrong device that does not have its own
volume control, an error message appears.
SUCCESS.
SYSTEM SETUP.
ALL VOL.
Helpline No. UK/ North Ireland 0871 37 61 020 Rep. Ireland 1-800-992 508
Web Support www.medion.co.uk
Model Number: 83388
28
Page 29

Switching off the VOL/MUTE universal function for a specific device
You can program the universal remote control in such a way that it will use only that
particular device’s own VOL/MUTE functions. The "Punch Through" function for this
device is therefore switched off.
The universal function cannot be switched off for the TV mode. As described in the
previous section, if you have selected a different mode for the VOL/MUTE universal
function, you will not be able to switch off the universal function
for this mode either.
1. Keep the Setup key pressed down for approx. 3 seconds,
CODE SETUP appears.
until
2. Press Setup again briefly to open SYSTEM SETUP.
3. Press OK" The VOL/MUTE SETUP is displayed.
4. Press OK again. The
5. Use the arrows to select the MODE VOL. SET menu. Use
this menu to switch off the VOL/MUTE universal function for
an individual device that you can select in the next step.
6. Press OK" The
7. Use a mode key to select the device type which should have
its own VOL/MUTE control (not: TV).
8.
PLEASE WAIT appears in the display, followed by the
confirmation message
ALL VOL SET menu is displayed.
MODE VOL MODE? query appears.
SUCCESS.
Helpline No. UK/ North Ireland 0871 37 61 020 Rep. Ireland 1-800-992 508
Web Support www.medion.co.uk
Model Number: 83388
29
Page 30

Restoring the VOL/MUTE universal function factory settings
If you have changed the universal VOL/MUTE functions as described in the previous two
sections, you can reset the functions to the factory settings.
1. Keep the Setup key pressed down for approx. 3 seconds,
CODE SETUP appears.
until
2. Press Setup again briefly to open
3. Press OK" The
4. Press OK again. The
5. Use the arrows (press twice) to select the VOL/MUTE
RESET
menu.
6. Press OK" The CONFIRM RESET message is displayed.
7. Confirm with OK to reset the settings.
PLEASE WAIT appears again in the display, followed by the
8.
confirmation message
VOL/MUTE SETUP is displayed.
VOL/MUTE ALL menu is displayed.
SUCCESS.
SYSTEM SETUP.
Helpline No. UK/ North Ireland 0871 37 61 020 Rep. Ireland 1-800-992 508
Web Support www.medion.co.uk
Model Number: 83388
30
Page 31

Error recovery 15
The display remains dark:
• Check whether the remote control batteries have been correctly inserted and have
matching +/– polarity.
• If the batteries are too weak then replace them with new ones.
The remote control does not work:
• Check whether your devices have been properly connected and are switched on.
There are several device codes listed under the brand name of my device. How do I
determine the correct device code?
• To determine the correct device code for your device, try each consecutive code until
most of the functions of the device function properly.
The devices only respond to a few remote control commands:
• Continue testing further codes until the devices respond to the commands accordingly.
• If none of the code programmings described are successful, it may be, in exceptional
cases, that the device is not compatible with your universal remote control.
Helpline No. UK/ North Ireland 0871 37 61 020 Rep. Ireland 1-800-992 508
Web Support www.medion.co.uk
Model Number: 83388
31
Page 32

Disposal 16
Packaging
Your universal remote control is wrapped in packaging to protect it against
transportation damage. Packaging is raw material and can be reused or added to
the recycling system.
Device
At the end of its life, the universal remote control should not be disposed of in
household rubbish. Seek the advice of your local authority on correct,
environmentally-friendly disposal.
Batteries
Do not dispose of used batteries in the household rubbish! They should be
deposited at a collection point for used batteries.
Technical data 17
Batteries (included): 2 x 1.5 V Micro (LR03, AAA)
Laser class: 1
Helpline No. UK/ North Ireland 0871 37 61 020 Rep. Ireland 1-800-992 508
Web Support www.medion.co.uk
Model Number: 83388
32
 Loading...