


TABLE OF CONTENTS
SAFETY INFORMATION . . . . . . . . . . . . . . . . . . . . . . . . . . . . . . . . . . . . . . . . . . . . . . . . . . . . . . . . . . . . . 4
GENERAL . . . . . . . . . . . . . . . . . . . . . . . . . . . . . . . . . . . . . . . . . . . . . . . . . . . . . . . . . . . . . . . . . . . . . . . 6
PREPARATION . . . . . . . . . . . . . . . . . . . . . . . . . . . . . . . . . . . . . . . . . . . . . . . . . . . . . . . . . . . . . . . . . . . . 8
AVAILABLE CONNECTIONS . . . . . . . . . . . . . . . . . . . . . . . . . . . . . . . . . . . . . . . . . . . . . . . . . . . . . . . . . . 9
PRIMARY SETTINGS . . . . . . . . . . . . . . . . . . . . . . . . . . . . . . . . . . . . . . . . . . . . . . . . . . . . . . . . . . . . . . 14
OSD language select . . . . . . . . . . . . . . . . . . . . . . . . . . . . . . . . . . . . . . . . . . . . . . . . . . . . . . . . . . . . . . . . . . . . . . . . 14
Country setup . . . . . . . . . . . . . . . . . . . . . . . . . . . . . . . . . . . . . . . . . . . . . . . . . . . . . . . . . . . . . . . . . . . . . . . . . . . . . . 14
Scan the antenna signal input source . . . . . . . . . . . . . . . . . . . . . . . . . . . . . . . . . . . . . . . . . . . . . . . . . . . . . . . . . . . 14
Time and date setting: . . . . . . . . . . . . . . . . . . . . . . . . . . . . . . . . . . . . . . . . . . . . . . . . . . . . . . . . . . . . . . . . . . . . . . . . 15
Complete primary settings . . . . . . . . . . . . . . . . . . . . . . . . . . . . . . . . . . . . . . . . . . . . . . . . . . . . . . . . . . . . . . . . . . . . 15
KEY FUNCTIONS . . . . . . . . . . . . . . . . . . . . . . . . . . . . . . . . . . . . . . . . . . . . . . . . . . . . . . . . . . . . . . . . .16
Sound functions . . . . . . . . . . . . . . . . . . . . . . . . . . . . . . . . . . . . . . . . . . . . . . . . . . . . . . . . . . . . . . . . . . . . . . . . . . . . . 22
Navigating MP3 CDs and Audio CDs . . . . . . . . . . . . . . . . . . . . . . . . . . . . . . . . . . . . . . . . . . . . . . . . . . . . . . . . . . . 22
Navigating JPEG and PICTURE CDs . . . . . . . . . . . . . . . . . . . . . . . . . . . . . . . . . . . . . . . . . . . . . . . . . . . . . . . . . . . 23
SETTINGS AVAILABLE IN THE SETUP MENU . . . . . . . . . . . . . . . . . . . . . . . . . . . . . . . . . . . . . . . . . . .25
Entering the Setup Menu . . . . . . . . . . . . . . . . . . . . . . . . . . . . . . . . . . . . . . . . . . . . . . . . . . . . . . . . . . . . . . . . . . . . . 25
System menu . . . . . . . . . . . . . . . . . . . . . . . . . . . . . . . . . . . . . . . . . . . . . . . . . . . . . . . . . . . . . . . . . . . . . . . . . . . . . . . 25
Video menu . . . . . . . . . . . . . . . . . . . . . . . . . . . . . . . . . . . . . . . . . . . . . . . . . . . . . . . . . . . . . . . . . . . . . . . . . . . . . . . . 25
Audio menu . . . . . . . . . . . . . . . . . . . . . . . . . . . . . . . . . . . . . . . . . . . . . . . . . . . . . . . . . . . . . . . . . . . . . . . . . . . . . . . . 26
Security menu . . . . . . . . . . . . . . . . . . . . . . . . . . . . . . . . . . . . . . . . . . . . . . . . . . . . . . . . . . . . . . . . . . . . . . . . . . . . . . 27
Record menu . . . . . . . . . . . . . . . . . . . . . . . . . . . . . . . . . . . . . . . . . . . . . . . . . . . . . . . . . . . . . . . . . . . . . . . . . . . . . . . 27
Disc menu . . . . . . . . . . . . . . . . . . . . . . . . . . . . . . . . . . . . . . . . . . . . . . . . . . . . . . . . . . . . . . . . . . . . . . . . . . . . . . . . . 27
PREPARING DISCS FOR RECORDING . . . . . . . . . . . . . . . . . . . . . . . . . . . . . . . . . . . . . . . . . . . . . . . . .29
Compatible Discs . . . . . . . . . . . . . . . . . . . . . . . . . . . . . . . . . . . . . . . . . . . . . . . . . . . . . . . . . . . . . . . . . . . . . . . . . . . 29
Disc Types . . . . . . . . . . . . . . . . . . . . . . . . . . . . . . . . . . . . . . . . . . . . . . . . . . . . . . . . . . . . . . . . . . . . . . . . . . . . . . . . . 29
Initialize a New Disc . . . . . . . . . . . . . . . . . . . . . . . . . . . . . . . . . . . . . . . . . . . . . . . . . . . . . . . . . . . . . . . . . . . . . . . . . . 29
Scheduled Disc Recording . . . . . . . . . . . . . . . . . . . . . . . . . . . . . . . . . . . . . . . . . . . . . . . . . . . . . . . . . . . . . . . . . . . . 30
Stop an In-Process Scheduled Recording . . . . . . . . . . . . . . . . . . . . . . . . . . . . . . . . . . . . . . . . . . . . . . . . . . . . . . . 31
Recording Quality . . . . . . . . . . . . . . . . . . . . . . . . . . . . . . . . . . . . . . . . . . . . . . . . . . . . . . . . . . . . . . . . . . . . . . . . . . . 31
Correct a Scheduled Recording . . . . . . . . . . . . . . . . . . . . . . . . . . . . . . . . . . . . . . . . . . . . . . . . . . . . . . . . . . . . . . . 31
Cancel a Scheduled Recording . . . . . . . . . . . . . . . . . . . . . . . . . . . . . . . . . . . . . . . . . . . . . . . . . . . . . . . . . . . . . . . . 32
Troubleshooting Scheduled Recordings . . . . . . . . . . . . . . . . . . . . . . . . . . . . . . . . . . . . . . . . . . . . . . . . . . . . . . . . . 32
Manual Disc Recording . . . . . . . . . . . . . . . . . . . . . . . . . . . . . . . . . . . . . . . . . . . . . . . . . . . . . . . . . . . . . . . . . . . . . . . 32
Pause recording . . . . . . . . . . . . . . . . . . . . . . . . . . . . . . . . . . . . . . . . . . . . . . . . . . . . . . . . . . . . . . . . . . . . . . . . . . . . . 33
Chapters . . . . . . . . . . . . . . . . . . . . . . . . . . . . . . . . . . . . . . . . . . . . . . . . . . . . . . . . . . . . . . . . . . . . . . . . . . . . . . . . . . . 33
Recording from External Devices . . . . . . . . . . . . . . . . . . . . . . . . . . . . . . . . . . . . . . . . . . . . . . . . . . . . . . . . . . . . . . . 33
Recording from a DV Camcorder . . . . . . . . . . . . . . . . . . . . . . . . . . . . . . . . . . . . . . . . . . . . . . . . . . . . . . . . . . . . . . 34
Editing Discs . . . . . . . . . . . . . . . . . . . . . . . . . . . . . . . . . . . . . . . . . . . . . . . . . . . . . . . . . . . . . . . . . . . . . . . . . . . . . . . 34
ADDITIONAL INFORMATION . . . . . . . . . . . . . . . . . . . . . . . . . . . . . . . . . . . . . . . . . . . . . . . . . . . . . . . . . 36
COUNTRY CODE . . . . . . . . . . . . . . . . . . . . . . . . . . . . . . . . . . . . . . . . . . . . . . . . . . . . . . . . . . . . . . . . . 37
TROUBLESHOOTING . . . . . . . . . . . . . . . . . . . . . . . . . . . . . . . . . . . . . . . . . . . . . . . . . . . . . . . . . . . . . . 43
TECHNICAL DATA . . . . . . . . . . . . . . . . . . . . . . . . . . . . . . . . . . . . . . . . . . . . . . . . . . . . . . . . . . . . . . . .45
DVD-RECORDER 80032 3

SAFETY INFORMATION
About this manual
Please read these instructions carefully before use. Take note of any warnings on the appliance and in the manual.
Always keep the operating manual close to hand. If you sell or give the device away, make
sure you also hand over this manual.
Electrical equipment does not belong in the hands of children.
Never allow children to use electrical devices unattended.
Batteries and accumulators can endanger life if swallowed. The appliance and
the batteries should, therefore, be kept out of the reach of children. If a battery
is swallowed, seek immediate medical help.
You should also keep the plastic packaging out of the reach of children - danger of suffocation.
Position the appliance safely.
Place the appliance on a solid, flat surface. The appliance is not designed for
operation in high humidity (e.g. in bathrooms). Ensure that the
the ventilation slits are not covered and that ventilation is unimpeded,
the appliance is not affected by any direct source of heat (e.g. room hea-
ters),
the appliance is not standing in direct sunlight,
the appliance does not come into contact with humidity, water or splashes
(do not, for example, stand vases on the appliance),
the appliance is not adjacent to sources of magnetic fields, such as televi-
sion receivers or loudspeakers,
the appliance is not near naked flames, such as burning candles.
If the appliance is moved from a cold place to a warm room, condensation
may form inside the appliance. Wait for a few hours before turning it on.
Do not subject the appliance to vibrations. Vibration can damage the sen-
sitive electronics.
Leave the mains connection accessible.
Only connect the appliance to a readily accessible socket (AC 100~240 V,
50/60 Hz) that is with a short distance of the point of installation. In the event
that the appliance must be disconnected quickly, the socket must be readily
accessible.
To avoid tripping people up, do not use an extension cable.
4
Never attempt to repair the appliance yourself.
If the plug, supply cable or the appliance is damaged or water or foreign objects get inside the appliance, pull the plug immediately.
Never switch on if the plug, supply cable or the appliance is damaged.
No objects may get inside the appliance, e.g. through the ventilation slots.
These could cause short-circuits or damage components.
To unplug, pull on the plug itself and never on the cable.
Never try to open and/or repair the appliance yourself. There is a danger of
electric shock. In the event of a fault, contact our service centre or another
qualified workshop.
Thunderstorms
If you are away for a long time or a thunderstorm is threatening, pull the mains
and antenna plugs.
SAFETY INFORMATION
The CD/DVD recorder
The DVD recorder is a class 1 laser product. The appliance has a safety system that prevents the emission of dangerous laser radiation during normal
use. To avoid eye injuries, never manipulate or damage the safety system.
Dispose of batteries correctly.
Used batteries do not belong in the household waste. The batteries can be
handed in to a collection point or a specialist retailer for disposal.
Cleaning the appliance
Before cleaning, pull the plug. Use a dry soft cloth for cleaning. Avoid chemical
solvents and cleaners, as these can damage the surfaces and/or lettering of
the appliance.
DVD-RECORDER 80032 5
GENERAL
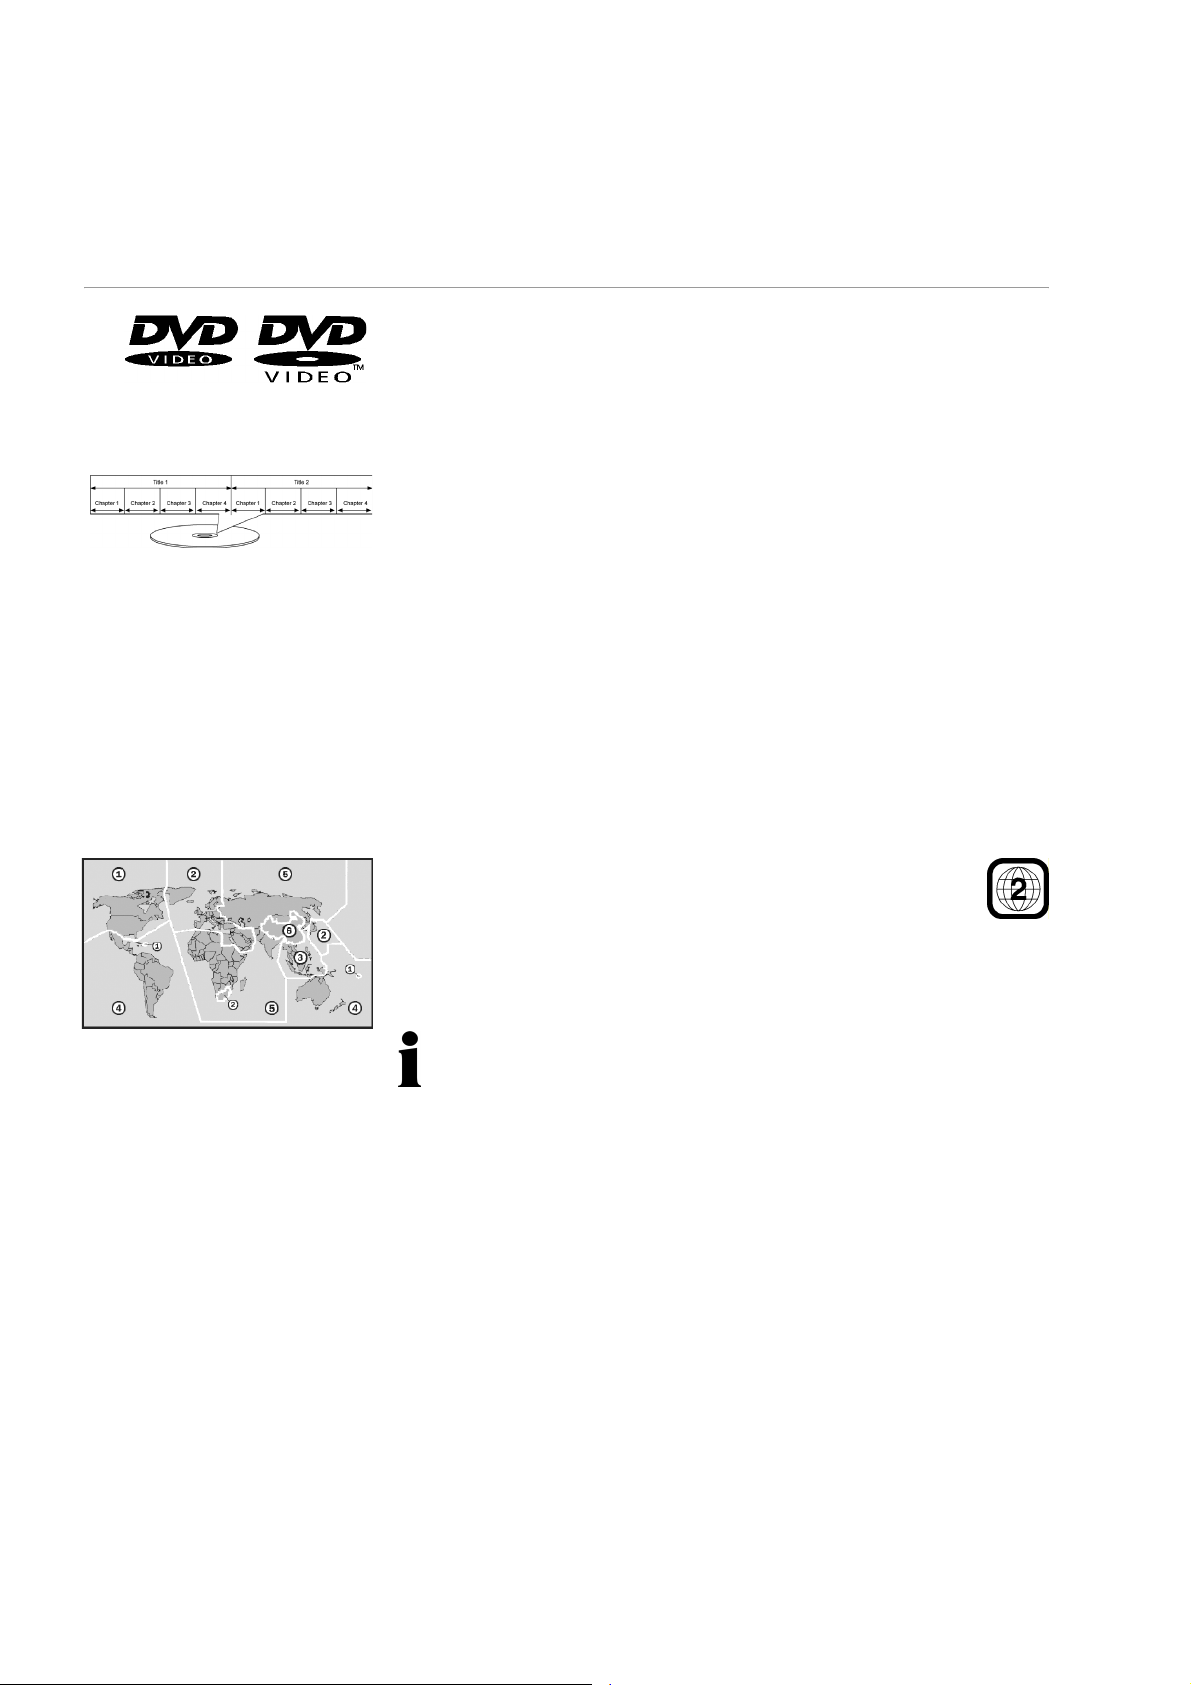
About DVD
The DVD - Digital Versatile Disc is a storage medium for digital information.
DVDs are marked with one of the adjacent symbols.
Depending on how the information is recorded, there are different types of
DVD with differing storage capacities.
DVD structure
Video DVDs are divided into titles and chapters. A DVD can have a number of
titles, each consisting of a number of chapters. Titles and chapters are serially
numbered:
Normally, the first title of a DVD consists of license notices and information
about the manufacturer. The next title is usually the film itself. Further titles can
be, for example, "Making of" reports, film previews or information about the
cast.
Languages and subtitles DVDs can store sound tracks in up to eight languages and subtitles in up to
32 languages. Sound track language and subtitle language can be mixed as
you wish.
Regional codes
In support of worldwide sales strategies, regional coding was developed
which only allows DVDs to be played on players purchased in certain regions.
This code is based on a system that divides the world into six regions. Europe is in zone 2. On your DVD player, you can only play
DVDs with regional code 2. The regional code is printed on the pakkaging of the DVD (see adjacent logo).
In addition to DVDs with regional code 2, you can play DVDs with regional
code 0 (no regional limitation) on your appliance.
If you have problems playing certain DVDs, check that they have regional
code 2 or 0.
DVD blanks
Your recorder can write two kinds of DVD blanks:
DVD+RW: DVD ReWritable blanks can be written a number of times. They
can be played on other DVD players without fixation (see "Finalize DVD
(DVD+R only)", p. 28).
DVD+R: DVD+R blanks (once-writable DVDs) cannot be played on other
DVD players without fixation. Although a recording on a DVD+R blank can be
deleted, it cannot be overwritten.
6

MP3 format
MP3 is a compression format for audio data. The MP3 format was developed
to provide extremely high compression of audio data.
To be recognised as such, MP3 files must be saved with the corresponding
.mp3 filename extension. Unlike the usual audio CD, an MP3 CD can be subdivided, in the same way as a computer data CD, into directories (folders, albums) and files (tracks, titles).
Available surround sound formats
GENERAL
Dolby Digital 5.1
This format uses digitally recorded sound with up to five separate full-band-
width audio channels (front left, right and middle, rear left and right) and an effects or base channel (5.1) recorded separately. Material with sound in Dolby
Digital format is marked with the adjacent trademark.
As the channels are completely independent, a three-dimensional impression
can be created with clarity of distance, movement and relative position.
Your DVD recorder can read these audio data and passes them to the digital
outputs (DIGITAL OUT) for decoding. It cannot, however, decode the sound
from a dts recording itself.
dts (Digital Theatre System)
The abbreviation dts denotes a sound format that is, as yet, not very widespread but also provides for the recording of up to six (5.1) separate channels. Material with sound in dts format is marked with the adjacent trademark.
Your DVD recorder can read these audio data and passes them to the digital
outputs (DIGITAL OUT) for decoding. It cannot, however, decode the sound
from a dts recording itself.
Prograssive Scan
Trademarks
"Dolby", "Pro Logic" and the
double-D symbol are trademarks of Dolby Labora-tories.
The term "dts" is a trademark of
DTS Technology, LLC.
Your recorder has standard, video, SCART (Peritel), S video, and component
outputs. With an S video connection, the picture quality is better than with a
simple cinch video connection. A SCART connection can yield still better picture quality than an S video connection.
If your TV receiver has a progressive scan capability, the best picture quality
will be obtained by using the component video outputs. Using progressive
scan, the picture frequency is higher, flicker is minimised and motion is better
resolved.
The requirement is, of course, that your TV receiver can process this format.
Progressive scan does not work with a SCART or any other video connection.
DVD-RECORDER 80032 7
PREPARATION
Unpack the appliance
Remove all packing material, including the protective foils on the front of the
appliance.
ATTENTION!
Do not allow small children to play with plastic foil danger of suffocation.
Check items delivered
When unpacking, ensure that the following parts were supplied:
DVD recorder
SCART cable
AV cable
Component cable
Antenna cable
Power cord
Remote control
2 mignon batteries (1,5 V; size AAA)
Empty DVD+RW
User instructions
Guarantee card
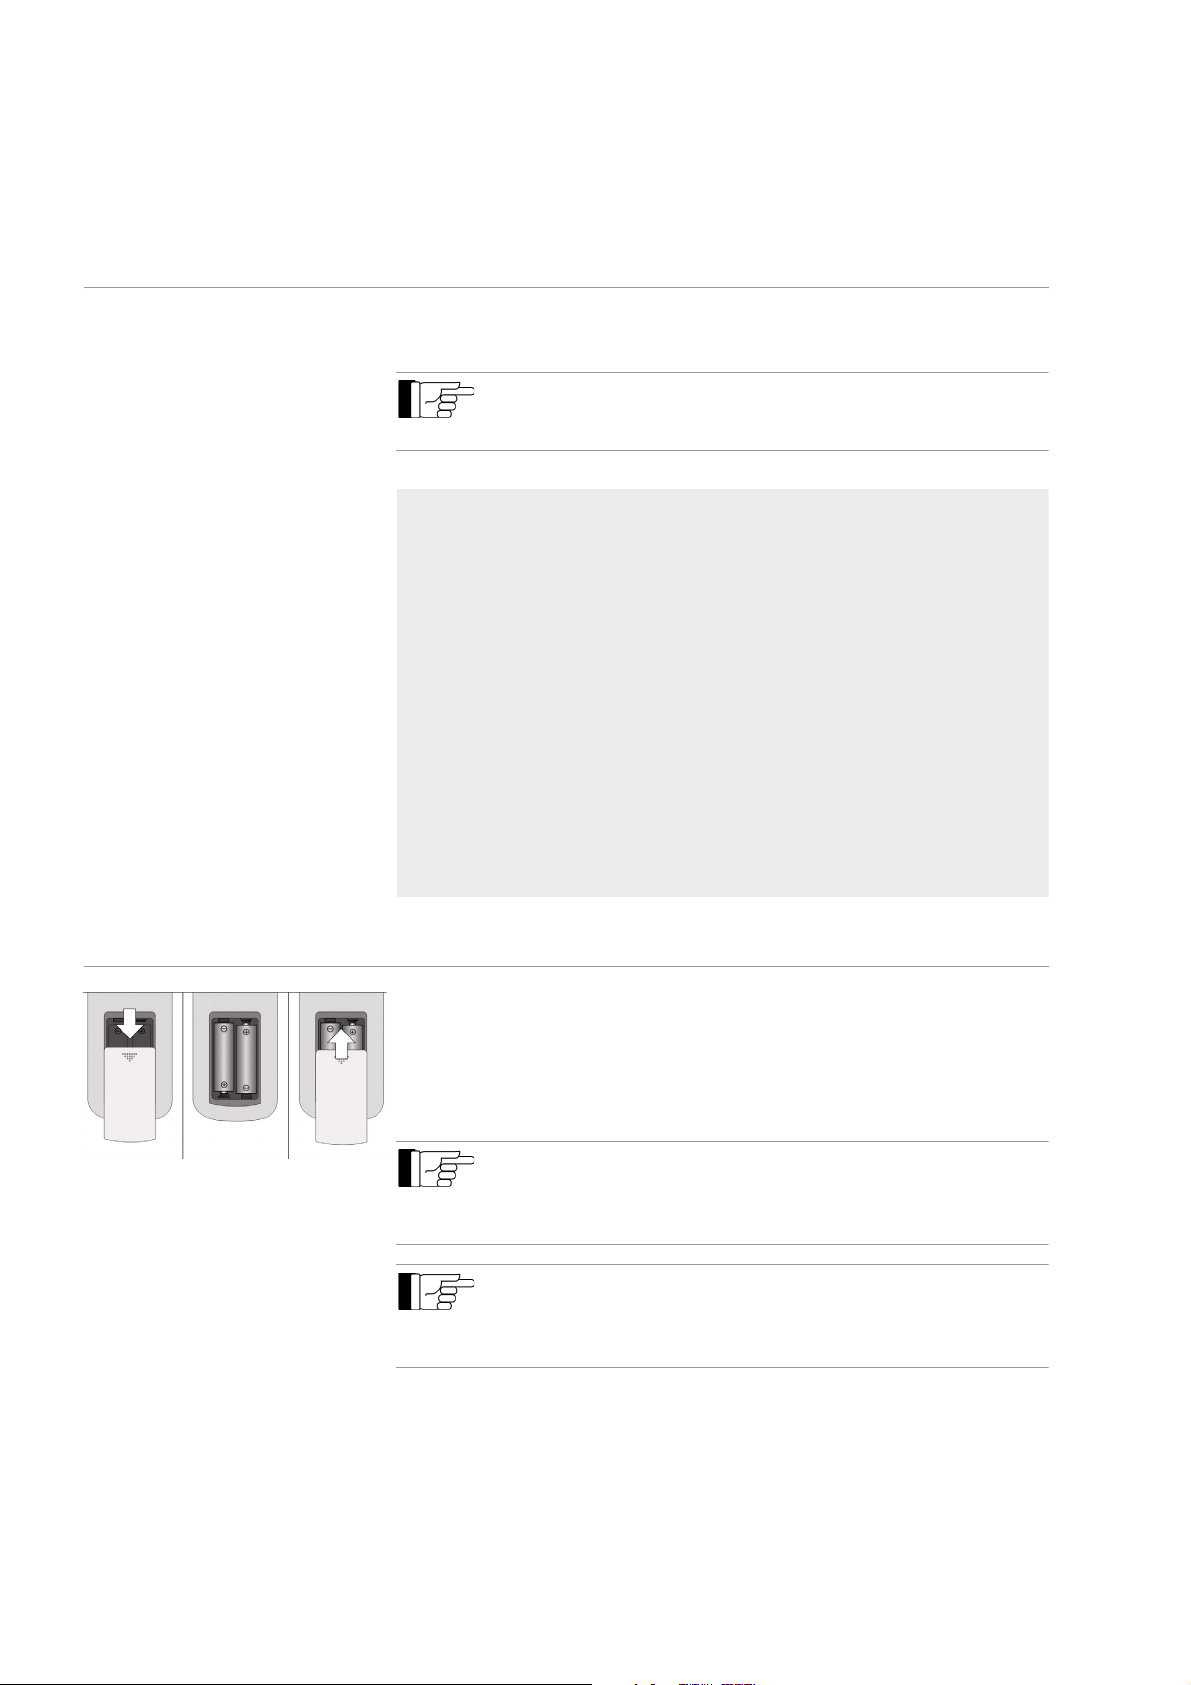
Insert batteries in the remote control.
Two mignon 1.5 V batteries (AAA-size) are supplied for the remote control.
• Remove the battery compartment cover from the back of the remote control
by sliding it in the direction of the arrow.
• Insert the batteries with their negative ends against the springs.
• Replace the battery cover.
ATTENTION!
Do not attempt to charge the batteries supplied, dismantle them, throw them in the fire or short-circuit
them.
Batteries can endanger life if swallowed. Keep batteries and the remote control beyond the reach of
small children. If a battery is swallowed, seek immediate medical help.
8

AVAILABLE CONNECTIONS
The DVD recorder can be interconnected with a number of other input and
output devices:
with a television set,
with an amplifier/receiver,
with a video recorder,
with other audio-visual equipment.
Before making connections, ensure that all equipment is switched
off. Do not connect the appliance to the mains until all interconnections have been made.
Connecting the DVD recorder
For ease of installation, most of the connecting cables are fitted with coloured
connectors. Simply mate plugs and sockets of the same colour when interconnecting two appliances.
The connection examples show a number of ways in which the recorder can
be interconnected with other equipment. To simply connect the DVD recorder
to a television receiver, all that is required is an audio and a video connection.
If the cable from your TV antenna or cables system is connected to the DVD
recorder with a further antenna cable from recorder to TV set, you can watch
TV programmes even when the DVD recorder is in standby mode.
Avoid connecting the DVD recorder indirectly, via a video recorder. This can
significantly affect picture quality.
DVD-RECORDER 80032 9
AVAILABLE CONNECTIONS
The drawing shows two options:
- TV connection with S-VHS
cable,
- TV connection with component cable.
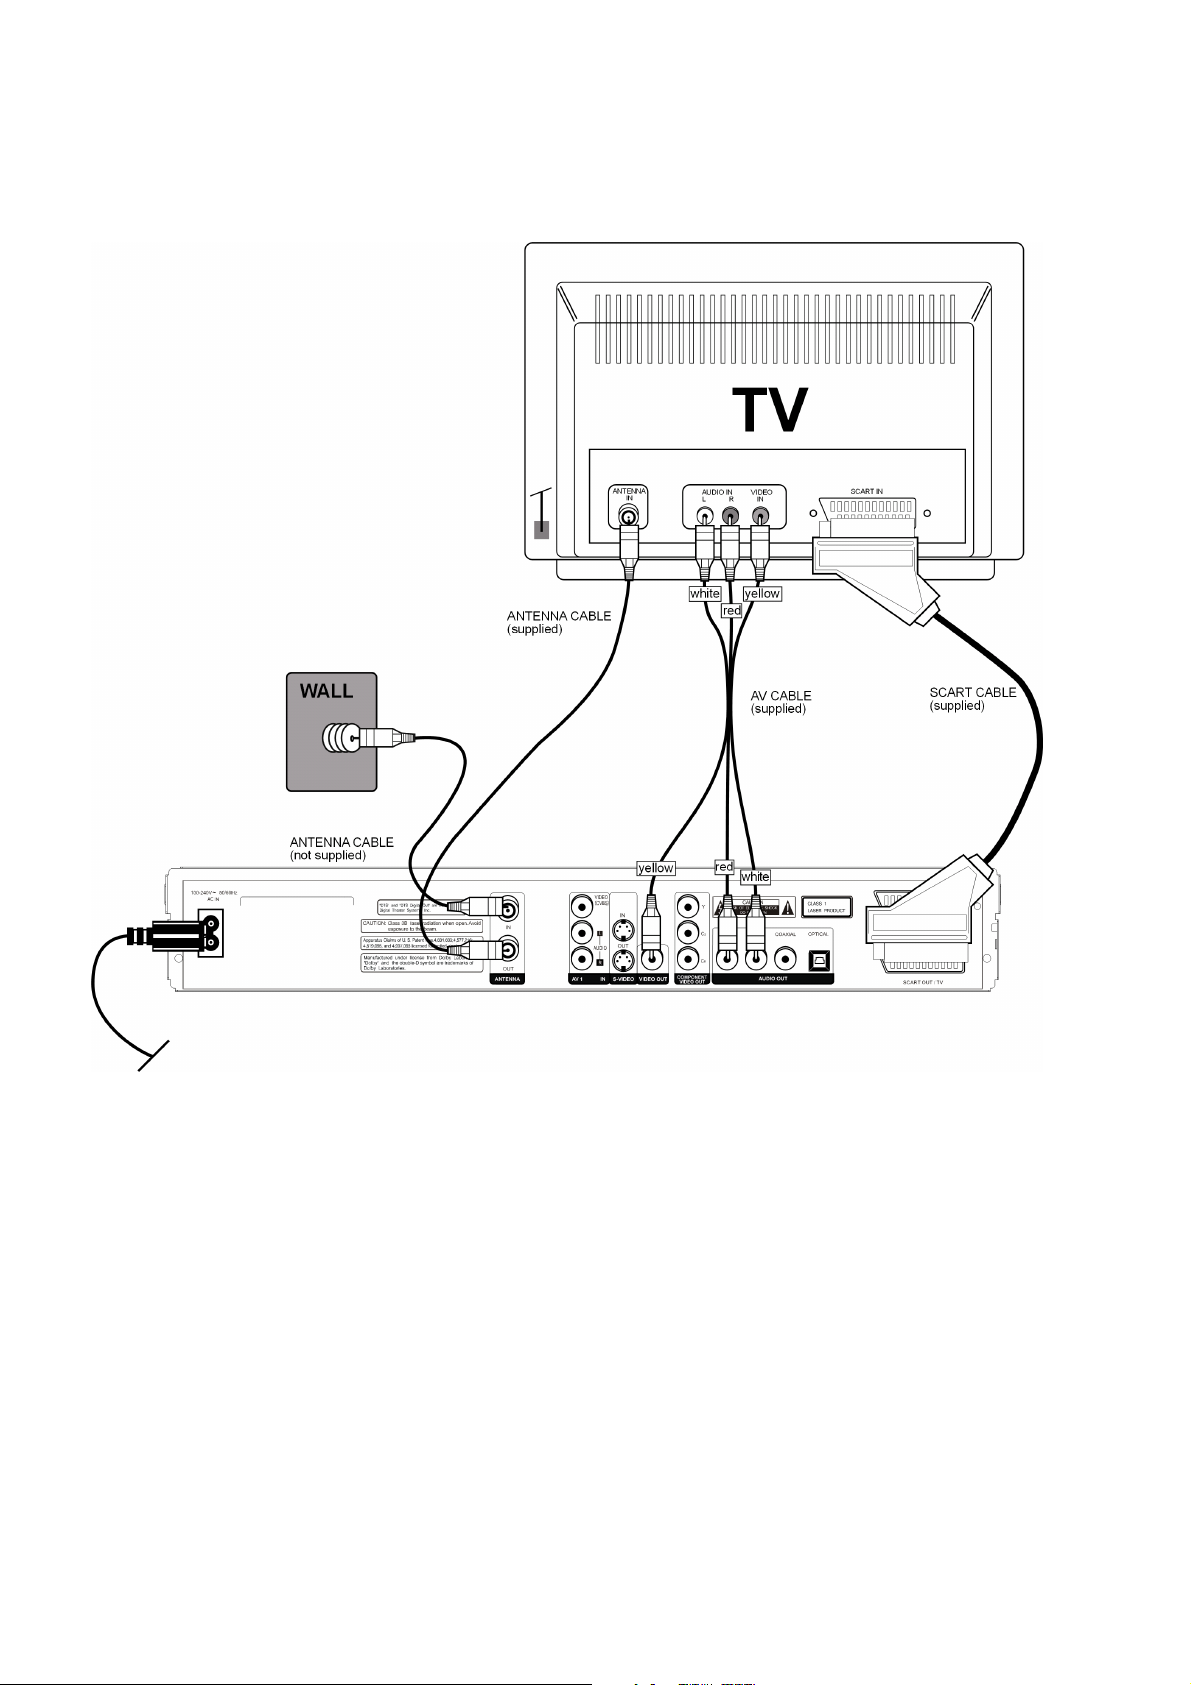
Connecting to the TV set with an AV or SCART cable
You can connect the DVD recorder to the TV set using either a AV cable or a
SCART cable.
10
In either case, the antenna cable from the wall socket to the TV set must be
disconnected from the TV set and connected to the ANTENNA IN socket of
the DVD recorder. Connect the antenna outlet of the DVD recorder to the antenna input of the TV set, using the antenna cable supplied.
1st option: connect one end of the AV cable to the Audio / Video output sokkets of the DVD recorder and the other end to the AV input sockets of your TV
set.
2nd option: connect one end of the SCART cable to the SCART output socket
of the DVD recorder and the other end to the SCART input socket of your TV
set.
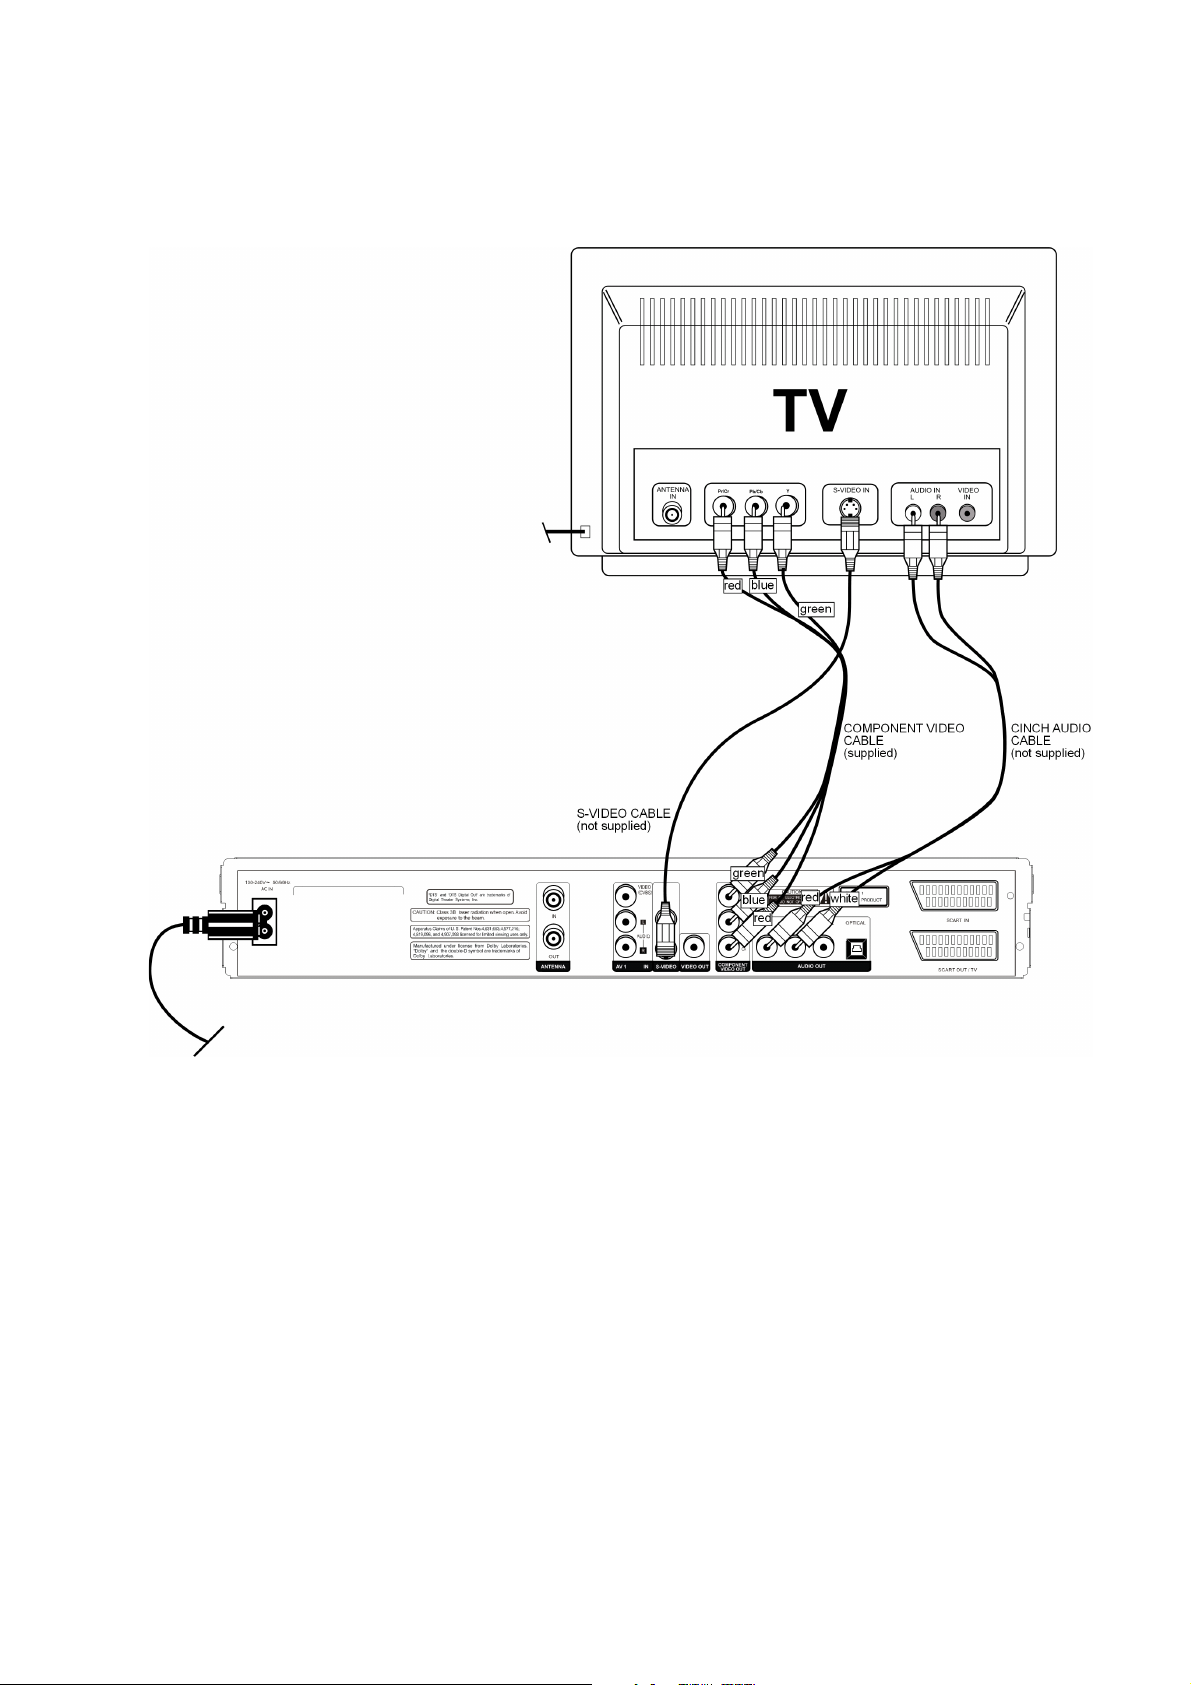
Connecting to the TV set using an S-VHS cable
or with the additional component cable
The drawing shows two options:
- TV connection with S-VHS
cable,
- TV connection with component cable.
AVAILABLE CONNECTIONS
If your TV set does not have a SCART connector, you can connect it to the
DVD player (S-VIDEO socket) using an S-VHS cable.
If the TV set also has a connection for progressive scan signals (usually marked Y/CB/CR), use the component cable supplied to link this with the corresponding output sockets of the DVD recorder.
Note:
For both options the DVD recorder has to be connected via a cinch-audio cable to the TV set!
DVD-RECORDER 80032 11
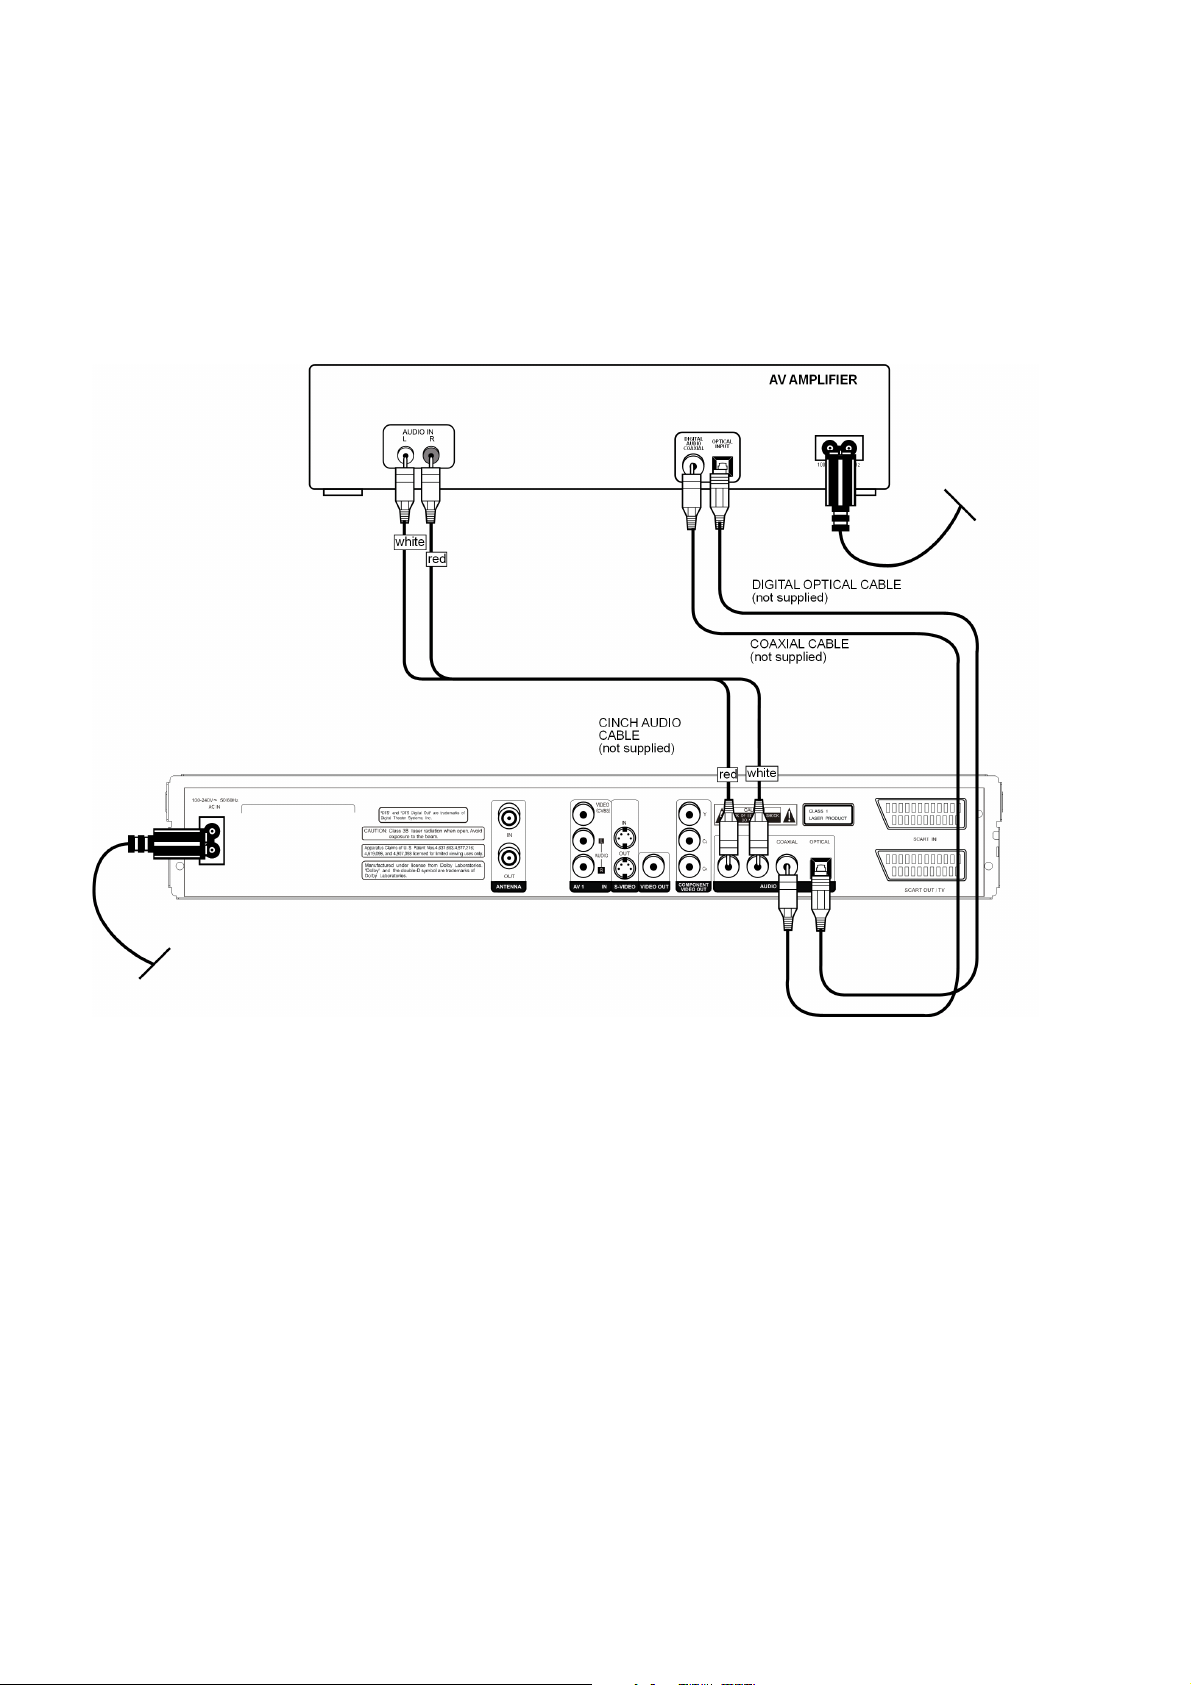
AVAILABLE CONNECTIONS
Connecting to a surround amplifier/receiver
If you wish to use the multi-channel surround sound format, you can choose
between three DVD recorder outputs:
the optical digital output,
the coaxial digital output
Connect the selected cable to the corresponding inputs of your AV amplifier.
12
The optical and coaxial digital cables are not included.
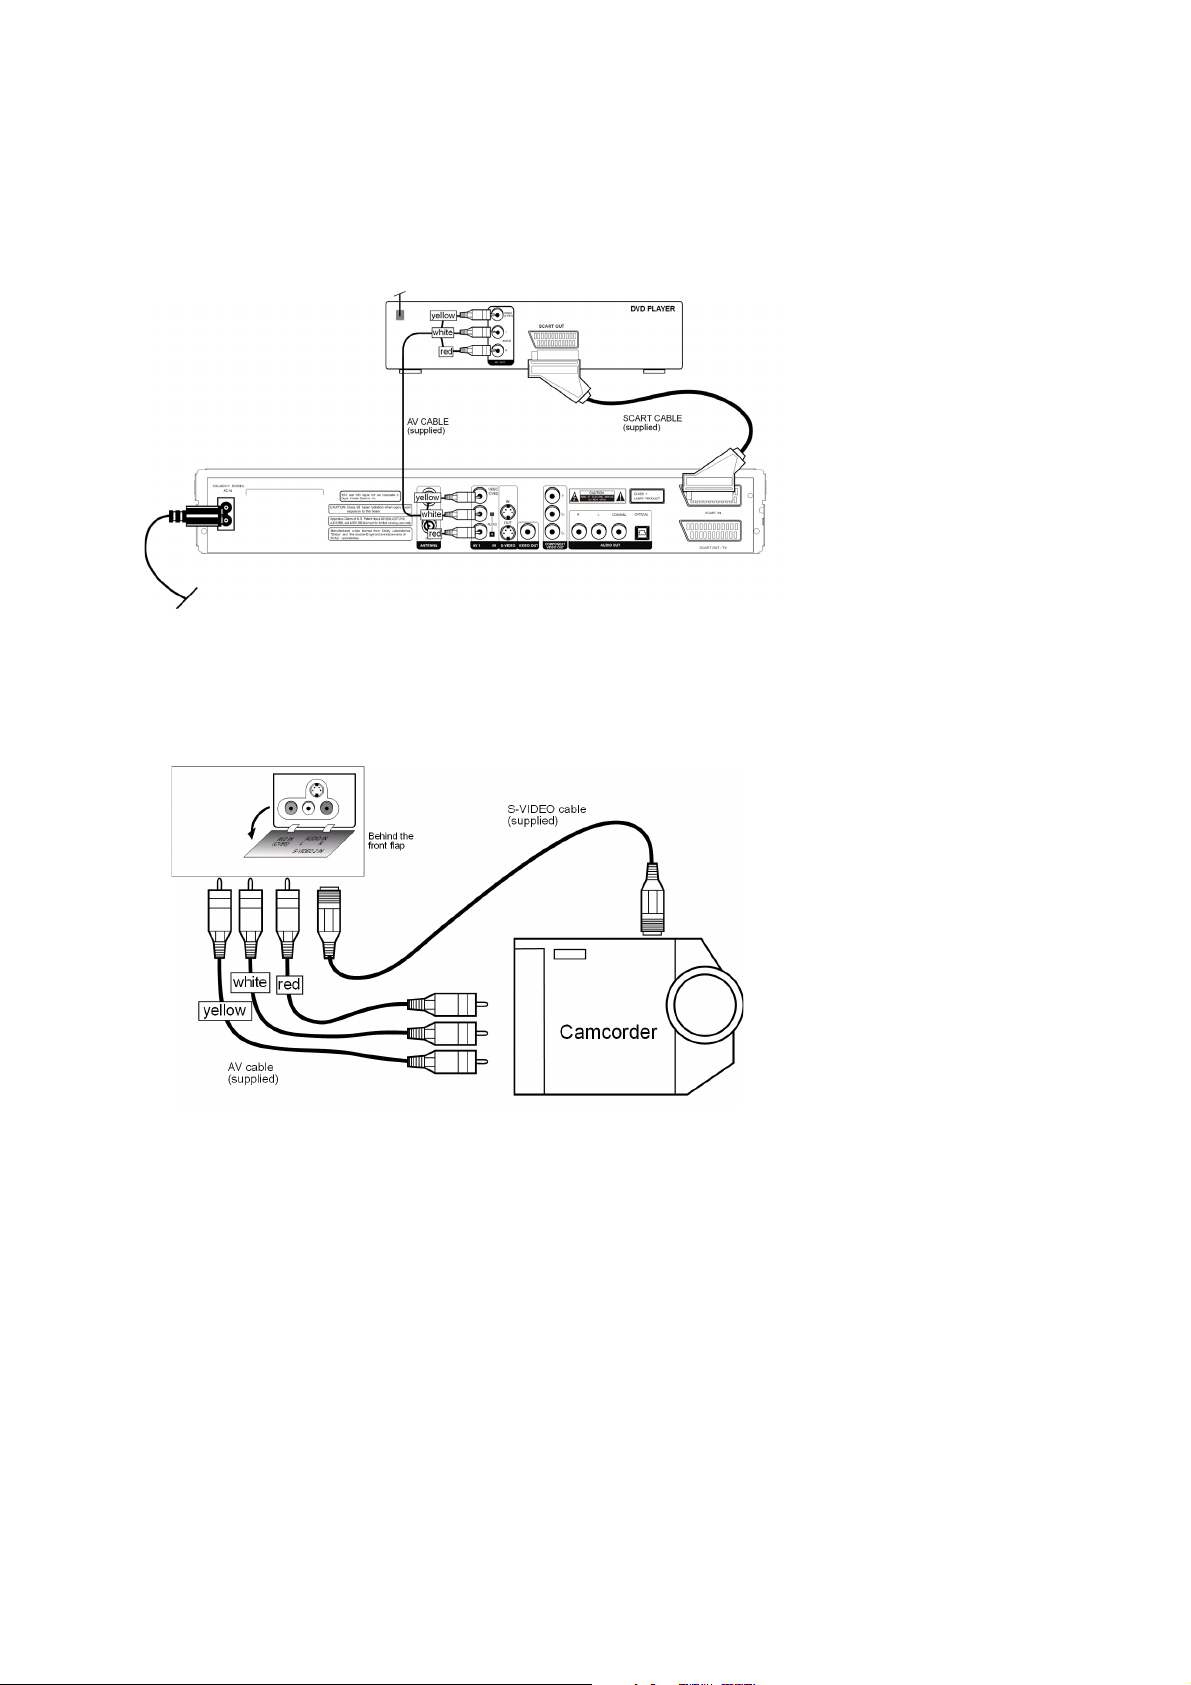
Connecting to another appliance
You can also use your DVD recorder to record signals from another appliance,
such as a SAT receiver, a video camera, a video recorder or a DVD player.
Connect the external appliances to the inputs of your DVD recorder.
Use the AV connecting cable to connect the outputs of the external appliance
to the inputs of the DVD recorder, as shown in the drawing.
AVAILABLE CONNECTIONS
An external appliance can be connected either with a SCART cable
or with an AV cable.
Connecting a video camera
Connect the AV cable from the AV output sockets of your camera to the AV
input sockets of your DVD recorder, as shown above.
DVD-RECORDER 80032 13

PRIMARY SETTINGS
Once you have connected your DVD recorder correctly and plugged in the power, switch on your TV set. Select the appropriate video source and then
switch on your DVD recorder by pressing the STANDBY/ON button on the remote control or on the front panel.
All functions of this DVD video recorder can be set easily by using direction keys. Please move the Cursor Bar (Highlighted color bar) to the desired item and then press
OSD language select
When the DVD recorder is turned on for the first time, the TV screen shows
the following message:
Press the direction keys to choose the menu language, then press
ENTER to confirm.
ENTER to confirm.
Country setup
As this appliance is distributed in the UK, the country code is set to United
Kingdom as default. Confirm this setting by pressing
Note:
You can change the country code later via the Setup menu, for case you want
to change the parental settings for another country.
Scan the antenna signal input source
The DVD recorder auto-searches the antenna input to find channels. When finished, the progress bar is complete. Press
ENTER.
ENTER to confirm.
14
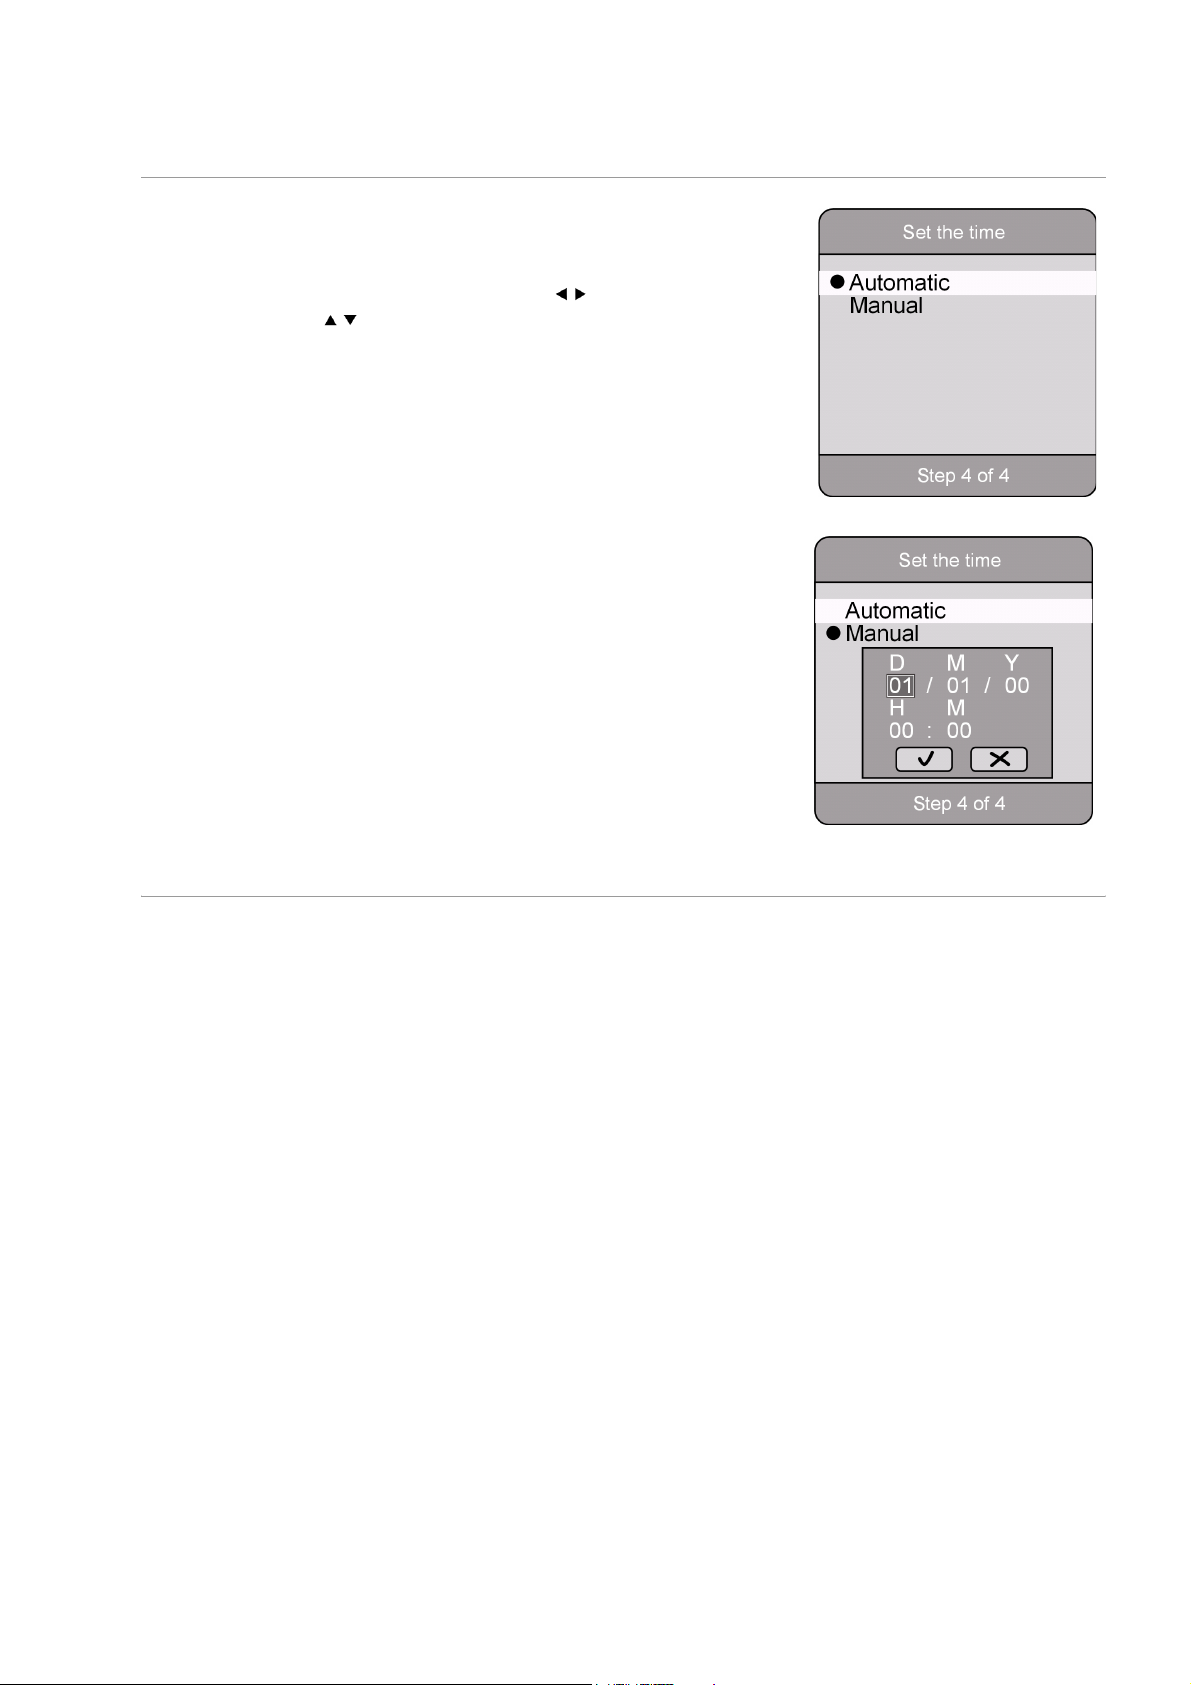
Time and date setting:
A: Auto setting: this DVD recorder will automatically set to correct time, based
on channel signal.
B: Manual setting: The first row indicates date, and second row indicate
month, and third row indicate year (D/M/Y). Use direction keys to move
the cursor and press direction keys or number keys to input the correct
numbers. Next, move the cursor to "Completed" to finalize the setting. See Figure.
PRIMARY SETTINGS
Complete primary settings
After the time setting is completed, the first channel is displayed on the screen.
If you have put a CD/DVD into the Disc slot, it will start playing.
DVD-RECORDER 80032 15

KEY FUNCTIONS
Controls on the recorder or on the remote control
Buttons on the front panel and
keys on the remote control - see
fold-out.
In this manual, the recorder is described by reference to the keys of the remote control,
as these include all functions of the recorder (with the exception of the mains switch). If
reference is made to the buttons on the recorder, this will be stated explicitly.
Standby/On
You can use the front panel buttons to control the main functions of your DVD
recorder. They can be used to play discs, start a recording, interrupt it and stop
it, skip backwards and forwards and select programmes.
In addition to these basic functions, the remote control has further controls,
giving access to the full functionality of your DVD recorder. In particular, it is
only by means of the remote control that you can navigate the on-screen menus.
Standby mode
Use the STANDBY/ON button on the front panel to turn the recorder on.
The display will briefly show HELLO and Reading. The recorder will now attempt
to read the disc.
- If no disc is inserted, the display will show NO DISC.
- If a disc has been inserted, the display will show the disc type.
Pressing the button again will return the recorder to standby mode and the
time of day will be shown on the display.
Insert a disc
16
Ensure that there is 15 cm free space in front of the recorder so that the disc
drawer can open fully.
• With the recorder switched on, press
OPEN.
• Place a disc with the label side upwards in the disc drawer. Ensure that the
disc is centred in the locating depression, so that it does not jam when the
drawer closes.
• Press the
show CLOSE and, after a few seconds, Reading.
If the disc is a DVD, playback will normally start automatically after a few seconds. The indication in the display depends on the type of disc (DVD, Video
CD, Music CD, MP3 or JPEG CD) and its format.
You may need to press
must make a selection with the navigation keys.
OPEN/CLOSE button. The disc drawer will close. The display will
PLAY or an on-screen menu may appear in which you
OPEN/CLOSE. The display will show

Playback functions
PAUSE
• To interrupt playback, press the PAUSE button. A pause symbol will appear
on the screen.
• Press
STEP (single picture playback)
• Press the STEP button to move the still picture on to the next picture.
PLAY
To start playback, press PLAY. A play symbol will appear on the screen.
STOP/ Resume Play
• Press STOP once to stop playback. In this mode, you can continue play-
• Press
PAUSE again to resume playback.
back at the same point by pressing
STOP again to stop the DVD completely. The recorder is now in Stop
mode.
PLAY (Resume Play).
KEY FUNCTIONS
Search Functions
S e a r c h f u n c t i o n s
` During playback, press the or button to skip backwards or for-
wards (in a DVD, from chapter to chapter, in a CD, from title to title).
Your current position in the whole disc is shown in the display.
CM SKIP
During playback, press the CM SKIP ("Commercial Skip") button. The DVD
player will now skip forwards by about 30 seconds, corresponding to the usual
length of a television commercial.
Note that, on many DVDs, the title/chapter before the start of the actual
film (license notices) cannot be skipped.
F a s t p l a y
• During playback, press the or button to start fast backwards or
forwards. The fast play symbol and the speed step will be displayed
on-screen:
press or once: double speed (
press or twice: four times normal speed (
press or three times: eight times normal speed (
press or four times: sixteen times normal speed (
press or five times: thirty times normal speed (
press or six times: sixty times normal speed (
press or seven times: one hundred times normal speed (
2x)
4x)
8x)
16x)
30x)
60x)
100x)
To revert to normal playback speed, press
Note:
In VCD play, the fast play is only possi b le up to 16 times n ormal speed
(
16x).
PLAY.
DVD-RECORDER 80032 17

KEY FUNCTIONS
Slow-motion - SLOW
• During playback, press the
bol and the speed step will be displayed on-screen:
press
SLOW once: 1/2 speed
press
SLOW twice: 1/4 speed
press
SLOW three times: 1/8 speed
press SLOW four times: 1/16 speed
press
SLOW five times: 1/2 speed backwards
press
SLOW six times: 1/4 speed backwards
press
SLOW seven times: 1/8 speed backwards
press SLOW eight times: 1/16 speed backwards
SLOW button repeatedly. The slow-motion sym-
Repeat functions
To revert to normal playback speed, press
Note that the SLOW function is not available with audio CDs or VCD discs.
PLAY.
Repeat - 1/ALL
• During playback, press the 1/ALL button. :
in DVD mode repeatedly:
OFF: normal playback
CHAPTER: repeats the current chapter
TITLE: repeats the current title
CD mode (a repeat symbol will appear on the screen):
: Trackrepeats the current title
: repeats the entire CD
Note:
This Function is not applicable on VCDs!
REPEAT A - B (DVD, VCD)
You can define a section to be repeated.
• During playback, press the
repeated. A repeat symbol will appear on the screen with the letter
• Press
• Press
The REPEAT
A-B again to set the end of the section to be repeated. A repeat sym-
bol will appear on the screen with the letters A-B. The defined section will
be endlessly repeated.
A-B a third time to start the repetition of the section.
A-B function is not available with MP3 CDs.
Random playback - RANDOM (CD only)
During playback, press the RANDOM button. On the right of the screen, the
random symbol will appear.
To stop random play, press
18
A-B button to set the start of the section to be
A .
RANDOM again.

Show playback bar - DISPLAY
The OSD provides useful information about the disc that is currently being
played, as well as quick access to commonly used menus.
• Press
• Use the buttons to select the item you would like to change.
• Use the buttons to cycle through the available options or use the num-
• Press DISPLAY again to exit the OSD display.
Title
If there are multiple titles on the DVD, this menu allows you to jump directly to
a desired title.
Chapter
If there are multiple chapters on the DVD, this menu allows you to jump directly
to a desired chapter.
DISPLAY on the remote control to show the following OSD informa-
tion:
ber keys (1, 2, 3…) to go directly to the desired option.
KEY FUNCTIONS
Time Counter
The time counter allows you to begin playback at a specific point of time on
the DVD.
Audio Channel Selection
This allows you to set the audio language for playback. The languages available depend on the disc. Not all discs have multiple audio languages. You may
need to use the disc menu to change audio languages - this depends on the
design of the disc.
Subtitle Selection
This allows you to set the subtitle language for playback. The languages available depend on the disc. Not all discs have multiple subtitle languages. You
may need to use the disc menu to change subtitle languages - this depends
on the design of the disc.
Angle
This allows you to select the camera angle. Angles available depend on the
disc. Not all discs have multiple angles.
RETURN
Use the RETURN key in VCD mode to go back to the previous window.
Add/delete channel - PROGRAM
Press the PROGRAM button to call up the Add/delete channel menu (see
"Add/Del Channel", p. 26). Move the cursor to a desired channel; press the
ENTER key once to add the channel and again to delete the channel.
DVD-RECORDER 80032 19

KEY FUNCTIONS
Setting "bookmarks" - BOOKMARK
This unit supports 8 separate stored bookmarks for the disc currently in the
DVD recorder. When you remove the disc from the recorder, the bookmarks
are lost.
Create Bookmark
While playing a disc, press BOOKMARK at the point you wish to bookmark.
The Bookmark menu shows on screen as follows:
The eight lines indicate the eight slots that the unit has for memory. A number
indicates that a bookmark is stored in that slot. If there is nothing above the
line, then there is nothing stored in that slot.
Use the button to move to an empty slot.
• Press
• Press
ENTER to memorize the present point as a bookmark. A number will
appear in the bookmark space, indicating that you have successfully stored
the bookmark.
BOOKMARK again to exit the bookmark menu.
Jump to Bookmark
• Press BOOKMARK to enter the bookmark menu.
• Use the buttons to select a bookmark.
• Press
ENTER to start playback from that bookmark point.
Clear Bookmark
• Press BOOKMARK to enter the bookmark menu.
• Use the buttons to select a bookmark.
• Press
CLEAR to erase the selected bookmark from memory.
NTSC/PAL and Progressive Scan
The NTSC/PAL button cycles between normal NTSC, NTSC progressive
scan, and PAL viewing modes.
NTSC is the normal format for North American TV broadcasts.
NTSC Progressive Scan can be used with a component connection to a TV
that supports progressive scan to watch DVD movies at a higher resolution.
PAL is the color format for Europe and other areas. If you select PAL, North
American movies and television programs will appear incorrectly on your
screen.
Setting the recording quality - QUALITY
• Press the MONITOR key to switch to record mode.
• Now press the
qualities. The currently selected quality will be shown at the edge of the
screen. This will be used for the next manual recording.
REC QUALITY key to switch through the various recording
Title Playback (DVD only)
Some DVDs have a title menu that can be accessed using the TITLE button
on your remote control.
20

While a DVD with a title menu is playing, press TITLE.
Use the buttons to select a title and press
ENTER to confirm.
DVD Menu (DVD only)
Some DVDs have complex content with many subtitle languages, audio languages, video angles, etc. The DVD menu can be used to acess these features.
If the disc contains a DVD menu, press
screen.
Use the buttons to make a slection and press
MENU/PBC to show the menu on the
ENTER to confirm.
Playing Multiple Angles - ANGLE
Some DVDs have multiple angle video segments.
When a DVD section with multiple view angle is playing, the screen shows:
KEY FUNCTIONS
While this icon is showing, press
points.
ANGLE to cycle through the available view-
Change Subtitle Language
When playing a DVD with more than one subtitle language, press SUB TITLE
to change or cancel subtitles. Press
ween available subtitle languages and subtitles off.
Note:
Some subtitle languages can be only be selected from the DVD menu and can
not be changed with the
the design of the DVD.
SUB TITLE button. Subtitle availability depends on
SUB TITLE multiple times to cycle bet-
Change Audio Language
If a DVD has more than one audio language, press AUDIO to change between
them.
Press
AUDIO multiple times to cycle through available audio languages.
Some audio languages can be only be selected from the DVD menu and can
not be changed with the
on the design of the DVD.
AUDIO button. Audio language availability depends
PBC Playback Control (VCD only)
Only VCDs edition 2.0 or above have this function. Different VCDs will have
different PBC functions, depending on the design of the disc. Please refer to
the instruction manual for the disc for more information.
Press
MENU/PBC to turn on/off the PBC function. The OSD shows “PBC on”
or “PBC off”.
If the VCD has a PBC menu, press
ges in the menu.
In PBC menus, all selections must be made with the numeric buttons.
DVD-RECORDER 80032 21
PREV and NEXT : to change pa-

KEY FUNCTIONS
Zoom
When playing VCD 2.0 edition discs, set PBC to “off” for optimal operation.
When PBC is on, press TITLE to enter the PBC menu.
When playing a DVD or VCD, press ZOOM to cycle through the zoom settings:
x2 > x4 > x8 > normal.
An inset screen in the upper left corner shows the entire viewable area.
While zoomed, use the buttons to move the zoomed portion within the
viewable area.
Sound functions
Muting - MUTE
• Press MUTE to turn the sound right down. A red line will appear on the
screen.
• Press
MUTE again to turn the sound back up again and delete the MUTE
symbol. The muting is also cancelled if you press one of the
Setting the volume - VOLUME
Using the VOLUME keys, you can set the output volume.
Navigating MP3 CDs and Audio CDs
Place a disc into your recorder and press the PLAY key, a file list menu will
appear.
VOLUME keys.
22
Move cursor to desired MP3 or music file using keys, press
to play this file immediately.
PLAY key

Edit MP3 / CD play list
Move cursor to desired MP3 or music file using keys, press ENTER key
to mark selected file.
After all desired files have been marked, then move cursor to “Add” icon using
and keys, press
Or simply move cursor to “Add All” icon and press
on disc to play list.
Press
PLAY key to start playback using this playlist.
ENTER key to add selected files to play list.
ENTER key to add all files
Delete play list
Move cursor to “Play List” icon, and press ENTER key to switch to play list
mode.
KEY FUNCTIONS
Under play list mode, move cursor to “Del All” icon and press
delete current play list.
Navigating JPEG and PICTURE CDs
JPEG file Play List Editing
Follow these steps while playing a CD-R containing JPG files,
Place your CD-R disc in the recorder, press
appear:
PLAY key, a file list menu will
ENTER key to
Move the cursor to select either JPEG (picture symbol) or MUSIC (note symbol) and press
Move cursor to desired JPG file using keys, press
this file immediately.
When playing JPG files, use key to rotate picture clockwise, or use to rotate picture counter-clockwise.
ENTER.
PLAY key to view
Edit play list
Move cursor to desired JPG file using keys, press ENTER key to mark selected file.
After all desired files have been marked, then move cursor to “Add” icon using
and keys, press ENTER key to add selected files to play list.
Or simply move cursor to “Add All” icon and press
on disc to play list.
ENTER key to add all files
DVD-RECORDER 80032 23

KEY FUNCTIONS
Move cursor to “Slide” icon, then press ENTER key to start picture slide show.
Move cursor to “Speed” icon can adjust time delay between each frame by
pressing or keys.
Delete play list
Move cursor to “Play List” icon and press ENTER key to switch to play list
mode
Under play list mode, move cursor to “Del All” icon and press
delete current play list.
Press to go back to the play list menu.
ENTER key to
24

SETTINGS AVAILABLE IN THE SETUP MENU
Entering the Setup Menu
Press SETUP on your remote control to enter the setup menu.
Note:
If you press
you exit the Setup menu.
How to Setup
Press SETUP to enter the setup menu.
Use the buttons to make a selection and press to enter into the first
sub-menu.
In the first sub-menu, use the buttons to make a selection. Press to
enter into second sub-menu, or press to return to the previous page.
In the second sub-menu, use the buttons to make a selection and press
to confirm your selection.
Press
SETUP during playback, playback will pause. It will resume when
SETUP again to exit the setup menu.
System menu
There are three items that can be set from the System menu:
Guide Language, Set Time and Factory Reset.
Guide Language
Determines the language displayed on the On Screen Display (OSD). The
OSD can be displayed in English, Spanish, French or Chinese.
Set Time
Determines the system time. The correct time can be entered manually or automatically.
Factory Reset
Will restore the DVD recorder setting to the original factory setting.
Video menu
There are four items that can be set from the Video menu: TV Input, Channel
Scan, Add/Del Channel and Screen Format.
TV Input
Select CATV if you have cable television, otherwise choose TV if the unit is
connected to an antenna.
Channel Scan
Select START to start automatically searching for stations.
DVD-RECORDER 80032 25

SETTINGS AVAILABLE IN THE SETUP MENU
Add/Del Channel
Allows you to add/delete specific channels. Move cursor to desired channel;
press the
You can also access this menu by pressing the
Screen Format
4:3 Letter Box
Select this setting to display a 16:9 format film on a conventional 4:3 television. The picture will be displayed full-width, with black bars on top and bottom.
4:3 Pan Scan
Choose this setting to display transmissions in conventional 4:3 format on a
4:3 television. Transmissions in 16:9 format will be displayed full-height (without black bars) but with the sides cut off, however the sidebars of the image
will be cropped to fit your screen.
16:9 Wide
This is the setting for output on a wide-screen television in 16:9 format.
ENTER key once to add the channel and again to delete the channel.
PROGRAM button.
Audio menu
Use this menu to ensure the audio output format is compatible with connected
devices (amplifier/receiver or TV set).
Dolby Digital
PCM: Recorder can output PCM data and play the same audio format as on
CDs. Additionally, 2-channel analog audio will output from the amplifier’s audio output jacks.
Bitstream: Recorder outputs raw data of Dolby® Digital soundtracks
DTS
PCM: Recorder can output PCM data and play the same audio format as on
CDs. Additionally, 2-channel analog audio will output from the amplifier’s audio output jacks.
Bitstream: Recorder outputs raw data of DTS® soundtracks
MPEG
PCM: Recorder can output PCM data and play the same audio format as on
CDs. Additionally, 2-channel analog audio will output from the amplifier’s audio output jacks.
Bitstream: Recorder outputs raw data of Dolby® Digital soundtracks
26
Sampling Freq.
This DVD recorder provides selections of 48KHz and 96KHz

SETTINGS AVAILABLE IN THE SETUP MENU
Security menu
Use directional keys to move cursor and press enter key to confirm change.
Rating varies according to different country setting.
Set Password
Use the number keys on the remote control to input your 4 digit password,
then press
Change
To change current password, the user will be prompt to enter the original
password
Delete
To disable a previous password, the user will be prompt to enter the original
password.
Original password for this machine is “3308”.
Country Code
This is a two-letter code which represents the country you are in. Find a table
under Additional Information (see "Country Code", p. 37).
ENTER to confirm.
Record menu
Record Quality
This recorder supports 5 recording modes: HQ (High Quality), SP (Short
Play), LP (Long Play), EP (Extended Play), and SLP (Super Long Play). This
can also be changed by using the REC QUALITY button on the remote control
Auto Chapter
When recording a new chapter will be created after a certain time delay. You
can select between 5, 10, or 15 minutes or disable this feature by selecting
Off. Default setting is 5 minutes.
Schedule Record
Please refer to Scheduled Disc Recording section of this manual (see "Scheduled Disc Recording", p. 30).
Disc menu
Audio Language
Select the audio language you want to automatically play when a DVD disc is
loaded. Default setting is “Original”.
Subtitle Language
Select the subtitle language you want to automatically play when a DVD disc
is loaded. Default setting is “OFF”.
Menu Language
Select menu language when a DVD disc is loaded. Default setting is “Original”.
DVD-RECORDER 80032 27

SETTINGS AVAILABLE IN THE SETUP MENU
Auto Play
When a DVD or VCD disc is loaded it will be played automatically. Default setting is “ON”.
Initialize DVD
Use this setting to format a DVD+RW disc. This will erase all contents on the
DVD+RW disc.
Finalize DVD (DVD+R only)
Make a DVD+R disc compatible with regular DVD video players. Only a
DVD+R disc will require this operation. Please note a finalized disc cannot be
recorded with new or revised content.
28

PREPARING DISCS FOR RECORDING
Compatible Discs
Recordable Disc Types
This unit can record to DVD+R and DVD+RW discs. Please see “Disc Types”
below.
Playable Disc and Media Types
DVD Video Commercial “Hollywood” DVD movies.
SVCD Super VCD. A format for video saved on CD. Usually used in
Asia.
DVD+RW DVD format that can be “burned” repeatedly by some recor-
ders.
DVD+R DVD format that can be “burned” only once.
DVD-RW DVD format that can be “burned” repeatedly by some recor-
ders.
DVD-R DVD format that can be “burned” only once.
CD-R Recordable CD format often used for music.
CD-RW Re-recordable CD format, also used for music.
Audio CD Commercial music CD.
MP3 Format for compressed digital music on CD.
JPEG Format for compressed digital photographs on CD or DVD.
We cannot guarantee that your recorded discs will play on another DVD
player. Please check the manual for the other DVD player to make sure that it
can play DVD+R and/or DVD+RW discs.
Although your DVD recorder can play DVD-R, music CDs, and MP3s, you can
not use it to create these types of discs. You can only use it to record video whether a TV broadcast or a home movie - to DVD+R or DVD+RW.
Disc Types
DVD+RW discs can be erased and copied over again, although this may reduce the quality of your recording. DVD+R discs cannot be copied over, and
you cannot add new data to a DVD+R disc once it has been finalized (see
"Editing Discs", p. 34).
You may not be able to record to a DVD+RW disc that already contains recordings from another DVD recorder or PC. If you are able to add a new recording to a disc from another DVD recorder, your recorder will rewrite the
DVD menu. If the disc contains data from a personal computer, this data will
be erased by your DVD recorder.
Initialize a New Disc
Your DVD recorder will automatically initialize a new DVD+R or DVD+RW
disc the first time it is placed into the recorder. This takes about 1 minute, du-
DVD-RECORDER 80032 29

PREPARING DISCS FOR RECORDING
ring which the TV screen shows READING. After the procedure is complete,
the TV screen shows a blank title and indicates the recording capacity is
100%.
For more information on erasing discs or portions of discs, see "Editing Discs",
p. 34.
Scheduled Disc Recording
Scheduling a Recording
You can schedule up to 8 different programs with your DVD recorder.
Make sure that the correct time and date are set on your DVD recorder.
Place an initialized DVD+R or DVD+RW disc in the DVD recorder.
Press
buttons to select the “Record” menu, then press the button to enter the
menu, next use the buttons to select “Schedule Record”, finally press the
button to enter the menu.
SETUP on your remote control to enter the setup menu. Use the
30
Use the buttons to select the first available record program (ID # 1-8).
• Press the button to schedule a recording for the selected ID #.
• Set the date for your recording: Use the buttons to choose between
Wkly Sun, Wkly Sat, Wkly Fri, Wkly Thu, Wkly Wed, Wkly Tue, Wkly Mon,
Daily, Mon-Fri or Once. If once is selected use the buttons to move
the cursor and #’s 0-9 to input the date (mm/dd/yy)
• Set the start time for your recording: Use the buttons to move the cursor and either the buttons or #’s 0-9 to set the time. Next, use the
buttons to select AM or PM.
• Set the stop time: Use the buttons to move the cursor and either the
buttons or #’s 0-9 to set the time. Next, use the buttons to select
AM or PM.
• Set the Mode (quality): Use the buttons to move the cursor to the mode
field, and then use the buttons to select the desired mode. More information about quality levels: see "Record Quality", p. 27.
• Set the source: Use the buttons to move the cursor to the source field,
and then use the buttons to select the source for your recording.

PREPARING DISCS FOR RECORDING
• Confirm your settings: Use the buttons to move the cursor to the green
arrow to confirm and save settings or the red X to cancel settings. Press
ENTER to confirm.
When you are done, press
Note:
Turn off recorder prior to the start of your scheduled program. If unit
is left on the scheduled programs will not record.
SETUP again to leave the setup menu.
Stop an In-Process Scheduled Recording
• While the record is proceeding, press STOP to stop recording and go to
DVD mode, or press
POWER to stop recording and go to stand-by status.
Recording Quality
You can record discs using five different quality levels. The higher the quality
level, the more space (time) will be taken up on your disc. Press
on your remote to change the quality settings.
LITY
REC QUA-
HQ (High Quality):
The best picture quality 60 min. / 1 hour
SP (Standard Play):
Excellent (DVD video) picture quality 120 min. / 2 hours
LP (Long Play):
Good (S-VHS) picture quality 180 min. / 3 hours
EP (Extended Play):
Better than VHS quality 240 min. / 4 hours
SLP (Super Long Play):
VHS picture quality 360 min. / 6 hours
Recording times are estimates, actual recording times may vary. Please note
that if your source video is of low quality, then your final recording will be of
low quality even if you select a higher quality recording level. Recording over
previously recorded discs may also decrease the quality level.
Correct a Scheduled Recording
• Press SETUP on your remote control to enter the setup menu. Use the
buttons to select the “Record” menu, then press the button to enter the
menu, next use the buttons to select “Schedule Record”, finally press
the button to enter the menu.
• Use the buttons to move the cursor to the number of the recording that
you would like to correct. Next press the button to make corrections.
• Use the buttons to move the cursor to the information that you would
like to correct, then, use either the buttons or #’s 0-9 on the remote to
enter the correct value.
• Confirm your settings: Use the buttons to move the cursor to the green
arrow to confirm and save settings or the red X to cancel settings. Press
ENTER to confirm.
DVD-RECORDER 80032 31

PREPARING DISCS FOR RECORDING
Cancel a Scheduled Recording
• Press SETUP on your remote control to enter the setup menu. Use the
buttons to select the “Record” menu, then press the button to enter the
menu, next use the buttons to select “Schedule Record”, finally press
the button to enter the menu.
• Use the buttons to move the cursor to the number of the recording that
you would like to cancel.
• Press
• Confirm that you would like to cancel this recording by using the but-
CLEAR on your remote control.
tons to select the green arrow to perform the operation or the red X to cancel.
Troubleshooting Scheduled Recordings
Your DVD recorder will not be able to perform the scheduled recording if:
1. No disc is loaded.
2. The disc is write-protected.
3. The disc is not the correct format (DVD+R or DVD+RW).
4. The disc already contains 49 titles. This is the maximum num-
ber of titles that can be recorded to a single disc.
5. Another recording is in progress.
Manual Disc Recording
6. The DVD recorder’s Time and Date is not set properly.
7. The time set for your recording is in the past.
8. The 8 memory slots for setting recordings are already filled.
9. There is no signal from the selected input source (it may be
connected incorrectly or turned off).
The DVD recorder will not be able to tell if a disc is damaged. Even if the recording seems to be working, you may not be able to play back the disc if it
has been scratched, smeared, or otherwise damaged.
Place an initialized DVD+R or DVD+RW disc in the DVD recorder.
• Select the channel you want to record.
• Press
• Press SOURCE to select the input source that you want to record. Press
• Press
• Press
• Press MONITOR to switch to DVD mode. The recorded title will appear on
After recording, the following messages will also be stored:
• Record date and channel source.
MONITOR on the remote to switch to external input mode.
SOURCE multiple times to cycle through the options: CVBS1 > CVBS2 >
S-VIDEO01 > S-Video02 > CHANNEL
RECORD on the remote control or the front panel of the DVD recor-
der to start recording.
STOP to stop recording. Please wait 15-17 seconds while your re-
cording completes.
the screen. Press ENTER to view your recorded video.
32

PREPARING DISCS FOR RECORDING
• Record time.
• Recording length and recording mode.
• Recording index screen.
DVD+RW: These discs can be erased and recorded over.
DVD+R: These discs can be recorded and finalized only once. They cannot be
erased and recorded over.
Pause recording
• Press PAUSE while recording to temporarily stop the DVD recorder from
recording information. This may be useful for excluding sections that you do
not want to record, such as TV commercials.
• Press
PAUSE again to resume normal recording.
Chapters
Chapters can only be added after your recording has completed, not during
the recording itself. For more information about adding chapters, see "Chapters", p. 33.
Recording from External Devices
You can record the signal from external devices, such as a VCR, video camcorder (V8, Hi8), or DVD player onto DVDs using your DVD recorder.
• Please confirm the external device is properly connected to the DVD recorder. See the connection diagrams for more information (see "Connecting
the DVD recorder", p. 9).
• Place an initialized DVD+R or DVD+RW disc in the DVD recorder.
• Press
• Press
• Press
• Press
• Press
Note:
MONITOR on the remote to switch to external input mode.
SOURCE to select the source for your recording.
RECORD to begin recording.
STOP to stop recording. Please wait while the screen displays
“WAIT.” When “WAIT” disappears from the screen, your recording is done.
MONITOR to switch to DVD mode. The recorded title will appear on
the screen. Press
ENTER to view your recorded video.
The DVD recorder will stop recording automatically if there is no signal from the input device (such as a blank part of a videotape or an
interrupted TV signal).
DVD-RECORDER 80032 33

PREPARING DISCS FOR RECORDING
Recording from a DV Camcorder
Connect the red, yellow, and white AV output connectors from your DV camcorder to the AV input connectors on the front of your DVD recorder.
• Place an initialized DVD+R or DVD+RW disc in the DVD recorder.
• Turn on the DV camcorder and switch it to “VCR” mode.
• Press MONITOR on the remote to switch to external input mode.
• Press SOURCE to select the source for your recording .
• Press RECORD to begin recording.
• Press STOP to stop recording. Please wait while the screen displays
“WAIT.” When “WAIT” disappears from the screen, your recording is done.
• Press MONITOR to switch to DVD mode. The recorded title will appear on
the screen. Press
Note:
Recording will stop automatically if there is no signal from the DV camcorder.
All recorded signals must be in DVD-SD format.
Date and time information can’t be recorded from a DV camcorder.
ENTER to view your recorded video.
Editing Discs
You can’t record copy-protected discs or one-time duplicable discs.
Under disc title menu, press EDIT key to enter edit menu:
Protect and Unprotect Title
Protect and unprotect selected disc title. Move cursor to “Protect Title” menu,
press
ENTER key to proceed to protect title. To unprotect a title, follow the
previous step.
Protect and Unprotect disc
Protect and unprotect the entire disc. Move cursor to “Protect Disc” menu,
press
ENTER key to proceed protect disc. To unprotect a disc, follow the pre-
vious step.
Make Compatible (DVD+R only)
Use this feature to make a DVD+R disc playable on other DVD video players.
Note that after this procedure, the DVD+R disc cannot record any new contents.
Note:
We can’t guarantee a DVD+R/RW disc is playable on every DVD
player. Check the instruction manual of the DVD player in advance to
confirm which kind of disc can be played.
34
Play Full Title
If there is a hidden chapter in title, this setup can view all the contents.

PREPARING DISCS FOR RECORDING
Edit Title Name
• Move cursor to “Edit Title Name”, press ENTER key, a Virtual keyboard will
appear.
• Move cursor using direction keys and to select desired letter, press
ENTER key to input. Title Name contains a maximum 14 letters.
• After finishing your title, move cursor to “Done” and press
complete. To edit your title move cursor to “Clear” then press
to clear input title name. Move cursor to “Delete” or “BS” icon then press
ENTER key for erasing inputted letter(s). To cancel , move cursor to “Can-
cel”, then press
Note
“Delete” and “BS” work in different ways, using delete to erase letter(s) from
the beginning, and BS (backspace) to erase letters from the tail.
ENTER key to abort inputting.
ENTER key to
ENTER key
Erase Title (DVD+RW only)
Move cursor to “Erase Title” menu, Press ENTER key to confirm, and wait for
15 to 18 seconds for the title to erase.
During playback, press EDIT key to enter edit menu:
Insert Chapter
If “Auto Chapter” at Record menu has been activated, every 5~15 minutes
(depends on setting) will divide into a chapter. But if users wish to divide chapters at specific points in a title, users can use Insert Chapter function here.
• During title playback, press EDIT on remote control to show edit menu.
• Choose Insert Chapter and press ENTER key to add one chapter. Repeat
above to add more chapters.
Delete Chapter
Chapter mark can be deleted after recording. While a movie is playing, press
EDIT on remote control to show edit menu, choose “Remove Chapter”, and
you can remove current chapter mark of a title.
Note:
If DVD+R has not been finalized, Insert/Remove Chapter Mark step
can be made.
DVD-RECORDER 80032 35

ADDITIONAL INFORMATION
Regional Code
This DVD recorder is designed and manufactured to respond
to the Region Management Information recorded on a DVD
disc. If the region number described on the DVD disc does
not correspond to the region number of this DVD recorder,
this DVD recorder will not play the disc. The OSD message
“
WRONG REGION” will show on the TV screen. This recorder
will play DVD discs made for “ALL” regions, as well as DVD
discs made for Region 1. The illustration below shows the
regions and corresponding region numbers.
Region 1 USA & Canada
Region 2 Europe, Japan, South Africa, Middle East
Region 3 Southeast Asia
Region 4 Central & South America, Australia, New Zealand
Region 5 Former Soviet Union, India, Pakistan, Africa
Region 6 China
36

COUNTRY CODE
AD Andorra
AE United Arab Emirates
AF Afghanistan
AG Antigua and Barbuda
AI Anguilla
AL Albania
AM Armenia
AN Netherlands Antilles
AO Angola
AQ Antarctica
AR Argentina
AS American Samoa
AT Austria
AU Australia
AW Aruba
AZ Azerbaidjan
BA Bosnia-Herzegovina
BB Barbados
BD Bangladesh
BE Belgium
BF Burkina Faso
BG Bulgaria
BH Bahrain
BI Burundi
BJ Benin
BM Bermuda
BN Brunei Darussalam
BO Bolivia
BR Brazil
BS Bahamas
BT Bhutan
BV Bouvet Island
BW Botswana
BY Belarus
BZ Belize
CA Canada
CC Cocos Islands
CF Central African Republic
DVD-RECORDER 80032 37

COUNTRY CODE
CD Congo, The Democratic Republic of the
CG Congo
CH Switzerland
CI Ivory Coast
CK Cook Islands
CL Chile
CM Cameroon
CN China
CO Colombia
COM Commercial
CR Costa Rica
CS Former Czechoslovakia
CU Cuba
CV Cape Verde
CX Christmas Island
CY Cyprus
CZ Czech Republic
DE Germany
DJ Djibouti
DK Denmark
DM Dominica
DO Dominican Republic
DZ Algeria
EC Ecuador
EE Estonia
EG Egypt
EH Western Sahara
ER Eritrea
ES Spain
ET Ethiopia
FI Finland
FJ Fiji
FK Falkland Islands
FM Micronesia
FO Faroe Islands
FR France
FX France (European Territory)
38
GA Gabon
GB Great Britain
GD Grenada
GE Georgia

GF French Guyana
GH Ghana
GI Gibraltar
GL Greenland
GM Gambia
GN Guinea
GP Guadeloupe (French)
GQ Equatorial Guinea
GR Greece
GS S. Georgia
GT Guatemala
GU Guam (USA)
GW Guinea Bissau
GY Guyana
HK Hong Kong
HM Heard and McDonald Islands
HN Honduras
COUNTRY CODE
HR Croatia
HT Haiti
HU Hungary
ID Indonesia
IE Ireland
IL Israel
IN India
IQ Iraq
IR Iran
IS Iceland
IT Italy
JM Jamaica
JO Jordan
JP Japan
KE Kenya
KG Kyrgyzstan
KH Cambodia
KI Kiribati
KM Comoros
KN Saint Kitts
KP North Korea
KR South Korea
KW Kuwait
KY Cayman Islands
DVD-RECORDER 80032 39

COUNTRY CODE
KZ Kazakhstan
LA Laos
LB Lebanon
LC Saint Lucia
LI Liechtenstein
LK Sri Lanka
LR Liberia
LS Lesotho
LT Lithuania
LU Luxembourg
LV Latvia
LY Libya
MA Morocco
MC Monaco
MD Moldavia
MG Madagascar
MH Marshall Islands
MK Macedonia
ML Mali
MM Myanmar
MN Mongolia
MO Macau
MP Northern Mariana Islands
MQ Martinique (French)
MR Mauritania
MS Montserrat
MT Malta
MU Mauritius
MV Maldives
MW Malawi
MX Mexico
MY Malaysia
MZ Mozambique
NA Namibia
NC New Caledonia
NE Niger
NF Norfolk Island
40
NG Nigeria
NI Nicaragua
NL Netherlands
NO Norway

NP Nepal
NR Nauru
NT Neutral Zone
NU Niue
NZ New Zealand
OM Oman
PA Panama
PE Peru
PF Polynesia
PG Papua New Guinea
PH Philippines
PK Pakistan
PL Poland
PM Saint Pierre and Miquelon
PN Pitcairn Island
PR Puerto Rico
PT Portugal
COUNTRY CODE
PW Palau
PY Paraguay
QA Qatar
RE Reunion
RO Romania
RU Russian Federation
RW Rwanda
SA Saudi Arabia
SB Solomon Islands
SC Seychelles
SD Sudan
SE Sweden
SG Singapore
SH Saint Helena
SI Slovenia
SJ Svalbard and Jan Mayen Islands
SK Slovak Republic
SL Sierra Leone
SM San Marino
SN Senegal
SO Somalia
SR Suriname
ST Saint Tome and Principe
SV El Salvador
DVD-RECORDER 80032 41

COUNTRY CODE
SY Syria
SZ Swaziland
TC Turks and Caicos Islands
TD Chad
TG Togo
TH Thailand
TJ Tadjikistan
TK Tokelau
TM Turkmenistan
TN Tunisia
TO Tonga
TP East Timor
TR Turkey
TT Trinidad and Tobago
TV Tuvalu
TW Taiwan
TZ Tanzania
UA Ukraine
UG Uganda
UK United Kingdom
US United States
UY Uruguay
UZ Uzbekistan
VA Holy See
VC Saint Vincent & Grenadines
VE Venezuela
VG Virgin Islands (British)
VI Virgin Islands (USA)
VN Vietnam
VU Vanuatu
WF Wallis and Futuna Islands
WS Samoa
YE Yemen
YT Mayotte
YU Yugoslavia
ZA South Africa
ZM Zambia
42
ZR Zaire
ZW Zimbabwe

TROUBLESHOOTING
If something goes wrong, the first thing to do is to see whether you can correct
the problem yourself. The following overview may help you.
In no event should you attempt to repair the appliance yourself. If a repair is necessary, please contact our service centre or another suitably specialist
workshop.
FAULT POSSIBLE CAUSE / CORRECTION
GENERAL
No standby indication Check the mains connection: is the plug fully engaged in the socket?
The recorder does not work Press
The disc does not run although
PLAY has been pressed or it stops
almost at once.
The recorder does not respond to
the remote control
No picture Are the cables between the recorder and the TV are correctly connected and
Distorted picture Check whether the disc is dirty; if so, it can be cleaned by wiping with a soft,
Badly distorted picture
No colour
Poor picture
Incorrect picture format (4:3, 16:9) Check that the settings in the menu item,
No sound Is the sound muted (MUTE)?
STANDBY/ON on the remote control or the front panel.
If the appliance has been affected by lightning, a static discharge or some
other external factor, try the following procedure:
press
STANDBY/ON on the front panel (Standby mode); Now unplug the
supply cable, pause and plug it in again.
Has the disc been inserted with the label side uppermost?
Check that the disc is not damaged by trying another disc. If the disc is dirty,
it can be cleaned by wiping with a soft, dry cloth from the middle to the edge.
Is the disc one of the playable types - DVD, VCD or CD?
If the disc is a commercial DVD, does it have the correct regional code (2)?
Condensation may have formed; allow one or two hours for the recorder to
dry out.
Check that the batteries are not flat and that they are correctly inserted. Ensure that there is no obstruction between the infrared transmitter of the remote control and the sensor on the recorder.
Are you, perhaps, too far from the recorder (more than 7 m)?
undamaged?
Is the TV set switched on?
Have you selected the video "channel" (input) on the TV set?
Is the correct function (DVD) selected?
Is the correct DVD recorder output selected?
Have you pressed the NTSC/PAL button by mistake so that the picture processing is incorrect?
Do you need to make another station search?
dry cloth from the middle to the edge. Minor picture interference is not a fault.
The television standard recorded on your DVD may not be the same as that
of your TV set (NTSC/PAL button).
The video output signal is set to a standard that is not supported by your TV
set (NTSC/PAL button).
SETUP > VIDEO > SCREEN
FORMAT
, are correct for your TV set.
DVD-RECORDER 80032 43

TROUBLESHOOTING
Check your audio connections.
Incorrect audio output setting.
The DVD is playing in quick or slow motion.
Sound is too quiet Check the audio settings in the SETUP menu: correct sound format selec-
ted? Are the loudspeakers correctly set?
FOR DVDs ONLY
Wrong language
Wrong subtitle language
SKIP function does not work Some DVDs have titles/chapters for which the SKIP function is disabled.
Cannot change camera position Different camera positions are only available on a few DVDs and often only
You have forgotten the password. Use the factory password - 3308.
A recorded DVD cannot be played
on another player.
A recorded chapter is not shown on
another DVD player.
RECORDING
Record does not work No disc in the drawer; disc is write-protected.
Change the language settings in the SETUP menu (
LANGUAGE)
or
SUB TITLE key).
Check, on the DVD cover or in the DVD menu, whether the desired language
is available.
for a few, selected scenes.
The DVD+R was not finalised (fixed) after recording.
The DVD was not made compatible - see "Make Compatible (DVD+R only)",
p. 34.
The disk is not of the correct type (DVD+R or DVD+RW).
There are already 49 titles on the disc.
Another recording is being made at the scheduled time.
The scheduled time is already past.
All 8 schedule slots are already filled.
There is no signal from the selected source.
by pressing the subtitle button or in the DVD menu (MENU
DISC - SUBTITLE
REMOTE CONTROL
Does not work No batteries or the batteries are flat.
The remote control is not pointing at the recorder.
44

TECHNICAL DATA
Supply voltage: 100 - 240 V ~ 50/60 Hz
Power consumption: 30 W
Standby power consumption: 9 W
Remote control batteries: 2 X 1.5V R03 / LR03 TYPE AAA
Colour television system: PAL/NTSC
Laser power: Class 1 laser
Playable disc formats: DVD (Digital Versatile Disk), DVD+R, DVD+RW, DVD-R, DVD-RW;
VCD, SVCD, CD-Audio; CD-R, CD-RW, JPEG-CD, MP3-CD
Recordable disc formats: DVD+R; DVD+RW
There is no guarantee that a DVD+R or DVD+RW recorded on your DVD machine can be played on another
DVD player. If you have problems, read the manual for the other player and check whether it can play DVD+R
and DVD+RW discs.
If you use Audio CDs, check the label.
Please note: There are now many CD recording and copy-protection methods, some of which are not standardised. There are also different kinds of CD-R and CD-RW blanks. In individual cases, reading errors or delays
can occur. This is not a recorder defect.
Subject to technical changes.
DVD-RECORDER 80032 45
 Loading...