

Page 1
01/04
Phone: 0870 7270370 • +44 (0) 1793 715699 (EIRE)
or e-mail: hotline@medion.co.uk
Fax: 01793 715716
Swindon SN3 5JF
GB-Wiltshire
MEDION Electronics Ltd.
130 Faraday Park
Faraday Road
Dorcan
MD 7455 BDA_UK 26.09.2003 8:28 Uhr Seite 1
MD 7455
Heart Rate Monitor
•
in order to avoid any premature discharge of the batteries.
pacemaker bearers should use this heart rate monitor
only after consultation with their doctor.
CARE
Wipe off your heart rate monitor and the transmitter with a damp
cloth after your training.
Please take care that the transmitter unit is kept in a dry place
•
rate monitor, please contact the service hotline or an
authorised service shop.
Please read the operating instructions carefully and keep
the instructions as long as you possess your heart rate
monitor.
Individuals with cardiovascular disease or cardiac
•
•
With the parameters of your current fitness level, you will
then achieve the best possible results.
Do not use your heart rate monitor when practising any
injury-prone sports.
For changing batteries or with regard to the legally prescribed
removal of the batteries prior to the disposal of your heart
OPERATING INSTRUCTIONS
•
•
rate, your calorie consumption and fat catabolism.
Before starting your training programme, please consult your
doctor or trainer to determine your individual upper and lower
heart rate limit (training zone), training frequency and length
of training.
!
The heart rate monitor is not medical device. It is a training
instrument designed for measuring and indicating your heart
SAFETY NOTES
Please unfold!
Page 2
MD 7455 BDA_UK 26.09.2003 8:28 Uhr Seite 2
Mode
A
Set
B
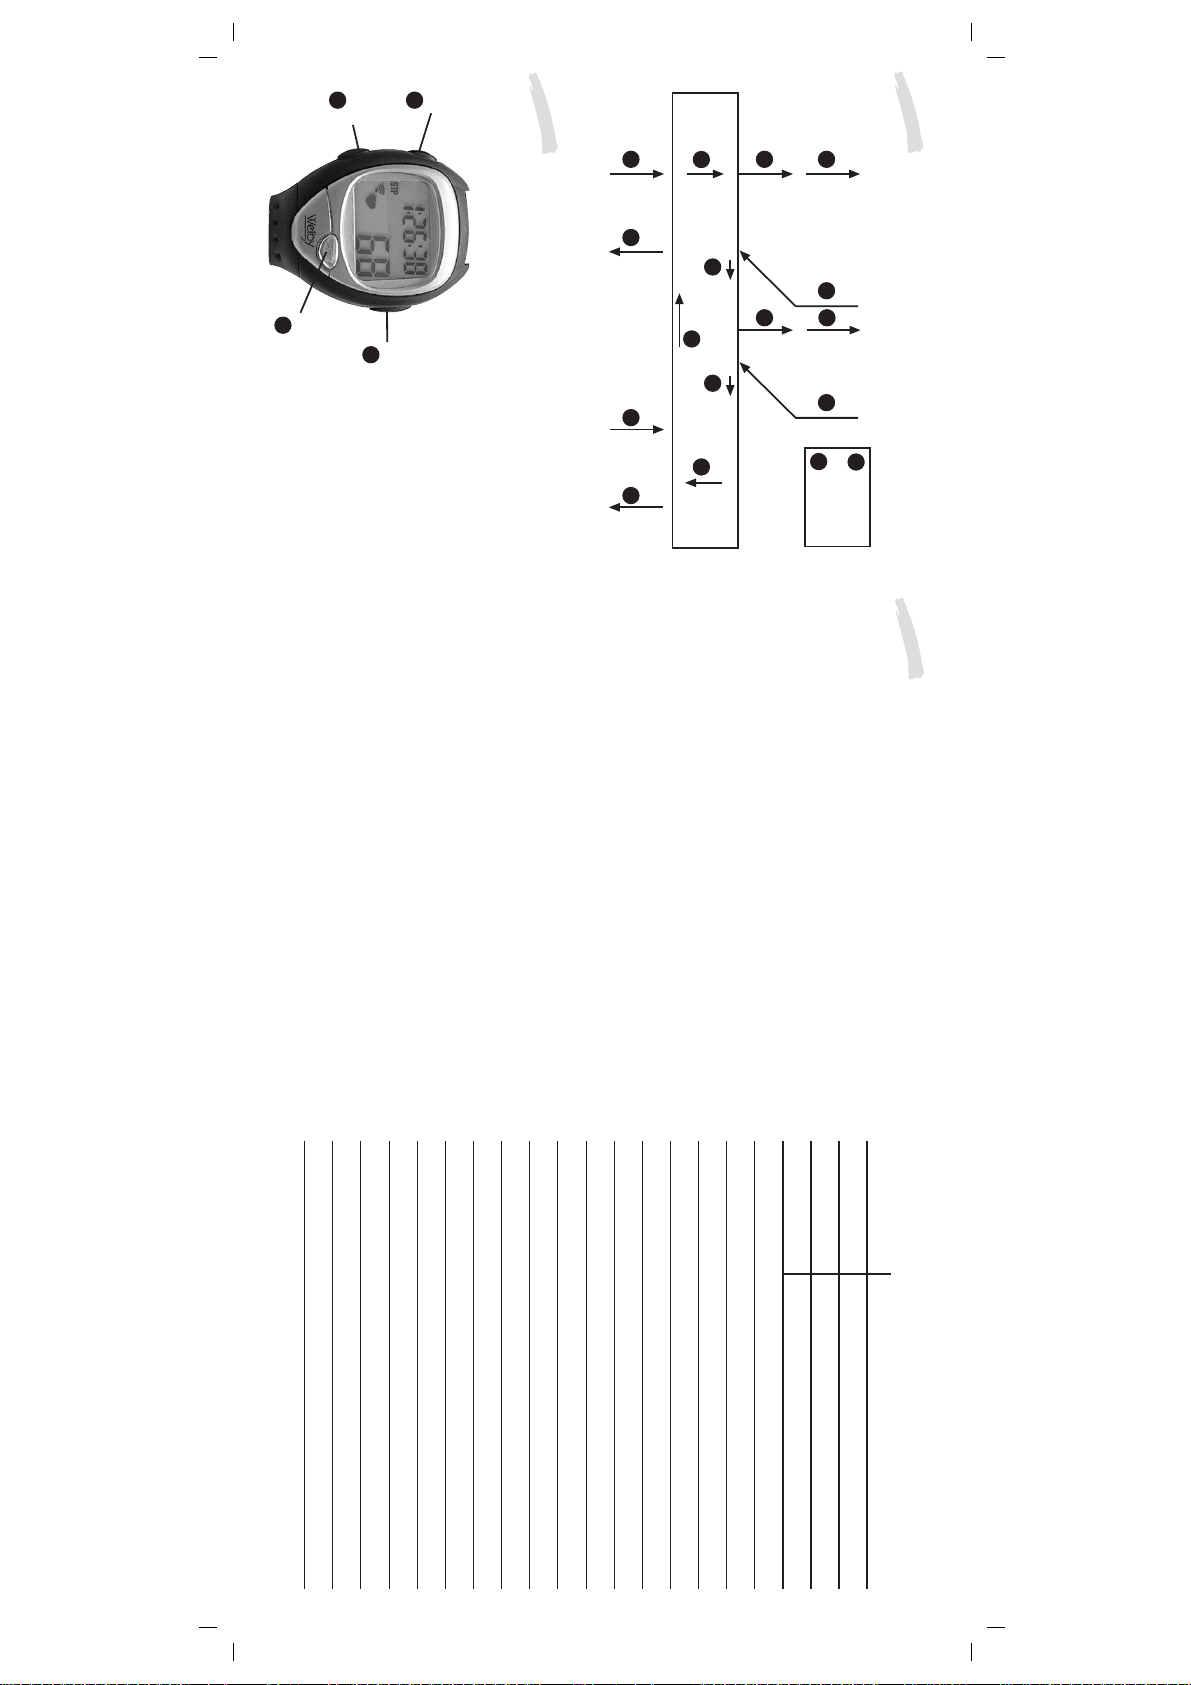
BUTTON FUNCTIONS
Your heart rate monitor has four buttons.
TRAINING STOPWATCH MODE
FLOW CHART
Alarm / light
D
C C C C
FAT CATABOLISM METER
KILOGRAM CALORIE METER
A
C C
A A
CLOCK MODE TRAINING ZONE MODE
Option
C
MAXIMUM HEART RATE
A
AVERAGE HEART RATE
A
mode.
B Set button
The B set button is used for setting the upper and lower heart rate,
normal time, date, alarm time, countdown timer and the calorie
consumption parameters.
Furthermore, the set button is used for starting the countdown, training
stopwatch and lap stopwatch functions.
C Option button
The C option button is used for switching between the individual options
to the respective operating mode as follows:
From the normal time mode, you will get to the alarm mode, to the
date mode and back again to the normal time mode.
From the heart rate mode, you will get from the average heart rate to
the maximum heart rate and back again to the average heart rate.
From the training stopwatch mode, you will get to the countdown mode,
to the lap stopwatch mode and back again to the training stopwatch
mode.
D Alarm/ light button
The D alarm/ light button is used for switching on the back light or a
signal tone. Press the alarm button to activate the signal tone. A sound
symbol appears on the display, and when pressing the button or when
leaving the training zone, a signal tone will be heard, provided this
function has been activated.
Press the alarm button for 2 seconds for activate the back light for 5
seconds.
C C
C
LAP STOPWATCH MODE
DATE MODE
COUNTDOWN MODE
ALARM MODE
C
C
A
=Mode button
=Option button
A Mode button
The A mode button is used for changing the different operating modes.
Press the mode button briefly to switch from the clock mode to the
training zone mode, to the heart rate mode, to the kilogram calorie
mode, to the training stopwatch mode and to return again to the clock
BUTTON FUNCTIONS
The function Buttons must never be pressed or activated under
water, since moisture could penetrate into the housing.
- 1 -
Name:
Normal pulse rate:
Lower pulse rate limit:
Upper pulse rate limit:
Page 3
Press the mode button. The display of
minutes will start flashing. Set the
Press the mode button. The display of the
time zone will start flashing. Set the desired
time shift with the set button.
By pressing the mode button, you will return
again to the clock mode.
By pressing the option button for 2 seconds,
you will change to the second time zone.
- 2 -
minutes with the set button.
You confirm your choice with the mode
button, and the clock with a flashing
display of the hours will appear. Set the
Or in case of a 12 hour setting:
current hour with the set button.
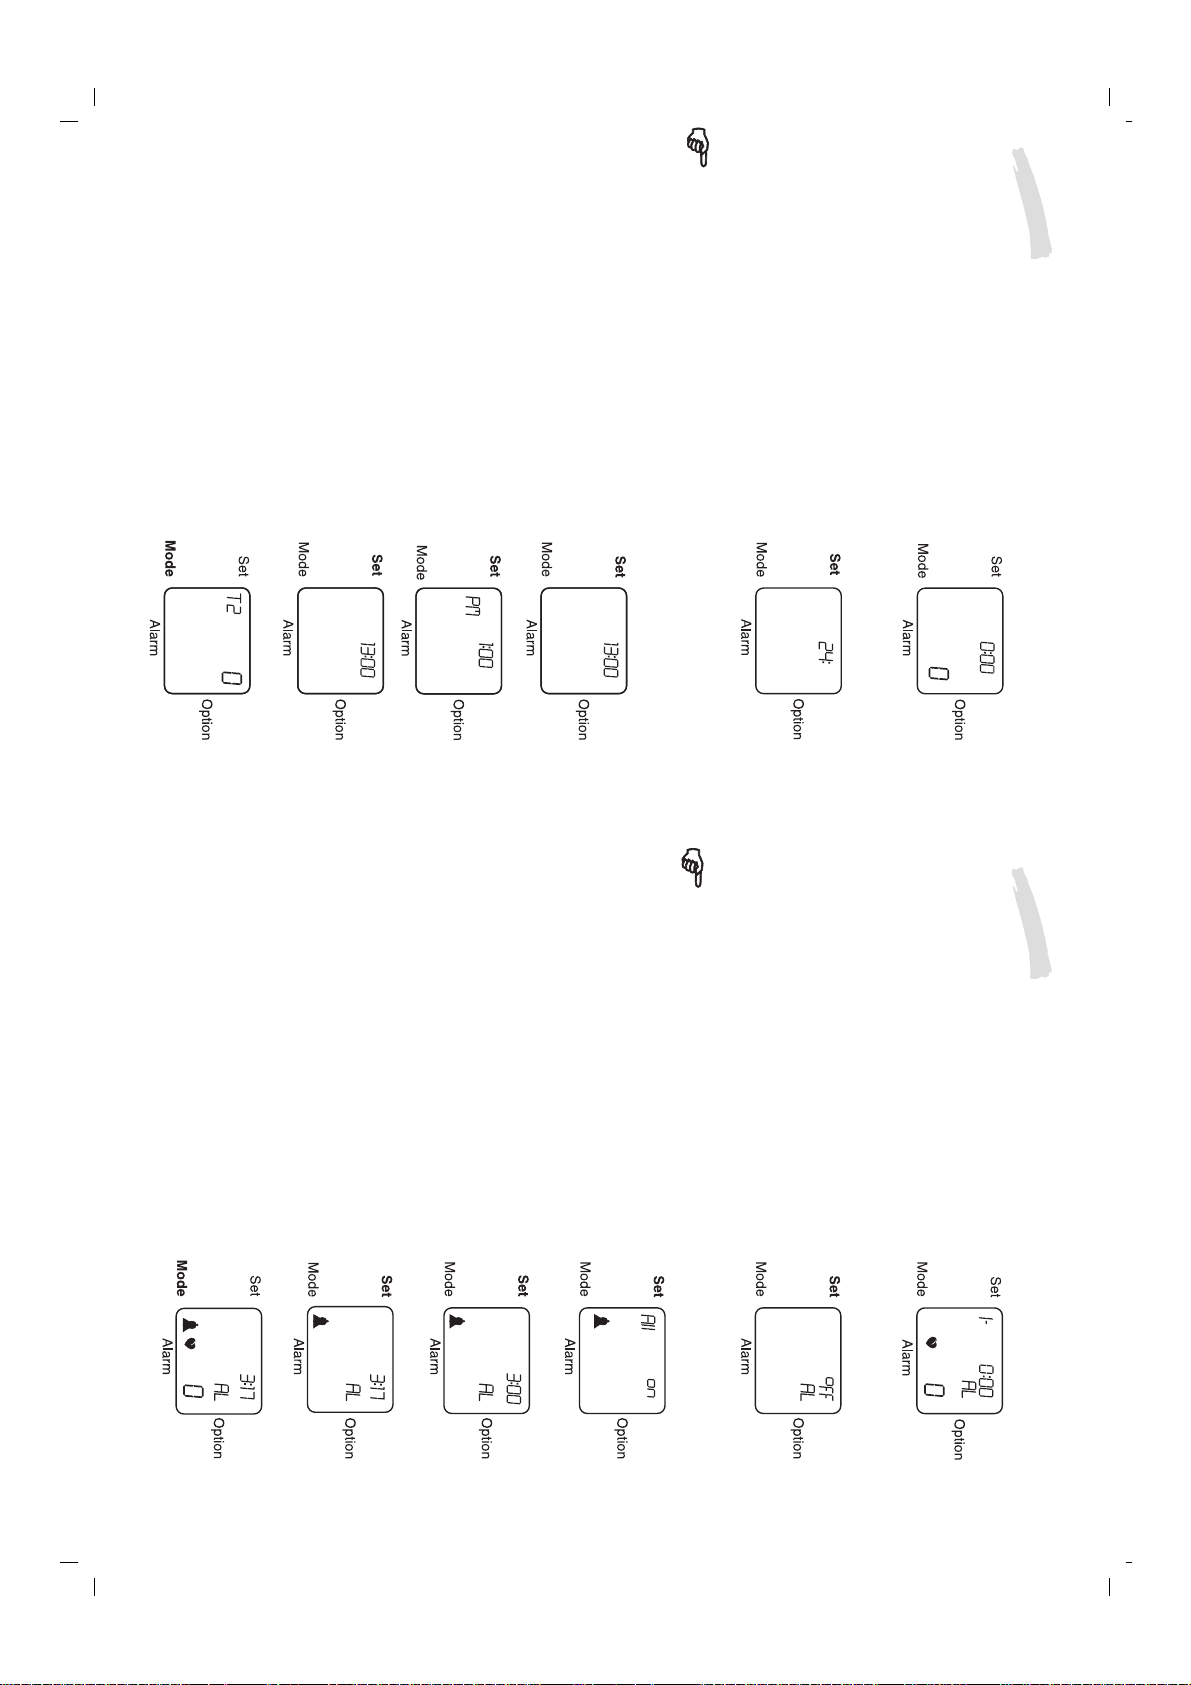
When choosing the 12 hour display, the American calendar format of month/day will automatically
be shown; when choosing the 24 hour display, the European format of day/month.
In the case of the 12 hour setting, please note that AM will be displayed for the morning and
PM for the afternoon.
To set the time, the monitor must be in
the clock mode, i.e. the time will be
indicated on the display on the upper
right, and the current heart rate on the
lower right. If this is not so, press the
option button until you get to the operating
mode. There, you press the mode button
to get to the clock mode.
In the clock mode, keep the set button
pressed for about 2 seconds until the
display “Hold“ disappear. Press the set
button now to choose between a
12 hour and 24 hour display of the time
of day.
SETTING THE TIME
- 3-
above).
Press the mode button. The display of
minutes will start flashing. Now, set the
minutes with the set button.
By pressing the mode button, you will
return to the alarm time mode.
By pressing the option button for two
seconds, you can set the second up to
the eighth alarm now (as described
You confirm your choice with the mode
button, and the alarm clock will appear
with a flashing display of the hours. Set
the desired hour by pressing the set
button.
as on a weekly basis.
With pressing the option button for about
2 seconds you can set up to eight
personal alarms:
Both individually on a daily basis as well
The bell symbol will remain visible in every operating mode, if any alarms are switched on.
alarm on (“on“ and a bell symbol will
appear on the display) or off (“off“ will
appear on the display).
In the alarm time mode, keep the set
button pressed for about 2 seconds until
the display “Hold“ will disappear. Press
the set button now for switching the
display.
If this is not so, switch to the clock mode
and press the option button to get to the
alarm time mode.
For setting the alarm time, the monitor
must be in the alarm clock mode, i.e.
the alarm time, current heart rate and
the letters “AL“ will be indicated on the
SETTING THE ALARM TIME
Page 4

Explanation of the abbreviations of the days of the week:
Monday = MO Tuesday = TU Wednesday = WE
Thursday =TH Friday = FR Saturday = SA
Sunday = SU
date.
By pressing the mode button, you will
return to the date mode. The day of the
week will automatically be displayed as
an English abbreviation in front of the
- 4 -
Press the mode button. The display of
the day will start flashing. Set the day
with the set button.
desired month by pressing the set button.
If you have chosen the 12 hour display for your time setting, please note that the American
calendar format of month/date will automatically be displayed; if you have chosen the
24 hour display, the European format of date/month will be shown.
You confirm your choice with the mode
button, and the date will appear with a
flashing display of the month. Set the
In the date mode, keep the set button
pressed for about 2 seconds until the
display “Hold“ disappears. Now, press
the set button for setting the year between
the year 2000 and the year 2050.
date mode.
you the day of the week of the respective date up to the year 2050.
To set the date, the monitor must be in
date mode, i.e. the date and the current
heart rate are shown on the display.
If this is not so, switch to the clock mode
and press the option button to get to the
SETTING THE DATE DISPLAY
Your pulse rate monitor is equipped with a 50 year calendar which will compute for
- 5 -
The heart symbol on the display
will start flashing as soon as your
heart rate monitor receives
Wireless heart rate monitors can be influenced by interferences of external radio
frequencies. Electronic training devices at fitness clubs, mobile phones, wireless
bicycle computers, high voltage transmission lines or the like can cause irregular
transmitter pulses and be the reason why “0“ is indicated on the display during the
training. When training in groups, other heart rate transmitters can interfere with your
signal which will lead to a false heart rate display. To get correct signals, keep a
distance of approx. 2 metres to other users of heart rate monitors.
signals from the transmitter.
RADIO FREQUENCY INTERFERENCES
HEART RATE DISPLAY
signals.
It can take a few seconds until a heart rate display can be seen.
If necessary, try varying positions of the transmitter to achieve an optimum contact.
To achieve a better contact with the skin, the transmitter cushion should be slightly moistened,
e.g. with an ECG gel (available from your local chemist). Put on the strap a few minutes
before you are going to start so it can heat to body temperature. Find the best possible strap
position for you. The contact between the skin and the transmitter must not be interrupted
at any time, even in the event of deep breathing.
Attach the heart rate monitor to your wrist.
Press whatever button you choose for activating the monitor. If there is a problem-
free reception, the heart symbol will start flashing with the incoming transmitted
PUTTING ON THE TRANSMITTER AND THE HEART RATE MONITOR
The transmitter has to be worn on naked skin. Adjust the elastic strap so that the
transmitter sits tightly your chest.
:
®
Page 5

- 6 -
ATTENTION!
The types of training with the different heart rate zones are just examples.
Please ensure you discuss your choice of training with your doctor or qualified trainer.
maximum heart rate with the factors listed below.
Choose your desired kind of training here.
MEN : 220 minus age = maximum heart rate (MHR)
WOMEN : 230 minus age = maximum heart rate (MHR)
Calculate the upper and lower training limit of your kind of training by multiplying your
as a basis. To determine your maximum heart rate, please consult your doctor or
your trainer. If you do not know your maximum heart rate, you can estimate it on the
basis of the following formula:
For calculating the training limits, your maximum heart rate (MHR) has to be taken
button to get to the training zone mode.
The display will indicate your current heart
rate during the training. A flashing value
and an arrow pointing upward or downward
will tell you that you are outside of your
set training zone.
In addition, an audible alarm can be set.
The arrows will disappear as soon as your
current value is within the preset training
zone.
For setting the training limits, the monitor
has to be in the training zone mode, i.e.
it will alternately be indicated on the
display how long you were in the upper
(HI), in the lower (Lo) and in the desired
(In) training zone. If this is not so, switch
to the clock mode and press the mode
SETTING THE TRAINING ZONE
The heart rate monitor will enable you to set a specific training zone with an upper
and lower heart rate limit.
- 7 -
tone will be audible every six seconds, if your pulse rate is above or below the limits.
By pressing the mode button, you will return to the training zone mode.
You cannot set a lower limit which is higher than the upper limit.
In this case, the upper limit will again be shown on the display so that you can set it again.
Confirm your choice with the mode button,
and the lower flashing limit will be displayed.
Set the desired lower limit by pressing the
set button between 30 and 179.
between 100
and 240.
In the training zone mode, keep the set
button pressed for about 2 seconds until
the display “Hold” will disappear. Press the
set button now for setting the upper limit
WARNING SIGNAL FOR TRAINING ZONE
When exceeding or staying below the limits,
you can also be informed about this by a
warning signal tone besides the visual display.
Press the alarm button for activating or deactivating
the signal tone. If the signal tone is activated,
a sound symbol will appear on the display.
If the warning signal function is activated, a signal
TYPE OF TRAINING - HEALTH BENEFITS
Formula: lower limit: MHR x 0.50
TYPE OF TRAINING - ENDURANCE TRAINING
Formula: lower limit: MHR x 0.65
TYPE OF TRAINING - MAXIMUM LOAD
Formula: lower limit: MHR x 0.80
upper limit: MHR x 0.95
upper limit: MHR x 0.80
upper limit: MHR x 0.65
Page 6

display, and below the current heart rate
as well as the letters “KCAL“. If this is
not so, switch to the clock mode and
press the mode button to get to the
kilogram calorie mode.
In the kilogram calorie mode, keep the
set button pressed for about 2 seconds
until the display “Hold” will disappear.
Press the set button now to choose your
sex between “M” for men and “F” for
women.
- 8 -
CALORIE CONSUMPTION MODE
While the training stopwatch is switched on, the achieved calorie consumption and
fat catabolism will be calculated on the basis of the measured heart rate. You must
enter your sex, weight and current activity so that these values can be determined
precisely. Proceed as follows:
For setting the data, the monitor must
be in the kilogram calorie mode, i.e. the
consumed kilogram calories will be
indicated on the upper right on the
By pressing the option button again, you will return to the heart rate display mode.
To be able to see the average or the
maximum heart rate, your monitor must be
in the heart rate display mode, i.e. the
average heart rate will be indicated on the
upper right on the display and the current
heart rate value as well as the letters “AVG“
on the lower right.
If this is not so, switch to the clock mode
and press the mode button to get to the
heart rate display mode.
In the heart rate display mode, press the
option button, then the maximum heart rate
value and the letters “MAX“ will appear on
the upper right on the display.
HEART RATE DISPLAY MODE
Your heart rate monitor provides the possibility of reading your average and maximum
heart rate so that you will be able to adjust your training the best possible way and
to avoid any overloading.
If you have entered your weight in lb (British pound), the fat catabolism will be
displayed in pounds.
- 9 -
Press the option button in order to read the
exact fat catabolism achieved during your
training sequence with a precision of
10 grammes. The maximum display
amounts to 1.30 kg.
in the training stopwatch mode.
onwards and only after the training stopwatch has been started.
By pressing the mode button, you will get
again to the kilogram calorie mode. Here,
you can read the consumed kilogram
calories while the training stopwatch is on
These calorie parameters are approximate values which are to serve as a rough guideline.
You should decide individually, since each of these types of sport can be practised with
different intensiveness.
The calorie consumption will only be measured from a heart rate of more than 100 beats/minute
Jogging 0.00036 – 0.00069 Tennis 0.00050
Canoeing 0.00020 – 0.00047 Circuit training 0.00039 – 0.00060
Basketball 0.00063 Bicycle riding 0.00029 – 0.00079
Soccer 0.00060 Swimming 0.00028 – 0.00078
Gardening 0.00025 – 0.00057 Skiing 0.00052 – 0.00074
Handball 0.00063 Squash 0.00096
Some examples of different calorie parameters are as follows:
Aerobic 0.00047 – 0.00061 Climbing 0.00055
Badminton 0.00044 Running 0.00074 – 0.00131
value of 00010 and the value of 00131.
Confirm your choice with the mode button,
and the flashing weight display will appear.
Set your actual weight between 20kg
(British pounds) and 225kg by pressing the
set button.
By pressing the option button, you can
choose between kilogram and the British
pound (454g).
Press the mode button. The calorie
parameter will start flashing. Set the calorie
parameter with the set button between the
Page 7

By pressing the set button (more than for 2 seconds), the training stopwatch will be
By resetting the training stopwatch to 0:00:00, the memory for the heart rate will be deleted,
and your heart rate monitor will be ready for the next training session.
- 10 - - 11 -
reset to 0:00:00.
indicated in the upper line for comparison
with the current heart rate in the lower line.
In the training stopwatch mode, press the
set button in order to start the training time
After pressing the set button again, a beep
will be audible, a break of 3 minutes will
begin. The training time stopped by you will
remain visible for another 5 seconds.
Thereafter, the break countdown will appear,
which will automatically be effected down
to 0 seconds.
At the end of the break, four beeps will be
audible. The stored heart rate will be
and thereby your training sequence.
Your heart rate monitor is equipped with a training stopwatch with which you can read
times up to 9 hours, 59 minutes and 59 seconds.
To start the training stopwatch, the monitor
must be in the training stopwatch mode, i.e.
the training time will be indicated on the
upper right on the display, and below the
current heart rate as well as the letters “STP”.
If this is not so, switch to the clock mode
and press the mode button to get to the
training stopwatch mode.
TRAINING STOPWATCH MODE
S
T
P
Confirm your choice with the mode button,
and the minute display will start flashing.
Press the set button now for setting the
At the end of the countdown time, the display will stop when 0:00:00 is reached, and an
alarm signal will be audible. By keeping the set button pressed for a longer time, the
countdown timer will be reset to the originally set value.
set value.
By pressing the mode button, you will return
to the countdown mode.
By pressing the set button, you will start or
stop the countdown timer. By keeping the
set button pressed for a longer time, the
countdown timer will be reset to the originally
minutes.
pressed for about 2 seconds until the display
“Hold“ disappears. Press the set button now
for setting the number of hours between 0
and 9 hours.
S
T
P
Your heart rate monitor provides the possibility of programming a countdown timer
from 1 minute up to 9 hours and 59 minutes.
In the countdown mode, keep the set button
the countdown mode.
heart rate as well as the letters “CDT”. If this
is not so, change to the clock mode and press
the mode button to get to the training stopwatch
mode, then press the option button to get to
For setting the countdown timer, the monitor
must be in the countdown mode, i.e. the
countdown timer will be indicated on the upper
right on the display, and below this the current
COUNTDOWN TIMER MODE
Page 8

Press the set button again to stop the time
measurement for the current lap.The
stopwatch will automatically start with the
By pressing the mode button, you will stop
the time measurement without continuing
Press the set button to start the time
measurement for the next lap, or press the
option button for leaving the lap time mode
again.
Press the set button and hold it pressed for more than 2 seconds to reset the lap
time mode again to the original state.
- 12 -
automatically with the next lap.
will again start with 00:00.
time measurement for the next lap.
The maximum lap time amounts to 99 minutes and 59 seconds. Thereafter, the time display
Press the set button in order to start the
time measurement for the current lap.
You can read back the measured lap times from the memory.
For setting the lap timer, the monitor must be
in the lap time stopwatch mode, i.e. the lap
and the lap time will be indicated on the upper
right on the display, and below the current
heart rate as well as the letters “LAP”.
If this is not so, change to the clock mode
and press the mode button to get to the
training stopwatch mode, then press the option
button to get to the lap time stopwatch mode.
In the lap time stopwatch mode, press the
set button in order to start the lap time
measurement.
LAP TIME STOPWATCH MODE
Your heart rate monitor provides a lap time stopwatch for up to 16 training laps.
- 13 -
Press the set button for indicating the
average heart rate and the time stopped for
each lap. By pressing the set button, you
Press the mode button to leave the lap time
memory and to return again to the lap time
Press the set button and hold it pressed for
more than 2 seconds to delete the lap time
memory.
mode.
will change the individual laps.
In the lap time mode, keep the mode button
pressed for about 2 seconds to start the lap
Now the total lap time and the total number of laps will be indicated from the lap time memory
in intervals of 2 seconds, together with the average time for all laps as well as with the
respective average heart rate.
time memory.
stopwatch mode, and then press the option
button to get to the lap time mode.
the current heart rate as well as the letters
“LAP”.
If this is not so, change to the clock mode and
press the mode button to get to the training
For calling up the lap memory, the monitor
must be in the lap time stopwatch mode, i.e.
the lap and the lap time will be indicated on
the upper right on the display, and below this
heart rate.
After your training, you have the possibility to call up from the lap time memory the
training values for the total time of all laps and the total number of laps with the
average time for all laps, together with the respective average heart rate. In addition
you can call up the times of the individual laps together with the respective average
LAP TIME MEMORY
Page 9

- 14 -
Your heart rate monitor is now in the state it was delivered from the factory.
The display is black.
-The ambient temperature is outside of the operating range (0° C to 55° C).
-Is the transmitter too far away from the monitor?
-Are there any electronic interference sources interfering with a problem-free transmission?
-Is the transmitter battery flat?
The display is blank.
-The receiver battery is flat. For changing the receiver battery, please contact a
watchmaker's shop or the service hotline.
Reset – resetting the receiver
1. Keep all 4 buttons pressed for about 3 seconds.
2. Press the set button. The monitor will then count down from 3 to 0.
3. Press the mode button and thereafter the option button.
TROUBLESHOOTING
The heart rate is not displayed.
-Is the transmitter flat against your chest.
Attach the fixing device supplied to the handlebars. Attach your heart rate monitor
to the fixing device and adjust the watch strap in such a way that the fixing device
will be pressed together on the handlebar.
HANDLEBARS OF A BICYCLE
ATTACHING THE HEART RATE MONITOR TO THE
POWER SAVING MODE
If no signal is received for approx.
5 minutes, your heart rate monitor will
automatically switch to the power saving
mode, and the current time will be
indicated. Press any button to “wake up“
your heart rate monitor. Thereafter, you
will again be back in the training stopwatch
mode.
SPECIFICATIONS
Batteries:
Receiver 1 x CR 2025 3V
Station 1 x CR 2032 3V
Transmitter frequency: 5.3 KHz
Subject to technical modifications!
Mode
Open the battery compartment at the chest strap by turning the battery cover in the
direction of the arrow by means of a coin. Now you can remove the transmitter battery
and dispose of it.
As for your heart rate monitor, remove the four screws on the back of the housing by
means of a small screwdriver for slotted screws. Now lift carefully one of the watch
strap halves out of its anchoring and take off the cover. Now remove the securing clip
and then remove the battery for proper disposal.
Caution: This procedure must only be applied in connection with the disposal of the
monitor, since the monitor will be destroyed while doing so.
Set
1
3
:
2
4
ENVIRONMENTAL NOTE
Old batteries must not be disposed of via your household waste, but have to be
disposed of properly via the collecting boxes.
Prior to the disposal of your heart rate monitor (at the end of its life), the batteries
must be removed in any case!
 Loading...