

Page 1

MCD7009
COMPACT
DISC
PLAYER
Page 2

IMPORTANT
SAFETY
INSTRUCTIONS
THESE
INSTRUCTIONS
ARE TO PROTECT
YOU AND THE
MclNTOSH
INSTRUMENT.
BE SURE TO
FAMILIARIZE
YOURSELF
WITH THEM
1. Read all instructions - Read the safety and operating instructions before operating the instrument.
2. Retain Instructions - Retain the safety and operating instructions for future reference.
3. Heed warnings - Adhere to warnings and operating instructions.
4. Follow Instructions - Follow all operating and use instructions.
WARNING:
TO
REDUCE RISK
OF
FIRE
OR
ELECTRICAL SHOCK,
DO NOT
EXPOSE THIS
IN-
STRUMENT TO RAIN OR MOISTURE.
5. Power Sources - Connect the power supply only to the type described in the operating instructions
or as marked on the unit.
6. Power-Cord Protection - Route power-supply cords so that they are not likely to be walked on or
pinched by items placed upon or against them, paying particular attention to cords at plugs,
convenience receptacles, and the point where they exit from the instrument.
7. Ventilation - Locate the instrument for proper ventilation. For example, the instrument should not
be placed on a bed, sofa, rug, or similar surface that may block ventilation openings; or, placed
in a built-in installation, such as a bookcase or cabinet, that may impede the flow of air through
the ventilation openings.
8. Heat - Locate the instrument away from heat sources such as radiators, heat registers, stoves, or
other appliance (including amplifiers) that produce heat.
9. Wall or Cabinet Mounting - Mount the instrument in a wall or cabinet only as described in the owner's
manual.
10. Water and Moisture - Do not use the instrument near water - for example, near a bathtub, washbowl,
kitchen sink, laundry tub, in a wet basement, or near a swimming pool, etc.
11. Cleaning - Clean the instrument by dusting with a dry cloth. Clean the panel with a cloth moistened
with a window cleaner.
12. Object and Liquid Entry - Do not permit objects to fall and liquids to spill into the instrument through
enclosure openings.
13. Nonuse Periods • Unplug the power cord from the AC power outlet when left unused for a long period
of time.
14. Damage Requiring Service - Service must be performed by qualified service personnel when:
A. The power supply cord or the plug has been damaged; or
B. Objects have fallen, or liquid has been spilled into the instrument; or
C. The instrument has been exposed to rain; or
D. The instrument does not appear to operate normally or exhibits a marked change in performance;
or
E. The instrument has been dropped, or the enclosure damaged.
15. Servicing - Do not attempt to service beyond that described in the operating instructions. All other
service should be referred to qualified service personnel.
16. Grounding or Polarization - Do not defeat the inherent design features of the polarized plug. Nonpolarized line cord adaptors will defeat the safety provided by the polarized AC plug.
17.
CAUTION:
WITH AN EXTENSION CORD, RECEPTACLE OR OTHER OUTLET UNLESS THE BLADES CAN
BE FULLY INSERTED TO PREVENT BLADE EXPOSURE.
ATTENTION:
FICHE POLARISEE AVEC UN PROLONGATEUR, UNE PRISE DE COURANT OU UNE AUTRE
SORTIE DE COURANT, SAUF SI LES LAMES PEUVENT ETREINSEREES A FOND SANS EN
LAISSER AUCUNE PARTIE A DECOUVERT.
The lightning flash with arrowhead, within an equilateral triangle, is intended to alert the
user to the presence of uninsulated "dangerous voltage" within the product's enclosure
that may be of sufficient magnitude to constitute a risk of electric shock to persons.
TO
PREVENT ELECTRICAL SHOCK
POUR PREVENIR
LES
CHOCS ELECTRIQUES
DO NOT USE
THIS (POLARIZED) PLUG
PAS
UTILISER CETTE
Copyright 1994 © by
Mclntosh Laboratory Inc.
CAUTION:
REMOVE COVER (OR BACK). NO USER-SERVICABLE PARTS INSIDE.
REFER SERVICING TO QUALIFIED PERSONNEL.
The exclamation point within an equilateral triangle is intended to alert the user to the
presence of important operating and maintenance (servicing) instructions in the literature
accompanying the appliance.
TO
PREVENT
THE
RISK
OF
ELECTRIC
SHOCK,
DO NOT
WARNING: THIS UNIT IS CAPABLE OF PRODUCING HIGH SOUND
PRESSURE LEVELS. CONTINUED EXPOSURE TO HIGH SOUND
PRESSURE LEVELS CAN CAUSE PERMANENT HEARING IMPAIRMENT
OR LOSS. USER CAUTION IS ADVISED AND EAR PROTECTION IS
RECOMMENDED WHEN PLAYING AT HIGH VOLUMES.
2
Page 3

Your decision to own this piece of Mclntosh Stereo Equipment ranks you at the very top
among discriminating music listeners. You now have "The Best". The Mclntosh dedication
to "Quality", is assurance that you will receive thousands of hours of musical enjoyment from
this unit.
Please take a short time to read the information in this manual. We want you to be as familiar
as possible with all the features and functions of your new piece of Mclntosh. This will ensure that you receive all the performance benefits this instrument can offer you, and that
it will become a highly valued part of your home music system.
The serial number, purchase date, and Mclntosh Laboratory Service Contract number are
important to you for possible insurance claim or future service. Record this information here.
Serial Number Purchase Date
Service Contract Number
Upon application, Mclntosh Laboratory provides a Service Contract to the original purchaser.
Your Mclntosh Authorized Service Agency can expedite repairs when you provide them with
the Service Contract.
THANK
YOU
SERVICE CONTRACT 4
READ BEFORE OPERATING 5, 6
HOW TO INSTALL BATTERIES IN THE REMOTE CONTROLLER 6
HOW TO INSTALL THE MCD7009 6
THE REAR PANEL AND HOW TO CONNECT 7, 8
HOW TO OPERATE THE MCD 7009 WITH REMOTE CONTROLLERS FROM
OTHER MclNTOSH REMOTE CONTROLLED PRODUCTS 9, 10, 11
THE FRONT PANEL AND REMOTE CONTROLLER 12
HOW TO OPERATE 13-21
IF YOU NEED HELP 22
SPECIFICATIONS 23
FOLD-OUT DRAWING OF MCD7009 BACK PANEL 24
CUSTOM INSTALLATION DRAWING 25
TABLE OF
CONTENTS
3
Page 4
MclNTOSH
THREE YEAR
SERVICE
CONTRACT
TAKE ADVANTAGE OF 3 YEARS OF CONTRACT SERVICE. . .
FILL IN THE APPLICATION NOW.
Your MCD7009 Compact Disc Player will give you many years of satisfactory performance.
If you have any questions, please contact,
Mclntosh Laboratory Inc.
2 Chambers Street
Binghamton, New York 13903-2699
Phone: 607-723-3512
An application for A THREE YEAR SERVICE CONTRACT is included with this manual.
The terms of the contract are:
1. If
m
ori
sh
II provide all parts,
instrument to the
es not cover any
ry.
2. An
ser
vice
3. Alw
moc
ed
4. The
misr
5. Units in operation outside the United States and Canada are not covered by the Mclntosh
Factory Service Contract, irrespective of the place of purchase. Nor are units acquired
outside the USA and Canada, the purchasers of which should consult with their dealer
to ascertain what, if any, service contract or warranty may be available locally.
be transferred to a second owner.
ments at normal
contract, the sere service agency.
he instrument is
t will be cancell-
ice contract.
protect you from
Page 5

Choose the installation location of your unit carefully. Avoid placing it in direct sunlight or
close to a source of heat. Also avoid locations subject to vibrations and excessive dust, heat,
cold or moisture. Keep away from such sources that hum, such as transformers or motors.
Do not open the cabinet as this might result in damage to the circuitry or electrical shock.
If a foreign object should get into the MCD7009, contact your authorized Mclntosh dealer.
Be sure not to handle discs with dirty fingers. Never insert a disc which has a crack on
the surface.
When removing the power plug from the wall outlet, always pull directly on the plug, never
yank the cord.
To keep the laser-pickup clean, do not touch it, and do not forget to close the disc tray.
Do not attempt to clean the unit with chemical solvents as this might damage the finish.
Use a clean, dry cloth.
Keep this manual in a safe place for future reference.
BEWARE OF CONDENSATION
When the player (or a compact disc) is moved from a cold to a warm place or used after
a sudden temperature change, there is the danger of condensation. Water vapor in the air
could condense on the mechanism or the laser pickup. If droplets of water form on these
parts, correct playback will be impossible because the laser cannot read the information from
the disc correctly. To prevent this, if you are going to use the player in a condition where
condensation could occur, you should leave the player for 1 or 2 hours after plugging it into
an AC outlet depending on the amount of condensation. If this is done, the player will stabilize
at the temperature of its surroundings.
READ
BEFORE
OPERATING
HANDLING THE DISCS
Always place the compact disc in the disc tray with the label facing upward. (Compact
discs can be played only on one side.)
To remove a disc from its storage case, press down on the center of the case and lift the
disc out, holding it carefully by the edges.
How to remove the disc. How to hold the disc.
Fingermarks and dust should be carefully wiped off the disc's recorded surface with a soft
cloth.
Wipe radially
5
Page 6
READ
BEFORE
OPERATING
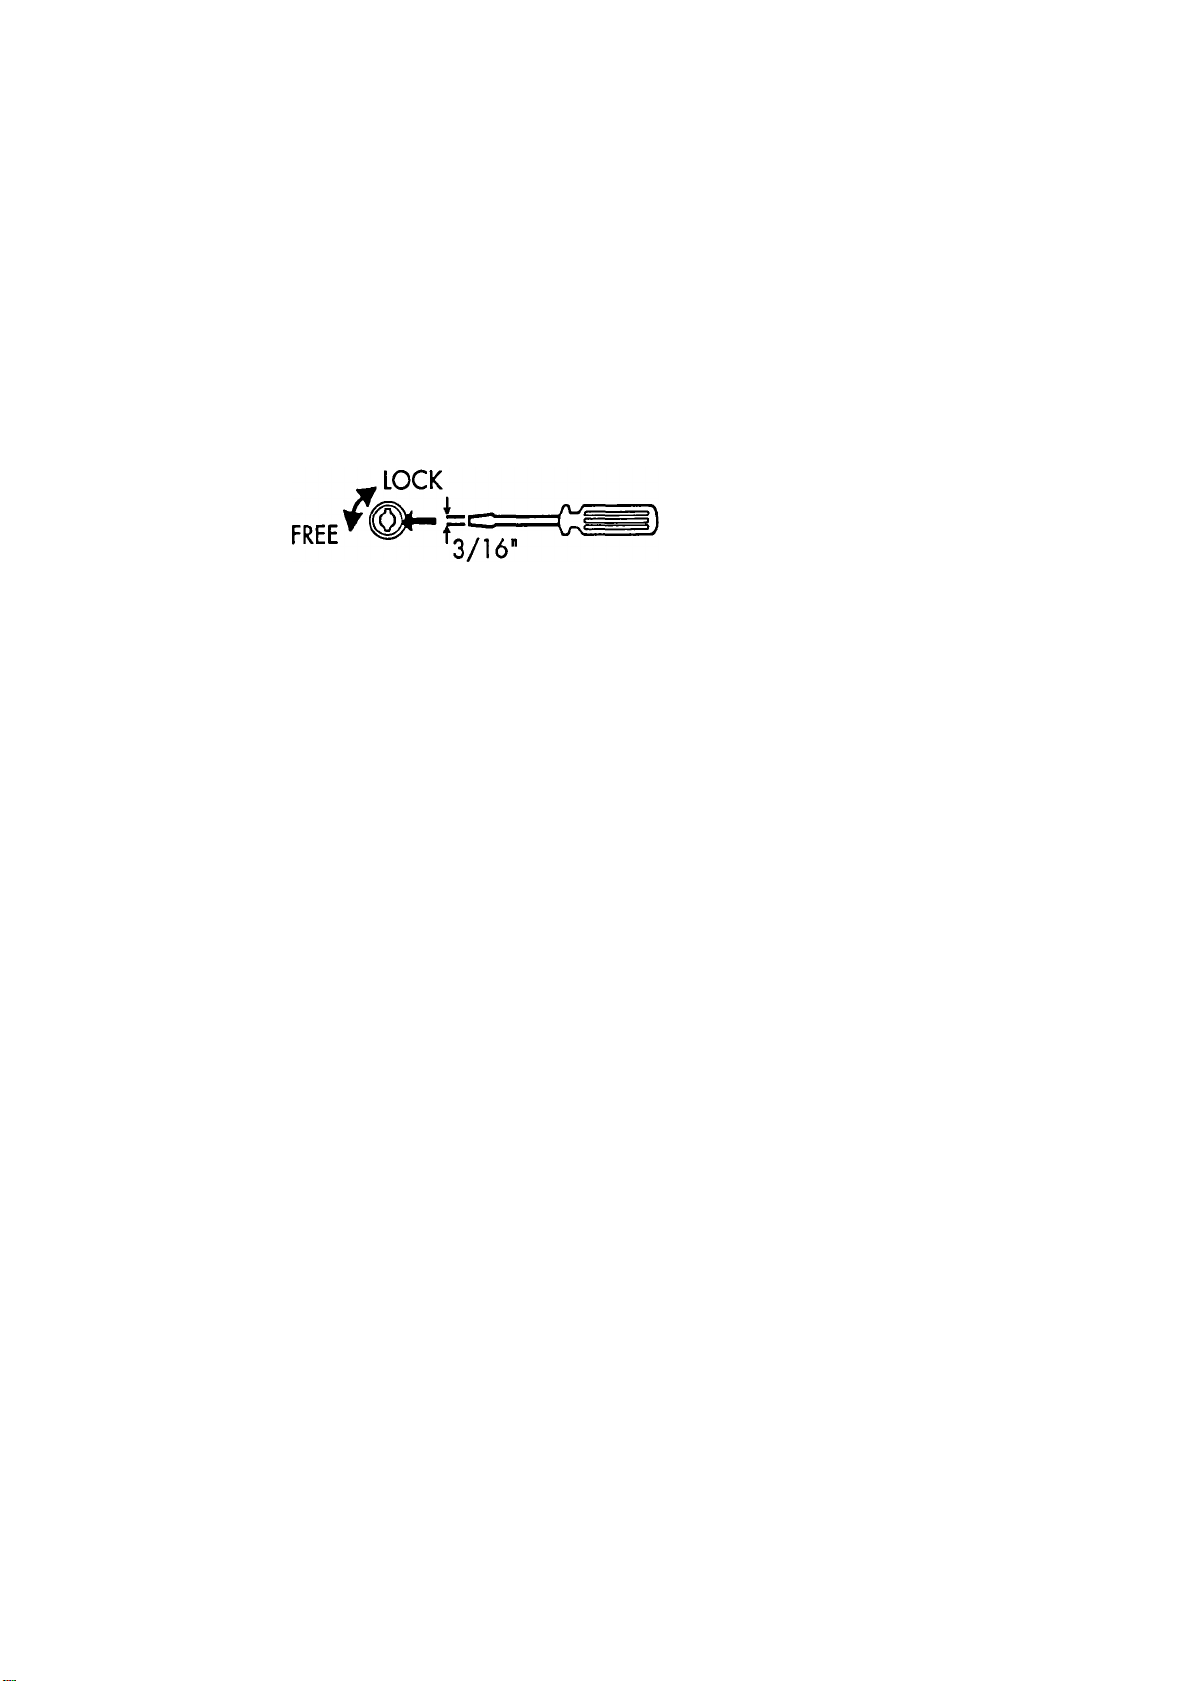
TRANSPORT FIXING (LOCKING) SCREW
A transport FIXING or locking screw is provided to protect the MCD7009 Laser pickup
mechanism from shocks and movement during transit or shipping. Access the fixing screw from
the bottom panel of the player.
RELEASE THE FIXING SCREW BEFORE OPERATING
1. Carefully place the player, upside down, on a firm surface with the bottom panel facing up.
2. Insert a 3/16 inch flat blade screwdriver into the fixing screw slot and turn the screw to the
FREE position, (approximately 45° rotation from LOCK).
TO TRANSPORT OR SHIP THE PLAYER
1 . Open the disc drawer to make sure no disc is loaded.
2. Carefully place the player, upside down, on a firm surface with the bottom panel facing up.
3. Insert a 3/16 inch flat blade screwdriver into the fixing screw slot and turn the screw to the
LOCK position.
HOW TO
INSTALL
BATTERIES
IN THE
REMOTE
CONTROLLER
HOW TO
INSTALL THE
MCD7009
Slide open the battery compartment. Insert two type AAA batteries into the compartment,
making sure to observe the battery polarities indicated in the battery compartment.
When the batteries are nearing exhaustion, the effective range of the remote controller
decreases, and MAY even fail to operate. In this case, replace both batteries with fresh ones.
NOTE:
1. Do not mix old and new batteries. Use ONLY batteries that are new.
2. Make sure both batteries are of the same type and identical.
3. To prevent damage caused by possible battery leakage, remove the batteries from
the remote controller if it is not going to be used for an extended period of time.
4. Never dismantle batteries of dispose of them in a fire, as they may explode. Dispose
of old batteries in an approved method for proper safety.
The MCD7009 can be placed upright on a table or shelf, standing on its own plastic feet.
It can also be installed in an optional Mclntosh L72 cabinet.
The MCD7009 can also be custom installed in a piece of furniture or cabinet of your choice.
The required panel cutout and unit dimensions are shown on a page further back in this manual.
Always provide adequate ventilation for your MCD7009, even though it developes very little
heat. Cool operation insures the longest possible operating life for any electronic instrument.
Do not install your MCD7009 directly above a heat generating component such as a high
powered amplifier. In a system stack, the power amplifier should always be at the top. If all
the components are installed in a single cabinet, a quiet running ventilation fan can be a definite
asset in maintaining all the system components at the coolest possible temperatures.
A custom cabinet installation should allow the following recommended minimum spacing dimensions for cool operation. Allow at least 1-1/2 inches (3.8cm) above the unit so airflow is not
obstructed. Allow 17 inches (43.2cm) depth behind the mounting panel, which includes clearance
for connectors. Allow 1-1/8 inches (2.9cm) in front of the mounting panel for knob clearance.
6
Page 7

The last page of this manual folds out to show a drawing of the rear panel of the
MCD7009. The letters on the drawing refer to the information that follows.
1. DIGITAL OUT: OFF/ON
Turns the OPTICAL and COAXIAL, DIGITAL OUT connectors ON or OFF.
2. OPTICAL DIGITAL OUT
1. Set the DIGITAL OUT switch (1) to the ON position.
2. Remove the protective cap from the MCD7009 OPTICAL DIGITAL OUT connector.
3. Connect an Optical cable from the MCD7009 OPTICAL DIGITAL OUT to the Optical in-
put of an external DA Converter.
4. Connect the analog outputs of the DA Converter to the CD inputs of the Control Center
or preamplifier.
3. COAXIAL DIGITAL OUT
1. Set the DIGITAL OUT switch (1) to the ON position.
2. Connect a coaxial cable (RG6 or RG59U) from the MCD7009 COAXIAL DIGITAL OUT
to the coaxial input of the external DA Converter.
3. Connect the analog outputs of the DAC to the CD inputs of the Control Center or
preamplifier.
4. CONTROL
(This connector is used with a Mclntosh Control Center or Remote Control System that does
not have a CD DATA PORT.)
Connect a 7 pin DIN cable from the MCD7009 DIN CONTROL socket to a matching DIN
CD CONTROL socket on a Mclntosh Control Center or Remote Control System. The Control
Center Remote Controller will then operate PLAY, STOP, BACK Track
on the MCD7009, by sending control signals to the player through the Control Center sensor
in either the main or a remote area.
5. DATA IN
Connect a DATA cable from the MCD7009 DATA IN (5) jack to a CD DATA Port on a Mclntosh Control Center or Remote Control System. This allows the Mclntosh Control Center Remote
Controller to operate a wide range of functions on the MCD7009 player, from either the main
or remote area
Refer to the drawings of the various Mclntosh hand held Remote Controllers in the manual
section HOW TO USE THE MCD7009 WITH OTHER MclNTOSH REMOTE CONTROL PRO-
DUCTS. These drawings show which pushbuttons on each specific Controller are active for
controlling the MGD7009. The drawings also indicate several pushbuttons that perform player
functions that are different from the markings on the Remote Controllers.
A Keypad can also be used to control the MCD7009 in a remote area. Refer to the keypad
drawing which indicates which pushbuttons are active with the MCD7009.
The MCD7009 Remote Controller can also be used in a remote area of any Mclntosh remote
control system to operate the player by sending control signals to a wall mounted IR sensor.
All the MCD7009 Remote Controller pushbuttons are active in this configuration.
A Data cable uses single conductor shielded wire with 1/8" mini phone plugs. Connections
are to the sleeve (-) and tip (+) of the plug.
(Do not connect a DIN CONTROL cable to the MCD7009 when the DATA In is being used.)
6. AC POWER
Connect the MCD7009 AC Power Cord to a 120 volt, 50Hz/60Hz outlet.
7. LINE OUT, L AND R
Connect shielded cables from the L (Left) and R (Right) LINE OUT jacks to the CD inputs of
a Control Center or Preamplifier. Similar high level audio inputs such as Auxiliary or Tape can be
used, but you will then not be able to control the player with the Control Center Remote Controller.
and NEXT Track
THE REAR PANEL
AND HOW TO
CONNECT
7
Page 8

THE REAR PANEL
AND HOW TO
CONNECT
8. LEFT and RIGHT BALANCED OUTPUTS
Connect cable with XLR type Balanced Connectors from the MCD7009 LEFT and RIGHT BAL-
ANCED OUTPUT jacks to the balanced CD or AUX input jacks of a Preamplifier or Control Center.
Using balanced connectors and cables can reduce noise and interference by as much as
40dB. This extra noise reduction can be a significant improvement, especially if the cables are
quite long. If cable lengths between the MCD7009 and the preamplifier inputs are short, (one
meter or less), you will probably find high quality unbalanced cables to be equally satisfactory.
You can use both the Balanced and Unbalanced Outputs simultaneously if you desire.
Balanced Jack Pin Configuration:
Pin 1 System Ground
Pin 2 + Output
Pin 3 - Output
HOW TO CONNECT FOR NORMAL AUDIO PLAYBACK
Connect cables with RCA connectors from the LINE OUT L (Left) and R (Right) outputs to the
CD inputs of a Control Center or preamplifier.
HOW TO CONNECT THE MCD7009 DIGITAL
COAXIAL OUTPUT TO AN EXTERNAL DA CONVERTER
1. Set the DIGITAL OUT Switch (1) to the ON position.
2. Connect a coaxial cable (RG6 or RG59U) from the MCD7009 COAXIAL DIGITAL OUT to the
coaxial input of the external DA Converter.
3. Connect the analog outputs of the DAC to the CD inputs of the Control Center or preamplifier.
HOW TO CONNECT THE MCD7009 OPTICAL OUTPUT TO AN EXTERNAL DA CONVERTER
1. Set the DIGITAL OUT Switch (1) to the ON position.
2. Remove the protective cap from the MCD7009 OPTICAL DIGITAL OUT connector.
3. Connect an Optical cable from the MCD7009 OPTICAL DIGITAL OUT to the Optical input
of an external DA Converter.
4. Connect the analog outputs of the DA Converter to the CD inputs of the Control Center or
preamplifier.
HOW TO CONNECT TO OPERATE THE MCD7009
WITH THE REMOTE CONTROLLER FROM A MclNTOSH
REMOTE CONTROL SYSTEM OR CONTROL CENTER THAT HAS NO CD DATA PORT
Connect a Control Cable with DIN connectors, from the MCD7009 CONTROL (4) receptacle
to the matching CD CONTROL connector on a Mclntosh Control Center or Remote Control
System. The Control Center Remote Controller will then operate the MCD7009 by sending IR
signals to the Control Center sensor and then on to the CD player. This connection allows the
following four player operations: PLAY. STOP. NEXT track and BACK track. A control cable is
included with the MCD7009.
HOW TO CONNECT TO OPERATE THE MCD7009 WITH THE REMOTE CONTROLLER FROM
A MclNTOSH REMOTE CONTROL SYSTEM OR CONTROL CENTER THAT INCLUDES A CD
DATA PORT.
Connect a DATA cable from the MCD7009 DATA IN (5) receptacle to the CD DATA PORT of
a Mclntosh Control Center or Remote Control System.
(Do not connect a DIN Control cable when the DATA IN Is used.)
8
Page 9

The DATA IN connection allows a Mclntosh Control Center Remote transmitter to operate a
wide range of functions on the MCD7009 player from the main area or a remote area.
Refer to the drawings of the various Mclntosh hand held remote controllers showing which
pushbuttons are active for controlling the MCD7009. The drawings also indicate several pushbuttons that perform player functions that are different from the markings on the remote
controller.
A keypad can also be used to control the MCD7009 in a remote area. Refer to the keypad
drawing which indicates which pushbuttons are active with the MCD7009.
The MCD7009 Remote Controller can also be used in a remote area of any Mclntosh remote
control system to operate the player by sending control signals to a wall mounted IR sensor. All
the MCD7009 Remote Controller pushbuttons are active in this configuration.
The cable connected from the DATA port uses single conductor shield wire with 1/8" mini
phone plugs. Connections are to the sleeve (-) and tip (+) of the plug.
Most of the operating functions of the MCD7009 can be controlled with the following Mclntosh
Remote Controllers and keypad. The pushbuttons active with the MCD7009 are shaded on the
drawings. Please note the pushbuttons that have specific functions when used with the
MCD7009 that are different from the normal functions of the pushbuttons.
CR10 REMOTE CONTROL
THE REAR PANEL
AND HOW TO
CONNECT
HOW TO
OPERATE
THE
MCD7009
WITH REMOTE
CONTROLLERS
FROM OTHER
MclNTOSH
REMOTE
CONTROLLED
PRODUCTS
9
Page 10

HOW TO
OPERATE
THE
MCD7009
WITH REMOTE
CONTROLLERS
FROM OTHER
MclNTOSH
REMOTE
CONTROLLED
PRODUCTS
MX118/C712 REMOTE CONTROL
C39/MX130 REMOTE CONTROL
10
Page 11

C38/C712 REMOTE CONTROL
HOW TO OPERATE
THE
MCD7009
WITH REMOTE
CONTROLLERS
FROM OTHER
MclNTOSH
REMOTE
CONTROLLED
PRODUCTS
WK-2 KEYPAD
11
Page 12

FRONT PANEL
AND REMOTE
CONTROLLER
1. OPEN/CLOSE
2. REPEAT
3. STOP
4. PAUSE
5. PLAY
6. DISPLAY WINDOW
A. PROGRAM Indicator
B. TRACK Indicator
C. INDEX Indicator
D. REPEAT / A-B Indicators
E. TOTAL / REMAIN Time Indicators
R SINGLE Indicator
G. DELETE Indicator
H. AUTO SPACE Indicator
I. Time Counter
7.
8.
9. POWER
REV (Reverse) /
BACK /
FF (Fast Forward) Search
NEXT (Track Skip)
12
REMOTE CONTROLLER
1. NUMERIC PUSHBUTTONS, (0-9, +10)
2. DELETE
3. PGM (Program)
4. REPEAT
5. SINGLE
6.
7. INDEX
8. PAUSE
9. STOP
10. CLEAR
11. REVIEW
12. AUTO SPACE
13. A-B
14. TIME
15.
16. FADER
17. PLAY
REV (Reverse) /
BACK/
(Search)
FF (Fast Forward) Search
NEXT (Track Skip)
Page 13

BASIC OPERATION
1. Press the POWER pushbutton
The front panel teal pushbutton nomenclature will turn on.
2. Press the OPEN/CLOSE pushbutton.
The Red LED above the pushbutton starts to flash and the disc tray will slide out. The front panel
display will indicate "OPEN" Place a disc within the guides, on the tray with the label facing up.
There is a recessed area on the disc tray to accommodate 3 inch (7.6cm) discs.
3. Press the OPEN/CLOSE pushbutton again.
The disc tray will close and the front panel display will indicate "CLOS". The Red LED above the
pushbutton will turn on, to indicate a disc is loaded. This LED will stay on as long as a disc is in
the tray or playing.
The above information is displayed.
Several seconds later, the MCD7009 enters the standby mode.
4. PRESS THE PLAY BUTTON
Disc playback starts from the first track.
HOW TO
OPERATE
CAUTION
Do not force the tray by hand during opening and closing operations.
Do not leave the disc tray open when the MCD7009 is not in use to prevent dirt and dust
from entering the mechanism.
EVEN IF THE DISC TRAY IS OPEN
DIRECT ACCESS PLAY:
By pressing the numeric buttons corresponding to the required track, the tray will close
and play starts from the specified track directly, without your having to press the play button.
Example 1
To play the 5th track:
Press
Example 2
To play the 21st track:
Press
WHEN THE PLAY BUTTON IS PRESSED
The disc tray will close and playback starts from the first track.
WHEN THE PAUSE BUTTON IS PRESSED
The tray will close and the MCD7009 will enter the pause mode at the beginning of the
first track. The Red LED above the PAUSE pushbutton will turn on to indicate the pause mode
is in effect.
twice, then
TO STOP PLAYBACK
Press the stop button. The MCD7009 enters the stop mode.
13
Page 14

HOW TO
OPERATE
TO UNLOAD THE DISC
Press the open/close button on the front panel; playback stops and the disc tray will slide out,
and all functions are reset to their initial settings.
TO TEMPORARILY SUSPEND PLAYBACK (PAUSE MODE)
Press the pause button. Playback stops at the current position and the Red LED above the
PAUSE pushbutton turns on. To resume playback from the same position, press the play button
or pause button again.
SINGLE PLAYBACK
1. Press the single button. The SINGLE indicator will light in the display.
2. Press the numeric buttons corresponding to the required track.
3. A single track will be played back, after which the MCD7009 will enter the stop mode. To
release the single mode, press the single button again.
PROGRAM PLAYBACK
The program playback function allows you to program up to 20 tracks for playback in any
desired order.
PROGRAMMING REQUIRED TRACKS
Example:
To program tracks in the order
1. Press the stop button.
2. Press the program button.
The PROGRAM indicator lights in the display.
3. Press the numeric buttons in the following order:
If the
to cancel it.
button is pressed by mistake, press the clear button on the remote control unit
in the stop mode.
4. Press the play button.
Programmed playback starts from the first programmed track, the 2nd track on the disc.
When this track is finished, the MCD7009 skips to the 15th track which has been stored as
the second track in the program, etc.
The programmed contents will be held in memory even after programmed playback has
been completed or when programmed playback is stopped by pressing the stop (•) button.
When the stop button is pressed in the stop mode, the contents of the program are relased.
To release the program mode, press the program button again.
During program playback, the TOTAL REMAIN time display shows the total remaining time
of the programmed tracks, from the current position.
14
Page 15

If tracks with numbers higher than 20 are programmed, either the REMAIN time or TOTAL
REMAIN time may not appear in the display.
In the playback mode, press the program button. The current track will be programmed
as first track.
REVIEWING THE PROGRAMMED CONTENTS
The programmed contents can be reviewed easily using the review button. Press the review
button; the display will show the details of the first programmed track. To review the details
of the second track, press the review button again. Each time the review button is pressed,
the display shows the details of the next programmed track.
When reviewing the progammed contents, the total program playback time is displayed
regardless of the time mode indication.
If the total playback time exceeds 100 minutes, the 10's digit of the minutes display will
show one of the following codes:
HOW TO
OPERATE
The above example, therefore, shows 102 minutes 30 seconds.
If the total program time exceeds 150 minutes, there will be no code. When playback starts,
the minutes display will show a number which is the total program playback time minus 160.
CHANGING THE PROGRAM
After programming is complete, unnecessary tracks can be deleted from the original pro-
gram or new tracks can be added after a track originally programmed, in the following way.
DELETION
EXAMPLE:
With the original program set as follows;
Program No.
To delete the "15" from the above program:
1. With the PROGRAM indicator lit, press the
review button repeatedly.
The TRACK indicator will show "15".
Press twice.
Track No. to be deleted
15
Page 16

HOW TO
OPERATE
2. Press the clear button.
The TRACK indicator now shows the next track number
"10", to show that "15" has been deleted.
To delete other unnecessary tracks, repeat steps 1 and
2 above.
ADDITION
1. When the PROGRAM indicator is lit, press the review button to indicate the track number
in the display.
2. To add new tracks to a program, input the track number using the numeric buttons (this
can even be done after starting programmed playback); the track is added after the indicated
track which was previously programmed.
TO PROGRAM A "PAUSE" AT A DESIRED POINT IN
THE PROGRAM (PAUSE PROGRAM)
A "Pause" can also be programmed in the program memory to stop programmed playback
in the middle. This function is convenient when you have to turn a cassette over when recording a CD onto both sides of the cassette.
Example
To program a "Pause" between 3rd and 4th tunes: 2
1. Program the tracks "2", "15" and "10" in order.
2. Press the pause button.
"PA" will appear in the track number display with
the program number "4". This shows that the "PA"
code (designating a "Pause") is programmed as the
fourth program.
3. Program the following track "8".
In this case, the time display shows the total playback time of the tracks after the "PA" code.
15
10
PAUSE
8.
When played back, programmed playback will be suspended (stopped temporarily) after
track "10" is finished. To restart program playback, press the play button.
During program playback, when the "PA" code is programmed, the TOTAL REMAIN indicator
shows the total remaining time up to the point at which the "PA" code is programmed. In
this case, when program playback is restarted, the TOTAL REMAIN indicator will show the
total remaining time to the end of the program.
More than two "PA" codes can be programmed in one program, however, it is impossible
to program a "PA" code immediately after a previously programmed "PA" code.
DELETE PROGRAMMING
This is the opposite to normal programming, and is used to program tracks which are not
to be played. Use it when there are tracks on the disc you don't want to listen to.
16
Page 17

1. Press the delete button.
The display shows the total number of tracks
and total playback time of the disc.
2. Press the numeric buttons corresponding to
the track numbers which you don't want to listen
to in the same way as in normal programming.
To specify more tracks that are not to be played,
press their numeric buttons. The numbers of
tracks that have been deleted can be checked or
corrected by the same procedure as in normal
programming.
Track number
Order in the memory
Total playback lime without
Track number '5'
If the program includes track number "21" or
later, the total playback time is not indicated.
3. If the play button is pressed, playback of the tracks except for the track(s) that have been
"deleted" will start.
Delete programming can also be engaged during the normal playback mode.
When the delete button is pressed during playback, the track currently playing is not deleted.
REPEAT FUNCTION
The repeat function allows repeat playback of any single track, the entire disc, or of any
desired portion on the disc designated by two (start and end) points.
HOW TO
OPERATE
TO REPEAT ONE TRACK (Single repeat mode)
1. Press the single button and repeat button.
The SINGLE and REPEAT indicators light.
2. Press the numeric buttons corresponding
to the required track.
The selected track is played, then when the end
of the track is reached, the player will return to
the beginning of the track and playback starts again. In this way, the selected track will be
played back repeatedly.
Single repeat play can also be engaged during playback.
TO REPEAT AN ENTIRE DISC (All repeat mode)
1. Press the repeat button.
The REPEAT indicator lights.
2. Press the play button.
Playback starts and, when the end of the disc
is reached, the player will return to the beginning of the first track, and then playback continues repeatedly.
All repeat play can also be engaged after playback has started normally, by pressing the
repeat button.
17
Page 18

HOW TO
OPERATE
TO REPEAT A DESIGNATED SECTION (A-B
repeat mode)
1. Press the numeric buttons or the play button
2. Designate the point at which playback should
start (point A) by pressing the A-B button.
The REPEAT indicator lights and the A-B indicator
blinks to show that point A has been entered.
3. When the portion at which repeat playback should end is reached, press the A-B
button again to designate point B.
The A-B indicator is changed to light steadily
to show that the A-B repeat function has been
activated.
The MCD7009 automatically returns to point A
and restarts playback.
When play reaches point B, the MCD7009 returns to point A and starts playback again,
repeatedly.
After designating point A, when quick searching point B, use the
stead of playing back normally.
During programmed playback or in the "delete program" play mode, the block repeat func-
tion is possible only within one track.
When the A-B button is pressed again during block repeat play, block repeat playback will
be released.
button in-
PROGRAMMED REPEAT PLAYBACK
Repeat function can be activated even in the programmed playback mode.
To repeat all the programmed tracks, press the
repeat button.
When the single button is pressed ON during
programmed repeat playback, the track currently playing will be played back repeatedly. In that
case, the original program will be erased.
Any of the repeat functions can be released by pressing the repeat button again, so that
the REPEAT indicator goes off. If this is done during playback, the MCD7009 will continue
normal playback.
MUSIC SEARCH OPERATION
MUSIC SEARCH USING
The beginning of any track can be easily located using the
buttons during playback or in the pause mode. This operation is indicated clearly in the TRACK
display.
TO SKIP TO THE NEXT TRACK
When the
next track.
Each time the
from the beginning of that track.
button is pressed during play, the pickup will skip to the beginning of the
button is pressed, the pickup skips forward by one track and play starts
BUTTONS (BACK/NEXT)
and
BACK/NEXT
18
Page 19

This operation is possible even in the program
playback mode. However only programmed tracks
will be detected.
HOW TO
OPERATE
TO SKIP BACK TO THE PREVIOUS TRACK PRESS THE
The MCD7009 will skip back one track each time the button is pressed. If this button
is pressed in the middle of a track, the MCD7009 will skip back to the beginning of the current track. To make it skip back to the previous track, the button must be pressed twice.
In this way, the MCD7009 can be returned to the beginning of the first track on the disc.
This operation is possible even in the program
playback mode. However, only programmed
tracks will be detected.
BUTTON.
MUSIC SEARCH USING
During playback or in the pause mode, hold down the
tion quickly in the forward direction, and hold down the
reverse direction.
REV AND FF BUTTONS (SEARCH)
button to move the playing posi-
button to move quickly in the
19
Page 20

HOW TO
OPERATE
During the manual search operation, sound will be audible but the output level will be
lowered. This lets you search for any required portion while checking the sound.
When the desired position is reached, release the button to reenter the previous mode.
During the normal play mode (or in the programmed playback mode), when the MCD7009
reaches the end of the disc (or program) after the
enters the pause mode whereas when the MCD7009 reaches the beginning of the disc (or
program) after the
In the single repeat mode, holding the
within the current track.
In the program playback mode, holding the
previous programmed track, respectively.
INDEX SEARCH
Index Search is possible using the index
to any desired points on the discs where
1. Select the required track within which the
desired Index code is encoded, using the
numeric buttons.
button has been pressed, the MCD7009 enters the playback mode.
INDEX codes have been encoded.
button has been pressed, the MCD7009
or
button will move the playing position
or
and
button will move to the next or
buttons. This allows direct access
2. Press the index
INDEX display.
Press
press
The MCD7009 skips to the selected INDEX point and playback starts from the point at which
the designated Index code is encoded.
If the Index number designated exceeds the highest Index number in the selected track,
playback will begin from the portion with the highest Index number in the track.
While the MCD7009 searches the desisgnated Index point, the time counter displays no
time information. During this interval, no control buttons except for the stop and the open/close
buttons can be engaged.
DIRECT TRACK SEARCH
Select a required track number using the
stop mode. Pressing the play
selected track and play it.
DIRECT INDEX SEARCH
After selecting a required track number using the
in the stop mode, select the required index number
starts from the selected index point.
to increase the INDEX number, and
decrease the INDEX number.
to
or
button until the desired Index number appears in the
or pause
or
button allows the MCD7009 to search the
button with the MCD7009 in the
or
using the
button with the MCD7009
or
button. Playback
TIME COUNTER DISPLAY
The time counter shows various time readouts,
as follows. First, when the disc tray is closed with
the disc loaded, the total disc playback time ©
will be displayed for several seconds.
20
Page 21

During playback, shows the elapsed time (2) of the current track, but no time mode indicator will light. However, each time the time button is pressed, the time counter shows a
different time, in the order, the remaining time of the current track (3) - the total remaining
time of the disc © - after which the elapsed time is displayed again.
© TOTAL DISC PLAYBACK TIME
In the stop mode, when no tracks have been programmed, pressing the time button will
recall the total playback time (and the total number of tracks on the disc) for several seconds.
(2) ELAPSED TIME DISPLAY
When playback begins, the elapsed time of the track being played is displayed in minutes
and seconds.
(3) REMAINING TIME DISPLAY (REMAIN)
Displayed when the time button is pressed once. This provides an easy check of the remaining time of the track being played.
(4) TOTAL REMAINING TIME DISPLAY (TOTAL REMAIN)
Displayed when the time button is pressed twice. This provides an easy check of the total
time required to finish the disc. The time displayed is the total remaining playback time from
the position being played, to the end of the disc; the counter counts down to "0:00" during
playback.
When a "Pause" is programmed within the program, the remaining time up to the point
at which "Pause" is programmed will be displayed.
In normal playback mode, if a track with a number higher than 20 is being played, the re-
maining time will not be displayed in the time counter even when the time button is pressed.
If tracks with numbers higher than 20 are included in the program, the remaining time and
total remaining time may not be displayed in the time counter depending on the track being
played.
HOW TO
OPERATE
AUTO SPACING
When this function is activated, an interval of approx. 4 seconds will be inserted between
tracks automatically, so they are played back with a fixed spacing. To activate this, press
the auto space button so that the AUTO SPACE indicator lights in the display.
When the auto space button is pressed again, the indicator goes off and the auto spacing
function is released.
FADE IN/FADE OUT
During the playback mode, press the fade but-
ton. (FAdE" is indicated in the display.) The
MCD7009 will fade out gradually and the
MCD7009 enters the pause mode.
To continue playback, press the fader button again; the MCD7009 will fade in gradually.
21
Page 22

IF YOU
NEED HELP
PROBLEM
No power when power
is pressed.
PROBABLE CAUSE
Power plug not inserted
securely.
REMEDY
Plug in securely.
No playback when
disc is loaded.
No audio output
(or too low level output).
Playback starts when
power is switched on
Only single track
can be played.
No program playback
Disc loaded with
label side down.
Disc dirty.
Connection to stereo
is incorrect.
Compact disc left on
the disc tray
Single button engaged.
Program button
not pressed.
Play button
not pressed.
Load with label side up.
Clean disc surface.
Check connections.
When the power is turned
ON with a disc loaded, the
MCD7009 will start playing
automatically, Remove the
disc from the player.
Press button to disengage it.
Pressed button to display
"PROGRAM"
Press button
Mistracking
(sound jumping).
Hum
Noise in tuner.
Remote control unit
operation is impossible
CAUTION
Since the MCD7009 incorporates a microcomputer, it may not operate correctly because
of external noise, etc. If this happens, turn the power switch OFF, then turn it ON again and
restart operations.
MCD7009 receiving
vibration or shock
Disc dirty.
Pin-cord plug not
connected securely.
MCD7009 too near tuner.
MCD7009's power switch
set to
OFF.
Batteries not inserted in
remote control unit.
Change the installation
position.
Clean disc surface
Re-connect plug securely
Keep a reasonable distance
between them or switch off
the MCD7009's power.
Set switch to ON.
Insert batteries
22
Page 23

AUDIO
NUMBER OF CHANNELS
2
FREQUENCY RESPONSE
4 - 20,000Hz ± 0.3dB
SIGNAL-TO-NOISE RATIO
Better than 110dB (A-weighted)
DYNAMIC RANGE
Better than 99dB (1kHz)
HARMONIC DISTORTION
0.0013% (1kHz)
WOW AND FLUTTER
Unmeasurable (Quartz accuracy)
CHANNEL SEPARATION
Better than 110dB (1kHz)
OUTPUT
Analog 2.2Vrms
Digital 0.5V
D/A CONVERTER
Bitstream conversion
DIGITAL FILTER
8-times oversampling 20-bit digital
filter.
ANALOG FILTER
3rd order Butterworth filter
p-p/75ohm
-15dBm - - 21dBm (Optical)
(Coaxial)
SIGNAL FORMAT
SPECIFICATIONS
SAMPLING FREQUENCY
44.1kHz
QUANTIZATION BIT
16-bit linear/channel
CHANNEL BIT RATE
4.3218Mb/sec.
CHANNEL MODULATION CODE
EFM (Eight to Fourteen Modulation)
ERROR CORRECTION
CIRC (Cross Interleave Reed Solomon
Code)
GENERAL
POWER REQUIREMENTS
120V AC. 60Hz.
POWER CONSUMPTION
22 watts
DIMENSIONS
17-1/2" (44.5cm) W x 5-3/8" (6.8cm) H
x 15" (38.1cm) D
WEIGHT
22lbs. net, 38lbs. in shipping carton.
STANDARD ACCESSORIES
Wireless Remote Control Unit
Two AAA batteries
PICK UP
TYPE
Optical 3-beam laser pick up.
OBJECTIVE LENS
2-dimensional parallel drive
LASER TYPE
GaAIAs type semiconductor laser
WAVE LENGTH
780nm
23
Page 24

The numbers refer to the paragraphs on page 7.
Page 25

CUSTOM
INSTALLATION
DIAGRAM
25
Be112002
 Loading...