

Page 1

THE MclNTOSH C 33 SOLID STATE STEREO PREAMPLIFIER
Reading Time: 43 Minutes
Price $2.00
Page 2

VARIOUS REGULATORY AGENCIES REQUIRE THAT WE BRING THE FOLLOWING
INFORMATION TO YOUR ATTENTION. PLEASE READ IT CAREFULLY.
WARNING: TO PREVENT FIRE OR SHOCK
HAZARD, DO NOT EXPOSE THIS UNIT TO
RAIN OR MOISTURE.
The Mclntosh you have purchased is a Model C 33. It
has a serial number located on the rear panel of the
chassis. Record that serial number here:
Serial Number
The model, serial number and purchase date are im-
portant to you for any future service. Record the pur-
chase date here:
Purchase date
Upon application, Mclntosh Laboratory provides a
Three-Year Service Contract. Your Mclntosh Authorized
Service Agency can expedite repairs when you provide
the Service Contract with the instrument for repair. To
assist, record your Service Contract number here:
Service Contract Number
Page 3
Your C 33 Stereo Preamplifier is designed
to perform to its specifications
for many years. If you
have any questions, please contact:
CUSTOMER SERVICE
Mclntosh Laboratory Inc.
2 Chambers Street
Binghamton, New York 13903-9990
Phone: 607-723-3512
Take Advantage of 3 years
of Contract Service...
Fill in the Application NOW.
Contents
INTRODUCTION 2
SIMPLIFIED BLOCK DIAGRAM 3
INSTALLATION 4
SIMPLIFIED CONNECTING DIAGRAM 6
HOW TO CONNECT 7
USING THE FRONT PANEL CONTROLS 12
USING THE PUSHBUTTONS 15
TOP PANEL INFORMATION AND
SECONDARY CONTROLS 17
PERFORMANCE LIMITS AND RATINGS 18
PERFORMANCE CHARTS 19
TECHNICAL DESCRIPTION 22
BLOCK DIAGRAM 24
MclNTOSH THREE YEAR SERVICE CONTRACT
An application for A THREE YEAR SERVICE CONTRACT is included with this manual.
The terms of the contract are:
1. Mclntosh will provide all parts, materials
and labor needed to return the measured
performance of the instrument to the
original performance limits. The SERVICE CONTRACT does not cover any
shipping costs to and from the authorized service agency or the factory.
2. Any Mclntosh authorized service agency
will repair Mclntosh instruments at normal service rates. To receive service
under the terms of the SERVICE CON-
TRACT, the SERVICE CONTRACT CERTIFICATE must be presented when the
instrument is taken to the service agency.
3. Always have service done by a
Mclntosh authorized service agency. If
the instrument is modified or damaged
as a result of unauthorized repair, the
SERVICE CONTRACT will be cancelled.
Damage by improper use or mishandling is not covered by the SERVICE
CONTRACT.
4. The SERVICE CONTRACT is issued to
you as the original purchaser. To protect you from misrepresentation, this
contract cannot be transferred to a second owner.
5. To receive the SERVICE CONTRACT,
your purchase must be made from a
Mclntosh franchised dealer.
6. Your completely filled in application for
the SERVICE CONTRACT must be postmarked within 30 days of the date of
purchase of the instrument.
7. To receive the SERVICE CONTRACT, all
information on the application must be
filled in. The SERVICE CONTRACT will
be issued when the completely filled in
application is received by Mclntosh
Laboratory Incorporated in Binghamton,
New York.
8. Units in operation outside the United
States and Canada are not covered by
the Mclntosh SERVICE CONTRACT, regardless of the place of purchase. Nor
are units acquired outside the U.S.A.
and Canada, the purchasers of which
should consult with their dealer to
ascertain what, if any, service contract
or warranty may be available locally.
Copyright 1982 © by Mclntosh Laboratory Inc.
-1-
Page 4

Introduction
The Mclntosh C 33 is a super quality, high performance Stereo Preamplifier. Its design has been
governed by insistence on great flexibility, versatility, low distortion and high performance with long
life.
The C 33 provides many features for your listening
enjoyment. They include:
1. a dual preamplifier system with separate listen
and record program lines, which allows listening
to one program source while recording from a different independent program source.
2. a low noise electronic input switching system,
which uses dual field effect transistors (FETs) and
short signal leads to give great source to source
isolation, low distortion, and freedom from noise
and hum pickup.
3. two, seven source, input selector switches for 3
tape decks, 2 turntables, 1 tuner, and 1 auxiliary,
which allow independent source selection for
listening and recording.
4. an electronic record monitor switch, which
allows the record program line to be heard
through the main listen output.
5. a five band program equalizer, which permits
the adjustment and improvement of the loudness
contrast of the five most important frequency
ranges. Each band can be emphasized or deemphasized to satisfy your listening taste. The
program equalizer can be switched to either the
listen or record program lines. This allows
equalizing the record output signal to tape
recorders or equalizing the main listening output.
6. a precision volume control, which is electronically trimmed during manufacture to maintain
channel to channel accuracy to better than 1
decibel (dB). This high order of accuracy assures
continuing program balance as the listening
volume is changed.
7. an active circuit loudness control, which is
electrically independent of the volume control.
Close conformity to the Fletcher-Munson equal
loudness curves can be attained regardless of the
volume control position.
8. high and low frequency filters, which reduce
high frequency noise and low frequency rumble at
a 12 dB per octave roll off rate.
9. a compandor, which permits expansion or compression of the dynamic range of program material from either the record tape output or the main
listen output. Compressed recordings and broadcasts can be expanded on playback to restore
their dynamic range. Tapes can be recorded using
compression and replayed using expansion to increase signal-to-noise ratio.
10. front panel tape recorder jacks, which allow
simple plug-in of an additional tape recorder
without disconnecting your regular system. This
makes tape copying to a portable recorder very
convenient.
11. a tape recording program line, which makes it
very easy to record phono, tuner, or auxiliary on
up to 3 recorders at the same time (4 recorders
when using the front panel tape recorder jacks) or
to copy from recorder to recorder. Recording
operations do not interfere with the separate
listen program line.
12. an automatic AC power control circuit, which
can conveniently turn off the entire stereo system
when the turntable turns off.
13. a built-in monitor amplifier, which provides 20
watts per channel power output and includes the
Mclntosh patented Power Guard protection circuit. The monitor amplifier can be operated from
the listen program line, the record program line, or
independently from a separate external source.
14. two front panel headphone jacks, which are
powered by the internal monitor amplifier.
15. two speaker output pushbuttons, which control
the operation of two sets of loudspeakers (when
used with the optional SCR-2 speaker control
relay) or two sets of power amplifiers.
16. electronically regulated power supplies, which
maintain stable operation even during periods of
low line voltage.
This outstanding preamplifier will serve you best
when you understand its functions and what it is designed to do. Some time invested with this manual
will be valuable in your knowledge of how it works.
The simplified block diagram on page 3 shows how
the C 33's internal circuits are arranged. The simplified connecting diagram on page 6 shows how other
components are connected to the C 33.
-2-
Page 5
Identical
Diagram
Block
Shown, Other Channel
Channel
One
Simplified
STEREO PREAMPLIFIER
C 33
MclNTOSH
-3-
Page 6

The PANLOC system of installing equipment con-
veniently and securely is a direct result of Mclntosh
research. By depressing the two PANLOC buttons
on the front panel, the instrument can be either locked firmly in place or it can be unlocked so that the
chassis can slide forward, giving you easy access to
the top and rear panels.
The trouble-free life of an electronic instrument is
greatly extended by providing sufficient ventilation
to prevent the build-up of high internal temperatures
that cause deterioration of component parts. You
should allow enough clearance so that cool air can
enter at the bottom of the cabinet and be vented
from the top. With adequate ventilation the instrument can be mounted in any position. The recom-
mended minimum space for installation is 15 inches
(38.1 cm) deep, 17 inches (43.2 cm) wide, and 6 inches (15.2 cm) high.
To install the instrument in a Mclntosh cabinet,
follow the instructions that are enclosed with the
cabinet. For any other type of installation, follow
these instructions:
1. Unpack from Carton
Open the carton and remove the PANLOC brackets,
hardware package, and mounting template. Remove
the C 33 from its plastic bag and place it upside
down on the shipping pallet, then unscrew the four
plastic feet from the bottom of the chassis.
2. Mark the Cabinet Panel
Place the mounting template in the position on the
cabinet panel where the instrument is to be installed, and tape it in place. The broken lines that represent the outline of the rectangular cutout also represent the outside dimensions of the chassis. Make
sure these lines clear shelves, paritions, or any
equipment. With the template in place, first mark the
six A and B holes and the four small holes that
locate the corners of the cutout. Then, join the four
corner markings with pencil lines using the edge of
the template as a straight edge.
3. Drill Holes
Use a drill with a 3/16 inch (5 mm) bit held perpendicular to the panel and drill the six A and B holes.
Then, using a drill bit slightly larger than the tip of
your saw blade, drill one hole at each of two diagonally opposite corners. The holes should barely
touch the inside edge of the penciled outline. Before
taking the next step, make sure that the six A and B
holes have been drilled.
4. Saw the Panel Cutout
Saw carefully on the inside of the penciled lines.
First make the two long cuts and then the two short
cuts. After the rectangular opening has been cut out,
-4-
Page 7
use a file to square the corners and smooth any irregularities in the cut edges,
5. Install the Mounting Strips
In the hardware package you will find two mounting
strips and two sets of machine screws. For panels
that are less than ½ inch (12.7 mm) thick, use the ¾
inch (19.1 mm) screws; for panels that are more than
½ inch (12.7 mm) thick, use the 1¼ inch (31.8 mm)
screws.
Starting at the right-hand side of the panel, insert
a screw of proper length into the center hole in the
panel, marked B on the template. On the back of the
panel, align a mounting strip with the holes in the
panel and tighten the screw in the center hole until
the screwhead is pulled slightly into the wood.
Repeat this procedure to attach the mounting
strip to the left side of the panel.
6. Attach the PANLOC Brackets
Using two screws of proper length in the A holes on
each side, attach the PANLOC brackets to the cabi-
net panel; the short flange is mounted against the
front (face) of the cabinet panel. The screws pass
through the PANLOC bracket flange, the cabinet
panel, and then through the mounting strips
previously mounted.
7. Install the Instrument
Guide the AC power cord through the panel opening
to the back of the cabinet; then, slide the instrument
into the opening carefully so that the rails on the
bottom of each side of the chassis engage the
tracks on the mounting brackets. Continue to slide
the instrument into the cabinet until it is stopped by
the adjust position latches. Press the latches inward, this permits the instrument to slide into the
cabinet until its front panel is flush with the cabinet
panel. Depress the PANLOC buttons at the lower left
and right corners of the instrument panel to lock the
unit firmly in the cabinet. Depressing the PANLOC
buttons again will unlock the instrument so that it
can slide forward to the adjust position; if you press
inward on the adjust position latches then you can
remove the instrument from the cabinet.
-5-
Page 8
Simplified Connecting Diagram
-6-
Page 9

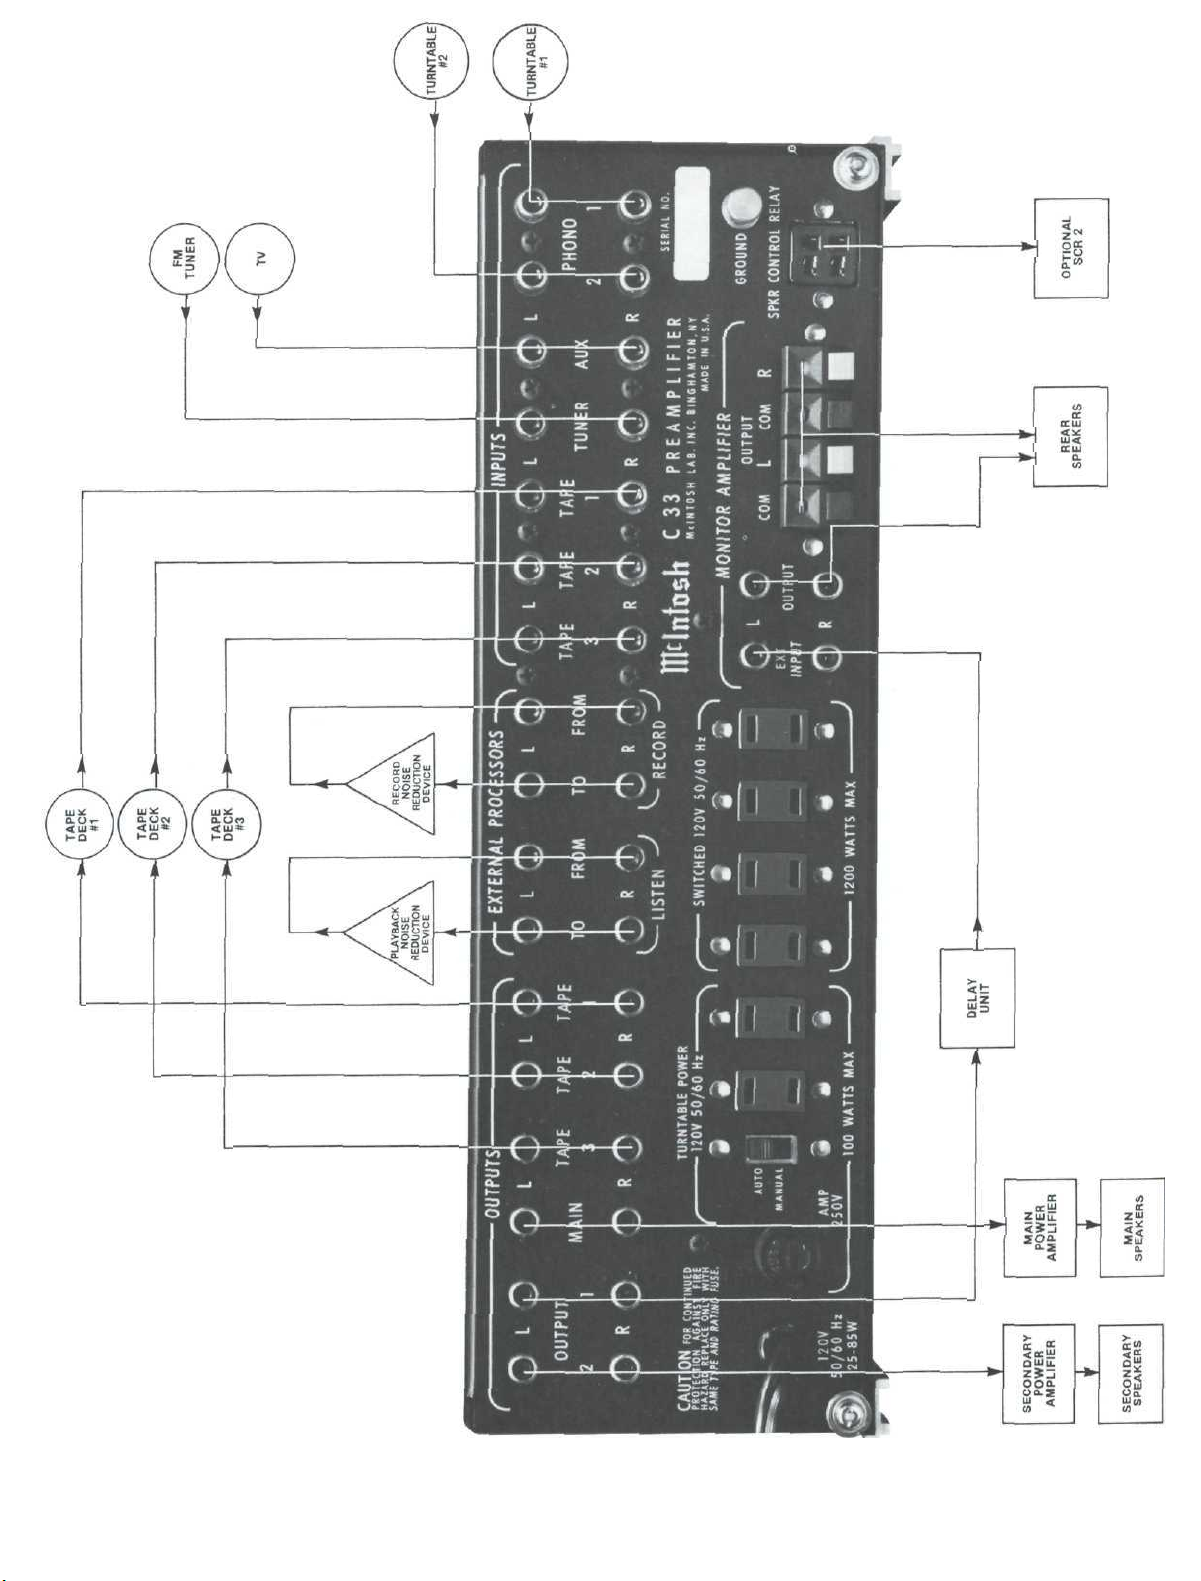
How to Connect
Rear panel input jacks are provided for 2 stereo
turntables, PHONO 1 and PHONO 2; a stereo tuner,
TUNER; 3 stereo tape recorders, TAPE 1, TAPE 2,
and TAPE 3; and an auxiliary high level source, AUX.
Rear panel output jacks are provided to feed 3
stereo tape recorders, TAPE 1, TAPE 2, and TAPE 3;
and 3 stereo 2.5 volt listen program line outputs,
MAIN, OUTPUT 1, and OUTPUT 2. Two sets of jacks,
EXTERNAL PROCESSORS; LISTEN and RECORD,
are provided to connect noise reduction units or
other signal processing devices. Monitor amplifier
EXT INPUT jacks, OUTPUT jacks and speaker terminals allow connecting to and from the monitor
amplifier.
CONNECTING TURNTABLES
Connect the cable from the left channel of the
turntable into the Left PHONO 1 INPUT jack. Connect the cable from the right channel of the turntable into the Right PHONO 1 INPUT jack. For a second turntable, connect PHONO 2 in the same way.
The C 33 uses automatic shorting jacks for the
PHONO inputs. If the inputs are not connected,
shorting plugs are not needed.
the Right TAPE 1 INPUT jack. Connect a second and
third recorder in the same manner to the TAPE 2 INPUT and TAPE 3 INPUT jacks.
Front Panel Tape Recorder Jacks:
TAPE 3 recorder input and output connections are
also available at the TAPE 3 IN-OUT jacks on the
front panel. When a plug is inserted in the front panel TAPE IN jack the circuit to the rear panel TAPE 3
INPUT jacks will be disconnected. Inserting a plug in
the front panel TAPE OUT jacks does not disconnect
the rear panel TAPE 3 OUTPUT. Thus it is possible to
record from the front panel TAPE OUT jack and the
rear panel TAPE 3 OUTPUT jack at the same time but
it is not possible to listen from the corresponding
jacks at the same time. Metal shielded ¼ inch
stereo phone plugs may be used. Connections are
tip: left signal, ring: right signal, and sleeve: com-
mon ground.
CONNECTING AUX
Connect the left channel cable from any high level
source (tuner, TV set, tape recorder, etc.) to the Left
AUX INPUT jack. Connect the right channel cable to
the Right AUX INPUT jack.
CONNECTING A STEREO TUNER
Connect the cable from the tuner left channel out-
put to the Left TUNER INPUT jack.
Connect the cable from the tuner right channel
output to the Right TUNER INPUT jack.
CONNECTING TAPE RECORDERS
To Record:
Connect a cable from the Left TAPE 1 OUTPUT jack
to the left high level input of the tape recorder. Connect a cable from the Right TAPE 1 OUTPUT jack to
the right high level input of the tape recorder. Connect a second and third recorder in the same manner
to the TAPE 2 OUTPUT and TAPE 3 OUTPUT jacks.
To Playback/Monitor:
Connect a cable from the tape recorder left channel output to the Left TAPE 1 INPUT jack. Connect a
cable from the tape recorder right channel output to
CONNECTING EXTERNAL PROCESSORS
There are two sets of EXTERNAL PROCESSOR
jacks. One set is for LISTEN program lines and one
set is for RECORD program lines. These jacks are
used to connect to and from a noise reduction unit
or to and from any other signal processing device.
Be sure to match left to left and right to right channels when connecting external processors.
When connections are made to the EXTERNAL
PROCESSOR from jacks, the signal path is broken
within the C 33. THE PROCESSOR MUST BE TURNED ON FOR THE PROGRAM TO PASS THROUGH
THE SYSTEM.
CONNECTING TO POWER AMPLIFIERS
Connect the MAIN OUTPUT jacks to the input of a
stereo power amplifier. The Left MAIN jack connects
to the amplifier left input jack. The Right MAIN jack
connects to the amplifier right input jack.
-7-
Page 10

Two stereo power amplifiers or two delay units
may be connected in the same fashion to the OUTPUT 1 and OUTPUT 2 jacks. Audio output signal is
supplied to these jacks only when the front panel
pushbutton SPEAKER/OUTPUT 1 and/or 2 pushbuttons are pushed. This arrangement is useful for
large systems where separate amplifiers and
loudspeakers are used at distant locations.
SPEAKER CONTROL RELAY (an optional accessory)
The SPEAKER CONTROL RELAY, or SCR, is designed to provide both speaker control switching
and high power switched AC outlets. To control
loudspeakers, SPEAKERS 1 and 2 pushbuttons on
the front panel must be used. When this is done,
OUTPUT jacks 1 and 2 are normally not used. The operation of output jacks and speaker control will
otherwise interfere with each other.
Plug the cable from the SCR into the C 33 back
panel SPEAKER CONTROL RELAY receptacle. Connect the power amplifier output to the FROM
POWER AMPLIFIER terminals on the SCR. Observe
correct channel identification as well as correct
polarity. The MAIN speakers (controlled by SPEAK-
ER 1 pushbutton) are connected at the TO MAIN
SPEAKER terminals. The REMOTE speakers (controlled by SPEAKER 2 pushbutton) are connected at
the TO REMOTE SPEAKERS terminals. Again
observe correct channel identification and polarity.
The SCR also has two AC power outlets that provide additional capacity of 2400 watts switched by
the C 33. Use these outlets to supply AC power to
amplifiers or other components whenever the total
load to be switched by the C 33 exceeds the rating of
1200 watts. For proper operation, the cable from the
SCR must remain connected to the SCR receptacle
at the back of the C 33. Plug the SCR heavy line cord
directly into a wall outlet. Do not plug it into the C 33.
When the C 33 is turned on, power from the C 33 will
energize a relay in the SCR which connects the two
SCR AC outlets directly to the wall outlet.
MONITOR AMPLIFIER
Although its primary purpose is to drive headphones, the monitor amplifier can also be used to
drive speakers. This eliminates the need for a separate stereo monitor amplifier. The monitor amplifier
will furnish 20 watts per channel into 8 ohms or 12.6
volts RMS into a 600 ohm line. For operation see
MONITOR AMPLIFIER page 17. The speakers can be
connected to the red and black output terminals at
the rear of the C 33. Connect the left speaker minus
lead to the black OUTPUT COM terminal closest to
the center of the C 33. Connect the left plus speaker
lead to the red OUTPUT L terminal. Connect the right
speaker minus lead to the black OUTPUT COM ter-
minal closest to the C 33 ground terminal. Connect
the right plus lead to the red OUTPUT R terminal.
Resistance of the speaker hookup wire should be
kept less than 0.5 ohms to avoid losses and
response changes.
The monitor OUTPUT jacks can be connected to
drive a low impedance unbalanced line.
The INPUT jacks are used when an external source
is fed to the monitor amplifier.
CONNNECTING AC POWER
The preamplifier AC power cord is to be plugged
into a 120 volt 60 Hz wall outlet.
Two types of AC power outlets are on the back
panel of the C 33. Four are black and two are green.
The black outlets are switched on and off when
the C 33 is turned on and off. These are intended for
power amplifiers, equalizers, and others accessor-
ies totaling up to 1200 watts capacity.
The green AC power outlets are on at all times and
are for use only with turntables. Do not use them for
any other purpose. The turntable can be used as a
power switch as described in the following section.
USING THE TURNTABLE AS A POWER SWITCH
If a turntable is used with the C 33, it can often be
used to turn your entire system on and off. The turn-
table must be plugged into one of the green AC out-
lets at the rear of the C 33. The AUTO/MANUAL
switch also at the rear must be in the AUTO position.
When you switch on the power to the turntable, a
special sensor circuit will detect the current drain of
the turntable and will turn on the C 33 the same way
the red POWER pushbutton does. The red pushbutton must be in the OFF or out position to do this.
Read the section on AUTO-ON SENSIVITY on page
17 before using this feature.
CONNECTING PROGRAM SOURCE GROUNDS
A GROUND post is provided to connect the grounds
from record changers, tape decks, etc. To prevent
hum pick-up, the left and right program cables and
the ground wire from that source should be wound
or twisted together. Make sure the ground wire does
not make any connection to the shields of the left
and right program cables as they run between the
source and the input of the preamplifier.
FUSE
A 1.0 AMP fast acting fuse protects the C 33 turntable current sensing circuits and the green AC turntable outlets. The fuse does not protect equipment
connected to the black AC outlets. This fuse must
be replaced with the same type and rating. Do not
use SLO BLO fuses.
-8-
Page 11

TAPE
RECORDER
2
FM ANTENNA
APE
T
RECORDER 3
TAPE
RECORDER
I
TUNER
AC POWER TO
TAPE RECORDERS,
TUNERS, POWER
AMPLIFIERS.
TOTAL OF 1200 WATTS.
FOR MORE AC POWER
USE THE SCR SPEAKER
CONTROL RELAY
AC POWER
TURNTABLE #2
AC POWER
TURNTABLE #1
CONNECTIONS FOR TUNERS, TURNTABLES, AND TAPE RECORDERS
-9-
Page 12

CUSTOM
ENVIRONMENTAL
EQUALIZER
(FOR MAIN SPEAKERS)
MAIN SPEAKERS
NOISE REDUCTION PROCESSOR
PLAYBACK
RECORD
REMOTE AREA 2
(CONTROLLED BY
SPEAKER 2
PUSHBUTTON)
REMOTE AREA 1
(CONTROLLED BY
SPEAKER 1
PUSHBUTTON)
-10-
CONNECTIONS FOR POWER
AMPLIFIERS AND LOUDSPEAKERS
USING MAIN SPEAKERS AND ENVIRONMENTAL
EQUALIZER. ALSO SHOWN FOR REMOTE
SPEAKERS USING SEPARATE POWER AMPLIFIERS AND CONNECTIONS FOR AN EXTERNAL
NOISE REDUCTION SIGNAL PROCESSOR.
Page 13

TO AC LINE
REMOTE
SPEAKERS
(CONTROLLED BY
SPEAKER 2
PUSHBUTTON)
MAIN SPEAKERS
(CONTROLLED BY
SPEAKER 1 PUSHBUTTON)
TIME
DELAY
UNIT
CONNECTIONS FOR POWER AMPLIFIERS AND LOUDSPEAKERS
USING OPTIONAL SCR-2 SPEAKER CONTROL RELAY. CONNECTIONS ALSO
SHOWN FOR TIME DELAY UNIT AND MONITOR AMPLIFIER LOUDSPEAKERS.
THE SPEAKER/OUTPUT 1 PUSHBUTTON WILL TURN ON AND OFF THE MAIN
SPEAKERS AND THE TIME DELAYED PROGRAM. IF THE SCR 2 IS NOT USED
THE PUSHBUTTON WILL TURN ON AND OFF ONLY THE TIME DELAYED PROGRAM.
-11-
MONITOR AMPLIFIER SPEAKERS
TO REPRODUCE
TIME DELAYED
PROGRAM
Page 14

Using the Front Panel Controls
LISTEN AND RECORD
SELECTOR SWITCHES
The LISTEN input se-
lector switch is located
at the upper left on the
front panel. This is used
to select the input for
the LISTEN program
line. The LISTEN program line feeds the main output
for the system power amplifier and loudspeakers.
The RECORD input selector switch is located at
the lower left on the front panel. This control is used
to select the input for the RECORD program line.
The RECORD program line feeds the record output
for tape recorders. To make a tape recording, turn
the RECORD selector to the input program to be recorded. To copy a tape, turn this control to select the
recorder on which the tape is to be played. This can
be TAPE 1, 2, or 3. Copies can then be made on the
other recorders connected to the C 33. The COMPANDOR, RECord EQUALizer, and RECord MONI-
TOR pushbuttons can be used when making record-
ings. Refer to the description of these controls on
Page 15 for their operation.
MODE SELECTOR
The MODE SELEC-
TOR allows you to
identify each stereo
channel, create monophonic program material, and direct program material to one
channel or the other. This selector is used only in the
LISTEN program line.
It controls the program in seven ways:
L TO L&R: Connects the left input to both left and
right output circuits.
R TO L&R: Connects the right input to both left
and right output circuits.
STEREO REV: Connects the left input to the right
output circuit and the right input to the left output
circuit.
STEREO: Connects the left input to the left output
circuit and the right input to the right output circuit. Use this STEREO position for normal listening.
MONO (L + R): Adds the left and right inputs
together and connects to both output circuits.
L + R TO L: Connects the left plus right program
to the left output circuit only.
L + R TO R: Connects the left plus right program
to the right output circuit only.
EQUALIZER FREQUENCY CONTROLS
Each of five EQUALIZER FREQUENCY controls
raises or lowers the amplitude of a band of frequencies centered on the frequency marked above the
control. Both left and right channels are affected.
The center, or flat position of the control has a detent for easy reference.
Use the EQUALIZER FREQUENCY controls to
modify the sound and balance of program material.
Here are some suggestions from which to start.
-12-
Page 15

Problem
Deep bass to weak
All bass weak
Voice reinforcement
Hum on program
Violins, trumpets dull
Cymballs not audible
Equalizer Correction
Raise 30
Raise 30 and 150
Lower 150 and raise 500
Reduce 30 and 150
Raise 1500
Raise 10 K
The EQUALIZER FREQUENCY controls can be
switched to either the LISTEN or RECORD program
lines by the RECORD EQUALizer pushbutton. The
equalizer circuit is located after the COMPANDOR
circuit. Using the equalizer will not influence the behavior of the COMPANDOR.
BALANCE AND LOUDNESS
The BALANCE and
LOUDNESS controls are
concentric. The BALANCE
control (large outer knob)
adjusts the volume of the
channels relative to each
other.
L-LEFT...turning the control to the left accents the
left channel by reducing
the right channel output.
range. It can be used for making tape recordings or
for listening to background music. The Compandor
can be switched to either the record or listen lines.
In this way you can make your own recordings using
compression and then play them back using expansion.
The Compandor System has a total of four controls. The concentric COMPANDOR and RATIO controls are located on the front panel. The LEVEL
MATCH and SPEED selector are located on the C 33
top panel.
COMPANDOR SELECTOR
The outer COMPANDOR knob can be set to EX-
PAND, OFF, or COMPRESS. When the COMPANDOR switch is in EXPAND or COMPRESS, a red light
will appear above Listen or RECord at the COMPAN-
DOR pushbutton. In the center OFF position, the
Compandor System is switched out of the circuit
and the lights will be out. When the Compandor is
not used, the selector should be placed in the OFF
position.
RATIO CONTROL
The inner RATIO knob is used to control
the
amount of expansion or compression.
R-RIGHT...turning the control to the right accents
the right channel by reducing the left channel output.
LOUDNESS
The LOUDNESS control (small center knob) provides a frequency response contour which compensates for the behavior of the human ear at lower listening levels. This contour is accurately modeled
after the family of "equal loudness" curves identified by Fletcher and Munson. At the fully counterclockwise detented FLAT position, the loudness
contour is electrically flat. As the control is turned
clockwise, both bass and treble frequencies increase in the correct proportion. The contour is not
affected by different settings of the VOLUME control. After setting the VOLUME control for the desired listening level, adjust the loudness control for
the preferred compensation.
COMPANDOR SYSTEM
The Mclntosh Compandor System can be used to
control the dynamic range
of program material. It can
be used in two different
ways. The circuits can by
switched to function as an
expander or as a compressor. Expansion increases
the dynamic range of pro-
gram material. This can be used to restore compressed material from tape recordings, records, or radio
broadcasts. Compression decreases the dynamic
LEVEL MATCH
The LEVEL MATCH control on the top panel is used to restore the listening level when the expander
or compressor is switched into the circuit.
SPEED
The SPEED selector on the top panel is used to
control how fast the Compandor System responds
to signals. By switching from FAST to NORMAL to
SLOW, a more gradual rate of change in volume can
be heard. Select the position that sounds best to
you. If music with percussive instruments is used,
NORMAL or FAST can provide very attractive sound.
At the FAST speed the Compandor System follows
changes quickly but will track low frequencies less
accurately. Non-percussive music and voice require
slower speed. At SLOW speed the low frequency
tracking is accurate but the system will respond
more slowly. The NORMAL position is best suited
for most program material.
USING THE COMPANDOR AS AN EXPANDER
When the COMPANDOR selector is in the EXPAND position, the RATIO control is used to select
the amount of expansion. Full counterclockwise
rotation corresponds to a ratio of 1.0. This means
that the dynamic range of the expander output is the
same as the dynamic range of its input. Set the
VOLUME control to a normal listening level. No
change in dynamic range will be heard. As the
RATIO control is increased clockwise, however, the
output dynamic range becomes greater than the in-
put. Set the RATIO control to the desired expansion
-13-
Page 16

(usually between 1.2 and 1.5). Now switch the ex-
pander on and off. A change in the average listening
level will usually be heard at this time. Adjust the
LEVEL MATCH control until the average listening
level matches as closely as possible when the expander is on and off. After this adjustment you will
notice that with the expander on, loud passages will
be louder and soft passages including noise will be
softer.
When the RATIO control is at the fully clockwise
position it corresponds to a ratio of 2.0. The output
dynamic range is then twice the input dynamic range.
This setting is usually too high for most program
material.
Two examples for using the expander are as
follows.
1. To reduce background noise (hum, hiss or
scratch):
a. Select the desired program source with the
LISTEN input selector.
b. Increase the VOLUME control during a quiet
passage of the program until noise is clearly audi-
ble.
c. Turn the COMPANDOR selector knob to EXPAND. The Listen indicator will light over the
COMPANDOR pushbutton.
d. Rotate the RATIO control clockwise until the
noise is acceptably reduced.
e. Adjust the LEVEL MATCH control as described
previously.
2. To improve the "live" sound of recorded or
transmitted program material:
a. Select the LISTEN input.
b. Increase the VOLUME to a satisfactory level.
c. Turn the COMPANDOR selector to EXPAND.
d. Rotate the RATIO control clockwise until the
dynamic range of the music, the ratio of loud to
soft, is correct for you. The usual position will be
between 1.2 and 1.5
e. Adjust the LEVEL MATCH control as described
previously.
USING THE COMPANDOR AS A COMPRESSOR
When the COMPANDOR selector is in the COMPRESS position, the RATIO control is used to select
the amount of compression. Full counterclockwise
rotation corresponds to a ratio of 1.0. The compressor output and input dynamic range will be the same.
Set the VOLUME control to a normal listening level.
As the RATIO control is increased clockwise the output dynamic range becomes less than the input
range. Set the RATIO control to the desired compression. Switch the compressor on and off. A
change in the average listening level will usually be
heard. Adjust the LEVEL MATCH control until the
average listening level matches as closely as possible when the compressor is switched on and off.
After this adjustment you will notice that with the
compressor on, loud passages will be softer and
soft passages including noise will be louder.
When the RATIO control is at the fully clockwise
position it corresponds to a ratio of 2.0. The output
dynamic range is then one half of the input range.
This setting can be useful to create highly com-
pressed background music.
-14-
Page 17

Using the Pushbuttons
COMPANDOR
The COMPANDOR pushbutton connects the compandor to either the listen or the record program
line. The red indicator lights above the pushbutton
will show that the compandor is connected to the
LIS (listen) program line (pushbutton out) or to the
REC (record) program line (pushbutton in). These
lights will light only when the COMPANDOR knob is
turned to the EXPAND or COMPRESS positions.
REC EQUAL
This pushbutton connects the EQUALIZER FRE-
QUENCY controls to the listen or the record program
lines. When the pushbutton is out, the equalizers are
connected to the listen line. The red indicator light
above the button will be off. When the pushbutton is
in, the equalizers are connected to the record line.
The red light will be on.
REC MONITOR
This pushbutton connects the C 33 main output to
either the listen line or the record line. This pushbutton does not stay in after it is pushed as the others
do. To change the switching status, push it again.
Normal operation occurs when the red indicator light
is off. The listen line is then connected to the C 33
output. When the light is on, the record line is connected to the C 33 output. This switch enables you
to monitor what is being fed to the tape recorder.
To monitor the program from a tape recorder, turn
the LISTEN input selector to TAPE 1, TAPE 2, or
TAPE 3 as appropriate. To compare this program
with the signal being fed into the recorder, press the
REC MONITOR pushbutton so that the red indicator
light is on. Press the REC MONITOR button a se-
cond time to listen to the recorder output again. The
red indicator will then be off.
LF FILTER
The Low Frequency FILTER can be used only in
the listen program line. When the pushbutton is out,
the filter is out of the circuit and the red indicator
light will be off. When the pushbutton is in, the LF
FILTER is in the circuit and the red light will be on.
The filter is effective for all frequencies below 50 Hz
and attenuates at the rate of 12 dB per octave. Use it
to reduce undesirable low frequency noise such as
rumble or mechanical feedback.
HF FILTER
The High Frequency FILTER affects only the listen program line. When the pushbutton is out the filter is out of the circuit and the red indicator light is
off. When the pushbutton is in, the HF FILTER is in
the circuit and the red light will be on. The filter is effective for all frequencies above 7,000 Hz and attenuates at the rate of 12 dB per octave. Use it to reduce
undesirable high frequency noise such as record
surface noise or tape hiss.
SPEAKER/OUTPUT 1 and 2
The SPEAKER/OUTPUT 1 and 2 pushbuttons can
be used to control either the output jacks 1 and 2 or
the main and remote speakers when the optional
SPEAKER CONTROL RELAY (SCR) is connected.
The SPEAKER/OUTPUT pushbuttons are not normal-
ly used to control connections to the OUTPUT 1 and
2 jacks and a SCR for speaker switching at the same
time. The operation of the output jacks and speaker
control will interfere with each other.
OUTPUT 1 AND 2
The output jacks 1 and 2 are located on the rear
panel of the C 33. Signals from output 1 and 2 are the
same as the main output. When the front pushbuttons are out, the listen program line is not connected to output jacks 1 and 2 and the red indicator
lights are off. When one or both pushbuttons are IN,
the listen line is connected to the corresponding
pair of output jacks and the appropriate indicator
light will be on. The C 33 output can then be switched to additional amplifiers or other devices.
Additional amplifiers can serve remote areas such
as selected living areas, workshop, or outdoor
recreational facilities. Other devices can be controll-
-15-
Page 18

ed such as rear channel reverberation units, color
displays, etc. For example Output 1 or 2 can be con-
nected to a reverberation device and then to the C 33
monitor amplifier and a set of rear loudspeakers.
(The monitor amplifier switch must be in the EXTER-
NAL position.) Rear channel reverberation can then
be switched in and out without the need for an extra
amplifier.
SPEAKER 1 AND 2 USING THE SCR
When pushbutton 1 is in and pushbutton 2 is out,
the MAIN speakers will be connected to the power
amplifier via the relays in the SCR. The red light
above 1 will be on. When pushbutton 1 is out and
pushbutton 2 is in, the remote speakers will be con-
nected instead. The red light above 2 will be on.
When both pushbuttons 1 and 2 are in, both sets of
speakers will be connected and lights 1 and 2 will be
on. CAUTION: When both sets of speakers are connected at the same time, their combined parallel impedance must not be too low for the power amplifier
to handle. For example: If both sets of speakers are
8 ohms, connections to the power amplifier must be
to the 4 ohm tap. If the amplifier does not have different impedance taps, it must be able to deliver
power to a 4 ohm load as well as an 8 ohm load.
POWER ON
The red pushbutton turns the C 33 on and off.
When the power is on, the panel illuminates and the
red light above this pushbutton will go on. The turntable can also be used as a power switch. See page 8.
-16-
Page 19

Top Panel Information and
Secondary Controls
COMPANDOR
Operation of the LEVEL MATCH and SPEED con-
trols is explained on page 13 under the Compandor
System description.
AUTO-ON SENSITIVITY
The SENSITIVITY control is located at the right of
the C 33 top panel. For normal operation with most
turntables, the control can be left at mid-position.
Some turntables, however, have electronic circuits
that draw current whether they are turned "off" or
not. The C 33 AUTO-ON SENSITIVITY control can be
used to "fine tune" for the smaller difference between on and "off" currents.
If your turntable does not control the AUTO-ON
feature of the C 33 correctly, use one of the follow-
ing procedures:
1. Switch on the turntable. If the C 33 does not go on,
or goes on but does not stay on, rotate the AUTOON SENSITIVITY control clockwise towards MAX
until the C 33 goes on and stays on. Then check
for proper operation.
2. Switch off the turntable. If the C 33 does not go
off, rotate the AUTO-ON SENSITIVITY control
counterclockwise towards MIN until it does go
off. Check for proper operation.
If this doesn't correct the problem, your turntable
probably has electronic circuits that draw the same
or nearly the same current whether on or off. AUTOON control is not possible when using this turntable.
The green AC outlet can still be used but the AUTO/
MANUAL switch must be set in the MANUAL position. The red POWER pushbutton must be used instead.
In the event you are using two record players, ad-
just the SENSITIVITY control as described above
with both turntables connected to the C 33 green
outlets. Start with both turntables switched off, and
then one at a time switched on.
MONITOR AMPLIFIER
HEADPHONES
The built-in Monitor Amplifier can drive head-
phones, loudspeakers, or provide a low impedance
line output. The input to the Monitor Amplifier is selected by the INPUT switch located near the center
of the C 33 top panel. This switch selects the LISTEN
program, RECORD program, or separate EXTERNAL
input. For normal listening use the LISTEN position.
The Monitor Amplifier LEFT and RIGHT GAIN controls are located to the left of the INPUT switch.
When the switch is in the LISTEN position, the LEFT
and RIGHT GAIN controls regulate the monitor vol-
ume along with the main front panel VOLUME control. When the INPUT switch is in the RECORD or EXTERNAL position, only the LEFT and RIGHT GAIN
controls regulate the monitor volume.
The monitor amplifier can be used with any low
impedance dynamic headphones. High impedance
headphones will work but at a reduced listening
level.
-17-
Page 20

Performance Limits and Ratings
PERFORMANCE LIMITS
Performance limits are the maximum deviation
from perfection permitted for a Mclntosh instru-
ment. We promise you that when you purchase a
new C 33 from a Mclntosh franchised dealer, it will
be capable of or can be made capable of perfor-
mance at or exceeding these limits or you can return
the unit and get your money back. Mclntosh is the
only manufacturer that makes this statement.
PREAMPLIFIER SECTION
FREQUENCY RESPONSE
+ 0, -0.5dB from 20Hz to 20,000Hz
MAXIMUM VOLTAGE OUTPUT
10 volts from 20Hz to 20,000Hz
TOTAL HARMONIC DISTORTION
0.01% maximum from 20Hz to 20,000Hz
at rated output
SENSITIVITY
Phono- 2mV for 2.5V rated output
(0.4mV IHF)
High Level- 250mV for 2.5V rated output
(50mV IHF)
SIGNAL TO NOISE RATIO, A-WEIGHTED
Phono- 90dB below 10mV input
(84dB IHF)
High Level- 100dB below rated output
(86dB IHF)
MAXIMUM INPUT SIGNAL
Phono- 100mV
High Level- 10 volts
INPUT IMPEDANCE
Phono- 47k ohms and 65pf capacitance
High Level- 50k ohms
EQUALIZATION CONTROLS
Variable 12dB boost to 12dB cut at center frequencies of 30, 150, 500, 1500, 10k Hz
COMPANDOR RATIOS
From 1:2 compression to 2:1 expansion
LF FILTER
Flat or roll-off at 12dB per octave below 50 Hz.
HF FILTER
Flat or roll-off at 12dB per octave above 7,000 Hz.
MONITOR AMPLIFIER SECTION
CONTINUOUS AVERAGE POWER OUTPUT
20 watts per channel into 8 ohms, from 20Hz to
20kHz, at 0.01% maximum harmonic distortion
FREQUENCY RESPONSE
+ 0 -0.2dB from 20Hz to 20,000Hz
SENSITIVITY
750mV for rated output (170mV IHF), input im-
pedance is 27K ohms
SIGNAL TO NOISE RATIO, A-WEIGHTED
100dB below rated output (87dB IHF)
GENERAL INFORMATION
SEMICONDUCTOR COMPLEMENT
31 Bipolar Transistors
76 Field Effect Transistors
35 Integrated Circuits
107 Diodes
1 Silicon Controlled Rectifier (SCR)
AC POWER OUTLETS
2 turntable current-sensing, 100 watts, green
4 switched, 1200 watts total, black
POWER REQUIREMENTS
120 volts, 50/60 Hz, 25 to 85 watts
MECHANICAL INFORMATION
SIZE:
Front panel measures 16 inches wide (40.6 cm)
by 5-7/16 inches high (13.8 cm). Chassis measures
15 inches wide (38.1 cm) by 5 inches high (12.7 cm)
by 13 inches deep (33.0 cm), including PANLOC
shelf and back panel connectors. Knob clearance
required is 1-1/2 inches (3.81 cm) in front on the
mounting panel.
FINISH:
Front panel is anodized gold and black with
special gold/teal nomenclature illumination.
Chassis is black.
MOUNTING:
Exclusive Mclntosh developed professional
PANLOC
WEIGHT:
26 pounds (11.8 kg) net, 38 pounds (17.2 kg) in
shipping carton
-18-
Page 21

Performance
Charts
FREQUENCY RESPONSE
0
-4
IN dB
-8
IN: AUX; OUT: MAIN
LF AND HF FILTERS
MONITOR AMPLIFIER
20
15
IN dB
10
RESPONSE
5
0
20
100
FREQUENCY IN HERTZ
1K
RESPONSE
-12
-16
-20
20
10
10K 20K
100
FREQUENCY IN HERTZ
LOUDNESS CONTROL RESPONSE
1K
FOR VARIOUS CONTROL
POSITIONS
10K
100K
IN dB
RESPONSE
-10
-20
10
IN dB
EQUALIZER FREQUENCY RESPONSE
CONTROLS SET AT MAXIMUM
AND MINIMUM
20
10
0
20
100
1K
FREQUENCY IN HERTZ
RESPONSE
-10
-20
0
20
100
10K 20K
1K
FREQUENCY IN HERTZ
RIAA EQUALIZATION CURVE
10K 20K
-19-
Page 22

-04
.03
PHONO HARMONIC DISTORTION
AT 2.5 VOLTS OUTPUT
,05
.04
.03
02
PERCENT
IN
.01
0
HARMONIC DISTORTION
20
100
1K
FREQUENCY IN HERTZ
10K 20K
.02
PERCENT
IN
.01
HARMONIC DISTORTION
0
2 3 4 5 6 7 8 9 10 11 12
RMS OUTPUT VOLTS
.04
INTERMODULATION DISTORTION
IN: AUX; OUT: MAIN
INPUT FREQUENCY: 60Hz & 7kHz
RATIO: 4:1
32
28
IN
24
20
16
12
8
AVERAGE WATTS
POWER OUTPUT
4
0
10 100 1K 10K
FREQUENCY IN HERTZ
.03
.02
PERCENT
IN
.01
0
2 3
INTERMODULATION DISTORTION
100K
4 5
HARMONIC DISTORTION
IN: AUX; OUT: MAIN
6 7
EQUIVALENT OUTPUT VOLTS
MONITOR AMPLIFIER POWER BANDWIDTH
AT .02% T.H.D., 8 OHMS
8 9
10
12
11
MONITOR AMPLIFIER HARMONIC
DISTORTION 20 WATTS OUTPUT
PER CHANNEL, 8 OHMS
.05
.04
.03
.02
PERCENT
IN
.01
0
HARMONIC DISTORTION
20 100 1K 10K 20K
FREQUENCY IN HERTZ
-20-
Page 23

2.0
1.8
1.6
1.4
1.2
1.0
.8
LEVEL MATCH
.6
FOR
.4
LEVEL INPUT VOLTAGE NEEDED
.2
0
HIGH
CCW
LEVEL MATCH CONTROL POSITION
MID ROTATION
CW
60
50
COMPANDOR LEVEL MATCH RANGE
COMPANDOR EXPANSION AND
COMPRESSION CHARACTERISTICS
12
11
10
VOLTS
9
IN
8
7
6
5
LEVEL INPUT
4
HIGH
3
2
1
MAXIMUM
0
1.0 1.1 1.2 1.3 1.4 1.5 1.6 1.7 1.8 1.9 2.0
RATIO CONTROL POSITION
40
30
OUTPUT (dB)
20
10
0 10 20 30 40 50 60
INPUT (dB)
96
88
80
MILLIVOLTS
72
64
56
AT 1k HZ IN
48
40
32
24
16
8
0
MAXIMUM PHONO INPUT
COMPANDOR INPUT VOLTAGE LIMIT
-21-
Page 24

Technical Description
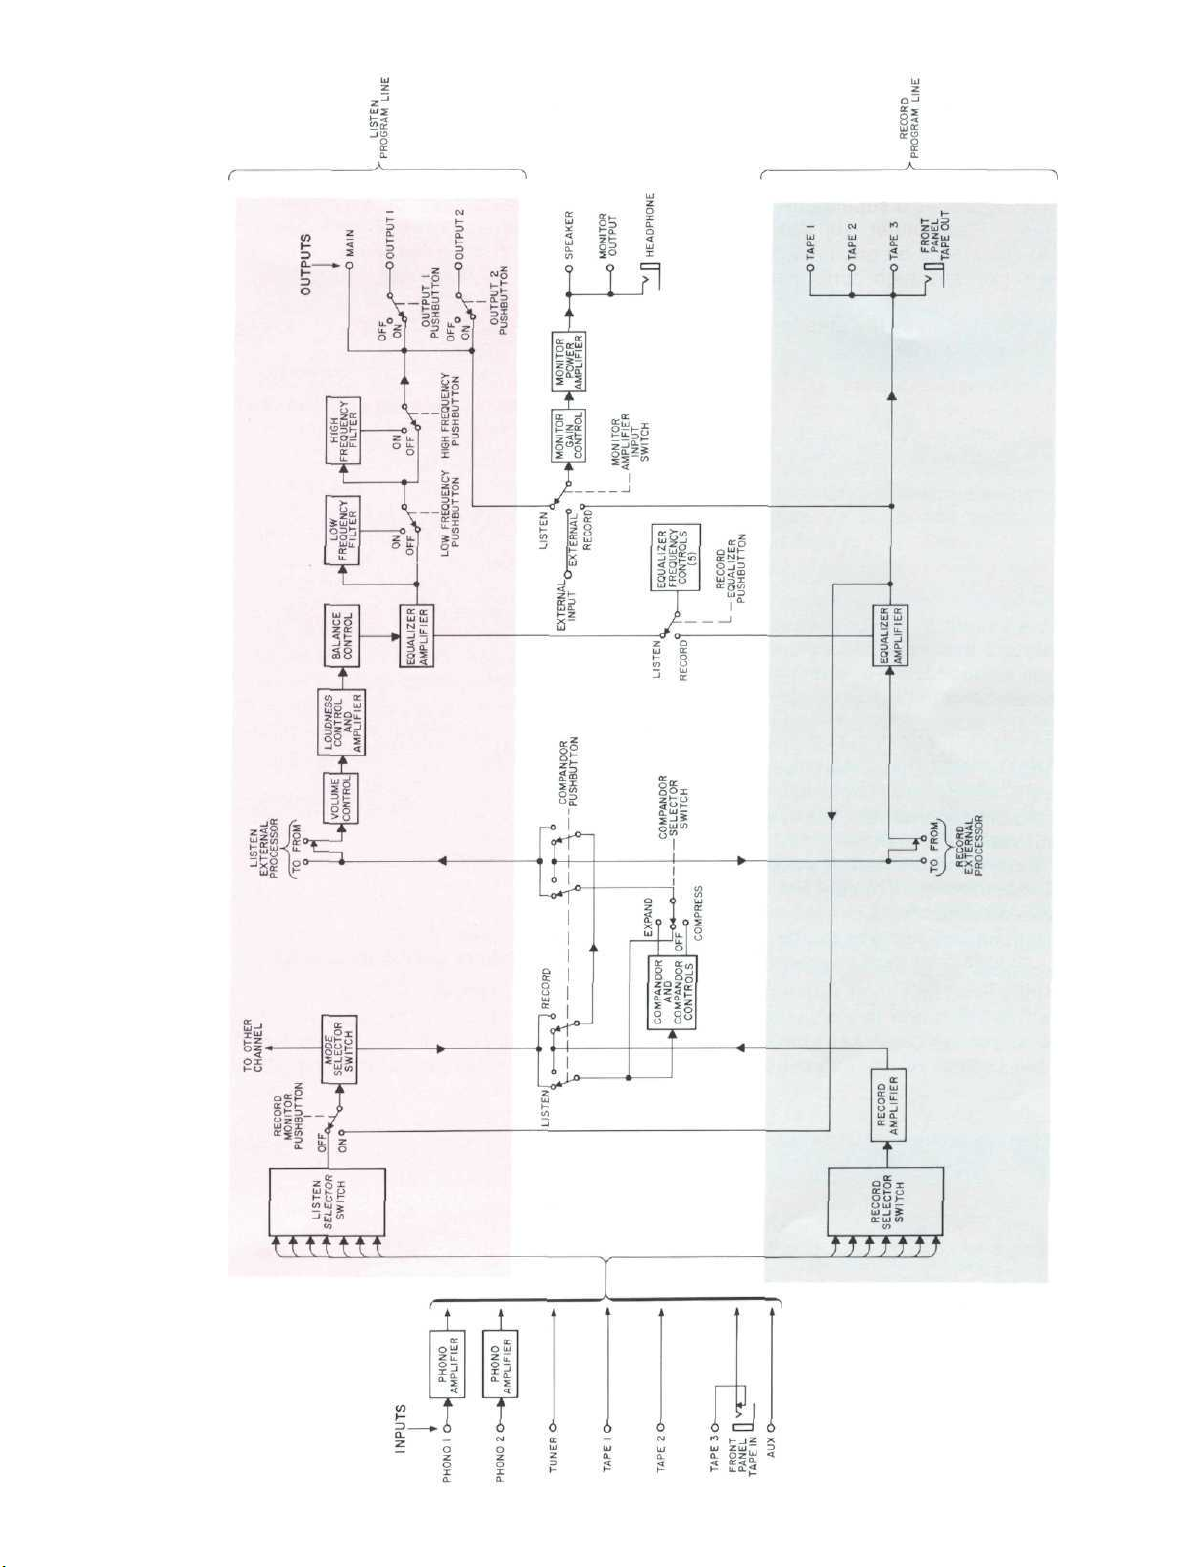
The simplified block diagram on page 3 and the
detailed block diagram on page 24 show how the C 33
internal circuits are arranged. The C 33 uses separate program channels (referred to as "program lines"
in this manual) for "listening" and "recording". This
allows you to listen to any program source while you
record from another or the same program source.
The mode selector, volume control, loudness con-
trol, balance control, and LF and HF filters are in the
Listen program line only. The compandor, the five
equalizer frequency controls, and the monitor amplifier can be individually switched to the Listen program line or the Record program line. A description
of the C 33 circuits follows.
PHONO AMPLIFIER
Four separate phono amplifiers are provided; two
for Phono 1 and two for Phono 2. Each amplifier uses
a high technology integrated circuit operational
amplifier. Its differential input stage has been optimized for low noise and low distortion performance. Open loop gain of this integrated circuit is
100,000 times. With high open loop gain a large
amount of negative feedback is used around the
phono amplifier to further reduce noise and distortion. The feedback network also provides precision
RIAA frequency compensation. The network uses
1 % metal film resistors and 5% poly film capacitors.
To achieve low noise performance it is essential that
the feedback network have very low impedance. As a
consequence, the preamplifier must be capable of
operating as a power amplifier to drive this impedance. The actual power output capability of this
preamplifier stage is more than 100 milliwatts, a
great margin beyond that which is required.
Input sensitivity of the phono amplifier is 2.2 millivolts. The gain of the amplifier is 42 dB at 1000 Hz.
The phono amplifier has a very wide dynamic range.
At 1000 Hz the phono input circuit will accept 100
millivolts without overload, a voltage far greater
than the output of any magnetic phono cartridge presently available.
LISTEN AND RECORD SELECTOR SWITCHES
Input switching is accomplished electronically.
Signals from the 7 inputs connect to two arrays of
Field Effect Transistors (FET) to perform the switch-
ing. Control signals from the Listen and Record
selector switches turn on the appropriate FET
switches to pass the selected input signals. The
other input signals are blocked by the "off" FET
switches. Each FET switch uses two cascaded FET
transistors to provide the required isolation and pre-
vent cross talk between inputs. The FET "on"
resistance is very low which prevents distortion. The
switching transistors are located right at the input
jacks, so that signal wiring is kept to a minimum.
This eliminates cross talk and noise problems.
LISTEN PROGRAM LINE
The listen program signal from the Listen input
switch goes to the Compandor control switching
where the Compandor can be inserted in either the
listen or the record program path. The Compandor
circuit is described later.
The listen program then goes to the Listen Exter-
nal Processor jacks. These jacks have switching
contacts so that the signal passes through when
there is no plug in the jacks. Therefore, if an External
Processor is used, the Listen program leaves the C 33
through the External Processor "to" jack and returns
via the "from" jack. If no processor is used, the sig-
nal passes directly through the jacks.
The volume control is the next step in the listen
path. The volume control is a step attenuator which
has left to right tracking accuracy within 1 dB
throughout its entire range. Such extremely accurate matching is achieved through electronically controlled trimming of the resistance material depos-
ited on pairs of printed circuits. Since the switch
commutator touches only contact pads and not the
actual resistance element, tracking accuracy is not
degraded with use as in ordinary volume controls.
The loudness control and its amplifiers follow the
volume control. In the past, loudness controls have
typically used simple passive circuits connected to
a tap on the volume control. As a consequence, compensation accuracy was dependent on many variables such as volume control position and differences in the input level. The C 33 loudness control
uses active circuits. An integrated circuit operational amplifier is used here. It has two feedback
loops. One has flat frequency response. The other
has response conforming to the Fletcher-Munson
equal loudness contours. A potentiometer is placed
between these two feedback loops making it possible to select any combination of the two, from a flat
response to full loudness compensation. The overall
gain of the stage is 20 dB at mid-frequencies and the
listening volume is not affected by the position of
the loudness control.
The listen program signals next pass to the bal-
ance control and then to the Equalizer Amplifier. This
amplifier uses a low noise operational amplifier and
has flat response and unity gain. Five other opera-
-22-
Page 25

tional amplifiers are arranged in circuit configurations that are equivalent to five series tuned circuits,
each at one of the equalizer frequencies. These
series tuned circuits are inserted via control potentiometers into either the input circuit or feedback
circuit of the equalizer amplifier. This provides a
boost or cut capability of 12 dB for each equalizer
band of frequencies. A pushbutton switch allows the
equalizer circuit to be switched from the Listen program line to the Record program line.
The LF and HF Filters follow next. These filters
are active filters using operational amplifiers. When
switched in, the LF filter attenuates frequencies
below 50 Hz at a rate of 12 dB per octave. The HF
Filter attenuates frequencies above 7kHz at a rate of
12 dB per octave.
The Listen program signal then arrives at the main
output jacks. The main jacks are fed directly. The
output 1 and output 2 jacks receive the same signal
but can be turned on and off by the Speaker/Output 1
and 2 pushbuttons.
RECORD PROGRAM LINE
The record program signal from the Record input
switch goes first through a unity gain amplifier and
then to the Compandor switching where the Compandor can be inserted into the record program path.
The Compandor circuit is described later. The
Record program then goes to the Record External
Processor jacks. These jacks, like the Listen External Processor jacks, have switching contacts so that
the signal passes through when there are no plugs
in the jacks. Therefore, if an External Processor is
used, the Record program leaves the C 33 through
the External Processor "to" jack and returns via the
"from" jack. If no processor is connected the signal
passes directly through the jacks.
An equalizer amplifier with unity gain follows
next. A pushbutton switch allows the 5 band
equalizer controls to be switched from the Listen
program line to the Record program line. This
feature allows equalizing the record signal before it
is fed to a recorder.
voltages for this VCA are developed from a sample
taken from the left and right channel input signals to
the VCA. The electronic processing of this sample is
detailed. It includes band shaping, logarithmic con-
version, full wave rectification, level setting, expan-
sion or compression ratio regulation, attack timing,
and DC amplification. The resulting processed voltage controls the gain of the VCA to cause logarithmic gain expansion when expanding the program,
or the opposite, logarithmic gain compression when
compressing the program.
MONITOR AMPLIFIER
The monitor amplifier is a 20 watt per channel
stereo power amplifier. The monitor input selector
switch allows the amplifier to be driven from the
Listen or Record program lines or from an external
input.This amplifier is a push pull complementary
class AB amplifier using a differential input stage.
The amplifier includes Mclntosh's Power Guard protection circuit. The Power Guard circuit compares
the amplifier output signal with its input signal. If
there is a difference between the waveforms of
these signals, Power Guard activates an electronic
attenuator at the input of the amplifier which
reduces the amplifier input level. This automatic
control system makes it impossible to drive the
monitor amplifier into clipping. Thus, clipping distortion and loudspeaker damage due to clipping are
eliminated.
AUTO TURN-ON
A turntable plugged into the green outlets at the
rear of the C 33 can control the on-off operation of
the C 33. Current flow to the turntable is sensed and
controls a silicon control rectifier (SCR). When the
SCR conducts a relay closes. This relay turns on
power to the C33 and to the black AC power outlets.
A current sensing sensitivity control allows cal-
ibrating the Auto Turn-On circuit to the turntable
used. Power is also controlled by the C 33 Power On
pushbutton. The Auto Turn-On circuit may be
switched off for manual power control.
The equalizer amplifier feeds to electronic interlock switching and then finally to the record output jacks. The switching is arranged so that if the
Record input selector is positioned to select the output of a recorder, the Record program line will not
feed the record output jack connected to that
recorder. This prevents recorder feedback.
COMPANDOR
The Compandor will expand or compress the
dynamic range of the program material. The Compandor can be switched to the Listen or Record program lines or turned off. Program to the Compandor
is applied to a voltage controlled amplifier (VCA)
which operates as a variable gain block. Control
-23-
Page 26

Block Diagram
-24-
MclNTOSH C33 STE
Page 27

REO PREAMPLIFIER
-25-
Page 28

MclNTOSH LABORATORY INC.
2 CHAMBERS ST., BINGHAMTON, N.Y. 13903-9990
607-723-3512
The continuous improvement of its products is the policy of
Mclntosh Laboratory Incorporated, who reserves the right to
improve design without notice.
Printed in U.S.A.
039299
BE032003
 Loading...