

Page 1

Model SA-17S1 User Guide
Super Audio CD Player
R
CLASS 1 LASER PRODUCT
LUOKAN 1 LASERLAITE
KLASS 1 LASERAPPARAT
Page 2

ENGLISH
ITALIANO
WARRANTY
For warranty information, contact your local Marantz distributor.
RETAIN YOUR PURCHASE RECEIPT
Your purchase receipt is your permanent record of a valuable purchase.
It should be kept in a safe place to be referred to as necessary for
insurance purposes or when corresponding with Marantz.
IMPORTANT
When seeking warranty service, it is the responsibility of the consumer
to establish proof and date of purchase. Your purchase receipt or invoice is adequate for such proof.
FOR U.K. ONLY
This undertaking is in addition to a consumer's statutory rights and does
not affect those rights in any way.
FRANÇAIS
GARANTIE
Pour des informations sur la garantie, contacter le distributeur local
Marantz.
CONSERVER L'ATTESTATION D'ACHAT
L'attestation d'achat est la preuve permanente d'un achat de valeur. La
conserver en lieu sur pour s'y reporter aux fins d'obtention d'une
couverture d'assurance ou dans le cadre de correspondances avec
Marantz.
IMPORTANT
Pour l'obtention d'un service couvert par la garantie, il incombe au client d'établir la preuve de l'achat et d'en corroborer la date. Le reçu ou
la facture constituent des preuves suffisantes.
DEUTSCH
GARANTIE
Bei Garantiefragen wenden Sie sich bitte an Ihren Marantz-Händler.
HEBEN SIE IHRE QUITTING GUT AUF
Die Quittung dient Ihnen als bleibende Unterlage für Ihren wertvollen
Einkauf Das Aufbewahren der Quittung ist wichtig, da die darin
enthaltenen Angaben für Versicherungswecke oder bei Korrespondenz
mit Marantz angeführt werden müssen.
WICHTIG!
Bei Garantiefragen muß der Kunde eine Kaufunterlage mit Kaufdatum
vorlegen. Ihren Quittung oder Rechnung ist als Unterlage ausreichend.
NEDERLANDS
GARANZIA
L’apparecchio è coperto da una garanzia di buon funzionamento della
durata di un anno, o del periodo previsto dalla legge, a partire dalla data
di acquisto comprovata da un documento attestante il nominativo del
Rivenditore e la data di vendita. La garanzia sarà prestata con la
sostituzione o la riparazione gratuita delle parti difettose.
Non sono coperti da garanzia difetti derivanti da uso improprio, errata
installazione, manutenzione effettuata da personale non autorizzato o,
comunque, da circostanze che non possano riferirsi a difetti di
funzionamento dell’apparecchio. Sono inoltre esclusi dalla garanzia gli
interventi inerenti l’installazione e l’allacciamento agli impianti di
alimentazione.
Gli apparecchi verranno riparati presso i nostri Centri di Assistenza
Autorizzati. Le spese ed i rischi di trasporto sono a carico del cliente.
La casa costruttrice declina ogni responsabilità per danni diretti o indiretti
provocati dalla inosservanza delle prescrizioni di installazione, uso e
manutenzione dettagliate nel presente manuale o per guasti dovuti ad
uso continuato a fini professionali.
PORTUGUÊS
GARANTIA
Para informações sobre a garantia, contactar o distribuidor Marantz local.
GUARDAR O RECIBO DE COMPRA
O recibo é o registo permanente da compra que fez. Deve ser guardado
num local seguro, para ser apresentado em questões relacionadas com
o seguro ou para quando tiver de contactar a Marantz.
IMPORTANTE
Quando procurar assisténcia técnica ao abrigo da garantia, é da
responsabilidade do consumidor estabelecer a prova e data de compra.
O recibe é prova adequada.
SVENSKA
GARANTI
För information om garantin, kontakta Marantz lokalagent.
SPAR KVITTOT
Kvittot är ett inköpsbevis på en värdefull vara. Det skall förvaras säkert
och hänvisas till vid försäkringsfall eller vidkorrespondens mod Marantz.
VIKTIGT
Fö att garantin skall gälla är det kundens sak att framställa bevis och
datum om köpet. Kvitto eller faktura är tillräokligt bevis fö detta.
GARANTIE
Voor inlichtingen omtrent garantie dient u zich tot uw plaatselijke Marantz.
UW KWITANTIE, KASSABON E.D. BEWAREN
Uw kwitantie, kassabon e.d. vormen uw bewijs van aankoop van een
waardevol artikel en dienen op een veilige plaats bewaard te worden
voor evt, verwijzing bijv, in verbend met verzekering of bij
correspondentie met Marantz.
BELANGRIJK
Bij een evt, beroep op de garantie is het de verantwoordelijkheid van
de consument een gedateerd bewijs van aankoop te tonen. Uw
kassabon of factuurzijn voldoende bewijs.
ESPAÑOL
GARANTIA
Para obtener información acerca de la garantia póngase en contacto
con su distribuidor Marantz.
GUARDE SU RECIBO DE COMPRA
Su recibo de compra es su prueba permanente de haber adquirido un
aparato de valor, Este recibo deberá guardarlo en un lugar seguro y
utilizarlo como referencia cuando tenga que hacer uso del seguro o se
ponga en contacto con Marantz.
IMPORTANTE
Cuando solicite el servicio otorgado por la garantia el usuario tiene la
responsabilidad de demonstrar cuá¥do efectuó la compra. En este caso,
su recibo de compra será la prueba apropiada.
DANSK
GARANTI
Henvend dem til Deres MARANTZ-forhandler angående inrformation om
garantien.
GEM DERES KVITTERING
Deres købskvittering er Deres varige bevis på et dyrt køb. Den bør
gemmes godt og anvendes som bevis, hvis De vil tegne en forsikring,
eller hvis De kommunikerer med Marantz.
VIGTIGT
Det påhviler forbrugeren at skaffe bevis for købet og købsdatoen, hvis
han eller hun ønsker garantiservice. Deres købskvittering eller faktura
er et fuldgyldigt bevis herpå.
Page 3
FOREWORD
This section must be read before any connection is made to the
mains supply.
WARNINGS
Do not expose the equipment to rain or moisture.
Do not remove the cover from the equipment.
Do not insert anything into the equipment through the
ventilation holes.
Do not handle the mains lead with wet hands.
Do not cover the ventilation with any items such as tablecloths,
newspapers,curtains,etc.
No naked flame sources,such as lighted candles,should be
placed on the equipment.
When disposing of used batteries, please comply with
governmental regulations or environmental public instruction’s
rules that apply in your country or area.
CE marking
The SA-17S1 conforms with the EMC directive and lowvoltage directive.
EQUIPMENT MAINS WORKING SETTING
Your Marantz product has been prepared to comply with the
household power and safety requirements that exist in your area.
This product can be powered by 230 V AC only.
COPYRIGHT
Recording and playback of any material may require consent. For
further information refer to the following:
— Copyright Act 1956
— Dramatic and Musical Performers Act 1958
— Performers Protection Acts 1963 and 1972
— any subsequent statutory enactments and orders
INTRODUCTION
Thank you for selecting the Marantz SA-17S1 Super Audio CD Player
for your A / V system.
This Player incorporates a number of features designed to enhance
the listening of your favorite audio sources.
Please read these operating instructions carefully. We recommend
that you read the entire user guide before you attempt to connect or
operate the player.
After you have reviewed the contents of this manual,we suggest that
you make all system connections before you attempt to operate the
unit.
Refer to the figures on the pages at the back of this user’s guide. The
callout numbers on the figures correspond to those found in the text.
INSTALLATION
Remember the following important points when installing the player:
• Do not expose the player to rain or moisture, as this may cause
damage to the player.
• All players produce some heat during operation and this heat must
be allowed to disperes freely. Do not close any ventilation openings
and insure that there is adequate ventilation space behind, beside
and above the player.
• Prevent extra heat from reaching the unit. Never put the player in the
full glare of the sun or near a heat source.
PRECAUTIONS
The following precautions should be taken when operating the equipment.
GENERAL PRECAUTIONS
When installing the equipment ensure that:
– the ventilation holes are not covered.
– air is allowed to circulate freely around the equipment.
– it is placed on a vibration-free surface.
– it will not be exposed to excessive heat, cold, moisture or dust.
– it will not be exposed to direct sunlight.
– it will not be exposed to electrostatic discharges.
In addition, never place heavy objects on the equipment.
If a foreign object or water does enter the equipment, contact your
nearest dealer or service center.
Do not pull out the plug by pulling on the mains lead; grasp the plug.
It is advisable when leaving the house for an extended period, or
during a thunderstorm, to disconnect the equipment from the mains
supply.
ENGLISH
PRECAUTIONS IN CONNECTION
• Be sure to unplug the power cable from the AC outlet or turn off
the POWER switch before proceeding with any connection.
• Connect one cable at a time observing the “input” and “output”.
This will avoid any cross connection between channels and signal
inputs and outputs.
• Insert the plugs securely. Incomplete connection may result in
noise.
• Prior to connecting other audio and video equipment to the SA17S1, please read their owner’s manuals.
1
Page 4

TABLE OF CONTENTS
ENGLISH
BEFORE USING .......................................................................................................................... 3
Notes about the discs .......................................................................................................... 3
Inappropriate places for installation ..................................................................................... 3
Do not place objects on top ................................................................................................. 3
Cautions on handling power cord ........................................................................................ 3
Do not attempt repairs yourself............................................................................................ 4
Precautions .......................................................................................................................... 4
Cautions on handling batteries ............................................................................................ 4
INTRODUCTION.......................................................................................................................... 5
About super audio ...............................................................................................................5
Playing CD-RW discs .......................................................................................................... 5
Applicable Discs to the Unit ................................................................................................. 5
FEATURES .................................................................................................................................. 6
ACCESSORIES ........................................................................................................................... 7
Checking the accessories .................................................................................................... 7
Usage of REMOTE CONTROL UNIT .................................................................................. 7
NAMES AND FUNCTIONS .......................................................................................................... 8
Front panel........................................................................................................................... 8
Display ................................................................................................................................. 9
Remote control unit............................................................................................................ 10
Rear panel ..........................................................................................................................11
CONNECTIONS......................................................................................................................... 12
Connecting the player to a 2-channel stereo amplifier or AV amplifier .............................. 12
Connecting the player to an analog multi-channel amplifier or AV amplifier ...................... 13
Connections when the phantom center function is to be used .......................................... 14
Installing the SACD multi-channel audio speakers ............................................................ 15
OPERATION .............................................................................................................................. 16
Preparing for disc play ....................................................................................................... 16
Disc play ............................................................................................................................ 16
Switching Sound Mode (SACD)......................................................................................... 17
Start sound mode .............................................................................................................. 17
Phantom center function .................................................................................................... 17
Playing your favorite tracks of a disc ................................................................................. 18
Repeated disc play (Repeat Play) ..................................................................................... 18
Playing tracks in a random sequence (Random Play)....................................................... 19
Playing tracks in a specific sequence (Program Play) ....................................................... 19
Searching your favorite tracks (AMS (Automatic Music Scan) Play) ................................. 20
About TEXT Information Display ....................................................................................... 21
About TEXT ....................................................................................................................... 21
Timer Play.......................................................................................................................... 22
Filter Switch ....................................................................................................................... 22
TROUBLE SHOOTING .............................................................................................................. 23
2
Page 5
BEFORE USING
Notes about the discs
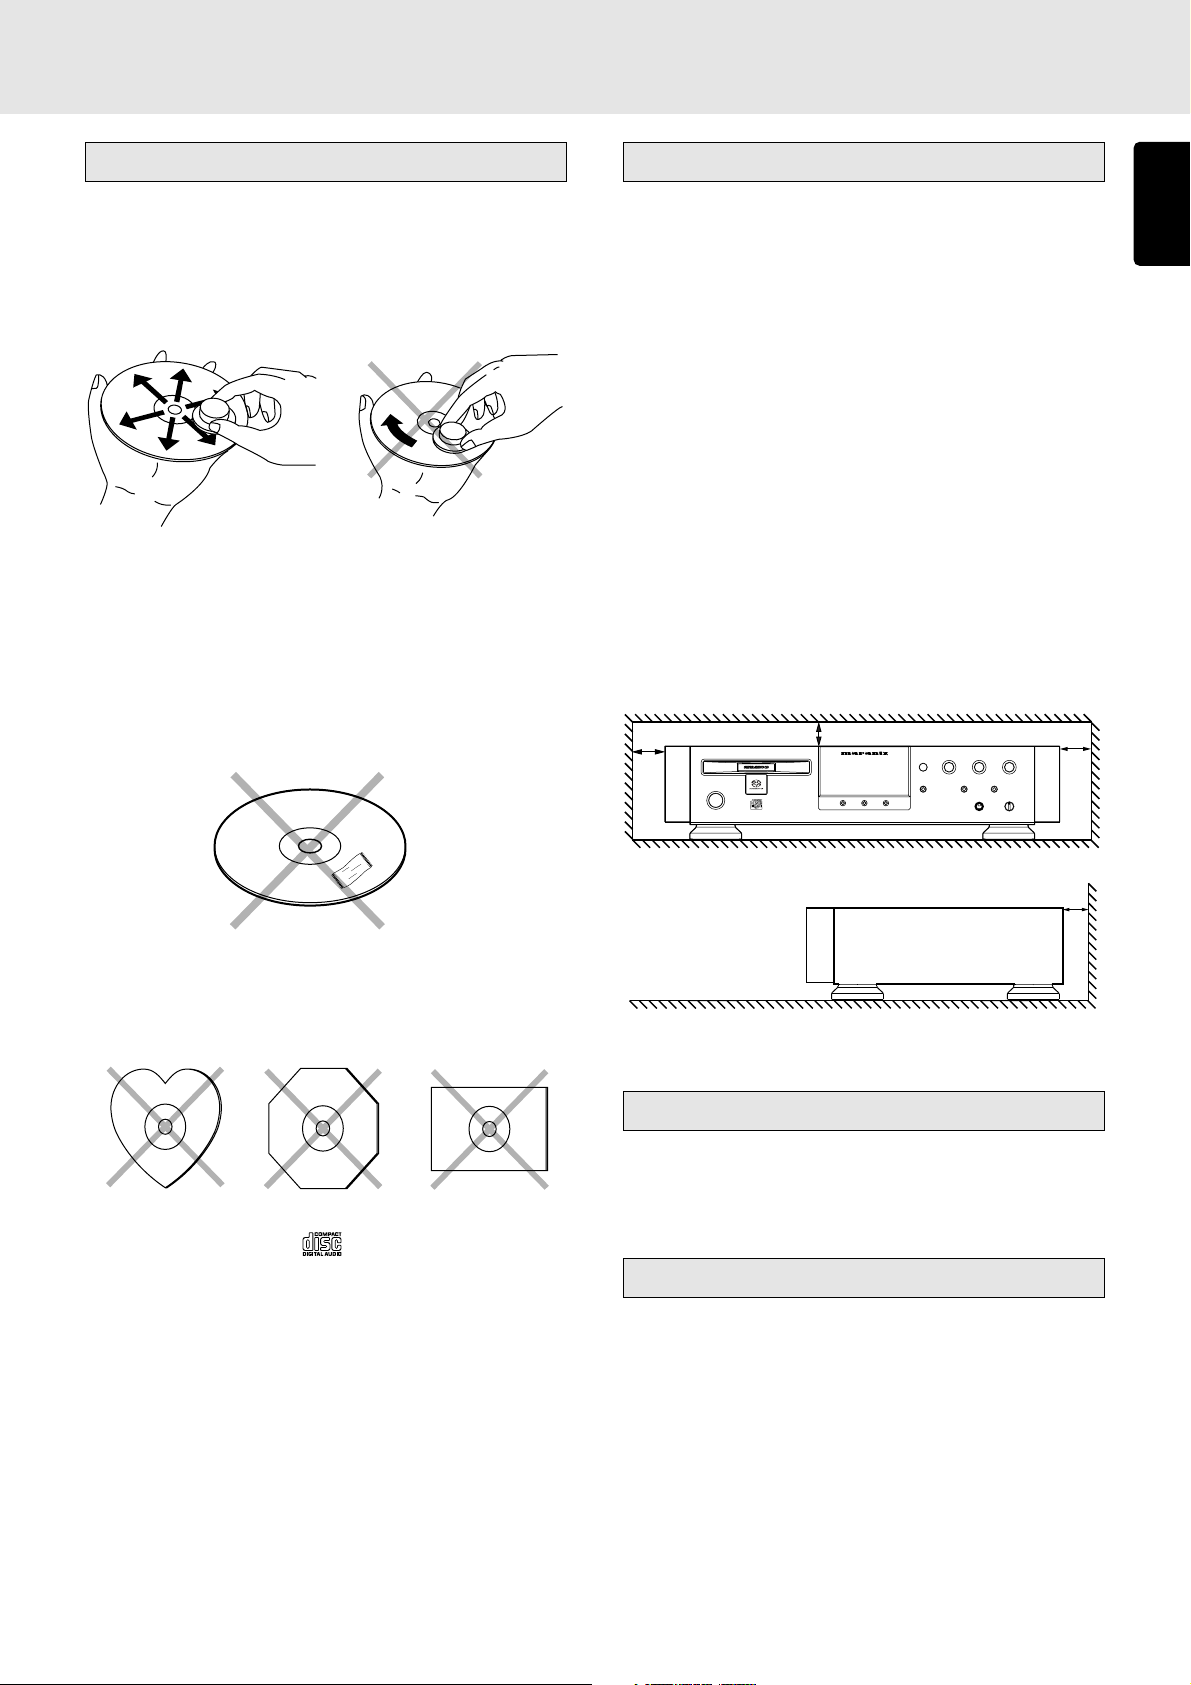
* Handle the discs carefully so as not to scratch their
surfaces.
* Keep the surfaces of the discs clean at all times.
When cleaning the surfaces of discs, always be sure to use
the special cleaner and wipe the surfaces in the directions
shown in the figure below.
• Wipe the surface radially
from the center.
* Do not attach pieces of paper or stickers to the label
surfaces of the discs.
When a disc has a piece of plastic tape or rental CD label
with paste protruding from the edge or when a disc still bears
traces of sticky tape or adhesive labels, do not attempt to
play it. If such a disc is played on the CD player, you may
find that you cannot remove it or that some other kind of
malfunctioning may occur.
• Do not wipe the surface in
the circumferential direction.
Inappropriate places for installation
To keep your player in perfect working order for the longest
possible time, avoid installing the player in the following
locations.
• Wherever it will be exposed to direct sunlight
• Wherever it will be close to a heater or other heat-radiating
appliance
• Wherever the humidity is high or ventilation is poor
• Wherever it is very dusty
• Wherever it will be subject to vibration
• On top of a rickety stand or in an unstable location which
is tilted at an angle
• On top of an amplifier or other component which dissipates
a great deal of heat
• In an audio rack with little space at the top and bottom or
other location where the heat dissipation will be obstructed
To ensure proper heat dissipation, install the player while
leaving clearances between the player and wall or other
components, as shown in the figure below.
10 cm or more
10 cm or more
10 cm or more
ENGLISH
* Do not use discs which come in special shapes.
Do not attempt to play heart-shaped or octagonal discs or
discs with any other special shapes. You may find that you
cannot remove them or that some other kind of
malfunctioning may occur in the player.
* Use discs which satisfy the CD standards such as those
with the “CD logo” or “
surfaces.
No guarantees are made for playback if discs which do not
satisfy the appropriate CD standards are used.
Similarly, no guarantees are made for their sound quality
even if it is possible to play such discs.
* To protect your discs from damage, avoid placing them
in the following locations.
• Where they will be exposed to direct sunlight or where they
will be close to a heater or other heat-radiating appliance
• Where the humidity level is high or it is very dusty
• Near a window or other such location where they may be
exposed to rain
* Get into the habit of putting the discs back in their cases
after use.
” mark on their disc label
5 cm or more
Do not place objects on top
• Refrain from placing any objects on top of the player.
Cautions on handling power cord
• Do not touch the power cord with wet hands.
• When disconnecting the power cord, always make sure
that you take hold of the plug. Yanking out or bending the
cord can damage it and/or cause electric shocks or a fire.
• Get into the habit of disconnecting the power plug before
leaving home.
3
Page 6

BEFORE USING
ENGLISH
Do not attempt repairs yourself
• Refrain from lubricating the player: doing so can cause
malfunctioning.
• Only qualified engineers with specialized expertise are
authorized to repair the pick-up and parts inside the player.
Precautions
• In winter, droplets of water form on the insides of the
windows of a heated room: this is called condensation.
This player uses an optical lens, so the condensation may
form in the following cases.
- In a room immediately after the heating has been turned
on
- In a room where the humidity level is high
- When the player has been suddenly brought from a cold
location into a warm room
Since, in cases like this, the track numbers may not be
read and the player is prevented from operating properly,
wait about 30 minutes, and then operate the player.
• This player may cause interference on a tuner or TV set. If
this is the case, place it further away from the tuner or TV
set.
• Compact discs have much less noise than analog records
and hardly any noise is heard before play starts. Bear in
mind, therefore, that if the volume control on the amplifier
is set too high, you will risk damaging other audio
components.
• This player is designed to play music CDs only. It cannot
play CD-ROMs used with personal computers, game CDs,
video CDs or DVDs (video/audio).
Cautions on handling batteries
Misuse of the batteries can result in electrolyte leakage,
rupturing, corrosion, etc.
Bear in mind the following points when using batteries.
• Remove the batteries from the remote control unit if the
unit is not going to be used for a prolonged period (a month
or more).
• Do not use an old battery together with a new one.
• Insert the batteries while ensuring that their
are properly aligned with the corresponding markings on
the remote control unit.
• Batteries with the same shape may have different voltages.
Do not use different types of batteries together.
• If electrolyte has leaked, thoroughly wipe the inside of the
battery compartment, and then insert new batteries.
• When batteries which are no longer required are to be
discarded, follow the directions (regulations) laid down by
the local authorities in the area concerned for their disposal.
and poles
4
Page 7
INTRODUCTION
About super audio
The Super Audio standard is based on Direct Stream Digital
(DSD) technology. This new direct-stream digital format
comprises a 1-bit system that has a digital sampling frequency
that is 64 times higher than that of conventional audio CD.
The results are spectacular: a frequency response of over
50k Hz and a 120 dB dynamic range over the entire audible
spectrum. Mixed with as many of the original frequencies as
possible, the audio information audible for human ears sounds
much more natural.
All audible frequencies are, after all, embedded in the
frequency range as emitted by the sound source. A better
reproduction does not exist! For the first time your ears will
relive reality.
The latest information on the software and other aspects of
SACD can be accessed over the Internet.
http://www.super-audiocd.com
Playing CD-RW discs
This unit can play back the CD-RW (ReWritable) discs as well
as ordinary music CD and CD-R (Recordable) discs.
• The CD-R and CD-RW discs should contain properlyrecorded TOC information so that they can be played back.
With the CD recorder system, writing the TOC information
in a disc is referred to as finalizing the disc. A disc cannot
be recognized as a CD disc and played back unless it has
been finalized properly. For details, please read the
instruction manual provided with a CD recorder.
* TOC stands for Table Of Contents and contains
information such as the total number of tracks and total
playing time of the disc.
• This unit can play only the discs recorded in the CD-DA
format designed for music reproduction. Do not attempt to
play a disc containing other data, such as a CD-ROM for
PCs, on this unit.
• As the playback of a CD-RW disc necessitates partial
change of the player setup, it may take longer time for
reading the TOC information than when a music CD or CDR disc is played.
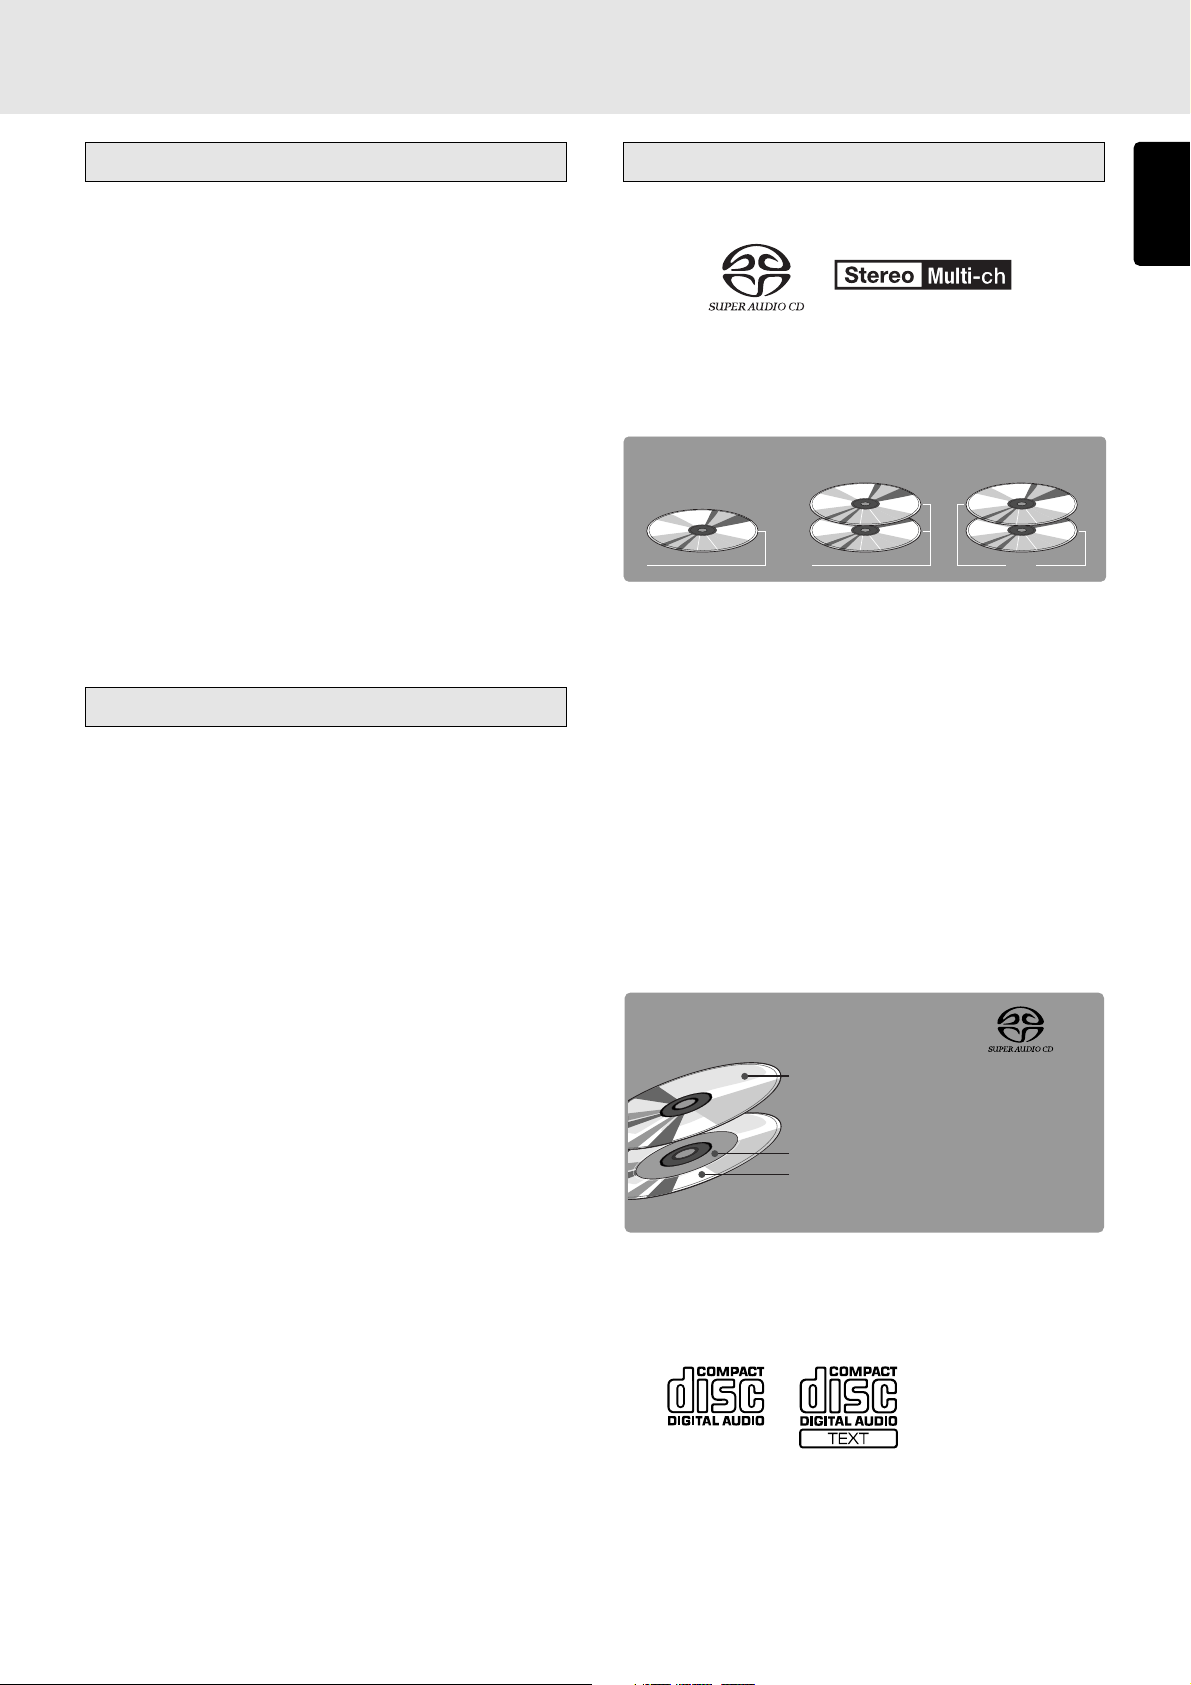
Applicable Discs to the Unit
1. Super Audio CD
There are three types of Super Audio CDs.
- Single-layer Disc
- Dual-layer Disc
- Hybrid-layer Disc
SACD Disc Types
Single-layer Disc
HD layer HD layer CD layer HD layer
And each type may contain two areas of recorded information.
- High quality stereo area
- High quality multi-channel area
• Single Layer Disc
It can contain both high quality stereo area and high quality
multi-channel area information.
• Dual Layer Disc
It can contain both high quality stereo area and high quality
multi-channel area information. And a double amount of
information can be stored on the disc thanks to the second
layer.
• Hybrid Layer Disc
The hybrid disc may contain not only both information areas
but also a second, standard CD layer, making it playable
on standard CD players.
Hybrid SACD-Disc
The number of tracks recorded may vary per layer. It will be
shown on the display window of the unit.
Dual-layer Disc
1 CD layer that plays on any of your
existing CD players
High-Density layer containing:
2 - High-Quality DSD Stereo
3 - High-Quality DSD Multi-channel
Hybrid-layer Disc
ENGLISH
2. Audio CD (CDDA)
Audio CDs contain music tracks only.
5
Page 8

FEATURES
ENGLISH
Super Audio CD multi-channel player
“Reproducing the acoustics of the concert hall in your own
room”
The Super Audio CD (SACD) multi-channel format is the
fulfillment of what audiophiles have dreamed of for many years.
Through a multiple number of speakers placed around the
listener, it enables sound to be reproduced with the authentic
acoustics of the hall or performers’ stage with all the
impressions of its real-life dimensions.
“Conjuring up the acoustics of a concert hall within the
confines of the listening room”
The <SA-17S1> SACD multi-channel player enables you to
experience through the very fibers of your body the excellent
quality of the SACD multi-channel format.
Multi-channel audio circuits, complete with
current feedback HDAM and structured
identically for all 6 channels
Current feedback-type HDAMs (high-speed voltage
amplification modules which are the result of yet another
Marantz original breakthrough) are used for all six audio output
channels. The discretely configured current feedback
amplifier is also employed in the filter amplifier to help ensure
that the vast amounts of high-density music information
recorded on the SACDs are reproduced faithfully by wideband/high-speed circuit technology.
Copper plates have been added to the bases of the multichannel output connectors to achieve zero ground impedance
between the connectors.
As a result, the ground potential of all six channels is fixed in
one point, and authentic multi-channel acoustics are spirited
up with nothing withheld in this department.
SACD-DACs made by Cirrus Logic, Inc. featured
to ensure that the SACD and CD sound is
reproduced with a high sound quality
The player incorporates three CS4397 D/A converters (made
by Cirrus Logic, Inc.) developed for use with SACDs and CDs
to achieve full drive for all six channels.
• When an SACD is played
The DSD signals recorded on the SACD are directly
connected to the multi-element switched capacitors (24
elements) with low jitter characteristics in the last stage of
the CS4397 SACD D/A converters, and they are converted
into extremely accurate analog signals.
• When a conventional CD is played
The PCM signals recorded on the CD are processed by
128x oversampling inside the CS4397 SACD D/A
converters and, by means of a combination of the dynamic
element matching (DEM) and multi-element switched
capacitors, they are converted into very accurate analog
signals with a high linearity.
Mechanism module exclusively designed
for SACD/CD audio
The mechanism module developed by Marantz uses a circuit
board to reduce the noise generated from the digital circuits
to the lowest level possible, and its stable reproduction
capability ensures that SACDs and CDs are played with a
high sound quality.
Power supply circuit for high-quality SACD
play
•“Super ring” (toroidal transformer) used
The player features a powerful power supply section that
contains a “super ring” (toroidal transformer) with a high
efficiency and minimal leakage flux. Also featured is a
special power transformer for the display tube to yield a
stable power supply and shut out noise.
• Original audio-use capacitors adopted
Capacitors specially designed for audio applications with
a high sound quality and large capacity are used in the
power supply block. They were created through a process
of repeated prototype production and test listening
sessions.
They help to create the “Marantz sound” which is soft,
sophisticated and full of acoustic ambience.
Phantom center function makes its debut
If, when you intend to sit back and enjoy SACD multi-channel
discs, you cannot find a place for the center speaker because
of the conditions prevailing in the operating environment, the
sound field at the front will be extended to the left and right
and feel unnatural. If the player’s “phantom center function”
is used in a situation like this, the center channel sound will
be distributed to the front left and right channels, resulting in
the synthesis of a virtual center channel. In other words, the
function makes it possible to recreate a convincing sound
field that has almost the same superb acoustics as what would
be reproduced using the center speaker as well.
Headphone output with high sound quality
The headphone output circuit uses a discrete configuration
that incorporates a high-speed buffer amplifier with a high
drive capability. As a result, you can enjoy the pure sound
delivered by SACDs even through your headphones.
LPF (low-pass filter) selector switch provided
Using this LPF switch provided on the rear panel, you can
now select either the “CUSTOM” setting (wide-band play for
all channels) that fits the bill when listening to sound
reproduced by a system that supports SACDs or the
“STANDARD” setting when listening to the sound reproduced
by a conventional audio system.
Double-layered chassis
The chassis is made of copper-plated steel sheets, and 3.2
mm thick steel sheets (weighing 3.2 kg) are used for the
bottom chassis with its double-layered construction. It anchors
the SACD mechanism firmly in place and eliminates all
vibration. It helps to reproduce a clear sound free from
indistinctness.
DISPLAY OFF function
This function slashes the amount of noise emanating from the
fluorescent display tube and ensures that it does not affect
the reproduced sound.
SACD/CD TEXT display function
This displays the TEXT information that is provided on SACD
and CD discs.
6
Page 9
ACCESSORIES
Checking the accessories
After opening the cover of the packing box, check that the
following accessories are included.
• Remote control unit (RC-17SAS1)
• AAA (R03) Batteries
• Power Cord
• Audio Cable (1 meter long) 3Pairs
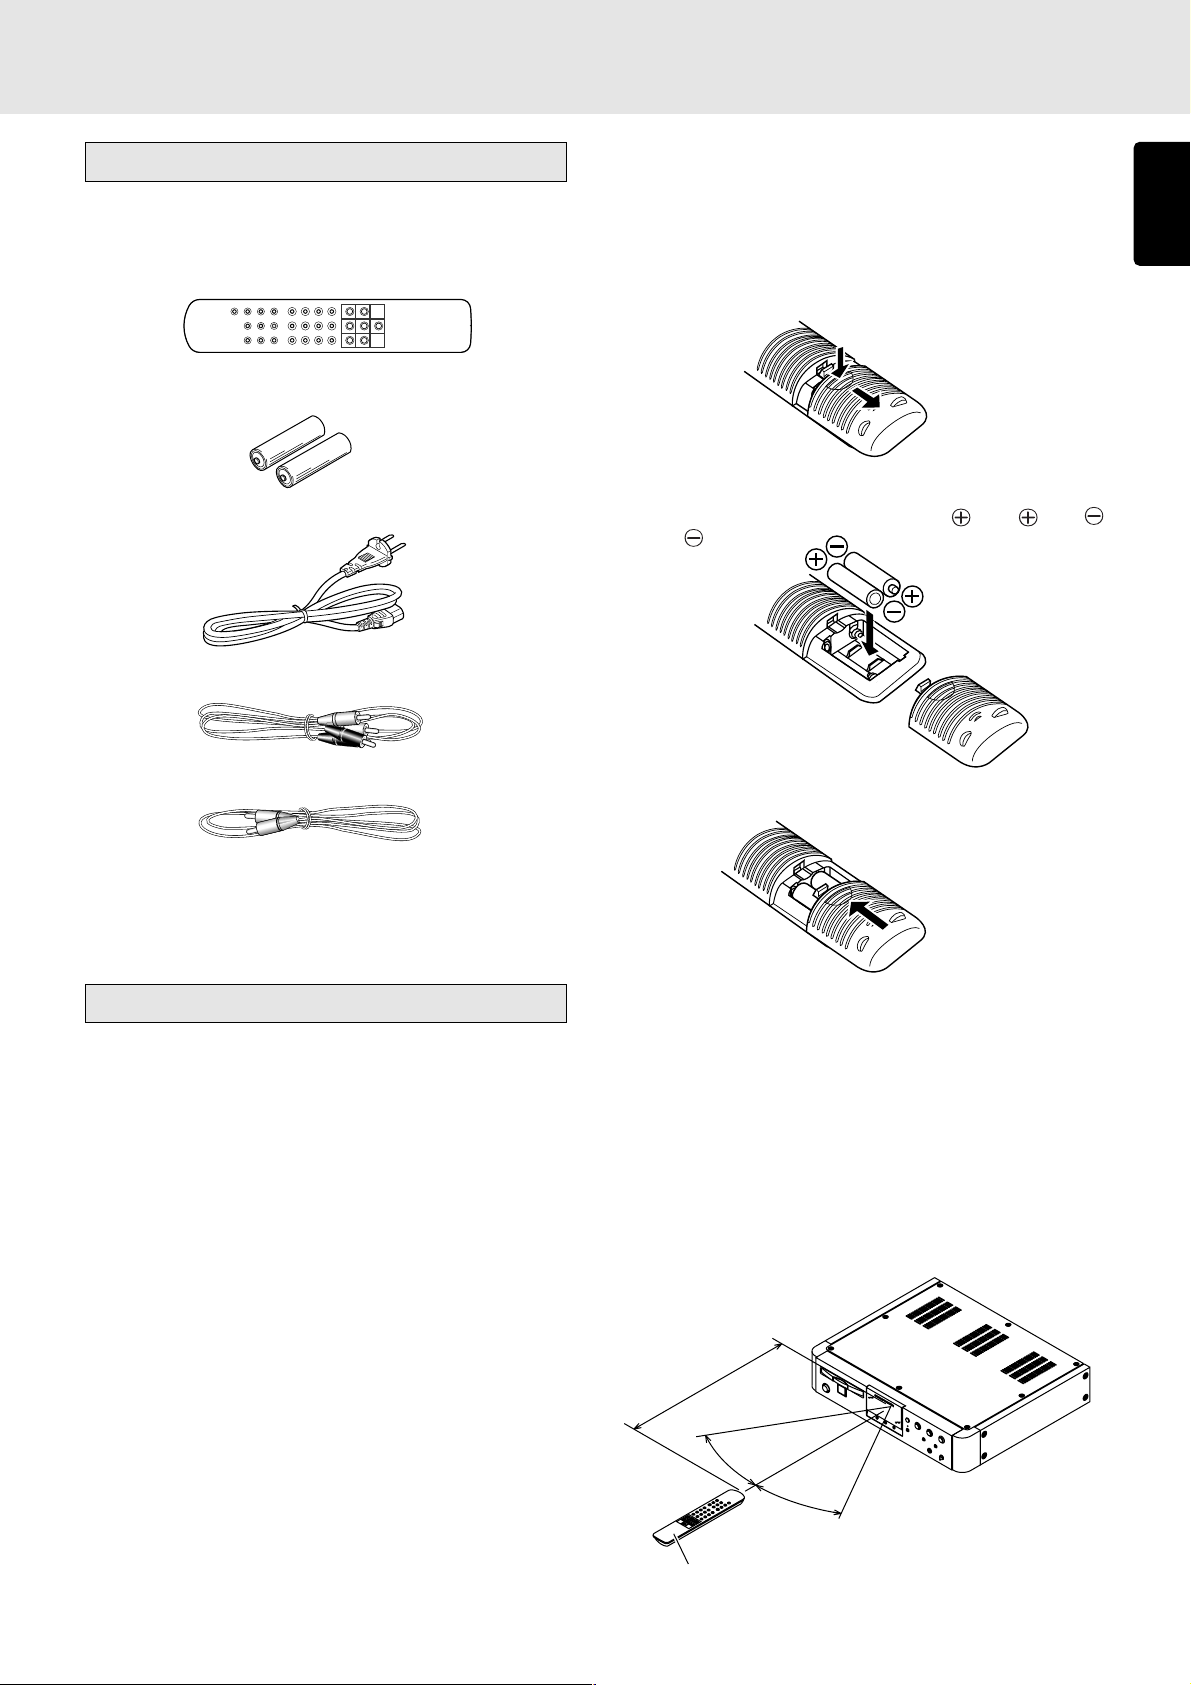
• Loading batteries
Before using the supplied remote control unit for the first
time, load the batteries in the remote control unit. The
batteries provided are used to verify the operations of the
remote control unit only.
1 Remove the battery cover which is found on the back side
of the remote control unit.
2 Load the two new size “AAA” batteries inside the battery
compartment while taking care to align their polarities
correctly with the polarity markings (
with ).
with and
ENGLISH
• Remote control connecting cable (90 cm long)
• User Guide
Usage of REMOTE CONTROL UNIT
• Precautions
- Do not allow direct sunlight, an inverter fluorescent light
or other strong source of light to shine onto the player’s
infrared signal reception window (remote sensor).
Otherwise, the operation of the remote control unit may
be disabled.
- Bear in mind that operating the remote control unit may
cause other devices operated by infrared rays to be
operated by mistake.
- The remote control unit cannot be operated if the space
between the controller and the player’s remote sensor is
obstructed.
- Do not place any objects on top of the remote control
unit. Doing so may cause one or more buttons to be
held down which will cause the batteries to run down.
3 Push the cover on the back side in the direction of the
arrow to close.
• Operational range
Operate the remote control unit (RC-17SAS1) within a
distance of approx. 5 m from the infrared signal reception
window (remote sensor) on the front of the SACD player.
Remote control operation may not be possible if the remote
control unit’s transmitter is not pointing in the direction of
the remote sensor or if there is an obstruction between the
transmitter and the remote sensor.
Remote control operating range
Super Audio CD Player
(SA-17S1)
Approx. 5m
30°
30°
Remote Control Unit (RC-17SAS1)
7
Page 10

NAMES AND FUNCTIONS
ENGLISH
Front panel
POWER
ON/OFF
z POWER ON/OFF switch
This switch is used to turn the power ON and OFF. When
it is pressed, the display window lights up, and the power
comes on. When it is pressed again, the display window
is extinguished, and the power goes off.
x Disc tray
The disc to be played is placed on the tray.
c SOUND MODE button
This button is used to select “SACD stereo,” “SACD multichannel” or “CD” (if discs are supported) as the Super
Audio CD sound mode. (See page 17)
v TIME button
This button is used to change the player’s display from
“text information” to “time information” while a disc that
supports TEXT is in use. It is also pressed to switch the
time display of the disc being played. (See page 16)
SUPER AUDIO CD PLAYER SA-17S1
SOUND MODE
TIME
PAUSE
LEVEL
MIN MAX
PHANTOM-C
OPEN/CLOSE
DISPLAY
PLAY
STOP
PHONES
. 4/1, ¡/¢ (Track Skip/Search buttons)
These buttons can be used as both track skip and track
search buttons. (The buttons on the main unit only.)
44
11
4/
1 : When this button is pressed, the unit goes
44
11
back to the beginning of the current track. If
the button is pressed more times, the track
being played is skipped back. When this
button is held down, tracks are searched
backward (Fast Rewind).
¡¡
¢¢
¡/
¢ : Each time this button is pressed, the track
¡¡
¢¢
being played is skipped forward. When this
button is held down, tracks are searched
forward (Fast Forward).
In program play, Fast Forward and Fast Rewind can be
done in the playing track only.
⁄0 8 PAUSE button
This button is used to pause playback. If pressed again,
the unit returns to playback.
b PHANTOM-C (phantom center) button
This button is used to select the phantom center function.
(See page 17)
n DISPLAY button and indicator
This button is used to extinguish the display window
(DISPLAY OFF). When it is pressed, the display window
is extinguished, and the DISPLAY indicator lights. When
it is pressed again, the display window lights, and the
DISPLAY indicator goes off.
m PHONES (headphone) jack
The headphones are connected to this jack. Use
headphones with a standard plug.
* In the SACD multi-channel mode, the front L and R signals
are output.
, LEVEL (headphone volume) control
This control is used to adjust the headphone volume. Turn
it clockwise to increase the headphone volume.
⁄1 7 STOP button
This button is used to stop playback. Also this button is
used to clear all programs.
⁄2 3 PLAY button
This button is used to start playback.
⁄3 0 OPEN/CLOSE button
This button is used to open the tray. Put on a disk label
side up. Press the button again to close the tray.
⁄4 Infrared sensor
The infrared control signals emitted from the remote control
unit are sensed here.
8
Page 11

NAMES AND FUNCTIONS
Display
ENGLISH
TIMER
DISC
TEXT
RNDM
PROG A — B
TRK
12 34 56 78 910 1112 1314 1516 1718 1920
a Main display
The time display and text information of the disc to be
played as well as the setting menus and other displays
appear on the main display.
b TEXT indicator
This lights when a disc supporting TEXT has been inserted.
c 1-20, (music calendar)
The number of tracks recorded on the disc to be played,
the number of remaining tracks to be played, and the
number of tracks programmed by program play appear
here. “
recorded on the disc.
” light when 21 or more tracks have been
d DISC indicator
This flashes when the disc’s table of contents (TOC) is
being read.
RPT
1
TTL
k 1 (1-track repeat) indicator
This lights during 1-track repeat play.
88
l
8 (pause) indicator
88
This lights when play is paused (temporarily stopped).
m TTL (total time) indicator
When the total remaining time or the total program time is
displayed, this lights above the display.
33
n
3 (play) indicator
33
This lights during disc play.
o TIME indicator
This lights when the elapsed time or other time is displayed.
p Disc indicator
This indicates the type of disc on the disc tray.
TIME
CD
SACD
2CH
MULTI
e TIMER indicator
This lights when timer play has been set.
f RNDM (random) indicator
This lights during random play.
g PROG (program) indicator
This lights during program play.
h TRK (track) indicator
This lights above the display of the track number now
playing, for instance.
i A-B (A-B repeat) indicator
This lights during A-B repeat play.
j RPT (repeat) indicator
This lights during repeat play.
9
Page 12

NAMES AND FUNCTIONS
ENGLISH
Remote control unit
OPEN/CLOSE
SOUND
DISPLAY
MODE
RANDOM
A-B
REPEAT
SCROLL
TEXTTIME
/RECALL
CANCEL0PROGRAM
i TIME button
This button is used to change the player’s display from
“text display” to “time display” while a disc that supports
TEXT is in use. It is also pressed to switch the time display
of the disc being played. (See page 16)
o TEXT button
AMS
321
654
987
When a disc with text is being played, this button changes
information displayed from time information to text
information.
When a disc without text information is being played, “No
Text” will be displayed.
!0 SCROLL/RECALL button
This button is used to scroll text while displaying text
information in a disc with text.
Also, this button is to check programmed tracks for
program play. (See page 20)
!1 Number (0-9) buttons
These buttons are used to specify the numbers of the
tracks which are to be played.
!2 PROGRAM button
This button is used to program play. (See page 19)
q OPEN/CLOSE button
This button is used to open or close the disc tray.
w DISPLAY button
This button is used to turn the display window on or off
(DISPLAY OFF).
e SOUND MODE button
This button is used to select “SACD stereo,” “SACD multichannel” or “CD” (if discs are supported) as the Super
Audio CD sound mode. (See page 17)
r AMS (auto music scan) button
This button is used to play just the first 10 seconds of
each track on the disc in sequence starting with track 1.
(AMS play) (See page 20)
t REPEAT button
This button is used to repeatedly play one track or all the
tracks on the disc. (Repeat play) (See page 18)
y A-B (A-B repeat) button
This button is used to specify the start point (A) and end
point (B) to repeatedly play the desired part specified by
these two points. (A-B repeat play) (See page 18)
!3 CANCEL button
This button is used to cancel a programmed track. (See
page 20)
!4 3 PLAY button
This button is used to start playback.
!5 4, ¢ (Track skip buttons)
4 : When this button is pressed, the unit goes back
to the beginning of the current track. If the button
is pressed more times, the track being played is
skipped back.
¢ : Each time this button is pressed, the track being
played is skipped forward.
!6 8 PAUSE button
This button is used to pause playback. If pressed again,
the unit returns to playback.
!7 1, ¡ (Search buttons)
1 : While this button is pressed during playback,
tracks are searched backward.
¡ : While this button is pressed during playback,
tracks are searched forward.
In program play, Fast Forward and Fast Rewind can be
done in the playing track only.
u RANDOM button
This button is used to play the tracks on a disc in a random
sequence. (Random play) (See page 19)
!8 7 STOP button
This button is used to stop playback. Also this button is
used to clear all programs.
10
Page 13

NAMES AND FUNCTIONS
Rear panel
MULTI CHANNEL AUDIO OUT
FILTER
STANDARD
CUSTOM
REMOTE
CONTROL
EXTERNAL
INTERNAL
DIGITAL
AUDIO OUT
ENGLISH
IN
OUT
AC IN
STEREO
L
FRONT
R
CENTER
SUB
WOOFER
SURROUND
RL
A MULTI CHANNEL AUDIO OUT (analog
output) connectors
STEREO FRONT L/R
CENTER : Output connector for center channel
SUB WOOFER : Output connector for sub-woofer
SURROUND L/R : Output connectors for surround
: Output connectors for front channel
channel
channel
B DIGITAL AUDIO OUT COAX. (coaxial digital
output) connector
During play, the CD signal in digital format are output from
this coaxial output connector.
Note:
No signals are output during Super Audio CD play.
C DIGITAL AUDIO OUT OPT. (optical digital
output) connector
During play, the CD signal in digital format are output from
this optical output connector.
Note:
No signals are output during Super Audio CD play.
D FILTER STANDARD/CUSTOM switch
The switch is used to select the setting that suits the
amplifiers and speakers used. For further details, refer to
“Filter Switch” on page 22.
Note:
Turn the power off before setting this switch. Setting the
switch during play may cause noise to be generated.
OPT.
COAX.
E REMOTE CONTROL EXTERNAL/INTERNAL
switch
Set this switch to INTERNAL (factory setting) when the
player is to be used on its own.
Set it to EXTERNAL when connecting the remote control
connectors on the player and on a Marantz AV component
(equipped with an infrared sensor supporting RC-5*) using
the accessory remote control connecting cables and using
several components as a system.
* “RC-5” refers to the remote control signal system used
as a standard feature on the component made by
Marantz.
F REMOTE CONTROL IN, OUT (input and
output) connectors
When the remote control connectors on the player and on
a Marantz AV component are connected using the
accessory remote control connecting cables, the
components can be operated as a system by remote
control.
• When connecting to a component which is equipped
with remote control connectors, the player’s REMOTE
CONTROL IN connector must always be connected to
the REMOTE CONTROL OUT connector on the other
component to be connected.
• When connecting a component which is not equipped
with an infrared remote sensor, this component must
always be connected to the player’s REMOTE CONTROL
OUT connector.
G Power socket
Use the accessory power cable to connect the player to a
household AC outlet.
11
Page 14

CONNECTIONS
The method used to connect the player differs depending on the amplifier or AV amplifier used. In order to ensure that the
ENGLISH
components are connected properly, refer to the operating instructions of the components which will be connected.
Note:
When making the connections, push the plugs on the ends of the connecting cables firmly into place. Loose connections cause
noise.
Connecting the player to a 2-channel stereo amplifier or AV amplifier
• Performing the analog connections
Use the accessory audio connecting cable q to connect the
player’s MULTI CHANNEL AUDIO OUT (analog output)
STEREO FRONT L and R connectors to the corresponding
audio input connectors (such as the CD input connectors) on
the stereo or AV amplifier to be used.
To listen to Super Audio CDs with these connections, set the
SOUND MODE button to STEREO. (See page 17)
Note:
Do not connect the player’s analog (audio) output connectors
to the PHONO input connectors on the stereo or AV amplifier
to be used.
REMOTE
FILTER
CONTROL
STANDARD
EXTERNAL
CUSTOM
MULTI CHANNEL AUDIO OUT
STEREO
R
L
FRONT
CENTER
SUB
WOOFER
L
SURROUND
INTERNAL
DIGITAL
AUDIO OUT
R
• Performing the digital connections
This player comes with one OPTICAL digital output connector
and one COAXIAL digital output connector.
Using an optical cable w or coaxial cable e available from
an audio store, connect the player to the digital input
connectors on the AV amplifier, D/A converter, CD recorder
or other component.
When a CD recorder or other digital recorder is connected,
you can enjoy digitally recording the signals from CDs.
Notes:
- Digital signals are output only during CD play. No digital
signals are output during Super Audio CD play.
- Do not bend or bundle the optical digital connecting cable.
SA-17S1
AC IN
COAX.
IN
OUT
OPT.
(White)
q
Audio cable
(supplied)
(White)
Stereo amplifier, etc.
(Red)
(Red)
To audio input connectors
w
Optical cable (Optional)
Coaxial cable (Optional)
e
12
Connect these cables to the
digital input connectors on the AV
amplifier, D/A converter, CD
recorder or other component.
: Signal flow
Page 15

CONNECTIONS
Connecting the player to an analog multi-channel amplifier or AV amplifier
This player can play Super Audio CDs which have been recorded in a multi-channel format. Set the SOUND MODE button to
MULTI for multi-channel play. (See page 17)
1 Using the accessory audio cable q, connect the player’s MULTI CHANNEL AUDIO OUT (analog output) STEREO FRONT L
and R connectors to the corresponding input connectors on the amplifier or AV amplifier to be used.
2 Using the accessory audio cable w, connect the player’s MULTI CHANNEL AUDIO OUT (analog output) CENTER and SUB
WOOFER connectors to the corresponding input connectors on the amplifier or AV amplifier to be used.
3 Using the accessory audio cable e, connect the player’s MULTI CHANNEL AUDIO OUT (analog output) SURROUND L and R
connectors to the corresponding input connectors on the amplifier or AV amplifier to be used.
SA-17S1
REMOTE
FILTER
CONTROL
STANDARD
EXTERNAL
CUSTOM
MULTI CHANNEL AUDIO OUT
L
R
STEREO
FRONT
CENTER
SUB
WOOFER
L
SURROUND
INTERNAL
DIGITAL
AUDIO OUT
R
COAX.
IN
OUT
OPT.
AC IN
ENGLISH
(White) (Red) (White) (Red) (White) (Red)
qwe
Audio cables x3 (supplied)
(White) (Red) (White) (Red) (White) (Red)
R
SUB
WOOFER
RL
: Signal flow
L
SURROUND
CENTER
FRONT
Multi-channel input connectors
Analog multi-channel amplifier
or AV amplifier
Front speaker
(Left)
Surround speaker
(Left )
Center
speaker
13
Front speaker
(Right)
Sub woofer
Surround speaker
(Right)
* See page 15 for proper
speaker settings.
Page 16

CONNECTIONS
ENGLISH
Connections when the phantom center function is to be used
Connect the cables (q, w and e) to the corresponding connectors on the analog multi-channel amplifier or AV amplifier.
The phantom center function serves to synthesize in virtual terms the center channel with the front two (left and right) channels
when SACD multi-channel discs recorded with 5 or 6 channels are to be played. To play discs recorded with 4 channels, set the
phantom center function to OFF. (See page 17)
SA-17S1
REMOTE
MULTI CHANNEL AUDIO OUT
L
R
(White)
STEREO
FRONT
CENTER
(Red) (White) (Red) (White) (Red)
SUB
WOOFER
qwe
L
SURROUND
FILTER
STANDARD
CUSTOM
CONTROL
EXTERNAL
INTERNAL
DIGITAL
AUDIO OUT
R
COAX.
IN
OUT
OPT.
Audio cables x3 (supplied)
AC IN
(White) (Red) (White) (Red) (White) (Red)
R
SUB
WOOFER
RL
Front speaker
(Left)
Center
speaker
: Signal flow
L
SURROUND
CENTER
FRONT
Multi-channel input connectors
Analog multi-channel amplifier
or AV amplifier
Front speaker
(Right)
Sub woofer
Surround speaker
(Left )
Surround speaker
(Right)
14
Page 17

CONNECTIONS
Installing the SACD multi-channel audio speakers
In order to enjoy SACD multi-channel sound with the best
possible acoustics, it is recommended that the speaker
systems be laid out in compliance with the ITU-R BS.775-1
recommendation which is a standard formulated by the
International Telecommunication Union (ITU).
SACD multi-channel discs are recorded and mixed in such a
way that they will achieve the optimum effects when the
speaker systems are laid out as per the ITU-R BS.775-1
recommendation.
• On SACD multi-channel discs, the music signals are
basically recorded using 5 channels (or 3, 4 or 6 channels
in some cases). In some instances, however, LFE (for the
sub woofer) is recorded as a sixth channel.
Each disc indicates how many channels have been
recorded on it.
• The basic settings are 3 speakers for front and 2 for back
since multi-channel discs have basically 5 channels
The 2-front, 1-center, and 2-surround speakers should be
set on the circle from the listening point as shown below.
When you use different sizes of speakers, please adjust
the volume balances in your amplifier/surround receiver.
• The location of the sub-woofer in the picture is just to you a
patter of settings. Sub-woofer can be located any place in
your room. (See the users manual of your sub-woofer.)
7 (ITU) International Telecommunication
Union
The ITU is a special organization of the United Nations. It
consists of a number of organs, one of which is the Radio
Broadcasting Section.
ITU-R BS in the recommendation which consists of standards
relating to broadcasting (audio) operations, one of which is
the ITU-R BS.775-1 which governs “multi-channel stereo
sound systems.”
ENGLISH
Front speaker
Rear speaker
(Left Surround)
Sub-woofer
(Left)
approx. 110° approx. 110°
Center
speaker
60°
Reference listening
position
Front speaker
(Right)
Rear speaker
(Right Surround)
15
Page 18

OPERATION
ENGLISH
Preparing for disc play
q Referring to “Connections,” connect the player and
amplifier.
w Connect one end of the power cable supplied to the power
socket on the player’s rear panel.
AC IN
e Connect the other end to the power outlet.
r Set the power switch on the connected amplifier to ON.
t Use the amplifier’s input selector to select the input
connected to the player.
Disc play
STOP
PAUSE
(Exp.:Track 6, Elapsed time 2 min 8 sec)
Number of current track Minutes Seconds
TRK TIME
6 7 8 9 10 1112 1314 15 16 17 18 19 20
Remaining track numbers
* When a SACD/CD hybrid disc (see page 5) is loaded,
SACD layer is automatically played. If you want to play
CD layer, use SOUND MODE button to select CD layer
(see page 17).
How to use the buttons for operations relating to normal play
To stop playback
Press 7 STOP button.
To pause playback
Press 8 PAUSE button.
PAUSE indicator will light and playback is paused at the point
that the button is pressed. To restart playback, press 8 PAUSE
button again or press 3 PLAY button.
OPEN/CLOSE
SOUND
AMS
DISPLAY
MODE
RANDOM
A-B
REPEAT
SCROLL
TEXTTIME
/RECALL
321
654
987
CANCEL0PROGRAM
q Press the POWER switch to turn on the power of the player.
w Press the 0 OPEN/CLOSE button.
The disc tray comes out. Place the disc with its label side
(side with the printed text) facing up on the tray. To play a
single (8 cm) CD, align the disc with the indentation at the
center of the tray when placing it on the tray.
e Press the 0 OPEN/CLOSE button to retract and close the
disc tray.
r Press 3 PLAY button.
Disc type is automatically detected and playback is started.
Track number and track elapsed time(minute, second)
appear on the display.
Playback automatically stops at the end of the final track.
To remove the disc
After stopping play, press the 0 OPEN/CLOSE button. The
disc tray comes out, allowing the disc to be removed. After
removing the disc, press the 0 OPEN/CLOSE button again
to retract and close the disc tray. Be absolutely sure to keep
the disc tray closed when the player is not going to be used.
To change time display
Press TIME button.
Each time TIME button is pressed, display will change in the
following order. “Track elapsed time” → “Track remaining time”
→ “Total remaining time” → “Track elapsed time”.
• Track remaining time
(The remaining playing time from the playing point to
the end of the current track)
“-” is displayed
TRK TIME
1516 1718 1920
• Total remaining time
(The remaining playing time from the playing point to
the end of the last track)
“-” is displayed “TTL (TOTAL) is displayed
TRK TTL TIME
1516 1718 1920
* If TIME button is pressed when a disc with text is played,
time display is given priority and text information will not be
displayed afterward. To see text information, press TEXT
button.
16
Page 19

OPERATION
Switching Sound Mode (SACD)
OPEN/CLOSE
SOUND
AMS
DISPLAY
SUPER AUDIO CD PLAYER SA-17S1
SOUND MODE
PHANTOM-C
TIME
REPEAT
MODE
A-B
TEXTTIME
SOUND MODE
Press SOUND MODE button in stop mode (not playing).
The layer or area currently in is shown on the display. (CD,
SACD STEREO, SACD MULTI)
If SOUND MODE button is pressed again, a selectable layer
or area will be shown. About 2 seconds after the layer or area
will be switched to new one.
* When layer or area is switched, TOC will be read again.
* If a CD disc or SACD disc with stereo area only is loaded,
sound mode cannot be changed.
* When a hybrid SACD disc that has both stereo and multi-
channel areas is loaded, sound mode will be changed in
the following order.
SACD multi-channel area → SACD stereo area → CD layer
* Sound mode can be selected while the tray is open. Select
a desired layer or area and press 3 PLAY button then the
tray will close and playback will be started.
• Displaying the number of tracks in a SACD multi-
channel disc
If SOUND MODE button is pressed once during playback,
the number of channels being played will be shown.
Examples
6ch : Sub-woofer channel will be played.
Number of channels is displayed
5ch : Sub-woofer channel will not be played.
For some discs recorded in 4ch or 3ch,
“5ch” will be displayed.
4ch or 3ch : If loaded disc is made to show the channel
display, 4ch or 3ch will be displayed.
* See software (disc) jacket or attached instraction for signal
output terminals for 4ch or 3ch discs.
RANDOM
SCROLL
/RECALL
321
654
987
SOUND MODE
Start sound mode
When SACD discs with both multi-channel and stereo
information areas are to be played, this player makes it
possible to set the layer/area (multi-channel or stereo) to be
played first.
q Press the POWER switch to turn on the power of the player.
w If a disc is already on the disc tray, remove it.
“No Disc” now appears on the display.
e Hold down the player’s SOUND MODE button for at least
2 seconds. The currently selected layer/area is displayed.
If the multi-channel layer/area is selected: Start Multi_
If the stereo layer/area is selected: Start Stereo
r The sound mode is switched when the SOUND MODE
button is pressed within 2 seconds.
Even when discs are changed over or the power turned off,
the “start sound mode” setting is stored in the memory and
remains unchanged.
Phantom center function
SUPER AUDIO CD PLAYER SA-17S1
SOUND MODE
Concert halls have superb acoustics which are quite
distinctive, and they are referred to as “hall tone.” Provided
that the speaker systems are laid out in their recommended
positions, the SACD multi-channel format makes it possible
to recreate an authentic sound field in which the listener can
actually feel these superb acoustics.
Ideally, the sound should be reproduced through the same
number of speakers as the number of channels recorded on
the discs played, and when this is not possible, there will be
some aspect of the reproduced sound field that will sound
unnatural. In particular, if there is no center speaker, the sound
field at the front will be extended to the left and right and feel
unnatural.
In a situation like this, press the player’s PHANTOM-C button
to turn on the phantom center function in stop mode. This
causes the center channel sound to be distributed to the front
left and right channels, resulting in the synthesis of a virtual
center channel. In this way, the function makes it possible to
recreate a convincing sound field that has almost the same
superb acoustics as the ones that would be reproduced with
the center speaker.
The function is also effective when the center speaker differs
from the stereo speakers.
To play discs recorded with 4 channels (two front and two
surround channels), set the phantom center function to OFF.
PHANTOM-C
TIME
PHANTOM Center
ENGLISH
17
Page 20

OPERATION
ENGLISH
Playing your favorite tracks of a disc
7 Specify track number to play (Direct
Search)
Specify track number with numerical buttons (0-9)
on the remote
(example)
3rd track : Press 3.
12th track : Press 1 and then press 2 (within approximately
1.5 seconds).
If the first pressed number is only in the digit of ones and not
in the digit of tens, search begins approximately 0.5 second
after.
If a wrong number is pressed
Press correct number again.
* If a track number that is not in the disc is specified, “No
Track” will be shown on the main display. Please specify a
correct track.
Repeated disc play (Repeat Play)
7 All track repeat
When REPEAT button on the remote is pressed, “RPT”
indicator will light up and all track repeat play begins.
To Return to Normal Play
Press REPEAT button two times. “RPT” indicator will
disappear, repeat mode will be off and it returns to normal
play mode.
* If REPEAT button is pressed when in program mode,
programmed tracks are played repeatedly.
7 One Track Repeat
Press REPEAT button on the remote two times when the track
is being played. “RPT”, ”1”indicators will light and the track
will be played repeatedly.
To Exit from One Track Repeat
Press REPEAT button.
7 Skipping to the previous or next track
(Track Skip)
To listen to a track posterior to the current track
Press ¡/¢ buttons on the main unit or ¢ button on the
remote the number of times you want to proceed tracks.
To listen to a track prior to the current track
Press 4/1 buttons on the main unit or 4 button on the
remote go back to the beginning of the current track. Then
press 4/1 buttons on the main unit or 4 button on the
remote the number of times you want to go back.
* When the 4/1 button on the player or 4 button on the
remote control unit is pressed at the first track on the disc,
operation moves to the last track; conversely, when the ¡/
¢ button on the player or ¢ button on the remote control
unit is pressed at the last track on the disc, operation moves
to the first track.
7 Playing your favorite parts of a disc (Search)
7 A-B Repeat
q Press A-B button on the remote at your chosen starting
point. “A-“ indicator will light up.
w Press A-B button again at your chosen end point. “B“
indicator will light up and the chosen section will be played
repeatedly.
To Exit from A-B Repeat
Press A-B button on the remote. “A-B” indicator will disappear,
A-B repeat mode will be off and it returns to normal play mode.
* A-B repeat cannot be done when random play is going on.
If 4 /1, ¡/¢ buttons on the main unit or 1 , ¡
buttons on the remote are kept pressing during playback,
track search begins. Release the button when the point you
want to listen to gets close.
* No sound can be heard during search.
18
Page 21

OPERATION
Playing tracks in a random
sequence (Random Play)
When RANDOM button on the remote is pressed, the unit
shuffles track order and plays all the tracks in the shuffled
order. It can be done in both playback and stop modes. The
RNDM (random) indicator lights.
• The gap between tracks will be approximately 4 seconds
during random play.
RNDM
34 56 78 910
If RANDOM button is pressed when the disc tray is open and
a disc is set, the tray will automatically close and random
play will begin.
To Exit from Random Play and Return to Normal Play
Press RANDOM button again.
The RNDM (random) indicator goes off, and random play is
released.
¡¡
¢¢
If
¡/
¢ buttons on the main unit or
¡¡
¢¢
the remote are Pressed during Random Play
It jumps to the next track of the shuffled order.
44
11
¡¡
If
4/
1,
44
11
¡¡
¡ buttons on the remote are Pressed during Ran-
¡¡
¢¢
¡/
¢ buttons on the main unit or
¡¡
¢¢
dom Play
Search will be done only in the current track. Search does not
go to the previous or next track.
To Listen to Random Play Repeatedly
Press REPEAT button on the remote once during random play.
Every time the order will be shuffled.
• If RANDOM button is pressed during program play, the
programmed tracks will be shuffled.
¢¢
¢ button on
¢¢
11
1,
11
Playing tracks in a specific
sequence (Program Play)
You can arrange and play tracks in a specific sequence. Up
to 30 tracks to be played can be programmed.
(Example: To program the 7th track in a disc with 15 tracks)
TIME
TTLTRK
12
34 56 78 910 1112 1314 15
q Press PROGRAM button on the remote in stop mode.
“PROG” indicator will blink and it goes to program mode.
Blinks
PROG
TRK
w Choose a track to be programmed with numeric buttons
on the remote or 4, ¢ buttons.
(Example: The 15th track is chosen and it’s length is
4min30sec)
Blinks
PROG
TRK TTL TIME
Only the numbers of programmed tracks light up
e With the sequence described in step w above, program
another track. Repeat that sequence to program all the
tracks you want. You can program up to 30 tracks.
(Example: The 7th track is chosen and total length of
7th and 15th is 7min50sec)
Blinks
PROG
TRK TTL TIME
TTL TIME
15
ENGLISH
715
Total playing time of programmed tracks
r When you finish programming, press PROGRAM button
or 7 STOP button. Blinking “PROG” indicator will lights up
constantly. Program has been settled.
Lights up
PROG
TRK
715
Total programmed
number
Total playing time of
programmed tracks
TTL TIME
t Press 3 PLAY button to starts playback in programmed
order.
* You can skip the sequence r and press 3 PLAY button
to start program play.
19
Page 22

OPERATION
ENGLISH
To Check Programmed Tracks
Press SCROLL/RECALL button on the remote while
programming or program play (when “PROG” indicator is
blinking or lighting up). Programmed tracks will be displayed
in programmed order.
Q&A
• How many tracks can be programmed?
Up to 30 tracks can be programmed for program
play.
To Delete a Programmed Track
q Press SCROLL/RECALL button in stop mode when
program has been made (when “PROG” indicator lights
up or blinks). Programmed tracks will be displayed in
programmed order.
w When the track you want to delete appears on the display,
press CANCEL button on the remote at once. The deleted
track’s track number indicator will disappear.
To Clear Whole Program
Press 7 STOP button two times while in program play. In stop
mode, press 7 STOP or CANCEL button once.
Program can also be cleared by pressing 0 OPEN/CLOSE
key to open the disc tray.
To Add Tracks to Program
Press PROGRAM button when program is remaining (“PROG”
indicator is constantly lights up) and in stop mode. “PROG”
indicator will blink and tracks can be added to the end of
program.
* Please be careful about the following matters.
• When programming 1st to 9th tracks in a disc that has
over 10 tracks by using numeric buttons,. For instance,
programming the 3rd track after programming the 1st track,
press 3 button more than approximately 1.5 seconds after
1 button is pressed.
• Likewise, when programming a track at 10th or after. For
example, to program 13th track, press 3 button within
approximately 1.5 seconds after 1 button is pressed.
• When programming a track in a disc that has less than 9
tracks. For instance, to program the 5th track after 4th track
has been programmed, press 5 button more than
approximately 0.5 second after 4 button is pressed.
• When programming with 4 and ¢ buttons, press the
buttons repeatedly until the track you want appears. And
the gap has to be less than 0.5 second.
• Can I listen to program play repeatedly?
Press REPEAT button once. “RPT” indicator will light
and program play will be repeated.
• Can I shuffle the programmed track order?
Press RANDOM button during program play or in
stop mode.
Searching your favorite tracks
(AMS (Automatic Music Scan) Play)
If AMS button on the remote is pressed in stop mode or in
playback mode, PLAY “3” indicator will blink and the
beginnings of all the tracks will be played for 10 seconds
each starting from the first track. This feature is convenient to
search where your favorite track is.
Blinks
TRK
12
34 56 78 910 1112 1314 15
When you have found the favorite track, press AMS button
again. PLAY indicator will light up constantly and normal
playback will begin from the current track.
* If AMS button is pressed after tracks have been
programmed, only the selected tracks will be played with
AMS.
20
Page 23

OPERATION
About TEXT Information Display
The following items of text information in a disc with text can
be displayed by pressing TEXT button.
items of information are recorded depends on discs so some
information may not be displayed. This unit skips unrecorded
information to display.
• During Playback
Each time TEXT button on the remote is pressed, text
information will be displayed in the following order. In general,
information of the playing track will be displayed during
playback.
Title of the xxth track currently playing
Album Title
xx Title (xx th Track Title)
xx Artist (xx th Track Artist)
Nevertheless, which
Time Display
Album Title
Album Artist
-- Title (-- th Track Title)
About TEXT
CD TEXT is a new type of music disc that contains text
information like artist name, album title, music title, etc. CDs
with the logos shown below and most SACDs have text
information.
ENGLISH
xx Songwriter (xx th Track Songwriter)
xx Composer (xx th Track Composer)
xx Arranger (xx th Track Arranger)
Time Display
• In Stop Mode
Each time TEXT button on the remote is pressed, text
information will be displayed in the following order.
If 3 PLAY button is pressed while -- Title is displayed, that
track will be played.
The maximum number of characters to be displayed is 64
characters.
CD TEXT
TEXT
This text information is recorded on a area which is not used
for ordinary music CDs. Therefore music CDs with text
information can be played with ordinary CD player. And the
text information can be displayed with players that has TEXT
feature.
This unit automatically detects whether text information is
recorded and shows it on the display window.
Main unit display
TRK
TEXT 1 2
3 4 5 6 7 8 9 10 1112 1314 1516 1718 1920
Lights up when the loaded disc has text information
TTL TIME
Album title, track title, artist name, songwriter name, composer
name, arranger name, can be displayed by operating main
unit and remote control. Be noticed that those information items
are not always recorded all in a disc.
• This unit can display 12 characters in one time. If
information is longer than 12 characters, the display will
scroll right to left.
• This unit can display only alphabets, numeric numbers and
symbols. Chinese and Japanese characters cannot be
displayed. If information is in Chinese and Japanese
characters, the unit displays nothing.
21
Page 24

OPERATION
ENGLISH
Timer Play
This unit can perform timer play by cooperating with your audio
timer.
Connect this unit’s power cord to the audio timer’s power
socket and the timer’s power cord to power outlet.
* For connection to audio timer and it’s operation, please refer
to the instruction manual of your audio timer.
AC IN
Audio Timer
Setting method of Timer Play
Filter Switch
FILTER
STANDARD
CUSTOM
Super Audio CDs have a wide playback frequency band of
100 kHz that is beyond the audible range: this means that
their signals contain ultra-high-range components that
conventional CDs do not have. A conventional amplifier is
often not built to reproduce signals containing these
components, and when Super Audio CD signals are output in
their original state, noise may be generated, the amplifier’s
protection circuits may be activated and/or the speakers may
be damaged.
q Press 7 STOP button for 2 seconds in stop mode.
Timer play is activated and “Timer On” will be displayed.
* To turn off Timer Play, press 7 STOP button for 2 seconds.
(“Timer Off” will be displayed.)
w Insert the disc to be played.
* If program play has been set, program play will begin
upon the timer on.
e Set the audio timer.
To prevent this sort of trouble from occurring, the unit
incorporates a filter (STANDARD) for attenuating the ultra-highrange components, and the filter can be set STANDARD or
CUSTOM using a switch on the rear panel. (This switch is set
to STANDARD when the unit is shipped from the manufacturing
plant.)
When the unit is to be connected with a next-generation
amplifier that supports Super Audio CDs and set the switch
to CUSTOM for use. This will ensure play with a wider
frequency range.
* Use the switch at the STANDARD position if the unit is to be
used with a regular amplifier. Otherwise, the amplifier and/
or speakers may be damaged.
* Even when the unit has been connected with an amplifier
that supports Super Audio CDs, change the switch to the
STANDARD position when recording Super Audio CD sound
on a tape deck, for instance.
* Turn the power off before setting this switch. Setting the
switch during play may cause noise to be generated.
22
Page 25

TROUBLE SHOOTING
If you think a malfunction has occurred, first check the points listed below. The problem is likely to have been caused by a simple
operational error or a connection problem. If the problem cannot be corrected even after carrying out the following checks,
consult your dealer or nearest Marantz sales office or service counter.
• The disc fails to rotate.
1. Is the mains lead plugged in properly?
2. Is the POWER switch ON?
3. Is the disc placed in the correct position on the disc tray?
4. Is the disc placed properly with the label side facing up?
5. Is the disc dirty?
6. Is the disc scratched?
7. Is the disc warped?
• A Super Audio CD cannot be played.
1. Is the disc scratched, dirty or warped?
2. Is the amplifier’s input selector set to digital?
* Digital audio signal will not be output when a Super Audio
CD is played.
• Some channels are not played (Super Audio CD MultiChannel)
1. Confirm the number of channels in the disc. (See page 17)
ENGLISH
• The disc is rotating but no sound is heard.
1. Are the amplifier and speakers connected properly?
2. Is the amplifier switch ON?
3. Is the amplifier’s volume control set at the minimum level?
4. Is the amplifier’s selector switch set to the correct input
(“CD” or “AUX”, whichever corresponds to the input jacks
the SACD player is connected to)?
• The disc stops in mid-operation.
The sound drops out or noise is heard.
1. Is the disc dirty?
2. Is the disc scratched?
3. Is the disc warped?
* In the case of a CD-R or CD-RW disc, this problem may
occur when the conditions under which its data was
originally written were substandard or when the quality of
the disc itself is poor.
• Remote control operation is not possible.
1. Is the remote control unit’s transmitter pointed correctly at
the remote sensor on the front of the SACD player?
Or is there an obstruction between the transmitter and the
remote sensor?
2. Are the batteries in the remote control unit exhausted?
3. Is there another strong light (from a window, etc.) striking
the SACD player’s remote sensor?
• A CD-R/CD-RW disc cannot be played.
1. Is the disc placed upside down?
2. Is the disc contains properly written TOC?
3. Is the recorded information in an audio (CD-DA) format?
23
Page 26

SPECIFICATIONS
Audio Characteristics
Analog output
Channels 6channels (Max.) 2channels
Frequency range 2Hz — 100kHz 2Hz — 20kHz
Frequency characteristics 2Hz — 50kHz (-3dB) 2Hz — 20kHz
Dynamic range 114dB 100dB
THD (1kHz) 0.0008% 0.0020%
wow & flutter Precision of quartz Precision of quartz
Output level 2.2V 2.2V
Digital output
output level (cinch JACK) — 0.5Vp-p (75Ω)
output level (optical) — -19dBm
Headphone output level 0.5W / 32Ω (max, Vol.) 0.5W / 32Ω (max, Vol.)
Optical Readout System
Laser AlGaAs AlGaAs
Wave length 650nm 780nm
Super Audio CD CD
Signal format 1-bit DSD 16-bit linear PCM
Sampling frequency 2.8224MHz 44.1kHz
Power Supply
Input Voltage, Frequency ............................................................................................. AC 230V 50Hz
Power Consumption ....................................................................................................................... 24W
Cabinet, etc.
Dimensions (Width × Height × Depth) .................................................................. 458 × 110 × 394mm
Net weight .................................................................................................................................. 11.5kg
Operating temperatures ................................................................................................ +5ºC ~ +35ºC
Operating humidity ........................................................................................... 5 ~ 90% (without dew)
Accessories
• Remote control unit (RC-17SAS1) .................................................................................................. 1
Dimensions (Width × Height × Depth) .......................................................... 44 × 17.5 × 239mm
Net weight (without Batteries) .............................................................................................. 189g
• AAA (R03) Batteries ........................................................................................................................ 2
• AC Power cord ............................................................................................................................... 1
• Audio cable ........................................................................................................................... 3 pairs
• Remote connection Cable .............................................................................................................. 1
• User’s Guide ................................................................................................................................... 1
Specifications subject to change without prior notice.
Page 27

www.marantz.com
You can find your nearest authorized distributor or dealer on our website.
JAPAN Marantz Japan, Inc. 35-1 Sagami Ohno 7-Chome, Sagamihara-shi, Kanagawa 228-8505, Japan
U.S.A. Marantz America, Inc. 1100 Maplewood Drive, Itasca, IL 60143, U.S.A.
EUROPE Marantz Europe B.V. P.O. Box 8744, 5605 LS Eindhoven, The Netherlands
is a registered trademark.
Printed in Japan
03/04 MITs 08AK851312
 Loading...