

Marantz SA-10 Owner Manual

.
Model SA-10 Owner’s Manual
Super Audio CD Player

Contents
Accessories ....................................................................................
About the remote control .............................................................. 2
Inserting the batteries ................................................................... 2
Operating range of the remote control unit .................................... 2
Features .......................................................................................... 3
High quality sound ........................................................................ 3
High performance ......................................................................... 3
Part names and functions ............................................................. 4
Front panel ................................................................................... 4
Display .......................................................................................... 5
Rear panel .................................................................................... 6
Remote control unit ....................................................................... 7
Connections ...........................................................
Connecting to a stereo audio amplifier .......................................
Connecting to a device with digital audio input connectors
.......................................................................................................... 8
Connecting to a device with digital audio output connectors
.......................................................................................................... 9
Connecting an iPod or USB memory device to the USB port
.......................................................................................................... 9
Connecting a PC or Mac ............................................................. 10
Connecting devices with remote control connectors .............. 10
Connection ................................................................................. 10
Setting ........................................................................................ 10
Connecting the timer device ...................................................... 10
Connecting the power cord ........................................................ 10
8
2
Playback ...............................................................
Basic operation ............................................................................
Turning the power on .................................................................. 11
Selecting the playback media mode ........................................... 11
Having the display and the illumination lamp off ......................... 11
Having the illumination lamp always off ...................................... 11
Stopping digital outputs .............................................................. 12
Setting the top priority playback layer for Super Audio CDs ........ 12
Playing CDs/Super Audio CDs ................................................... 13
Playing CDs and Super Audio CDs ............................................. 13
Playing tracks in a specific order (Program playback) ................ 14
Playing Data CDs and Data DVDs .............................................. 15
Playing files ................................................................................ 15
Playing an iPod ............................................................................ 16
8
Listening to music on an iPod ..................................................... 16
Setting operation mode (“On-Display” mode) ............................. 16
Charging the iPod ....................................................................... 17
Playing a USB memory device ................................................... 18
Playing files stored on USB memory devices ............................. 18
Using as a D/A converter ............................................................ 20
Connecting and playing back from a computer (USB-DAC) ....... 20
Connect and playback from a digital device (Coaxial/Optical) .... 24
Specifying the desired sound quality ........................................ 24
Switching the filter characteristics ............................................... 24
11
11
Settings ................................................................
Menu map .....................................................................................
Menu operation ........................................................................... 25
Dither ............................................................................................ 26
NoiseShaper ................................................................................. 26
Phones .......................................................................................... 26
HP AMP Gain ................................................................................ 26
Resume Play ................................................................................ 27
Phase ............................................................................................ 27
AutoStandby ................................................................................ 27
Timer Play ..................................................................................... 27
Tips .......................................................................
Tips ............................................................................................. 29
Troubleshooting .......................................................................... 30
Appendix ..............................................................
Playable media .............................................................................
Discs ........................................................................................... 34
USB memory device ................................................................... 36
Playback order of music files ...................................................... 37
About discs and files ................................................................... 37
Cautions on using media ............................................................ 37
Inserting a disc ............................................................................ 37
How to handle media .................................................................. 38
Cleaning discs ............................................................................ 38
D/A converter ............................................................................... 39
Specifications of supported audio formats .................................. 39
Explanation of terms ................................................................... 39
Trademark information ............................................................... 40
Specifications .............................................................................. 41
Index ............................................................................................. 43
25
25
28
34
34
1
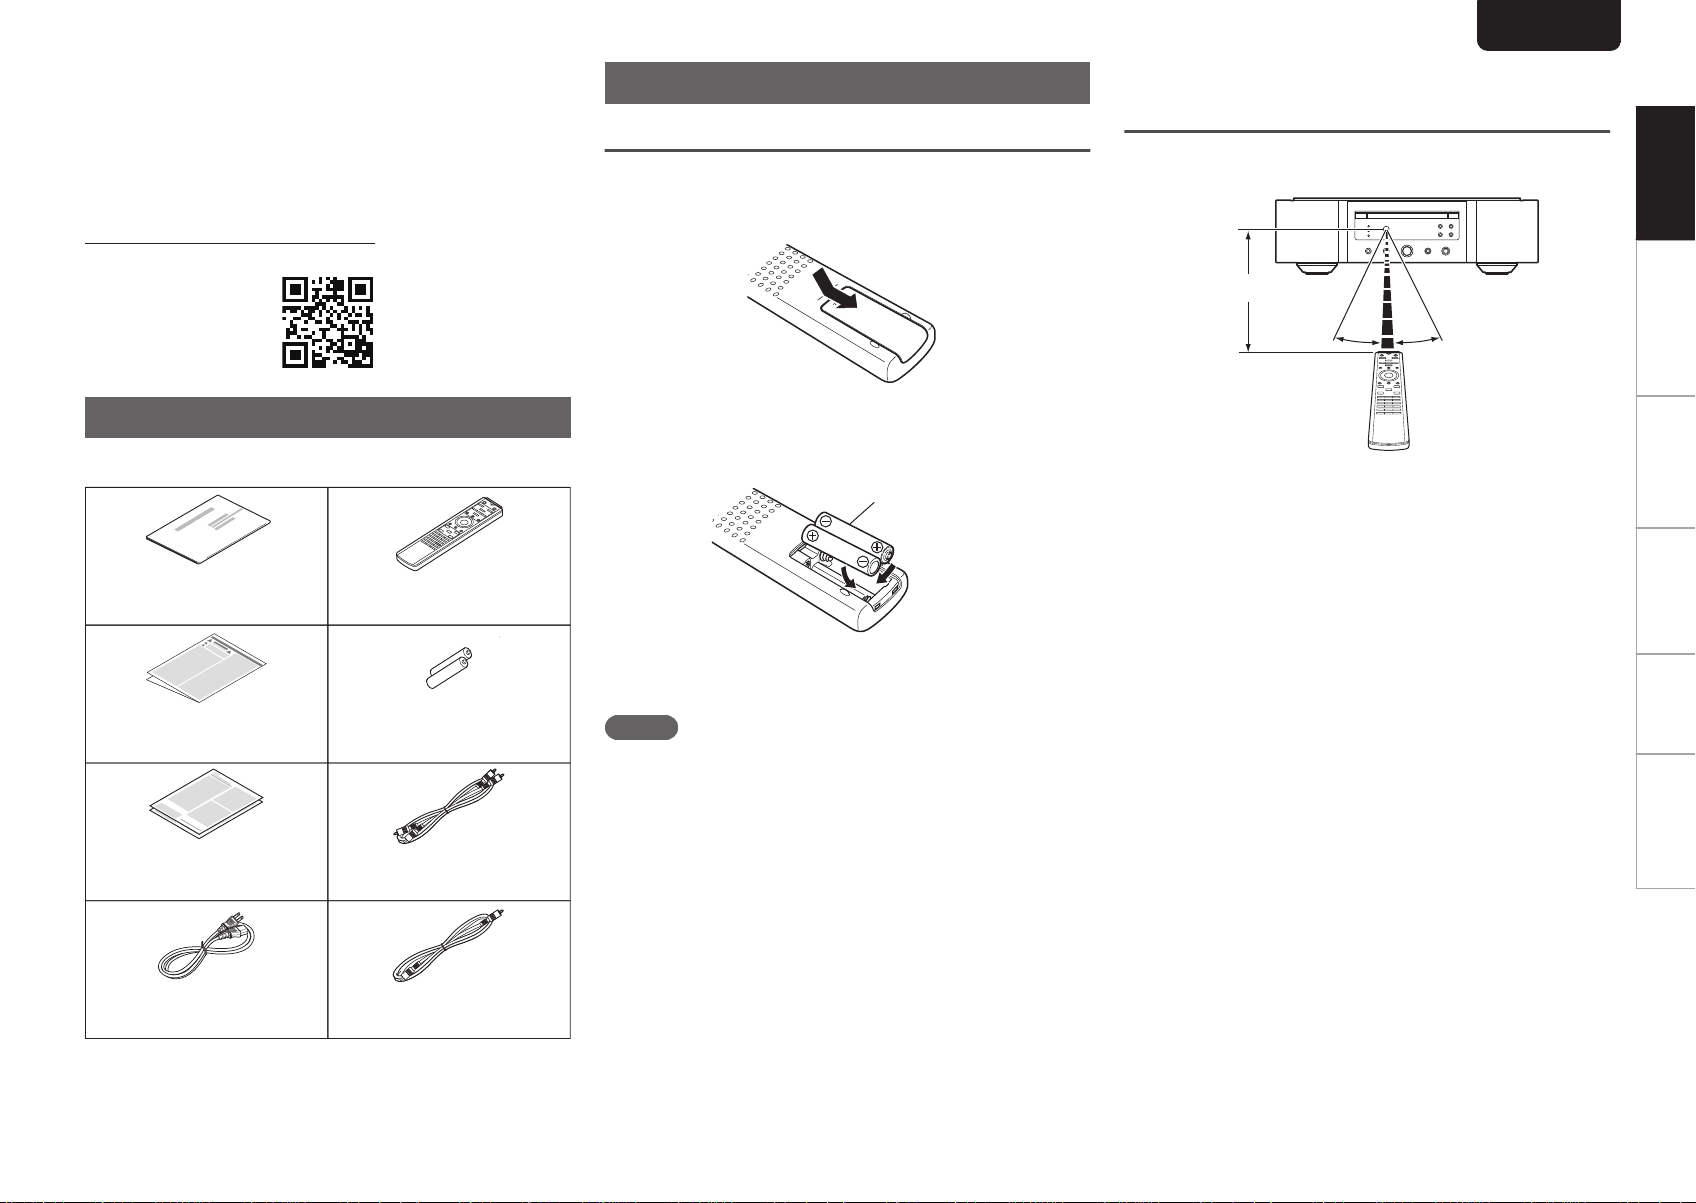
R03/AAA batteries
Owner’s Manual
Remote control unit
(RC004PMSA)
Safety Instructions
Power cord Remote connector cable
Audio cableWarrant y
(for USA/for CANADA)
Batteries
30°
Approx. 23 ft/7 m
30°
ENGLISH
Thank you for purchasing this Marantz product.
To ensure proper operation, please read this owner’s manual
carefully before using the product.
After reading this manual, be sure to keep it for future
reference.
This manual can also be viewed in a web browser. Launch
your web browser from a tablet or computer and enter the
following URL.
manuals.marantz.com/SA10/NA/EN/
.
Accessories
Check that the following parts are supplied with the product.
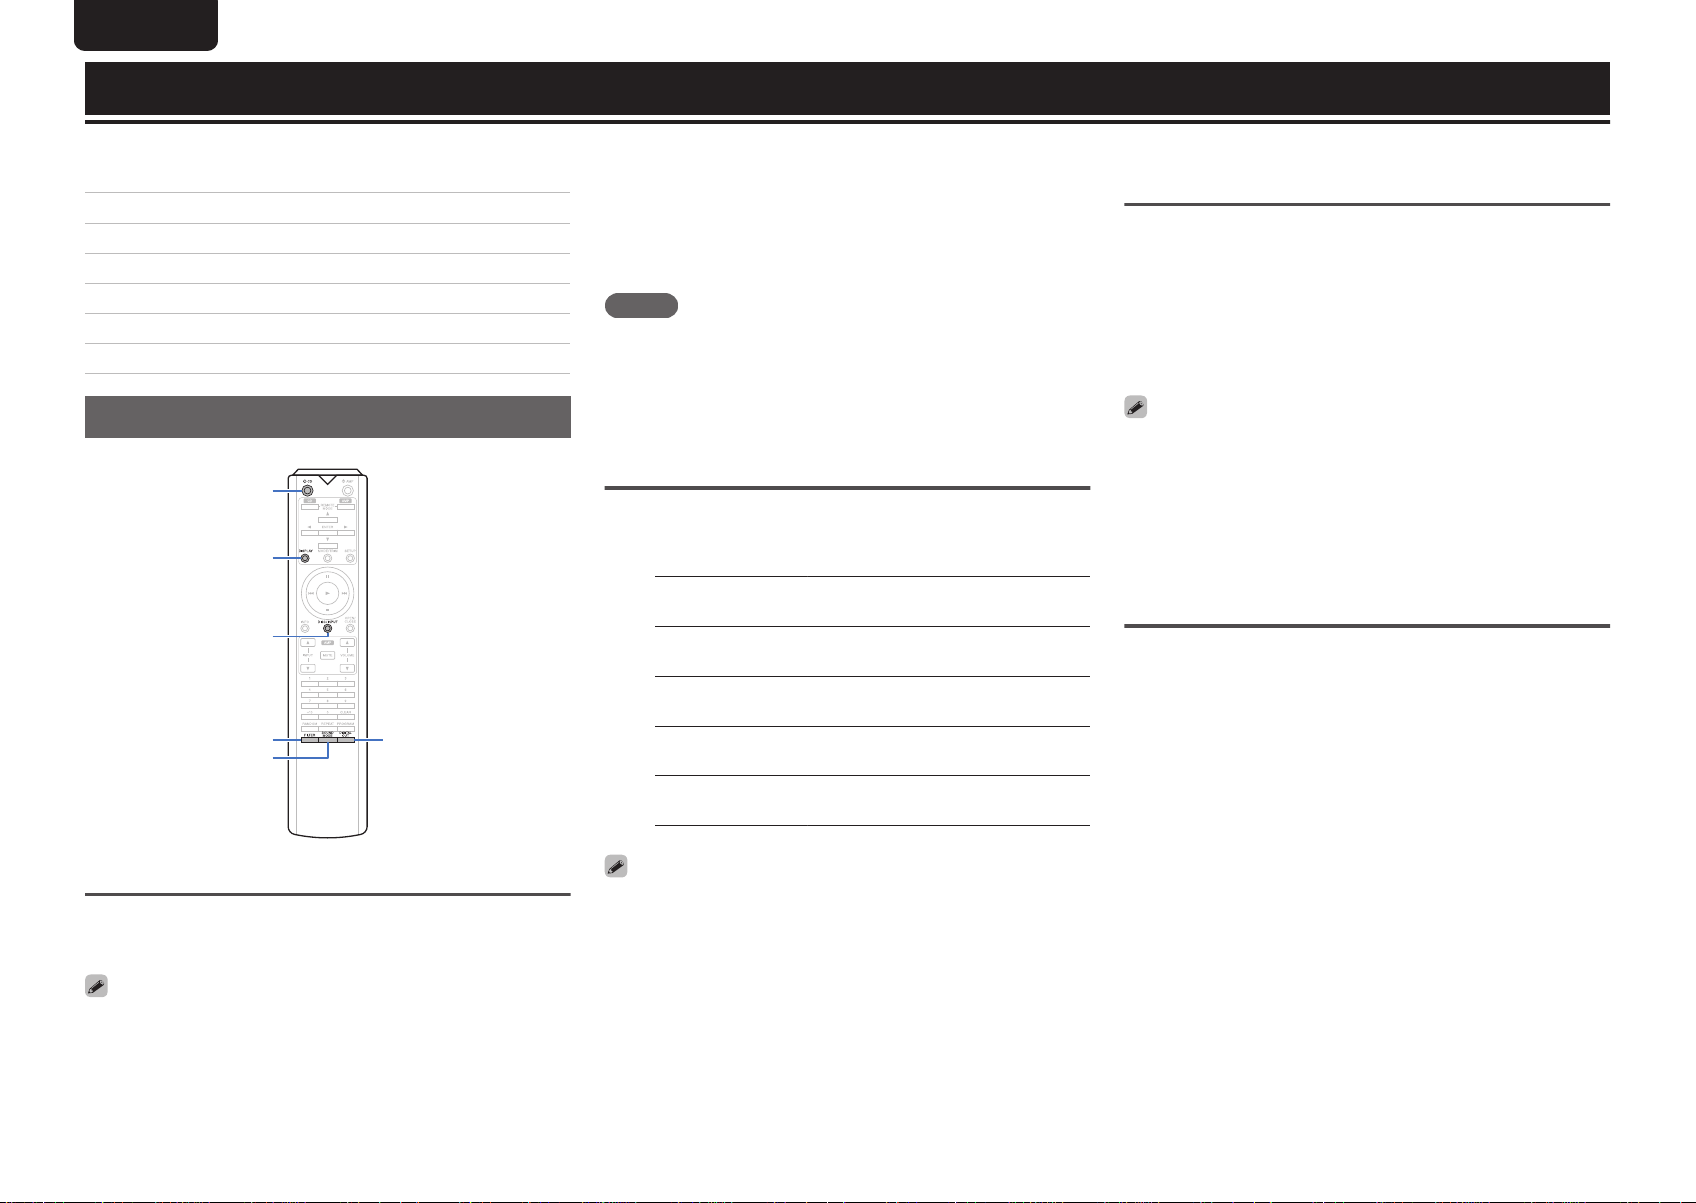
About the remote control
Inserting the batteries
Remove the rear lid in the direction of the
1
arrow and remove it.
.
Insert two batteries correctly into the battery
2
compartment as indicated.
.
Operating range of the remote
control unit
Point the remote control unit at the remote sensor when
operating it.
.
Overview Connections Playback Settings Tips Appendix
.
Put the rear cover back on.
3
NOTE
0
To prevent damage or leakage of battery fluid:
0
Do not use a new battery together with an old one.
0
Do not use two different types of batteries.
0
Remove the batteries from the remote control unit if it will
not be in use for long periods.
0
If the battery fluid should leak, carefully wipe the fluid off
the inside of the battery compartment and insert new
batteries.
2

ENGLISH
Features
High quality sound
0
Toroidal transformer
This unit features a toroidal transformer that produces less
vibration and magnetic leakage flux compared to
conventional power transformers. The materials and
manufacturing process of the ring-shaped core are strictly
controlled to reduce vibration, while the short-ring attached
to the perimeter of the transformer reduce magnetic
leakage flux.
0
Large-capacitance block capacitor
A large capacitance 4700
for its acoustic characteristics is incorporated into the
power supply circuit.
0
Audiophile-grade film capacitors and electrolytic
capacitors
The unit’s features the same audiophile-grade film
capacitors and electrolytic capacitors specifically used in
top-range models.
0
Low-noise low-distortion filter circuit and highspeed
HDAM®SA2-type output amplifier
0
Double-layered chassis
0
High-grade machined analog audio output
connectors
0
High grade headphone circuit
The high-grade headphone circuit incorporates
HDAM®SA2 amplifier to enable headphone listening of
high quality sound reproduction, late at night or in other
such situations.
0
Isolation design
To prevent audio quality from degrading due to noise from
external devices when this unit is connected to external
devices such as computers, the ground circuit for the USB
input interface device is isolated from the audio circuit.
0
Optical Drive off design
When USB-DAC, Coaxial or Optical input is selected, this
unit achieves high quality sound by turning off the drive.
μF capacitor carefully selected
High performance
0
Equipped with a USB-DAC function to support
playback of high-resolution sound sources
This unit supports the playback of high resolution audio
formats such as DSD (2.8/5.6/11.2 MHz) and PCM files up
to 384 kHz/32 bits. It provides high quality playback of high
resolution files into this unit from a computer via USB-B
connection.
0
Can be used as a D/A convertor
Digital audio signals input from an external device or
computer into this unit can be converted and output as
analog signals using this unit’s D/A converter.
0
Supports high-resolution audio sources stored on
discs
MP3, WMA, AAC, WAV, FLAC, ALAC, AIFF and DSD files
that have been recorded onto DVD-R/-RW/+R/+RW or CDR/-RW discs can be played back on this unit.
0
Plays USB memory devices (MP3/WMA/AAC/WAV/
FLAC/ALAC/AIFF/DSD) and iPod®/iPhone
You can play back audio files stored on a USB memory
device or iPod/iPhone by connecting the USB memory
device or iPod/iPhone to the USB port.
0
Peripheral circuitry off function minimizes audio
output signal interference
In order to minimize noise from peripheral circuitry which
could interfere with the analog audio signal, this unit is
equipped with a peripheral circuitry off function which turns
off the digital output circuit, the display, and the illumination
lamp.
0
Filter switching function
Switching between 2 types of filter characteristics is
possible during playback in the CD/DAC modes, allowing
the listener to enjoy different shadings of the music.
0
Inverted-phase analog output signal is possible
The European system balanced output of this unit can be
inverted to permit a balanced input to a USA type amplifier.
®
3
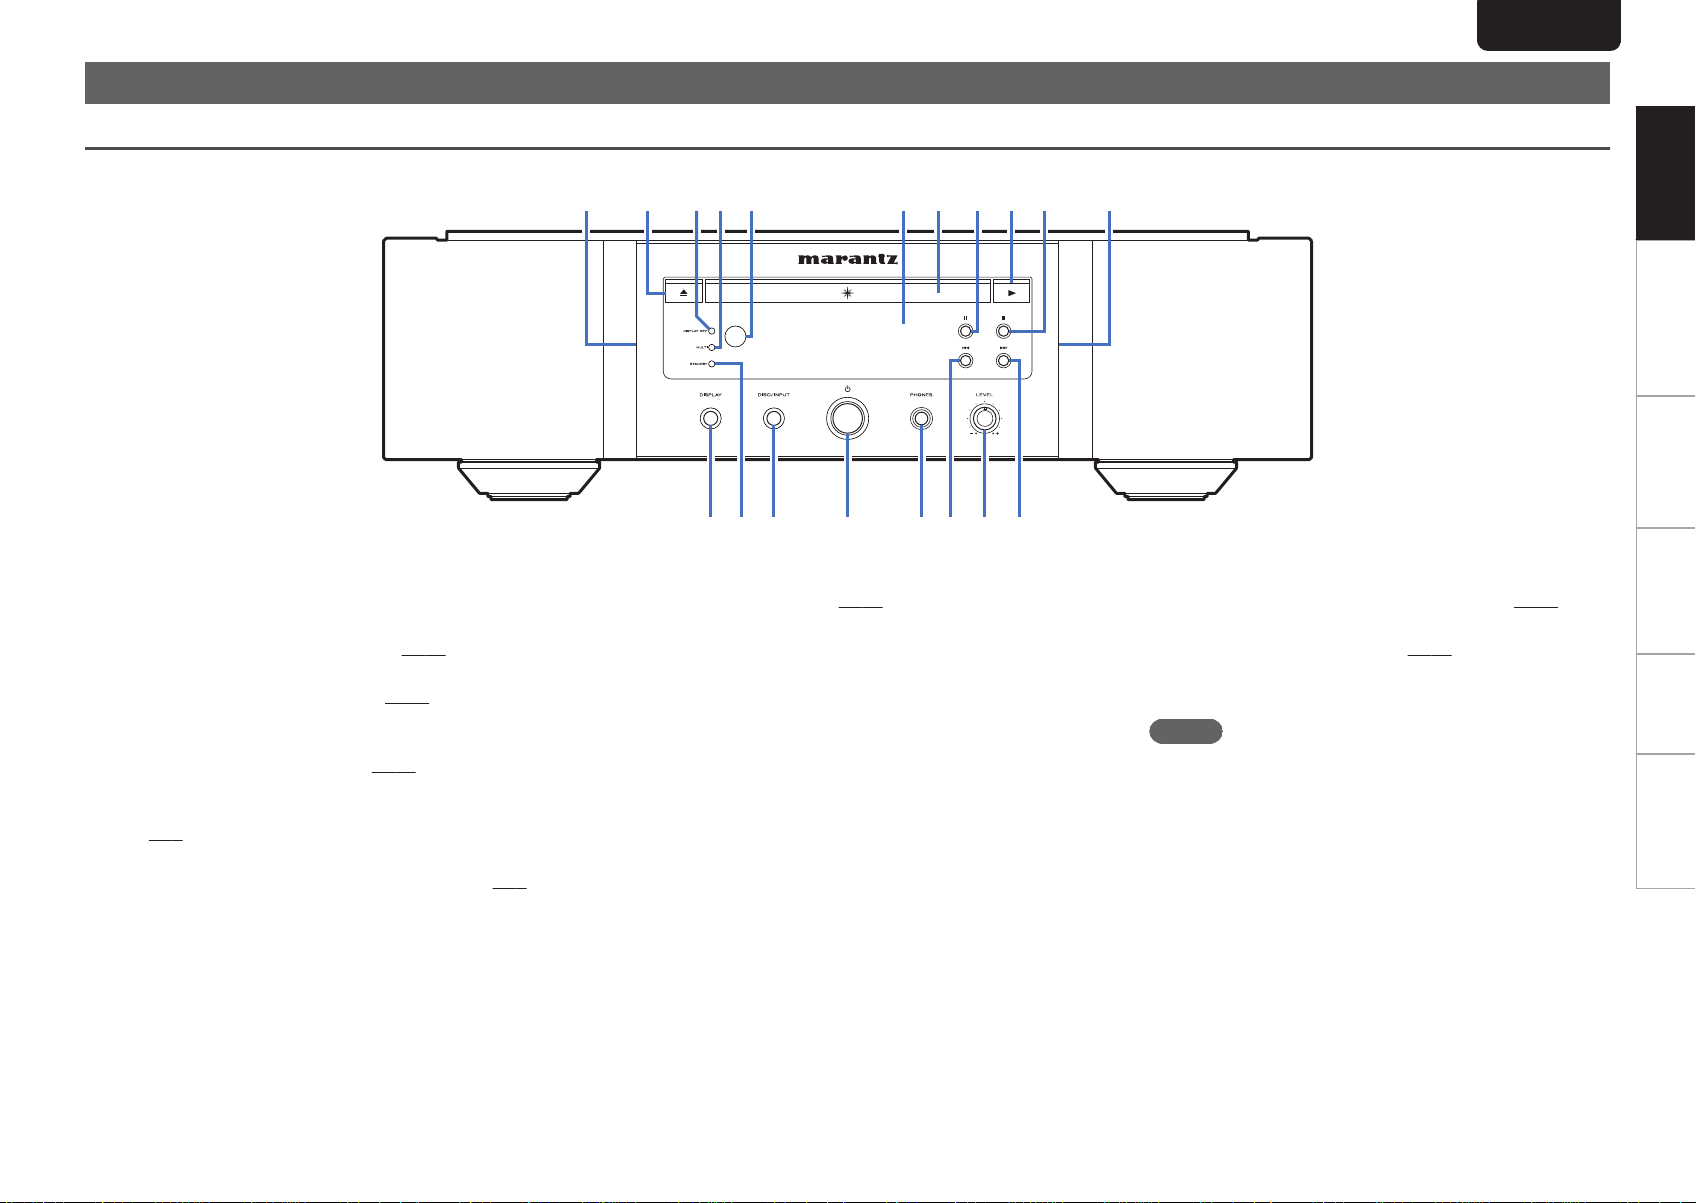
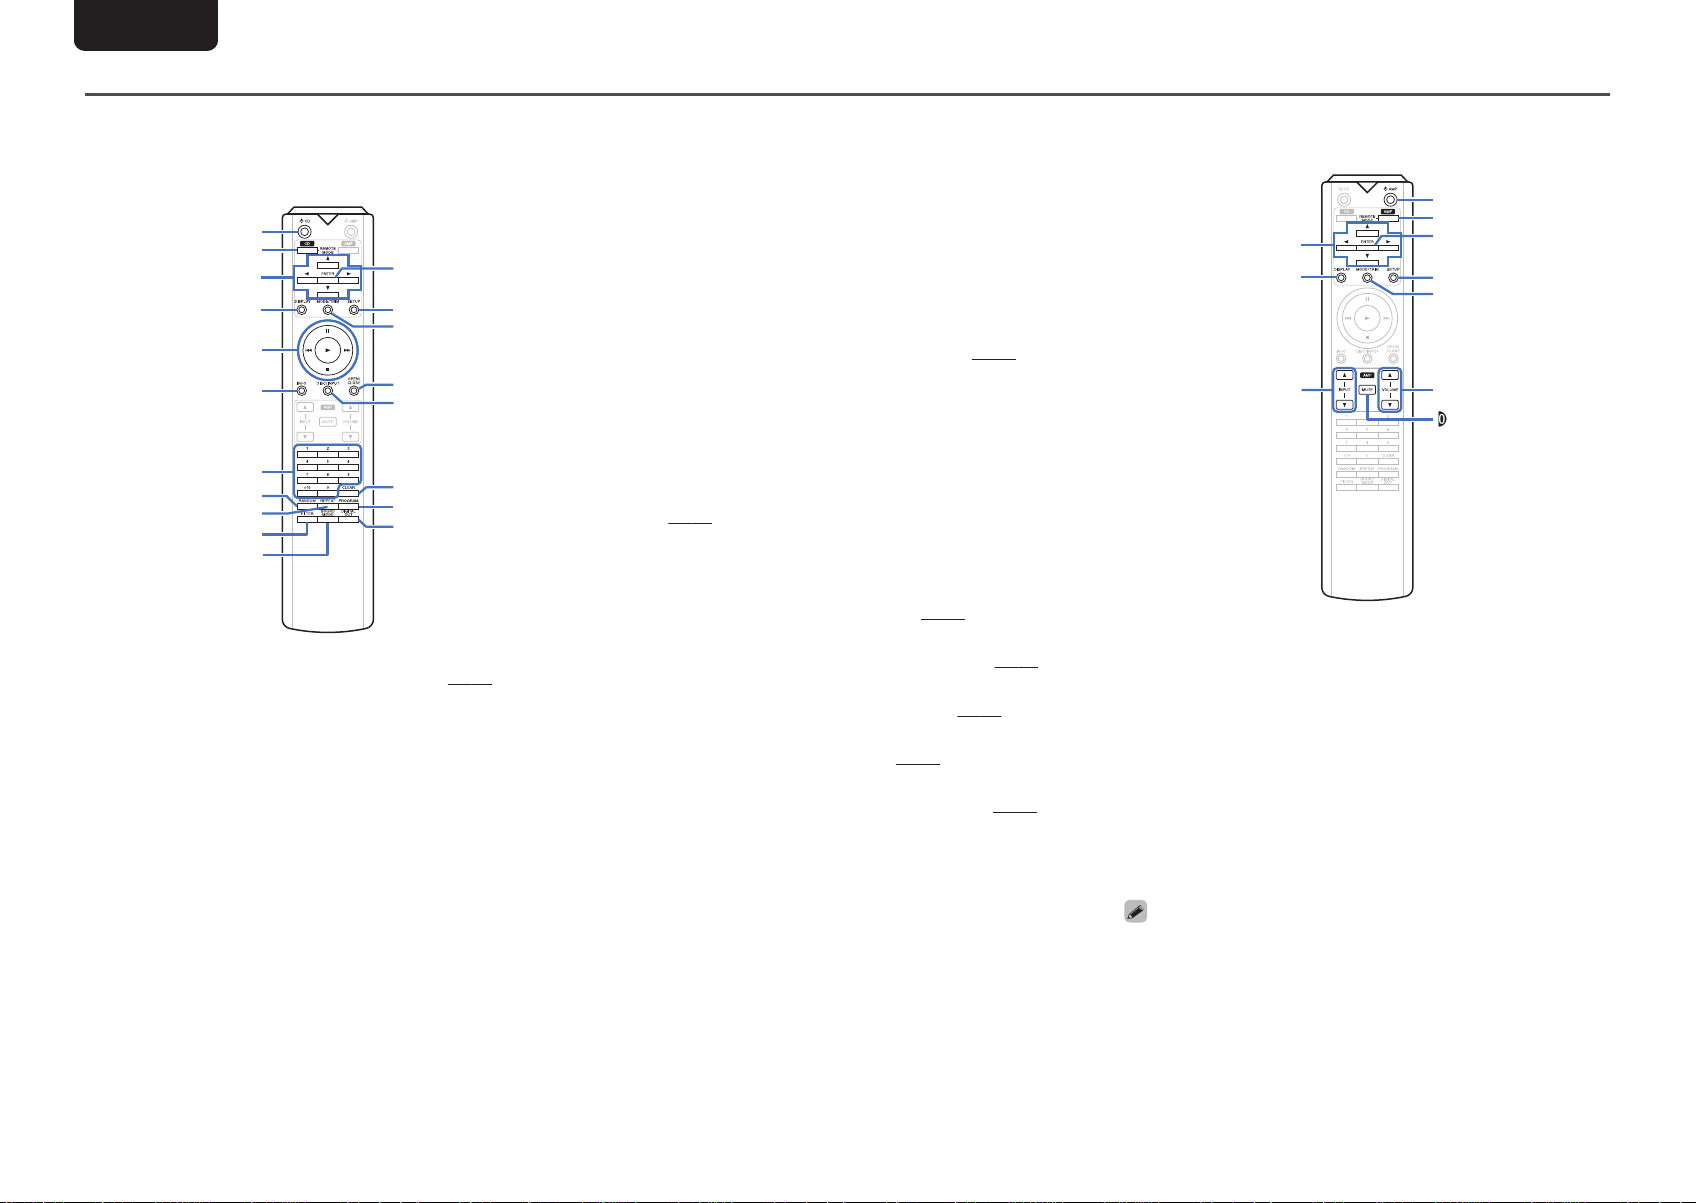
Part names and functions
Q
2
Q
4
Q
3
Q
1
Q
5
Q
7Q6
Q
8
qewuoyitQ0 qr
ENGLISH
Front panel
.
Illumination lamp
A
The illumination lamp lights (blue).
Disc tray open/close button (5)
B
Opens and closes the disc tray. (v
DISPLAY OFF indicator
C
Lights when the display is off.
MULTI indicator
D
This indicator lights up when the Multi channel area of a
Super Audio CD is selected.
Remote control sensor
E
This receives signals from the remote control unit.
(v p. 2)
Display
F
This displays various pieces of information.
(v
(v
p. 13)
p. 11)
p. 12)
(v
p. 5)
Disc tray
G
Used to insert a disc. (v
Pause button (3)
H
Pauses playback.
Play button (1)
I
Playback starts.
Stop button (2)
J
Stops playback.
DISPLAY button
K
This turns the display on/off. Press and hold to turn the
illumination lamp on/off.
STANDBY indicator
L
This is lit as follows according to the power status:
0
Power on : Off
0
Standby : Red
0
iPod charge standby : Orange
0
Power off : Off
p. 13)
DISC/INPUT button
M
Used to select the playback media mode.
Power operation button (X)
N
This turns the power on/off.
Headphones jack (PHONES)
O
Used to connect headphones.
NOTE
0
To prevent hearing loss, do not raise the volume level
excessively when using headphones.
Fast-reverse/Reverse-skip button (8)
P
Returns to the start of the currently playing track. Press
and hold to fast-reverse the track.
Headphone volume control knob (LEVEL)
Q
Adjusts the headphone volume.
Fast-forward/Forward-skip button (9)
R
Plays the next track. Press and hold to fast-forward the
track.
(v
p. 11)
(v
p. 11)
Overview Connections Playback Settings Tips Appendix
4
wq
tyery iuQ1oQ0
Q
2
ENGLISH
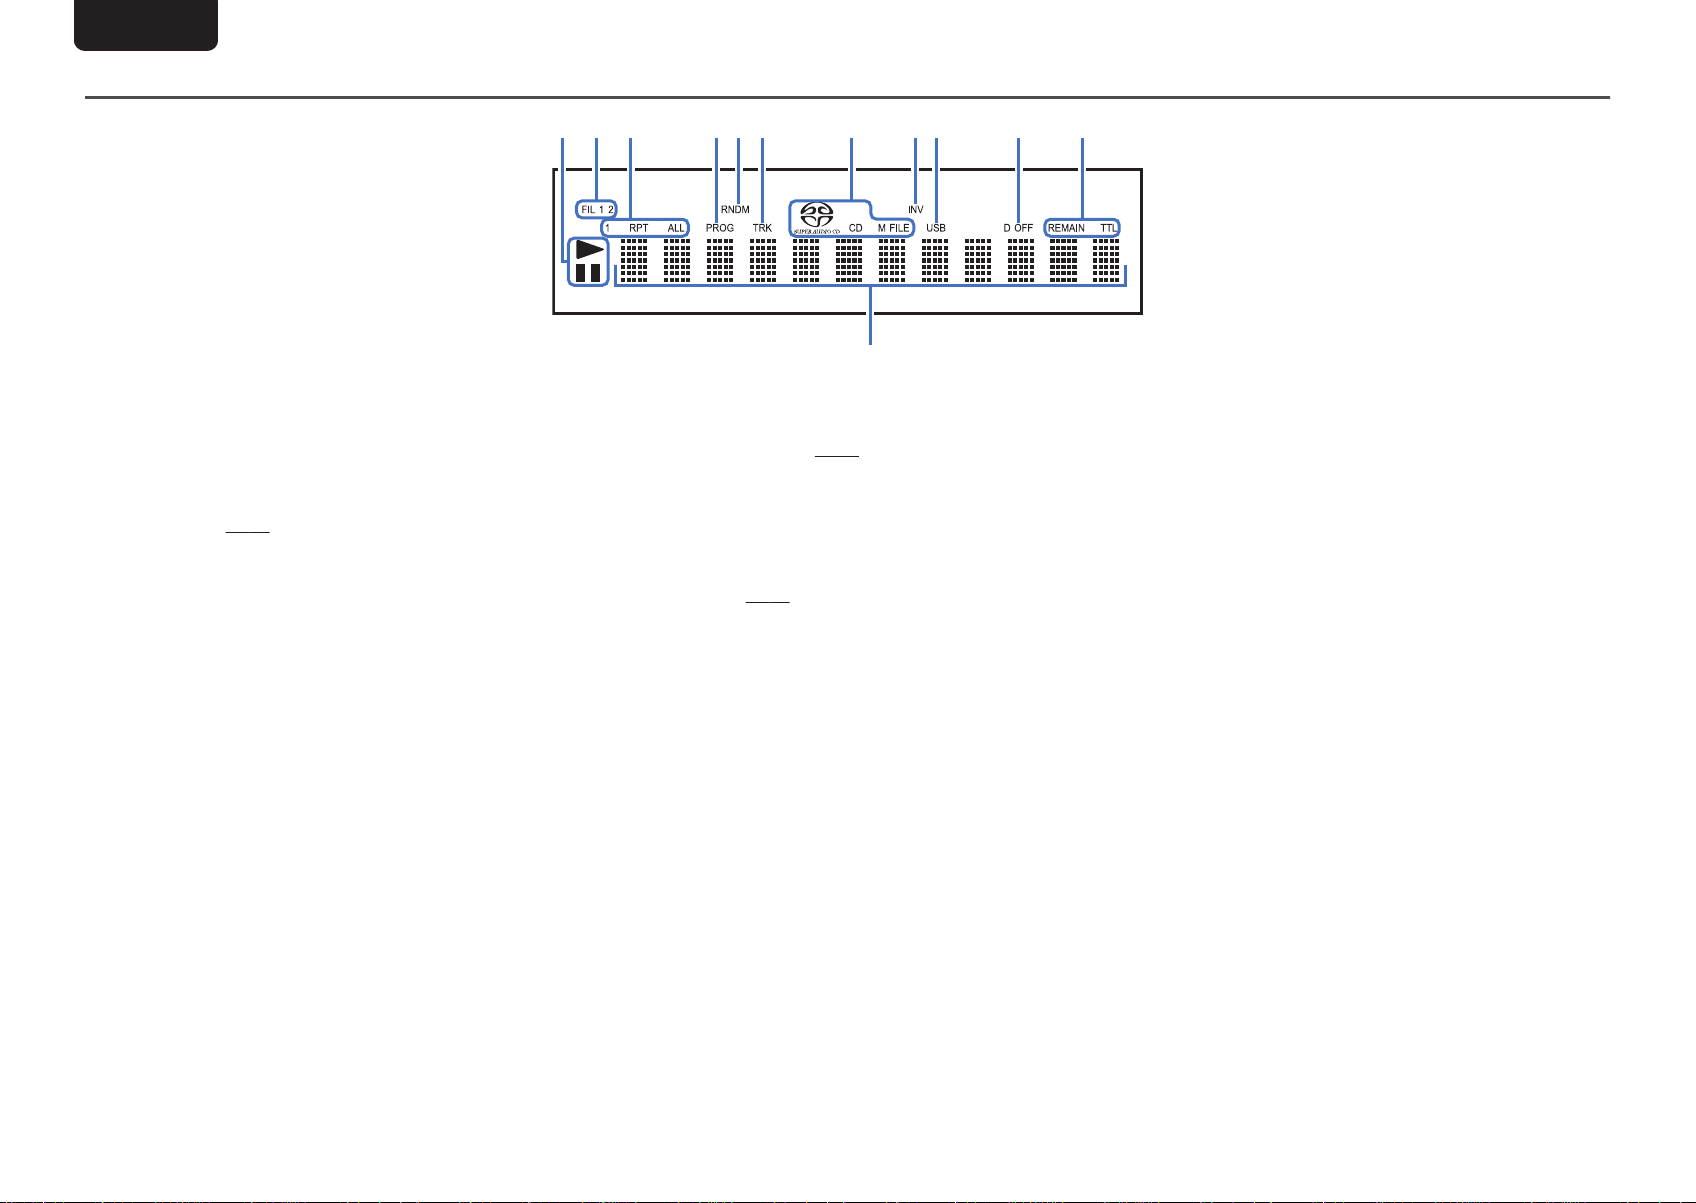
Display
.
Playback mode indicators
A
1 : Lights up during playback.
3 : Lights up during pause.
Filter indicators (FIL 1 2)
B
This indicator shows which filter (Filter 1 or Filter 2) is
selected. (v
Repeat mode indicators
C
Lights to match the repeat mode settings.
Program indicator (PROG)
D
Lights up during program playback.
Random indicator (RNDM)
E
Lights during random playback.
Track number indicator (TRK)
F
Lights up when displaying the track number.
Disc media indicators
G
Displays the type of disc that is being played back.
“M FILE” lights up when a a CD-R/-RW or DVD-R/-
RW/+R/+RW is played.
p. 24)
INV indicator
H
This indicator lights up when the inverted phase output
setting is in effect. (v
USB indicator
I
This indicator lights up when “iPod/USB” is set as the
playback media mode.
Digital output off indicator (D OFF)
J
This indicator lights up when the digital output setting is
set to off. (v p. 12)
Time display indicators
K
REMAIN : This indicator lights up while the remaining
track time is displayed.
TTL : This indicator lights up while the total remaining
time.
Information display
L
Displays various information or playback elapsed time and
so on of the disc.
p. 27)
5
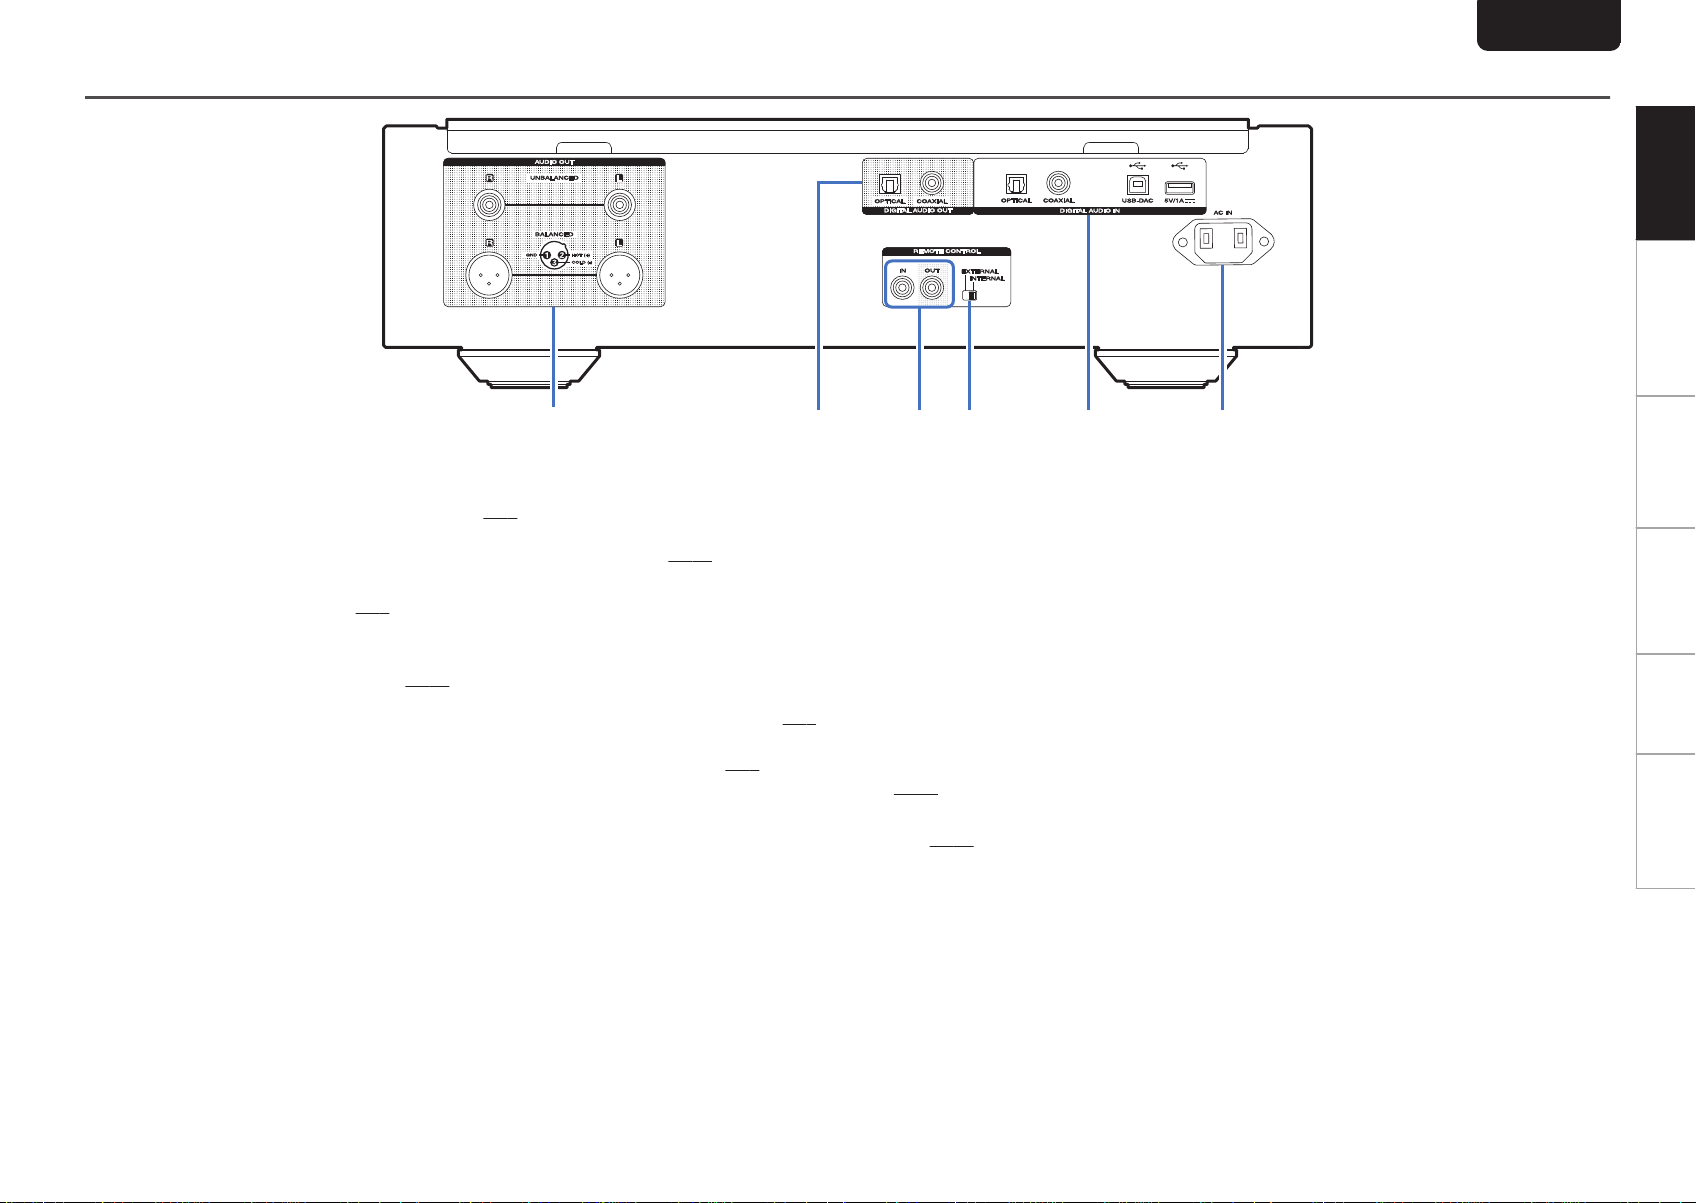
Rear panel
q
wer t y
ENGLISH
Overview Connections Playback Settings Tips Appendix
.
AUDIO OUT connectors
A
Used to connect devices equipped with analog audio
inputs connectors or an external amplifier. (v
DIGITAL AUDIO OUT connectors (COAXIAL/
B
p. 8)
OPTICAL)
Used to connect an AV receiver or D/A converter that has
a digital input connectors. (v p. 8)
REMOTE CONTROL connectors
C
Used to connect to a Marantz amplifier that is compatible
with the remote control function.
(v
p. 10)
EXTERNAL/INTERNAL switch
D
Turn this switch to “EXTERNAL” to operate the unit by
pointing the remote control at the amplifier connected to
this unit using the remote control connection.
(v p. 10)
DIGITAL AUDIO IN connectors
E
Used to connect a device with digital audio output
connectors (coaxial/optical) or to connect a USB memory
device, an iPod/iPhone with the supplied USB cable or a
computer.
0
“Connecting to a device with digital audio output
connectors” (v p. 9)
0
“Connecting an iPod or USB memory device to the USB
port” (v
0
“Connecting a PC or Mac” (v p. 10)
AC inlet (AC IN)
F
p. 9)
Used to connect the power cord. (v p. 10)
6
q
w
e
r
t
u
i
o
Q0
Q1
y
Q7
Q9
Q8
Q3
Q5
Q6
Q2
Q4
r
e
w
q
y
t
u
i
o
Q0
ENGLISH
Remote control unit
Operating this unit
n
To operate CD player, press REMOTE MODE CD button
to switch the remote control to the CD operation mode.
.
Power operation button (X CD)
A
This turns the power on/off (standby).
Remote mode select button (REMOTE MODE CD)
B
This switches the remote control operating mode to CD.
Cursor buttons (uio p)
C
These select items.
DISPLAY button
D
This turns the display on/off. Press and hold to turn the
illumination lamp on/off.
System buttons
E
These perform playback related operations.
0
Skip buttons (8 / 9)
0
Stop button (2)
0
Play button (1)
0
Pause button (3)
7
(v
p. 11)
Information button (INFO)
F
This switches the track information shown in the display
during playback.
Number buttons (0 – 9, +10)
G
These enter numbers into the unit.
RANDOM button
H
Switches the random playback.
REPEAT button
I
Switches the repeat playback.
FILTER button
J
This switches the filter characteristics. (v
SOUND MODE button
K
p. 24)
This switches the playback layer of a Super Audio CD.
ENTER button
L
This determines the selection.
SETUP button
M
This displays the setting menu on the display.
(v p. 25)
Playback mode switching button (MODE/TRIM)
N
This switches the playback mode.
OPEN/CLOSE button
O
Opens and closes the disc tray. (v p. 13)
DISC/INPUT button
P
Used to select the playback media mode.
CLEAR button
Q
This clears the program registration.
PROGRAM button
R
This sets program playback.
DIGITAL OUT button
S
(v
This switches the digital audio out on/off.
(v
p. 14)
(v
p. 14)
(v
p. 11)
p. 12)
Amplifier operations
n
A Marantz amplifier can be operated.
.
Cursor buttons (uio p)
A
DISPLAY button
B
Input source select buttons (INPUT df)
C
Power operation button (X AMP)
D
Remote mode select button (REMOTE MODE AMP)
E
ENTER button
F
SETUP button
G
Volume balance adjustment menu button (MODE/
H
TRIM)
VOLUME buttons (df)
I
MUTE button
J
0
The remote control may not operate some products.
Connections
R
L
R
L
R
L
R
L
R
L
R
L
AUDIO
RL
IN
AUDIO
LR
IN
Amplifier
1
2
3 HOT
COLD
GND
1
2
3 COLD
HOT
GND
OPTICAL
IN
COAXIAL
IN
AV receiver /
D/A converter
ENGLISH
Contents
n
Connecting to a stereo audio amplifier
Connecting to a device with digital audio input
connectors
Connecting to a device with digital audio output
connectors
Connecting an iPod or USB memory device to the USB
port
Connecting a PC or Mac
Connecting devices with remote control connectors
Connecting the timer device
Connecting the power cord
NOTE
0
Do not plug in the power cord until all connections have
been completed.
0
Do not bundle power cords together with connection
cables. Doing so can result in noise.
Cables used for connections
n
Provide necessary cables according to the devices you want
to connect.
Audio cable
(supplied)
.
Balance cable
(Sold separately)
.
Remote connector
cable
(supplied)
Optical cable
(Sold separately)
Coaxial digital cable
(Sold separately)
USB cable
(Sold separately)
.
.
.
.
Connecting to a stereo audio
8
amplifier
8
This unit has both unbalanced and balanced connectors. The
balanced connectors have three pins, making it possible to
9
transmit audio signals as a balanced signal, reducing the
effect of external noise. They also have a removable lock
9
mechanism, which reduces shaking in the connector area,
making the connection highly reliable.
10
10
10
10
.
Phases of the balanced connectors
n
The XLR connector for professional use is internally wired in
either of the following two systems. This unit employs the
European system.
0
USA system (2 PIN=COLD 3 PIN=HOT)
.
0
European system (2 PIN=HOT 3 PIN=COLD)
.
If a product that employs the USA system is connected with
this unit via a balanced cable, the output signal may be
phase-inverted. To correct the inversion, set the “Phase” to
“Inverted” at the menu setting. (v p. 27)
Connecting to a device with
digital audio input
connectors
You can enjoy digital audio playback by connecting an AV
receiver or D/A converter that has a digital audio terminal to
this unit.
.
NOTE
0
Digital audio output stops during playback of the HD layer
of Super Audio CDs and DSD files.
0
Digital audio output stops during playback of the DSD files
and linear PCM signals with a sampling frequency of
352.8/384 kHz using this unit’s D/A converter.
Overview Connections Playback Settings Tips Appendix
8
COAXIAL
OUT
OPTICAL
OUT
CD transport /
Digital device
or
iPod
USB memory
device
• iPod classic
• iPod nano
• iPod touch
• iPhone
ENGLISH
Connecting to a device with
Connecting an iPod or USB
Supported iPod/iPhone models
n
Use this connection to input digital audio signals to this unit,
and convert the signals for playback using the D/A converter
of this unit. (v p. 20)
.
n
digital audio output
connectors
Specifications of supported audio
formats
See “D/A converter” (v p. 39).
memory device to the USB
port
You can enjoy music stored on an iPod/iPhone or USB
memory device.
0
To connect an iPod/iPhone to this unit, use the USB
adapter cable that was supplied with the iPod/iPhone.
0
For operating instructions, see
iPod” (v
p. 16) or “Playing a USB memory
device” (v p. 18).
.
0
Marantz does not guarantee that all USB memory devices
will operate or receive power. When using a portable USB
hard disk drive (HDD) which came with an AC adapter, use
that device’s supplied AC adapter.
NOTE
0
USB memory devices will not work via a USB hub.
0
It is not possible to use this unit by connecting the unit’s
USB port to a PC via a USB cable.
0
Do not use an extension cable when connecting a USB
memory device. This may cause radio interference with
other devices.
“Playing an
.
9
Ty pe A
USB 2.0 cable
(Sold separately)
Ty pe B
Computer on which the driver software and audio player
software are installed
This unit
Remote
connector
cable
(supplied)
Signal flow
Amplifier
Set to
“EXTERNAL”.
This unit
Amplifier
To household power outlet
(AC 120V, 60Hz)
Timer device
Power cord (supplied)
To household power outlet
(AC 120 V, 60 Hz)
ENGLISH
Connecting a PC or Mac
By connecting a computer to the USB port (USB-DAC) on the
rear panel of this unit using a commercially available USB
cable (Sold separately), this unit can be used as a D/A
converter.
.
0
0
NOTE
0
(v
p. 20)
Before USB connecting this unit to your computer, install
the driver software in your computer. (v p. 20)
Download the driver software from the SA-10 page of the
Marantz website.
Use a cable that is 10 ft (3 m) or less to connect to the
computer.
Connecting devices with
remote control connectors
When you use this unit connected to a Marantz amplifier, this
unit receives operation signals sent from the amplifier and
operates accordingly.
Next, configure the “Connection” and “Setting”.
Connection
Use the supplied remote connector cable to connect the
REMOTE CONTROL IN connector of this unit to REMOTE
CONTROL OUT connector of the amplifier.
Setting
Turn the EXTERNAL/INTERNAL switch on the unit to
“EXTERNAL”.
0
This setting will disable remote sensor reception of this
unit.
0
To operate the unit, point the remote control at the remote
sensor of the amplifier.
0
To use this unit by itself without connecting an amplifier,
turn the switch to “INTERNAL”.
Connecting the timer device
This unit can perform timer play when an amplifier and timer
device are connected to this unit.
(“Timer Play” (v p. 27))
.
Connecting the power cord
After completing all the connections, insert the power plug
into the power outlet.
Overview Connections Playback Settings Tips Appendix
.
.
10
CD
DISPLAY
FILTER DIGITAL OUT
DISC/INPUT
SOUND MODE
X
ENGLISH
Playback
Contents
n
Basic operation
Playing CDs/Super Audio CDs
Playing Data CDs and Data DVDs
Playing an iPod
Playing a USB memory device
Using as a D/A converter
Specifying the desired sound quality
Basic operation
Turning the power on
1
.
Press X on this unit to turn the power on.
When power is switched to standby
n
11
13
15
16
18
20
24
Press X CD.
1
The unit switches to standby mode, and the STANDBY
indicator lights red.
NOTE
0
Power continues to be supplied to some of the circuitry
even when the power is in the standby mode. When
leaving home for long periods of time or when going on
vacation, either press X on the main unit to turn off the
power, or unplug the power cord from the power outlet.
Selecting the playback media mode
Press DISC/INPUT to select the playback
1
media mode.
Disc
(Default) :
iPod/USB:
USB-DAC:
Coaxial:
Optical:
0
You can also select the playback media mode by pressing
DISC/INPUT on the unit.
Select to playback a disc.
Select to playback a iPod and USB
memory device.
Plays back audio files on the
computer.
Plays back the device connected
to the COAXIAL connector.
Plays back the device connected
to the OPTICAL connector.
Having the display and the
illumination lamp off
The display circuit operation can be stopped to minimize
noise from the display and the display circuit which could
interfere with the analog audio output signal.
During playback, press DISPLAY
1
Each time you press DISPLAY, the display and the
illumination lamp (blue) switch on/off at the same time.
0
When the display is switched off, the “DISPLAY OFF”
indicator lights.
0
If you press DISPLAY at any time other than during
playback, the display and the illumination lamp (blue) do
not light off.
Having the illumination lamp always
off
The following procedure makes the illumination lamp always
off regardless of the display on/off operation.
Press and hold DISPLAY for two seconds and
1
longer while display is lighted.
Press and hold DISPLAY for two seconds and longer
while the lamp is always off to return to the normal
setting.
0
Press X CD on the remote control unit to turn on power
from standby mode.
0
You can also press 1 on the main unit to turn on power
from standby mode.
11
ENGLISH
Stopping digital outputs
Stopping digital audio output reduces a source of noise that
affects sound quality, enabling higher sound quality playback.
Press DIGITAL OUT.
1
The digital audio output is switched on and off each
time the button is pressed.
0
When digital output is turned off, the “D OFF”
indicator lights up on the display.
Setting the top priority playback
layer for Super Audio CDs
The layer that is played with priority when the disc is loaded
can be set.
Press DISC/INPUT to select the playback
1
media mode to “Disc”.
Check that no disc is loaded.
2
0
If the layer is switched while the disc is being loaded,
the playback layer switches for that disc, but the top
priority playback layer setting itself does not change.
Press SOUND MODE and switch to the layer
3
you want to set.
STEREO
(Default):
MULTI:
CD:
Plays back the 2-channel area
of the Super Audio CD.
Plays back the multi-channel
area of the Super Audio CD.
The analog output of this unit
outputs a down-mixed 2channel signal.
Plays back the CD layer of the
Super Audio CD.
0
When a disc is loaded after the setting has been made, the
contents recorded on the set layer are displayed.
0
If a disc that does not contain the layer set for top priority
playback is loaded, the contents recorded on another layer
are displayed automatically.
0
This setting is stored in the memory and is not cleared
even when the disc holder is opened or closed or the
power is turned off. To change the setting, repeat the
procedure above.
0
The priority playback layer cannot be set when a disc is
inserted or “Open
0
If the area and layer have not been set for a disc, the
priority playback order is as follows:
STEREO
A
MULTI
B
CD
C
” is shown on the display.
Overview Connections Playback Settings Tips Appendix
12
SOUND MODE
PROGRAM
0 – 9, +10
INFO
RANDOM
REPEAT
1
8 9
3
2
CLEAR
OPEN/CLOSE
ENGLISH
Playing CDs/Super Audio
CDs
.
Playing CDs and Super Audio CDs
Press OPEN/CLOSE to insert a disc.
1
(v p. 37)
The playback media mode automatically switches to
“Disc”.
0
You can also open/close the disc tray by pressing 5
on the unit.
0
You can also close the disc tray by pressing 1, then
starts playback automatically.
When playing back a Super Audio CD, press
SOUND MODE to set the playback
2
layer.
Press 1.
3
The 1 indicator lights on the display. Playback starts.
NOTE
0
Do not place any foreign objects in the disc tray. Doing so
could damage the unit.
0
Do not push the disc tray in by hand when the power is
turned off. Doing so could damage the unit.
(v
p. 12)
Operation buttons Function
1
3
2
8, 9
0 – 9, +10 Select the track
REPEAT
RANDOM Random playback
INFO
Playback
Pause
Stop
Skip to previous track / Skip to next
track
(Press and hold)
Fast-reverse / Fast-forward
Repeat playback
0
Switching between All-track
repeat and Single-track repeat.
Time display switching
0
Switching between elapsed time
of the current track, remaining
time of the current track and
remaining time of all tracks.
0
The time displayed on this unit
may differ from this actual time,
as it is calculated by truncating to
the nearest 1 second.
Text information recorded on the
Super Audio CD appears in the
display.
13
 Loading...