

Page 1

22
Model PM-17mk
Integrated Amplifier
UserGuideUserGuide
2
UserGuide
22
UserGuideUserGuide
Page 2

ENGLISH
WARRANTY
Contact your local Marantz distributors for warranty information.
RETAIN YOUR RECEIPT AS PROOF OF PURCHASE
Your receipt is proof of a valuable purchase. Keep it in a safe place
where you can easily find it for filing insurance claims when necessary
or when corresponding with Marantz.
IMPORTANT
It is the responsibility of the consumer to establish proof of purchase
when seeking servicing covered by the warranty. Your receipt or invoice is valid as such proof.
U.K. ONLY
This undertaking is in addition to a consumer’s statutory rights and
does not affect those rights in any way.
FRANÇAIS
GARANTIE
Veuillez contacter les revendeurs Marantz locaux pour de plus amples informations concernant la garantie.
CONSERVER LE TICKET DE CAISSE COMME PREUVE
D’ACHAT
Le ticket de caisse représente la preuve d’un achat de valeur. Le
conserver dans un endroit sûr, où il peut être retrouvé aisément,
afin d’introduire les revendications éventuelles auprès des
assurances ou auprès de Marantz, le cas échéant.
IMPORTANT
Il incombe au consommateur d’établir la preuve de son achat, à l’aide
du ticket de caisse ou de la facture, lors de la demande d’interventions couvertes par la garantie.
DEUTSCH
GARANTIE
Wenden Sie sich bezüglich Informationen zur Garantie an Ihren örtlichen Marantz-Händler.
BEWAHREN SIE ALS KAUFNACHWEIS IHRE KAUFQUITTUNG AUF
Ihre Quittung bzw. Rechnung ist ein Beweis für Ihren wertvollen Kauf.
Bewahren Sie diese an einem sicheren Ort auf, wo Sie sie im Fall
eines Versicherungsschadens oder bei der Korrespondenz mit
Marantz leicht wiederfinden können.
WICHTIG
Es liegt in der Verantwortung des Käufers, den Kaufnachweis zu
liefern, wenn Garantiereparaturen in Anspruch genommen werden
sollen. Ihre Quittung oder Rechnung dient als ein solcher Nachweis.
NEDERLANDS
GARANTIE
Neem contact op met de Marantz distributeurs in uw buurt voor informatie over de garantie.
BEWAAR UW REçu ALS AANKOOPBEWIJS.
Uw reçu is het bewijs dat u een waardevol product heeft gekocht.
Berg het veilig op, zodat u het snel terug kunt vinden als u een
verzekeringsclaim moet indienen of voor uw correspondentie met
Marantz.
BELANGRIJK
De klant is verantwoordelijk voor het tonen van een aankoopbewijs
wanneer het apparaat onder garantie moet worden gerepareerd. Uw
reçu of uw factuur is een geldig aankoopbewijs.
ESPAÑOL
GARANTÍA
Consulte a su distribuidor local de Marantz si desea más información
sobre la garantía.
CONSERVE EL RECIBO COMO PRUEBA DE COMPRA
Su recibo constituye la prueba de compra. Guárdelo en un lugar
seguro donde pueda hallarlo fácilmente en caso de que lo necesite
para presentar una reclamación de garantía o mantener algún tipo
de correspondencia con Marantz.
IMPORTANTE
Es responsabilidad del consumidor presentar la prueba de compra
siempre que solicite alguna reparación cubierta por la garantía. La
factura o el recibo son documentos válidos como prueba de compra.
ITALIANO
GARANZIA
Contattare i distributori Marantz della zona dell’utente per
informazioni sulla garanzia.
CONSERVARE LA RICEVUTA COME PROVA D’ACQUISTO
La ricevuta comprova un acquisto di valore. Conservarla in un luogo
sicuro e facilmente reperibile per intraprendere dei reclami, ove
necessario, o quando ci si rivolga alla Marantz.
IMPORTANTE
L’utente ha la responsabilità di produrre una prova d’acquisto se
vuole servirsi dell’assistenza coperta da garanzia. La ricevuta o la
fattura è valida in questo senso.
PORTUGUÊS
GARANTIA
Para informações sobre a garantia, contacte o concessionário local
Marantz.
GUARDE O TALão DE COMPRA COMO PROVA
O talão de compra é a prova de ter comprado qualquer coisa de
valor. Guarde-o em lugar seguro, pois pode precisar dele para obter
uma cobertura de seguro ou no âmbito de correspondência com
Marantz.
IMPORTANTE
Para obter um serviço coberto pela garantia, o cliente deve
apresentar a prova e a data da compra. O talão ou a factura
constituem provas suficientes.
SVENSKA
GARANTI
Kontakta din lokala Marantz-distributör för information om garantin.
SPAR KVITTOT SOM INKöpSBEVIS
Kvittot är ditt bevis för ett värdefullt inköp. Förvara det på en säker
plats där du lätt kan hitta det för försäkringsfrågor eller korrespondens
med Marantz.
VIKTIGT
Kunden ansvarar för att uppvisa inköpsbevis när service begärs som
täcks av garantin. Ditt kvitto eller faktura är ett giltigt inköpsbevis.
DANSK
GARANTI
Bed din Marantz-forhandler om oplysninger om garantien.
GEM DIN KVITTERING SOM KøBSBEVIS
Din kvittering er bevis på et værdifuldt køb. Opbevar den på et sikkert
sted, hvor du let kan finde den i forbindelse med eventuelle erstatningskrav eller korrespondance med Marantz.
VIGTIGT
Det er brugerens ansvar at forelægge købsbevis, hvis der er brug
for det i garantiforbindelse. Din kvittering eller faktura er gyldige
beviser.
Page 3
CONTENTS
Engligh ............................................................................................................................................................................................. page 1
Français.......................................................................................................................................................................................... page 10
Deutsch .......................................................................................................................................................................................... Seite 19
Nederlands .................................................................................................................................................................................. pagina 28
Español ....................................................................................................................................................................................... página 37
Italiano ......................................................................................................................................................................................... pagina 46
Português .................................................................................................................................................................................... página 55
Svenska ......................................................................................................................................................................................... sidan 64
Dansk ............................................................................................................................................................................................. side 73
Specifications................................................................................................................................................................................. page 82
Figures ........................................................................................................................................................................................... page 83
English
CE MARKING
The PM-17mk2conforms with the EMC directive and low-voltage directive.
Français
Le PM-17mk2 est conforme à la directive EMC et à la directive sur les basses tensions.
Deutsch
Der PM-17mk2 entspricht den Bestimmungen über elektromagnetische Störfreiheit (EMC) und denen über
Niederspannungsgeräte.
Nederlands
De PM-17mk2voldoet aan de EMC-richtlijn en aan de richtlijn voor laag voltage.
Español
El modelo PM-17mk2cumple la directiva EMC y a la directiva sobre baja tensión.
Italiano
Il PM-17mk2è conforme alla direttiva EMC e alla direttiva sul basso voltaggio.
Português
O PM-17mk2é conforme às Directivas relativas à EMC e à baixa tensão.
Svenska
PM-17mk2uppfyller direktiven angående elektromagnetisk kompatibilitet och lågspänning.
Dansk
PM-17mk2overholder EMC-direktivet og lavspændingsdirektivet.
English
To ventilae the unit, do not install the unit in a rack or bookshelf, and note
the followings.
- Do not touch the top of the enclosure during operation.
- Do not block the openings in the enclosure during operation.
- Do not insert objects beneath the unit.
- Do not block the ventilation slots at the top of the unit.
Do not place anything about 1 meter above the top panel.
- Make a space of about 0.2 meter around the unit.
Français
Pour que l’appareil puisse être correctement ventilé, ne pas l’installer
dans un meuble ou une bibliothèque et respecter ce qui suit.
- Ne pas toucher le dessus du coffret.
- Ne pas obstruer les ouïes de ventilation du coftret pendant le
fonctionnement.
- Ne placer aucun objet sous l’appareil
- Ne pas obstruer les ouães de ventilation du panneau supérieur. Ne placer
aucun objet à moins d’un mètre environ du panneau supérieur.
- Veiller à ce qu’aucun objet ne soit à moins de 0,2 mètre des côtés de
l’appareil.
Deutsch
Um eine einwandfreie Belüftung des Geräts zu gewährleisten, darf das
Gerät nicht in einem Gestell pder Bücherregal aufgestellt werden; die
folgenden Punkte sind besonders zu beachten:
- Während des Betriebs das Oberteil des Gehäuses nicht berühren.
- Während des Betriebs die Öffnungen im Gehäuse nicht blockieren.
- Keine Gegenstände in das Gerät einführen.
- Die Belüftungsschlitze an der Oberseite des Geräts dürfen nicht blokkiert
werden. Darauf achten, daß über dem Gerät ein Freiraum von
mindestens 1 meter vorhanden ist.
- Auf allen Geräteseiten muß ein Zwischenraum von ungefähr 0,2 meter
vorhanden sein.
Nederlands
Installeer het toestel niet in een rek of boekenkast waar de ventilatie
mogelijk wordt gehinderd. Let tevens op de volgende punten:
- Raak de bovenkant van het toestel niet aan als het in gebruik is.
- Blokkeer de openingen van het toestel niet als het in gebruik is.
- Plaats geen onderwerpen onder het toestel.
- Blokkeer de ventilatie-openingen aan de bovenkant van het toestel niet.
Zorg dat er tenminste 1 meter vrije ruimte boven het toestel is.
- Zorg dat er 0,2 meter vrije ruimte rond het toestel is.
Español
Para ventilar la unidad no la instale en una estanteria ni estante para
libros, y tenge en cuenta lo siguiente:
- No toque la parte superior de la caja durante el funcionamiento.
- No tape las ranuras en la caja durante el funcionamiento.
- No ponga objetos debajo de la unidad.
- No tape las ranuras de ventilación de la parte superior de la unidad.
No ponga nada a menos de 1 metro por encima del panel superior.
- Deje un espacio de unos 0,2 metro alrededor de la unidad.
Italiano
Perch é l’unità possa essere sempre ben ventilata, non installarla in scaffali
o librerie e tenere presente quanto segue.
- Non toccare la parte superiore del rivestimento durante il funzionamento.
- Non inserire oggetti al di sotto dell’unit¡à.
- Non bloccare le fessure di ventilazione sopra l’unità
Non posare nulla per circa un metro sopra il pannello superiore.
- Lasciare 0,2 metro liberi tutto intomo l’unità.
Português
Para ventilar o aparelho, não instalá-lo dentro duma estante ou algo similar,
e observar as seguintes recomendações:
- Não tocar a parte superior do aparelho durante a operação.
- Não bloquear as aberturas do aparelho durante a operação.
- Não insertar objectos debaixo do apareiho.
- Não bloquear as aberturas de ventilação na parte de cima do aparelho.
Deixar um espaço completamente livre de cerca de 1 metro acima do
painel superior.
- Deixar um espaço de cerca de 0.2 metro ao redor do aparelho.
Svenska
För att ventilera enheten, ställ den inte i ett ställ eller bokhylla och tänk på
följande.
- Vidrör inte ytterhöljets ovansida under pågående drift.
- Blockera inte öppningarna i ytterhöljet under pågående drift.
- Stick inte in föremål under enheten.
- Blockera inte ventialtionshålen ovanpå enheten.
Placera inte någonting närmare än 1 meter ovånför apparaten eller
enheten.
- Se till det finns omkring 0,2 meter fri plats runt omkring enheten.
Dansk
Anbring ikke apparatet i et rack eller en boghylde, da dette kan bloke
luftcirkulationen omkring apparatet, lagttag ligeledes følgende:
- Berør ikke oversiden af kabinettet under anvendelsen.
- Bloker ikke åbningerne i kabinettet under anvendelsen.
- Stik ikke genstande ind under apparatet.
- Bloker ikke ventilationsåbningerne ovenpå apparatet.
Anbring ikke noget nærmere end 1 m over apparatets overside.
- Sørg for, at der er frit område på omkring 0,2 m omkring apparatet.
3
Page 4
ENGLISH
FOREWORD
This section must be read before any connection is made to
the mains supply.
WARNINGS
Do not expose the equipment to rain or moisture.
FRANCÇAIS
DEUTSCH
NEDERLANDS
ESPAÑOL
ITALINO
PORTUGUÊS
SVENSKA
DANSK
Do not remove the cover from the equipment.
Do not push anything inside the equipment through the
ventilation holes.
Do not handle the mains lead with wet hands.
EQUIPMENT MAINS WORKING SETTING
Your Marantz product has been prepared to comply with the
household power and safety requirements that exist in your
area.
This product can be powered by 230 V AC only.
IMPORTANT: (For UK version only)
This apparatus is fitted with an approved moulded 13 Ampere
plug.
To change a fuse in this type of plug proceed as follows:
1. Remove fuse cover and fuse.
2. Fix new fuse which should be a BS1362 5A, A.S.T.A. or BSI
approved type.
3. Refit the fuse cover.
If the fitted plug is not suitable for your socket outlets, it should
be cut off and an appropriate plug fitted in its place.
If the mains plug contains a fuse, this should have a value of
5A. If a plug without a fuse is used, the fuse at the distribution
board should not be greater than 5A.
NOTE:
The severed plug must be destroyed to avoid a possible shock
hazard should it be inserted into a 13A socket elsewhere.
HOW TO CONNECT A PLUG
The wires in the mains lead are coloured in accordance with
the following code:
BLUE—“NEUTRAL” (“N”)
BROWN—“LIVE” (“L”)
1. The BLUE wire must be connected to the terminal which is
marked with the letter “N” or coloured BLACK.
2. The BROWN wire must be connected to the terminal which
is marked with the letter “L” or coloured RED.
3. Do not connect either wires to the earth terminal in the plug
which is marked by the letter “E” or by the safety earth
symbol or coloured green or green-and-yellow.
Before replacing the plug cover, make certain that the cord
grip is clamped over the sheath of the lead — not simply
over the two wires.
COPYRIGHT
Recording and playback of any material may require consent.
For further information refer to the following:
— Copyright Act 1956
— Dramatic and Musical Performers Act 1958
— Performers Protection Acts 1963 and 1972
— any subsequent statutory enactments and orders
ABOUT THIS USER GUIDE
Refer to the Figures on the page 83 at the rear of this user
guide. The numbers on the diagrams correspond to those in
the text. All references to the connections and controls that
are printed in BOLD type are as they appear on the unit.
PRECAUTIONS
The following precautions should be taken when operating the
equipment.
GENERAL PRECAUTIONS
When setting the equipment ensure that:
— the ventilation holes are not covered
— air is allowed to circulate freely around the equipment
— it is on a vibration free-surface
— it will not be exposed to interference from an external source
— it will not be exposed to excessive heat, cold, moisture or
dust
— it will not be exposed to direct sunlight
— it will not be exposed to electrostatic discharges
Never place heavy objects on the equipment.
If a foreign body or water does enter the equipment, contact
your nearest dealer or service centre.
Do not pull out the plug by pulling on the mains lead, hold the
plug.
It is advisable when leaving the house, or during a thunderstorm, to disconnect the equipment from the mains supply.
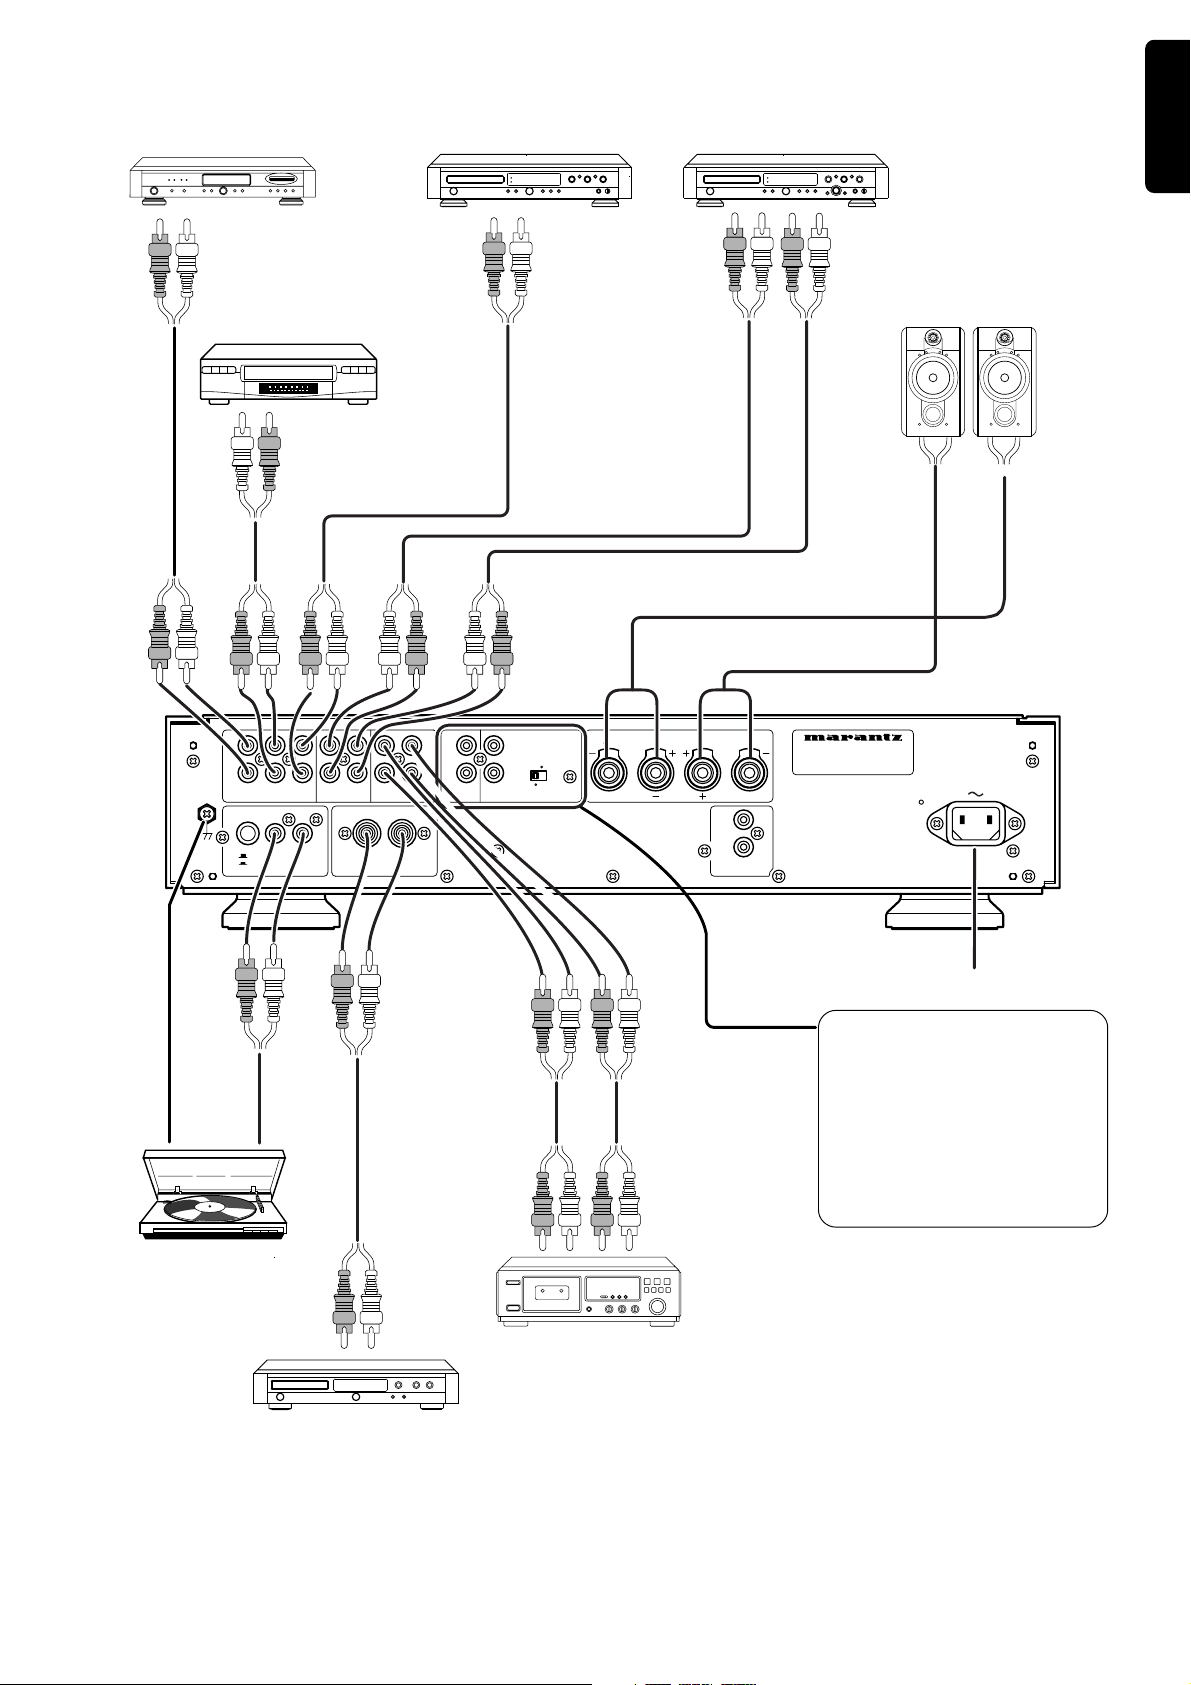
CONNECTIONS
(Figure 1)
CONNECTIONS OF TUNER
Connect the output jacks of your stereo tuner to the LINE 1LINE 3 jacks of this unit.
CONNECTION OF VCR OR DVD PLAYER
Connection the audio output jacks of your VCR or DVD player
to the LINE1–LINE3 jacks of this unit.
CONNECTION OF COMPACT DISC PLAYER
Connect the output jacks of your CD player to the CD jacks of
this unit.
CONNECTION OF ANALOG TURNTABLE
Connect the L (Left) output cord of the turntable to the “L”
PHONO jack of this unit, and connect the R (Right) output cord
to the “R” PHONO jack. Also be sure to connect the turntable's
grounding wire to the GND jack of this unit. The GND jack
does not have to be connected if the turntable is not provided
with a grounding wire.
CONNECTION OF CD RECORDER/TAPE DECK
Connect the IN (line input) jacks of the CD recorder or the tape
deck to the OUT jacks of this unit, and connect the OUT (line
output) jacks of the CD recorder or the tape deck to the IN
jacks of this unit.
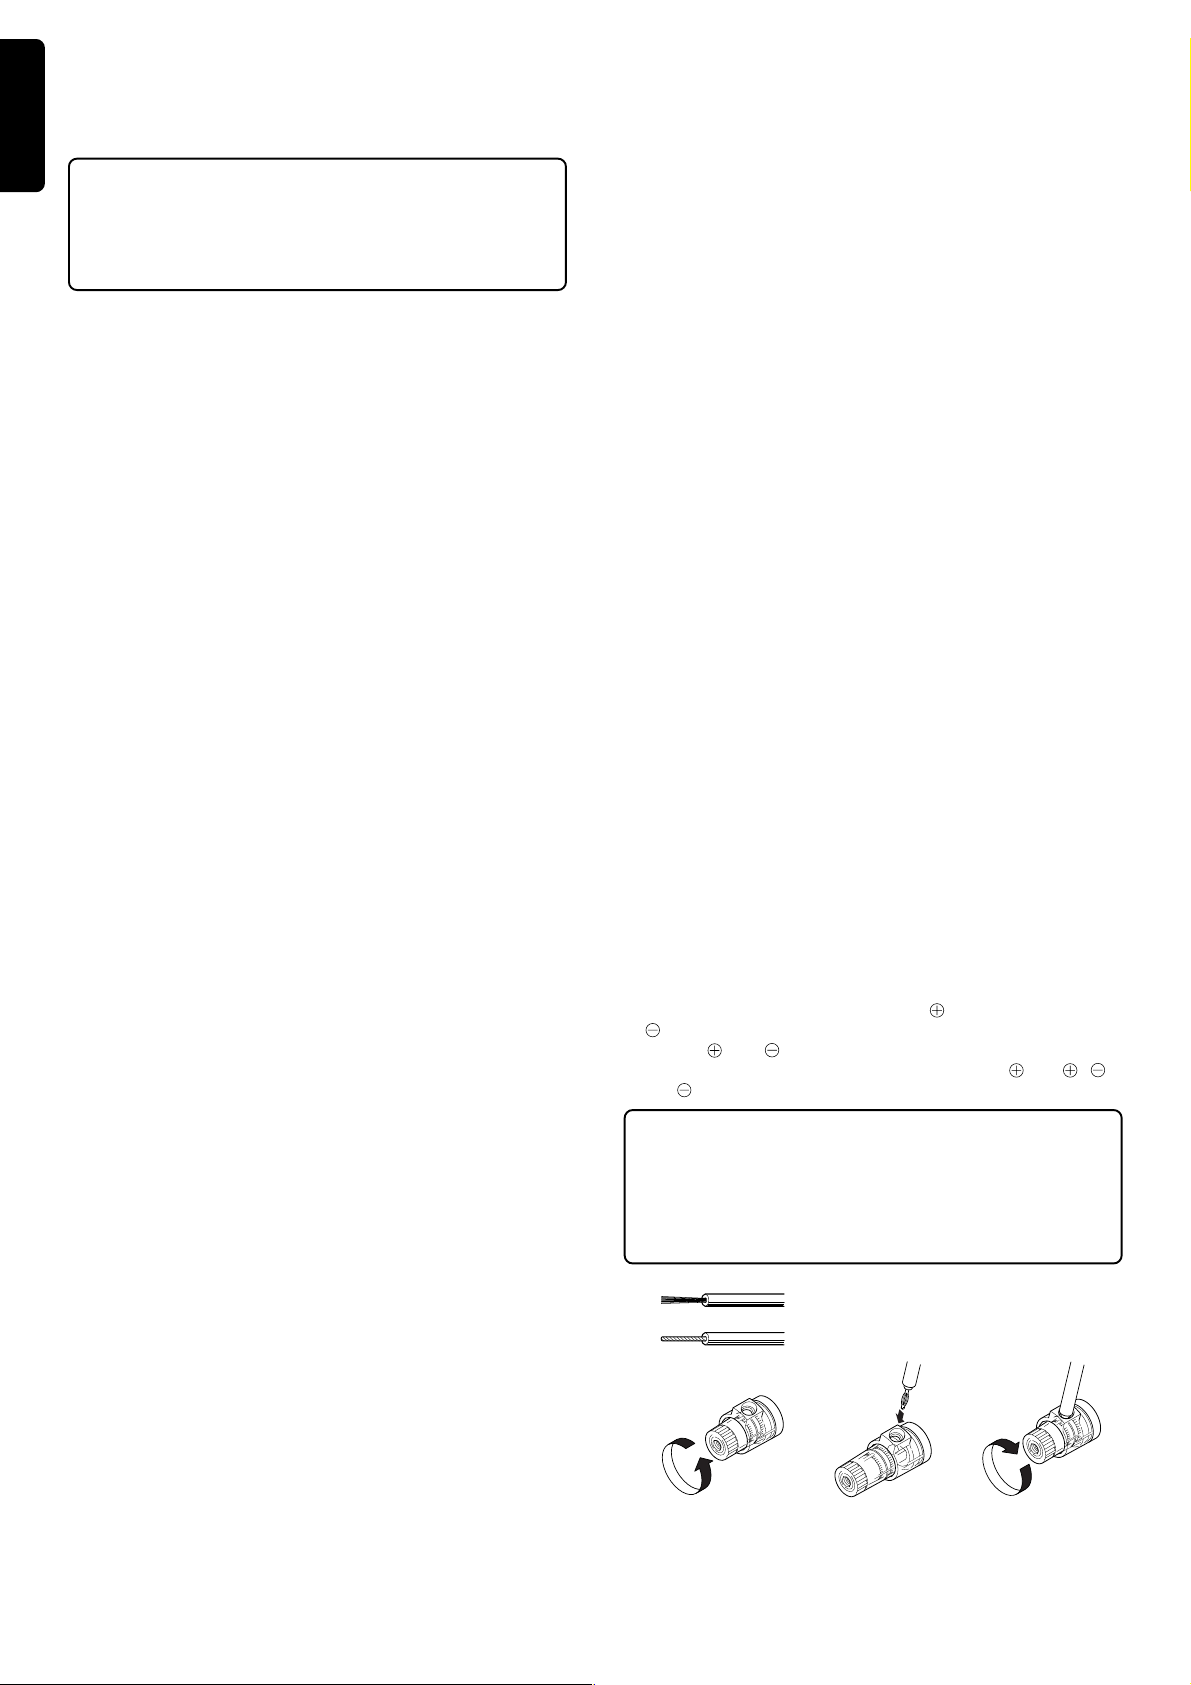
CONNECTION OF SPEAKER SYSTEMS
This unit is equipped with a sets of SPEAKERS terminals.
- The speakers in the speaker system should have an impedance
between 4 and 16 ohms. If speakers with an impedance of
less than 4 ohms are connected, the protection circuit may be
activated during play.
- Connect the Right channel speaker to the R terminals, and the
Left channel speaker to the L terminals.
- The output terminals have positive (
( : white) polarity, and each speakers also has the same
polarity (
connect the terminals with the same polarity (
with ).
When connecting two pairs of speaker systems simultaneously, the impedance of each speaker system should be
no less than 8 ohm .
Connecting a speaker system with a lower impedance than
8 ohm may activate the protection circuitry and make normal
stereo reproduction impossible.
Turn counterclockwise to
loosen.
When combined with a Marantz SM-17 (main amp), the PM17mk2main amp can be used as a BTL amp (monaural). It
cannot be used as a BTL amp when combined with other prod-
ucts.
1
and ). When connecting the speaker, be sure to
CAUTION:
Connection of speaker cord
Strip coating from extermity.
Twist conductors.
Speaker cord
Insert conductors.
: Red) and negative
with ,
Turn clockwise
to tighten.
ENGLISH
FRANCAIS
DEUTSCH
NEDERLANDS
ESPANOL
ITALINO
PORTUGUES
SVENSKA
DANSK
Page 5
ENGLISH
Fugure 1
FRANCÇAIS
DEUTSCH
NEDERLANDS
Tuner, etc
To output jacks
(LINE OUTPUT)
VCR, etc
To output jacks
(LINE OUTPUT)
DVD player, etc
To output jacks
(LINE OUTPUT)
CD-R
ENGLISH
To input jacks
(LINE INPUT)
FRANCAIS
To output jacks
(LINE OUTPUT)
LR
DEUTSCH
NEDERLANDS
ESPAÑOL
ITALINO
PORTUGUÊS
SVENSKA
L
R
23
/
TUNER OUTIN
1
PHONO
GND
LINE
MM
R
MC
Analog turntable
To output jacks
(LINE OUTPUT)
L
R
R
OUTIN
TAPE
CD-R
L
LR
CDPHONO
PRELMAIN
OUT IN
L
SEPARATE
R
COUPLED
SPEAKERS IMPEDANCE L+R:4-8 OHMS BTL:8-16 OHMS
SPEAKERS
R
L
BTL
IN
OUT
REMOTE
CONTROL
SERIAL NO.
AC IN
ESPANOL
To AC power outlet
ITALINO
The initial setting for the SEPARATE/COUPLED switch is
COUPLED.
Keep the switch at the COUPLED
setting if you are connecting it as
shown on this page.
See next page for examples of
how to connect and use the PRE
OUT (pre-amp output) jack and
MAIN IN (main amp input) jack.
PORTUGUES
SVENSKA
To output jacks
(LINE OUTPUT)
To input jacks
(LINE INPUT)
Tape deck
DANSK
CD Player
- It is also possible to connect a BS tuner, LV player, TV or other component to LINE1-LINE3 jacks.
- The audio input/output jacks of VCR or other component can be connected to CD-R and TAPE as their program sources.
2
DANSK
Page 6

ENGLISH
PRE OUT JACK AND MAIN IN JACK USAGE EXAMPLES
You can expand your audio system through appropriate setting of the SEPARATE/COUPLED switch and connection of the PRE
OUT jack and MAIN IN jack.
SEPARATE/COUPLED switch
When this switch is set to COUPLED, the PRE OUT jack and MAIN IN jack are connected internally, allowing the PM-17mk2to be
used as a pre-main amp.
When the switch is set to SEPARATE, the PRE OUT jack and MAIN IN jack are internally disconnected, allowing the PM-17mk2to
FRANCÇAIS
be used as a pre-amp or main amp.
Usage example 1: Bi-amp connection combined with Marantz SM-17 (main amp)
ENGLISH
DEUTSCH
NEDERLANDS
ESPAÑOL
ITALINO
SPEAKERS
SPEAKERS IMPEDANCE L+R:4-8 OHMS BTL:8-16 OHMS
L
Set the switch to 0 (dB).
HF
LF
SPEAKERS IMPEDANCE L+R:4-8 OHMS BTL:8-16 OHMS
L
R
BTL
INPUT SELECTOR
CD
LINE 1
PHONO
LINE 2
LINE 3
CD-R
REC SELECTOR
CD
TAPE
PHONES
L
R
BTL
SPEAKERS
SPEAKERS
TAPECD-R
LINE 1
LINE 2
COPY
LINE 3
PHONO
ON
INTEGRATED AMPLIFIER PM-17
TEMP
BASS
POWER
OFF
L
R
R
PRELMAIN
OUT IN
L
(BTL)
ATT
R
0
- 6
(dB)
INPUT
POWER AMPLIFIER SM-17
TEMP
POWER
4
- 6
SEPARATE
COUPLED
NORMAL
TREBLE
0
242
202
4
6 +
6 +- 6
(dB)
(dB)
Set the switch to COUPLED.
R+
-
R
BTL
VOLUME
20
27
15
13
35
10
43
58
BALANCE
4
LEFT
4
SOURCE
8
0
DIRECT
(-dB)
OFF
ON
RIGHT
R
Set the switch
L+
to NORMAL.
L
R
BTL OUT
-
L
HF
LF
FRANCAIS
DEUTSCH
NEDERLANDS
ESPANOL
If you are using a speaker system that supports bi-wiring, you can combine the PM-17mk2 with the SM-17 for bi-amp operation that
provides a higher quality of sound.
In case of BTL connection with SM-17. Please refer to the user guide of SM-17.
PORTUGUÊS
Usage example 2: Graphic equalizer connection
SVENSKA
INPUT SELECTOR
CD
LINE 1
PHONO
LINE 2
LINE 3
CD-R
REC SELECTOR
CD
TAPE
PHONES
SPEAKERS
TAPECD-R
LINE 1
LINE 2
COPY
LINE 3
PHONO
ON
INTEGRATED AMPLIFIER PM-17
TEMP
BASS
POWER
OFF
L
SEPARATE
R
R
PRELMAIN
COUPLED
OUT IN
TREBLE
0
202
242
4
4
6 +
- 6
6 +- 6
(dB)
(dB)
VOLUME
20
27
15
13
35
43
10
4
58
BALANCE
4
LEFT
SOURCE
8
0
DIRECT
(-dB)
OFF
ON
RIGHT
Set the switch to SEPARATE.
TAPE
LINE
IN
OUT
IN
OUT
L
R
L
R
Graphic equalizer
DANSK
)
RL
ITALINO
PORTUGUES
SVENSKA
DANSK
3
Page 7

ENGLISH
NAMES OF CONTROLS AND INDICATORS
(Figure 2)
A GND (GROUND) terminal
Connect the grounding wire from the Analog turntable to this
terminal.
FRANCÇAIS
B MM/MC SELECTOR switch
When the INPUT SELECTOR is set to PHONO, the type of
cartridge used on the turntable can be selected between MM
(Moving Magnet) and MC (Moving Coil) using this switch.
Set this switch according to the cartridge used on the turntable.
MM (Moving Magnet)
Set the switch to the out (
MC (Moving Coil)
DEUTSCH
set the switch to the in ( )position.
C PHONO INPUT jacks
Connect the output jacks of the Analog turntable to these jacks.
D CD PLAYER INPUT jacks
NEDERLANDS
Connect the output jacks of a Compact Disc player to these
jacks.
)position.
L REMOTE CONTROL BUS terminals
(REMOTE CONT. BUS)
By connecting this unit with a MARANTZ component equipped
with the remote control (D-BUS) jacks, both components can
be remote controlled as a system.
For details of the remote control function, read the owner’s
manual of the connected component.
The bus OUT terminal is used to send signals to another item
of equipment. The bus IN terminal is used to receive signals
from another item of equipment.
M AC IN jack
Connect to AC power outlet.
This unit can be powered by 230V AC only.
q INPUT SELECTOR switch
Selects the program source to be produced, from PHONO,
CD, LINE 1, LINE 2, LINE 3,CD-R and TAPE.
w VOLUME control
Turn the knob to adjust the volume. Turning the knob clockwise (
tions can also be controlled from the provided remote control
unit.
) to increase the volume. The volume up-down opera-
ENGLISH
FRANCAIS
DEUTSCH
E LINE 1 – LINE 3 INPUT jacks
These are LINE 1 – LINE 3 input jacks which can be used to
connect the audio outputs of AV components such as TV multiplex/stereo audio turners, VCRs, and leaserdisc players.
F CD-R IN/OUT jack
ESPAÑOL
Connect the line output jacks and line input jacks of CD recorder to these jacks.
G TAPE IN/OUT jacks
Connect the play (output) jacks and record (input) jacks of
tape decks to these jacks.
H PRE OUTPUT terminal
ITALINO
Output jack for connection to extension power-amp, mixer or
similar.
I MAIN IN jacks
Connect the pre output jacks of your pre-amp to these jacks at
the SEPARATE position of the selection switch J.
PORTUGUÊS
J SEPARATE/COUPLED selection switch
The initial setting of the selection switch is COUPLED position.
This unit is possible to use integrated-amp at the COUPLED
position.
Set according to the SEPARATED position, this unit is pos-
sible to use pre-amp or power-amp.
SVENSKA
K SPEAKER Terminals
Connect your speaker system to these terminals.
e PHONES jack
This jack accepts the standard stereo phone plug of headphones.
r REC SELECTOR switch
Selects the COPY mode between CD recorder and TAPE deck,
or the signal to be output to the OUT jacks of CD-R and TAPE.
t SPEAKERS switch
Press to switch the speaker systems ON (pressed-in position)
and OFF (out position).
Set the switch to OFF (out position) when you listen through
headphones only.
y IR SENSOR
The unit receives the infrared remote control signal through
this window. Point the transmitter of the remote control unit toward this window to send correct remote control signals.
u POWER switch
Press to turn power ON and press again to turn it OFF.
Meter !1 lights up when the POWER is turned ON. The pointer
LED of the INPUT SELECTOR switch q also lights when the
power is ON and goes out when it is OFF.
i Tone (BASS, TREBLE) controls
Turn the knobs to adjust the tone. Turning a knob controls the
level of the corresponding frequency range. Turning each control toward “+” boosts the corresponding frequency range and
toward “– ” attenuates it.
TREBLE: Controls the tone of high frequencies.
BASS: Controls the tone of low frequencies.
NEDERLANDS
ESPANOL
ITALINO
PORTUGUES
DANSK
SVENSKA
DANSK
4
Page 8

ENGLISH
o BALANCE control
Turn to correct the left-right imbalance which may occur in stereo broadcast reception or otherwise change the output level
of either the LEFT or RIGHT channel. Be careful of the position
of this control because turning it fully clockwise or counterclockwise mutes the sound from the other channel.
FRANCÇAIS
!0 SOURCE DIRECT switch
When this switch is pressed in, the signals are transmitted by
bypassing the BALANCE and tone (BASS and TREBLE) control circuitry so that they can be reproduce with a higher quality.
(The BALANCE, BASS and TREBLE controls are defeated.)
!1 Warm-up meter
DEUTSCH
With any audio unit, the real sound quality cannot be obtained
immediately after the power is turned on, and warming up is
required to make the unit exhibit its full performance. As time
passes after the power has been turned ON, the temperatures
of different parts of the unit become constant and the electrolytic capacitors become active.
This meter allows to check the warm-up condition of the unit.
NEDERLANDS
The meter needle starts to swing gradually in a little while after
the power is turned ON and reaches about 2/3 of the meter’s
full scale in about 30 minutes. Now the unit has almost been
warmed up and can reproduce music with its original performance.
The meter positions immediately after turning power on and at
the end of warming up and the time taken for warming up are
variable depending on the temperature, ventilation and other
conditions of the listening room where the unit is located.
ESPAÑOL
ENGLISH
FRANCAIS
DEUTSCH
NEDERLANDS
ITALINO
PORTUGUÊS
SVENSKA
ESPANOL
ITALINO
PORTUGUES
SVENSKA
DANSK
DANSK
5
Page 9

ENGLISH
PLAYING PROGRAM SOURCE RECORDING OF TAPE DECKS
FRANCÇAIS
PHONES
wq
INPUT SELECTOR
CD
LINE 1
PHONO
LINE 2
LINE 3
CD-R
REC SELECTOR
CD
TAPE
SPEAKERS
TAPECD-R
LINE 1
LINE 2
COPY
LINE 3
PHONO
ON
INTEGRATED AMPLIFIER PM-17
TEMP
BASS
POWER
OFF
TREBLE
0
202
242
4
4
6 +
- 6
6 +- 6
(dB)
(dB)
VOLUME
20
27
15
13
35
43
10
4
58
BALANCE
4
LEFT
SOURCE
8
0
DIRECT
(-dB)
OFF
ON
RIGHT
q
INPUT SELECTOR
CD
LINE 1
PHONO
LINE 2
LINE 3
CD-R
REC SELECTOR
CD
TAPE
PHONES
SPEAKERS
TAPECD-R
LINE 1
LINE 2
COPY
LINE 3
PHONO
ON
INTEGRATED AMPLIFIER PM-17
OFF
ENGLISH
w
VOLUME
20
27
15
13
35
43
TEMP
BASS
POWER
202
4
4
6 +
- 6
(dB)
242
BALANCE
TREBLE
0
4
6 +- 6
LEFT
(dB)
10
4
58
SOURCE
8
0
DIRECT
(-dB)
OFF
ON
RIGHT
Playing an analog disk
DEUTSCH
1. Set the INPUT SELECTOR switch q to PHONO.
2. Play the analog turntable.
3. Adjust the volume with the VOLUME control w.
Caution for analog disk play
- Reduce the volume to the minimum position before replacing
NEDERLANDS
the cartridge or placing the stylus on the disk.
- Do not apply shock to the turntable during play. Otherwise
the stylus may jump and damage the disk surface.
- Avoid installing the turntable near a speaker, for this may
cause howling and make it impossible to increase the listening
volume.
- Do not turn power of the turntable off while the stylus is placed
on a disk.
ESPAÑOL
Playing a CD player
1. Set the INPUT SELECTOR switch q to CD.
2. Play the CD player.
3. Adjust the volume with the VOLUME control w.
Playing a source connected to one of LINE 1 to LINE 3
The source component connected to any of the LINE 1 to LINE 3
input jacks on the rear panel can be played as described below.
ITALINO
1. Set the INPUT SELECTOR switch q to LINE 1, LINE 2 or
LINE 3.
2. Play the component connected to the selected input.
3. Adjust the volume with the VOLUME control w.
r
Recording a CD-R and a tape
A program source such as the analog turntable, tuner or CD
player can be recorded onto CD-R or tape as described below.
Recording of CD
1. Set the REC SELECTOR switch r to CD.
2. Play a CD on the CD player.
3. Operate the CD recorder or the tape deck to start recording.
Recording of analog disk played on the analog turntable
1. Set the REC SELECTOR switch r to PHONO.
2. Play an analog disk on the turntable.
3. Operate the CD recorder or the tape deck to start recording.
Recording of a source connected to one of LINE 1 to LINE 3
1. Set the REC SELECTOR switch e to LINE1,LINE2 or LINE3.
2. Play the source component connected to the selected input.
3. Operate the CD recorder or the tape deck to start recording.
Copying a pre-recorded tape using the REC SELECTOR
switch r
Regardless of the program source selected with the INPUT
SELECTOR switch q, when copying from a CD recorder to a
TAPE deck, set the REC SELECTOR switch r to CD-R ョ
TAPE.
- You can listen to another program source selected with the
INPUT SELECTOR switch q while you are copying.
FRANCAIS
DEUTSCH
NEDERLANDS
ESPANOL
ITALINO
Playing a CD-R
1. Set the INPUT SELECTOR switch q to CD-R.
PORTUGUÊS
2. Play a pre-recorded disk on the CD recorder.
3. Adjust the volume with the VOLUME control w.
Playing a TAPE
1. Set the INPUT SELECTOR switch q to TAPE.
2. Play a pre-recorded tape on the tape deck.
3. Adjust the volume with the VOLUME control w.
SVENSKA
DANSK
PORTUGUES
SVENSKA
DANSK
6
Page 10

ENGLISH
REMOTE CONTROL OPERATION
(Remote control unit: RC-17mk
The RC-17mk2PM remote control unit can control MARANTZ
audio/video components equipped with an infrared remote
sensor as well as other MARANTZ components which are connected with the above components through the remote control
bus. The following illustration shows the button layout of the
FRANCÇAIS
RC-17mk2PM.
Note that the functions of the RC-17mk2PM that can be remote controlled are only the volume up/down control and input selection operations.
REPEAT
DEUTSCH
NEDERLANDS
c
ESPAÑOL
RANDOM
+ / A
- / B
OPEN / CLOSE
PHONO CD
CD-R
0
VOLUME
LINE 1
/ TUNER
LINE 2TAPE
LINE 3
321
654
987
22
2PM)
22
z
x
v
ITALINO
z Group of buttons for selecting the connected
components *1
These buttons are used as the amplifier’s input selector.
x Group of buttons for controlling playback, etc.
These buttons are used to control the CD player, tape deck,
PORTUGUÊS
etc.
Button functions when the CD-R button is pressed:
Button Function
Play
Fast forward
Fast backward
Not used
Stop
OPEN/CLOSE Open/close
+ Not used
– Not used
Skip forward to next track
Skip backward to previous track
REPEAT Repeat
RANDOM Random play
VOL Amplifier volume Up
VOL Amplifier volume Down
Button functions when the TAPE button is pressed:
Button Function
Play
Fast forward
Fast backward
Play direction change
Stop
OPEN/CLOSE Open/close
+ Deck A
– Deck B
Skip forward to next music
Skip backward to previous music
REPEAT Not used.
RANDOM Not used.
VOL Amplifier volume Up
VOL Amplifier volume Down
Button functions when the CD button is pressed:
ENGLISH
FRANCAIS
DEUTSCH
NEDERLANDS
ESPANOL
ITALINO
c Group of numeric buttons
These buttons are used to enter figures for the tuner, CD player,
etc.
v Group of amplifier (PM-17mk
These buttons are used to control the listening volume.
SVENSKA
22
2) control buttons
22
*1 Pressing one of these buttons (CD, CD-R,TUNER, TAPE
DECK, etc., except for PHONO and LINE3) change the functions of the buttons in groups x, c and v according to the
selected source component.
Please refer to the following tables entitled, which show how
the button functions change.
DANSK
Button Function
Play
Fast forward
Fast backward
Not used
Stop
OPEN/CLOSE Open/close
+ Disc Up (changer-equipped model only)
– Disc Down (changer-equipped model only)
Skip forward to next track
Skip backward to previous track
REPEAT Repeat
RANDOM Random play
VOL Amplifier volume Up
VOL Amplifier volume Down
7
PORTUGUES
SVENSKA
DANSK
Page 11

ENGLISH
Button functions when the LINE1(TUNER) button is
pressed:
Button Function
Not used.
FRANCÇAIS
OPEN/CLOSE Not used.
+ Preset Up
– Preset Down
DEUTSCH
REPEAT Not used.
RANDOM Not used.
VOL Amplifier volume Up
NEDERLANDS
VOL Amplifier volume Down
Button functions when the LINE2 button is pressed:
Button Function
ESPAÑOL
OPEN/CLOSE VCR eject
+ Channel/program Up
– Channel/program Down
ITALINO
REPEAT Not used.
RANDOM Not used.
VOL Amplifier volume Up
PORTUGUÊS
VOL Amplifier volume Down
Frequency Up
Frequency Down
Not used.
Not used.
Programme type Up
Programme type Down
VCR play
VCR fast forward
VCR fast backward
Not used.
VCR stop
VCR double-speed forward
VCR double-speed backward
HOW TO USE THE REMOTE CONTROL UNIT
1. Remote control unit
The distance between the signal transmitter of the remote control unit (RC-17mk2PM) and the IR SENSOR of the integrated
amplifier (PM-17mk2) should be less than about 5 meters. To
ensure remote control, the remote control unit should be pointed
accurately toward the IR SENSOR and there should be no obstacle between the remote control unit and the IR SENSOR.
Remote controllable range
Stereo integrated amplifier (PM-17mk2)
Approx.5m
60°
Remote control unit (RC-17mk2PM)
2. Loading batteries
The service life of the batteries used in the remote control unit
is about 1 year under normal use.
Remove the batteries when the remote control unit is not to be
used for a long period of time. Replace batteries early whenever they seem to be weakened.
(1) Remove the back cover.
(2) Insert batteries with correct and polarity.
ENGLISH
FRANCAIS
DEUTSCH
NEDERLANDS
ESPANOL
ITALINO
SVENSKA
DANSK
(3) Slide close the battery cover until it clicks.
Improper use of batteries may cause the risk of fluid leakage
or explosion.
Be specially careful in the following points.
1. Insert the batteries with the correct and polarity as
indicated inside the battery case.
2. Do not use a brand-new battery and used battery together.
3. Dry cell batteries may produce different voltages even
when their shapes are the same. Do not use different types
of batteries together.
4. Some batteries are rechargeable and some are not. Be
sure to read the caution and instructions described on each
battery.
5. Used batteries should be disposed of in compliance with
the treatment method specified for your local area.
8
PORTUGUES
SVENSKA
DANSK
Page 12

ENGLISH
TROUBLESHOOTING
In case of trouble with the unit, first check the following before
calling for service. What seems to be a serious malfunction is
often due to a simple operation mistake.
If the trouble still persists after checking, please consult your
dealer or nearest MARANTZ service agent.
FRANCÇAIS
The amplifier does not work and the warm-up meter lamp
does not light.
1. Check if the power cord is plugged properly into an AC
power outlet.
The warm-up meter lamp lights but the amplifier will not
function.
1. Check the settings of the INPUT SELECTOR switch, VOLUME
DEUTSCH
NEDERLANDS
ESPAÑOL
control and SPEAKERS switches.
Sound is produced only from one of the speaker systems.
1. Check the setting of the BALANCE control.
2. Turn power of the set off and change the connections of
the left and right speaker systems. If sound is still not output
from the same speaker system, check its connection cord
or the speaker system itself.
Sound is not produced at all.
1. Check the settings of the INPUT SELECTOR switches.
2. Check that at least one of the SPEAKERS switches is
pressed in.
3. Check that the speaker cords are connected properly.
4. Check that the connection cords with RCA pin plugs are
connected properly.
5. Check the SEPARETE/COUPLED switch position on rear
panel.
ENGLISH
FRANCAIS
DEUTSCH
NEDERLANDS
Sound from the analog turntable is not output or very noisy
(hum noise).
1. Check that the connection to the PHONO jacks is made
properly.
2. Connect the grounding wire of the turntable to the GND
ITALINO
terminal on the rear panel of the amplifier set. If it has al
ready been connected, try removing it.
3. Check that the cartridge is attached properly to the tone
arm.
4. Remove the power plug of the turntable from the power
outlet and insert it again by inverting the relationship of the
left and right blades with respect to the power outlet slots.
PORTUGUÊS
SVENSKA
ESPANOL
ITALINO
PORTUGUES
SVENSKA
DANSK
DANSK
9
Page 13

TECHNICAL SPECIFICATIONS (DIN)
Rated power output (20Hz to 20 kHz, 2ch simultaneous drive) ..... 60 W x 2 (8 Ω load)
80 W x 2 (6 Ω load)
100 W x 2 (4 Ω load)
Total harmonic distortion (20Hz to 20 kHz, 2ch drive, 8 Ω load) ......................... 0.01 %
Cross-modulation distortion (SMPTE) ................................................................ 0.01 %
Output bandwidth (8 Ω load, 0.04 %).................................................... 10 Hz to 50 kHz
Frequency response (CD, SOURCE DIRECT) ...................... 5Hz to 70kHz, +0 / –1 dB
Damping factor (8 Ω load, 20Hz to 10 kHz) ............................................................. 100
Input sensitivity/Input impedance
PHONO (MC) ................................................................................................................... 230 µV/100 Ω
PHONO (MM) ....................................................................................................................2.5 mV/22 kΩ
HIGH LEVEL .................................................................................................................... 220 mV/22 kΩ
MAIN IN ................................................................................................................................ 1.6 V/22 kΩ
Maximum allowable PHON input (1 kHz)
MC ................................................................................................................................................ 15 mV
MM ............................................................................................................................................. 150 mV
RIAA deviation (20 Hz to 20 kHz) ................................................................................................ ± 0.2 dB
S/N (IHF A network, input shorted)
PHONO (MC) ................................................................................................................................ 76 dB
PHONO (MM) ................................................................................................................................ 90 dB
HIGH LEVEL ............................................................................................................................... 112 dB
Tone control
BASS (100 Hz) ............................................................................................................................. ± 8 dB
TREBLE (10 kHz) ......................................................................................................................... ± 8 dB
Supply voltage ................................................................................................................ 230 V/AC, 50 Hz
Dimensions
Width ..........................................................................................................................................458 mm
Height ......................................................................................................................................... 110 mm
Depth ..........................................................................................................................................429 mm
Weight ............................................................................................................................................... 16 kg
Accessories
Remote control unit (RC-17mk
Dimensions
Width ............................................................................................................................................44 mm
Height .........................................................................................................................................239 mm
Depth ......................................................................................................................................... 17.5 mm
Weight (without batteries) ................................................................................................................ 189 g
SUM-4 (AAA size) dry cell battery ...................................................................................................... x 2
22
2PM) ................................................................................................. x 1
22
Design and specifications are subject to change without notice.
82
Page 14

E
F
G KH I
J
A
PHONO
GND
B
L
R
/
TUNER OUTIN
23
1
LINE
MM
R
MC
C
q
INPUT SELECTOR
PHONO
PHONES
L
R
R
CD-R
L
OUTIN
TAPE
LR
CDPHONO
PRELMAIN
OUT IN
L
SEPARATE
R
COUPLED
SPEAKERS IMPEDANCE L+R:4-8 OHMS BTL:8-16 OHMS
D
SPEAKERS
R
L
BTL
IN
OUT
REMOTE
CONTROL
SERIAL NO.
AC IN
LM
!1 w
CD
LINE 1
LINE 2
LINE 3
CD-R
REC SELECTOR
TAPE
CD
TAPECD-R
COPY
SPEAKERS
LINE 1
LINE 2
LINE 3
PHONO
OFF
ON
INTEGRATED AMPLIFIER PM-17
TEMP
POWER
BASS
4
- 6
(dB)
TREBLE
0
242
202
4
6 +
(dB)
BALANCE
4
6 +- 6
LEFT
VOLUME
20
15
27
35
43
58
8
RIGHT
13
10
4
SOURCE
0
DIRECT
(-dB)
OFF
ON
t
uyrei
o
!0
Figure 2
83
Page 15

COUNTRY COMPANY ADDRESS
AUSTRALIA Scan audio Pty. Ltd. 4 Station Street, Thornleigh NSW 2120, Australia
AUSTRIA Huber & Prohaska GmbH Taborstraße 95 / Ladestraße 1, Gebäude Hangartner, A-1200 Wien, Austria
BELGIUM Van der Heyden Audio N.V. Brusselbaan 278, 9320 Erembodegem, Belgium
BULGARIA Ariescommerce GmbH Makedonia Blvd. 16, 1606 Sofia, Bulgaria
CANADA Lenbrook Industries Limited 633 Granite Court, Pickering, Ontario
CYPRUS Empire Hifi systems Ltd. P.O. Box 5604, Nicosia, Cyprus
CZECH REPUBLIC Audio International Fugnerova 1, 67801 Blansko, Czech Republic
DENMARK Hi-Fi Klubben Denmark Aboulevarden 1, DK-8000 Arhus C., Denmark
DUBAI V.V.& SONS P.O. Box 105, Dubai, U.A.E.
ESTONIA Audio International Baltic Lo Hu 12, EE0026 Tallin, Estonia
F.Y.R.O.M. T.P. KODI ul.Cedomir Kantargiev 21a, Skopje, Former Yugoslavian Republic of Macedonija
FINLAND Hi-Fi Klubi Finland Uudenmaankatu 4-6, SF-00120 Helsinki, Finland
FRANCE Marantz France A division of Marantz Europe B.V., P.O. Box 301, 92 156 Suresnes Cedex, France
GERMANY Marantz Deutschland Hakenbusch 3, 49078 Osnabrück, Germany
GREECE Adamco S.A. 188, Hippocratous Street, 11471 Athens, Greece
HEADQUARTERS EUROPE: Marantz Europe B.V. Building SFF-2, P.O. Box 80002, 5600 JB Eindhoven, The Netherlands
HONG KONG Marantz Asia Ltd. Unit 1706, Metroplaza II, 223 Hing Fong Road, Kwai Fong, N.T., Kowloon, Hong Kong
HUNGARY Infovox Ltd. Terez Krt.31, 1067 Budapest, Hungary
ICELAND Radiobudin HF Skipholti 19, P.O. Box 424, 121 Reykjavik, Iceland
INDIA Marantz India c/o Philips India Ltd., Plot 80, Bhosari Industrial Estate Pune - 411026, India
IRAN Home Co. 5th floor no 878 Philips Building Enghelab ave, P.O. 11365/7844 Tehran, Iran
IRELAND Marantz Ireland Clonskeagh, Dublin 14, Ireland
ISRAEL Elmor Ltd. 52 Heh Beiyar Street, Kikar Hamedina, Tel Aviv, Israel
ITALY Marantz Italy Via Casati 23, 20052 Monza (Milano), Italy, Servizio Consumatori 1678-20026, Numero Verde
JAPAN Marantz Japan Inc. 35-1 Sagami Ohno 7-Chome, Sagamihara-shi, Kanagawa 228-8505, Japan
KOREA Mk Enterprises Ltd. 121-210, 2F Shinhan Bldg., 247-17 Seokyo-dong, Mapo-ku, Seoul, Korea
KUWAIT alAlamiah Electronics Intl. P.O. Box 8196, Salmiah 22052, Kuwait
LATVIA Ace Ltd. 61, LacPlesa Str., Riga LV 1011, Latvia
LEBANON AZ Electronics S.A., 1, P.O. Box 11 2833, Beirut, Lebanon
LITHUANIA A Accapella Ltd. Ausros, Vartu G5, Pasazo Skg., 2001 Vilnius, Lithuania
MALAYSIA Wo Kee Hong Electronics Sdn. Bhd. 102 Jalan SS 21/35, Damansara Utama, 47400 Petaling Jaya, Selangordarul Ehsan, Malaysia
MALTA Doneo Co Ltd. 78 The Strand, Sliema SLM07, Malta
MAURITIUS SKR Electronics Ltd. P.O. Box 685, Bell Village, Port Louis, Mauritius
NETHERLANDS Marantz Trading
NEW ZEALAND Scan audio Pty. Ltd. 4 Station Street, Thornleigh NSW 2120, Australia
NORWAY Hi-Fi Klubben Norway Lillegrensen 7, N-0159 Oslo, Norway
OMAN Mustafa & Jawad Trading CO. P.O. Box 1918, Ruwi, Oman
POLAND Philips Polska Sp. z o. o. Al. Jerozolimskie 195b, 02 222 Warszawa, Poland
PORTUGAL Corel2 Comércio de Electrónica Lda., Av. Luís Bívar, No 85 A, 1050 Lisboa, Portugal
PROFESSIONAL EUROPE Marantz Professional Products Kingsbridge House, Padbury Oaks, 575-583 Bath Road, Longford, Middlesex UB7 0EH, U.K.
PROFESSIONAL U.S.A. Marantz Professional Products Distributed by: Superscope Technologies Inc., 1000 Corporate Blvd. Ste.D, Aurora, Illino
QATAR Almana & Partners W.W.L. P.O. Box 49, Doha, Qatar
REUNION Vision + 180 Rue du Marechal Leclerc, 97400 Saint Denis, Ile de la Reunion
ROMANIA Alltrom SRL Soseaua Bucuresti, Ploiesti 10, Sector 1, Bucharest, Romania
RUSSIA Trade Company SV Bld. 2, 7 Montazhnaya Street, 107497 Moscow, Russia
SAUDI ARABIA Ultimate Fidelity Sameria Comm. Center, Roadah Dist., P.O. Box 7760, Jeddah 21472, Saudi Arabia
SINGAPORE Forward Marketing (S) Pte. Ltd. Wo Kee Hong Centre, 29 Leng Kee Road, Singapore 159099, Singapore
SLOVAKIA Audio International Slovakia Nam. SNP 10, 96001 Zvolem, Slovakia
SLOVENIA Bofex Smartinska 152, HALA V/3, 61000 Ljubljana, Slovenia
SOUTH AFRICA Coherent Imports (PTY) Ltd. P.O. Box 1614, Alberton, 1450, South Africa
SPAIN Marantz Spain Martinez Villergas 2, Apartado 2065, Madrid 28027, Spain
SWEDEN Hi-Fi Klubben A.B. Tegnersgatan 21, S-412 52 Gotenborg, Sweden
SWITZERLAND Sound Company AG Postfach, 8010 Zürich, Switzerland
TAHITI Covecolor Av. Prince Hinoi, Cours de l'union sacré, P.O. Box 2334, Papeete, Tahiti
TAIWAN Pai-Yuing Co. Ltd. 6th No 148 Sung Kiang Road, Taipei 10429, Taiwan R.O.C.
THAILAND MRZ Standard Co. Ltd. 746-750 Mahachai Road, Wangburapa, Bangkok 10200, Thailand
TURKEY Penta Elektronic Sanayi Ve Ticaret Ltd. Sti., Selvi Kokak, No. 4/1, Senlikkoy, 34810 Florya, Istanbul, Turkey
U.K. Marantz Hifi UK Ltd. Kingsbridge House, Padbury Oaks, 575-583 Bath Road, Longford, Middlesex UB7 0EH, U.K.
U.S.A. Marantz America Inc. 440 Medinah Road, Roselle, IL 60172, U.S.A.
YUGOSLAVIA ITM Ljutice Bogdana la, Belgrade, Yugoslavia
EXPORT Marantz Trading
www.marantz.com
A division of Marantz Europe B.V., Building SFF-2, P.O. Box 80002, 5600 JB Eindhoven, The Netherlands
A division of Marantz Europe B.V., Building SFF-2, P.O. Box 80002, 5600 JB Eindhoven, The Netherlands
http://www.marantz.co.jp
Printed in Japan
is a registered trademark.
99/12 313J851312 (MITa)
 Loading...