

Page 1

AV Surround Receiver
NR1605
English
Français
EsPaÑOl
Quick Start Guide
Guide de démarrage rapide
Guía de inicio rápido
Page 2
Welcome Before You Begin
Thank you for choosing a Marantz AV receiver. This guide
provides step-by-step instructions for setting up your AV
receiver.
Please do not return this unit to the store – call for
assistance.
If you need help… :
If you need additional help in solving problems, contact
Marantz customer service in your area.
1-855-ONE-Marantz
1-855-663-6272
Call for Assistance: 9:00AM to 8:00PM M-F E.S.T.
For frequency asked questions please visit
http://marantz.custhelp.com/app/answers/list
For US and Canada only
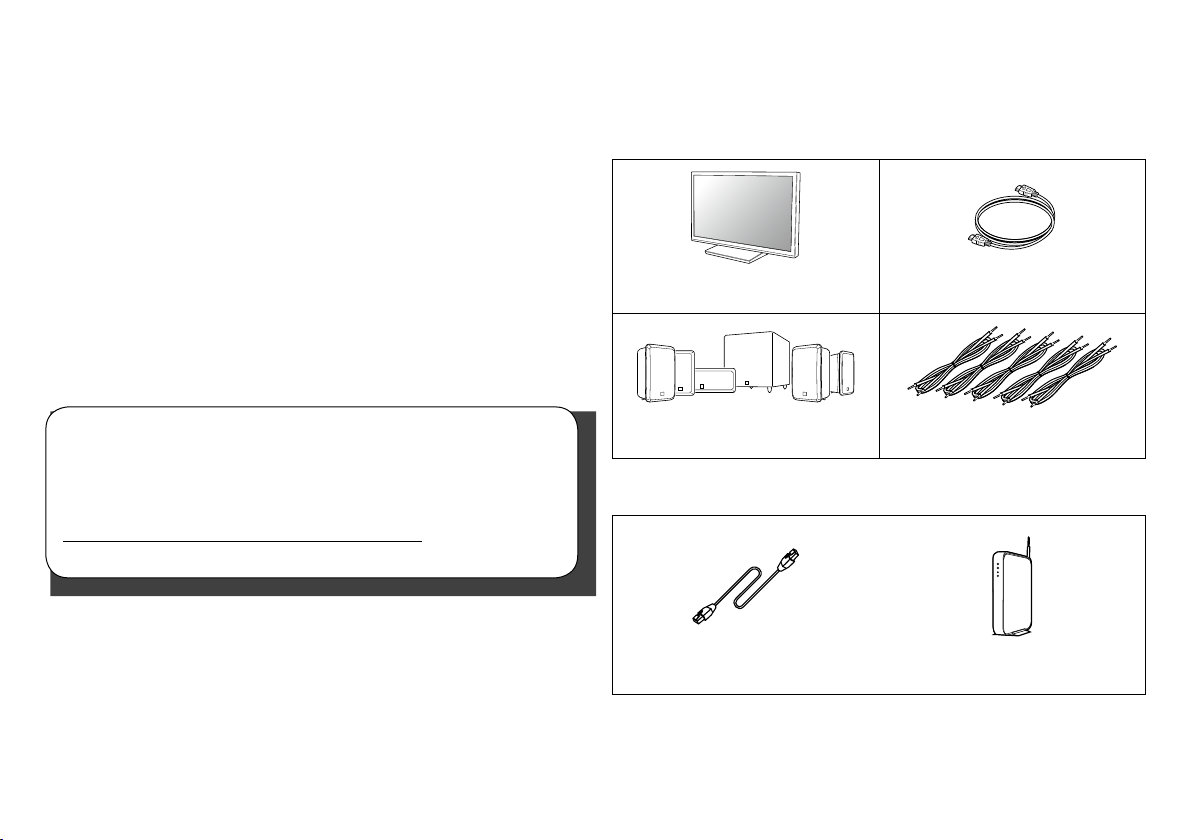
Required for Setup
TV HDMI cable
Speaker systems Speaker cables
Optional
or
LAN cable Wi-Fi router
1
Page 3
• When connecting this unit to a device that is compatible
with the Deep Color, 4K and ARC functions, use an “High
Speed HDMI cable with Ethernet” that comes with the
HDMI logo.
• These drawings are for illustrative purposes only and may
not represent the actual product(s).
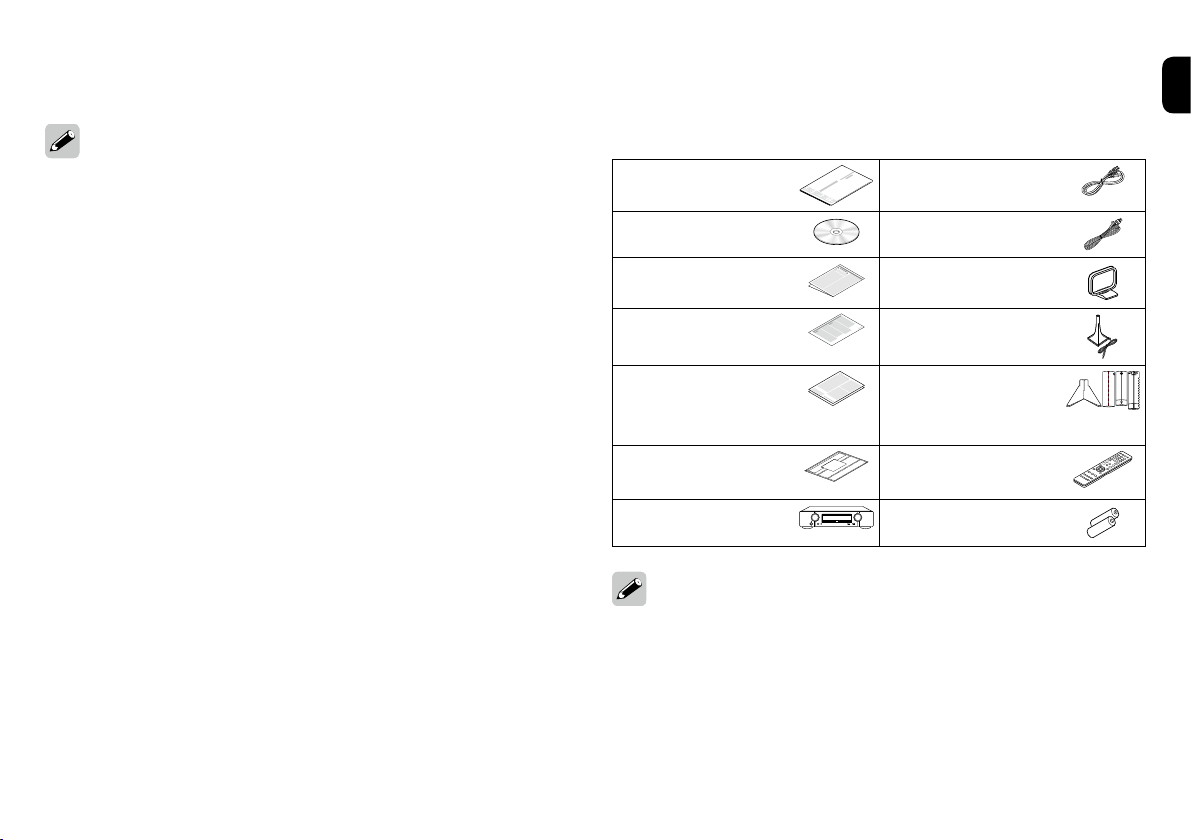
What’s In the Box
Quick Start Guide Power cord
Owner’s Manual FM indoor antenna
Safety Instructions AM loop antenna
Notes on radio Sound calibration
microphone
Warranty
(for North America
model only)
Cable labels Remote control
Receiver R03/AAA batteries
The supplied Sound calibration microphone stand is
convenient for use when performing Speaker Calibration.
Using your own tripod or the supplied Sound calibration
microphone stand enables settings to be automatically
configured to the optimum listening environment, providing
exceptionally high performance.
Sound calibration
microphone stand
unit
2
Page 4
Setup
There are three steps to the setup
process.
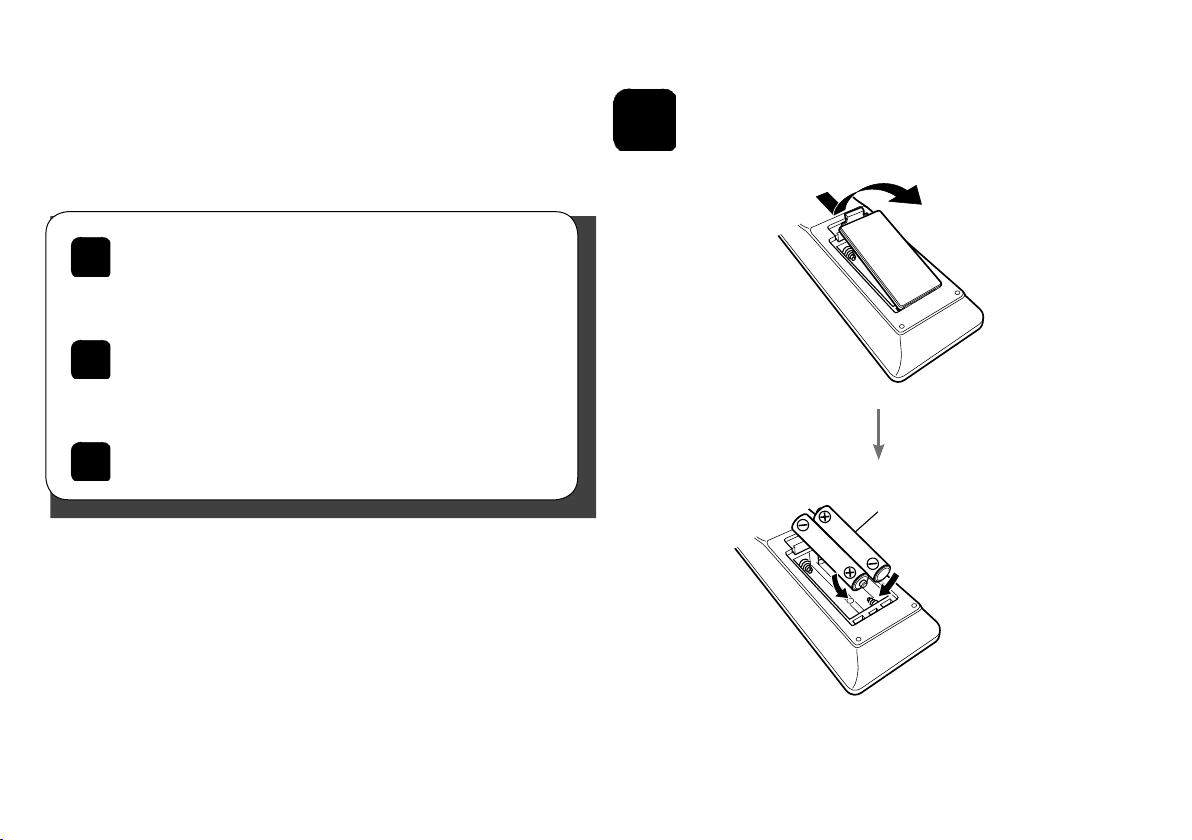
Install batteries in the remote control unit
1
Connecting the receiver
2
Follow the On-Screen Setup Assistant
3
Installing batteries in the
1
remote control unit
R03/AAA batteries
3
Page 5

2
Connecting the receiver
n Place the receiver near your TV and
connect the power cable.
TV
Receiver
Power cord
(supplied)
Connect to household
power outlet
(AC 120 V, 60 Hz)
4
Page 6

n Connect to the network.
Wired LAN
When connecting cables (wired connection), connect a LAN
cable between your receiver and your network router.
Internet Modem
To WAN side
To LAN port
Router
CBL/
SAT
COAXIAL
)
SUBWOOFER
FRONT ZONE2
PRE OUT
TV
AUDIO
OPTICAL
(
)
ASSIGNABLE
1 CBL/SAT 2 DVD 3 Blu-ray 4 GAME 5
2
1
VIDEO OUT
CBL/SAT
DVD
MONITOR
1
CBL/
SAT
2 DVD
3
Blu-ray
COMPONENT VIDEO IN
(
)
ASSIGNABLE
(
)
VIDEO IN
ASSIGNABLE
IR
IN
FLASHER
DIGITAL AUDIO IN
NETWORK
DC OUT
FM
75Ȑ
1
CBL/SAT
DC12V
150mA
MAX.
2
DVD
IN
AM
3
OUT
CD
REMOTE
(
ANTENNA
ASSIGNABLE
AUDIO IN
CONTROL
5
MONITOR
COMPONENT
VIDEO OUT
MEDIA PLAYER
6 AUX2 7 CD
MONITOR
(
)
HDMI IN
ASSIGNABLE
Y
PB/
C
B
PR/
C
R
SPEAKERS
ARC
HDMI OUT
AC IN
IMPEDANCE : 4㹼16Ȑ
Wireless LAN
When using a wireless connection (Wi-Fi), rotate the
antennas upword.
Internet
Router with
access point
IR
IN
CBL/
SAT
COAXIAL
FLASHER
DC OUT
IN
OUT
CONTROL
DIGITAL AUDIO IN
FM
75Ȑ
1
CBL/SAT
DC12V
150mA
MAX.
2
DVD
AM
3
CD
REMOTE
(
)
ASSIGNABLE
ANTENNA
AUDIO IN
1 CBL/SAT 2 DVD 3 Blu-ray 4 GAME 5
TV
AUDIO
OPTICAL
(
)
ASSIGNABLE
VIDEO OUT
SUBWOOFER
MONITOR
CBL/
SAT
2 DVD
FRONT ZONE2
(
ASSIGNABLE
VIDEO IN
PRE OUT
HDMI IN
2
1
MONITOR
CBL/SAT
DVD
)
COMPONENT VIDEO IN
(
ASSIGNABLE
Y
PB/
C
B
PR/
C
R
COMPONENT
VIDEO OUT
)
1
3
Blu-ray
MEDIA PLAYER
(
)
ASSIGNABLE
SPEAKERS
Modem
To WAN side
6 AUX2 7 CD
MONITOR
ARC
HDMI OUTNETWORK
IMPEDANCE : 4㹼16Ȑ
AC IN
Page 7

n Connect the receiver to your TV with
an HDMI cable.
HDMI IN
(ARC)
n Turn on the TV.
HDMI cable
ARC
MONITOR
HDMI OUT
MONITOR
HDMI OUT
IR
IN
CBL/
TV
SAT
AUDIO
COAXIAL
OPTICAL
(
DIGITAL AUDIO IN
(
ASSIGNABLE
)
SUBWOOFER
FRONT ZONE2
PRE OUT
)
ASSIGNABLE
VIDEO OUT
2 DVD
VIDEO IN
FLASHER
NETWORK
DC OUT
FM
75Ω
1
CBL/SAT
DC12V
150mA
MAX.
2
DVD
IN
AM
3
OUT
CD
REMOTE
CONTROL
ANTENNA
AUDIO IN
(ARC)
1 CBL/SAT 2 DVD 3 Blu-ray 4 GAME 5
(
HDMI IN
ASSIGNABLE
2
1
MONITOR
CBL/SAT
DVD
MONITOR
1
CBL/
SAT
3
(
ASSIGNABLE
Y
PB/
C
B
PR/
C
R
Blu-ray
COMPONENT VIDEO IN
COMPONENT
)
VIDEO OUT
(
)
ASSIGNABLE
)
MEDIA PLAYER
SPEAKERS
6 AUX2 7 CD
IMPEDANCE : 4~16Ω
MONITOR
ARC
HDMI OUT
AC IN
n Select the appropriate HDMI input
on your TV.
HDMI
TV remote control unit
TV/
INPUT
or
VIDEO
Receiver (Rear panel)
TV remote control unit
6
Page 8

n Turn on the receiver.
n Verify the connection.
•Press X to turn on the receiver.
7
•Verify that you can see this screen on your TV.
AV Reciever Setup Assistant
Please select a language...
English
Español
Français
When this screen is not displayed, please read operation
from the beginning.
Page 9

3
Follow the On-Screen Setup Assistant
The Setup Assistant will walk you through connecting and
configuring your speakers and components to your Marantz
receiver. Please use the remote control and follow the
on-screen instructions.
AV Reciever Setup Assistant
Please select a language...
English
Español
Français
8
Page 10

Owner’s Manual
Please reference these manuals for more details about the setup and operation of the receiver and it’s features.
n Web Manual
To read it on your tablet or PC, please access to Web
Manual site.
manuals.marantz.com/NR1605/NA/EN/
This Web Manual is optimized for
tablets and mobile devices.
Web Manual
Contents
Introductions
Connections
Playback
Settings
Tips
Appendix
PDF
PDF Download
WEB Manual
AV SURROUND RECEIVER
AV SURROUND RECEIVER
c
Copyright 2014 D&M Holdings Inc. All Rights Reserved.
n PDF Manual
To read the owner's manual on your computer or to print it
out, please open the included CD-ROM or select the “PDF
Download” link from the Web Manual.
1
Insert the disc into
your PC.
2
Follow the screen or double click on
the PDF le.
9
Page 11

Printed in China 5411 11185 00AM
D&M Holdings Inc.
 Loading...