

Page 1

Model DV-12S2 User Guide
Super Audio CD/DVD Player
R
CLASS 1 LASER PRODUCT
LUOKAN 1 LASERLAITE
KLASS 1 LASERAPPARAT
Page 2

ENGLISH
LASER SAFETY
WARRANTY
For warranty information, contact your local Marantz distributor.
RETAIN YOUR PURCHASE RECEIPT
Your purchase receipt is your permanent record of a valuable purchase. It
should be kept in a safe place to be referred to as necessary for insurance
purposes of when corresponding with Marantz.
IMPORTANT
When seeking warranty service, it is the responsibility of the
consumer to establish proof and date of purchase. Your purchase
receipt or invoice is adequate for such proof.
FOR U.K. ONLY
This undertaking is in addition to a consumer’s statutory rights and
does not affect those rights in any way.
FRANÇAIS
GARANTIE
Pour des informations sur la garantie, contacter le distributeur local Marantz.
CONSERVER L’ATTESTATION D’ACHAT
L’attestation d’achat est la preuve permanente d’un achat de valeur. La
conserver en lieur sûr pour s’y reporter aux fins d’obtention d’une couverture
d’assurance ou dans le cadre de correspondances avec Marantz.
IMPORTANT
Pour l’obtention d’un service couvert par la garantie, il incombe au client
d’établir la preuve de lachat et d’en corroborer la date. Le reçu ou la facture
constituent des preuves suffisantes.
This unit employs a laser. Only a qualified service person
should remove the cover or attempt to service this device,
due to possible eye injury.
USE OF CONTROLS OR ADJUSTMENTS OR
PERFORMANCE OF PROCEDURES OTHER THAN
THOSE SPECIFIED HEREIN MAY RESULT IN
HAZARDOUS RADIATION EXPOSURE.
CAUTION VISIBLE AND INVISIBLE LASER RADIATION WHEN OPEN
AVOID EXPOSURE TO BEAM (WARNING LOCATION:
INSIDE ON LASER COVERSHIELD)
DEUTSCH
GRANTIE
Bei Garantiefragen wenden Sie sich bitte an Ihren Marantz-Händler.
HEBEN SIE IHRE QUITTUNG GUT AUF
Die Quittung dient Ihnen als bleibende Unterlage für Ihre wertvolle
Anschaffung Das Aufbewahren der Quittung ist wichtig, da die darin
enthaltenen angaben für Versicherungszwecke oder bei korrespondenz mit
Marantz angeführt werden müssen.
WICHTIG!
Bei Garantiefrangen muß der Kunde eine Kaufunterlage mit kaufdatum
vorlegen. Ihre Quittung oder Rechnung ist als Unterlage ausreichend.
ITALIANO
GARANZIA
L’apparecchio è coperto da una garanzia di buon funzionamento della durata
di un anno, o del periodo previsto dalla legge, a partire dalla data di acquisto
comprovata da un documento attestante il nominativo del Rivenditore e la
data di vendita. La garanzia sarà prestata con la sostituzione o la riparazione
gratuita delle parti difettose.
Non sono coperti da garanzia difetti derivanti da uso improprio, errata
installazione, manutenzione effettuata da personale non autorizzato o,
comunque, da circostanze che non possano riferirsi a difetti di
funzionamento dell’apparecchio. Sono inoltre esclusi dalla garanzia gli
interventi inerenti l’installazione e l’allacciamento agli impianti di
alimentazione.
Gli apparecchi verranno riparati presso i nostri Centri di Assistenza
Autorizzati. Le spese ed i rischi di trasporto sono a carico del cliente.
La casa costruttrice declina ogni responsabilità per danni diretti o indiretti
provocati dalla inosservanza delle prescrizioni di installazione, uso e
manutenzione dettagliate nel presente manuale o per guasti dovuti ad uso
continuato a fini professionali.
2
En/Fr/Ge/It
Page 3

FOREWORD
This section must be read carefully before any connection is made to
the mains supply.
PRECAUTIONS
The following precautions should be taken when operating the equipment.
English
WARNINGS
Do not expose the equipment to rain or moisture.
Do not remove the cover from the equipment.
Do not insert anything into the equipment through the ventilation holes.
Do not handle the mains lead with wet hands.
Make a space of about 0.1 meter around the unit.
CE marking
This product is in conformity with the EMC directive and
low-voltage directive.
EQUIPMENT MAINS WORKING SETTING
Your Marantz product complies with the household power and safety
requirements in your area.
IMPORTANT: (FOR UK version only)
This apparatus is fitted with an approved moulded 13 Amp plug. To
change a fuse in this type of plug proceed as follows:
1. Remove fuse cover and fuse.
2. Fix new fuse which should be a BS1362 5A, A.S.T.A. or BSI approved
type.
3. Refit the fuse cover.
If the fitted plug is not suitable for your socket outlets, it should be cut off
and an appropriate plug fitted in its place.
If the mains plug contains a fuse, this should have a value of 5A. If a
plug without a fuse is used, the fuse at the distribution board should not
be greater than 5A.
NOTE : The severed plug must be destroyed to avoid a possible shock
hazard should it be inserted into a 13A socket elsewhere.
GENERAL PRECAUTIONS
When installing the equipment ensure that:
– the ventilation holes are not covered.
– air is allowed to circulate freely around the equipment.
– it is placed on a vibration-free surface.
– it will not be exposed to excessive heat, cold, moisture or dust.
– it will not be exposed to direct sunlight.
– it will not be exposed to electrostatic discharges.
In addition, never place heavy objects on the equipment.
If a foreign object or water does enter the equipment, contact your nearest
dealer or service center.
Do not pull out the plug by pulling on the mains lead; grasp the plug.
It is advisable when leaving the house, or during a thunderstorm, to
disconnect the equipment from the mains supply.
This product incorporates copyright protection technology that is
protected by method claims of certain U. S. patents and other
intellectual property rights owned by Macrovision Corporation and
other rights owners. Use of this copyright protection technology
must be Authorized by Macrovision Corporation, and is intended for
home and other limited viewing uses only unless otherwise
authorized by Macrovision corporation. Reverse engineering or
disassembly is prohibited.
Français
Deutsch
Italiano
HOW TO CONNECT A PLUG
The wires in the mains lead are coloured in accordance with the following
code:
BLUE—”NEUTRAL” (“N”)
BROWN—”LIVE” (“L”)
1. The BLUE wire must be connected to the terminal which is marked with
the letter “N” or coloured BLACK.
2. The BROWN wire must be connected to the terminal which is marked with
the letter “L” or coloured RED.
3. Do not connect either wires to the earth terminal in the plug which is
marked by the letter “E” or by the safety earth symbol or coloured
green or green-and-yellow.
Before replacing the plug cover, make certain that the cord grip is clamped
over the sheath of the lead — not simply over the two wires.
3
En
Page 4

AVANT-PROPOS
VORWORT
Prière de lire ce chapitre avant de brancher l’appareil sur le secteur.
AVERTISSEMENTS
Ne pas exposer l’appareil à la pluie ou à l’humidité.
Garder le coffret de l’appareil fermé.
Ne rien insérer par les orifices d'aération de l’appareil.
Ne pas manipuler le cordon d’alimentation avec des mains
mouillées.
Veiller à ce qu'aucun objet ne soit à moins de 0,1 mètre des côtés
de l'appareil.
Marquage CE
Cet appareil est conforme à la directive EMC et à la
directive sur les basses tensions.
REGLAGE DE L’ALIMENTATION SECTEUR DE L’APPAREIL
Cet appareil Marantz a été conçu pour respecter les exigences de votre
région en matière d’alimentation secteur et de sécurité.
PRECAUTIONS
Respecter les précautions suivantes à l’emploi de l’appareil.
PRECAUTIONS GENERALES
Lors de l’installation de l’appareil, vérifier que:
– Les orifices d’aération ne sont pas obstrués.
– L’air peut circuler librement autour de l’appareil.
– Il est posé sur une surface non soumise à des vibrations.
– Il n’est pas exposé à des températures excessives, à de l’humidité ou
à de la poussière.
– Il n’est pas en plein soleil.
– Il ne subira pas de décharges électrostatiques.
Ne jamais déposer d’objets pesants sur l’appareil.
Si un liquide ou un solide pénètre à l’intérieur du coffret, contacter le
distributeur ou le service après-vente le plus proche.
Débrancher le cordon d’alimentation en le saisissant par sa fiche et ne
pas tirer sur le cordon proprement dit.
Il est conseillé de débrancher l’appareil au niveau de sa prise secteur
avant une longue période d’inutilisation ou en cas d’orage.
Cet appareil fait appel à divers circuits et principes destinés á
interdire la piraterie des oeuvres protégées par des droits d'auteurs,
circuits et principes qui sont couverts aux Etats-Unis soit par des
brevets détenus par Macrovision Corporation et d'autres sociétés,
soit par d'autres formes de propriété intellectuelle appartenant
également á Macrovision et à d'autres sociétés. L'utilisation de la
technologie visant à la protection des droits dàuteur doit être
autorisée par Macrovision Corporation, et doit être limitée à des fins
domestiques, ou similaires, sauf accord préalable de Macrovision
Corporation. La rétro-technique et le désassemblage sont proscrits.
Dieser Abschnitt muß gelesen werden, bevor das Gerät an eine
Netzsteckdose angeschlossen wird.
ZUR BEACHTUNG
Das Gerät vor Feuchtigkeit und Nässe schützen.
Das Gehäuse des Geräts nicht öffnen oder entfernen.
Darauf achten, daß keine Gegenstände durch die
Lüftungsöffnungen ins lnnere des Geräts gelangen können.
Das Netzkabel nicht mit nassen Händen berühren.
Auf allen Geräteseiten muß ein Zwischenraum von ungefähr 0,1
meter vorhanden sein.
CE-Markierung
Dieses Produkt entspricht den EMC-Richtlinien und
den Richtlinien für Niederspannungsgeräte.
NETZSPANNUNGS-EINSTELLUNG DES GERÄTES
Dieses Marantz-Produkt entspricht den Netzspannungs- und
Sicherheitsanforderungen, die im Vertriebsgebiet gelten.
ZUR BEACHTUNG
Für die Verwendung dieses Gerätes müssen die folgenden Hinweise
beachtet werden.
ALLGEMEINE HINWEISE
Das Gerät muß so aufgestellt werden, daß:
– die Ventilationsöffnungen nicht verdeckt sind.
– die Luft unbehindert um das Gerät zirkulieren kann.
– es keinen Vibrationen ausgesetzt ist.
– es nicht Hitze, Kälte, Feuchtigkeit oder Staub ausgesetzt ist.
– es nicht direkter Sonnenbestrahlung ausgesetzt ist.
– es keinen elektrostatischen Entladungen ausgesetzt ist.
Außerdem dürfen niemals schwere Gegenstände auf das Gerät gelegt
werden. Wenn Gegenstände oder Wasser in das Gerät gelangen,
wenden Sie sich an Ihren Fachhändler oder an eine Kundendienststelle.
Zum Ziehen des Netzsteckers niemals am Kabel ziehen, sondern den
Stecker anfassen.
Es wird empfohlen, den Netzstecker zu ziehen, wenn das Haus
verlassen wird oder wenn ein Gewitter aufzieht.
Dieses Produkt beinhaltet urheberrechtlich geschützte Technologie
gemäß Verfahrensansprüchen bestimmter US-Patente und anderer
Rechte geistigen Eigentums im Besitz der Macrovision Corporation
und anderer Rechtsinhaber. Gebrauch dieser urheberrechtlich
geschützten Technologie muß von Macrovision Corporation
autorisiert werden, und ist nur auf Heimanwendungen und andere
begrenzte Anwendungen beschränkt, sofern nicht eine spezielle
Genehmigung der Macrovision Corporation eingeholt worden ist.
Nachbau und Zerlegung verboten.
4
Fr/Ge
Page 5

INTRODUZIONE
Leggete questa sezione prima di effettuare qualsiasi collegamento con
la rete.
AVVERTENZA
Non esponete gli apparecchi alla pioggia o all’umidità.
Non rimuovete il coperchio.
Non inserite alcun oggetto nei fori di ventilazione dell’ apparecchio.
Non toccate il cavo di alimentazione con le mani bagnate.
Lasciare 0,1 metro liberi tutto intorno l'unità.
Solo con il marchio CE
Questo prodotio è conforme alle direttive CEE ed a
quelle per le basse tentioni.
REGOLAZIONE DELLA TENSIONE DI FUNZIONAMENTO
DELL’APPARECCHIO
Il vostro apparecchio Marantz è stato predisposto per l’adattamento alla
tensione ed alle norme di sicurezza esistenti nella vostra zona.
PRECAUZIONI
Quando utilizzate l’apparecchio seguite sempre le seguenti precauzioni.
Français
Deutsch
Italiano
PRECAUZIONI GENERALI
Quando installate l’apparecchio accertatevi che:
–i fori di ventilazione non vengano coperti.
– l’aria circoli liberamente attorno all’apparecchio.
– l’apparecchio sia installato su di una superifcie senza vibrazioni.
– l’apparecchio non sia esposto a calore, freddo, umidità o polvere in
misura eccessiva.
– l’apparecchio non sia esposto alla luce solare diretta.
– l’apparecchio non sia esposto a scariche elettrostatiche.
Inoltre, non appoggiate mai oggetti pesanti sull’apparecchio.
Se un oggetto estraneo o dell’acqua dovessero penetrare
nell’apparecchio, rivolgetevi al rivenditore locale oppure ad un centro di
assistenza.
Non estraete la spina tirando il cavo di alimentazione; afferrate
direttamente la spina.
Quando si esce di casa per un certo tempo o durante i temporali è
consigliabile scollegare l’apparecchio dall’alimentazione di rete.
Questo prodotto contiene una tecnologia di protezione dei diritti di
autore, che è a sua volta protetta dal contenuto di certi brevetti
americani e da altri diritti sulla proprietà intellettuale, posseduti dalla
Macrovision Corporation e da altri possessori di diritti. L'uso di
questa tecnologia di protezione dei diritti d'autore deve essere
autorizzato dalla Macrovision Corporation, ed è inteso solamente
per uso domestico, o per altri scopi limitati, ove non altrimenti
autorizzato dalla Macrovision Corporation. L'uso di tecniche di
inversione e lo smontaggio sono proibiti.
5
It
Page 6

CONGRATULATIONS ON YOUR PURCHASE OF THIS FINE MARANTZ PRODUCT.
MARANTZ is on the leading edge of Super Audio CD, DVD research for consumer products and this unit incorporates the latest technological
developments.
We are sure you will be fully satisfied with the DVD player.
Thank you for your support.
Please read through these operating instructions so you will know how to operate your model properly. After you have finished reading the
instructions, put them away in a safe place for future reference.
• This player is not suitable for commercial use.
Table Of Contents
1 Before You Start
Features ..................................................................................................... 10
What’s in the box.................................................................................... 14
Putting the batteries in the remote control ..................................... 14
Using the remote control ..................................................................... 16
Discs compatible with this player ...................................................... 18
MP3 compatibility information........................................................... 22
2Connecting Up
Easy Setup ................................................................................................24
Home theater video connections....................................................... 28
Home theater audio connections....................................................... 32
3Controls & Displays
Front panel ...............................................................................................36
Remote control ....................................................................................... 38
Display....................................................................................................... 40
4Getting Started
Setting the TV System.......................................................................... 44
Using the Setup Navigator ...................................................................46
Using the FL Menu .................................................................................50
Playing discs ............................................................................................ 54
Navigating DVD disc menus .................................................................58
Navigating Video CD PBC menus ...................................................... 60
Navigating DVD-RW discs menus ...................................................... 60
5 Playing Discs
Introduction ............................................................................................. 62
Finding what you want on a disc ........................................................ 62
Still Frame/Slow Play/Frame Advance Playback.............................. 64
Switching camera angles....................................................................... 66
Switching subtitles .................................................................................66
Switching audio language..................................................................... 68
Switching audio channel (DVD-Audio) ............................................. 68
Switching audio channel (DVD-RW/Video CD/CD/MP3) .........68
Making a program list............................................................................ 70
Programming tips.................................................................................... 74
Using random play ................................................................................. 76
Using repeat play ................................................................................... 78
Bookmarking a place in a disc (LAST MEMORY) ...........................82
Memorizing disc settings (CONDITION MEMORY) ..................... 84
Using setup menu shortcuts (FUNCTION MEMORY) ..................86
Displaying disc information ................................................................ 90
6 Playing MP3s
Playing MP3s .......................................................................................... 94
Searching for folders and tracks ........................................................ 96
Using random play ................................................................................ 96
Using repeat play .................................................................................. 96
Displaying MP3 information............................................................... 98
Using the MP3 Navigator .................................................................. 100
Making a program list of MP3 tracks.............................................. 102
7DVD Setup Menu
Using the Setup menu........................................................................ 104
Setup Menu Mode............................................................................... 106
OSD Settings ........................................................................................ 106
Audio settings ....................................................................................... 108
Video settings ........................................................................................122
Language settings .................................................................................136
General settings .................................................................................... 146
8Additional Information
Handling discs .......................................................................................154
Storing discs ..........................................................................................154
Discs to avoid ........................................................................................ 156
Cleaning the pickup lens .................................................................... 156
Problems with condensation .............................................................156
Hints on installation ............................................................................ 158
Moving the player................................................................................. 158
Power cord caution .............................................................................. 158
Glossary ................................................................................................. 160
Tr oubleshooting.................................................................................... 168
Resetting the Player ............................................................................. 178
Country Code List................................................................................ 180
Language code list ............................................................................... 181
Specifications ........................................................................................ 182
6
En
Page 7

FÉLICITATIONS POUR AVOIR ACHETÉ CET EXCELLENT PRODUIT MARANTZ.
MARANTZ se situe à la pointe de la recherche en Super Audio CD, DVD pour les produits de consommation et cet appareil intègre les derniers
développements technologiques.
Nous sommes sûrs que vous serez pleinement satisfaits avec ce lecteur DVD.
Merci pour votre soutien.
Veuillez prendre le temps de lire ce mode d’emploi de façon à utiliser l’appareil au mieux de ses possibilités.Conservez soigneusement ce
mode d’emploi à portée de main pour être en mesure de vous y référer chaque fois que cela sera nécessaire.
• Cet appareil n’a pas été conçu pour un usage commercial.
Table des matières
English
Français
1Avant de commencer
Caractéristiques ..................................................................................... 10
Vérification du contenu de la boîte .................................................... 14
Installation des piles dans la télécommande .................................. 14
Utilisation de la télécommande .......................................................... 16
Disques compatibles avec ce lecteur ................................................. 18
Remarques sur la compatibilité MP3 .................................................22
2Raccordements
Installation accélérée........................................................................... 25
Raccordement vidéo pour le cinéma à domicile .............................29
Raccordement audio pour le cinéma à domicile............................ 33
3 Commandes et fenêtre d’affichage
Panneau avant ....................................................................................... 36
Télécommande ...................................................................................... 38
Fenêtre d’affichage ................................................................................ 41
4Préparation
Réglage du système de télévision...................................................... 44
Utilisation du navigateur d’installation ............................................. 46
Utilisation du menu FL ..........................................................................50
Lecture de disques .................................................................................54
Navigation parmi les menus de DVD ................................................. 58
Navigation parmi les menus PBC des Vidéo-CD ........................... 60
Navigation dans les menus de DVD-RW .......................................... 60
5 Lecture de disques
Introduction........................................................................................... 62
Recherche sur un disque....................................................................... 62
Arrêt sur image/Lecture au ralenti/Lecture image par image ..... 64
Commutation des angles de prise de vues ......................................66
Commutation des sous-titres ..............................................................66
Commutation de la langue des dialogues ........................................68
Commutation du canal audio (DVD-Audio) .................................... 68
Commutation du canal audio (DVD-RW/Video CD/CD/MP3)..68
Programmation d’une liste de lecture................................................ 70
Conseils de programmation .................................................................74
Mode de lecture aléatoire .................................................................... 76
Mode de lecture répétée ......................................................................78
Indexation d’un passage sur un disque (LAST MEMORY) ........... 82
Mémorisation des paramètres d’un disque
(CONDITION MEMORY) .....................................................................84
Utilisation des raccourcis du menu d’installation
(FUNCTION MEMORY)........................................................................ 86
Affichage des informations sur le disque ........................................ 90
6 Lecture de fichiers MP3
Lecture de fichiers MP3 ....................................................................... 94
Recherche de dossiers et de plages.................................................. 96
Mode de lecture aléatoire ................................................................... 96
Mode de lecture répétée ..................................................................... 96
Affichage des informations MP3 ....................................................... 98
Utilisation du navigateur MP3 ......................................................... 100
Programmation d’une liste de lecture de plages MP3 .............. 102
7 Menu d’installation DVD
Utilisation du menu d’installation ................................................... 104
Mode de menu d’installation............................................................ 106
Paramètres de réglage des menus ................................................... 106
Réglages audio ..................................................................................... 108
Réglages de la qualité vidéo ..............................................................122
Choix de la langue ................................................................................136
Réglages généraux ................................................................................146
8 Informations complémentaires
Manipulation des disques................................................................... 154
Rangement des disques ......................................................................154
Disques à éviter..................................................................................... 156
Nettoyage de la lentille du capteur optique ..................................156
Problèmes liés à la condensation .....................................................156
Conseils d’installation .........................................................................158
Déplacement du lecteur...................................................................... 158
Manipulation du câble d’alimentation............................................. 158
Glossaire ................................................................................................ 160
Dépannage .............................................................................................168
Réinitialisation du lecteur................................................................... 178
Liste des codes de pays ...................................................................... 180
Liste des codes de langue .................................................................. 181
Spécifications ........................................................................................ 183
7
Fr
Page 8

WIR DANKEN IHNEN, DASS SIE SICH FÜR DIESES HOCHWERTIGE MARANTZ-ERZEUGNIS ENTSCHIEDEN HABEN.
MARANTZ ist eines der führenden Unternehmen in bezug auf Super Audio CD, DVD-Forschung für Unterhaltungselektronik; auch dieses Gerät ist
mit den neuesten technischen Vorzügen ausgestattet.
Wir sind sicher, daß Sie mit diesem DVD-Spieler in jeder Hinsicht zufrieden sein werden.
Wir danken Ihnen für Ihr Vertrauen.
Bitte lesen Sie diese Bedienungsanleitung aufmerksam durch, um eine problemlose Bedienung Ihres Geräts zu gewährleisten. Nach dem
Durchlesen bewahren Sie die Anleitung gut auf, um sich jederzeit darauf beziehen zu können.
• Dieses Gerät ist nicht für eine gewerbliche Verwendung geeignet.
Inhaltsverzeichnis
1Vor der Inbetriebnahme
Merkmale ................................................................................................. 11
Überprüfung des Lieferumfangs ......................................................... 15
Einlegen von Batterien in die Fernbedienung .................................. 15
Verwendung der Fernbedienung ......................................................... 17
Verwendbare Discs für diesen Player ................................................. 19
Hinweise zur Kompatibilität mit MP3-Dateien................................ 23
2 Anschlüsse
Einfache Systemanordnung ..................................................................26
Video-Anschluss von Heimkino-Komponenten ...............................30
Audio-Anschluss von Heimkino-Komponenten............................... 34
3 Bedienelemente und Anzeigen
Frontplatte ................................................................................................ 37
Fernbedienung......................................................................................... 39
Anzeigen ................................................................................................. 42
4Vorbereitungen
Einstellen des TV-Farbsystems ............................................................ 45
Der Setup-Navigator zur Systemeinstellung.................................... 47
Verwendung des FL-Menüs................................................................... 51
Wiedergabe von Discs ........................................................................... 55
Navigieren mit DVD-Menüs .................................................................59
Navigieren auf Video-CDs mit PBC-Menüs ......................................61
Navigieren von DVD-RW-Menüs ......................................................... 61
5Wiedergabe von Discs
Einführung ................................................................................................63
Suche nach Passagen auf einer Disc.................................................. 63
Standbild-/Zeitlupen-/Einzelbild-Wiedergabe ...............................65
Umschalten des Blickwinkels................................................................ 67
Umschalten der Untertitelsprache ..................................................... 67
Umschalten der Dialogsprache ...........................................................69
Umschalten des Audiokanals (DVD-Audio) ................................... 69
Umschalten des Audiokanals (DVD-RW/Video CD/CD/MP3) ..... 69
Eingabe von Abspielprogrammen ....................................................... 71
Programmiertipps ...................................................................................75
Zufallswiedergabe................................................................................... 77
Wiederholfunktion.................................................................................. 79
Markieren einer Position auf einer Disc (LAST MEMORY) ..........83
Speichern von Disc-Einstellungen (CONDITION MEMORY) .....85
Einstellmenü-Schnellzugriffsmenü (FUNCTION MEMORY) ........ 87
Abruf von Disc-Informationen............................................................. 91
6Wiedergabe von MP3-Dateien
Wiedergabe von MP3-Dateien ............................................................95
Suche nach Ordnern und Titeln.......................................................... 97
Zufallswiedergabe................................................................................... 97
Wiederholfunktion.................................................................................. 97
Anzeige von MP3-Informationen....................................................... 99
Nutzung des MP3 Navigators ........................................................... 101
Erstellen eines Abspielprogramms aus MP3-Titeln ..................... 103
7DVD-Setup-Menü
Verwendung des DVD-Setup-Menüs .............................................. 105
Setup Menu Mode (Einstellmenü-Modus)..................................... 107
Einstellungen für Bildschirmeinblendungen ................................. 107
Dialog-Einstellungen ........................................................................... 109
Video-Einstellungen ............................................................................. 123
Spracheneinstellungen ........................................................................ 137
Allgemeine Einstellungen ....................................................................147
8Weitere Informationen
Handhabung von Dics .........................................................................155
Aufbewahren von Discs ...................................................................... 155
Ungeeignete CDs ................................................................................. 157
Reinigen der Abtastlinse .....................................................................157
Probleme durch Kondensation ..........................................................157
Hinweise zur Aufstellung ................................................................... 159
Ändern des Aufstellorts ......................................................................159
Vorsichtshinweise zum Netzkabel ................................................... 159
Erläuterung der Begriffe...................................................................... 161
Fehlersuche .............................................................................................169
Rücksetzen des Players ..................................................................... 179
Verzeichnis der Landescodes .............................................................180
Liste der Sprachcodes ........................................................................ 181
Technische Daten ................................................................................. 184
8
Ge
Page 9

CONGRATULAZIONI PER L’ACQUISTO DI QUESTO PRODOTTO MARANTZ.
MARANTZ è all’avanguardia della tecnologia Super Audio CD, DVD per il consumatore e quest’unità include i suoi ultimi sviluppi tecnologici.
Siamo certi che sarete soddisfatti di questo lettore per DVD.
Vi ringraziamo per la vostra scelta.
Leggere completamente questo manuale per essere certi di saper usare correttamente il lettore per DVD.
Terminata la lettura, conservare il manuale in un luogo sicuro per poterlo riutilizzare in caso di bisogno.
• Questo lettore non è adatto all’uso commerciale.
Indice
1 Istruzioni preliminari
Dati tecnici ............................................................................................... 11
Contenuto della confezione................................................................ 15
Inserimento delle batterie nel telecomando .................................... 15
Uso del telecomando ............................................................................ 17
Dischi compatibili con il lettore .......................................................... 19
Compatibilità col formato MP3 .......................................................... 23
2Collegamento
Predisposizione facilitata ...................................................................... 27
Collegamenti video di tipo Home Theater ...................................... 31
Collegamenti audio di tipo Home Theater .................................... 35
3 Comandi e display
Lato anteriore e comandi...................................................................... 37
Telecomando ...........................................................................................39
Display....................................................................................................... 43
4 Istruzioni preliminari per l’uso
Impostazione del sistema TV............................................................. 45
Uso del Navigatore ............................................................................... 47
Uso del menu FL ..................................................................................... 51
Riproduzione dei dischi......................................................................... 55
Navigazione nel menu dei dischi DVD ...............................................59
Navigazione nel menu dei dischi Video-CD PBC ............................ 61
Navigazione nel menu dei dischi DVD-RW .......................................61
5 Riproduzione dei dischi
Introduzione .......................................................................................... 63
Ricerca all’interno del disco................................................................. 63
Immagine ferma/rallentatore/riproduzione per fotogrammi........65
Modifica di angolazione della telecamera ...................................... 67
Variazione dei sottotitoli .......................................................................67
Modifica della lingua di ascolto ........................................................ 69
Modifica del canale di ascolto (DVD-Audio) ...................................69
Modifica del canale di ascolto
(DVD-RW/Video CD/CD/MP3) .........................................................69
Programmazione di una sequenza personalizzata.......................... 71
Suggerimenti per la programmazione.............................................. 75
Uso della riproduzione casuale ...........................................................77
Uso della ripetizione.............................................................................. 79
Impostazione di un segnalibro su disco (LAST MEMORY) ........ 83
Memorizzazione delle impostazioni del disco
(CONDITION MEMORY) .....................................................................85
Uso delle scelte rapide del menu di Setup
(FUNCTION MEMORY)........................................................................ 87
Visualizzazione delle informazioni relative al disco ........................ 91
6 Riproduzione di file MP3
Riproduzione di file MP3 ......................................................................95
Ricerca delle cartelle e delle tracce ................................................... 97
Uso della riproduzione casuale .......................................................... 97
Utilizzo della ripetizione ....................................................................... 97
Visualizzazione delle informazioni relative al file MP3 ................. 99
Utilizzo del Navigatore per file MP3............................................... 101
Programmazione di una sequenza personalizzata di file MP3 . 103
7 Menu di Setup DVD
Utilizzo del menu di Setup DVD ...................................................... 105
Mode del menu di Setup ....................................................................107
Impostazioni OSD ................................................................................ 107
Impostazioni audio .............................................................................. 109
Impostazioni Video............................................................................... 123
Impostazione della lingua ...................................................................137
Impostazioni varie................................................................................. 147
8 Ulteriori informazioni
Manipolazione dei dischi .................................................................... 155
Conservazione dei dischi .................................................................... 155
Dischi da non utilizzare .......................................................................157
Pulizia della lente del pick up di lettura .......................................... 157
Come evitare la formazione di condensa........................................ 157
Suggerimenti per l’installazione ........................................................159
Precauzioni in caso di trasporto del lettore ................................... 159
Precauzioni durante la manipolazione del cavo
di alimentazione ....................................................................................159
Glossario ................................................................................................. 161
Individuazione guasti ...........................................................................169
Reset del lettore ....................................................................................179
Elenco dei Codici paese...................................................................... 180
Lista codici di lingue ............................................................................ 181
Dati tecnici .............................................................................................185
Deutsch
Italiano
9
It
Page 10
Before You Start1 Avant de commencer
Features
An HDCP-compatible DVI-D (digital RGB)
terminal is provided for the realization of the
very highest picture quality by fully digital
transmission
This unit is equipped with an HDCP-compatible digital
image output terminal (DVI-D) to realize copyright
protection.
Direct digital transmission without analog conversion of
DVD image data makes it possible to enjoy real-life images
without any image deterioration resulting from AD/DA
conversion.
Superlative audio performance with DVDAudio, Dolby*1 Digital and DTS*2 software
R
Logos: 1
The DV-12S2 delivers breathtaking sound quality with
Dolby Digital and DTS discs.
TruSurround
Logo:
When used with stereo sources, TruSurround creates a
realistic surround-sound effect using just two speakers
(see page 114).
*3
Caractéristiques
Une borne de sortie DVI-D compatible
HDCP (RVB numérique) est disponible pour
la réalisation d’une qualité d’image optimale
grâce à une transmission entièrement
numérique
Cette unité est équipée d’une borne de sortie d’image
numérique compatible HDCP (DVI-D) pour permettre la
protection de copyright.
La transmission numérique directe sans conversion en
données analogiques de l’image DVD permet d’obtenir
une qualité d’image d’un grand réalisme, exempte des
détériorations dues aux conversions AN/NA.
Excellentes performances audio avec les DVD
audio, et les formats Dolby*1 Digital et DTS
R
Logos: 1
Le DV-12S2 produit une qualité sonore époustouflante
avec les disques Dolby Digital et DTS.
TruSurround
Logo:
Avec des sources stéréo, le système TruSurround crée un
effet de son spatial réaliste avec seulement deux hautparleurs (voir page 114).
*3
*2
MP3 compatibility
This player is compatible with CD-R, CD-RW and CDROM discs that contain MP3 audio tracks (see pages 22,
94).
Video Adjust
This new type of DNR (Digital Noise Reduction) for
encoding video enables you to adjust the video
settings on a more detailed and exact level. There are
three possible settings to choose from. These
include: TV (CRT), PDP, and Professional. This
technology can remember which setting you’ve
chosen and employ it at the proper time
130 ).
(see page
Compatibilité MP3
Ce lecteur est compatible avec les CD-R, les CD-RW et les
CD-ROM comportant des plages audio MP3 (voir pages
22, 94).
Réglage vidéo
Ce nouveau type de DNR (Digital Noise Reduction)
pour le codage vidéo vous permet d’ajuster les
réglages vidéo de façon plus détaillée et plus précise.
Vous avez le choix entre trois réglages possibles. Il
s’agit en l’occurrence de : TV (CRT), Projector et
Professional. Cette technologie mémorise le réglage
que vous avez sélectionné et l’utilise au moment
approprié (voir page 130).
10
En/Fr
Page 11

Istruzioni preliminari
1Vor der Inbetriebnahme
Merkmale
Ein HDCP-komtatibles DVI-D Terminal
(digitales RGB) dient der Realisierung der
höchsten Bildqualität durch voll digitale
Übertragung
Diese Einheit ist mit einem HDCP-kompatiblen digitalen
Bildausgangs-Terminal (DVI-D) zur Realisierung des
Copyright-Schutzes ausgestattet.
Die direkte Digitalübertragung ohne Analog-Umwandlung
der DVD-Bild-Daten ermöglicht es, sich an lebensechten
Bildern ohne irgendwelche Verzerrungen durch AD/DAUmwandlung zu erfreuen.
Überragende Audioleistung mit DVD-Audio-,
Dolby*1 Digital-und DTS*2-Software
R
Logos: 1
Der DV-12S2 liefert mit Dolby Digital- und DTS-Discs
eine atemberaubende Klangqualität.
Dati tecnici
Si fornisce un terminale DVI-D (RGB digitale)
compatibile HDCP per la realizzazione della
più elevata qualità d’immagine con una
trasmissione interamente digitale
Questo apparecchio è dotato di un terminale d’uscita di
immagine digitale (DVI-D) compatibile HDCP, in grado di
realizzare una protezione di copyright.
Una trasmissione digitale diretta senza conversione
analogica dei dati dell’immagine DVD consente di godere
di immagini naturali, senza alcun deterioramento derivante
dalla conversione AD/DA.
Qualità del suono eccellente con sistemi
DVD-Audio, Dolby*1 Digital e software DTS
R
Loghi: 1
Il DV-12S2 consente un’elevata qualità del suono con
dischi in Dolby Digital e DTS.
*2
English
Français
Deutsch
Italiano
TruSurround
Logo:
Bei Verwendung mit Stereo-Signalquellen erzeugt
TruSurround einen realistisch wirkenden SurroundKlangeffekt mit lediglich zwei Lautsprechern (siehe Seite
115 ).
*3
MP3-Kompatibilität
Dieser Player ist mit CD-R-, CD-RW- und CD-ROM-Discs
kompatibel, die MP3-Titel enthalten (siehe Seite 23 und
95).
Einstellung
Dieser neue Typ von DNR (Digital Noise Reduction)
zur Videocodierung ermöglicht detailliertere und
präzisere Videoeinstellungen. Drei mögliche
Einstellung stehen zur Wahl: TV (CRT), PDP und
Professional. Diese Technologie kann die gewählte
Einstellung registrieren und zum gegebenen
Zeitpunkt aufrufen (siehe Seite 131).
TruSurround
Logo:
In presenza di segnali stereo, la funzione TruSurround
ricrea un effetto di tipo “surround” assolutamente
realistico, utilizzando due soli diffusori (cfr. pag. 115).
*3
Compatibilità formato MP3
Il lettore è compatibile con dischi CD-R, CD-RW e CDROM contenenti tracce audio in formato MP3 (cfr. pagg.
23, 95).
Regolazioni video
Questo nuovo tipo di riduzione digitale del rumore,
o DNR (Digital Noise Reduction), per la codifica
video consente di regolare le impostazioni video in
modo più dettagliato e preciso. É possibile scegliere
fra tre diversi tipi di impostazione. Essi sono i
seguenti: TV (CRT), PDP e Professional. Questa
tecnologia è in grado di memorizzare l’impostazione
scelta e di utilizzarla al momento opportuno (vedere
pagina 131).
Svenska
Español Português
11
Ge/It
Page 12

Before You Start1 Avant de commencer
12
En/Fr
High quality 24-bit/192kHz DAC
The high specification 24-bit/192kHz DAC delivers
dynamic, smooth and expansive analog sound from
CDs and DVDs.
Flexible video output
The DV-12S2 has an array of video outputs, including two composite, one S-Video, AV connector
(which can output RGB component video) and DVI-D
for connection to a wide range of video equipment.
Graphical Setup Navigator
Setting up your DVD player is easy using the graphical Setup Navigator. Answer the questions that
appear on-screen and the Setup Navigator makes
the necessary audio, video and language settings for
you (see page 46).
Energy conservation design
This unit is designed to reduce electrical power
consumption by automatically switching to standby
mode after 30 minutes of non-use.
High quality 12bit/216MHz Video D/A
converter*
It uses a Video D/A converter that performs D/A
conversion of all video signals in 12 bits and can
perform 8X over-sampling to let you enjoy beautiful
video possible with DVD. And its NSV technology
lowers the noise during DA conversion.
*1Manufactured under license from Dolby Laboratories.
“Dolby” and the double-D symbol are trademarks of
Dolby Laboratories. Confidential unpublished works. ©
19 9 2-1997 Dolby Laboratories. All rights reserved.
*2“DTS” and “DTS Digital Surround” are registered trade-
marks of Digital Theater Systems, Inc.
*3TruSurround, SRS and the
SRS Labs, Inc. TruSurround technology is incorporated
under license from SRS Labs, Inc.
*4“NSV” is a registered trademark of Analog Device Co.
Ltd.
4
®
symbol are trademarks of
Convertisseur N/A 24-bit/192 kHz de
haute qualité
Les spécifications élevée du convertisseur N/A 24bit/192kHz génèrent un son analogique dynamique,
lisse et expansif tant à partir de CD que de DVD.
Sortie vidéo flexible
Le DV-12S2 est doté d’une série de sorties vidéo,
comprenant deux sorties composites, une S-Vidéo, ,
un connecteur AV (qui peut sortir de la vidéo à
composantes RVB), et une sortie DVI-D permettant
la connexion à une vaste gamme d’équipements
vidéo.
Navigateur d’installation graphique
L’installation de votre lecteur de DVD est facilitée
grâce au navigateur d’installation graphique.
Répondez aux questions qui apparaissent sur l’écran
et le navigateur d’installation effectue pour vous tous
les réglages audio, vidéo et de langue requis (voir
page 46).
Une conception pour l’économie
d’énergie
Cette unité est conçue pour réduire la consommation
d’électricité grâce à son dispositif de commutation
automatique en mode veille au terme de 30 minutes
d’inactivité.
Convertisseur*4 Vidéo Numérique/
Analogique à 12bits/216 MHz de première
qualité
Utilise un convertisseur N/A qui effectue la conversion N/A de tous les signaux vidéo à 12 bits et peut
effectuer un sur-échantillonnage 8x qui vous permet
de profiter de la meilleure qualité d’image possible
avec le format DVD.Il est doté de technologie NSV
qui réduit le bruit durant la conversion N/A.
*1Fabriqué sous licence de Dolby Laboratories.
“Dolby” et le symbole double D sont des marques de
commerce de Dolby Laboratories. Œuvres confidentielles
non publiées. © 1992-1997 Dolby Laboratories.
Tous droits réservés.
*2“DTS” et “DTS Digital Surround” sont des marques
commerciales déposées de Digital Theater Systems, Inc.
*3TruSurround, SRS et le symbole
déposées par SRS Labs, Inc. La technique TruSurround
est employée sous licence de SRS Labs, Inc.
*4“NSV” est une marque déposée de Analog Device Co.,
Ltd.
®
sont des marques
Page 13

Istruzioni preliminari
1Vor der Inbetriebnahme
Hochwertiger 24-Bit/192-kHz-D/AWandler
Der leistungsstarke 24-Bit/192-kHz-D/A-Wandler
liefert einen dynamischen, flüssigen und expansiven
Analogklang von CDs und DVDs.
Flexible Videosignalausgabe
Der DV-12S2 hat eine Reihe von Video-Ausgängen
einschließlich von zwei Composite-VideoAusgängen, einem S-Video-Ausgang, einem AVKonnektor-Ausgang (der RGB-Component-VideoSignale überträgt) und DVI-D für den Anschluss an
einen weiten Bereich von Video-Geräten.
Graphischer Setup-Navigator
Die Einstellung des DVD-Players ist mit dem
graphischen Setup-Navigator leicht zu
bewerkstelligen. Sie müssen nur auf die Fragen
antworten, die auf dem Bildschirm erscheinen und
der Setup-Navigator erledigt die notwendigen Audio-,
Video- und Spracheinstellungen für Sie (siehe Seite
47 ).
Energiesparende Ausführung
Diese Einheit ist so gestaltet, dass der
Energieverbrauch dadurch reduziert wird, dass
automatisch auf den Bereitschafts-Modus
umgeschaltet wird, wenn das Gerät 30 Minuten lang
nicht in Betrieb ist.
Hochleistungs-Video-D/A-Wandler für 12
Bit / 216 MHz*
Die Einheit verwendet einen Video-D/A-Wandler, der
alle Video-Signale in 12-Bit-Signale umsetzt und der
eine 8-fache Abtastrate realisieren kann, was es
Ihnen ermöglicht, von Ihren DVDs wunderschöne
Videobilder genießen zu können. Ferner senkt die
NSV-Technologie das Rauschen bzw. Störungen
während der D/A-Wandlung.
*1In Lizenz von Dolby Laboratories hergestellt.
“Dolby” und das Doppel-D-symbol sind Warenzeichen
der Dolby Laboratories. Vertrauliche, unveröffentlichte
Schriften. © 1992-1997 Dolby Laboratories. Alle Rechte
vorbehalten.
*2“DTS” und “DTS Digital Surround” sind eingetragene
Warenzeichen von Digital Theater Systems Inc.
*3TruSurround, SRS und das
Warenzeichen der SRS Labs, Inc. Die TruSurroundTechnologie wird in Lizenz der SRS Labs, Inc. verwendet.
*4“NSV” ist ein eingetragenes Warenzeichen der Firma
Analog Device Co., Ltd.
4
®
-Symbol sind geschützte
Funzione DAC a 24 bit/192 kHz High
Quality
La funzione DAC a 24 bit/192 kHz High quality
consente un suono analogico allo stesso tempo
dinamico, uniforme ed ampio per CD e DVD.
Uscita video di tipo versatile
Il DV-12S2 ha un insieme di uscite video, tra le quali
due composite, una per S-Video, un connettore AV
(che può fornire un’uscita di componente video
RGB) e una per DVI-D che può essere collegata a una
vasta gamma di apparecchiature video.
Navigatore grafico
Il navigatore grafico consente di impostare il lettore
DVD con facilità. Il Navigatore imposta le funzioni
necessarie relative a video, audio e lingua, sulla base
delle risposte fornite alle domande che compaiono
di volta in volta sullo schermo (cfr. pag. 47).
Progetto per il risparmio energetico
Questa unità è stata progettata per ridurre il
consumo di energia elettrica, grazie alla
commutazione automatica sulla modalità di standby
dopo 30 minuti di non utilizzo.
Convertitore Video D/A 12but/216NHz di
Alta Qualità*
Usa un convertitore Video D/A che esegue
conversioni D/A di tutti i segnali video in 12 bit e
può eseguire 8 x sovra-campionature per permettervi
di godere del video migliore possibile con il DVD. E la
tecnologia NSV riduce il disturbo durante la
conversione DA.
*1Prodotto sotto licenza della Dolby Laboratories.
“Dolby” ed il simbolo doppia D sono marchi registrati
della Dolby Laboratories. Lavori non pubblicati riservati.
© 1992-1997 Dolby Laboratories. Tutti i diritti sono
riservati.
*2“DTS” e “DTS Digital Sorround” sono marchi registrati
della Digital Theater Systems, Inc.
*3TruSurround, SRS e il simbolo
fabbrica della SRS Labs, Inc. TruSurround è utilizzata
sotto licenza della SRS Labs, Inc.
*4“NSV” è un marchio registrato di Analog Device Co. Ltd.
4
®
sono marchi di
English
Français
Deutsch
Italiano
Svenska
Español Português
13
Ge/It
Page 14
Before You Start1 Avant de commencer
What’s in the box
Thank you for buying this MARANTZ product. Please
confirm that the following accessories are in the box
when you open it.
•Remote control
• AAA/R03P dry cell batteries x2
• Audio/Video cable
•System control cable
•Power cable
• Operating instruction (this manual)
•Warranty card
Putting the batteries in the remote
control
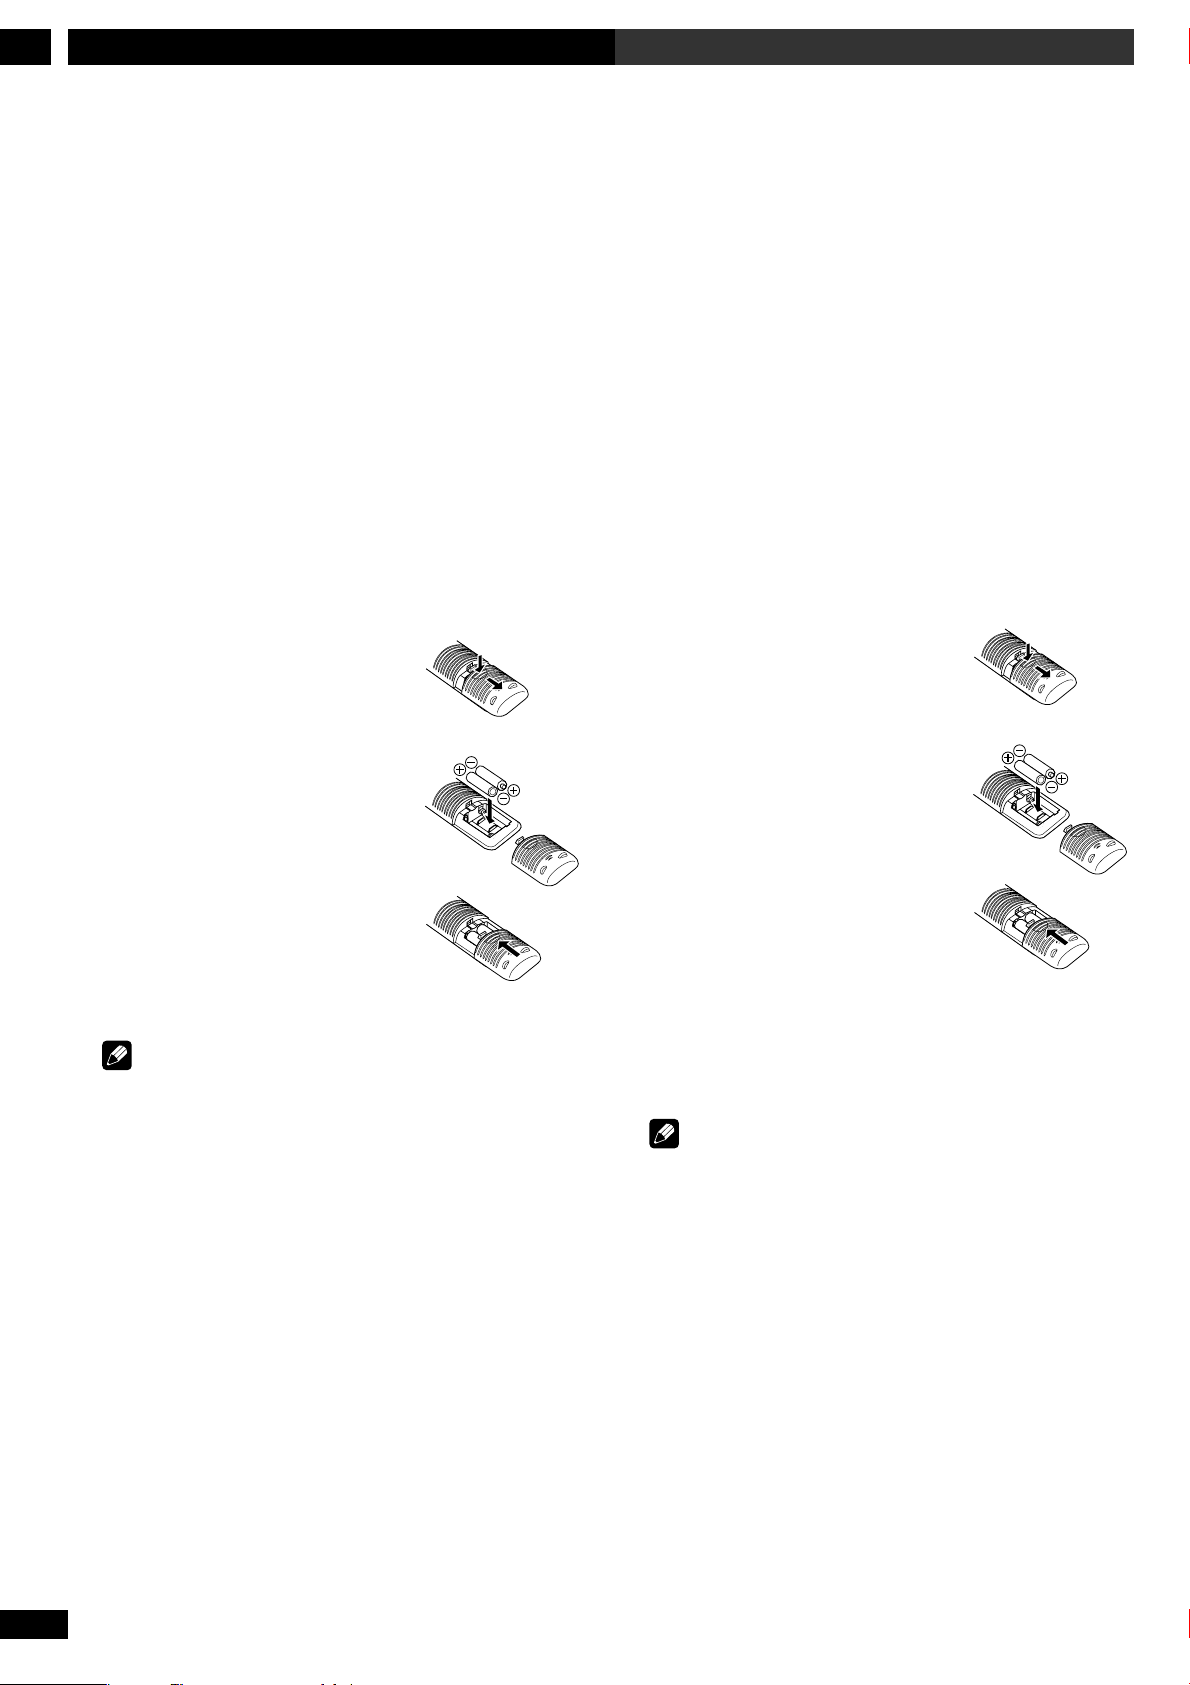
1While pushing the tab on the
battery compartment cover
toward the center of the
remote, pull out in the direction indicated by the arrow.
2 Insert batteries. Make sure to
match the plus (ª ) and
minus (·) polarity guides on
the batteries with the marks
inside the battery compartment.
3Close the cover.
Vérification du contenu de la boîte
Nous vous remercions pour cet achat d’un produit
MARANTZ. Veuillez vous assurer que les accessoires
suivants se trouvent dans la boîte lorsque vous
l’ouvrez.
•Télécommande
• Piles sèches AAA/R03P x2
• Câble audio/vidéo
• Câble de commande de système
• Câble d’alimentation
• Manuel d’instructions (ce manuel)
• Carte de garantie
Installation des piles dans la
télécommande
1Poussez le clapet sur le
couvercle du compartiment à
piles vers le centre de la
télécommande et tirez le
couvercle vers l’extérieur dans
la direction indiquée par la
flèche.
2 Insérez les piles. Assurez-vous
que les signes de polarité plus
(ª) et moins (·) reportées
sur les piles correspondent
bien aux indications figurant à
l’intérieur du compartiment à
piles.
14
En/Fr
Note
Incorrect use of batteries can result in hazards such as
leakage and bursting. Please observe the following:
• Don’t mix new and old batteries together.
• Don’t use different kinds of battery together—although
they may look similar, different batteries may have
different voltages.
• Make sure that the plus and minus ends of each battery
match the indications in the battery compartment.
•Remove batteries from equipment that isn’t going to be
used for a month or more.
When disposing of used batteries, please comply with
governmental regulations or environmental public
instruction’s rules that apply in your country or area.
3Refermez le couvercle.
Remarque
Une utilisation incorrecte des piles peut entraîner des
risques tels que des fuites d’électrolyte ou une explosion.
Aussi, veuillez vous conformer aux précautions suivantes:
• Ne mélangez pas des piles neuves et des piles usagées.
• N’utilisez pas différents types de piles en même temps —
bien qu’elles semblent similaires, des piles différentes
peuvent présenter des tensions différentes.
•Assurez-vous que les pôles positif et négatif de chaque
pile correspondent aux indications dans le compartiment
à piles.
•Retirez les piles de la télécommande si vous prévoyez de
ne pas l’utiliser pendant une période d’un mois ou plus.
Lorsque vous diposez de piles/batteries usées, veuillez vous
conformer aux normes gouvernementales ou
environnementales en vigueur dans votre pays ou région.
Page 15
Istruzioni preliminari
1Vor der Inbetriebnahme
Überprüfung des Lieferumfangs
Vielen Dank für den Kauf dieses MARANTZ-Produkts.
Vergewissern Sie sich bitte, dass der Versandkarton
die folgenden Zubehörteile enthält.
•Fernbedienung
•Batterien x2 (Format AAA/R03P)
• Audio/Video-Kabel
•Systemsteuerkabel
•Netzkabel
• Bedienungsanleitung (das vorliegende Handbuch)
• Garantiekarte
Einlegen von Batterien in die
Fernbedienung
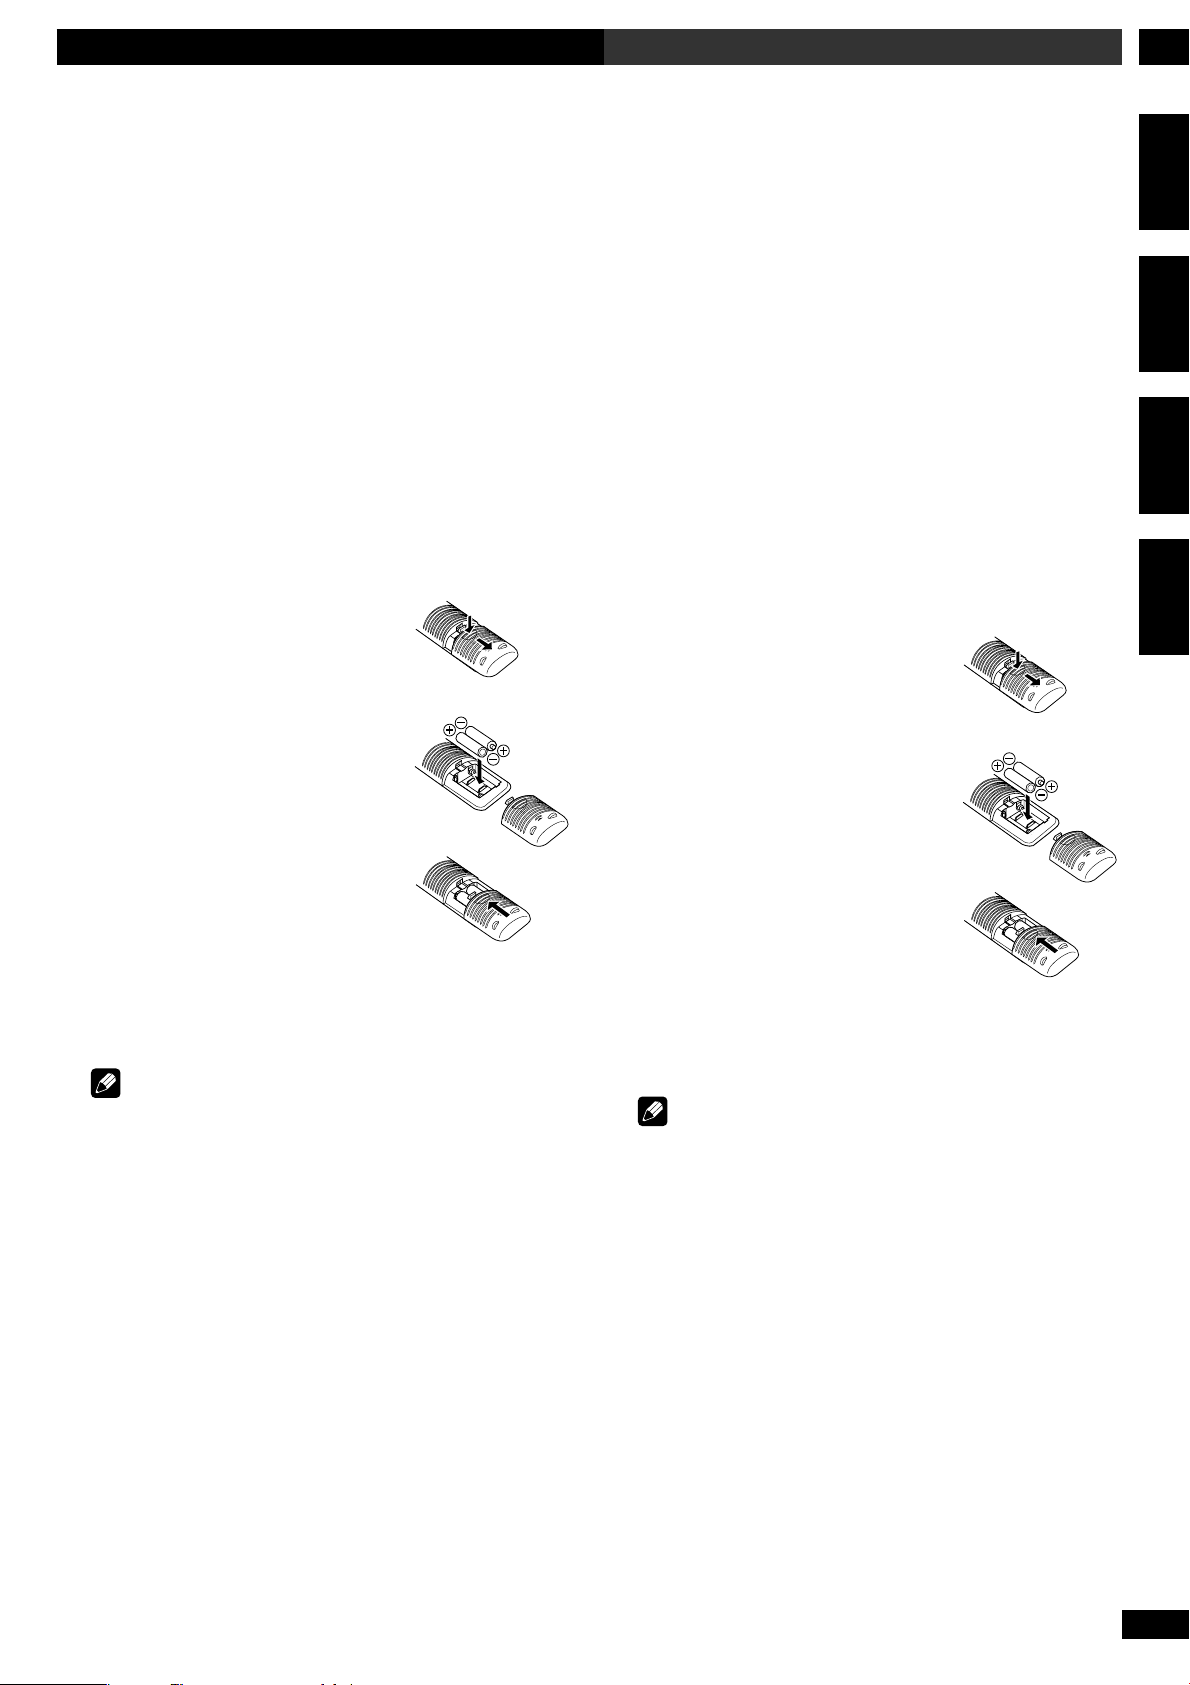
1Drücken Sie das den Bereich
des Etiketts des Batteriefachs
zur Mitte der Fernbedienung
hin und ziehen Sie dieses Teil
in der durch den Pfeil
angezeigten Richtung heraus.
Contenuto della confezione
Grazie per la preferenza accordataci con l’acquisto di
questo MARANTZ lettore. Controllare che all’interno
della confezione siano presenti tutti i seguenti
accessori.
•Telecomando
• Due pile tipo “AAA” R03P
•Cavo audio/video
•Cavo di controllo del sistema
•Cavo di alimentazione
• Istruzioni per l’uso (questo manuale)
•Foglio di garanzia
Inserimento delle batterie nel
telecomando
1 Spingendo la linguetta sul
coperchio dell’alloggiamento
delle pile verso il centro del
telecomando, estraetelo
seguendo la freccia.
English
Français
Deutsch
Italiano
2Setzen Sie die Batterien ein.
Achten Sie darauf, dass der
Pluspol (ª) und der Minuspol
(·) der Batterien mit den
betreffenden Markierungen im
Batteriefach übereinstimmen.
3 Schließen Sie die Abdeckung.
Hinweis
Unsachgemäßer Einsatz und falsche Handhabung der
Batterie kann Defekte durch Austritt von Elektrolyt oder
Bersten der Batterie zur Folge haben. Daher folgende
Hinweise beachten:
• Niemals alte und neue Batterien zusammen verwenden.
• Niemals verschiedene Arten von Batterien zusammen
verwenden—obwohl sie sich ähneln können, liefern sie
unter Umständen verschiedene Spannungen.
• Darauf achten, dass die Plus- und Minuspole der
Batterien entsprechend den Symbolen im Batteriefach
ausgerichtet sind.
• Die Batterien aus der Fernbedienung herausnehmen, wenn
sie einen Monat oder länger nicht verwendet werden soll.
Zur Entsorgung von verbrauchten Batterien beachten Sie
bitte diegesetzlichen Vorschriften bzw.
Umweltschutzbestimmungen Ihres Landes.
2 Inserite le batterie.
Assicuratevi che i riferimenti di
polarità positiva (ª) e
negativa (·) sulle pile
coincidano con i segni
all’interno del loro
alloggiamento.
3 Richiudete il coperchio.
Nota
Un uso non corretto delle batterie può provocare fuoriuscita
di acido e ustioni. Si raccomanda di osservare le precauzioni
descritte di seguito:
• Non abbinare batterie vecchie e nuove.
• Non abbinare batterie di tipo diverso. Anche se sembrano
simili possono avere tensioni diverse.
•Verificare il corretto inserimento delle batterie mediante la
corrispondenza del segno di polo positivo e negativo alle
estremità delle medesime con i segni presenti nel vano
portabatterie.
• Se il telecomando rimane inattivo per un mese o più,
togliere le batterie.
Quando recuperate le pile/batterie usate, fate riferimento
alle norme di legge in vigore nel vs. paese in tema di
protezione dell’ambiente.
Svenska
Español Português
15
Ge/It
Page 16
Before You Start1 Avant de commencer
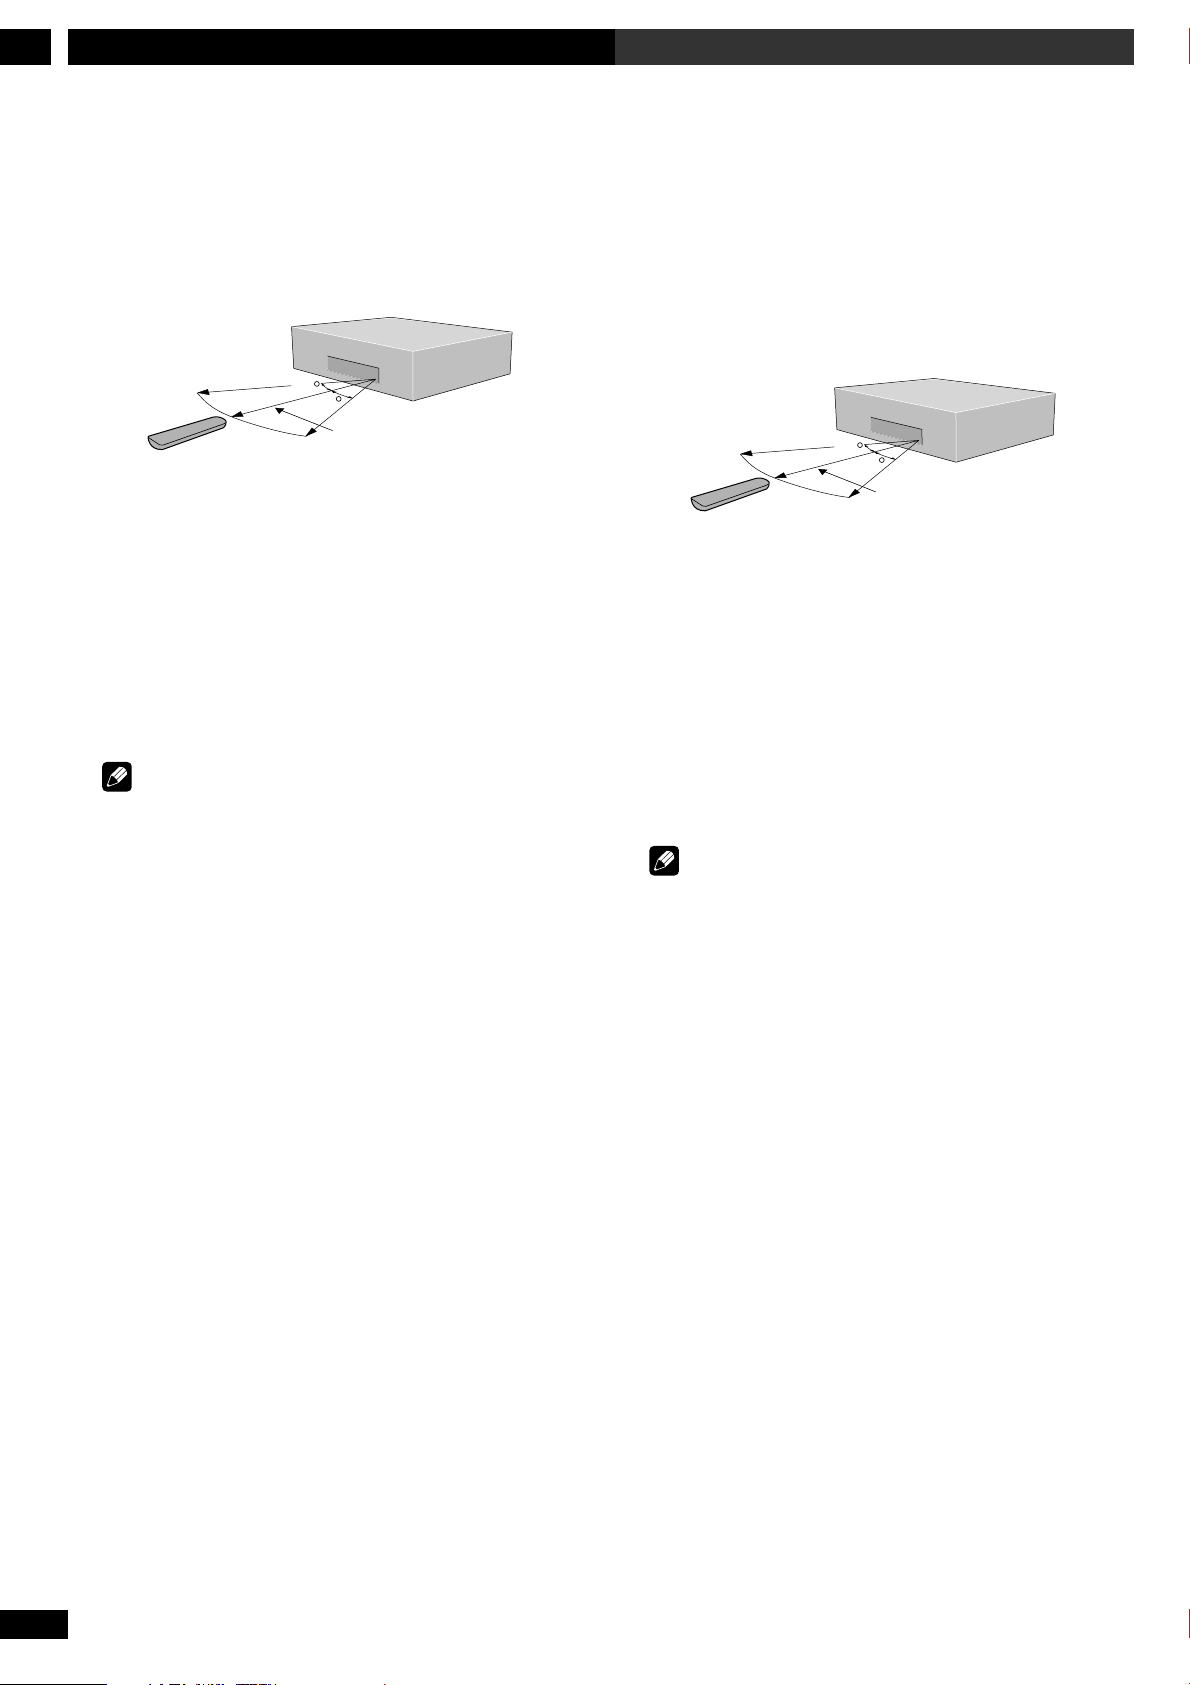
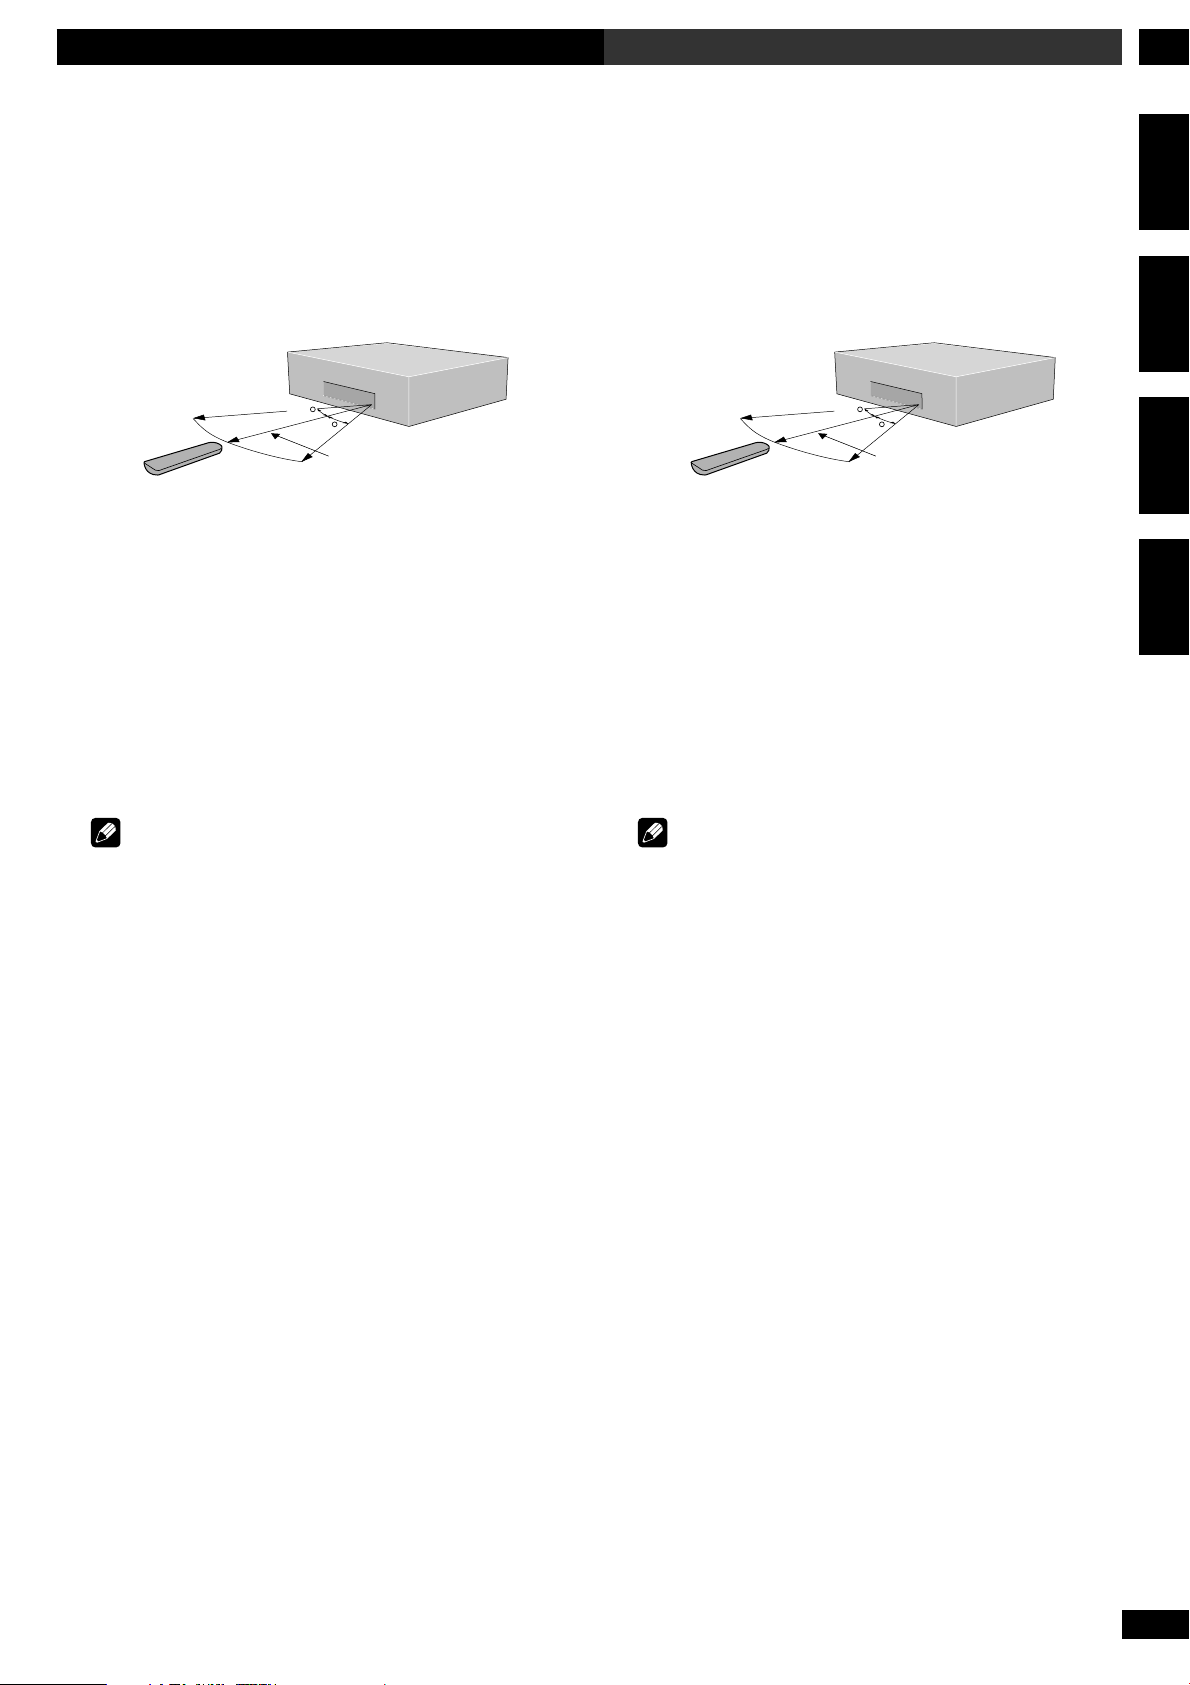
Using the remote control
Keep in mind the following when using the remote
control:
• Make sure that there are no obstacles between the
remote and the remote sensor on the unit.
• Use within the operating range and angle, as shown.
30
30
5m
•Remote operation may become unreliable if strong
sunlight or fluorescent light is shining on the unit’s
remote sensor.
•Remote controllers for different devices can interfere with
each other. Avoid using remotes for other equipment
located close to this unit.
•Replace the batteries when you notice a fall off in the
operating range of the remote.
Note
When using this player independently, set a REMOTE
CONTROL switch on the rear panel to INT.. (page 24)
Utilisation de la télécommande
Ne perdez pas de vue les consignes de base suivantes
lorsque vous utilisez la télécommande:
•Assurez-vous qu’il n’y a pas d’obstacle entre la
télécommande et le capteur de télécommande de
l’appareil.
•Actionnez la télécommande dans la portée et sous l’angle
efficaces de la télécommande comme illustré.
30
30
5m
• Le fonctionnement de la télécommande peut devenir
aléatoire si le capteur de la télécommande est exposé à
une forte luminosité ou à une lampe fluorescente.
•Les télécommandes de différents appareils peuvent
interférer les unes avec les autres. Evitez d’utiliser les
télécommandes d’autres équipements situés à proximité
de cet appareil.
•Remplacez les piles lorsque vous constatez que la portée
efficace de la télécommande diminue.
Remarque
Lorsque vous utilisez ce lecteurindépendamment, réglez
l’interrupteur REMOTE CONTROL situé sur le panneau
arrière sur la position INT.. (page 25)
16
En/Fr
Page 17
Istruzioni preliminari
1Vor der Inbetriebnahme
Verwendung der Fernbedienung
Berücksichtigen Sie bitte folgende Hinweise zur
Verwendung der Fernbedienung:
•Achten Sie darauf, dass zwischen Fernbedienung und
Sensor im Gerät ein freies Feld besteht.
•Verwenden Sie die Fernbedienung im gezeigten Bereich
und Winkel.
30
30
5m
•Starke Sonneneinstrahlung oder Neonlichteinfall auf den
Fernbedienungssensor kann die Funktion der
Fernbedienung beeinträchtigen.
• Die Fernbedienungen verschiedener Geräte können sich
gegenseitig stören. Vermeiden Sie die Verwendung von
Fernbedienungen für Geräte in unmittelbarer Umgebung
des Geräts.
•Tauschen Sie die Batterien aus, sobald die Reichweite der
Fernbedienung abnimmt.
Uso del telecomando
Per l’uso del telecomando osservare le regole
seguenti:
• Controllare che non siano presenti ostacoli fisici tra il
telecomando e il sensore relativo sul lettore.
• Usare il telecomando nel campo operativo e con
l’angolazione illustrati in figura.
30
30
5m
• Se il sensore è esposto direttamente ai raggi solari di
forte intensità o a luce fluorescente, telecomando
potrebbe non rispondere efficacemente.
•I telecomandi in dotazione ad apparecchi diversi
potrebbero interferire tra di loro. Evitare l’uso di
telecomandi relativi ad altri apparecchi a distanza troppo
ravvicinata con il lettore.
• Sostituire le batterie non appena si nota un calo di
prestazioni del telecomando.
English
Français
Deutsch
Italiano
Hinweis
Wenn Sie diesen DVD-Player unabhängig verwenden, stellen
Sie den Schalter REMOTE CONTROL auf der Rückwand auf
INT.. (Seite 26)
Nota
Quando utilizzate questo lettore indipendentemente,
impostate l’interruttore REMOTE CONTROL sul pannello
posteriore su INT.. (pag. 27)
Svenska
Español Português
17
Ge/It
Page 18
Before You Start1 Avant de commencer
18
En/Fr
Discs compatible with this player
Any disc that displays one of the following logos
should play in this player. Other formats, including
DVD-RAM, DVD-ROM, CD-ROM (except those that
contain MP3 files), and Photo CD will not play.
DVD Video compatibility:
• Logos:
• Single-sided or double-sided discs
• Single layer or dual layer discs
• Dolby Digital, DTS, MPEG or Linear PCM digital audio
• MPEG-2 digital video
Discs are generally divided into one or more titles. Titles may
be further subdivided into chapters.
DVD Audio compatibility:
• Logos:
• Single sided discs
• Single layer or dual layer discs
• Linear or packed PCM digital audio
• Some discs may contain MPEG-2 video, and Dolby
Digital, DTS or MPEG digital audio
Discs are generally divided into one or more groups. Groups
may be further subdivided into tracks.
Note
Dolby Digital or DTS that are included in the DVD audio
disc are intended to let you replay on a DVD-Video player. It
cannot be replayed on this unit (DVD-Audio player). For
details, also refer to the users manual that you receive with
the disc.
DVD-R compatibility:
This unit can play DVD-R discs. Please note the following
points when using these discs:
• Logo:
• This unit can play DVD-R discs recorded as DVD video
format.
DVD-RW compatibility:
This unit can play DVD-RW discs. Please note the following
points when using these discs:
• Logo:
• This unit can play DVD-RW discs recorded as DVD video
format or DVD video recording format.
•DVD-RW discs that were recorded with copy-once only
permission cannot be played. The message, ‘COPY
PROTECT PROGRAM, UNPLAYABLE’ appears in the
display during these parts of the disc.
Disques compatibles avec ce lecteur
Tous les disques arborant l’un des logos suivants
peuvent être lus sur ce lecteur. Les autres formats, et
notamment les DVD-RAM, DVD-ROM, CD-ROM
(excepté ceux qui contiennent des fichiers MP3), et
les CD photo ne peuvent être lus.
Compatibilité des DVD vidéo:
• Logos:
• Disques simple face ou double face
• Disques simple couche ou double couche
• Dolby Digital, DTS, MPEG ou audionumérique PCM
linéaire
•Vidéo numérique MPEG-2
Les disques sont généralement divisés en un ou plusieurs
titres. Les titres peuvent à leur tour être divisés en chapitres.
Compatibilité des DVD audio:
• Logos:
• Disques simple face
• Disques simple couche ou double couche
• Audionumérique PCM linéaire ou condensé
• Certains disques peuvent contenir des signaux vidéo
MPEG-2, et des signaux audionumériques Dolby Digital,
DTS ou MPEG.
Les disques sont généralement divisés en un ou plusieurs
groupes. Les groupes peuvent à leur tour être divisés en
plages.
Remarque
Le matériel en format Dolby Digital ou DTS inclus dans un
DVD Audio est destiné à la lecture sur lecteur de DVDVidéo. Ces formats ne peuvent pas être lus sur cette unité
(lecteur de DVD-Audio). Pour des informations plus
détaillées, reportez-vous également au manuel de
l’utilisateur fourni avec le DVD.
Compatibilité des DVD-R:
Cet appareil peut lire des disques DVD-R. Veuillez vous
conformer aux points suivants lorsque vous utilisez ces
disques:
• Logo:
•Cet appareil peut lire les DVD-R enregistrés selon le
format DVD vidéo.
Compatibilité des DVD-RW:
Cet appareil peut lire des disques DVD-RW. Veuillez vous
conformer aux points suivants lorsque vous utilisez ces
disques:
• Logo:
•Cet appareil peut lire les DVD-RW enregistrés selon le
format DVD vidéo ou le format d’enregistrement vidéo
DVD.
•Les DVD-RW qui ont été enregistrés avec une permission
pour une seule copie ne peuvent être reproduits. Le
message “COPY PROTECT PROGRAM, UNPLAYABLE”
apparaît dans la fenêtre d’affichage pendant ces passages
du disque.
Page 19

Istruzioni preliminari
1Vor der Inbetriebnahme
Verwendbare Discs für diesen Player
Alle Discs, die mit den nachfolgenden Symbolen
gekennzeichnet sind, sollten Sie mit diesem Gerät
abspielen können. Andere Formate wie DVD-RAM, DVDROM, CD-ROM (außer solchen mit
MP3-Dateien), und Photo-CDs lassen sich nicht
wiedergeben.
DVD-Videokompatibilität:
• Logos:
• Ein- oder zweiseitig bespielte Discs
• Einschichtige oder zweischichtige Discs
• Digital-Audiodaten in den Formaten Dolby Digital, DTS, MPEG
oder Linear PCM
• MPEG-2 Digital-Video
Discs sind im Allgemeinen in einen oder mehrere als Sektoren
bezeichnete Abschnitte unterteilt. Sektoren können weiter in Kapitel
unterteilt sein.
DVD-Audiokompatibilität:
• Logos:
• Einseitig bespielte Discs
• Einschichtige oder zweischichtige Discs
• Lineare oder gepackte PCM-Digital-Audiodaten
• Manche Discs enthalten u.U. außerdem auch MPEG-2-Videound Dolby Digital-, DTS- oder MPEG-Digitalaudio.
Discs sind im allgemeinen in eine oder mehrere als Gruppen
bezeichnete Abschnitte unterteilt. Gruppen können weiter in Titel
unterteilt sein.
Hinweis
Die auf einer DVD-Audiodisc enthaltenen Funktionen Dolby
Digital oder DTS sind dafür bestimmt, dass Sie die
betreffende Disc auf einem DVD-Videospieler wiedergeben
können. Sie kann auf dieser Einheit (DVD-Audiospieler)
nicht abgespielt werden.
mitgelieferten Nutzerinformationen verwiesen.
Zu Einzelheiten sei auf die mit der Disc
Dischi compatibili con il lettore
Il lettore è adatto alla riproduzione di tutti i dischi
che riportano il seguente logo. Al contrario, il lettore
non consente l’uso di altri formati, compreso DVDRAM, DVD-ROM, CD-ROM (se non contenenti file
MP3), e Photo CD.
Compatibilità video DVD:
• Logohi:
• Dischi con lato singolo o doppio
• Dischi con layer singolo o doppio
• Dolby digital, DTS, MPEG o audio digitale Linear PCM
•Video digitale MPEG-2
Il contenuto dei dischi è generalmente suddiviso in uno o più
titoli. I titoli sono ulteriormente suddivisi in capitoli.
Compatibilità DVD-Audio:
• Logohi:
• Dischi con lato singolo
• Dischi con layer singolo o doppio
• Audio digitale PCM, lineare o compatto
• Alcuni dischi possono contenere formati video MPEG-2 e
formati audio digitali Dolby Digital, DTS o MPEG
Il contenuto dei dischi è solitamente suddiviso in uno o più
gruppi. I gruppi sono ulteriormente suddivisi in tracce.
Nota
Il Dolby Digital o DTS compresi nell’audio del DVD sono
intesi a permettevi di rileggere un registratore DVD Video.
Non è possibile rileggerlo su questa unità (registratore DVD
Audio). Per dettagli, riferitevi anche al manuale d’uso che
avete ricevuto insieme al disco.
Compatibilità DVD-R:
Quest’unità può riprodurre dischi DVD-R. In relazione all’uso
di tali dischi, notare quanto segue:
English
Français
Deutsch
Italiano
Svenska
Español Português
DVD-R-Kompatibilität:
Mit diesem Gerät lassen sich DVD-R-Discs abspielen. Beachten Sie
bei Gebrauch dieser Discs bitte die folgenden Punkte:
• Logo:
• Auf diesem Gerät können DVD-Rs wiedergegeben werden, die
im DVD-Videoformat aufgenommen wurden.
DVD-RW-Kompatibilität:
Mit diesem Gerät lassen sich DVD-RW-Discs abspielen. Beachten
Sie bei Gebrauch dieser Discs bitte die folgenden Punkte:
• Logo:
• Auf diesem Gerät können DVD-RWs wiedergegeben werden, die
im DVD-Videoformat oder dem DVD-VideoAufzeichnungsformat aufgenommen wurden.
•DVD-RW-Discs, die nur eine Kopiergeneration erlauben, lassen
sich nicht abspielen. Die Meldung ‘COPY PROTECT PROGRAM,
UNPLAYABLE’ erscheint auf dem
entsprechenden Passagen der Disc.
Display bei den
• Logo:
• Quest’unità può riprodurre dischi DVD-R registrati nel
formato DVD video.
Compatibilità DVD-R/RW:
Quest’unità può riprodurre dischi DVD-RW. In relazione
all’uso di tali dischi, notare quanto segue:
• Logo:
• Quest’unità può riprodurre dischi DVD-RW registrati nel
formato DVD video o DVD per la registrazione video.
•I dischi DVD-RW registrati con il permesso di
duplicazione limitato ad una generazione non possono
venire riprodotti. Durante la riproduzione del disco il
display visualizzerà il messaggio ‘COPY PROTECT
PROGRAM, UNPLAYABLE’ (programma protetto da copia,
non riproducibile).
19
Ge/It
Page 20
Before You Start1 Avant de commencer
•When playing a DVD-RW disc that was edited on a DVD
recorder, the screen may go momentarily black at the
edited point.
•When playing a DVD-RW disc that was edited on a DVD
recorder, you may see scenes from just before the edited
point.
• Up to 20 characters of a title name can be displayed.
Audio CD compatibility:
• Logos:
•12cm or 8cm discs
• Linear PCM digital audio
• CD-Audio, CD-R* and CD-RW* formats
CDs are divided into tracks.
*This unit can play CD-R and CD-RW discs recorded in CD
Audio or Video CD format, or with MP3 audio files.
*Some copy-controlled CDs may not conform to official CD
standards. They are special discs and may not play on the
DV-12S2.
Video CD compatibility:
• Logo:
•12cm or 8cm discs
• MPEG-1 digital audio
• MPEG-1 digital video
Video CDs are divided into tracks.
Super Audio CD compatibility:
• Logo:
• Single layer, dual layer or Hyblid layer
•12cm (5in.) or 8cm (3in.) discs
• Digital audio (DSD)
Super Audio CDs are divided into tracks.
DVD Video regions
• Lors de la lecture d’un DVD-RW édité à l’aide d’un
enregistreur de DVD, l’image peut momentanément
disparaître au moment où se présente le passage édité.
• Lors de la lecture d’un DVD-RW édité à l’aide d’un
enregistreur de DVD, des scènes précédant le point
d’édition peuvent parfois s’afficher.
• Un maximum de 20 caractères peut être affiché pour le
titre.
Compatibilité des CD audio:
• Logos:
• Disques de 12 ou 8 cm
• Audionumérique PCM linéaire
•Formats CD audio, CD-R* et CD-RW*
Les CD audio sont divisés en plages.
*Ce appareil peut lire les CD-R et CD-RW qui portent des
enregistrements au format CD Audio et Video CD, ou des
fichiers audio MP3.
*Certains CD équipés de dispositifs de protection contre la
copie ne sont pas conformes aux standards officiels. Il s’agit
de disques spéciaux qui pourraient ne pas être lisibles par le
DV-12S2.
Compatibilité des Vidéo-CD:
• Logo:
• Disques de 12 ou 8 cm
• Audionumérique MPEG-1
•Vidéo numérique MPEG-1
Les Vidéo-CD sont divisés en plages.
Compatibilité Super Audio CD:
• Logo:
• Simple couche, double couche ou couche Hybrid
• Disques 12 cm ou 8 cm
• Digital audio (DSD)
Les Super Audio CD sont divisés en plages.
20
En/Fr
ALL
2
All DVD Video discs carry a region mark on the case
somewhere that indicates which region(s) of the
world the disc is compatible with. Your DVD player
also has a region mark, which you can find on the
rear panel. Discs from incompatible regions will not
play in this player. Discs marked ALL will play in any
player.
Zones géographiques des DVD vidéo
ALL
2
Tous les DVD vidéo portent sur le boîtier une
indication de zone géographique qui précise les
régions du monde avec lesquelles ils sont
compatibles. Votre lecteur de DVD porte également,
sur le panneau arrière, une indication de zone
géographique. Les disques destinés à des régions
incompatibles ne peuvent être lus sur ce lecteur. Les
disques portant l’indication ALL peuvent être lus sur
tous les lecteurs.
Page 21
Istruzioni preliminari
2
ALL
1Vor der Inbetriebnahme
•Wenn eine DVD-RW wiedergegeben wird, die auf einem
DVD-Recorder editiert wurde, kann sich der Bildschirm
am Editierpunkt kurzzeitig verdunkeln.
•Wenn eine DVD-RW wiedergegeben wird, die auf einem
DVD-Recorder editiert wurde, können unter Umständen
Szenen wiedergegeben werden, die sich kurz vor dem
Editierpunkt befinden.
• Es können bis zu 20 Zeichen des Sektornamens angezeigt
werden.
Audio-CD-Kompatibilität:
• Logos:
•12- oder 8-cm-Discs
• Digital-Audiodaten im PCM-Bitreihenformat
•Formate CD-Audio, CD-R* und CD-RW*
CDs sind in Titel unterteilt.
*Das Gerät kann CD-R- und CD-RW-Discs abspielen, die im
Format CD-Audio oder Video-CD bespielt sind, bzw. solche
mit MP3-Audiodateien.
*Es ist möglich, dass einige kopiergeschützte CDs nicht den
offiziellen CD-Standards entsprechen. Es handelt sich dabei
spezielle Discs, die nicht auf dem DV-12S2 abgespielt
werden können.
Video-CD-Kompatibilität:
• Logo:
•12- oder 8-cm-Discs
• MPEG-1 Digital-Audio
• MPEG-1 Digital-Video
Video-CDs sind in Titel unterteilt.
Super Audio CD-Kompatibilität:
• Logo:
• Einzelschicht, Doppelschicht oder Hybrid-Schicht
•12-cm- oder 8-cm-Discs
• Digital Audio (DSD)
Super Audio CDs sind in Titel unterteilt.
• Quando si riproduce un disco DVD-RW editato con un
registratore DVD, lo schermo può farsi temporaneamente
nero in punti in cui manca segnale.
• Quando si riproduce un disco DVD-RW editato con un
registratore DVD, si possono a volte vedere scene subito
prima del punto di editazione.
• I titoli possono venire visualizzarti con sino a 20
caratteri.
Compatibilità CD audio:
• Loghi:
• Dischi da 12 cm o 8cm
• Audio digitale Linear PCM
•Formati CD-Audio, CD-R* e CD-RW*
Il contenuto dei CD è suddiviso in tracce.
*Quest’unità può riprodurre CD-R e CD-RW registrati con
formati CD Audio o Video-CD , oppure contenenti file audio
MP3.
*Alcuni CD a controllo di duplicazione possono non essere
conformi agli standard ufficiali dei CD. Sono dischi speciali e
il DV-12S2 potrebbe non essere in grado di leggerli.
Compatibilità Video-CD:
• Logo:
• Dischi da 12 cm o 8 cm
• Audio digitale MPEG-1
•Video digitale MPEG-1
Il contenuto dei Video-CD è suddiviso in tracce.
Compatibilità Super Audio CD:
• Logo:
•Layer singolo, layer doppio o ibrido
• Dischi da 12 cm o 8 cm
• Audio digitale (DSD)
Super Audio CD sono suddivisi in tracce.
Regioni geografiche per i DVD Video
English
Français
Deutsch
Italiano
Svenska
Español Português
DVD-Regionalcodes
ALL
2
Alle DVD-Video-Discs tragen eine
Regionalmarkierung auf der Hülle, aus der
hervorgeht, in welcher geographischen Zone sie
verwendbar sind. Ihr
DVD-Spieler ist ebenfalls mit einer
Regionalmarkierung auf der Rückseite
gekennzeichnet. Discs für nicht kompatible Gebiete
lassen sich mit diesem Spieler nicht abspielen. Discs
mit der Kennzeichnung “ALL” lassen sich mit jedem
beliebigen Spieler wiedergegeben.
Sulla custodia di tutti i dischi DVD Video viene
riportata l’indicazione di una regione che indica la/le
regioni geografiche per la compatibilità della
riproduzione. Anche sul lettore DVD in vostro
possesso è riportato un identificativo di regione,
ubicato sul lato posteriore dell’apparecchio. Il lettore
non consente la riproduzione di dischi di regioni
geografiche non compatibili. I dischi contrassegnati
con l’identificativo ALL sono adatti alla riproduzione
con tutti i lettori.
21
Ge/It
Page 22

Before You Start1 Avant de commencer
MP3 compatibility information
• The CD-ROM must be ISO 9660 compatible.
• Mono or stereo MPEG-1 Audio Layer 3 format, 44.1 or
48kHz, fixed bit-rate. Incompatible files will not play and
"UNPLAYABLE MP3 FORMAT" will be displayed.
•Not compatible with variable bit-rate (VBR) files.
• This player only plays tracks that are named with the file
extension “.mp3” or “.MP3”.
• This player is not compatible with multi-session discs. If you
try and play a multi-session disc, only the first session will be
played.
• Use CD-R or CD-RW media for recording your MP3 files. The
disc must be finalized in order to play.
• Audio encoded at 128Kbps should sound close to regular
audio CD quality. Although this player will play lower bit-rate
MP3 tracks, the sound quality becomes noticeably worse at
lower bit-rates.
• Only the first 8 characters of folder and track names (excluding the “.mp3” extension) are displayed.
• This player can recognize a maximum of 250 folders and 250
tracks. Discs containing more than 250 folders or tracks will
play, but only the first 250 folders/tracks.
Caution!
•DVD-R/RW and CD-R/RW discs recorded using a personal
computer or a DVD or CD recorder may not play if the disc is
damaged or dirty, or if there is dirt or condensation on the
player’s lens.
• If you record a disc using a personal computer, even if it is
recorded in a compatible format, there are cases in which it
may not play because of the settings of the application
software used to create the disc. (Check with the software
publisher for more detailed information.)
• Unfinalized DVD-R/RW discs cannot be played.
• Unfinalized CD-R/RW discs can be played, but not all time
information (playing time, etc.) will be displayed.
•For more information on using DVD-R/RW and CD-R/RW
discs, see Handling discs starting on page 154.
Remarques sur la compatibilité MP3
• Le CD-ROM doit être conforme à la norme ISO 9660.
•Les fichiers doivent être au format MPEG1 Audio couche 3,
avec fréquence d’échantillonnage de 44,1 ou 48 kHz et taux
binaire fixe. Les fichiers qui sont incompatibles ne sont pas lus
et la mention “UNPLAYABLE MP3 FORMAT” s’affiche.
• Absence de compatibilité avec les fichiers pour lesquels le taux
binaire est variable (VBR).
•Cet lecteur ne lit que les fichiers dont le nom porte l’extension
“.mp3” ou “.MP3”.
•Cet lecteur n’est pas compatible avec les disques multisession.
Lorsque vous commandez la lecture d’un disque multisession,
seule la première session est lue.
• Utilisez des CD-R et CD-RW pour enregistrer les fichiers MP3.
Le disque doit être finalisé afin d’être reproduit.
•Les signaux audio codés à 128 kbps doivent apporter une
qualité proche de celle des CD audio standard. Bien que cet
lecteur soit capable de lire les fichiers MP3 créés avec un taux
binaire inférieur, la qualité sonore se dégrade sensiblement dès
que le taux binaire baisse.
• Seuls les 8 premiers caractères du dossier ou du nom du fichier
(et à l’exclusion de l’extension “.mp3”) peuvent être affichés.
•Cet appareil peut reconnaître 250 noms de dossier et 250
noms de fichier. Si le disque porte plus de 250 dossiers ou
fichiers, sa lecture n’est pas possible.
Attention!
• La lecture d’un DVD-R/RW ou celle d’un CD-R/RW gravés au
moyen d’un ordinateur personnel ou d’un graveur de DVD ou
de CD peut être impossible si le disque est endommagé ou
sale, ou encore si des poussières ou de la condensation sont
présentes sur l’optique du lecteur.
• La lecture d’un disque gravé à l’aide d’un ordinateur, y
compris dans le cas où le format est compatible, peut être
impossible en raison des réglages employés pour le logiciel
d’application ayant servi à créer le disque. (Pour de plus
amples détails concernant cette question, consultez l’éditeur
du logiciel.)
• La lecture des DVD-R/RW non finalisés est impossible.
• La lecture des CD-R/RW non finalisés est possible mais
toutes les informations de temps (durée totale du disque,
etc.) ne sont pas affichées.
•Pour de plus amples détails concernant les DVD-R/RW et les
CD-R/RW, reportez-vous à la page 154, Manipulation des
disques.
22
En/Fr
Page 23

Istruzioni preliminari
1Vor der Inbetriebnahme
Hinweise zur Kompatibilität mit MP3Dateien
• Die CD-ROM muß mit dem ISO-Standard 9660 kompatibel
sein.
•Dateien müssen das MPEG-1 Audio Layer 3-Format mit einer
fixierten Bitrate von 44,1 oder 48 kHz aufweisen. Nicht
kompatible Dateien können nicht wiedergegeben werden; in
diesem Fall wird “UNPLAYABLE MP3 FORMAT” (nicht
abspielbares MP3-Format) am Display angezeigt.
•Das Gerät ist mit Dateien, die eine variable Bitrate aufweisen
(VBR-Dateien) nicht kompatibel.
• Mit diesem Geräts können nur Titel wiedergegeben werden, die
mit der Extension “.mp3” oder “.MP3” versehen sind.
• Dieses Geräts ist mit solchen Discs, die mehrere Sessionen
aufweisen, nicht kompatibel. Bei Wiedergabe einer MultiSession-Disc wird nur die erste Session wiedergegeben.
• Zum Überspielen der MP3-Dateien muß eine CD-R oder CDRW verwendet werden. Um diese Disc dann wiedergeben zu
können, muß sie zuerst initialisiert werden.
• Audiosignale, die mit 128 Kbps codiert wurden, entsprechen
normalerweise der Standard-Audioqualität. Obwohl dieses
Geräts auch MP3-Titel mit niedrigeren Bitraten wiedergeben
kann, ist bei niedrigen Bitraten eine erhebliche
Verschlechterung der Klangqualität festzustellen.
• Es werden nur die ersten 8 Zeichen der Ordner- und
Titelnummern angezeigt (ausschließlich der Extension “.mp3”).
• Mit diesem System können maximal 250 Ordner und 250 Titel
angelegt werden. Wenn Discs mehr als 250 Ordner oder Titel
enthalten, werden erste 250 Ordner oder Titel wiedergegeben.
Compatibilità col formato MP3
•I CD-ROM riprodotti devono essere registrati nel formato ISO
9660.
• I file devono essere di formato MPEG1 Audio Layer 3 a 44.1 o
48 kHz, a velocità in bit costante. I file non compatibili non
vengono riprodotti e viene visualizzata l’indicazione
“UNPLAYABLE MP3 FORMAT” (formato MP3 non
riproducibile).
•L’unità non è compatibile con file a velocità in bit variabile
(VBR).
• Questo lettore riproduce solo file il cui nome possiede
l’estensione “.mp3” o “.MP3”.
• Questo lettore non è compatibile con dischi multiseduta. Se se
ne tenta la riproduzione, viene riprodotta solo la prima seduta.
•Registrare i proprio file MP3 su dischi CD-R o CD-RW. Per poter
venire riprodotto, il disco deve essere stato finalizzato.
• Il segnale audio codificato a 128 kbps dovrebbe essere
qualitativamente vicino a quello di un normale CD. Nonostante
questo lettore riproduca brani di compressione superiore
(MP3), la qualità in tal caso scende percettibilmente.
•Vengono visualizzati solo i primi otto caratteri dei nomi di
cartella e brano, e senza l’estensione “.mp3”.
• Questo sistema può riconoscere al massimo 250 cartelle e 250
brani. I dischi che ne contengono di più di 250 non vengono
riprodotti oltre 250.
English
Français
Deutsch
Italiano
Achtung!
•DVD-R/RWs und CD-R/RWs, die unter Verwendung eines
PCs oder eines DVD- oder CD-Recorders aufgenommen
wurden, können unter Umständen nicht wiedergegeben
werden, wenn die Disc beschädigt oder verschmutzt ist, oder
wenn sich Kondensation an der Linse des CD-Spielers
gebildet hat.
• Beim Aufzeichnen einer Disc unter Verwendung eines PCs ist
eine Wiedergabe unter gewissen Umständen nicht möglich,
selbst wenn zur Aufnahme ein kompatibles Format benutzt
wurde; dies ist auf die Einstellungen der Anwender-Software
zurückzuführen, die beim Aufzeichnen der Disc verwendet
wurde. (Für weitere Einzelheiten den Software-Hersteller zu
Rate ziehen.)
• Nicht finalisierte DVD-R/RWs können nicht abgespielt
werden.
• Nicht finalisierte CD-R/RW-Discs können zwar abgespielt
werden, doch werden nicht alle Zeit-Informationen
(Wiedergabezeit usw.) angezeigt.
•Für weitere Informationen zur Verwendung von DVD-R/RWs
und CD-R/RW sich auf den Abschnitt Handhabung von Dics
auf Seite 155 beziehen.
Attenzione!
•I dischi DVD-R/RW e CD-R/RW registrati con un personal
computer o un registratore DVD o CD possono non venire
riprodotti correttamente se il disco è sporco o danneggiato,
oppure se ci fosse sporco o condensa sulla lente del lettore.
• Se si registra un disco con un personal computer, anche se
fosse registrato in un formato compatibile, ci sono casi un cui
non può venire riprodotto a causa delle impostazioni
dell’applicativo usato per creare il disco. Per maggiori
informazioni in proposito, consultare l’azienda che produce il
programma.
•I dischi DVD-R/RW non finalizzati non possono venire
riprodotti.
•I dischi CD-R/RW possono venire riprodotti, ma non tutte le
informazioni sui tempi (durata, ecc.) vengono visualizzate.
•Per maggiori informazioni sull’uso di DVD-R/RW e CD-R/RW,
consultare la sezione Manipolazione dei dischi a pag. 155.
Svenska
Español Português
23
Ge/It
Page 24

Connecting Up
2
Easy Setup
This easy setup is the minimum set of connections you
need to start watching DVD video discs. Both sound and
picture are fed directly to your TV using the supplied
Audio/Video cable. For other possible connections, see
pages 28 and 32.
Important
Before making or changing any rear panel connections, make sure
that all components are switched off and unplugged from the wall
outlet.
RS-232C terminal
EXT.
Control terminal for
use by custom
installers.
RS-232C
IN
OUT
REMOTE CONTROL
(HDCP)
DVI-D OUT
COAX.
OPT.
EXT.
INT.
DIGITAL OUTPUT
13
SURROUND
R
COMPONENT
Y
Connect to a composite video input
on your TV using the supplied yellow
video cable.
Connecting Audio/Video cables
Be sure to insert each plug fully for
the best connection. The plugs and
jacks are colour-coded to make
connection easier.
INT.
C
L
B/PB
VIDEO OUTPUT
/PRC
R
SUB WOOFER
AUDIO OUTPUT
S1/S2
VIDEO
1
CENTER
2
2
Connect to a pair of stereo audio
inputs on your TV using the
supplied Audio/Video cable.
FRONT
2
1
RL
A/V EUROCONNECTOR
Plug into a standard AC
wall outlet.
•
When connecting to component which is not equipped with a
remote sensor, be sure to connect the component to the
REMOTE CONTROL OUT jack of this DVD player.
Note
Be sure to leave power switch on the Front panel in the
power mode.
24
En
Important
•
In order to properly ground this player, you must connect at
least one audio or video cable (not including an optical cable)
in addition to the control cable.
Connecting system control cables
By connecting this DVD player to another Marantz audio
component using a supplied System Control cable, you can
remotely operate the components as a single system.
•
When connecting to component with a remote sensor (such as
the SR-12S1), be sure to connect the REMOTE CONTROL IN
jack of this DVD player to the REMOTE CONTROL OUT jack of
the component with the remote sensor.
Remote switch
•
When using this DVD player independently, set this switch to
INT.. When using this DVD player in a system with a Marantz
receiver equipped with a remote sensor, set the switch to EXT..
Page 25
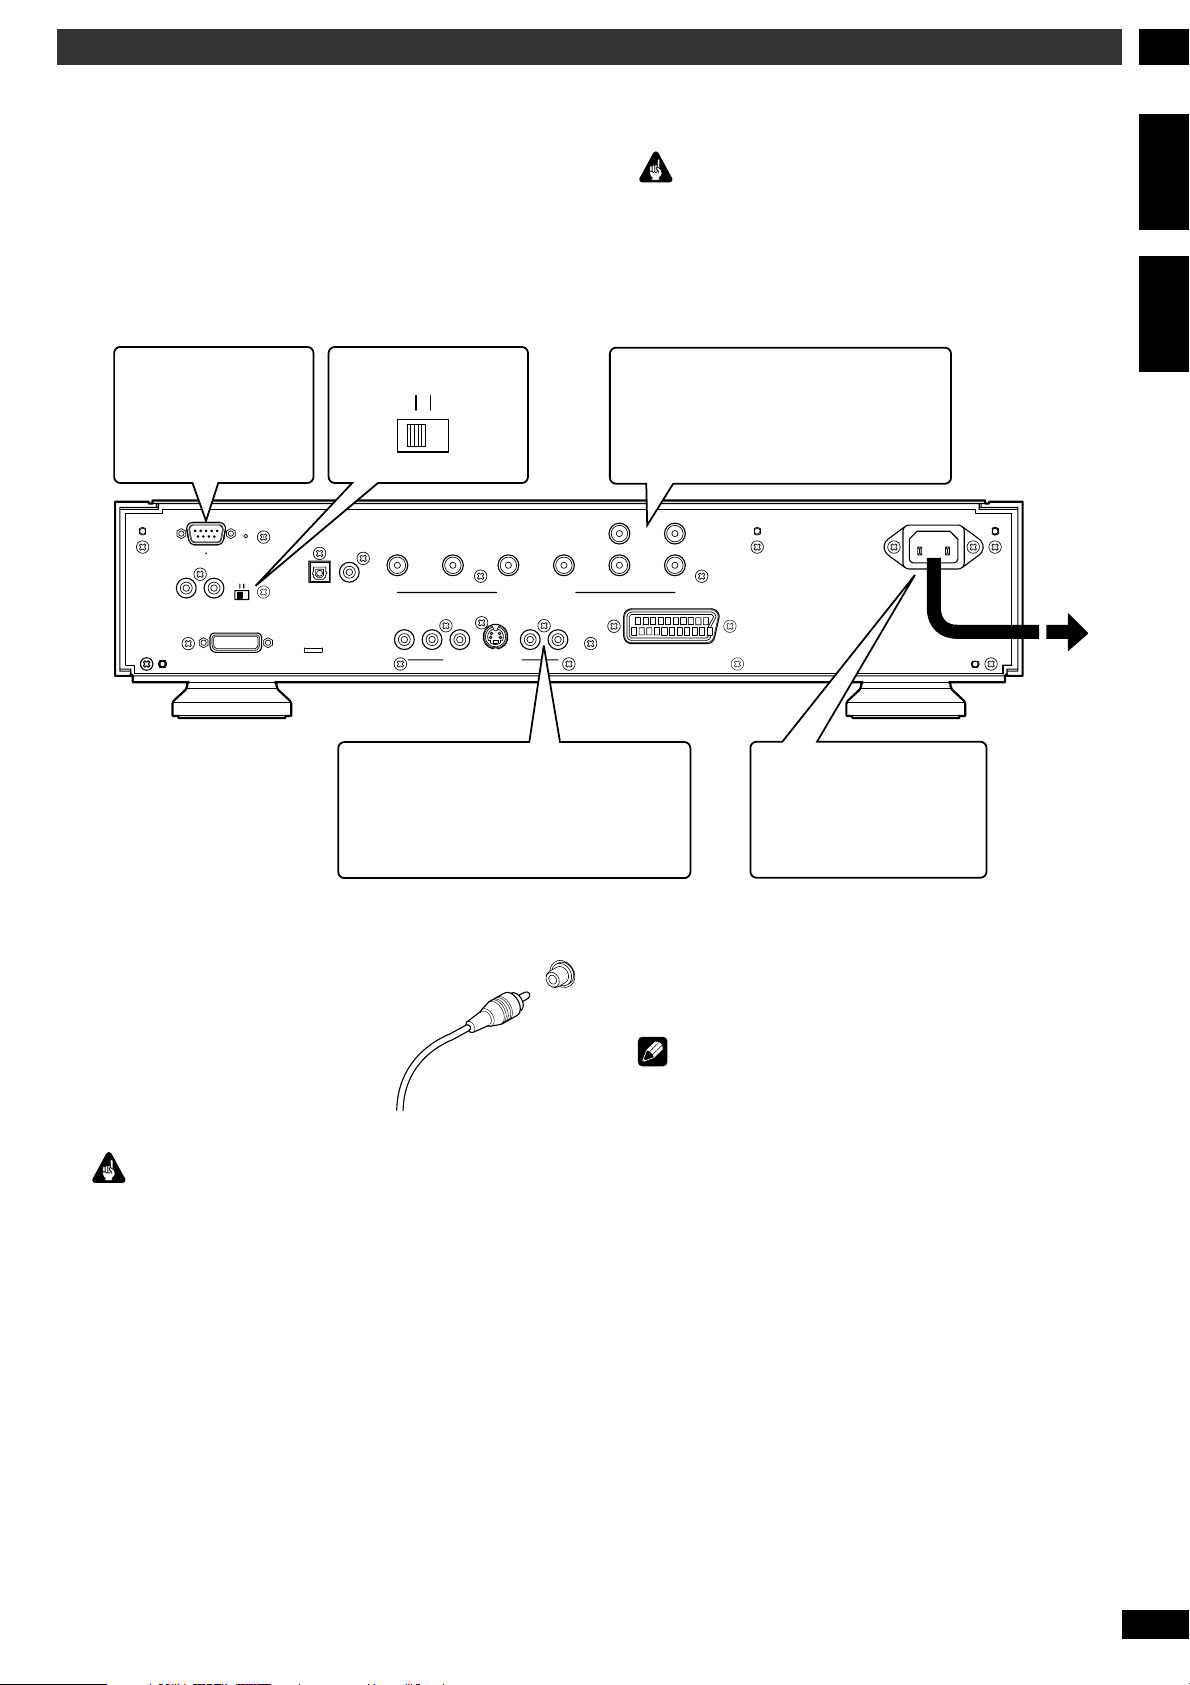
2Raccordements
Installation accélérée
La procédure d’installation accélérée décrit les connexions
minimales requises dont vous avez besoin pour commencer
à visionner des DVD vidéo. Le son et l’image sont
directement transmis à votre appareil TV à l’aide du câble
Audio/Vidéo fourni. Pour les autres reccordements
possibles, reportez-vous aux pages 29 et 33.
Borne RS-232C
Borne de
commande à l’usage
des installateurs
clients.
RS-232C
IN
OUT
EXT.
INT.
REMOTE CONTROL
(HDCP)
DVI-D OUT
COAX.
OPT.
DIGITAL OUTPUT
EXT.
SURROUND
R
COMPONENT
Y
INT.
C
L
B/PB
VIDEO OUTPUT
/PRC
R
SUB WOOFER
AUDIO OUTPUT
S1/S2
VIDEO
1
2
CENTER
2
Important
Avant d’entamer ou de modifier des connexions sur le panneau
arrière, assurez-vous que tous les équipements sont hors tension et
débranchés de la prise murale.
Raccordez-les à une paire d’entrées
audio stéréo sur votre appareil TV à
l’aide du câble Audio/Vidéo fourni.
FRONT
2
1
RL
A/V EUROCONNECTOR
English
Français
13
Raccordez-les à l’entrée vidéo
composite de votre téléviseur à
l’aide du câble vidéo jaune fourni.
Raccordement d’un câble Audio/Vidéo
Insérez complètement les fiches de
manière à obtenir la meilleure
connexion possible. Les fiches et les
prises sont identifiées par un code
de couleur pour faciliter les
connexions.
Important
•
Pour relier correctement ce lecteur à la masse, vous devez
raccorder au moins un câble audio ou vidéo (excepté câble
optique) en plus du câble de commande.
Raccordement des câbles de commande
En raccordant ce lecteur DVD à un autre composant audio
Marantz au moyen du câble de commande de système
fourni, vous pouvez télécommander tous les composants
en tant que système.
•
Lors d’un raccordement à un composant équipé d’un capteur de
télécommande (comme un SR-12S1), raccordez toujours la
prise REMOTE CONTROL IN de ce lecteur DVD à la prise
REMOTE CONTROL OUT du composant équipé du capteur de
télécommande.
Raccordez-la à une prise
murale secteur standard.
•
Lors d’un raccordement à un composant qui n’est pas équipé
d’un capteur de télécommande, raccordez toujours le
composant à la prise REMOTE CONTROL OUT de ce lecteur
DVD.
Remarque
Veillez à laisser la touche d’alimentation du panneau avant
en mode sous tension.
Commutateur de télécommande
•
Lorsque vous utilisez ce lecteur DVDindépendamment, réglez
ce commutateur sur la position INT.. Quand vous utilisez
celecteur DVD avec un système doté d’un récepteur Marantz
équipé d’un capteur de télécommande, réglez ce commutateur
sur la position EXT..
25
Fr
Page 26

Anschlüsse2
Einfache Systemanordnung
Diese einfache Systemanordnung beinhaltet die
grundlegenden Anschlüsse, um DVD-Video-Discs abspielen
zu können. Ton und Bild werden hierbei unter Verwendung
der mitgelieferten Audio- /Videokabel dem Fernsehgerät
direkt zugeführt. Andere Anschlussmöglichkeiten finden Sie
auf den Seiten 30 und 34.
Wichtig
Vor dem Anschließen oder Ändern von Anschlüssen an der
Geräterückwand sind unbedingt alle Komponenten auszuschalten
und vom Netz abzutrennen.
RS-232CTermimal
EXT.
INT.
Steuer-Terminal für
den Gebrauch durch
Benutzer-Einrichter.
RS-232C
IN
OUT
REMOTE CONTROL
(HDCP)
DVI-D OUT
COAX.
OPT.
EXT.
INT.
DIGITAL OUTPUT
13
SURROUND
R
L
COMPONENT
Y
C
/PRC
B/PB
R
VIDEO OUTPUT
Über das mitgelieferte gelbe
Videokabel mit dem FBAS-Eingang
eines Fernsehgeräts verbinden.
Anschluss Audio-/Videokabel
Führen Sie die Stecker stets bis zum
Anschlag ein, um eine optimale
Verbindung sicherzustellen. Zur
Vereinfachung des Anschlusses sind
die Stecker und Buchsen
farbcodiert.
Wichtig
•
Zur einwandfreien Erdung dieses Spielers ist neben dem
Steuerkabel mindestens ein Audio- oder Videokabel (kein
optisches Kabel) anzuschließen.
SUB WOOFER
AUDIO OUTPUT
S1/S2
VIDEO
1
CENTER
2
2
RL
Unter Verwendung des
mitgelieferten Audio-/Videokabels
mit einem Paar von StereoEingangsbuchsen am Fernsehgerät
verbinden.
FRONT
2
1
A/V EUROCONNECTOR
An eine Netzsteckdose
anschließen.
•
Bei Anschluss an eine Komponente ohne Fernbedienungssensor
schließen Sie die Komponente an die Buchse REMOTE
CONTROL OUT dieses DVD-Spielers an.
Hinweis
Achten Sie darauf, dass der Netzschalter an der Frontplatte
eingeschaltet bleibt.
Fernsteuerungsschalter
•
Wenn Sie diesen DVD-Player unabhängig verwenden, stellen Sie
diesen Schalter auf INT.. Wenn Sie hingegen diesen DVD-
Spieler in einem System mit einem Marantz-Tuner, der mit einem
Fernbedienungssensor ausgestattet ist, verwenden, dann stellen
Sie diesen Schalter auf EXT..
26
Ge
Anschluss von Systemsteuerkabeln
Wenn Sie diesen DVD-Spieler über das mitgelieferte
Systemsteuerkabel an eine andere MarantzAudiokomponente anschließen, können Sie die
Komponenten als ein einziges System fernsteuern.
•
Bei Anschluss an eine Komponente mit Fernbedienungssensor
(wie z.B. SR-12S1) verbinden Sie die Buchse REMOTE
CONTROL IN dieses DVD-Spielers mit der Buchse REMOTE
CONTROL OUT der mit dem Fernbedienungssensor
ausgestatteten Komponente.
Page 27
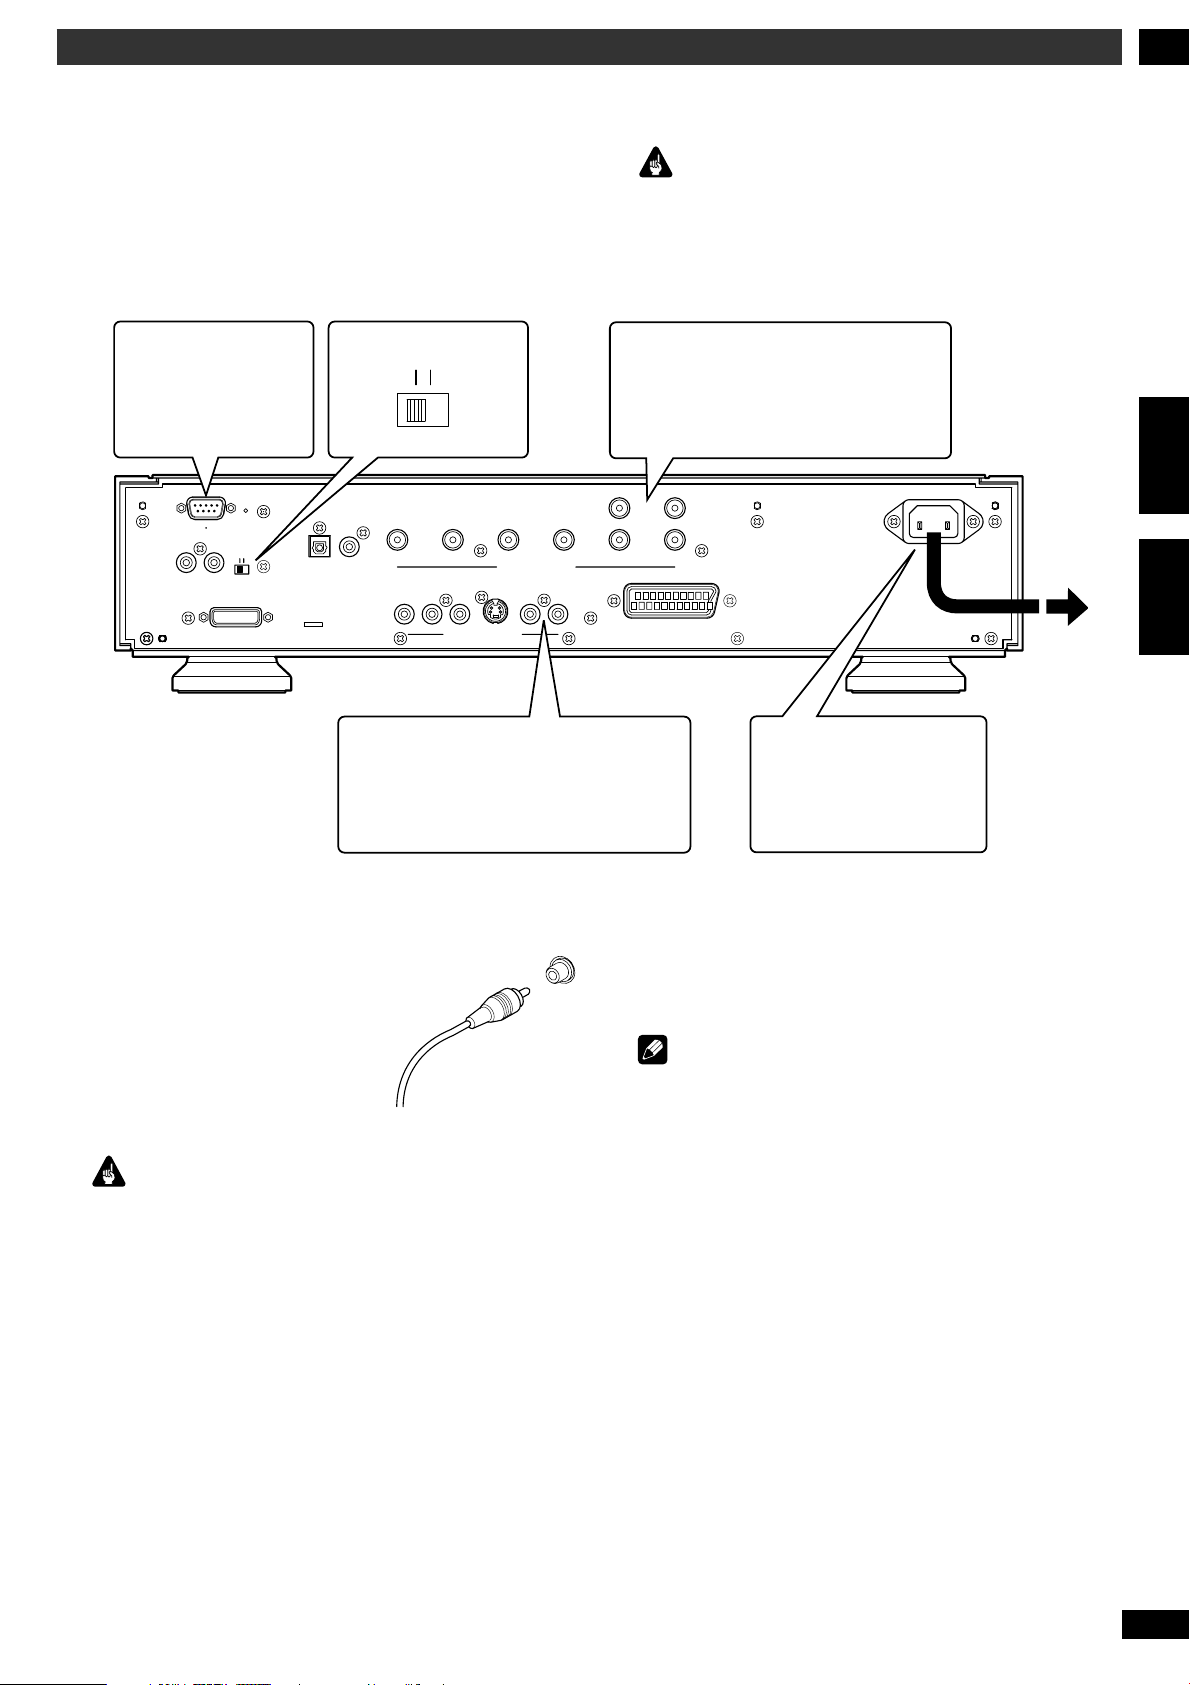
Collegamento
Predisposizione facilitata
La predisposizione facilitata comprende la serie minima di
collegamenti da eseguire per utilizzare il lettore DVD. Sia il
suono, sia immagine sono inviati direttamente
all’apparecchio TV usando il cavo Audio/Video fornito. Per
altri eventuali collegamenti, cfr. pagg. 31 e 35.
2
Attenzione
Prima di eseguire o modificare qualsiasi collegamento sul pannello
posteriore del lettore, verificare che tutti i componenti siano spenti
o che la spina sia disinserita dalla presa a muro.
Terminale RS-232C
Terminale di
controllo ad uso
degli installatori
presso il cliente.
RS-232C
IN
OUT
EXT.
INT.
REMOTE CONTROL
(HDCP)
DVI-D OUT
EXT.
INT.
2
Collegate a un paio di uscite audio
sulla vostra TV utilizzando il cavo
Audio/Video fornito.
FRONT
COAX.
OPT.
DIGITAL OUTPUT
13
SURROUND
R
COMPONENT
Y
C
L
B/PB
VIDEO OUTPUT
/PRC
R
SUB WOOFER
S1/S2
AUDIO OUTPUT
VIDEO
1
CENTER
2
Per il collegamento ad un ingresso
video composito dell’apparecchio TV
da collegare utilizzare il cavo giallo in
dotazione con il lettore.
2
1
RL
A/V EUROCONNECTOR
Collegare la spina ad una
presa standard di
corrente alternata a
parete.
Deutsch
Italiano
Connessione del cavo Audio/Video
Verificare che i connettori siano
inseriti a fondo per il corretto
collegamento degli apparecchi.
Prese e jack sono contraddistinti da
colori diversi a seconda degli
accoppiamenti e delle funzioni per
facilitare i collegamenti.
Attenzione
•
Per eseguire un corretto collegamento a massa del lettore,
collegare almeno un cavo video o audio (ad esclusione del cavo
a fibre ottiche) oltre al cavo di controllo.
Collegamento ai cavi di controllo del
sistema
Collegando questo lettore DVD a un altro componente
audio Marantz con il cavo di controllo del sistema fornito,
è possibile telecomandare i componenti come un sistema
unico.
•
Quando viene collegato un componente che dispone di un
sensore del telecomando (quale SR-12S1), prestare attenzione
a collegare la presa REMOTE CONTROL IN di questo lettore
DVD alla presa REMOTE CONTROL OUT del componente
dotato del sensore del telecomando.
•
Quando viene collegato un componente che non dispone di un
sensore del telecomando, prestare attenzione a collegare il
componente alla presa REMOTE CONTROL OUT di questo
lettore DVD.
Nota
Prestare attenzione a lasciare l’interruttore di
alimentazione sul pannello anteriore nel modo di
alimentazione.
Interruttore telecomando
•
Quando utilizzate questo lettore DVD indipendentemente,
impostate questo interruttore su INT.. Quando usate questo
DBD in un sistema dotato di ricevitore Marantz con sensore del
telecomando, impostate l’interruttore su EXT..
27
It
Page 28

Connecting Up
2
Home theater video connections
This player outputs video in a number of different ways.
Choose the one most suitable for your system using the
guide below.
If your TV and projector have a DVI-D
terminal for Video Input, we recommend using
it to connect directly to the DVI-D out of this
player.
RS-232C
IN
OUT
EXT.
INT.
REMOTE CONTROL
(HDCP)
DVI-D OUT
If your TV has a component video
1
input, we recommend using it to
connect directly to the COMPO-
NENT VIDEO OUT of this player.
Use the standard 3-jack component
video output.
COAX.
OPT.
DIGITAL OUTPUT
SURROUND
R
COMPONENT
Y
3
C
SUB WOOFER
L
AUDIO OUTPUT
S1/S2
/PRC
B/PB
R
VIDEO OUTPUT
If a SCART input is not available to you,
connect this player to your TV or AV
receiver using either the VIDEO or S1/
S2-VIDEO jacks.
VIDEO
1
CENTER
2
Important
Before making or changing any rear panel connections, make sure
that all components are switched off and unplugged from the wall
outlet.
If your TV has a SCART input,
2
we recommend using it to
connect directly to the A/V
EURO CONNECTOR on this
player.
FRONT
2
1
RL
A/V EUROCONNECTOR
Plug into a standard
4
AC wall outlet.
28
En
Connecting SCART and S-Video cables
SCART and S-Video cables will only plug in one way, so
make sure the plug is correctly lined up with the jack
before inserting. Be sure to fully insert for a good connection.
Note
The A/V EURO CONNECTOR connector can output composite,
S-Video or RGB component video. If you connect just one TV, use
the A/V EURO CONNECTOR connector. You can select the type
of video output by changing the Video Out setting in the Setup
Menu (page 124).
S-Video or composite video?
S-Video should give a better picture, so if you have an SVideo input, use it. S-Video cables are available from any
good audio/visual dealer.
DVI output format (for NTSC replay)
System : 525p (480p)/60
Resolution : 720 x 480
Vertical frequency : 60 Hz
Horizontal frequency : 31.5 kHz
P : Indicates Progressive (progressive scan)
NTSC : A broadcast format using primarily in Japan, the
U.S., Canada, Taiwan and Korea.
Note
• The DVI output of this unit is HDCP compatible. When watching
DVI output images with this unit, it is necessary to use a TV or
display with HDCP compatible DVI input.
• There may be no Image output if connected to a TV or display
that is not compatible with the above format.
• When PAL progressive button is pressed, DVI cannot be output.
• Refer to the instruction manual of the TV or display to be
connected to this unit for detailed information regarding the DVID terminal.
Page 29
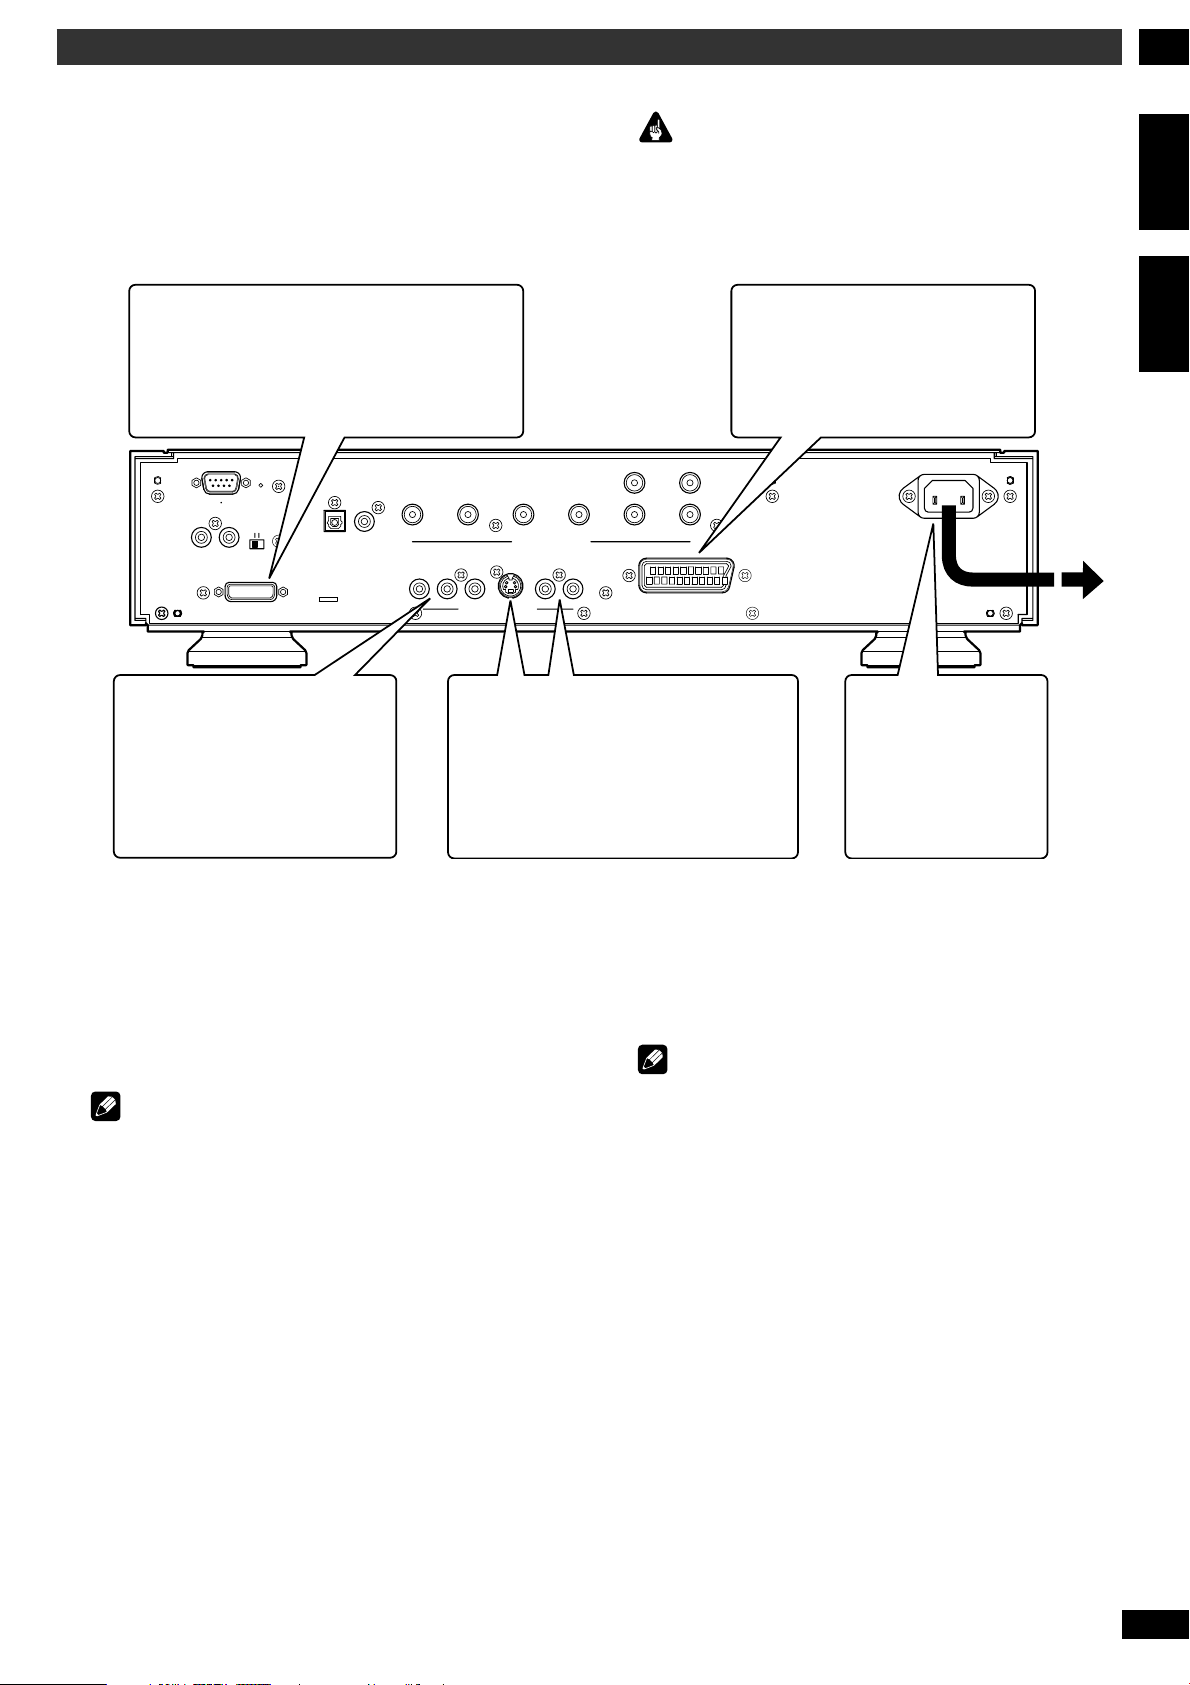
2Raccordements
Raccordement vidéo pour le cinéma à
domicile
Ce lecteur sort les signaux vidéo de différentes manières.
Choisissez le mode le mieux approprié à votre système en
consultant le guide ci-dessous.
Si votre appareil TV eet votre projecteur
disposent d’une borne DVI-D pour l’entrée
vidéo, nous vous conseillons de l’utiliser pour les
connecter directement à la sortie DVI-D de ce
lecteur.
RS-232C
IN
OUT
EXT.
INT.
REMOTE CONTROL
(HDCP)
DVI-D OUT
Si votre téléviseur dispose d’une entrée
1
composant vidéo, nous recommandons
de l’utiliser pour raccorder directement
l’appareil TV à la sortie COMPONENT
VIDEO OUT de cet appareil. Veuillez
utiliser la sortie composant vidéo
standard à trois fiches.
COAX.
OPT.
DIGITAL OUTPUT
SURROUND
R
COMPONENT
Y
3
C
SUB WOOFER
L
AUDIO OUTPUT
S1/S2
/PRC
B/PB
R
VIDEO OUTPUT
Si vous ne disposez pas d’une prise
Péritel, raccordez ce lecteur à votre
téléviseur ou à votre récepteur AV via les
prises VIDEO ou S1/S2-VIDEO.
VIDEO
1
CENTER
2
Important
Avant d’entamer ou de modifier des connexions sur le panneau
arrière, assurez-vous que tous les équipements sont hors tension
et débranchés de la prise murale.
Si votre téléviseur est doté d’une
2
entrée SCART, nous vous
conseillons de l’utiliser pour le
raccorder directement à la sortie A/
V EURO CONNECTOR de ce
lecteur.
FRONT
2
1
RL
A/V EUROCONNECTOR
Raccordez-la à une
4
prise murale secteur
standard.
English
Français
Raccordement des câbles SCART et S-Vidéo
Comme les câbles Péritel et S-Vidéo ne se branchent que
dans un sens, alignez correctement les fiches sur les prises
avant de les insérer. Insérez complètement les fiches pour
obtenir une bonne connexion.
Remarque
Le connecteur A/V EURO CONNECTOR peut sortir de la vidéo
composite, S-Vidéo, ou composant RVB. Sivous connectez un seul
appareil TV, utilisez le connecteur A/V EURO CONNECTOR.
Vous pouvez sélectionner le type de sortie vidéo en changeant le
réglage de Video Out dans le Setup Menu (page 124).
S-Vidéo ou vidéo composite ?
S-Vidéo produit une meilleure image – donc, si vous
disposez d’un connecteur d’entrée S-Vidéo,
utilisez-le. Les câbles S-Vidéo sont disponibles chez tous
les bons revendeurs de matériel audio/vidéo.
Format de sortie DVI (pour lecture NTSC)
Systèmee : 525p (480p)/60
Résolution : 720 x 480
Fréquence verticale : 60 Hz
Fréquence horizonale : 31,5 kHz
P : indique fonction Progressive (Progressive scan)
NTSC : Format de diffusion utilisé principalement au
Japon, aux Etats-Unis, au Canada, à Taiwan et en
Corée.
Remarque
• La sortie DVI de cette unité est compatible HDCP. Lorsque vous
visionnez des images DVI en sortie avec cette unité, il vous faut
utiliser un appareil TV ou un écran doté d’une entrée DVI
compatible avec le format HDCP.
• Si la connexion est effectuée avec un appareil TV ou un écran non
compatible avec le format ci-dessus, il se peut que vous
n’obteniez pas de sortie d’image.
• Quand vous appuyez sur la touche PAL Progressive, l’émission de
DVI en sortie n’est pas possible.
• Pour des informations plus détaillées concernant la borne DVI-D,
consultez le mode d’emploi de l’ appareil TV ou de l’ écran que
vous devez connecter à cette unité.
29
Fr
Page 30
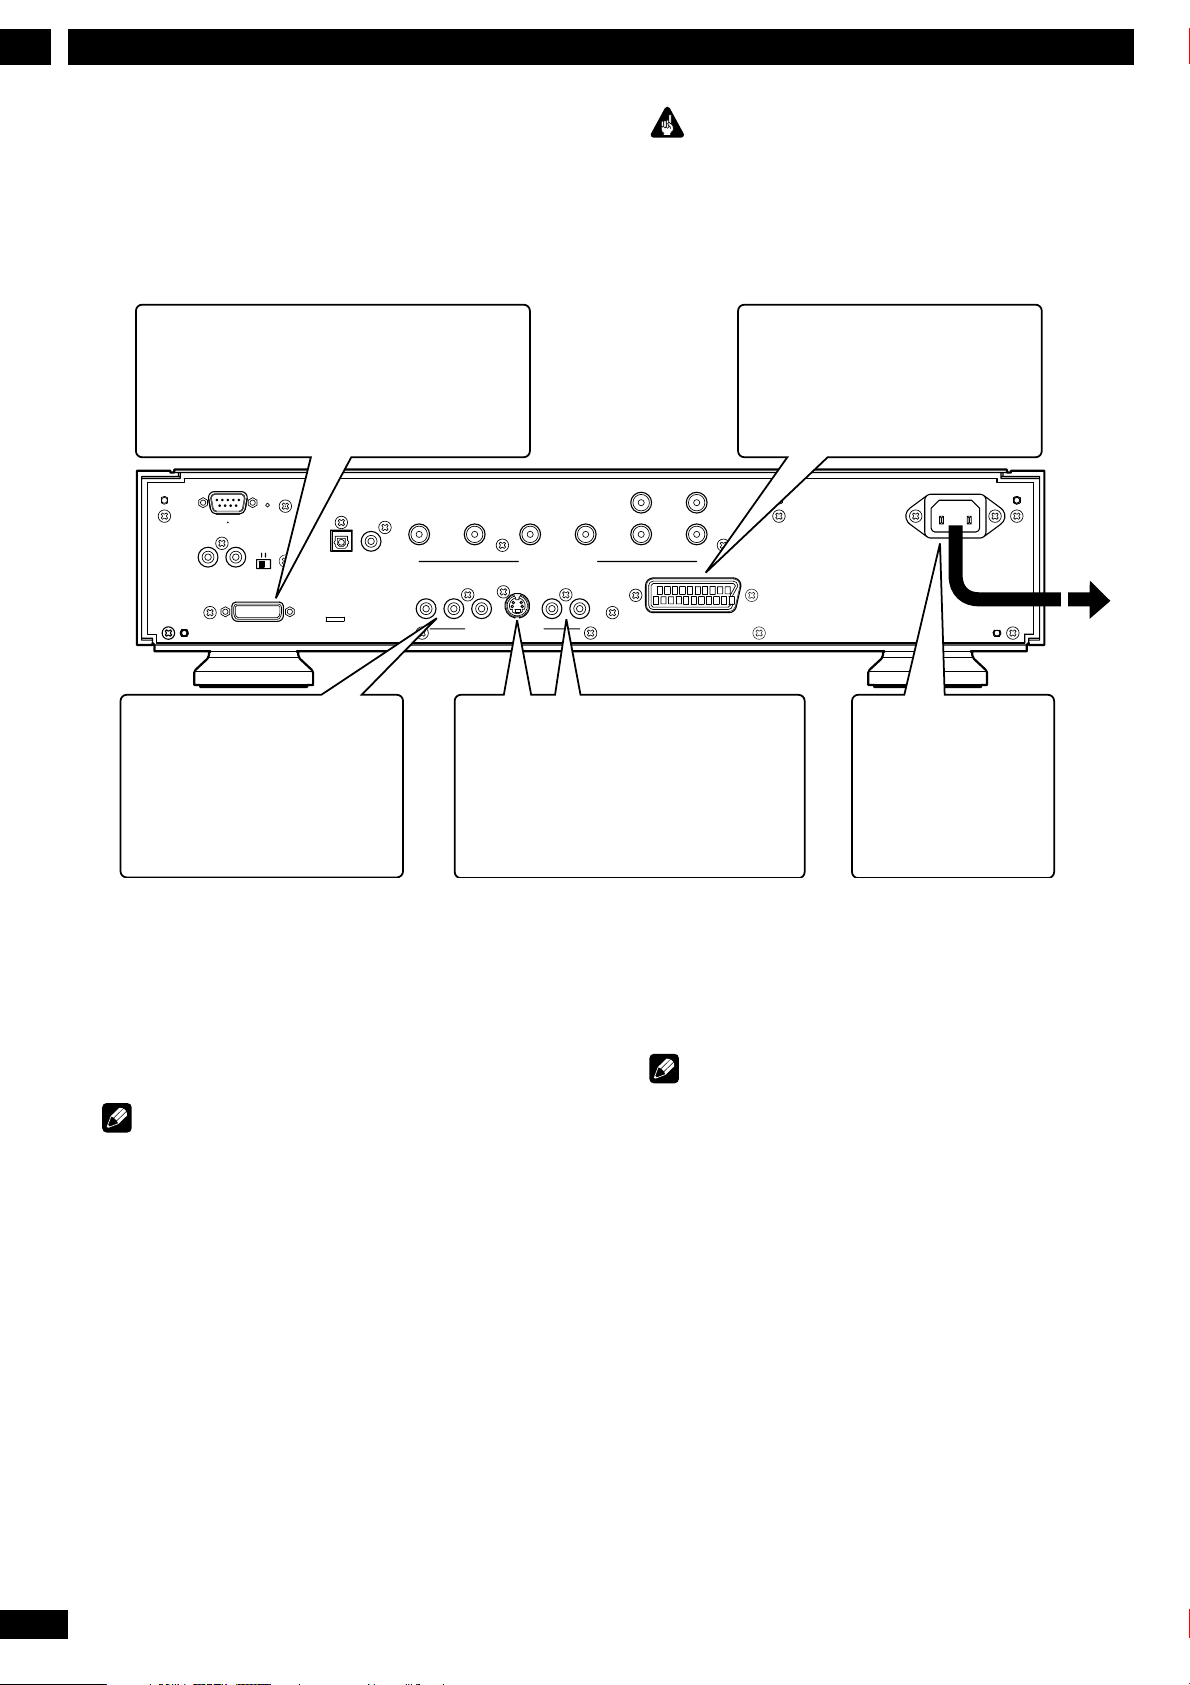
Anschlüsse2
Video-Anschluss von HeimkinoKomponenten
Der Spieler bietet eine Reihe verschiedener
Ausgabemöglichkeiten für Videosignale, Wählen Sie die für
Ihr System beste Methode anhand der nachstehenden
Erläuterungen.
Wenn Ihr Fernseher und Ihr Projektor ein DVID-Terminal für Video-Eingang besitzt,
empfehlen wir, es zum direkten Anschluss an
den DVI-D-Ausgang dieses Players zu
verwenden.
RS-232C
IN
OUT
REMOTE CONTROL
(HDCP)
DVI-D OUT
COAX.
OPT.
EXT.
INT.
DIGITAL OUTPUT
SURROUND
R
COMPONENT
Y
C
L
B/PB
VIDEO OUTPUT
/PRC
R
SUB WOOFER
AUDIO OUTPUT
S1/S2
VIDEO
1
CENTER
2
Wichtig
Vor dem Anschließen oder Ändern von Anschlüssen an der
Geräterückwand sind unbedingt alle Komponenten auszuschalten
und vom Netz abzutrennen.
Falls Ihr Fernsehgerät über einen
2
SCART-Eingang verfügt, sollten
Sie ihn direkt mit dem Ausgang
A/V EURO CONNECTOR an
diesem Spieler verbinden.
FRONT
2
1
RL
A/V EUROCONNECTOR
1
Wenn Ihr Fernseher einen VideoEingang für Composite Video besitzt,
empfehlen wir, ihn direkt an den
Ausgang COMPONENT VIDEO
OUT anzuschließen. Verwenden Sie
Steht kein SCART-Eingang zur Verfügung,
3
schließen Sie diesen Player am besten über
die Buchsen VIDEO oder S1/S2-VIDEO an
das Fernsehgerät oder einen AV-Receiver an.
dazu den standardgemäßen, aus 3
Buchsen bestehenden ComponentVideoausgang.
Anschluss von SCART- und S-Video-Kabeln
Da sich SCART- und S-Video-Kabel nur in einer Position
anschließen lassen, sollten Sie sich vor dem Einführen der
Stecker vergewissern, dass sie korrekt ausgerichtet sind.
Führen Sie die Stecker stets bis zum Anschlag ein, um eine
optimale Verbindung sicherzustellen.
Hinweis
Der Steckverbinder A/V EURO CONNECTOR kann Composite
Video, S-Video oder RGB Component Video übertragen. Wenn Sie
nur einen Fernseher anschließen, dann verwenden Sie nur den
Steckverbinder A/V EURO CONNECTOR. Sie können das Video-
Ausgangssignalformat über die Einstellung Video Out im Setup
Menu (Seite 125) wechseln.
S-Video- oder FBAS-Videosignal
Da das S-Videoformat eine bessere Bildqualität ermöglicht,
sollten Sie ggf. den S-Video-Eingang des Fernsehgeräts
nutzen. S-Videokabel sind bei jedem guten Audio-/VideoHändler erhältlich.
An eine Netzsteckdose
4
anschließen.
P : Zeigt Progressives Scanning an.
NTSC : Ein Wiedergabe-Format, das hauptsächlich in
Japan, den USA, Kanada, Taiwan und Südkorea
verwendet wird.
Hinweis
• Der DVI-Ausgang dieser Einheit ist HDCP-kompatibel. Beim
Betrachten von DVI-Ausgangs-Bildern mit dieser Einheit ist es
notwendig, einen Fernseher oder ein Display mit einem HDCPkompatiblen DVI-Eingang zu verwenden.
• Wenn an einen Fernseher oder ein Display angeschlossen wird,
der bzw. das nicht mit dem oben genannten Format kompatibel
ist, kann es sein, dass kein Bild erscheint.
• Bei gedrückter Taste PAL PROGRESSIVE können DVI-Signale nicht
ausgesendet werden.
• Zu genaueren Informationen hinsichtlich des DVI-D-Terminals
schlagen Sie bitte in der Bedienungsanleitung für Ihren Fernseher
oder Ihr Display nach, der bzw. das an diese Einheit
angeschlossen wird.
30
Ge
DVI-Ausgangsformat (für die NTSCWiedergabe)
System : 525p (480p)/60
Auflösung : 720 x 480
Vertikal-Frequenz : 60 Hz
Horizontal-Frequenz : 31,5 kHz
Page 31

Collegamento
2
Collegamenti video di tipo Home Theater
Il lettore permette l’uso di molte modalità di visione per i
video. Scegliere la modalità più adatta al sistema collegato
utilizzando la guida seguente.
Se la vostra TV e il vostro proiettore hanno un
terminale DVI-D per l’Ingresso Video,
raccomandiamo di usarla per collegarla
direttamente all’uscita DVI-D di questo
apparecchio.
RS-232C
IN
OUT
REMOTE CONTROL
(HDCP)
DVI-D OUT
Se la vostra TV ha una componente
1
ingresso video, raccomandiamo di
utilizzarla per connetterla
direttamente alla COMPONENT
VIDEO OUT di questo lettore.
Usate la componente uscita video
standard a 3 spine jack.
COAX.
OPT.
EXT.
INT.
DIGITAL OUTPUT
SURROUND
R
COMPONENT
Y
3
SUB WOOFER
L
B/PB
VIDEO OUTPUT
S1/S2
/PRC
R
C
Se non si dispone di ingresso con presa
SCART, collegare il lettore al proprio
apparecchio TV o ricevitore AV mediante
jack VIDEO o S1/S2-VIDEO.
AUDIO OUTPUT
VIDEO
1
CENTER
2
Attenzione
Prima di eseguire o modificare qualsiasi collegamento sul pannello
posteriore del lettore, verificare che tutti i componenti siano spenti
o che la spina sia disinserita dalla presa a muro.
Se il televisore collegato ha un
2
ingresso SCART, se ne
raccomanda l’uso per il
collegamento diretto all’uscita
A/V EURO CONNECTOR del
lettore.
FRONT
2
1
RL
A/V EUROCONNECTOR
Collegare la spina ad
4
una presa standard
di corrente alternata
a parete.
Deutsch
Italiano
Collegamento di cavi SCART e S-Video
Esiste una sola possibilità di collegamento dei cavi SCART
e S-Video, pertanto verificare che la spina sia allineata
correttamente con il jack prima di procedere
all’inserimento. Verificare che le prese siano inserite a
fondo per il corretto collegamento delle apparecchiature.
Nota
Il connettore A/V EURO CONNECTOR può fornire un’uscita per
la componente video composita, S-Video o RGB. Se collegate solo
una TV, utilizzate il connettore A/V EURO CONNECTOR. È
possibile selezionare il tipo di uscita video modificando
l’impostazione Video Out dal Setup Menu (pag. 125).
S-Video o video composito?
Un S-Video dovrebbe garantire una migliore qualità di
immagine, pertanto si raccomanda di usare l’ingresso S
Video eventualmente esistente. I cavi S-Video si trovano
comunemente in commercio presso qualsiasi rivenditore di
materiale audiovisivo ben fornito.
Standard d’uscita DVI (per riripetere in
NTSC)
Sistema : 525p (480p)/60
Risoluzione : 720 x 480
Frequenza verticale : 60 Hz
Frequenza orizzontale : 31,5 kHz
P : Significa Progressivo (scansione progressiva)
NTSC : Uno standard di trasmissione usato
principalmente in Giappone, U.S.A., Canada,
Taiwan e Corea
Nota
• L’uscita DVI di questo apparecchio è compatibile HDCP. Quando
si guardano immagini in uscita DVI con questo apparecchio è
necessario usare una TV o uno schermo con ingresso DVI
compatibile HDCP.
• Potrebbe non apparire nessuna uscita d’immagine se se collegato
a una TV o uno schermo che non siano compatibili con lo
standard menzionato qui sopra.
• Quando viene premuto il pulsante PAL progressivo, il DVI non
può uscire.
• Controllate il manuale d’istruzioni della TV o dello schermo per
collegarvi a questo apparecchio e per informazioni dettagliate
riguardanti il terminale DVI-D.
31
It
Page 32

Connecting Up
2
Home theater audio connections
This player outputs multi-channel audio in both analog
and digital form. Check the manual for your amplifier/
receiver to see what equipment it is compatible with
(especially which digital formats—Dolby Digital, DTS,
etc.—it can decode).
If your amplifier has 5.1 channel analog
inputs, connect them here.
Connect to the FRONT L (left)/R (right),
SURROUND L/R, CENTER and
SUBWOOFER inputs of your amplifier.
RS-232C
IN
OUT
REMOTE CONTROL
(HDCP)
DVI-D OUT
COAX.
OPT.
EXT.
INT.
DIGITAL OUTPUT
SURROUND
R
COMPONENT
Y
C
L
B/PB
VIDEO OUTPUT
/PRC
R
SUB WOOFER
AUDIO OUTPUT
S1/S2
VIDEO
1
CENTER
2
Important
Before making or changing any rear panel connections, make sure
that all components are switched off and unplugged from the wall
outlet.
12
If your amplifier has
stereo inputs only,
connect them here.
FRONT
2
1
RL
A/V EUROCONNECTOR
Connect to the coaxial or optical input of your
amplifier, if it has digital inputs.
Connecting analog audio cables
Be sure to fully insert each plug for the best connection.
The plugs and jacks are colour-coded to make connection
easier.
Connecting optical cables
Optical interconnects only plug in one
way, so make sure the plug is correctly
lined up with the jack before inserting.
You should hear it click into position
when fully inserted. When inserting
the plug, the protective shutter will
open and you should hear it click into
position when fully inserted. Be careful that you do not
force the plug, because this could result in damage to the
protective shutter, the cable, or the unit itself.
O
P
T.
Plug into a standard AC wall
43
outlet.
Connecting coaxial cables
Use an interconnect with a pin-type
COAX.
(also called RCA or phono) plug on
each end to connect up digital
coaxial-type jacks. Make sure that
the plug is pushed fully home.
Note
If you listen to multichannel DVD-Audio through one of the digital
outputs, it will be downmixed to stereo. Also, high sampling rate
DVD-Audio (192kHz or 176.4kHz) will be downsampled to 96kHz,
88.2kHz, 48kHz or 44.1kHz, depending on the disc. Multi channel
and high sampling rate DVD-Audio is only available through the
analog outputs.
All DVD-Audio and all Super Audio CD audio is output only
through the analog outputs.
32
En
Page 33

2Raccordements
Raccordement audio pour le cinéma à
domicile
Ce lecteur sort des signaux audio multicanaux sous forme
analogique et numérique. Vérifiez dans le mode d’emploi
de votre amplificateur/récepteur avec quels équipements il
est compatible (et plus particulièrement quels formats
numériques — Dolby Digital, DTS, etc.— il peut décoder).
Si votre amplificateur est doté d’entrées
analogiques à 5,1 canaux, utilisez-les pour
la connexion.
Raccordez les entrées FRONT L(gauche)/R
(droite), Surround L/R, CENTER et
SUBWOOFER de votre amplificateur.
RS-232C
IN
OUT
REMOTE CONTROL
(HDCP)
DVI-D OUT
COAX.
OPT.
EXT.
INT.
DIGITAL OUTPUT
SURROUND
R
COMPONENT
Y
C
L
B/PB
VIDEO OUTPUT
/PRC
R
SUB WOOFER
AUDIO OUTPUT
S1/S2
VIDEO
1
CENTER
2
Important
Avant d’entamer ou de modifier des connexions sur le panneau
arrière, assurez-vous que tous les équipements sont hors tension et
débranchés de la prise murale.
Si votre amplificateur est
12
uniquement doté
d’entrées stéréo, utilisezles pour la connexion.
FRONT
2
1
RL
A/V EUROCONNECTOR
English
Français
Raccordez-le à l’entrée coaxiale ou optique de votre
amplificateur, s’il est doté d’entrées numériques.
Raccordement de câbles audio
analogiques
Insérez complètement les fiches de manière à obtenir la
meilleure connexion possible. Les fiches et les prises sont
identifiées par un code de couleur pour faciliter les
connexions.
Raccordement de câbles optiques
Comme les interconnexions optiques
ne s’enfichent que dans un sens,
assurez-vous que la fiche est
correctement alignée sur la prise avant
de insérer. Elle produit un déclic
lorsqu’elle est complètement enfichée
en position. Lorsque vous introduisez
la fiche, l’obturateur de protection
s’ouvre et vous devez entendre un déclic lorsqu’elle est
enfichée à fond. Veillez à ne pas forcer sur la fiche car vous
risquez sinon d’endommager l’obturateur de protection, le
câble ou l’appareil proprement dit.
O
PT.
Raccordez-la à une prise murale
43
secteur standard.
Raccordement des câbles coaxiaux
Utilisez un interconnecteur doté
d’une fiche à broche (également
appelée fiche RCA ou phono) aux
deux extrémités pour raccorder des
prises numériques coaxiales.
Assurez-vous que les fiches sont
complètement insérées dans les
prises.
Remarque
Si vous écoutez un DVD audio multicanaux via l’une des sorties
numériques, il sera mixé en stéréo. De même, un DVD audio à
fréquence d’échantillonnage élevée (192 kHz ou 176,4 kHz) sera
mixé, suivant le disque, à 96 kHz, 88,2 kHz, 48 kHz ou 44,1 kHz.
Les DVD audio multicanaux et à fréquence d’échantillonnage élevée
ne sont accessibles que via les sorties analogiques.
La totalité des DVD-Audio et des Super Audio CD audio est
accessible uniquement via les sorties analogiques.
COAX.
33
Fr
Page 34

Anschlüsse2
Audio-Anschluss von HeimkinoKomponenten
Dieser Spieler liefert Mehrkanal-Audiosignale in analoger
und digitaler Form. Schlagen Sie in der
Bedienungsanleitung Ihres Verstärkers/Receivers nach, mit
welchen Komponenten er kompatibel ist (bzw. welche
Digitalformate—z.B. Dolby Digital oder DTS—er
decodieren kann).
Falls der Verstärker über 5,1-KanalAnalogeingänge verfügt, sind diese hier
anzuschließen.
Mit den Anschlüssen FRONT L/R (links/
rechts), Surround L/R, CENTER und
SUBWOOFER am Verstärker verbinden.
RS-232C
IN
OUT
REMOTE CONTROL
(HDCP)
DVI-D OUT
COAX.
OPT.
EXT.
INT.
DIGITAL OUTPUT
SURROUND
R
COMPONENT
Y
C
L
B/PB
VIDEO OUTPUT
/PRC
R
SUB WOOFER
AUDIO OUTPUT
S1/S2
VIDEO
1
CENTER
2
Wichtig
Vor dem Anschließen oder Ändern von Anschlüssen an der
Geräterückwand sind unbedingt alle Komponenten auszuschalten
und vom Netz abzutrennen.
12
Falls der Verstärker nur
über Stereoeingänge
verfügt, sind diese hier
anzuschließen.
FRONT
2
1
RL
A/V EUROCONNECTOR
Mit dem Koaxial-Eingang oder dem optischen Eingang
des Verstärkers verbinden, falls er Digitaleingänge
besitzt.
Anschluss von analogen Audiokabeln
Führen Sie die Stecker stets bis zum Anschlag ein, um eine
optimale Verbindung sicherzustellen. Zur Vereinfachung des
Anschlusses sind die Stecker und Buchsen farbcodiert.
Anschluss von optischen
O
PT.
Kabeln
Da sich optische Kabel nur in einer
Position anschließen lassen, sollten Sie
sich vor dem Einführen des Steckers
vergewissern, dass er korrekt
ausgerichtet ist. Achten Sie beim
Anschluss darauf, dass der Stecker
hörbar einrastet. Beim Einführen des Steckers öffnet sich
der Schutzverschluss und sobald er bis zum Anschlag
eingeführt ist, muss ein Einrastklicken zu hören sein.
Versuchen Sie keinesfalls, den Stecker mit Gewalt
einzuführen, da sonst Beschädigungsgefahr für den
Schutzverschluss, das Kabel oder das Gerät selbst droht.
An eine Netzsteckdose anschließen.
43
Anschluss von Koaxialkabeln
Zum Beschalten der digitalen
Koaxialbuchsen verwenden Sie an
beiden Enden ein Kabel mit
Stiftstecker (auch Cinchkabel
genannt). Führen Sie den Stecker bis
zum Anschlag ein.
Hinweis
Bei der Wiedergabe von DVD-Audio-Mehrkanal über einen der
Digitalausgänge erfolgt Heruntermischen auf Stereo. Außerdem
wird bei DVD-Audiodiscs mit hoher Abtastrate (192 oder 176,4
kHz) je nach Disc der jeweilige Wert auf 96, 88,2, 48 oder 44,1
kHz herabgesetzt. Die Wiedergabe von DVD-Audio mit mehreren
Kanälen und hoher Abtastrate ist nur über die Analogausgänge
möglich.
Alle DVD-Audio- sowie alle Super Audio CD-Audiosignale werden
nur über die Analogausgänge ausgegeben.
COAX.
34
Ge
Page 35

Collegamento
2
Collegamenti audio di tipo Home Theater
Il lettore consente l’uso della modalità audio multicanale in
forma sia analogica sia digitale. Consultare il manuale in
dotazione dell’amplificatore/ricevitore da collegare per
verificarne la compatibilità con le altre apparecchiature (in
particolare per quanto riguarda i formati digitali—Dolby
Digital, DTS, ecc.—che può decodificare).
In caso di amplificatore dotato di ingressi
analogici di tipo 5,1 Channel, utilizzare
questi per il collegamento.
Collegare agli ingressi FRONT L(sinistro)/R
(destro), Sorround L/R, CENTER e
SUBWOOFER dell’amplificatore.
RS-232C
IN
OUT
REMOTE CONTROL
(HDCP)
DVI-D OUT
COAX.
OPT.
EXT.
INT.
DIGITAL OUTPUT
SURROUND
R
COMPONENT
Y
C
B/PB
VIDEO OUTPUT
L
/PRC
R
SUB WOOFER
AUDIO OUTPUT
S1/S2
1
VIDEO
CENTER
2
Attenzione
Prima di eseguire o modificare qualsiasi collegamento sul pannello
posteriore del lettore, verificare che tutti i componenti siano spenti
o che la spina sia disinserita dalla presa a muro.
12
In caso di amplificatore
dotato soltanto di
ingressi stereo,
utilizzare questi per il
collegamento.
FRONT
2
1
RL
A/V EUROCONNECTOR
Deutsch
Italiano
Collegare l’ingresso coassiale o ottico dell’amplificatore,
se questo è dotato di ingressi digitali.
Collegamento dei cavi audio analogici
Verificare che i connettori siano inseriti a fondo per il
corretto collegamento degli apparecchi. Prese e jack sono
contraddistinti da colori diversi a seconda degli
accoppiamenti e delle funzioni per facilitare i collegamenti.
Collegamento di cavi ottici
O
Esiste una sola possibilità di
collegamento dei cavi ottici, pertanto
verificare che la spina sia allineata
correttamente con il jack prima di
procedere all’inserimento. Inserire il
cavo a fondo sino ad udire uno scatto,
a conferma del corretto fissaggio.
Quando si inserisce la spina, lo sportellino di protezione si
apre ed il raggiungimento del fondo corsa è segnalato da
uno scatto. Non forzare l’inserimento della spina in quanto
si potrebbe danneggiare lo sportellino, il cavo o
l’apparecchio.
PT.
Collegare la spina ad una presa
43
standard di corrente alternata a parete.
Collegamento di cavi coassiali
Per il collegamento dei jack di tipo
coassiale, usare un sistema dotato di
connettore a pin (denominato anche
RCA o fono) su ciascuna estremità.
Verificare che il connettore sia
inserito a fondo.
Nota
In caso di ascolto di DVD-Audio multicanale attraverso una delle
uscite digitali, l’audio viene inviato e mixato dallo stereo. Inoltre i
DVD-Audio ad alta frequenza di campionamento (192 kHz o 176,4
kHz) vengono trasformati in frequenze da 96 kHz, 88,2 kHz, 48
kHz o 44,1 kHz, a seconda del disco. I DVD-Audio multicanale e ad
alta frequenza di campionamento sono resi disponibili solo sulle
uscite analogiche.
Tu tti gli audio DVD e gli audio Super Audio CD possono essere
emessi solo attraverso le uscite analogiche.
COAX.
35
It
Page 36

Controls & Displays
%$#@!~=-0
3
Commandes et fenêtre d’affichage
Front panel
V-PART
GRP
TITLE
SACD/DVD PLAYER DV-12S2
DVD
AUDIO
SACD
PROGRESSIVE
PAL
FL OFF
RANDOM
POWER
VIDEO ON/OFF
SRS TS
STANDBY
1PAL PROGRESSIVE – Set the PAL progressive mode
(see pages 44, 128).
2 FL OFF – change the brightness of FL display.
3RANDOM – Set the random playback mode.
4 VIDEO ON/OFF – turn Video Output off and on.
5Disc tray
6 0 OPEN/CLOSE
7 3 – play.
8 7 – stop.
9 8 – pause.
10 P OWER
11 S R S TS – Lights when playing a disc with TruSurround
switched on.
12 STANDBY indicator – lights when unit is in standby.
13 Display window (FL)
14 Remote control sensor
15 FL OFF indicator – lights when the fluorescent (FL)
display is switched off.
16 PAL PROGRES. – Lights when PAL progressive button
is pressed.
17 4 /1 – press to skip reverse title/group, chapter,
or track. You can also press and hold this button to
scan the above.
18 ¡ /¢ – press to skip forward title/group, chapter,
or track. You can also press and hold this button to
scan the above.
Panneau avant
9
8764 5321
STOP
OPEN/CLOSE
PAL
192kHz
PROGRESSIVE
VCD
96kHz
DOLBY D
TRK
VIDEO OFF
CHP
REMAIN
TOTAL
DIG OFF
L C
LS S RS
LAST MEMO
CONDITION
DOWN MIX
LFE
PROGRES.
R
FL OFF
PLAY
1PAL PROGRESSIVE – Règle le mode PAL progressif
(voir pages 44, 128).
2 FL OFF – change la luminosité de l’affichage fluores-
cent (FL).
3RANDOM – Règle le mode de lecture aléatoire.
4 VIDEO ON/OFF – met Sortie Vidéo sous/hors
tension.
5 Plateau de disque
6 0 OPEN/CLOSE
7 3 – lecture.
8 7 – stop.
9 8 – pause.
10 P OWER
11 S R S TS – s’allume lorsqu’un disque est en lecture avec
TruSurround activé.
12 Voyant STANDBY – s’allume quand l’unité est en
mode veille.
13 Fenêtre d’affichage (FL)
14 Capteur de la télécommande
15 Voyant FL OFF – s’allume lorsque l’affichage fluores-
cent (FL) est désactivé.
16 PAL PROGRES. – S’allume quand vous appuyez sur la
touche PAL Progressive.
17 4 /1 – appuyez sur cette touche pour sauter en
direction arrière des titres/groupes, chapitres ou
plages. Pour un balayage d’exploration des zones
mentionnées ci-dessus, appuyez sur cette touche et
maintenez-la enfoncée.
PAUSE
36
En/Fr
18 ¡ /¢ – appuyez sur cette touche pour effectuer
des sauts vers l’avant à l’intérieur d’un titre/groupe,
chapitre ou piste. Vous pouvez également appuyer sur
cette touche et la maintenir enfoncée pour effectuer
un balayage des aires citées ci-dessus.
Page 37

Bedienelemente und Anzeigen Comandi e display
%$#@!~=-0
3
Frontplatte
V-PART
AUDIO
GRP
SACD
TITLE
SACD/DVD PLAYER DV-12S2
DVD
PROGRESSIVE
PAL
FL OFF
RANDOM
POWER
VIDEO ON/OFF
SRS TS
STANDBY
1PAL PROGRESSIVE – Einstellung des Modus ‘PAL PRO-
GRESSIVE’.
(siehe Seite 45, 129)
2 FL OFF – Änderung der Helligkeit des FL-Displays
(Leuchtdisplays).
3RANDOM – Einstellung des Zufallsreihenfolgewiedergabe-
Modus.
4 VIDEO ON/OFF – Ein- und Ausschaltung des
Videoausgangs.
5 Disc-Schubfach
6 0 OPEN/CLOSE (Öffnen/Schließen)
7 3 – Wiedergabe (Play).
8 7 – Stop.
9 8 – Anhalten (Pause).
10 P OWER (Netztaste)
Lato anteriore e comandi
9
8764 5321
STOP
OPEN/CLOSE
PAL
192kHz
PROGRESSIVE
VCD
96kHz
DOLBY D
TRK
VIDEO OFF
CHP
REMAIN
TOTAL
DIG OFF
LAST MEMO
L C
LS S RS
CONDITION
DOWN MIX
LFE
PROGRES.
R
FL OFF
PLAY
1PAL PROGRESSIVE – Imposta la modalità a linee
contigue PAL. (cfr. pagg. 45, 129)
2 FL OFF – cambia la luminosità del display FL.
3RANDOM – Imposta la modalità playback casuale
(random).
4 VIDEO ON/OFF – apre e chiude l’Uscita Video.
5 Piatto del disco
6 0 OPEN/CLOSE (APRE/CHIUDE)
7 3 – lettura.
8 7 – stop.
9 8 – pausa.
10 P OWER
PAUSE
English
Français
Deutsch
Italiano
11 S R S TS – Anzeige leuchtet, wenn eine Disc mit der Funktion
TrueSurround eingeschaltet ist.
12 STANDBY-Anzeige – Anzeige leuchtet, wenn sich die Einheit
in Bereitschaft befindet.
13 Display-Fenster (FL)
14 F ernbedienungssensor
15 Anzeige FL OFF – Anzeige leuchtet, wenn das Leuchtdisplay
(FL-Display) ausgeschaltet ist.
16 P AL PROGRES. –
Anzeige leuchtet, wenn die Taste PAL
PROGRESSIVE gedrückt ist.
17 4 /1 – Taste wird gedrückt, um zum vorhergehenden
DVD-Titel / zur vorhergehenden Gruppe, zum
vorhergehenden Kapitel oder zum vorhergehenden Titel
zurückzuspringen. Sie können die Taste auch drücken und
gedrückt halten, um die genannten Disc-Einheiten im
Schnelldurchlauf wiederzugeben.
18 ¡/¢ – Taste wird gedrückt, um zum nächsten DVD-Titel
/ zur nächsten Gruppe, zum nächsten Kapitel oder zum
nächsten Titel zu springen. Sie können die Taste auch
drücken und gedrückt halten, um die genannten DiscEinheiten im Schnelldurchlauf wiederzugeben.
11 S R S TS – Si accende durante la lettura di un disco con
il TruSurround acceso.
12 Spia STANDBY – si accende quando l’apparecchio è
in standby.
13 F inestra del display (FL)
14 Sensore del telecomando
15 Spia FL OFF – si illumina quando il display
fluorescente (FL) è spento.
16 PAL PROGRES. – Si accende quando il pulsante PAL
progressivo viene premuto.
17 4 /1 – da premere per saltare all’indietro un
titolo/gruppo, capitolo o pista. Si può anche premere
e tenere premuto questo pulsante per la scansione di
quanto sopra.
18 ¡ /¢ – da premere per saltare in avanti un titolo/
gruppo, capitolo, o pista. Si può anche premere e
tenere premuto per la scansione di quanto sopra.
37
Ge/It
Page 38

3
Controls & Displays
Commandes et fenêtre d’affichage
1
2
3
4
5
6
7
8
9
0
=
~
!
@
OPEN/CLOSE
DISPLAY
A-B
ANGLE
TOP MENU
SEARCH
CLEAR
F.MEMO
REPEAT
SUBTITLE
ENTER
0
POWER
VIDEO ADJ.
PROGRAM
AUDIO
MENU
SETUPRETURN
312
654
987
+10
LAST MEMO
CONDITION
MEMO
#
$
%
^
&
*
(
=
)
~
_
Remote control
1OPEN/CLOSE – Disc tray open/
close
2F.MEMO – Function memory
(page 86)
3DISPLAY – pages 90, 98
4SUBTITLE – page 66
5ANGLE – page 66
6TOP MENU – page 58
7Joystick(2/3/5/∞)/ENTER
button – pages 58, 60
8 RETURN (
9Number buttons – pages 58, 60
10 SEARCH – page 62
11 3 – Play
12 4 ¢ – Skip
13 1 ¡ – Scan
14 7 – Stop
15 CLEAR – Clear
16 P O WER – switches player on or
into standby.
17 VIDEO ADJ. – Video adjust (page
13 0)
18 REPEAT — A-B – page 80
19 P R OGRAM – pages 70, 102
20 AUDIO – page 68
21 ME NU – pages 58, 60
22 SETUP – pages 46, 104
23 8 – Pause
24 LAST MEMO/CONDITION
MEMO– pages 82, 84
)– Return
Té lécommande
1OPEN/CLOSE – Ouvre/ferme le
plateau de lecture
2F.MEMO – Mémoire de fonction
(page 86)
3DISPLAY – pages 90, 98
4SUBTITLE – page 66
5ANGLE – page 66
6TOP MENU – page 58
7Joystick(2/3/5/∞)/touche
ENTER – pages 58, 60
8 RETURN (
9
Touches numériques – pages 58, 60
10 SEARCH – page 62
11 3 – Lecture
12 4 ¢ – Saut
13 1 ¡ – Balayage
14 7 – Arrêt
15 CLEAR – Effacement
16 P O WER – Met le lecteur sous
tension ou en mode de veille.
17 VIDEO ADJ. – Réglage de la
qualité vidéo (page 130)
18 REPEAT — A-B – page 80
19 P R OGRAM – pages 70, 102
20 AUDIO – page 68
21 M ENU – pages 58, 60
22 SETUP – pages 46, 104
23 8 – Pause
24 LAST MEMO/CONDITION
MEMO– pages 82, 84
)– Retour
RC-12DVS1
•
This remote control supports two remote control codes: DVD1 and DVD2.
•
When the unit is shipped from the factory, the remote control is set to DVD1.
•
To set the remote control to DVD2, hold down both the “7 (Stop)” button and the “2” number button on the remote control for at least
five seconds. (If the batteries in the remote control are replaced while the remote control is set to DVD2, the setting will revert to DVD1.)
•
To set the remote control back to DVD1, hold down both the “7 (Stop)” button and the “1” number button on the remote control for at
least five seconds.
•
To check which remote control code is set at any time, hold down both the Stop and Pause buttons; the current setting (either “DVD1” or
“DVD2”) will be displayed in the display window on the main unit.
•
Also set the REMOT CODE on the FL menu to the same setting as the remote control. (This setting is set to DVD1 when the unit is shipped
from the factory.) (page 50)
•
Cette télécommande prend en charge deux codes de télécommande : DVD1 et DVD2.
•
Lors de la sortie d’usine de l’appareil, la télécommande est réglée sur DVD1.
•
Pour régler la télécommande sur DVD2, maintenez enfoncées la touche d’arrêt 7 et la touche numérique “2” de la télécommande pendant
au moins cinq secondes. (Si vous remplacez les piles de la télécommande alors qu’elle est réglée sur DVD2, le code revient à DVD1.)
•
Pour ramener la télécommande à DVD1, maintenez enfoncées la touche d’arrêt 7 et la touche numérique “1” de la télécommande pendant
au moins cinq secondes.
•
Pour vérifier le code de télécommande qui est réglé, maintenez les deux touches d’arrêt et de pause enfoncées; le réglage actuel (“DVD1” ou
“DVD2”) apparaît dans la fenêtre d’affichage de l’unité principale.
•
Réglez aussi REMOT CODE du menu FL sur le même code que la télécommande. (Ce code est réglé sur DVD1 lors de la sortie d’usine de
l’appareil.) (pages 50)
38
En/Fr
Page 39

Bedienelemente und Anzeigen
Comandi e display
3
1
2
3
4
5
6
7
8
9
0
=
~
!
@
OPEN/CLOSE
DISPLAY
A-B
ANGLE
TOP MENU
SEARCH
CLEAR
F.MEMO
REPEAT
SUBTITLE
ENTER
0
RC-12DVS1
POWER
VIDEO ADJ.
PROGRAM
AUDIO
MENU
SETUPRETURN
312
654
987
+10
LAST MEMO
CONDITION
MEMO
#
$
%
^
&
*
(
=
)
~
_
Fernbedienung
1OPEN/CLOSE – Öffnen/
Schließen der Disc-Lade
2F.MEMO – Funktionsspeicher
(Seite 87)
3DISPLAY – Seiten 91, 99
4SUBTITLE – Seite 67
5 ANGLE – Seite 67
6TOP MENU – Seite 59
7Joystick(2/3/5/∞)/ENTER-
Ta s t e – Seiten 59, 61
8 RETURN (
9 Zifferntasten – Seiten 59, 61
10 SEARCH – Seite 63
11 3 – Wiedergabe
12 4 ¢ – Überspringfunktion
13 1 ¡ – Suchlauf
14 7 – Wiedergabestopp
15 C LEAR – Löschen
16 P O WER – schaltet den Player ein
oder auf Bereitschaftsmodus.
17 VIDEO ADJ. – Videoeinstellung
(Seite 131)
18 REPEAT — A-B – Seite 81
19 P R OGRAM – Seiten 71, 103
20 AUDIO – Seite 69
21 M ENU – Seiten 59, 61
22 SETUP – Seiten 47, 105
23 8 – Wiedergabepause
24 LAST MEMO/CONDITION
MEMO– Seiten 83, 85
)– Zurückschalten
Telecomando
1OPEN/CLOSE – Cassetto di
caricamento dischi aperto/chiuso
2F.MEMO – Memoriafunzione
(pag. 87)
3DISPLAY – pagg. 91, 99
4SUBTITLE – pag. 67
5ANGLE – pag. 67
6TOP MENU – pag. 59
7Joystick(2/3/5/∞) Pulsante
ENTER – pagg. 59, 61
8 RETURN (
9Tasti numerici – pagg. 59, 61
10 SEARCH – pag. 63
11 3 – Riproduzione
12 4 ¢ – Salto
13 1 ¡ – Scorritore
14 7 – Stop
15 CLEAR – Cancellazione
16 P O WER – accende il lettore o
attiva lo standby.
17 VIDEO ADJ. – Regolazione video
(pag. 131)
18 REPEAT — A-B – pag. 81
19 P R OGRAM – pagg. 71, 103
20 AUDIO – pag. 69
21 M ENU – pagg. 59, 61
22 SETUP – pagg. 47, 105
23 8 – Pausa
24 LAST MEMO/CONDITION
MEMO– pagg. 83, 85
)– Ritorno
English
Français
Deutsch
Italiano
•
Diese Fernbedienung unterstützt zwei Fernbedienungscodes: DVD1 und DVD2.
•
Die werkseitige Einstellung der Fernbedienung ist DVD1.
•
Um die Fernbedienung auf DVD2 umzustellen, halten Sie die “Stopptaste 7” und die Zifferntaste “2” an der Fernbedienung mindestens fünf
Sekunden lang gedrückt. (Werden die Batterien der Fernbedienung bei Einstellung auf DVD2 ausgewechselt, wird die Einstellung auf DVD1
zurückgesetzt.)
•
Um die Fernbedienung wieder auf DVD1 zurückzustellen, halten Sie die “Stopptaste 7” und die Zifferntaste “1” an der Fernbedienung
mindestens fünf Sekunden lang gedrückt.
•
Sie können jederzeit prüfen, welcher Fernbedienungscode eingestellt ist. Halten Sie dazu die beiden Funktionstasten Stopp und Pause
gleichzeitig gedrückt; die aktuelle Einstellung (entweder “DVD1” oder “DVD2”) wird dann im Display des Hauptgerätes angezeigt.
•
Stellen Sie außerdem REMOT CODE im FL-Menü auf die gleiche Einstellung wie die Fernbedienung. (Die Werksvorgabe für diese Einstellung
ist DVD1.) (Seite 51)
•
Questo telecomando supporta due codici di telecomando: DVD1 e DVD2.
•
Alla spedizione dallo stabilimento il codice del telecomando è impostato a DVD1.
•
Per impostare il telecomando a DVD2, tenere premuto contemporaneamente il pulsante di arresto 7 e il pulsante del numero “2” sul
telecomando per almeno cinque secondi. (Se quando il telecomando è impostato su DVD2 le pile vengono sostituite, l’impostazione ritorna
a DVD1.)
•
Per impostare nuovamente il telecomando a DVD1, tenere premuto contemporaneamente il pulsante di arresto 7 e il pulsante del numero
“1” sul telecomando per almeno cinque secondi.
•
Per verificare in un qualsiasi momento quale sia il codice impostato sul telecomando, mantenere premuti i tasti Stop e Pause; sulla finestra del
display dell’unità principale sarà visualizzata l’impostazione attuale (“DVD1” o “DVD2”).
•
Impostare anche REMOT CODE sul menu FL come sul telecomando. (Questa impostazione è DVD1 alla spedizione dell’unità dallo
stabilimento.) (Pagina 51)
39
Ge/It
Page 40

Controls & Displays
3
Display
&
1
3
2
4
*()
5
6
78
9
_
1 3 – Lights when a disc is playing
2 8 – Lights wheh a disc is paused
3GRP – Indicates that the number below in the charac-
ter display is a DVD-Audio group number
4V-PART – Lights during playback of the video part of
DVD discs
5DVD-AUDIO – Lights when a DVD-Audio disc is
playing
0
=
-
+
!
~
@
#
$%
¡
^
15 VIDEO OFF – Indicates that video output is turned off
16
17
- Lights during repeat play
– Lights during a multi-angle section of a DVD-
Video disc
18 L A S T MEMO – Lights when the disc has a bookmark
memory (see page 82)
19 CONDITION – Lights when the disc has had prefer-
ences set (see page 84)
™
6DIG OFF – Lights wheh unit is set to Digital Out off
7192kHz/96kHz – Indicates a DVD disc containing
high-sampling rate (192kHz/96kHz) audio is playing
8VCD – Lights when a Video CD is loaded
CD – Lights when a Audio CD is loaded
9 TRK – Indicates that the number below in the charac-
ter display is a DVD-Audio, CD, Video CD or MP3
track number
10 DVD – Lights when a DVD is loaded
11 DOLBY D – Lights when a disc with Dolby Digital
audio is playing
12
– Lights when a disc with DTS audio is playing
13 T OTAL – Indicates that the time shown in the charac-
ter display is the total playing time of the disc
14 PROGRESSIVE – Lights when unit is outputting
progressive scan (non-interlaced) video.
20
– Lights when Remote Control Signal is received
21 TITLE – Indicates that the number below in the
character display is a DVD-Video title number
22 SACD – Lights when a Super Audio CD is loaded
23 CHP – Indicates that the number below in the charac-
ter display is a DVD-Video chapter number
24 Character display
25 REMAIN – Indicates that the time shown in the
character display is the remaining playing time of the
disc
26 L, C, R, LS, S, RS, LFE – show which channels are
recorded on the disc playing
27 D OWN MIX – Lights when multi-channel DVD-Audio,
Dolby Digital, DTS or MPEG audio is downmixed, for
example to two channel stereo
40
En
Page 41

Commandes et fenêtre d’affichage
3
Fenêtre d’affichage
3
4
*()
&
1
2
1 3 – S’allume pendant la lecture d’un disque
2 8 – S’allume lorsqu’un disque se trouve en mode de
pause
3GRP – Indique que le champ d’affichage des caractères
situé en dessous affiche un numéro de groupe de DVD
audio
4V-PART – S’allume pendant la lecture des sections
vidéo d’un DVD
5DVD-AUDIO – S’allume lorsqu’un DVD audio se
trouve en cours de lecture
6DIG OFF – S’allume lorsque le réglage de sortie
numérique Digital Out est désactivé sur cette unité
7192kHz/96kHz – Indique qu’un disque DVD doté
d’une fréquence d’échantillonnage élevée est en mode
de lecture.
8VCD – S’allume lorsqu’un CD Vidéo est chargé
CD – S’allume lorsqu’un CD Audio est chargé
9 TRK – Indique que le champ d’affichage des
caractères situé en dessous affiche un numéro de plage
de DVD audio, de CD, de Vidéo-CD ou de disque MP3
10 DV D –
S’allume lorsqu’un DVD est introduit dans l’appareil
11 DOLBY D – S’allume pendant la lecture d’un disque
comportant des signaux audio Dolby Digital
12
– Sallume pendant la lecture d’un disque
comportant des signaux audio DTS
13 TO TAL – Indique que le champ d’affichage des
caractères affiche la durée totale de lecture du disque
5
6
78
9
_
0
=
-
+
!
~
@
#
$%
¡
^
15 VIDEO OFF – Indique que la sortie vidéo est
désactivée
- S’allume en mode de lecture répétée
16
– S’allume pendant la lecture des scènes multi-
17
angles d’un DVD vidéo
18 LAST MEMO – S’allume si le disque est doté d’une
mémoire d’indexation (voir page 82)
19 C ONDITION – S’allume si le disque comporte des
réglages utilisateur (voir page 84)
–
20
21 TITLE –
S’allume lorsqu’un signal de télécommande est reçu
Indique que le champ d’affichage des caractères
situé en dessous affiche un numéro de titre de DVD vidéo
22 SACD – S’allume lorsqu’un Super Audio CD est
introduit
23 CHP – Indique que le champ d’affichage des caractères
situé en dessous affiche un numéro de chapitre de DVD
vidéo
24 Champ d’affichage de caractères
25 REMAIN – Indique que le champ d’affichage des
caractères affiche la durée de lecture restante du
disque
26 L, C, R, LS, S, RS, LFE – Indiquent les canaux qui sont
enregistrés sur le disque en cours de lecture
27 DOWN MIX – S’allume lorsque les signaux audio de
DVD audio multicanaux, Dolby Digital, DTS ou MPEG
sont mixés en aval, par exemple en deux canaux en stéréo
English
Français
™
14 PROGRESSIVE – S’allume quand cette unité émet en
sortie du matériel vidéo progressive Scan (Non
entrelacé)
41
Fr
Page 42

Bedienelemente und Anzeigen
3
Anzeigen
&
1
3
2
4
*()
5
6
78
9
_
1 3 – Leuchtet, wenn eine Disc abgespielt wird
2 8 – Leuchtet bei Wiedergabepause
3GRP – Verweist darauf, dass die Nummer unten auf
dem Display eine DVD-Audio-Gruppe bezeichnet
4V-PART – Leuchtet während er Wiedergabe des
Videoteils von DVDs
5DVD-AUDIO – Leuchtet, wenn eine DVD-Audio-Disc
abgespielt wird
6DIG OFF – Leuchtet, wenn die Einheit auf Digital Out
OFF eingestellt ist
7192kHz/96kHz – Zeigt an, dass gerade eine DVD-
Disc mit Audio hoher Abtastrate (192 kHz/96 kHz)
abgespielt wird
0
-
16
17
=
+
!
~
@
#
$%
¡
- Leuchtet während der Wiederholfunktion
– Leuchtet bei Wiedergabe von DVD-Video-Discs
^
mt Mehrfach-Blickwinkelmodus
18 L A S T MEMO – Leuchtet, wenn Positionen auf der Disc
abgespeichert sind (siehe Seite 83)
19 CONDITION – leuchtet, wenn der geladenen Disc im
Speicher individuelle Einstellungen zugeordnet sind
(siehe Seite 85)
20
– Leuchtet, wenn ein Signal von der Fernbedienung
empfangen wird
21 TITLE – Verweist darauf, dass die Nummer unten auf
dem Display einen DVD-Videosektor bezeichnet
22 SACD – Leuchtet bei eingelegter Super Audio CD
™
8VCD – Leuchtet, wenn eine Video-CD geladen ist
CD – Leuchtet, wenn eine Audio-CD geladen ist
9 TRK – Verweist darauf, dass die Nummer unten auf
dem Display einen DVD-Audio-, CD-, Video-CD- oder
MP3-Titel bezeichnet
10 DV D – Leuchtet, wenn eine DVD geladen ist
11 DOLBY D – Leuchtet, wenn eine Disc im Dolby
Digital-Audioformat abgespielt wird
12
– Leuchtet beim Abspielen einer Disc mit DTS-
codierten Audiodaten
13 TO TAL – Verweist darauf, dass das Display die
Gesamtspielzeit der Disc anzeigt
14 PROGRESSIVE – Anzeige leuchtet, wenn die Einheit
gerade Videosignale unter progressivem Abtasten
(nicht im Interlaced- bzw. Zeilensprungverfahren)
aussendet
15 VIDEO OFF – Zeigt an, dass der Video-Ausgang
ausgeschaltet ist
23 CHP – Verweist darauf, dass die Nummer unten auf
dem Display ein DVD-Video-Kapitel bezeichnet
24 Zeichendisplay
25 REMAIN – Verweist darauf, dass das Display die
restliche Abspielzeit der Disc anzeigt
26 L, C, R, LS, S, RS, LFE – Geben an, welche Kanäle auf
der abgespielten Disc bespielt sind
27 D OWN MIX – Leuchtet beim Heruntermischen von
mehrkanaligen DVD-Audio-, Dolby Digital-, DTS- oder
MPEG-Audioformaten z.B. auf Zweikanal-Stereo
42
Ge
Page 43

Comandi e display
Display
3
&
1
3
2
4
*()
5
6
78
9
_
1 3 – Si accende durante la riproduzione di un disco
2 8 – Si accende durante la pausa nella riproduzione del
disco
3GRP – Indica che il numero visualizzato nel display
caratteri si riferisce al gruppo di un disco in formato
DVD-Audio
4V-PART – Si accende durante la riproduzione delle
sezioni video dei dischi DVD
5DVD-AUDIO – Si accende durante la riproduzione di
dischi DVD-audio
6DIG OFF – S’illumina quando l’unità è impostata su
Digital Out off
0
!
=
-
~
+
- Si accende in fase di ripetizione
16
– Si accende durante la riproduzione di sezioni del
17
@
#
$%
¡
disco DVD-Video contenenti angolazioni diverse
18 LAST MEMO – Si accende in presenza di disco con
memoria segnalibro (cfr. pag. 83)
19 C ONDITION – Si accende in presenza di disco con
impostazioni attivate (cfr. pag. 85)
20
– S’illumina quando riceve il Segnale del
Telecomando
21 TITLE – Indica che il numero visualizzato nel display
caratteri si riferisce al titolo di un disco in formato
DVD-Video
^
Deutsch
™
Italiano
7192kHz/96kHz – Indica quando un disco DVD
contenente un tasso di campionatura elevato
(192kHz/96kHz) si sta riproducendo
8VCD – S’illumina quando viene caricato un CD Video
CD – S’illumina quando viene caricato un CD Audio
9 TRK – Indica che il numero visualizzato nel display
caratteri si riferisce alla traccia di un disco in formato
DVD-Audio, CD, Video CD o MP3
10 DV D – Si accende all’inserimento di DVD
11 DOLBY D – Si accende durante la riproduzione di
dischi con segnale audio Dolby Digital
12
– Si accende durante la riproduzione di dischi
con segnale audio DTS
13 TO TAL – Indica che il display caratteri mostra la durata
totale del disco inserito
14 PROGRESSIVE – Si accende quando l’unità sta
trasmettendo una scannerizzazione progressiva del
video (non interlacciata)
22 SACD – Si accende per segnalare che il disco inserito
è di tipo Super Audio CD
23 CHP – Indica che il numero visualizzato nel display
caratteri si riferisce al capitolo di un disco in formato
DVD-Video
24 Display caratteri
25 REMAIN – Indica che il display caratteri mostra il
tempo residuo di riproduzione del disco inserito
26 L, C, R, LS, S, RS, LFE – Indica quali sono i canali
registrati per il disco inserito
27 DOWN MIX – Si accende quando viene mixato l’audio
di DVD-Audio multicanale, Dolby Digital, DTS o MPEG,
ad esempio su due canali stereo
15 VIDEO OFF – Indica che l’uscita video è spenta
43
It
Page 44

Getting Started
4
Préparation
Setting the TV System
The default setting of this player is AUTO, and unless you notice that the
picture is distorted when playing some discs, you should leave it set to
AUTO.
If you experience picture distortion with some discs, set the TV system to
match your country or region’s system. Doing this, however, may restrict
the kinds of disc you can watch. The table below shows what kinds of disc
are compatible with each setting (AUTO, PA L and NTSC).
Composite video, S-video, Component video Out
Disc
Type
Format
NTSC PAL AUTO
DVD
NTSC
NTSC MOD. PAL NTSC
PAL
Video CD
Super Audio CD
CD, No disc
NTSC
PAL
NTSC MOD. PAL NTSC
NTSC PAL PAL
NTSC PAL NTSC or PAL
NTSC PAL NTSC or PAL
Component Video Out for progressive/DVI-D
Disc
Type
Format
NTSC PAL AUTO
DVD
Video CD
Super Audio CD
CD, No disc
NTSC
PAL
NTSC
PAL
POWER
PAL
PROGRESSIVE
525p 525p 525p
625p 625p 625p
525p 525p 525p
525p 625p 625p
525p 625p 525p or 625p
525p 625p 525p or 625p
VIDEO ON/OFF
FL OFF
RANDOM
SRS TS
V-PART
POWER
AUDIO
GRP
SACD
TITLE
STANDBY
Note
• If you watch PAL progressive (625p) via Component Video Out,
press PAL progressive button on the Front Panel.
• When PAL progressive button is pressed, DVI cannot be output.
•P : Indicates Progressive (Progressive Scan)
1 Switch the player into power off.
2 Hold down ¡/¢ and STOP 7 then press POWER to switch the
TV system.
The TV system changes as follows:
AUTO ] NTSC
NTSC ] PA L
PA L ] AUTO
The display indicates the new setting.
Note that you have to switch the player into power off before each
change.
About MOD. (Modulation) PAL
• SHRINK
Most models of the newly developed countdown PAL TV system
detect 50 Hz (PAL)/60 Hz (NTSC) and automatically switch vertical
amplitude, resulting in a display without vertical shrinkage.
• If your PAL TV does not have a V-Hold control, you may not be able
to view NTSC disc because the picture may roll. If the TV has a VHold control, adjust it until the picture stops rolling. On some TVs,
the picture may shrink vertically, leaving black bands at the top and
bottom of the screen. This is not a malfunction; it is caused by the
NTSC]PAL conversion.
44
En/Fr
Output format
Position of TV SYSTEM switch
PAL PAL
Output format
Position of TV SYSTEM switch
STOP 7
SACD/DVD PLAYER DV-12S2
DVD
PAL
192kHz
96kHz
DIG OFF
PROGRES.
LAST MEMO
PROGRESSIVE
VCD
CONDITION
DOLBY D
TRK
VIDEO OFF
CHP
REMAIN
TOTAL
DOWN MIX
L C
R
LFE
FL OFF
LS S RS
STOP
PLAY
OPEN/CLOSE
¡/¢
PAUSE
Réglage du système de télévision
Ce lecteur est réglé par défaut en mode AUTO et, à moins que vous
n’observiez des distorsions de l’image pendant la lecture de certains
disques, il est préférable de ne pas changer le mode AUTO.
Si vous observez des distorsions de l’image pendant la lecture de certains
disques, réglez le système de télévision en fonction du système employé
dans votre pays ou dans votre zone géographique. En changeant de
système, vous risquez cependant de limiter les types de disques que vous
pouvez regarder. Le tableau ci-dessous indique les types de disques
compatibles avec chaque réglage (AUTO, PA L et NTSC).
Vidéo composite, S-vidéo, Sortie composant vidéo
Disque
Type
Format
Réglage du système de télévision (TV SYSTEM)
NTSC PAL AUTO
DVD
NTSC
NTSC MOD. PAL NTSC
PAL
Video CD
Super Audio CD
CD, aucun disque
NTSC
PAL
NTSC MOD. PAL NTSC
NTSC PAL PAL
NTSC PAL NTSC ou PAL
NTSC PAL NTSC ou PAL
Sortie Composant Vidéo pour progressive/DVI-D
Disque
Type
DVD
Video CD
Super Audio CD
CD, aucun disque
• Si vous visionnez du matériel en PAL progressive (625 p) par
l’intermédiaire de la Sortie Composant Vidéo, appuyez sur la
touche PAL Progressive présente sur le panneau avant.
• Quand vous appuyez sur la touche PAL Progressive, l’émission
de DVI en sortie n’est pas possible.
•P : indique Progressive (Progressive Scan, Balayage progressif)
1Eteignez le lecteur.
2Maintenez les touches ¡/¢ et STOP 7 enfoncées, appuyez
ensuite sur POWER pour commuter le système TV.
Le système de télévision change comme suit:
AUTO ] NTSC
NTSC ] PA L
PA L ] AUTO
Le nouveau réglage apparaît dans la fenêtre d’affichage.
N’oubliez pas d’éteindre le lecteur avant chaque changement.
A propos de MOD. (Modulation) PAL
• SHRINK
La plupart des modèles fonctionnant suivant le nouveau système de
télévision PAL dégressif détectent les fréquences de 50 Hz (PAL)/60 Hz
(NTSC) et commutent automatiquement l’amplitude verticale, ce qui
produit un affichage sans écrasement vertical.
• Si votre téléviseur PAL n’est pas doté d’une commande de réglage de la
stabilité verticale, il se peut que vous ne puissiez pas visionner de
disques NTSC parce que l’image risque alors de défiler. Si votre téléviseur
est équipé d’une commande de réglage de la stabilité verticale (V-Hoid),
ajustez-la jusqu’à ce que le défilement de l’image cesse. Sur certains
téléviseurs, il se peut que l’image soit écrasée verticalement et laisse
apparaître des bandes noires dans le haut et dans le bas de l’écran. Ceci
esr dû à la conversion NTSC]PAL; il ne s’agit pas d’un
dysfonctionnement.
Format
NTSC
PAL
NTSC
PAL
POWER
PAL
FL OFF
PROGRESSIVE
POWER
Remarque
Réglage du système de télévision (TV SYSTEM)
NTSC PAL AUTO
525p 525p 525p
625p 625p 625p
525p 525p 525p
525p 625p 625p
525p 625p 525p ou 625p
525p 625p 525p ou 625p
VIDEO ON/OFF
RANDOM
SRS TS
STANDBY
SACD/DVD PLAYER DV-12S2
V-PART
192kHz
PROGRESSIVE
DVD
VCD
AUDIO
96kHz
DOLBY D
TRK
GRP
CHP
SACD
REMAIN
TITLE
TOTAL
DIG OFF
Format de sortie
PAL PAL
Format de sortie
STOP 7
OPEN/CLOSE
PAL
PROGRES.
LAST MEMO
CONDITION
VIDEO OFF
DOWN MIX
L C
R
LFE
FL OFF
LS S RS
¡/¢
STOP
PLAY
PAUSE
Page 45

Vorbereitungen Istruzioni preliminari per l’uso
4
Einstellen des TV-Farbsystems
Die Voreinstellung des Spielers ist AUTO. Diese Einstellung sollten Sie
beibehalten, ausgenommen, es kommt beim Abspielen mancher Discs
zu Bildverzerrungen (AUTO).
Sollten bei manchen Discs Verzerrungen auftreten, das TV-Farbsystem
auf die vor Ort geltende Norm einstellen. Dadurch können Sie
allerdings u.U. nicht mehr alle Disctypen abspielen. Die nachstehende
Tabelle zeigt, welche Disctypen mit den einzelnen Systemeinstellungen
kompatibel sind (AUTO, PA L und NTSC).
Composite-Video-, S-Video-, Component-Video-Ausgang
Disc
Typ
Format
NTSC PAL AUTO
DVD
NTSC
NTSC MOD. PAL NTSC
PAL
Video CD
Super Audio CD
CD, keine Disc
NTSC
PAL
NTSC MOD. PAL NTSC
NTSC PAL PAL
NTSC PAL NTSC oder PAL
NTSC PAL NTSC oder PAL
Component-Videoausgang für progressives Abtasten/DVI-D
Disc
Typ
DVD
Video CD
Super Audio CD
CD, keine Disc
Format
NTSC
PAL
NTSC
PAL
POWER
PAL
PROGRESSIVE
NTSC PAL AUTO
525p 525p 525p
625p 625p 625p
525p 525p 525p
525p 625p 625p
525p 625p 525p oder 625p
525p 625p 525p oder 625p
VIDEO ON/OFF
FL OFF
RANDOM
POWER
SRS TS
STANDBY
Ausgabeformat
Position des TV SYSTEM-Modusschalters
PAL PAL
Ausgabeformat
Position des TV SYSTEM-Modusschalters
STOP 7
SACD/DVD PLAYER DV-12S2
V-PART
192kHz
DVD
VCD
AUDIO
96kHz
TRK
GRP
CHP
SACD
TITLE
DIG OFF
OPEN/CLOSE
PAL
PROGRES.
LAST MEMO
PROGRESSIVE
CONDITION
DOLBY D
VIDEO OFF
REMAIN
TOTAL
DOWN MIX
L C
R
LFE
FL OFF
LS S RS
¡/¢
STOP
PLAY
PAUSE
Impostazione del sistema TV
L’impostazione predefinita del lettore è AUTO, e salvo il caso di
immagini distorte nella riproduzione di alcuni dischi, è consigliabile
mantenere tale impostazione (AUTO).
In presenza di immagini distorte, regolare il sistema TV sulle
impostazioni locali (paese o regione). Tuttavia, ciò può impedire
l’utilizzo di alcuni tipi di dischi. La tabella sottoriportata indica quali
tipi di dischi siano compatibili con ciascuna impostazione (AUTO, PAL
e NTSC).
Uscita video composita, S-video, componente video Out
Disco
Tipo
Formato
NTSC PAL AUTO
DVD
NTSC
NTSC MOD. PAL NTSC
PAL
Video CD
Super Audio CD
CD, nessun disco
NTSC
PAL
NTSC MOD. PAL NTSC
NTSC PAL PAL
NTSC PAL NTSC o PAL
NTSC PAL NTSC o PAL
Componenti di Video Out per DVI-D/progressivo
Disco
Tipo
DVD
Video CD
Super Audio CD
CD, nessun disco
POWER
PAL
PROGRESSIVE
Formato
NTSC
PAL
NTSC
PAL
FL OFF
RANDOM
POWER
NTSC PAL AUTO
525p 525p 525p
625p 625p 625p
525p 525p 525p
525p 625p 625p
525p 625p 525p o 625p
525p 625p 525p o 625p
VIDEO ON/OFF
SRS TS
STANDBY
Formato di uscita
Posizione di TV SYSTEM
Formato di uscita
Posizione di TV SYSTEM
SACD/DVD PLAYER DV-12S2
V-PART
192kHz
DVD
VCD
AUDIO
96kHz
TRK
GRP
CHP
SACD
TITLE
DIG OFF
OPEN/CLOSE
PAL
PROGRES.
LAST MEMO
PROGRESSIVE
CONDITION
DOLBY D
VIDEO OFF
REMAIN
TOTAL
DOWN MIX
L C
R
LFE
FL OFF
LS S RS
PAL PAL
STOP 7
¡/¢
STOP
PLAY
PAUSE
English
Français
Deutsch
Italiano
Hinweis
• Drücken Sie, wenn Sie über den Component-Videoausgang „PAL
progressive” (625 Zeilen) sehen wollen, die Taste PAL PROGRESSIVE auf dem vorderen Bedienfeld.
• Bei gedrückter Taste PAL PROGRESSIVE können DVI-Signale
nicht ausgesendet werden.
• P: Zeigt Progressive an (progressives Abtasten)
1 Schalten Sie den Player aus.
2 Halten Sie ¡/¢ und STOP 7 gedrückt und betätigen Sie POWER
zur Einschaltung des TV-Systems.
Das TV-Farbsystem wird wie folgt umgeschaltet:
AUTO ] NTSC
NTSC ] PA L
PA L ] AUTO
Auf dem Display erscheint die jeweils neue Einstellung.
Achten Sie darauf, dass der Player vor jedem Systemwechsel
ausgeschaltet wird.
Hinweise zu MOD. (Modulation) PAL
• SHRINK
Die meisten Modelle nach dem neu entwickelten
PAL-TV-System mit Rückwärtszählung erkennen die Frequenz 50 Hz
(PAL)/60 Hz (NTSC) und schalten automatisch die Vertikalamplitude
um, so dass das Wiedergabebild den Schirm voll ausfüllt.
•Hat Ihr PAL-Gerät keinen Bildfangregler (V-Hold), so ist u.U. wegen
Bilddurchlaufs die Wiedergabe von NTSC-Discs nicht möglich.
Ver fügt das Gerät über einen Bildfangregler, können Sie
wahrscheinlich damit die Bildwiedergabe stabilisieren. Bei manchen
Fernsehgeräten kann das Bild vertikal so gestaucht werden, dass am
oberen und unteren Bildschirmrand schwarze Streifen verbleiben.
Dabei handelt es sich nicht um eine Störung, sondern um eine
Begleiterscheinung der Umsetzung von NTSC]PAL.
Nota
• Se state visionando in PAL progressivo (625p) via Component
Video out, premete il pulsante PAL progressivo sul Pannello
Anteriore.
• Quando viene premuto il pulsante PAL progressivo, il DVI non
può uscire.
• P: significa Progressivo (Scannerizzazione progressiva)
1 Spegnere il lettore.
2Tenete premuto
¡/¢
e STOP 7 quindi premete POWER per
commutare il sistema TV.
Il sistema TV varia nel modo seguente:
AUTO ] NTSC
NTSC ] PA L
PA L ] AUTO
Il display visualizza la nuova impostazione.
Si noti che prima di ogni modifica è necessario spegnere il lettore.
Sistema di MOD. (Modulazione) PAL
• SHRINK
La maggior parte dei modelli che adottano il nuovo sistema TV PAL
countdown rilevano le frequenze comprese tra 50 Hz (PAL) e 60 Hz
(NTSC)e selezionando automaticamente le dimensioni verticali dello
schermo, con conseguente visualizzazione priva di ridimensionamento
verticale.
• In caso di apparecchio TV PAL privo di comando tipo V-Hold, è
possibile che non si riesca a visualizzare un disco per sistema NTSC a
causa dello scorrimento dell’immagine. In caso di apparecchio TV
dotato di comando tipo V-Hold, procedere alla regolazione fino ad
eliminare lo scorrimento delle immagini. Su alcuni apparecchi TV è
possibile che le dimensioni verticali dell’immagine si riducano,
determinando la presenza di bordi neri in corrispondenza delle
estremità superiori e inferiori dello schermo. Non si tratta di un
difetto; bensì della normale visualizzazione dovuta alla conversione
tra sistemi NTSC]PAL.
45
Ge/It
Page 46

4
General
A2
V2
Language
Audio1
Video1
Exit
Move
Select
Setup using the Setup Navigator
Setup Navigator
Setup Navigator
Start
Auto Start Off
SETUPENTER
General
A2
V2
Language
Audio1
Video1
Exit
Move
Select
Setup using the Setup Navigator
Setup Navigator
Setup Navigator
Start
Auto Start Off
SETUPENTER
General
A2
V2
Language
Audio1
Video1
Exit
Move
Select
Select the On Screen Language
Setup Navigator
OSD Language
Language
English
français
Deutsch
Italiano
Español
SETUPENTER
Getting Started
Préparation
ENTER
POWER
SETUP
Using the Setup
Navigator
Before playing any discs, we strongly
recommend using the Setup Navigator. This makes all the basic DVD
player settings for you.
1
Press POWER button on the front
panel to switch on.
Also turn on your TV and make sure
that it is set to the correct video input.
• The POWER button on the remote
switches the player between
standby and on.
• If a disc that’s already loaded
starts to play, press 7 to stop it.
Note
When it is required to remote control
the power mode of this DVD player,
be sure to leave this switch in the
power on mode.
2
Press SETUP.
The Setup Navigator on-screen
display (OSD) appears:
A2
Video1
V2
Language
General
Audio1
Setup Navigator
Utilisation du navigateur
d’installation
Avant de lancer la lecture de disques sur
ce lecteur, nous vous conseillons vivement
d’utiliser le navigateur d’installation. Il
effectuera tous les réglages de base du
lecteur de DVD pour vous.
1 Appuyez sur la touche POWER
située sur le panneau avant pour
mettre sous tension.
Mettez également votre téléviseur
sous tension et assurez-vous qu’il est
réglé sur l’entrée vidéo correcte.
• La touche POWER de la télécommande
met alternativement le lecteur sous
tension et en mode de veille.
• Si la lecture d’un disque déjà introduit
démarre, appuyez sur 7 pour l’arrêter.
Remarque
Lorsqu’il s’avère nécessaire de
télécommander la mise sous tension
de ce lecteur DVD, assurez-vous que
cet interrupteur soit réglé sur On.
2
Appuyez sur SETUP.
L’écran du navigateur d’installation apparaît:
46
En/Fr
Setup Navigator
Setup using the Setup Navigator
Move
Start
Auto Start Off
SETUPENTER
Select
Exit
Navigate all of the following OSDs
using these controls:
Joystick (5/∞) – cursor up/down
ENTER – select the highlighted menu
option
Joystick (2) – go back to the
previous question.
The control possibilities for the
current OSD are shown at the bottom
of each screen.
3
Select ‘Start’.
Audio1
Setup Navigator
Setup using the Setup Navigator
V2
Video1
A2
Setup Navigator
Move
Language
Start
Auto Start Off
Select
General
SETUPENTER
Exit
Remember
Press ENTER to select an option.
• If you decide you don’t want to
use the Setup Navigator, select
Auto Start Off here instead.
4
Choose an OSD menu language.
Video1
A2
OSD Language
Move
V2
Language
English
français
Deutsch
Italiano
Español
Select
General
SETUPENTER
Exit
Audio1
Setup Navigator
Language
Select the On Screen Language
Naviguez parmi tous les écrans
suivants à l’aide de ces commandes :
Joystick (5/∞) – Déplacement du
curseur vers le haut ou vers le bas
ENTER – Sélectionne l’option de
menu mise en évidence
Joystick (2) – Pour revenir à la
question précédente.
Les possibilités de commande de
l’écran affiché (OSD) sont indiquées
dans le bas de chaque écran.
3
Sélectionnez “Start”.
Rappel
Appuyez sur ENTER pour sélectionner
une option.
• Si vous décidez de ne pas utiliser le
navigateur d’installation, sélectionnez
Auto Start Off.
4
Choisissez une langue d’affichage
(OSD) pour les menus.
Page 47

Vorbereitungen
General
A2
V2
Language
Audio1
Video1
Exit
Move
Select
Setup using the Setup Navigator
Setup Navigator
Setup Navigator
Start
Auto Start Off
SETUPENTER
General
A2
V2
Language
Audio1
Video1
Exit
Move
Select
Setup using the Setup Navigator
Setup Navigator
Setup Navigator
Start
Auto Start Off
SETUPENTER
General
A2
V2
Language
Audio1
Video1
Exit
Move
Select
Select the On Screen Language
Setup Navigator
OSD Language
Language
English
français
Deutsch
Italiano
Español
SETUPENTER
Istruzioni preliminari per l’uso
4
ENTER
POWER
SETUP
Der Setup-Navigator zur
Systemeinstellung
Vor dem Abspielen von Discs mit diesem
Player raten wir dringend, den Setup
Navigator zu verwenden. Der Setup
Navigator erledigt alle Grundeinstellungen
des DVD-Spielers für Sie.
1
Zum Einschalten des Players die
POWER-Taste drücken.
Schalten Sie auch das Fernsehgerät
ein, und sorgen Sie dafür, dass der
korrekte Videoeingang gewählt ist.
•
Die Taste POWER an der Fernbedienung
schaltet den Spieler zwischen
Einschaltzustand und Standby um.
•
Beginnt eine bereits geladene Disc zu
spielen, die Wiedergabe mit 7 stoppen.
Hinweis
Wenn es erforderlich ist, diesen DVDPlayer durch Fernbedienung einzuschalten,
dann achten sie bitte darauf, diesen
Schalter auch wieder auszuschalten.
2
Drücken Sie SETUP.
Dadurch wird der Setup Navigator in
den Bildschirm (OSD) eingeblendet:
A2
Video1
V2
Language
General
Audio1
Setup Navigator
Uso del Navigatore
Prima di inserire qualsiasi disco nel
lettore si raccomanda di imparare ad
usare il Navigatore. Il Navigatore
imposta automaticamente tutte le
funzioni principali del sistema DVD.
1
Premete il pulsante POWER sul
pannello frontale per accendere.
Accendere anche l’apparecchio TV e
accertarsi che sia collegato all’ingresso
video corretto.
• Il pulsate POWER sul telecomando
serve a mettere in standby o ad
accendere il dispositivo.
• Qualora si attivasse la riproduzione
di un disco eventualmente presente
nel lettore, premere 7 per fermarla.
Nota
Quando il telecomando richiede la modalità
di alimentazione di questo riproduttore
DVD, assicuratevi di lasciare questo
interruttore accesso in posizione On.
2
Premere SETUP.
Sullo schermo (OSD) compare la
scritta Setup Navigator:
English
Français
Deutsch
Italiano
Setup Navigator
Setup using the Setup Navigator
Move
Start
Auto Start Off
SETUPENTER
Select
Exit
Menüaufruf und Positionswahl (OSD)
erfolgen dann mit den nachstehenden
Bedienelementen:
Joystick (5/∞
) – Cursor nach oben/
unten
ENTER – wählt die markierte Menüoption
Joystick (2
) – kehrt zur letzten Frage
zurück
Die Wahlmöglichkeiten für gegenwärtige
Menüoptionen werden jeweils am
unteren Bildschirmrand gezeigt.
3
Wählen Sie “Start”.
Audio1
Setup Navigator
Setup using the Setup Navigator
V2
Video1
A2
Setup Navigator
Move
Language
Start
Auto Start Off
Select
General
SETUPENTER
Exit
Achtung
Drücken Sie zur Wahl von Menüoptionen
ENTER.
•Falls Sie den Setup Navigator nicht
verwenden wollen, wählen Sie hier
stattdessen Auto Start Off.
4
Wählen Sie eine BildschirmMenüsprache.
Per navigare attraverso le funzioni OSD
descritte, utilizzare i comandi seguenti:
Joystick (5/∞
) – sposta il cursore in
alto/in basso
ENTER – seleziona l’opzione di menu
evidenziata
Joystick (2
) – riporta il cursore alla
domanda precedente
Sulla parte inferiore dello schermo
vengono riportati i possibili comandi
attivabili per la videata OSD corrente.
3
Selezionare ‘Start’.
Ricordareche
Premere ENTER per selezionare
un’opzione.
• Se non si desidera usare il
Navigatore, selezionare invece Auto
Start Off da questa posizione.
4
Selezionare una lingua dal menu OSD.
47
Ge/It
Page 48

Getting Started
General
A2
V2
Language
Audio1
Video1
Exit
Move
Select
Widescreen TV
16:9 aspect ratio
Setup Navigator
TV Type
TV Connection
Widescreen(16:9)
Standard(4:3)
SETUPENTER
General
A2
V2
Language
Audio1
Video1
Exit
Move
Select
2channel jacks for L/R
Setup Navigator
Analog Jacks
Amp Connection
2 ChannelDolby Digital/DTS
5.1Channel
Not Connected
SETUPENTER
General
A2
V2
Language
Audio1
Video1
Exit
Move
Select
Center speaker is connected
to an amplifier
Setup Navigator
Center Speaker
Amp Connection
PresentDolby Digital/DTS
Not Present
SETUPENTER
General
A2
V2
Language
Audio1
Video1
Exit
Move
Select
Surround speakers are connected
to an amplifier
Setup Navigator
Surround Speakers
Amp Connection
PresentDolby Digital/DTS
Not Present
SETUPENTER
General
A2
V2
Language
Audio1
Video1
Exit
Move
Select
Sub–woofer is connected
to an amplifier
Setup Navigator
Sub–woofer
Amp Connection
PresentDolby Digital/DTS
Not Present
SETUPENTER
General
A2
V2
Language
Audio1
Video1
Exit
Move
Select
Compatible with Dolby Digital
Setup Navigator
Digital Jack
Amp Connection
Dolby Digital
Dolby Digital/DTS
Dolby Digital/MPEG
Dolby D/DTS/MPEG
PCM
Not Connected
SETUPENTER
4
5
Select the type of TV you have.
Audio1
Video1
A2
Setup Navigator
TV Connection
TV Type
Widescreen TV
16:9 aspect ratio
Move
• See Aspect ratio in the Glossary on page 160 if you’re unsure of
the difference between widescreen and standard TVs.
6
Select the type of analog audio connections you made to
your amplifier/receiver.
Audio1
Video1
A2
Setup Navigator
Amp Connection
Analog Jacks
2channel jacks for L/R
Move
• If you connected the audio output directly to your TV
following the Easy setup on page 24, choose 2 Channel.
7 If you selected 5.1 Channel audio connections in step 6,
confirm which speakers are connected to your amplifier.
Audio1
Video1
A2
Setup Navigator
Amp Connection
Center Speaker
Center speaker is connected
to an amplifier
Move
Audio1
Video1
A2
Setup Navigator
Amp Connection
Surround Speakers
Surround speakers are connected
to an amplifier
Move
Audio1
Video1
A2
Setup Navigator
Amp Connection
Sub–woofer
Sub–woofer is connected
to an amplifier
Move
8
Confirm the digital audio formats your amplifier is
compatible with (if you made a digital connection).
Audio1
Video1
A2
Setup Navigator
Amp Connection
Digital Jack
Compatible with Dolby Digital
Move
• All options (except Not Connected) assume PCM compat-
ibility. The PCM option means only compatible with PCM.
• More information on these audio formats is available in
the Glossary on page 160.
• Consult the manual that came with your amplifier if you’re
unsure about compatibility with any of these formats.
48
En/Fr
V2
Language
General
Widescreen(16:9)
Standard(4:3)
SETUPENTER
Select
V2
Language
General
2 ChannelDolby Digital/DTS
5.1Channel
Not Connected
SETUPENTER
Select
V2
Language
General
PresentDolby Digital/DTS
Not Present
SETUPENTER
Select
V2
Language
General
PresentDolby Digital/DTS
Not Present
SETUPENTER
Select
V2
Language
General
PresentDolby Digital/DTS
Not Present
SETUPENTER
Select
V2
Language
General
Dolby Digital
Dolby Digital/DTS
Dolby Digital/MPEG
Dolby D/DTS/MPEG
PCM
Not Connected
SETUPENTER
Select
Exit
Exit
Exit
Exit
Exit
Exit
Préparation
5
Sélectionnez le type de téléviseur dont vous disposez.
•Reportez-vous à l’entrée Format du Glossaire à la page
16 0 si vous n’êtes pas sûr de la différence entre un
téléviseur à écran large et à écran standard.
6
Sélectionnez le type de raccordements audio analogiques
de votre amplificateur/récepteur.
• Si vous avez directement raccordé la sortie audio à votre
téléviseur en suivant la procédure d’Installation accélérée à
la page 25, choisissez 2 Channel.
7
Si vous avez sélectionné les raccordements audio à 5,1
canaux au point 6, vérifiez quels haut-parleurs sont
raccordés à votre amplificateur.
8
Vérifiez les formats audionumériques avec lesquels votre
amplificateur est compatible (si vous avez établi un
raccordement numérique).
•Toutes les options (excepté Not Connected) requièrent
la compatibilité PCM. L’option PCM signifie uniquement
compatible avec PCM.
•Vous trouverez davantage d’informations sur ces formats
audio dans le Glossaire à la page 160.
• Consultez le mode d’emploi fourni avec votre
amplificateur si vous n’êtes pas sûr de sa compatibilité
avec l’un de ces formats.
Page 49

Vorbereitungen Istruzioni preliminari per l’uso
General
A2
V2
Language
Audio1
Video1
Exit
Move
Select
Widescreen TV
16:9 aspect ratio
Setup Navigator
TV Type
TV Connection
Widescreen(16:9)
Standard(4:3)
SETUPENTER
General
A2
V2
Language
Audio1
Video1
Exit
Move
Select
2channel jacks for L/R
Setup Navigator
Analog Jacks
Amp Connection
2 ChannelDolby Digital/DTS
5.1Channel
Not Connected
SETUPENTER
General
A2
V2
Language
Audio1
Video1
Exit
Move
Select
Center speaker is connected
to an amplifier
Setup Navigator
Center Speaker
Amp Connection
PresentDolby Digital/DTS
Not Present
SETUPENTER
General
A2
V2
Language
Audio1
Video1
Exit
Move
Select
Surround speakers are connected
to an amplifier
Setup Navigator
Surround Speakers
Amp Connection
PresentDolby Digital/DTS
Not Present
SETUPENTER
General
A2
V2
Language
Audio1
Video1
Exit
Move
Select
Sub–woofer is connected
to an amplifier
Setup Navigator
Sub–woofer
Amp Connection
PresentDolby Digital/DTS
Not Present
SETUPENTER
General
A2
V2
Language
Audio1
Video1
Exit
Move
Select
Compatible with Dolby Digital
Setup Navigator
Digital Jack
Amp Connection
Dolby Digital
Dolby Digital/DTS
Dolby Digital/MPEG
Dolby D/DTS/MPEG
PCM
Not Connected
SETUPENTER
Audio1
Setup Navigator
Language
Select the On Screen Language
5
Wählen Sie den Typ Ihres Fernsehgeräts.
Audio1
Setup Navigator
TV Connection
Widescreen TV
16:9 aspect ratio
• Siehe Bildformat in der Erläuterung der Begriffe auf Seite
16 1 , wenn Ihnen der Unterschied zwischen
Fernsehgeräten mit Breit- und Normalbild unklar ist.
6
Wählen Sie die Art der analogen Audioanschlüsse mit
dem Verstärker/Receiver.
Audio1
Setup Navigator
Amp Connection
2channel jacks for L/R
•Falls Sie den Audioausgang direkt mit dem Fernsehgerät
verbunden haben, wie unter Einfache Systemanordnung auf
Seite 26 erklärt, 2 Channel wählen.
7
Bei Wahl der 5,1-Kanalanordnung (5.1 Channel) in
Schritt 6 prüfen, welche Lautsprecher an den Verstärker
angeschlossen sind.
Audio1
Setup Navigator
Amp Connection
Center speaker is connected
to an amplifier
Audio1
Setup Navigator
Amp Connection
Surround speakers are connected
to an amplifier
Audio1
Setup Navigator
Amp Connection
Sub–woofer is connected
to an amplifier
8
Überprüfen Sie die Digital-Audioformate, die Ihr
Verstärker verarbeiten kann (gilt nur bei digitalen
Anschlüssen).
Audio1
Setup Navigator
Amp Connection
Compatible with Dolby Digital
• Alle Optionen (außer Not Connected (nicht
V2
Video1
A2
OSD Language
Move
V2
Video1
A2
TV Type
Move
V2
Video1
A2
Analog Jacks
Move
V2
Video1
A2
Center Speaker
Move
V2
Video1
A2
Surround Speakers
Move
V2
Video1
A2
Sub–woofer
Move
V2
Video1
A2
Digital Jack
Move
Language
General
English
français
Deutsch
Italiano
Español
SETUPENTER
General
SETUPENTER
General
SETUPENTER
General
SETUPENTER
General
SETUPENTER
General
SETUPENTER
General
SETUPENTER
Exit
Exit
Exit
Exit
Exit
Exit
Exit
Select
Language
Widescreen(16:9)
Standard(4:3)
Select
Language
2 ChannelDolby Digital/DTS
5.1Channel
Not Connected
Select
Language
PresentDolby Digital/DTS
Not Present
Select
Language
PresentDolby Digital/DTS
Not Present
Select
Language
PresentDolby Digital/DTS
Not Present
Select
Language
Dolby Digital
Dolby Digital/DTS
Dolby Digital/MPEG
Dolby D/DTS/MPEG
PCM
Not Connected
Select
5
Selezionare il tipo di apparecchio TV collegato.
• Cfr. Rapporto di aspetto nel Glossario a pag. 161 per la
differenza tra gli apparecchi TV Widescreen e di tipo
standard.
6
Selezionare il tipo di collegamenti audio digitali eseguiti
sull’amplificatore/ricevitore.
• Se l’uscita audio è stata collegata direttamente alla TV
secondo le istruzioni della Predisposizione facilitata a pag.
27, selezionare 2 Channel.
7
Se sono stati selezionati collegamenti audio di tipo 5,1
Channel al passo 6, confermare quali sono i diffusori
collegati all’amplificatore utilizzato.
8
Confermare il tipo di formato audio digitale con cui
l’amplificatore collegato è compatibile (in caso di
collegamento digitale).
•Tutte le opzioni (eccetto Not Connected)
presuppongono una compatibilità PCM. L’opzione PCM
significa compatibile esclusivamente con PCM.
•Per ulteriori informazioni sui formati audio cfr. Glossario,
pag. 161.
• Consultare il manuale dell’amplificatore da collegare per
verificarne la compatibilità con uno dei formati descritti.
4
English
Français
Deutsch
Italiano
49
Ge/It
Page 50

Getting Started
General
A2
V2
Language
Audio1
Video1
Exit
Move
Select
Digital jack not compatible with 96kHz
Setup Navigator
96kHz PCM Audio
Amp Connection
No
Yes
Don't Know
SETUPENTER
General
A2
V2
Language
Audio1
Video1
Exit
Move
Select
Changes are saved
Setup Navigator
Exit Setup Navigator
Save Changes
Delete Changes
Start Again
SETUPENTER
4
9
Confirm whether your amplifier is compatible with
96kHz audio.
Audio1
Video1
A2
Setup Navigator
Amp Connection
96kHz PCM Audio
Digital jack not compatible with 96kHz
Move
•You won’t see this screen if you selected Not Connected
in step 8.
• Selecting Don’t Know has the same effect as selecting No:
any 96kHz audio will be downsampled to 48kHz. This is a
more compatible sampling frequency. See Sampling
frequency in the Glossary on page 164 for more on this.
10
Select ‘Save Changes’ to make the settings.
Audio1
Video1
A2
Setup Navigator
Exit Setup Navigator
Changes are saved
Move
V2
Language
No
Yes
Don't Know
V2
Language
Save Changes
Delete Changes
Start Again
Select
Select
General
SETUPENTER
General
SETUPENTER
Exit
Exit
Préparation
9
Vérifiez si votre amplificateur est compatible avec les
signaux audio à 96 kHz.
•Vous ne voyez pas apparaître cet écran si vous avez
sélectionné Not Connected au point 8.
• La sélection de Don’t Know produit le même effet que si
vous sélectionnez No: tous les signaux audio à 96 kHz
sont convertis à une fréquence d’échantillonnage de 48
kHz. C’est une fréquence d’échantillonnage plus
généralement compatible. Reportez-vous à l’entrée
Fréquence d’échantillonnage du Glossaire à la page 164
pour plus de détails à ce sujet.
10
Sélectionnez “Save Changes” pour activer les réglages.
11
Press SETUP to exit.
•You may not need to do this step, depending on when
you use the Setup Navigator.
Congratulations, set up is complete!
If you want to use the Setup Navigator again at any time, it
is available from the General menu. Also, each individual
setting can be changed using the appropriate menu option—chapter 7 explains all menu options in detail.
Using the FL menu
The FL menu has been designed to set “DISP MODE”, “DVI
V LVL”, “AUTO P OFF”, “REMOT CODE” and “ECO
MODE”.
Selecting the FL menu
Press SETUP for longer than 1 sec.
The FL OFF indicator on the player turn on and off.
FL menu is displayed in the FL display.
FL OFF
PAL
PROGRESSIVE
VIDEO ON/OFF
FL OFF
RANDOM
POWER
SACD/DVD PLAYER DV-12S2
SRS TS
STANDBY
PAL
PROGRES.
FL OFF
FL menu
Move the Joystick (5/∞) to select the FL menu you want
as follows.
STOP
PLAY
OPEN/CLOSE
PAUSE
11
Appuyez sur SETUP pour quitter.
• Il se peut que vous ne deviez pas exécuter ce point, selon
que vous utilisez le navigateur d’installation ou pas.
Félicitations, vous venez de terminer l’installation de votre
lecteur!
Si vous souhaitez par la suite encore utiliser le navigateur
d’installation, il est accessible via le menu General. De
même, chacun des paramètres de réglage peut être modifié
individuellement en utilisant l’option de menu appropriée—
le chapter 7 vous explique dans le détail toutes les options
de menu.
Utilisation du menu FL
Le menu FL a été conçu pour régler “DISP MODE”, “DVI V
LV L”, “AUTO P OFF”, “REMOT CODE” et “ECO MODE”.
Sélection du menu FL
Appuyez sur SETUP pendant plus de 1 sec.
L’indicateur FL OFF du lecteur s’allume et s’éteint.
FL menu est indiqué sur l’affichage FL.
FL OFF
PAL
PROGRESSIVE
VIDEO ON/OFF
FL OFF
RANDOM
POWER
SACD/DVD PLAYER DV-12S2
SRS TS
STANDBY
PAL
PROGRES.
FL OFF
STOP
PLAY
OPEN/CLOSE
PAUSE
50
En/Fr
FL menu
Utilisez le Joystick (5/∞) pour sélectionner le menu FL (FL
menu) désiré selon les procédures suivantes.
Page 51

Vorbereitungen Istruzioni preliminari per l’uso
General
A2
V2
Language
Audio1
Video1
Exit
Move
Select
Digital jack not compatible with 96kHz
Setup Navigator
96kHz PCM Audio
Amp Connection
No
Yes
Don't Know
SETUPENTER
General
A2
V2
Language
Audio1
Video1
Exit
Move
Select
Changes are saved
Setup Navigator
Exit Setup Navigator
Save Changes
Delete Changes
Start Again
SETUPENTER
4
beschaltet)) setzen voraus, dass der Verstärker PCM-
Signale decodieren kann. Die PCM-Option bedeutet, dass
Ihr Verstärker nur PCM-Signale verarbeiten kann.
•Weitere Informationen zu diesen Audioformaten finden
Sie unter Erläuterung der Begriffe auf Seite 161.
• Schlagen Sie in der Bedienungsanleitung des Verstärkers
nach, falls Sie sich nicht sicher sind, mit welchen der
möglichen Formate Ihr Verstärker kompatibel ist.
9
Prüfen Sie, ob Ihr Verstärker 96-kHz-Digitalsignale
verarbeiten kann.
Audio1
Setup Navigator
Amp Connection
Digital jack not compatible with 96kHz
• Sie sehen dieses Menü jedoch nicht, falls Sie in Schritt 8
die Option Not Connected gewählt haben.
•Das Wählen von Don’t Know hat den gleichen Effekt wie
die Eingabe von No: In diesem Fall werden 96-kHzDigitalsignale in 48-kHz-Signale konvertiert. Diese
niedrigere Abtastfrequenz ist mit den meisten
Komponenten kompatibel. Näheres hierzu siehe unter
Abtastfrequenz im Abschnitt Erläuterung der Begriffe auf
Seite 165.
10
Wählen Sie “Save Changes”, um die Einstellungen
V2
Language
Video1
A2
96kHz PCM Audio
Move
General
No
Yes
Don't Know
Select
SETUPENTER
Exit
anzuwenden.
A2
Video1
Move
V2
Language
Save Changes
Delete Changes
Start Again
Select
General
SETUPENTER
Exit
Audio1
Setup Navigator
Exit Setup Navigator
Changes are saved
11
Drücken Sie SETUP, um das Menü zu verlassen.
• Bei Nutzung des Setup-Navigator ist dieser Schritt u.U.
nicht erforderlich.
Herzlichen Glückwunsch, Ihr DVD-Spieler ist nun spielbereit.
Falls Sie den Setup-Navigator später wieder benötigen,
können Sie ihn jederzeit über das Menü General aufrufen.
Individuelle Einstellungen können über die betreffenden
Menüoptionen jederzeit geändert werden – Näheres hierzu
finden Sie in Kapitel 7.
Verwendung des FL-Menüs
Das FL-Menü ermöglicht die Einstellung von “DISP MODE”,
“DVI V LVL”, “AUTO P OFF”, “REMOT CODE” und “ECO
MODE”.
Wahl des FL-Menüs
Halten Sie SETUP länger als 1 Sekunde gedrückt.
Die Anzeige FL OFF am Gerät wird ein- und ausgeschaltet.
Das FL-Menü wird im FL-Display angezeigt.
FL OFF
PAL
PROGRESSIVE
VIDEO ON/OFF
FL OFF
RANDOM
POWER
SACD/DVD PLAYER DV-12S2
SRS TS
STANDBY
PAL
PROGRES.
FL OFF
STOP
PLAY
OPEN/CLOSE
PAUSE
9
Confermare la compatibilità dell’amplificatore da
collegare con il segnale audio a 96 kHz.
• Questa videata non comparirà se al punto 8 è stata
selezionata l’opzione Not Connected.
• Selezionando Don’t Know si ottiene il medesimo effetto
che si avrebbe selezionando No: l’audio a 96 kHz viene
campionato e convertito a 48 kHz. Si ottiene così una
frequenza di campionamento di maggiore compatibilità.
Cfr. Frequenze di campionamento nel Glossario a pag. 165
per ulteriori informazioni in proposito.
10
Selezionare ‘Save Changes’ per rendere effettive le
impostazioni.
11
Premere SETUP per uscire.
• Se si intende utilizzare il Navigatore questo passaggio è
superfluo.
A questo punto il lettore è correttamente predisposto per il
funzionamento.
Per visualizzare nuovamente il Navigatore in qualsiasi
momento, andare al menu General. Inoltre, ogni singola
impostazione può essere modificata mediante il relativo
menu opzioni-il capitolo 7 spiega dettagliatamente tutte le
opzioni dei menu.
Uso del menu FL
Il menu FL è stato progettato per impostare “DISP MODE”,
“DVI V LVL”, “AUTO P OFF”, “REMOT CODE” e “ECO
MODE”.
Selezione del menu FL
Premere SETUP per più di un secondo.
L’indicatore FL OFF sul display si accende e si spegne.
Sul display FL appare il menu FL.
FL OFF
SACD/DVD PLAYER DV-12S2
PAL
PROGRESSIVE
VIDEO ON/OFF
FL OFF
RANDOM
POWER
SRS TS
STANDBY
FL menu
PAL
PROGRES.
FL OFF
Fate scorrere il joystick (5/∞) secondo le istruzioni
seguenti per selezionare il menu FL desiderato.
STOP
PLAY
OPEN/CLOSE
PAUSE
English
Français
Deutsch
Italiano
Bewegen Sie den Joystick (5/∞) und wählen Sie das
gewünschte FL-Menü wie folgt.
FL menu
51
Ge/It
Page 52

Getting Started
DISP OFF
DISP ON
ENTER
SETUP
ON 30 MIN
OFF
4
Préparation
(Example)
DISP MODE
DVI V LVL
AUTO P OFF
REMOT CODE
ECO MODE
ENTER
SETUP
To e xit the FL menu
When you have compleated setting up the FL menu or if you want exit the FL menu.
Press SETUP to close the FL menu.
DISP MODE setting
Select DISP MODE, then press ENTER.
Move the Joystick (5/∞) to select the type of DISP MODE you want to set as
follows.
(Example)
Press ENTER you want to set.
The menu select is set.
• If you play a CD, MP3 or Super Audio CD while DISP ON is selected, FL display
and video output shut off automatically. FL display is on and video output is off
during Stop. And if you push the FL OFF button on the front panel during DISP
ON, for three seconds, only FL display is displayed.
•Depending on the disc, it may not operate normally. When this happens, use it
after turning off DISP MODE.
DISP OFF
DISP ON
*
* Factory setting
DVI V LVL setting
Select DVI V LVL, then press ENTER.
Move the Joystick (
follows.
(Example)
5/∞
) to select the type of DVI V LVL you want to set as
NORMAL
*
(Exemple)
DISP MODE
DVI V LVL
AUTO P OFF
REMOT CODE
ECO MODE
Pour quitter le menu FL
Lorsque vous avez terminé les réglages de FL menu ou si vous voulez sortir de FL menu,
appuyez sur SETUP pour fermer FL menu.
Réglages DISP MODE
Sélectionnez DISP MODE, appuyez ensuite sur ENTER.
Utilisez le joystick (5/∞) pour sélectionner le type de DISP MODE que vous
souhaitez régler en suivant les procédures ci-dessous.
(Exemple)
Appuyez sur ENTER sur l’option que vous voulez régler.
La sélection du menu est terminée.
• Si vous lancez la lecture d’un CD, d’un MP3ou d’un Super Audio CD alors que
l’option DISP ON est sélectionnée, l’affichage FL et la sortie vidéo sont
automatiquement désactivés. En position Stop, l’affichage FL est activé et la sortie
vidéo est désactivée. Et si vous appuyez sur la touche FL OFF sur le panneau
avant en mode DISP ON, pendant 3 secondes seul l’affichage FL sera affiché.
•Un fonctionnement normal pourrait être impossible avec certains disques. Dans ce
cas, effectuez cette opération après avoir désactivé DISP MODE.
*
* Réglage d’usine
Réglages DVI V LVL
Sélectionnez DVI V LVL, appuyez ensuite sur ENTER.
Utilisez le joystick (5/∞) pour sélectionner le type de DVI V LVL que vous
souhaitez régler en suivant les procédures ci-dessous.
(Exemple)
NORMAL
*
52
En/Fr
EXPAND
* Factory setting
Press ENTER you want to set.
The menu select is set.
•When connecting the DVI unit, black may rise to the surface depending on the
display. If that happens, set to Expand. The DVI V.LEVEL switches between the
following output image data ranges.
Normal: 16 (black) – 235 (white)
Expand: 0 (black) – 246 (white)
AUTO P OFF setting
Select AUTO P OFF, then press ENTER.
Move the Joystick (5/∞) to select the type of AUTO P OFF you want to set as
follows.
(Example)
Press ENTER you want to set.
The menu select is set.
• The standby mode is automatically selected to save power if the player is left in
the stop mode for about 30 minutes.
ON 30 MIN
OFF
*
* Factory setting
REMOT CODE setting
Select REMOT CODE, then press ENTER.
Move the Joystick (5/∞) to select the type of REMOT CODE you want to set as
follows.
(Example)
Press ENTER you want to set.
The menu select is set.
• The DVD player support two remote control codes: DVD 1 and DVD 2.
• Set the remote control code of the Remote Control to the same setting.
• See page 38 for more information.
DVD 1
DVD 2
*
* Factory setting
ECO MODE setting
This setting for use by Custom installers. Please do not touch this setting.
Default setting is ON.
EXPAND
* Réglage d’usine
Appuyez sur ENTER sur l’option que vous voulez régler.
La sélection du menu est terminée.
• Lorsque vous connectez l’unité DVI, du noir peut émerger en surface selon
l’affichage utilisé. Si cela se produit, régler sur Expand. La fonction DVI V.LEVEL
commute entre ces deux zones de sortie d’image.
Normal: 16 (noir) – 235 (blanc)
Expand: 0 (noir) – 246 (blanc)
Réglage de AUTO P OFF
Sélectionnez AUTO P OFF, puis appuyez sur ENTER.
Utilisez le joystick (5/∞) pour sélectionner le type de AUTO P OFF que vous
souhaitez régler en suivant les procédures ci-dessous.
(Exemple)
Appuyez sur ENTER sur l’option que vous voulez régler.
La sélection du menu est terminée.
• Le mode de veille est sélectionné automatiquement pour économiser l’énergie si
vous laissez le lecteur en mode d’arrêt pendant environ 30 minutes.
*
* Réglage d’usine
Réglage de REMOT CODE
Sélectionnez REMOT CODE, puis appuyez sur ENTER.
Utilisez le joystick (5/∞) pour sélectionner le type de REMOT CODE que vous
souhaitez régler en suivant les procédures ci-dessous.
(Exemple)
Appuyez sur ENTER sur l’option que vous voulez régler.
La sélection du menu est terminée.
• Le lecteur DVD prend en charge deux codes de télécommande: DVD 1 et DVD 2.
•Réglez le code de télécommande de la télécommande sur le même paramètre.
•Voir page 38 pour plus d’informations.
DVD 1
DVD 2
*
* Réglage d’usine
Réglage de ECO MODE
Ce réglage est à l’usage des installateurs professionnels. Vous êtes priés de ne pas
toucher à ce réglage. Le réglage par défaut est ON.
Page 53

Vorbereitungen Istruzioni preliminari per l’uso
ON 30 MIN
OFF
ENTER
SETUP
DISP OFF
DISP ON
4
(Beispiel)
DISP MODE
DVI V LVL
AUTO P OFF
REMOT CODE
ECO MODE
ENTER
SETUP
Zum Verlassen des FL-Menüs
Wenn Sie mit der Einstellung des FL-Menüs fertig sind oder das FL-Menüs verlassen
wollen, drücken Sie SETUP, um das FL-Menüs zu schließen.
Einstellung DISP MODE
Wählen Sie DISP MODE und drücken Sie dann ENTER.
Bewegen Sie den Joystick (5/∞) und wählen Sie, den gewünschten Typ des DISP
MODE einzustellen. Verfahren Sie dabei wie folgt.
(Beispiel)
Drücken Sie ENTER auf dem gewünschten Posten.
Die Menüeinstellung wird eingegeben.
•Wenn Sie eine CD, MP3 oder Super Audio CD abspielen, während DISP ON
gewählt ist, werden das FL-Display sowie der Video-Ausgang automatisch
abgeschaltet. Während der Einstellung Stop ist das FL-Display eingeschaltet und
der Video-Ausgang abgeschaltet. Und der Videoausgang ist während „Stop”
ausgeschaltet. Und wenn Sie während DISP ON die auf dem vorderen Bedienfeld
befindliche Taste FL OFF drei Sekunden drücken, wird nur das Leuchtdisplay (FLDisplay) angezeigt.
• Je nach der Disc, die abgespielt wird, kann es vorkommen, dass sie nicht normal
funktioniert. Wenn dies geschieht, schalten Sie zunächst den DISP MODE aus und
beginnen Sie das Abspielen der Disc dann erneut.
DISP OFF
DISP ON
*
* Werkseinstellung
Einstellung DVI V LVL
Wählen Sie DVI V LVL und drücken Sie dann ENTER.
Bewegen Sie den Joystick (5/∞) und wählen Sie, den gewünschten Typ des DVI V LVL
einzustellen. Verfahren Sie dabei wie folgt.
(Beispiel)
Drücken Sie ENTER auf dem gewünschten Posten.
Die Menüeinstellung wird eingegeben.
• Beim Anschließen der DVI-Einheit (Digital Video Interface) kann je nach dem
jeweiligen Display der Schwarzpegel auf dem Bildschirm ansteigen. Stellen Sie,
wenn dies geschieht, Expand (Erweitern) ein. Der DVI-V.Level schaltet zwischen
den folgenden Bereichen für die Bilddaten am Ausgang um:
Normal: 16 (Schwarz) – 235 (Weiß)
Expand: 0 (Schwarz) – 246 (Weiß)
NORMAL
EXPAND
*
* Werkseinstellung
Einstellung von AUTO P OFF
Wählen Sie AUTO P OFF, und drücken Sie dann ENTER.
Bewegen Sie den Joystick (5/∞) und wählen Sie, den gewünschten Typ des AUTO P
OFF einzustellen. Verfahren Sie dabei wie folgt.
(Beispiel)
Drücken Sie ENTER auf dem gewünschten Posten.
Die Menüeinstellung wird eingegeben.
•Der Bereitschaftsmodus wird automatisch aktiviert, um Strom zu sparen, wenn das
Gerät etwa 30 Minuten lang im Stoppmodus belassen wird.
ON 30 MIN
*
OFF
* Werkseinstellung
Einstellung von REMOT CODE
Wählen Sie REMOT CODE, und drücken Sie dann ENTER.
Bewegen Sie den Joystick (5/∞) und wählen Sie, den gewünschten Typ des REMOT
CODE einzustellen. Verfahren Sie dabei wie folgt.
DVD 1
(Beispiel)
Drücken Sie ENTER auf dem gewünschten Posten.
Die Menüeinstellung wird eingegeben.
•Dieser DVD-Spieler unterstützt zwei Fernbedienungscodes: DVD1 und DVD2.
•Stellen Sie die Fernbedienung auf den gleichen Fernbedienungscode ein.
•Weitere Informationen auf Seite 39.
Einstellen des
Diese Einstellung ist für den Gebrauch durch Kunden-Installierer vorgesehen. Bitte
berühren Sie diese Einstellung nicht. Die Voreinstellung ab Werk ist ON (Ein).
*
DVD 2
ECO MODE
* Werkseinstellung
(Sparmodus)
(Esempio)
DISP MODE
DVI V LVL
AUTO P OFF
REMOT CODE
ECO MODE
Uscita dal menu FL
Quando l’impostazione del menu FL è stata completata, o si desidera uscire dal menu
FL, premere SETUP per chiuderlo.
Impostazioni DISP MODE
Selezionate DISP MODE, quindi premete ENTER.
Fate scorrere il joystick (5/∞) secondo le istruzioni seguenti per selezionale il DISP
MODE che desiderate impostare.
(Esempio)
Per l’impostazione desiderata premere ENTER.
La selezione del menu viene impostata.
• Se state riproducendo un CD, MP3 o Super Audio CD mentre è selezionato DISP
ON, il display FL e l’uscita video si chiudono automaticamente. Il display FL è
attivo, mentre l’uscita Video è chiusa, in posizione OFF, durante Stop e Pause.
Premendo per tre secondi il pulsante FL OFF sul pannello anteriore, quando è
attivo DISP ON, rimane in vista solo il display FL.
• Secondo il disco usato potrebbe non funzionare normalmente. Se questo accade,
utilizzatelo dopo avere spento il DISP MODE.
*
* Impostazione di fabbrica
Impostazioni DVI V LVL
Selezionate DVI V LVL, quindi premete ENTER.
Fate scorrere il joystick (5/∞) secondo le istruzioni seguenti per selezionale il DVI V
EXP che desiderate impostare.
(Esempio)
Per l’impostazione desiderata premere ENTER.
La selezione del menu viene impostata.
•Quando si collega l’unità DVI, il nero potrebbe emergere, secondo il display,.
Qualora si verificasse questo inconveniente, impostate Expand. Il V.LEVEL DVI
commuta tra queste bande dati di uscita dell’immagine:
Normal: 16 (nero) – 235 (bianco)
Expand: 0 (nero) – 246 (bianco)
NORMAL
EXPAND
*
* Impostazione di fabbrica
Impostazione AUTO P OFF
Selezionare AUTO P OFF, quindi premere ENTER.
Fate scorrere il joystick (5/∞) secondo le istruzioni seguenti per selezionale il AUTO
P OFF che desiderate impostare.
(Esempio)
Per l’impostazione desiderata premere ENTER.
La selezione del menu viene impostata.
• Se il lettore è lasciato nel modo di arresto per circa 30 minuti, viene selezionato il
modo di attesa per risparmiare energia.
*
* Impostazione di fabbrica
Impostazione REMOT CODE
Selezionare REMOT CODE, quindi premere ENTER.
Fate scorrere il joystick (5/∞) secondo le istruzioni seguenti per selezionale il
REMOT CODE che desiderate impostare.
(Esempio)
Per l’impostazione desiderata premere ENTER.
La selezione del menu viene impostata.
• Il lettore DVD supporta due codici di telecomando: DVD1 e DVD2.
•Impostare il codice del telecomando con la medesima impostazione.
•Per maggiori informazioni vedere pagina 39.
DVD 1
DVD 2
*
* Impostazione di fabbrica
Impostazione ECO MODE
È un’impostazione che serve al servizio installazione clienti. Si prega di non toccarla.
L’impostazione di default è ON (attiva).
English
Français
Deutsch
Italiano
53
Ge/It
Page 54

4
Getting Started
Préparation
OPEN/CLOSE
POWER
Playing discs
The basic playback controls for
playing discs are covered here.
Further functions are detailed in
the next chapter.
Lecture de disques
Les commandes de base pour la
lecture de disques sont
expliquées dans cette section. Les
autres fonctions sont détaillées
dans le chapitre suivant.
Note
Throughout this manual, the term
‘DVD’ means DVD-Video, DVD-Audio
and DVD-R/RW. If a function is
specific to a particular kind of DVD
disc, it is specified.
1Switch the player on.
312
654
987
+10
0
If you’re playing a DVD or Video CD,
also turn on your TV and make sure
that it is set to the correct video
input.
2Press OPEN/CLOSE to open the
1Mettez le lecteur sous tension.
disc tray.
3 Load a disc.
Load a disc with the label side facing
up, using the disc tray guide to align
the disc (if you’re loading a doublesided DVD disc, load it with the side
you want to play face down).
2 Appuyez sur OPEN/CLOSE pour
3 Introduisez un disque.
4Press 3 to start playback.
If you’re playing a DVD or Video CD,
a menu may appear. See pages 58,
60 for how to navigate these.
Remarque
Tout au long de ce manuel, le terme
“DVD” a été utilisé pour désigner des
DVD vidéo, des DVD audio et des
DVD-R/RW. Si une fonction est
spécifique à un type de DVD
particulier, le texte le précise
clairement.
Si vous lancez la lecture d’un DVD ou
un Vidéo-CD, mettez également votre
téléviseur sous tension et assurezvous qu’il est réglé sur l’entrée vidéo
correcte.
ouvrir le plateau de lecture.
Placez le disque avec la face imprimée
vers le haut en vous aidant du guide
du plateau de lecture pour aligner le
disque (dans le cas d’un DVD double
face, placez-le avec la face qui vous
intéresse vers le bas).
4 Appuyez sur 3 pour démarrer la
lecture.
Si vous lancez la lecture d’un DVD ou
un Vidéo-CD, il se peut qu’un menu
s’affiche. Reportez-vous à la pages
58, 60 pour la méthode de navigation sur ces disques.
54
En/Fr
Page 55

Vorbereitungen
Istruzioni preliminari per l’uso
4
OPEN/CLOSE
English
Français
POWER
Wiedergabe von Discs
Im Folgenden sind die
grundlegenden Bedienvorgänge
zum Abspielen von Discs
beschrieben. Weiterführende
Funktionen werden ausführlich im
Riproduzione dei dischi
Nel presente capitolo vengono
descritti i comandi principali di
riproduzione dei dischi. Per
ulteriori informazioni consultare
il capitolo successivo.
nächsten Kapitel behandelt.
Nota
Hinweis
In der vorliegenden Anleitung steht
der Ausdruck “DVD” gemeinsam für
DVD-Video- DVD-Audio-Discs und
DVD-R/RW. Bezieht sich eine
312
654
987
+10
0
Funktion ausschließlich auf eine
bestimmte Art von DVD, so wird
ausdrücklich darauf hingewiesen.
1 Schalten Sie den Player ein.
Zum Abspielen einer DVD oder
Video-CD müssen Sie natürlich auch
das Fernsehgerät einschalten und
sicherstellen, dass es auf den
korrekten Video-Eingang geschaltet
ist.
2 Zum Öffnen der Disc-Lade
drücken Sie OPEN/CLOSE.
3 Laden Sie eine Disc.
Laden Sie eine Disc mit nach oben
weisendem Etikett in das Profil der
Disc-Lade, um sie korrekt
auszurichten (bei Verwendung von
zweiseitig bespielten DVDs muss die
abzuspielende Seite nach unten
weisen).
4Durch Drücken von 3 starten
Sie die Wiedergabe.
Bei der DVD- oder Video-CDWiedergabe erscheint u.U. ein Menü.
Aus Seiten 59, 61 ersehen Sie, wie
Menüaufruf und Positionswahl
erfolgen.
Nell’ambito del presente manuale, il
termine ‘DVD’ indica i formati DVDVideo, DVD-Audio e DVD-R/RW. Sarà
specificato se una funzione specifica
corrisponde ad un tipo particolare di
disco DVD.
1Accendere l’apparecchio.
In caso di riproduzione di dischi DVD
o Video-CD, accendere anche
l’apparecchio TV e verificare che
questo sia collegato all’ingresso video
corretto.
2Premere OPEN/CLOSE per
aprire il cassetto di caricamento
dischi.
3 Inserire un disco.
Inserire un disco nel cassetto con
l’etichetta rivolta verso l’alto,
utilizzando la guida del cassetto per il
corretto allineamento del disco (in
caso di dischi DVD con lato doppio,
l’inserimento deve avvenire con il lato
da ripordurre rivolto verso il basso).
4Premere 3 per avviare la
riproduzione.
In presenza di dischi DVD o VideoCD, è possibile che appaia il menu.
Cfr. pagg. 59, 61 per navigare
attraverso le funzioni disponibili.
Deutsch
Italiano
55
Ge/It
Page 56

Getting Started
4
Préparation
Basic playback controls
Button What it does
3 Starts playback.
DVD and Video CD: if the display shows RESUME,
playback starts from the resume point.
8 Pauses a disc that’s playing, or restarts a paused
disc.
7 Stops playback.
DVD and Video CD: Display shows RESUME. Press
7 again to cancel the resume function.
1 1. Press & hold for fast reverse scanning. Release to
resume normal playback.
2. Press once to start reverse scannning.
Press again to increase the scan speed. (Super
Audio CD, CD and Video CD have two scan speeds;
DVD has three.) Press 3 to resume normal
playback.
¡ 1. Press & hold for fast forward scanning. Release
to resume normal playback.
2. Press once to start forward scannning.
Press again to increase the scan speed. (Super
Audio CD, CD and Video CD have two scan speeds;
DVD has three.) Press 3 to resume normal
playback.
4 Skips to the start of the current track or chapter,
then to previous tracks/chapters.
¢ Skips to the next track or chapter.
Commandes de lecture de base
Touche
3
8
7
1
¡
4
Opération activée
Démarre la lecture.
DVD et Vidéo-CD: si la fenêtre d’affichage indique
RESUME, la lecture démarre au point de reprise.
Active une pause de lecture d’un disque ou
reprend la lecture d’un disque en mode de pause.
Arrête la lecture.
DVD et Vidéo-CD: RESUME s’affiche. Appuyez de
nouveau sur 7 pour désactiver la fonction de
reprise.
1. Maintenez cette touche enfoncée pour effectuer
une recherche arrière accélérée. Relâchez-la pour
reprendre la lecture normale.
2. Appuyez une fois pour démarrer l’exploration
arrière. Appuyez de nouveau pour augmenter la
vitesse d’exploration. (Les Super Audio CD, CD et
des vidéo-CD offrent deux vitesses d’exploration;
les DVD en ont trois.) Appuyez sur 3 pour
reprendre la lecture normale.
1. Maintenez cette touche enfoncée pour effectuer
une recherche avant accélérée. Relâchez-la pour
reprendre la lecture normale.
2. Appuyez une fois pour démarrer l’exploration
avant. Appuyez de nouveau pour augmenter la
vitesse d’exploration. (Les Super Audio CD, CD et
les Vidéo-CD offrent deux vitesses d’exploration; les
DVD en ont trois.) Appuyez sur 3 pour reprendre la
lecture normale.
Revient au début de la plage ou du chapitre en
cours, et ensuite aux plages/chapitres précédents.
Numbers 1. If the disc is stopped, playback starts from the
selected title/group (DVD) or track number (Super
Audio CD/CD/Video CD).
2. If the disc is playing, playback jumps to the start
of the selected chapter or track (within the current
group for DVD-Audio).
+10 Selects titles/groups/chapters/tracks 10 and over.
(For example, for 24, press +10, +10, 4.)
Important
While using the DVD playback controls, you may see the
or mark displayed on-screen.
• means that the operation is not allowed by the player.
• means that the operation is not allowed by the disc.
¢
Touches
numériques
+10
Passe à la plage ou au chapitre suivant.
1. Si le disque est à l’arrêt, la lecture démarre à
partir du titre/groupe (DVD) ou du numéro de
plage (Super Audio CD/CD/Vidéo-CD) sélectionné.
2. Si le disque est en cours de lecture, la lecture
passe au début du chapitre ou de la plage
sélectionnée (dans le groupe actuel sur les DVD
audio).
Sélectionne les titres/groupes/chapitres/plages
portant le numéro 10 et au-delà. (Par exemple,
pour sélectionner le numéro 24, appuyez sur +10,
+10, 4.)
Important
Lorsque vous utilisez les commandes de lecture de DVD, il
se peut que vous voyiez apparaître la marque ou sur
l’écran.
• signifie que cette opération n’est pas autorisée par le
lecteur.
• signifie que cette opération n’est pas autorisée par le
disque.
56
En/Fr
Page 57

Vorbereitungen Istruzioni preliminari per l’uso
4
Ta sten für grundlegende Wiedergabefunktionen
Ta ste Funktion
3 Startet die Wiedergabe.
DVD und Video-CD: bei Displayanzeige RESUME
setzt die Wiedergabe an der Fortsetzungsstelle ein.
8 Schaltet die Wiedergabepause ein/aus.
7 Stoppt die Wiedergabe.
DVD und Video-CD: Das Display zeigt RESUME.
Durch erneutes Drücken von 7 annullieren Sie die
Fortsetzungsfunktion.
1 1. Für Schnellsuchlauf in Rückwärtsrichtung
gedrückt halten. Zur Fortsetzung der
Normalwiedergabe Taste freigeben.
2. Durch einmaliges Drücken wird die Abtastsuche
in Rückwärtsrichtung ausgelöst. Durch erneutes
Drücken wird die Abtastgeschwindigkeit erhöht (bei
Super Audio CD, CD und Video-CD gibt es zwei
Geschwindigkeiten, bei DVD drei.) Zur Fortsetzung
der Normalwiedergabe ist 3 zu drücken.
¡ 1. Für Schnellsuchlauf in Vorwärtsrichtung gedrückt
halten. Zur Fortsetzung der Normalwiedergabe
Ta ste freigeben.
2. Durch einmaliges Drücken wird die Abtastsuche
in Vorwärtsrichtung ausgelöst. Durch erneutes
Drücken wird die Abtastgeschwindigkeit erhöht (bei
Super Audio CD, CD und Video-CD gibt es zwei
Geschwindigkeiten, bei DVD drei.) Zur Fortsetzung
der Normalwiedergabe ist 3 zu drücken.
4 Springt zum Anfang des aktuellen Titels/Kapitels
und dann zu den vorangehenden Titeln/Kapiteln
zurück.
¢ Springt zum nächsten Kapitel/Titel vor.
Zifferntasten 1. Ist die Disc gestoppt, so setzt die Wiedergabe
mit dem von Ihnen gewählten Sektor/der Gruppe
(DVD) oder der Titelnummer (Super Audio CD/CD/
Video CD) ein.
2. Während der Wiedergabe der Disc fährt der
Abtastkopf an den Anfang der gewählten Kapitel-/
Titelnummer (bei DVD-Audio-Disc innerhalb der
aktuellen Gruppe).
+10 Zur Wahl von Sektoren/Gruppen/Kapiteln mit
Nummer 10 und höher. (Um z.B. 24 einzugeben,
+10, +10 und dann 4 drücken.)
Comandi principali della funzione playback
Ta sto Funzione
3 Avvio della riproduzione.
DVD e Video-CD: Se il display visualizza RESUME,
la riproduzione riprende dal punto in cui è stata
fermata.
8 Mette in pausa un disco durante la riproduzione o fa
partire un disco in pausa.
7 Ferma la riproduzione.
DVD e Video-CD: il display indica RESUME;
premere nuovamente 7 per cancellare la funzione
resume.
1 1. Mantenere premuto per la scansione indietro
veloce. Rilasciare il tasto per tornare al playback
normale.
2. Premere una volta per attivare la scansione
indietro. Premere una seconda volta per aumentare
la velocità di scansione. (Super Audio CD, CD e
Video-CD sono dotati di due velocità di scansione e
i DVD di tre.) Premete 3 per ripristinare il playback
normale.
¡ 1. Mantenere premuto per la scansione avanti
veloce. Rilasciare il tasto per tornare alla
riproduzione normale.
2. Premere una volta per attivare la scansione
avanti. Premere una seconda volta per aumentare la
velocità di scansione. (Super Audio CD, CD e
Video-CD sono dotati di due velocità di scansione e
i DVD di tre.) Premete 3 per ripristinare il playback
normale.
4 Ritorna all’inizio della traccia o del capitolo in corso
di riproduzione, quindi alle tracce/capitoli
precedenti.
¢ Passa alla traccia o al capitolo successivo.
Numeri 1. Quando un disco viene fermato, la riproduzione
parte dal titolo/gruppo (DVD) o dal numero di
traccia (Super Audio CD/CD/Video-CD)
selezionati.
2. Se il disco è in corso di riproduzione, il playback
va automaticamente all’inizio del numero di capitolo
o traccia selezionato (all’interno del gruppo
corrente per dischi DVD-Audio).
English
Français
Deutsch
Italiano
Wichtig
Während der Betätigung der DVD-Wiedergabetasten sehen
Sie u.U. das Symbol oder auf dem Display.
• bedeutet, dass das Gerät diesen Bedienvorgang nicht
zulässt.
• bedeutet, dass die Disc diesen Bedienvorgang nicht
zulässt.
+10 Seleziona i titoli/gruppi/capitoli/tracce a partire dal
numero 10 in poi. (Ad esempio, per 24, premere
+10, +10, 4.)
Attenzione
Se si utilizzano i comandi di playback per DVD, è possibile
che sullo schermo compaiano i simboli or .
• significa che il lettore non permette di eseguire
l’operazione.
• significa che il disco non permette di eseguire
l’operazione.
57
Ge/It
Page 58

Getting Started
4
Préparation
Navigating DVD disc menus
Many DVD discs contain menus. Sometimes these are
displayed automatically when you start playback;
others only appear when you press MENU or TOP
MENU. For DVD Audio discs, use TOP MENU.
Note
Some DVD-Audio discs feature a ‘bonus group’. To access
this group you have to input a password, which you can find
on the disc’s packaging. See page 160 for more information.
Button What it does
TOP MENU Displays the ‘top menu’ of a DVD disc—this varies
with the disc.
MENU Displays a DVD disc menu—this varies with the disc
and may be the same as the ‘top menu’.
RETURN Returns to the previously displayed menu screen.
On some DVD-Audio discs featuring browsable
pictures, press to display the browser screen.
Joystick Moves the cursor around the screen.
(2/3/5/∞)
ENTER Selects the current menu option.
Numbers Selects a numbered menu option (some discs only).
+10 Selects a numbered menu option 10 and over. (For
example, for 24, press +10, +10, 4.) (Some discs
only.)
Navigation parmi les menus de DVD
De nombreux DVD contiennent des menus. Dans
certains cas, ils s’affichent automatiquement lorsque
vous démarrez la lecture ; dans d’autres, ils
n’apparaissent que lorsque vous appuyez sur la
touche MENU ou TOP MENU. Pour les DVD audio,
utilisez la touche TOP MENU.
Remarque
Certains DVD audio comportent un “groupe en bonus”. Pour
accéder à ce groupe, vous devez introduire un mot de passe,
que vous trouverez sur le boîtier du disque. Voir page 160
pour plus de détails à ce sujet.
Touche
TOP MENU Affiche le “menu principal” d’un DVD—cela varie
MENU Affiche un menu de DVD—cela varie selon les
RETURN Retourne à l’écran de menu précédemment affiché.
Joystick Déplace le curseur sur l’écran.
(2/3/5/∞)
ENTER Sélectionne l’option de menu en cours.
Touches
numériques
+10 Sélectionne une option de menu portant le numéro
Opération activée
selon les disques.
disques et il peut s’agir du même menu que le
“menu principal”.
Avec certains DVD audio comportant une fonction
d’exploration d’images, appuyez sur cette touche
pour afficher l’écran d’exploration d’images.
Sélectionnent une option de menu numérotée (sur
certains disques uniquement).
10 ou au-delà. (Par exemple, pour sélectionner le
numéro 24, appuyez sur +10, +10, 4.)
(Uniquement sur certains disques.)
58
En/Fr
Page 59

Vorbereitungen Istruzioni preliminari per l’uso
4
Navigieren mit DVD-Menüs
Manche DVDs enthalten Menüs. Oft erscheinen die
Menüs beim Wiedergabestart automatisch. In
anderen Fällen müssen Sie zum Menüaufruf MENU
oder TOP MENU drücken. Bei Audio-DVDs ist TOP
MENU zu wählen.
Hinweis
Manche DVD-Audio-Discs enthalten eine “Bonus-Gruppe”.
Um auf diese Gruppe zuzugreifen, müssen Sie ein Passwort
eingeben, das auf der Disc-Verpackung angegeben ist.
Näheres hierzu finden Sie auf Seite 161.
Ta ste Funktion
TOP MENU Ruft das Hauptmenü von DVDs auf—diese Funktion
hängt von der Disc ab.
MENU Ruft das Menü einer DVD auf—diese Funktion
hängt von der Disc ab. Unter Umständen ist dieses
Menü mit dem Hauptmenü identisch.
RETURN Schaltet auf das vorhergehende Menü zurück.
Manche DVD-Audio-Discs enthalten suchlauffähige
Bilder. Durch Drücken der Taste wird das
Suchlaufdisplay aufgerufen.
Joystick Bewegt den Cursor auf dem Bildschirm.
(2/3/5/∞)
ENTER Wählt die aktuelle Menüoption.
Zifferntasten Wahl nummerierter Menüoptionen (nur bei
bestimmten Discs).
+10 Wahl von Titeln mit Nummer 10 und höher. (Um z.B.
24 einzugeben, +10, +10 und dann 4 drücken.)
(Nur bei bestimmten Discs.)
Navigazione nel menu dei dischi DVD
Molti dischi DVD contengono dei menu. Talvolta i
menu vengono automaticamente visualizzati non
appena si avvia il playback, in altri casi compaiono
unicamente premendo MENU o TOP MENU. Per i
DVD-Audio usare TOP MENU.
Nota
Alcuni dischi DVD-Audio contengono come ‘bonus’ un
ulteriore gruppo. L’accesso a tale gruppo richiede
l’immissione del codice presente sulla confezione del disco.
Cfr. pag. 161 per ulteriori informazioni.
Tasto Funzione
TOP MENU Mostra il ‘primo menu’ di un disco DVD—tale menu
è diverso a seconda del disco.
MENU Visualizza il menu di un disco DVD—tale menu è
diverso a seconda del disco e potrebbe essere
uguale al ‘primo menu’.
RETURN Torna alla videata del menu visualizzato in
precedenza.
Su alcuni dischi DVD-Audio contenenti immagini
visualizzabili, premere per visualizzare lo schermo di
scorrimento immagini.
Joystick Sposta il cursore sulla videata.
(2/3/5/∞)
ENTER Seleziona l’opzione corrente del menu.
Numeri Seleziona una opzione numerata del menu (solo per
alcuni dischi).
+10 Seleziona un’opzione del menu numerata 10 o
maggiore. (Ad esempio, per 24, premere +10, +10,
4.) (Solo per alcuni dischi.)
English
Français
Deutsch
Italiano
59
Ge/It
Page 60

Getting Started
4
Préparation
Navigating Video CD PBC menus
Some Video CDs have menus from which you can
choose what you want to watch. These are called
PBC (Playback control) menus.
You can play a PBC Video CD without having to
navigate the PBC menu by starting playback using a
number button to select a track, rather than the 3
button.
Button What it does
RETURN Displays the PBC menu.
Numbers Selects a numbered menu option.
+10 Selects a numbered menu option 10 and over. (For
example, for 24, press +10, +10, 4.)
4 Displays the previous menu page (if there is one).
¢ Displays the next menu page (if there is one).
Navigating DVD-RW discs menus
Navigation parmi les menus PBC des
Vidéo-CD
Certains vidéo-CD comportent des menus dans
lesquels vous pouvez choisir ce que vous voulez
regarder. Ce sont les menus PBC (de commande de
lecture).
Vous pouvez reproduire des Vidéo-CD PBC sans pour
autant devoir naviguer dans le menu PBC en
démarrant la lecture à l’aide d’une touche numérique
pour sélectionner une plage, plutôt que la touche 3.
Touche
RETURN Affiche le menu PBC.
Touches
numériques
+10 Sélectionne une option de menu portant le numéro
4 Affiche la page de menu précédente (s’il y en a
Opération activée
Sélectionnent une option de menu numérotée.
10 ou au-delà. (Par exemple, pour sélectionner le
numéro 24, appuyez sur +10, +10, 4.)
une).
1Press MENU.
2Move the Joystick (2/3) to toggle between Origi-
nal and Play List.
The Original screen shows the contents of the disc as
recorded. The Play List screen shows the contents in the
order programmed by the person who recorded the disc
(not all DVD-RW discs contain a Play List).
• You can’t switch between Original and Play List
while a disc is playing.
3Move the Joystick (5/∞) to highlight a menu item
in the list, then press ENTER to select it.
• Use the 4 and ¢ to see the previous/next page.
•To preview the first frame of the highlighted menu item,
move the Joystick (3).
•To display this disc menu during playback, press MENU.
¢ Affiche la page de menu suivante (s’il y en a une).
Navigation dans les menus de DVD-RW
1 Appuyez sur MENU.
2Utilisez le joystick (2/3) pour commuter entre
l’Original et la Play List.
L’écran Original présente le contenu du disque tel qu’il a été
enregistré.
L’écran Play List présente le contenu dans l’ordre
programmé par la personne qui a enregistré le disque (tous
les DVD-RW ne contiennent pas une liste de lecture).
•Vous ne pouvez pas commuter les écrans Original et Play
List pendant la lecture d’un disque.
3Utilisez le joystick (5/∞) pour sélectionner en
surbrillance une option de menu dans la liste,
ensuite appuyez sur la touche ENTER pour valider
l’opération.
• Utilisez 4 et ¢ pour consulter la page précédente/
suivante.
•Pour visualiser la première image de l’option de menu
sélectionnée en surbrillance, utilisez le joystick (3).
•Pour afficher le menu du disque en cours de lecture,
appuyez sur MENU.
60
En/Fr
Page 61

Vorbereitungen Istruzioni preliminari per l’uso
4
Navigieren auf Video-CDs mit PBCMenüs
Manche Video-CDs haben Menüs, über die sich
Passagen zum Abspielen wählen lassen. Dabei
handelt es sich um die sogenannten PBC-Menüs (für
Wiedergabesteuerung).
Zum Abspielen von Video-CDs mit PBC brauchen Sie
nicht das PBC-Menü aufzurufen, sondern können
stattdessen die Wiedergabe durch Wahl eines Titels
mit einer Zifferntaste statt Taste 3 starten.
Ta ste Funktion
RETURN Ruft das PBC-Menü auf.
Zifferntasten Wahl nummerierter Menüoptionen.
+10 Wahl von Titeln mit Nummer 10 und höher. (Um z.B.
24 einzugeben, +10, +10 und dann 4 drücken.)
4 Ruft die vorangehende Menüseite auf (falls
vorhanden).
Navigazione nel menu dei dischi VideoCD PBC
Alcuni Video-CD contengono menu in cui selezionare
ciò che si desidera guardare. Tali menu sono definiti
menu PBC (Playback control).
È possibile riprodurre un Video-CD PBC senza
necessariamente navigare attraverso il menu PBC
semplicemente avviando il playback mediante il tasto
corrispondente al numero della traccia da
selezionare oppure mediante il tasto 3.
Tasto Funzione
RETURN Torna alla videata del menu PBC.
Numeri Seleziona un’opzione numerata del menu.
+10 Seleziona un’opzione del menu numerata 10 o
maggiore. (Ad esempio, per 24, premere +10, +10,
4.)
4 Visualizza l’eventuale pagina precedente del menu.
English
Français
Deutsch
Italiano
¢ Ruft die nächste Menüseite auf (falls vorhanden).
Navigieren von DVD-RW-Menüs
1Drücken Sie MENU.
2Bewegen Sie den Joystick (2/3) zur Umschaltung
zwischen Original und Play List.
Das Original-Fenster zeigt den Inhalt der Disc nach der
ursprünglichen Aufnahme.
Das Play List-Menü gibt dagegen den Inhalt in der vom
Benutzer programmierten Reihenfolge (nicht alle DVD-RWDiscs enthalten ein Abspielprogramm (Play List)) an.
•Während der Wiedergabe einer Disc lässt sich nicht
zwischen Original und Play List-Menü umschalten.
3Bewegen Sie den Joystick (5/∞) zur Markierung
einer Menü-Position in der Liste und drücken Sie
anschließend ENTER, um diese Position zu wählen.
•Rufen Sie mit 4 und ¢ die vorherige/nächste Seite
auf.
•Bewegen Sie, um sich das erste Bild der markierten Menü-
Position anzuschauen, den Joystick (3).
• Zur Anzeige dieses Disc-Menüs während der Wiedergabe
MENU drücken.
¢ Visualizza l’eventuale pagina successiva del menu.
Navigazione nel menu dei dischi DVD-RW
1Premere MENU.
2Fate scorrere il joystick (2/3) per commutare tra
Originale e Lista d’Ascolto.
La schermata Original visualizza il contenuto del CD così
come originariamente registrato.
La schermata Play List visualizza il contenuto secondo
l’ordine programmato da chi ha successivamente registrato il
disco (non tutti i dischi DVD-RW supportano la funzione
Play List).
• Non è possibile commutare tra Original e Play List nel
corso della riproduzione di un disco.
3Fate scorrere il joystick (5/∞) per evidenziare una
voce del menu in elenco, quindi premete ENTER
per selezionarla.
• Utilizzare 4 e ¢ per vedere la pagina precedente/
successiva.
•Per visualizzare il primo fotogramma della voce del menu
evidenziata, fate scorrere il joystick (3).
•Per visualizzare il menu durante la riproduzione, premere
MENU.
61
Ge/It
Page 62

5
Playing Discs
Lecture de disques
62
En/Fr
SEARCH
Introduction
•
Many of the functions covered in
this chapter apply to DVD discs,
Video CDs, Super Audio CDs and
CDs, although the exact operation
of some varies slightly with the
kind of disc loaded.
•
When playing DVD discs, if the
or icon appears on-screen
when you try and use a particular
function, either the player or the
disc doesn’t allow the use of that
function.
•
When playing Video CDs, some of
the functions are not available in
PBC mode. If you want to use
312
them, start the disc playing using
a number button to select a track.
654
987
Finding what you want
on a disc
0
You can directly access any point on a
disc using one of the search modes.
Use these search modes while a disc is
playing, or when it’s stopped. Playback
jumps to the point specified.
1Press SEARCH repeatedly to choose
between:
•
Title/Group search (DVD only)
•
Chapter/Track search
•
Page search (DVD-Audio discs with
browsable pictures only)
•
Time search (DVD-Video and Video CD
only)
•
Frame & Time search (DVD-Video only)
(The Frame Search option in the Video 1 menu
must be On to use this) (page 126)
•
Off
Note
PAL displays 25 frames per second, numbered
0-24. NTSC displays 30 frames per second,
numbered 0-29. The Frame Search option in
the Video menu must be On to use this.
Press DISPLAY while a still picture is displayed
to see the frame number.
Depending on the disc, it may not be possible
to search for a specific frame. Also, when using
frame advance, forward step or reverse step.
Each frame may not be appear in exact order
when stepping through them. The number
assigned to a specific frame may be different
when stepping through the frames in forward
or reverse mode.
2 Enter the title/chapter/group/track
number or time (minutes & seconds).
For example, for title 4, press 4.
For chapter/track 12, press 1 , 2.
For 45 minutes into the disc, press 4, 5, 0, 0.
3Press 3 to start/restart playback.
Introduction
•
La plupart des fonctions abordées
dans ce chapitre concernent les DVD,
les Vidéo-CD, les Super Audio CD et
les CD, bien que leur mode
opératoire varie légèrement selon le
type de disque introduit dans le
lecteur.
•
Si, pendant la lecture de DVD, I’icone
ou apparaît sur Iécrân lorsque
vous tentez d’utiliser une fonction
particulière cela signifie que le lecteur
ou le disque n’autorise pas
l’utilisation de cerre fonction.
•
Lorsque vous lancez la lecture des
Vidéo-CD, certaines fonctions ne sont
pas disponibles en mode PBC. Pour
pouvoir les utiliser, démarrez la lecture
du disque en utilisant une touche
numérique pour sélectionner une plage.
Recherche sur un disque
Vous pouvez directement accéder à
n’importe quel endroit d’un disque
au moyen de l’un des modes de
recherche. Utilisez ces modes de
recherche lorsque le disque se trouve
en mode de lecture ou à l’arrêt. La
lecture commence au point spécifié.
1 Appuyez plusieurs fois de suite sur
SEARCH pour sélectionner:
•
Recherche Title/Group (Titre/Groupe)
(DVD uniquement)
•
Recherche Chapter/Track (Chapitre/Plage)
•
Recherche Page (DVD audio avec fonction
d’exploration d’images uniquement)
•
Recherche Time (Durée) (DVD vidéo et
Vidéo-CD
•
Recherche Frame & Time (DVD vidéo
uniquement)
(L’option Frame Search du menu video 1 doit
être activée pour pouvoir l’utiliser.) (page 126)
•
Off (Sans)
Remarque
Le système PAL affiche 25 images par seconde,
numérotées de 0 à 24. Le système NTSC affiche
30 images par seconde, numérotées de 0 à 29.
L’option Frame Search du menu Video doit pour
cela être activée.
Appuyez sur DISPLAY lorsqu’un arrêt sur image est
activé de manière à visualiser le numéro d’image.
Suivant les disques, il peut s’avérer impossible de
rechercher une image spécifique. Il en va de même
dans les modes d’avance image par image, et de
recherche avant ou arrière image par image. Les
images peuvent ne pas apparaître exactement
dans l’ordre en cours de recherche image par
image. Le numéro attribué à une image spécifique
peut être différent lorsque vous effectuez une
recherche image par image en avant ou en arrière.
2 Introduisez le numéro de titre/
chapitre/groupe/plage ou une durée
uniquement)
(minutes et secondes).
Pour le titre numéro 4, par exemple, appuyez sur 4.
Pour le chapitre/plage 12, appuyez sur 1, 2.
Pour une durée de 45 minutes sur le disque,
appuyez sur 4, 5, 0, 0.
3 Appuyez sur 3 pour démarrer/
redémarrer la lecture.
Page 63

Wiedergabe von Discs
Riproduzione dei dischi
5
SEARCH
Einführung
•
Viele in diesem Kapitel behandelten
Funktionen beziehen sich auf DVDs,
Video-CDs, Super Audio CDs und
CDs. Allerdings können die
Bedienschritte je nach Typ der
geladenen Disc geringfügig variieren.
•
Wenn bei der Wiedergabe von DVDs
das Symbol
eingeblendet wird, während Sie eine
bestimmte Funktion auszuführen
versuchen, lässt der Spieler oder die
Disc diese Funktion nicht zu.
•
Bei der Wiedergabe von Video-CDs
sind bestimmte Funktionen im PBCModus nicht verfügbar. Falls Sie diese
312
654
987
Funktionen nutzen wollen, die
Wiedergabe der Disc durch Wahl eines
Titels mit den Zifferntasten starten.
Suche nach Passagen auf
oder in das Bild
Introduzione
•
Molte delle funzioni spiegate in
questo capitolo sono applicabili a
dischi DVD, Video-CD, Super Audio
CD e CD, anche se il funzionamento
può variare leggermente a seconda
del tipo di disco caricato.
•
Se durante la riproduzione di un
disco DVD compare l’icona
oppure mentre si prova ad
utilizzare una determinata funzione,
significa che il lettore o il disco non
ne consentono l’uso.
•
Durante la riproduzione dei VideoCD non sono disponibili tutte le
funzioni del modo PBC. Per
utilizzarle, avviare la riproduzione
mediante il tasto corrispondente al
numero della traccia da selezionare.
Ricerca all’interno del disco
English
Français
Deutsch
Italiano
einer Disc
0
Mit Hilfe der folgenden Suchfunktionen
bekommen Sie auf praktisch jede Stelle
einer Disc direkten Zugriff. Die
Suchfunktionen lassen sich bei
Wiedergabe oder Wiedergabestopp
aufrufen. Die Wiedergabe springt zur
angegebenen Stelle.
1 Mit SEARCH wählen Sie zwischen:
•
Title/Group ( Sektor-/Gruppensuche)Suche (nur DVDs)
•
Chapter/Track -Suche (Abschnitts-/Titelsuche)
•
Page- Suche (Seitensuche)(nur DVD-AudioDiscs mit suchlauffähigen Bildern)
•
Time- Suche (Zeitsuche) (nur DVD-VideoDiscs und Video-CDs)
•
Frame & Time (Vollbild- und Zeitsuche)
(nur bei DVD-Video)
(Zur Nutzung dieser Funktion muss die
Option Frame Search im Menü Video 1 auf
On eingestellt sein.) (Seite 127)
•
Off (Aus)
Hinweis
Die PAL-Wiedergabe erfolgt mit 25 Vollbildern pro
Sekunde, die von 0 bis 24 durchnummeriert sind,
und die NTSC-Wiedergabe mit 30 Vollbildern pro
Sekunde, die von 0 bis 29 durchnummeriert sind.
Zur Nutzung dieser Funktion muss die Option Frame
Search im Menü Video 1 auf On eingestellt sein.
Drücken Sie DISPLAY während der Standbildanzeige,
um die Vollbildnummer sehen zu können.
Je nach Disc ist u.U. die Suche nach einem bestimmten
Vollbild nicht möglich. Bei Vollbildvorschub und
Vorwärts- oder Rückwärtsschritt erscheinen außerdem
die einzelnen Vollbilder u.U. beim schrittweisen
Durchgehen nicht in der exakten Reihenfolge. Die
einem bestimmten Vollbild zugeordnete Nummer ist
u.U. beim schrittweisen Durchgehen der Vollbilder in
Vorwärts- oder Rückwärtsrichtung anders.
2 Geben Sie die Sektor-/Kapitel-/
Gruppen-/Titelnummer oder die
Zeit (Minuten und Sekunden) ein.
Beispiel: Für Sektor 4 drücken Sie 4.
Für Kapitel/Titel 12 drücken Sie 1 und 2.
Bei 45 Minuten Abspielzeit drücken Sie 4, 5, 0 und 0.
3 Durch Drücken von 3 starten Sie
die Wiedergabe bzw. setzen sie fort.
Utilizzando uno dei modi di ricerca
previsti è possibile accedere
direttamente a qualsiasi punto del
disco. Usare i modi di ricerca mentre la
riproduzione è in corso oppure mentre
è ferma. La riproduzione va al punto
prescelto.
1Premere ripetutamente SEARCH
per selezionare una delle opzioni
seguenti:
•
Cerca Title/Group (Titolo/Gruppo) (solo
per i DVD)
•
Cerca Chapter/Track (Capitolo/Traccia)
•
Cerca Page (pagina) (solo dischi DVD-Audio
con immagini visualizzabili)
•
Cerca Time (Tempo) (solo dischi DVDVideo e Video-CD)
•
Cerca Frame & Time (solo per DVD-Video)
(Per poter attivare la funzione, l'opzione
Frame Search del menu Video 1 deve essere
impostata su ON) (pag. 127)
•
Off (Spento)
Nota
Il sistema PAL mostra 25 fotogrammi al secondo,
numerati da 0 a 24. Il sistema NTSC visualizza
30 fotogrammi al secondo, numerati da 0 a 29.
L’opzione di Frame Search nel menu Video deve
essere attivata per poter utilizzare la funzione.
Per visualizzare il numero di fotogramma
premere DISPLAY durante un fermo immagine.
A seconda del tipo di disco, può darsi che non sia
possibile eseguire la ricerca di un fotogramma
specifico. Lo stesso vale in caso di uso delle opzioni
di avanti e indietro. Passando da un fotogramma un
altro è possibile che non compaiano nell’ordine
esatto. Il numero assegnato ad un fotogramma
specifico potrebbe essere diverso durante la
scansione avanti o indietro.
2 Inserire il numero di titolo/capitolo/
gruppo/il numero o la durata della
traccia (minuti e secondi).
Ad esempio, per il titolo 4, premere 4.
Per il capitolo/traccia 12, premere 1, 2.
Per 45 minuti sul disco, premere 4, 5, 0, 0.
3Premere 3 per far partire/ripartire
la riproduzione.
63
Ge/It
Page 64

Playing Discs
5
Lecture de disques
64
En/Fr
Still Frame/Slow Play/
Frame Advance Playback
The video images on DVD and Video CD can be viewed as a still
frame, played back at slow speeds and even advanced frame by
frame.
Viewing a still frame
Press 8.
When viewing a DVD, if the paused picture shakes, select the
[Field] setting in the Setup screen Video menu [Still Picture]
setting as described on page 134.
To return to normal playback
When viewing a still frame playback, pressing 8 or 3 restores
normal playback operation.
Viewing slow playback
With this function, DVDs can be viewed in both forward and
reverse direction. Video CDs can only be moved in the forward
direction.
Press ¡ for longer than one second during Pause.
•
Slow playback is engaged.
•
During slow playback, the speed of
playback can be adjusted from
1/16 normal playback speed to
1/2 normal playback speed in four
steps using ¡.
•
During slow playback, the player return to pause when pressing
1
.
1/16 – 1/8 – 1/4 – 1/2
Press 1 for longer than one second during Pause.
•
Slow playback in the reverse direction is engaged.
•
During slow playback, the speed
of playback can be adjusted from
1/16 normal playback speed to
1/2 normal playback speed in four
steps using 1.
•
During slow playback, the player return to pause when pressing
¡
.
1/2 – 1/4 – 1/8 – 1/16
To return to normal playback
When viewing still frames or slow playback, pressing 3 restores
normal playback operation.
Frame by frame advance playback: Viewing
one frame at a time
With this function, DVDs can be viewed in both forward and
reverse directions. Video CDs can only be moved in the forward
direction.
1Press 8.
2Press
¡
or 1 rapidly.
¡
: The picture advances one frame each time the button is
pressed.
1
: The picture backs up a DVD a few frames each time the
button is pressed.
To return to normal playback
When viewing frame by frame playback, pressing 8 or 3 restores
normal playback operation.
Note
• There is no sound when viewing still frames or slow playback, or
when advancing one frame at a time.
• Still frame, slow play, or frame advance playback may not be
possible with certain titles. In this case, the mark is displayed.
• If a Browsable picture (page 16 0 ) is recorded on a DVD-Audio
disc, frame advance playback is possible.
• Depending on the disc, it may automatically return to normal
replay at the transition between chapters. And when this
happens, it may not fast forward or rewind even if you push the
scan (1/¡) button. In this case, push the 3 button once
more, then push the scan button (1/¡) button again.
Arrêt sur image/
Lecture au ralenti/
Lecture image
par image
Les images vidéo des DVD et CD vidéo peuvent être vues
en arrêt sur image, reproduites à basse vitesse et même
avancées image par image.
Arrêt sur image
Appuyez sur 8.
Lorsque vous regardez un DVD, si l’image en pause tremble,
sélectionnez l’option [Field] sur l’écran Setup, puis l’option [Still
Picture] du menu Video comme décrit page 134.
Pour revenir à la lecture normale
Lors d’une lecture d’arrêts sur image, en appuyant sur 8 ou
vous redémarrez la lecture normale.
Lecture au ralenti
Avec cette fonction, vous pouvez regarder des DVD dans les
deux sens avant et arrière. Vous ne pouvez regarder des CD
vidéo qu’en sens avant.
Appuyez sur ¡ pendant plus d’une seconde en
mode de pause.
•
La lecture au ralenti est activée.
•
Pendant la lecture au ralenti, vous pouvez régler la vitesse de
lecture de 1/16 ème de la vitesse de lecture normale à 1/2 de
la vitesse de lecture normale en quatre pas au moyen de ¡.
•
Pendant la lecture au ralenti le
lecteur se remet en mode de pause
quand vous appuyez sur 1.
1/16 – 1/8 – 1/4 – 1/2
Appuyez sur 1 pendant plus
d’une seconde en mode de pause.
•
La lecture au ralenti en sens arrière est activée.
•
Pendant la lecture au ralenti, vous pouvez régler la vitesse de
lecture de 1/16 ème de la vitesse
de lecture normale à 1/2 de la
vitesse de lecture normale en
quatre pas au moyen de 1.
•
Pendant la lecture au ralenti le lecteur se remet en mode de
pause quand vous appuyez sur ¡.
1/2 – 1/4 – 1/8 – 1/16
Pour revenir à la lecture normale
Lors d’une lecture à arrêt sur image ou au ralenti, appuyez sur
pour reprendre la lecture normale.
Lecture image par image: Pour regarder une
image à la fois
Avec cette fonction, vous pouvez regarder des DVD dans les deux
sens avant et arrière. Vous ne pouvez regarder des CD vidéo qu’en
sens avant.
1 Appuyez sur 8.
2 Appuyez brièvement sur
¡
: Le film avance d’une image chaque fois que vous appuyez sur
cette touche.
1
: Le film sur un DVD recule de quelques images chaque fois
que vous appuyez sur cette touche.
Pour revenir à la lecture normale
Lors d’une lecture d’arrêts sur image, appuyez sur 8 ou 3 pour
reprendre la lecture normale.
Remarque
• Il n’y a pas de son pendant la lecture à arrêt sur image ou
au ralenti, ou lors de l’avance image par image.
• La lecture à arrêt sur image, au ralenti ou image par image
peut être impossible avec certains titres. Dans ce cas,
l’icône est affichée.
• Si un film parcourable (page 16 0 ) est enregistré sur un
disque DVD audio, la lecture image par image est possible.
• Au moment de la transition entre deux chapitres, certains
disques retournent au mode de lecture normale, et lorsque
cela se produit, les modes d’avance ou de retour arrière
rapides pourraient ne pas être activés même si vous
appuyez sur la touche SCAN(1/¡). Dans ce cas,
appuyez encore une fois d’abord sur la touche 3, ensuite
sur la touche SCAN(1/¡).
¡
ou 1.
3
3
Page 65

Wiedergabe von Discs Riproduzione dei dischi
5
Standbild-/Zeitlupen-/
Einzelbild-Wiedergabe
Sie können die Videobilder auf einer DVD und Video-CD
als Standbild betrachten, in Zeitlupe wiedergeben und
sogar Bild für Bild weiterschalten.
Standbild-Wiedergabe
Drücken Sie 8.
Falls das Standbild bei Wiedergabe einer DVD zittert, wählen Sie
die Einstellung [Field] für den Posten [Still Picture] im Video-
Menü des Einrichtungsbildschirms, wie auf Seite 135 beschrieben.
Zum Zurückschalten auf Normalwiedergabe
Bei Standbild-Wiedergabe wird durch Drücken von 8 oder 3 auf
den normalen Wiedergabebetrieb umgeschaltet.
Zeitlupen-Wiedergabe
Diese Funktion ermöglicht Einzelbild-Wiedergabe von DVDs in
Vorwärts- und Rückwärtsrichtung. Bei Video-CDs ist EinzelbildWiedergabe nur in Vorwärtsrichtung möglich.
Halten Sie ¡ während der Pause länger als eine
Sekunde gedrückt.
•
Die Zeitlupen-Wiedergabe in Vorwärtsrichtung wird aktiviert.
•
Während der Zeitlupen-Wiedergabe
kann die Wiedergabegeschwindigkeit
mit den Tasten ¡ in vier Stufen
zwischen 1/16 und 1/2 der
normalen Wiedergabegeschwindigkeit eingestellt werden.
•
Während der Zeitlupen-Wiedergabe kann der Player durch
Drücken von 1 wieder auf Pause umgeschaltet werden.
1/16 – 1/8 – 1/4 – 1/2
Halten Sie 1 während der Pause länger als eine
Sekunde gedrückt.
•
Die Zeitlupen-Wiedergabe in Rückwärtsrichtung wird aktiviert.
•
Während der Zeitlupen-Wiedergabe kann die
Wiedergabegeschwindigkeit mit
den Tasten 1 in vier Stufen
zwischen 1/16 und 1/2 der
normalen Wiedergabegeschwindigkeit eingestellt werden.
•
Während der Zeitlupen-Wiedergabe kann der Player durch
Drücken von ¡ wieder auf Pause umgeschaltet werden.
1/2 – 1/4 – 1/8 – 1/16
Zum Zurückschalten auf Normalwiedergabe
Bei Standbild- oder Zeitlupen-Wiedergabe wird durch Drücken von
3
auf den normalen Wiedergabebetrieb umgeschaltet.
Einzelbildschaltung: Einzelbild-Wiedergabe
Diese Funktion ermöglicht Einzelbild-Wiedergabe von DVDs in
Vorwärts- und Rückwärtsrichtung. Bei Video-CDs ist EinzelbildWiedergabe nur in Vorwärtsrichtung möglich.
1 Drücken Sie 8.
2Tippen Sie
¡
: Mit jedem Drücken der Taste erfolgt Einzelbildschaltung
vorwärts.
1
: Mit jedem Drücken der Taste erfolgt Einzelbildschaltung
rückwärts.
Zum Zurückschalten auf Normalwiedergabe
Bei Einzelbildwiedergabe wird durch Drücken von 8 oder 3 auf
den normalen Wiedergabebetrieb umgeschaltet.
Hinweis
•
Bei Standbild-, Zeitlupen- oder Einzelbild-Wiedergabe erfolgt
keine Tonwiedergabe.
•
Bei bestimmten Titeln ist Standbild-, Zeitlupen- oder EinzelbildWiedergabe eventuell nicht möglich.
In diesem Fall wird das Symbol angezeigt.
•
Falls eine DVD-Audio-Disc ein durchsuchbares Bild (Seite 161 )
enthält, ist Einzelbild-Wiedergabe möglich.
• Je nach der Disc, die abgespielt wird, kann es vorkommen, dass
sie am Übergang zwischen Kapiteln automatisch zur
Normalwiedergabe zurückkehrt. Wenn dies geschieht, sind
schneller Vorlauf oder Rücklauf nicht möglich, auch wenn Sie die
entsprechende Scan-Taste (
diesem Falle einmal die 3-Taste und drücken Sie dann die
entsprechende Scan-Taste (
¡
oder 1 kurz an.
1/¡
1/¡
) drücken. Drücken Sie in
) erneut.
Immagine ferma/
rallentatore/riproduzione
per fotogrammi
Le immagini video su DVD e CD video possono essere
visualizzate in immagine ferma, al rallentatore o anche per
fotogrammi.
Immagine ferma
Premere 8.
Nel riprodurre un DVD, se l’immagine ferma non è stabile,
selezionare l’impostazione [Field] del menu Video della schermata
di Setup, sezione [Still Picture] come descritto a pagina 135.
Ritorno alla riproduzione normale
Se intendete visualizzare il playback durante il fermo-immagine,
premete 8 o 3 per ripristinare la riproduzione normale.
Visualizzazione al rallentatore
Questa funzione permette di visualizzare in avanti e indietro i DVD.
I CD video possono invece essere visualizzati solo in avanti.
Premere ¡ per più di un secondo durante la pausa.
•
Viene attivata la riproduzione al rallentatore.
•
Durante la riproduzione al rallentatore la velocità di
riproduzione può essere regolata
da 1/16 a 1/2 della velocità di
riproduzione normale in quattro fasi
usando ¡.
•
Durante il playback al rallentatore il lettore ritorna in modalità
pausa premendo 1.
1/16 – 1/8 – 1/4 – 1/2
Premere 1 per più di un secondo durante la pausa.
•
Viene attivata la riproduzione al rallentatore all’indietro.
•
Durante la riproduzione al
rallentatore la velocità di
riproduzione può essere regolata
da 1/16 a 1/2 della velocità di
riproduzione normale in quattro fasi usando 1.
•
Durante il playback al rallentatore il lettore ritorna in modalità
pausa premendo ¡.
1/2 – 1/4 – 1/8 – 1/16
Ritorno alla riproduzione normale
Premendo 3 durante l’immagine ferma e rallentatore si ritorna alla
riproduzione normale.
Riproduzione per fotogrammi: riproduzione
di un fotogramma alla volta
Questa funzione permette di visualizzare in avanti e indietro i DVD.
I CD video possono invece essere visualizzati solo in avanti.
1Premere 8.
2Premere rapidamente
¡
: l’immagine avanza di un fotogramma ogni volta che il pulsante
viene premuto.
1
: l’immagine indietreggia di un fotogramma ogni volta che il
pulsante viene premuto.
Ritorno alla riproduzione normale
Quando visualizzate il playback fotogramma dopo fotogramma,
premendo 8 o 3 ripristinate le normali operazioni di playback.
Nota
• Non c’è audio durante l’immagine ferma, rallentatore e
riproduzione di un fotogramma alla volta.
• Con certi titoli potrebbe non essere possibile l’immagine ferma,
rallentatore o riproduzione di un fotogramma alla volta. In tal
caso appare il simbolo .
• Se su un disco DVD audio è registrata un’immagine consultabile
(pagina 16 1 ), è possibile riprodurre un fotogramma alla volta.
• Secondo il disco usato potrebbe ritornare automaticamente alla
normale ripetizione nel momento di transizione tra capitoli. Se
questo dovesse accadere, potrebbe non avanzare o riavvolgersi
velocemente anche premendo il pulsante di scansione (1/
¡). In questo caso, premete un’altra volta il pulsante 3,
quindi premete nuovamente il pulsante di scansione (1/¡).
¡
o 1.
English
Français
Deutsch
Italiano
65
Ge/It
Page 66

5
Playing Discs
Lecture de disques
ANGLE
CLEAR
SUBTITLE
Switching camera angles
Some DVD Video discs feature
scenes shot from two or more
angles—check the disc box for
details: it should be marked with
a
icon if it contains multi-
angle scenes.
•To switch the camera angle,
press ANGLE.
If the disc was paused, playback starts
again with the new angle.
•To hide the TV angle indicator,
choose Angle Indicator > Off from
the Video 2 menu (see page 134).
Switching subtitles
Many DVD Video discs have
subtitles in one or more languages—the disc box will usually
tell you which subtitle languages
are available. You can switch
subtitle language anytime during
playback.
•To display/switch the subtitle
language, press SUBTITLE
repeatedly.
The current subtitle language is
shown on-screen.
•To switch off subtitles, press
SUBTITLE then CLEAR.
•To set subtitle preferences, see
page 138.
Commutation des angles
de prise de vues
Certains DVD vidéo comprennent
des scènes offrant deux angles de
prises vues ou davantage—
examinez le boîtier pour plus de
détails: il doit porter une icône
indiquant qu’il comprend des
scènes à angles de prise de vues
multiples.
•Pour commuter l’angle de prise
de vues, appuyez sur ANGLE.
Si le disque se trouvait en mode de
pause, la lecture redémarre sous le
nouvel angle de prise de vues.
•Pour dissimuler l’indicateur
d’angles de prise de vues multiples,
sélectionnez Angle Indicator > Off
dans le menu Video 2 (voir page
13 4 ).
Commutation des
sous-titres
De nombreux DVD vidéo
comportent des sous-titres dans
une ou plusieurs langues—le
boîtier du disque vous renseigne
généralement sur les langues de
sous-titres disponibles. Vous
pouvez commuter les langues de
sous-titres à n’importe quel
moment en cours de lecture.
•Pour afficher/commuter les
langues de sous-titres, appuyez
plusieurs fois de suite sur
SUBTITLE.
La langue d’affichage des sous-titres
sélectionnée est indiquée à l’écran.
66
En/Fr
•Pour désactiver les sous-titres,
appuyez sur SUBTITLE et
ensuite sur CLEAR.
•Pour définir des préférences de
sous-titres, voir page 138.
Page 67

Wiedergabe von Discs
Riproduzione dei dischi
5
ANGLE
CLEAR
SUBTITLE
Umschalten des
Blickwinkels
Manche DVD-Video-Discs
enthalten Szenen, die aus zwei
oder mehr Kamerawinkeln
aufgezeichnet wurden—Näheres
hierzu finden Sie auf der Discbox:
Falls die DVD Szenen mit
mehreren Blickwinkeln enthält,
wird dies normalerweise durch
das Symbol
•Die Taste ANGLE schaltet
zwischen den Blickwinkeln um.
Nach einem Wiedergabestopp wird
die Wiedergabe mit dem neuen Winkel
fortgesetzt.
•Wenn Sie das Kamerasymbol
ausblenden wollen, müssen Sie im
Menü Video 2 die Option Angle
Indicator > Off wählen (siehe
Seite 135).
angezeigt.
Umschalten der
Modifica di angolazione
della telecamera
Alcuni dischi DVD contengono
immagini riprese con angolazioni
diverse—controllare le
informazioni riportate sulla
custodia in proposito: se il disco
contiene scene riprese con
angolazioni diverse, il contenitore
dovrebbe riportare l’icona
relativa.
•Per modificare la visuale di
angolazione della ripresa,
premere ANGLE.
Se il disco si trovava in pausa, la
riproduzione riprende con la nuova
angolazione.
•Per non far comparire l’icona di
angolazione della ripresa,
selezionare Angle Indicator > Off
dal menu Video 2 (cfr. pag. 135).
English
Français
Deutsch
Italiano
Untertitelsprache
Viele DVD-Video-Discs enthalten
Untertiltel in einer oder
mehreren Sprachen—es ist
gewöhnlich auf der Discbox
vermerkt, ob und welche
Untertitelsprachen zur Wahl
stehen. Sie können die
Untertitelsprache während der
Wiedergabe jederzeit wechseln.
•Drücken Sie SUBTITLE
entsprechend oft zur Anzeige/
Umschaltung der
Untertitelsprache.
Daraufhin werden die Untertitel in der
aktuell gewählten Sprache in das Bild
eingeblendet.
• Zum Ausschalten der
Untertitelanzeige drücken Sie
SUBTITLE und dann CLEAR.
• Zur Einstellung von
Untertitelvoreinstellungen siehe
Seite 139.
Variazione dei sottotitoli
Molti dischi DVD contengono
sottotitoli in lingue diverse—
controllare il contenitore del
disco per vedere quali sono le
lingue disponibili. La lingua dei
sottotitoli può essere modificata
in qualsiasi momento durante la
riproduzione.
•Per visualizzare/modificare la
lingua dei sottotitoli, premere
SUBTITLE più volte.
Sullo schermo compare la lingua
corrente dei sottotitoli.
•Per escludere i sottotitoli,
premere SUBTITLE e poi CLEAR.
•Per impostare la lingua
preferenziale per i sottotitoli,
cfr. pag. 139.
67
Ge/It
Page 68

5
Playing Discs
Lecture de disques
AUDIO
Switching audio
language
When playing a DVD Video disc
recorded with dialog in two or more
languages, you can switch audio
language anytime during playback.
•
To display/switch the audio
language, press AUDIO repeatedly.
The current audio language is shown onscreen.
•
To set audio language preferences,
see page 136.
Switching audio channel
Depending on the disc, you may be
able to switch channels, when
playing DVD-Audio discs—see the
disc box for details.
•
To switch the audio channel, press
AUDIO repeatedly.
Switching audio channel
On Video CDs, CDs and MP3s you
can switch between stereo, just the
left channel or just the right channel.
On DVD-RW discs that have both L
and R audio channel, you can switch
between the L, R, or a mix of both.
•
To switch the audio channel, press
AUDIO repeatedly.
The current playback channel(s) are
indicated on-screen.
Commutation de la
langue des dialogues
Pendant la lecture d’un DVD vidéo
enregistré avec des dialogues dans
une ou plusieurs langues, vous
pouvez commuter la langue des
dialogues à n’importe quel moment
en cours de lecture.
•
Pour afficher/commuter la langue
des dialogues, appuyez plusieurs
fois de suite sur AUDIO.
La langue des dialogues sélectionnée est
indiquée à l’écran.
•
Pour définir des préférences de
langue de dialogues, voir page 136.
Commutation du canal
audio
Selon le disque, il se peut que vous
ne puissiez pas commuter les canaux
pendant la lecture de DVD audio—
voir le boîtier du disque pour plus
de détails.
•
Pour commuter les canaux audio,
appuyez plusieurs fois de suite sur
AUDIO.
Commutation du canal
audio
Sur les
disques MP3, vous pouvez commuter
les canaux stéréo, uniquement le
canal gauche ou uniquement le canal
droit.
Sur les DVD-RW qui comportent un
canal audio L et R, vous pouvez
commuter le canal L, le canal R ou
un mixage des deux canaux.
•
Pour commuter le canal audio,
appuyez plusieurs fois de suite sur
AUDIO.
Les canaux de lecture sélectionnés sont
indiqués à l’écran.
Vidéo-CD
, les CD et les
68
En/Fr
Page 69

Wiedergabe von Discs
Riproduzione dei dischi
5
AUDIO
Umschalten der
Dialogsprache
Wenn Sie eine DVD abspielen, die
mit mehreren Dialogsprachen
bespielt wurde, können Sie die
Dialogsprache jederzeit während der
Wiedergabe wechseln.
•
Drücken Sie AUDIO entsprechend
oft zur Anzeige/Umschaltung der
Dialogsprache.
Daraufhin werden die Dialoge in der
aktuell gewählten Sprache ausgegeben.
•
Zur Eingabe von Voreinstellungen
für die Dialogsprache siehe Seite
137.
Umschalten des
Audiokanals
Je nach Disc ist u.U. eine
Kanalumschaltung beim Abspielen
von Audio-DVDs möglich —
Näheres hierzu findet sich auf der
Discbox.
•
Wenn Sie auf einen anderen
Audiokanal wechseln wollen,
müssen Sie AUDIO entsprechend
oft antippen.
Modifica della lingua di
ascolto
Se il dialogo è stato registrato sul
disco DVD in due o più lingue, la
lingua di ascolto può essere
modificata in qualsiasi momento
durante la riproduzione.
•
Per visualizzare/modificare la lingua
di ascolto, premere AUDIO più
volte.
Sullo schermo compare la lingua corrente
per l’ascolto.
•
Per impostare la lingua di ascolto
preferenziale, cfr. pag. 137.
Modifica del canale di
ascolto
A seconda del disco, è possibile
commutare i canali durante la
riproduzione di un DVD Audio—per
ulteriori informazioni, consultare la
confezione del disco.
•
Per modificare il canale audio
premere AUDIO più volte.
Modifica del canale di
ascolto
English
Français
Deutsch
Italiano
Umschalten des
Audiokanals
Bei Video-CDs, CDs und MP3Dateien können Sie zwischen
Stereowiedergabe und Wiedergabe
ausschließlich über den linken oder
rechten Kanal wählen.
Bei DVD-RW-Discs, die über einen
linken und rechten Audiokanal
verfügen, ist ein Umschalten
zwischen L- und R-Kanal oder eine
Mischung beider Kanäle möglich.
•
Drücken Sie zum Umschalten des
Audiokanals AUDIO entsprechend
oft.
Die aktuellen Wiedergabekanäle werden
auf dem Bildschirm angezeigt.
Con dischi Video-CD, CD e file MP3s
è possibile scegliere tra ascolto in
stereo, solo dal canale di sinistra o
solo dal canale di destra.
Per i dischi DVD-RW dotati di
entrambi i canali di ascolto L
(sinistro) e R (destro), è possibile
scegliere il sinistro, il destro o
l’ascolto contemporaneo di
entrambi.
•
Per modificare il canale di ascolto,
premere ripetutamente AUDIO.
Sullo schermo compaiono il/i canale/i di
riproduzione corrente.
69
Ge/It
Page 70

5
Playing Discs
Lecture de disques
ENTER
Programmation d’une
liste de lecture
Cette fonction vous permet de
programmer l’ordre de lecture des
titres/groupes/chapitres/plages
d’un disque. Vous compilez une liste
de programme dans l’affichage
d’écran, à l’aide du joystick pour
naviguer et des touches numériques
pour saisir les titres/chapitres/
PROGRAM
Making a program list
This feature lets you program the
play order of titles/groups/chapters/tracks on a disc. You make a
program list via an on-screen
display, using the Joystick to navigate and the number buttons to
enter titles/chapters/tracks.
Note that programmed playback is
not available for DVD-RWs.
plages.
Vous remarquerez que la lecture
1Press PROGRAM.
312
654
987
+10
0
Program Chapter Program Title
Title
Current:
Titl e
Program Memory — Off
Move
(Chapter 1~18)
1
Play
2Move the Joystick (2/3) to select
7
Chapter
PROGRAMENTER
Program Chapter Program Title
1
Current:
Exit
2(/20)
Title
Program Memory — Off
Move
PROGRAMENTER
Play
Exit
‘Program Chapter’ or ‘Program
Title’.
programmée n’est pas disponible
pour les DVD-RW.
1 Appuyez sur PROGRAM.
Program Chapter Program Title
Title
Current:
1
Title
Program Memory — Off
Move
Play
7
1
Chapter
(Chapter 1~18)
PROGRAMENTER
Exit
Program Chapter Program Title
Current:
Program Memory — Off
Move
2(/20)
Titl e
PROGRAMENTER
Play
Exit
CLEAR
∞
3Move the Joystick (
) to the
program list window.
If you selected Program Chapter, move
the Joystick (5) and enter a title number
(all the programmed chapters will come
from this title).
4 Enter the title/chapter numbers for
your program list.
For titles/chapters 1–9, use the
corresponding number buttons. For 10
and over, use the +10 button (+10, +10,
4 for 24, etc.)
•
You can program a pause instead of a
title/chapter: press 8 instead of
entering a number in the program list.
(A pause can't be the first or last step
in the list.)
•
A program list can contain up to 24
steps.
2
Utilisez le joystick (2/3) pour
sélectionner
ou
‘Program Title’.
Utilisez le joystick (∞) pour vous
3
‘Program Chapter’
déplacer vers la fenêtre de la
liste de programme.
Si vous sélectionnez Program Chapter,
utilisez le joystick en direction (5) et
saisissez un numéro de titre (tous les
chapitres programmés proviendront de ce
titre).
4 Introduisez les numéros de titre/
chapitre pour votre liste de lecture.
Pour les titres/chapitres 1 à 9, utilisez les
touches numériques correspondantes.
Pour les numéros 10 et au-delà, utilisez la
touche +10 (+10, +10, 4 pour 24, etc.).
•
Vous pouvez programmer une pause
au lieu d’un titre/chapitre : appuyez
sur 8 au lieu d’introduire un numéro
dans la liste de programmation. (Vous
ne pouvez pas introduire une pause
comme premier ou comme dernier
élément d’une liste.)
•
Une liste de lecture programmée peut
contenir jusqu’à 24 entrées.
70
En/Fr
Page 71

Wiedergabe von Discs
Riproduzione dei dischi
5
CLEAR
ENTER
English
Français
Deutsch
PROGRAM
312
Eingabe von
Abspielprogrammen
Bei der Eingabe eines
Abspielprogramms werden die
abzuspielenden Sektoren/Kapitel/
Titel und ihre Abspielreihenfolge auf
der Disc in den Spieler
einprogrammiert. Sie erstellen über
eine Bildschirmanzeige unter
Verwendung des Joysticks zum
Navigieren und der Zifferntasten zur
Eingabe der DVD-Titel/Kapitel/Titel
eine programmierte Liste.
Beachten Sie, dass bei DVD-RW-
Programmazione di una
sequenza personalizzata
La funzione in oggetto consente la
programmazione della sequenza
personalizzata di titoli/gruppi/
capitoli/tracce all’interno di un
disco. Potete eseguire una lista di
programma per mezzo di un display
su schermo, utilizzando il joystick per
navigare e i pulsanti numerati per
accedere ai titoli/capitoli/piste.
Si noti che la programmazione della
riproduzione non è disponibile per
dischi DVD-RWs.
Discs eine Programmwiedergabe
654
987
+10
0
nicht möglich ist.
1 Drücken Sie PROGRAM.
Program Chapter Program Title
Title
Current:
1
Title
Program Memory — Off
Move
(Chapter 1~18)
Play
7
Chapter
PROGRAMENTER
Program Chapter Program Title
1
Current:
Exit
2(/20)
Titl e
Program Memory — Off
Move
Play
PROGRAMENTER
2Bewegen Sie den Joystick (2/3),
um „Program Chapter” (Kapitel
programmieren) oder „Program
Title” (DVD-Titel programmieren)
zu wählen.
3Bewegen Sie den Joystick (∞) zum
Fenster mit der programmierten
Liste.
Wenn Sie Program Chapter gewählt
haben, dann bewegen Sie den Joystick
(5) und geben Sie mit dessen Hilfe eine
DVD-Titelnummer ein (aus dem alle zu
programmierenden Titel stammen).
4 Geben Sie die
Sektor-/Kapitelnummern für das
gewünschte Abspielprogramm ein.
Die Eingabe der Sektor-/Kapitelnummern
1 bis 9 erfolgt mit den entsprechenden
Zifferntasten. Drücken Zifferntasten +10
für die Eingabe über 10 (z.B. +10, +10
und 4 für 24).
•
Sie können eine Pause statt eines
Sektors/Kapitels einprogrammieren:
Drücken Sie 8 anstatt eine Nummer in
das Abspielprogramm einzugeben.
(Eine Pause kann nicht an erster oder
letzter Stelle im Abspielprogramm
stehen.)
•
Ein Abspielprogramm darf bis zu 24
Schritte enthalten.
1Premere PROGRAM.
Program Chapter Program Title
Title
Current:
Title
Program Memory — Off
Move
2
Exit
Fate scorrere il Joystick (2/3)
(Chapter 1~18)
1
Play
per selezionare
o
‘Program Title’
ter’
3
Fate scorrere il joystick (∞) per
Program Chapter Program Title
7
1
Chapter
Current:
Exit
Program Memory — Off
PROGRAMENTER
‘Program Chap-
.
Title
Move
andare alla finestra della lista di
programma.
Se selezionate
scorrere il joystick (5) per accedere a
un numero di titolo
programmati faranno capo a questo
titolo).
Program Chapter
(tutti i capitoli
4 Inserire nella programmazione della
sequenza personalizzata i numeri
relativi al titolo/capitolo prescelti.
Per i titoli/capitoli numerati da 1 a 9,
utilizzare i tasti con il numero
corrispondente. Dal numero 10 in avanti
utilizzare il tasto +10 (+10, +10, 4 per
24, ecc.)
•
É possibile programmare una pausa
invece di un titolo/capitolo: premere
8 invece di immettere un numero
nell’elenco dei programmi. (la pausa
non può occupare la prima o l’ultima
posizione della sequenza).
•
La sequenza personalizzata può
contenere fino a 24 programmazioni.
2(/20)
Play
PROGRAMENTER
, fate
Italiano
Exit
71
Ge/It
Page 72

Playing Discs
Exit
Move
Current:
Title
Title
Program Memory On
7
1
09 07 18
Chapter
(Chapter 1~18)
1
Program Chapter Program Title
Off
PROGRAMENTER
Select
Exit
Move
Play
Current:
Track
Total Time
1(/10)
0.00
Program Track
PROGRAMENTER
5
Lecture de disques
5 If you want to save the program list, move the Joystick
∞
) to ‘Program Memory’ and set it to ‘On’.
(
Program Chapter Program Title
Current:
Title
09 07 18
Program Memory On
Move
Title
1
Off
7
Chapter
(Chapter 1~18)
PROGRAMENTER
Select
1
Exit
If you do this, the program list is automatically recalled when you
next load the disc.
•
You can save program lists for up to 24 discs.
•
After setting to On, move the cursor back up to the program list
window.
6Press ENTER or 3 to start playback immediately, or
PROGRAM to exit if you want to start playback later.
During program play, you may occasionally see the start of a
chapter that was not programmed when the chapter number
changes. This is not a malfunction.
For Video CDs that feature PBC, make sure that the disc is
stopped before you start.
5 Si vous voulez sauvegarder la liste de programme,
positionnez-vous à l’aide du joystick (∞) sur ‘Program
Memory’ et réglez sur ‘On’.
Ainsi, la liste de lecture sera automatiquement activée la
prochaine fois que vous introduirez ce disque dans le lecteur.
•
Vous pouvez programmer des listes de lecture pour 24
disques.
•
Après avoir sélectionné ‘On’, ramenez le curseur dans la
fenêtre de liste de lecture.
6 Appuyez sur ENTER ou 3 pour démarrer la lecture
immédiatement ou sur PROGRAM pour quitter le menu
si vous préférez démarrer la lecture à un autre moment.
Pendant la lecture programmée, il se peut que vous voyiez
occasionnellement le début d’un chapitre non programmé lorsque
le numéro de chapitre change. Il ne s’agit pas d’un
dysfonctionnement.
Note
You can’t program track numbers over 100 on Super Audio CDs.
1Press PROGRAM.
Program Track
Current:
Total Time
Move
Track
1(/10)
0.00
Play
PROGRAMENTER
Exit
2 Enter the track numbers for your program list.
For tracks 1–9, use the corresponding number buttons. For 10 and
over, use the +10 button (+10, +10, 4 for 24, etc.)
•
You can program a pause instead of a track/chapter: press
instead of entering a number in the program list. (A pause can't
be the first or last step in the list.)
•
A program list can contain up to 24 steps.
3Press ENTER or 3 to start playback immediately, or
PROGRAM to exit if you want to start playback later.
•
You can't start playback later with a PBC Video CD; press
ENTER or 3 to start.
Pour les
Vidéo-CD
PBC, assurez-vous que le disque se
trouve en mode d’arrêt avant de commencer.
Remarque
Vous ne pouvez pas programmer de numéros de plage supérieurs à
100 sur les Super Audio CD.
1 Appuyez sur PROGRAM.
8
2 Introduisez les numéros de plages pour votre liste de
lecture.
Pour les plages 1 à 9, utilisez les touches numériques
correspondantes. Pour les numéros 10 et au-delà, utilisez la touche
+10 (+10, +10, 4 pour 24, etc.).
•
Vous pouvez programmer une pause au lieu d’une plage ou d’un
chapitre: appuyez sur 8 au lieu de saisir un numéro dans la liste
de programmation. (Vous ne pouvez pas introduire de pause
comme première ou dernière entrée d’une liste.)
•
Une liste de lecture programmée peut contenir jusqu’à 24
entrées.
72
En/Fr
3 Appuyez sur ENTER ou 3 pour démarrer la lecture
immédiatement ou sur PROGRAM pour quitter le menu
si vous préférez démarrer la lecture à un autre moment.
•
Vous ne pouvez pas démarrer la lecture d’un
un autre moment; appuyez sur ENTER ou 3 pour démarrer.
Vidéo-CD
PBC à
Page 73

Wiedergabe von Discs Riproduzione dei dischi
5
Wenn sie die programmierte Liste speichern wollen,
dann bewegen Sie den Joystick (∞) auf
Memory’
Sie
Program Chapter Program Title
Current:
Daraufhin wird das Abspielprogramm automatisch beim nächsten
Laden einer Disc aufgerufen.
•
•
(Programmierungsspeicher) und stellen
‘On’
(Ein) ein.
7
Tit le
Title
09 07 18
1
Program Memory On
Move
Off
Sie können Abspielprogramme für bis zu 24 Discs speichern.
Nach der Einstellung auf On bewegen Sie den Cursor zum
Fenster mit dem Abspielprogramm.
Chapter
(Chapter 1~18)
PROGRAMENTER
Select
1
Exit
‘Program
5
Se volete salvare la lista di programma, fate
scorrere il joystick (∞) su
‘On’
7
Chapter
(Chapter 1~18)
PROGRAMENTER
Select
.
impostatelo su
Program Chapter Program Title
Current:
Title
09 07 18
Program Memory On
Move
Title
1
Off
‘Program Memory’
1
Exit
In seguito a ciò, la sequenza personalizzata è attivata
automaticamente al successivo inserimento del disco.
•
È possibile memorizzare fino a 24 sequenze personalizzate.
•
Dopo aver selezionato On, spostare il cursore nuovamente
verso l’alto verso la finestra relativa alla sequenza
personalizzata.
5
English
e
Français
Deutsch
6 Durch Drücken von ENTER oder 3 können Sie nun
direkt die Wiedergabe starten oder mit PROGRAM den
Programmiermodus verlassen, wenn die Wiedergabe erst
später starten soll.
Während des Abspielprogramms ist gelegentlich beim Wechsel der
Kapitelnummer der Anfang eines nicht programmierten Kapitels zu
sehen. Es handelt sich hierbei um keine Störung.
Sorgen Sie bei Video-CDs mit PBC unbedingt dafür, dass
die Disc vor dem Programmieren gestoppt ist.
Hinweis
Die Programmierung von Titelnummern über 100 auf Super Audio
CDs ist nicht möglich.
1 Drücken Sie PROGRAM.
Program Track
Current:
Total Time
Move
Track
1(/10)
0.00
Play
PROGRAMENTER
Exit
2 Geben Sie dieTitelnummern für das gewünschte
Abspielprogramm ein.
Titel von 1 bis 9 werden über die entsprechenden Zifferntasten
eingegeben. Ab 10 erfolgt die Eingabe zusätzlich mit Taste +10
(z.B. +10, +10 und 4 für 24).
•
Sie können eine Pause statt eines Titels oder Kapitels
einprogrammieren: Drücken Sie 8, anstatt eine Nummer in das
Abspielprogramm einzugeben. (Eine Pause kann nicht an erster
oder letzter Stelle im Abspielprogramm stehen.)
•
Ein Abspielprogramm darf bis zu 24 Schritte enthalten.
6Premere ENTER o 3 per avviare immediatamente la
riproduzione oppure PROGRAM per uscire, se si desidera
avviare la riproduzione successivamente.
Durante la riproduzione, è possibile vedere sporadicamente l’inizio
di un capitolo non programmato in occasione del cambio di
numero del capitolo. Ciò non costituisce un difetto.
In caso di Video-CD dotati di funzione PBC, prima
dell’avvio verificare che il disco sia in fase di arresto.
Nota
Nel caso dei Super Audio CD non è possibile programmare numeri
di brano superiori a 100.
1Premere PROGRAM.
Program Track
Current:
Total Time
Move
Track
1(/10)
0.00
Play
PROGRAMENTER
Exit
2 Inserire i numeri delle tracce che compongono la
sequenza personalizzata.
Per le tracce numerate da 1 a 9, utilizzare i tasti con i numeri
corrispondenti. Dal numero 10 in avanti utilizzare il tasto +10
(+10, +10, 4 per 24, ecc.)
•
È possibile programmare una pausa invece di traccia/capitolo:
premere 8 invece di immettere un numero nell’elenco dei
programmi. (La pausa non può occupare la prima o l’ultima
posizione della sequenza.)
•
La sequenza personalizzata può contenere fino a 24
programmazioni.
Italiano
3 Durch Drücken von ENTER oder 3 können Sie nun
direkt die Wiedergabe starten oder mit PROGRAM den
Programmiermodus verlassen, wenn die Wiedergabe erst
später starten soll.
•
Bei einer Video-CD mit PBC-Modus ist ein späteres Starten der
Wiedergabe nicht möglich; drücken Sie in diesem Fall ENTER
oder 3 zum Starten.
3Premere ENTER o 3 per avviare immediatamente la
riproduzione oppure PROGRAM per uscire, se si desidera
avviare la riproduzione successivamente.
•
In caso di Video-CD PBC non è possibile avviare la riproduzione
in un secondo momento; premere ENTER o 3 per l’avvio.
73
Ge/It
Page 74

Playing Discs
5
Lecture de disques
Programming tips
•To view the program list press PROGRAM.
•To delete a step in the program list, position the
cursor on the title/group/chapter/track and press
CLEAR.
•To insert a step into the program list, position the
cursor where you want the new step to appear,
then enter the title/group/chapter/track number.
All the following steps move up one.
•To add the currently playing title/group/chapter/
track to the program list, press and hold PRO-
GRAM for about a second.
If there is no current program list, a new one is created
(for DVD, if the last list created was a title list then the a
title program list is created, otherwise a chapter program
list is created).
•To delete the program list, stop playback (press
7), then press CLEAR.
The program list is also erased when you remove the disc
from the player or turn the power off (standby).
•To delete a memorized DVD program list, load the
DVD, press PROGRAM, then change the Program
Memory option to Off. Press ENTER to confirm.
Conseils de programmation
•Pour visualiser la liste de lecture, appuyez sur
PROGRAM.
•Pour supprimer une entrée d’une liste de lecture,
positionnez le curseur sur le numéro du titre/
groupe/chapitre/plage à supprimer et appuyez
ensuite sur CLEAR.
•Pour insérer une entrée dans une liste de lecture,
positionnez le curseur à l’endroit où vous voulez
voir apparaître la nouvelle entrée et introduisez
ensuite le numéro du titre/groupe/chapitre/plage.
Toutes les entrées suivantes seront décalées d’un rang.
•Pour ajouter le titre/groupe/chapitre/plage en
cours de lecture dans une liste de lecture,
maintenez la touche PROGRAM enfoncée pendant
environ une seconde.
S’il n’y a pas de liste de lecture en cours, une nouvelle
liste est créée (pour les DVD, si la dernière liste créée
était une liste de titres, c’est une liste de lecture de titres
qui est créée, sinon c’est une liste de lecture de chapitres
qui est créée).
•Pour effacer une liste de lecture, arrêtez la lecture
(appuyez sur 7) et appuyez ensuite sur CLEAR.
La liste de lecture est également effacée lorsque vous
retirez le disque du lecteur ou que vous le mettez hors
tension (veille).
•Pour effacer une liste de lecture de DVD
mémorisée, introduisez le DVD dans le lecteur,
appuyez sur PROGRAM et commutez ensuite
l’option Program Memory sur Off. Appuyez sur
ENTER pour confirmer.
74
En/Fr
Page 75

Wiedergabe von Discs Riproduzione dei dischi
5
Programmiertipps
• Zur Anzeige des Abspielprogramms PROGRAM
drücken.
•Falls ein Eintrag aus dem Abspielprogramm
gestrichen werden soll, den Cursor an die
entsprechende Sektor-/Gruppe-/Kapitel-/
Titelnummer setzen und CLEAR drücken.
• Um einen Eintrag in das Abspielprogramm
einzufügen, setzen Sie den Cursor an die Stelle, an
der der neue Programmschritt erscheinen soll, und
geben dann die Sektor-/Gruppe-/Kapitel-/
Titelnummer ein.
Alle nachfolgenden Einträge werden um eine Position
versetzt.
• Sie können auch während der Wiedergabe einen
Sektor, eine Gruppe, ein Kapitel oder einen Titel
einem Abspielprogramm anfügen. Drücken Sie
dazu ca. 1 Sekunde lang PROGRAM.
Falls kein aktuelles Abspielprogramm existiert, wird ein
neues kreiert (hat bei DVD das zuletzt eingegebene
Abspielprogramm aus Sektoren bestanden, so wird ein
Sektoren-Abspielprogramm kreiert, andernfalls ein
Kapitel-Abspielprogramm).
• Zum Löschen des Abspielprogramms die
Wiedergabe (7 drücken) stoppen und dann
CLEAR drücken.
Das Abspielprogramm wird auch bei Entnahme der Disc
aus dem Player oder Ausschalten der Stromversorgung
(Bereitschaftsmodus) gelöscht.
•Wenn Sie ein für eine DVD gespeichertes
Abspielprogramm löschen wollen, müssen Sie
zunächst die betreffende DVD laden, PROGRAM
drücken und anschließend die Option Program
Memory auf Off stellen. Drücken Sie ENTER zur
Bestätigung.
Suggerimenti per la programmazione
•Per visualizzare la programmazione di una sequenza
personalizzata premere PROGRAM.
•Per eliminare una selezione dalla sequenza
personalizzata, portare il cursore sul
titolo/gruppo/capitolo/tracccia in questione e
premere CLEAR.
•Per inserire una selezione nella sequenza
programmata, portare il cursore nel punto della
sequenza prescelto e quindi inserire il numero
corrispondente al titolo/gruppo/capitolo/traccia.
Tu tte le successive selezioni sono spostate in avanti di una
posizione.
•Per aggiungere il titolo/gruppo/capitolo/traccia in
corso di riproduzione alla sequenza personalizzata,
tenere premuto PROGRAM per circa un secondo.
Se non è stata programmata alcuna sequenza
personalizzata, ne viene creata una nuova (con dischi
DVD, la nuova programmazione della sequenza
personalizzata riguarda i titoli nel caso in cui l’ultima
sequenza fosse di questo tipo, altrimenti viene creata una
sequenza personalizzata per capitoli).
•Per eliminare una sequenza personalizzata,
interrompere la riproduzione (premere 7), quindi
premere CLEAR.
L’eliminazione della sequenza personalizzata avviene anche
in caso di estrazione del disco o allo spegnimento del
lettore (posizione di standby).
•Per eliminare dalla memoria una sequenza
personalizzata relativa a supporti DVD, inserire il
disco DVD, premere PROGRAM, quindi modificare
l’opzione Program Memory selezionando Off.
Premere ENTER per confermare l’operazione.
English
Français
Deutsch
Italiano
75
Ge/It
Page 76

5
Playing Discs
Lecture de disques
ENTER
Using random play
Use the random play function to
play titles/chapters/groups/tracks
(DVD) or tracks (CD or Video CD)
in a random order.
You can’t use random play with
DVD-RW discs, Super Audio CD or
Video CDs playing in PBC mode.
1Press RANDOM on the front panel
repeatedly to select a random play
mode.
The mode is displayed on-screen:
•
Random Chapter/Track (from
within the current title)
•
Random Title/Group
•
Random (random play starts
immediately)
Mode de lecture
aléatoire
Utilisez la fonction de lecture
aléatoire pour reproduire des titres/
chapitres/groupes/plages (DVD) ou
des plages (CD ou Vidéo-CD) dans
un ordre quelconque.
Vous ne pouvez pas activer la lecture
aléatoire avec des DVD-RW, des
Super Audio CD ni des Vidéo-CD qui
se trouvent en mode de lecture PBC.
1 Appuyez plusieurs fois sur la touche
RANDOM située sur le panneau
avant pour sélectionner un mode
de lecture aléatoire.
Le mode est affiché sur l’écran:
•
Random Chapter/Track (dans le
titre en cours)
•
Random Title/Group
RANDOM
PAL
FL OFF
RANDOM
PROGRESSIVE
POWER
VIDEO ON/OFF
CLEAR
3
2DVD only: Press ENTER or
start random play.
•
To stop the disc and cancel random
to
•
Random (la lecture aléatoire
démarre immédiatement)
playback, press 7.
•
To cancel random playback without
stopping playback, press CLEAR. The
rest of the disc plays out.
Tip
•
During random play, the 4 and
buttons function a little differently to
normal: 4 returns to the beginning
of the current track/chapter/. You
can't go back further than this.
¢
selects another track/chapter at
PLAY 3
SACD/DVD PLAYER DV-12S2
SRS TS
V-PART
192kHz
LAST MEMO
PROGRESSIVE
DVD
VCD
AUDIO
96kHz
CONDITION
DOLBY D
TRK
GRP
VIDEO OFF
CHP
SACD
REMAIN
TITLE
TOTAL
DIG OFF
DOWN MIX
L C
R
STANDBY
LFE
LS S RS
OPEN/CLOSE
PAL
PROGRES.
FL OFF
4 /1
STOP 7
STOP
PLAY
PAUSE
¡ / ¢
random from those remaining.
•
You can't use random play together
with program or repeat play.
2DVD uniquement: Appuyez sur
3
ENTER ou
pour démarrer la
lecture aléatoire.
•
Pour arrêter le disque et annuler la
lecture aléatoire, appuyez sur 7.
¢
•
Pour annuler la lecture aléatoire sans
arrêter la lecture, appuyez sur CLEAR.
La lecture du disque se poursuit
jusqu’à la fin.
Conseil
•
En cours de lecture aléatoire, les
touches 4 et ¢ fonctionnent un
peu différemmentdu mode habituel:
4
retourne au début de la plage/
chapitre en cours. Vous ne pouvez pas
retourner plus loin en arrière.
¢
sélectionne une autre plage/chapitre
de manière aléatoire parmi ceux qui
restent.
•
Vous ne pouvez pas activer
simultanément le mode de lecture
aléatoire et les modes de lecture
programmée et répétée.
76
En/Fr
Page 77

Wiedergabe von Discs
Riproduzione dei dischi
5
ENTER
Zufallswiedergabe
Mit dem Zufallswiedergabemodus
lassen sich Sektoren/Kapitel/Titel
(DVD) oder Titel (CD oder VideoCD) in zufälliger Reihenfolge
wiedergeben.
Bei DVD-RW-Discs, Super Audio CD
oder Video-CDs ist im PBC-Modus
eine Zufallswiedergabe nicht
möglich.
1 Drücken Sie die Taste RANDOM
(Wiedergabe in jeweils zufälliger
Reihenfolge) auf dem vorderen
Bedienfeld wiederholt, um einen
ZufallsreihenfolgewiedergabeModus zu wählen.
Der Modus wird auf dem Bildschirm:
•
Random Chapter/Track
(innerhalb des aktuellen Sektors)
•
Random Title/Group
Uso della riproduzione
casuale
Utilizzare la funzione in oggetto per
la riproduzione di
titoli/capitoli/gruppi/tracce (DVD)
o tracce (CD o Video-CD) secondo
una sequenza casuale.
Non è possibile utilizzare la
riproduzione casuale con dischi
DVD-RW, Super Audio CD o VideoCD in PBC.
1
Premete più volte di seguito
RANDOM sul pannello anteriore
per selezionare una modalità di
lettura casuale.
Il modo selezionato compare sullo
schermo:
•
Random Chapter/Track
(nell’ambito del titolo corrente)
•
Random Title/Group
English
Français
Deutsch
Italiano
RANDOM
PAL
FL OFF
RANDOM
PROGRESSIVE
POWER
VIDEO ON/OFF
CLEAR
SRS TS
STANDBY
•
Random (Die Zufallswiedergabe
setzt unverzüglich ein.)
2 Nur DVD: Durch Drücken von
ENTER oder
3
starten Sie die
Zufallswiedergabe.
•
Drücken Sie 7, um die Disc zu stoppen
und die Zufallswiedergabe zu
annullieren.
•
Zum Annullieren der
Zufallswiedergabe ohne
Wiedergabestopp drücken Sie CLEAR.
Daraufhin wird der Rest der Disc
abgespielt.
PLAY 3
SACD/DVD PLAYER DV-12S2
V-PART
192kHz
LAST MEMO
PROGRESSIVE
DVD
VCD
AUDIO
96kHz
CONDITION
DOLBY D
TRK
GRP
VIDEO OFF
CHP
SACD
REMAIN
TITLE
TOTAL
DIG OFF
DOWN MIX
L C
R
LFE
LS S RS
OPEN/CLOSE
PAL
PROGRES.
FL OFF
4 /1
STOP 7
STOP
PLAY
PAUSE
¡ / ¢
Tipp
•
Während der Zufallswiedergabe ist die
Funktion der Tasten 4 und
¢
etwas anders als sonst: 4 schaltet
an den Anfang des aktuellen Titels/
Kapitels zurück. Darüber hinaus
können Sie nicht weiter
zurückspringen. ¢ wählt einen
anderen Titel/anderes Kapitel zufällig
unter den restlichen aus.
•
Sie können die Zufallswiedergabe
nicht zusammen mit
Programmwiedergabe oder
•
Random (la riproduzione casuale
inizia immediatamente)
2 Solo DVD: Premere ENTER o
avviare la riproduzione casuale.
•
Per fermare il disco e annullare la
riproduzione casuale, premere 7.
•
Per annullare la riproduzione casuale
senza interrompere la riproduzione in
corso, premere CLEAR. La
riproduzione prosegue per la
rimanente porzione del disco.
Suggerimento
•
Durante la riproduzione casuale, la
funzione dei tasti 4 e ¢ è
modificata rispetto a quella solita:
ritorna all’inizio della
traccia/capitolo corrente. Non è
possibile andare ad una traccia
precedente. ¢ seleziona
casualmente un’altra traccia/capitolo
tra quelle/i restanti.
•
Non è possbile utilizzare la
riproduzione casuale insieme alla
modalità di programmazione o di
ripetizione.
3
per
4
Wiederholfunktion verwenden.
77
Ge/It
Page 78

5
Playing Discs
Lecture de disques
A-B
CLEAR
REPEAT
Using repeat play
You can set the player to repeat
individual tracks on CDs or VideoCDs, chapters/tracks or titles/group
on DVD discs, or the whole disc. It's
also possible to loop a section of a
disc.
You can use the repeat together with
the programming mode to repeat the
tracks/chapters in the program list
(see page 70 for how to make a
program list).
You can’t use any repeat mode or
looped play with a Video CD playing
in PBC mode.
Looped playback is not possible with
Super Audio CD.
Note
•
You can’t use repeat and random play
at the same time.
•
If you switch camera angle during
repeat play, repeat play is cancelled.
1Press REPEAT during playback to
select a repeat mode.
Each press switches the repeat mode:
•
Repeat Chapter/Track
•
Repeat Title/Group
•
Repeat Off
•
Repeat Tr ack
•
Repeat All
•
Repeat Off
Mode de lecture répétée
Vous pouvez programmer le lecteur
pour répéter la lecture de certaines
plages sur des CD et des Vidéo-CD,
de certains chapitres/plages ou
titres/groupe sur des DVD, ou
encore la totalité d’un disque. Il est
également possible de reproduire en
boucle une section d’un disque.
Vous pouvez utiliser le mode de
répétition avec le mode de
programmation pour répéter la
lecture de plages/chapitres d’une
liste de lecture programmée (voir
page 70 pour la programmation
d’une liste de lecture).
Vous ne pouvez utiliser aucun des
modes de répétition ni la lecture en
boucle sur un Vidéo-CD en cours de
lecture PBC.
La lecture en boucle n’est pas
possible sur les Super Audio CD.
Remarque
•
Vous ne pouvez pas activer
simultanément les modes de lecture
répétée et aléatoire.
•
Si vous changez l’angle de prise de
vues en cours de lecture répétée, la
lecture répétée est annulée.
1 Appuyez sur REPEAT en cours de
lecture pour sélectionner un mode
de répétition.
Chaque pression sur la touche change le
mode de répétition:
•
Repeat Chapter/Track
•
Repeat Title/Group
•
Repeat Off
78
En/Fr
•
Repeat Tr ack
•
Repeat All
•
Repeat Off
Page 79

Wiedergabe von Discs
Riproduzione dei dischi
5
A-B
CLEAR
REPEAT
Wiederholfunktion
Sie können den Player so einstellen,
dass einzelne Titel auf CDs oder
Video-CDs, Kapitel/Sektoren oder
Sektoren/Gruppen auf DVDs oder
der gesamte Discinhalt wiederholt
werden. Außerdem ist es auch
möglich, bestimmte Disc-Abschnitte
(Passagen) für Wiederholung zu
markieren.
Durch Kombination von Wiederholund Programmierfunktion ist die
Wiederholung der Sektoren/Kapitel
in Abspielprogrammen möglich
(siehe Seite 71 zur Eingabe von
Abspielprogrammen).
Beim Abspielen von Video-CDs im
PBC-Modus ist nicht in jedem Fall
der Aufruf von Wiederholfunktionen
oder die Wiederholung markierter
Passagen möglich.
Wiederholung von Passagen ist bei
Super Audio CDs nicht möglich.
Hinweis
•
Sie können Wiederholfunktion und
Zufallswiedergabe nicht gleichzeitig
aktivieren.
•
Bei einem Wechsel des Blickwinkels
während der Wiederholung wird die
Wiederholfunktion desaktiviert.
1 Zur Wahl einer Wiederholfunktion
drücken Sie REPEAT während der
Wiedergabe.
Bei jedem Tastendruck wird zwischen den
Wiederholfunktionen wie folgt
umgeschaltet:
Uso della ripetizione
È possibile impostare il lettore per la
ripetizione di singole tracce su CD o
Video-CD, di capitoli/tracce o di
titoli/gruppi su dischi DVD, o
dell’intero disco. È altresì possibile
collegare due punti specifici su un
disco formando uno spezzone del
materiale da produrre.
È possibile utilizzare la funzione in
oggetto insieme alla modalità di
programmazione per la ripetizione di
tracce/capitoli della sequenza
personalizzata (cfr. pag. 71 per la
creazione della sequenza
personalizzata).
Con video-CD in modo PBC non è
possibile utilizzare la funzione di
ripetizione o di collegamento di due
punti del disco.
La riproduzione continua non è
possibile con i Super Audio CD.
Nota
•
Non è possibile utilizzare
contemporaneamente la funzione di
ripetizione e la riproduzione casuale.
•
Se si modifica la visuale di angolazione
della telecamera durante la ripetizione,
questa viene cancellata.
1Premere REPEAT durante la
riproduzione per selezionare la
modalità di ripetizione.
Ciascuna pressione modifica la modalità
di ripetizione:
English
Français
Deutsch
Italiano
•
Repeat Chapter/Track
•
Repeat Title/Group
•
Repeat Off
•
Repeat Tr ack
•
Repeat All
•
Repeat Off
•
Repeat Chapter/Track
•
Repeat Title/Group
•
Repeat Off
•
Repeat Tr ack
•
Repeat All
•
Repeat Off
79
Ge/It
Page 80

Playing Discs
5
Lecture de disques
2To resume normal playback, press CLEAR.
Tip
You can use repeat play with program play. During program
play, press REPEAT.
Looping a section of a disc
1Press (REPEAT) A-B once at the start of the
section you want to repeat, then again at the end.
Playback immediately jumps back to the start point and
plays the loop round and round.
• On a DVD disc, the start and end points of the loop must
be in the same title/group.
2To resume normal playback, press CLEAR.
•You can also repeat a section of a disc just once by
pressing 3 to mark the end point (instead of A-B).
2Pour reprendre la lecture normale, appuyez sur
CLEAR.
Conseil
Vous pouvez utiliser le mode de répétition en mode de
lecture programmée. En cours de lecture programmée,
appuyez sur REPEAT.
Mise en boucle d’une section d’un disque
1 Appuyez une fois sur (REPEAT) A-B au début de la
section que vous voulez répéter, et encore un fois à
la fin de la section.
La lecture démarre immédiatement au point de début et
recommencer à l’infini.
• Sur un DVD, les points de début et de fin de la boucle de
lecture doivent se trouver dans le même titre.
2Pour reprendre la lecture normale, appuyez sur
CLEAR.
•Vous pouvez également répéter une seule fois la lecture
d’une section d’un disque en appuyant sur 3 pour
marquer le point de fin (au lieu de A-B).
80
En/Fr
Page 81

Wiedergabe von Discs Riproduzione dei dischi
5
2 Zur Umschaltung auf normale Wiedergabe drücken
Sie CLEAR.
Tipp
Sie können die Wiederholfunktion zusammen mit
Programmwiedergabe nutzen. Drücken Sie während der
Programmwiedergabe REPEAT.
Markieren und Wiederholen von
Disc-Passagen
1Drücken Sie (REPEAT) A-B einmal am Anfang der
zu wiederholenden Passage und dann erneut an
ihrem Ende.
Daraufhin springt die Wiedergabe sofort zum Startpunkt
zurück und spielt nun die markierte Passage endlos ab.
• Bei DVDs müssen sich der Start- und der Endpunkt der
Passage innerhalb eines Sektors befinden.
2 Zur Umschaltung auf normale Wiedergabe drücken
Sie CLEAR.
• Sie können auch Disc-Passagen nur einmal wiederholen
lassen, indem Sie zur Markierung des Endpunkts 3
drücken (anstatt A-B).
2Per tornare alla normale funzione di riproduzione,
premere CLEAR.
Suggerimento
È possibile utilizzare contemporaneamente le funzioni di
ripetizione e di programmazione. Durante la riproduzione
programmata, premere REPEAT.
Collegamento di due punti specifici su un
disco per formare uno spezzone del
materiale da riprodurre
1Premere (REPEAT) A-B una sola volta all’inizio
dello spezzone da ripetere, quindi premerlo una
seconda volta alla fine dello spezzone.
La riproduzione torna immediatamente all’inizio dello
spezzone e ne avvia la riproduzione ripetuta.
• In un disco DVD, l’inizio e la fine dello spezzone devono
essere contenuti all’interno dello stesso titolo.
2Per tornare alla normale funzione di riproduzione,
premere CLEAR.
•È anche possibile la singola ripetizione dello spezzone
premendo il tasto 3 per contrassegnare solo la fine
(invece di A-B).
English
Français
Deutsch
Italiano
81
Ge/It
Page 82

5
Playing Discs
Lecture de disques
CLEAR
LAST MEMO
CONDITION
MEMO
Bookmarking a place in
a disc (LAST MEMORY)
If you watch only part of a DVD disc
with the intention of picking up later
where you left off, you can bookmark the place then resume playback at a later date without having
to manually search for the right
place.
You can use this feature for up to
five discs (after that the oldest
bookmark is deleted to make space
for a new one).
Bookmarking also works with Video
CDs, but for one disc only, and you
must leave the disc in the player—
opening the disc tray erases the
memory. Last Memory may not work
reliably with some PBC Video CDs.
You can’t use bookmarking with
DVD-Audio and DVD-RW discs.
Depending on the disc, you may not
be able to use bookmarking with
DVD-Video or Video CD discs.
•
At the point from which you want
to resume playback next time, press
LAST MEMO rapidly.
Press 7 if you want to stop playback
here.
•
To resume playback, load the disc
and press LAST MEMO rapidly.
If the disc starts auto playback, stop it
first.
•
To clear the bookmark for the disc
loaded, press LAST MEMO rapidly
then CLEAR while ‘Last Memory’ is
displayed on-screen.
Indexation d’un passage
sur un disque
(LAST MEMORY)
Si vous ne visionnez qu’une partie
d’un DVD avec l’intention de
reprendre plus tard à l’endroit où
vous vous êtes arrêté, vous pouvez
insérer un index à cet endroit et
reprendre ensuite la lecture à une
date ultérieure sans devoir
rechercher manuellement le passage
voulu.
Vous pouvez activer cette fonction
pour indexer cinq disques (ensuite,
le plus ancien index est effacé pour
laisser la place à un nouvel index).
La fonction d’indexation est
également opérante avec les VidéoCD, mais uniquement pour un seul
disque, et vous devez dans ce cas
laisser le disque dans le lecteur—
l’ouverture du plateau de lecture
entraîne l’effacement de la mémoire.
La fonction de dernière position de
lecture peut ne pas fonctionner
correctement avec certains VidéoCD PBC.
Vous ne pouvez pas utiliser la
fonction d’indexation avec des DVD
audio et des DVD-RW.
Selon le disque, il se peut que vous
ne puissiez pas utiliser la fonction
d’indexation avec des DVD vidéo ou
des Vidéo-CD.
• Appuyez rapidement sur LAST
MEMO à l’endroit précis où vous
voulez reprendre la lecture plus
tard.
Appuyez sur 7 pour arrêter la lecture à
cet endroit.
•Pour reprendre la lecture, chargez
le disque et appuyez rapidement
sur LAST MEMO.
Si la lecture du disque démarre
automatiquement, arrêtez-la d’abord.
•Pour effacer les index du disque
chargé, appuyez d’abord
rapidement sur LAST MEMO et
ensuite sur CLEAR pendant que
‘Last Memory’ est affiché à l’écran.
82
En/Fr
Page 83

Wiedergabe von Discs
Riproduzione dei dischi
5
CLEAR
LAST MEMO
CONDITION
MEMO
Markieren einer Position
auf einer Disc
(LAST MEMORY)
Falls Sie die Wiedergabe einer DVD
unterbrechen und später fortsetzen
wollen, können Sie mit dieser
Funktion die gegenwärtige Position
markieren. Dadurch können Sie die
Wiedergabe dann später direkt ab
dieser Unterbrechungsstelle ohne
langwieriges Suchen fortsetzen.
Diese Funktion kann Positionen für
bis zu 5 Discs speichern (danach
wird stets die älteste
Positionsmarkierung gelöscht, um
Platz für eine neue zu schaffen).
Diese Funktion kann auch für VideoCDs herangezogen werden,
allerdings nur für eine Disc.
Außerdem muss die CD im Spieler
verbleiben, da eine Entnahme der
Disc den Speicher löscht. Die Last
Memory-Funktion arbeitet bei
manchen Video-CDs mit PBC nicht
einwandfrei.
Bei DVD-RW- und DVD-RW-Discs ist
das Markieren von Positionen nicht
möglich.
Abhängig vom Typ des DVD-Videos
oder der Video-CD funktioniert das
Markieren von Passagen unter
Umständen nicht.
• Drücken Sie an dem Punkt, von
dem aus Sie das nächste Mal die
Wiedergabe fortsetzen möchten,
schnell die Taste LAST MEMO.
Soll hier die Wiedergabe stoppen, so
drücken Sie 7.
•
Laden Sie, um die Wiedergabe
fortzusetzen, die Disc und drücken
Sie schnell die Taste LAST MEMO.
Falls die Wiedergabe der Disc
automatisch einsetzt, müssen Sie
zunächst die Disc stoppen.
•
Drücken sie, um bei der geladenen
Disc das Lesezeichen zu löschen,
schnell die Taste LAST MEMO und
anschließend, während auf dem
Bildschirm “Last Memory”
angezeigt wird, die Taste CLEAR.
Impostazione di un
segnalibro su disco
(LAST MEMORY)
Se un disco DVD è stato visionato
solo parzialmente con l’intenzione di
proseguire in seguito a partire dal
medesimo punto in cui la
riproduzione è stata interrotta, è
possibile impostare un segnalibro
per richiamare in seguito tale
posizione senza dover eseguire una
ricerca manuale.
L’opzione può essere utilizzata per
cinque dischi (dopo aver cancellato
il segnalibro più vecchio per far
posto a quello nuovo).
L’impostazione di un segnalibro può
essere utilizzata anche con i VideoCD ma solo per un disco, che deve
comunque rimanere inserito nel
lettore poiché il segnalibro si cancella
automaticamente con l’apertura del
cassetto. È possibile che il segnalibro
impostato con Last Memory non
funzioni correttamente con alcuni
Video-CD PBC.
Non è possibile utilizzare il
segnalibro con dischi audio DVD e
DVD-RW.
Con alcuni dischi DVD-Video o
Video-CD non è possibile impostare i
segnalibri.
•Nel punto in cui la prossima
volta desiderate riprendere il
playback, premete velocemente
LAST MEMO.
Premere 7 se si desidera interrompere la
riproduzione in questo punto.
•Per riprendere il playback,
inserite il disco e premete
velocemente LAST MEMO.
Se la riproduzione è partita in automatico
prima di premere il tasto, fermare il disco.
•Per cancellare il segnalibro del
disco inserito, premete
velocemente LAST MEMO e
quindi CLEAR, con la scritta
‘Last Memory’ sul display a
schermo.
English
Français
Deutsch
Italiano
83
Ge/It
Page 84

5
Playing Discs
Lecture de disques
CLEAR
LAST MEMO
CONDITION
MEMO
Memorizing disc settings
(CONDITION MEMORY)
If you have a particular set of
preferences for a disc, you can
memorize them using the Condition
Memory function. Once memorized,
your settings will be recalled
automatically whenever you load
that disc. The player can store
settings for 15 discs; after this,
memorizing another replaces the
oldest one stored.
Condition Memory does not work
with DVD-Audio and DVD-RW discs.
The settings memorized are:
•
Multi-Angle (page 66)
•
Subtitle Language (page 66)
•
Audio Language (page 68)
•
On Screen Display (page 106)
•
Video Adjust (page 130)
•
Parental Lock level (page 146)
•
To memorize settings for the
current disc, press CONDITION
MEMO for longer than 1 sec during
playback.
•
To r ecall memorized settings, just
load the disc.
The display shows COND_MEM and
‘Condition Memory’ appears on-screen.
•
To clear memorized settings, load
the disc and press CLEAR while
‘Condition Memory’ is displayed
on-screen.
Mémorisation des
paramètres d’un disque
(CONDITION MEMORY)
Si vous avez des préférences de
réglage pour un disque particulier,
vous pouvez les mémoriser à l’aide
de la fonction de mémoire des
conditions de lecture. Lorsqu’ils ont
été mémorisés, vos réglages seront
automatiquement activés chaque
fois que vous introduirez ce disque.
Le lecteur peut mémoriser des
réglages pour 15 disques ; ensuite, la
mémorisation de nouveaux réglages
entraîne l’effacement des plus
anciens réglages.
La fonction de mémoire des conditions de lecture est inopérante avec
les DVD audio et les DVD-RW.
Les réglages mémorisés sont:
•
Scènes multi-angles (page 66)
•
Langue des sous-titres (page 66)
•
Langue des dialogues (page 68)
• Affichage des menus à l’écran
(page 106)
•
Réglage vidéo (page 130)
•
Niveau de blocage parental
(page 146)
•
Pour mémoriser les paramètres de
réglage du disque en cours, appuyez
sur CONDITION MEMO pendant
plus d’une seconde pendant la
lecture.
•
Pour rappeler des réglages
mémorisés, il vous suffit
d’introduire le disque.
La fenêtre d’affichage indique
COND_MEM et “Condition Memory”
apparaît sur l’écran.
84
En/Fr
•
Pour effacer des réglages
mémorisés, introduisez le disque et
appuyez sur CLEAR pendant que
“Condition Memory” est affiché sur
l’écran.
Page 85

Wiedergabe von Discs
Riproduzione dei dischi
5
CLEAR
LAST MEMO
CONDITION
MEMO
Speichern von
Disc-Einstellungen
(CONDITION MEMORY)
Wenn Sie für eine Disc bestimmte
Einstellungen bevorzugen, können
Sie sie mit der Funktion Condition
Memory abspeichern. Nach dem
Abspeichern werden diese
Einstellungen automatisch
aufgerufen, sobald sie die
betreffende Disc laden. Der Spieler
kann Einstellungen für bis zu 15 Discs
festhalten. Bei Speicherung der
Einstellungen weiterer Discs werden
die ältesten Speicherwerte
überschrieben.
Condition Memory ist bei
DVD-Audio-Discs und DVD-RW-Discs
funktionslos.
Die folgenden Einstellungen werden
gespeichert:
•
Mehrfach-Blickwinkel (Seite 67)
•
Untertitelsprache (Seite 67)
•
Dialogsprache (Seite 69)
• Bildschirmeinblendung
107 )
•
Videoeinstellung (Seite 131)
•
Kindersperre (Seite 147)
• Drücken Sie, um die Einstellungen
für die momentan abgespielte Disc
zu speichern, während der
Wiedergabe die Taste CONDITION
MEMO länger als 1 Sekunde lang.
•
Zum Aufruf der abgespeicherten
Einstellungen einfach die Disc
laden.
Auf dem Display erscheint COND_MEM
und Sie sehen ‘Condition Memory’ in
den Bildschirm eingeblendet.
•
Zum Löschen der gespeicherten
Einstellungen laden Sie die Disc und
drücken CLEAR, während ‘Condition Memory’ auf dem Bildschirm
angezeigt wird.
(Seite
Memorizzazione delle
impostazioni del disco
(CONDITION MEMORY)
Se si desidera memorizzare una
specifica serie di preferenze
relativamente ad un disco è possibile
usare la funzione Condition Memory.
Le impostazioni memorizzate
saranno automaticamente richiamate
caricando il disco. Il lettore può
memorizzare le impostazioni di 15
dischi, dopodiché le nuove
impostazioni memorizzate
cancelleranno le più vecchie.
La funzione Condition Memory non
funziona con dischi audio DVD e
DVD-RW.
Le impostazioni memorizzate sono le
seguenti:
•
Angolazione multipla (pag. 67)
•
Lingua dei sottotitoli (pag. 67)
•
Lingua di ascolto (pag. 69)
• Schermate OSD
•
Regolazione video (pag. 131)
•
Livello di blocco bambini (pag.
147 )
•Per memorizzare le impostazioni
per il disco corrente, premete
CONDITION MEMO per più di
1 secondo in playback.
Per richiamare le impostazioni
•
memorizzate, è sufficiente caricare
il disco.
Sul display compare COND_MEM e il
medesimo messaggio ‘Condition
Memory’ compare a video.
•
Per cancellare le impostazioni
memorizzate inserire il disco nel
cassetto e premere CLEAR mentre a
video comppare la scritta ‘Condition Memory’.
(pag. 107)
English
Français
Deutsch
Italiano
85
Ge/It
Page 86

5
Playing Discs
Lecture de disques
F.MEMO
ENTER
SETUP
Using setup menu
shortcuts
(FUNCTION MEMORY)
You can create a shortcut menu
of up to 5 setup menu items that
you often access. Rather than
navigate through the whole setup
menu each time you want to alter
a setting, you can access the
setting straight from the shortcut.
To add a menu item to the
shortcut list:
1Press SETUP.
2 Select the menu item you want
to add.
3Press F.MEMO.
The item is marked FM. (Some items
in the Setup menu cannot be added
to the shortcut menu. In this case, the
mark or ‘
registered in the function memory’
is displayed on-screen.)
4Repeat steps 2 and 3 to add up
to five items to the shortcut
menu.
5Press SETUP to exit.
i
This item cannot be
Utilisation des
raccourcis du menu
d’installation
(FUNCTION MEMORY)
Vous pouvez créer un menu de
raccourci pour 5 options du
menu d’installation auxquelles
vous accédez fréquemment.
Plutôt que de naviguer dans tout
le menu d’installation chaque fois
que vous voulez modifier un
réglage, vous pouvez directement
accéder à cette option grâce au
raccourci.
Pour ajouter une option
de menu dans la liste des
raccourcis:
1 Appuyez sur SETUP.
2 Sélectionnez l’option de menu
que vous voulez ajouter.
3 Appuyez sur F.MEMO.
L’option est identifiée par FM.
(Certaines options du menu
d’installation ne peuvent être ajoutées
au menu de raccourcis. Dans ce cas,
la marque ou ‘
cannot be registered in the function memory’ apparaît sur l’écran.)
i
This item
86
En/Fr
4Répétez les points 2 et 3 pour
ajouter jusqu’à cinq options au
menu de raccourcis.
5 Appuyez sur SETUP pour
quitter.
Page 87

Wiedergabe von Discs
Riproduzione dei dischi
5
F.MEMO
ENTER
SETUP
EinstellmenüSchnellzugriffsmenü
(FUNCTION MEMORY)
Sie können für bis zu 5 häufige
Setup-Menüparameter eine
“Abkürzung” festlegen, um
direkten Zugriff zu bekommen.
Dadurch müssen Sie nicht erst
das gesamte Setup-Menü
durchgehen, wenn Sie eine
Einstellung ändern wollen,
sondern können den Parameter
direkt aufrufen.
Hinzufügen eines
Parameters in
“Schnellzugriffsmenü”:
1Drücken Sie SETUP.
2Rufen Sie den betreffenden
Menüparameter oder -punkt
auf.
3Drücken Sie F.MEMO.
Der Parameter wird mit FM markiert.
(Manche Parameter im Setup-Menü
können nicht in das
Schnellzugriffsmenü aufgenommen
werden. In diesem Fall erscheint die
Markierung oder ‘
cannot be registered in the function memory’ auf dem Bildschirm.
4Wiederholen Sie die Schritte 2
und 3, um bis zu 5
Menüparameter in das
Schnellzugriffsmenü
einzutragen.
i
This item
Uso delle scelte rapide
del menu di Setup
(FUNCTION MEMORY)
Il sistema consente di creare un
menu di scelta rapida contenente
sino a 5 tra le opzioni del menu
di Setup utilizzate più
frequentemente. Per evitare di
passare continuamente attraverso
tutte le opzioni del menu, nel
caso in cui si desideri modificare
una impostazione è possibile
creare una voce di scelta rapida.
Per aggiungere una
opzione alle voci di scelta
rapida:
1Premere SETUP.
2 Selezionare l’opzione che si
desidera aggiungere.
3Premere F.MEMO.
L’opzione viene identificata con FM. (Non
tutte le opzioni del menu di setup
possono essere incluse nel menu di scelta
rapida. In questo caso, sullo schermo
viene visualizzato il segnalibro oppure
i
‘
This item cannot be registered in
the function memory’)
4 Ripetere i passi 2 e 3 per
aggiungere sino a cinque
opzioni al menu di scelta rapida.
5Premere SETUP per uscire.
English
Français
Deutsch
Italiano
5Drücken Sie SETUP, um das
Menü zu verlassen.
87
Ge/It
Page 88

Playing Discs
5
Lecture de disques
To use the shortcut menu:
1Press F.MEMO.
Function Memory
On Screen Display
Digital Out
2 Select the item you want moving the Joystick (2/
3/5/∞) and press ENTER.
3 The Setup menu opens on the item you selected.
Select from the options in the normal way.
4Press SETUP to exit.
To delete an item from the shortcut menu:
1Press SETUP.
2 Select the menu item you want to delete from the
shortcut menu.
It should be marked FM.
3Press F.MEMO to clear the FM mark.
4Press SETUP to exit.
Pour utiliser le menu de raccourcis:
1 Appuyez sur F.MEMO.
Function Memory
On Screen Display
Digital Out
2
Sélectionnez l’option désirée en vous aidant du joystick
(2/3/5/∞) et appuyez sur la touche ENTER.
3 Le menu d’installation s’ouvre sur l’option que vous
avez sélectionnée.
Sélectionnez les options suivant la procédure normale.
4 Appuyez sur SETUP pour quitter.
Pour supprimer une option du menu de
raccourcis:
1 Appuyez sur SETUP.
2 Sélectionnez l’option de menu que vous voulez
effacer du menu de raccourcis.
Elle doit être identifiée au moyen de FM.
3 Appuyez sur F.MEMO pour supprimer la marque
FM.
4 Appuyez sur SETUP pour quitter.
88
En/Fr
Page 89

Wiedergabe von Discs Riproduzione dei dischi
5
Verwendung des Direktzugriffmenüs:
1Drücken Sie F.MEMO.
Function Memory
On Screen Display
Digital Out
2Wählen Sie durch entsprechende Bewegung des
Joysticks (2/3/5/∞) die gewünschte Position und
drücken Sie anschließend ENTER.
3Das Setup-Menü wird mit dem gewählten Param-
eter geöffnet.
Wählen Sie die gewünschte Option auf übliche Weise.
4Drücken Sie SETUP, um das Menü zu verlassen.
Streichen eines Menüparameters aus dem
Schnellzugriffsmenü:
1Drücken Sie SETUP.
2Wählen Sie den Menüparameter, der aus dem
Schnellzugriffsmenü gestrichen werden soll.
Er muss mit FM markiert sein .
3Drücken Sie F.MEMO, um die Markierung FM zu
löschen.
Per utilizzare il menu di scelta rapida:
1Premere F.MEMO.
Function Memory
On Screen Display
Digital Out
2 Selezionate la voce che desiderate, facendo
scorrere il joystick (2/3/5/∞) quindi premete
ENTER.
3 Il menu di Setup apre la voce selezionata.
Selezionare le opzioni con la normale procedura.
4Premere SETUP per uscire.
Per cancellare un’opzione dal menu di
scelta rapida:
1Premere SETUP.
2 Selezionare l’opzione da cancellare dal menu di
scelta rapida.
L’opzione verrà contrassegnata con FM.
3Premere F.MEMO per cancellare il marchio FM.
4Premere SETUP per uscire.
English
Français
Deutsch
Italiano
4Drücken Sie SETUP, um das Menü zu verlassen.
89
Ge/It
Page 90

5
Play
Track
2–1 0.24
6.29–6.05/
Play
Tr. Rate :
3
9.2
Playing Discs
Lecture de disques
DISPLAY
Displaying disc
information
Various track, chapter and title
information, as well as the video
transmission rate for DVD discs,
can be displayed on-screen while
a disc is playing, or while it’s
stopped.
•To show/switch the information
displayed, press DISPLAY.
When a disc is playing, the information appears at the top of the screen.
Keep pressing DISPLAY to change
the displayed information.
Example:
Play
Track
DVD-Audio display
Play
Tr. Rate :
DVD display showing the data transmission rate
2–1 0.24
6.29–6.05/
3
9.2
Affichage des
informations sur le
disque
Diverses informations sur les
plages, les chapitres et les titres
ainsi que sur le débit de
transmission pour les DVD,
peuvent être affichées sur l’écran
pendant la lecture d’un disque ou
lorsqu’il se trouve en mode
d’arrêt.
•Pour afficher/commuter les
informations affichées, appuyez
sur DISPLAY.
Lorsque le disque se trouve en mode
de lecture, les informations
apparaissent dans le haut de l’écran.
Maintenez la touche DISPLAY
enfoncée pour changer les informations affiches.
Exemple:
Ecran DVD audio
Ecran DVD indiquant le débit de
transmission de données
90
En/Fr
Page 91

Wiedergabe von Discs
Play
Track
2–1 0.24
6.29–6.05/
Play
Tr. Rate :
3
9.2
Riproduzione dei dischi
5
DISPLAY
Abruf von
Disc-Informationen
Bei Wiedergabe oder
Wiedergabestopp von Discs
können verschiedene
Informationen über Sektoren,
Kapitel und Titel sowie die
DVD-Videoübertragungsrate in
den Bildschirm eingeblendet
werden.
• Zum Abrufen/Umschalten der
gezeigten Informationen
drücken Sie DISPLAY.
Während der Wiedergabe von Discs
werden die Informationen am oberen
Bildrand eingeblendet. Zum Wechsel
der angezeigten Informationen
DISPLAY kontinuierlich drücken.
Beispiel:
Play
Track
Audio-DVD-Displayanzeige
Play
Tr. Rate :
DVD-Display mit Anzeige der
Datenübertragungsrate
2–1 0.24
6.29–6.05/
3
9.2
Visualizzazione delle
informazioni relative al
disco
Durante la riproduzione o a disco
fermo si possono visualizzare
sullo schermo le informazioni
relative a tracce, capitoli e titoli,
nonché la velocità di trasmissione
per i dischi DVD.
•Per visualizzare/modificare le
informazioni visualizzate
premere DISPLAY.
Durante la riproduzione, le
informazioni relative al disco
compaiono sulla parte superiore dello
schermo. Per modificare le
informazioni visualizzate tenere
costantemente premuto il tasto
DISPLAY.
Esempio:
Display DVD Audio
Il display DVD mostra la
velocità di trasmissione dati
English
Français
Deutsch
Italiano
91
Ge/It
Page 92

Playing Discs
DISPLAY
Total time 72 . 04
Track
Time
Track
Time
01
06
07
08
09
10
02
03
04
05
5 . 23
4 . 55
6 . 13
5 . 45
5 . 10
6 . 51
3 . 18
6 . 50
4 . 16
3 . 22
1/2
Information: Compact Disc
Exit
Durée totale de lecture du disque, des plages et
durées de plage
DISPLAY
Disc
Title
Original
Play List
1 ~ 6
1 ~ 3
Information: DVD-RW
Exit
titre du disque (si programmé)
Titre du disque (si programmé) et nombre de
titres dans l’enregistrement Original et dans la
Play List
DISPLAY
Tot a l time 72 . 04
Track
Tim e
Tra c k
Tim e
001
006
007
008
009
010
002
003
004
005
5 . 23
4 . 55
6 . 13
5 . 45
5 . 10
6 . 51
3 . 18
6 . 50
4 . 16
3 . 22
1/2
Information: SACD 2ch Area
Exit
Durée de lecture totale du disque, des
plages et durée des plages
5
Lecture de disques
When a disc is stopped, all title/group/chapter, or track
information for the disc loaded appears on-screen. Press
DISPLAY again to exit the screen.
Information: DVD
Title Chapter
01 06
02
03
04
05
1/2
Titles and number of chapters in each title
Information: Compact Disc
Total time 72 . 04
Track
01
02
03
04
05
1/2
To tal playing time of disc, tracks and track times
1 ~ 30
1 ~ 21
1 ~ 46
1 ~ 12
1 ~ 8
Time
5 . 23
4 . 55
6 . 13
5 . 45
5 . 10
Title
07
08
09
10
Track
06
07
08
09
10
Chapter
1 ~ 10
1 ~ 13
1 ~ 5
1 ~ 4
1 ~ 8
DISPLAY
Time
6 . 51
3 . 18
6 . 50
4 . 16
3 . 22
DISPLAY
Exit
Exit
Lorsque le disque se trouve en mode d’arrêt, toutes les
informations sur le titre/groupe/chapitre ou sur la plage du
disque introduit dans le lecteur apparaissent sur l’écran.
Appuyez de nouveau sur DISPLAY pour quitter l’écran.
Information: DVD
Title Chapter
01 06
02
03
04
05
1/2
Titres et nombre de chapitres dans chaque
titre
1 ~ 30
1 ~ 21
1 ~ 46
1 ~ 12
1 ~ 8
Title
07
08
09
10
Chapter
1 ~ 10
1 ~ 13
1 ~ 5
1 ~ 4
1 ~ 8
DISPLAY
Exit
disc name (if programmed)
Information: DVD-RW
Disc
Title
Original
Play List
Disc name (if programmed) and number of
titles in the Original recording and the
Play List
Information: DVD
Group Track
1 ~ 1
01 06
1 ~ 1
02
1 ~ 1
03
1 ~ 1
04
1 ~ 1
05
1/1
Group
07
08
09
Track
1 ~ 1
1 ~ 1
1 ~ 1
1 ~ 4
DISPLAY
1 ~ 6
1 ~ 3
DISPLAY
Exit
Exit
Groups and number of tracks in each group
Information: SACD 2ch Area
Total time 72 . 04
Track
001
002
003
004
005
1/2
Time
5 . 23
4 . 55
6 . 13
5 . 45
5 . 10
Track
006
007
008
009
010
Time
6 . 51
3 . 18
6 . 50
4 . 16
3 . 22
DISPLAY
Exit
To tal playing time of disc, tracks and track times
Information: DVD
Group Track
01 06
02
03
04
05
1/1
Groupes et nombre de plages dans chaque
Groupe
1 ~ 1
1 ~ 1
1 ~ 1
1 ~ 1
1 ~ 1
Group
07
08
09
Track
1 ~ 1
1 ~ 1
1 ~ 1
1 ~ 4
DISPLAY
Exit
92
En/Fr
Page 93

Wiedergabe von Discs Riproduzione dei dischi
DISPLAY
Total time 72 . 04
Track
Tim e
Track
Tim e
001
006
007
008
009
010
002
003
004
005
5 . 23
4 . 55
6 . 13
5 . 45
5 . 10
6 . 51
3 . 18
6 . 50
4 . 16
3 . 22
1/2
Information: SACD 2ch Area
Exit
Durata totale del disco, delle tracce e di
ogni singola traccia
5
Bei gestoppter Disc erscheinen alle Informationen über
Titel/Gruppen/Kapitel bzw. über Titel der geladenen Disc
auf dem Bildschirm. Drücken Sie DISPLAY erneut, um das
Informationsdisplay zu beenden.
Information: DVD
Title Chapter
01 06
02
03
04
05
1/2
Sektoren und Anzahl der Kapitel in jedem
Sektor
Information: Compact Disc
Tot a l time 72 . 04
Track
01
02
03
04
05
1/2
Gesamtspielzeit von Disc, Titeln und
Titelspielzeiten
1 ~ 30
1 ~ 21
1 ~ 46
1 ~ 12
1 ~ 8
Tim e
5 . 23
4 . 55
6 . 13
5 . 45
5 . 10
Title
07
08
09
10
Track
06
07
08
09
10
Chapter
1 ~ 10
1 ~ 13
1 ~ 5
1 ~ 4
1 ~ 8
DISPLAY
Tim e
6 . 51
3 . 18
6 . 50
4 . 16
3 . 22
DISPLAY
Exit
Exit
A disco fermo compaiono sullo schermo tutte le
informazioni relative a titoli/gruppi/capitoli o tracce.
Premere nuovamente DISPLAY per uscire dal modo di
visualizzazione su schermo.
Information: DVD
Title Chapter
01 06
02
03
04
05
1/2
Titoli e numeri di capitolo per ogni titolo
Information: Compact Disc
Total time 72 . 04
Track
01
02
03
04
05
1/2
Durata totale del disco, delle tracce e durata di
ogni singola traccia
1 ~ 30
1 ~ 21
1 ~ 46
1 ~ 12
1 ~ 8
Time
5 . 23
4 . 55
6 . 13
5 . 45
5 . 10
Title
07
08
09
10
Track
06
07
08
09
10
Chapter
1 ~ 10
1 ~ 13
1 ~ 5
1 ~ 4
1 ~ 8
DISPLAY
Time
6 . 51
3 . 18
6 . 50
4 . 16
3 . 22
DISPLAY
Exit
Exit
English
Français
Deutsch
Italiano
Disc-Name (falls programmiert)
Information: DVD-RW
Disc
Title
Original
Play List
Disc-Name (falls programmiert) sowie
Sektorenanzahl der ursprünglichen
Original und Play List
Information: DVD
Group Track
1 ~ 1
01 06
1 ~ 1
02
1 ~ 1
03
1 ~ 1
04
1 ~ 1
05
1/1
Gruppen und Anzahl der Title in jeder Gruppe
Information: SACD 2ch Area
Tot a l time 72 . 04
Track
Tim e
5 . 23
001
4 . 55
002
6 . 13
003
5 . 45
004
5 . 10
005
1/2
Gesamtabspielzeit der Disc sowie Titel und
Titelabspielzeiten
Group
07
08
09
Track
006
007
008
009
010
1 ~ 6
1 ~ 3
DISPLAY
DISPLAY
Tim e
6 . 51
3 . 18
6 . 50
4 . 16
3 . 22
DISPLAY
Track
1 ~ 1
1 ~ 1
1 ~ 1
1 ~ 4
Exit
Exit
Exit
denominazione del disco
(eventualmente programmata)
Information: DVD-RW
Disc
Title
Original
Play List
Denominazione disco (eventualmente
programmata) e numero di titoli della
registrazione Original e della Play List
Information: DVD
Group Track
01 06
1 ~ 1
1 ~ 1
02
1 ~ 1
03
1 ~ 1
04
1 ~ 1
05
1/1
Gruppi e numero delle tracce per ogni gruppo
Group
07
08
09
1 ~ 6
1 ~ 3
DISPLAY
DISPLAY
Track
1 ~ 1
1 ~ 1
1 ~ 1
1 ~ 4
Exit
Exit
93
Ge/It
Page 94

6 Lecture de fichiers MP3
Playing MP3s
OPEN/CLOSE
Playing MP3s
This player can play MP3 files on
POWER
312
654
987
+10
0
a CD-ROM disc. MP3 is a popular audio format on computers
and the Internet because file
sizes are small (compared to
uncompressed CD audio), while
the sound quality remains
surprisingly good.
1Switch the player on.
2Press OPEN/CLOSE button to
open the disc tray.
3 Load a CD-ROM containing
MP3 tracks.
4Press 3 to start playing the first
MP3 track on the disc.
• It may take a few seconds for the
player to locate the track on the
disc, depending on the complexity
of the file structure. During this
time, ‘Please wait a moment’ is
displayed.
• The track name is displayed for the
first five seconds of the track.
After the selected track has played
out, the next track recorded on the
disc starts playing.
•Press 8 while a track is playing to
pause. Press again to restart
playback.
•Press 4 / ¢ to skip to the
previous/next track on the disc.
•Press and hold 1 / ¡ to scan
backward/forward.
•Press 7 to stop playback. Except in
program or random play, the player
remembers the current folder as
long as the disc remains in the
player. Press 3 to restart playback
from the first track of that folder.
Lecture de fichiers MP3
Ce lecteur peut lire des fichiers
MP3 sur un CD-ROM. Le MP3 est
un format audio populaire en
informatique et pour internet
parce que la taille des fichiers est
réduite (en comparaison des CD
audio non comprimés) et que la
qualité audio reste étonnamment
bonne.
1Mettez le lecteur sous tension.
2 Appuyez sur touche OPEN/CLOSE
pour ouvrir le plateau de lecture.
Introduisez dans le lecteur un CD-
3
ROM contenant des plages MP3.
4 Appuyez sur 3 pour démarrer la
lecture de la première plage
MP3 du disque.
• Suivant la complexité de la
structure des fichiers, il peut falloir
quelques secondes pour que le
lecteur localise la plage sur le
disque. Pendant ce temps,
l’indication “Please wait a
moment” s’affiche.
• Le titre de la plage est affiché
pendant les cinq premières
secondes de la plage.
Après la lecture de la plage
sélectionnée, la lecture continue
avec la plage suivante enregistrée
sur le disque.
• Appuyez sur 8 pendant la lecture
d’une plage pour activer une
pause. Appuyez de nouveau sur
cette touche pour redémarrer la
lecture.
• Appuyez sur 4 / ¢ pour
passer à la plage précédente/
suivante du disque.
• Maintenez la touche 1 / ¡
enfoncée pour lancer une recherche avant/arrière.
• Appuyez sur 7 pour arrêter la
lecture. Excepté en mode de
lecture programmée ou aléatoire, le
lecteur mémorise le dossier en
cours aussi longtemps que le
disque reste dans le lecteur.
Appuyez sur 3 pour redémarrer la
lecture à partir de la première
plage de ce dossier.
94
En/Fr
Page 95

Wiedergabe von MP3-Dateien
Riproduzione di file MP3
6
OPEN/CLOSE
Wiedergabe von MP3Dateien
POWER
312
654
987
+10
0
Dieser Player kann MP3-Dateien auf
CD-ROM wiedergeben. MP3 ist ein
populäres Audioformat für Rechner
und Internet, denn die Dateien
zeichnen sich (im Vergleich zu nicht
komprimierten Audio-CDs) durch
relativ kleinen Umfang bei
erstaunlich guter Klangqualität aus.
1 Schalten Sie den Player ein.
2 Zum Öffnen der Disc-Lade drücken
OPEN/CLOSE-Taste
Sie
.
3 Laden Sie eine CD-ROM mit MP3-
Titeln.
3
4 Drücken Sie
zur Wiedergabe des
ersten MP3-Titels auf der Disc.
•
Je nach der Komplexität der
Dateistruktur braucht der Spieler u.U.
einige Sekunden zum Auffinden des
Titels auf der Disc. Während dieser
Zeit erscheint “Please wait a
moment” auf dem Display.
•
Der Titelname wird während der
ersten fünf Sekunden Abspielzeit
angezeigt.
Nachdem der gewählte Titel
abgespielt ist, begint die Wiedergabe
des nächsten auf der Disc
aufgezeichneten Titels.
•
Drücken Sie 8, um den Titel während
der Wiedergabe auf Pause zu schalten.
Durch erneutes Drücken der Taste
wird die Wiedergabe fortgesetzt.
•
Drücken Sie 4 / ¢, um zum
vorhergehenden/nächsten Titel auf
der Disc zu springen.
•
Halten Sie 1 / ¡ gedrückt, um
die Disc in Rückswärts-/
Vorwärtsrichtung durchzugehen.
•
Durch Drücken von 7 stoppen Sie die
Wiedergabe. Außer bei Programmoder Zufallswiedergabe greift der
Spieler, solange die Disc im Spieler
verbleibt, auf den aktuellen Ordner zu.
Durch Drücken von 3 wird die
Wiedergabe ab dem ersten Titel im
jeweiligen Ordner fortgesetzt.
Riproduzione di file MP3
Il lettore consente la riproduzione di
file MP3 contenuti su CD-ROM. Il
formato MP3 trova largo impiego su
computer e in Internet per i file
audio, poiché a fronte delle
dimensioni ridotte (in rapporto ai
normali file audio non compressi) la
qualità del suono rimane
sorprendentemente elevata.
1Accendere l’apparecchio.
2Premere palsante
per aprire il cassetto di caricamento
dischi.
3 Inserire un CD-ROM contenente
tracce MP3.
4Premere
3
riproduzione della prima traccia
MP3 presente sul disco.
•
L’individuazione della traccia
contenuta all’interno del disco da
parte del lettore richiede alcuni istanti,
a seconda della complessità della
struttura del file. In tale fase compare
il messaggio “Please wait a moment”.
•
Durante i primi 5 secondi della
riproduzione compare il nome della
traccia corrente.
Al termine della prima traccia
selezionata, inizia automaticamente la
riproduzione della traccia successiva.
•
Per mettere in pausa durante la
riproduzione, premere 8. Premere
nuovamente per riavviare la
riproduzione.
•
Premere 4 / ¢ per passare alla
traccia precedente/successiva sul
disco.
•
Tenere premuto 1 / ¡ per
effettuare la scansione indietro/avanti.
•
Premere 7 per interrompere la
riproduzione. La cartella corrente
rimane memorizzata per tutto il tempo
in cui il disco è inserito nel lettore,
tranne quando questo si trova nel
modo di programmazione di una
sequenza personalizzata o nel modo di
riproduzione casuale. Premere 3 per
avviare nuovamente la riproduzione
della prima traccia presente all’interno
della cartella.
OPEN/CLOSE
per avviare la
English
Français
Deutsch
Italiano
95
Ge/It
Page 96

Playing MP3s
6 Lecture de fichiers MP3
Searching for folders and tracks
1Use the SEARCH to choose between:
• Folder search
• Tr ack search
• Off
2 Enter the folder/track number.
For example, for folder 4, press 4.
For track 12, press 1 , 2.
3Press ENTER or 3 to start/restart playback.
Using random play
Files can be mono or stereo. Use the random play
feature to play tracks on a disc in a random order.
Playback stops when all the tracks have played.
1Press RANDOM to start random play.
2To cancel random play, press 7.
Random play is also canceled if the disc tray is opened, you
press PROGRAM, or you use the number buttons to jump
to another track.
Recherche de dossiers et de plages
1Utilisez la touche SEARCH pour choisir:
• Folder search (recherche de dossier)
•Track search (recherche de page)
• Off (sans)
2 Introduisez le numéro de dossier/plage.
Par exemple, pour sélectionner le dossier numéro 4,
appuyez sur 4.
Pour la plage 12, appuyez sur 1 , 2.
3 Appuyez sur 3 pour démarrer/redémarrer la
lecture.
Mode de lecture aléatoire
Les fichiers peuvent être en mono ou en stéréo.
Utilisez la fonction de lecture aléatoire pour
reproduire des plages sur un disque dans un ordre
aléatoire. La lecture s’arrête lorsque toutes les plages
ont été lues.
1 Appuyez sur RANDOM pour démarrer la lecture
aléatoire.
Using repeat play
Use the repeat play feature to repeat the current
track, or all the tracks on the disc.
1During playback, press REPEAT to select a repeat
play mode.
Each press changes the repeat play mode:
•Repeat Tr ack
•Repeat Folder
•Repeat Disc
•Repeat Off
If you stop playback or open the disc tray, repeat play is
also canceled.
2Pour annuler la lecture aléatoire, appuyez sur 7.
La lecture aléatoire est également annulée si le plateau de
lecture est ouvert, si vous appuyez sur la touche PROGRAM
ou si vous utilisez les touches numériques pour passer à une
autre plage.
Mode de lecture répétée
Utilisez la fonction de répétition de lecture pour
répéter la plage en cours ou toutes les plages du
disque.
1 En cours de lecture, appuyez sur REPEAT pour
sélectionner un mode de répétition de lecture.
Chaque pression sur cette touche change le mode de
répétition de lecture:
•Repeat Tr ack
•Repeat Folder
•Repeat Disc
•Repeat Off
Si vous arrêtez la lecture ou si vous ouvrez le plateau de
lecture, la lecture répétée est également annulée.
96
En/Fr
Page 97

Wiedergabe von MP3-Dateien Riproduzione di file MP3
6
Suche nach Ordnern und Titeln
1Mit SEARCH wählen Sie zwischen:
• Folder-Suche (Ordner)
• Tr ack-Suche (Titel)
• Off (Aus)
2Geben Sie die Nummer von Ordner/Titel ein.
Bei Ordner 4 z.B. drücken Sie 4.
Bei Titel 12 drücken Sie 1, 2.
3Durch Drücken von 3 starten Sie die Wiedergabe
bzw. setzen sie fort.
Zufallswiedergabe
Dateien können in Mono oder Stereo aufgezeichnet
sein. Mit der Zufallswiedergabefunktion lassen sich
Titel auf einer Disc in zufälliger Reihenfolge
wiedergeben. Nachdem alle Titel abgespielt sind,
stoppt die Wiedergabe.
1Durch Drücken von RANDOM starten Sie die
Zufallswiedergabe.
2 Zum Annullieren der Zufallswiedergabe drücken Sie 7.
Die Zufallswiedergabe wird auch annulliert, wenn Sie die
Disc-Lade öffnen, die Taste PROGRAM drücken oder mit
den Zifferntasten einen anderen Titel wählen.
Wiederholfunktion
Mit der Wiederholfunktion ist die Wiederholung des
aktuellen Titels oder aller Titel auf der Disc möglich.
1 Zur Wahl einer Wiederholfunktion drücken Sie
REPEAT während der Wiedergabe.
Bei jedem Tastendruck wird zwischen den
Wiederholfunktionen wie folgt umgeschaltet:
•Repeat Tr ack
•Repeat Folder
•Repeat Disc
•Repeat Off
Beim Stoppen der Wiedergabe oder Öffnen der Disc-Lade
wird die Wiederholung ebenfalls annulliert.
Ricerca delle cartelle e delle tracce
1 Utilizzare il tasto SEARCH per scegliere una delle
opzioni seguenti:
• Cerca Folder (cartella)
• Cerca Track (traccia)
• Off (Spento)
2 Inserire il numero di cartella/traccia.
Ad esempio, per la cartella 4 premere 4.
Per la traccia 12 premere 1, 2.
3Premere 3 per far partire/ripartire la
riproduzione.
Uso della riproduzione casuale
I file possono essere di tipo mono o stereo. Utilizzare
la funzione in oggetto per la riproduzione di tracce
secondo una sequenza casuale. La riproduzione si
interrompe automaticamente al termine dell’ultima
traccia.
1Premere RANDOM per avviare il modo di
riproduzione casuale.
2Per annullare la riproduzione casuale premere 7.
La riproduzione casuale è annullata anche all’apertura del
cassetto di caricamento dischi, con il PROGRAM premuto, o
in caso di utilizzo dei tasti numerici per passare ad una
traccia diversa.
Utilizzo della ripetizione
Per ripetere la traccia corrente o tutte le tracce
presenti su disco, usare la funzione di ripetizione.
1Premere REPEAT durante la riproduzione per
selezionare la modalità di ripetizione.
Ciascuna pressione modifica la modalità di ripetizione:
•Repeat Tr ack
•Repeat Folder
•Repeat Disc
•Repeat Off
L’interruzione della riproduzione o l’apertura del cassetto di
caricamento dischi cancella la modalità di ripetizione.
English
Français
Deutsch
Italiano
97
Ge/It
Page 98

Playing MP3s
Exit
Folder
001
002
003
004
005
Folder
006
007
008
009
010
Track
1 ~ 10
1 ~ 13
1 ~ 5
1 ~ 4
1 ~ 8
Track
1 ~ 9
1 ~ 11
1 ~ 3
1 ~ 22
1 ~ 15
1/2
Information: MP3
Dossiers et nombre de plages dans chaque
dossier
DISPLAY
6 Lecture de fichiers MP3
Displaying MP3 information
1Press DISPLAY repeatedly during playback to
display various MP3 information on-screen.
There are four information screens:
Displays when playing
current track number/
total number of tracks in folder elapsed time of current track
Play
Track
current folder number/total number of folders elapsed time of current track
Play
Folder
current folder number/current track number
Play
Track
remaining time of current track total time of current track
current folder number/current track number elapsed time of current track
Play
Tr. Rate:
1/7 0.07
TRACK1~1
track name
«
2/3 0.07
FOLDER~1
folder name
«
elapsed time of current track
0.07
2–1
3.20
–3.13/
«
2–16 0.07
128kbps
transmission rate level
«
Display off
Affichage des informations MP3
1 Appuyez plusieurs fois de suite sur DISPLAY en
cours de lecture pour afficher différents types
d’informations MP3 sur l’écran.
Il existe quatre types d’écrans d’information:
Ecrans d’information affichés en cours de
lecture
numéro de la plage musicale actuelle/
nombre total de plages musicales
Play
Track
nom de la plage musicale
numéro du dossier actuel/
nombre total de dossiers
Play
Folder
nom du dossier
numéro du dossier actuel/
numéro de la plage musicale actuelle
Play
Track
temps restant avant la fin de la
plage musicale actuelle
numéro du dossier actuel/
numéro de la plage musicale actuelle
Play
Tr. Rate:
taux de transmission
temps total écoulé depuis le
début de la plage musicale
actuelle
1/7 0.07
TRACK1~1
«
temps total écoulé depuis le
début de la plage musicale
actuelle
2/3 0.07
FOLDER~1
«
temps total écoulé depuis le
début de la plage musicale
actuelle
0.07
2–1
3.20
–3.13/
durée totale de la plage
musicale actuelle
«
temps total écoulé depuis le
début de la plage musicale
actuelle
2–16 0.07
128kbps
Displays when stopped
Folders and number of tracks in each folder
98
En/Fr
Information: MP3
Track
Folder
1 ~ 9
001
1 ~ 11
002
1 ~ 3
003
1 ~ 22
004
1 ~ 15
005
1/2
Folder
006
007
008
009
010
Tra c k
1 ~ 10
1 ~ 13
1 ~ 5
1 ~ 4
1 ~ 8
DISPLAY
«
Arrêt de l’affichage
Ecrans d’information affichés en mode
d’arrêt
Exit
Page 99

Wiedergabe von MP3-Dateien Riproduzione di file MP3
Exit
Folder
001
002
003
004
005
Folder
006
007
008
009
010
Track
1 ~ 10
1 ~ 13
1 ~ 5
1 ~ 4
1 ~ 8
Track
1 ~ 9
1 ~ 11
1 ~ 3
1 ~ 22
1 ~ 15
1/2
Information: MP3
Cartelle e numero delle tracce per cartella
DISPLAY
6
Anzeige von MP3-Informationen
1Durch entsprechend häufiges Drücken von DISPLAY
während der Wiedergabe lassen sich verschiedene
MP3-Informationen auf den Bildschirm abrufen.
Es gibt vier Informationsfenster:
Anzeigen bei der Wiedergabe
Gegenwärtige Titelnummer/
Gesamtzahl der Titel im Ordner
Play
Track
Titelbezeichnung
Gegenwärtige Ordnernummer/
Gesamtzahl der Ordner
Play
Folder
Ordnerbezeichnung
Gegenwärtige Ordnernummer/
gegenwärtige Titelnummer
Play
Track
Restzeit des gegenwärtigen Titels
Gegenwärtige Ordnernummer/
gegenwärtige Titelnummer
Play
Tr. Rate:
Pegel der Übertragungsgeschwindigkeit
Display ausgeschaltet
Abgelaufene Wiedergabezeit des
gegenwärtigen Titels
1/7 0.07
TRACK1~1
«
Abgelaufene Wiedergabezeit des
gegenwärtigen Titels
2/3 0.07
FOLDER~1
«
Abgelaufene Wiedergabezeit des
gegenwärtigen Titels
0.07
2–1
3.20
–3.13/
Gesamtzeit der gegenwärtigen
Titel
«
Abgelaufene Wiedergabezeit des
gegenwärtigen Titels
2–16 0.07
128kbps
«
Visualizzazione delle informazioni
relative al file MP3
1Premere ripetutamente DISPLAY durante la
riproduzione per visualizzare sullo schermo le
informazioni relative al file MP3.
Sono disponibili quattro videate:
Visualizzazione delle informazioni durante
la riproduzione
umero brano attuale/
numero brani in cartella
Play
Track
numero cartella attuale/
numero totale cartelle
Play
Folder
numero cartella attuale/
numero brano attuale
Play
Track
tempo rimanente brano attuale
numero cartella attuale/
numero brano attuale tempo trascorso brano attuale
Play
Tr. Rate:
Velocità trasmissione
tempo trascorso brano attuale
1/7 0.07
TRACK1~1
nome brano
«
tempo trascorso brano attuale
2/3 0.07
FOLDER~1
nome cartella
«
tempo trascorso brano attuale
0.07
2–1
3.20
–3.13/
durata totale brani attuali
«
2–16 0.07
128kbps
English
Français
Deutsch
Italiano
Anzeigen bei Wiedergabestopp
Information: MP3
Ordner und Anzahl der Titel in jedem Ordner
Folder
001
002
003
004
005
1/2
Track
1 ~ 9
1 ~ 11
1 ~ 3
1 ~ 22
1 ~ 15
Folder
006
007
008
009
010
Track
1 ~ 10
1 ~ 13
1 ~ 5
1 ~ 4
1 ~ 8
DISPLAY
«
Display spento
Visualizzazione delle informazioni a disco
fermo
Exit
99
Ge/It
Page 100

Playing MP3s
6 Lecture de fichiers MP3
Using the MP3 Navigator
Use the MP3 Navigator to make searching for the track(s)
you want to play easier. You can also use it to add or clear
tracks from the program list.
1 Load a CD-ROM containing MP3 tracks.
2Press MENU to enter the MP3 Navigator screen.
•
The left side of the screen shows a list of folders containing
MP3 tracks.
•
If you display the MP3 Navigator when a disc is playing, the
currently playing folder and track numbers are shown at the
top left of the screen.
To tal number of Track
Current : 3 1-1
Folder
1.FOLDER~1
2.FOLDER~2
3.FOLDER~3
4.FOLDER~4
5.FOLDER~5
6.FOLDER~6
To tal number of Folder
•
On the right side is a list of MP3 tracks from the first folder in
the list.
Current : 3 1-1
Folder
1.FOLDER~1
2.FOLDER~2
3.FOLDER~3
4.FOLDER~4
5.FOLDER~5
6.FOLDER~6
CLEAR
Del PGM
Navigate using the following controls:
Joystick (2/3) – Select folder and tracks from the current
screen.
Joystick (5/∞) – Select the previous/next of folders and tracks.
To move rapidly up or down a long list of folders or tracks, press
and hold the Joystick (5/∞).
ENTER – Play the currently selected folder or track. MP3 tracks
that are unplayable on this player are automatically skipped and
the display shows ‘UNPLAYABLE MP3 FORMAT’.
MENU – Exit the MP3 Navigator
PROGRAM – Add the currently selected track to the program
list. (Tracks in the program list are marked .) Pressing
PROGRAM repeatedly will add the track to the program list
repeatedly.
See Making a program list of MP3 tracks on page 102 for how to
use program play.
(Press MENU to exit the MP3 Navigator first.)
CLEAR – Clear the currently selected track from the program list.
Track
1.TRACK1~1
2.TRACK2~2
3.TRACK3~3
4.TRACK4~4
Play
Tra ck
1.TRACK1~1
2.TRACK2~2
3.TRACK3~3
4.TRACK4~4
Play
MP3 Navigator
MENUENTER
Exit
MP3 Navigator
1~41~10
MENUENTER
Exit
Utilisation du navigateur MP3
Utilisez le navigateur MP3 pour rechercher les plages que
vous voulez reproduire plus simplement. Vous pouvez
également l’utiliser pour ajouter ou supprimer des plages
d’une liste de lecture.
1 Introduisez dans le lecteur un CD-ROM contenant des
plages MP3.
2 Appuyez sur MENU pour activer l’écran du navigateur
MP3.
•
Le côté gauche de l’écran indique une liste des dossiers
contenant des plages MP3.
•
Si vous affichez le navigateur MP3 pendant la lecture d’un
disque, le numéro du dossier et de la plage en cours de lecture
apparaissent dans l’angle supérieur gauche de l’écran.
Nombre total de plages
Current : 3 1-1
Folder
1.FOLDER~1
2.FOLDER~2
3.FOLDER~3
4.FOLDER~4
5.FOLDER~5
6.FOLDER~6
Nombre total de dossiers
•
A droite figure une liste des plages MP3 du premier
dossier de la liste.
Current : 3 1-1
Folder
1.FOLDER~1
2.FOLDER~2
3.FOLDER~3
4.FOLDER~4
5.FOLDER~5
6.FOLDER~6
CLEAR
Del PGM
Naviguez à l’aide des commandes suivantes:
Joystick (2/3) – Sélectionne le dossier et les plages dans
l’écran actuel.
Joystick (5/∞) – Sélectionnez les répertoires et les plages
précédents/suivants. Pour faire défiler rapidement une longue liste
de répertoires ou de plages vers le haut ou vers le bas de la liste,
appuyez sur le joystick (5/∞) et maintenez-le enfoncé.
ENTER – Démarre la lecture du dossier ou de la plage
sélectionnée. Les plages MP3 qui ne peuvent être lues sur ce
système sont automatiquement omises et la fenêtre d’affichage
indique le message “UNPLAYABLE MP3 FORMAT”.
MENU – Quitte le navigateur MP3.
PROGRAM – Ajoute la plage sélectionnée à la liste de lecture.
(Les plages de la liste de lecture sont marquées .) Appuyez
plusieurs fois de suite sur PROGRAM pour ajouter une plage
plusieurs fois à la liste de lecture.
Voir Programmation d’une liste de lecture de plages MP3 à la page
10 2 pour savoir comment utiliser la fonction de lecture
programmée.
(Avant de procéder, appuyez sur MENU pour quitter le
Navigateur MP3.)
CLEAR – Supprime la plage sélectionnée de la liste de lecture.
Track
1.TRACK1~1
2.TRACK2~2
3.TRACK3~3
4.TRACK4~4
Play
Track
1.TRACK1~1
2.TRACK2~2
3.TRACK3~3
4.TRACK4~4
Play
MP3 Navigator
MENUENTER
Exit
MP3 Navigator
1~41~10
MENUENTER
Exit
100
En/Fr
 Loading...