

Page 1
-m-rro-r.rrt2"@
Model
Compact Disc
DR-700
User
Recorder
Guide
Page 2
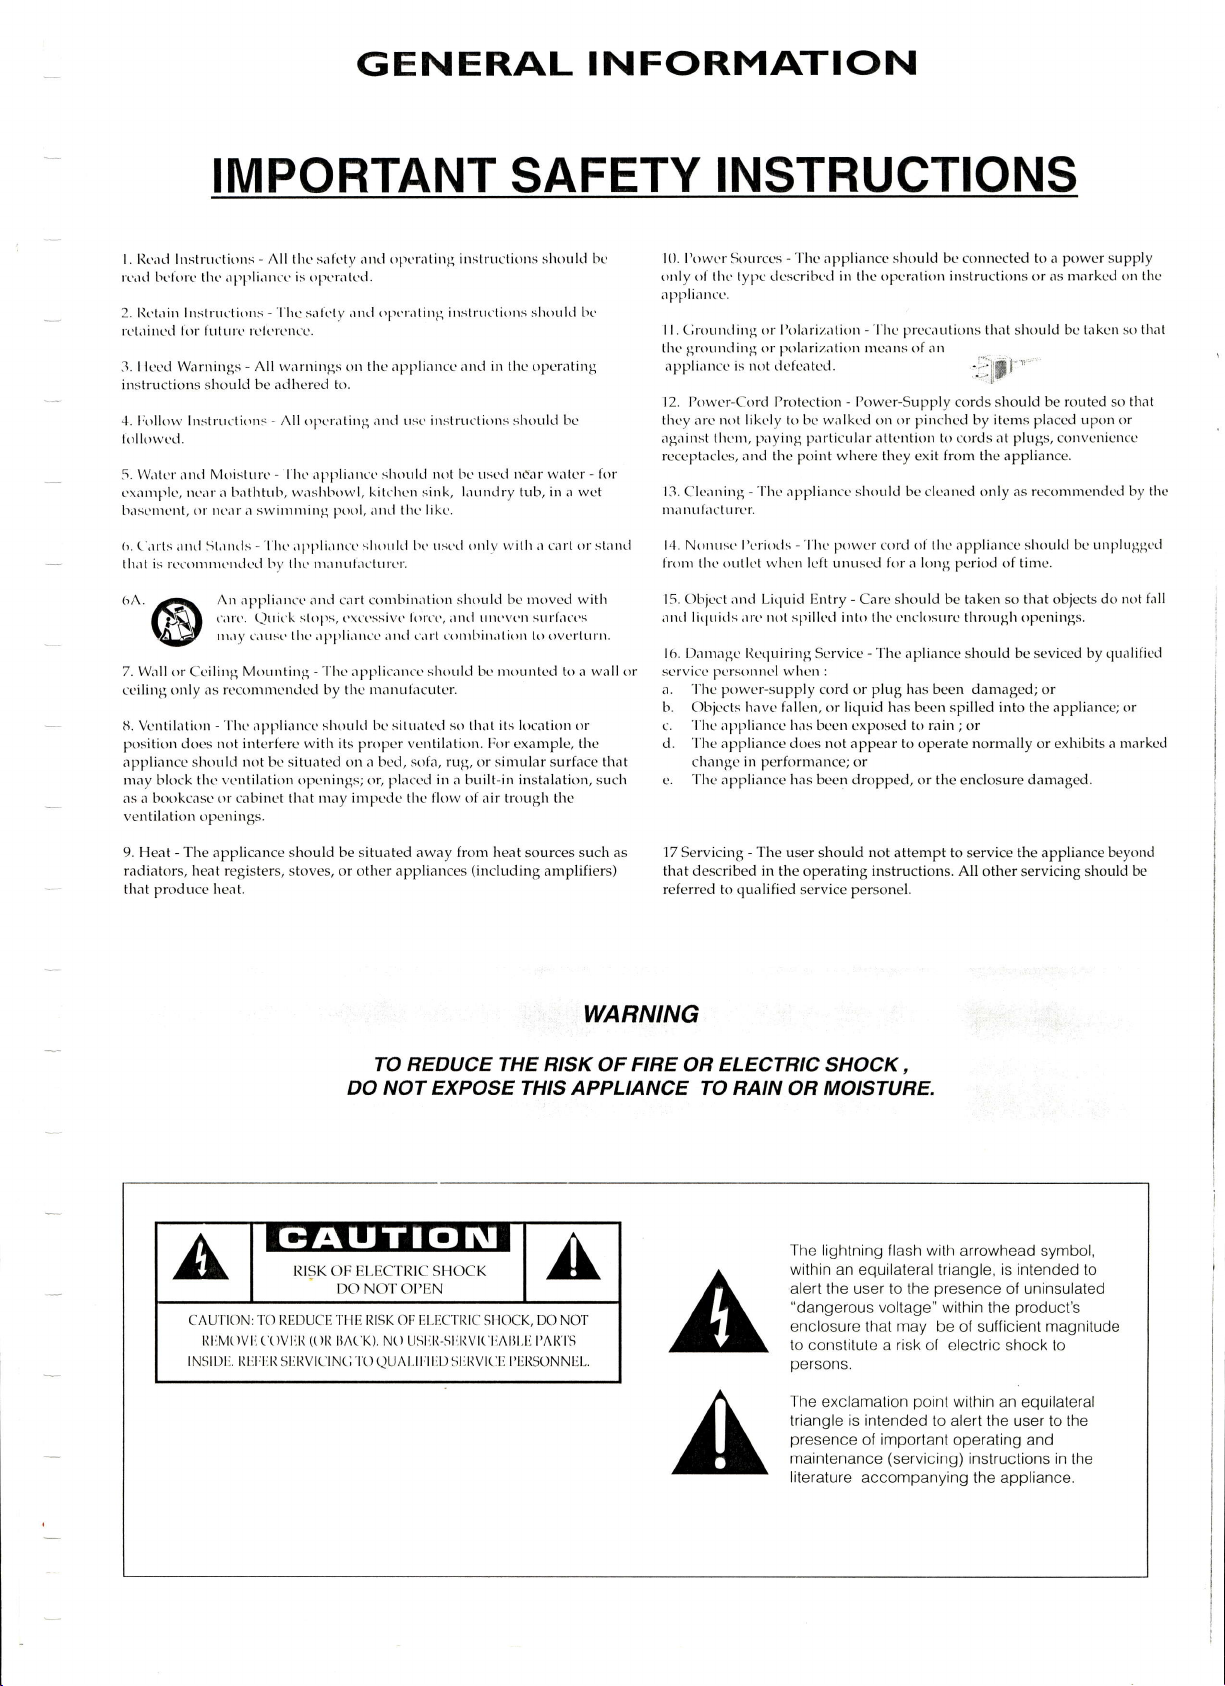
GENERAL
INFORMATION
IMPORTANT
l. lltrrl lnstructitrrrs - All the srlt'ty atrtl
reati
bt'lort' tlrr' appliaIrce
2. lit'tairr lnstnrctions
retainr:tl f()r l uturc lclt'rcnce.
3. llcecl Wtrrninlls
instructions shoulcl
.1.
lrolkrw lnstrurcti()ns
Iolloworl.
5. Wate r irntl
orlnrplc, nelr a bathtrrb,
basenrr'rrt,
(r. ('arts
tlr.rt is rertrrrrrrrt'rrrlt'rl lrv
Moistttrt'- lltt'apPli111g1' slrortlel
()r
n(\rr r swinrrrrinrl p(x)l,.lnd
Starrrls - l lro aPPli1ll1g slrorrltl lrt'trst'ti
rrrtl
is oPeralcd.
-'l
h{l
s.tlcty .11111
-
All wanlings
be
aclherecl
-
All
opcr.rtillg
wtrslrbou,l, kitcllcn sirtk, llunclry tub, itr a wct
llr(' nr,rnul,)( tul('r.
'^
(S
7. Wirll or
cciling
tl. Vcntilartiorr
positiorr does
appliancc shoulcl
rlay block tht'vcntilation opt:nirrgs; or, plact:rl
as a bookcase or cabinct th.rt
ventilatiur openings.
9. Heat - The
radiakrrs, heat registers,
that produce heat.
il]i
:{ilitii:;,;;il:ilill,rililji:r[:il]:,
-l'hc
Mountinu
Ccilirrg
only as roconrr.rrcnclecl try the rnanufacutcr.
-'l'ht.
not interfere with its
not Lrc
applicarrce
-
apirliarrcc shotrltl
sittratec-l orr
lnay inrpcdc tho flow
shoulcl be situated away from heat
stoves, or other appliances
opt'ratittg itrstructiotrs shoultl [tt:
lrpt'nrting irtstrttctiotrs shoulrl be
thc appliancc atrcl itr thc
otr
to.
rntl rrse irrstnrctions shotrlcl bc
thc likc.
apprlictrncc slrotrlcl Lrr:
lrc situatt'cl s() that its location or
vcntilation. l"or
propcr
a bcd, sofa, rug, or simular surface that
SAFETY
()perating
not
in
a btrilt-in instalatitln, such
ttt'ar wrttcr - ftlr
lrc ttsctl
onlv !vitl) l clrI rlr st;rrttl
rnourrtccl
air trotrgh
of
(including
to a
examplc,
thc
sources
amplifiers)
wall
thc
such as
INSTRUCTIONS
10. I'owcr
orrly ol tlrt'type clcscribed
appliance.
(inrrrnrlirrg
I l.
the grorrnding or polarizatiorr r.ttcarrs of att
appliancc
Powcr-Corcl Protection - I'ower-Supply
I2.
thcy
not likcly kr bt'walkcd on or pinchcd by items placcd uprn rlr
arc.
tll('nl,
ag,.lilrst
reccptaclcs, ancl the point whcre they exit
13.
Cloarring
nra tt
ul trclu
14. Norrrrst'
fronr tlrc orrtlct when lelt unusccl for a long pcriod of timc..
15. Objcct ancl Lirluicl Entry - Carc should be taken so that objects
anrl litlrritls art'noI spilk'tl irrto Ilre cnclostrrc through optnittgs.
I 6. Danragc l{ctluiring Scrvice
or
scrvice personncl
-l-he
a.
c.
;:owcr-supply
b. Objccts havc fallcu, or liquid has bccn spillcd into the appliance; or
'l'hc
appliancc
'l'hc
d.
appliance docs not appcar to operate normally or exhibits a markcd
chango in performance; or
'l'lrc
e.
appliance has been drulpped, or the enclosure damaged.
17
Servicing
that described in the operating instructions. All
referred b qualified
-
Sources
1'hc appliancc slrould bc cotrtrcctcd to a powcr supply
itr
tlrc ttPeratiotr
l\rlarization - l'hc
or
is not tiefcatcc{.
partictrlar lttonti()n to cords at plugs, convenicrtce
paying
-'l'lrc
appliancc should be clerncd only as rcconrnrendcd
rcr.
-'l
I'e riotls
-
ltr'powcr
'l'he
-
whorr :
cord
or plug
lrls bcen cxposccl to rain;
The user
service
should
personel.
not
corcl
itrstructiolrs or
prccautions
that should bc takcn so that
flnl'"'
cords should
from
the appliance.
ol tlrc
appliarrcc
apliance
should
has been damaged;
or
attempt to service the appliance
other servicing
shoulcl bc unprluggt'cl
be
seviced
nrarkcd otr the
as
be routed so tlrat
by the
do not fall
by qualificcl
or
beyond
should be
TO REDUCE THE HISK
DO NOT EXPOSE THIS APPLIANCE
frl:Lr-lil-r-lil
t{lgK oF ELECTtilC SHOCK
DO NOl'OI'EN
CAUTION: TO REDUCE TtlE RISK OF ELECTRlC SIIOCK, DO NOT
ItilVl()Vli ( OVlllt
tNSlDlt. Rtitiili
()lt
llA('K).
sliRVtclNC
N() USlllt-SIrRVl( liAlil.li l'AR IS
1()
QUAt_ilrlliD
sltRVlcu
t'[RSONNHL
WAHNING
FIRE
OF
ON ELECTNrc SHOCK,
TO
NNN
OR MOISTURE.
The lightning flash with
within
equilateral
an
alert the user to the
"dangerous
voltage" within
arrowhead symbol,
triangle,
is intended
presence
the
enclosure that may be of su{ficient magnitude
to constitute a
risk
o[ electric shock to
persons.
Ihe
exclamalion
poinl
within
an equilateral
triangle is intended to alert the user to the
presence
maintenance
literature accompanying
important
of
(servicing)
operating and
instructions in
the appliance.
of uninsulated
to
product's
the
Page 3
CONTENTS
Operatingbuttons..
Introduction-Unpacking,
Connections
Using
the recorder
Recording
Finalizing/Erasing
Playing.
Additional Information
Otherinformatiotr...
Notes.
Organesdecommande
Introduction-Ddballage
Connexions,
Fonctionnementdel'appareil.....
..
-
Fixing
problcrrts
. .
........
.... 10
..,.,....I1
....12
...,..,,..13
..,..
....,..
14
15
1
2
.?
4
s
7
I
9
I
It
to
I,
i;
lc
l9
F
Enregistrement..,,.,
Finalisation/Effacement-Lecture
Informations
Autresinformations.
complementaires
-
Remides en
cas de
.... 16
........19
panne
.....21
. . . 2O
Page 4
--
-
ope
Intr
Con
Usit
Rect
Fint
PIal
Add
oth
PLAYER
FRONT
n
--l r_!
UL
'ossru'!i:ii
_!. c t]@
IJ'))
j
' '- '
Nof,
Orgr
Intr
-*
Con
Fon
-- Enr,
Fint
Infa
Aut
PLAYER
REMOTE
BACK
CONTROL
O
ITPUI
C:)
1
O
4
O
7
O
l4i)
Fql
Eel
@
Flt
t54
IffACKINCS P8OGUil
flilauzt
ililililililililililililililililililililililililt1
.@
@.
E-.P,-i
DISPLAY
NEPTAI
G
3
2
O
O
5
5
(:)
cl
9
a
O
O
o
O
co
8Ec
sYilc
t6rl
161j
Eo'l
tiol
t"'l
l58l
IE
fs6l
ccl
tE
co
E0lzrl l?21 l4l
l2sl
l28l
l27l
l26l
Page 5
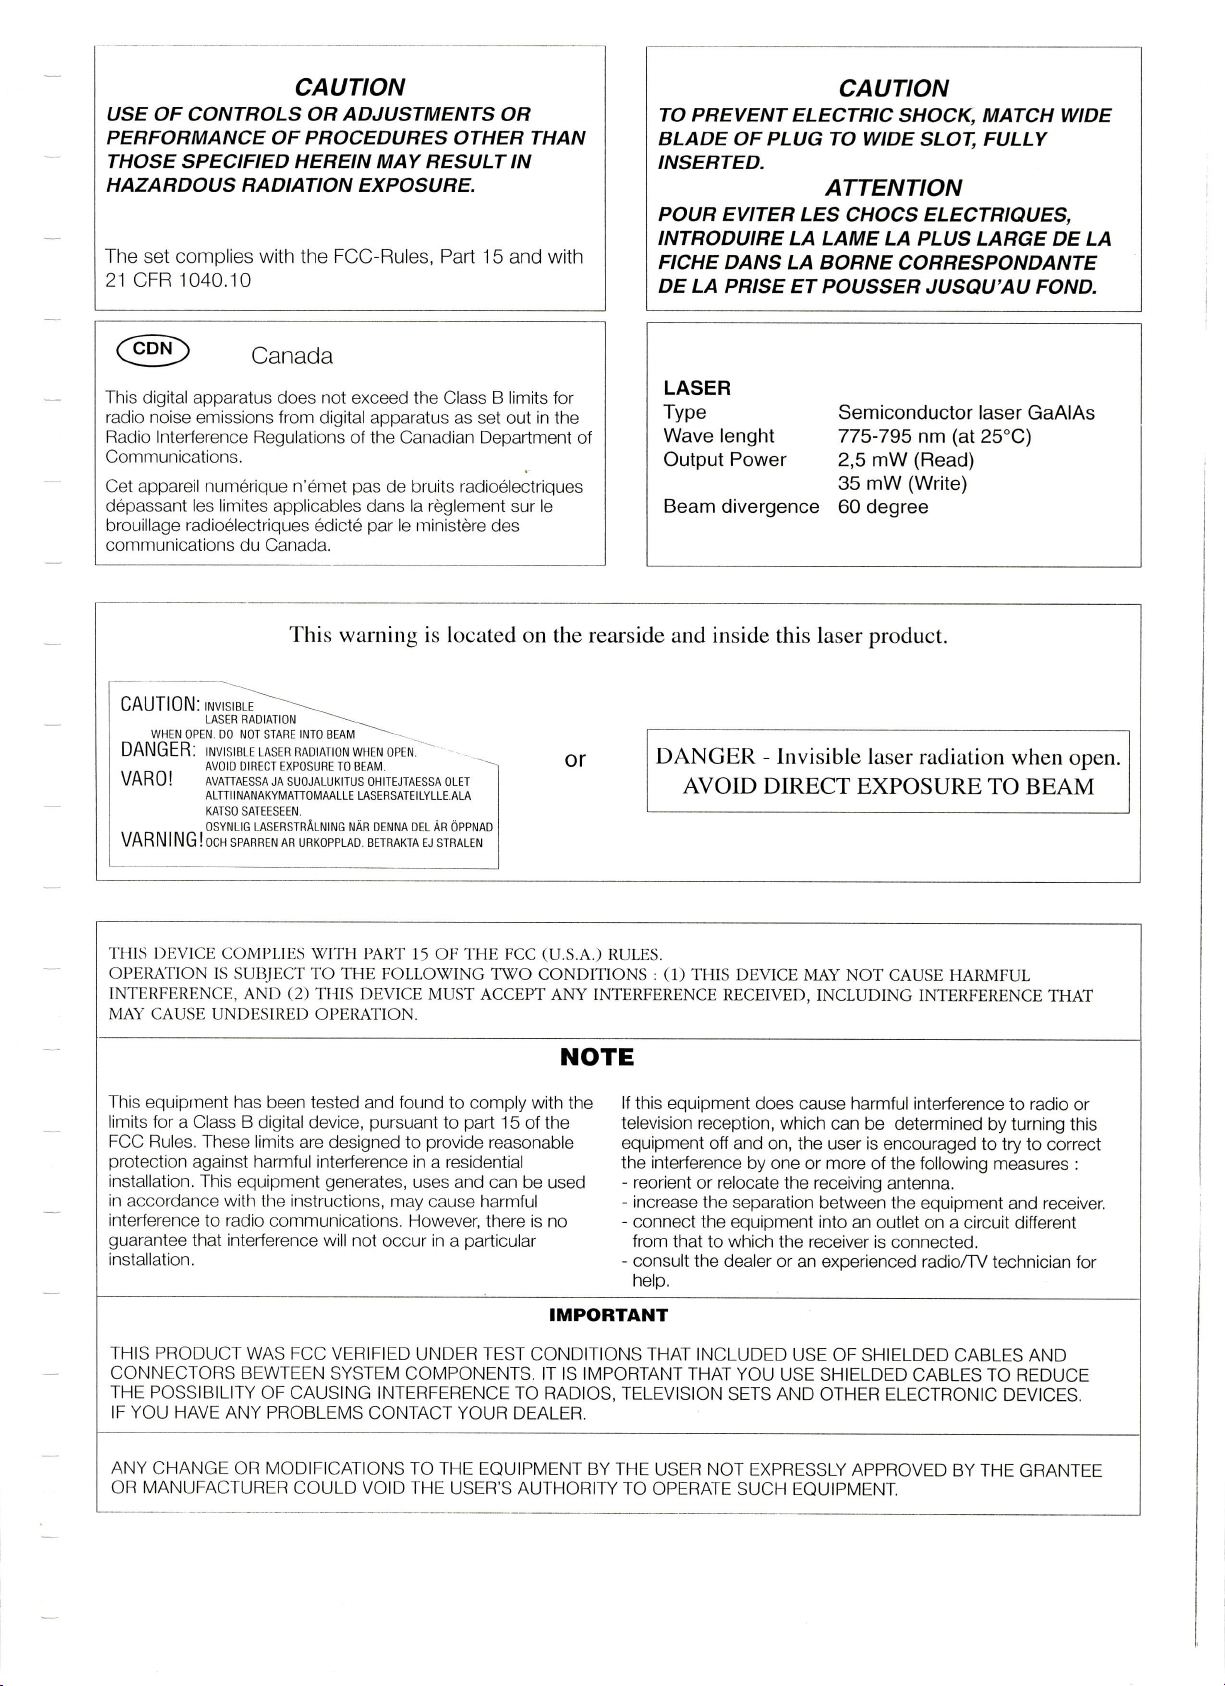
CAUTION
USE OF CONTROLS OR
PERFORMANCE
OF PROCEDURES OTHEB THAN
THOSE SPECIFIED HEREIN MAY RESULT IN
HAZARDOUS RADIATION EXPOSU RE.
The
set complies with the
21 CFR 1040.10
ADJUSTMENTS
FCC-Rules,
Part 15
OR
and
Canada
This digital apparatus
radio noise
Radio Intederence Regulations
Communications.
Cet appareil
d6passant
brouillage
communications du Canada.
emissions from digital apparatus as
num6rique
les limites
radio6lectriques
not
does
applicables dans la reglement
This
exceed the Class B limits for
of the Canadian Depadment
pas
n'6met
6dict6
bruits radioelectriques
de
par
le ministere des
set out
warning is located on the rearside
sur
with
in the
le
of
CAUTION
PREVENT
TO
BLADE OF PLUG TO WIDE
INSERTED.
POUR
EVITER
INTRODUIRE
FICHE DANS LA BORNE
DE LA PRISE
LASER
Type
Wave lenght 775-795
Output
Power
Beam divergence
inside
and
ELECTRIC
ATTENTION
LES
CHOCS
LA LAME
ET POUSSER
this laser
LA PLUS LARGE DE LA
Semiconductor laser
2,5 mW
35 mW
60 degree
product.
SHOCK, MATCH WIDE
CORRESPONDANTE
SLOT, FULLY
ELECTRIQUES,
JUSAU'AU FOND.
GaAlAs
(at
nm
25"C)
(Read)
(Write)
-\
CAUTI 0 N :,ru,.,r,i-------
DANGER: rNVrsrBLE LAsER RADTAIoN wHEN opEN.
VARN I NG
THIS I)F]VICE COMPLIBS \fITH
OPERATION IS
INTERFERENCE, AND
MAY CAUSE
This
limits for a Class B
FCC Rules. These
protection
installation.
in accordance with
interference
guarantee
installation.
LASERRADIATION
wHEN
equiprnent has
D0 NOT
OpEN.
AVOID DIRECT EXPOSURE TO BEAM,
AVATTAESSA
ALTTI I NANAKYMATTOMAALLE
KATSO SATEESEEN.
OSYNLIG LASERSTRALNING NAR DENNA DEL AR
I OCN SPARREN AR URKOPPLAO. BETRAKTA EJ STRALEN
SUBJECT TO THE FOLLO\TING
UNDESIRED OPERATION.
against harmful inteference
This equipment
to radio
that interference
------\
rttto
STABE
JA SUOJALUKITUS OHITEJTAESSA OLET
(2)
been tested and found to
digital device,
limits
are
the instructions, may
communications. However,
--
BEAII
LASERSATEI LYLLE.ALA
I'AI{T 15
TI]IS DEVICE MUST
pursuant
designed
generates,
will not
occur
OPPNAD
THE FCC
OF
T\TO CONDITIONS
ACCEPT ANY
comply with the
part
to
provide
to
in a residential
uses and
cause harmful
in
15 of the
reasonable
can be used
there is no
particular
a
or
DANGER
AVOID
(U.S.A.)
RULES.
(1)
:
THIS DEVICE MAY
INTERFERENCE RECEIVED,
lf this equipment
television reception,
equipment
the interference
-
reorient
-
increase the separation
-
connect the equipment
from
-
consult the dealer
helo.
or
that to which the
-
Invisible laser
radiation
DIRECT EXPOSURE
NOT CAUSE HARMFUL
INCLUDING
does cause harmful interference
which
off and on, the user is
by one
relocate
can be determined
more
or
the receiving
between the
into an
receiver is
or an experienced radio/TV
INTERFERENCE
encouraged to try
of the following measures
antenna.
outlet on a circuit different
connected.
TO BEAM
by turning this
equipment
technician
when open.
THAT
to radio
and receiver.
or
to correct
:
for
THIS PRODUCT WAS
CONNECTORS BEWTEEN
THE POSSIBILITY
IF YOU HAVE
ANY
CHANGE OR MODIFICATIONS
OR MANUFACTURER
ANY PROBLEMS
FCC VERIFIED
SYSTEM COMPONENTS. IT IS IMPORTANT
OF CAUSING INTERFERENCE
COULD VOID THE
IMPORTANT
UNDER TEST
CONTACT YOUR DEALER.
TO THE EQUIPMENT BY
USER'S AUTHORITY TO
CONDITIONS
TO RADIOS,
THAT
INCLUDED
TELEVISION
THE
THAT YOU
SETS AND
NOT EXPRESSLY
USER
OPERATE SUCH EQUIPMENT.
USE OF
USE SHIELDED
OTHER
SHIELDED CABLES AND
CABLES TO REDUCE
ELECTRONIC
APPROVED
DEVICES.
BY THE
GRANTEE
Page 6

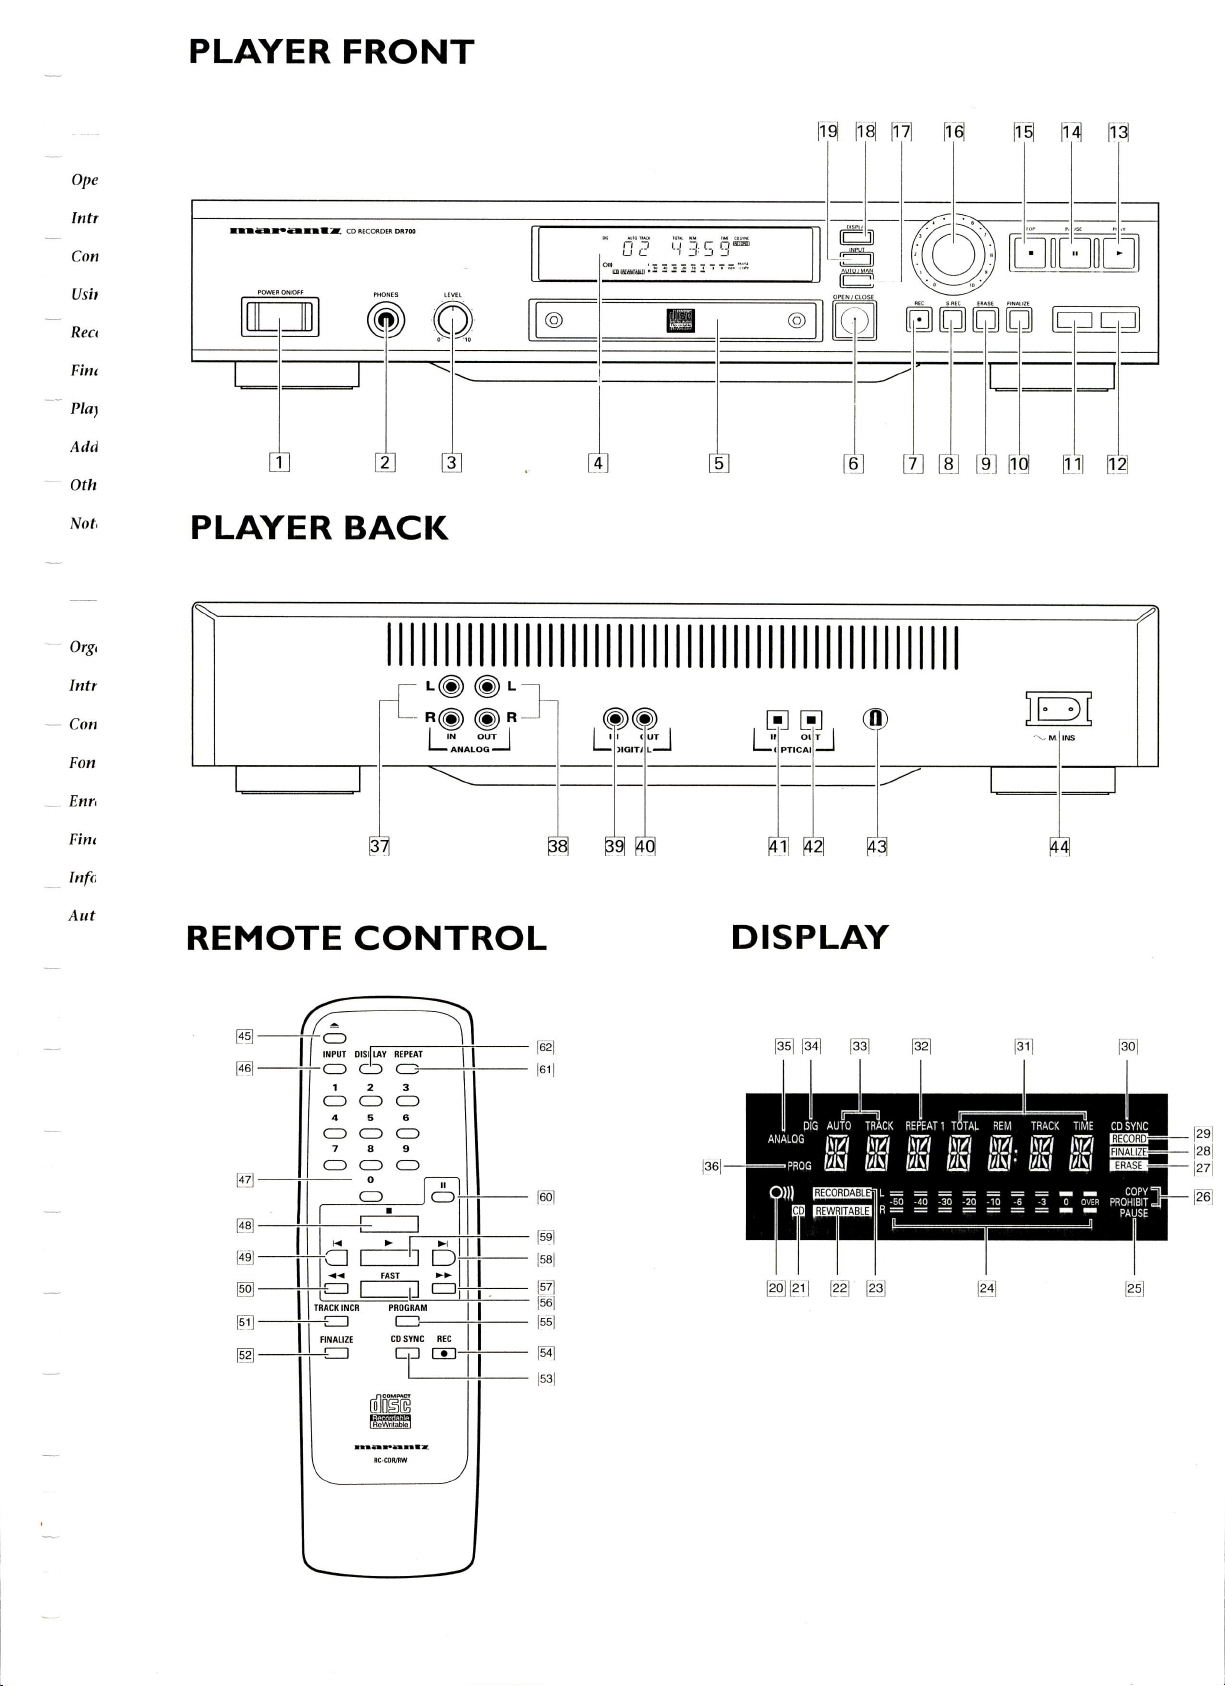
OPERATING
For
illustration:
see fold-out
BUTTONS
Player
pOWen
E
pHOrufS...............ptug
El
l-ql
LeVeL...................headphone
E
Oisptay
f{
oisc
[q]
OpfNlCl-OSE
[7]
nec....,..................recor0
E flruRuzf
E ennSe..................erase
@ CO
pneV
E
li2l ruexr
pUV
EE
pnUSe
ItZl
E srop
li6l necording
FZ
RUfOnrrlnN...........determine
Llql
D|SPLAY...............select
[t9 lrupUf
front
ON/OFF..turns
(information
drawer
..............finalize
SYNC.........,.,..synchronized
l{
.............previ0us
)1..............nexr
).................start
............interrupt ptaying
r................stop
level
...................setect
screen)
A
opens/closes
when
(anatogue)
ptayer
the
for
recording
recording
recording)
hack
ptay
to
display
input
on/off
headphones
volume
disc
recording (automatic
track
or record
track
number
information
signal
drawer
start
Player
[97
nnatogue
lQ91
Analogue
f99 Digitat
1401 Digitatoutput
E-11
Opticat
l42l
Opticat
Fsl
Mains
[-42]
Connection
back
input
output
input
digital
input
digitat
outpur
voltage
selector
to
mains
Display
(teft
and right)
(teft
and right)
(not
on
all models)
Remote
lnEl
OperulClOSE
Ed tnpUf
@ Number
EE
srop r
pnevouS
lagj
E0
Search
lStl
rnacx
E4
rlrunlze..............finatize
@ CoSyttC...............synchronized
@
nec
pnOCnnu
E
@
rnsr.....................fast
E Search
159
ruexr )1...............next
puY
lsgl
@pAUSf
[0tl
nepenr................repeat ptay
@ OtSpUY...............selection
control
a..Open
...................setect
keys
0 - 9
................stop
F(......previous
backward
INCR........determine
r1..,...............rec0rd
...........se|ect
fonivard )>
).................ptay
............intenuptptaying
{{
or close
input
program
search
rrack
disc
signal
track
track number
recording
lor informalion
drawer
to be
displayed
EQI
Remote
l?tl
C0.........................CD present
@
neWnfRBLE
@ neCOROABLE
E4l Indication
plUSe
Eql
@
COpV PROH|B|T..digitalrecording
EZ en1Se..................erase
@ ftNntZe..............finatize
@ neCOnO...............record
@
coSvNc...............CDSYNC
E Track
Fa nepenf
lssl nUfO
@ 0tC........................digitat
Fql
nrunlOC...............analogue
pnOC....................p|aying
Eql
control
is actve
CD-H
or CD-RW
......disc
of recording
.................pause
number
and
...............repeat
TRACK
......automatically
present
present
....disc
ptaying
and
function
last
erase-waiting
recorded
waiting
setting)
(ftashes
duration
function
input
input
based
pre-recorded
(a
disc)
for
recording
for
recording
level
is active
not
ailowed
track or
recording
entire
setting)
CD
in record-waiting
activated
increasing
signal
signal
program
on
CD or finatized
-
during
(ftashes
CD
(flashes
in finatize-
during
track
numbers
playing
in
setting)
playing
Page 7

-INTRODUCTION
Unpacking
--l-Congratulations
CD-Recorder now
$l
audio Compact
E
l
$l_ntaV
__l
_discs
_not
-1
pre-recorded
all
With the exception of legal reskictions
can now
used to record must
fees have been
on other types of discs
possible.
There are two types
CD Recordable Audio
Fully
discs
disc can be
OJ[5G
OIGITALAUDIO
on the acquisition
enables
Discs. Naturally
CDs and combined
your
create
recorded and
can be
ncoMpAgr
own
paid
on lhese discs in some countries. Recording
of
played
recognized
you
high-quality
bear
(e.9.
recordable
(record
subsequently finalized audio
on all CD
by the following
r:EFFIEEIIIII
your
of
to record,
the recorder
pertaining
audio recordings on
the logos
professional
lor
CD-R
AUDIO discs:
once):
players
CD-Recorder. This
play
and erase
can also be used to
such
CDs,
shown below. Copyright
recorders.
and
logo:
your
Extra.
as CD
to copying,
recordings)
CD-R
you
CD.
A CD-R
own
The
is
First
check the contents
following:
-
CD-Recorder DR700
-
Remote control with
-
Power
cord
Audio
cables
Digital coaxial
lnstructions
lf one of these components is missing,
immediately.
you
move
the appliance.
Mains
Check whether
the
same as the voltage of the mains.
recorder have
position
indicated for
-
(2
with red
audio cable
Save the
packaging
voltage
voltage
the
a selector
the local mains voltage.
packaging.
the
of
batteries
packaged
white
and
(with
black
material - it may come in handy if
selection
indicated
on the back
on the back of the
Some models
(43).
please
Set-Up
lt should contain the
separately
plugs)
plugs)
your
inform
Set the selector to the
supplier
appliance
ol this
is
2
ReWritable
CD
Recorded
players
all
CD
An increasing number
for these discs in
by the following
_
ncoMpAcr
reJ[5G
DIGITALAUOIO
tBelllntablej
you
Once
to
use an
_
while following
Attention!
start using the recorder,
'make'your
erasable
Recordings
It is
copyright, including
television
not be used for
(multiple
Audio
and linalized
and recorders that
own
CDs. Nevertheless, we
(CD-RW)
the instructions
forbidden to
audio CD-RW
players
of
the future. A
logo:
digital audio disc
given
may
only be made for
copy material
computer
and audio recordings.
applications
recording):
discs can be
are suitable for
and recorders will
CD-RW disc
you
will
here.
can be
discover how
recommend that
your
on
personal
protected
programs,
This
of this type.
played
on
CD-RW discs.
be suitable
recoonized
easy it is
you
first
attempt,
use.
by
films,
appliance may
-
Place
-
Do not
sunlight.
-
Do not
-
lf the recorder
space remains free
ventilation.
Aftention!
recorder
the
place
use the recorder
lf the
with the instructions,
dangerous radiation
Only authorized
appliance
maintenance.
on a strong, vibration-free
the recorder
placed
is
appliance is not
casing or to
near a source
under extremely damp
in
a cabinet, make
on all sides
technicians
of the recorder for
used or
this may result
or
other risks.
perform
surface.
of heat or in
conditions.
sure
that a 1 inch
operated in
in exposure
are allowed
repairs
or
direct
proper
accordance
to
to open the
-
Read the
that
text carefully
you
can
refer
and keep the instructions
to them if necessary.
close at hand
so
Page 8

CONNECTIONS
(PRE-}
AMPLIFIER.
DAT RECORDER.
CD PLAYEB.
DIG. BROADC.
OCC RECORDER
-
SAT. REC.
The numbers
This
CD-Recorder can
(pre-)
amplifier from
In
addition, the
Read
how to connect
your
other audio
Please
between
appliance can be
equipment offers.
refer to the
equipment first.
The following
-
analogue
-
digital connections
-
ootical
Analogue
1 For
with red
(preferably
diaoram
options
connections
connections
connections
recording
and
and white
the
below:
parentheses
be used to record
any digital
refer to the fold-out.
directly or through
or analogue
used as a regular
the CD-Recorder
operating instructions
based on the
for
are available:
playing,
plugs)
the
connect
CD-Recorder or TAPE
(using
CD-Recorder to
connection) based
audio source.
player.
CD
oossibilities
your
other audio
the
enclosed cable
an amplifier
a
on the
<'r
@)
Note:
-
Direct recordings
such as a
player,
CD
can
also be made from
tuner, DCC
digital satellite receiver.
-
playing,
For
connected
DCC,
the
digital output
to the
AUX, etc.).
digital input of
Optical digital
otcltaL
It
aur
__ll
,,
ll,
.
F
Ill.
I
11, 1 L
u
other digital
recorder, DAT
on the CD-Recorder
an amplifier
connections
r'ir''|r"-
sources,
recorder or
(40)
must
(preferably
CD-R or
be
(PRE-)
AMPLIFIER
OAT RECORDER. DIG,
[.-l]
tml
Note:
-
Direct recordings
analogue satellite receiver,
-
playing,
For
must be connected
or TAPE,
Digital
1 For
AUX, etc., but not the PHONO input).
connections
recording and
with
black
the next
diagram:
cr
O
can also be made
output
(Left
the
to the input of an amplifier
playing,
plug)
the
CD-Recorder to a digital amplifier based on
-
CD PLAYER
-
BROADC. - SAT. REC.
'Oe.
ol
ro
ourl
l'"
from: CD
etc.
and Right) on the
connect
DCC RECORDER
player,
CD-Becorder
(preferably
(using
the enclosed
tuner,
CD-R
cable
(38)
1 For recording
available from
and
your
digital amplifier
below. To
connections.
do so, remove
We recommend that
(PRE-}
AMPLIFIER
DAT RECOROER.
t
ml
@
Note;
-
Direct recordiigs can
with optical
DAT recorder
-
For
must be connected
connections, such
or digital satellite
playing,
the
optical digital output
playing
(using
a
supplier)
(with
connect the
optical connections)
the dust caps from
-
CD PLAYER. DCC RECOBDER
DIG. BROADC.
OfflCAl
lx ow
EE
outl
lt"
ro
'o,
LEI:l
also be made from
as a CD
receiver.
to the digital input on
suitable fibre-optic cable,
CD-Recorder to a
based on the
diagram
the digital optical
save the caps.
vou
-
SAT. REC.
E
E
o
another digital source
player,
DCC recorder,
(42)
on the CD-Recorder
an amplifier.
Page 9

-USING
fne numbers
l-
9l
Switching
H
$r
1 Connect
-l
point (44).
THE
between
plug
the
RECORDER
parentheses
and
ON
the
on
Plug the cable
OFF
power
cord in
into the
to
refer
the
mains.
the fold'out.
proper
connection
Attention!
Do not
Never use
alkaline,
Note:
-
player
point
you
cannot be
the remote
there
press
The
control.
-
Atways
make sure
and the appliance.
-
When
on the display
use old and
different
together.
etc.)
switched
control directly
no
are
obstacles
button on
a
CD-Recorder
of the
will
together'
using
towards
the
light up
(standard,
remote control
new batteries
types of batteries
on and off
between
remote control,
the
the remote
recorder and
the
the indicator
(20)
-2
Press the
CD-Recorder
Using
_
Inserting
1 Open
'
2 Insert
indicated.
Reolace the
3
Power ON/OFF
to turn
remote
the
the batteries
'AAA
lid.
lid.
(R03
the battery
two
button
(display
it
on
control
or UM-4)
the front
on
will light up)
batteries
in the
(1)
of the
or off.
manner
Inserting
Inserting
Press the OPEN/CLOSE
1
to open
2 Insert an
appropriate
3 Gently
button
and
discs
the disc
appropriate
area
press
the front
(6)
to
close
drawer.
in the drawer
the drawer.
(6)
discs
on the
label
press
or
removing
button
(see
disc
of the drawer
introduction
with the
front of the appliance
p.
2) in the
facing up.
the OPEN/CLOSE
Note:
-
Check
(See
Disc
-
lf
inappropriate
an
to ensure
that the
Maintenance).
disc is
recording side of
inserted, the display
the disc
is
clean
will show
lu RuxI[7.
-
you
lf
drawer, the
During this
recording time used
Removing discs
Press the OPEN/CLOSE
1
to open
2 Remove the disc
3 Gently
button
4
blank disc or
insert a
recorder
process,
the disc drawer.
from the drawer.
press
the front of the drawer
(6/
to close the drawer.
non-finalized CD-R
will calibrate the disc
the display
and the
willfirst show
last track
(6,lon
button
number.
or
or CD'RW
for optimum
0/a[ and then
the front ol the
press
the OPEN/CLOSE
in the
recording.
the
appliance
Page 10

RECORDING
The numbers
between
parentheses
refer to
the fold-out.
.nDnttK\
AUTO TRACX
ANALOG
r,
r'
!l()r0
PC
tnoc
Olll IFTCoRDABLE
gq
ISEWBITA8LE]
L: : : :
R:
REPTAT I T0TAI
50 40 30 20
: : :
TRACK
.630owR
TIME
CD SYNC
lffrcoRDl
rzrl
lFrNAr
rBASr
I
COPY
PROHISIT
PAUSE
I
General
Make
sure the display
REWRITABLE'is
types
of disc.
lf the
disc already
automatically
can be
started from there.
Recordings
recording
Display
Comments
on; the recording
contains recordings,
search for
can only
time left
button
on the
(18),
indicator'CD-RECORDABLE'
the end of the
be made if there
disc, You can check
after
which
snown.
lf
the display indicates'COPY
can be made
the
of
digilal
source material.
AUTO
VIDEO DIG
ANALOG
PHOTO
PC PROG
O)ll lFEcoRDAsrFl
Eq IREWRITAELEI
TRACK BEftAT] TOTAT
L:::
R:
procedure
-30
20 10 6
are at least
is the
.3
the
CD-Recorder will
last track
sd that recording
seven
this by
the remaining recording
PROHIBIT' (26),
NEM
:
:
no digital recording
TRACK TIME
30
or'CD-
same for
seconds ol
pressing
time witl
CDSYNC
IREcoRDI
lfrNALrzEl
IRASE
I
I
COPY
PROHIBI]
both
the
be
pressing
By
automatically
'AUTO
+
With
automatically
three
+
With
AUTO/MANUAL (17), you
increasing
TRACK' (33)will
VIDEO DI
ANAIOG
PHOTO
PC
PRO6
TEmnDffi-in L: : : coPY
Ol)l
. .- _
,Cq
|REWnTTABLE
automatic
added after
seconds;
manual increments,
track numbers
time during recording
(51) (on
the remote
seconds. Track
Attention!
lf the
original has
seconds, the
manually. lf
recommend
of the track
the track
appear
.50
40
30
: :
R:
increments,
numbers
track numbers
you
that
numbering.
a new track
a silence
you
can
pressing
by
control); the
cannot be
pauses
are recording
you
always select
can opt for manually
numbers.
on the
TOTAL
NEM TRACK
-20 .10
on the odginal
cannot
add track numbers
REC
minimum
added after recordino.
lasting
should
lf Auto is
display.
TIME
.3
6
0 ovEn
number will
be added
(7)
or TRACK
track length is four
less than
be increased
from
LPs, we
manual operation
selected,
pRoHtEtT
inulr
be
of at least
manually.
at any
INCR
three
or
The
Serial
Copy Management
recordings
the disc is
A
maximum lotal
cannot
unrestricted.
Attention!
Never
switch the
this can damage the
power
lf a
Recorder will
power
will indicate Rff.n|ER.
r*a *-
I
| ffiil'.'
rcproc f\ ,- ,-
I
I
ottt
I
'cqlRnvRrIABLEiH:::
i
L
__.
Manually
Preparing
+
Make
(see
1 Press
the
display.
recording
to
begin recording
sure the disc is free
p.
10)
the INPUT button
System
(SCMS)
be digitally re-recorded.
of 99 tracks
can be recorded
CD-Recorder otf when recording;
disc.
failure
occurs during
attempt to repair the
is restored;
AUT. TRACK
L:l
tREcoRDABrEt
during this
nEpEAr ] TorAr ,r"
t- l-t t r t_
L-
:
U
; fr = = fr =
U ,- lr
an analogue
of scratches and/or dust
(19)
'ANALOG'
until
ensures that
Analogue
recording
on a disc.
recording, the
disc as
procedure,
-,r;;
= " *-,
the
rMF
cDSyNr
L:i lji:?l?l
ii'osi
*o.r?;;
PA,,sl
source
(35)
appears on
digital
of
CD-
soon as the
display
oarticles.
To
start recording
1
Switch the record-waiting
button. The display
VIDEO OIG
ANATOG
PHO]O
PC
PROG
O))l
_:
[q LBEWBlTAgtEl
To
set the desired recording
source and
that all
recording
the
you
lf
number,
the
of
and
loudest fraoments.
VIOEO DIG AUTO TRACK ffEPEATl TOTAL
ANALO6
PHOTO
PC
PHOG
ol)l
cq
want
a
press
indicator will
AUTO
TRACK REPEAT1
IREcoRDAEmL:::
adjust the recording
blue but none
playing
period
of silence at the
PAUSE
be recorded.
Press
analogue
The
displayed.
recording
(13)
PLAY
to
start recording,
source.
relevant track number
Press the Display
time remaining.
setting
on by
start to flash
TOTAL REM
-30
H:
50 40
: :
level,
20 l0
start
level
of the red
level
indicator
on the display
NTM
-10 .6
30 20
beginning of a new
(14).
A three-second
and immediately
and the recording
(18)
button
pressing
6
playing
using the button
segments light
the REC
'RECORD'
j
the
analogue
(16)
up on the
(24)
pause
(silence)
start the
time
used will be
to view
the amount
(7)
(29)
so
during
will
of
Page 11

-
ln
the automatic
pause (silence)
+
You can also use
(15)
button
-)
recording, the
After
be automatically
indicate
*
Attention!
you
lf
player,
disc'p. 7.
mode, recording
on the original.
the PAUSE button
you
want to make
if
up-dated. During
Llfj Xh1 T [ .
want to
the disc
will
more than one
temporary table of contents
] TOTAL REM TFACK
RTP€AT
r-r r-l l-l T l-
f-
Ltfl
.403020t0630ovn
play
the disc
must be finalized. See
after a twenty-second
stop
(14l
instead of
recording.
of the disc
process,
this
in another,
the
TIMI
t
L
regular
'Finalizing
the STOP
will
will
display
cD sYNc
I
lREcoFDl
I
lFrtuALiZEl I
ERASE
L
I
coPY
I
PROHIBIT I
PAUSE
I
CD-
a
{
In the
by
control).
cannot
manual mode,
pressing
on REC
The minimum track
be inserted after
you
(Z)
add track numbers at any
can
TRACK INCR
or
length is four seconds.
recording.
Note:
-
With the
D8700, direct
with an'lnput Sample'Frequency
The
Sample
ln all other cases, the Sample
off.
Rate Converter
the input signals
To start
recording
recordings can be made
of 44.1
willthen be automatically
Rate Converter
into
CD
signals
(44.1
1 Activate the record-waiting setting
. The display indicator'RECORD'
button
TOTAI RI
: : : :
REPTAT I TOTAL REM
.50
40 30 20 t0
+
lf the digital
AUTO TRAC( REPEATI
VIDEO DIG
ANALOG
PHOTO
PC PROG
RFCoBDABLE,;;;--
O))l
led iuEwnnABlal
R:
connection is incorrect, the display
AWo TBACK
G
lDih^ohioi a '
IFEWRTTABLEIR:::::
(5t) (on
kHz +/- 100
kHz).
pressing
by
(29)will
.6 -3
TRACK
63
the
lncrements
from
sources
ppm.
switched
willtranslate
the REC
start
COPY
0 own
PROHISIT
PAUSE
indicator'DlG'
TIME
CDSYNC
rREaoFol
IiTNITEE
IEFESA
0 owR
PRoHlglT
point
remote
(7)
flashing.
--
Manual
source
Preparations
In
order to
1 Press the
(depending
DIG EPI
pressing
By
automatic
selected,
-+
In Auto
the digital source
numbers
recording
from a digital
for recording
record lrom a CD,
INPUT button
DCC, DAT or MD
(19)
number of times until
a
on the connection used)
IIFL appears on the display.
nEptArr TorAr RFM TBA.K
,66ilb"
I
TllT-f
I ;1";;. i t t f-t
t"*"'-
O)ll
I
I |ed mffirAilEl
u,fffiDo
;YFLfI FI
O)ll
@-REwRrrABtElR:::
AUTO/MANUAL
increments
'AUTO
r)lll IRECoRDABLEIL:::
Eq iwnir^BiEl
mode,
TBA.K
l-i
Feeonoai)Lr,;
R:
rFAcK
\/
L:i
/\
fr ; ; - = -
:
:
ToTAL
BEpEAr l
II:i:I
lEEcoEaABlE,
TRACK'
track
; ; ; i = E
-
you
(17),
for
track numbers. lf
the
(33)
will appear on
'
d0
s0
30 20
: :
R:
numbers are automatically detected
material. In this mode,
manually.
DIG
r tjl
,
f-l
BErv
can opt
.10 6 .3
you
)(
t1L
i- Et7
I
TIMI CDSYNC
r lREeonDl
I LrNAtzEl
]-
O OVEF
'FACK
TIME
Lffi
",i!i
for manual or
'automatic'
the display.
ovrR
0
cannot
ot
LIIASE ]
PROHIBIT
cD syNc
pAUsE
"oi?;il
coPY
PffoHl8ll
pAUsE
insert
is
from
track
want a
pause
(14l.
button
the
at
beginning
A three-second
of a new number,
pause
you
lf
the PAUSE
then be recorded.
the PLAY button
Press
the digital source.
start
+
The relevant
track number and the
appear on the display.
(13)
to start recording and
recording time used will
Press DISPLAY
(18)
to
remaining recording time.
trAcK nEP€ATrr.rAL
ii'
3
Press
ffi{.'-'
O))l,trcoRDAdLEr:E
Eq,REWNIIASLEIH:::
(15/
STOP
to
stop
; 6 ; ; = = t ;a *o!,o,fiI
recording in either the
automatic mode.
t
In the automatic mode, recording
pause (silence)
on the original.
will
Note:
-
You can also use the PAUSE button
(15)
button
-
After recording, the temporary table of contents will be
automatically up-dated.
you
if
want to make more than
During this
(14)
process,
indicate UPll1rt.
AUTO
VIDEO DIG
ANALOG
PHOTO
rc PROG
Olll lnlcono^BrrL:::
-50403020106300vtfi
lqq llw!ffflA8ul
TRACK NEPEAT ] TOTAL REM
| | f-r t-l l-l
,_t r- t_| f-t
: :
R:
lr
5-
stop after a
instead
recording.
one
the display will
press
(silence)
will
immediately
view the
ffi
PAUSE
manual
or
twenty-second
of the STOP
TIME
CD SYNC
18!C0r0l
L_
EIAL]Zq
t_
rEiAsll
COPY
PROHIEIT
PAUSE
Page 12

Aftention!
you
lf
want to
the
disc must
Automatic
In
order to make
equipped with
used to
original may
Preparations
1 Press
(depending
X16 0/-'r [[flL
play
the disc in
finalized.
be
recording
recordings
the handy
synchronously record
be a CD, DCC,
for recording
the INPUT button
on the connection
[;@.
I ffiH-f
;;'i'c
|
I
o)ll IEE--c.-089a-aEl
I
rU tn.wnfABrrt
I
u,fiffio
CD-SYNC function.
appears
*o.*
t-t
L U
TRACK
rFll ir
(Jlll
InEC0fiDABLEIL:::
- '-
- __--.
.
BS
I-8FW8[4CL!
.t
Do not
start the digital
source
To start recording
1 To
record a
one track; 5LJll[tracks,
all tracks; 5LJl,lL-
single track,
press
CDSYNC
i
willappear
will appear
"--
Si{.'-'
())ll
lBEcoRDABlEl
Eq iREwslTABLEl
Wait until the record-waiting
indicator'RECORD' (29)
is incorrect,
Press
2
+
The CD-Recorder will
start the
recording will not
The relevant
appear on the display.
the display indicator'DlG'
OIG AUTO TRACK R€PEAT1
VIDEO
ANALOG
PHOTO
PC
PBOG
O))l FEcohDTtirTl
_ __ Eq
O))l lREcoRDAilr
c0 BFWnIAB|f
L:::
x:
LRIWBIIABLEI
L: :
n:
Play on the digital
now automatically
source in the middle
commence until the
track number
a different,
See'Finalizing
from
easily and
individual
a digital
quickly,
tracks or
DAT or MD.
(19)
a number
of times
used) XIE
on the display.
,rr*r rro,
n
f-t
L
= _: _:
:19 -99 -:9 J -q
3
n
BE'EAT r Toral RrM TRA.(
I r
.50 .40
-
: :
n:
\/
/\
,:
30 20 10
,r"
r
|
yet.
press
CDSYNC
on the display. To
(10)Iwice
L: : :
H:
starts to flash. lf
50 40
source.
in rapid
the
on
display.
{"i,t
:
: :
:
and
iij l:-
:
setting is
-30 -20 .10
30 20 10
of a track, automatic
activated and the display
(34)
TOTAL REM TRACK
6 3 0 ovrs
6 3
beginning of the next
the
recordino time used will
regular
CD-player,
a disc' .
source
the recorder
This
function
entire discs. The
until
L-Dfl)(IflL
'*o*.-n",
LIi r ffr:?[?l
f-l t-
g
-1
?llj
rMr
l-:l
L ffi
.6 .3
o ovLP
(10)
once to record
succession to record
fT
the digital
will flash.
TNACK TIME
0 ovrr
start to record. lf
is
can be
or
*rrr.
i'|il''i'i
coPY
"311'fl1
cD syNc
coPY
PfloHl8rl
pcusr
record all
F$4
coPY
PAUSE
connection
coPY
PRoHtBtr
pAUsE
CDSYNC
lhEcbBAl
LFINALIZE]
IRASE
COPY
PflOlil8[
fAI'St
you
Synchro
track.
{
To
view the
3 Press
.t
In the
second
recording time
(15)
STOP
to
stop recording.
automatic mode,
pause
(silence)
remaining,
recording
on the
press
will stop
source.
DISPLAY
after a twenty-
Note:
-
You
can also use
make
more
-
After recording,
automatically
indicate
UFXErt.
the PAUSE
than one recording.
the temporary
up-dated.
VIDEO
Tllg' ttt-tt1
;;;;.
O)ll lRFcorittA6ir'
tco truwnrrAELEl
During
DIG AUTO TSACK REPEAT1
r-
u
r:
n*
(14)
button
table
of contents will be
process,
this
TOTAI
,_l
: :
l! g 39
l3 i _1
instead
the display will
TRACK TIME
T- r_-
tt-
g
Aftention!
you
lf
want to
player,
disc'.
a
play
the disc
the disc
must be finalized
on a ditferent,
first.
See
Note:
-
you
lf
do not want
must
manually
-
Do not record
because
record
-
A track
this will result
numbers in
on a CD will
information.
a twenty-second
stop recording.
programmed
a
the original
The
CD-Becorder will not
digital signal. Although
seconds,
not
recording
a fraction
be completely
recorded. lf
manually
in the wrong
sometimes immediately
the reaction
of the beginning of
(see
Manual
pause
to be recorded,
sequence from a DCC
track numbering.
(non-programmed)
start with music
start unless ll recognizes
time is less
than 400 milli-
a number may
this happens,
recording from
you
can start the
a digital
FINALIZING/ERASING
The numbers between
Finalizing
Finalizing
order to
necessary if
Attention!
To start finalizing
1
2 From the
is an extremely
play
the
the disc is used
Finalizing
CD-R
disc. With
erased
Place the disc
yet
not
in the recorder).
STOP setting,
within two seconds.
The approximate finalization
and will
be at least two
parentheses
a
disc
simple
disc on another, regular
in another
refer to the fold-out.
procedure
CD
CD-Recorder.
makes it impossible
a CD-RW disc, the
before it can
you
want to finalize
be used again.
in the CD-Recorder
press
FINALIZE
time will
be shown on
minutes.
that is necessary
player.
to record further
entire disc must be
(8)
and then REC
(tg).
of
,,lllj
(15)
STOP
CDSYNC
trEmfiit
IFIilIilEI
IEFISFI
COPY
P8oilt8lT
PAUSE
regular
'Finalizing
you
or DAT,
Always
sequence.
sometimes
source).
in
lt is
not
on a
(if
it is
the display
to
CD
a
(7)
Page 13

{
finalization, the display will count
During
Finalization is complete
total time
recorded appears
l-
Note:
Sl
6 |
dl
$l
-
|
finalization, the CD-Recorder
During
commands.
ln order to
prevent
not be switched off
Erasing a disc
--.rVith
a CD-RW
new recording.
fhere
are two ootions:
Erasing the last recording
I Place the disc to be erased
in the recorder).
From
2
then REC
rFFft(
ANALOG
-irasing
1 From the STOP setting,
within five seconds, and then
to erase the entire disc; ,?15i and
the display.
disc, recordings can be erased
the STOP setting,
(Z)
within
'ERASE'(27I
and
DIG AUTO TRACK
VIDEO
PHOTO
PC
PffOG
RrcoFDABrrl L;
O)ll
lcD lREwiiriAdiEl
the entire disc
VIOEO OIG AUTO
ANALOG
PHOTO
PC PROG
O))l tuEc()RDiqlEl
labl IAEWBITABLEI
TRACK
when
total number of tracks and
the
in
lhe display.
will not accept any operating
damages
or disconnected durino
B:
:
r
=
u
to the disc, the CD-Recorder
in
the CD-Recorder
press
the ERASE button
two
seconds
REPEAI 1 TOTAL REI!,I TRACK
T
L:i L:i
I
tr I t,_
fr =; - = : :
press
R€PEAT 1 TOTAL REM TRACK
ll
-30 -20 -10 .6 .3
40
to erase the
will appear
on the display.
T
the ERASE button
press
REC
'ERASE'(27)
t1 'l*
t-1
the time down.
finalization.
and replaced by a
(il
it is not
(9)
last
track;
ik-ffi
c0ry
PFOHISIT
PAUSE
(9/
(Z)
within two seconds
will appear on
ovER
0
the
may
yet
once and
twice
PLAYING
The numbers between
Normal
1 Press
playing
(13)
PLAY
when the disc drawer
track number and the
display.
{
Press DISPLAY
track.
{
Press DISPLAY
time of the disc.
{
i
DISPLAY
Press
indicators
time
Press
(blue
passed
PAUSE
button again to continue
t
+
t
NEXT
Press
Press PREV
You can select any
using the number buttons
number,
digit
{
Press
twice the
{
Press FAST
>>
playing
(57)
forward or backward at eight
{
Press REPEAT
displayed.'REPEAT
ANALOC
PHOTO
PC PROG
O)ll EEeanDaBLE
lco lREwRlTAbLtl
parentheses
to start
(18/
to
(18)
twice to view the total
(18)
a third time to deactivate
and red
will once again appear on
(14)
to temporarily interrupt
go
to
02)
go
(1,
to
track number by
press
the two digits
{{
or
speed.
(56)
and then
(61/
to repeat
1'(32)will
:
r
=
R
refer to the fold-out,
playing
(this
is
either open
playing
view
indicators)
or closed).The relevant
passed
time
remaining
the
on the display.
playing.
to the next track.
previous
to the
(47)
on the remote control.
in rapid
(50/
to search
(57)
>>
times the
the track that is
appear on
-10 -6 -3
.30 .20
40
may
button
will appear on
playing
remaining
the record
the
display.
playing.
track.
pressing
the
succession.
forward
(50)
{{
or
playing
currently
the
display.
|IEmFol
IFJNTIiA
fEtreil
ovEn
0
PRoH|S|T
PAUSE
pressed
be
the
time of the
playing
playing
The
Press this
track number
For a two-
or backward
to search
speed.
c0ry
at
process
This
may take up to 1.5 minutes.
Before the disc is
finalized,
--
{
Vote;
erased.
-
A finalized
-
again to
-
While erasing, the CD-Recorder
disc
record.
must
be completely
last track recorded
the
erased before being used
may not
be switched
can
be
off .
Press REPEAT
programmed
Press STOP
Programmed
With the CD-Recorder stopped,
(61)
again
or
48)
'REPEAT'
to stop
sequence.
(15
play
to repeat the
wrll appear on the display.
playing.
press
remote control.
Enter
the
tracks
you
want to
play
using the numeric keys
For 2-digit track numbers, enter both digits
{
You can
To
3
-t
To
program
play
your
the
cancel
up to 20 tracks
program, press
program,
PLAY
press
in
any order.
(13
STOP
the disc drawer.
disc or
entire
PROGRAM
in rapid
or 59).
(15
or 48) twice,
pre-
(55)
the
on
(47).
succession.
open
or
Page 14

ADDITIONAL
IN
FORMATION
FIXING
The
numbers
PROBLEMS
between
parentheses
refer
to the fold-out.
Specific
MESSAGE
READING
OPC.......,........|aser
N0
DISC
UPDATE ........the
WAIT
..............
FU11..............
CD FULL........
EMPTY
INPUT
............
FINAL ............
RECOVER......
OPCFAIL........
SERV|CE....,...
NO
AUDIO ....
display
....MEANING
......disc
........n0
..........the
information
power
present
disc
table
of contenls
after
a recording
player
the
the
numbers; it
there is
finalized
no digital
OPC has
number
recovery
power
fails,
no longer
OPC
recorder's
contact
no audio information
are trying
intended
instructions)
is
playback
no room for
disc contains
input was
been
of calibrations);
procedure
failure
the
CD-R disc - unlike
be usable
has
failed;
self-test has
your
to record
for
messages
is
being read
calibration
or disc is
performing
program
is full
performed
during recording.
disc is damaged
supplier
digital audio
progress
in
unreadable
of the disc
internal
already
additional
no recordings;
selected
performed
on a CD-R
for
96 times
the
disc must
the
failed;
is
available on
(see
is being
contains
recording
CD-SYNC
automatically
lf
CD-RW disc - mav
see
disc that is not
Introduction,
updated
actions
twenty
it
cannot be
(maximum
be finalized
procedure
this
player
or
'Fixing
problems';
the disc. You
after
is defect
user
you
lf
first. Maybe
sYMPToM.........,......SOLUTION
No
No sound......
Amplifier
is
distorted
Play
not
Remote
not work.............,......
Will
Recording
distorted
20
second
between
Player
not
your
think
you
power......
sound
will
start........
control
not record
does
react.....
.........
is
pause
recordings.
CD-Recorder
forgot
.
.
.
a
a
is defective,
a simple
check to
(1)
check to
plugged
switch
immediatelyback
check the
if
source
the
be
sure this is
check to
facing
clean the
check
another
step.
ensure
is on.
ensure that
in
the recorder
using an
line
outputs on the
connected
ensure that
up
disc
that the
disc
does
point
the remote
Recorder
a
check the
no recordable
I
check the
I
the disc
make
see
source'CD-SYNC
use
player
batteries and replace
disc and replace
is not an
sure the recording
'Automatic
the
ON/OFF button on the
to
switch it off and
that POWER
conectly
ON
audio connections
amplifier, try
to the PHoNo
not the
(see
disc is not defective
control directly
disc has been inserted
audio disc
recording
it is
wise to read
ON/OFF buflon
the
oower cord is
OFF and then
using a different
CD-Recorder
input;
case
the label of the
p.
10)
if necessary
level is not too
from
p.
7
a digital
back on
this list
might
make
CD is
by trying
at the CDif necessary
high
front of the
9
Page 15

OTHER
mallunction
ll the
I
rnl
,d
1 Switch
\l
2 Simultaneously
$[
I
+
{
+
--
+
{
3 Switch
the
switch
and
button.
The display
few minutes,
a
After
tat155[ X.
lf the tfltl]tl
to be
needs
Consumer
the Consumer
of
fttl!;lit
l{ the
malfunction
the
instructions,
incorrect
instructions
user
supplier.
you
cannot solve
lf
center.
from
exit
INFORMATION
continues,
recorder
the
Line to
connection.
the
off
the
off using
press
recorder
will now
indicate
the
message
repaired. Consult
find the
Line can
il message
may be a
inappropriate
an
once
the
recorder using
Diagnostic
perform
the PLAY
back on
message
appears'
nearest
be
appears,
result of
To solve
again;
problem, go
Program.
Diagnostic
the
the POWER
(13)and
using the
".fii|i1-l.
willchange
your
your
supplier
service
in the
found
there
misinterpretation
mechanical
disc, a
problem,
this
you
can
to the
POWER
the
Program:
ON/OFF
STOP
POWER
recorder
centre.
guarantee
is no clear defect
conlact
also
nearest service
ON/OFF
button
(15)
buttons
ON/OFF
l]flLifl
I
lo
is defective
call the
or
The
of the
defect
carefully
read the
your
button
(1/.
(t)
or
and
Marantz
number
booklet'
and
user
or an
(1)
to
maintenance
Disc
As is the
disc
disc
extent
.
.
case
not directly
will
is, the
that
To write
never use
because
Keep the
always
Never
Never
Never leave
to extremely
disc
pre-recorded
with
affect
reflected signal
clarity of
the sound
wipe
use cleaning
use
the
quality
printed
on the
pen
with a
a
this could
shiny side
damage
of
in a straight
agents
other cleaning
the disc
high temperatures.
CDs,
the signal.
side
hard
the disc
in direct
Depending
diminishes.
CD-R,
of a
point (such
recording'
the
clean. Use
from the
line
for conventional
or scouring
agents
sunlight
fingerprints
may deteriorate
and spots
how dirty
on
felt-tipped
use a
as a ball-point)
nonjluffy cloth
a
to the edge'
center
records.
agents.
do not subiect
and
the
on
the
t0 such
pen;
the
an
and
Recorder
The
Do
ammonia
maintenance
appliance
not use cleaning
scouring
or
be cleaned
can
agents
agents.
using
as alcohol,
such
a damp
cloth'
leather
methylated
spirits,
\
I
to
Page 16

TECHNICAL
SPECIFICATIONS
General
.
System
.
Number
.
Applicable
.
Power
o
Power
.
Operating
.
Weight
.
t
I
I
I
I
(.
Dimensions
Audio
.
Frequency
.
Playback
.
Playback
.
Playback
.
Recording
.
Recording
.
Recording
.
Line
.
Digital
.
Digital
.
Headphones
of channels
discs
supply
consumption
temperature
response
5/N
dynamic
total harmonic
S/N
dynamic
total
output
voltage
coaxial
optical
output
output
range
harmonic
compact
(stereo)
2
CD,
CD-RW
AC
15W
5-35'C
4,2
a3s(W)x30s(D)x8B(H)
distortion
range
distortion
disc
(digital
CD-R
(digital
120V(DR
kg
digital
audio
audio),
audio)
700U
BL)
mm
2OHz-2OkHz
1 05d8.
98dB
85dB
90dB
95dB
85dB
2Vrms
0.sv(pp)/7so
-20dBm
0-5Vrms/8-2000C,
*recording
.
Digital
coaxial
(automatic
.
Digital
optical
(automatic
.
Analogue
values
input
sample
input
sample
input
for line
rate
conversion)
rate
conversion)
input
32-48kHz
32-48kHz
: 500mVrms/5OkO
 Loading...