


Universal
Table of contents
 Loading...

Contents
Special Pointers for Using Mamiya Universal
Main Features
Specifications
Description of Parts
Assembling
Attaching the Lens..
Pulling Out the Lens from its Retracted Position..
Attaching the Hand Grip
Stabilizing Plate
Attaching the Back
M Adapter
G
Adapter..
Polaroid Land Camera Back..
Operating the Viewfinder
Selecting Brilliant Frame in the Viewfinder
Focusing with Coupled Rangefinder..
Areas of
When Using Roll Film Holder
Distance Range Composed by
When Using Polaroid Land Pack Film Holder
Depth of
Depth of Field Scale
Infrared Photography
Shutter Operation
Press Focus Operation
Using Flash
ACCESSORIES
Acceptable Photosensitive Material and Actual Picture Size
Roll Film Holder (6
Description of
Prior to Loading Roll Film
.................................................................................................. 3
...................................................................................................
........................................................................................
........................................................................................................ 7
................................................................................................... 9
Viewfinder Field to be Composed
Field Scale and Infrared Photography
.................................................................................... ................
..................................................................................
........................................................................................ 8
.................................................................................................
..........................................................................................
................................................................................................
x
Parts
......................................................................... 8
.................................................................................. 9
.................................................................................
..............................................................................
9, 6 x 7)
.................................................................................
.............................................................
...............................................................
Brilliant Frame
.............................................................................
..........................................................................
...................................................................
....................................................................
.......................................... 2
............................ 7
.......................................
.................................................
.............................................
................................
.................................
....................................
10
.16
...............
.21
10
10
11
11
12
12
12
13
15
15
15
16
17
18
19
.20
20
Loading Roll Film
Photographing
Roll Film Holder Model
4
5
7
Prior to Loading Roll Film Holder..
Loading Roll Film
Focusing Hood
Polaroid Land Pack Film Holder
Short Course on Photography
Accessories for Polaroid Land Pack Film Holder
Focusing Hood Model
Optical Viewfinder Model
Format Gauge
Focusing Screen Holder
Right-angle and Magnifying Focusing Backs
Composing the Picture by Ground Glass Focusing Screen for
Cut Film
Cut Film/Plate Holder Type J
Cut Film/Plate Holder Type A
Extension Rings
Spacer Set
Life-size Photocopying Set
Tetraphoto Adapter
Accessories for the Viewfinder
Grip and Tripod Adapter
Cases
......................................................................................................
......................................................................................................
.................................................................................................................
.....................................................................................
..........................................................................................
K ...........................................................................
....................................................................................
................................................................................................
P ........................................................................
P ..................................................................
..........................................................................................
..............................................................................
.....................................................................
.....................................................................
.............................................................................................
........................................................................
........................................................................................
..............................................................................
21
22
23
......................................................
................................................................
...............................................................
..................................
.........................................
..................................................................
23
23
24
25
25
26
26
26
26
27
28
29
30
31
32
33
36
37
38
39
41
11
Special Pointers for Using Mamiya Universal
Refer to the following pages for further details.
The 100 mm f/3.5 lens is a retracting type. When the lens
has been retracted, focusing cannot be effected although
l
the two images on the rangefinder coincide.
Page 7
Be sure to cock the shutter before keeping the shutter
open with the press focus lever. Disengage the lever lock
I
button and turn the lever in the same direction as the shutter
cock; then the shutter will remain open.
By pushing the lever back to its original position, the shutter
will close.
Page 16
When framing a 6x9 or 6x7 composition with the finders
brilliant frame, compose it within the inner edges of the
frame width for short distances; use the outer edges as a
guide for long distances.
Page 12
When taking photographs with the vertical format camera
position, on a tripod, use a tripod adapter on the hand grip
socket for vertical format photography.
When using the roll film holder for Mamiya RB or the various
film holders and adapters for the 2
I
made by
M adapter.
GRAFLEX® , Inc., use the G adapter instead of the
1/4 x
3
1/4
Graflok® back,
Page 40
Page 10
2
Main Features
The Mamiya Universal, the same unique breed as the Mamiya Press used by professional
photographers both at home and abroad, is a large 6 x9 film format camera with the functional
features listed below. It offers the distinct advantage of its large film size not only for general
photography, but also for news photography, commercial work, and scientific application.
* Large film size presents sharp, fine rendition of every detail.
* Variety of interchangeable lenses ranging from 50 mm wide angle to 250 mm telephoto.
* Quick interchangeability of lenses with bayonet ring mounting.
* Accurate focusing through coupled rangefinder.
* Finder with bright, easy-to-see brilliant frame, featuring automatic parallax compensation.
* Further accurate focusing through ground glass focusing screen possible.
* Quick photography with roll film holder (lever winding system).
Available in 6 x 9 and 6 x 7 format for both 120 and 220 films.
* Roll film holder K enables photography in 6 x 9, 6 x 6, or 6 x 4.5 format.
* Also accepts dry plates and cut films, providing for single shots with these films.
* Extreme close-up photography through using spacer set and/or extension rings.
* Use of Polaroid Land pack film holder offers instant photographic prints in 3¼ X 4¼ inch for-
mat
.
* The G adapter enables using the roll film holder and various film holders for Mamiya RB, in
addition to the film holders of 2¼ x 3¼ Graflok back made by Graflex, Inc.
* Easy-to-grasp hand grip with cable release for added versatility.
* Many other accessories available for any type of photography.
3

Specifications
Type
Picture size
Lens mount
Shutter
Standard lens
Rangefinder
Viewfinder
: Interchangeable lens type 6 x 9 format camera
: Photography with 6 x 9, 6 x 7, and 6 x 4.5
formats by using various holders. When using
the POLAROID LAND pack film holder, actual
picture size is 73 x 95 mm.
: Breech lock bayonet mount type.
:
SEIKO
#0 shutter
Shutter speed B, 1 -1/500 second
Flash synchronization, M and X selecting type.
With press focus device (shutter blade arrest-
ing)
: 100 mm f/3.5 retracting type, minimum aper-
ture f/32, with lens hood.
127 mm f/4.7, minimum aperture f/64, with lens
hood.
: Reversed Galileian telescope, couples double-
image coincidence type, instant coupling to
selected lens.
: Adjustable brilliant frame fields for 100 mm,
150 mm, and 250 mm lenses; 6 x 9 and 6 x 7
formats; Automatic parallax compensation.
Use exclusive optical viewfinders for 50 mm
and 75 mm lenses. When photographing
through the Polaroid Land film pack size, use
the optical viewfinder model P for 75, 100,
and 127 mm lenses.
Back mount
Grip
Others
Physical dimensions
: Interchangeable back, three types (M adapter,
G adapter, and Polaroid Land camera back)
can be attached.
: Removable hand grip with cable release.
: Flashgun mounting socket, accessory shoe,
camera body stabilizing plate, and tripod
socket are provided.
: (Camera body, with 100 mm f/3.5 lens)
Height: 6 19/32 in. (167 mm)
Width: 4 25/32 in. (121 mm)
without hand grip
Depth: 4 1/2 in. (114 mm)
lens in retracted position, distance
scale at infinity
(Camera body with 127mm f/4.7 lens)
Height: 6 19/32 in. (167 mm)
Width: 4 25/32 in. (121 mm)
without hand grip
Depth: 6 in. (152 mm)
Weight: Camera body: 2 Ibs. 1 1/2oz. (950 gr.)
100 mm f/3.5 lens: 1 lb. 1 oz. (480 gr.)
127 mm f/4.7 lens: 1 lb. 9/16 oz.
(470 gr.)
Hand grip: 10
9/16
oz. (300 gr.)
4
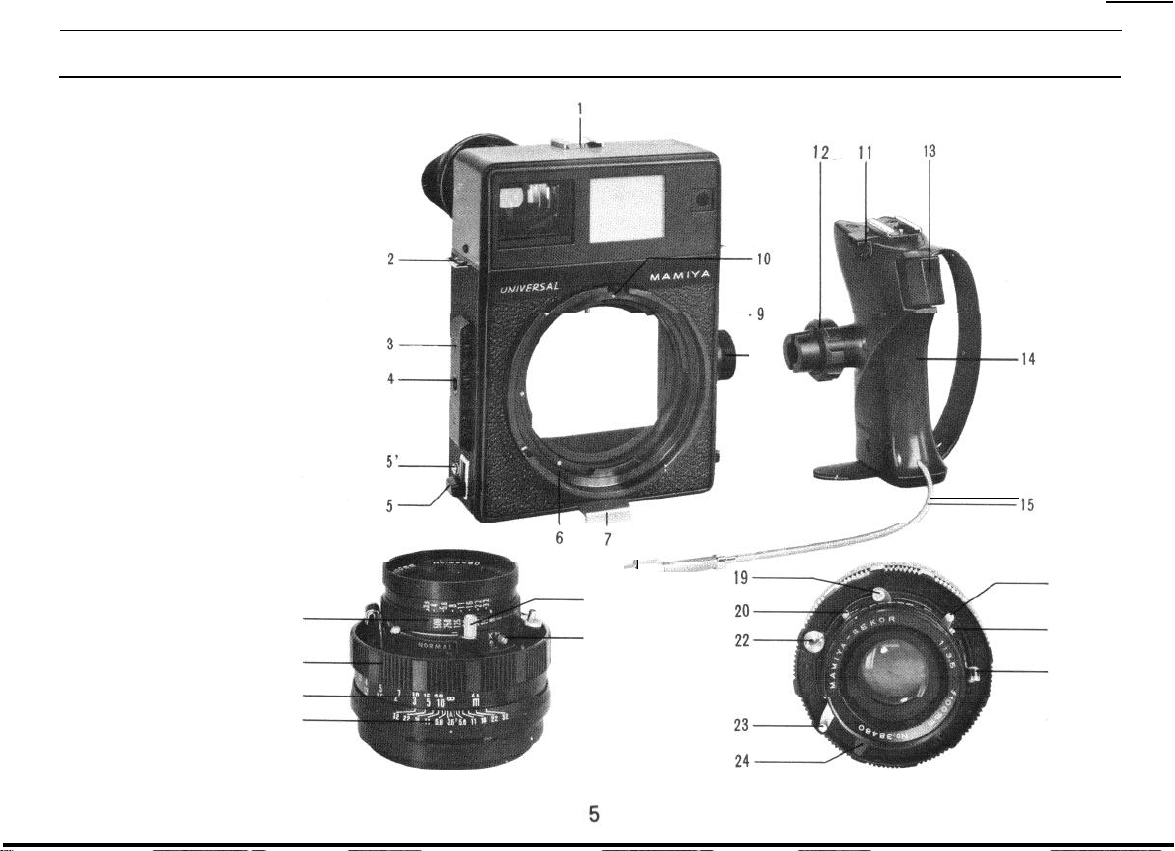
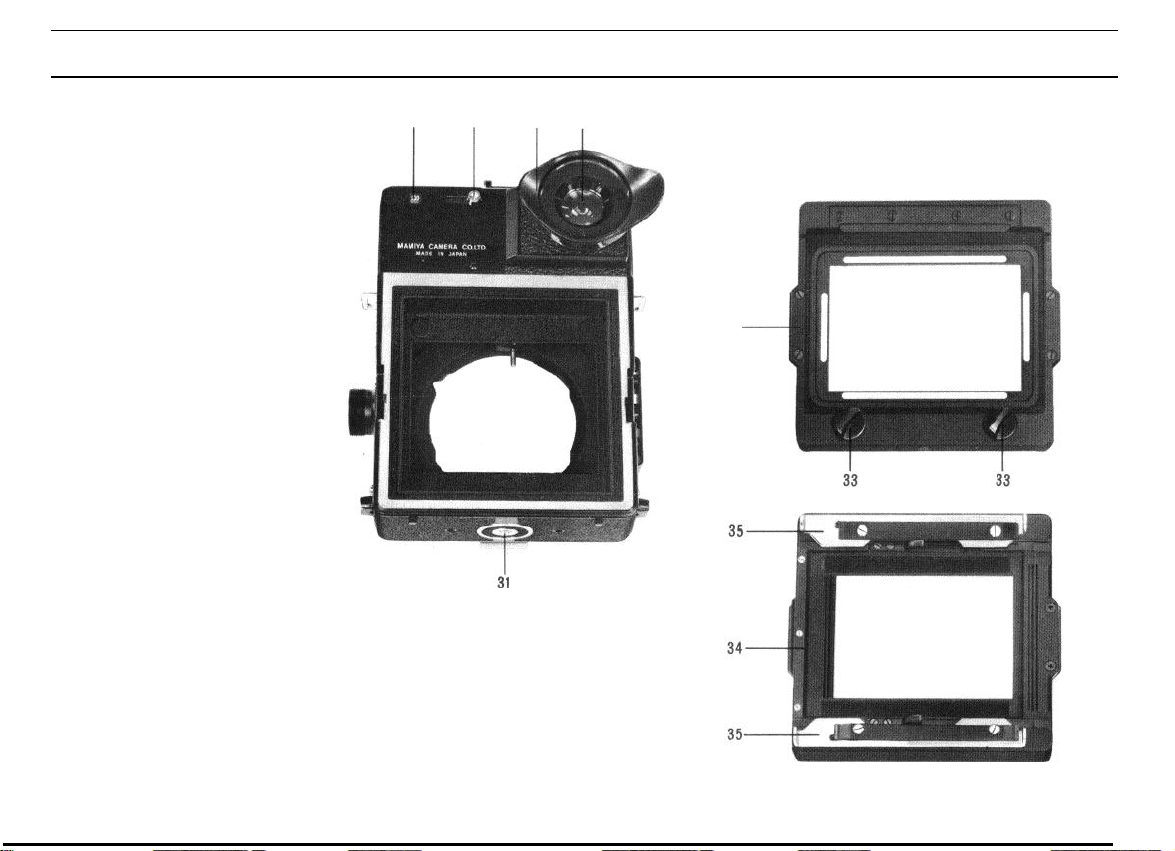
Description of Parts
1
.
Accessory shoe
2.
Strap eyelet
3.
Flashgun mount
4.
Flashgun mounting socket
5.
Back locking slide
5'
Lock button
6.
Bayonet ring
7
. Stabilizing plate
8.
Hand grip socket
9.
Rangefinder coupling pin
10.
Lens coupling mark
11.
Cable release holder
12.
Hand grip lock ring
13.
Shutter release trigger
14.
Hand grip
15.
Cable release
16.
Depth of field scale
17.
Distance scale
18.
Focusing ring
19.
Shutter cocking lever
21
I8
17
16
8
.4
19
20
26
26'
25
20. .
M-X selector
21. Shutter speed dial
22. Synchroflash terminal
23
23.
Shutter release lever
24. Aperture control lever
25. Cable release socket
26
26.
Press focus lever
26' Press focus lever lock button
27. Indicator window for viewfinder
field frame
28. Slide button for viewfinder field
frame selection
29. Eyecup
30. Eyepiece
31. Tripod socket
32. M adapter
33. Locking knob
34. G adapter
35. Locking slide
27 28
29 30
32
6
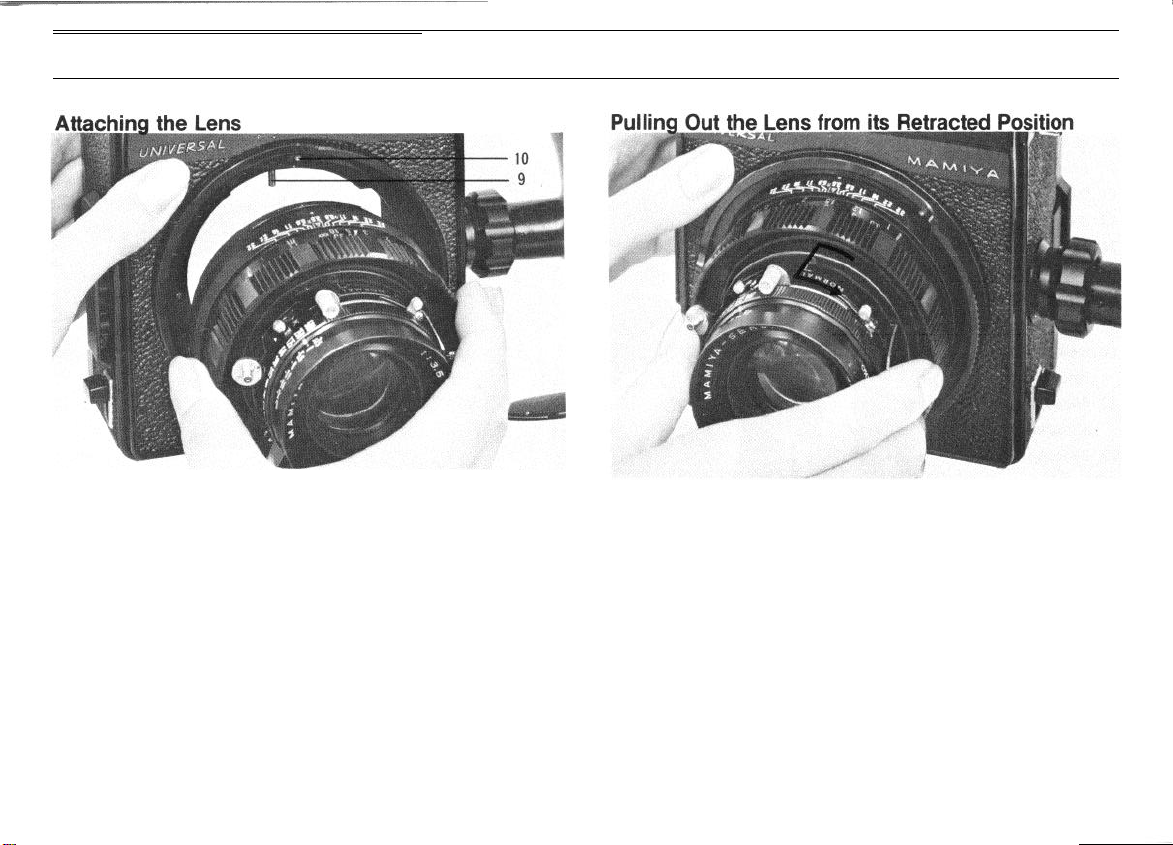
Assembling
By rotating the bayonet ring counter clockwise until it stops, the red
dot of the lens coupling mark on the bayonet ring comes to the top, and
the dust cap on the front of the camera body can be removed. At this
position of the bayonet ring, insert the lens, matching the red mark on
the lens to the red mark on the bayonet ring. Then turn the bayonet ring
clockwise, locking the lens in place.
Detaching the lens is done in a reverse order to that described
above.
PRECAUTION !
Do not touch the pin (9) on the camera body used to couple the lens
to the rangefinder.
If the lens is changed while a loaded film holder is attached to the
camera, be sure to insert a dark slide into the holder.
When using the 100mm f/3.5 standard lens, the lens-shutter assembly
must be pulled out from its retracted position before taking general
photographs. Grip the lens-shutter assembly firmly, turn it slightly counterclockwise, and pull it out; then, turn it clockwise (in the arrow direction)
and secure it in place.
If the lens-shutter assembly is left in its retracted position, the
coupled rangefinder will not function even when the two images coincide and form a single image.
Although the lens is not used for normal photography with the lens-
shutter assembly in its retracted position, the lens is designed to allow
its lens-shutter assembly to remain retracted so that it can be used even
when extension rings are used.
Also lens retraction is necessary, when using this lens with another
camera whose back mount can be extended, when taking a picture with
the back mount tilted.
7
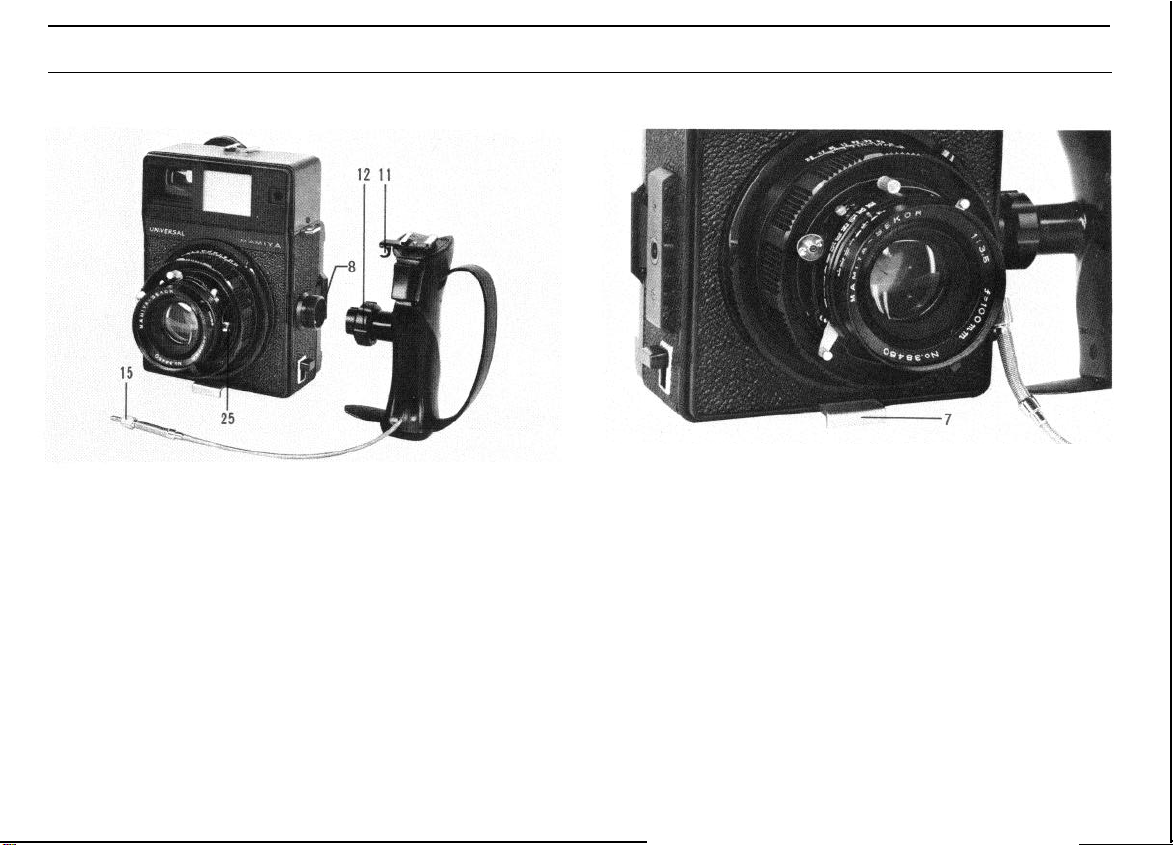
Attaching the Hand Grip
Stabilizing Plate
To attach the hand grip, insert the hand grip into the grip socket (8)
of the camera body, and firmly turn the hand grip lock ring (12).
Screw the end of the cable release (15) extending from the hand grip
into the release socket (25) of the lens-shutter assembly.
While dismounting a lens, hang the cable release on the cable
release holder (11).
Pull out the stabilizing plate (7) on the bottom of the camera body
when resting the camera on a desk, table, or other surface.
8
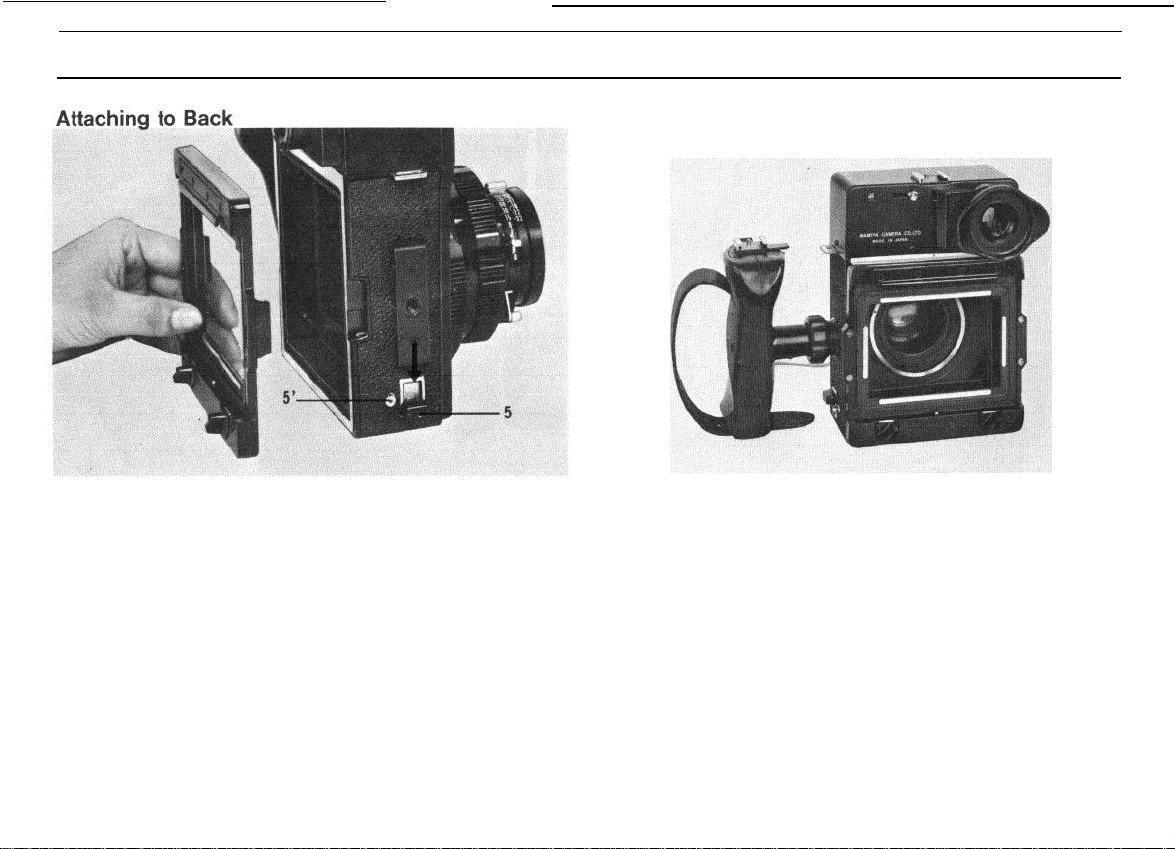
Assembling
M Adapter
Before attaching the back, confirm that both side locking slides (5)
are kept at their lowest position. If not, push down the locking slide
while pushing in the lock button (5’).
Align the red point on the M adapter, G adapter, or Polaroid Land
camera back (Polaroid Land pack film holder and focusing hood model
P) with the red point on the camera body, inserting both sides of the
protruded portions to the indented portions on the camera body.
Securely push up the locking slide on both sides. While pushing
up the slide, the lock button will spring out automatically. The lock button
functions to prevent the back from being detached unexpectedly from
the camera body.
Secure both sides of the back by using the locking slides (5). Do
not raise the camera by holding the back in a condition that only one
side is secured.
To remove the back, depress both side locking slides (5) while the
lock buttons (5’) are pushed in.
When installing the M adapter on the camera back, the roll film
holder for Mamiya Press, focusing screen holder, and so on can be
used.
To attach the above-mentioned accessories to the adapter, keep the
flattened edges of the two locking knobs of the M adapter parallel with
the bottom line of the picture format, insert the top of the holder in the
upper groove, and push in the bottom: then rotate the two knobs 90
degrees either to the right or left.
9
G
Adapter
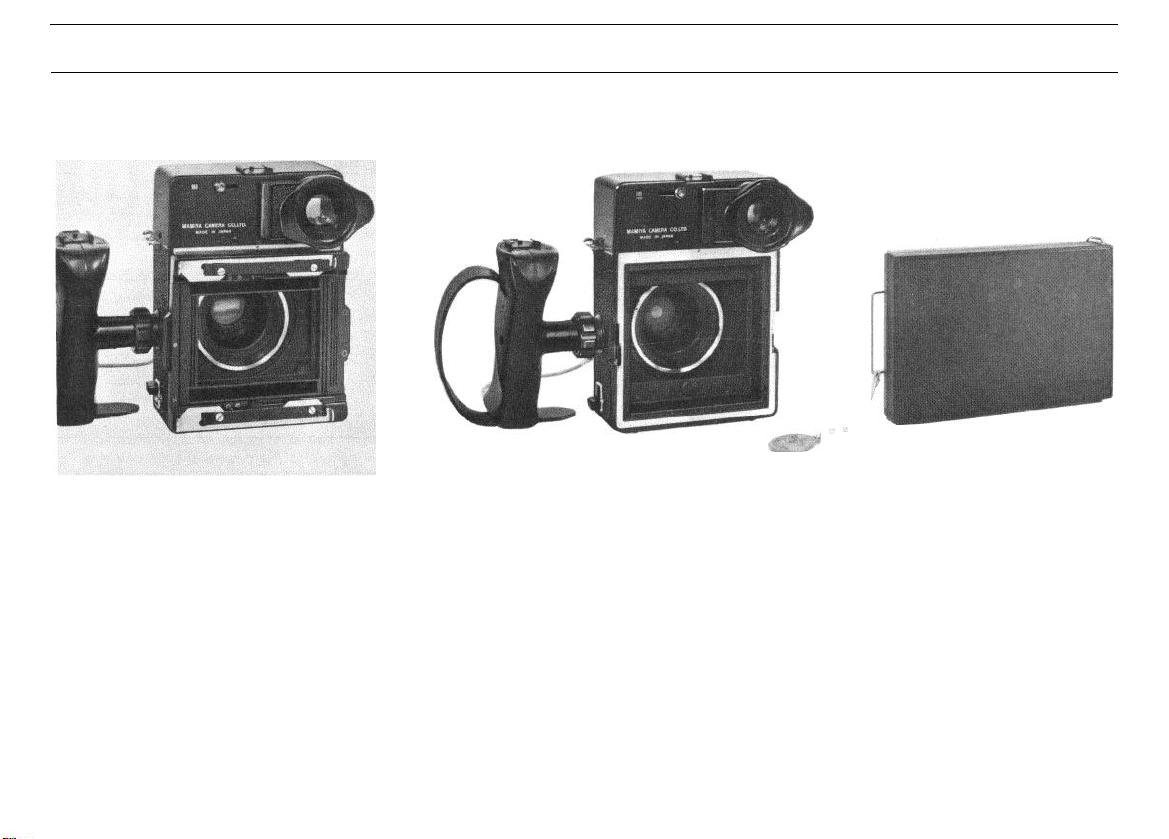
Polaroid® Land Camera Back
__ \\
When the G adapter is attached instead
of the M adapter, the roll film holder for
Mamiya RB can be used. Furthermore, the
roll film holder and the focusing panel made
by GRAFLEX, Inc., and accessories for the
GRAFLOK back can be employed.
Remove the camera back adapter and
attach the Polaroid Land camera back directly to the camera body. The Polaroid Land
pack film holder and the focusing hood
model P are available.
With the Polaroid Land pack film holder,
use a Polaroid a-exposure, 3¼ x 4¼ inch Land
film pack. For color photography, use
Polaroid Polacolor
black-and-white photography, use Polaroid
Land film type 107, 665 or 667
By attaching the focusing hood model P,
direct focusing through the ground glass
focusing screen of 3¼ x 4¼ inc
®
film type 108 or 668, for
h
format (ef-
1010
fective picture size of 2
95mm) becomes possible. On the ground
glass focusing screen are 6 x 9 and 6
x 7 format indicating lines.
7/8 x 3 3/4
inch, 73mm
NOTE :
The back attaching system used on this
camera is exclusive with Mamiya; thus, do not
attempt to use other Polaroid Land camera
backs.
x
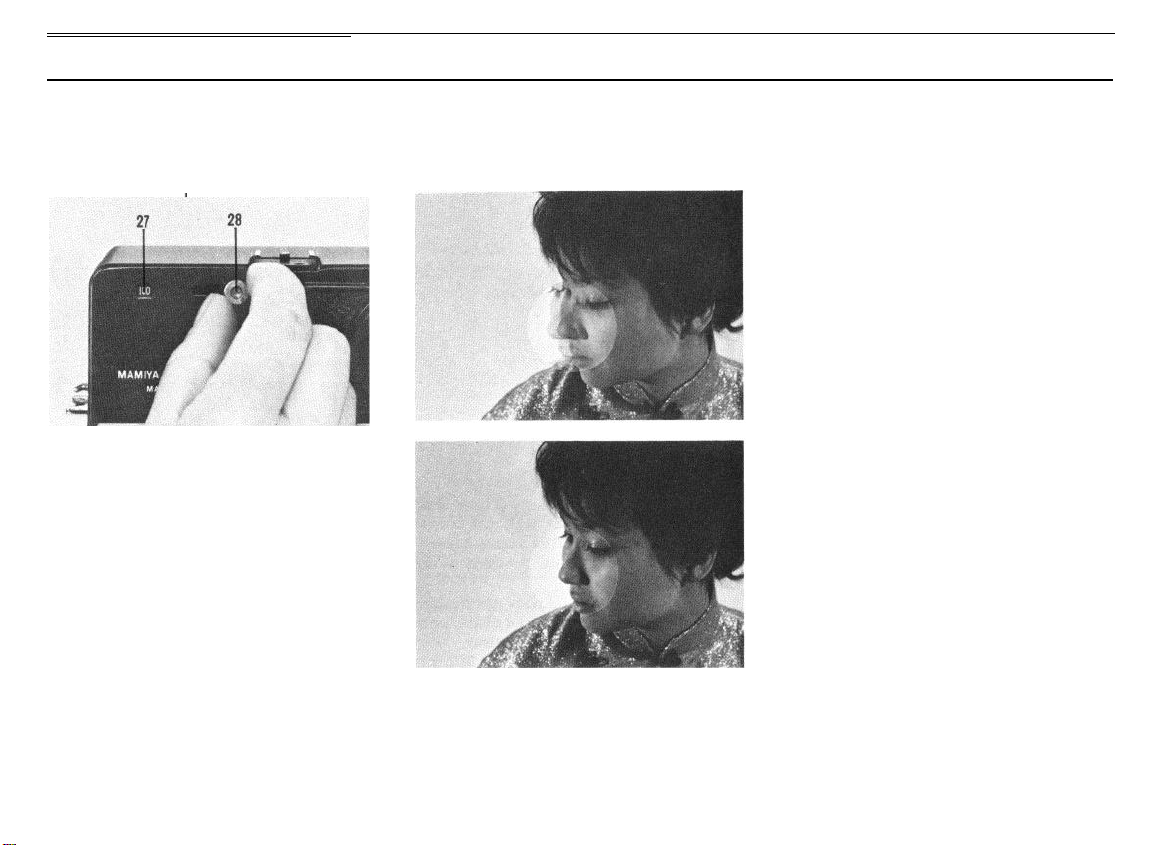
Operating the Viewfinder
Selecting Brilliant Frame in the
Viewfinder
\
The viewfinder field frame, indicating the
field for 6 x 9 and 6 x 7 formats, is adjustable
for 100mm, 150mm and 250mm focal length
lenses. By sliding over the slide button (28),
adjust the number in the indicator window
(27) to match the focal length of the using
lens.
When using the 50mm or 75mm lens,
attach the exclusive optical viewfinder of
each lens to the accessory shoe on the
camera body.
Focusing with Coupled Rangefinder
Within the small circle in the center of the
viewfinder field two images of the subject are
visible. Turn the focusing ring so that these
two images coincide.
When focusing, coincide the double images
at the center of the circle. Looking through
the center of the eyepiece is also a key point
in accurate focusing. When turning the focusing ring of the lens barrel, be careful not to
turn the bayonet ring of the camera body.
When the lens-shutter assembly is in a
retracted position, or when extension rings
are used, the rangefinder will not function
even though the double images coincide.
Parallax
Brilliant frames in the viewfinder for 100
mm, 150mm and 250mm lenses are coupled
with the rangefinder to automatically correct
parallax
.
11
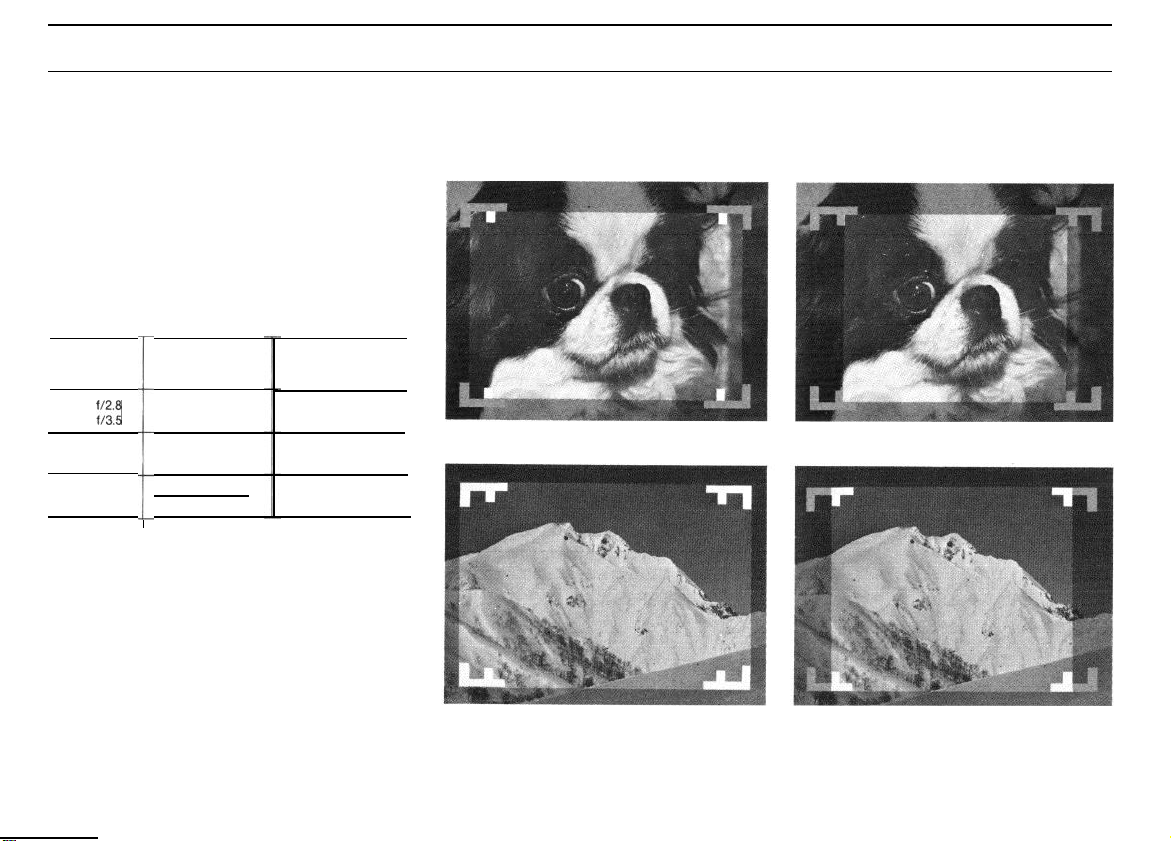
Areas of Viewfinder Field to be Composed
When using Roll Film Holder
When composing the 6 x 9 or 6 x 7 format with
the viewfinder frame, employ inside edges of the
frame for subjects at close distance; use the
outer edges of the frame for subjects further
away.
Distance Range Composed by Brilliant
Frame
Focal length
of lens
100mm
:;;;
150mm
f/5.6
250mm f/5
The 250mm f/5 lens interlocks with the range-
finder from distances of 20 ft (7m) to CO (infinity).
When photographing with the 6 x 6 format or
6 x 4.5 format by employing the roll film holder
model K, use the attached finder mask. See page
24 for details.
For close ranges,
use inside
edges of frame
3.5ft to approx. 6ft
(1m)
6ft. to approx. 9ft.
(2m) (3m)
I
For distances further
away, use outside
edges of frame
approx. 6ft. to infinity
(2m)
approx. 9ft. to infinity
approx. 12ft. to infinity
(2m)
(3m)
(4m)
6x9
For close range
For distances further away
6x7
For close range
For distances further away
12
Loading...