


645 PRO TL
Table of contents
 Loading...
Instructions

Congratulations on your purchase of the Mamiya 645 PRO TL
Mamiya pioneered the 6
x
4.5 film format and introduced the world’s first 645
SLR in 1975. The 645 PRO TL is the latest masterpiece in this series and
Incorporates all the latest mechanical, electronic and optical advances. Its
external appearance, too, has been modernized and its ergonomic design
further enhanced.
We are
sure
that you will enjoy the many advantages this camera and its
accessories offer and want to particularly mention :
The 645 PRO TL has a built-in self-timer (delayed shutter release) which will
also facilitate time exposures. Attaching special leaf shutter lenses will
automatically set the focal plane shutter to 1/8 sec. Heavy duty gears connect
to the improved Power Drive Grip
WG401,
This grip also automatically cocks
the leaf shutter lenses and permits remote control.
The AE Prism Finder
FE401,
specially created for this camera, automates
exposure and shows LED safety signals. 35mm film holders now
come
with
panoramic adapters. A super fast 300mm
f/2.8
APO lens was also designed
for this camera.
We are
convinced
that your camera will serve you well, because we have
designed it for
heavy
professional use. However, we ask you to please read all
operating instructions carefully before you put your equipment to work, in
order to ensure proper operation and maximum results
This manual covers the basic
camera.
Separate instructions
are supplied with all system
accessories,
including lenses,
finders, film holders, etc.
For additional information
please
feel
free
to
contact your
authorized Mamiya dealer or
the Mamiya importer in your
country.

Contents
Special Features of the Mamiya 645 PRO TL
.......
3
Names and Functions of Parts
..............................
7
Attaching andRemovingLenses
........................
10
Attaching and Removing the Roll Film Holders. 11
Attaching and Removing the Viewfinder
............
12
Removing and Attaching the Film Advance
Crank
......................................................................
13
Insertingthe
Battery
.............................................
14
BatteryCheck
........................................................
15
Shutter Release Selector......................................
16
Shutter Performance Test....................................
17
Before Film Loading
.............................................
16
FilmLoading
..........................................................
19
Advancing the Film to the First Frame..
..............
21
Shutter Speed Settings.........................................
22
ApertureRing/Stop-down
Operation..
.................
23
Focusing
................................................................
24
DepthofField
........................................................
25
Film Advance and Unloading Exposed Film
......
26
Using the Self-timer/Delayed Shutter Release..
27
Time
Exposures
....................................................
26
MultipleExposures
...............................................
26
MirrorLock-up
Photography..
..............................
29
Infrared Photography..
..........................................
30
Using a Tripod
.......................................................
30
Flash
Photography..
..............................................
31
Holding the Camera Steady and Securely..
........
35
Attaching and Removing the Neck Strap..
..........
36
Basic Accessories
................................................
37
SystemChart
.........................................................
39
Trouble Shooting
..................................................
40
Mamiya 645
PROTL
Specifications
....................
41
ThingstoWatch
....................................................
43
Common Sense Camera Care and Practice
.......44

Special Features of the Mamiya 645 PRO TL
1.
Image Area about 3X larger than 35mm
Format
3.
Interchangeable Rollfilm Holder System
-
Bigger is better --
The
6X4.5cm
image size is about
3x larger than 35mm
and therefore produces far superior results. It is large
enough to be viewed without magnifier and its aspect
ratio of about 1.25 (long side :
short
side)
matches
the
standard 8 x
10
inch “ideal format”, the most popular in
photography and industrial use. It requires minimum
cropping and gives maximum film utilization. (15 or 30
exposures on 120 or 220 film respectively)
-120, 220, 35mm,
35mm
Panoramic and
Polaroid --
Permits quick film change, even in mid-roll. Many fail
safe features prevent accidental exposures or film waste.
2.
Rugged, Versatile and Reliable Camera
Body
-
Built for professional
use
--
Mamiya pioneered the 645 SLR camera system in 1975
to create medium format image quality with 35mm
handling ease. New models have periodically followed
over the years to keep in step with mechanical, optical
and electronic advances

4
.
Interchangeable Viewfinders
1. AE Prism Finder FE401
The AE (automatic exposure) Prism Finder FE401
features three modes of TTL metering, including
automatic switching from center-weighted averaging
to spot metering. It also has a
+3EV
exposure
compensation adjustment.
2. AE Finder FK402
Light weight, Keplerian (non prism) AE aperture
priority finder offers an unreversed, upright image
Features telescoping eyepiece with diopter
adjustment from
+5
to -5.
3. Prism Finder
PF401
The Prism Finder
PF401
is without metering
electronics and designed for manual photography
mode. Both Prism Finders show an unreversed,
upright image and are ideal for eyelevel photography.
4. Waist Level Finder N
The Waist level Finder N is desirable for low angle
photograhpy and particularly for horizontal
composition.
A self erecting hood with built-in magnifier shields
groundglass from all ambient light. A built-in
sportsfinder permits eyelevel viewing and is ideal for
action photography.
5.
Interchangeable Focusing Screens
The camera
comes
with a Type E, bright, split image,
micro prism screen, useful for most applications. Five
other types, for all specialized requirements, are also
available.
6.
Large Selection of World-Class Mamiya
Lenses
Mamiya’s in-house optical engineering and
manufacturing department produces lenses specially
designed for the medium format, of unsurpassable
resolution, contrast and
color
fidelity. From
24mm
Fisheye
to 500mm telephoto, plus macro,
zoom
and APO lenses,
these lenses have become the choice of the pros.

7
. Motorized Power Drive Grips
Two accessory motorized drives, interchangeable with
the manual film advance crank, are incorporated into an
ergonomically designed grips for easy, right handed
camera operation.
Model WG 401 requires 6 AA batteries and features
multiple exposure switch, cable release socket, battery
check and continuous shooting. It also can be used with
leaf shutter
lenses.
Model WG402, a simplified version, permits only
individual exposures, uses one 6 Volt lithium battery and
is much lighter.
8.
A Broad Accessory System
For Specialized Applications
A useful accessory system to serve the specialized
needs of the photographer. It includes Auto Bellows and
Auto Extension Rings for close-up and copying work;
Infrared Remote Control for studio and nature
photography; External Battery Case for operating in cold
surroundings; Camera Grips for convenient holding and
more.
<Self-timer>
Self-timer for delayed shutter release. When activated it
will light a red pilot lamp in the front of the camera for
eight seconds and will blink for two seconds before
triggering the shutter.
<Time
Exposure>
Time exposures are made by utilizing the Self-timer and
the
"B"
shutter setting. A new power saving circuit
design switches the battery off and extends is life.
9
TTL (through-the-lens) Flash Exposure
. Automation
The light that hits the film surface during exposure is
reflected to a photoreceptor within the camera body
which automatically adjusts the flash output to the
required level.

10
.
Other Features
<Mirror Lock-up>
After focusing, the mirror can be locked up before
making an exposure. This is convenient when the
camera is used at slow shutter speeds and is mounted
on a tripod for telephotography, copywork, etc.,
since even a very small amount of vibration should
be eliminated.
<Self-timer>
Shutter will be released 10 seconds after shutter
button is pressed.
<Time Exposure>
When making time exposures, the battery circuit is
automatically disconnected, to save battery power.
This is especially useful for
astrophotography.
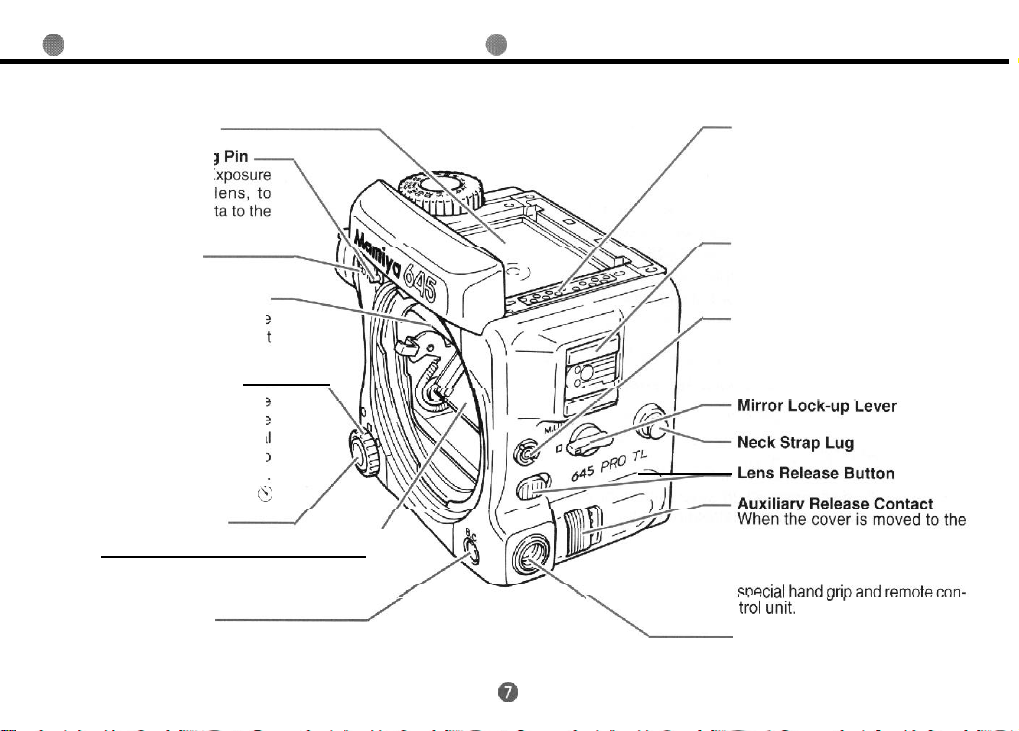
Names and Functions of Parts
@
Focusing Screen
N
Aperture Ring
Coupling
This pin is fitted into the E
Meter Coupler of the
l
transmit the aperture dat
AE Prism Finder.
Battery Check Lamp
13 Gold Plated Contacts
These contacts interface the AE
Prism Finder with the
IS0
dial on
the film holder and the shutter
speeds.
Hot-shoe
(X
contact)
A cordless flash can be used with
Focusing Screen Release Pin
When you want to change the
screen, slide this pin to the left
and
remove the screen.
Shutter Release Selector
Align the white index dot on the
selector collar with the white
square dot in the center for normal
use.
When the
collar
is turned to
the red dot, the release is locked.
To use the
Self-timer, set
it to
e..
this shoe.
Flash Sync Terminal
Flash cord and optional Terminal
Adapter
RA401
can be connected
to this terminal.
Shutter Release
Button
Mirror
l Never touch the
surface
of the
mirror
left, the contact appears. This
contact is used for connections of
external releases such as a
Battery Check Button
/
LED displays the present battery
condition.
\
tro’
u”it.
6-
Pin Coupling Connector for
dedicated TTL flash
0
automation. (Such as
Metz
SCA396)
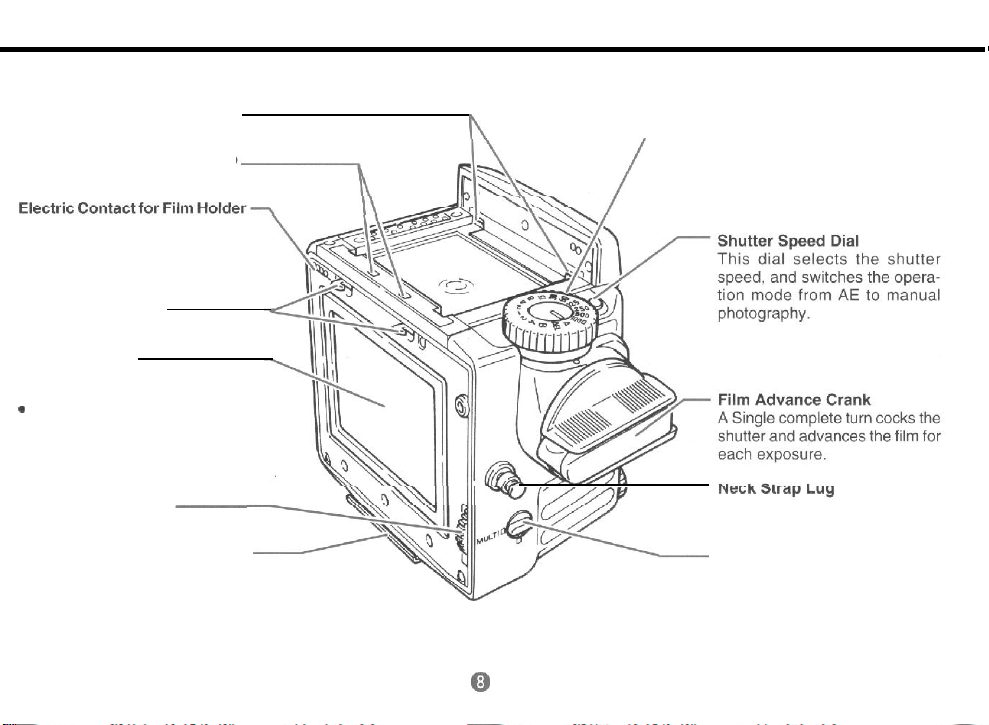
Finder Coupling Panel (Front)
tl
Shutter Speed
Dial
Lock
Release
Button
Finder Coupling Panel (Rear)
’
This
button is used for unlocking
/
the Shutter Speed Dial from an
AE
position
This contact receives film sensi-
tivity data from the film holder.
Film Holder Mount
Shutter
Curtain
Exposures
are
controlled
by
opening and closing the curtain:
a
Never touch the surface of this
curtain.
Film Transport Gear
-
Film Holder Mounting Bracket
Multiple Exposure Lever
When this lever is set at
"MULTI",
film is not advanced even when
the Film Advance Crank is turned,
thus allowing multiple exposures
on the same film frame.
Tripod Socket
1/4’
tripod
socket.
To
convert
to
a
3/8’
socket,
remove the small
screw in the base of the socket.
Then remove the bushing. See
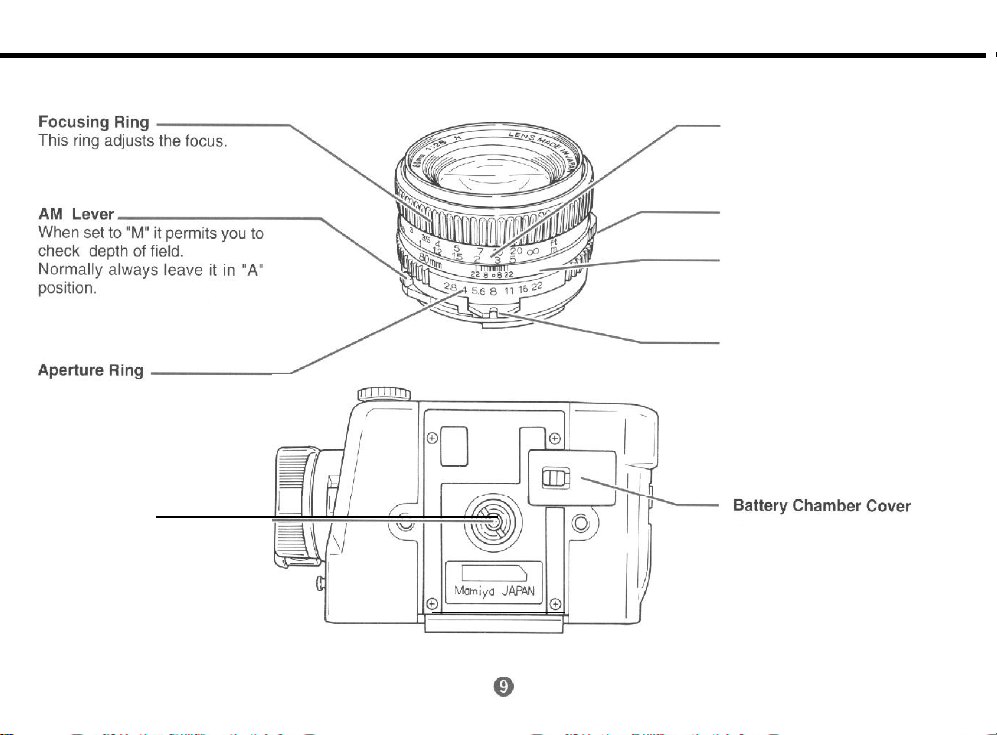
page 32.
Distance Scale
The camera to subject distance
can be set or confirmed with this
scale
Lens Alignment Dot
Depth-of-field Scale
Provides a quick reading of depth-
of-field for various
apertures
and
distances.
Exposure Meter Coupler
This coupler is engaged with the
Aperture Ring Coupling Pin, trans-
mitting diaphragm information to
the AE Prism
Finder.

@
Attaching and Removing Lenses
0
Removing the Front Body Cap
and
Rear
Cover
Attaching
the Lens
First remove the Front Body Cap in
the direction of the
arrow,
while push-
ing the Lens Release Button
8
backwards as indicated by arrow.
Rear Body Protective Cover can be
readily removed by depressing the
part of
@
as shown in the illustra-
tion.
Line up red Lens Alignment Dot
0
against red camera Alignment Dot
$3
and gently insert the lens into the
camera body. Then turn the lens
clock wise, as indicated by arrow,
until it clicks into place. Make sure
that the
Aperture
Ring Coupler Pin is
engaged with the Exposure Meter
Coupling Pin
@I,,
which sticks out
under the Mamiya name plate of the
camera.
Removing the Lens.
While pushing lens release button
@
backwards, turn lens counter-
clockwise. (Same procedure as
removing body cap).
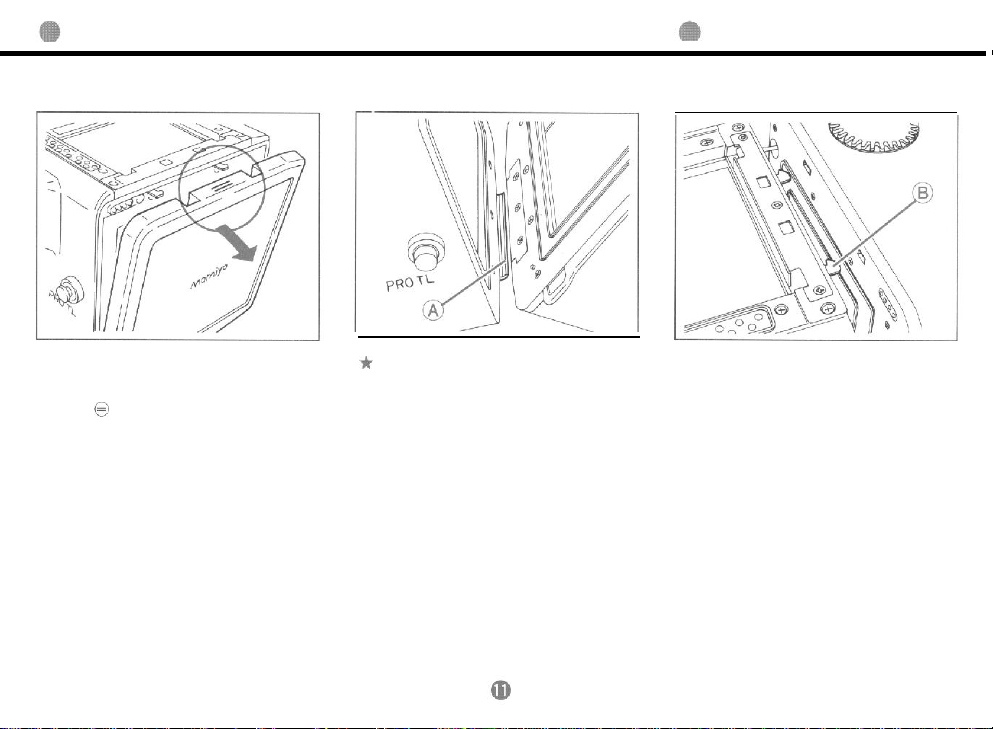
Attaching and Removing the Roll Film Holder
Removing the Rear Body Cap
Rear Body Protective Cover can be
readily removed by depressing the
part
of
0
as shown in the illustration.
*After removing the rear cap, be
careful not to touch the shutter
blind. This can cause breakage of
shutter.
Attaching the Roll Film Holder
*
Remove the Roll Film Holder
Cover.
1. While spanning the Roll Film Holder
between your thumb and middle fin-
ger, holding it on the rubberized fin-
ger rests, carefully align its Film
Holder Mounting Bracket with the
corresponding center clip
of
the cam-
era body.
2. While keeping this alignment, press
the upper part of the Roll Film Holder
against the camera body, so that it
clicks into place by engaging the
spring loaded twin camera catch.
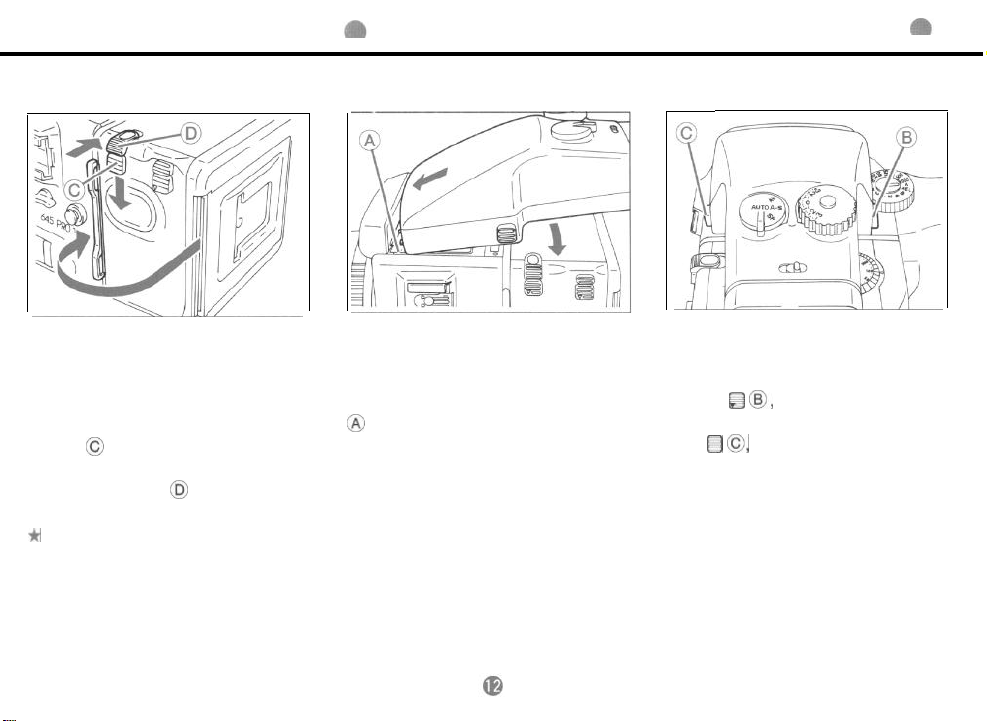
Attaching and Removing the Viewfinder
Removing the Roll Film Holder
1. Insert the Dark slide into the slot
marked by White Lines on the side of
the holder.
2. Push the lower one of the Film
Holder Detaching Lock Release
Button
@
downward, while simulta-
neously pushing the Film Holder
Detaching Button
@$
inward.
*
If the Dark Slide is not inserted,
the safety lock will prevent the
holder from being removed.
Attaching the Finder.
Lift the Upper Cover from the camera
body.
Insert the Attaching Latches of the
finder into the Finder Coupling Panel
@I
in the front wall of the body. Press
the finder down until the rear latch
locks securely in place.
Removing the Finder
Spanning the finder with your fin-
gers, push the button on its right side
marked with a downward pointing
arrow
@
@I,
downward, while
pushing the other button, on the left
side
@
0,
inward.
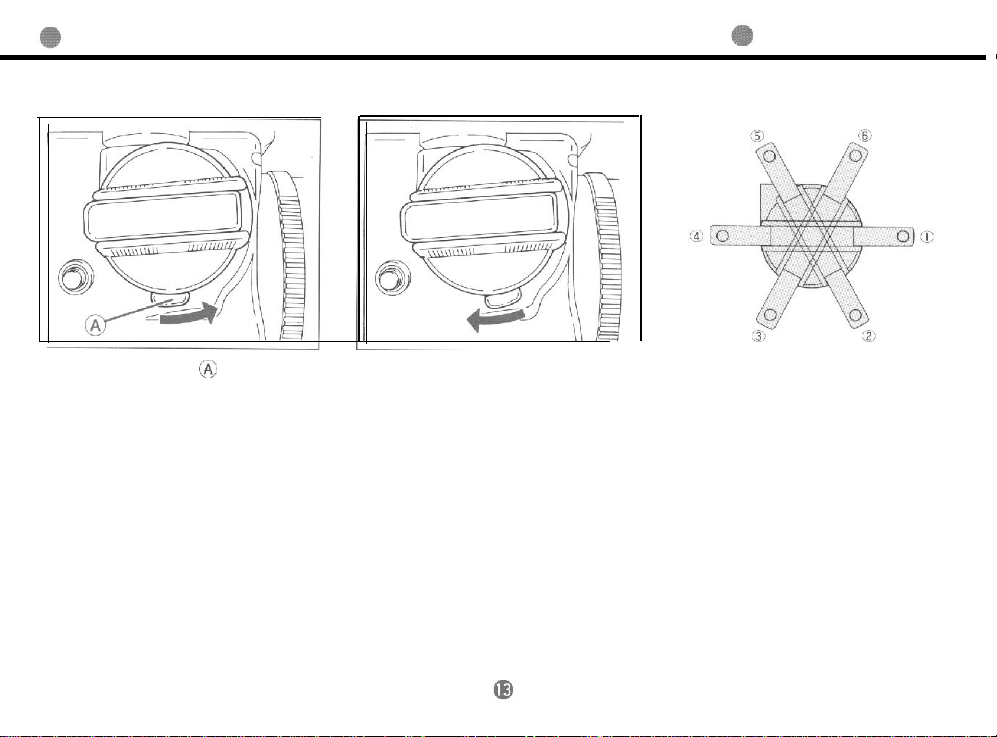
Removing and Attaching the Film Advance Crank
Removing the Crank
Attaching the Crank
Push the lock Lever
‘&>
on its bottom
in a forward direction as far as it will
With the flat part, having a White
go (see illustration).
Index Line, on top, line the Crank up
against its mounting plate on the side
of the body and push Film Advance
Crank Lock Lever backward.
You may choose six different crank
starting positions to suit your prefer-
ence. The orientation of the crank
proper against its base, before it is
attached to the camera, will be main-
tained when the entire assembly is
locked into place.
Loading...