


READ ME FIRST
The camera is shipped with the light shield curtain in the open position.
Therefore you cannot remove the body cap unless you close the curtain first.
Please read page 10 of the instruction book first.
The camera will not function without a battery. Please read pages 8 and 9 next.
You will want to practice with the camera without film. This can be done in two ways. Either leave the back cover open or set the Multi Exposure Lever to Multi.
The instruction book was written for the black finished camera. Subsequently a silver model was added. The white index marks and dots on the black model appear in black on the silver model.
Introduction
Congratulations on your purchase of the Mamiya 7II and welcome to the world-wide family of happy Mamiya camera owners !
Mamiya pioneered the 6x7cm medium format SLR system camera when it introduced the first Mamiya RB67 in 1970. In 1982 an additional model followed, the Mamiya RZ67 with electronic features.
Both cameras soon became the market leaders and the preferred tool of trade for portrait, commercial and magazine photographers all over the world and established the 6x7 rectangular image as the "ideal format".
Now we are proud to present the Mamiya 7II, 6 x 7cm rangefinder camera.
Reflecting Mamiya's traditional quality workmanship plus modern design, the Mamiya 7II is compact and lightweight. It offers the handling ease of a 35mm camera, while yielding far superior 4.5 times larger images. Featuring interchangeable, rangefinder coupled lenses and AE metering, it also permits taking 24 x 65mm panoramic images on 35mm film, by means of an optional adapter kit.
The Mamiya 7II lens program includes a standard 80mm lens, a 50mm and 65mm wide angle lens, an ultra-wide 43mm lens and a 150mm telephoto lens.
The Mamiya 7II and its lenses have undergone extensive quality controls at every step of manufacture. Please read this instruction manual thoroughly before you use the camera. A proper understanding of all its features and functions will eliminate potential misuse and ensure a long service life.
1
Contents |
|
Mamiya 7II, the ultimate 6x7 |
|
rangefinder camera ................................. |
3 |
Nomenclature Parts ................................ |
4 |
Camera Body ........................................... |
4 |
Lens ........................................................... |
6 |
Viewfinder display ................................... |
7 |
Inserting Battery ...................................... |
8 |
Power ON/OFF and |
|
Shutter Release Button .......................... |
8 |
Battery Check ........................................... |
9 |
Mounting/Removing Lenses ................ |
10 |
Closing the light shield curtain .............. |
10 |
Removing camera body cap ................. |
10 |
Mounting lens .......................................... |
11 |
Removing lens ........................................ |
12 |
Precaution for mounting/ |
|
removing lenses ...................................... |
13 |
Camera Functional Test ........................ |
14 |
Before Loading the Film ....................... |
15 |
Setting the film speed ............................ |
15 |
Opening/closing the back cover ........... |
15 |
Setting the film type ................................ |
16 |
Memo clip ................................................ |
16 |
Loading the Film ..................................... |
17 |
Taking Photographs .............................. |
20 |
AE (Automatic Exposure) Photography 20 |
|
Manual Photography .............................. |
22 |
Focusing the Lens .................................. |
24 |
Photographic area covered ................... |
25 |
Unloading the film ................................... |
27 |
Photographing to conform |
|
to purposes .............................................. |
28 |
AE Lock(AEL) Photography .................. |
28 |
Self-Timer ................................................. |
29 |
Time Exposures ...................................... |
30 |
Flash Photography ................................. |
31 |
Multiple exposure mechanism .............. |
32 |
Infrared Photography ............................. |
32 |
Exposure Compensation ....................... |
33 |
Diopter Correction Lenses ..................... |
34 |
Depth-of-Field .......................................... |
34 |
How to Hold the Camera ....................... |
35 |
Neck strap . . . . . . . . . . . . . . . . . . . . |
....35 |
Troubleshooting ...................................... |
36 |
Lenses ....................................................... |
37 |
Accessories ............................................. |
39 |
System chart ............................................ |
40 |
Specifications .......................................... |
41 |
Common Sense Camera Care and |
|
Practice ..................................................... |
42 |
2
Mamiya 7II, the ultimate 6x7 rangefinder camera
The Mamiya 7II is the only camera in the
world that has these exclusive features:
∙Ideal 6x7cm film format that enlarges to standard photographic and industrial paper sizes without cropping and without wasting film. A size that can be viewed with the naked eye and that is easy to retouch.
∙Lightweight, compact, "quick on the draw" and ergonomically designed to fit in your hand like a glove.
∙Crisp, accurate, broad based, split-image rangefinder, that is easy to focus, even in poor light.
∙Bright viewfinder with frame lines that are automatically indexed to match the focal length of lens in use and that automatically adjust for parallax.
∙Interchangeable, world-class Mamiya lenses, utilizing the latest optical glasses and computer aided design and that take advantage of the camera's short flange focal distance (there is no mirror box) to reach new heights in lens quality.
•Precision, super quiet, electronic shutter with speeds from 4 to 1/500 sec., flash synchronized at all speeds.
•Built-in "dark slide" curtain that permits changing lenses with film in camera.
•Precision AE (automatic exposure) meter with manual overrides.
•Self-timer (delayed action release) with automatic turn-off.
•Optional external battery case to wear inside clothing in extreme cold.
•Optional panoramic adapter that permits use of 35mm film and yields 24x65mm images.
•Built with typical Mamiya quality for hard professional use and long service life.
3
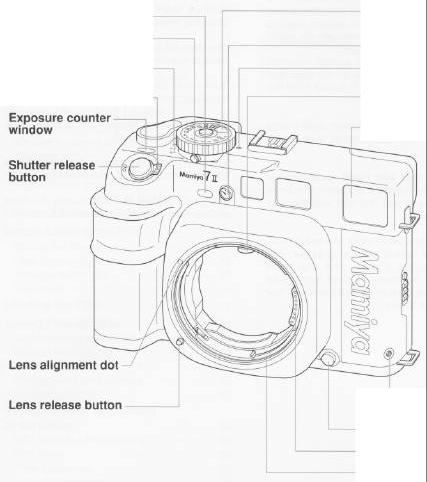
Nomenclature Parts
Camera Body
Self-timer pilot lamp
Exposure compensation lock release button
Exposure compensation scale
Power on/off lever
Film speed window (ISO)
Self-timer button 
Shutter speed Index Mark
Rangefinder coupling roller
Rangefinder window
Cable release socket
PC Terminal
Electronic contacts
Bayonet mount
4

Hot Shoe for mounting electronic
Nomenclature Parts
Shutter speed dial A/AEL release button Film advance lever Multi-exposure lever Film setting index dots
Film starting indicator
5
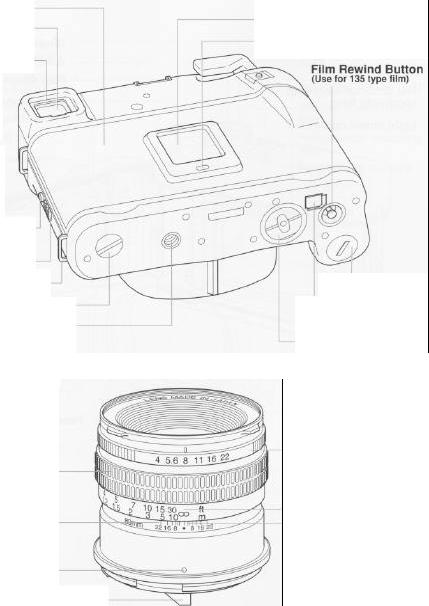
Nomenclature Parts
Back cover Viewfinder eyepiece
Rubber eyecup
Back cover lock release button Back cover latch
Carrying strap lugs
Film spool stud
Tripod socket
(The socket has U1/4" threads)
Lens
Focusing ring
Depth-of-field scale
Lens alignment dot
Rangefinder coupling lever
Memo clip
120 • 220/135 selector index window
Battery chamber
Light shield curtain release
Light shield curtain closing lever handle
Aperture ring
Distance scale (m • ft)
Infrared index mark
6

Nomenclature Parts
Viewfinder display
Bright field of view frame with 80mm F4 standard lens
Double-image superimposing
Long time exposure range finder zone (under-exposure
[Blinks])
Bulb
Red warning lamp |
Over-exposure indicator |
The red lamp illuminates when |
|
•the shutter is not cocked
•the light shield curtain is closed
•the film is not loaded
•the lens is not attached
•the battery power is weakening : The lamp blinks.
7

Inserting Battery
The camera will not function without a battery.
1. Remove the battery cover.
Remove the battery chamber cover on the bottom of the camera with a coin or screwdriver.
2. Insert the battery.
The + terminal is indicated on the inside of the battery chamber cover. Insert the battery as shown in the Illustration, being sure to properly place the battery with the “+” side up, facing the cover.
* Batteries
The Mamiya 7II uses one of 4SR44 silver oxide battery, 4LR44 alkaline battery or 2CR1/3 lithium battery.
CAUTION : Insert the direction of battery polarities
("+" and "-") correctly.
Power ON/OFF
Power ON
To turn the Power ON, align dot “A” on the power switch lever with the “B” on the camera body.
Power OFF
To turn the Power OFF, align dot “A” on the power switch lever with the dot “C” on the camera body.
Shutter release button
The shutter release button is designed so that pressure can be applied in two stages. When it is lightly touched, correct metering data is displayed on the bottom of the view finder. When it is depressed all the way, the shutter is released and an exposure is made.
The LED's are located at the bottom of the finder in order not to interfere with the field of view of the wide angle lens.
8
Battery Check
1. Set the shutter speed dial at 15.
Turn shutter speed dial and set the figure 15 at the dot “A”
*When the shutter speed was already set at the position A • AEL, the lock mechanism is functioning. Therefore, turn the dial while pressing the AE lock button “B” located at the center of the shutter speed dial.
2. Half-pressing the shutter button.
When the shutter button is touched gently, the figure 15 lights in the red color at the bottom part in the viewfinder, which indicates that the battery power is normal. If the figure 15 blinks, it indicates drop of the battery power below the allowable level, when prepare for the new battery. When the battery power drops further, the figure 15 will not blink, and warning LED blinks. Replace the battery with a new one.
∙Other than set figure 15, blinks and warning LED lights, but check and confirm only set figure 15.
∙Battery check can be done not only shutter speed at 15 but also other shutter speeds, viz: B - 1 /1 to 1 /500.
∙Even when AE photographing, the battery check can be done with the shutter speed indicated in the viewfinder.
9
Mounting/Removing Lenses
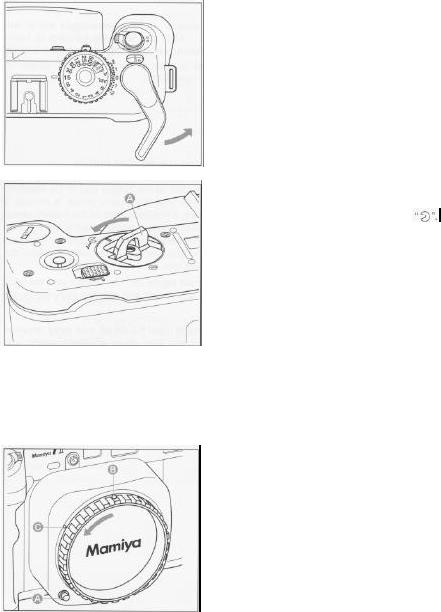
Closing the light shield curtain
1. Cock the wind-up lever.
After cocking the shutter, close the light shield curtain.
2. Close the light shield mask.
Set upright the light shield curtain closing lever handle “A” and turn it from the open position ( ) following arrow direction and fit the white index line on the lever to the closed position, the light shield curtain will be closed. After the motion, bring down the light shield closing curtain lever handle.
*The light shield curtain closing lever is ratchet type. Do not stop turning without going all the way. Be sure to turn until it clicks and stops.
If your finger is removed from the light shield curtain closing lever immediately before its stopping, it sometimes return to its original position.
If the lever is brought halfway and left, the lens removing button cannot be pressed.
Removing camera body cap
While pressing the lens release button “A” in, rotate the cap counterclockwise, and align the groove “B” on the cap's side with the lens alignment dot “C” on the body. The body cap can then be pulled out.
10

Mounting/Removing Lenses
Mounting lens
1. Mounting lens.
Align Lens Alignment Dot “A” with the Camera Alignment Dot “B”. Insert the lens into the camera body. Then turn the lens in the direction of the arrow (clockwise) until it clicks and locks into place.
*Remove the front and rear lens caps. The front lens cap can be removed by pressing in the tabs on the right and left with your fingers and pulling the cap towards you.
The rear lens cap can be removed by rotating it counterclockwise.
2. Opening the light shield curtain.
To open the light shield curtain, slide the light shield curtain release lever along to follow the arrow  down and right. This will cause curtain to snap open. The light shield lever indicator- (a white line) is then
aligned with 
* When the light shield curtain is closed, the shutter cannot be released. When taking a picture, open the light shield curtain.
11
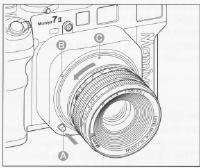
Mounting/Removing Lenses
Removing lens
1.Cock the shutter and close the light shield curtain.
After cocking the shutter, close the light shield curtain just as same as mounting the lens.
2. Remove the lens.
While pressing the lens releasing button “A”, turn the lens in the arrow direction until the lens alignment dot “B” lined up with the alignment dot “C” on the camera body, and pull out the lens.
∙ Never touch the light shield curtain. If touched, light leakage or a malfunction may result.
∙ When removing a lens from the camera in which the film is loaded, do not move the light shield releasing lever. If this lever is moved, the film will be exposed to the light.
∙ When the light shield curtain is open the lens cannot be removed. Close the curtain to remove the lens.
∙ When the lens has been removed and film remains in the camera body avoid exposure to direct sunlight as film fogging may result.
∙ Put the front and rear lens cap on the lens when the lens is removed.
12
 Loading...