

Mamiya M645 1000S User Manual

The Mamiya M645
model of the M645, a camera widely acclaimed
for bridging the gap between small and large
format cameras by introducing the medium format, the purpose of which is to offer the world
of larger-negative quality to camera users who
are accustomed to the handling ease and compactness of 35mm SLR’s.
Every care has been taken to assure that your
Mamiya M645
of trouble-free service.
ble mishandling, be sure to carefully read this instruction manual before using your new camera.
1000S
is a new improved
1000s
will provide you with years
However,
to avoid possi-

1000s
Special Features of the Mamiya M645
Specifications
Names and Functions of Parts
Testing to See if the Camera Functions Properly
Interchanging Lenses
Interchanging Finders
Focusing Screens
Inserting a Battery
Battery Check
Film Loading
Film advancing
Shutter Speed Dial
Aperture Ring/Stop-down Operation
Focusing
Shutter Release and Film Transport Mechanism
Unloading Film
The
Neck
Holding the Camera
Using the PD Prism Finder S
Using the CdS Prism Finder
........................................................................ 5
.......................................... 7
........................................................ 17
........................................................ 18
..............................................................
.............................................................. 21
....................................................................... 22
....................................................................... 23
..................................................................... 27
.............................................................. 27
.............................. 28
................................................................................
.................................................................... 31
Strap ....................................................................
...........................................................
............................................. 35
............................................. 39
................
29
3
........ 16
20
30
........
32
32
Using the Waist-Level
The Mamiya Moving Coil Electronic Shutter
Depth-of-Field
Using Flash
Multiple-Exposures
Infrared Photography
Mirror Lock-up
Using the Delayed Shutter Release
Interchanging the Film Advance Crank
Tripod Socket
Time Exposures
Trouble-Shooting
Precautions
Care of the Camera
Mamiya-Sekor C Lenses
Depth-of-Field Table
Accessories
2
...........................................................................
........................................................................... 57
.......................................................................... 63
Finder
..................................................................... 48
............................................................
......................................................... 50
..................................................................... 51
........................................................................ 55
..................................................................
..................................................................
............................................................ 58
.........................................................
.......................................
S
...................................................
44
.. .............. 47
..
49
50
................................. 52
........................... 53
55
56
59
62
Special Features of the Mamiya
em-.-
The Mamiya M645 is a 6 x 4.5cm large-negative SLR that
is both extremely versatile and compact.
i
. Large-Negative Quality
The 6 x 4.5cm format offers approximately 3 times more
area than the 35mm format. Moreover, unlike the 6 x 6cm
square negative, there is little waste of the negative area.
For beautiful color enlargements everytime, the 6 x 4.5cm
format is the ideal format.
2
. Compact Design
Despite the large-negative it produces, the Mamiya M645
is designed to handle as easily as a 35mm SLR. Its compact size and light weight are perfectly suited for the ac-
tion photographer. It fits so well into one’s hands that it
becomes an extension of his reflexes,
3
n
Mamiya’s Moving Coil Electronic Shutter
Mamiya has developed a revolutionary Moving Coil Electronically Controlled Shutter for the Mamiya M645. Electrical consumption of this new shutter is approximately
1/10 that of previous electronic shutters. Furthermore,
consumption remains constant regardless of the shutter
speed being used. In addition to accuracy, long battery
life is assured by this new shutter.
__-~_---
M645 1000S \ ’ \
~.~ -.-I~ .-. -
4
. Large, Bright Viewfinder
It becomes easy to catch the peak of action when looking
through the large, bright viewfinder. Because of the
Mamiya M645’s automatic diaphragm and quick-return
mirror, the viewfinder never grows dim. It is always bright,
ready for the next photograph.
5
. Interchangeable Finders
a
Lightweight, dual-function Waist-Level Finder S
A compact and lightweight finder which opens and closes
with a single touch, the Waist-Level Finder S is ideal for
copying, close-ups, low and high angle pictures, and
working in dim light. Additionally, it is instantly convertible
to an eye-level sports finder which accurately shows the
f
ields for the 80,110,150 and 210mm lenses, allowing one
to easily follow the quickest action.
0
Prism Finder
The Prism Finder is well-suited for action photography.
Whether the vertical or horizontal format is utilized, focus-
ing and following action is as easy as on a 35mm SLR.
0
PD Prism Finder
The PD Prism Finder employs silicon cells for full-aperture,
center-weighted readings. It is your assurance that every
negative will be properly exposed.
3

a CdS Prism Finder with built-in meter
Accurate through-the-lens exposure measurement is
possible with the CdS Prism Finder which couples to the
aperture of the lens and indicates the proper shutter
speed to set on the camera.
.
Flatness of the Film Plane
6
Developed through Mamiya’s long experience as a manufacturer of 120/220 roll-film cameras, the Roll-Film Inserts
for the Mamiya M645 keep the film perfectly flat for edgeto-edge sharpness. Inserts are available for 120 or 220
roll-film.
7
.
Multi-Coated Lenses
Mamiya-Sekor lenses have achieved world-renown as pro-
fessional lenses of exceptional contrast, high resolution,
clear definition, and excellent color balance. All the lenses
for the Mamiya M645, from wide-angle to telephoto, have
been multi-coated to maintain their high standard of per-
formance even under adverse lighting,
.
Unlimited Scope
8
A full range of accessories are available for the Mamiya
M645 to assist the photographer in capturing virtually any
type of image. Accessories include hand grips, interchangeable focusing screens, and auto extension rings
complete with meter coupling.
l
Multiple-Exposure Provision
Merely lowering the multiple-exposure lever allows the
photographer to take as many multiple-exposures as he
wishes. During multiple-exposures, the exposure counter
does not move.
a
Mirror Lock-Up
The Mamiya M645 is designed to have minimal mirror
shock; nevertheless, when it is necessary to completely
eliminate vibrations, all you have to do is lock the mirror
in the up position. To do so, simply lower the mirror lockup lever. Mirror lock-up provision makes close-up and
telephoto photography possible even at slow shutter
speeds.
l
Two Shutter Release Buttons
The Mamiya M645 is equipped with two ideally located
shutter release buttons, so that regardless of how you
hold the camera, there is always a release button at your
finger tips.
a
Built-in Delayed Shutter Release
a
Depth-of-Field Preview Lever
A single touch on the Depth-of-Field Preview Lever,
which is ideally located on the camera body, stops the
lens down to the preselected aperture for direct viewing
of the depth-of-field.
4

Specifications
--
--ll_-- ____
0
Camera Body
Camera Type:
6 x 4.5 cm electronic focal-plane shutter SLR.
Film Type:
120 roll-film for 15 exposures,
220 roll-film for 30 exposures
Actual Negative Size:
56 x 41.5mm (2-13/64” x1-41/64”)
Standard Lenses:
Mamiya-Sekor C (multi-coated)
80mm f/1.9, automatic diaphragm,
with meter coupler, 67mm filter size
Mamiya-Sekor C (multi-coated)
80mm f/2.8, automatic diaphragm,
with meter coupler, 58mm filter size
Lens Mount:
Mamiya M645 bayonet mount
Shutter:
B, 8-1/1000 sec.
Moving Coil Electronic Focal-Plane Shutter,
FP and X (1/60 sec.) synchronization,
Shutter release lock and shutter speed dial lock
provision
Battery Type:
One 6V silver-oxide battery
(Eveready 544, UCAR 544, Mallory PX28)
or 6V alkaline battery 4LR44
Focusing Method:
Each Mamiya-Sekor lens is equipped with its own
helicoid focusing mount
4SR44
Focusing Screen:
The standard focusing screen,
able, has three focusing aids, a central split-image
rangefinder spot (wedge set at a 45° angle) surrounded by a micro-prism collar and outer ground
glass ring. A Fresnel lens assures corner-to-corner
brightness, and 94% of the picture-taking area is
visible.
Mirror:
Instant return, with mirror lock-up provision
Film Transport:
A single revolution of the interchangeable film advance crank transports the film. The camera is
equipped with double exposure prevention, but mul-
tiple exposure can be easily made.
Exposure Counter:
Progressive type, automatic reset, automatic
changeover with insertion of 120/220 roll-film inserts
Battery Check:
Depressing B.C. button illuminates green
battery condition is satisfactory.
Multiple-Exposure:
Lowering multiple-exposure lever makes multipleexposures possible; exposure counter does not
move during multiple-exposures.
Delayed Shutter Release:
Variable time delay of 5-10 seconds.
Depth-of-Field Preview Lever:
Spring-loaded, self-returning.
which
is interchange-
L.E.D
if

D Interchangeable Finders
6
Prism Finder:
The image in the Prism Finder is right-side up, lat-
erally correct, and moves in the correct direction;
magnification of 0.74X with the standard lens at infinity, built-on hot-shoe; comes with eyecup.
PD Prism Finder:
Prism Finder with built-in silicon cell, through-the-
lens, full-aperture, center-werghted metering: 7
LED’s visible in the viewfinder for correct or com-
pensated exposure, with 100
meter coupling range of EV -1.15 - +19 (f/1.9,
8 sec.- f/22, 1/1000 sec.); with f/2.8 lens, EV 0- 19
(f/2.8, 8 sec. - f/22, 1/1000 sec.); camera body battery serves as power source; other features same as
Prism Finder.
CdS Prism Finder:
Prism Finder with CdS through-the-lens, full-aper-
ture, center-weighted metering; zero method with
indicator needle; couples to aperture and shutter
speed manually set, power source, one 1.5V silver
oxide battery SR44 or alkaline battery LR44, with
100
ASA
EV 2.85 - 17 (f/1.9, 1/2 sec. - f/11, 1/1000 sec.):
with f/2 8 lens: EV 4 - 18 (f/2.8, 1/2 sec. - f/16,
1/1000 sec.); other features same as Prism Finder.
and f/1.9 lens, meter coupling range of
ASA
and f/1.9 lens,
Waist-Level Finder S:
Opens and closes with a single touch; magnification
of
1.3X
(w/standard lens at infinity); diopter correc-
tion lenses interchangeable with standard magnifier;
built- in sports finder shows field for standard lens
and accepts a mask for 110,150, and 210mm lenses,
all fields showing approximately 80% of the picture-
taking area.
Dimensions and Weight:
(width, height, depth, w/80mm f/1.9 lens)
(w/Waist-Level Finder S) (w/1.9 lens)
3-29/32” x 3-15/16” x 6-9/16”
(99.3 x 100 x 166.5mm)
(w/Prism Finder)
3-29/32” x 4-27/32” x 6-9/16”
(99.3 x 122.7 x 166.5mm)
(w/PD Prism Finder S)
3-29/32” x 4-29/32” x 6-9/16” 66.5 oz
(99.3 x 124.7 x 166.5mm)
(w/CdS Prism Finder)
3-29/32” x 4-29/32” x 6-9/16” 67.2 oz
(99.3 x 124.7 x 166.5mm)
Depth w/80mm f/2.8 lens; 6-1/16” (154mm)
55.4 oz
(1570 g)
62.3 oz
(1765 g)
(1885 g)
(1905 g)
(w/2.8 lens)
49.6 oz
(1405 g)
56.4 oz
(1600 g)
60.7 oz
(1720 g)
61.4 oz
(1740 g)
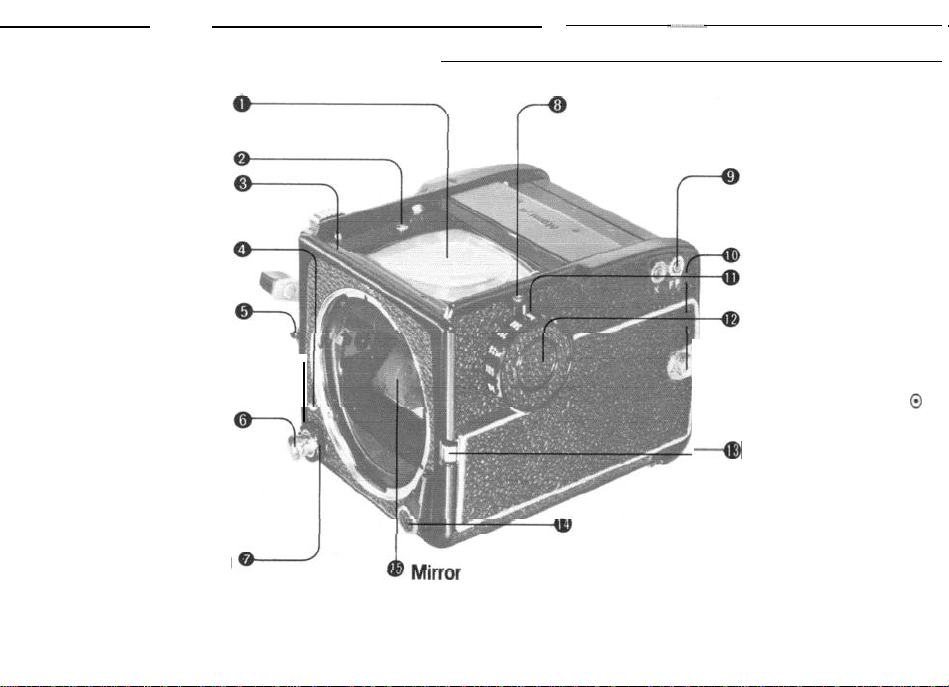
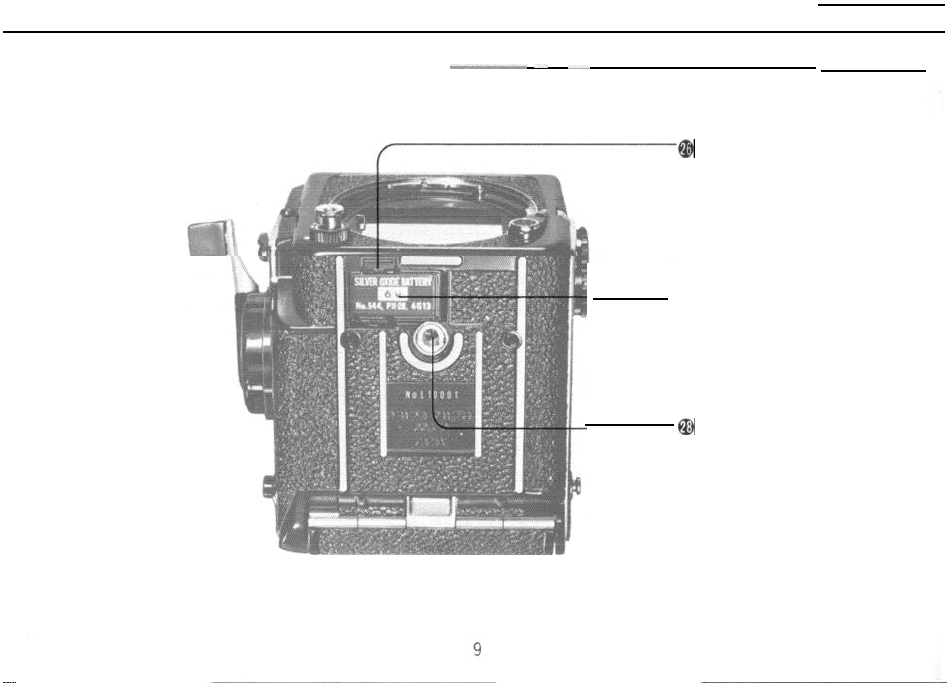
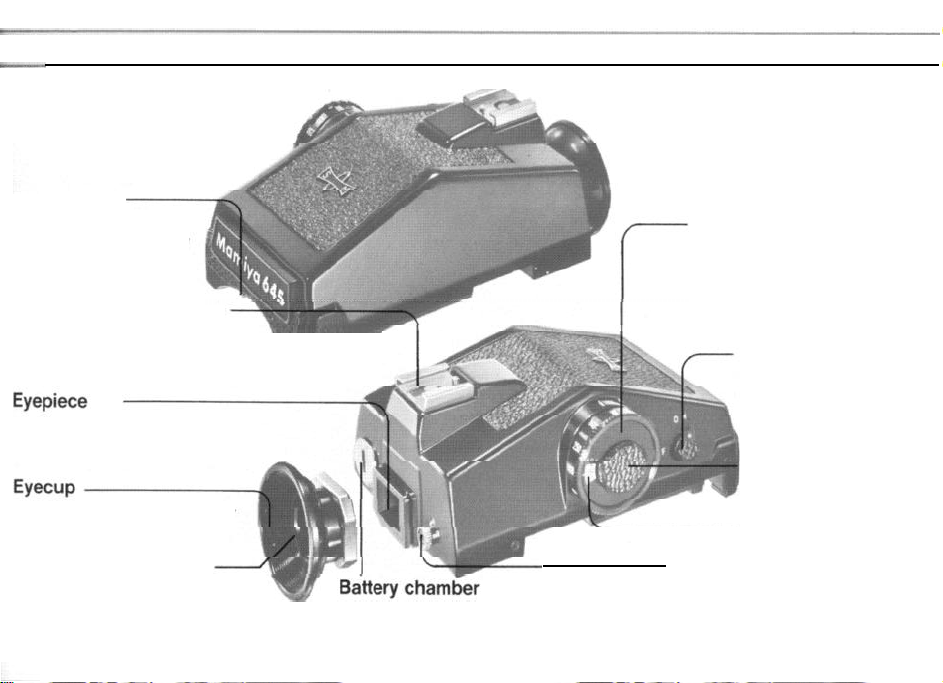
Names and Functions of Parts (1)
Lever
--
-___--
Focusing screen
Five different types are
available.
Focusing screen lug
Mounting guide pin for
finder
Fits into the finder opening.
Alignment dot
Alignment reference point
for mounting lens.
Depth of Field Preview
A slight upward push on the
lever stops lens down to
preselected aperture,
spring-loaded for self-return.
Shutter release button
(front)
When pushing in on this
button, the upper shutter
release button is coupled to
move in unison.
Equipped with cable
lease socket.
re-
Shutter release lock ring
Turn lock ring and align with red dot to simultaneously lock both shutter release buttons.
To unlock, align with white dot.
Never touch the
surface of the mirror.
layed shutter release.
7
Battery check lamp
If the green battery check lamp glows when the
battery check button on the opposite side is depressed, battery condition is good.
Flash sync terminals
With safety cover, only the
cover of the sync terminal
being used is removed.
Neck strap lug
Shutter speed
alignment mark
Shutter speed dial
Push in on safety lock built
into the center of the shutter speed dial while rotating
dial to desired speed.
Do not set dial to the
position unless using the
PD or AE Prism Finder.
---4B
Lens release button
Push in and simultaneously
turn the lens counterclockwise to remove.
@
Delayed Shutter Release Lever
To cock the built-in delayed shutter release, turn the
lever clockwise. Upon removing your finger from the
lever it will return to its former position, leaving the
activating lever exposed. Push the activating lever in
the direction of the engraved arrow to start the de-
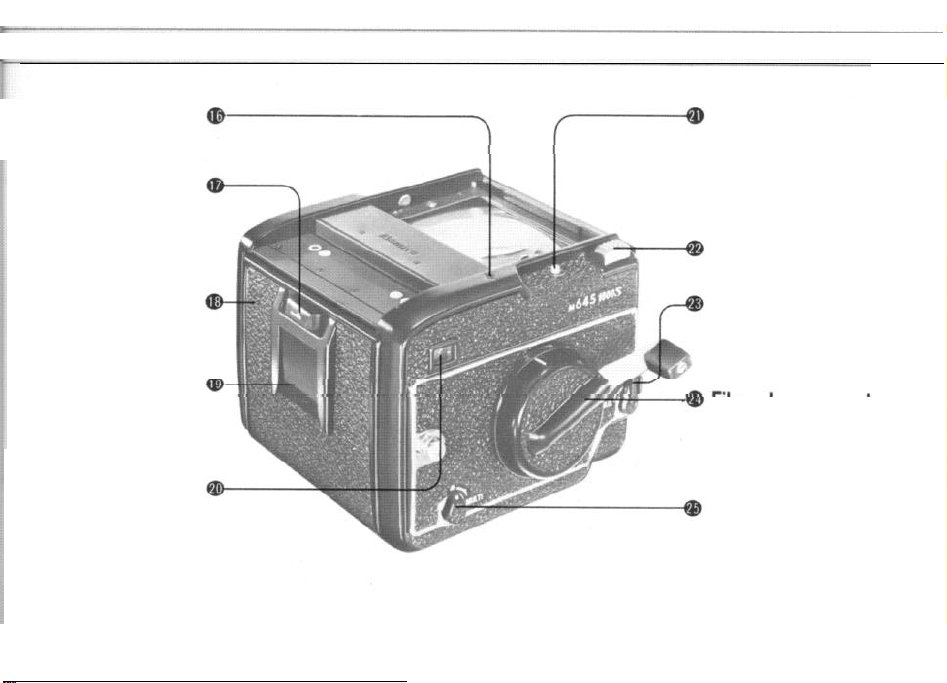
Film plane mark
Indicates the position of the
film plane.
Back cover latch
While pushing in on the
memo clip, simultaneously
move the back cover latch
in the direction of the arrow
to open camera back.
Back cover
When closing, apply pressure firmly and evenly in the
area of the back cover latch.
Memo clip
Holds the film box top as a
reminder.
Exposure counter
window
Automatic changeover upon
i
nsertion of 120 or 220 film
insert. Goes up to 15 with
120 film and up to 30 with
220 film.
Battery check button
When depressed, the
battery check lamp on the
opposite side illuminates.
Used to check the condition
of the battery.
Shutter release button
(upper)
Mirror lock-up lever
Push backward to lock
mirror in the up position.
Film advance
One complete turn cocks
shutter and advances film.
Multiple-exposure lever
Move the multiple-exposure
lever to the “multi” position
for multiple-exposures or to
release the shutter when
there is no film in the
camera.
8
crank
Names and Functions of Parts (2)
_
@ Battery chamber cover
latch
Pull the latch toward the lens
to open the battery chamber.
I-
27
Battery chamber cover
Insert a battery into the battery
chamber
@ Tripod socket
1/4 inch tripod socket. To
vert to a 3/8 inch socket, first
remove the small screw in the
base of the socket. Next, remove the inner socket by turning counterclockwise with a
coin.
con-
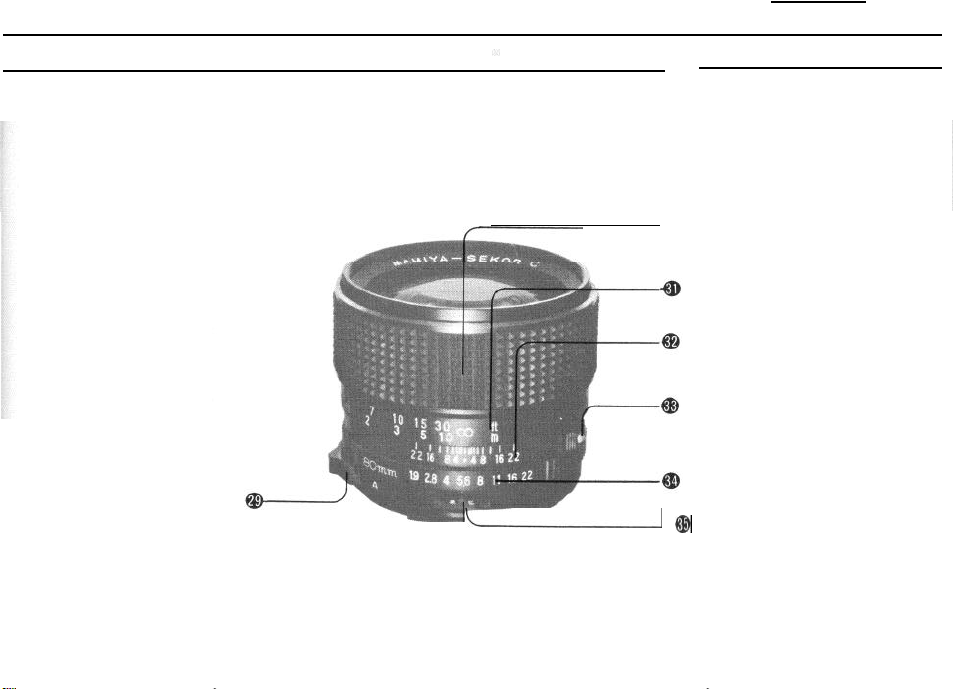
30 Focusing ring
Distance scale
Depth-of-field scale
Alignment dot
Align with matching alignment
dot on camera body for rapid
lens mounting.
A.M. Lever
Automatic diaphragm operation
when ”A” appears in the window.
Diaphragm stopped down to
preselected aperture when “M”
appears in window.
i___________
10
Aperture ring
@
Exposure meter coupler
Couples the aperture ring to
any prism finder with built-in
meter
ames and Functions of Parts (3)
_
__
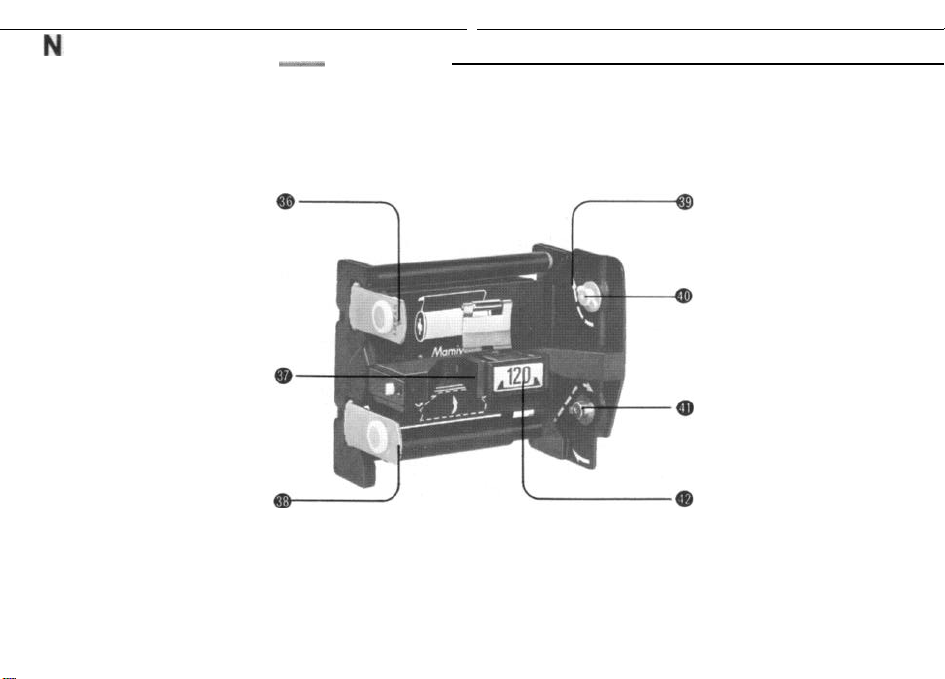
Roll-Film Insert
(120 and 220 roll-film inserts are available)
Start Mark
After aligning the start mark on
the film’s leader paper with this
mark, the roll-film insert is ready
for insertion into the camera.
Release latch
After squeezing in on both sides
of release latch, the roll-film
insert can be pulled out of
camera.
Spool clip
Pull out and lower spool clip to
insert or remove film spools.
Leader paper guide marks
Indicates the direction leader
paper is to follow.
Film spool stud
Place film spool on film spool
stud so that the black side of
the leader paper faces up.
Take-up spool stud
Attach empty spool to take-up
spool stud and insert the tip of
the leader paper into the spool
slot.
Film type index
(120 or 220)
Insert roll-film insert into camera
with the film type index upright.
If the film type index is upside
down, roll-film insert will not fit
into the camera.
11

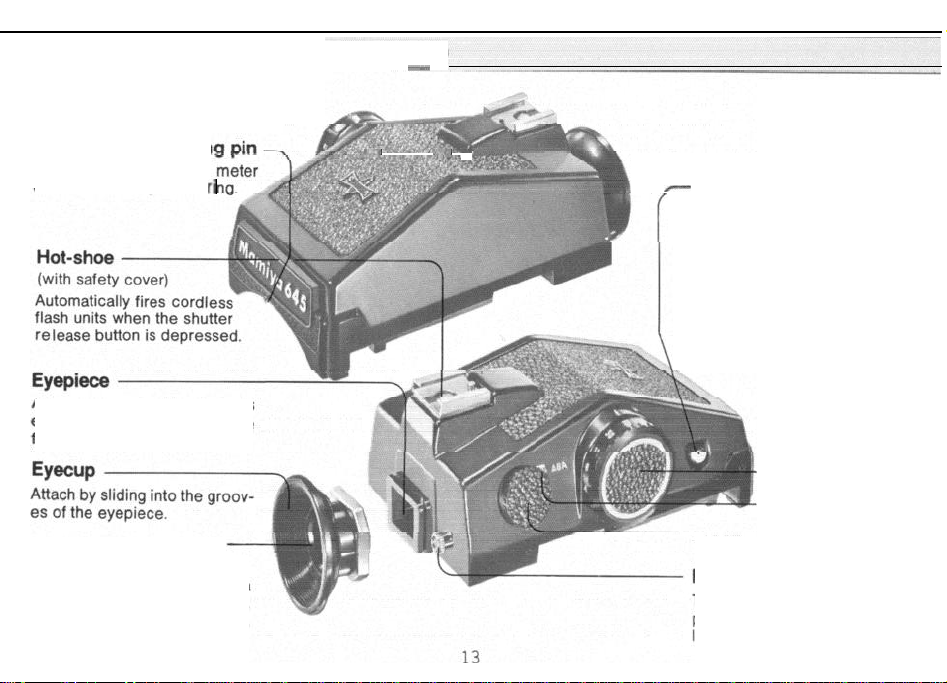
Prism Finder
--
EYecUP
Attach by sliding into the
grooves of the eyepiece.
Diopter correction lens
retainer ring
Remove by unscrewing in
a counterclockwise direc-
tion. After inserting cor-
rection lens, replace retainer ring.
Hot-shoe
Automatically fires cordless
flash units when the shutter
release button is depressed
(with safety cover)
.
Eyepiece
Accessories such as eyecup, magnifier, and angle
finder can be attached.
Finder release button
Turn clockwise until it stops,
push in, and the finder can
;E,;fted
1212
off the camera
Names and Functions of Parts (4)
- -. - -
“-- - - - -”
PD Prism Finder S
(Detailed Instructions on pp. 35-38)
Aperture ring
Couples to the exposure
coupler on the aperture
couplin
ri
.*
.i,
-
Meter switch
Pushing in on this switch when
the finder is attached to the
camera will turn on the meter
and a LED in the finder will light
up. Even if you release pressure
from the meter switch, the
meter will remain on for approxi-
mately 15 seconds and then
automatically turn off to conserve electricity.
Accepts accessories such
eyecup
,
magnifier, and angle
finder.
Diopter correction lens
retainer ring
Remove by unscrewing in a
counterclockwise direction.
After inserting correction lens,
replace retainer ring.
as
Shutter speed dial
ASA window
ASA dial
Pull out and then turn.
Finder release button
Turn clockwise until it stops,
push in, and the finder can be
lifted off the camera body.
CdS
Prism Finder
(Detailed instructions on
pp.39-43)
Aperture ring
coupling pin
Couples to the exposure
meter coupler on the
aperture ring.
Hot-shoe (with safety cover)
Automatically fires cordless
flash units when the shutter release button is depressed.
Accepts accessories such as
eyecup,
magnifier, and angle
finder.
Attach by sliding into the grooves of the eyepiece.
Diopter correction lens
retainer ring
Remove by unscrewing in a
counterclockwise direction.
After inserting correction lens,
replace retainer ring,
Remove the cover
Insert a 15V battery into the chamber
*
with a coin and
14
cover
push in, and the finder can be
Shutter Speed Dial
Be sure to manually set the
shutter speed dial of the
camera body to the speed
indicated by this dial.
Power switch
Set to OFF when the
meter is not being
used.
ASA
dial
Pull out and then turn
ASA window
Finder release button
Turn clockwise until it stops,
lifted off the camera body.

Names and Functions of Parts (5)
Waist-Level Finder S
.--~-
(For detailed instructions, see pp. 44-46)
_
__.
Sports finder eyepiece
Retracted when not used.
Sports finder wire-frame
for standard lens
Retracted when not used.
Auxiliary mask for 110,
Not necessary with standard lens
.
Alignment dot for
changing magnifier
To remove magnifier, twist
counterclockwise and lift out,
The magnifier is interchangeable with 5 types of magnifiers
with diopter corrections.
Finder
Turn clockwise until it stops,
push in, and the finder can be
release
lifted off the camera body.
button
90”
Magnifier release
Push in to raise the
magnifier.
-

Testing to See if the Camera Functions Properly
To release the shutter when there is no film in the camera, proceed as follows.
[For detailed instructions on particular points, refer to the page number shown
in parentheses.)
1. Insert a battery into the camera (p.21)
2. Set the multiple-exposure lever to “MULTI” (p.50).
(If you have just purchased the camera and the vinyl tube is still on the take-up
spool, there is no need to move the multiple-exposure lever.)
3. Set the shutter speed dial to any shutter speed other than the 0 red mark
(p.27)
.
4. Turn the film advance crank until it stops.
5. Align the shutter release lock ring with the white dot and release the shutter
(p.30).
When ready to load the camera with film, return the multiple-exposure lever to
its normal position. If this is not done, the film will not advance.
If the shutter is released without a battery in the camera, the mirror will lock in
the up position. To return the mirror to its normal position, depress the battery
check button (21) as far as it will go.
If the shutter is released with the shutter speed dial set to the red 0
the mirror will lock in the up position. To lower the mirror, turn the shutter speed
dial in either direction (B or 1/1000 sec.).
At times it may be necessary to rotate the film advance crank two full turns to
cock the shutter when an empty take-up spool (without its original vinyl tube) is
in the camera.
.
position,
,
,
16

l
Removing the body cap
While depressing the lens release button (13) turn body cap counterclockwise until the red dots are aligned and
lift out.
The upper body cover can be removed
by merely sliding backwards and lifting,
l
Interchanging Lenses
--
- ---_)II
Attaching Lenses
While
aligning the two alignment dots
(33 & 4), insert lens into camera body
Then twist lens clockwise until it clicks
and locks into place.
0
Removing Lenses
While depressing the lens release button (13) grasp the part of the lens bar-
rel that has the depth-of-field scale (32)
and alignment dot (33) and twist the
lens counterclockwise until it stops
Then lift out
.
I
17
 Loading...