

Page 1
Owner’s and Safety Manual
for Hedge Trimmer
Manuel d’emploi et de sécurité
du Taille-Haie Thermique
Manual de empleo y de seguridad
para el Corta Setos a Gasolina
EH5000W
EH6000W
EH7500W
WARNING!
To reduce the RISK of injury, user must read and understand the instruction manual before using the hedge
trimmer.
AVERTISSEMENT!
An de réduire les RISQUES de blessure, l’utilisateur doit lire et comprendre ce manuel d’instructions avant
d’utiliser le taille-haie.
¡ADVERTENCIA!
Para reducir el RIESGO de lesiones, el usuario deberá leer y comprender el manual de instrucciones antes de
usar el cortasetos.
Page 2
English
(Original instructions)
Thank you very much for selecting the MAKITA hedge trimmer. We are pleased
to be able to offer you the MAKITA hedge trimmer which is the result of a long
development program and many years of knowledge and experience.
The hedge trimmer models EH5000W, EH6000W and EH7500W combine the
advantages of state-of-the-art technology with ergonomic design, light weight,
handy, compact and represent professional equipment for a great variety of
applications.
Please read, understand and follow this booklet which refers in detail to
the various points that will demonstrate its outstanding performance. This
will assist you to safely obtain the best possible results from your MAKITA
hedge trimmer.
Table of Contents Page
Symbols .........................................................................2
Safety instructions .........................................................3
Technical data................................................................6
Designation of parts.......................................................7
Fuels/refueling ...............................................................8
Precautions before starting............................................9
Starting the machine....................................................10
Stopping the machine ..................................................10
Operation of the machine ............................................ 11
Adjusting rear handle angle ......................................... 11
Maintenance instructions .............................................12
Storage ........................................................................15
Maintenance schedule.................................................15
Fault location ...............................................................15
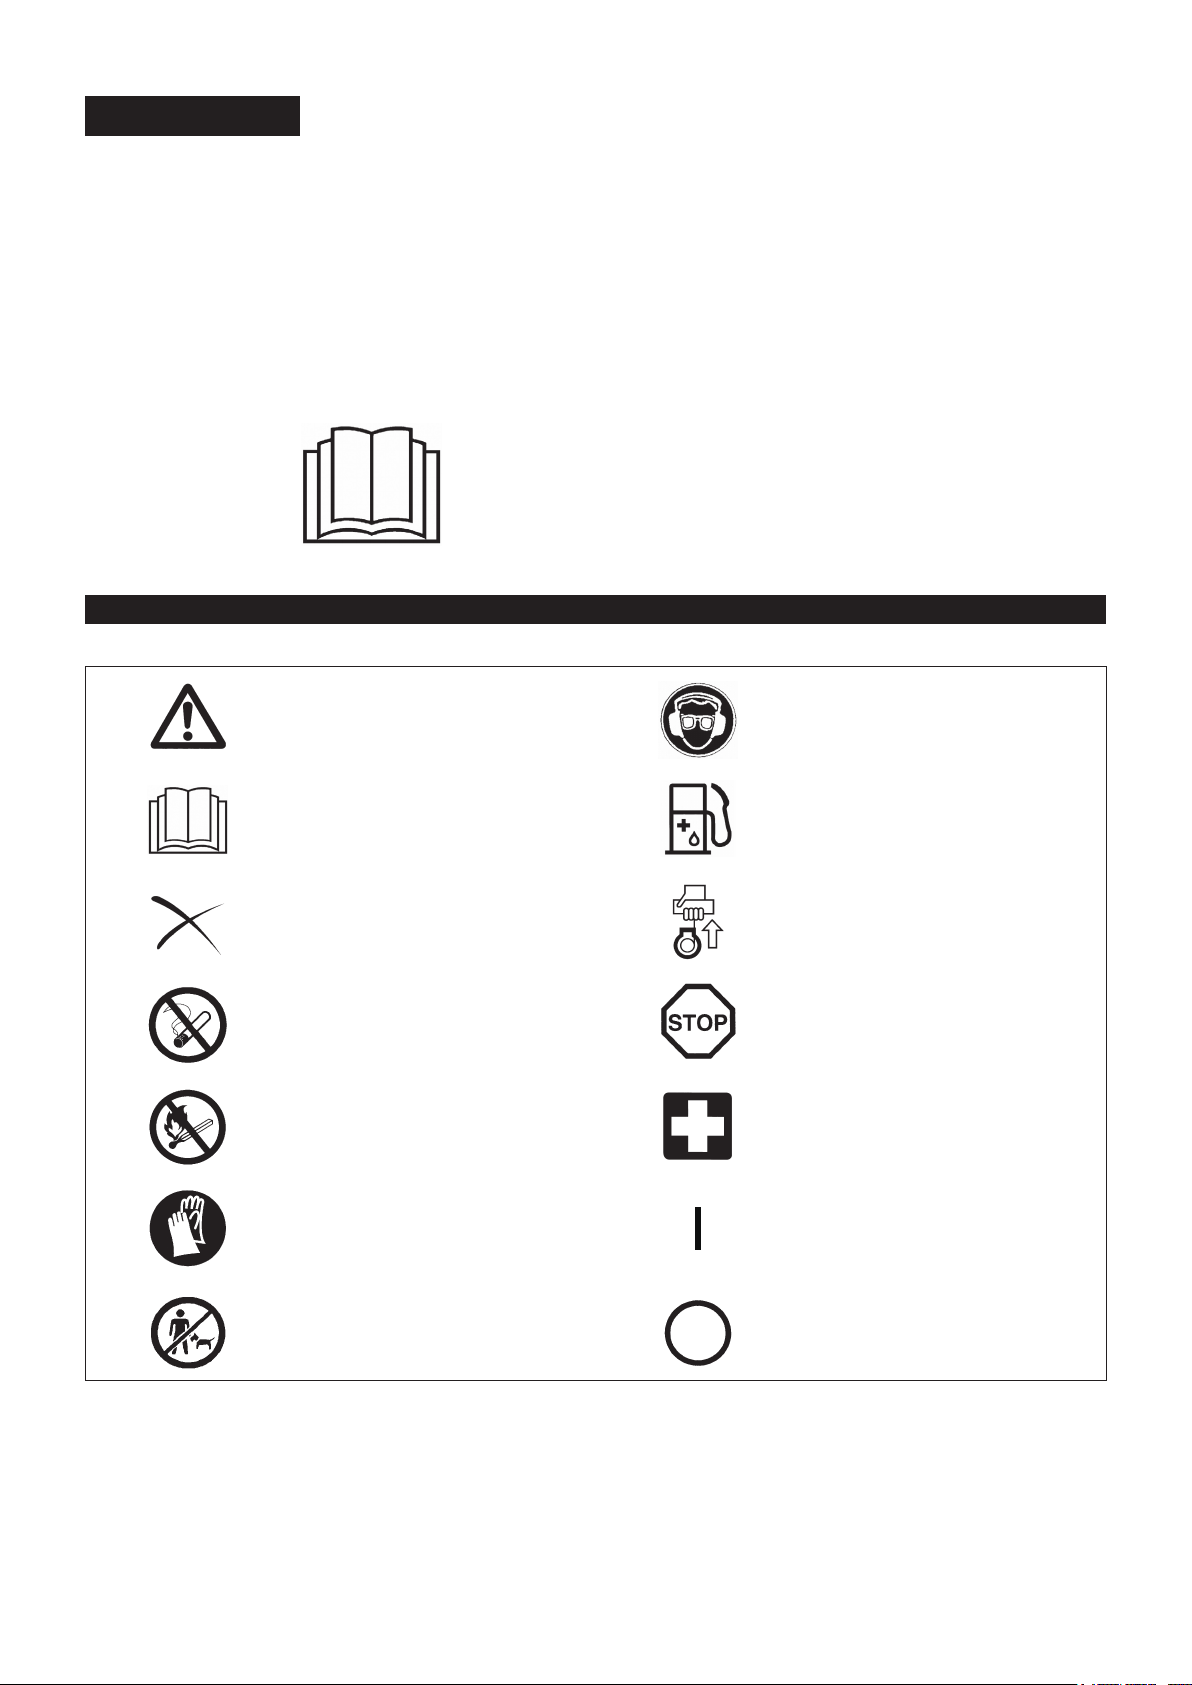
SYMBOLS
It is very important to understand the following symbols when reading this instructions manual.
WARNING/DANGER Wear eye and ear protection
Read, Understand and Follow
Instruction Manual
Forbidden Engine-Manual start
No smoking Emergency stop
No open ame First Aid
Protective gloves must be worn ON/START
Keep the area of operation clear of all
persons and pets
Fuel and oil mixture
OFF/STOP
2
Page 3
SAFETY INSTRUCTIONS
General Instructions
- THIS MACHINE CAN CAUSE SERIOUS INJURIES. Read the Instructions
carefully for correct handling, preparation, maintenance, starting and stopping of
the machine. Be familiar with all controls and the proper use of the machine. (1)
- It is recommended only to loan the hedge trimmer to people who have proven to
be experienced with hedge trimmers.
Always hand over the instruction manual.
- First-time users should ask the dealer for basic instructions to familiarize
themselves with handling of an engine powered hedge trimmer.
- Children and young persons aged under 18 years must not be allowed to operate
the hedge trimmer. Persons over the age of 16 years may however use the
device for the purpose of being trained only while under the supervision of a
qualied trainer.
- Use the hedge trimmer with the utmost care and attention.
- Operate the hedge trimmer only if you are in a good physical condition. Perform
all work calmly and carefully. The user has to accept liability for others.
- Never use the hedge trimmer after consuming alcohol or drugs, or if feeling tired
or ill. (2)
Intended use of the machine
- The hedge trimmer is designed for only the purpose of trimming bushes and
hedges, and must not be used for any other purpose. Do not abuse the Trimmer.
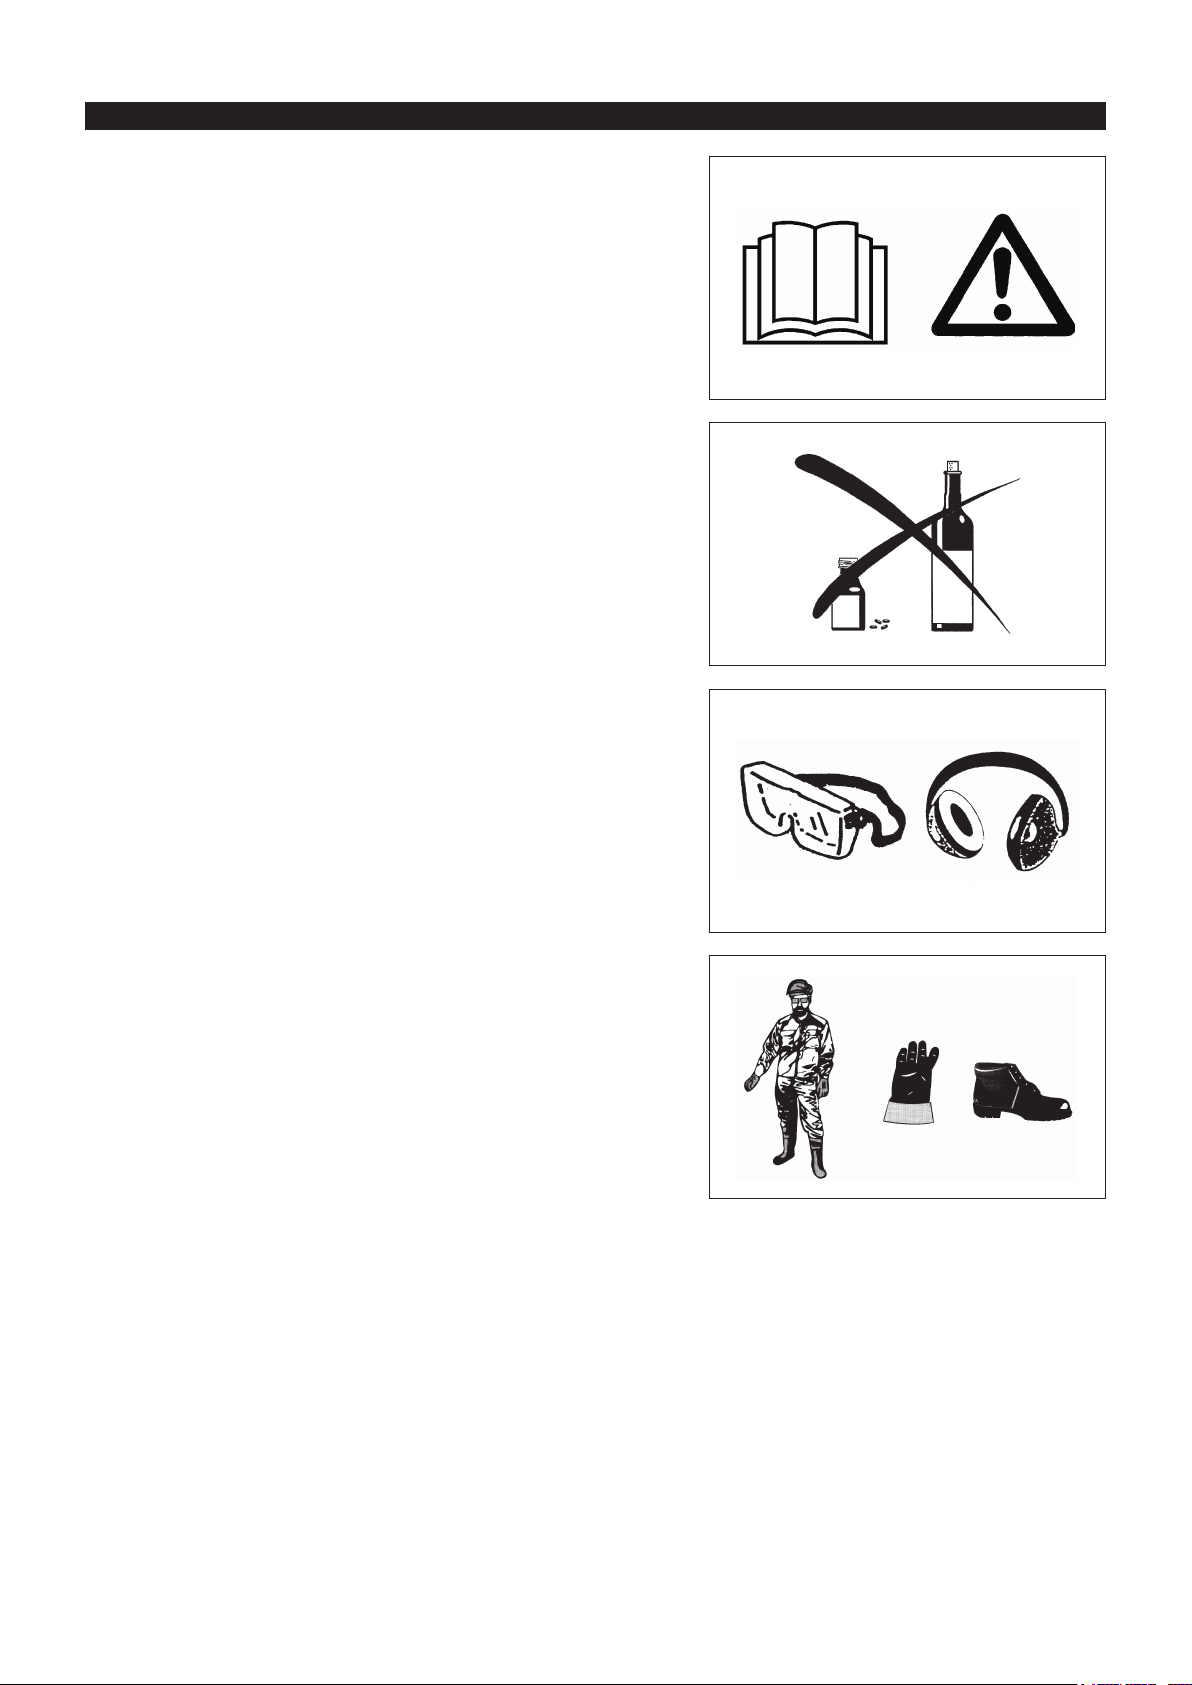
Personal protective equipment
- The clothing worn should be functional and appropriate, i.e. it should be tight-
tting but not cause hindrance. Do not wear jewelry or loose clothing which could
become entangled with bushes or shrubs, or the machine.
- In order to avoid eye, hand or foot injuries as well as to protect your hearing,
the following protective equipment and protective clothing must be used during
operation of the hedge trimmer.
- During operation of the hedge trimmer always wear goggles or a visor to prevent
eye injuries. (3)
- Wear adequate noise protection equipment to avoid hearing impairment, ear
muffs, ear plugs, etc. (3)
- We strongly recommend that the user wears work overalls. (4)
- Special gloves made of thick leather are part of the prescribed equipment and
must always be worn during operation of the hedge trimmer. (4)
- When using the hedge trimmer, always wear sturdy shoes with a non- slip sole.
This protects against injuries and ensures a good footing. (4)
(1)
(2)
(3)
(4)
3
Page 4
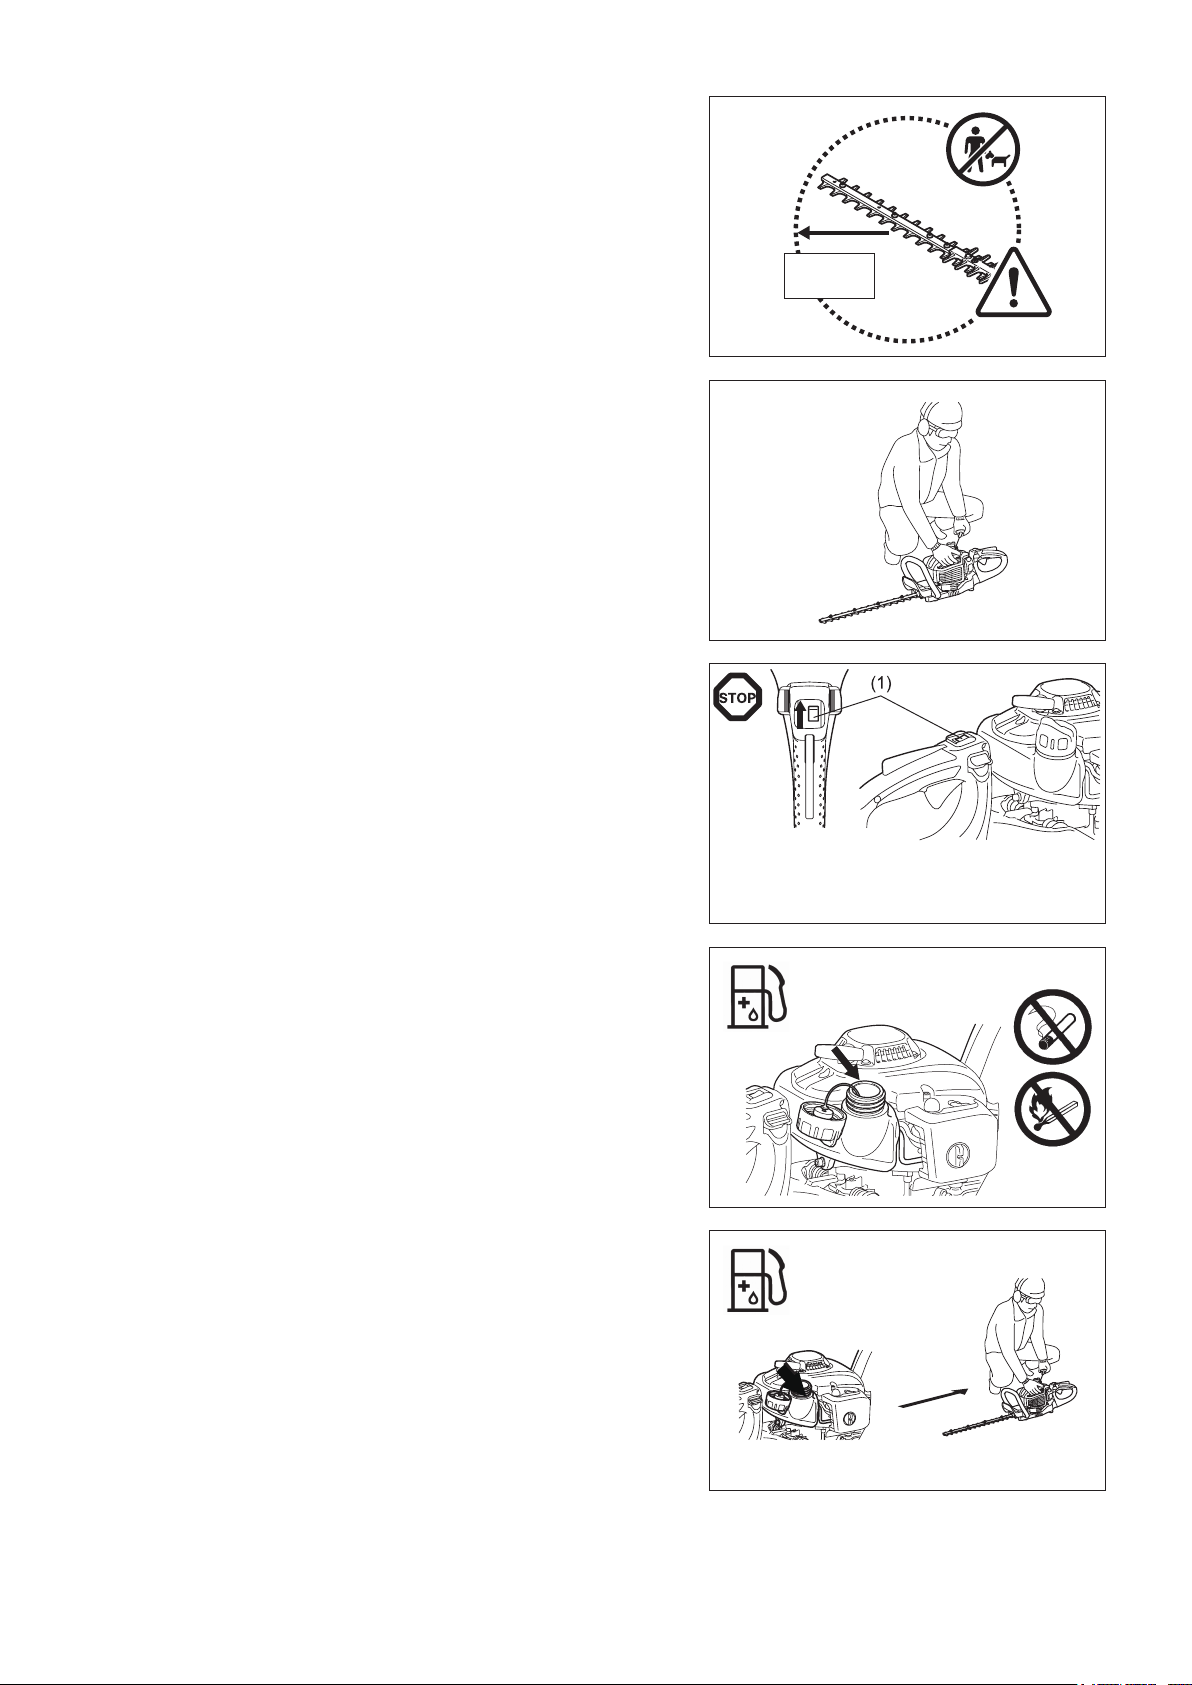
Starting up the hedge trimmer
- Please make sure that there are no children or other people within a working
range of 15 meters (5), also pay attention to any animal in the working vicinity.
- Before operating, always check the hedge trimmer is safe for operation.
- Check the security of the throttle lever. The throttle lever should be checked for
the smooth and easy actions. Check for proper functioning of the throttle lever
lock. Check for clean and dry handles and test the function of the I-O switch.
Keep handles free of oil and fuel.
Start the hedge trimmer only in accordance with the instructions.
Do not use any other methods for starting the engine (6)!
- Use the hedge trimmer only for applications specied.
- Start the hedge trimmer engine only after the entire assembly is done. Operation
of the hedge trimmer is permitted only after all the appropriate accessories are
attached!
- Before starting, make sure that the cutter blade will not contact any objects such
as branches, stones, etc.
- Stop the engine immediately if there are any engine problems.
- During operation, hold both the front and rear handle rmly by wrapping your
ngers around the handles. Keep handles clean and free of moisture, resin, oil or
grease.
Always ensure a safe, well-balanced footing.
- Only use outdoors.
- Always be aware of your surroundings and stay alert for possible hazards that
you may not hear due to the noise of the machine.
- Operate the hedge trimmer in such a manner as to avoid inhalation of the
exhaust gases. Never run the engine in enclosed rooms (risk of suffocation and
gas poisoning). Carbon monoxide is an odorless gas. Always ensure there is an
adequate ventilation.
- Stop the engine when resting and when leaving the hedge trimmer unattended.
Place it in a safe location to prevent danger to others or, setting re to
combustible materials or damage to the machine.
- Never put the hot hedge trimmer onto dry grass or onto any combustible
materials.
- To reduce re hazard, keep the engine and silencer free of debris, leaves, or
excessive lubricant.
- Never operate the engine with a faulty exhaust mufer.
- Stop the engine during transport (7).
- Stop the engine before:
- Cleaning a blockage;
- Checking, maintenance or working on the machine.
- Position the hedge trimmer safely during car or truck transportation to avoid a fuel
leakage.
- When transporting the hedge trimmer ensure that the fuel tank is completely
empty to avoid fuel leakage.
- When transporting or storing the machine always t the cutting device guard.
Refuelling
- Stop the engine before refuelling (7), keep well away from open ame (8) and do
not smoke.
- Do not attempt to refuel a hot or a running engine.
- Avoid skin contact with petroleum products. Do not inhale fuel vapors. Always
wear protective gloves during refuelling. Change and clean protective clothing at
regular intervals.
- Take care not to spill either fuel or oil in order to prevent soil contamination
(environmental protection). Wipe down the hedge trimmer immediately after fuel
has been spilled. Dry the cloths used for wiping the fuel at a well ventilated area
before disposing them. Failure to do so may cause spontaneous combustion.
- Avoid any fuel contact with your clothes. Change your clothes immediately if fuel
has been spilled on it (dangerous hazard).
- Inspect the fuel cap at regular intervals making sure that it stays securely fastened.
- Carefully tighten the fuel tank cap. Change locations to start the engine (at least 3
meters away from the place of refuelling) (9).
- Never refuel in closed rooms. Fuel vapors accumulate at ground level (risk of
explosions).
- Only transport and store fuels in approved containers. Make sure stored fuel is
not accessible to children.
- When mixing gasoline with two-stroke engine oil, use only gasoline which
contains no ethanol or methanol (types of alcohol).
This will help to prevent damage to fuel lines and other engine parts.
15 meters
(50 feet)
(5)
(6)
• Resting
• Transporting
• Refuelling
• Maintenance
(7)
• Tool Replacement
(8)
(9)
360°
3 meters
(10 feet)
4
Page 5
Method of operation
- Always use two hands to grip each handle during operation.
- Use the hedge trimmer only in a good light and visibility. During cold seasons
beware of slippery or wet areas, ice and snow (risk of slipping). Always ensure a
safe footing.
- Never work on unstable surfaces or steep terrain.
- Never stand on a ladder and run the hedge trimmer.
- Never climb up onto trees to perform cutting operation with the hedge trimmer.
- To reduce the risk of stumbling and loss of control, do not walk backward while
operating the machine.
- Always stop the engine before cleaning or servicing the unit or replacing parts.
- Do not operate the machine with a damaged or excessively worn cutting device.
Maintenance instructions
- Be kind to the environment. Operate the hedge trimmer with as little noise and
pollution as possible. In particular check the correct adjustment of the carburetor.
- Clean the hedge trimmer at regular intervals and check that all screws and nuts
are securely tightened.
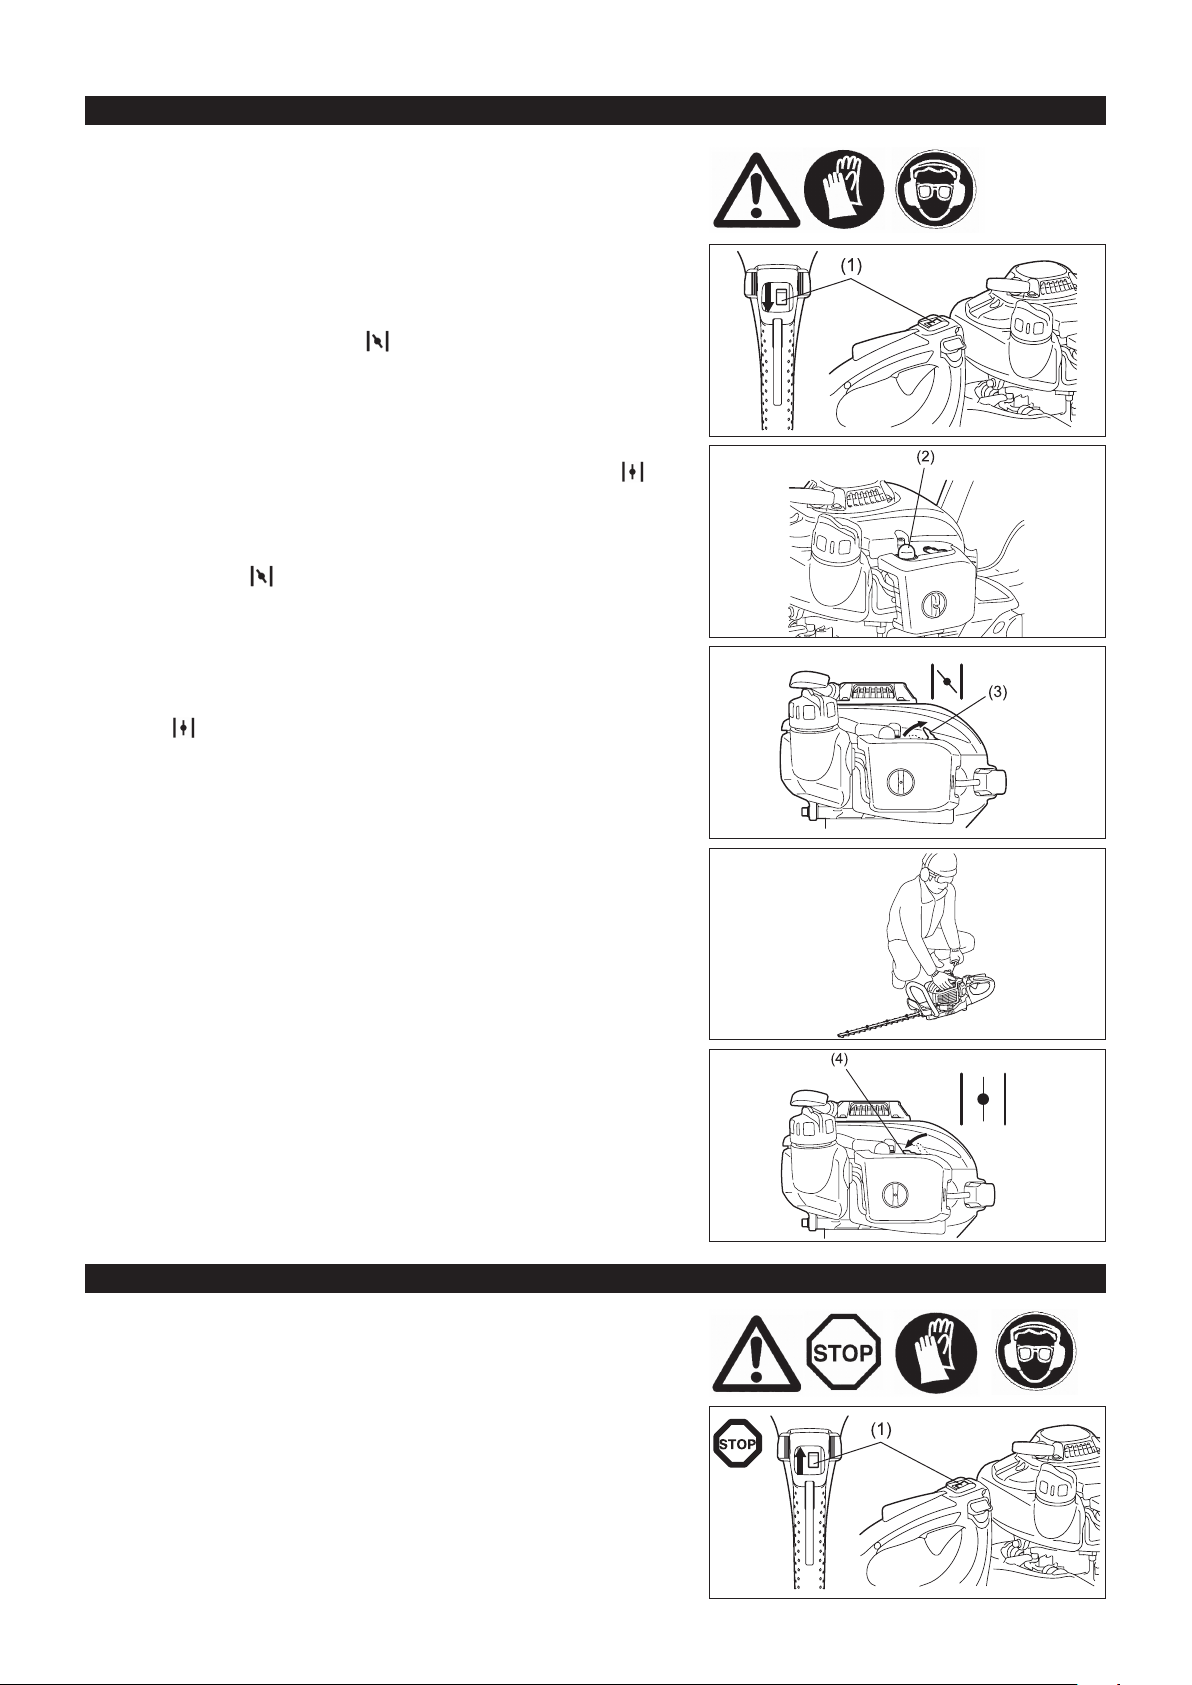
- Never service or store the hedge trimmer in the vicinity of open ames, sparks,
etc. (11).
- Empty the fuel tank before storing the hedge trimmer.
- Never store the hedge trimmer in the vicinity of naked ames to avoid res.
- Store the hedge trimmer in well ventilated and high or locked location out of reach
of children.
- Do not attempt to repair the machine unless you are qualied to do so.
(10)
(11)
Observe and follow all relevant accident prevention instructions issued by the trade associations safety board and by insurance
companies.
Do not perform any modications to the hedge trimmer as this will risk your safety.
The performance of maintenance or repair work by the user is limited to those activities as described in this instruction manual. All other works
are to be done by Authorized Service Agents.
Use only genuine spare parts and accessories supplied by MAKITA authorized or factory service centers.
Use of non-approved accessories and tools means increased risk of accidents and injuries. MAKITA will not accept any liability for accidents or
damage caused by the use of any non-approved accessories.
First aid
In case of an accident make sure that a well-stocked rst-aid kit according to DIN
13164, is available in the vicinity of the cutting operations.
Immediately replace any item taken from the rst aid kit.
When asking for help, please give the following information:
- Place of accident
- What happened
- Number of injured persons
- Extend of injuries
- Your name
5
Page 6

TECHNICAL DATA
Model EH5000W EH6000W EH7500W
Dimension (L x W x H) mm (inch)
Mass (without blade cover) kg (lbs) 4.8 (10.5) 5.0 (11.0) 5.2 (11.4)
Volume (fuel tank) L (.oz) 0.4 (13.5)
3
Engine displacement cm
Cutting length mm (inch) 483 (19”) 588 (23-1/8”) 728 (28-3/4”)
Maximum engine performance kW (hp) 0.68 (0.91)
Stroke per minute 4,270
Idling speed RPM 3,000
Clutch engagement speed RPM 4,000
Carburetor type type WALBRO WYL
Ignition system type Solid state ignition
Spark plug type NGK CMR6A
Electrode gap mm (inch) 0.7 - 0.8 (1/32”)
MAKITA genuine two-stroke
Mixture ratio
(fuel: engine oil)
Gear ratio 9 : 43
engine oil
Other manufacutrer's two-stroke
engine oil
(cu.in) 22.2 (1.35)
1,014 x 262 x 216
(40” x 10-3/8” x 8-1/2”)
1,119 x 262 x 216
(44” x 10-3/8” x 8-1/2”)
50 : 1
25 : 1
1,259 x 262 x 216
(49-1/2” x 10-3/8” x 8-1/2”)
(For Canada)
NOTE: This spark ignition system complies with the Canadian standard ICES-002.
6
Page 7

DESIGNATION OF PARTS
4
3
1
2
7
9
13
5
6
81410
12
11
1516
17
DESIGNATION OF PARTS DESIGNATION OF PARTS DESIGNATION OF PARTS
1 Blade 7 Carburetor (not shown) 13 Release lever
2 Blunt extension 8 I-O switch (ON-OFF) 14 Mufer
3 Front handle 9 Spark plug 15 Primer pump
4 Recoil starter 10 Lock-off lever 16 Fuel tank
5 Fuel tank cap 11 Throttle lever 17 Blade cover
6 Choke lever 12 Rear handle
7
Page 8

FUELS/REFUELING
Fuel and oil mixture
- The engine of the hedge trimmer is a high-efciency two-stroke engine.
It is run with a mixture of fuel and two-stroke engine oil. The engine is designed
for unleaded regular fuel with a min. octane value of 91 ROZ.
In case no such fuel is available, you can use fuel with a higher octane value.
This will not damage the engine, but may cause poor operating behaviour.
A similar situation will arise from the use of leaded fuel.
To obtain optimum engine operation and to protect your health and the
environment, only unleaded fuel should be used!
- For lubricating the engine use a two-stroke engine oil (quality grade: TSC-3),
which is added to the fuel.
The engine has been designed for use with MAKITA two-stroke engine oil and a
mixture ratio of 50:1 only to protect the environment. In addition, a long service
life and a reliable operation with a minimum emission of exhaust gases is
guaranteed. It is absolutely essential to observe a mixture ratio of 50:1 (MAKITA
2-stroke engine oil), otherwise the reliable function of the hedge trimmer cannot
be guaranteed.
- The correct mixture ratio:
Gasoline: Specied two-stroke engine oil = 50 : 1 or
Gasoline: Other manufacturer’s two-stroke engine oil = 25 : 1
recommended
NOTE: For preparing the fuel-oil mixture, rst mix the entire oil quantity with half of
the fuel required in an approved canister which meets or exceeds all local
code standards. Then add the remaining fuel.
Thoroughly shake the mixture before lling it into the hedge trimmer’s tank.
Do not add more engine oil than specied to ensure safe operation. It will
only result in a higher production of combustion residues which will pollute
the environment and clog the exhaust channel in the cylinder as well as the
mufer. In addition, the fuel consumption will rise and the performance will
decrease.
Observe the Safety Instructions on page 4.
Handling petroleum products
Utmost care is required when handling fuels. Fuels may contain substances similar
to solvents. Refuel either in a well ventilated area or outdoors. Do not inhale fuel
vapors, avoid any contact of fuel or oil with your skin.
If your skin comes in contact with these substances repeatedly and for an extended
period of time, it will desiccate.
Various skin diseases may result. In addition, allergic reactions are known to occur.
Eyes can be irritated by contact with oil, fuel etc.
If oil, fuel, etc., comes into your eyes, immediately wash them with clear water.
If your eyes are still irritated, see a doctor immediately!
Gasoline Oil
+
50:1
1,000 cm3 (1 litter)
5,000 cm3 (5 litter)
10,000 cm3 (10 litter)
50:1 25:1
20 cm3 40 cm
100 cm3 200 cm
200 cm3 400 cm
3
3
3
8
Page 9

Refuelling
- The engine must be switched off.
- Stop the engine during refuelling, keep away from ames and do not smoke.
- Take care not to spill either fuel or oil in order to prevent soil contamination.
Clean the hedge trimmer immediately after fuel has been spilled.
- Do not spill fuel onto the engine. Wipe down if the fuel is spilled.
- Avoid any fuel contact with your clothes. Change your clothes instantly if fuel has
been spilled on it (to prevent clothes catching re).
- Inspect the fuel cap regularly making sure that it can be securely fastened and
does not leak the fuel.
- Carefully tighten the fuel tank cap. Change location to start the engine (at least
3 meters away from the place of refuelling.)
- Never refuel in closed rooms. Fuel vapors accumulate at ground level. (Risk of
explosions.)
- Transport and store fuel only in approved containers. Make sure the fuel stored is
not accessible to children.
- Thoroughly clean the area around the tank cap to prevent dirt from getting into
the fuel tank.
- Unscrew the plug and ll the tank with fuel. Use a gauze funnel to lter the fuel.
- Tightly screw on the plug by hand only.
- Clean around the screw plug and the tank after refuelling.
- Always wipe up any spilled fuel to prevent a re.
Storage of fuel
- Fuel cannot be stored for an unlimited period of time.
- Purchase only the quantity required for a 4 week operation period.
- Use approved fuel storage containers only.
PRECAUTIONS BEFORE STARTING
- Make sure that there are no children or other people within a working range of
15 meters. Also pay attention to any animal in the working vicinity.
- Before use always check that the hedge trimmer is safe for operation. Check the
cutting device is not damaged, the control lever for easy action and check for the
proper function of the I-O switch.
Make sure that the cutting blades do not run when the engine is idling.
Check with your dealer for adjustment if in doubt. Check for clean and dry
handles and test function of the I-O switch.
- Start the hedge trimmer only in accordance with the instructions. Do not use any
other methods for starting the engine. (See Starting)
- Start the engine only after the entire assembly is done. Operation of the engine is
only permitted after all the appropriate accessories are attached. Otherwise there
is a risk of injury.
- Before starting, make sure that the cutting blades have no contact with objects
such as branches, stones, etc.
- Before trimming, inspect the area for wires, cords, glass, or other foreign objects
which could come in contact with the blade.
- Electrical shock. Be aware of any and all electric lines and electric fences. Check
all areas for electrical lines before cutting.
3 meters
(10 feet)
Diagrammatic
gure
360°
15 meters
(50 feet)
9
Page 10
STARTING THE MACHINE
Move at least 3 meters away from the place of refuelling. Place the hedge trimmer
on a clean area of ground. Make sure that the cutting blades do not come into
contact with the ground or any other objects.
Cold starting: (When the engine is cold or it has been stopped for more than
5 minutes or when fuel is added to the engine.)
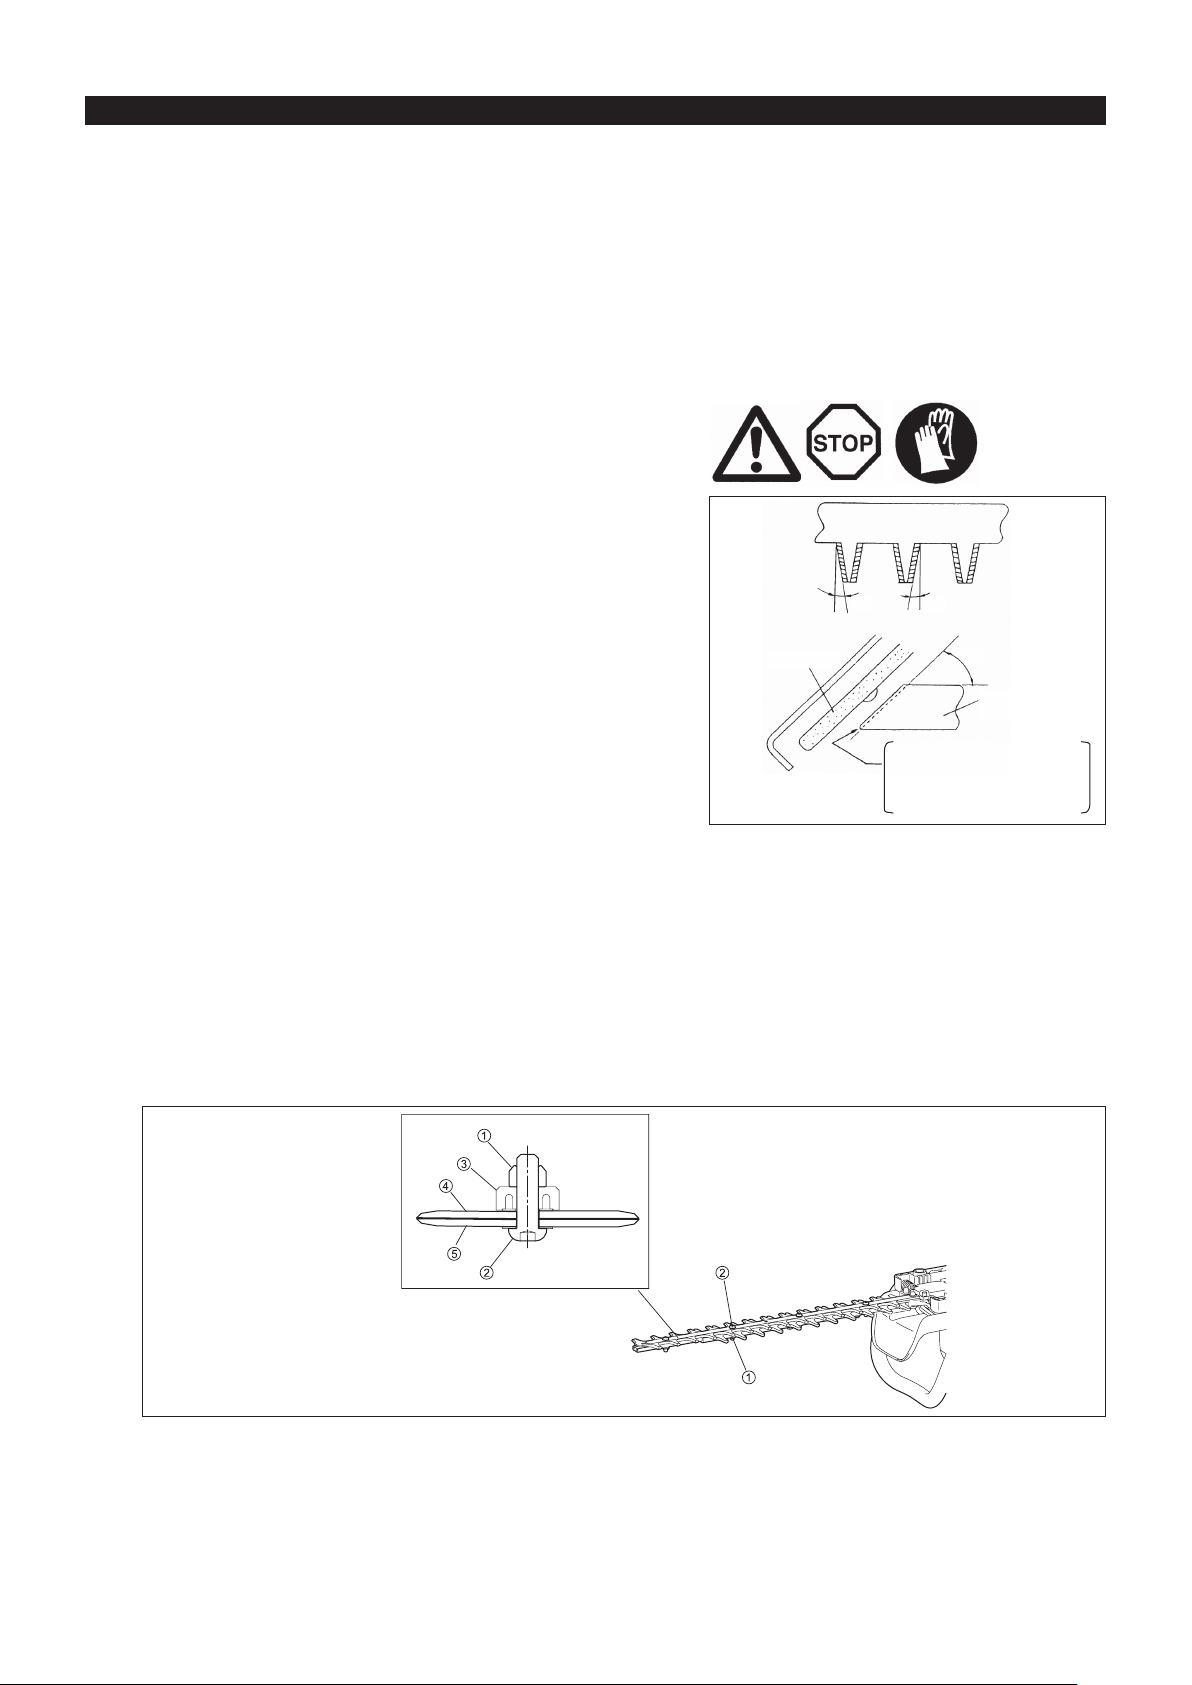
1. Push the I-O switch (1) to “I” position.
2. Repeat pushing the primer pump (2) gently (7 to 10 times) until the fuel comes
into the primer pump.
3. Move the choke lever (3) to position “
4. Hold the hedge trimmer down rmly to avoid loss of control while cranking the
engine. Failure to do so may cause serious injury and/or property damage due to
falling or contact with the cutting blade.
5. Pull the starter handle slowly for 10 to 15 cm until you feel the resistance.
6. Pull the starter handle strongly with feeling the resistance and start the engine.
7. When the engine starts or pop-up and stop, return the choke lever (4) to “
8. Run the engine for approximately one minute at a moderate speed before
accelerating to full throttle.
”.
”.
Note: • If the starter handle is pulled repeatedly when the choke lever
• In case of excessive fuel intake, remove the spark plug and pull the
Hot starting: (Restarting immediately after the engine has stopped.) When
restarting a hot engine, rst try the above procedure: 1, 2, 4, 5, 6 with the choke
lever (4) to “
Note: Do not pull the starter rope to its full extension. Do not allow the
remains at “
excessive fuel intake.
starter handle slowly to remove excess fuel. Also, dry the electrode
section of the spark plug.
”. If the engine does not start, repeat above steps 1-8.
starter grip to be retracted without control. Ensure that it is retracted
slowly.
” position, the engine will not start easily due to
STOPPING THE MACHINE
1. Release the throttle lever completely.
2. Push the I-O switch (1) to “O” position. The engine will slow down and stop.
10
Page 11
OPERATION OF THE MACHINE
- Never operate the hedge trimmer with a loose grip.
- Never touch the cutting blades when starting the engine and during operation.
- Operate the hedge trimmer in such a manner as to avoid inhalation of the
exhaust gases. Never run the engine in enclosed rooms (Risk of gas poisoning).
Carbon monoxide is an odorless gas.
- All protective equipment such as a guard supplied with the machine must be used
during operation.
- Never operate the engine if the mufer is faulty or missing.
- Use the hedge trimmer only in good light and visibility.
- During the winter season beware of slippery or wet areas, ice and snow. (Risk of
slipping.) Always ensure a safe footing.
- Never stand on a ladder and run the hedge trimmer. Keep both feet on the
ground.
- Never climb up the trees with the hedge trimmer to perform cutting operation.
- Never work on unstable surfaces.
- Remove sand, stone, nails, wire, etc. found within the working area. Foreign
objects may damage the cutting blades.
- Prior to the cutting operation, cut away 8 mm or thicker branches with pruning
shears.
- Before commencing cutting, the cutting blades must have reached full working
speed.
- Always hold the hedge trimmer rmly with both hands on the handles.
- Use a rm grip with thumbs and ngers encircling the handles.
- When you release the throttle, it takes a few moments before the cutting blades
stop.
- Do not operate the hedge trimmer with high idle speed. You cannot adjust the
cutting speed with the throttle control if the idle speed is too high.
- During the cutting operation, hold the hedge trimmer so that the blades form a
15-30° angle with the cutting line.
- Pay special attention when cutting hedges close to or against wire fences.
- Do not touch hard objects such as wire fence, stone or ground with the cutter
blades. It may cause blades to crack, chip or break.
- Should the cutting blades hit stones or other hard objects, immediately switch off
the engine and inspect the cutting blades for damage. Replace damaged blades
before re-commencing work.
- Take a rest periodically. MAKITA recommends to take a 10- to 20-minute rest
every 50 minutes of use.
- Switch off the engine immediately in case of any engine problems.
- Operate the hedge trimmer with as little noise and contamination as possible. In
particular check the correct setting of the carburetor and the fuel/oil ratio.
- Never attempt to remove jammed cut material when blades are running. Put unit
down, turn it off, and remove necessary cuttings.
ADJUSTING REAR HANDLE ANGLE
The rear handle can be turned down to 90° to the left or right side and set at every
45°.
To change the angle:
1. Press the release lever to release the lock.
2. Turn the handle to an angle of 0°, 45° or 90°.
3. Make sure that the release lever returns to the original position to engage the
lock.
Do not pull the throttle lever while the lock is released.
Do not release the lock during operation.
11
Page 12
MAINTENANCE INSTRUCTIONS
- Turn off the engine and remove the spark plug connector when cleaning/replacing/sharpening the cutting blades or carrying out any
maintenance.
- Never straighten or weld a damaged cutting blade.
- Frequently inspect the cutting blades for damage with the engine switched off.
- Keep the cutting blades sharp.
- Clean the hedge trimmer and check that all screws and nuts are well tightened regularly.
- Never service the hedge trimmer in the vicinity of naked ames to avoid res.
- Always wear leather gloves when handling or sharpening the blades, as they are sharp.
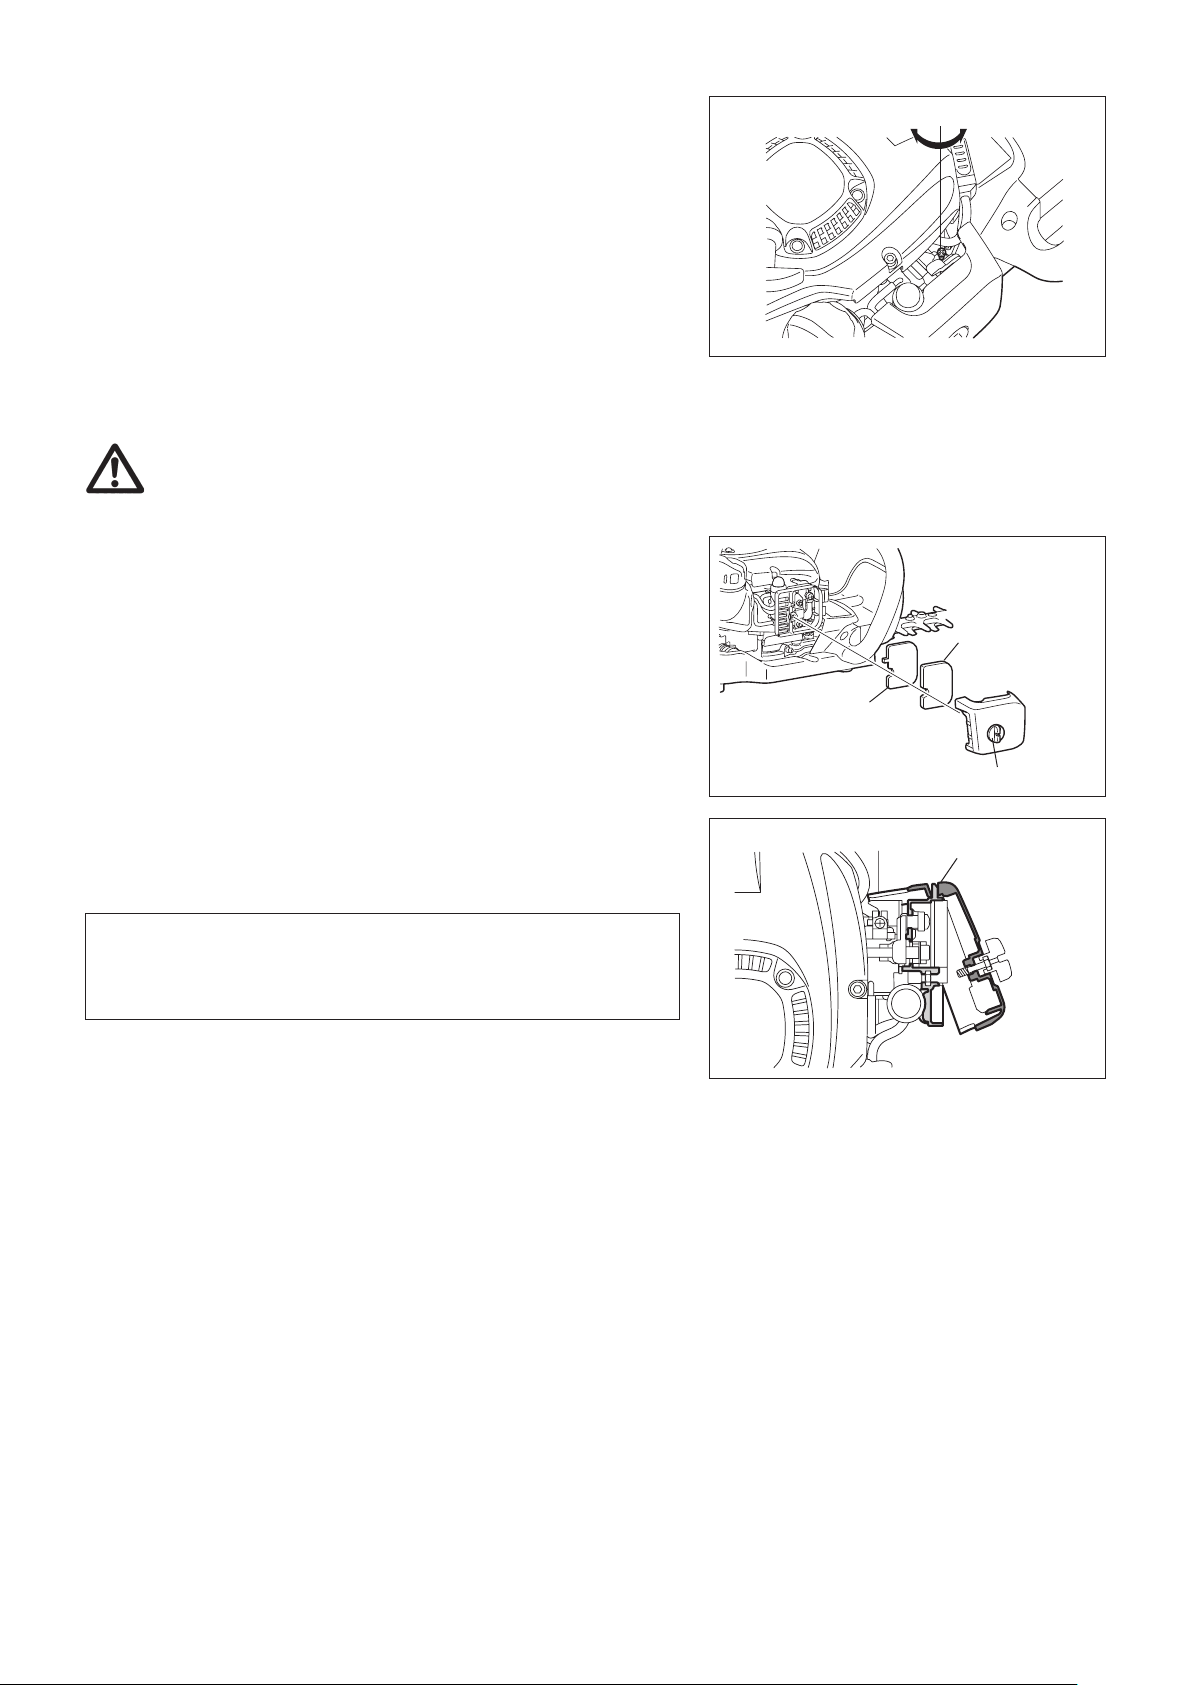
Sharpening blade
If the edges are rounded and do not cut well any more, grind off only the shaded
portions in the gure. Do not grind the contact surfaces (sliding surfaces) of the top
and bottom edges.
- Before grinding, be sure to secure the blade rmly and switch off the engine and
remove the spark plug cap.
- Wear gloves, protective glasses, etc.
- Do not remove too much material. It lose the hardened layer and cause the
blades to get dull very quickly in use.
10° 10°
Adjusting blade clearance
The upper/lower blades wear. If you cannot get a clean cut though the blades are
sharp enough, adjust the clearance as follows.
1. Remove the blunt extension by loosen the screws.
2. Loosen the nut (1) with a box or open-ended wrench.
3. Tighten the truss bolt (2) with a hex wrench lightly till it stops and screw it back a
quarter turn.
4. Tighten the nut (1), holding the truss bolt (2).
5. Apply light oil on the friction surface of the blades.
6. Start the engine, operate the throttle on and off for a minute.
7. Measure the time necessary for the blades to stop after releasing the throttle. If it
is two seconds or longer, stop the engine and repeat the step 2 to 7.
8. Stop the engine and touch the blade surface. If they are not too hot to touch, you have made a proper adjustment. If they are too hot to touch,
turn the truss bolt (2) back a little and repeat the step 6 to 8.
9. Attach the blunt extension by tightening the screws.
Disk grinder
Holding the disk grinder at
a 45° angle, grind the edge
off to the dotted line to
sharpen the rounded tip.
45°
Edge cross
section
NOTE: Before making the adjustment, stop the engine and wait for the blades to stop.
The blades have a slot around screw (2). In case you nd dust in the end of any of the slots, clean it.
Nut
①
Truss bolt
②
Blade guide
③
Upper blade
④
Lower blade
⑤
12
Page 13
Checking and adjusting the idling speed
The cutting blades should not run when the engine is at idle.
- Idle speed should be set to 3,000 min
- If necessary, adjust the idle screw (the cutting blades must not run when the
engine is on idle).
• The cutting blades run while idling - turn the idle screw counterclockwise to
decrease the idle speed.
• The engine stops while idling - turn the idle screw clockwise to increase the idle
speed.
- If the cutting blades still continue to run at idle after the adjustment, consult your
nearest authorized service agent.
• The clutch should engage at 3,750 min
• Check the functioning of the I-O switch, the lock-off lever and the throttle lever.
-1
(rpm).
-1
(rpm) or higher revolution.
Cleaning the air cleaner
DANGER: Inammables strictly prohibited
Check and clean the air cleaner daily or every 10 operating hours.
- Turn the choke lever to the close side fully, and keep the carburetor free from
dust or dirt.
- Loosen the xing bolt.
- Pull the rear side of the air cleaner cover and move it forward to detach.
- If oil adheres to the element (sponge), squeeze it rmly.
- For heavy contamination:
1) Remove the element (sponge), immerse it in warm water or in water-diluted
neutral detergent, and dry it completely.
2) Clean the element (felt) with gasoline, and dry it completely.
- Before attaching the elements, be sure to dry it completely. Insufcient drying of
the elements may lead to difcult startup.
- Wipe out oil adhering around the air cleaner with waste cloth.
- Immediately after cleaning is nished, attach the cleaner cover and tighten it with
xing bolts. (In remounting, rst place the upper claw.)
Element (Sponge)
Element (felt)
Fixing bolt
Upper claw
Points in handling the air cleaner elements
- Clean the elements several times a day, if excessive dust adheres to it.
- If operation continues with the elements remaining not cleared of oil, oil in
the air cleaner may fall outside, resulting in oil contamination.
13
Page 14
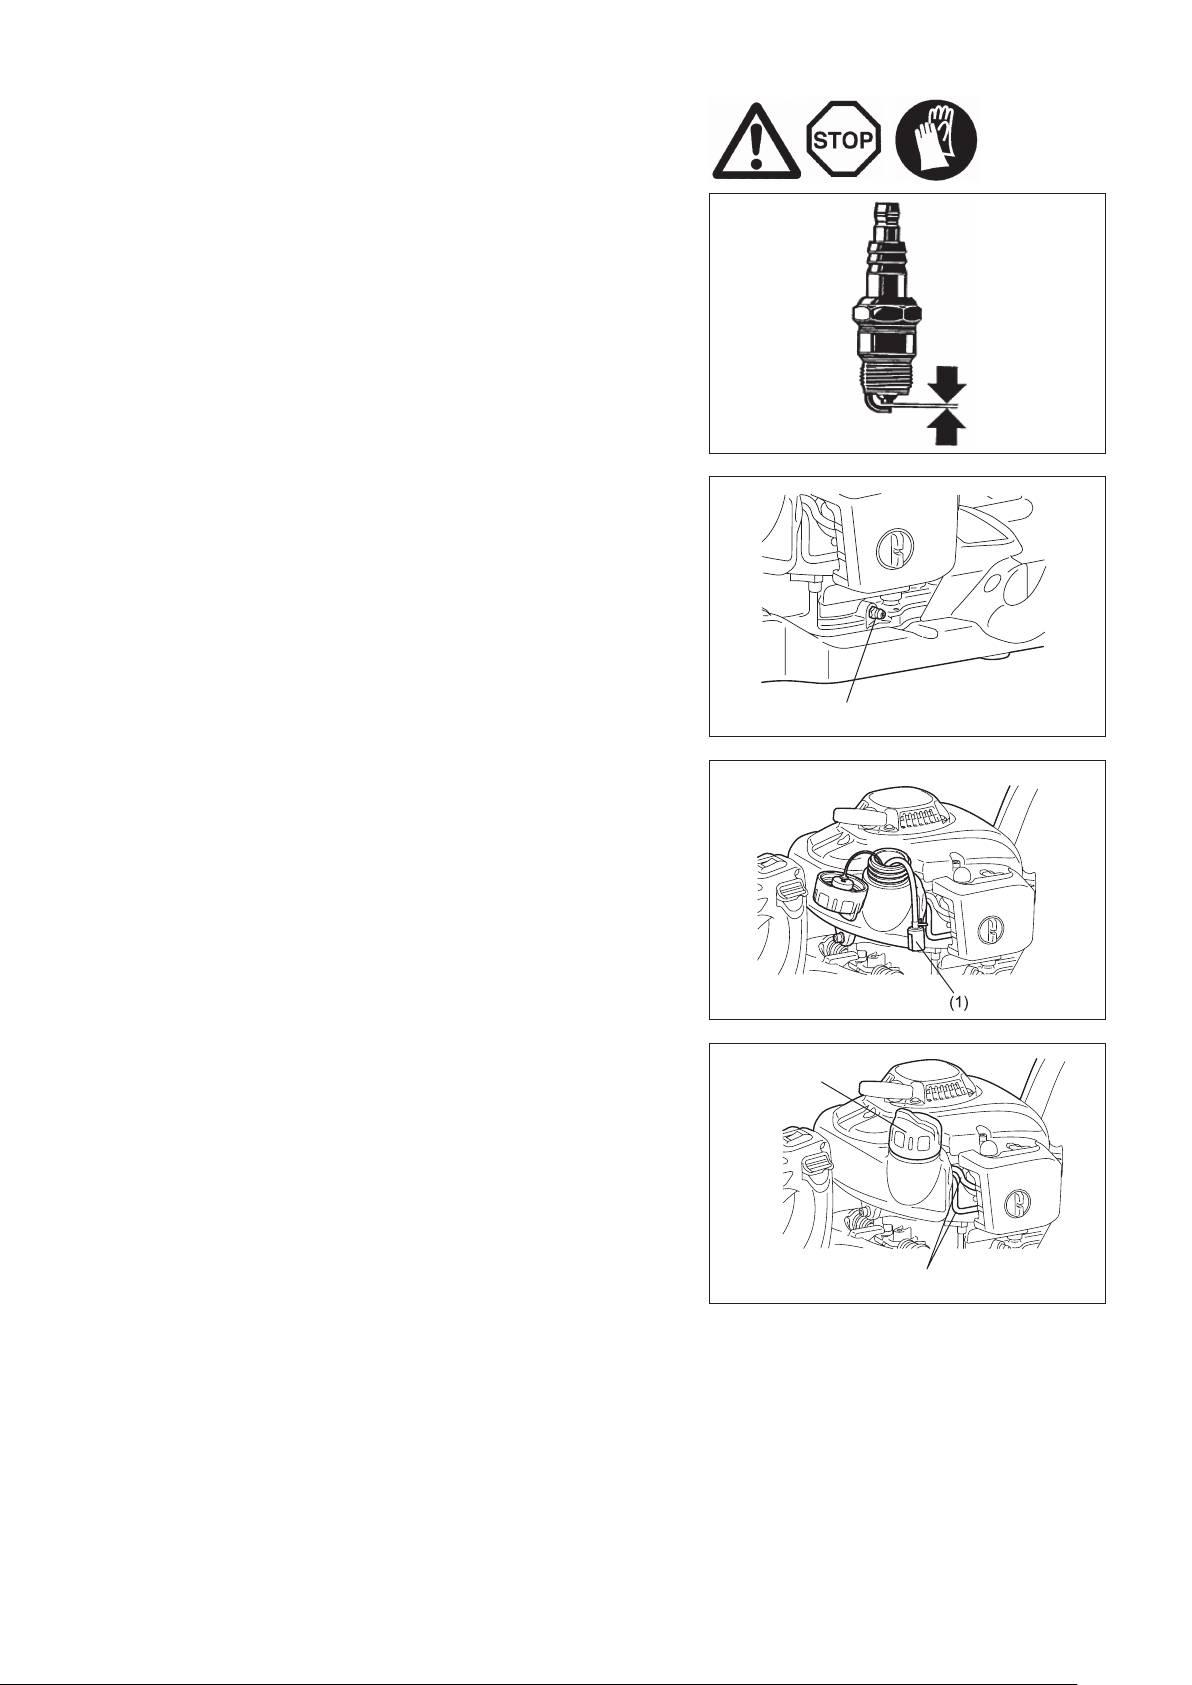
Checking the spark plug
Check and clean the spark plug daily or every 8 operating hours.
- Only use the supplied universal wrench to remove or install the spark plug.
- The gap between the two electrodes of the spark plug should be 0.7 to
0.8 mm. If the gap is too wide or too narrow, adjust it. If the spark plug is
clogged with carbon or fouled, clean it thoroughly or replace it. Use an exact
replacement.
Supplying grease and lubricant
- Supply grease through the grease nipple every 50 operating hours. (Shell
Alvania No. 3 or equivalent)
NOTE: Be sure to observe the specied time and amount of grease supply.
Otherwise an insufcient grease supply will cause a machine trouble.
Cleaning the fuel lter (suction head in the fuel tank)
WARNING: Inammables strictly prohibited
Check and clean the fuel lter monthly or every 50 operating hours.
- The felt lter (1) of the suction head is used to lter the fuel required by the
carburetor.
- Visually check the felt lter regularly.
- To check the felt lter, open the tank cap, use a wire hook and pull out the
suction head through the tank opening.
Replace the felt lter if it has hardened, been contaminated or be clogged.
- Replace the felt lter at least quarterly to ensure an enough fuel supply to the
carburetor. Otherwise an insufcient fuel supply will cause the engine start
failure and limited maximum speed.
0.7 - 0.8 mm
Grease nipple
Replacing the fuel pipe
CAUTION: Inammables strictly prohibited
Check and clean the fuel pipe daily or every 10 operating hours.
Replace the fuel pipe every 200 operating hours or every year regardless of
operating frequency. Otherwise fuel leakage may lead to re.
If you nd any leakage during inspection, replace the oil pipe immediately.
Tank cap
Replacing the tank cap
- If there is any aw or damage on the tank cap, replace it.
- The tank cap wears out in course of time. Replace it every two or three years.
Fuel pipe
For any maintenance or adjustment not described in this manual, ask your local MAKITA authorized service center.
Daily checkup and maintenance
To ensure a long service life and to avoid any damage to the equipment, the following servicing operations should be performed at regular
intervals.
- Before use;
• Check the machine for loose screws or missing parts. Pay particular attention to the tightness of the cutter blade screws.
• Check for clogging of the cooling air passage and the cylinder ns. Clean them if necessary.
• Clean and check the fuel tank for fuel leakage or foreign object in the tank.
- After use;
• Clean the hedge trimmer externally and inspect for damage.
• Clean the air lter. When working under extremely dusty conditions, clean the lter several times a day.
• Check the blades for damage and make sure they are rmly mounted.
14
Page 15

STORAGE
- When keeping the machine in storage for a long time, drain fuel from the fuel tank
and carburetor, as follows: Drain all fuel from the fuel tank.
- Remove the spark plug and add a few drops of oil into the spark plug hole. Then,
pull the starter gently to conrm that oil lm covers inside of the engine and
tighten the spark plug.
- Clear dirt or dust from the cutter blade and outside of the engine, wipe them with
a oil-immersed cloth and keep the machine at a place as dry as possible.
MAINTENANCE SCHEDULE
After each refuelling Throttle lever
I-O switch
Before each use Engine assembly,
screws and nuts
Air lter
Cooling air duct
Cutting tool
Idling speed
Fuel tank
Every 50 hours Gear case Supply grease
Weekly Spark plug Check and replace if necessary
Yearly Fuel pipe Replace
Biyearly Tank cap Replace
Before long term storage Fuel tank
Carburetor
Suction head
Check the function
Check the function
Visually check for damage and tightness
Check for general condition and security
Clean
Clean
Check for damage and sharpness
Inspection (cutting tool must not move)
Check and clean
Empty and clean
Operate until the engine runs out of fuel
Replace
FAULT LOCATION
Fault System Observation Cause
Engine not starting or
under difculties
Warm start problems Tank lled Ignition spark
Engine starts but dies
immediately
Insufcient performance Several systems may
Ignition system Ignition spark is present Faulty fuel supply or compression system, mechanical
No ignition spark I-O switch operated, wiring fault or short circuit, spark
Fuel supply Fuel tank lled Incorrect choke position, carburetor defective, suction
Compression Inside of engine Cylinder bottom gasket defective, crankshaft seals
Outside of engine Improper sealing of spark plug
Mechanical fault Starter not engaging Broken starter spring, broken parts inside of the engine
existing
Fuel supply Tank lled Incorrect idling adjustment, suction head or carburetor
Engine idling Air lter contaminated, carburetor contaminated, mufer
simultaneously be
affected
defect
plug or connector defective, ignition module faulty
head (gas line lter) dirty, fuel supply line bent or
interrupted
damaged, cylinder or piston rings defective
Carburetor contaminated, have it cleaned
contaminated
Fuel tank vent defective, fuel supply line interrupted,
cable or I-O switch faulty
clogged, exhaust duct in the cylinder clogged
15
Page 16

Français
(Mode d’emploi original)
Nous vous remercions d’avoir choisi le taille-haie MAKITA. Nous sommes
heureux d’être en mesure de vous proposer le taille-haie MAKITA qui est le
fruit d’un long programme de développement et de nombreuses années de
connaissances et d’expérience.
Les modèles de taille-haie EH5000W, EH6000W et EH7500W associent les
avantages d’une technologie dernier cri avec un design ergonomique, un
faible poids, une petite taille et une grande praticité. Il s’agit d’un équipement
professionnel adapté pour une grande variété d’applications.
Veuillez lire, comprendre et suivre les instructions de ce document qui
décrit en détails les performances remarquables de cette machine. Il
vous aidera à obtenir les meilleurs résultats possibles de votre taille-haie
MAKITA en toute sécurité.
Table des matières Page
Pictogrammes..............................................................16
Consignes de sécurité .................................................17
Données techniques ....................................................20
Désignation des pièces ...............................................21
Essence/remplissage du réservoir ..............................22
Précautions avant utilisation ........................................23
Démarrage de la machine ...........................................24
Arrêt de la machine .....................................................24
Fonctionnement de la machine ...................................25
Réglage de l’angle de la poignée arrière .....................25
Consignes d’entretien ..................................................26
Entreposage ................................................................29
Programme d’entretien ................................................29
Emplacement des défaillances ....................................29
PICTOGRAMMES
Il est primordial que vous compreniez les symboles suivants lorsque vous lisez ce manuel d’instructions.
AVERTISSEMENT/DANGER
Protections oculaire et auditive
obligatoires!
Lire, comprendre et suivre
les consignes du manuel d’instructions
Interdit Démarrage manuel du moteur
Défense de fumer Arrêt d’urgence
Flamme nue interdite Premiers soins
Gants de protection obligatoires MARCHE/DÉMARRAGE
Zone de fonctionnement interdite aux
individus et aux animaux
Mélange d’essence et d’huile
ARRÊT/COUPURE MACHINE
16
Page 17

CONSIGNES DE SÉCURITÉ
Consignes générales
- L’UTILISATION DE CETTE MACHINE COMPORTE UN RISQUE DE
BLESSURE. Lisez attentivement les instructions an de manipuler, préparer,
entretenir, démarrer et arrêter correctement la machine. Familiarisez-vous avec
toutes les commandes et l’utilisation correcte de la machine. (1)
- Il est recommandé de prêter cet équipement seulement à des personnes ayant
déjà utilisé un taille-haie.
Remettez toujours le manuel d’instructions avec la machine.
- Les utilisateurs inexpérimentés doivent demander des instructions de base au
vendeur an de se familiariser avec la manipulation d’un taille-haie à moteur.
- Les enfants et les mineurs ne doivent pas être autorisés à utiliser le taille-haie.
Les individus âgés de plus de 16 ans peuvent toutefois utiliser la machine en vue
d’apprentissage, mais toujours sous la surveillance d’une personne qualiée.
- Utilisez le taille-haie avec le maximum de soin et d’attention.
- Utilisez le taille-haie seulement si vous êtes en bonne forme physique. Manipulez
délicatement et soigneusement la machine. L’utilisateur doit endosser la
responsabilité du fait d’autrui.
- N’utilisez jamais le taille-haie après avoir consommé de l’alcool ou de la drogue,
ou encore si vous vous sentez fatigué ou malade. (2)
Utilisation normale de la machine
- Le taille-haie est conçu pour tailler les buissons et les haies exclusivement et ne
doit en aucun cas être utilisé dans un autre but. Ne malmenez pas l’équipement.
(1)
(2)
Équipement de protection personnel
- La tenue portée doit être fonctionnelle et appropriée, autrement dit elle doit
être ajustée et ne pas entraver les mouvements. Ne portez pas de bijoux ni de
vêtements amples qui pourraient s’accrocher dans les buissons, les arbustes ou
la machine.
- An d’éviter les blessures aux yeux, aux mains ou aux pieds et de protéger votre
ouïe, vous devez porter l’équipement et les vêtements de protection indiqués
ci-dessous lorsque vous manipulez le taille-haie.
- Portez toujours des lunettes étanches ou une visière lorsque vous utilisez le
taille-haie, an de prévenir les blessures aux yeux. (3)
- Portez un équipement anti-bruit adéquat an d’éviter une perte auditive :
protège-oreilles, bouchons d’oreilles, etc. (3)
- Il est vivement conseillé à l’utilisateur de porter une combinaison de travail. (4)
- Des gants spéciaux en cuir épais font partie de l’équipement recommandé; vous
devez toujours les porter lors de l’utilisation du taille-haie. (4)
- Lorsque vous utilisez le taille-haie, portez toujours des chaussures robustes
dotées d’une semelle antidérapante. Cela vous protègera des blessures et vous
assurera une bonne stabilité. (4)
(3)
(4)
17
Page 18

Démarrage du taille-haie
- Veillez à éloigner les enfants ou toute autre personne dans une zone de travail
de 15 mètres (5), et faites également attention aux animaux présents dans cette
zone.
- Assurez-vous toujours que le taille-haie est en bonne condition avant de l’utiliser.
- Vériez l’état du levier d’accélérateur. Vous devez vérier que vous pouvez
l’actionner facilement et sans forcer. Vériez que le système de verrouillage du
levier d’accélérateur fonctionne correctement. Vériez que les poignées sont
propres et sèches, et testez le fonctionnement du commutateur marche/arrêt. Il
ne doit y avoir aucune trace d’huile ou d’essence sur les poignées.
Suivez strictement les instructions pour démarrer le taille-haie.
Ne démarrez pas le moteur d’une autre façon (6) !
- N’utilisez le taille-haie que pour les applications spéciées.
- Ne démarrez le moteur du taille-haie qu’une fois que le montage complet est
terminé. Le fonctionnement du taille-haie n’est possible qu’une fois tous les
accessoires correctement xés!
- Avant le démarrage, assurez-vous que la lame n’entrera pas en contact avec des
objets tels que des branches, des pierres, etc.
- Coupez le moteur immédiatement s’il présente des problèmes.
- Pendant l’utilisation, tenez fermement les poignées avant et arrière. Les poignées
doivent être propres et n’avoir aucune trace d’humidité, de résine, d’huile ou de
graisse.
Assurez-vous toujours de votre stabilité.
- N’utilisez l’équipement qu’à l’extérieur.
- Gardez toujours un œil autour de vous et méez-vous des dangers possibles que
vous pourriez ne pas entendre à cause du bruit de la machine.
- Utilisez le taille-haie de manière à éviter l’inhalation des gaz d’échappement. Ne
faites jamais fonctionner le moteur dans une pièce fermée (risque de suffocation
et d’asphyxie au gaz). Le monoxyde de carbone est un gaz inodore. Assurez-
vous toujours que la zone est sufsamment ventilée.
- Coupez le moteur lorsque vous vous reposez et lorsque vous laissez le taille-
haie sans surveillance. Placez-le dans un endroit sûr an d’éviter de mettre
d’autres personnes en danger, de mettre le feu à des matériaux combustibles ou
d’endommager la machine.
- Ne placez jamais le taille-haie chaud sur de l’herbe sèche ou sur tout matériau
combustible.
- Pour réduire les risques d’incendie, veillez à ce qu’il n’y ait ni débris, ni feuilles, ni
un excès de lubriant sur le moteur et le pot d’échappement.
- Ne faites jamais tourner le moteur avec un silencieux d’échappement défectueux.
- Coupez le moteur pendant le transport (7).
- Coupez le moteur avant de :
- retirer un élément qui bloque la machine;
- vérier, entretenir ou travailler sur la machine.
- Placez le taille-haie dans une position sûre pendant tout transport en voiture ou
camion an d’éviter une fuite d’essence.
- Lorsque vous transportez le taille-haie, assurez-vous que le réservoir est
complètement vide an d’éviter une fuite d’essence.
- Lorsque vous transportez ou entreposez la machine, placez toujours la protection
sur l’outil de coupe.
Remplissage du réservoir
- Coupez le moteur avant de remplir le réservoir (7), maintenez-le éloigné de toute
amme nue (8) et ne fumez pas.
- N’essayez pas de remplir un moteur chaud ou en marche.
- Évitez tout contact des produits pétroliers avec la peau. N’inhalez pas les vapeurs
d’essence. Portez toujours des gants de protection pendant le remplissage du
réservoir. Changez et nettoyez souvent les vêtements de protection.
- Veillez à ne pas renverser l’essence ou l’huile an de ne pas contaminer les sols
(protection de l’environnement). Si de l’essence a été renversée sur le taillehaie, essuyez-le immédiatement. Faites sécher les chiffons utilisés pour essuyer
l’essence dans un endroit bien ventilé avant de les jeter. Autrement, il y a risque
de combustion spontanée.
- Évitez les projections d’essence sur vos vêtements. Changez immédiatement de
vêtements si de l’essence a été renversée dessus (risque important).
- Vériez à intervalles réguliers que le bouchon du réservoir d’essence est fermé
correctement.
- Serrez bien le bouchon du réservoir d’essence. Déplacez-vous pour démarrer le
moteur (à au moins 3 mètres du lieu de remplissage du réservoir) (9).
- Ne remplissez jamais le réservoir dans une pièce fermée. Les vapeurs d’essence
s’accumulent au ras du sol (risque d’explosions).
- Ne transportez et ne conservez l’essence que dans des conteneurs appropriés.
Veillez à conserver l’essence hors de portée des enfants.
- Lorsque vous mélangez l’essence avec de l’huile pour moteur à deux temps,
n’utilisez que de l’essence qui ne contient ni éthanol, ni méthanol (types d’alcool).
Ceci permettra d’éviter d’endommager les tuyaux d’alimentation en essence ainsi
que d’autres pièces du moteur.
18
360°
15 mètres
(50 pieds)
(5)
(6)
• Pause
• Transport
• Remplissage du réservoir
• Entretien
(7)
• Remplacement d’outil
(8)
(9)
3 mètres
(10 pieds)
Page 19

Mode de fonctionnement
- Utilisez toujours vos deux mains pour tenir les poignées pendant l’utilisation.
- N’utilisez le taille-haie que dans des environnements bien éclairés et avec une
bonne visibilité. Pendant les saisons froides, faites attention aux sols glissants et
aux zones humides, à la glace et à la neige (risque de glissade). Assurez-vous
toujours de votre stabilité.
- Ne travaillez jamais sur des sols instables ou des terrains en pente.
- N’utilisez jamais le taille-haie en vous tenant sur une échelle.
- Ne montez jamais dans un arbre pour réaliser des opérations de coupe à l’aide
du taille-haie.
- Pour réduire les risques de trébuchement et de perte de contrôle, ne reculez pas
en utilisant la machine.
- Coupez toujours le moteur avant de nettoyer ou de réparer la machine ou avant
de remplacer des pièces.
- N’utilisez pas la machine avec un outil de coupe endommagé ou très usé.
Consignes d’entretien
- Pensez à protéger l’environnement. Utilisez le taille-haie en produisant le
moins de bruit et de pollution possible. Vériez notamment le bon réglage du
carburateur.
- Nettoyez le taille-haie à intervalles réguliers et vériez que toutes les vis et tous
les écrous sont bien serrés.
- Ne réparez ou n’entreposez jamais le taille-haie à proximité de ammes nues,
d’étincelles, etc. (11).
- Videz le réservoir d’essence avant d’entreposer le taille-haie.
- N’entreposez jamais le taille-haie à proximité de ammes nues an d’éviter tout
risque d’incendie.
- Entreposez le taille-haie dans un espace bien ventilé et placez-le en hauteur ou
dans un endroit fermé à clef, hors de portée des enfants.
- N’essayez pas de réparer la machine à moins que vous ne soyez qualié pour le
faire.
(10)
(11)
Prenez connaissance et suivez toutes les instructions de prévention des accidents émises par le conseil de sécurité des associations
professionnelles ainsi que par les compagnies d’assurance.
N’apportez aucune modication au taille-haie, cela vous mettrait en danger.
Les travaux d’entretien ou de réparation réalisables par l’utilisateur sont ceux décrits dans le manuel d’instructions. Tous les autres travaux
doivent être réalisés par des techniciens agréés.
N’utilisez que des pièces de rechange et accessoires d’origine fournis par des services après-vente ou des centres agréés MAKITA.
L’utilisation d’accessoires et outils non agréés accroît le risque d’accidents et de blessures. MAKITA ne pourra être tenue pour responsable en
cas d’accidents ou de dommages dus à l’utilisation d’accessoires non agréés.
Premiers soins
Au cas où un accident surviendrait, assurez-vous qu’une trousse de premiers soins
complète conforme à la norme DIN 13164 est disponible à proximité de la zone de
coupe.
Remplacez sans délai tout article utilisé dans la trousse de premiers soins.
Si vous demandez de l’aide, veillez à donner les informations suivantes :
- lieu de l’accident;
- conditions de l’accident;
- nombre de personnes blessées;
- gravité des blessures;
- votre nom.
19
Page 20

DONNÉES TECHNIQUES
Modèle EH5000W EH6000W EH7500W
Dimensions (L x P x H) mm (pouce)
Poids (sans le couvercle de
lame)
Volume (réservoir d’essence) l (oz liq) 0,4 (13,5)
Cylindrée cm
Longueur de coupe mm (pouce) 483 (19”) 588 (23-1/8”) 728 (28-3/4”)
Rendement maximal du moteur kW (hp) 0,68 (0,91)
Course par minute 4 270
Vitesse au ralenti tr/min 3 000
Vitesse d’embrayage tr/min 4 000
Type de carburateur type WALBRO WYL
Système d’allumage type Allumage transistorisé
Bougie d’allumage type NGK CMR6A
Distance entre les électrodes mm (pouce) 0,7 - 0,8 (1/32”)
Dosage du mélange
(essence :
huile moteur)
Rapport de transmission 9 : 43
Huile pour moteur à deux
temps MAKITA d’origine
Huile pour moteur à deux
temps d’autres fabricants
kg (lb) 4,8 (10,5) 5,0 (11,0) 5,2 (11,4)
3
(pouce cube) 22,2 (1,35)
1 014 x 262 x 216
(40” x 10-3/8” x 8-1/2”)
1 119 x 262 x 216
(44” x 10-3/8” x 8-1/2”)
50 : 1
25 : 1
1 259 x 262 x 216
(49-1/2” x 10-3/8” x 8-1/2”)
(Pour le Canada)
REMARQUE : Le système d’allumage par bougie est conforme à la norme canadienne ICES-002.
20
Page 21

DÉSIGNATION DES PIÈCES
4
3
1
2
7
9
13
5
6
81410
12
11
1516
17
DÉSIGNATION DES PIÈCES DÉSIGNATION DES PIÈCES DÉSIGNATION DES PIÈCES
1 Lame 7 Carburateur (non visible) 13 Doigt de débrayage
2 Extension émoussée 8 Commutateur (marche/arrêt) 14 Silencieux
3 Poignée avant 9 Bougie d’allumage 15 Pompe d’amorçage
4 Lanceur à rappel 10 Levier de sécurité 16 Réservoir d’essence
5 Bouchon du réservoir d’essence 11 Levier d’accélérateur 17 Couvercle de lame
6 Levier d’étrangleur 12 Poignée arrière
21
Page 22

ESSENCE/REMPLISSAGE DU RÉSERVOIR
Mélange d’essence et d’huile
- Le moteur du taille-haie est un moteur à deux temps hautement performant.
Il fonctionne avec un mélange d’essence et d’huile pour moteur à deux temps. Le
moteur est conçu pour fonctionner avec de l’essence ordinaire sans plomb avec
une valeur minimale d’octane de 91 ROZ.
Si ce type d’essence n’est pas disponible, vous pouvez en utiliser avec une
valeur d’octane supérieure. Ceci n’endommagera pas le moteur, mais ses
performances pourraient être réduites.
Il en sera de même si vous utilisez de l’essence avec plomb.
Pour obtenir un fonctionnement optimal du moteur et pour préserver votre santé
ainsi que l’environnement, n’utilisez que de l’essence sans plomb.
- Pour lubrier le moteur, utilisez une huile pour moteur à deux temps (niveau de
qualité : TSC-3) ajoutée à l’essence.
Le moteur est conçu pour être utilisé avec l’huile pour moteur à deux
temps MAKITA et un dosage du mélange à seulement 50:1 pour protéger
l’environnement. De plus, une longue durée de vie et un fonctionnement able
avec un minimum d’émissions de gaz d’échappement sont garantis. Il est
impératif de respecter un dosage du mélange à 50:1 (huile pour moteur à deux
temps MAKITA), dans le cas contraire, le fonctionnement able du taille-haie ne
peut pas être garanti.
- Dosage du mélange correct :
essence : huile pour moteur à deux temps spéciée = 50 : 1 ou
essence : huile pour moteur à deux temps d’autres fabricants = 25 : 1
recommandé
Respectez les consignes de sécurité page 18.
REMARQUE : Pour préparer le mélange d’essence et d’huile, mélangez tout
d’abord la quantité totale d’huile avec la moitié de l’essence requise
dans un réservoir à charbon actif approprié répondant à toutes les
normes locales ou les dépassant. Ajoutez ensuite l’essence restante.
Mélangez bien le mélange en le secouant avant de le verser dans le
réservoir du taille-haie.
Pour garantir une utilisation en toute sécurité, n’ajoutez pas plus
d’huile moteur que la quantité spéciée. Cela n’entraînerait qu’une
plus grande production de résidus de combustion qui pollueraient
l’environnement et obstrueraient le conduit d’échappement dans le
cylindre ainsi que le silencieux. De plus, la consommation d’essence
augmenterait et les performances diminueraient.
Manipulation de produits pétroliers
Le plus grand soin est requis lorsque vous manipulez l’essence. Elle peut contenir
des substances telles que des solvants. Remplissez le réservoir dans un endroit
bien ventilé ou à l’extérieur. N’inhalez pas les vapeurs d’essence et évitez tout
contact de l’essence ou de l’huile avec votre peau.
Si votre peau entre en contact avec ces substances de manière répétée et pendant
une période prolongée, elle va se déshydrater.
Cela peut entraîner diverses maladies de la peau. De plus, des réactions
allergiques peuvent survenir.
Les yeux peuvent être irrités s’ils entrent en contact avec de l’huile, de l’essence,
etc.
Si de l’huile, de l’essence, etc. s’introduit dans vos yeux, rincez-les immédiatement
à l’eau claire.
Si vos yeux sont toujours irrités, consultez immédiatement un médecin.
Essence Huile
+
50 : 1
1 000 cm3 (1 litre)
5 000 cm3 (5 litres)
10 000 cm3 (10 litres)
50 : 1 25 : 1
20 cm3 40 cm
100 cm3 200 cm
200 cm3 400 cm
3
3
3
22
Page 23

Remplissage du réservoir
- Le moteur doit être coupé.
- Coupez le moteur pendant le remplissage du réservoir, éloignez-vous de toute
amme et ne fumez pas.
- Veillez à ne pas renverser l’essence ou l’huile an de ne pas contaminer les sols.
Si de l’essence a été renversée sur le taille-haie, nettoyez-le immédiatement.
- Ne renversez pas d’essence sur le moteur. Si de l’essence a été renversée,
essuyez-la.
- Évitez les projections d’essence sur vos vêtements. Changez immédiatement vos
vêtements en cas de projection d’essence (pour éviter qu’ils ne s’enamment).
- Inspectez régulièrement le bouchon du réservoir d’essence pour vous assurer
qu’il se ferme correctement et qu’il ne fuit pas.
- Serrez bien le bouchon du réservoir d’essence. Déplacez-vous pour démarrer le
moteur (à au moins 3 mètres du lieu de remplissage du réservoir).
- Ne remplissez jamais le réservoir dans une pièce fermée. Les vapeurs d’essence
s’accumulent au ras du sol. (Risque d’explosions.)
- Ne transportez et ne conservez l’essence que dans des conteneurs appropriés.
Veillez à conserver l’essence hors de portée des enfants.
- Nettoyez soigneusement la zone autour du bouchon du réservoir pour éviter que
des saletés ne pénètrent dans le réservoir d’essence.
- Dévissez le bouchon et remplissez le réservoir avec de l’essence. Utilisez un
entonnoir de gaz pour ltrer le carburant.
- Serrez fermement le bouchon à la main uniquement.
- Nettoyez autour du bouchon et le réservoir après l’avoir rempli.
- Si de l’essence est renversée, essuyez-la toujours an d’éviter un incendie.
Entreposage de l’essence
- L’essence ne peut pas être entreposée pendant une période de temps illimitée.
- N’achetez que la quantité dont vous avez besoin pour une période d’utilisation de
4 semaines.
- N’utilisez que des conteneurs appropriés pour l’entreposage de l’essence.
3 mètres
(10 pieds)
PRÉCAUTIONS AVANT UTILISATION
- Assurez-vous qu’il n’y a aucun enfant ou aucune autre personne dans une zone
de travail de 15 mètres. Faites également attention aux animaux présents dans
cette zone.
- Avant de l’utiliser, vériez toujours que le taille-haie est en bonne condition.
Vériez que l’outil de coupe n’est pas endommagé, que le levier de commande
peut être actionné facilement et que le commutateur marche/arrêt fonctionne
correctement.
Assurez-vous que les lames de coupe ne fonctionnent pas lorsque le moteur est
au ralenti.
Vériez le réglage auprès de votre vendeur en cas de doute. Vériez que les
poignées sont propres et sèches, et testez le fonctionnement du commutateur
marche/arrêt.
- Suivez strictement les instructions pour démarrer le taille-haie. Ne démarrez pas
le moteur d’une autre façon. (Voir Démarrage)
- Ne démarrez le moteur qu’une fois que le montage complet est terminé. Le
fonctionnement du moteur n’est possible qu’une fois tous les accessoires
correctement xés. Sinon il y a un risque de blessure.
- Avant le démarrage, assurez-vous que les lames de coupe n’entrent pas en
contact avec des objets tels que des branches, des pierres, etc.
- Avant de tailler, vériez qu’il n’y a pas dans la zone de câble, de cordon, du verre
ou tout autre objet étranger pouvant entrer en contact avec la lame.
- Choc électrique. Sachez où se trouvent toutes les lignes et clôtures électriques.
Vériez systématiquement s’il y a des lignes électriques dans la zone avant de
couper.
Schéma de
représentation
360°
15 mètres
(50 pieds)
23
Page 24

DÉMARRAGE DE LA MACHINE
Allez à au moins 3 mètres du lieu de remplissage du réservoir. Placez le taille-haie
sur un sol dégagé. Assurez-vous que les lames de coupe n’entrent pas en contact
avec le sol ou tout autre objet.
Démarrage à froid : (Lorsque le moteur est froid, s’il est resté arrêté pendant plus
de 5 minutes ou si de l’essence est ajoutée dans le moteur.)
1. Placez le commutateur marche/arrêt (1) sur la position « I ».
2. Actionnez doucement la pompe d’amorçage (2) plusieurs fois (7 à 10 fois) jusqu’à
ce que l’essence y arrive.
3. Déplacez le levier d’étrangleur (3) sur la position «
4. Maintenez le taille-haie fermement pour éviter d’en perdre le contrôle lors du
démarrage du moteur. Autrement, il y a risque de blessures graves et/ou de
dommages matériels du(e)s à une chute sur ou un contact avec la lame de
coupe.
5. Tirez lentement la poignée de démarrage de 10 à 15 cm, jusqu’à ce que vous
ressentiez la résistance.
6. Tirez avec force la poignée de démarrage tout en ressentant la résistance et
démarrez le moteur.
7. Lorsque le moteur démarre ou commence à démarrer et s’arrête, replacez le
levier d’étrangleur (4) sur «
8. Faites fonctionner le moteur pendant environ une minute à une vitesse modérée
avant d’accélérer jusqu’à la vitesse maximale.
».
».
Remarque : • Si vous tirez plusieurs fois sur la poignée de démarrage alors
• En cas d’admission d’essence excessive, retirez la bougie
Démarrage à chaud : (Redémarrage de suite après que le moteur ait été coupé.)
pour redémarrer un moteur chaud, essayez tout d’abord la procédure ci-dessus :
1, 2, 4, 5, 6 avec le levier d’étrangleur (4) sur «
répétez les étapes 1 à 8 ci-dessus.
Remarque : Ne tirez pas le câble de démarreur jusqu’au bout. Ne laissez pas
que le levier d’étrangleur reste en position «
démarrera difcilement en raison d’une admission d’essence
excessive.
d’allumage et tirez lentement sur la poignée de démarrage
an de supprimer l’excédent d’essence. Séchez également
l’électrode de la bougie d’allumage.
». Si le moteur ne démarre pas,
la poignée du démarreur se rétracter sans contrôle. Assurez-
vous qu’elle se rétracte lentement.
», le moteur
ARRÊT DE LA MACHINE
1. Relâchez complètement le levier d’accélérateur.
2. Placez le commutateur marche/arrêt (1) sur la position « O ». Le moteur ralentit
et s’arrête.
24
Page 25

FONCTIONNEMENT DE LA MACHINE
- N’utilisez jamais le taille-haie en ne tenant pas fermement les poignées.
- Ne touchez jamais les lames de coupe lorsque vous démarrez le moteur et
pendant le fonctionnement.
- Utilisez le taille-haie de manière à éviter l’inhalation des gaz d’échappement. Ne
faites jamais fonctionner le moteur dans une pièce fermée (risque d’asphyxie au
gaz). Le monoxyde de carbone est un gaz inodore.
- Toutes les protections telles que les gaines fournies avec la machine doivent être
utilisées au cours du fonctionnement.
- Ne faites jamais fonctionner le moteur si le silencieux est défectueux ou absent.
- N’utilisez le taille-haie que dans des environnements bien éclairés et avec une
bonne visibilité.
- En hiver, faites attention aux sols glissants et aux zones humides, à la glace et à
la neige. (Risque de glissade.) Assurez-vous toujours de votre stabilité.
- N’utilisez jamais le taille-haie en vous tenant sur une échelle. Gardez les deux
pieds au sol.
- Ne montez jamais dans un arbre pour réaliser des opérations de coupe à l’aide
du taille-haie.
- Ne travaillez pas sur des surfaces instables.
- Retirez le sable, les pierres, les clous, les ls de fer, etc. qui se trouvent dans la
zone d’utilisation de la machine. Les objets étrangers peuvent endommager les
lames de coupe.
- Avant de commencer la coupe, taillez les branches de 8 mm ou plus à l’aide d’un
sécateur.
- Avant de commencer la coupe, les lames de coupe doivent avoir atteint leur
pleine vitesse de travail.
- Tenez toujours le taille-haie fermement avec les deux mains sur les poignées.
- Vos pouces et doigts doivent enserrer les poignées.
- Lorsque vous relâchez l’accélérateur, il faut quelques secondes pour que les
lames de coupe s’arrêtent.
- N’utilisez pas le taille-haie au ralenti rapide. Vous ne pouvez pas régler la vitesse
de coupe à l’aide de la commande des gaz si le ralenti est trop élevé.
- Pendant la coupe, tenez le taille-haie de sorte que les lames forment un angle de
15-30° avec la ligne de coupe.
- Faites tout particulièrement attention lorsque vous coupez des haies proches de
ou contre des clôtures en ls de fer.
- Ne touchez pas des objets durs tels qu’une clôture en ls de fer, des pierres ou le
sol avec les lames. Cela pourrait fendre, ébrécher ou casser les lames.
- Si les lames de coupe heurtent des pierres ou des objets durs, coupez
immédiatement le moteur et vériez qu’elles ne sont pas endommagées.
Remplacez les lames endommagées avant de reprendre le travail.
- Faites régulièrement des pauses. MAKITA vous recommande de prendre des
pauses de 10 à 20 minutes toutes les 50 minutes de travail.
- Coupez le moteur immédiatement s’il présente des problèmes.
- Utilisez le taille-haie en produisant le moins de bruit et de pollution possible.
Vériez en particulier que le carburateur est bien réglé et que le dosage essence/
huile est correct.
- N’essayez jamais de retirer des matériaux de coupe bloqués lorsque les lames
sont en marche. Posez l’unité, éteignez-la et retirez les matériaux coincés.
RÉGLAGE DE L’ANGLE DE LA POIGNÉE ARRIÈRE
La poignée arrière peut être tournée jusqu’à 90° vers le côté gauche ou droit et
réglée tous les 45°.
Pour modier l’angle :
1. Appuyez sur le doigt de débrayage pour débloquer le verrou.
2. Tournez la poignée à un angle de 0°, 45° ou 90°.
3. Assurez-vous que le doigt de débrayage revient à sa position d’origine pour
enclencher le verrou.
Ne tirez pas le levier d’accélérateur tandis que le verrou est débloqué.
Ne débloquez pas le verrou pendant le fonctionnement.
25
Page 26

CONSIGNES D’ENTRETIEN
- Coupez le moteur et retirez le connecteur de bougie d’allumage lors du nettoyage/du remplacement/de l’affûtage des lames de coupe ou
pendant toute opération d’entretien.
- Ne réparez ou ne soudez jamais une lame de coupe endommagée.
- Vériez fréquemment, lorsque le moteur est coupé, que les lames de coupe ne sont pas endommagées.
- Faites en sorte que les lames de coupe soient toujours affûtées.
- Nettoyez régulièrement le taille-haie et vériez que les vis et écrous sont bien serrés.
- Ne réparez jamais le taille-haie à proximité de ammes nues an d’éviter tout risque d’incendie.
- Portez toujours des gants en cuir lorsque vous manipulez ou affûtez les lames car elles sont tranchantes.
Affûtage de la lame
Si les rebords sont émoussés et ne coupent plus bien, ne meulez que les portions
hachurées sur la gure. Ne meulez pas les surfaces de contact (surfaces de
glissement) des rebords inférieur et supérieur.
- Avant de meuler, assurez-vous de maintenir la lame fermement, coupez le
moteur et retirez le protecteur de bougie.
- Portez des gants, lunettes de protection, etc.
- Ne meulez pas trop. Cela retire la couche dure et fait que les lames s’émoussent
très vite lors de l’utilisation.
10° 10°
Réglage de l’espace entre les lames
Les lames supérieures/inférieures s’usent. Si vous n’arrivez pas à obtenir une
coupe nette bien que les lames soient sufsamment affûtées, réglez l’espace
comme suit.
1. Retirez l’extension émoussée en desserrant les vis.
2. Desserrez l’écrou (1) à l’aide d’une clé polygonale ou ouverte.
3. Serrez le boulon (2) à l’aide d’une clé hexagonale doucement jusqu’à ce qu’il
s’arrête, puis desserrez-le d’un quart de tour.
4. Serrez l’écrou (1) en maintenant le boulon (2).
5. Appliquez de l’huile légère sur les surfaces de friction des lames.
6. Démarrez le moteur puis accélérez et décélérez pendant une minute.
7. Mesurez le temps nécessaire aux lames pour s’arrêter après avoir relâché
l’accélérateur. S’il leur faut deux secondes ou plus, coupez le moteur et répétez les étapes 2 à 7.
8. Coupez le moteur et touchez la surface des lames. Si elles ne sont pas trop chaudes pour être touchées, vous avez effectué le bon réglage.
Si elles sont trop chaudes pour être touchées, desserrez légèrement le boulon (2) et répétez les étapes 6 à 8.
9. Fixez l’extension émoussée en serrant les vis.
Meuleuse à
disque
45°
Coupe
transversale de
l’arête
En maintenant la
meuleuse à disque à
un angle de 45°, affûtez
l’arête jusqu’aux pointillés
et faites disparaître
l’extrémité arrondie.
REMARQUE : Avant d’effectuer le réglage, coupez le moteur et attendez que les lames s’arrêtent.
Les lames disposent d’une encoche autour de la vis (2). Si vous trouvez de la poussière à l’extrémité de l’une des
encoches, nettoyez-la.
Écrou
①
Boulon
②
Guide lame
③
Lame supérieure
④
Lame inférieure
⑤
26
Page 27

Vérication et réglage du ralenti
Les lames de coupe ne doivent pas fonctionner lorsque le moteur est au ralenti.
- Le ralenti doit être réglé à 3 000 min
- Si nécessaire, réglez la vis de ralenti (les lames de coupe ne doivent pas
fonctionner lorsque le moteur est au ralenti).
• Les lames de coupe fonctionnent au ralenti : tournez la vis de ralenti dans le
sens inverse des aiguilles d’une montre pour réduire la vitesse de ralenti.
• Le moteur se coupe au ralenti : tournez la vis de ralenti dans le sens des
aiguilles d’une montre pour augmenter la vitesse de ralenti.
- Si les lames de coupe continuent de fonctionner au ralenti après le réglage,
consultez le technicien agréé le plus proche.
• L’embrayage doit s’engager à 3 750 min
• Vériez que le commutateur marche/arrêt, le levier de sécurité et le levier
d’accélérateur fonctionnent correctement.
-1
(tr/min).
-1
(tr/min) ou plus.
Nettoyage du ltre à air
DANGER : Produits inammables strictement interdits
Contrôlez et nettoyez le ltre à air tous les jours ou toutes les 10 heures de
fonctionnement.
- Fermez complètement le levier d’étrangleur et veillez à ce qu’il n’y ait ni poussière
ni impuretés sur le carburateur.
- Desserrez le boulon de xation.
- Tirez le côté arrière du cache du ltre à air et déplacez-le vers l’avant pour le
détacher.
- Si de l’huile adhère à l’élément (éponge), pressez-le bien.
- En cas de contamination importante :
1) Retirez l’élément (éponge), plongez-le dans de l’eau chaude ou de l’eau
additionnée d’un détergent neutre, puis séchez-le complètement.
2) Nettoyez l’élément (feutre) avec de l’essence, puis séchez-le complètement.
- Avant de replacer les éléments, veillez à les sécher complètement. Un séchage
insufsant des éléments peut entraîner des problèmes de démarrage.
- Essuyez l’huile adhérant autour du ltre à air à l’aide d’un chiffon.
- Immédiatement après le nettoyage, xez le cache du ltre et serrez-le à l’aide des
boulons de xation. (Lors du remontage, placez tout d’abord la griffe supérieure.)
Élément (éponge)
Élément (feutre)
Boulon de xation
Griffe supérieure
Remarques concernant la manipulation des éléments du ltre à air
- Nettoyez les éléments plusieurs fois par jour, en cas d’adhérence excessive
de poussière.
- Si vous continuez à utiliser les éléments sans nettoyer l’huile qui se trouve
dessus, l’huile pourrait déborder du ltre à air et être contaminée.
27
Page 28

Vérication de la bougie d’allumage
Contrôlez et nettoyez la bougie d’allumage tous les jours ou toutes les 8 heures
de fonctionnement.
- Utilisez uniquement la clé universelle fournie pour retirer ou installer la bougie
d’allumage.
- L’espace entre les deux électrodes de la bougie d’allumage doit être compris
entre 0,7 et 0,8 mm. Si l’espace est trop grand ou trop petit, réglez-le. Si la
bougie d’allumage est obstruée par du carbone ou encrassée, nettoyez-la
bien ou remplacez-la. Utilisez une pièce de rechange identique.
Application de la graisse et du lubriant
- Appliquez de la graisse via l’embout de graissage toutes les 50 heures de
fonctionnement. (Shell Alvania N°3 ou équivalente)
0,7 - 0,8 mm
REMARQUE : Assurez-vous de respecter le moment et la quantité spéciés
pour l’application de la graisse.
Une application de graisse insufsante entraînera un
dysfonctionnement de la machine.
Nettoyage du ltre à carburant (hauteur d’aspiration dans
le réservoir d’essence)
AVERTISSEMENT : Produits inammables strictement interdits
Contrôlez et nettoyez le ltre à carburant tous les jours ou toutes les 50 heures
de fonctionnement.
- Le ltre en feutre (1) de la hauteur d’aspiration permet de ltrer l’essence
nécessaire au carburateur.
- Contrôlez visuellement régulièrement le ltre en feutre.
- Pour contrôler le ltre en feutre, ouvrez le bouchon du réservoir et tirez la
hauteur d’aspiration par l’orice du réservoir à l’aide d’un crochet métallique.
Remplacez le ltre en feutre s’il a durci ou s’il est encrassé ou obstrué.
- Remplacez le ltre en feutre au moins une fois tous les trois mois pour
garantir un approvisionnement en essence sufsant vers le carburateur.
Sinon, un approvisionnement en essence insufsant entraînera un problème
de démarrage du moteur et une réduction de la vitesse maximale.
Remplacement du tuyau d’alimentation en essence
ATTENTION : Produits inammables strictement interdits
Contrôlez et nettoyez le tuyau d’alimentation en essence tous les jours ou
toutes les 10 heures de fonctionnement.
Remplacez le tuyau d’alimentation en essence toutes les 200 heures de
fonctionnement ou tous les ans, quelle que soit la fréquence d’utilisation. Sinon,
une fuite d’essence peut provoquer un embrasement.
Si vous détectez une fuite lors de l’inspection, remplacez immédiatement le
tuyau d’huile.
Embout de graissage
Bouchon du
réservoir
Remplacement du bouchon du réservoir
- Si le bouchon du réservoir présente un défaut ou est endommagé,
remplacez-le.
- Le bouchon du réservoir s’use au l du temps. Remplacez-le tous les deux
ou trois ans.
Pour toute opération d’entretien ou de réglage non décrite dans ce manuel, consultez votre service après-vente agréé MAKITA.
Tuyau d’alimentation en essence
Vérication et entretien quotidiens
An de garantir un long délai entre deux réparations et d’éviter tout dommage à l’équipement, effectuez régulièrement les procédures de
réparation suivantes.
- Avant utilisation :
• Vériez s’il y a des vis desserrées ou des pièces manquantes sur la machine. Faites particulièrement attention au serrage des vis de lame.
• Vériez que le tuyau de l’air de refroidissement et les ailettes du cylindre ne sont pas entravés. Nettoyez-les si nécessaire.
• Nettoyez le réservoir d’essence en cas de fuite et vériez qu’il n’y a aucun objet étranger à l’intérieur.
- Après utilisation :
• Nettoyez l’extérieur du taille-haie et vériez qu’il n’a pas été endommagé.
• Nettoyez le ltre à air. Lorsque vous travaillez dans une atmosphère très poussiéreuse, nettoyez le ltre plusieurs fois par jour.
• Vériez que les lames ne sont pas endommagées et assurez-vous qu’elles sont bien xées.
28
Page 29

ENTREPOSAGE
- Lorsque vous entreposez la machine pendant une longue période, vidangez
l’essence du réservoir et du carburateur comme suit : vidangez toute l’essence
du réservoir.
- Retirez la bougie d’allumage et ajoutez quelques gouttes d’huile dans l’orice
de celle-ci. Puis, tirez doucement sur le démarreur pour vous assurer qu’une
pellicule d’huile recouvre l’intérieur du moteur et serrez la bougie d’allumage.
- Nettoyez la saleté ou la poussière sur la lame et à l’extérieur du moteur, essuyezles avec un chiffon huilé et conservez la machine dans un endroit aussi sec que
possible.
PROGRAMME D’ENTRETIEN
Après chaque remplissage du
réservoir
Avant chaque utilisation Bloc-moteur
Toutes les 50 heures Carter d’engrenage Graissez
Chaque semaine Bougie d’allumage Vériez et remplacez si nécessaire
Une fois par an Tuyau d’alimentation en essence Remplacez
Tous les deux ans Bouchon du réservoir Remplacez
Avant un entreposage prolongé Réservoir d’essence
Levier d’accélérateur
Commutateur marche/arrêt
vis et écrous
Filtre à air
Tuyau d’air de refroidissement
Outil de coupe
Vitesse au ralenti
Réservoir d’essence
Carburateur
Hauteur d’aspiration
Vériez le fonctionnement
Vériez le fonctionnement
Contrôlez visuellement qu’il n’est pas endommagé et qu’il est
bien serré
Vériez la condition générale et le niveau de sécurité
Nettoyer
Nettoyer
Vériez qu’il n’est pas endommagé et qu’il est affûté
Inspection (l’outil de coupe ne doit pas bouger)
Vériez et nettoyez
Videz et nettoyez
Utilisez la machine jusqu’à ce que le moteur soit à court
d’essence
Remplacez
EMPLACEMENT DES DÉFAILLANCES
Défaillance Système Observation Cause
Le moteur ne démarre
pas ou difcilement
Problèmes de démarrage
à chaud
Le moteur démarre mais
se coupe immédiatement
Performances
insufsantes
Système d’allumage L’allumage est présent Défaillance au niveau de l’alimentation en essence ou
Alimentation en
essence
Compression Intérieur du moteur Joint inférieur de cylindre défectueux, dispositif
Défaut mécanique Démarreur non engagé Ressort du démarreur cassé, pièces cassées à l’intérieur
Alimentation en
essence
Plusieurs systèmes
peuvent être
concernés
du système de compression, défaut mécanique
Pas d’allumage Commutateur marche/arrêt actionné, défaut de câblage
ou court-circuit, bougie d’allumage ou connecteur
défectueux, module d’allumage défectueux
Réservoir plein Position de l’étrangleur incorrecte, carburateur
défectueux, hauteur d’aspiration (ltre de tuyau
d’alimentation en essence) encrassée, tuyau
d’alimentation en essence plié ou sectionné
d’étanchéité de vilebrequin endommagé, bagues de
cylindre ou segments de piston défectueux
Extérieur du moteur Mauvais scellage de la bougie d’allumage
du moteur
Réservoir plein, allumage
correct
Réservoir plein Mauvais réglage du ralenti, hauteur d’aspiration ou
Moteur au ralenti Filtre à air encrassé, carburateur encrassé, silencieux
Carburateur encrassé, doit être nettoyé
carburateur encrassé(e)
Évent du réservoir d’essence défectueux, tuyau
d’alimentation en essence sectionné, câblage ou
commutateur marche/arrêt défectueux
obstrué, tuyau d’échappement du cylindre obstrué
29
Page 30

Español
(Instrucciones originales)
Muchas gracias por haber seleccionado el cortasetos MAKITA. Nos complace
poder ofrecerle el cortasetos MAKITA el cual es el resultado de un gran
programa de desarrollo y de muchos años de conocimiento y experiencia.
Los modelos de cortasetos EH5000W, EH6000W y EH7500W combinan
las ventajas de tecnología de punta con un diseño ergonómico, peso ligero,
fáciles de operar, compactos y conforman el equipo profesional para una gran
variedad de aplicaciones.
Favor de leer, entender y seguir este folleto el cual reere en detalle los
varios puntos que se demostrarán sobre su sobresaliente desempeño.
Esto le ayudará a obtener un óptimo resultado de su cortasetos MAKITA.
Índice Página
Símbolos......................................................................30
Instrucciones de seguridad..........................................31
Información técnica .....................................................34
Identicación de las piezas..........................................35
Combustible / reabastecimiento ..................................36
Precauciones antes de comenzar ...............................37
Encendido del equipo ..................................................38
Apagado del equipo.....................................................38
Operación del equipo ..................................................39
Ajuste del ángulo del mango trasero ...........................39
Instrucciones de mantenimiento ..................................40
Almacenamiento ..........................................................43
Programa de mantenimiento .......................................43
Lugar inapropiado........................................................43
SÍMBOLOS
Es muy importante comprender los siguientes símbolos al leer este manual de instrucciones.
ADVERTENCIA / PELIGRO
Use equipo protector para los ojos y
oídos
Lea, entienda y siga la indicación del
Manual de instrucciones
Prohibido Encendido manual del motor
No fumar Paro de emergencia
No exponer a fuego Primeros auxilios
Se debe usar guantes protectores ENCENDIDO / INICIAR
Conserve el área de operación despejada
de personas y mascotas
Mezcla de combustible y aceite
APAGADO / PARAR
30
Page 31

INSTRUCCIONES DE SEGURIDAD
Instrucciones generales
- ESTE EQUIPO PUEDE CAUSAR LESIONES GRAVES. Lea las instrucciones
cuidadosamente para una correcta operación, preparación, mantenimiento,
encendido y apagado del equipo. Familiarícese con todos los controles y el uso
adecuado del equipo. (1)
- Se recomienda sólo prestar el cortasetos a personas que cuenten con
experiencia demostrada en el manejo de cortasetos.
Siempre incluya el manual al prestar el equipo.
- Los usuarios primerizos deberán solicitar instrucciones básicas en el manejo con
su distribuidor para familiarizarse con el manejo de un cortasetos motorizado.
- No se debe permitir a los niños ni a las personas menores de 18 años usar
el cortasetos. Sin embargo, las personas mayores de 16 años podrán usar la
herramienta con nes de entrenamiento y sólo mientras estén bajo la supervisión
de un instructor calicado.
- Use el cortasetos con máxima precaución y atención.
- Opere el cortasetos sólo si se encuentra en una buena condición física. Realice
todo el trabajo tranquila y cuidadosamente. El usuario tiene que aceptar la
obligación de responsabilidad por los demás.
- Nunca use el cortasetos después de haber consumido bebidas con alcohol,
drogas, medicamentos, o si se siente cansado o enfermo. (2)
Uso intencionado de la herramienta
- El cortasetos está diseñado sólo con el propósito de podar arbustos y setos,
y no deberá usarse para ningún otro propósito. Evite el uso inapropiado del
cortasetos.
(1)
(2)
Equipo protector personal
- La vestimenta a ser usada debe ser funcional y adecuada, es decir, debe quedar
ajustada pero sin que estorbe. Evite el uso de joyas o prendas de vestir holgadas
que podrían enredarse con ramas y arbustos, o el equipo.
- Para evitar lesiones en la cabeza, ojos, manos o pies, así como para proteger su
audición, se requiere el uso del siguiente equipo protector y prendas protectoras
durante la operación del cortasetos.
- Use siempre gafas protectoras o visor para evitar lesiones en los ojos durante el
uso del cortasetos. (3)
- Use equipo adecuado de protección auditiva, orejeras , tapones para los oídos,
etc. para evitar daño auditivo. (3)
- Recomendamos rmemente que el operador use overol de trabajo. (4)
- Los guantes especiales hechos de piel gruesa o cuero forman parte del equipo
prescrito y deben usarse siempre durante la operación del cortasetos. (4)
- Al usar el cortasetos, use siempre calzado resistente con suela antiderrapante.
Esto le protegerá de lesiones y asegura que pise rmemente. (4)
(3)
(4)
31
Page 32

Encendido del cortasetos
- Asegúrese de que no haya niños ni otras personas en un rango de 15 metros
(5), y también ponga atención de que no haya animales alrededor del área de
trabajo.
- Antes de usar el cortasetos, revíselo antes siempre para una operación segura.
- Revise la seguridad de la palanca de aceleración. La palanca de aceleración
deberá revisarse para un accionamiento suave y sencillo. Revise un
funcionamiento apropiado del seguro de la palanca de aceleración. Revise que
los mangos estén limpios y secos, y pruebe el funcionamiento del interruptor I-O.
Conserve los mangos libres de aceite y combustible.
Encienda el cortasetos sólo como se describe en las instrucciones.
¡No utilice ningún otro método para arrancar el motor! (6)
- Use el cortasetos sólo para las aplicaciones especicadas.
- Arranque el motor del cortasetos sólo tras haber realizado el ensamble completo
del equipo. ¡El uso del cortasetos sólo se permite tras haberle colocado todos los
accesorios adecuados!
- Antes de iniciar, asegúrese que la cuchilla cortadora no esté haciendo contacto
con ningún objeto como ramas, piedras, etc.
- Detenga el motor de inmediato si detecta que hay problemas en su
funcionamiento.
- Durante la operación, sujete tanto el mango delantero como el mango trasero
con rmeza empuñando sus manos alrededor de los mangos. Mantenga los
mangos limpios y libres de humedad, resina, aceite o grasa.
Asegúrese siempre de pisar el suelo con rmeza y estabilidad.
- Use sólo en espacios al aire libre.
- Esté siempre consciente de sus alrededores y manténgase alerta de posibles
peligros que puede que no escuche debido al ruido generado por el equipo.
- Use el cortasetos de tal forma que evite la inhalación de los gases de escape.
Nunca active el motor en lugares cerrados (riesgo de sofocación e intoxicación
por gases). El monóxido de carbono es un gas inoloro. Asegúrese siempre de
que haya una ventilación adecuada.
- Apague el motor cuando el equipo esté en reposo o cuando el cortasetos no
esté siendo atendido. Coloque en un lugar seguro para prevenir el peligro a otras
personas, provocar el incendio de sustancias inamables o daños al equipo.
- Nunca coloque el cortasetos cuando esté caliente sobre el césped ni sobre
materiales inamables.
- Para reducir el peligro de incendio mantenga el motor y el silenciador libre de
residuos, hojas y exceso de lubricante.
- Nunca accione el motor con un moe de escape defectuoso.
- Apague el motor durante la transportación del equipo (7).
- Detenga el motor antes de:
- Despejar algún bloqueo.
- Comprobar o hacer servicio de inspección y mantenimiento sobre el equipo.
- Coloque el cortasetos de forma segura durante su transportación en automóvil o
camioneta para evitar fuga del combustible.
- Al transportar el cortasetos, asegúrese de que el tanque de combustible esté
completamente vacío para evitar fugas.
- Al transportar o almacenar el cortasetos, coloque siempre el protector de la pieza
cortadora.
Reabastecimiento de combustible
- Apague el motor antes de reabastecer combustible (7), manténgase alejado de
fuego activo (8) y no fume.
- No intente reabastecer combustible cuando el motor esté caliente o activo.
- Evite el contacto de la piel con productos del petróleo. No inhale las emisiones
del combustible. Use siempre guantes protectores durante el reabastecimiento
de combustible. Cambie y limpie la vestimenta protectora de forma periódica.
- Tenga la precaución de no derramar combustible ni aceite para prevenir la
contaminación del suelo (protección ambiental). Limpie con un paño el cortasetos
de inmediato tras un derrame de combustible. Deje secar los paños usados para
limpiar el derrame de combustible en un lugar bien ventilado antes de guardarlos
o desecharlos. No seguir esta indicación podría generar una combustión que
resulte en incendio.
- Evite cualquier contacto del combustible con su vestimenta. Cambie su
vestimenta de inmediato si se ha derramado combustible en ésta (riesgo
peligroso).
- Inspeccione la tapa del tanque de combustible de forma periódica para asegurarse
que quede bien sellada al cerrar.
- Apriete a conciencia la tapa del tanque de combustible. Cambie de lugar para
encender el motor (al menos a 3 metros de donde reabasteció el combustible).
(9)
- Nunca reabastezca el combustible en lugares cerrados. Las emisiones pueden
acumularse al nivel del suelo (generando un riesgo de explosión).
- Transporte y almacene los combustibles solamente en contenedores diseñados
para ello. Asegúrese de que el combustible almacenado no esté al alcance de los
niños.
- Al preparar la mezcla de gasolina con aceite para motor a dos tiempos, use sólo
gasolina que no contenga etanol ni metanol (tipos de alcohol).
Esto ayudará a prevenir daños a los conductos por donde pasa el combustible,
entre otras piezas del motor.
360°
15 metros
(50 pies)
(5)
(6)
• Reposo
• Transporte
• Reabastecimiento de combustible
• Mantenimiento
(7)
• Reemplazo de la herramienta
(8)
3 metros
(10 pies)
(9)
32
Page 33

Método de operación
- Use siempre ambas manos para sujetar cada mango durante la operación.
- Use el cortasetos sólo en lugares con iluminación y visibilidad adecuadas.
Durante la época invernal, tenga especial cuidado con las áreas resbalosas
y mojadas, así como con el hielo y la nieve (riesgo de resbalones). Siempre
asegúrese de pisar suelo rme.
- Nunca trabaje sobre supercies inestables o en terrenos con inclinación
pronunciada.
- Nunca active el cortasetos al estar sobre una escalera.
- Nunca trepe los árboles para realizar operaciones de corte con el cortasetos.
- Para reducir el riesgo de tropiezos y pérdida del control, no camine en reversa
mientras esté operando el equipo.
- Apague siempre el motor antes de limpiar, hacer algún servicio al equipo o
reemplazar alguna pieza.
- No opere el equipo con una pieza cortadora que esté dañada o demasiado
desgastada.
Instrucciones de mantenimiento
- Tenga consideración con el entorno. Opere el cortasetos con el menor ruido y
contaminación posibles. Revise en particular el correcto ajuste del carburador.
- Limpie el cortasetos periódicamente y revise que todas la tuercas y tornillos
estén bien apretados.
- Nunca dé servicio ni almacene el cortasetos en cercanía de las chispas, llamas,
etc. de algún fuego. (11)
- Vacíe el tanque de combustible antes de almacenar el cortasetos.
- Nunca almacene el cortasetos en cercanía de alguna llama de fuego para evitar
incendios.
- Almacene el cortasetos en un lugar elevado, con buena ventilación y bajo llave
para que no esté al alcance de los niños.
- No intente hacer reparaciones al equipo a excepción de que esté calicado para
ello.
(10)
(11)
Observe y siga todas las instrucciones pertinentes para la prevención de accidentes emitidas por los comités de seguridad de
asociaciones comerciales y compañías de seguro.
No haga ninguna modicación en el cortasetos puesto que esto pondría en riesgo su seguridad.
La realización de mantenimiento o reparación por el usuario se limita a aquellas actividades como aparecen descritas en este manual de
instrucciones. Todo lo demás deberá ser realizado por los Agentes Autorizados de Servicio.
Use sólo piezas de repuestos originales suministradas por centros autorizados y de servicio de MAKITA.
El uso de accesorios y herramientas no aprobados implica un aumento del riesgo de accidentes y lesiones. MAKITA no aceptará
responsabilidad alguna por accidentes o daños causados por el uso de accesorios no aprobados.
Primeros auxilios
En caso de algún accidente, asegúrese de contar con un juego de primeros auxilios
que esté bien abastecido y que esté al alcance al realizar operaciones de corte en
conformidad con la normativa DIN 13164.
Reemplace inmediatamente cualquier artículo que haya utilizado de su juego de
primeros auxilios.
Al solicitar ayuda, por favor proporcione la siguiente información:
- Lugar del accidente
- Lo sucedido
- Número de personas lesionadas
- Alcance de las lesiones
- Su nombre
33
Page 34

INFORMACIÓN TÉCNICA
Modelo EH5000W EH6000W EH7500W
Dimensiones (La × An × Al) mm (pulg.)
Peso (sin la cubierta de la cuchilla) kg (lbs) 4,8 (10,5) 5,0 (11,0) 5,2 (11,4)
Volumen (tanque de combustible) L (.oz) 0,4 (13,5)
3
Desplazamiento del motor cm
Longitud de corte mm (pulg.) 483 (19”) 588 (23-1/8”) 728 (28-3/4”)
Máximo rendimiento del motor kW (hp) 0,68 (0,91)
Ciclos por minuto 4 270
Velocidad en estado pasivo RPM 3 000
Velocidad con accionamiento del
embrague
Tipo de carburador tipo WALBRO WYL
Sistema de encendido tipo Encendido de estado sólido
Bujía de encendido tipo NGK CMR6A
Separación de electrodos mm (pulg.) 0,7 - 0,8 (1/32”)
Relación de la
mezcla
(combustible :
aceite para motor)
Relación de cambios 9 : 43
Aceite genuino MAKITA para
motor a dos tiempos
Aceite de otro fabricante para
motor a dos tiempos
(pulg. cúb.) 22,2 (1,35)
RPM 4 000
1 014 × 262 × 216
(40” × 10-3/8” × 8-1/2”)
1 119 × 262 × 216
(44” × 10-3/8” × 8-1/2”)
50 : 1
25 : 1
1 259 × 262 × 216
(49-1/2” × 10-3/8” × 8-1/2”)
(Para Canadá)
NOTA: Este sistema de encendido con bujía cumple con el estándar canadiense ICES-002.
34
Page 35

IDENTIFICACIÓN DE LAS PIEZAS
4
3
1
2
7
9
13
5
6
81410
12
11
1516
17
IDENTIFICACIÓN DE LAS PIEZAS IDENTIFICACIÓN DE LAS PIEZAS IDENTIFICACIÓN DE LAS PIEZAS
1 Cuchilla 7 Carburador (no se muestra) 13 Palanca de liberación
2 Extensión de la aguja 8
3 Mango delantero 9 Bujía de encendido 15 Bomba cebadora
4 Arrancador de retroimpacto 10 Palanca de desbloqueo 16 Tanque de combustible
5 Tapa del tanque de combustible 11 Palanca de aceleración 17 Cubierta de la cuchilla
6 Palanca dosicadora 12 Mango trasero
Interruptor I-O (encendido “ON” /
apagado “OFF”)
14 Moe
35
Page 36

COMBUSTIBLE / REABASTECIMIENTO
Mezcla de combustible y aceite
- El motor del cortasetos es uno de alta eciencia a dos tiempos.
Funciona con una mezcla de combustible y aceite para motor a dos tiempos. El
motor está diseñado para combustible común sin plomo con octanaje mínimo de
91 RON.
Si no se encuentra dicho octanaje, puede usar combustible con un octanaje
mayor. Esto no dañará al motor, pero puede que el desempeño sea inferior.
Una situación similar surgirá con el uso de combustible con plomo.
Para obtener un desempeño óptimo del motor, y para proteger su salud y el
ambiente, ¡deberá usarse combustible sin plomo solamente!
- Para la lubricación del motor utilice aceite de motor a dos tiempos (calidad de
gradiente: TSC-3), el cual debe añadirse al combustible.
El motor ha sido diseñado para usar aceite MAKITA para motor a dos tiempos
con una relación de mezcla 50:1 solamente para protección del medio ambiente.
Además, esto garantiza una prolongada vida útil y una operación conable con
un mínimo de emisiones y gases de escape. Es estrictamente crucial observar
la mezcla con una relación 50:1 (aceite MAKITA para motor a 2 tiempos), de otra
forma no se puede garantizar un rendimiento conable del cortasetos.
- La relación de mezcla correcta es:
Gasolina: aceite especíco de motor a dos tiempos = 50 : 1 o
Gasolina: aceite de otro fabricante para motor a dos tiempos = 25 : 1
recomendado
NOTA: Para preparar la mezcla con combustible y aceite, la cantidad total de aceite
con la mitad del combustible requerido de una lata aprobada puede cumplir
o superar todos los estándares normativos. Luego añada el combustible
restante.
Agite la mezcla a conciencia antes de abastecerla en el tanque del
cortasetos.
No agregue más aceite de la cantidad que se especica para una
operación segura. Esto sólo resultará en una producción mayor de residuos
por combustión, lo cual contaminará el ambiente y congestionará el canal
de escape en el cilindro, así como el moe. Además, el consumo de
combustible incrementará y el rendimiento disminuirá.
Asegúrese de seguir las instrucciones de
seguridad de la página 32.
Manejo de sustancias del petróleo
Se requiere un máximo cuidado al estar manejando combustibles. Puede que
contengan sustancias similares a los disolventes. Haga el reabastecimiento de
combustible ya sea en un lugar al aire libre o en un lugar bien ventilado. No inhale
las emisiones del combustible y evite cualquier contacto del combustible o aceite
con su piel.
Si su piel entra en contacto con estas sustancias repetidamente y por un periodo
prolongado, ésta se resecará en gran magnitud.
Esto puede resultar en varios tipos de enfermedades de la piel. Además, se sabe
de reacciones alérgicas que esto puede generar.
Los ojos pueden irritarse por el contacto con el aceite, combustible, etc.
Si llega a haber contacto del aceite, combustible, etc. con sus ojos, lávelos
inmediatamente con agua limpia.
Si sus ojos continúan irritados, ¡acuda a su médico de inmediato!
Gasolina Aceite
+
50:1
1 000 cm3 (1 litros)
5 000 cm3 (5 litros)
10 000 cm3 (10 litros)
50:1 25:1
20 cm3 40 cm
100 cm3 200 cm
200 cm3 400 cm
3
3
3
36
Page 37

Reabastecimiento de combustible
- El motor debe estar apagado.
- Apague el motor al estar reabasteciendo el combustible, así mismo manténgase
alejado de las llamas de fuego y evite fumar.
- Tenga la precaución de no derramar combustible ni aceite para prevenir la
contaminación del suelo.
Limpie el cortasetos de inmediato tras un derrame de combustible.
- No derrame nada del combustible sobre el motor. Limpie con un paño si se ha
derramado combustible.
- Evite cualquier contacto del combustible con su vestimenta. Cambie su
vestimenta de inmediato si se ha derramado combustible en ella (para evitar el
riesgo de que ésta prenda fuego).
- Inspeccione la tapa del tanque de combustible de forma periódica para
asegurarse que selle bien al cerrar y que no haya fugas.
- Apriete a conciencia la tapa del tanque de combustible. Cambie de lugar para
arrancar el motor (al menos a 3 metros de donde reabasteció el combustible).
- Nunca reabastezca el combustible en lugares cerrados. Puede que la emisión de
gases se acumule a nivel del suelo (riesgo de explosión).
- Transporte y almacene el combustible solamente en contenedores diseñados
para ello. Asegúrese de que el combustible almacenado no esté al alcance de los
niños.
- Limpie muy bien el área alrededor de la tapa del tanque de combustible para
prevenir la entrada de partículas o residuos en el tanque.
- Desenrosque la tapa del tanque y llene el tanque con el combustible. Use un
embudo con una gasa para ltrar el combustible.
- Enrosque la tapa jamente sólo con la mano.
- Limpie el área alrededor de la tapa y el tanque tras el reabastecimiento.
- Limpie siempre cualquier cantidad de combustible que se haya derramado para
prevenir incendios.
3 metros
(10 pies)
Almacenamiento del combustible
- El combustible no puede almacenarse por tiempo ilimitado.
- Adquiera sólo la cantidad necesaria para un periodo de operación de cuatro
semanas.
- Utilice contenedores para el almacenamiento de combustible que sean
aprobados para ello.
PRECAUCIONES ANTES DE COMENZAR
- Asegúrese que no haya niños ni otras personas dentro del área de trabajo en un
rango de 15 metros alrededor. También esté al pendiente de cualquier animal o
mascota alrededor.
- Antes de usar el cortasetos, revíselo antes siempre para una operación segura.
Compruebe que la pieza cortadora no esté dañada, que la palanca de control
pueda accionarse con facilidad, y que el interruptor I-O funcione correctamente.
Asegúrese de que las cuchillas cortadoras no estén ejecutándose cuando el
motor del equipo esté en marcha pasiva.
Consulte con su distribuidor para un ajuste en caso de tener duda. Revise que
los mangos estén limpios y secos, y pruebe el funcionamiento del interruptor I-O.
- Encienda el cortasetos sólo como se describe en las instrucciones. No utilice
ningún otro método para arrancar el motor (reérase a la sección de Encendido).
- Arranque el motor sólo tras haber realizado el ensamble completo del equipo.
El uso del motor sólo se permite tras haber colocado todos los accesorios
adecuados. De otra forma, habrá riesgo de lesiones.
- Antes de poner el equipo en marcha, asegúrese que las cuchillas cortadoras no
esté haciendo contacto con ningún objeto como ramas, piedras, etc.
- Antes de podar, inspeccione el área para despejar alambres, cordones, vidrio u
otros objetos que podrían entrar en contacto con la cuchilla.
- Descarga eléctrica. Esté atento de cualquier línea de corriente eléctrica, así
como de cercos electricados. Revise toda el área para ver si hay líneas
eléctricas antes de hacer operaciones de corte.
Esquema
ilustrativo
360°
15 metros
(50 pies)
37
Page 38
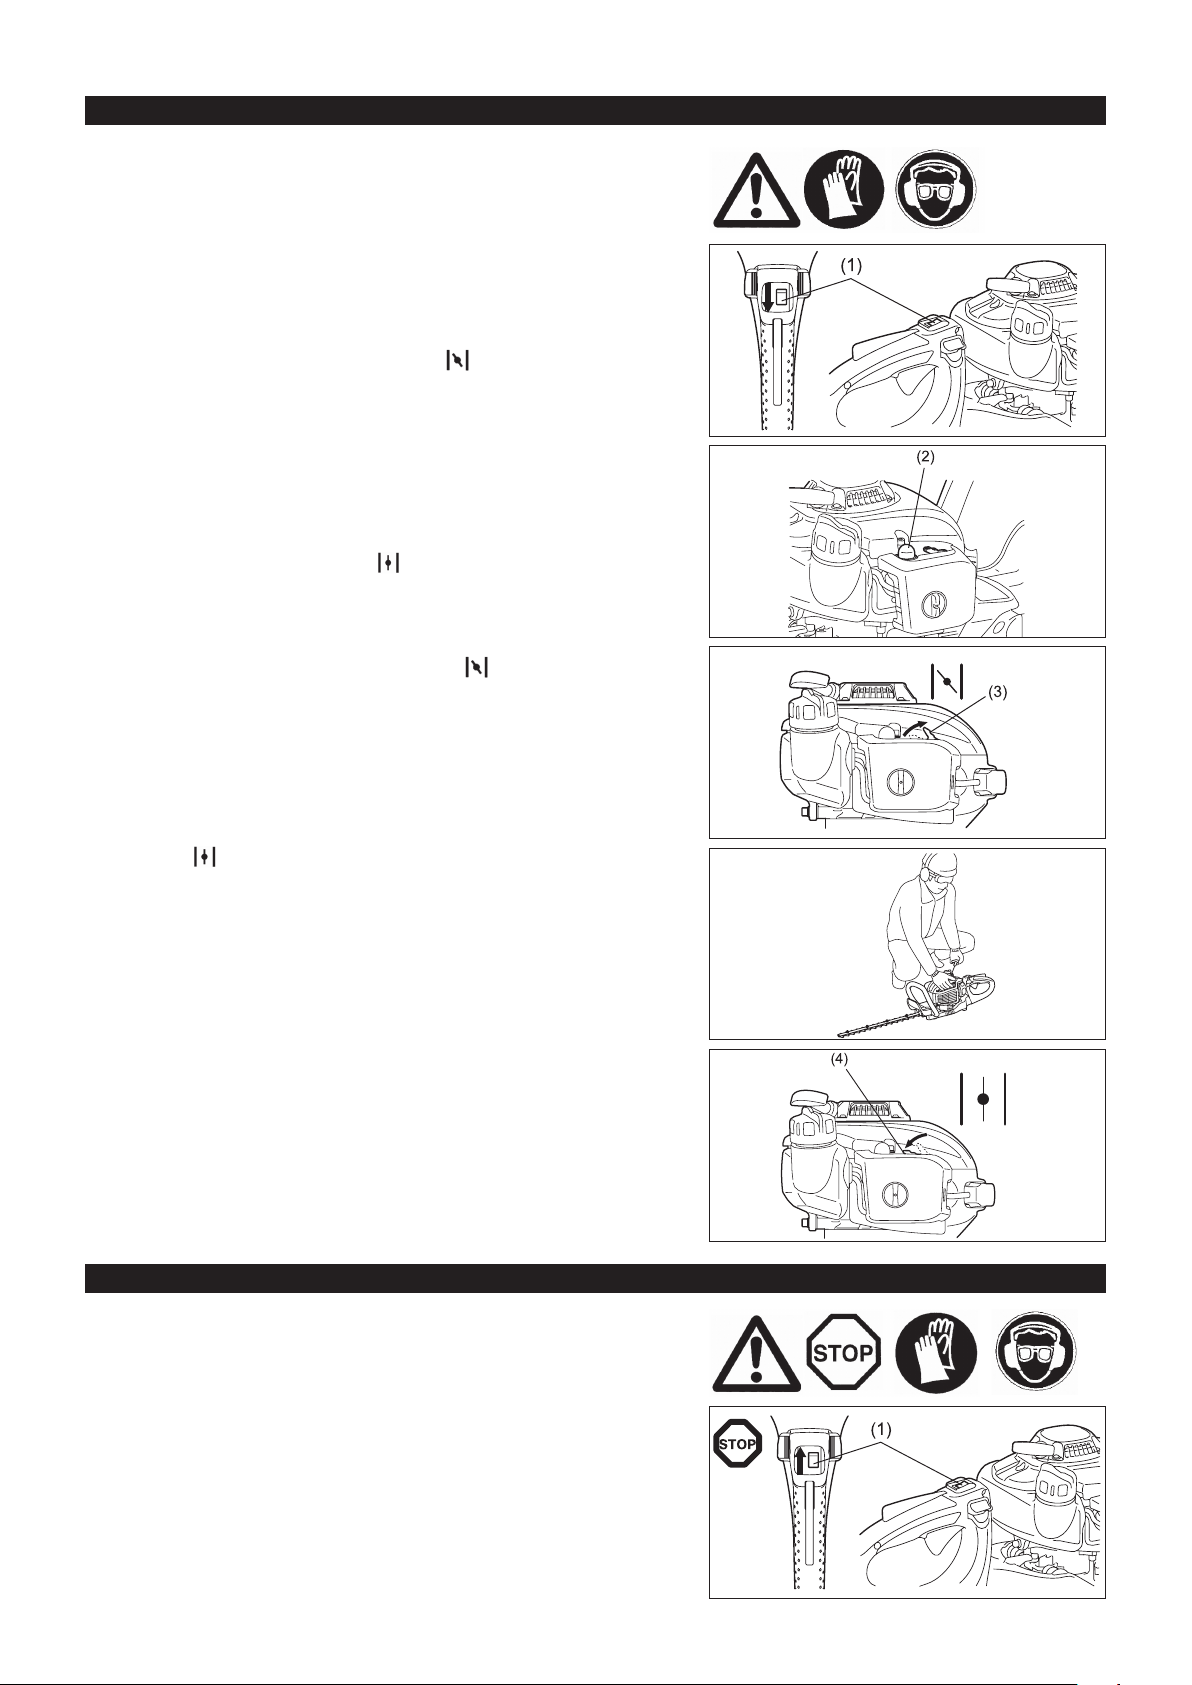
ENCENDIDO DEL EQUIPO
Aléjese al menos 3 metros del lugar en donde realizó el reabastecimiento de
combustible. Coloque el cortasetos en el suelo sobre una sección limpia. Asegúrese
de que las cuchillas cortadoras no hagan contacto con el suelo ni con cualquier otro
objeto.
Arranque en frío: (Cuando el motor está frío o ha estado inactivo por más de
5 minutos, o cuando se ha reabastecido de combustible).
1. Presione el interruptor I-O (1) a la posición “I”.
2. Oprima ligera y repetidamente la bomba cebadora (2) (bombeando entre 7 y
10 veces) hasta que el combustible llegue a ésta.
3. Mueva la palanca dosicadora (3) a la posición “
4. Mantenga el cortasetos sujetado con rmeza para evitar la pérdida del control
mientras arranca el motor. Omitir esta indicación puede que cause graves
lesiones y/o daños a la propiedad debido a caídas o al contacto con la cuchilla
cortadora.
5. Jale el mango de arranque lentamente entre 10 y 15 cm hasta que sienta
resistencia.
6. Jale el mango de arranque con fuerza sin exceder el punto de resistencia y
arranque el motor.
7. Cuando el motor encienda, o cuando sobresalte y se estabilice, regrese la
palanca dosicadora (4) a la posición “
8. Deje que el motor continúe corriendo por aproximadamente un minuto a una
velocidad moderada antes de acelerar por completo con la palanca.
”.
”.
Nota: • Si el mango de arranque se jala repetidamente mientras la palanca
• En caso de una entrada excesiva de combustible, retire la bujía de
Arranque en caliente: (Volver a arrancar el equipo inmediatamente después de
haberse usado). Primero intente el siguiente procedimiento para volver arrancar un
equipo cuyo motor ya se ha calentado: 1, 2, 4, 5, 6 con la palanca dosicadora (4)
en la posición “
Nota: No jale el cordón del arrancador hasta su máxima extensión. No
dosicadora permanece en la posición “
fácilmente debido a la entrada excesiva de combustible.
encendido y jale el mango de arranque lentamente para eliminar el
exceso de combustible. También, seque la sección del electrodo de
la bujía de encendido.
”. Si el motor no arranca, repita los pasos anteriores 1-8.
suelte la empuñadura del arrancador para que se retracte sin control.
Asegúrese de que se retracte lentamente.
”, el motor no arrancará
APAGADO DEL EQUIPO
1. Suelte la palanca de aceleración por completo.
2. Presione el interruptor I-O (1) a la posición “O”. El motor se desacelerará hasta
detenerse.
38
Page 39

OPERACIÓN DEL EQUIPO
- Nunca opere el cortasetos con una sujeción holgada.
- Nunca toque las cuchillas cortadoras al encender el motor ni durante la
operación.
- Use el cortasetos de tal forma que evite la inhalación de los gases de escape.
Nunca active el motor en lugares cerrados (riesgo de intoxicación). El monóxido
de carbono es un gas inoloro.
- Todos el equipo protector suministrado con el equipo, como los aditamentos
protectores, deben ser utilizados durante la operación del mismo.
- Nunca accione el motor si el moe presenta defectos o no está colocado.
- Use el cortasetos en lugares con iluminación y visibilidad adecuadas.
- Durante la época invernal, tenga especial cuidado con las áreas resbalosas
y mojadas, así como con el hielo y la nieve (riesgo de resbalones). Siempre
asegúrese de pisar suelo rme.
- Nunca active el cortasetos al estar sobre una escalera. Mantenga ambos pies
rmes en el suelo.
- Nunca trepe los árboles para realizar operaciones de corte con el cortasetos.
- No trabaje nunca sobre supercies inestables.
- Despeje el área quitando la arena, las piedras, los clavos, etc. que encuentre
dentro del rango de trabajo. Puede que los objetos causen daños a las cuchillas
de corte.
- Antes de la operación de corte, use una cizalla (tijeras para podar) para cortar las
ramas cuyo grosor sea de 8 mm o más.
- Tiene que permitir que las cuchillas de corte alcancen velocidad completa antes
de comenzar a cortar.
- Sujete el cortasetos siempre rmemente con ambas manos en los mangos.
- Sujete rmemente con los pulgares y los dedos empuñando los mangos.
- Cuando suelte la palanca de aceleración, tomará un momento antes de que la
cuchilla de corte se detenga.
- No use el cortasetos corriendo a una velocidad alta en estado pasivo. No es
posible ajustar la velocidad de corte mediante el acelerador si la velocidad en
estado pasivo es demasiado alta.
- Durante la operación de corte, sujete el cortasetos de tal forma que las cuchillas
formen un ángulo de entre 15° y 30° con la línea de corte.
- Ponga atención especial al cortar setos que se encuentren próximos o contra un
cerco de alambre.
- Evite el contacto de las cuchillas cortadoras con objetos duros como los cercos
de alambre, piedras o el suelo. Esto podría causar grietas, astillas o roturas en
las cuchillas.
- En caso de que las cuchillas cortadoras golpeen piedras u otros objetos duros,
apague el motor de inmediato y haga una inspección para ver si hay daños en
éstas. Cambie las cuchillas cortadoras dañadas antes de continuar la operación.
- Tome descansos periódicamente. MAKITA recomienda tomar un descanso de
entre 10 y 20 minutos por cada 50 minutos de operación.
- Apague el motor de inmediato en caso de observar cualquier problema con el
mismo.
- Opere el cortasetos con el menor ruido y contaminación posibles. Revise en
particular el correcto ajuste del carburador, así como la relación combustible /
aceite.
- No intente extraer material atascado mientras las cuchillas se encuentre activas.
Apague el equipo y colóquelo en el suelo, espere a que se detenga por completo
y despeje las obstrucciones.
AJUSTE DEL ÁNGULO DEL MANGO TRASERO
El mango trasero puede girarse 90° hacia el lado izquierdo o derecho y dejarse jo
cada 45°.
Para cambiar el ángulo:
1. Presione la palanca de liberación para liberar el seguro.
2. Gire el mango a un ángulo de 0°, 45° ó 90°.
3. Asegúrese que la palanca de liberación regrese a su posición original para
bloquear con el seguro.
No jale la palanca de aceleración mientras el seguro esté liberado.
No libere el seguro durante la operación.
39
Page 40

INSTRUCCIONES DE MANTENIMIENTO
- Apague el motor y quite el conector de la bujía de encendido al estar limpiando / cambiando / alando las cuchillas cortadoras, o al estar
llevando a cabo cualquier labor de mantenimiento.
- Nunca trate de enderezar o doblar las cuchillas cortadoras dañadas.
- Inspeccione con frecuencia las cuchillas cortadoras con el motor apagado.
- Mantenga aladas las cuchillas cortadoras.
- Limpie el cortasetos y compruebe de modo habitual que todas las tuercas y todos los tornillos se encuentren apretados.
- Nunca dé servicio al cortasetos en cercanía de alguna llama de fuego para evitar incendios.
- Use siempre guantes protectores de piel resistente o cuero al manipular o alar las cuchillas, pues éstas son muy losas.
Alamiento de la cuchilla
Si los bordes están redondeados y ya no cortan muy bien, ale sólo las secciones
sombreadas que se ilustran en la gura. No ale la supercies de contacto
(supercies corredizas) de los bordes superior e inferior.
- Antes de alar, asegúrese de jar la cuchilla con rmeza y de apagar el motor y
retirar la tapa de la bujía de encendido.
- Use guantes, gafas protectoras, etc.
- Procure no rebajar tanto el material de la cuchilla. Al excederse, se desgastaría
la capa endurecida causando que las cuchillas se desalen rápidamente con el
uso.
10° 10°
Ajuste del despeje de la cuchilla
Las cuchillas superior e inferior se desgastan. Si no puede obtener un corte limpio a
pesar de que las cuchillas están lo sucientemente aladas, ajuste el despeje como
se indica a continuación.
1. Retire la extensión desalada al aojar los tornillos.
2. Aoje la tuerca (1) con una llave combinada o de boca abierta.
3. Apriete ligeramente el perno de jación (2) con una llave hexagonal hasta que se
detenga y luego desatornille un cuarto de giro.
4. Apriete la tuerca (1), sujetando el perno de jación (2).
5. Aplique aceite ligeramente sobre la supercie de fricción de las cuchillas.
6. Encienda el motor, activando y desactivando la palanca de aceleración durante un minuto.
7. Mida el tiempo necesario para que las cuchillas se detengan tras haber liberado el acelerador. Si demora dos o más segundos, detenga el
motor y repita los pasos 2 a 7.
8. Apague el motor y toque la supercie de las cuchillas. Si no están demasiado calientes al tacto, ha realizado el ajuste adecuado. Si están
demasiado calientes, desenrosque el perno de jación (2) un poco y repita los pasos 6 a 8.
9. Coloque la extensión desalada al apretar los tornillos.
NOTA: Antes de hacer el ajuste, apague el motor y espere hasta que las cuchillas se hayan detenido.
Las cuchillas cuentan con una ranura alrededor del tornillo (2). En caso de que haya polvo en el extremo de cualquiera de las
ranuras, limpie.
Tuerca
①
Perno de jación
②
Guía de cuchilla
③
Cuchilla superior
④
Cuchilla inferior
⑤
Disco alador
Sujetando el disco alador
a un ángulo de 45°, ale el
borde de la línea punteada
para alar la punta
redondeada.
45°
Sección
transversal del
borde
40
Page 41

Revisión y ajuste de la velocidad pasiva
Las cuchillas cortadoras no deberán estar activas cuando el motor esté en
operación pasiva.
- Ajuste la velocidad pasiva a 3 000 min
-1
(rpm).
- De ser necesario, ajuste el tornillo pasivo (las cuchillas cortadoras no deberán
estar activas cuando el motor esté en operación pasiva).
• Las cuchillas cortadoras se activan en operación pasiva - gire el tornillo en
sentido contrario a las agujas del reloj para reducir la velocidad pasiva.
• El motor se apaga cuando se deja en operación pasiva - gire el tornillo en
sentido de las agujas del reloj para aumentar la velocidad pasiva.
- Si las cuchillas de corte aún continúan activándose en operación pasiva tras el
ajuste, acuda a su agente de servicio autorizado más cercano.
• El embrague deberá accionarse a una tasa de 3 750 min
-1
(rpm) o más.
• Compruebe el funcionamiento del interruptor I-O, de la palanca de desbloqueo,
y de la palanca de aceleración.
Limpieza del ltro de aire
PELIGRO: El uso de sustancias o material inamable queda
estrictamente prohibido.
Revise y limpie el ltro de aire diariamente o por cada 10 horas de operación.
- Gire la palanca dosicadora completamente al lado cerrado y mantenga el
carburador fuera de polvo y partículas.
- Aoje el perno de jación.
- Jale el lado trasero de la cubierta del ltro de aire y muévalo hacia adelante para
desprenderlo.
- Si hay aceite que se adhiere al elemento (esponja), exprima con rmeza.
- Para la contaminación profunda:
1) Retire el elemento (esponja), sumerja en agua tibia o en agua diluida con un
detergente neutro y luego seque por completo.
2) Limpie el elemento (eltro) con gasolina, y seque completamente.
- Antes de colocar los elementos, asegúrese de haberlos secado por completo. De
lo contrario, puede que éstos diculten el arranque del equipo.
- Limpie con un paño desechable el aceite que se haya adherido al ltro de aire.
- Inmediatamente tras terminar la limpieza, coloque la cubierta del ltro y apriete
con los pernos de jación (al reinstalar, coloque primero la pinza superior).
Puntos en el manejo de los elementos del ltro de aire
- Limpie los elementos varias veces al día en caso de que se adhiera polvo
en exceso.
- Si la operación continúa con los elementos sin haberse limpiado de
aceite, puede que el aceite en el ltro de aire se salga, resultando en la
contaminación del aceite.
Elemento
(esponja)
Elemento (eltro)
Perno de jación
Pinza superior
41
Page 42

Revisión del la bujía de encendido
Revise y limpie la bujía de encendido diariamente o por cada 8 horas de
operación.
- Use sólo la llave universal incluida para quitar o poner la bujía de encendido.
- El espacio de despeje entre los electrodos de la bujía de encendido debe ser
entre 0,7 y 0,8 mm. Si el espacio es demasiado amplio o angosto, ajústelo.
Si la bujía de encendido está congestionada con residuos de carbón o está
sucia, límpiela bien o reemplácela. Use un repuesto exacto de la pieza.
Suministro de grasa y lubricante
- Suministre grasa a través de la boquilla de engrasado por cada 50 horas de
operación (Shell Alvania No. 3 o equivalente).
NOTA: Asegúrese que el tiempo para reponer la grasa y la cantidad a ser
suministrada, sean como se ha especicado.
De otra manera, un suministro insuciente de grasa ocasionará
problemas en el equipo.
Limpieza del ltro de combustible (cabeza de succión en el
tanque de combustible)
ADVERTENCIA: El uso de sustancias o material inamable queda
estrictamente prohibido.
Revise y limpie el ltro de combustible mensualmente o por cada 50 horas de
operación.
- El ltro de combustible (1) de la cabeza de succión se utiliza para ltrar el
combustible requerido por el carburador.
- Visualmente revise el eltro del ltro de forma habitual.
- Para revisar el eltro del ltro, proceda con abrir la tapa del tanque y utilice
un gancho de alambre para jalar la cabeza de succión a través de la abertura
del tanque.
Reemplace el eltro del ltro si se ha endurecido, contaminado o
congestionado.
- Reemplace el eltro del ltro al menos una vez cada tres meses para
asegurar un suministro suciente de combustible al carburador. De otra
manera, un suministro insuciente de combustible causará que el motor
comience a fallar y se desempeñe a una velocidad máxima limitada.
0,7 - 0,8 mm
Engrasado de boquilla
Reemplazo de la manguera del combustible
PRECAUCIÓN: El uso de sustancias o material inamable queda
estrictamente prohibido.
Revise y limpie la manguera del combustible diariamente o por cada 10 horas
de operación.
Reemplace la manguera del combustible por cada 200 horas de operación, o
cada año independientemente de la frecuencia de uso. De otra manera, la fuga
de combustible puede ocasionar incendios.
Si descubre cualquier fuga durante la inspección, reemplace la manguera
inmediatamente.
Tapa del tanque
Reemplazo de la tapa del tanque
- Si observa cualquier desperfecto o daño en la tapa del tanque, reemplácela.
- Con el transcurso del tiempo, la tapa del tanque se desgasta. Reemplácela
cada dos a tres años.
Para cualquier labor de mantenimiento o ajuste que no se describa en este manual, acuda a su centro de servicio autorizado MAKITA.
Manguera del combustible
Revisión y mantenimiento diario
Para asegurar un largo tiempo de vida útil y evitar daños al equipo, las siguientes operaciones de servicio de mantenimiento deben realizarse
en intervalos periódicos.
- Antes de usar:
• Revise el equipo para ver si hay tornillos sueltos o piezas faltantes. Ponga especial atención al apretado de los tornillos de las cuchillas.
• Revise si hay congestión por residuos en el conducto de aire para el enfriamiento, así como en las rendijas del cilindro. Limpie de ser
necesario.
• Limpie y revise el tanque de combustible para ver si hay fugas o materia ajena dentro del tanque.
- Después de usar:
• Limpie el cortasetos externamente e inspeccione para ver si hay daños.
• Limpie el ltro del aire. Al trabajar en entornos con demasiado polvo, limpie el ltro varias veces al día.
• Revise si hay daños en las cuchillas y asegúrese que se encuentren instaladas con rmeza.
42
Page 43

ALMACENAMIENTO
- Cuando el equipo se almacene por un tiempo prolongado, drene el combustible
del tanque y carburador como se indica a continuación: Drene todo el
combustible del tanque.
- Retire la bujía de encendido y añada algunas gotas de aceite en el enchufe de
ésta. Luego, jale el arrancador suavemente para conrmar que el aceite cubra el
motor por dentro, colocando y apretando luego la bujía de encendido.
- Limpie la cuchilla cortadora eliminado el polvo y los residuos, así como el exterior
del motor pasando un paño que haya sumergido en aceite, y guarde el equipo en
un lugar lo más seco que sea posible.
PROGRAMA DE MANTENIMIENTO
Después de cada reabastecimiento
de combustible
Antes de cada uso Ensamble del motor,
Cada 50 horas Carcasa Suministrar grasa
Semanal Bujía de encendido Revisar y reemplazar en caso de ser necesario
Anual Manguera del combustible Reemplazar
Semestral Tapa del tanque Reemplazar
Antes de un almacenamiento de
largo plazo
Palanca de aceleración
Interruptor I-O
tuercas y tornillos
Filtro de aire
Conducto del aire de enfriamiento
Pieza cortadora
Velocidad en estado pasivo
Tanque de combustible
Tanque de combustible
Carburador
Cabeza de succión
Comprobar el funcionamiento
Comprobar el funcionamiento
Inspección visual para daños y nivel de apretamiento
Revisión de la condición general y la seguridad
Limpiar
Limpiar
Revisión de daños y del lo
Inspección (la pieza de corte no debe moverse)
Revisar y limpiar
Vaciar y limpiar
Utilizar hasta que el motor agote el combustible
Reemplazar
LUGAR INAPROPIADO
Falla Sistema Observación Causa
El motor no arranca o
arranca con dicultad
Problemas al arrancar el
motor ya calentado
El motor arranca pero se
apaga de inmediato
Rendimiento deciente Puede que varios
Sistema de encendido Hay chispa de encendido Falla en el suministro de combustible o sistema de
Suministro de
combustible
Compresión Dentro del motor Empaque inferior del cilindro defectuoso; sellos
Falla mecánica Arrancador no embraga Resorte del arrancador roto; piezas rotas dentro del
Suministro de
combustible
sistemas del equipo
se vean afectados a
la vez
compresión; problema mecánico
No hay chispa de encendido Falla en la operación del interruptor I-O; falla en
el cableado o corto circuito; defecto en la bujía de
encendido o su enchufe; problema en el módulo de
encendido
Tanque de combustible lleno Posición incorrecta del dosicador; carburador
defectuoso; cabeza de succión sucia (ltro del conducto
de gasolina); conducto de suministro de combustible
doblado u obstruido
del cigüeñal dañados; cilindro o anillos de pistón
defectuosos
Fuera del motor Sellado inadecuado de la bujía de encendido
motor
Existencia de chispa de
encendido con el tanque
lleno
Tanque lleno Ajuste incorrecto de operación pasiva; cabeza de
Motor en operación pasiva Filtro de aire contaminado; carburador contaminado;
Carburador contaminado, límpielo
succión o carburador contaminados
Respiradero del tanque defectuoso; obstrucción de la
línea de suministro de combustible; falla en el cable
interruptor I-O
congestión del moe; congestión del conducto de
escape en el cilindro
43
Page 44

<USA only>
WARNING
The engine exhaust from this product contains chemicals known to the State of California to cause cancer, birth
defects or other reproductive harm.
<USA solamente>
ADVERTENCIA
Los gases de escape del motor de este producto contienen sustancias químicas conocidas en el Estado de
California como causantes de cáncer, defectos genéticos y otros problemas relacionados con la reproducción.
Makita Corporation
3-11-8, Sumiyoshi-cho,
Anjo, Aichi 446-8502 Japan
885103A895 www.makita.com
ALA
 Loading...