


 Loading...
Flash MX Tutorials
™
macromedia®

Trademarks
Afterburner, AppletAce, Attain, Attain Enterprise Learning System, Attain Essentials, Attain Objects for Dreamweaver, Authorware, Authorware Attain, Authorware Interactive Studio, Authorware Star, Authorware Synergy, Backstage, Backstage Designer, Backstage Desktop Studio, Backstage Enterprise Studio, Backstage Internet Studio, Design in Motion, Director, Director Multimedia Studio, Doc Around the Clock, Dreamweaver, Dreamweaver Attain, Drumbeat, Drumbeat 2000, Extreme 3D, Fireworks, Flash, Fontographer, FreeHand, FreeHand Graphics Studio, Generator, Generator Developer’s Studio, Generator Dynamic Graphics Server, Knowledge Objects, Knowledge Stream, Knowledge Track, Lingo, Live Effects, Macromedia, Macromedia M Logo & Design, Macromedia Flash, Macromedia Xres, Macromind, Macromind Action, MAGIC, Mediamaker, Object Authoring, Power Applets, Priority Access, Roundtrip HTML, Scriptlets, SoundEdit, ShockRave, Shockmachine, Shockwave, Shockwave Remote, Shockwave Internet Studio, Showcase, Tools to Power Your Ideas, Universal Media, Virtuoso, Web Design 101, Whirlwind and Xtra are trademarks of Macromedia, Inc. and may be registered in the United States or in other jurisdictions including internationally. Other product names, logos, designs, titles, words or phrases mentioned within this publication may be trademarks, servicemarks, or tradenames of Macromedia, Inc. or other entities and may be registered in certain jurisdictions including internationally.
Third-Party Information
Speech compression and decompression technology licensed from Nellymoser, Inc. (www.nellymoser.com).
Sorenson™ Spark™ video compression and decompression technology licensed from
Sorenson Media, Inc.
This guide contains links to third-party Web sites that are not under the control of Macromedia, and Macromedia is not responsible for the content on any linked site. If you access a third-party Web site mentioned in this guide, then you do so at your own risk. Macromedia provides these links only as a convenience, and the inclusion of the link does not imply that Macromedia endorses or accepts any responsibility for the content on those third-party sites.
Apple Disclaimer
APPLE COMPUTER, INC. MAKES NO WARRANTIES, EITHER EXPRESS OR IMPLIED, REGARDING THE ENCLOSED COMPUTER SOFTWARE PACKAGE, ITS MERCHANTABILITY OR ITS FITNESS FOR ANY PARTICULAR PURPOSE. THE EXCLUSION OF IMPLIED WARRANTIES IS NOT PERMITTED BY SOME STATES. THE ABOVE EXCLUSION MAY NOT APPLY TO YOU. THIS WARRANTY PROVIDES YOU WITH SPECIFIC LEGAL RIGHTS. THERE MAY BE OTHER RIGHTS THAT YOU MAY HAVE WHICH VARY FROM STATE TO STATE.
Copyright © 2002 Macromedia, Inc. All rights reserved. This manual may not be copied, photocopied, reproduced, translated, or converted to any electronic or machine-readable form in whole or in part without prior written approval of Macromedia, Inc.
Acknowledgments
Director: Erick Vera
Producer: Wayne Wieseler
Writing: Jody Bleyle, JuLee Burdekin, Mary Burger, Dale Crawford, Marcelle Taylor
Instructional Design: Stephanie Gowin, Barbara Nelson
Editing: Rosana Francescato, Lisa Stanziano, Anne Szabla
Multimedia Design and Production: Aaron Begley, Benjamin Salles, Noah Zilberberg
Print Design and Production: Chris Basmajian, Caroline Branch
First Edition: February 2002
Macromedia, Inc.
600 Townsend St.
San Francisco, CA 94103

CONTENTS
CHAPTER 1
Introduction to Flash MX Tutorial . . . . . . . . . . . . . . . . . . . . . . . . . . . . . . . . . . . . . 5
What you should know . . . . . . . . . . . . . . . . . . . . . . . . . . . . . . . . . . . . . . . . . . . . . . . . . . 5 View the completed movie . . . . . . . . . . . . . . . . . . . . . . . . . . . . . . . . . . . . . . . . . . . . . . . 6 Analyze the stiletto.fla file . . . . . . . . . . . . . . . . . . . . . . . . . . . . . . . . . . . . . . . . . . . . . . . . 6 Define properties for a new document and create a gradient background . . . . . . . . . . . 12 Create and mask vector art . . . . . . . . . . . . . . . . . . . . . . . . . . . . . . . . . . . . . . . . . . . . . . 21 Tween bitmap effects within a movie clip . . . . . . . . . . . . . . . . . . . . . . . . . . . . . . . . . . . 29 Load dynamic text at runtime . . . . . . . . . . . . . . . . . . . . . . . . . . . . . . . . . . . . . . . . . . . . 36 Add animation and navigation to buttons . . . . . . . . . . . . . . . . . . . . . . . . . . . . . . . . . . . 40 Add streaming and event sounds . . . . . . . . . . . . . . . . . . . . . . . . . . . . . . . . . . . . . . . . . . 45 Organize your Library panel . . . . . . . . . . . . . . . . . . . . . . . . . . . . . . . . . . . . . . . . . . . . . 47 Test download performance and publish the movie . . . . . . . . . . . . . . . . . . . . . . . . . . . . 48 The next steps . . . . . . . . . . . . . . . . . . . . . . . . . . . . . . . . . . . . . . . . . . . . . . . . . . . . . . . . 52
CHAPTER 2
Introduction to ActionScript Tutorial . . . . . . . . . . . . . . . . . . . . . . . . . . . . . . . . . 53
View a completed movie . . . . . . . . . . . . . . . . . . . . . . . . . . . . . . . . . . . . . . . . . . . . . . . . 54 Initialize the movie . . . . . . . . . . . . . . . . . . . . . . . . . . . . . . . . . . . . . . . . . . . . . . . . . . . . 56 Save and retrieve information . . . . . . . . . . . . . . . . . . . . . . . . . . . . . . . . . . . . . . . . . . . . 61 Display information in a dynamic text box . . . . . . . . . . . . . . . . . . . . . . . . . . . . . . . . . . 63 Write an expression . . . . . . . . . . . . . . . . . . . . . . . . . . . . . . . . . . . . . . . . . . . . . . . . . . . . 64 Control the flow of the movie . . . . . . . . . . . . . . . . . . . . . . . . . . . . . . . . . . . . . . . . . . . . 66 Create commands and reuse code . . . . . . . . . . . . . . . . . . . . . . . . . . . . . . . . . . . . . . . . . 68 Use a built-in object . . . . . . . . . . . . . . . . . . . . . . . . . . . . . . . . . . . . . . . . . . . . . . . . . . . 73 Test the movie . . . . . . . . . . . . . . . . . . . . . . . . . . . . . . . . . . . . . . . . . . . . . . . . . . . . . . . . 75 The next steps . . . . . . . . . . . . . . . . . . . . . . . . . . . . . . . . . . . . . . . . . . . . . . . . . . . . . . . . 77
CHAPTER 3
Introduction to Components Tutorial. . . . . . . . . . . . . . . . . . . . . . . . . . . . . . . . . 79
Types of components. . . . . . . . . . . . . . . . . . . . . . . . . . . . . . . . . . . . . . . . . . . . . . . . . . . 79 View the completed form . . . . . . . . . . . . . . . . . . . . . . . . . . . . . . . . . . . . . . . . . . . . . . . 80 Create a form . . . . . . . . . . . . . . . . . . . . . . . . . . . . . . . . . . . . . . . . . . . . . . . . . . . . . . . . 80 The next steps . . . . . . . . . . . . . . . . . . . . . . . . . . . . . . . . . . . . . . . . . . . . . . . . . . . . . . . . 90
3

4Contents

CHAPTER 1
Introduction to Flash MX Tutorial
This tutorial guides you through the process of creating a compelling Web experience with Macromedia Flash MX. By completing the tutorial, you’ll learn how to design a movie, from opening a new document to publishing the movie for Web playback. The tutorial takes approximately three hours to complete, depending on your experience, and will teach you how to do the following tasks:
•Analyze a completed movie
•Define document properties and create a gradient
•Create and mask vector art
•Tween bitmap effects within a movie clip
•Load dynamic text
•Modify buttons and add navigation
•Add streaming and event sounds
•Test and publish the movie
We recommend that you complete the eight sections that comprise the tutorial in sequence, although you may choose to review only the sections that interest you. If you do complete the tutorial out of sequence, keep in mind that later sections assume you’ve mastered skills introduced in earlier sections.
What you should know
Before taking the tutorial, complete the seven lessons found in Flash Help. These interactive lessons created in Flash introduce you to the concepts you need to know to complete the tutorial. Lesson topics include the following:
•Getting Started with Flash MX
•Illustrating in Flash
•Adding and Editing Text
•Creating and Editing Symbols
•Understanding Layers
•Creating Buttons
•Creating Tweened Animation
To take a lesson, choose Help > Lessons, then select from the list.
5

View the completed movie
You can open a completed version of the tutorial movie to better understand how your finished file will appear.
In this section, you’ll accomplish the following tasks:
•Analyze the completed movie using the Property inspector and Movie Explorer
•Examine a movie clip and discern its relationship to the main movie
•View the types of assets included in the movie
1Within your Flash MX application folder, browse to Tutorials/FlashIntro and double-click stiletto.swf to open the completed movie in the stand-alone Flash Player.
Published Flash movies have the SWF extension; documents in the authoring environment have the FLA extension.
2When the movie opens, watch the three views of the car fade in and out. You’ll create this animation by tweening bitmap effects within a movie clip.
3Listen to the sound that plays continuously while the movie plays. This is an example of a streaming sound.
4Roll over the three buttons along the lower right edge of the window to view the rollover effect, and to hear the event sounds included in each button.
5 Click a button to see where it links, then close the browser that opened and return to the SWF file.
6 After viewing the movie, click its close box.
Analyze the stiletto.fla file
It’s helpful to analyze the completed FLA file to see how the author designed the document. To analyze the file, you can view the properties for an object, view the Timeline and Stage, look at library assets, and use the Movie Explorer.
6Chapter 1

1In Flash, choose File > Open. Navigate to your Flash application folder and open Tutorials/ FlashIntro/stiletto.fla.
You now see the completed tutorial movie in the authoring environment.
Drag the bar that separates the
Stage from the Timeline
2To view all layers in the main Timeline, drag down the bar that separates the Stage from the Timeline.
3 In the Timeline, unlock the Copy layer and the Images layer.
View document properties
The Property inspector lets you view specifications for selected objects. The specifications depend on the type of object selected. If you select a text object, for example, settings to view and modify text attributes appear.
1 If the Property inspector isn’t open, choose Window > Properties.
Introduction to Flash MX Tutorial |
7 |
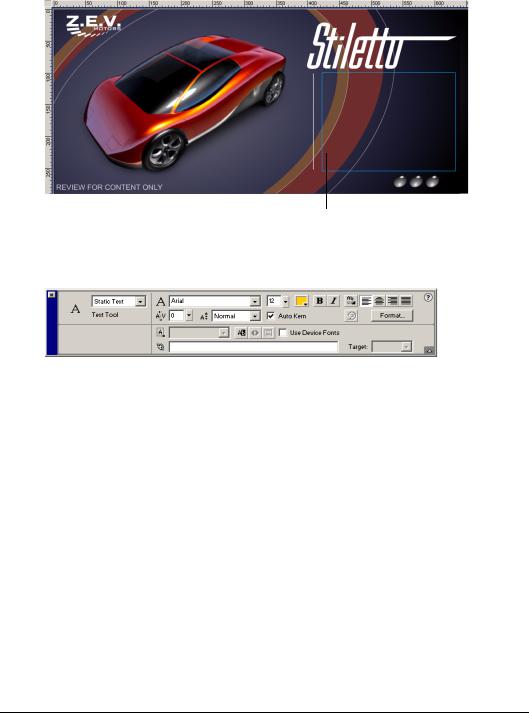
2On the Stage, scroll down if necessary and select the rectangular block where descriptive text appeared in the finished SWF file. The text does not appear in the FLA file because it loads from an external TXT file into a dynamic text field.
Text box
In the Property inspector, you can view the size, style, and color of the text, among other attributes.
If the Property inspector is not fully expanded, click the white triangle in lower right corner.
3On the Stage, select the car.
Movie clip settings replace the text settings. Movie clips are symbols with their own independent Timelines. You can think of them as movies within movies.
View the movie clip
Now you’ll open symbol-editing mode to view the Timeline for a movie clip.
1On the Stage, double-click the movie clip of the car.
As you learned in the Creating Tweened Animation lesson, you define changes in animation in keyframes. When you scroll around the Timeline, note which layers have keyframes in them and which frames are keyframes.
Beginning and intermediate keyframes that include content are indicated in the Timeline by solid circles, ending keyframes appear as small outlined rectangles.
8Chapter 1

2 In the Timeline, select the playhead and drag it slowly across the frames.
Watch how changes in action on the Stage correspond to changes in the Timeline. As you drag the playhead, the movie plays sequentially. You can add ActionScript, the Flash scripting language, to movies to make the playhead jump to specific frames.
3 When you finish viewing the movie clip, do one of the following to return to the main movie:
•Choose Edit > Edit Document.
•Click the Back button.
•Click Scene 1 above the Stage.
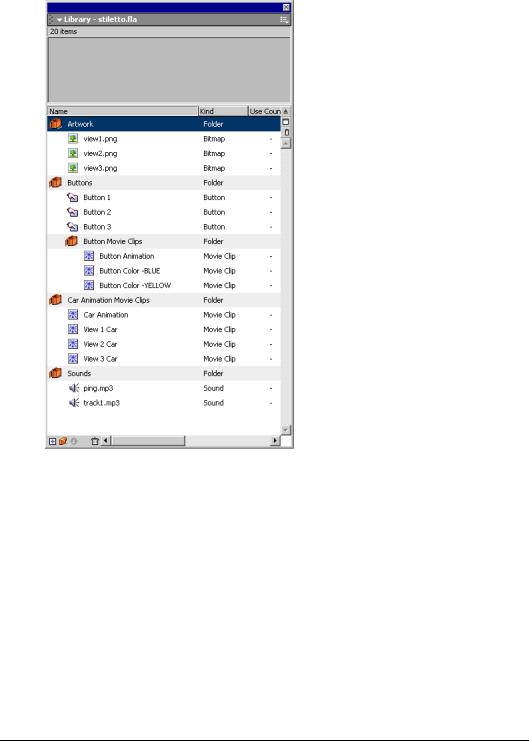
View library assets
The Library panel contains the symbols and imported objects in your document.
1 If the Library panel isn’t open, choose Window > Library.
2 Drag the Library panel to enlarge it, if necessary, to view the objects within the library.
3 If the Artwork folder is not expanded, double-click it to view the objects in the folder.
4 Click view1.png to view the image in the preview area at the top of the Library panel.
5Expand the other folders in the Library panel to view the assets included in the document, such as buttons and movie clips.
Introduction to Flash MX Tutorial 9
6 When you finish viewing the assets, close the Library panel.
Analyze the movie structure with the Movie Explorer
The Movie Explorer helps you arrange, locate, and edit media. With its hierarchical tree structure, the Movie Explorer provides information about the organization and flow of a movie, especially useful when you analyze a movie authored by someone else.
1 If the Movie Explorer is not already open, choose Window > Movie Explorer.
2If necessary, enlarge the Movie Explorer to view the tree structure within the pane. The Movie Explorer filtering buttons display or hide information.
10 Chapter 1
3Click the pop-up menu in the title bar of the Movie Explorer, and verify that Show Movie Elements and Show Symbol Definitions are selected.
4Deselect the Show Frames and Layers button along the top of the Movie Explorer. Verify that the only filtering buttons selected are Show Text; Show Buttons, Movie Clips, and Graphics; Show ActionScripts; and Show Video, Sounds, and Bitmaps.
5Examine the list to view some of the assets included in the movie and to see their relationship to other assets.
6 To expand an object or category, click the Plus (+) button to the left of the name
7Select the Show Frames and Layers filtering button. Scroll down to the Symbol Definitions category. With the category expanded, double-click the Car Animation movie clip.
You’re now in symbol-editing mode for the movie clip.
Introduction to Flash MX Tutorial |
11 |

8In the Movie Explorer, with the Car Animation category selected and expanded, expand the View 3 Fade icon, then double-click Frame 60.
In the Timeline for the movie clip, the playhead moves to Frame 60 of the View 3 Fade layer.
To view an item listed in the hierarchical tree, click the corresponding icon. If you click a frame icon, the playhead moves to that frame in the Timeline. If you click an asset, such as a bitmap image, the Property inspector displays the image settings. Double-clicking an icon that represents a symbol opens symbol-editing mode.
9Close the Movie Explorer. To close the document, choose File > Close. If you’ve made changes to the file, do not save them.
Define properties for a new document and create a gradient background
To learn how to create a movie in Flash, let’s start from the very first step in the process: opening a new file. Then, by completing this section, you’ll learn how to complete the following tasks:
•Open a new file and define document properties
•Create and transform a gradient background
Open a new file
Now you’re ready to create your own version of the tutorial movie.
1 Choose File > New.
2 Choose File > Save As.
3Name the file mystiletto.fla and save it within your Flash MX application folder, in the Tutorials/FlashIntro/My_Stiletto sub folder.
Note: As you complete the tutorial, remember to save your work frequently.
Define document properties
Configuring document properties is a common first step in authoring. You can use the Property inspector and Document Properties dialog box to specify settings that affect the entire movie, such as the frames per second (fps) playback rate, and the Stage size and background color.
1If the Property inspector isn’t open, choose Window > Properties. In the Property inspector, verify that 12 is the number in the Frame Rate text box.
The movie will play at 12 frames per second, an optimal frame rate for playing animations on the Web.
Note: If the Property inspector is not fully expanded, click the white triangle in lower right corner.
12 Chapter 1
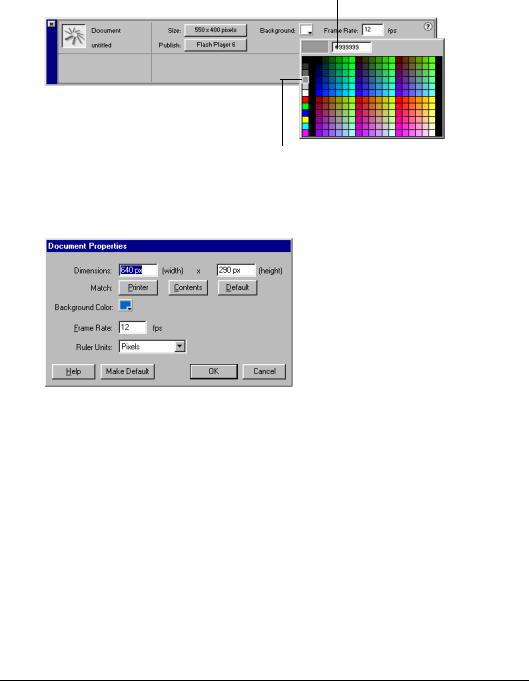
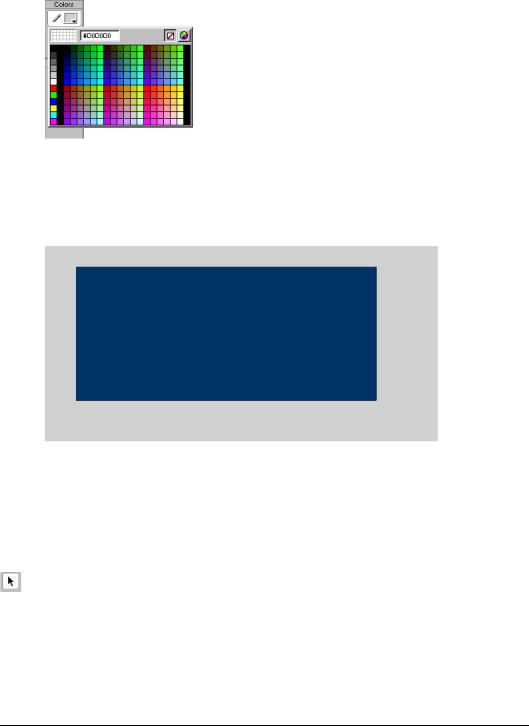
2The Background Color box indicates the color of the Stage. Click the down arrow on the Background Color box, then move the Eyedropper tool over the color swatches to view their hexadecimal values in the Hexadecimal text box.
3 Find and click the gray color swatch with the hexadecimal value of 999999.
Hexadecimal text box
Select this shade of gray
4To resize the Stage, click the Size button, which indicates the size of the Stage. In the Document Properties dialog box, type 640 px in the first Dimensions text box and 290 px in the second Dimensions text box. Verify that Pixels is selected in the pop-up menu, and click OK.
The Stage dimensions change to reflect the new settings of 640 x 290 pixels.
Specify grid settings
On the Stage, you can align objects along horizontal and vertical grid lines. Even when the grid is not visible, you can snap objects to it. Now you’ll modify the distance between the horizontal and vertical grid lines, and create a grid in alignment with the Stage borders.
1 Choose View > Grid > Edit Grid.
2 In the Grid dialog box, type 10 px in the grid width text box and 10 px in the grid height text box.
3Select Snap to Grid and verify that Show Grid is not selected. Objects will now snap to the grid, even when the grid is not visible.
Introduction to Flash MX Tutorial 13
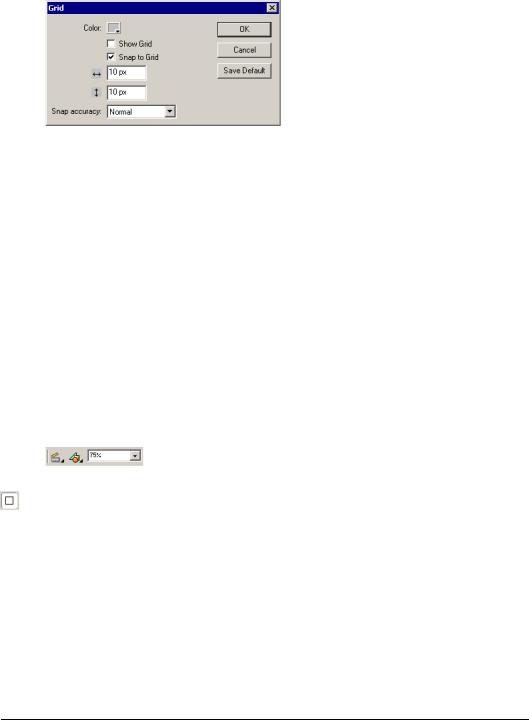
4Verify that Normal is selected for Snap Accuracy, and click OK.
Snap accuracy determines how close an object must be to a grid line before snapping to it.
Create a gradient background
A gradient displays subtle variations of a color, or transitions between two or more colors. In the finished tutorial file, the background is a gradient that blends black and dark blue with a transparent area that allows part of the gray Stage color to be displayed. You achieve this effect using the Color Mixer.
Note: While gradients offer interesting effects in movies, overuse of gradients can adversely affect computer processor speeds and decrease the speed at which an animation plays. When designing a movie, consider both your artistic and performance requirements to determine the best use of gradients.
Draw a rectangle
Earlier in the tutorial, you created a grid that aligned against the Stage and allowed you to snap objects to the grid lines. Now you’ll draw a rectangle that snaps to the area of the grid bordering the Stage.
1In the pop-up menu above the right side of the Stage, enter 75% to view the entire Stage.
This setting indicates your magnified or scaled-down view of the Stage. The setting does not affect the actual size of the Stage in your movie, which you specified in the Document Properties dialog box.
2 In the toolbox, select the Rectangle tool.
14 Chapter 1
3In the toolbox, click the Stroke Color control. Select No Stroke (the button with the red diagonal line above the color palette).
The selected fill color of the shape is unimportant; you’ll soon change the color.
4Starting from the upper left corner of the Stage, drag to the lower right corner of the Stage to draw a rectangle that covers the Stage.
When you release the pointer, the rectangle snaps to the edges of the Stage, along the hidden grid.
Note: While completing the tutorial, you may find it useful to undo a change you’ve made. Flash can undo several of your recent changes, depending on the number of undo levels you have set in Preferences. To undo, choose Edit > Undo or press Control+Z (Windows) or Command+Z (Macintosh). Conversely, you can redo what you’ve undone by choosing Edit > Redo or pressing Control+Y (Windows) or Command+Y (Macintosh).
Specify a color for the gradient
Dark blue is the first color you’ll add to your gradient.
1 In the toolbox, select the Arrow tool. On the Stage, click inside the rectangle to select the fill.
When you drew the rectangle, the Property inspector displayed properties for the Rectangle tool. When you select a shape that has already been created, the Property inspector displays properties for the shape.
2 If the Color Mixer is not open, choose Window > Color Mixer.
Introduction to Flash MX Tutorial 15
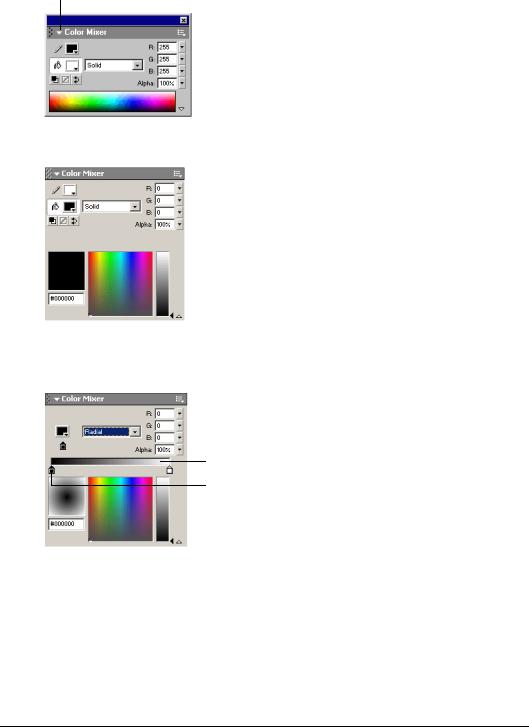
3 To expand the Color Mixer, click the white arrow in the panel title bar.
Click here to expand the panel
4 If the Color Mixer is not fully expanded, click the arrow in the lower right of the panel.
5 In the Fill Style pop-up menu, select Radial.
6 Click the gradient slider to the left of the gradient bar to select it.
Gradient bar
Gradient slider
7Click the color box in the upper left corner of the window to open the color palette. Use one of the following methods to select dark blue:
• Type 000066 in the hexadecimal value text box and press Enter or Return.
16 Chapter 1
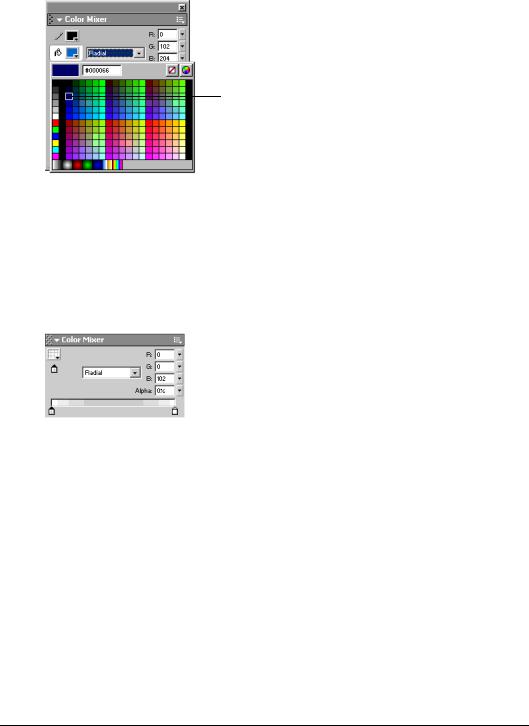
•Move the eyedropper over the color swatches until you find the dark blue with the hexadecimal value of 000066, then click the swatch to select it.
Click this shade of blue
Change the alpha value
In the Color Mixer, the Alpha text box indicates the transparency of the color, with 0% indicating that the color is completely transparent, and 100% indicating the color is completely opaque. You’ll specify an alpha value of 0% to create a gradient that includes dark blue and black along with the gray Stage color that shows through the transparent areas of the gradient.
•In the Color Mixer, either type 0 in the Alpha text box and press Enter or Return, or move the Alpha slider to 0.
Add a second gradient color
You’ll now add black to the gradient.
1 In the Color Mixer, click the gradient slider to the right of the gradient bar to select it.
Introduction to Flash MX Tutorial 17
2Click the color box to open the color palette and select the black with a hexadecimal value of 000000.
Remember, you can either type the hexadecimal value in the Hexadecimal text box and press Enter or Return, or you can find and select the color swatch with the same hexadecimal value.
Transform the gradient fill
When you transform an object, you rotate, scale, or skew it. You can transform a fill using the Fill Transform tool.
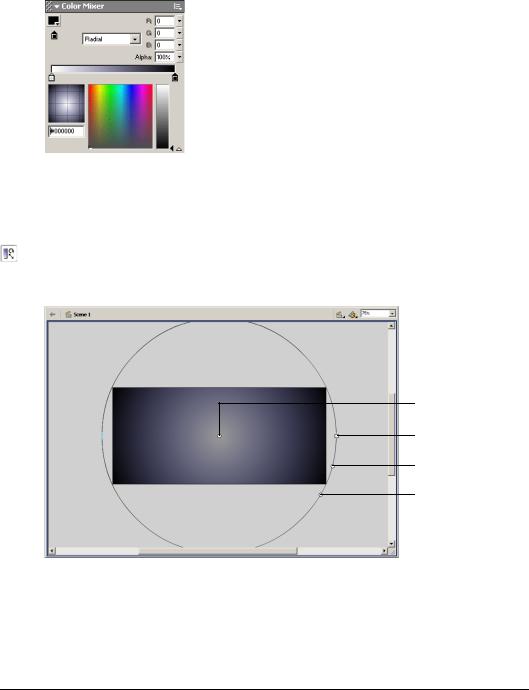
1 In the toolbox, select the Fill Transform tool. On the Stage, click anywhere inside the rectangle.
An ellipse that indicates the shape and location of the gradient appears around the Stage. The ellipse has controls for the location, width, scale, and rotation of the radial gradient.
Center placement
Width
Scale
Rotation
18 Chapter 1
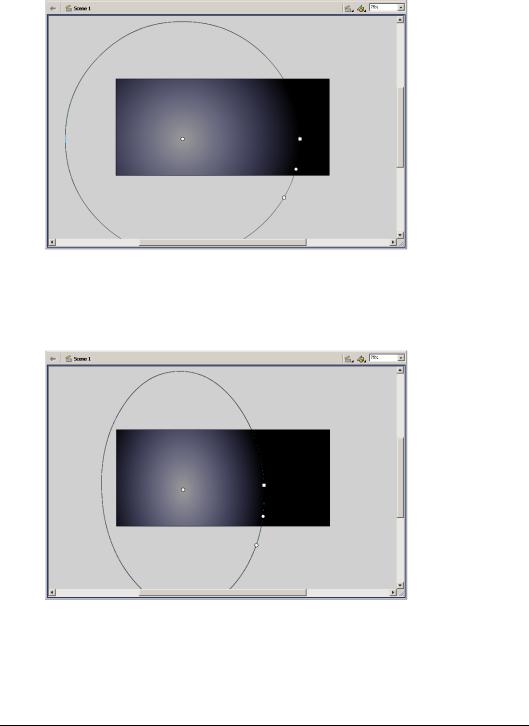
2Drag the center control to the left of the Stage so that it’s approximately 1/3 of the distance from the left edge of the Stage, as shown in the following illustration.
As you change the shape and placement of the ellipse, the shape and placement of the color transitions on the Stage change accordingly.
3Drag the square handle on the ellipse, which controls gradient width, to the left to make the ellipse narrower; the approximate shape of the ellipse is shown in the following illustration.
Introduction to Flash MX Tutorial 19
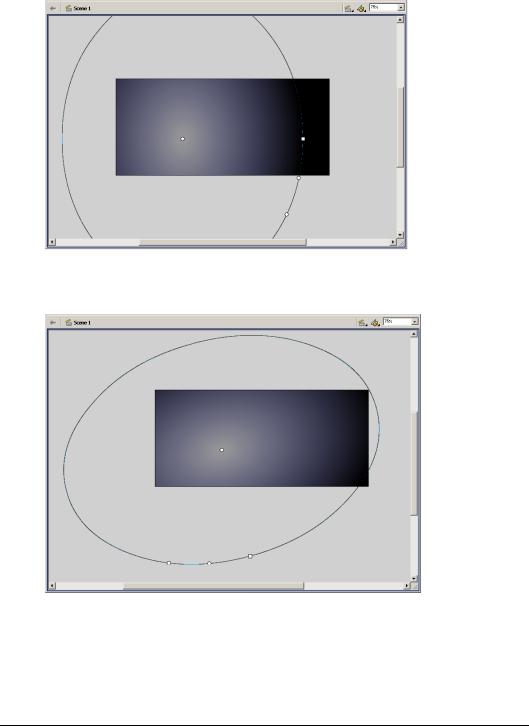
4Drag the circular middle handle, which controls the size of the gradient, to the right to make the ellipse larger, as shown in the following illustration.
5Drag the bottom circular handle, which controls the rotation of the ellipse, toward the left to rotate the ellipse to the approximate angle shown in the following illustration.
20 Chapter 1
Name and lock a layer
The gradient shape appears on Layer 1 in the Timeline, currently the only layer in your document. In preparation for adding and moving additional objects on the Stage, you’ll rename and lock the layer. In the next section of the tutorial, you’ll create a new layer.
As you learned in the Understanding Layers lesson, by locking the layer, you ensure that you or other users don’t make inadvertent changes to objects on the layer.
1 In the Timeline, double-click the Layer 1 name and type Background to rename the layer.
2 Click away from the layer name, then click the padlock icon to lock the layer.
Create and mask vector art
When you draw in Flash, you create vector art, which is a mathematical representation of lines, curves, color, and position. Vector art is resolution-independent; you can rescale the art to any size or display it at any resolution without losing clarity. Additionally, vector art downloads faster than comparable bitmap images.
Along with the gradient, the finished file contains background shapes. You’ll use the Oval tool to create the shapes.
Specifically, in this section you’ll learn how to complete the following tasks:
•Add a layer
•Create and “cut out” shapes
•Mask the layer containing the shapes
To complete this section, you can either continue to work on your mystiletto.fla file, or you can browse to your Flash MX application folder and open Tutorials/FlashIntro/stiletto2.fla. If you do use the stiletto2.fla file, save the file with a new name in your My_Stiletto folder to maintain an unadulterated version of the original file.
Add a layer
Rather than create the shapes on the Background layer, you’ll add a new layer on which you can draw the shapes.
1To add a new layer, choose Insert > Layer, or click the Insert Layer button. Name the new layer Shapes.
Insert Layer button
2 In the toolbox, select the Oval tool.
Introduction to Flash MX Tutorial 21
3In the Property inspector, select Hairline from the Stroke Style pop-up menu. Click the Stroke Color control. In the color palette, select the gray with a hexadecimal value of 999999.
Remember, you can either enter the hexadecimal value in the hexadecimal text box, or find and click the color swatch with the same hexadecimal value.
4If the Color Mixer isn’t open, choose Window > Color Mixer. In the Fill Style pop-up menu, select Solid. Click the Fill Color control to select it. In the R (red) field, type 109. In the G (green) and B (blue) text boxes, type 45, then press Enter or Return.
You are specifying the values for the amount of red, green, and blue within a color.
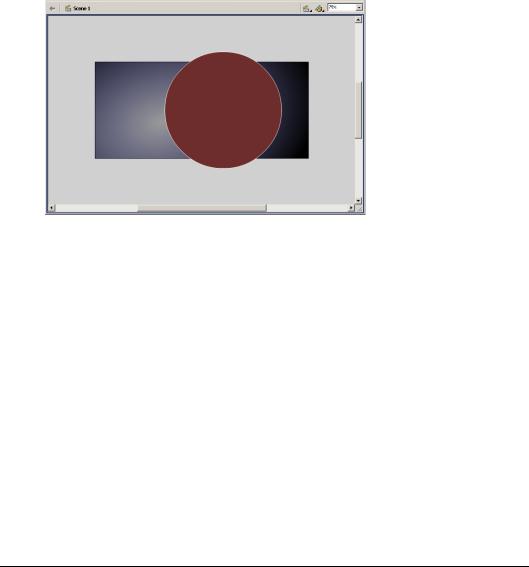
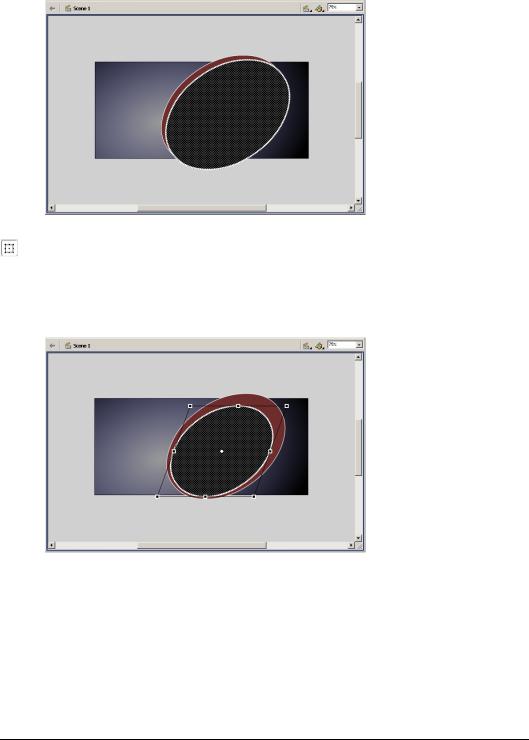
5In the Timeline, verify that the Shapes layer is selected. On the Stage, constrain the oval to a circle by pressing Shift as you drag, to draw a circle that extends from the canvass area above the Stage to the canvass below the Stage.
Note: If you make a mistake, choose Edit > Undo and try again.
6Select the Arrow tool in the toolbox, then double-click the circle on the Stage to select both the fill and the stroke.
7 If the Transform panel isn’t open, choose Window > Transform.
22 Chapter 1
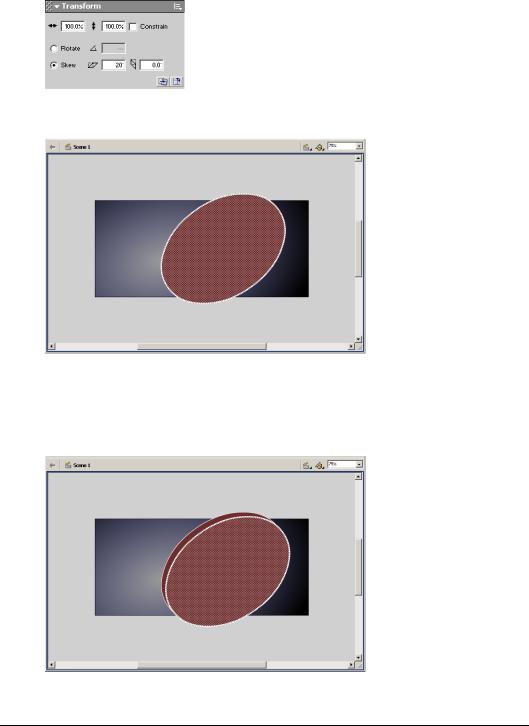
8To expand the Transform panel, click the white arrow in the upper left corner. Select Skew and type 20.0 in the Skew Horizontally text box, then press Enter or Return.
The circle that you drew changes into a skewed oval.
Create and transform a duplicate shape
You’ll now create and transform a duplicate oval.
1 With the oval fill and stroke still selected on the Stage, choose Edit > Duplicate.
Introduction to Flash MX Tutorial 23
2 In the Property inspector, use the Fill Color control to select black.
3In the toolbox, select the Free Transform tool.
A guide with handles appears around the duplicate oval.
4Move the pointer over a corner handle until a diagonal indicator with arrows at both ends appears. Drag the corner handle inward to make the oval smaller. Verify that the stroke of the inside oval is not touching the stroke of the outside oval.
24 Chapter 1
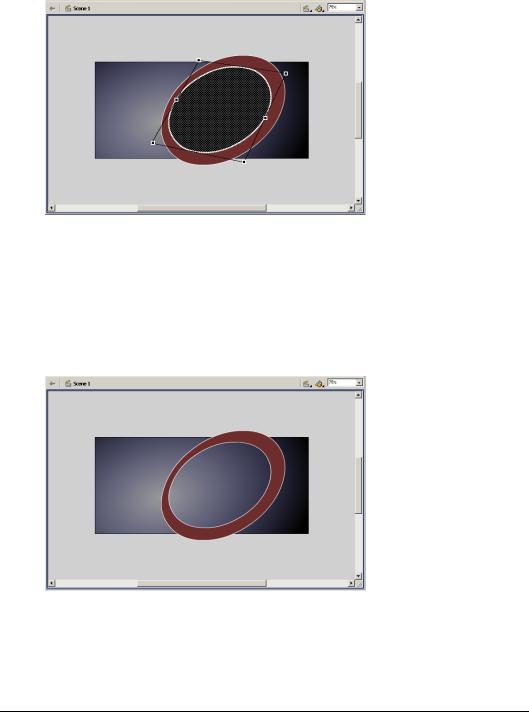
5Move your pointer above the corner handle until the pointer changes into a circular rotation indicator. Drag the rotation indicator to the left to rotate the oval to the approximate position shown in the following illustration.
Create a “cut out” with the duplicate
When you create one shape on top of another on the same layer, and the two shapes are different colors as well as ungrouped, the shape on top “cuts out” the area of the shape underneath. You’ll delete the duplicate oval to view the cut out effect.
1With the Free Transform tool guide around the duplicate oval, click anywhere on the Stage or canvass away from the shapes, then click the fill of the inner oval. Press Delete on your keyboard to delete the fill.
Introduction to Flash MX Tutorial 25
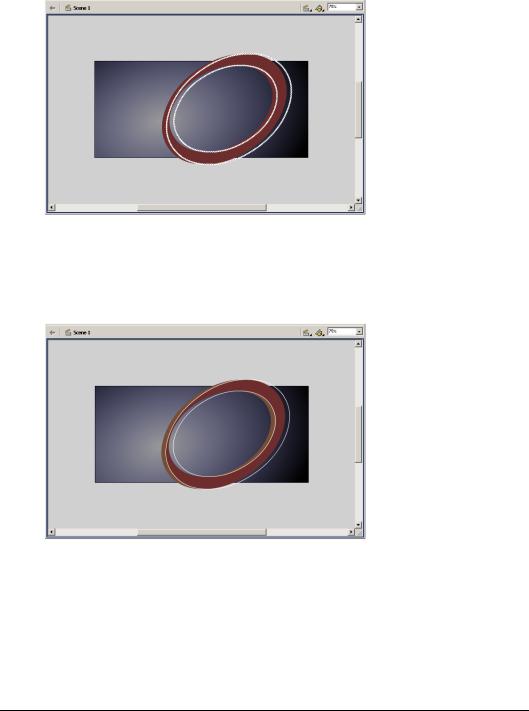
2The oval now has an outer and an inner stroke. With the Arrow tool, click the outermost stroke on the oval to select it, then Shift-click to select the innermost stroke as well. Drag the strokes slightly to the right of the fill, as shown in the following illustration.
3Each area of fill color within the area bisected by the stroke now represents a discrete segment that you can color individually. Select an area of the shape fill, and use the Color Mixer to change the fill color to a brown shade with an R (red) value of 117, a G (green) value of 78, and a B (blue) value of 53. If desired, repeat this step to change another fill area to the lighter shade of brown, as shown in the following illustration:
26 Chapter 1
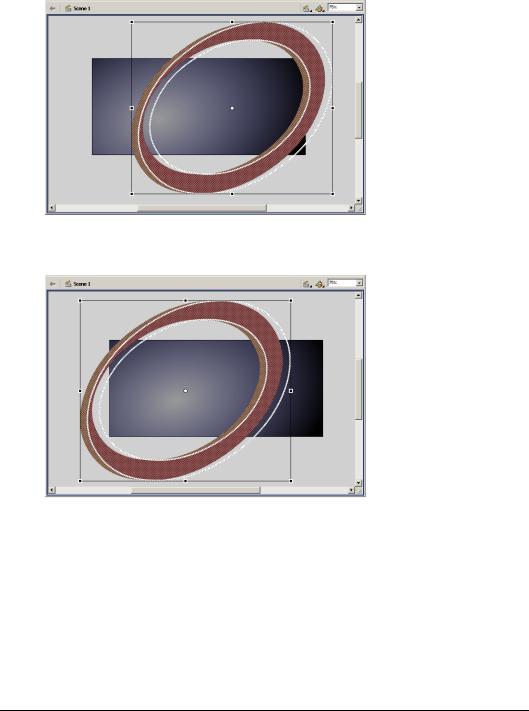
4Select the Free Transform tool. Drag around the oval background shapes to select all the shapes, then drag the right corner handle of the guide to enlarge the shapes, as shown in the following illustration.
5Drag the shapes on the Stage so that part of the curve shows on the upper left corner and right side of the Stage.
Note: As you complete the tutorial, remember to save your file frequently.
Create a mask
The art that you created on the Shapes layer extends beyond the Stage, well into the canvass area. Although the area on the canvass won’t appear in your published movie, the art beyond the Stage can be distracting in the authoring environment. While you can erase the part of the shapes that extend into the canvass, a better solution is to apply a mask over the Stage so that only the area under the mask—the entire Stage, in this case—remains visible. This way, if you’d like to return to the shapes to modify them, they will be intact.
Introduction to Flash MX Tutorial 27
Loading...