


 Loading...
Using FreeHand
™
macromedia®
Trademarks
Add Life to the Web, Afterburner, Aftershock, Andromedia, Animation Powerpack, Aria, Attain, Authorware, Authorware Star, Backstage, Design in Motion, Director, Dream Templates, Dreamweaver, Drumbeat 2000, Extreme 3D, Fireworks, Flash, Fontographer, FreeHand, Generator, Know Your Site, Knowledge Objects, Knowledge Stream, Knowledge Track, LikeMinds, Lingo, Live Effects, Macromedia, Macromedia Action!, Macromedia M Logo & Design, Macromedia Flash, Macromedia Xres, Macromind, MacroModel, Made with Macromedia Logo and Design, MAGIC, Mediamaker, Movie Critic, Roundtrip, Roundtrip HTML, ShockRave, Shockmachine, Shockwave, SoundEdit, Titlemaker, UltraDev, Web Design 101, what the web can be and Xtra are trademarks or registered trademarks of Macromedia, Inc. in the United States and/or internationally.
FreeHand software is owned by Macromedia, Inc. Copyright © 1988-2001 Macromedia, Inc. All rights reserved. US Patents 5,353,396, 5,361,333, 5,434,959, 5,467,443, 5,500,927, 5,594,855 and 5,808,610. Other patents pending.
Third-Party Information
Third-party trademarks, trade names, product names, and logos contained in this publication may be the trademarks or registered trademarks of their respective owners.
This guide contains links to third-party web sites that are not under the control of Macromedia, and Macromedia is not responsible for the content on any linked site. If you access a third-party web site mentioned in this guide, then you do so at your own risk. Macromedia provides these links only as a convenience, and the inclusion of the link does not imply that Macromedia endorses or accepts any responsibility for the content on those third-party sites.
FreeHand is produced under the license of DIC to use copyrights of color-data-base derived from Sample Books. Color Database © Dainippon Ink & Chemicals, Inc. Pantone, Inc. is the copyright owner of PANTONE Color Computer Graphics and Software, licensed to Macromedia, Inc. to distribute for use only in combination with FreeHand. PANTONE Color Computer Graphics and Software shall not be copied onto another diskette or into memory unless as part of the execution of FreeHand. PANTONE® Computer Video simulations used in this product may not match PANTONE-identified solid color standards. Use current PANTONE Color Reference Manuals for accurate color. © Pantone, Inc., 1986, 1988. PANTONE and HEXACHROME are registered trademarks of Pantone, Inc. The Proximity/Merriam-Webster Hyphenation System® © 1983, 1990 Merriam-Webster, © 1983, 1990. All rights reserved. Proximity Technology Inc. GIF-LZW licensed under U.S. Patent No. 4,558,302 and foreign counterparts. Kodak Digital Science and the DS monogram symbol are trademarks of Eastman Kodak Company and are used with permission. Stone is a trademark of International Typeface Corporation and is used by Stone Type Foundry Inc., under agreement with ITC. © 1991, 1992, 1993 Stone Type Foundry, Inc., Palo Alto, California. Trumatch 4-Color Selector © 1992 Trumatch Inc. Additional fonts supplied by Font Bureau, Inc., Boston, Massachusetts. Adobe, Adobe Type Manager, Illustrator, and Photoshop are trademarks of Adobe Systems Incorporated. CorelDRAW is a registered trademark of Corel Corporation or Corel Corporation Limited in Canada, the United States and/or other countries. Java and all Java-based marks are trademarks or registered trademarks of Sun Microsystems, Inc. in the U.S. and other countries. This software is based in part on the work of the Independent JPEG Group. The Graphics Interchange Format is Copyright © CompuServe Incorporated. GIF is a Service Mark and the property of CompuServe Incorporated. Portions Copyright © 1988-1992 Sam Leffler. Portions Copyright © 1991, 1992 Silicon Graphics. Images © 1999 PhotoDisc, Inc. URW is a trademark of URW++GmbH, Poppenbutteler Bogen 29A, D-22399 Hamburg, Germany, Phone 49 (40) 60 60 50, Fax 49 (40) 60 60 51 11. Png2pnm.c Copyright © 1999 By Willem van Schaik. Permission to use, copy, modify and distribute png2pnm.c and its documents for any purpose without fee. Access Softek Software Copyright © 1994 Access Softek. Focoltone Software provided by Focoltone International Ltd.
Apple Disclaimer
APPLE COMPUTER, INC. MAKES NO WARRANTIES, EITHER EXPRESS OR IMPLIED, REGARDING THE ENCLOSED COMPUTER SOFTWARE PACKAGE, ITS MERCHANTABILITY OR ITS FITNESS FOR ANY PARTICULAR PURPOSE. THE EXCLUSION OF IMPLIED WARRANTIES IS NOT PERMITTED BY SOME STATES. THE ABOVE EXCLUSION MAY NOT APPLY TO YOU. THIS WARRANTY PROVIDES YOU WITH SPECIFIC LEGAL RIGHTS. THERE MAY BE OTHER RIGHTS THAT YOU MAY HAVE WHICH VARY FROM STATE TO STATE.
Apple, the Apple Logo, Macintosh, Power Macintosh, Mac OS, and LaserWriter are registered trademarks of Apple Computer, Inc. Clipart Copyright © 1984-1995 Broderbund Software, Inc. ClickArt, T/Maker, and Broderbund are registered trademarks of Broderbund Software, Inc. All Rights Reserved.
2
T/Maker ClickArt License Agreement
United States copyright law and international copyright treaties protect these ClickArt images (“The Images”) but you may copy The Images in their present or modified form and incorporate them into another work for your own internal use. The Images may not be distributed as part of any software product or as part of an electronic document or collection of documents except as specified in the following: You are permitted to use The Images as part of an electronic product or collection of electronic products provided that the recipient of such document is not able to extract or otherwise access any file containing The Images. Without limiting the generality of the preceding sentence, you may not (a) make any copies of any Image files for download, distribution or resale via electronic, magnetic, optical or similar media; (b) embed native format Image data in any electronic document; or (c) include any Images in any software product or its documentation developed for resale without special written permission from Broderbund.
If you use The Images on any electronic page accessible through the internet, the world wide web, or other electronic services, and such use: (a) includes more than five (5) Images per page; or (b) includes more than twenty (20) Images per document; or (c) represents more than one-third of a standard 640x480 pixel screen, then you must also include an intellectual property notice and an electronic link to the ClickArt homepage. Call (415) 382-3135 or write Broderbund for detailed instructions and assistance.
T/Maker gives you permission to incorporate and distribute duplicate or modified Images as an incidental part of any non-electronic product or collection of products that are distributed commercially (i.e., distributed for profit, such as a newsletter), provided the use or distribution of any of The Images does not constitute a substantial portion of the value of the goods distributed commercially. For example, you may not, without written permission from T/Maker, use an Image as an art image on a T-shirt or poster manufactured for resale. You may not make any copies of any portion of The Images for distribution or resale. ClickArt, T/Maker, and Broderbund are registered trademarks of Broderbund Software, Inc.
Any implied warranties with respect to The Images, The Fonts, or compact disc or CD ROM, including implied warranties of merchantability, fitness for a particular purpose, and noninfringement of third party rights, are specifically disclaimed. Neither Macromedia, Broderbund, URW nor anyone else involved in the creation, production, delivery or licensing of The Images and The Fonts makes any warranty or representation of any kind, express or implied, with respect to The Images and The Fonts or their quality, reliability, or performance, or their merchantability or fitness for any particular purposes. The Images and The Fonts are licensed “as is.” You assume the entire risk as to the quality, reliability, and performance of The Images. If The Images or The Fonts prove defective, you, and not Macromedia, Broderbund, URW or anyone else involved in the creation, production, delivery, or licensing of The Images and The Fonts, must assume the entire cost of all necessary corrections.
Copyright © 2001 Macromedia, Inc. All rights reserved. This manual may not be copied, photocopied, reproduced, translated, or converted to any electronic or machine-readable form in whole or in part without prior written approval of Macromedia, Inc. Part Number ZFH10M100
Acknowledgments
Writing: Mary Burger, Stephanie Gowin, John Bennett, and Cathleen Janos
Editing: Rosana Francescato and Lisa Stanziano
Project Management: Gary White
Artwork: Aaron Begley and Noah Zilberberg
Production Management: John “Zippy” Lehnus
Production: Paul Benkman and Caroline Branch
Special thanks to Robin Collins, Margaret Dumas, Delores Highsmith, Meredith Hines, David Spells, and Erick Vera.
First Edition: March 2001
Macromedia, Inc.
600 Townsend St.
San Francisco, CA 94103
3

4
CONTENTS
INTRODUCTION
Getting Started . . . . . . . . . . . . . . . . . . . . . . . . . . . . . . . . . 11
System requirements . . . . . . . . . . . . . . . . . . . . . . . . . . . . . . . . . . . . . . 12 Installing and starting FreeHand . . . . . . . . . . . . . . . . . . . . . . . . . . . . . 13 Resources for learning FreeHand . . . . . . . . . . . . . . . . . . . . . . . . . . . . . 14 What’s new in FreeHand 10 . . . . . . . . . . . . . . . . . . . . . . . . . . . . . . . . 16
CHAPTER 1
Tutorial . . . . . . . . . . . . . . . . . . . . . . . . . . . . . . . . . . . . . . . 19
Introduction . . . . . . . . . . . . . . . . . . . . . . . . . . . . . . . . . . . . . . . . . . . . 19 What you should know . . . . . . . . . . . . . . . . . . . . . . . . . . . . . . . . . . . . 20 View the tutorial files . . . . . . . . . . . . . . . . . . . . . . . . . . . . . . . . . . . . . 20 Create objects . . . . . . . . . . . . . . . . . . . . . . . . . . . . . . . . . . . . . . . . . . . 23 Use the Tools panel to apply different stroke and fill colors . . . . . . . . . 34 Create a blend along a path . . . . . . . . . . . . . . . . . . . . . . . . . . . . . . . . . 37 Add special effects . . . . . . . . . . . . . . . . . . . . . . . . . . . . . . . . . . . . . . . . 39 Work with objects in layers . . . . . . . . . . . . . . . . . . . . . . . . . . . . . . . . . 41 Import objects . . . . . . . . . . . . . . . . . . . . . . . . . . . . . . . . . . . . . . . . . . . 44 Work with symbols and instances . . . . . . . . . . . . . . . . . . . . . . . . . . . . 44 Use the spray brush . . . . . . . . . . . . . . . . . . . . . . . . . . . . . . . . . . . . . . . 46 Use colors and tints . . . . . . . . . . . . . . . . . . . . . . . . . . . . . . . . . . . . . . . 48 Add a contour gradient to text. . . . . . . . . . . . . . . . . . . . . . . . . . . . . . . 51 Remove pages from your document. . . . . . . . . . . . . . . . . . . . . . . . . . . 55 Use the perspective grid. . . . . . . . . . . . . . . . . . . . . . . . . . . . . . . . . . . . 56 Define the print area . . . . . . . . . . . . . . . . . . . . . . . . . . . . . . . . . . . . . . 61 Add navigation to buttons. . . . . . . . . . . . . . . . . . . . . . . . . . . . . . . . . . 62 Preview the file in the Flash Player window . . . . . . . . . . . . . . . . . . . . . 63 Export the document . . . . . . . . . . . . . . . . . . . . . . . . . . . . . . . . . . . . . 64 To learn more . . . . . . . . . . . . . . . . . . . . . . . . . . . . . . . . . . . . . . . . . . . 65
5

CHAPTER 2
FreeHand Basics . . . . . . . . . . . . . . . . . . . . . . . . . . . . . . 67
About vector graphics and bitmap images . . . . . . . . . . . . . . . . . . . . . . .67 The Document window . . . . . . . . . . . . . . . . . . . . . . . . . . . . . . . . . . . .68 Using panels . . . . . . . . . . . . . . . . . . . . . . . . . . . . . . . . . . . . . . . . . . . . .69 Inspectors . . . . . . . . . . . . . . . . . . . . . . . . . . . . . . . . . . . . . . . . . . . . . . .73 Using toolbars . . . . . . . . . . . . . . . . . . . . . . . . . . . . . . . . . . . . . . . . . . . .74 Using preferences . . . . . . . . . . . . . . . . . . . . . . . . . . . . . . . . . . . . . . . . .77 Using tooltips . . . . . . . . . . . . . . . . . . . . . . . . . . . . . . . . . . . . . . . . . . . .79 Using and managing Xtras . . . . . . . . . . . . . . . . . . . . . . . . . . . . . . . . . .79 Setting the document view . . . . . . . . . . . . . . . . . . . . . . . . . . . . . . . . . .80 Using context menus (Windows) . . . . . . . . . . . . . . . . . . . . . . . . . . . . .86 Customizing your environment. . . . . . . . . . . . . . . . . . . . . . . . . . . . . . .88
CHAPTER 3
Setting up Your Document . . . . . . . . . . . . . . . . . . . . .95
Using the Document inspector . . . . . . . . . . . . . . . . . . . . . . . . . . . . . . .96 Working with pages. . . . . . . . . . . . . . . . . . . . . . . . . . . . . . . . . . . . . . . .96 Working with master pages . . . . . . . . . . . . . . . . . . . . . . . . . . . . . . . . .104 Using the rulers. . . . . . . . . . . . . . . . . . . . . . . . . . . . . . . . . . . . . . . . . .107 Using the grid and guides . . . . . . . . . . . . . . . . . . . . . . . . . . . . . . . . . .109 Creating and opening documents . . . . . . . . . . . . . . . . . . . . . . . . . . . .112 Object Linking and Embedding (Windows) . . . . . . . . . . . . . . . . . . . .117 Importing artwork . . . . . . . . . . . . . . . . . . . . . . . . . . . . . . . . . . . . . . .117 Linking and embedding . . . . . . . . . . . . . . . . . . . . . . . . . . . . . . . . . . .122 Working with bitmap images in FreeHand . . . . . . . . . . . . . . . . . . . . .125 Handling font substitution . . . . . . . . . . . . . . . . . . . . . . . . . . . . . . . . .133 Sending mail (Windows). . . . . . . . . . . . . . . . . . . . . . . . . . . . . . . . . . .134 Using AppleScript to automate FreeHand (Macintosh) . . . . . . . . . . . .135 Working with wizards (Windows) . . . . . . . . . . . . . . . . . . . . . . . . . . . .136
6Contents

CHAPTER 4
Drawing . . . . . . . . . . . . . . . . . . . . . . . . . . . . . . . . . . . . . . 137
About vector graphics . . . . . . . . . . . . . . . . . . . . . . . . . . . . . . . . . . . . .137 Drawing rectangles, ellipses, and lines . . . . . . . . . . . . . . . . . . . . . . . . .142 Drawing polygons and stars . . . . . . . . . . . . . . . . . . . . . . . . . . . . . . . .144 Drawing spirals and arcs . . . . . . . . . . . . . . . . . . . . . . . . . . . . . . . . . . .145 Drawing freeform paths . . . . . . . . . . . . . . . . . . . . . . . . . . . . . . . . . . .147 Drawing with the Pen tool and Bezigon tool . . . . . . . . . . . . . . . . . . . .149 Editing paths. . . . . . . . . . . . . . . . . . . . . . . . . . . . . . . . . . . . . . . . . . . .152 Tracing artwork. . . . . . . . . . . . . . . . . . . . . . . . . . . . . . . . . . . . . . . . . .162 Creating charts and pictographs . . . . . . . . . . . . . . . . . . . . . . . . . . . . .165 Drawing with the Graphic Hose tool . . . . . . . . . . . . . . . . . . . . . . . . .171
CHAPTER 5
Working with Objects . . . . . . . . . . . . . . . . . . . . . . . . . 175
Undoing actions . . . . . . . . . . . . . . . . . . . . . . . . . . . . . . . . . . . . . . . . .175 Changing default attributes. . . . . . . . . . . . . . . . . . . . . . . . . . . . . . . . .176 Selecting objects . . . . . . . . . . . . . . . . . . . . . . . . . . . . . . . . . . . . . . . . .177 Moving objects . . . . . . . . . . . . . . . . . . . . . . . . . . . . . . . . . . . . . . . . . .180 Copying objects . . . . . . . . . . . . . . . . . . . . . . . . . . . . . . . . . . . . . . . . .181 Converting vector graphics to bitmap images . . . . . . . . . . . . . . . . . . .186 Grouping objects. . . . . . . . . . . . . . . . . . . . . . . . . . . . . . . . . . . . . . . . .187 Arranging objects . . . . . . . . . . . . . . . . . . . . . . . . . . . . . . . . . . . . . . . .190 Adding names and notes to objects . . . . . . . . . . . . . . . . . . . . . . . . . . .191 Making global changes . . . . . . . . . . . . . . . . . . . . . . . . . . . . . . . . . . . .191
CHAPTER 6
Transforming and Distorting Objects . . . . . . . . . . . 195
Selecting complex objects . . . . . . . . . . . . . . . . . . . . . . . . . . . . . . . . . .195 Combining paths . . . . . . . . . . . . . . . . . . . . . . . . . . . . . . . . . . . . . . . .196 Working with clipping paths . . . . . . . . . . . . . . . . . . . . . . . . . . . . . . . .203 Expanding a path . . . . . . . . . . . . . . . . . . . . . . . . . . . . . . . . . . . . . . . .205 Insetting a path . . . . . . . . . . . . . . . . . . . . . . . . . . . . . . . . . . . . . . . . . .206 Working with blends. . . . . . . . . . . . . . . . . . . . . . . . . . . . . . . . . . . . . .207 Adding special effects to objects . . . . . . . . . . . . . . . . . . . . . . . . . . . . .211 Transforming objects. . . . . . . . . . . . . . . . . . . . . . . . . . . . . . . . . . . . . .216 Distorting objects . . . . . . . . . . . . . . . . . . . . . . . . . . . . . . . . . . . . . . . .224 Creating perspective . . . . . . . . . . . . . . . . . . . . . . . . . . . . . . . . . . . . . .231
Contents 7

CHAPTER 7
Using Layers, Symbols, and Styles . . . . . . . . . . . . 237
Using layers. . . . . . . . . . . . . . . . . . . . . . . . . . . . . . . . . . . . . . . . . . . . .237 Using the Library panel. . . . . . . . . . . . . . . . . . . . . . . . . . . . . . . . . . . .246 Using styles . . . . . . . . . . . . . . . . . . . . . . . . . . . . . . . . . . . . . . . . . . . . .250
CHAPTER 8
Color, Strokes, and Fills . . . . . . . . . . . . . . . . . . . . . . 257
Spot and process colors . . . . . . . . . . . . . . . . . . . . . . . . . . . . . . . . . . . .257 Color modes . . . . . . . . . . . . . . . . . . . . . . . . . . . . . . . . . . . . . . . . . . . .258 Using the Color Mixer panel . . . . . . . . . . . . . . . . . . . . . . . . . . . . . . . .258 Using the Tints panel . . . . . . . . . . . . . . . . . . . . . . . . . . . . . . . . . . . . .261 Using the Swatches panel . . . . . . . . . . . . . . . . . . . . . . . . . . . . . . . . . .262 Editing colors . . . . . . . . . . . . . . . . . . . . . . . . . . . . . . . . . . . . . . . . . . .270 Exporting colors . . . . . . . . . . . . . . . . . . . . . . . . . . . . . . . . . . . . . . . . .273 Applying color in FreeHand . . . . . . . . . . . . . . . . . . . . . . . . . . . . . . . .274 Applying strokes . . . . . . . . . . . . . . . . . . . . . . . . . . . . . . . . . . . . . . . . .275 Applying fills. . . . . . . . . . . . . . . . . . . . . . . . . . . . . . . . . . . . . . . . . . . .287
CHAPTER 9
Color Management. . . . . . . . . . . . . . . . . . . . . . . . . . . . 301
Color management strategy. . . . . . . . . . . . . . . . . . . . . . . . . . . . . . . . .302 Calibrating monitor colors visually . . . . . . . . . . . . . . . . . . . . . . . . . . .304 Applying dithering (Macintosh) . . . . . . . . . . . . . . . . . . . . . . . . . . . . .306 Using Kodak Digital Science and Apple ColorSync CMS . . . . . . . . . .306 Managing RGB image color for selected images . . . . . . . . . . . . . . . . .311 Using color tables . . . . . . . . . . . . . . . . . . . . . . . . . . . . . . . . . . . . . . . .312
8Contents

CHAPTER 10
Using Type . . . . . . . . . . . . . . . . . . . . . . . . . . . . . . . . . . . 315
Creating text . . . . . . . . . . . . . . . . . . . . . . . . . . . . . . . . . . . . . . . . . . . .315 Working with text blocks . . . . . . . . . . . . . . . . . . . . . . . . . . . . . . . . . .316 Importing text. . . . . . . . . . . . . . . . . . . . . . . . . . . . . . . . . . . . . . . . . . .321 Selecting text. . . . . . . . . . . . . . . . . . . . . . . . . . . . . . . . . . . . . . . . . . . .322 Linking text blocks . . . . . . . . . . . . . . . . . . . . . . . . . . . . . . . . . . . . . . .323 Editing text . . . . . . . . . . . . . . . . . . . . . . . . . . . . . . . . . . . . . . . . . . . .325 About the type adjustment tools . . . . . . . . . . . . . . . . . . . . . . . . . . . . .330 Setting precise type specifications . . . . . . . . . . . . . . . . . . . . . . . . . . . .332 Setting tabs, indents, and margins . . . . . . . . . . . . . . . . . . . . . . . . . . . .342 Aligning paragraphs and adding paragraph rules . . . . . . . . . . . . . . . . .350 Applying color to text and text blocks . . . . . . . . . . . . . . . . . . . . . . . . .351 Copying text attributes . . . . . . . . . . . . . . . . . . . . . . . . . . . . . . . . . . . .353 Working with columns, rows, and tables . . . . . . . . . . . . . . . . . . . . . . .353 Using paragraph styles. . . . . . . . . . . . . . . . . . . . . . . . . . . . . . . . . . . . .358 Applying text effects . . . . . . . . . . . . . . . . . . . . . . . . . . . . . . . . . . . . . .362 Converting text to paths . . . . . . . . . . . . . . . . . . . . . . . . . . . . . . . . . . .371
CHAPTER 11
Creating Web Graphics and Animation . . . . . . . . 373
Attaching URLs to objects and text. . . . . . . . . . . . . . . . . . . . . . . . . . .373 About compressing artwork for the Web . . . . . . . . . . . . . . . . . . . . . . .374 Publishing FreeHand documents as HTML . . . . . . . . . . . . . . . . . . . .375 Animating objects and text . . . . . . . . . . . . . . . . . . . . . . . . . . . . . . . . .378 Assigning Flash actions . . . . . . . . . . . . . . . . . . . . . . . . . . . . . . . . . . . .380 Exporting Flash movies . . . . . . . . . . . . . . . . . . . . . . . . . . . . . . . . . . . .381 Using the Controller or Control menu with SWF files . . . . . . . . . . . .384
Contents 9

CHAPTER 12
Printing. . . . . . . . . . . . . . . . . . . . . . . . . . . . . . . . . . . . . . .387
About choosing an output device . . . . . . . . . . . . . . . . . . . . . . . . . . . .387 Setting up to print. . . . . . . . . . . . . . . . . . . . . . . . . . . . . . . . . . . . . . . .388 Choosing a PPD . . . . . . . . . . . . . . . . . . . . . . . . . . . . . . . . . . . . . . . . .390 Using print preview. . . . . . . . . . . . . . . . . . . . . . . . . . . . . . . . . . . . . . .391 Setting PostScript prepress options . . . . . . . . . . . . . . . . . . . . . . . . . . .394 Overprinting . . . . . . . . . . . . . . . . . . . . . . . . . . . . . . . . . . . . . . . . . . . .405 Trapping . . . . . . . . . . . . . . . . . . . . . . . . . . . . . . . . . . . . . . . . . . . . . . .408 Defining a print area . . . . . . . . . . . . . . . . . . . . . . . . . . . . . . . . . . . . . .412 Printing sections of a document . . . . . . . . . . . . . . . . . . . . . . . . . . . . .413 About printing fonts . . . . . . . . . . . . . . . . . . . . . . . . . . . . . . . . . . . . . .415 Using Document Report . . . . . . . . . . . . . . . . . . . . . . . . . . . . . . . . . . .416 Preparing a document for a service bureau . . . . . . . . . . . . . . . . . . . . .418 Guidelines for faster printing. . . . . . . . . . . . . . . . . . . . . . . . . . . . . . . .419
CHAPTER 13
Saving and Exporting Files . . . . . . . . . . . . . . . . . . . . 421
Saving files . . . . . . . . . . . . . . . . . . . . . . . . . . . . . . . . . . . . . . . . . . . . .422 Adding IPTC file information. . . . . . . . . . . . . . . . . . . . . . . . . . . . . . .422 About export file formats . . . . . . . . . . . . . . . . . . . . . . . . . . . . . . . . . .423 Exporting files . . . . . . . . . . . . . . . . . . . . . . . . . . . . . . . . . . . . . . . . . . .427 Exporting vector artwork . . . . . . . . . . . . . . . . . . . . . . . . . . . . . . . . . .431 Exporting bitmap images . . . . . . . . . . . . . . . . . . . . . . . . . . . . . . . . . .434 Exporting PDF files . . . . . . . . . . . . . . . . . . . . . . . . . . . . . . . . . . . . . .440 Exporting text . . . . . . . . . . . . . . . . . . . . . . . . . . . . . . . . . . . . . . . . . . .443
APPENDIX
Troubleshooting . . . . . . . . . . . . . . . . . . . . . . . . . . . . . 445
Contacting Technical Support . . . . . . . . . . . . . . . . . . . . . . . . . . . . . . .445 Troubleshooting CorelDRAW files . . . . . . . . . . . . . . . . . . . . . . . . . . .451 Troubleshooting printing of strokes and fills . . . . . . . . . . . . . . . . . . . .454 Troubleshooting printing . . . . . . . . . . . . . . . . . . . . . . . . . . . . . . . . . .455
INDEX . . . . . . . . . . . . . . . . . . . . . . . . . . . . . . . . . . . . . . . . . 461
10 Contents
INTRODUCTION
Getting Started
. . . . . . . . . . . . . . . . . . . . . . . . . . . . . . . . . . . . . . . . . . . . . . . . . . . . . . . .
Macromedia FreeHand 10 is a vector-based drawing application. With FreeHand, you can create vector graphics that can be scaled and printed at any resolution, without losing detail or clarity.
You can use FreeHand to create print and Web graphic illustrations such as logos and advertising banners. You can also use FreeHand to turn your artwork into Flash animations.
The FreeHand user interface contains a work area and tools panel that are consistent with other Macromedia products such as Dreamweaver, Fireworks, and Flash, to give you a true integrated print and Web solution. In addition, now you can view and test your FreeHand documents in a Flash Player window without ever leaving the FreeHand environment.
11

System requirements
FreeHand runs on both Windows™ and Macintosh® operating systems. Their installers are found on separate CD-ROM disks. To install FreeHand and begin using the application, you will need the following hardware and software:
Windows
•An Intel Pentium® processor or equivalent running Microsoft® Windows 98, Windows 2000, Windows NT version 4, or Windows ME
•RAM sufficient to meet your operating system’s requirements plus 64 MB application memory
•70 MB available hard disk space
•A CD-ROM drive™
•A color monitor capable of 800-by-600-pixel resolution and 256-color display (1024 x 768 and millions of colors recommended)
•Adobe Type Manager Version 4 or later with Type 1 fonts (recommended)
•A PostScript Level 2–compatible printer or later
Macintosh
•PowerPC processor running System 8.6, 9.1, or OS X
•RAM sufficient to meet your operating system’s requirements plus 32 MB application memory
•70 MB available hard disk space
•A CD-ROM drive
•A color monitor capable of 800-by-600-pixel resolution and 256-color display (1024 x 768 and millions of colors recommended)
•Adobe Type Manager Version 4 or later with Type 1 fonts (recommended)
•A PostScript Level 2–compatible printer or later
Note: To conserve disk space, FreeHand clip art is not copied to your local hard drive during installation. The clip art is located in the Clipart folder on your FreeHand CD-ROM and can be viewed using the viewer in the FreeHand folder.
12 Introduction

Installing and starting FreeHand
This section describes how to install FreeHand on your hard disk and start the application.
Before you begin, make sure your computer meets the system requirements listed under “System requirements” on page 12. Read the Read Me document on the FreeHand CD-ROM for late-breaking information.
To install and start FreeHand in Windows:
1 Disable any virus-protection application.
2 Insert the FreeHand CD-ROM in your CD-ROM drive.
3Follow the onscreen instructions. The FreeHand installer prompts you to enter the serial number found on your registration card.
4Launch FreeHand from the Windows Start menu by selecting Start > Programs > Macromedia FreeHand 10 > FreeHand 10.
To install and start FreeHand on the Macintosh:
1 Insert the FreeHand CD-ROM in your CD-ROM drive.
2 From the Apple menu, choose Control Panels > Extensions Manager.
3Disable virus-protection extensions and restart your computer. The root folder of the CD-ROM appears on your desktop.
4 Open the FreeHand 10 folder.
5 Double-click the FreeHand 10 Installer icon to launch the FreeHand installer.
6 When the FreeHand installer screen displays, follow the onscreen instructions.
The FreeHand installer prompts you to enter the serial number found on your registration card.
Once the installation is complete, the FreeHand folder opens on your desktop.
7 If prompted, restart your computer.
Getting Started |
13 |

Uninstalling FreeHand
To uninstall FreeHand, you should use Add/Remove Programs (Windows) or the installer (Macintosh) to ensure that all FreeHand files are removed from your system.
To uninstall FreeHand in Windows:
1 Choose Start > Settings > Control Panel.
2 Double-click Add/Remove Programs.
3Select Macromedia FreeHand 10 from the list of programs that can be removed.
4 Click the Add/Remove button.
5Follow the onscreen instructions.
The uninstaller removes all FreeHand 10 program files from your system.
Note: If you try to delete FreeHand files manually, several files and registry database entries may be left on your computer.
To uninstall FreeHand on the Macintosh:
1Insert the FreeHand CD-ROM in your CD-ROM drive and launch the installer.
2From the Install screen, a pop-up menu prompts you to select an option. Select Uninstall.
3Follow the onscreen instructions.
The uninstaller removes all FreeHand application files from your computer.
Note: If you used custom installation to install FreeHand in a folder other than the default folder, you must specify the same folder when uninstalling.
Resources for learning FreeHand
The FreeHand package contains a variety of media to help you learn the program quickly and become proficient in creating your own FreeHand illustrations. The package includes a printed book, online help that appears in your Web browser, interactive lessons, and a tutorial. In addition, Macromedia provides a regularly updated Web site (www.macromedia.com/support/freehand).
14 Introduction

FreeHand lessons and tutorial
If you are new to FreeHand, or if you have used only a limited set of its features, start with the lessons. The lessons introduce you to the main features of FreeHand, letting you practice on isolated examples.
To view the lessons, choose Help > Lessons > Introduction.
The tutorial, in both the Help menu and chapter 1 of the printed manual, introduces the FreeHand workflow by showing you how to create a basic illustration. The tutorial assumes an understanding of the topics covered in the lessons.
Using FreeHand
The Using FreeHand manual contains instructions and information for using all FreeHand tools and commands. It is provided in both online help and book forms.
FreeHand Help
FreeHand Help contains all the information in Using FreeHand, but is optimized for online viewing. FreeHand Help is available any time the FreeHand application is active. For the best experience when using FreeHand Help, Macromedia strongly recommends that you use Netscape Navigator 4.0 or later or Microsoft Internet Explorer 4.0 or later (Windows). For the Macintosh, Macromedia recommends that you use Netscape Navigator 4.0 or later or Microsoft Internet Explorer 4.5 or later. For either platform your browser must contain Flash plug-ins. If you use the 3.0 version of either browser, all the content of the movies and FreeHand Help is still accessible, but some features (such as Search) will not work. Running FreeHand and FreeHand Help simultaneously on a Macintosh may require more than 64 MB of memory, depending on your browser’s memory needs.
FreeHand Support Center
The FreeHand Support Center Web site contains the latest information on FreeHand, plus tutorials, advice from expert users, examples, tips, updates, and information on advanced topics. For the latest news on FreeHand and how to get the most out of the program, check the Web site often at http:// www.macromedia.com/support/freehand.
Getting Started |
15 |

What’s new in FreeHand 10
In addition to new and improved tools and panels that enhance your work experience, FreeHand 10 offers a new array of features that allow you to move seamlessly from print to Web.
And you can now use FreeHand with other applications more smoothly and efficiently than ever.
Navigation panel
Using the Navigation panel, you can assign URL links to objects or create notes that export with your document. You can also assign Flash actions to FreeHand objects, to create interactive Flash movies that you can export as SWF files. For more information, see “Adding names and notes to objects” on page 191, “Attaching URLs to objects and text” on page 373, and “Assigning Flash actions” on page 380.
Master pages
Master pages are special nonpasteboard pages that can contain any object or graphic symbol that ordinary pages can contain except for page numbers. They provide a method of easily creating objects and setting page attributes shared by a range of pages in a document. You can change a master page at any time, and the changes you make are reflected in each child page. Master pages are saved with the document and can be imported or exported as library items. For more information on master pages, see “Working with master pages” on page 104.
Pen tool features
The enhanced Pen tool features in FreeHand 10 let you make changes to your illustration mid-path. The Pen tool, in addition to conforming with Fireworks and Flash functionality, adds compatibility with the Adobe Illustrator pen tool without changing how the tool works in FreeHand. For more information, see “Drawing with the Pen tool and Bezigon tool” on page 149.
The Pen tool includes the following functionality:
•The new Show Solid Points preference lets you display points as a solid shape for easier editing.
•New smart cursors similar to those used in Illustrator show what action will happen if you click at the Pen’s location in the drawing.
•FreeHand 10 remembers the last active end point of a path, allowing you to perform other actions and then easily return to editing the path.
16 Introduction

•You can now click on a selected path to insert a new point.
•In FreeHand 10 you can click on a point to retract its handles. If the handles are retracted, clicking on a point with the Pen deletes the point.
•You can now use the Shift key to temporarily disable certain Pen functions, allowing greater flexibility when working with multiple paths.
Enhanced tools panel
The Subselect and Hand tools are now available on the Tools panel. The icons for the Freeform, Zoom, and Line tools have changed to match those in Fireworks. For more information on these and other tools, see “FreeHand Basics” on page 67.
Brush Stroke feature
Using the Brush Stroke feature, you can now create a graphic element, save it as a symbol, then use it as a brush stroke to stretch, repeat, or stack multiple times along the length of a path. Using this feature reduces file size and eliminates excessive redraw time. For more information on the Brush Stroke feature, see “Using brush strokes” on page 279.
Library panel
Formerly known as the Symbols panel, the Library panel now stores symbols and master pages. For more information on the Library panel, see “Using the Library panel” on page 246.
Editing symbols
When you edit a symbol, FreeHand updates all instances of that symbol within your document. This functionality is particularly useful for graphics that need to be updated often. For more information on editing symbols, see “Editing symbols” on page 249.
Integration with Flash
New features in FreeHand 10 allow you to assign Flash actions to FreeHand objects, preview and test a Flash movie in FreeHand, and export a FreeHand document as a SWF file. For more information, see “Assigning Flash actions” on page 380 and “Using the Controller or Control menu with SWF files” on page 384.
Getting Started |
17 |

File Info dialog box
The File Info dialog box lets you enter optional information such as dates, file names, captions, headline slugs, author/photographer names, and copyright information. FreeHand uses the International Press Telecommunications Council (IPTC) protocol standard to store this information.
Contour gradients
With the Contour Gradient feature on the Fill inspector’s Gradient panel, you can now blend color in two dimensions (both horizontally and vertically). For more information on contour gradients, see “Applying gradient fills” on page 290.
Print area
In FreeHand 10 you can define a print area within the work space to send to your printer. You can resize or delete the new print area, which is treated as part of your document’s attributes. For more information on the print area, see “Defining a print area” on page 412.
Unsaved document indicator
In FreeHand 10, you can track the revision of your working documents. When a document needs to be saved, an asterisk (*) appears at the end of the file name in the document title bar (similar to Dreamweaver and Fireworks 4 functionality).
For more information on the unsaved document indicator, see “The Document window” on page 68.
Color boxes
The Tools panel now contains color boxes that allow you to select from an array of standard color chips or swatches. This functionality is similar to that found in Fireworks, Flash, and Dreamweaver. For more information on the color boxes, see “Color, Strokes, and Fills” on page 257.
18 Introduction

1
CHAPTER 1
Tutorial
. . . . . . . . . . . . . . . . . . . . . . . . . . . . . . . . . . . . . . . . . . . . . . . . . . . . . . . .
Introduction
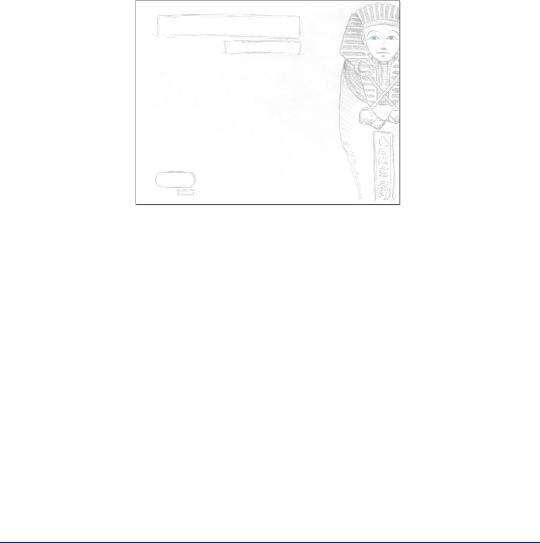
This tutorial demonstrates how to use the sophisticated illustration tools in Macromedia FreeHand 10 to create professional documents for both print and the Web. By taking the tutorial, you’ll design a document that publicizes a museum exhibit dedicated to the artifacts of ancient Egypt. When the document is complete, you’ll select an area of the pages in your document for printing. You’ll also export two pages that will comprise a Macromedia Flash movie, complete with navigation buttons.
Specifically, you will complete the following tasks:
•Create and edit vector shapes
•Import objects
•Organize objects in libraries
•Work with objects on layers
•Work with colors, including contour gradient fills
•Align objects along a path and on the perspective grid
•Select the print area for your document
•Preview the file in the Flash Playback window
•Export the file into the Flash movie format (SWF)
The tutorial takes approximately 1 1/2 hours or less to complete, depending upon your experience.
19

What you should know
Although the tutorial is designed for beginning FreeHand users, before completing it you need the basic skills covered in five lessons found in FreeHand Help. These interactive lessons cover the following topics:
•Introduction to FreeHand 10
•Working with paths
•Working with layers
•Using layers to create Flash animation
•Creating a master page
To take a lesson, choose Help > Lessons, then select from the list. To promote a greater understanding of the tutorial, be sure you’re comfortable with the concepts presented in the lessons before starting the tutorial.
View the tutorial files
Before you start to work on your own FreeHand file, view a completed version of the tutorial to understand how your completed file will appear.
1In FreeHand, choose File > Open. In your FreeHand 10 application folder, browse to the Tutorial folder and open the file named Tutorial_finished.fh10.
2The completed tutorial file contains 2 pages. To see both of the pages at once, choose Fit All from the Magnification pop-up menu.
20 Chapter 1

Pages 1 and 2 are designed to display in a Web browser; both pages include navigation buttons that link the pages to each other when the pages are exported into the Flash movie format (SWF).
3To turn from one page to another, select the desired page from the Go to Page pop-up menu.
 Go to Page pop-up menu
Note: Throughout the tutorial, you will be instructed to turn to a particular page in your FreeHand document. Use the Go to Page pop-up menu to turn to another page quickly.
4To change the page magnification, select a different magnification from the Magnification pop-up menu.
5When you finish viewing the file, you can either keep it open for reference, or close it by choosing File > Close.
If you’ve made any changes to the document, don’t save them when you close the file.
Tutorial 21
Open the starting file
1Choose File > Open. In your FreeHand 10 application folder, browse to the Tutorial folder and open Tutorial_start.fh10.
You see a partially completed version of the tutorial file that you viewed earlier. Page 1 of this file includes an artist’s sketch, which is in the background of the document. Objects that you place on the page will appear on top of the background art, and you will use the background art as a guide when placing objects. When you no longer need the background art, you will hide it.
Additionally, the file includes a guide, along one of the eyes, that will assist you in drawing.
2Choose File > Save As and save the file with a new name, in the same folder as Tutorial_start.fh10.
Making a copy of the file lets you save the results of your work while keeping the starting file intact for reuse at a later time.
Note: While completing the tutorial, you may find it useful to undo a change you’ve made. FreeHand can undo several of your recent changes, depending on the number of undo levels you have set in Preferences. To undo, chose Edit > Undo.
As you complete the tutorial, remember to save your work frequently. An asterisk in your document title bar indicates that you have modified the document but have not yet saved the changes.
22 Chapter 1
Create objects
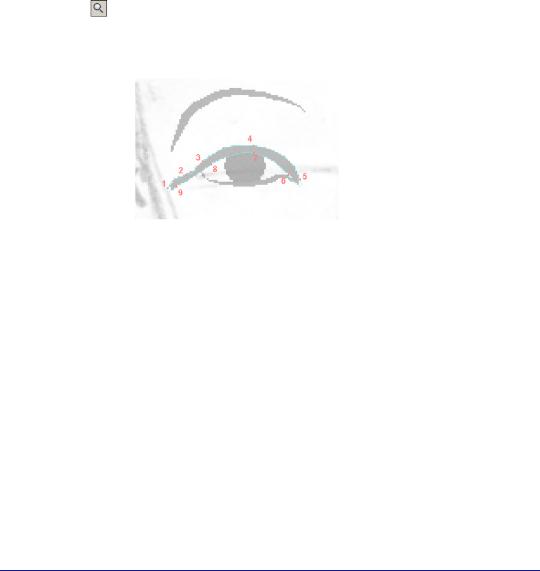
FreeHand offers a variety of tools for drawing and modifying objects. You’ll work with some of these tools now, as you create the art that completes the eye on the sarcophagus.
Zoom in on your document
Before you begin, you’ll want to zoom in on your document to have a larger area on which to draw.
1 In the Tools panel, click the Zoom tool.
2On page 1 of your FreeHand document, click the eye of the sarcophagus on the left side of the document repeatedly, until the Magnification pop-up menu indicates a magnification of 800%.
Note: You can also type a value in the Magnification text box.
Select stroke and fill colors
To specify the color of the path that you will draw, you use the Stroke inspector.
1 To open the Stroke inspector, choose Window > Inspectors > Stroke.
2 In the Stroke Type pop-up menu, verify that Basic is selected.
3 In the Stroke Width pop-up menu, select Hairline.
Tutorial 23
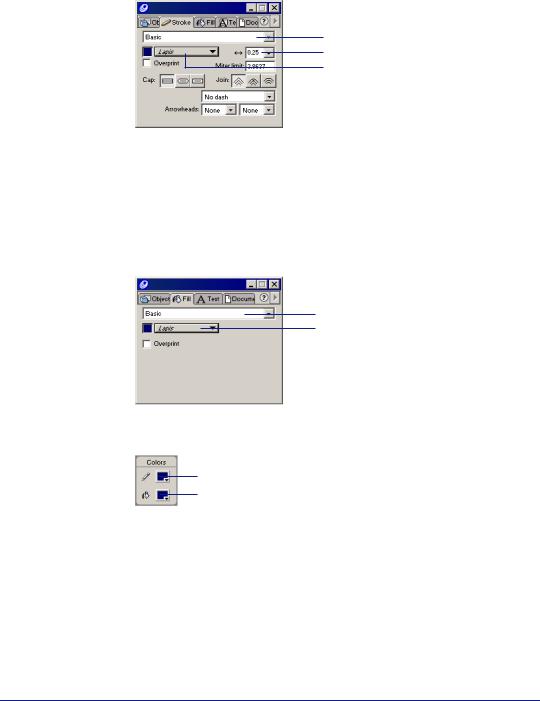
4 Click the Stoke Color pop-up menu and select Lapis.
Stroke Type pop-up menu
Stroke Width pop-up menu
Stroke Color pop-up menu
5To open the Fill inspector, choose Window > Inspectors > Fill, or click the Fill tab.
The Fill inspector lets you specify a color that appears within the boundaries of your path.
6 In the Fill Type pop-up menu, verify that Basic is selected.
7 Click the Fill Color pop-up menu and select Lapis.
Fill Type pop-up menu
Fill Color pop-up menu
The Tools panel displays the selected stroke and fill colors.
Stroke
Fill
24 Chapter 1
Draw a path with the Pen tool
With the Pen tool, you can create and modify precise paths easily. To draw a curved path with the Pen tool, you create points, then drag tangent handles to shape the curves.
The paths that you create in FreeHand are vectors, which define shapes mathematically to produce graphics that maintain their resolution and smooth lines even when enlarged.
1 In the Tools panel, click the Pen tool.
2To create the first point, click the number 1 dot on the background art, along the outside corner of the eye.
3Click the number 2 dot and continue to hold the mouse. Drag the number 2 point. As you drag, a handle appears. Drag the handle so the curved line follows the guide that outlines the eyeliner.
Tutorial 25
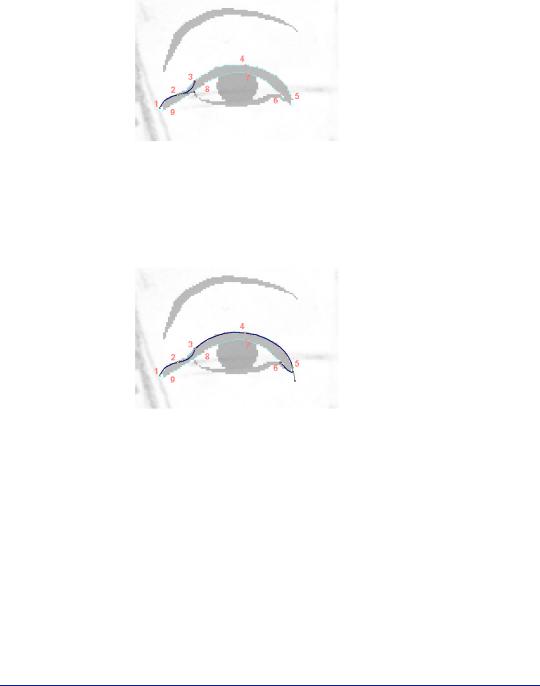
4Click the number 3 dot. The line will not follow the curve, but you will modify this line segment shortly.
5Click the number 4 dot and continue to hold the mouse. Drag the handle of the number 4 dot so the curve follows the guide.
6Click the number 5 dot and continue to hold the mouse. Drag the handle of the number 5 dot to create the next curved line.
7 Click the number 6 dot.
8Click the number 7 dot and continue to hold the mouse. Drag the handle of the number 7 dot to create another curved line that follows the guide. Repeat this step for the number 8 dot.
26 Chapter 1
9 Draw a straight line segment by clicking (without dragging) the number 9 dot.
10Position the Pen tool over the first point that you created on the number 1 dot. A small circle appears next to the pen tip when it is positioned correctly. This circle indicates that a click here will complete the path. Click the point.
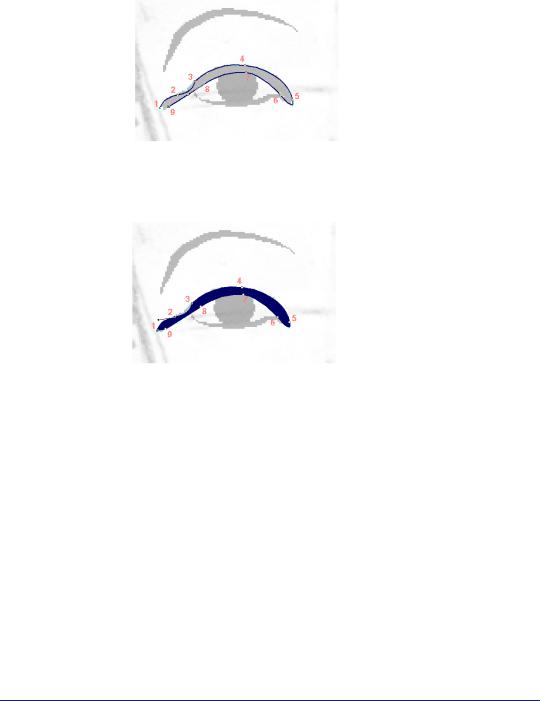
When you close the path, the fill color appears within the outline.
Modify the path
The line segment between the number 2 and 3 dots does not follow the curve. You will use the Object inspector to modify the path. The Object inspector displays the attributes of a selected object.
1In the Tools panel, click the Pointer tool. With the path on page 1 selected, click the number 2 point so that its handle appears.
2 Choose Window > Inspectors > Object.
Tutorial 27
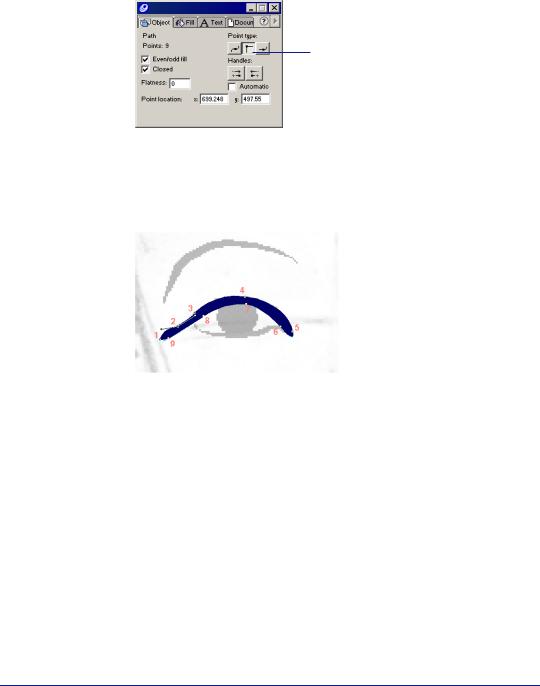
3In the Object inspector, select the Corner Point button to change the curved point to a corner point.
Corner Point button
Moving a curve point handle can affect adjacent path segments. Corner point handles move independently of each other, which lets you adjust adjacent path segments one at a time.
4 Drag the handle for the number 2 point until the line segment follows the guide.
Note: For more information about modifying your shape, refer to the steps you learned in the Working with Paths lesson (additionally, see “Reshaping a path” on page 153).
28 Chapter 1

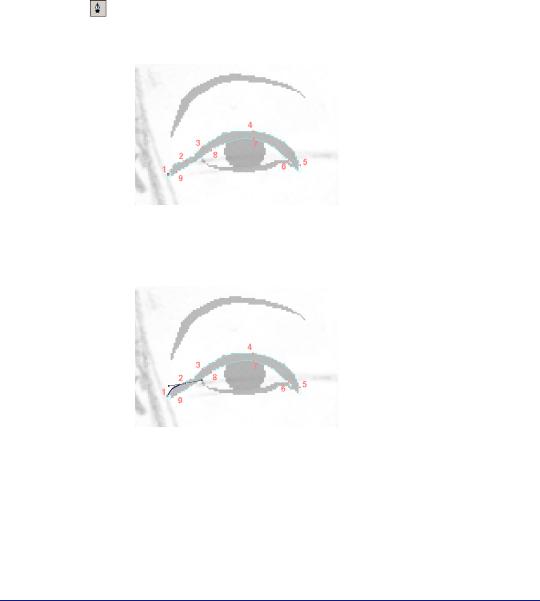
Use the Pencil tool
While the Pen tool lets you create a path by placing points, the Pencil tool lets you draw a freeform path. To compare the two tools, you will use the Pencil tool to draw another path that creates the eyeliner effect underneath the eye.
1 In the Tools panel, click the Pencil tool.
2Drag from the inner corner of the eye, along the eyeliner background art, to create another path underneath the eye, as shown in the following illustration.
Use the brush attribute
Brush strokes are an easy-to-manage attribute that you can apply to any FreeHand path to create two different effects:
•The paint effect extends a graphic symbol across the length of the path and lets you create lines that look like paintbrush strokes.
•The spray effect repeats a graphic symbol across the length of the path.
You will first add the paintbrush stroke attribute to the FreeHand line to complete the eyeliner effect. Later in the tutorial, you’ll have the opportunity to use the spray brush stroke.
1 With the pencil line selected, choose Window > Inspectors > Stroke.
2 In the Stroke inspector, choose Brush from the Stroke Type pop-up menu.
3In the Brush pop-up menu, select Eye brush.
You are using a predefined brush stroke. Later in the tutorial, you’ll learn how to create a custom brush stroke.
Tutorial 29
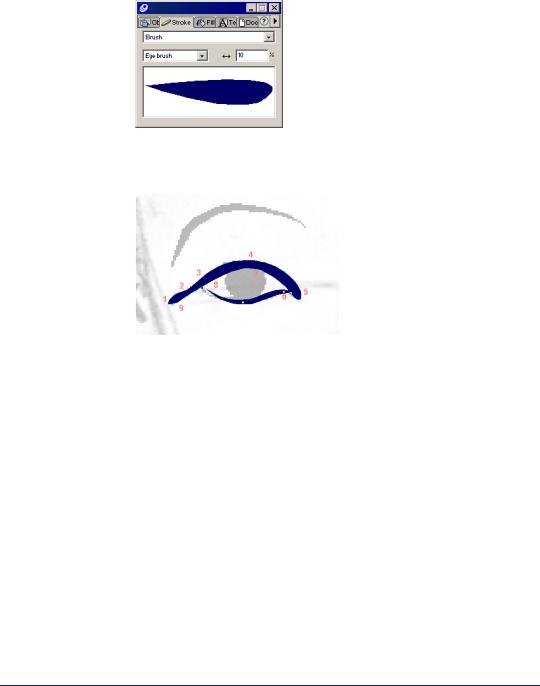
4In the Scale text box, change the percentage to 10%, and press Enter (Windows) or Return (Macintosh).
The path looks as though it has been applied with a brush; the stroke tapers at the ends.
30 Chapter 1
Loading...