

Page 1

LCI40
Signal Converter for Mass Flowmeters
®
Series
Installation and Parts
L I Q UID C O N T R O L S
An IDEX Energy & Fuels Business
LCI40 Series IOM
WWW.LCMETER.COM
LC_LCRIIE26:V1-0716
1
Page 2

PUBLICATION UPDATES AND TRANSLATIONS
The most current English versions of all Liquid
Controls publications are available on our web site,
www.lcmeter.com. It is the responsibility of the local
distributor to provide the most current version of LC
manuals, instructions, and specification sheets in the
required language of the country or the language of the
end user to which the products are shipping. If there
are questions about the language of any LC manuals,
instructions, or specification sheets, please contact
your local distributor.
The documentation is only complete when used in
combination with the relevant documentation for the
signal converter.
All rights reserved. It is prohibited to reproduce this
documentation, or any part thereof, without the prior
written authorization of Liquid Controls, LLC.
Content is subject to change without notice.
www.lcmeter.com
07/2016 LCI40
Copyright 2016 by Liquid Controls, LLC.
The documentation is only complete when used in
combination with the relevant documentation for the
signal converter.
2
WWW.LCMETER.COM
LCI40 Series IOM
Page 3

TABLE OF CONTENTS
1. SAFETY INSTRUCTIONS
1.1 Software History .............................................. 4
1.2 Intended Use ................................................... 5
1.3 Safety Instructions From The Manufacturer .... 5
2. DEVICE DESCRIPTION
2.1 Scope of Delivery ............................................6
2.2 Device Description ..........................................7
2.3 Field Housing ..................................................8
2.4 Name Plates .................................................... 9
3. INSTALLATION
3.1 General Notes on Installation ........................ 10
3.2 Storage .......................................................... 10
3.3 Transport .......................................................10
3.4 Installation Specifications ..............................10
4. ELECTRICAL CONNECTIONS
4.9 Electrical Connection of the
Inputs and Outputs ........................................24
4.10 Description of the Inputs and Outputs ........ 25
5. START-UP
5.1 Switching on the Power ................................34
5.2 Starting the Signal Converter ........................ 34
6.OPERATION
6.1 Display and Operating Elements ................... 35
6.2 Zero Calibration (Menu C1.1.1) .....................40
6.3 Menu Structure .............................................. 42
6.4 Function Tables .............................................45
6.5 Description of Functions ...............................65
6.6 Status Messages and
Diagnostic Information ..................................79
3.5 Mounting of the Compact Version ................10
3.6 Mounting the Field Housing, Remote Version ..11
4. ELECTRICAL CONNECTIONS
4.1 Safety Instructions .........................................13
4.2 Important Notes on Electrical Connection ....13
4.3 Requirements for Signal Cables
Provided by the Customer ............................13
4.4 Connecting the Signal Cables ....................... 14
4.5 Grounding the Measuring Sensor .................16
4.6 Connecting Power, All Housing VariantS....... 16
4.7 Inputs and Outputs, Overview .......................17
4.8 Description of the Inputs and Outputs .......... 21
6.7 Function Tests and Troubleshooting .............87
6.8 Diagnostic Functions .....................................89
7. SERVICE
7.1 Replacing the Signal Converter Electronics .. 90
7.2 Sensor or Drive Coil Fault..............................91
7.3 Spare Parts Availability .................................. 92
7.4 Availability of Services ................................... 92
7.5 Disposal .........................................................92
8. TECHNICAL DATA
8.1 Measuring Principle (Twin Tube) .................... 93
8.2 Technical Data ............................................... 95
LCI40 Series IOM
8.3 Dimensions and Weights ............................. 106
WWW.LCMETER.COM
3
Page 4

1. SAFETY INSTRUCTIONS
1.1 Software History
The “Electronic Revision” (ER) is consulted to
document the revision status of electronic equipment
according to NE 53 for all GDC devices. It is easy to
Changes and Effect on Compatibility
1
2-_
3-_
Downwards compatible changes and fault repair with no effect on operation (e.g. spelling
mistakes on display)
Downwards compatible hardware and/or software change of interfaces:
P PROFIBUS
F Foundation Fieldbus
M Modbus
X all interfaces
Downwards compatible hardware and/or software change of inputs and outputs:
I Current output
F, P Frequency / pulse output
S Status output
C Control input
CI Current input
X all inputs and outputs
4 Downwards compatible changes with new functions
5 Incompatible changes, i.e. electronic equipment must be changed.
see from the ER whether troubleshooting or larger
changes in the electronic equipment have taken place
and how that has affected the compatibility.
Information
In the table below, “x” is
a placeholder for possible
multi-digit alphanumeric
combinations, depending
on the available version
4
WWW.LCMETER.COM
LCI40 Series IOM
Page 5

1. SAFETY INSTRUCTIONS
1.2 Intended Use
The mass flowmeters are designed exclusively to
directly measure mass flow rates, product density and
temperature as well to indirectly measure parameters
such as the total volume and concentration of
dissolved substances as well as the volume flow rate.
DANGER
For devices used in hazardous
areas, additional safety notes
apply; please refer to the Ex
documentation.
DANGER
For devices used in hazardous
areas, additional safety notes
apply.
WARNING
If the device is not used according
to the operating conditions (refer
to chapter Technical data), the
intended protection could be
affected.
LCI40 Series IOM
WWW.LCMETER.COM
5
Page 6

1. SAFETY INSTRUCTIONS
1.3 Safety Instructions From The Manufacturer
1.3.1 Disclaimer
The manufacturer will not be liable for any damage
of any kind by using its product, including, but
not limited to direct, indirect ,or incidental and
consequential damages.
This disclaimer does not apply in case the manufacturer
has acted on purpose or with gross negligence. In the
event any applicable law does not allow such limitations
on implied warranties or the exclusion of limitation of
certain damages, you may, if such law applies to you,
not be subject to some or all of the above disclaimer,
exclusions, or limitations.
Any product purchased from the manufacturer is
warranted in accordance with the relevant product
documentation and our Terms and Conditions of Sale.
The manufacturer reserves the right to alter the content
of its documents, including this disclaimer in any way,
at any time, for any reason, without prior notification,
and will not be liable in any way for possible
consequences of such changes.
Liquid Controls disclaims all liability for damage to
meter or accessories because of corrosion, saltingout of product, or separation of chemicals, whether
occurring during periods of use or storage.
1.3.2 Product Liability and Warranty
The operator shall bear responsibility for the suitability
of the device for the specific purpose.
The manufacturer accepts no liability for the
consequences of misuse by the operator. Improper
installation and operation of the devices (systems)
will cause the warranty to be void. The respective
“Standard Terms and Conditions” which form the basis
for the sales contract shall also apply.
1.3.3 Information Concerning the
Documentation
To prevent any injury to the user or damage to the
device it is essential that you read the information
in this document and observe applicable national
standards, safety requirements and accident prevention
regulations.
If this document is not in your native language and if
you have any problems understanding the text, we
advise you to contact your local office for assistance.
The manufacturer can not accept responsibility for any
damage or injury caused by misunderstanding of the
information in this document.
This document is provided to help you establish
operating conditions, which will permit safe and
efficient use of this device. Special considerations and
precautions are also described in the document, which
appear in the form of icons on page 16.
6
WWW.LCMETER.COM
LCI40 Series IOM
Page 7

1. SAFETY INSTRUCTIONS
1.3 Safety Instructions From The Manufacturer
1.3.4 Warning
Be Prepared
• Before using this product, read and understand the
instructions.
• All work must be performed by qualified personnel
trained in the proper application, installation, and
maintenance of equipment and/or systems in
accordance with all applicable codes and ordinances.
• When handling electronic components and boards,
always use proper Electrostatic Discharge (ESD)
equipment and follow the proper procedures
• Make sure that all necessary safety precautions have
been taken.
• Provide for proper ventilation, temperature control,
fire prevention, evacuation, and fire management.
• Provide easy access to the appropriate fire
extinguishers for your product.
• Consult with your local fire department, state, and
local codes to ensure adequate preparation.
• Read this manual as well as all the literature provided
in your owner’s packet.
1.3.5 Notice
This manual provides warnings and procedures that
are intended to inform the owner and/or operator of the
hazards present when using the Liquid Controls Meter
on LP-Gas and other products. The reading of thee
warnings and the avoidance of such hazards is strictly
in the hands of the owner-operators of the equipment.
Neglect of that responsibility is not within the control of
the manufacturer of the meter.
1.3.6 Publication Updates and Translations
The most current English version of all Liquid Controls
publications are available on our Web site, www.
lcmeter.com. It is the responsibility of the local
distributor to provide the most current version of Liquid
Control manuals, instructions, and specification sheets
in the required language of the country or the language
of the end user to which the products are shipping. If
there are questions about the language of any Liquid
Controls manuals, instructions, or specification sheets,
please contact you local distributor.
• Save these instructions for future reference.
• Failure to follow the instructions set forth in this
publication could result in property damage, personal
injury, or death from fire and/or explosion, or other
hazards that may be associated with this type of
equipment.
Safely Evacuate Piping System
Before disassembly of any meter or accessory
component:
• All internal pressures must be relieved and all liquid
drained from the system in accordance with all
applicable procedures.
• Pressure must be 0 (zero) psi.
• Close all liquid and vapor lines between the meter
and liquid source.
For Safety Rules, refer to local authorities and relevant
NFPA Codes.
Failure to follow this warning could result in
property damage, personal injury, or death from
fire and/or explosion, or other hazards that may be
associated with this type of equipment.
LCI40 Series IOM
WWW.LCMETER.COM
7
Page 8

2. DEVICE DESCRIPTION
2.1 Scope of Delivery
Scope of Delivery
1. Device in the version as ordered
2. Documentation
3. Signal cable (only for remote
version)
Signal Converter / Measuring Sensor Combination Possibilities
Measuring Sensor Signal Converter LCI40
LCMass
LCMass
Compact Remote Field Housing
®
100 LCMass® 140 C LCMass® 140 F
®
600 LCMass® 640 C LCMass® 640 F
Information
Inspect the cartons carefully
for damages or signs of rough
handling. Report damage to the
carrier and to the local office of the
manufacturer.
Information
Look at the device nameplate to
ensure that the device is delivered
according to your order.
Check for the correct supply
voltage printed on the nameplate.
Information
Do a check of the packing list to
make sure that you have all the
elements given in the order.
8
WWW.LCMETER.COM
LCI40 Series IOM
Page 9

2. DEVICE DESCRIPTION
2.2 Device Description
The mass flowmeters are designed exclusively to
directly measure mass flow rates, product density and
temperature as well to indirectly measure parameters
such as the total volume and concentration of
dissolved substances as well as the volume flow rate.
Your measuring device is supplied ready for operation.
The factory settings for the operating data have been
made in accordance with your order specifications.
Device Versions
1. Compact version
2. Measuring sensor with connection box
3. Field housing
The following versions are available:
• Compact version (the signal converter is mounted
directly on the measuring sensor)
• Remote version (electrical connection to the
measuring sensor via field current and signal cable)
LCI40 Series IOM
WWW.LCMETER.COM
9
Page 10

2. DEVICE DESCRIPTION
2.3 Field Housing
Construction of the Field Housing
1. Cover for electronics and display
2. Cover for power supply and inputs/outputs terminal
compartment
3. Cover for measuring sensor terminal compartment
4. Cable entry for measuring sensor signal cable
5. Cable entry for measuring sensor field current cable
6. Cable entry for power supply
7. Cable entry for inputs and outputs
8. Mounting plate for pipe and wall mounting
Information
Each time a housing cover is
opened, the thread should be
cleaned and greased. Use only
resin-free and acid-free grease.
Ensure that the housing gasket
is properly fitted, clean, and
undamaged.
10
WWW.LCMETER.COM
LCI40 Series IOM
Page 11

2. DEVICE DESCRIPTION
2.4 Nameplates
2.4.1 Example of a Nameplate
➆
➅
➄
➃
➂
Example of a Nameplate
1. Approvals-related thresholds
2. Additional information on documentation, calibration and
patents
3. Protection category
4. Electrical connection data
5. Software and hardware revision (Electronics Revision), CG
number, order number for signal converter and measuring
sensor
6. Product description
7. Manufacturer and manufacturer logo
Liquid Controls LLC
Lake Bluff, IL 60044-2242
➀
➁
Information
Look at the device nameplate to
ensure that the device is delivered
according to your order.
2.4.2 Electrical Connection Data of
Inputs/Outputs (Example of Basic
Version)
• A = active mode; the signal converter supplies the
power for connection of the subsequent devices
• P = passive mode; external power supply required
for operation of the subsequent devices
• N/C = connection terminals not connected
Example of a Nameplate for Electrical Connection Data of
Inputs and Outputs
1. Power supply (AC: L and N; DC: L+ and L-; PE for ≥ 24
VAC; FE for ≤ 24 VAC and DC)
2. Connection data of connection terminal D/D-
3. Connection data of connection terminal C/C-
4. Connection data of connection terminal B/B-
5. Connection data of connection terminal A/A-; A+ only
operable in the basic version
Check for the correct supply
voltage printed on the nameplate.
LCI40 Series IOM
WWW.LCMETER.COM
11
Page 12

3. INSTALLATION
3.1 General Notes on Installation
Information
Inspect the cartons carefully
for damages or signs of rough
handling. Report damage to the
carrier and to the local office of the
manufacturer.
Information
Do a check of the packing list to
make sure that you have all the
elements given in the order.
3.2 Storage
• Store the device in a dry, dust-free location.
• Avoid continuous direct sunlight.
3.3 Transport
Signal Converter
Compact Version
Information
Look at the device nameplate to
ensure that the device is delivered
according to your order.
Check for the correct supply
voltage printed on the nameplate.
• Store the device in its original packing.
• Storage temperature: -58°F to +158°F / -50°C to +70°C
• No special requirements.
• Do not lift the device by the signal converter housing.
• Do not use lifting chains.
• To transport flange devices, use lifting straps. Wrap
these around both process connections.
3.4 Installation Specifications
Information
The following precautions must be taken to ensure reliable installation.
• Makesurethatthereisadequatespacetothesides.
• Protectthesignalconverterfromdirectsunlightandinstallasunshadeifnecessary.
• Signalconvertersinstalledincontrolcabinetsrequireadequatecooling,e.g.byfanorheat
exchanger.
• Donotexposethesignalconvertertointensevibrations.Themeasuringdevicesaretestedfor
a vibration level in accordance with IEC 68-2-64.
12
WWW.LCMETER.COM
LCI40 Series IOM
Page 13

3. INSTALLATION
3.5 Mounting of the Compact Version
Information
The signal converter is mounted directly on the measuring sensor. For installation of the
flowmeter, please observe the instructions in the supplied product documentation for the
measuring sensor.
3.6 Mounting the Field Housing, Remote Version
3.6.1 Pipe Mounting
Pipe Mounting of the Field Housing
1. Fix the signal converter to the pipe.
2. Fasten the signal converter using standard U-bolts
and washers.
3. Tighten the nuts.
Information
3.6.2 Wall Mounting
Wall Mounting of the Field Housing
1. Prepare the holes with the aid of the mounting plate. For
further information refer to Mounting plate, field housing
on page 133.
2. Use the mounting material and tools in compliance with
the applicable occupational health and safety directives.
3. Fasten the housing securely to the wall.
Assembly materials and tools are
not part of the delivery. Use the
assembly materials and tools in
compliance with the applicable
occupational health and safety
directives.
LCI40 Series IOM
Mounting Multiple Devices Next to Each Other
a ≥ 23.6” / 600 mm
b ≥ 9.8” / 250 mm
WWW.LCMETER.COM
13
Page 14
3. INSTALLATION
3.6 Mounting the Field Housing, Remote Version
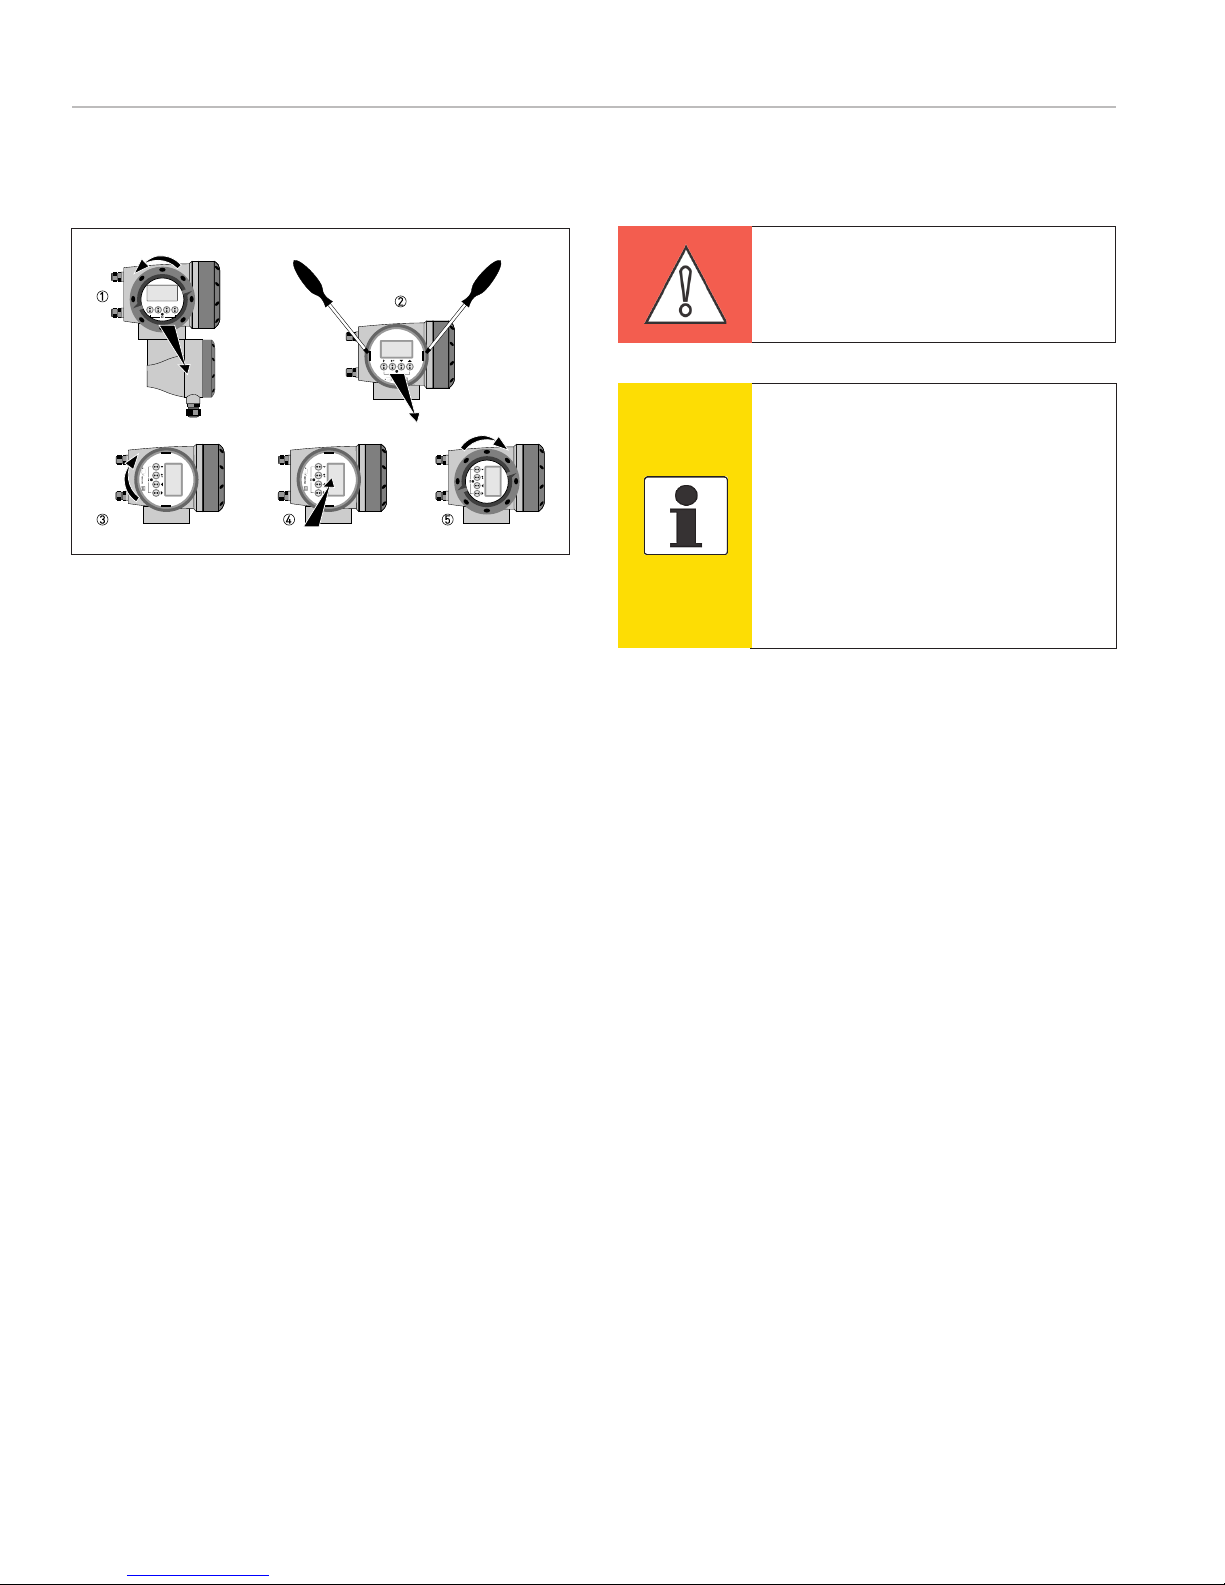
3.6.3 Turning the Display of the Field Housing Version
Turning the Display of the Field Housing
Version
The display of the field housing version can be turned
in 90° increments.
CAUTION
The ribbon cable of the display must
not be folded or twisted repeatedly.
Information
Each time a housing cover is
opened, the thread should be
cleaned and greased. Use only
resin-free and acid-free grease.
Ensure that the housing gasket
is properly fitted, clean and
undamaged.
1. Unscrew the cover from the display and operation
control unit.
2, Using a suitable tool, pull out the two metal puller
devices to the left and right of the display.
3. Pull out the display between the two metal puller
devices and rotate it to the required position.
4. Slide the display and then the metal puller devices
back into the housing.
5. Re-fit the cover and tighten it by hand.
14
WWW.LCMETER.COM
LCI40 Series IOM
Page 15

4. ELECTRICAL CONNECTIONS
4.1 Safety Instructions
DANGER All work on the electrical
connections may only be carried out with
the power disconnected. Take note of the
voltage data on the nameplate!
DANGER Observe the national regulations
for electrical installations!
DANGER For devices used in hazardous
areas, additional safety notes apply; please
refer to the Ex documentation.
4.2 Important Notes on Electrical Connection
DANGER Electrical connection is carried
out in conformity with the VDE 0100
directive “Regulations for electrical power
installations with line voltages up to 1000 V”
or equivalent national regulations.
DANGER Observe without fail the local
occupational health and safety regulations.
Any work done on the electrical components
of the measuring device may only be carried
out by properly trained specialists.
Information Look at the device nameplate
to ensure that the device is delivered
according to your order.
Check for the correct supply voltage printed
on the nameplate.
CAUTION
• Use suitable cable entries for the various
electrical cables.
• The measuring sensor and signal
converter have been configured together
at the factory. For this reason, please
connect the devices in pairs.
4.3 Requirements for Signal Cables Provided by the Customer
Specifications for Standard Signal Cables
• 5 twisted pair circuits (24 AWG)
• Insulation thickness of cables: ≥ 0.008” / 0.2 mm)
• Each cable pair shielded with foil and drain wire
• Overall foil/braid shield
• Casing color: grey
• Color of wires:
Pair 1: yellow/black
Pair 2: green/black
Pair 3: blue/black
Pair 4: red/black
Pair 5: white/black
• Test voltage: ≥ 100 VAC
• Temperature range: -40°F to +185°F / -40°C to +85°C
• Capacity between cables: ≤ 41 pF/m
Specifications for Cables in Hazardous Areas
• 5 twisted pair circuits (24 AWG)
• Insulation thickness of cables: ≥ 0.008” / 0.2 mm)
• Each cable pair shielded with foil and drain wire
• Overall foil/braid shield
• Casing color: blue
• Color of wires:
Pair 1: yellow/black
Pair 2: green/black
Pair 3: blue/black
Pair 4: red/black
Pair 5: white/black
• Test voltage: ≥ 100 VAC
• Temperature range: -40 to +85°C / -40 to +185°F
• Capacity between cables: ≤ 41 pF/m
• Capacity compared to shielding: ≤ 73 pF/m
• Inductance: ≤ 0.8 μH/m
LCI40 Series IOM
• Capacity compared to shielding: ≤ 73 pF/m
• Inductance: ≤ 0.8 μH/m
WWW.LCMETER.COM
15
Page 16

4. ELECTRICAL CONNECTIONS
4.4 Connecting the Signal Cables
DANGER Cables may only be connected
when the power is switched off.
DANGER The device must be grounded
in accordance with regulations in order to
protect personnel against electric shocks.
DANGER For devices used in hazardous
areas, additional safety notes apply; please
refer to the Ex documentation.
WARNING Observe without fail the local
occupational health and safety regulations.
Any work done on the electrical components
of the measuring device may only be carried
out by properly trained specialists.
Information
Each time a housing cover is
opened, the thread should be
cleaned and greased. Use only
resin-free and acid-free grease.
Ensure that the housing gasket
is properly fitted, clean and
undamaged.
4.4.1 Connection of Signal Cable - Field Housing and
Connection Box for Sensor
Connection of Signal Cable - Field Housing and Connection
Box for Sensor
1. Unscrew the terminal compartment cover.
2. Pass the prepared signal cable through the cable entry.
3. Secure the signal cable using the clip.
4. Connect the electrical conductors as shown. The shielding
must also be connected to the spring terminal.
5. Re-fit the cover and tighten it by hand.
Cable Cable
Cable Pair Color
1 yellow X1 SA+
1 black X1 SA-
2 green X1 SB+
2 black X1 SB-
3 blue X2 T1
3 black X2 T2
4 red X2 T3
4 black X2 T4
5 white X3 DR+
5 black X3 DR-
Connection Terminal
16
WWW.LCMETER.COM
LCI40 Series IOM
Page 17

4. ELECTRICAL CONNECTIONS
4.4 Connecting the Signal Cables
4.4.2 Connection Diagram
Connection Diagram
1. Terminal compartment for signal converter
2. Terminal compartment for measuring sensor
3. Connect shielding to spring terminal (drain wire and overall shield)
Cable Cable
Cable Pair Color
1 yellow X1 SA+
1 black X1 SA-
2 green X1 SB+
2 black X1 SB-
3 blue X2 T1
3 black X2 T2
4 red X2 T3
4 black X2 T4
5 white X3 DR+
5 black X3 DR-
Connection Terminal
DANGER
The device must be grounded in
accordance with regulations in
order to protect personnel against
electric shocks.
LCI40 Series IOM
WWW.LCMETER.COM
17
Page 18

4. ELECTRICAL CONNECTIONS
4.5 Grounding the Measuring Sensor
• The measuring sensor must be properly grounded.
• The grounding cable should not transmit any
interference voltages.
• Do not use the grounding cable to connect more than
one device to ground.
• The measuring sensors are connected to ground by
means of a functional grounding conductor FE.
• In hazardous areas, grounding is used at the same
time for equipotential bonding. Additional grounding
instructions are provided in the separate “Ex
documentation”, which are only supplied together
with hazardous area equipment.
4.6 Connecting Power, All Housing Variants
• The protection category depends on the housing
versions (IP65 to 67 to IEC 529 / EN 60529 or
NEMA4/4X/6).
• The housings of the devices, which are designed
to protect the electronic equipment from dust and
moisture, should be kept well closed at all times.
Creepage distances and clearances are dimensioned
to VDE 0110 and IEC 664 for pollution severity 2.
Supply circuits are designed for overvoltage category
III and the output circuits for overvoltage category II.
• Fuse protection (IN ≤ 16 A) for the infeed power
circuit, as well as a separator (switch, circuit breaker)
to isolate the signal converter must be provided close
to the device. The separator must be marked as the
separator for this device.
DANGER
There should be no difference in
potential between the measuring
sensor and the housing or
protective earth of the signal
converter!
DANGER
The device must be grounded in
accordance with regulations in
order to protect personnel against
electric shocks.
DANGER
For devices used in hazardous
areas, additional safety notes
apply; please refer to the Ex
documentation.
18
WWW.LCMETER.COM
LCI40 Series IOM
Page 19

4. ELECTRICAL CONNECTIONS
4.6 Connecting Power, All Housing Variants
100 to 230 VAC (tolerance range: -15% / +10%)
• Note the power supply voltage and frequency (50 to
60 Hz) on the nameplate.
• The protective ground terminal PE of the power supply
must be connected to the separate Uclamp terminal in
the terminal compartment of the signal converter
24 VDC (tolerance range: -55% / +30%)
24 VAC/DC (tolerance ranges: AC: -15% /
+10%; DC: -25% / +30%)
• Note the data on the nameplate!
• For measurement process reasons, a functional
ground FE must be connected to the separate
U-clamp terminal in the terminal compartment of the
signal converter.
• When connecting to functional extra-low voltages,
provide a facility for protective separation (PELV) (acc.
to VDE 0100 / VDE 0106 and/or IEC 364 / IEC 536 or
relevant national regulations).
Information
240 VAC+5% is included in the
tolerance range.
Information
For 24 VDC, 12 VDC-10% is
included in the tolerance range.
Power Supply Connection
1. 100 to230 VAC (-15% / +10%), 22 VA
2. 24 VDC (-55% / +30%), 12 W
3. 24 VAC/DC (AC: -15% / +10%; DC: -25% / +30%), 22 VA
or 12 W
4.7 Inputs and Outputs, Overview
4.7.1 Combinations of the Inputs/Outputs (I/Os)
This signal converter is available with various input/output combinations.
Basic Version
• Has 1 current output, 1 pulse output and 2 status
outputs / limit switches.
• The pulse output can be set as status output/limit
switch and one of the status outputs as a control
input.
Ex i Version
• Depending on the task, the device can be configured
with various output modules.
• Current outputs can be active or passive.
Modular Version
• Depending on the task, the device can be configured
with various output modules.
Bus Systems
• The device allows intrinsically safe and non
intrinsically safe bus interfaces in combination with
additional modules.
• For connection and operation of bus systems, please
note the separate documentation.
Ex Option
• Optionally available also with Foundation Fieldbus
and PROFIBUS PA
LCI40 Series IOM
• For hazardous areas, all of the input/output variants
for the housing designs C and F with terminal
compartment.
WWW.LCMETER.COM
19
Page 20

4. ELECTRICAL CONNECTIONS
4.7 Inputs and Outputs, Overview
4.7.2 Description of the CG Number
The last 3 digits of the CG number (5, 6 and 7) indicate
the assignment of the terminal connections. Please
refer to the following examples.
Marking (CG Number) of the Electronics Module and Input/
Output Variants
1. ID number: 3
2. ID number: 0 = standard; 9 = special
3. Power supply option
4. Display (language versions)
5. Input/output version (I/O)
6. 1st optional module for connection terminal A
7. 2nd optional module for connection terminal B
The last 3 digits of the CG number (5, 6 and 7) indicate
the assignment of the terminal connections. Please
refer to the examples.
CG Number Examples
100 to 230 VAC & standard display;
CG 330 11 100
CG 330 11 7FK
CG 330 81 4EB
basic I/O: Ia or Ip & Sp/Cp & Sp & Pp/
S
p
100 to 230 VAC & standard display;
modular I/O: Ia & PN/SN and optional
module P
24 VDC & standard display; modular
I/O: Ia & Pa/Sa and optional module
P
p/Sp
& I
N/SN
p
& C
N
Description of Abbreviations and CG Identifier for Possible Optional Modules on Terminals A and B
Abbreviation Identifier for CG No. Description
A Active current output
I
a
B Passive current output
I
p
/ Sa C Active pulse output, frequency output, status output or limit switch (changeable)
P
a
/ S
P
p
p
G Active control input
C
a
C
p
- 8 No additional module installed
- 0 No further module possible
E Passive pulse output, frequency output, status output or limit switch (changeable)
K Passive control input
20
WWW.LCMETER.COM
LCI40 Series IOM
Page 21

4. ELECTRICAL CONNECTIONS
4.7 Inputs and Outputs, Overview
4.7.3 Fixed, Non-alterable Input/Output Versions
This signal converter is available with various input/
output combinations.
• The grey boxes in the tables denote unassigned or
unused connection terminals.
• In the table, only the final digits of the CG no. are
depicted.
• Connection terminal A+ is only operable in the basic
input/output version.
CG No. Connection Terminals
A+ A A- B B- C C- D D-
Basic I/Os (standard)
1
I
1 0 0
Ia
p
1
S
/ Cp passive 2 Sp passive Pp / Sp passive
p
PROFIBUS PA (Ex i) (option)
D 0 0
/ SN
P
D 1 0 I
D 2 0 I
active
a
passive
p
N
C
passive
p
/ SN
P
N
C
passive
p
2
2
2
PA+ PA- PA+ PA
FISCO Device FISCO Device
PA+ PA- PA+ PA
FISCO Device FISCO Device
PA+ PA- PA+ PA
FISCO Device FISCO Device
FOUNDATION Fieldbus (Ex i) (option)
E 0 0
E 1 0 I
E 2 0 Ip passive
1 Function changed by reconnecting
2 Changeable
active
a
/ SN
P
N
C
passive
p
P
/ SN
N
C
passive
p
V/D+ V/D- V/D+ V/D
FISCO Device FISCO Device
V/D+ V/D- V/D+ V/D
2
FISCO Device FISCO Device
V/D+ V/D- V/D+ V/D
2
FISCO Device FISCO Device
LCI40 Series IOM
WWW.LCMETER.COM
21
Page 22

4. ELECTRICAL CONNECTIONS
4.7 Inputs and Outputs, Overview
4.7.4 Alterable input/output versions
This signal converter is available with various input/
output combinations.
• In the table, only the final digits of the CG no. are
depicted.
• The grey boxes in the tables denote unassigned or
• Term. = (connection) terminal
unused connection terminals.
CG No. Connection Terminals
A+ A A- B B- C C- D D-
Modular IOs (option)
4 _ _ max. 2 optional modules for term. A + B Ia Pa / Sa active
8 _ _ max. 2 optional modules for term. A + B Ip Pa / Sa active
6 _ _ max. 2 optional modules for term. A + B Ia Pp / Sp passive
B _ _ max. 2 optional modules for term. A + B I
p
Pp / Sp passive
1
1
1
1
PROFIBUS PA (option)
D _ _ max. 2 optional modules for term. A + B PA+ (2) PA- (2) PA+ (1) PA- (1)
FOUNDATION Fieldbus (option)
E _ _ max. 2 optional modules for term. A + B V/D+ (2) V/D- (2) V/D+ (1) V/D- (1)
PROFIBUS DP (option)
F _ 0
1 optional module for
term. A
Termination PRxD/
TxDP(2)
RxD/
TxDN(2)
Termination NRxD/
Modbus (option)
G _ _ 2 max. 2 optional modules for term. A + B Common
3
H _ _
max. 2 optional modules for term. A + B Common
1 changeable
2 not activated bus terminator
3 activated bus terminator
TxDP(1)
Sign. B
(D1)
Sign. B
(D1)
RxD/
TxDN(1)
Sign. A
(D0)
Sign. A
(D0)
22
WWW.LCMETER.COM
LCI40 Series IOM
Page 23

4. ELECTRICAL CONNECTIONS
4.8 Description of the Inputs and Outputs
4.8.1 Current Output
• All outputs are electrically isolated from each other
and from all other circuits.
• All operating data and functions can be adjusted.
• Passive mode: external power Uext ≤ 32 VDC at I ≤
22 mA
• Active mode: load impedance RL ≤ 1 kΩ at I ≤ 22
mA; RL ≤ 450 Ω at I ≤ 22 mA for Ex i outputs
• Self-monitoring: interruption or load impedance too
high in the current output loop
• Error message possible via status output, error
indication on LCI40 display.
• Current value error detection can be adjusted. Default
setting: 3.6 mA
• Automatic range conversion via threshold or
control input. The setting range for the threshold is
between 5 and 80% of Q
(corresponding ratio from smaller to larger range of
1:20 to 1:1.25). Signaling of the active range possible
via a status output (adjustable).
• Forward / reverse flow measurement (F/R mode) is
possible.
, ± 0 to 5% hysteresis
100%
Information
The current outputs must be
connected depending on the
version! Which I/O versions and
inputs/outputs are installed in
your signal converter are indicated
on the sticker in the cover of the
terminal compartment.
Information
For further information refer to
Description of the inputs and
outputs on page 25 and refer to
technical data on page 96.
DANGER
For devices used in hazardous
areas, additional safety notes
apply.
LCI40 Series IOM
WWW.LCMETER.COM
23
Page 24

4. ELECTRICAL CONNECTIONS
4.8 Description of the Inputs and Outputs
4.8.2 Pulse and Frequency Output
• All outputs are electrically isolated from each other
and from all other circuits.
• All operating data and functions can be adjusted.
• Passive mode:
External power supply required: U
I ≤ 20 mA at f ≤ 10 kHz (over range up to f
kHz)
I ≤ 100 mA at f ≤ 100 Hz
• Active mode:
Use of the internal power supply: U
I ≤ 20 mA at f ≤ 10 kHz (over range up to f
kHz)
I ≤ 20 mA at f ≤ 100 Hz
• Scaling:
Frequency output: in pulses per time unit (e.g. 1000
pulses/s at Q
Pulse output: quantity per pulse.
• Pulse width:
Symmetric (pulse duty factor 1:1, independent of
output frequency)
Automatic (with fixed pulse width, duty factor approx.
1:1 at Q
Fixed (pulse width adjustable as required from 0.05
ms to 2 s)
• Forward / reverse flow measurement (F/R mode) is
possible.
100%
100%
) or
);
≤ 32 VDC
ext
= 24 VDC
nom
max
max
≤ 12
≤ 12
Information
Depending on the version, the
pulse and frequency outputs must
be connected passively or actively.
Which I/O version and inputs/
outputs are installed in your signal
converter are indicated on the
sticker in the cover of the terminal
compartment.
Information
For further information refer to
Description of the inputs and
outputs on page 25 and refer to
technical data on page 96.
DANGER
For devices used in hazardous
areas, additional safety notes
apply.
• All pulse and frequency outputs can also be used as
a status output / limit switch.
24
WWW.LCMETER.COM
LCI40 Series IOM
Page 25

4. ELECTRICAL CONNECTIONS
4.8 Description of the Inputs and Outputs
4.8.3 Status Output and Limit Switch
• The status outputs / limit switches are electrically
isolated from each other and from all other circuits.
• The output stages of the status outputs/limit
switches during simple active or passive operation
behave like relay contacts and can be connected
with any polarity.
• All operating data and functions can be adjusted.
• Passive mode: external power supply required:
U
≤ 32 VDC; I ≤ 100 mA
ext
• Active mode: use of the internal power supply:
U
= 24 VDC; I ≤ 20 mA
nom
• For information on the adjustable operating states
refer to Function tables on page 46.
4.8.4 Control Input
• All control inputs are electrically isolated from each
other and from all other circuits.
Information
Depending on the version, the
pulse and frequency outputs must
be connected passively or actively.
Which I/O version and inputs/
outputs are installed in your signal
converter are indicated on the
sticker in the cover of the terminal
compartment.
Information
For further information refer to
Description of the inputs and
outputs on page 25 and refer to
technical data on page 96.
• All operating data and functions can be adjusted.
• Passive mode: external power supply required:
U
≤ 32 VDC
ext
• Active mode: use of the internal power supply:
U
= 24 VDC
nom
• For information on the adjustable operating states
refer to Function tables on page 46.
DANGER
For devices used in hazardous
areas, additional safety notes
apply.
LCI40 Series IOM
WWW.LCMETER.COM
25
Page 26

4. ELECTRICAL CONNECTIONS
4.9 Electrical Connection of the Inputs and Outputs
4.9.1 Field Housing, Electrical Connection of the Inputs and Outputs
Information
Assembly materials and tools are
not part of the delivery. Use the
assembly materials and tools In
compliance with the applicable
occupational health and safety
directives.
Terminal Compartment for Inputs and Outputs in Field
Housing
1. Open the housing cover.
2. Push the prepared cable through the cable entry and
connect the necessary conductors.
3. Connect the shield if necessary.
4. Close the touch guard.
5. Close the housing cover.
4.9.2 Laying Electrical Cables Correctly
Protect Housing from Dust and Water
1. Lay the cable in a loop just before the housing.
2. Tighten the screw connection of the cable entry securely.
3. Never mount the housing with the cable entries facing
upwards.
4. Seal cable entries that are not needed with a plug.
DANGER
All work on the electrical
connections may only be carried
out with the power disconnected.
Take note of the voltage data on
the nameplate!
Information
For frequencies above 100 Hz,
shielded cables are to be used
in order to reduce effects from
electrical interferences (EMC).
Information
Each time a housing cover is
opened, the thread should be
cleaned and greased. Use only
resin-free and acid-free grease.
Ensure that the housing gasket
is properly fitted, clean and
undamaged.
26
WWW.LCMETER.COM
LCI40 Series IOM
Page 27

4. ELECTRICAL CONNECTIONS
4.10 Description of the Inputs and Outputs
4.10.1 Important Notes
• All groups are electrically isolated from each other
and from all other input and output circuits.
• Passive mode: An external power supply is
necessary to operate (activation) the subsequent
devices (U
• Active mode: The signal converter supplies the
power for operation (activation) of the subsequent
devices, observe max. operating data.
• Terminals that are not used should not have
any conductive connection to other electrically
conductive parts.
ext
).
Information
Depending on the version, the
pulse and frequency outputs must
be connected passively or actively.
Which I/O version and inputs/
outputs are installed in your signal
converter are indicated on the
sticker in the cover of the terminal
compartment.
Description of Used Abbreviations
Ia I
P
a
S
a
C
p
Pp Pulse/frequency output active or passive
Sp Status output/limit switch active or passive
Cp Control input active or passive
a
Current output active or passive
4.10.2 Description of the Electrical Symbols
Description of Symbols
mA meter. 0 to 20 mA or 4 to 20 mA and other.
RL is the internal resistance of the measuring point including the cable resistance
DC voltage source (Uext), external power supply, any connection polarity
DC voltage source (Uext), observe connection polarity according to connection diagrams
Internal DC voltage source
Controlled internal power source in the device
DANGER
For devices used in hazardous
areas, additional safety notes
apply.
Electronic or electromagnetic counter.
At frequencies above 100 Hz, shielded cables must be used to connect the counters.
Ri Internal resistance of the counter.
Button, NO contact or similar
LCI40 Series IOM
WWW.LCMETER.COM
27
Page 28

4. ELECTRICAL CONNECTIONS
4.10 Description of the Inputs and Outputs
4.10.3 Basic Inputs/Outputs
Current Output Active, Basic I/Os
• U
= 24 VDC nominal
int, nom
• I ≤ 22 mA
• RL ≤ 1 kΩ
Current Output Active I
a
Current Output Passive, Basic I/Os
• U
• U
= 24 VDC nominal
int, nom
≤ 32 VDC
ext
• I ≤ 22 mA
• U0 ≥ 1.8 V
• RL ≤ (U
- U0) / I
ext
max
Pulse/Frequency Output Passive, Basic I/Os
• U
ext
• f
max
I ≤ 100 mA
open:
I ≤ 0.05 mA at U
closed:
U
0, max
U
0, max
• f
max
I ≤ 20 mA
Open:
I ≤ 0.05 mA at U
Closed:
U
0, max
U
0, max
U
0, max
• If the following maximum load impedance RL, max is
exceeded, the load impedance RL must be reduced
accordingly by parallel connection of R:
f ≤ 100 Hz: R
f ≤ 1 kHz: R
f ≤ 10 kHz: R
• The minimum load impedance R
follows:
R
L, min
• Can also be set as a status output; for the electrical
connection refer to status output connection diagram
≤ 32 VDC
in the operating menu set to f
= 32 VDC
ext
max
= 0.2 V at I ≤ 10 mA
= 2 V at I ≤ 100 mA
in operating menu set to 100 Hz < f
= 32 VDC
ext
= 1.5 V at I ≤ 1 mA
= 2.5 V at I ≤ 10 mA
= 5.0 V at I ≤ 20 mA
= 47 kΩ
L, max
= 10 kΩ
L, max
= 1 kΩ
L, max
is calculated as
L, min
= (U
- U0) / I
ext
max
≤ 100 Hz:
≤ 10 kHz:
max
Current Output Passive I
p
CAUTION
Observe connection polarity.
28
WWW.LCMETER.COM
Pulse/Frequency Output Passive Pp
Information
Compact and field housing
versions: Shield connected via
the cable terminals in the terminal
compartment.
Any connection polarity.
LCI40 Series IOM
Page 29

4. ELECTRICAL CONNECTIONS
4.10 Description of the Inputs and Outputs
4.10.3 Basic Inputs/Outputs
Status Output / Limit Switch Passive, Basic
I/Os
• U
≤ 32 VDC
ext
• I ≤ 100 mA
• RL, max = 47 kΩ
RL, min = (U
- U0) / I
ext
max
• Open:
I ≤ 0.05 mA at U
= 32 VDC
ext
• Closed:
U0, max = 0.2 V at I ≤ 10 mA
U0, max = 2 V at I ≤ 100 mA
• The output is open when the device is de-energized.
• X stands for the connection terminals B, C or D. The
functions of the connection terminals depend on the
settings refered to in Function tables on page 68.
Control Input Passive, Basic I/Os
• 8 V ≤ Uext ≤ 32 VDC
• I
max
I
max
• Switching point for identifying “contact open or
closed”:
Contact open (off): U0 ≤ 2.5 V with I
Contact closed (on): U0 ≥ 8 V with Inom = 2.8 mA
• Can also be set as a status output; for the electrical
connection refer to status output connection diagram.
= 6.5 mA at U
= 8.2 mA at U
≤ 24 VDC
ext
≤ 32 VDC
ext
= 0.4 mA
nom
Status Output / Limit Switch Passive S
Control Input Passive C
1. Signal
p
Information
Compact and field housing
p
versions: Shield connected via
the cable terminals in the terminal
compartment.
Any connection polarity.
LCI40 Series IOM
WWW.LCMETER.COM
29
Page 30

4. ELECTRICAL CONNECTIONS
4.10 Description of the Inputs and Outputs
4.10.4 Modular Inputs/Outputs and Bus Systems
Current Output Active, Modular I/Os
• U
• I ≤ 22 mA
• RL ≤ 1 kΩ
• X designates the connection terminals A, B or C,
depending on the version of the signal converter.
Current Output Active I
int, nom
= 24 VDC
a
CAUTION
Observe connection polarity.
Information
For further information on electrical
connection refer to Description of
the inputs and outputs on page 25.
For the electrical connection of
bus systems, please refer to the
separate documentation for the
respective bus systems.
Current Output Passive, Modular I/Os
≤ 32 VDC
• U
ext
• I ≤ 22 mA
• U0 ≥ 1.8 V
• RL ≤ (U
- U0) / I
ext
max
• X designates the connection terminals A, B, or C,
depending on the version of the signal converter.
Current Output Passive I
p
30
WWW.LCMETER.COM
LCI40 Series IOM
Page 31

4. ELECTRICAL CONNECTIONS
4.10 Description of the Inputs and Outputs
4.10.4 Modular Inputs/Outputs and Bus Systems
Pulse/Frequency Output Active, Modular I/Os
• U
• f
= 24 VDC
nom
in the operating menu set to f
max
≤ 100 Hz:
max
I ≤ 20 mA
Open:
I ≤ 0.05 mA
Closed:
U
• f
= 24 V at I = 20 mA
0, nom
in operating menu set to 100 Hz < fmax ≤ 10
max
kHz:
I ≤ 20 mA
Open:
I ≤ 0.05 mA
Closed:
U
U
U
= 22.5 V at I = 1mA
0, nom
= 21.5 V at I = 10 mA
0, nom
= 19 V at I = 20 mA
0, nom
• If the following maximum load impedance RL, max is
exceeded, the load impedance RL must be reduced
accordingly by parallel connection of R:
f ≤ 100 Hz: RL, max = 47 kΩ
f ≤ 1 kHz: RL, max = 10 kΩ
f ≤ 10 kHz: RL, max = 1 kΩ
• The minimum load impedance RL, min is calculated
as follows:
RL, min = U0 / I
max
• X designates the connection terminals A, B or D,
depending on the version of the signal converter.
Pulse/Frequency Output Passive, Modular I/Os
• U
≤ 32 VDC
ext
• f
in the operating menu set to f
max
≤ 100 Hz:
max
I ≤ 100 mA
Open:
I ≤ 0.05 mA at U
= 32 VDC
ext
Closed:
U0, max = 0.2 V at I ≤ 10 mA
U0, max = 2 V at I ≤ 100 mA
• f
in operating menu set to 100 Hz < f
max
≤ 10 kHz:
max
Open:
I ≤ 0.05 mA at U
= 32 VDC
ext
Closed:
U
U
U
= 1.5 V at I ≤ 1 mA
0, max
x =2.5 V at I ≤ 10 mA
0, ma
= 5 V at I ≤ 20 mA
0, max
• If the following maximum load impedance RL, max is
exceeded, the load impedance RL must be reduced
accordingly by parallel connection of R:
f ≤ 100 Hz: RL, max = 47 kΩ
f ≤ 1 kHz: RL, max = 10 kΩ
f ≤ 10 kHz: RL, max = 1 kΩ
• The minimum load impedance RL, min is calculated
as follows:
RL, min = (U
ext
- U0) / I
max
• Can also be set as status output; refer to status
output connection diagram.
• X designates the connection terminals A, B or D,
depending on the version of the signal converter.
Pulse / Frequency Output Active P
a
Information
Compact and field housing
versions: Shield connected via
the cable terminals in the terminal
compartment.
Any connection polarity.
LCI40 Series IOM
Pulse Frequency Output Passive P
WWW.LCMETER.COM
p
31
Page 32

4. ELECTRICAL CONNECTIONS
4.10 Description of the Inputs and Outputs
4.10.4 Modular Inputs/Outputs and Bus Systems
Status Output / Limit Switch Active,
Modular I/Os
• Observe connection polarity.
• U
= 24 VDC
int
• I ≤ 20 mA
• RL ≤ 47 kΩ
Open:
I ≤ 0.05 mA
Closed:
U
= 24 V at I = 20 mA
0, nom
• X designates the connection terminals A, B or D,
depending on the version of the signal converter.
Status Output / Limit Switch Passive,
Modular I/Os
• Any connection polarity.
• U
ext
• I ≤ 100 mA
• R
L, max
• R
L, min
Open:
I ≤ 0.05 mA at U
Closed:
U
0, max
U
0, max
• The output is open when the device is de-energized.
• X designates the connection terminals A, B or D,
depending on the version of the signal converter.
= 32 VDC
= 47 kΩ
= (U
- U0) / I
ext
= 32 VDC
ext
= 0.2 V at I ≤ 10 mA
= 2 V at I ≤ 100 mA
max
Status Output / Limit Switch Active S
a
Status Output / Limit Switch Passive S
p
Information
Compact and field housing
versions: Shield connected via
the cable terminals in the terminal
compartment.
Any connection polarity.
32
WWW.LCMETER.COM
LCI40 Series IOM
Page 33

4. ELECTRICAL CONNECTIONS
4.10 Description of the Inputs and Outputs
4.10.4 Modular Inputs/Outputs and Bus Systems
Control Input Active, Modular I/Os
Control Input Passive, Modular I/Os
• U
= 24 VDC
int
• External contact open:
=22V
U
0, nom
• External contact closed:
I
= 4 mA
nom
• Switching point for identifying “contact open or
closed”:
Contact closed (on): U0 ≤ 10 V with I
Contact open (off): U0 ≥ 12 V with I
nom
= 1.9 mA
nom
= 1.9 mA
• X designates the connection terminals A or B,
depending on the version of the signal converter.
Control Input Active Ca
1. Signal
• 3V≤U
• I
max
≤ 32 VDC
ext
= 9.5mA at U
ext
≤ 24 V I
= 9.5mA at U
max
ext
V
• Switching point for identifying “contact open or
closed”:
Contact open (off): U0≤2.5 V with I
Contact closed (on): U0≥3V with I
nom
nom
= 1.9mA
= 1.9mA
• X designates the connection terminals A or B,
depending on the version of the signal converter.
Control input Passive Cp
1. Signal
CAUTION
Observe connection polarity.
≤ 32
LCI40 Series IOM
WWW.LCMETER.COM
33
Page 34

4. ELECTRICAL CONNECTIONS
4.10 Description of the Inputs and Outputs
4.10.5 Ex i Inputs/0utputs
Current Output Active, Ex i I/Os
• Observe connection polarity
• U
• I ≤ 22 mA
• RL ≤ 450Ω
• X designates the connection terminals A or C,
depending on the version of the signal converter.
int, nom
= 20 VDC
DANGER
For devices used in hazardous
areas, additional safety notes
apply.
Information
For further information on electrical
connection refer to Description of
the inputs and outputs on page 25.
Current Output Active Ia Ex i
Current Output Passive, Ex i I/Os
• Any connection polarity
• U
≤ 32 VDC
ext
• I ≤ 22 mA
• U0 ≥ 4 V
• RL ≤ (U
- U0 I / I
ext
ma
)
• X designates the connection terminals A or C,
depending on the version of the signal converter.
Current Output Passive Ip Ex i
Information
Compact and field housing
versions: Shield connected via
the cable terminals in the terminal
compartment.
Any connection polarity.
34
WWW.LCMETER.COM
LCI40 Series IOM
Page 35

4. ELECTRICAL CONNECTIONS
4.10 Description of the Inputs and Outputs
4.10.5 Ex i Inputs/0utputs
Control Input Passive, Ex i I/Os
• 5.5 V≤U
• I
max
• I
max
• Switching point for identifying “contact open or
closed”:
Contact open (off): U0 ≤ 3.5 V with I ≤ 0.5 mA
Contact closed (on): U0 ≥ 5.5 V with I ≥ 4 mA
• X designates the connection terminals B, if available.
≤ 32 VDC
ext
= 6 mA at U
ext
= 6.5 mA at U
≤ 24 V
≤32 V
ext
DANGER
For devices used in hazardous
areas, additional safety notes
apply.
Information
Switching on the power.
Control Input Passive Cp Ex i
1. Signal
LCI40 Series IOM
WWW.LCMETER.COM
35
Page 36

5. START-UP
5.1 Switching on the Power
Before connecting to power, please
check that the system has been
correctly installed.
• The device must be mechanically safe and mounted
in compliance with the regulations.
• The power connections must have been made in
compliance with the regulations.
• The electrical terminal compartments must be
secured and the covers have been screwed on.
• Check that the electrical operating data of the power
supply are correct.
5.2 Starting the Signal Converter
This includes:
Information
Switching on the power.
The measuring device, consisting of the measuring
sensor and the signal converter, is supplied
ready for operation. All operating data have been
set at the factory in accordance with your order
specifications.
When the power is switched on, a self test is carried
out. After that the device immediately begins
measuring, and the current values are displayed.
Displays in Measuring Mode (Examples for 2 or 3 Measured
Values) x, y, and z Denote the Units of the Measured Values
Displayed
It is possible to change between the two measured
value windows, the trend display, and the list with the
status messages by pressing the keys ↑ and ↓. For
possible status messages, their meaning and cause
refer to Status messages and diagnostic information on
page 78.
36
WWW.LCMETER.COM
LCI40 Series IOM
Page 37

6 OPERATION
6.1 Display and Operating Elements
Display and Operating Elements (Example: Flow Indication
with 2 Measuring Values)
1. Indicates a possible status message in the status list
2. Tag number (is only indicated if this number was entered
previously by the operator)
3. Indicates when a key has been pressed
4. 1st measured variable in large representation
5. Bargraph indication
6. Operating keys, optical and mechanical (see table below
for function and representation in text)
7. Interface to the GDC bus (not present in all signal
converter versions)
8. Infrared sensor (not present in all signal converter versions)
CAUTION
The use of a jumper is only
permitted for custody transfer
devices to block access to
parameters relevant to custody
transfer. When the jumper is
set to or removed from the
“protected” position, the signal
converter restarts to switch into the
protected or unprotected operating
mode.
Information
The switching point for the 4
optical keys is located directly
in front of the glass. It is
recommended to activate the
keys at right angles to the front.
Touching them from the side can
cause incorrect operation.
After 5 minutes of inactivity, there
is an automatic return to measuring
mode. Previously changed data is
not saved.
LCI40 Series IOM
WWW.LCMETER.COM
37
Page 38

6 OPERATION
6.1 Display and Operating Elements
Key Measuring Mode Menu Mode Submenu or
Function Mode
> Switch from measuring
mode to menu mode;
press key for 2.5 s,
“quick start” menu is then
displayed
^
↓ or ↑ Switch between display
Esc (> + ↑) - - Return to menu mode
Reset display; “Quick
Access” function
pages: measured value 1
+ 2, trend page and status
page
Access to displayed
menu, then 1st submenu
is displayed
Return to measuring mode
but prompt whether the
data should be saved
Select menu Select submenu or
Access to displayed submenu or function
Press 1 to 3 times, return
to menu mode, data saved
function
without acceptance of
data
Parameter and
Data Mode
For numerical values,
move cursor (highlighted
in blue) one position to the
right
Return to submenu or
function, data saved
Use cursor highlighted in
blue to change number,
unit, property and to move
the decimal point
Return to submenu
or function without
acceptance of data
38
WWW.LCMETER.COM
LCI40 Series IOM
Page 39

6 OPERATION
6.1 Display and Operating Elements
6.1.1 Display in Measuring Mode with 2
Or 3 Measured Values
6.1.2 Display for Selection of Submenu
and Functions, 3 Lines
Display for Selection oof Submenu and Functions, 3 Lines
1. Indicates a possible status message in the status list
2. Menu, submenu or function name
3. Number relating to 6
4. Indicates position within menu, submenu or function list
5. Next menu, submenu or function (_ _ _ signalise in this line
the end of the list)
6. Current menu, submenu or function
7. Previous menu, submenu or function (_ _ _ signalise in this
line the beginning of the list)
Example For Display In Measuring Mode With 2 Or 3
Measured Values
1. Indicates a possible status message in the status list
2. Tag number (is only indicated if this number was entered
previously by the operator)
3. 1st measured variable in large representation
4. Bargraph indication
5. Depiction with 3 measured values
LCI40 Series IOM
WWW.LCMETER.COM
39
Page 40

6 OPERATION
6.1 Display and Operating Elements
6.1.3 Display when Setting Parameters,
4 Lines
Display When Setting Parameters, 4 Lines
1. Current menu, submenu or function
2. Number relating to 7
3. Denotes factory setting
4. Denotes permissible value range
5. Permissible value range for numeric values
6. Currently set value, unit or function (when selected,
appears with white text, blue background) This is where
the data is changed.
7. Current parameter
6.1.4 Display when Previewing
Parameters, 4 Lines
Display When Previewing Parameters, 4 Lines
. Current menu, submenu or function
1
. Number relating to 6
2
. Denotes a changed parameter (simple check of changed
3
data when browsing through lists)
. Next parameter
4
. Currently set data from 6
5
. Current parameter (for selection press key >; then see
6
previous chapter)
. Factory setting of parameter
7
8. Factory setting of parameter
40
WWW.LCMETER.COM
LCI40 Series IOM
Page 41

6 OPERATION
6.1 Display and Operating Elements
6.1.5 Using an IR Interface (Option)
The optical IR interface serves as an adapter for PCbased communication with the signal converter without
opening the housing.
Information
This device is not part of the scope
of delivery.
For more information about
activation with the functions A6 or
C6.6.7.
IR Interface
1. Glass panel in front of the control and display panel
2. IR interface
3. LED lights up when IR interface is activated.
4. Suction cups
Timeout Function
Following activation of the IR interface in Fct. A6 or
C6.6.7 the interface must be properly
positioned and attached to the housing with the suction
cups within 60 seconds. If this does not
happen within the specified time period, the device
can be operated using the optical keys again. Upon
activation, the LED 3 lights up and the optical keys no
longer function.
LCI40 Series IOM
WWW.LCMETER.COM
41
Page 42

6 OPERATION
6.2 Zero Calibration (Menu C1.1.1)
Following installation, perform zero calibration prior
to commissioning the device. Finalise the installation
before performing zero calibration. Changes (pipe
system or calibration factor) made after the zero
calibration may affect the accuracy, making it
necessary to perform zero calibration again.
Observe The Following For Reliable Zero Calibration
• The measuring sensor should be completely filled
with the product at the expected process pressure
and temperature.
• The product may contain no air or gas, especially
when it comes to horizontal installations. Prior to zero
calibration, it is recommended that the product be
flushed at a high flow rate (>50%), for 2 minutes.
A) Automatic Calibration
Button Screen
> A Quick Setup Press and hold for 2.5 s, then release the key.
2 x ↓ C Setup
3 x > C1.1.1 Zero Calibration
> Calibrate Zero? Automatic
^
^ Zero Calibration+XX.XXX% Display of measured zero calibration in %.
5 x ^ Save Configuration? Yes
^ Display page
Please Wait
Countdown from 40 s
Calibrate Zero
Passed
• After flushing, re-establish zero flow by closing off the
corresponding valves.
Set zero calibration automatically or manually using
the operating controls. The converter cover must be
installed on the display for automatic calibration.
B) Manual Calibration
Button Screen Description and setting
> A Quick Setup Press and hold for 2.5 s, then release the key.
2 x ↓ C Setup
3 x > C1.1.1 Zero Calibration
>
2 x ↓ Calibrate Zero? Manual
Zero Calibration+XX.XXX%
5 x ^ Save Configuration? Yes
^ Display Page
42
Calibrate Zero? Automatic
WWW.LCMETER.COM
Display currently stored zero calibration in %.
(Warning, value can be changed!)
Possible manual entry of zero calibration.
Storing the displayed zero calibration.
LCI40 Series IOM
Page 43

6 OPERATION
6.2 Zero Calibration (Menu C1.1.1)
Zero Calibration Log (C1.1.5)
Zero calibrations are recorded in the zero calibration
log. Log information includes zero offset, temperature,
date and time. Navigate using the ↑ and ↓ keys. Exit
the menu using the ^ key.
Under certain conditions, zero calibration is not
possible and will be cancelled:
• The product is still flowing. The shut-off valves are
not closed tightly enough.
Medium Possible Solutions
Media That Tend To Evaporate Or Outgas Increase pressure.
Two-Phase Media (Slurries), That Contain Solids That May Fall
Out.
Two-Phase Media In Which The Solids Or Gas-Forming
Components Cannot Be Separated.
• There are still gas bubbles in the measuring sensor.
Remedy: Flush measuring sensor and repeat
calibration.
With some media, it may be difficult to perform zero
calibration. In such cases, there are various methods to
still achieve good zero calibration:
Only fill the measuring sensor with the carrier medium.
Fill measuring sensor with another liquid, e.g. water.
LCI40 Series IOM
WWW.LCMETER.COM
43
Page 44

6 OPERATION
6.3 Menu Structure
Measure Mode Select Menu
↵ Press > 2.5 s
A Quick Setup > ↵ A1 Language > ↵
↓ ↑ ↓ ↑ ↓ ↑ ↓ ↑ >
↓ ↑
Select Menu And/Or Submenu ↓ ↑ Select Function
A2 Tag
A3 Reset > ↵ A3.1 Reset Errors
A3.2. All Totalizers
A3.3 Totalizer 1
A3.4 Totalizer 2
A3.5 Totalizer 3
A4 Analogue Outputs A4.1 Measurement
A4.2 Unit
A4.3 Range
A4.4 Low Flow Cutoff
A4.5 Time Constant
A5 Digital Outputs A5.1 Measurement
A5.2 Pulse Value Unit
A5.3 Value p. Pulse
A5.4 Low Flow Cutoff
A6 GDC IR interface
A7 Flow Direction
A8 Zero Calibration
A9 Operation Mode
And Set Data
↓ ↑ >
44
WWW.LCMETER.COM
LCI40 Series IOM
Page 45

6 OPERATION
6.3 Menu Structure
Measure Mode Select Menu
↵
Press >2.5s
B. Test
↑ ↓ ↑
↓
↓ ↑
Select Menu And/Or Submenu ↓ ↑
> ↵ B1 Simulation > ↵
B2 Actual Values
B3 Information
> ↵
> ↵
Select Function
and Set Data
↓ ↑ >
B1.1 Mass Flow > ↵
B1.2 Volume Flow
B1.3 Density
B1.4 Temperature
B1._ Current Output X
B1._ Status Output X
B1._ Control Input X
B1._ Pulse Output X
B2.1 Operating Hours
Date and Time
B2.3 Mass Flow
B2.4 Volume Flow
B2.5 Velocity
B2.6 Density
B2.7 Temperature
B2.8 Strain 1
B2.9 Strain 2
B2.10 Tube Frequency
B2.11 Drive Level
B2.12 Sensor A Level
B2.13 Sensor B Level
2.14 2 Phase Signal
B2.15 SE PCB
Temperature
B2.16 Act. Operat.
Mode
B3.1 Status Log
B3.2 Status Details
B3.3 C Number
B3.4 Sensor Electronics
B3.6 Electronic Revision
B3.7 Sensor Revision
Change Log
↓ ↑ ↓ ↑ >
Information
Note the key function within and
between the columns.
LCI40 Series IOM
WWW.LCMETER.COM
45
Page 46

6 OPERATION
6.3 Menu Structure
Measure Mode Select Menu
↓ ↑
Select Menu And/Or Submenu ↓ ↑
↵
Press >2.5s
C .Setup
↵
↵
↵
↵
↑ ↓ ↑ ↓ ↑ ↓ ↑ >
↓
> ↵ C1 Process Input > ↵
> ↵ C2 Concentration > ↵
> ↵ C3 I/O (Inputs/
Outputs)
> ↵ C4 I/O Totalizers > ↵
> ↵ C5 I/O > ↵
> ↵ C6 Device > ↵
C1.1 Zero and Offset
C1.2 Density
C1.3 Filter
C1.4 System Control
C1.5 Diagnosis
C1.6 Information
C1.7 Flow Calibration
C1.8 Density Calib.
C1.9 Simulation
C3.1 Hardware
> ↵
C3._ Current Output X
C3._ Frequency Output X
C3._ Pulse Output X
C3._ Status Output X
C3._ Limit Switch X
C3._ Control Input X
C4.1 Totalizer 1
C4.2 Totalizer 2
C4.3 Totalizer 3
C5.1 PV is
C5.2 SV is
C5.3 TV is
C5.4 4V is
C6.1 Device Info
C6.2 Display
C6.3 1st Meas. Page
C6.4 2nd Meas. Page
C6.5 Graphic Page
C6.6 Special Functions
C6.7 Units
C6.9 Quick Setup
Select Function
And Set Data ↓
↑ >
> ↵
> ↵
> ↵
> ↵
> ↵
46
WWW.LCMETER.COM
LCI40 Series IOM
Page 47

6 OPERATION
6.4 Function Tables
6.4.1 Menu A, Quick Setup
No. Function Setting / Description
A1 Language
A1 Language Language selection depends on the device version.
A2 Tag
A2 Tag Measuring point identifier (Tag no.) appears in the LCD header (maximum 8 digits).
A3 Reset
A3 Reset
A3.1 Reset Errors Reset Errors? Select: No / Yes
A3.2 All Totalizers Reset Totalizer? Select: No / Yes (available if activated in C6.9.4)
A3.3 Totalizer 1 Reset Totalizer? Select: No / Yes (available if activated in C6.9.4)
A3.4 Totalizer 2 Reset Totalizer? Select: No / Yes (available if activated in C6.9.4)
A3.5 Totalizer 3 Reset Totalizer? Select: No / Yes (available if activated in C6.9.4)
Information
The functions for Modbus, Foundation, Fieldbus, and
PROFIBUS are described in detail in the corresponding
supplementary instructions.
Depending on the device version, not all functions are
available.
LCI40 Series IOM
WWW.LCMETER.COM
47
Page 48

6 OPERATION
6.4 Function Tables
6.4.1 Menu A, Quick Setup
No. Function Setting / Description
A4 Station Address
A4 Station Address For PROFIBUS / FF / Modbus devices.
A5 Digital Outputs
A5 Digital Outputs Valid for all pulse outputs (terminals A, B and/or D) and Totalizer 1.
A5.1 Measurement 1) Select: Volume Flow / Mass Flow / Concentration Flow 1
2) Use for all outputs? (also use this setting for Fct. A5.2 to A5.4!) Setting: No (only for pulse
output D) / Yes (for all digital outputs)
A5.2 Pulse Value Unit Selection of the unit from a list, depending on the “measurement”
A5.3 Value Per Pulse 1) Setting for pulse output D (volume or mass value per pulse)
Setting: xxx.xxx in l/s or kg/s
2) Use for all outputs? Make setting, see Fct. A5.1 above!
A5.4 Low Flow Cutoff 1) Setting for pulse output D (sets output value to “0”)
Setting: x.xxx ± x.xxx% (range: 0.0 - 20%)
(1st value = switching point / 2nd value = hysteresis), condition: 2nd value ≤ 1st value
2) Use for all outputs? Make setting, see Fct. A5.1 above!
A6 GDC IR interface
A6 GDC IR Interface After this function has been activated an optical GDC adapter can be connected to the LC
display. After 60 seconds pass without a connection being established or after the adapter
is removed, the function is exited and the optical keys are active again.
Break (exit function without connection)
Activate (the IR interface adapter and interrupt the optical keys)
A7 Flow Direction
A7 Flow Direction Forwards (according to the arrow on the measuring sensor) or backwards (in the opposite
direction to the arrow)
A8 Zero Calibration
A8 Zero Calibration Zero calibration; calibration sequence as described in Fct. C1.1.1 to 1.1.4
A9 Operation Mode
A9 Operation Mode Set the operating mode.
Setting: Measure / Stop / Standby
For detailed information refer to Operation Mode (menu A9) on page 66.
48
WWW.LCMETER.COM
LCI40 Series IOM
Page 49

6 OPERATION
6.4 Function Tables
6.4.2 Menu B, Test
No. Function Setting / Description
B1 Simulation
B1 Simulation Displayed values are simulated.
B1.1 Mass Flow Simulation of mass flow
Set value (range and units depend on measurement)
Break (exit function without simulation)
Query: start simulation?
Settings: Yes (start simulation) / No (exit function without simulation)
B1.2 Volume Flow Sequence and settings similar to B1.1, see above!
B1.3 Density
B1.4 Temperature
B1._ Current Output X Simulation X
B1._ Pulse Output X
B1._ Frequency Output X
B1._ Control Input X
B1._ Limit Switch X
B1._ Status Output X
B2 Actual Values
B2 Actual Values Display of actual values; Exit the displayed function with the ^ key.
B2.1 Operating Hours Device operating hours
B2.2 Date and Time Date and time of real time clock
B2.3 Mass Flow Current unfiltered mass flow
B2.4 Volume Flow Current unfiltered volume flow
B2.5 Velocity Current unfiltered velocity
B2.6 Density Current unfiltered density
B2.7 Temperature Current unfiltered temperature
B2.8 Strain 1 Current value for the first strain
B2.9 Strain 2 Current value for the second strain
B2.10 Tube Frequency Current vibration frequency of the measuring tube
B2.11 Drive Level Current drive level to activate vibration
B2.12 Sensor A Level Current vibration amplitude
B2.13 Sensor B Level
B2.14 2 Phase Signal 2 phase indicator value
B2.15 SE PCB Temperature Temperature of measuring sensor electronics
B2.16 Act. Operat. Mode Current operation mode
[X stands for one of the connection terminals A, B, C or D]_ stands for Fct. B1.4 to 1.7
[X stands for one of the connection terminals A, B, C or D]
Sequence and settings similar to B1.1, see above! For the pulse output the set number of
pulses are displayed once in a second!
LCI40 Series IOM
WWW.LCMETER.COM
49
Page 50

6 OPERATION
6.4 Function Tables
6.4.2 Menu B, Test, continued
No. Function Settings / Descriptions
B3 Information
B3 Information
B3.1 Status Log Log with date and time of status messages that occurred
B3.2 Status Details Details about the status messages displayed
B3.3 C Number CG number, cannot be changed (input/output version)
B3.4 Sensor Electronics Displays the version of the measuring sensor electronics
B3.5 “Bus interface” Only appears with PROFIBUS, Modbus, and FF
B3.6 Electronic Revision For presentation of LC display see Fct. B3.3 and B3.4
B3.7 Sensor Revision Revision of measuring sensor
B3.8 Change Log The check sum across all settings is displayed directly below the menu item.
Shows the changes including date, time, and check sum for all settings and parameters in
the converter, regardless of the interface (display, PROFIBUS, etc.) to be used.
6.4.3 Menu C, Setup
No. Function Settings / Descriptions
C1 Process Input
C1.1 Zero and Offset
C1.1 Zero and Offset -
C1.1.1 Zero Calibration Start zero calibration
Query: calibrate zero?
Setting:
Automatic / Factory Settings /
Manual (display last value; set new value, range: -10 - +10%) /
Break (return with ^ key)
C1.1.2 Zero Add. Offset Direct setting of zero offset
C1.1.3 Pipe Diameter Set the pipe diameter in mm to calculate flow velocity
C1.1.4 Flow Correction Defines additional correction for mass flow;
Range: -100 to +100%
C1.1.5 Zero Calibration Log Log of last zero calibration including zero point, temperature, date, and time
C1.2 Density
C1.2.1 Density Calib. Start density calibration
For detailed information refer to Density calibration (menu C1.2.1) on page
67.
C1.2.2 Density Mode Selection of density mode:
Process (return with ^ key /
Fixed (a fixed value is used for the density (e.g. standard density)) /
Referred (calculates process density based on a reference temperature) /
Standard (calculates standard density based on a reference temperature and the correction
factors)
C1.2.3 Fixed Density Value Set the fixed value (e.g. standard density) for the density.
Appears only if density mode “Fixed” has been selected in Fct. C1.2.2.
C1.2.3 Density Ref. Temp. Set the reference temperature for the reference density option
Appears only if density mode “Referred” has been selected in Fct. C1.2.2.
50
WWW.LCMETER.COM
LCI40 Series IOM
Page 51

6 OPERATION
6.4 Function Tables
6.4.3 Menu C, Setup, continued
No. Function Settings / Descriptions
C1.2 Density
C1.2.4 Ref. Density Slope
C1.2.5
C1.2.6 Standard Density k0
C1.2.7 Standard Density k1
C1.2.8 Standard Density k2
C1.2.9 Last Density Cal. Date of last density calibration
C1.3 Filter
C1.3 Filter -
C1.3.1 Flow Direction Define polarity of flow direction.
C1.3.2 Press. Supp. Time Set the pressure suppression time; range: 0.0 to 20.0 s
C1.3.3 Press. Supp. Cutoff Low flow cutoff settings for the pressure suppression; range: 0.0 to 10.0%
C1.3.4 Low Flow Cutoff Set the low flow cutoff; range: 00.0 to 10.0%
C1.4 System Control
C1.4 System Control -
C1.4.1 Function
C1.4.2 Sys. Ctrl. Condition
C1.4.3 Sys. Ctrl. Max Limit Defines the upper limit for the condition selected in C1.4.2
C1.4.4 Sys. Ctrl. Min Limit Defines the lower limit for the condition selected in C1.4.2
C1.5 Diagnosis
C1.5 Diagnosis -
C1.5.1 Max. Rec. Temp. Display of maximum recorded sensor temperature
C1.5.2 Min. Rec. Temp. Display of minimum recorded sensor temperature
C1.5.3 2 Ph. Threshold Defines the process-dependent sensitivity for 2 phase signal error message.
C1.5.4 Defines the parameter for the respective diagnostic value.
C1.5.5
C1.5.6
C1.5.7 Proc: Signal Low Selection of status signal (Failure, Out of Specification, Function Check,
C1.5.8 Proc: Signal Search Selection of status signal (Failure, Out of Specification, Function Check,
C1.5.9 Proc: Current Input Selection of status signal (Failure, Out of Specification, Function Check,
C1.5.10 Proc: 2 Phase Flow Selection of status signal (Failure, Out of Specification, Function Check,
Standard Density
Temp.
Set the slope for the reference density option
Appears only if density mode “Referred” has been selected in Fct. C1.2.2.
Appears only if density mode “Standard” has been selected in Fct. C1.2.2.
Density reference temperature to calculate standard density
Appears only if density mode “Standard” has been selected in Fct. C1.2.2.
Coefficient k0 to calculate standard density
Appears only if density mode “Standard” has been selected in Fct. C1.2.2.
Coefficient k1 to calculate standard density
Appears only if density mode “Standard” has been selected in Fct. C1.2.2.
Coefficient k2 to calculate standard density
Forwards (according to the arrow on the measuring sensor) or backwards
(in the opposite direction to the arrow)
Set the system control.
Select: Inactive (off) / Flow = 0 (flow to zero)
Set the condition for activating the system control.
Selection: density or temperature
Select:
Off (goes to zero) / Sensor Average (sensor amplitude A+B) / Sensor
Deviation / Drive Level / MT Frequency / Strain 1 / Strain 2 /2 Phase Signal
Maintenance Required and Information) for the group “Proc: Signal Low”
Maintenance Required and Information) for the group “Proc: Signal Search”
Maintenance Required and Information) for the group “Proc: Current Input”
Maintenance Required and Information) for the group “Proc: 2 Phase Flow”
LCI40 Series IOM
WWW.LCMETER.COM
51
Page 52

6 OPERATION
6.4 Function Tables
6.4.3 Menu C, Setup, continued
No. Function Settings / Descriptions
C1.5 Diagnosis
C1.5.11 Proc: System Control Selection of status signal (Failure, Out of Specification, Function Check,
Maintenance Required and Information) for the group “Proc: System
Control”
C1.5.12 Config: Totalizer Selection of status signal (Failure, Out of Specification, Function Check,
Maintenance Required and Information) for the group “Config: Totalizer”
C1.5.13 Electr: Power Failure Selection of status signal (Failure, Out of Specification, Function Check,
Maintenance Required and Information) for the group “Electr: Power
Failure”
C1.5.14 Electr: IO Connection Selection of status signal (Failure, Out of Specification, Function Check,
Maintenance Required and Information) for the group “Electr: IO
Connection”
C1.6 Information
C1.6 Information -
C1.6.1 Sensor Name Name of measuring sensor
C1.6.2 Sensor ID ID of measuring sensor
C1.6.3 Nominal Mass Flow Nominal mass flow of measuring sensor
C1.6.4 Max. Allowed Temp. Displays the maximum permitted temperature for the measuring sensor
C1.6.5 Min. Allowed Temp. Displays the minimum permitted temperature for the measuring sensor
C1.6.6 Calibration Date Date of factory calibration
C1.6.7 V No. Sensor V number of the measuring sensor
C1.6.8 Serial No. Sensor Serial number of the measuring sensor
C1.6.9 V No. Converter V number of the signal converter
C1.6.10 Sensor Electronics Displays the version of the measuring sensor electronics
C1.7 Flow Calibration
C1.7 Flow Calibration -
C1.7.1 to
1.7.25
C1.8 Density Calibration
C1.8 Density Calib. -
C1.8.1 to
1.8.8
C1.9 Simulation
C1.9 Simulation -
C1.9.1 Mass Flow As in B1.1
C1.9.2 Volume Flow As in B1.2
C1.9.3 Density As in B1.3
C1.9.4 Temperature As in B1.4
C2 Concentration
C2 Concentration See supplementary concentration manual
CF1 to CF27
DCF1 to DCF8 Displays the measuring sensor calibration coefficients for density measurement
Displays the measuring sensor calibration coefficients (not CF9 or CF10) for the flow
measurement
52
WWW.LCMETER.COM
LCI40 Series IOM
Page 53

6 OPERATION
6.4 Function Tables
6.4.3 Menu C, Setup, continued
No. Function Settings / Descriptions
C3 I/O (Inputs/Outputs)
C3.1 Hardware
C3.1 Hardware Configuration of connection terminals.
Selection depends on signal converter version.
C3.1.1 Terminal A Select:
Off (switched off) / Current Output / Frequency Output / Pulse Output / Status
Output / Limit Switch / Control Input
C3.1.2 Terminal B Select:
Off (switched off) / Current Output / Frequency Output / Pulse Output / Status
Output / Limit Switch / Control Input
C3.1.3 Terminal C Select:
Off (switched off) / Current Output / Status Output / Limit Switch
C3.1.4 Terminal D Select:
Off (switched off) / Frequency Output / Pulse Output / Status Output / Limit
Switch
C3._ Current Output X
C3._ Current Output X X stands for one of the connection terminals A, B or C_ stands for Fct. C3.2 (A) / C3.3 (B) /
C3.4 (C)
C3._.1 Range 0% - 100% Current range for the selected measurement, e.g. 4 to 20 mA, corresponds to 0 - 100%
xx.x - xx.x mA; range: 0.00 - 20 mA
(condition: 0 mA ≤ 1st value ≤ 2nd value ≤20 mA)
C3._.2 Extended Range Min. and max. limits of current values. If the current range is exceeded, the current is set to
these limits.
xx.x - xx.x mA; range: 03.5 - 21.5 mA
(Condition: 0 mA ≤ 1st value ≤ 2nd value ≤ 21.5 mA and out of current range)
C3._.3 Error Current Specify error current (default setting: 3.6 mA)
xx.x mA; range: 3 - 22 mA (condition: outside of extended range)
C3._.4 Error Condition The following error conditions can be selected:
Select:
Failure / Maintenance Required / Out Of Specification (error category [S])
C3._.5 Measurement Measurements for activating the output
Select:
Volume Flow / Mass Flow / Temperature / Density / Velocity / Sensor
Average / Sensor Deviation / Drive Level / Tube Frequency / Strain 1 /
Strain 2 / 2 Phase Signal
Depending on the settings for the concentration measurement, the following measurements
are possible:
Concentration 1 / Concentration 2 / Conc. mass flow 1 / Conc. mass flow 2 /
Conc. volume flow 1 / Conc. volume flow 2
C3._.6 Range 0 - 100% of the measurement set in Fct. C3._.5
x.xx - xx.xx _ _ _ (format and unit depend on the “measurement”, see above)
LCI40 Series IOM
WWW.LCMETER.COM
53
Page 54

6 OPERATION
6.4 Function Tables
6.4.3 Menu C, Setup, continued
No. Function Settings / Descriptions
C3._ Current Output X
C3._.7 Polarity Set polarity; the flow direction in C1.3.2 must be noted!
Select:
Both Polarities (plus and minus values are displayed) /
Positive Polarity (display for negative values = 0) /
Negative Polarity (display for positive values = 0) /
Absolute Value (always displays positive, with both negative and positive values)
C3._.8 Limitation Limitation before applying the time constant
±xxx - ±xxx%; range: -150 - +150%
C3._.9 Low Flow Cutoff Sets the measurement to “0” for low values
x.xxx±x.xxx%; range: 0.0 - 20%
(1st value = switching point / 2nd value = hysteresis), condition: 2nd value≤1st value
C3._.10 Time Constant Range: 000.1 - 100 s
C3._.11 Special Function Automatic Range;
Select:
Off (switched off) /
Automatic Range (range is changed automatically, extended lower range, only makes sense
in combination with a status output) /
External Range (change by control input, extended lower range; control input must also be
activated)
C3._.12 Threshold Appears only when Fct. C3._.11 “Threshold” is activated between extended and normal
range. The automatic range function always changes from the extended to the normal
range when the 100% current is reached.
The upper 100% value of the hysteresis is then = 0. The threshold is then the hysteresis
value, instead of “Threshold ±Hysteresis” as shown in the display.
Range: 5.0 - 80%
(1st value = switching point / 2nd value = hysteresis), condition: 2nd value≤1st value
C3._.13 Information Serial no. of the I/O board, software version no. and production date of the circuit board
C3._.14 Simulation Sequence see B1._ current output X
C3._.15 4mA Trimming Trimming of the current at 4 mA
Reset to 4 mA restores the factory calibration.
C3._.16 20mA Trimming Trimming of the current at 20 mA
Reset to 20 mA restores the factory calibration.
54
WWW.LCMETER.COM
LCI40 Series IOM
Page 55

6 OPERATION
6.4 Function Tables
6.4.3 Menu C, Setup, continued
No. Function Settings / Descriptions
C3._ Frequency Output X
C3._ Frequency Output X X stands for one of the connection terminals A, B, or D_ stands for Fct. C3.2 (A) /
C3.3 (B) / C3.5 (D)
C3._.1 Pulse Shape Specify the pulse shape
Select:
Symmetric (about 50% on and 50% off) /
Automatic (constant pulse with about 50% on and 50% off at 100% pulse rate) /
Fixed (fixed pulse rate, setting see below Fct. C3._.3 100% pulse rate)
C3._.2 Pulse Width Only available if set to “Fixed” in Fct. C3._.1.
Range: 0.05 to 2000 ms
Note: max. setting value Tp [ms] ≤ 500 / max. pulse rate [1/s], gives the pulse width =
time where the output is activated
C3._.3 100% Pulse Rate Pulse rate for 100% of the measuring range
Range: 1 to 10000 Hz
Limitation 100% pulse rate ≤100/s: I
Limitation 100% pulse rate > 100/s: I
C3._.4 Measurement Measurements for activating the output
Select:
Volume Flow / Mass Flow / Temperature / Density / Velocity / Sensor
Average / Sensor Deviation / Drive Level / Tube Frequency / Strain 1 / Strain 2 / 2
Phase Signal
Depending on the settings for the concentration measurement, the following
measurements are possible:
Concentration 1 / Concentration 2 / Conc. mass flow 1 / Conc. mass flow 2 /
Conc. volume flow 1 / Conc. volume flow 2
C3._.5 Range 0 to 100% of the measurement set in Fct. C3._.4
x.xx - xx.xx _ _ _ (format and unit depend on the “measurement”, see above)
C3._.6 Polarity Set polarity; the flow direction in C1.3.2 must be noted!
Select:
Both Polarities (plus and minus values are displayed) /
Positive Polarity (display for negative values = 0) /
Negative Polarity (display for positive values = 0) /
Absolute Value (always displays positive, with both negative and positive values)
C3._.7 Limitation Limitation before applying the time constant
±xxx - ±xxx%; range: -150 to +150%
C3._.8 Low Flow Cutoff Sets the measurement to “0” for low values
x.xxx±x.xxx%; range: 0.0 to 20%
(1st value = switching point / 2nd value = hysteresis), condition: 2nd value ≤1st value
C3._.9 Time Constant Range: 000.1 to 100 s
C3._.10 Invert Signal Select:
Off (activated output: switch closed)
On (activated output: switch open)
C3._.11 Phase Shift w.r.t. B Only available when configuring the terminal A or D and only if output B is a pulse
or frequency output. If setting in Fct. C2.5.6 is “Both Polarities”, the phase shift is
prefixed by a symbol, e.g. -90° and +90°
Select:
Off (no phase shift)
0° Phase Shift (between outputs A or D and B, inversion possible)
90° Phase Shift (between outputs A or D and B, inversion possible)
180° Phase Shift (between outputs A or D and B, inversion possible)
≤100 mA
max
max
≤20 mA
LCI40 Series IOM
WWW.LCMETER.COM
55
Page 56

6 OPERATION
6.4 Function Tables
6.4.3 Menu C, Setup, continued
No. Function Settings / Descriptions
C3._ Frequency Output X
C3.3.11 Special Functions This function is only available at the terminal B frequency output. At the same time, 2
frequency outputs must be available:
1st output at terminal A or D / 2nd output at terminal B
The B output is operated as a slave output, controlled and set using master output A or D
Select:
Off (no phase shift) /
Phase Shift w.r.t. D or A (slave output is B and master output is D or A)
C3._.12 Information Serial no. of the I/O board, software version no. and production date of the circuit board
C3._.13 Simulation Sequence see B1._ Frequency Output X
C3._ Pulse Output X
C3._ Pulse Output X X stands for one of the connection terminals A, B or D_ stands for Fct. C3.2 (A) / C3.3 (B) /
C3.5 (D)
C3._.1 Pulse Shape Specify the pulse shape
Select:
Symmetric (about 50% on and 50% off) /
Automatic (constant pulse with about 50% on and 50% off at 100% pulse
rate) /
Fixed (fixed pulse rate, setting see below Fct. C3._.3 100% pulse rate)
C3._.2 Pulse Width Only available if set to “Fixed” in Fct. C3._.1.
Range: 0.05 - 2000 ms
Note: max. setting value Tp [ms] ≤ 500 / max. pulse rate [1/s], gives the pulse width = time
where the output is activated
C3._.3 Max. Pulse Rate Pulse rate for 100% of the measuring range
Range: 0.0 - 10000 1/s
Limitation 100% pulse rate ≤100/s: Imax≤100 mA
Limitation 100% pulse rate > 100/s: Imax≤20 mA
C3._.4 Measurement Measurements for activating the output
Select: Volume Flow / Mass Flow
C3._.5 Pulse Value Unit Selection of the unit from a list, depending on the “measurement”
C3._.6 Value Per Pulse Set value for volume or mass per pulse
xxx.xxx, measured value in [l] or [kg] depending on setting in C3._.6
At max. pulse rate see above 3._.3 “Pulse Output”
56
WWW.LCMETER.COM
LCI40 Series IOM
Page 57

6 OPERATION
6.4 Function Tables
6.4.3 Menu C, Setup, continued
No. Function Settings / Descriptions
C3._ Pulse Output X
C3._.7 Polarity Set polarity; the flow direction in C1.3.2 must be noted!
Select:
Both Polarities (plus and minus values are displayed) /
Positive Polarity (display for negative values = 0) /
Negative Polarity (display for positive values = 0) /
Absolute Value (always displays positive, with both negative and positive values)
C3._.8 Low Flow Cutoff Sets the measurement to “0” for low values
x.xxx±x.xxx%; range: 0.0 - 20%
(1st value = switching point / 2nd value = hysteresis), condition: 2nd value≤1st value
C3._.9 Time Constant Range: 000.1 - 100 s
C3._.10 Invert Signal Select:
Off (activated output: switch closed) /
On (activated output: switch open)
C3._.11 Phase Shift w.r.t. B Only available when configuring the terminal A or D and only if output B is a pulse or
frequency output. If setting in Fct. C2.5.6 is “Both Polarities”, the phase shift is prefixed by
a symbol, e.g. -90° and +90°
Select:
Off (no phase shift) /0° Phase Shift (between outputs A or D and B, inversion possible) /
90° Phase Shift (between outputs A or D and B, inversion possible) /
180° Phase Shift (between outputs A or D and B, inversion possible)
C3.3.11 Special Functions This function is only available at the pulse output of terminal B. At the same time, 2 pulse
outputs must be available:
1st output at terminal A or D / 2nd output at terminal B
The B output is operated as a slave output, controlled and set using master output A or D
Select:
Off (no phase shift) /
Phase Shift w.r.t. D or A (slave output is B and master output is D or A)
C3._.12 Information Serial no. of the I/O board, software version no. and production date of the circuit board
C3._.13 Simulation Sequence see B1._ Pulse Output X
LCI40 Series IOM
WWW.LCMETER.COM
57
Page 58

6 OPERATION
6.4 Function Tables
6.4.3 Menu C, Setup, continued
No. Function Settings / Descriptions
C3._ Status Output X
C3._ Status Output X X (Y) stands for one of the connection terminals A, B, C or D _ stands for Fct. C3.2 (A) /
C3.3 (B) / C3.4 (C) / C3.5 (D)
C3._.1 Mode The output shows the following measuring conditions:
Failure (output set, signals status of the category “Failure” refer to Status messages and
diagnostic information on page 104) /
Out Of Specification (output set, signals status of category “Failure” or “Maintenance
Required” or “Out Of Specification” refer to Status messages and diagnostic information on
page 104) /
Maintenance Required (output set, signals status of category “Failure” or “Maintenance
Required” refer to Status messages and diagnostic information on page 104) /
Flow Polarity (polarity of the current flow) /
Flow Over Range (over range of the flow)
Totalizer 1 Preset (activates when Totalizer X preset value is reached) /
Totalizer 2 Preset (activates when Totalizer X preset value is reached) /
Totalizer 3 Preset (activates when Totalizer X preset value is reached) /
Output A (activated by the status of output Y, additional output data see below) /
Output B (activated by the status of output Y, additional output data see below) /
Output C (activated by the status of output Y, additional output data see below) /
Output D (activated by the status of output Y, additional output data see below) /
Off (switched off)
C3._.2 Current Output Y Only appears if output A to C is set under “Mode” (see above), and this output is a “Current
Output”.
Polarity (is signalled)
Over Range (is signalled)
Automatic Range signals lower range
C3._.2 Frequency Output Y
and Pulse Output Y
C3._.2 Status Output Y Only appears if output A to D is set under “Mode” (see above), and this output is a “Status
C3._.2 Limit Switch Y and
Control Input Y
C3._.2 Output Y Only appears if output A to D is set under “Mode” (see above) and this output is switched
C3._.3 Invert Signal Select:
C3._.4 Information Serial no. of the I/O board, software version no. and production date of the circuit board
C3._.5 Simulation Sequence see B1._ Status Output X
Only appears if output A, B or D is set under “Mode” (see above), and this output is a
“Frequency/Pulse Output”.
Polarity (is signalled)
Over Range (is signalled)
Output”.
Same Signal (like other connected status output, signal can be inverted, see below)
Only appears if output A to D / input A or B is set under “Mode” (see above), and this
output / input is a “Limit Switch / Control Input”.
Status Off (is always selected here if Status Output X is connected with a Limit Switch /
Control Input Y).
off.
Off (activated output: switch closed) /
On (activated output: switch open)
58
WWW.LCMETER.COM
LCI40 Series IOM
Page 59

6 OPERATION
6.4 Function Tables
6.4.3 Menu C, Setup, continued
No. Function Settings / Descriptions
C3._ Limit Switch X
C3._ Limit Switch X X stands for one of the connection terminals A, B, C or D_ stands for Fct. C3.2 (A) / C3.3 (B)
/ C3.4 (C) / C3.5 (D)
C3._.1 Measurement Select:
Volume Flow / Mass Flow / Temperature / Density / Velocity / Sensor
Average / Sensor Deviation / Drive Level / Tube Frequency / Strain 1 /
Strain 2 / 2 Phase Signal
C3._.2 Threshold Switching level, set threshold with hysteresis
xxx.x ±x.xxx (format and unit depend on the measurement, see above)
(1st value = threshold / 2nd value = hysteresis), condition: 2nd value≤1st value
C3._.3 Polarity Set polarity; the flow direction in C1.3.2 must be noted!
Select:both polarities (plus and minus values are displayed) /
Positive Polarity (display for negative values = 0) /
Negative Polarity (display for positive values = 0) /
Absolute Value (always displays positive, with both negative and positive values)
C3._.4 Time Constant Range: 000.1 - 100 s
C3._.5 Invert Signal Select:
Off (activated output: switch closed) /
On (activated output: switch open)
C3._.6 Information Serial no. of the I/O board, software version no. and production date of the circuit board
C3._.7 Simulation Sequence see B1._ Limit Switch X
C3._ Control Input X
C3._ Control Input X
C3._.1 Mode X stands for connection terminal A or B_ stands for Fct. C3.2 (A) / C3.3 (B)
Off (control input switched off) /
Hold All Outputs (hold actual values, not display and Totalizers) /
Hold Output Y (hold actual values) /All Outputs To Zero (actual values = 0%, not display and
Totalizers) /
Output Y To Zero (actual value = 0%) /
All Totalizers (reset all Totalizers to “0”) /
Totalizer “Z” Reset (set Totalizer 1, 2 or 3 to “0”) /
Stop All Totalizers /
Stop counter “Z” (stops counter 1, 2 or 3) /
Zero Outp.+Stop Tot. (all outputs 0%, stop all Totalizers, not the display) /
External Range Y (control input for external range of current output Y) - also make this
setting on current output Y (no check if current output Y is available) /
Error Reset (all resettable errors are deleted) /
Calibrate Zero
C3._.2 Invert Signal Select:
Off (activated output: switch closed) /
On (activated output: switch open)
C3._.3 Information Serial no. of the I/O board, software version no. and production date of the circuit board
C3._.4 Simulation Sequence see B1._ Control Input X
LCI40 Series IOM
WWW.LCMETER.COM
59
Page 60

6 OPERATION
6.4 Function Tables
6.4.3 Menu C, Setup, continued
No. Function Settings / Descriptions
C4 I/O Totalizers
C4.1 Totalizer 1 Set function of counter._ stands for 1, 2, 3 (= Totalizer 1, 2, 3)
C4.2 Totalizer 2
C4.3 Totalizer 3
C4._.1 Totalizer Function Select:
C4._.2 Measurement Selection of the measurement for Totalizer _
C4._.3 Low Flow Cutoff Sets the measurement to “0” for low values
C4._.4 Time Constant Range: 0.1 - 100 s
C4._.5 Preset Value If this value is reached, positive or negative, a signal is generated that can be used for a
C4._.6 Reset Totalizer Sequence see Fct. A3.2, A3.3 and A3.4
C4._.7 Set Totalizer Set Totalizer _ to the desired value
C4._.8 Stop Totalizer Totalizer _ is stopped and holds the actual value
C4._.9 Start Totalizer Start Totalizer _ after that Totalizer is stopped
C4._.10 Information Serial no. of the I/O board, software version no. and production date of the circuit board
The basic version (standard) has only 2 Totalizer!
Absolute Total (counts positive + negative values) /+Totalizer (counts only the positive
values) /
-counter (counts only the negative values) /
Off (Totalizer is switched off)
Select:
Volume Flow / Mass Flow /
(depends on the settings for the concentration measurement):
Conc. mass flow 1 / Conc. mass flow 2 / Conc. volume flow 1 / Conc. volume flow 2
Range: 0.0 - 20%
(1st value = switching point / 2nd value = hysteresis), condition: 2nd value≤1st value
status output at which “Preset Totalizer X” has to be set.
Preset Value (max. 8 digits) x.xxxxx in selected unit, see C6.7.10 + 13
Select:
Break (exit function) / Set Value (opens the editor to make the entry)
Query: Set Totalizer?
Select:
Select: No (exit function without setting the value) / Yes (sets the Totalizer and exits the
function)
Select:
No (exit the function without stopping the Totalizer) / Yes (stop the Totalizer and exit the
function)
Select:
No (exits the function without starting the Totalizer) / Yes (starts the Totalizer and exits the
function)
60
WWW.LCMETER.COM
LCI40 Series IOM
Page 61

6 OPERATION
6.4 Function Tables
6.4.3 Menu C, Setup, continued
No. Function Settings / Descriptions
C5 I/O
C5.1 PV is Current output (primary variable)
C5.2 SV is (secondary variable)
C5.3 TV is (tertiary variable)
C5.4 4V is (4th variable)
C5._.1 Current Output X Shows the current analogue measured value of the linked current output.
The “measurement” cannot be changed!
C5._.1 Frequency Output X Shows the current analogue measured value of the linked frequency output, if present. The
“measurement” cannot be changed!
LCI40 Series IOM
WWW.LCMETER.COM
61
Page 62

6 OPERATION
6.4 Function Tables
6.4.3 Menu C, Setup, continued
No. Function Settings / Descriptions
C6 Device
C6.1 Device Info
C6.1 Device Info -
C6.1.1 Ta g Settable characters (max. 8 digits):
A - Z; a - z; 0 - 9; / - + , .
C6.1.2 V No. Sensor V number of the measuring sensor, cannot be changed
C6.1.3 Serial No. Sensor Serial no. of the measuring sensor, cannot be changed
C6.1.4 Sensor Revision Revision of the measuring sensor, cannot be changed
C6.1.5 V No. Converter V number of the signal converter, cannot be changed
C6.1.6 Converter Serial No. Serial no. of the signal converter, cannot be changed
C6.1.7 C Number CG number, cannot be changed; describes the signal converter version
C6.1.8 Electronics Serial No. Serial no. of the electronic assembly, cannot be changed
C6.1.9 Electronic Revision Shows ID no., electronic revision no. and production date;
Contains all hardware and software changes.
C6.2 Display
C6.2 Display -
C6.2.1 Language Language selection depends on the device version.
C6.2.2 Contrast Adjust display contrast for extreme temperatures.
Setting: -9 - 0 - +9
This change takes place immediately, not just when setting mode is exited!
C6.2.3 Default Display Specification of the default display page that is returned to after a short delay period.
Select:
None (the current page is always active) / 1st Meas. Page (show this page) /
2nd Meas. Page (show this page) / Status Page (show only status messages) / Graphic
Page (trend display of the 1st measurement)
C6.2.4 Optical Keys Activate or deactivate the optical keys
Select: On / Off
C6.3 & C6.4 1st Measurement Page & 2nd Measurement Page
C6.3 1st Meas. Page
C6.4 2nd Meas. Page
C6._.1 Function
C6._.2 1st Line Variable
C6._.3 Range
_ stands for 3 = 1st Meas. Page and 4 = 2nd Meas. Page
Specify number of measured value lines (font size)
Select:
One Line / Two Lines / Three Lines
Specify measurement for 1st line
Select:
Volume Flow / Mass Flow / Temperature / Density / Velocity / Sensor
Average / Sensor Deviation / Drive Level / Tube Frequency / Strain 1 /
Strain 2 / 2 Phase Signal
Depending on the settings for the concentration measurement, the following measurements
are possible:
Concentration 1 / Concentration 2 / Conc. mass flow 1 / Conc. mass flow 2 /
Conc. volume flow 1 / Conc. volume flow 2
0 - 100% of the measurement set in Fct. C5._.2
x.xx - xx.xx _ _ _ (format and unit depend on the “measurement”)
62
WWW.LCMETER.COM
LCI40 Series IOM
Page 63

6 OPERATION
6.4 Function Tables
6.4.3 Menu C, Setup, continued
No. Function Settings / descriptions
C6.3 & C6.4 1st Measurement Page & 2nd Measurement Page
C6._.4 Limitation
C6._.5 Low Flow Cutoff
C6._.6 Time Constant Range: 0.1 - 100 s
C6._.7 1st Line Format
C6._.8 2nd Line Variable
C6._.9 2nd Line Format
C6._.10 3rd Line Variable
C6._.11 3rd Line Format
Limitation before applying the time constant
±xxx to ±xxx%; range: -150 - +150%
Sets low flow values to “0”
x.xxx±x.xxx %; Range: 0.0 - 20 %
(1st value = switching point / 2nd value = hysteresis), condition: 2nd value≤1st value
Specify decimal places
Select:
Automatic (adaptation is carried out automatically) /
X°(=°none)° - X.XXXXXXXX°(max.°8°digits) depends on size of font
Specify 2nd Line Variable (only available if this 2nd line is activated)
Select:
Bargraph (for the “measurement” selected in the 1st line) / Volume Flow /
Mass Flow / Temperature / Density / Velocity / Sensor Average / Sensor
Deviation / Drive Level / Tube Frequency / Strain 1 / Strain 2 / 2 Phase
Signal / Totalizer 1 / Totalizer 2 / Totalizer 3 / Operating Hours
Depending on the settings for the concentration measurement, the following measurements
are possible:
Concentration 1 / Concentration 2 / Conc. mass flow 1 / Conc. mass flow 2 /
Conc. volume flow 1 / Conc. volume flow 2
Specify decimal places
Select:
Automatic (adaptation is carried out automatically) /
X°(=°none)° - X.XXXXXXXX°(max.°8°digits) depends on size of font
Specify 3rd Line Variable (only available if this 3rd line is activated)
Select:
Volume Flow / Mass Flow / Temperature / Density / Velocity / Sensor
Average / Sensor Deviation / Drive Level / Tube Frequency / Strain 1 /
Strain 2 / 2 Phase Signal / Totalizer 1 / Totalizer 2 / Totalizer 3 / Operating
Hours
Depending on the settings for the concentration measurement, the following measurements
are possible:
Concentration 1 / Concentration 2 / Conc. mass flow 1 / Conc. mass flow 2 /
Conc. volume flow 1 / Conc. volume flow 2
Specify decimal places
Select:
Automatic (adaptation is carried out automatically) /
X°(=°none)° - X.XXXXXXXX°(max.°8°digits) depends on size of font
LCI40 Series IOM
WWW.LCMETER.COM
63
Page 64

6 OPERATION
6.4 Function Tables
6.4.3 Menu C, Setup, continued
No. Function Settings / Descriptions
C6.5 Graphic Page
C6.5 Graphic Page -
C6.5.1 Select Range Graphic page always shows trend curve of the measurement of the 1st page / 1st line, see
Fct. C6.3.2
Select:
Manual (set range in Fct. C6.5.2) /
Automatic (automatic depiction based on the measured values)
Reset only after parameter change or after switching off and on.
C6.5.2 Range Set the scaling for the Y axis. Only available if “Manual” is set in C6.5.1.
±xxx ±xxx%; range: -100 - +100%
(1st value = lower limit / 2nd value = upper limit),condition: 1st value≤2nd value
C6.5.3 Time Scale Set the time scaling for the X axis, trend curve
xxx min; range: 0 - 100 min
C6.6 Special Functions
C6.6 Special Functions -
C6.6.1 Reset Errors Reset Errors?
Select: No / Yes
C6.6.2 Save Settings Save current settings
Select:
Break (exit function without saving) / Backup 1 (save in storage location 1) /
Backup 2 (save in storage location 2)
Query: Continue To Copy? (cannot be undone)
Select:
No (exit function without saving) / Yes (copy current settings to storage backup 1 or backup
2)
C6.6.3 Load Settings Load saved settings
Select:
Break (exit function without loading) / Factory Settings (restore factory settings) / Backup 1
(load data from storage location 1) / Backup 2 (load data from storage location 2)
Query: Continue To Copy? (cannot be undone)
Select:
No (exit the function without saving) / Yes (load data from the selected storage location)
C6.6.4 Password Quick Set Password required to change data in the menu “Quick Setup”
0000 (= to menu “Quick Setup” without password)
xxxx (password required); range 4 digits: 0001 - 9999
C6.6.5 Password Setup Password required to change data in the menu “Setup”
0000 (= to menu “Quick Setup” without password)
xxxx (password required); range 4 digits: 0001 - 9999
C6.6.6 Date and Time Set real time clock
C6.6.7 Quick Access Set “Quick Access” function;
Select:
Off (deactivated) / Reset Totalizer 1, 2, 3 or All Totalizers
64
WWW.LCMETER.COM
LCI40 Series IOM
Page 65

6 OPERATION
6.4 Function Tables
6.4.3 Menu C, Setup, continued
No. Function Settings / Descriptions
C6.6 Special Functions
C6.6.8 GDC IR Interface After this function has been activated an optical GDC adapter can be connected to the LC
display. After 60 seconds pass without a connection being established or after the adapter
is removed, the function is exited and the optical keys are active again.
Select:
Break (exit function without connection) /
Activate (the IR interface adapter and interrupt the optical keys)
After 60 seconds pass without a connection being established, the function is exited and
the optical keys are active again.
C6.7 Units
C6.7 Units
C6.7.1 Volume Flow m³/h; m³/min; m³/s; L/h; L/min; L/s (L = litres); IG/s; IG/min; IG/h cf/h; cf/min; cf/s; gal/h;
gal/min; gal/s; barrel/h; barrel/day
Free Unit (set factor and text in the next two functions, sequence see below)
C6.7.2 Text Free Unit For text to be specified refer to Set free units on page 87:
C6.7.3 [m³/s]*Factor Specification of the conversion factor, based on m³/s:
xxx.xxx refer to Set free units on page 87
C6.7.4 Mass Flow kg/s; kg/min; kg/h; t/min; t/h; g/s; g/min; g/h; lb/s; lb/min; lb/h; ST/min; ST/h (ST = Short
Ton); LT/h (LT = Long Ton);
Free Unit (set factor and text in the next two functions, sequence see below)
C6.7.5 Text Free Unit For text to be specified refer to Set free units on page 87:
C6.7.6 [kg/s]*Factor Specification of the conversion factor, based on kg/s:
xxx.xxx refer to Set free units on page 87
C6.7.7 Velocity m/s; ft/s
C6.7.9 Temperature °C; °F; K
C6.7.10 Volume m³; L; hL; mL; gal; IG; in³; cf; yd³; barrel
Free Unit (set factor and text in the next two functions, sequence see below)
C6.7.11 Text Free Unit For text to be specified refer to Set free units on page 87:
C6.7.12 [m³]*Factor Specification of the conversion factor, based on m³:
xxx.xxx refer to Set free units on page 87
C6.7.13 Mass kg; t; mg; g; lb; ST; LT; oz;
Free Unit (set factor and text in the next two functions, sequence see below)
C6.7.14 Text Free Unit For text to be specified refer to Set free units on page 87:
C6.7.15 [kg]*Factor Specification of the conversion factor, based on kg:
xxx.xxx refer to Set free units on page 87
C6.7.16 Density kg/L; kg/m³; lb/cf; lb/gal; SG
Free Unit (set factor and text in the next two functions, sequence see below)
C6.7.17 Text Free Unit For text to be specified refer to Set free units on page 87:
C6.7.18 [kg/m³]*Factor Specification of the conversion factor, based on kg/m³:
xxx.xxx refer to Set free units on page 87
C6.7.19 Pressure Pa; kPa; bar; mbar; psi (no free units possible);only if current input available
LCI40 Series IOM
WWW.LCMETER.COM
65
Page 66

6 OPERATION
6.4 Function Tables
6.4.3 Menu C, Setup, continued
No. Function Settings / Descriptions
C6.8
C6.8.1 Message
C6.8.2 Description
C6.9 Quick Setup
C6.9 Quick Setup Activate quick access in the menu “Quick Setup”
C6.9.1 Reset Totalizer 1 Reset Totalizer 1 in menu “Quick Setup”
C6.9.2 Reset Totalizer 2 Reset Totalizer 2 in menu “Quick Setup”
C6.9.3 Reset Totalizer 3 Reset Totalizer 3 in menu “Quick Setup”
C6.9.4 Reset All Totalizers Reset all Totalizer in menu “Quick Setup”
Set required text:
A - Z ; a - z ; 0 - 9 ; / - + , . *
Set required text:
A - Z ; a - z ; 0 - 9 ; / - + , . *
Select: Yes (activated) / No (switched off)
Select: Yes (activated) / No (switched off)
Select: Yes (activated) / No (switched off)
Select: Yes (activated) / No (switched off)
Select: Yes (activated) / No (switched off)
6.4.4 Set Free Units
Free units Sequences to Set Texts and Factors
Texts
Volume Flow, mass Flow, and
Density
Permissible Characters A - Z; a - z; 0 - 9; / - + , . *; @ $ % ~ () [] _
Conversion factors
Desired Unit = [unit see above] * conversion factor
Conversion Factor Maximum 9 digits
Shift Decimal Point ↑ to the left and ↓ to the right
3 digits before and after the slashxxx/xxx (max. 6 characters plus a “/”)
66
WWW.LCMETER.COM
LCI40 Series IOM
Page 67

6 OPERATION
6.5 Description of Functions
6.5.1 Reset Totalizer in the Menu “Quick Setup”
Key Display Description and Setting
> Quick Setup Press and hold for 2.5 s, then release the key
> Language -
2 x ↓
> Reset Errors -
↓
↓
↓
↓
> Reset Totalizer
↓ or ↑ Reset Totalizer
↵
3 x ↵ Measuring Mode -
Reset -
All Totalizer Select desired Totalizer
Totalizer 1
Totalizer 2
Totalizer 3
No
Yes
Totalizer 1,2 (or 3) Totalizer has been reset
(Totalizer 3 is optional)
-
-
Information
It may be necessary to activate
resetting of the Totalizer in the
menu “Quick Setup.”
6.5.2 Deleting Error Messages In The Menu “Quick Setup”
Key Display Description and Setting
> Quick Setup Press and hold for 2.5 s, then release the key
> Language 2 x ↓ Reset -
> Reset Errors -
> Reset?
No
↓ or ↑ Reset?
Yes
↵
3 x ↵ Measuring Mode -
Reset Errors Error has been reset
-
-
Information
The detailed list of the possible
error messages.
LCI40 Series IOM
WWW.LCMETER.COM
67
Page 68

6 OPERATION
6.5 Description of Functions
6.5.3 Operation Mode (Menu A9)
The device can be switched to “Standby”. In this mode,
all flow values are set to zero and the counter values
are “frozen”. The temperature and density values are
displayed normally and output via the outputs. The
“Standby” indicator on the display shows either the
“frozen” counter value or simply “Standby”. In this
mode, the measuring tubes continue to vibrate and the
device can immediately return to “Measuring” mode if
necessary.
Setting the Operation Mode (from measuring mode):
Key Display Description and setting
> A Quick Setup
> ↑ A9
>
↑
↑
3 x ↵
↵
Display page
Operation Mode
Measuring
Operation Mode
Measuring
Operation Mode
Standby
Operation Mode
Stop
Save Configuration?
Yes
There is also a “Stop” mode. In this mode, the
measuring sensor is switched off and is no longer
vibrating. To return to measuring mode from this mode,
the measuring device must go through the complete
“start-up” phase again before measurement continues.
The measuring device can be switched into “Standby”
mode either using the operating keys on the display or
using the control input. You can only switch to “Stop”
mode using the operating keys.
Press and hold for 2.5 s, then release the key.
If “Standby” or “Stop” is selected, the device
immediately switches to this operating state. To return
to the measuring mode, go to menu A9 and select
“Measuring”.
Information
When changing from the “Stop” to
“Standby” mode, the device goes
through the entire start-up phase.
In addition to the “Standby” mode, the system control
function also allows you to switch to a comparable
“Standby” status completely automatically depending
on the current operating temperature or density.
68
WWW.LCMETER.COM
LCI40 Series IOM
Page 69

6 OPERATION
6.5 Description of Functions
6.5.4 Density Calibration (Menu C1.2.1)
Mass flowmeters are calibrated for density in the
factory. Density calibration is based on two calibration
points. In the factory, air and water are used under
reference conditions. The result of this calibration is
Available Options
Option Explanation
1 Point Calibration One of the 2 saved calibration points is replaced by customer calibration.
The signal converter decides which of the 2 calibration points is modified.
2nd Calibration Point Calibration of the second point.
Factory Calibration The signal converter reactivates the factory settings for the density calibration.
Example of 1 point Calibration with Town Water
Key Display Description and Setting
> A Quick Setup
2 x ↑ C1 Setup
↑ C1.2 Density
2 x > C1.2.1
↵
Press ↑
Until
↵
↵
5 x ↵
↵
C1.2.1
C1.2.1
C1.2.1
Display page
Density Calibration?
1 Point Calibration
Density Calib. Product
XXXXXXX
Density Calib. Product
Town Water
Density Calibration?
OK
Please Wait
Countdown from 20 s
Density Calib.
Passed
Save Configuration?
Yes
saved in the converter electronics and stored in the
factory settings. Regardless, various applications
require maximum accuracy which can only be achieved
with on-site calibration.
Press and hold for 2.5 s, then release the key.
LCI40 Series IOM
WWW.LCMETER.COM
69
Page 70

6 OPERATION
6.5 Description of Functions
6.5.4 Density Calibration (Menu C1.2.1)
On-site Density Calibration:
• Ensure that the device has been properly installed
and functions smoothly.
• If air (empty) is used as the medium, the measuring
tube must be completely dry and free of liquids and
solids. If possible, blow dry air into the measuring
tube to empty it.
• If liquids are used, flush for a few minutes at a high
flow rate to remove gas bubbles.
• Set the flow rate to a typical value (50% of the
nominal flow is ideal).
• If the process temperature is higher than the ambient
temperature, wait until the system has stabilised.
• When it comes to 1 point and 2 point calibration, you
can choose from the options “empty”, “pure water”,
“town water” and “other”. The reference values for
the specified products are stored in the converter.
Density calibration has failed if “Density Calib. Error”
is displayed. The reason for the error may be indicated
on the display. Possible reasons for failed density
calibration:
• The device is not in “Measuring” mode.
• The calibration points are too close together.
• One or more calibration points did not pass the
plausibility test.
1 Point Calibration
• See examples for “Calibration with town water and
other.”.
• Select the function using ↓ and ↑ and then confirm
with ↵
• If “Other” is selected, the product density must be
entered.
• 1 point calibration is generally sufficient for
most applications, such as adapting the density
measurement to a new installation.
• Make sure that prior to calibrating the 2nd point that
1 point calibration was carried out and that the result
was saved with the dialog “Save Configuration?”.
2 Point Calibration
• In this case, both reference points are recalibrated
(with the products of the system).
• With 2 point calibration, ensure that both calibration
points entered by the user are accepted.
If the 2nd point cannot be calibrated immediately
after the first one, because the 2nd product is not yet
available, the device continues to function normally as
after the 1 point calibration. In other words, there can
be weeks or even months between the calibration of
the two measuring points.
• Flow, pressure, temperature or system are not
stable?
• Please check your system and try again.
• If this results in another failed calibration, please
contact the manufacturer.
70
WWW.LCMETER.COM
LCI40 Series IOM
Page 71

6 OPERATION
6.5 Description of Functions
6.5.5 Temperature/Density Table
Temperature Density Temperature Density
°F °C lb/ft
32 0 62.41999 999.8396 32.9 0.5 62.42197 999.8712
33.8 1 62.42367 999.8986 34.7 1.5 62.42509 999.9213
35.6 2 62.42625 999.9399 36.5 2.5 62.42714 999.9542
37.4 3 62.42777 999.9642 38.3 3.5 62.42814 999.9701
39.2 4 62.42825 999.972 40.1 4.5 62.42812 999.9699
41 5 62.42774 999.9638 41.9 5.5 62.42713 999.954
42.8 6 62.42627 999.9402 43.7 6.5 62.42517 999.9227
44.6 7 62.42386 999.9016 45.5 7.5 62.4223 999.8766
46.4 8 62.42053 999.8482 47.3 8.5 62.4185 999.8162
48.2 9 62.41632 999.7808 49.1 9.5 62.41389 999.7419
50 10 62.41125 999.6997 50.9 10.5 62.40840 999.6541
51.8 11 62.40535 999.6051 52.7 11.5 62.40209 999.5529
53.6 12 62.39863 999.4975 54.5 12.5 62.39497 999.4389
55.4 13 62.39112 999.3772 56.3 13.5 62.38708 999.3124
57.2 14 62.38284 999.2446 58.1 14.5 62.37841 999.1736
59 15 62.3738 999.0998 59.9 15.5 62.36901 999.0229
60.8 16 62.36403 998.9432 61.7 16.5 62.35887 998.8607
62.6 17 62.35354 998.7752 63.5 17.5 62.34803 998.687
64.4 18 62.34235 998.596 65.3 18.5 62.3365 998.5022
66.2 19 62.33047 998.4058 67.1 19.5 62.32428 998.3066
68 20 62.31793 998.2048 68.9 20.5 62.31141 998.1004
69.8 21 62.30473 997.9934 70.7 21.5 62.29788 997.8838
71.6 22 62.29088 997.7716 72.5 22.5 62.28372 997.6569
73.4 23 62.27641 997.5398 74.3 23.5 62.26894 997.4201
75.2 24 62.26132 997.2981 76.1 24.5 62.25355 997.1736
77 25 62.24563 997.0468 77.9 25.5 62.23757 996.9176
78.8 26 62.22936 996.7861 79.7 26.5 62.22099 996.6521
80.6 27 62.21249 996.5159 81.5 27.5 62.20384 996.3774
82.4 28 62.19507 996.2368 83.3 28.5 62.18614 996.0939
84.2 29 62.17708 995.9487 85.1 29.5 62.16788 995.8013
86 30 62.15855 995.6518 86.9 30.5 62.14907 995.5001
87.8 31 62.13947 995.3462 88.7 31.5 62.12973 995.1903
89.6 32 62.11986 995.0322 90.5 32.5 62.10987 994.8721
3
kg/m3 °F °C lb/ft
3
kg/m3
LCI40 Series IOM
WWW.LCMETER.COM
71
Page 72

6 OPERATION
6.5 Description of Functions
6.5.5 Temperature/Density Table
Temperature Density Temperature Density
°F °C lb/ft
91.4 33 62.09975 994.71 92.3 33.5 62.08950 994.5458
93.2 34 62.07912 994.3796 94.1 34.5 62.06861 994.2113
95 35 62.05799 994.0411 95.9 35.5 62.04724 993.8689
98.6 36 62.03637 993.6948 97.7 36.5 62.02537 993.5187
98.6 37 62.01426 993.3406 99.5 37.5 62.00302 993.1606
100.4 38 61.99168 992.9789 101.3 38.5 61.98020 992.7951
102.2 39 61.96862 992.6096 103.1 39.5 61.95692 992.4221
104 40 61.9451 992.2329 104.9 40.5 61.93317 992.0418
105.8 41 61.92113 991.8489 106.7 41.5 61.90898 991.6543
107.6 42 61.89672 991.4578 108.5 42.5 61.88434 991.2597
109.4 43 61.87186 991.0597 110.3 43.5 61.85927 990.8581
111.2 44 61.84657 990.6546 112.1 44.5 61.83376 990.4494
113 45 61.82085 990.2427 113.9 45.5 61.80783 990.0341
114.8 46 61.79471 989.8239 115.7 46.5 61.78149 989.6121
116.6 47 61.76816 989.3986 117.5 47.5 61.75473 989.1835
118.4 48 61.7412 988.9668 119.3 48.5 61.72756 988.7484
120.2 49 61.71384 988.5285 121.1 49.5 61.70 988.3069
122 50 61.68608 988.0839 122.9 50.5 61.67205 987.8592
123.8 51 61.65793 987.6329 124.7 51.5 61.64371 987.4051
125.6 52 61.62939 987.1758 126.5 52.5 61.61498 986.945
127.4 53 61.60048 986.7127 128.3 53.5 61.58588 986.4788
129.2 54 61.57118 986.2435 130.1 54.5 61.5564 986.0066
131 55 61.54153 985.7684 131.9 55.5 61.52656 985.5287
132.8 56 61.5115 985.2876 133.7 56.5 61.49636 985.0450
134.6 57 61.48112 984.8009 135.5 57.5 61.4658 984.5555
136.4 58 61.45039 984.3086 137.3 58.5 61.43489 984.0604
138.2 59 61.41931 983.8108 139.1 59.5 61.40364 983.5597
140 60 61.38787 983.3072 140.9 60.5 61.37203 983.0535
141.8 61 61.35611 982.7984 142.7 61.5 61.34009 982.5419
143.6 62 61.324 982.2841 144.5 62.5 61.30783 982.0250
145.4 63 61.29157 981.7646 146.3 63.5 61.27523 981.5029
147.2 64 61.25881 981.2399 148.1 64.5 61.24231 980.9756
149 65 61.22573 980.7099 149.9 65.5 61.20907 980.4432
3
kg/m
3
°F °C lb/ft
3
kg/m3
72
WWW.LCMETER.COM
LCI40 Series IOM
Page 73

6 OPERATION
6.5 Description of Functions
6.5.5 Temperature/Density Table
Temperature Density Temperature Density
°F °C lb/ft
150.8 66 61.19233 980.1751 151.7 66.5 61.17552 979.9057
152.6 67 61.15862 979.6351 153.5 67.5 61.14165 979.3632
154.4 68 61.1246 979.0901 155.3 68.5 61.10748 978.8159
156.2 69 61.09028 978.5404 157.1 69.5 61.07300 978.2636
158 70 61.05566 977.9858 158.9 70.5 61.03823 977.7068
159.8 71 61.02074 977.4264 160.7 71.5 61.00316 977.145
161.6 72 60.98552 976.8624 162.5 72.5 60.96781 976.5786
163.4 73 60.95002 976.2937 164.3 73.5 60.93216 976.0076
165.2 74 60.91423 975.7204 166.1 74.5 60.89623 975.4321
167 75 60.87816 975.1428 167.9 75.5 60.86003 974.8522
168.8 76 60.84182 974.5606 169.7 76.5 60.82355 974.2679
170.6 77 60.80520 973.9741 171.5 77.5 60.7868 973.6792
172.4 78 60.76832 973.3832 173.3 78.5 60.74977 973.0862
174.2 79 60.73116 972.7881 175.1 79.5 60.71249 972.489
176 80 60.69375 972.188
3
kg/m
3
°F °C lb/ft
3
kg/m3
LCI40 Series IOM
WWW.LCMETER.COM
73
Page 74

6 OPERATION
6.5 Description of Functions
6.5.6 Density Mode (Menu C1.2.2)
There Are Four Available Operating Modes
For Density That Can Be Set Here
• Process:
The device measures and displays the current
operating density of the product.
• Fixed:
The device displays a fixed density value. This value
must be entered in menu C1.2.3.
• Referred:
The device calculates the density based on a set
reference temperature.
• Standard:
The device calculates the standard density based on a
set reference temperature and the correction factors k0
to k2, so that a standard volume can be output.
The Following Equation Is Used For The
“Referred” Mode:
ρr = ρa + a (ta - tr)
ρr = Density at reference temperature
ρa = Current measured operating density at current
operating temperature
a = Programmed temperature coefficient/density
gradient
ta = Current measured operating temperature
tr = Reference temperature
The reference temperature must be entered in menu
item C1.2.3. The density gradient is set in C1.2.4.
Calculating the Density Gradient
1. Density
2. Temperature
The Following Equation is Used to Calculate
the Density Gradient
a = (ρD - ρC) / (TB - TA)
The value for the density gradient is generally positive
as an increase in temperature usually reduces the
measured density(exception: water anomaly).
Calculating The Standard Density
The measuring device can display a density which has
been corrected in terms of the standard temperature in
accordance with API 11.1. Standard 2540.
The corresponding reference temperature is entered
in menu C1.2.5. The correction factors k0 to k2 are
entered in menu C1.2.6 to C1.2.8.
74
WWW.LCMETER.COM
Standard factors for gasolines are: k0 = 346.4228; k1 =
0.4388; k2 = 0
LCI40 Series IOM
Page 75

6 OPERATION
6.5 Description of Functions
6.5.7 Pipe Diameter (Menu C1.1.3)
The converter can also provide the flow velocity based
on a pipe diameter which the customer can freely
program. This value can either be the inner diameter
of the measuring tube (factory default) or the inner
diameter of the process pipe.
6.5.8 Concentration measurement
(Menu C2)
This menu is used to enter the password to activate
concentration measurement (in case the concentration
option is purchased) after the meter is delivered.
6.5.9 Flow Direction (Menu C1.3.1)
This function allows the operator to set the direction
of flow in relation to the arrow on the housing. If
“Forwards” is selected, the flow direction corresponds
to the “+” arrow and with “Backwards” the flow
direction corresponds to the “-” arrow on the housing.
Information
Please refer to the separate
concentration manual for
further details of concentration
measurement.
LCI40 Series IOM
WWW.LCMETER.COM
75
Page 76

6 OPERATION
6.5 Description of Functions
6.5.10 Pressure Suppression
The pressure suppression eliminates any disruption
in the measurement in the event of an abrupt flow
switch-off e.g. when valves are suddenly closed. In
such cases, surges may occur in the pipe and in the
measuring device which could lead to over-vibration.
The flow then “swings” back and forth before a stable
zero flow is established, as shown in the figure below.
This effect occurs mainly in high pressure applications.
In most cases, the amplitude of this vibration is
below the low flow cutoff and thus does not affect
the measurement. In very few cases, the amplitude is
greater than the low flow cutoff (over-vibration) and can
cause errors with the counter values.
Vibration Behavior During Pressure Suppression
1. Flow switched off
2. Sinusoidal vibration (“over-vibration”)
3. Stable zero flow
Figure 6-9: Amplitude Behavior
1. Low flow cutoff
2. Low flow cutoff
3. Pressure suppression
4. Pressure suppression
The pressure suppression function eliminates this effect
by activating a larger low flow cutoff
level for a short period of time. The pressure
suppression is activated when the flow falls below the
standard low flow cutoff level for the first time. For a
programmable period of time, (can be programmed in
menu C1.3.2), the pressure suppression threshold is
added to the standard low flow threshold (can be set in
menu C1.3.3).
The optimal setting values for pressure suppression
depend on the current operating conditions and can
thus only be determined on-site through testing.
76
WWW.LCMETER.COM
LCI40 Series IOM
Page 77

6 OPERATION
6.5 Description of Functions
6.5.11 System Control
Menu C1.4.1 - Function
This menu makes it possible to switch off certain
measuring functions depending on a programmable
process state. When this system state occurs (as set in
Fct. C1.4.2), the following options can be activated:
• Inactive: system control is off
• Flow = 0: Flow set to zero
6.5.12 2 Ph. Threshold (Menu C1.5.3)
The threshold for the 2 phase signal can be set in this
menu item. This makes it possible to output a status
signal indicating the presence of gas bubbles in the
process. There are no default values for this threshold.
This means that the operator must adapt this value to
Menu C1.4.2 - Condition
Selecting the process measurement which activates
the system control. Density and temperature can be
selected.
Menu C1.4.3 – Max Limit
Menu C1.4.4 – Min Limit
Setting the limit values to activate system control.
Current measuring values outside of this range activate
this function.
suit his application. This can be done, for example, by
programming the 2 phase signal at the current output
and registering which threshold makes sense for the
respective process for a certain time period.
Example Regarding The Detection And Notification Of A Two-Phase Disturbed Flow
(e.g. Gas Bubbles In Paints)
Fct. Display Description and setting
B2.14 2 Phase Signal The 2-phase signal value in % can be read and
transferred to Diagnosis 1.
C1.5.3 2 Ph. Threshold Only input a value here if an error message is to be
generated.
This error message can be displayed via the status
outputs.
The error message is then indicated on the display as
S: Out Of Specification and
S: 2 Phase Flow indicated on the display.
Caution: Take into account the setting of the error
conditions of the current output!
C1.5.4 Diagnosis 1 Set “2 Phase Signal”.
C3.1.3 Terminals C Set “Limit Switch”.
C3.4.1 Measurement Set “Diagnosis 1”.
C3.4.2 Threshold e.g. set to “2.0 ± 0.2%”.
C3.4.3 Polarity e.g. set to “Absolute Value”.
C3.4.4 Time Constant Set as needed.
C3.4.4 Invert Signal Set as needed.
C6.4.1 2nd Measurement Page Set “Three Lines”.
C6.4.10 3rd Line Variable Set “Diagnosis 1”.
C6.4.11 3rd Line Format Set “X.XX”.
The 2 phase signal is displayed on the 2nd measuring
page at the bottom with e.g.: 0.02%. If the threshold is
exceeded (C3.4.2), a message is sent via terminals C.
LCI40 Series IOM
WWW.LCMETER.COM
77
Page 78

6 OPERATION
6.5 Description of Functions
6.5.13 Diagnosis Messages
(Menu C1.5.7 to .C1.5.14)
These settings make it possible to change the status
signal of the respective diagnosis message (status
group).
6.5.14 Optical Keys (C6.2.4)
This function can deactivate the optical keys. In the
display, the switched off state of the optical keys is
represented by a lock 1.
In this case, the device may only be operated using the
push buttons.
6.5.15 Graphic Page (Menu C6.5)
With this converter, the trend of the main measurement
can be graphically displayed. The first measurement
on display page 1 is always defined as the main
measurement.
6.5.16 Save Settings (Menu C6.6.2)
This function allows all settings to be stored in a
memory.
• Backup 1: Saves settings in backup memory area 1
• Backup 2: Saves settings in backup memory area 2
6.5.17 Load Settings (Menu C6.6.3)
This function allows the complete stored settings to be
loaded again.
• Backup 1: Loading from backup - memory 1
• Backup 2: Loading from backup - memory 2
• Factory: Uploading the original factory settings
6.5.18 Passwords (Menu 6.6.4 Quick Set;
Menu 6.6.5 Setup)
To create a password for the Quick Set menu or Setup
menu, you must enter a 4-digit code into the menu.
You are then prompted for this password every time
changes are to be made to the corresponding menus.
There is a hierarchy. The Setup password can also be
used to perform changes in the Quick Setup menu.
Enter 0000 in each menu to disable the password.
6.5.19 Date and Time (C6.6.6)
The signal converter has a real time clock which is used
for all of the log functions in the device.
This function can be used to set the date and time of
the real time clock.
• Menu C6.5.1 defines the range for the trend indicator
(manual or automatic).
• Menu C6.5.2 defines the range for manual setting.
• Menu C6.5.3 defines the time span for the trend
indicator.
78
WWW.LCMETER.COM
6.5.20 Quick Access (C6.6.7)
In measuring mode, pressing the ^ key for 2.5 seconds
carries out the “Quick Access” function.
Totalizers 1, 2, 3 and All Totalizers can be reset.
LCI40 Series IOM
Page 79

6 OPERATION
6.5 Description of Functions
6.5.21 Low flow cutoff
The low flow cutoff can be individually set for each
output and each display line. If the low flow cutoff has
been activated, the respective output or display is set
to zero when the flow is below the low flow cutoff value
entered.
The value can either be entered as a percentage of the
nominal flow of the sensor or, in the case of a pulse
output, as a discrete flow value.
Two values must be entered. The first is for the
operating point of the sensor and the second is for
hysterisis. Condition: 1st value > 2nd value
6.5.23 Dual Phase Pulse Output
A dual phase pulse or frequency output is often
required for custody transfer applications. This
operating mode requires 2 terminal pairs. Terminal
pairs A and B or D and B can be used.
In this case, perform the following settings:
• C3.3.11: Phase shift to D or shift to A
• All functions for output B are set using output D or
output A.
• C3.5.11: Setting phase shift from output B relative to
D, if terminal pair D was selected in C3.3.11. 0°, 90°
or 180° are offered as options. C3.2.11: Setting the
phase shift from output B relative to A, if terminal pair
A was selected in C3.3.11 0°, 90° or 180° are offered
as options.
6.5.24 Timeouts in Programming Mode
Normal Menu Function
If no key has been pressed for 5 minutes in a normal
menu function, the display automatically switches to
measuring mode. All changes are lost.
1. Flow
2. Time
3. Currently indicated flow
4. Display set to zero
5. Currently indicated flow
6. Positive hysteresis
7. Operating point
8. Negative hysteresis
6.5.22 Time Constant
To better process widely fluctuating measured values
in the device, the measured values are digitally filtered
to stabilise the output. The time constant can be
individually set for each output, the first line of the
display and the density measurement. However, keep
in mind that the degree of filtration affects the response
time of the device in the event of rapid changes.
Short Time Constant Fast response times
Fluctuating reading
Long Time Constant Slow response time
Stable reading
Test Function
In test mode, the test function is finished after 60
minutes.
GDC IR Interface
If the GDC-IR connection is activated, it is cancelled
after 60 seconds if no connection is established. If the
connection is interrupted, the display can be operated
again after 60 seconds using the optical keys.
6.5.25 Output Hardware
Depending on the hardware modules used (see CG
number), it may be possible to change the output
options on terminals A, B, C or D in the menus C3.1.x.
For example: A pulse output to a frequency output or a
status output to a control input.
The available options are determined by the hardware
module used. It is not possible to change the type of
output, e.g. from active to passive.
The time constant corresponds to the elapsed time
until 67% of the end value has been reached according
to a step function.
LCI40 Series IOM
WWW.LCMETER.COM
79
Page 80

6 OPERATION
6.6 Status Messages and Diagnostic Information
The error messages for the device are divided into
status groups, each with one status signal. There are
16 status groups with fixed status signals and 8 groups
with variable status signals. To facilitate identification of
the problem source, the status groups are then divided
into the groups: Sensor, Electronics, Configuration, and
Process.
The variable status signal can be changed in menu
C1.5.7 to C1.5.14. Changing the status signal to
“Information” switches off the message.
Each status message (= status signal) has a specific
symbol, which is displayed with the message. The
length of each message is limited to one line.
Symbol Letter Status Signal Description and Consequence
FF Failure No measurement possible.
S Out of Specification Measurements are available but are no longer sufficiently accurate and
M Maintenance Required Measurements are still accurate but this could soon change
C Function Check A test function is active; The displayed or transferred measured value
I Information No direct influence on the measurements
should be checked
does not correspond to the actual measured value.
All status messages are saved in the status log (menu
B3.1). Use the ↑ and ↓ keys to navigate through this
list. Use the ^ key to exit the list.
The status screen shows the status groups of all errors
that have occurred since the last time the status screen
was opened. All errors that are not current disappear
after two seconds. They are shown in the list in
brackets.
Information
As status message always the
name of the relevant status group
and the status signal (F/S/M/C) is
displayed.
80
WWW.LCMETER.COM
LCI40 Series IOM
Page 81

6 OPERATION
6.6 Status Messages and Diagnostic Information
Error Type Event Group Single Event Description Actions to
FF F Sensor
Sensor Containment Dam. High pressure detected in housing. Faulty
measuring tube.
Sensor Error The measuring sensor signals are out of
range.
Flow measurements are not possible.
FF F Electronics
System Error Electronics error in internal bus
System Error A
System Error C
HW Combination Error
BM Failure
DM Failure
Process Input Failure
IO 1 Failure
IO 2 Failure
Tot 1 Failure
Tot 2 Failure
Tot 3 Failure
IO A Failure
IO B Failure
IO C Failure
FF F Configuration
BM Configuration Error detected when starting device.
DM Configuration
Process Input Config. Settings for process input invalid. Check settings
Density Calib. Density calibration parameters invalid. Perform density
communication or due to a hardware
error.
Possible causes: inadmissible parameter
settings or fault with electronics
component.
Eliminate the
Event
Exchange
measuring sensor.
Check connection
between measuring
sensor and signal
converter (remote
version) or replace
measuring sensor.
Perform cold
start. If message
reappears, contact
manufacturer.
Check settings
of appropriate
function or load
factory settings.
If the error
persists, contact
manufacturer.
for process input
or load factory
settings.
calibration.
Check product and
function mode.
Legend
Fixed status signal
Variable status signal
LCI40 Series IOM
WWW.LCMETER.COM
81
Page 82

6 OPERATION
6.6 Status Messages And Diagnostic Information
Error Type Event Group Single Event Description Actions to Eliminate
the Event
Fieldbus Config. Inadmissible Fieldbus settings Check Fieldbus settings
or load factory settings.
PROFIBUS Config. Inadmissible PROFIBUS settings Check PROFIBUS
settings or load factory
settings.
Tot 1 FB4 Unit Error Totalizer is out of operation due to
inadmissible unit.
Tot 2 FB5 Unit Error Check unit in Totalizer
Tot 3 FB6 Unit Error Check unit in Totalizer
Modbus Config. Inadmissible Modbus settings Check Modbus settings
Display Config. Inadmissible settings for the display Check display settings or
IO1 Configuration Inadmissible settings for IO1 Check settings for IO1 or
IO2 Configuration Inadmissible settings for IO2 Check settings for IO2 or
Tot 1 Configuration Inadmissible settings for Totalizer 1 Check settings for
Tot 2 Configuration Inadmissible settings for Totalizer 2 Check settings for
Tot 3 Configuration Inadmissible settings for Totalizer 3 Check settings for
IO A Configuration Inadmissible settings for IO A Check settings for IO A or
IO B Configuration Inadmissible settings for IO B Check settings for IO B
IO C Configuration Inadmissible settings for IO C Check settings for IO C
IO D Configuration Inadmissible settings for IO D Check settings for IO D
FF F Process
C C Sensor
C C Electronics
Check unit in Totalizer
1 FB4 or load factory
settings.
2 FB5 or load factory
settings.
3 FB6 or load factory
settings.
or load factory settings.
load factory settings.
load factory settings.
load factory settings.
Totalizer 1 or load factory
settings.
Totalizer 2 or load factory
settings.
Totalizer 3 or load factory
settings.
load factory settings.
or load factory settings.
or load factory settings.
or load factory settings.
Legend
Fixed status signal
Variable status signal
82
WWW.LCMETER.COM
LCI40 Series IOM
Page 83

6 OPERATION
6.6 Status Messages And Diagnostic Information
Error Type Event Group Single Event Description Actions to Eliminate
C C Configuration
C C Process
S S Sensor
Sensor in Stop Mode The device is in stop mode. No flow
measurement is being performed.
All flowrelated values displayed are
substitute values. The measuring tube is
not vibrating
Sensor in Standby
Mode
Sensor Simulation
Active
Sensor Starting Up The sensor is in start-up mode. This is
Fieldbus Sim. Active The simulation function in the Foundation
PROFIBUS Sim/Man
Active
Totalizer 1 FB4 Sim.
Active
Totalizer 2 FB5 Sim.
Active
Totalizer 3 FB6 Sim.
Active
Totalizer 1 FB4 Man.
Active
Totalizer 2 FB5 Man.
Active
Totalizer 3 FB6 Man.
Active
IO A Simulation Active IO A simulation is active. Switch off simulation.
IO B Simulation Active IO B simulation is active.
IO C Simulation Active IO C simulation is active.
IO D Simulation Active IO D simulation is active.
Temp. Or Strain Res.
Def.
The device is in standby mode. No
flow measurement is being performed.
All flow-related values displayed are
substitute values. The measuring tube
continues to vibrate.
Simulation of mass flow, volume flow,
density or temperature
a normal state following a switch from
stop mode to measuring mode. The error
message “Sensor: Startup” becomes
active when this state goes on too long
or is unexpected.
Fieldbus module is active and being
used.
The simulation function in the PROFIBUS
module isactive and being used.
The simulation function in the PROFIBUS
module is active and being used.
The manual mode in the PROFIBUS
module is active.
The resistance network for temperature
and strain measurement is operated
outside of specifications and is possibly
faulty. The measured values for flow
and density remain valid however
the accuracy is undetermined. The
temperature measurement has failed.
the Event
Switch to measuring
mode for normal
operation.
Switch off measured
value simulation.
Check Fieldbus settings.
Check PROFIBUS
settings.
Switch off simulation.
Switch of manual mode.
Check connection
between measuring
sensor and signal
converter (remote
version) or replace
measuring sensor.
LCI40 Series IOM
WWW.LCMETER.COM
83
Page 84

6 OPERATION
6.6 Status Messages And Diagnostic Information
Error Type Event Group Single Event Description Actions to Eliminate
the Event
S S Electronics
Electr.Temp.A Out of
Spec
Electr.Temp.C Out of
Spec
Electr.Temp. Out of
Spec
S S Configuration
IO A Overrange The output value is limited by a filter. When limiting the input
IO B Overrange
IO C Overrange
IO D Overrange
S S Process
Proc.Temp.Out of
Range
Flow Out of Range The flow is out of range. The actual flow
Prod.Density Out of
Range
Velocity Out of Range The flow is out of range. The actual
M M Sensor
M M Electronics
Backplane Data Faulty The backplane data record is faulty. Check the correct
Factory Data Faulty Factory settings are invalid. Contact manufacturer.
Backplane Difference The data on the backplane differ from
Mem. Life Exceeded The number of maximum write cycles is
Temperature of the signal converter
electronics is out of range.
The process temperature is out of range.
The measurement continues but the
accuracy is undetermined.
is higher than the displayed value.
The density is out of range.
The measurement continues but the
accuracy of the density and flow is
undetermined.
flow is higher or lower than the value
displayed.
the data in the device.
exceeded for the memory component.
Protect signal converter
from process effects and
sunlight.
value, refer to the actions
listed there. Check the
range setting of the
output.
Check process
conditions.
Check process
conditions and density
calibration.
Check process
conditions and pipe
diameter setting.
installation of the signal
converter electronics.
After changing one
parameter, the message
should disappear within
one minute. If not,
contact the manufacturer.
After changing one
parameter, the message
should disappear within
one minute. If not,
contact the manufacturer.
Exchange the signal
converter electronics.
Legend
Fixed status signal
Variable status signal
84
WWW.LCMETER.COM
LCI40 Series IOM
Page 85

6 OPERATION
6.6 Status Messages And Diagnostic Information
Error Type Event Group Single Event Description Actions to Eliminate
the Event
M M Configuration
Backup 1 Data Faulty Error when checking the data record for
Backup 1.
Backup 2 Data Faulty Error when checking the data record for
Backup 2.
M M Process
F F Proc: Current
Input
IO A Error Current Error current is detected at current input
A.
IO B Error Current Error current is detected at current input B.Check device connected
S S Electr: IO
Connection
IO A Connection Current output A cannot provide the
necessary current. The current provided
is too low. The current at input A is below
0.5 mA or above 23 mA.
IO A Connection Open circuit or short circuit at IO A.
IO B Connection Current output B cannot provide the
necessary current. The current provided
is too low. The current at input B is below
0.5 mA or above 23 mA.
IO B Connection Open circuit or short circuit at IO B.
IO C Open Connector Current output C cannot provide the
necessary current. The current provided
is too low.
F F Proc: Signal
Search
Sensor signal search The measuring sensor signals are too
small for an accurate flow measurement.
The cause is typically too much damping,
e.g. due to gas bubbles or the viscosity is
too high.
S S Proc: 2
Phase Flow
2 Phase Flow Detected 2 phase flow has been detected.
The accuracy of the flow and density
measurement is undetermined.
Use “Setup > Device >
Special Functions > Save
Settings” to save the data
record. If the message
continues to appear,
contact the manufacturer.
Check device connected
to current input A. This
device submits an error
current.
to current input B. This
device submits an error
current.
Check connection at A.
Measure resistance of
current loop at A. Check
current at A.
Check connection at B.
Measure resistance of
current loop at B. Check
current at B.
Check connection at C.
Measure resistance of
current loop at C.
Check process
conditions. In the case
of a measuring sensor
in remote version, check
the electrical connection
between the field housing
and the measuring
sensor.
Check product for gas
bubbles.
Legend
Fixed status signal
Variable status signal
LCI40 Series IOM
WWW.LCMETER.COM
85
Page 86

6 OPERATION
6.6 Status Messages And Diagnostic Information
Error Type Event Group Single Event Description Actions to Eliminate
the Event
S S Proc: Signal
Low
Sensor signal low The sensor signals do not reach the
S S Config:
Totalizer
Tot 1 FB4 Overflow Totalizer 1 FB4 has overflowed and
I I Proc: System
Control
System Control Active System control is active.
I I Electr: Power
Failure
Tot 1 Power Failure Totalizer 1 invalid due to power failure. Check the value of the
expected amplitude. This can influence
the measuring accuracy.
started again at zero.
Tot 2 FB5 Overflow Totalizer 2 FB5 has overflowed and
started again at zero.
Tot 3 FB6 Overflow Totalizer 3 FB6 has overflowed and
started again at zero.
Tot 1 Overflow Totalizer 1 has overflowed and started
again at zero.
Tot 2 Overflow Totalizer 2 has overflowed and started
again at zero.
Tot 3 Overflow Totalizer 3 has overflowed and started
again at zero.
Tot 2 Power Failure Totalizer 2 invalid due to power failure.
Tot 3 Power Failure Totalizer 3 invalid due to power failure.
Tot 1 FB4 Power Failure Totalizer 1 FB4 invalid due to power
failure.
Tot 2 FB5 Power Failure Totalizer 2 FB5 invalid due to power
failure.
Tot 3 FB6 Power Failure Totalizer 3 FB6 invalid due to power
failure.
Power Failure Detected Power failure has occurred.
The Totalizer state may be invalid.
Check the product
for viscosity and gas
bubbles.
Check Totalizer format.
Totalizer.
Legend
Fixed status signal
Variable status signal
86
WWW.LCMETER.COM
LCI40 Series IOM
Page 87

6 OPERATION
6.6 Status Messages And Diagnostic Information
Error Type Event Group Single Event Description Actions to Eliminate the
Event
I I Config: No
Meas.Value
IO A No Meas. Values The measurement value for the
IO terminals A is not active.
IO B No Meas. Values The measurement value for the
IO terminals B is not active.
IO C No Meas. Values The measurement value for the
IO terminals C is not active.
IO D No Meas. Values The measurement value for the
IO terminals D is not active.
Tot 1 No Meas. Values The measurement value for the
Totalizer 1 is not active.
Tot 2 No Meas. Values The measurement value for the
Totalizer 2 is not active.
Tot 3 No Meas. Values The measurement value for the
Totalizer 3 is not active.
Disp. 1 No Meas. Values Measurement value at 1st
measuring page is not active.
Disp. 2 No Meas. Values Measurement value at 2nd
measuring page is not active.
Select another measurement for
IO A in menu C3.2 or activate
the measurement in C5.1 for
diagnosis values or in menu
C2 for concentration values.
Select another measurement for
IO B in menu C3.3 or activate
the measurement in C5.1 for
diagnosis values or in menu
C2 for concentration values.
Select another measurement for
IO C in menu C3.4 or activate
the measurement in C5.1 for
diagnosis values or in menu
C2 for concentration values.
Select another measurement for
IO D in menu C3.5 or activate
the measurement in C5.1 for
diagnosis values or in menu
C2 for concentration values.
Select another measurement
for Totalizer 1 in menu C4.1 or
activate the measurement in C1.5
for diagnosis values or in menu
C2 for concentration values.
Select another measurement
for Totalizer 2 in menu C4.2 or
activate the measurement in C1.5
for diagnosis values or in menu
C2 for concentration values.
Select another measurement
for Totalizer 3 in menu C4.3 or
activate the measurement in C1.5
for diagnosis values or in menu
C2 for concentration values.
Select another measurement for
1st measuring page or activate
the measurement in C1.5 for
diagnosis values or in menu
C2 for concentration values.
Select another measurement for
2nd measuring page or activate
the measurement in C1.5 for
diagnosis values or in menu
C2 for concentration values.
Legend
Fixed status signal
Variable status signal
LCI40 Series IOM
WWW.LCMETER.COM
87
Page 88

6 OPERATION
6.6 Status Messages And Diagnostic Information
Error Type Event Group Single Event Description Actions to Eliminate
the Event
I I Electr.
Operation Info.
Zero Calibr. Running A zero calibration is performed.
PROFIBUS: no data No data exchange via
PROFIBUS.
PROFIBUS Baudrate PROFIBUS searches for the current
Baudrate.
PROFIBUS Passivated PROFIBUS module is passivated. Disable PROFIBUS
PROFIBUS Clear Data PROFIBUS Clear Data is active Start of cyclic PROFIBUS
PROFIBUS Sync Mode PROFIBUS Sync Mode is active. Disable Sync Mode.
PROFIBUS Freeze
Mode
Tot 1 Stopped Totalizer 1 was stopped. If Totalizer is to continue
Tot 2 Stopped Totalizer 2 was stopped.
Tot 3 Stopped Totalizer 3 was stopped.
Tot 1 FB4 Threshold Tot 1 FB4 Threshold exceeded. Reset Totalizer 1 FB4.
Tot 2 FB5 Threshold Tot 2 FB5 Threshold exceeded. Reset Totalizer 2 FB5.
Tot 3 FB6 Threshold Tot 3 FB6 Threshold exceeded. Reset Totalizer 3 FB6.
Control In A Active
Control In B Active
Status Out A Active
Status Out B Active
Status Out C Active
Status Out D Active
Fieldbus No Connection Check Fieldbus terminal and connection.
Disp. 1 Overrange The value in the 1st measurement line of
Disp. 2 Overrange The value in the 2nd measurement line of
Optical Interf. Active The optical interface is being used. The
PROFIBUS Freeze Mode is active. Disable Freeze Mode.
the display page is limited.
the display page is limited.
optical keys are deactivated.
Set up cyclical
PROFIBUS
communication.
Check PROFIBUS
terminal and connection.
passivation.
communication
counting, select “Yes” in
Fct. C.y.9 (Start
Totalizer).
Check setting for 1st
measurement line.
Check setting for 2nd
measurement line.
The keys are ready for
operation again approx.
60 seconds after the
end of the data transfer/
removal of the optical
interface.
Legend
Fixed status signal
Variable status signal
88
WWW.LCMETER.COM
LCI40 Series IOM
Page 89

6 OPERATION
6.7 Function Tests and Troubleshooting
Min. And Max. Recorded Temperature
(Menu C1.5.1 / C1.5.2)
Stores the minimum and maximum value for the
temperature occurring during sensor operating time.
Measuring Sensor Type Operating Temperature
Minimum Maximum
®
LCMass
LCMass
LCMass
LCMass
LCMass
600 - Standard version -94°F / -70°C +446°F / +230°C
®
600 - Cryogenic version -328°F / -200°C +104°F / +40°C
®
600 - High temperature version -58°F / -50°C +752°F / +400°C
®
600 - Hastelloy C -94°F / -70°C +446°F / +230°C
®
600 - Duplex -58°F / -50°C +446°F / +230°C
Application Problems That May Indicate
Errors in the Signal Converter
• An improperly closed shut-off valve during zero
calibration results in high calibration values
• Air/gas bubbles result in high energy levels and high
calibration values
• Product deposits on the inside of the measuring tube
lead to higher/lower density indications and high
calibration values
Common Errors
(with Corresponding Symptoms)
• Slightly eroded or corroded measuring tube
- Erroneous density measurement
- High frequency
- Measurement error at low mass flow
• Eroded or corroded measuring tube (product in the
housing)
- Measuring tube does not start
- Low resistance to earth with conducting product
• Open circuits of drive and sensor coils or resistance
thermometers (RTD)
- Can be measured with ohmmeter
LCI40 Series IOM
WWW.LCMETER.COM
89
Page 90

6 OPERATION
6.7 Function Tests and Troubleshooting
Typical frequency values (at 68°F / 20°C; ±5Hz)
Size All Materials
Empty Water
®
LCMass
LCMass
LCMass
LCMass
LCMass
LCMass
LCMass
LCMass
LCMass
LCMass
Problems with Zero Calibration
1. Stop the flow.
600 - 08 220 205
®
600 - 10 187 172
®
600 - 15 212 191
®
600 - 25 266 231
®
600 - 50 262 230
®
600 - 80 234 203
®
600 - 100 257 221
®
600 - 150 245 208
®
600 - 200 218 184
®
600 - 250 187 160
Information
2. Set the Totalizer in Fct. C3.y.1 to “Absolute Total”.
3. Set the low flow cutoff in Fct. C3.y.3 to zero.
4. Perform automatic zero calibration.
5. Reset Totalizer and count for 2 minutes.
6. Compare the added value to the specified zero
calibration stability.
Possible Causes of Poor Zero Calibration
Valves not completely closed, air or gas bubbles, or
deposits on measuring tube
For best results, perform zero
calibration with the medium at
operating temperature.
90
WWW.LCMETER.COM
LCI40 Series IOM
Page 91

6 OPERATION
6.8 Diagnostic Functions
The following diagnostic functions are available in test menu B2.
6.8.1 Temperature (Menu B2.7)
Temperature display in °F or °C.
• This value should be steadily displayed.
• Unstable values may mean a faulty Pt500 or that
liquid is in the outer housing.
6.8.2 Frequency (Menu B2.10)
• Fluctuation in the first decimal places indicate gas or
air bubbles in the product.
• Worn or eroded measuring tube: frequency increases
by around 2 to 4Hz; recalibration required.
• Formation of a coating can reduce vibration
frequency, depending on the type of coating and the
layer thickness. If, however, the density of the coating
is the same as for the flowing medium, no frequency
is observed.
• Large fluctuations in frequency occur in the “start-up”
phase.
6.8.3 Drive Level (Menu B2.11)
Display of the drive energy in percent.
6.8.4 Sensor levels A and B
(Menu B2.12, B2.13)
Normal display values:
• 80% for LCMass 600 standard and cryogenic version
• 60% for LCMass 600 HT version
Information
The sensor levels for A and B
should not differ by more than 2%.
6.8.5 2 Phase Signal (Menu B2.14)
The value of the 2 phase signal can be read in this
function. For applications that must detect 2 phase
flow, an alarm level can be programmed. This alarm
level depends on the application and the process and
can thus only be set on-site under current operating
conditions during flow. For detailed information refer to
2 Ph. Threshold (menu C1.5.3) on page 75.
Typical values for drive energy in water and with no gas
inclusions
LCMass® 600 All sizes 0 to 1
Information
Higher values for drive energy can
occur when the product contains
air or gas bubbles or when
measuring products with high
viscosity or density.
LCI40 Series IOM
WWW.LCMETER.COM
91
Page 92

7 SERVICE
7.1 Replacing the Signal Converter Electronics
• Remove the front panel. Use a small screwdriver to
open the plastic clips that hold the display.
• Remove the 2 locking screws.
• Carefully pull the electronics almost completely out
of the housing.
• Remove the 2 connecting cables from the electronics
before removing the signal converter electronics to
be replaced.
• To insert the new electronics, first connect the two
connecting cables to the electronics.
• Carefully push the electronics back into the housing.
• Tighten the two locking screws again and secure
the display. The measuring system recognises the
hardware replacement when the power supply is
switched on.
DANGER
Work on the signal converter
electronics may only be performed
when disconnected from the power
supply.
WARNING
Observe without fail the local
occupational health and safety
regulations. Any work done on
the electrical components of the
measuring device may only be
carried out by properly trained
specialists.
92
WWW.LCMETER.COM
LCI40 Series IOM
Page 93

7 SERVICE
7.2 Sensor or Drive Coil Fault
The specified values are for guidance only.
Typical Values For Sensor Or Drive Coils
Size Resistance (Ohm)
Driver Sensor A - Sensor B
Black/Grey Purple/Green - White/Yellow
Cryo 446°F / 230°C 752°F / 400°C Cryo 446°F / 230°C / 752°F / 4 00°C
®
LCMass
LCMass® 600 - 10 68 6 640 1455
LCMass® 600 - 15 68 6 640 1455
LCMass® 600 - 25 42 12 342 755
LCMass® 600 - 50 42 52 342 755
LCMass® 600 - 80 42 52 4 43 960
LCMass® 600 - 100 42 54 342 755
LCMass® 600 - 150 42 54 375 852
LCMass® 600 - 200 42 54 375 852
LCMass® 600 - 250 42 54 375 852
600 - 08 72 12 640 1455
Typical Rtd Resistances
Resistance (Ohm)
Pt500 Compensation Lines
Red/Brown Brown/Orange
®
LCMass
600 - all sizes 540 at 68°F / 20°C 0.1
• Resistance values outside of the ranges specified
above may indicate a circuit error. The device may be
in “start-up” mode or indicate measuring errors.
• All circuits should be isolated with respect to earth
(device housing) and each other >20 MΩ.
• A drive/sensor coil short circuit can cause the device
to be put into “Startup mode.”.
7.3 Disposal
CAUTION
Disposal must be carried out
in accordance with legislation
applicable in your country.
Information
Failure of two or more of the upper
circuits may indicate a measuring
tube error. There may be product
in the housing. If this is the case,
depressurize the process line and
immediately remove the measuring
device from the process line.
LCI40 Series IOM
WWW.LCMETER.COM
93
Page 94

8 TECHNICAL DATA
8.1 Measuring Principle (Twin Tube)
Static Meter Not Energized and with No Flow
1. Measuring tubes
2. Drive coil
3. Sensor 1
4. Sensor 2
A Coriolis twin tube mass flowmeter consists of two
measuring tubes 1 a drive coil 2 and two sensors (3 and
4) that are positioned either side of the drive coil.
Energized Meter
1. Measuring Tubes
2. Direction of oscilation
3. Sine wave
When the meter is energised, the drive coil vibrates
the measuring tubes causing them to oscillate and
produce a sine wave 3. The sine wave is monitored by
the two sensors.
94
WWW.LCMETER.COM
LCI40 Series IOM
Page 95

8 TECHNICAL DATA
8.1 Measuring Principle (Twin Tube)
Energised Meter With Process Flow
1. Process flow
2. Sine wave
3. Phase shift
When a fluid or gas passes through the tubes, the
coriolis effect causes a phase shift in the sine wave
that is detected by the two sensors. This phase shift is
directly proportional to the mass flow.
Density measurement is made by evaluation of the
frequency of vibration and temperature measurement is
made using a Pt500 sensor.
LCI40 Series IOM
WWW.LCMETER.COM
95
Page 96

8 TECHNICAL DATA
8.2 Technical Data
Measuring System
Measuring Principle Coriolis principle
Application Range Measurement of mass flow, density, temperature, volume flow, flow velocity, concentration
Design
Modular Construction The measuring system consists of a measuring sensor and a signal converter.
Measuring Sensor
®
LCMass
Signal Converter
Compact version (C) LCMass
Field Housing (F) -Remote
Version
Compact and field housing versions are also available as Ex versions.
Options
Outputs / Inputs Current output, pulse output, frequency output, and/or status output, limit switch and/or
Totalizer 2 (optional 3) internal Totalizers with a maximum of 8 counter places (e.g. for counting
Verification Integrated verification, diagnostic functions: measuring device, process, measured value,
Concentration Measurement Concentration and concentration flow
Communication Interfaces Foundation Fieldbus, PROFIBUS PA and DP, Modbus
600 3/8 to 10” / DN08 to 250
All measuring sensors are also available in an Ex version.
®
640 C
LCI40 F
control input (depending on the I/O version)
volume and/or mass units)
stabilization
Information
The following data is provided for
general applications. If you require
data that is more relevant to your
specific application, please contact
us or your local sales office.
Additional information (certificates,
special tools, software, etc.) and
complete product documentation
can be downloaded free of charge
from the website.
96
WWW.LCMETER.COM
LCI40 Series IOM
Page 97

8 TECHNICAL DATA
8.2 Technical Data
Display And User Interface
Graphic Display LC display, backlit white.
Size: 128 x 64 pixels, corresponds to 59 x 31 mm = 2.32” x 1.22”
Display turnable in 90° steps.
Ambient temperatures below -13°F / -25°C may affect the readability of the
display.
Operating Elements 4 mechanical and 4 optical keys for operator control of the signal converter
without opening the housing.
Infrared interface for reading and writing all parameters with IR interface (option)
without opening the housing.
Remote Operation PACTwareTM (incl. Device Type Manager (DTM))
AMS® from Emerson Process
PDM® from Siemens
All DTMs and drivers are available free of charge from the manufacturer’s website.
Display Functions
Operating Menu Setting the parameters using 2 measuring pages, 1 status page, 1 graphic page
(measured values and graphics are freely adjustable)
Language Display Texts (As
Language Package)
Measurement Functions Units: US and Metric units selectable as desired from lists for volume/mass flow
Diagnostic Functions Standards: VDI / WIB 2650 and NE 107
Standard: English, French, German, Dutch, Portuguese, Swedish, Spanish, Italian
and counting, velocity, temperature, pressure
Measured values: Mass flow, total mass, temperature, density, volume flow, total
volume, velocity, flow direction (not displayed unit – but available via outputs),
BRIX,
Baume, NaOH, Plato, API, mass concentration, volume concentration
Status messages:: Output of status messages optional via display, current and/or
status output, or bus interface
Sensor diagnosis: Sensor values, drive level, measuring tube frequency, 2 phase
signal, drive coil impedance, insulation fault, circuit interruption, exceeding the
maximum flow, process temperature
Self-diagnosing sensor electronics: Electronics temperature, input gains, driver
amplifier
Signal converter and inputs/outputs: Data bus monitoring, current output
connections, electronics temperature, voltage drop, parameter and data integrity
LCI40 Series IOM
WWW.LCMETER.COM
97
Page 98

8 TECHNICAL DATA
8.2 Technical Data
Measuring Accuracy
Reference Conditions Medium: water
Temperature: +68°F / +20°C
Pressure: 14.5 psi / 1 bar
Maximum Measuring Error
Mass (Standard) Liquid (≥ 20:1 of nominal flow rate): ±0.1% of actual measured flow rate (depending on the
measuring sensor)
Liquid (< 20:1 of nominal flow rate): ± zero point stability (depending on the measuring
sensor)
Gas: ±0.35% of actual measured flow rate ± zero point stability (depending on the
measuring sensor)
Mass (Option) Liquid (≥ 10:1 of nominal flow rate):±0.05% of actual measured flow rate (depending on the
measuring sensor)
Current output electronics ±5μA
Repeatability Liquid: ≤ 0.05% + zero point stability
Gas: ≤ 0.2% + zero point stability
Operating Conditions
Temperature
Process Temperature Refer to technical data for the measuring sensor.
Ambient Temperature Depending on the version and combination of outputs.
It is a good idea to protect the signal converter from external heat sources such as direct
sunlight as higher temperatures reduce the life cycle of all electronic components.
-40 - +149°F / -40 - +65°C
Stainless steel housing: -40 - +140°F / -40 - +60°C
Ambient temperatures below -13°F / -25°C may affect the readability of the display.
Storage Temperature -58 - +158°F / -50 - +70°C
Pressure
Medium Refer to technical data for the measuring sensor.
Ambient Pressure Atmospheric
Chemical Properties
State of Aggregation Liquids, gases, and slurries
Flow Rate Refer to technical data for the measuring sensor.
Other Conditions
Ingress Protection Acc. to IEC
529 / EN 60529
IP66/67 (acc. to NEMA 4/4X)
Installation Conditions
Installation For detailed information, refer to chapter “Installation conditions”.
Dimensions and Weights For detailed information refer to chapter “Dimensions and weights”.
98
WWW.LCMETER.COM
LCI40 Series IOM
Page 99

8 TECHNICAL DATA
8.2 Technical Data
Materials
Signal Converter Housing Standard: die-cast aluminium (polyurethane coated)
Option: stainless steel 316 (1.4408)
Measuring Sensor For housing material, process connections, measuring tubes, accessories and gaskets, refer
to technical data for the measuring sensor.
Electrical Connection
General Electrical connection is carried out in conformity with the VDE 0100 directive “Regulations
for electrical power installations with line voltages up to 1000 V” or equivalent national
specifications.
Power Supply Standard: 100 to 230 VAC (-15% / +10%), 50/60 Hz
Option 1: 24 VDC (-55% / +30%)
Option 2: 24 VAC/DC (AC: -15% / +10%, 50/60 Hz; DC: -25% / +30%)
Power Consumption AC: 22 VA
DC: 12 W
Signal Cable Only for remote versions.
10 core shielded cable. Detailed specifications are available on request.
Length: max. 65.6 ft / 20 m
Cable Entries Standard: M20 x 1.5 (8 to 12 mm)
Option: ½ NPT, PF ½
LCI40 Series IOM
WWW.LCMETER.COM
99
Page 100

8 TECHNICAL DATA
8.2 Technical Data
Inputs and Outputs
General All outputs are electrically isolated from each other and from all other circuits.
All operating data and output values can be adjusted.
Description of Abbreviations U
Current output
Output Data Volume flow, mass flow, temperature, density, flow velocity, diagnostic value, 2-phase signal
Temperature Coefficient Typically ±30 ppm/K
Settings Q = 0%: 0 to 20 mA; Q = 100%: 10 to 20 mA
Operating data Basic I/Os Modular I/Os Ex i
Active Uint, nom=24 VDC
Passive Uext≤32 VDC
= external voltage; RL = load + resistance;
ext
U
= terminal voltage; I
0
= nominal current
nom
Safety limit values (Ex i):
U
= max. input voltage; Ii = max. input current; Pi = max. input power rating;
i
C
= max. input capacity; Li = max. input inductivity
i
Concentration and concentration flow are also possible with available concentration
measurement (optional).
Error identification: selectable 3 to 22 mA
, nom = 20 VDC
U
int
I ≤ 22 mA
RL ≤ 1 kΩ
I ≤ 22 mA
R
≤ 450Ω
L
= 21 V
U
0
I
= 90mA
0
P
= 0.5W
0
C
= 90 nF / L0 = 2 mH
0
C
=110 nF/ L0 = 0.5mH
0
Uext≤32 VDC
I ≤ 22 mA
U0≥1.8 V
RL≤(Uext-U0)/Imax
I ≤ 22 mA
U
≥ 4V
0
R
≤ (U
L
ext-U0
)/Imax
Ui = 30V
I
= 100mA
i
P
= 1W
i
C
= 10nF
i
Li ~ 0mH
100
WWW.LCMETER.COM
LCI40 Series IOM
 Loading...