


FIREHAWK FX
PILOT’S GUIDE
40-00-0363 Rev E Pilot’s Guide also available at www.line6.com/manuals ©2015 Line 6, Inc.
Important Safety Instructions
CAUTION
RISK OF ELECTRIC SHOCK DO
NOT OPEN
WARNING : TO REDUCE THE RISK OF FIRE OR ELECTRIC SHOCK, DO NOT REMOVE SCREWS. NO USER-SERVICEABLE PARTS INSIDE.
REFER SERVICING TO QUALIFIED SERVICE PERSONNEL.
WARNING : TO REDUCE THE RISK OF FIRE OR ELECTRIC SHOCK, DO NOT EXPOSE THE APPLIANCE TO RAIN OR MOISTURE.
Changes or modications not expressly approved by the party responsible for compliance could void the user's authority to operate the equipment.
NOTE: This equipment has been tested and found to comply with the limits for a Class B digital device, pursuant to Part 15 of the FCC Rules. These limits are
designed to provide reasonable protection against harmful interference in a residential installation.
This equipment generates, uses and can radiate radio frequency energy and, if not installed and used in accordance with the instructions, may cause harmful
interference to radio communications. However, there is no guarantee that interference will not occur in a particular installation. If this equipment does cause
harmful interference to radio or television reception, which can be determined by turning the equipment o and on, the user is encouraged to try to correct the
interference by one or more of the following measures:
- Reorient or relocate the receiving antenna.
- Increase the separation between the equipment and receiver.
- Connect the equipment into an outlet on a circuit dierent from that to which the receiver is connected.
- Consult the dealer or an experienced radio/TV technician for help.
FCC Radiation Exposure Statement: This equipment complies with FCC radiation exposure limits set forth for an uncontrolled environment. This equipment
should be installed and operated with minimum distance 20cm between the radiator & your body.
The lightning symbol within a triangle means “electrical caution!” It
indicates the presence of information about operating voltage and
potential risks of electrical shock.
Please Note: Line 6 is a registered trademark of Line 6, Inc. registered in the U.S. and other countries. FIREHAWK, AMPLIFi, James Tyler Variax and
Variax are trademarks of Line 6, Inc. All rights reserved. iPod touch®, iPhone® and iPad® are trademarks of Apple, Inc. registered in the U.S. and other
countries. App StoreSM is a service mark of Apple, Inc. Apple is not responsible for the operation of this device or its compliance with safety and regulatory standards. The Bluetooth® word mark and logos are registered trademarks owned by Bluetooth SIG, Inc. and any use of such marks by Line 6 is
under license. Android™ and Google Play™ are trademarks of Google, Inc. Windows® is a registered trademark of Microsoft Corporation in the United
States and/or other countries. ASIO® is a trademark and software of Steinberg Media Technologies GmbH.
The exclamation point within a triangle means “caution!” Please read
the information next to all caution signs.
You should read these Important Safety Instructions. Keep these instructions in a safe place
• Read these instructions.
• Keep these instructions.
• Heed all warnings.
• Follow all instructions.
• Do not use this apparatus near water.
• Clean only with dry cloth.
• Do not block any ventilation openings. Install in accordance with the manufacturer’s instructions.
• Do not install near any heat sources such as radiators, heat registers, stoves, or other apparatus (including ampliers) that produce heat.
• This apparatus shall be connected to a MAINS socket outlet with a protective earthing connection.
• Do not defeat the safety purpose of the polarized or grounding-type plug. A polarized plug has two blades with one wider than the other. A grounding
type plug has two blades and a third grounding prong. The wide blade or the third prong are provided for your safety. If the provided plug does not t into
your outlet, consult an electrician for replacement of the obsolete outlet.
• Protect the power cord from being walked on or pinched particularly at plugs, convenience receptacles, and the point where they exit from the apparatus.
• Only use attachments/accessories specied by the manufacturer.
• Use only with the cart, stand, tripod, bracket, or table specied by the manufacturer, or sold with the apparatus. When a cart is used, use caution when
moving the cart/apparatus combination to avoid injury from tip-over.
• Unplug this apparatus during lightning storms or when unused for long periods of time.
• Refer all servicing to qualied service personnel. Servicing is required when the apparatus has been damaged in any way, such as power-supply cord
or plug is damaged, liquid has been spilled or objects have fallen into the apparatus, the apparatus has been exposed to rain or moisture, does not
operate normally, or has been dropped.
• The apparatus shall not be exposed to dripping or splashing and that no objects lled with liquids, such as vases, shall be placed on the apparatus.
• WARNING: To reduce the risk of re or electric shock do not expose this apparatus to rain or moisture.
• The appliance coupler is used as the disconnect device, the disconnect device shall remain readily operable.
• Connect only to AC power outlets rated: 100/120V 220/240V 50/60Hz (depending on the voltage range of the included power supply).
• Prolonged listening at high volume levels may cause irreparable hearing loss and/or damage. Always be sure to practice “safe listening.”
• Service is required when the apparatus has been damaged in any way, such as:
• Power-supply cord or plug is damaged.
• Liquid has been spilled or objects have fallen into the apparatus.
• The unit has been exposed to rain or moisture.
• The unit is dropped or the enclosure is damaged.
• The unit does not operate normally or changes in performance in a signicant way.
• This apparatus should only be used at temperatures between 0° and 50° C.
• NB # CE2200
SERIAL NO:
WELCOME TO FIREHAWK FX - STAGE, STUDIO & BEYOND
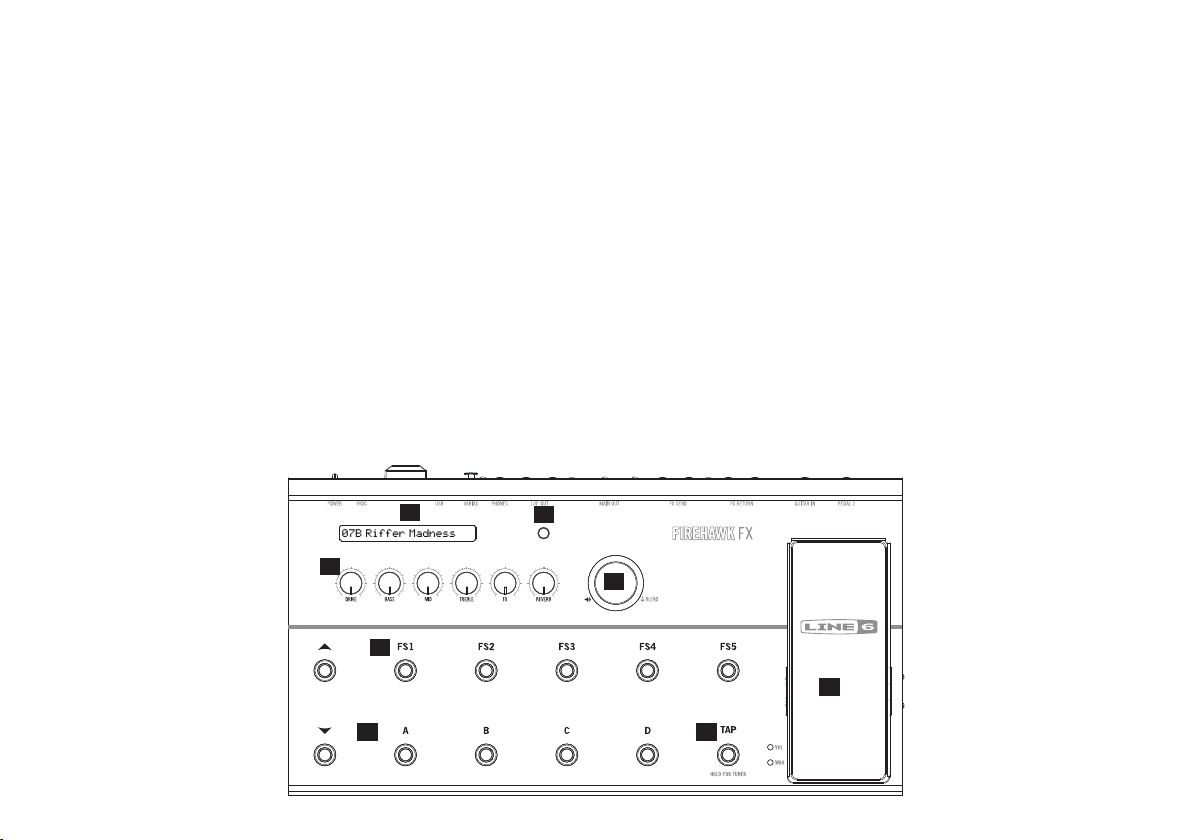
07B Riffer Madness
Firehawk FX takes the guitar multi-eects processor to the next level
by literally placing the power of great guitar tone right in the palm of your
hand. The hardware delivers the sonic fortitude of Line 6 HD modeling
with a exible array of connectivity for live performance and recording.
The software app leverages the power of your mobile device for alluring
visual tone creation & deep editing, online tone sharing & downloads,
and wireless streaming of the music library on your mobile device.
Firehawk FX Features
• High-performance oor eects processor
• Over 250 Classic and HD models of guitar amps, cabs, stompboxes
and studio eects
• Bluetooth® audio streaming from your device (compatible with iOS,
Android™, and Mac® or PC)
• Low-latency, USB direct recording to Mac®, Windows® and iPad®
(iPad® requires an Apple® Camera Connection Kit adapter)
Top Panel Controls
• Maximum connectivity, including Standard & Variax® Guitar Inputs,
1/4-Inch & XLR Balanced Outputs, FX Loop, Pedal Control and
more!
Firehawk Remote App
• Wirelessly control and edit every aspect of your guitar rig
• Create, edit, download and share an unlimited number of tones
with the Line 6 online community
• Jam along with the music that lives on your mobile device using
wireless playback through Firehawk FX
• Made for iPhone® 6 Plus, iPhone® 6, iPhone® 5s, iPhone®
5c, iPhone® 5, iPhone® 4S, iPad® (4th generation), iPad® (3rd
generation), iPad® 2, iPad® mini, iPad® mini 2, iPad® Air, and iPod
touch® (5th generation)
• Compatible with many Android™ phones and tablets running
Android™ 4.2 or later. See www.line6.com/android for details
• Download the latest version of the free Firehawk Remote iOS
application in the App StoreSM, or get the latest version of the free
Firehawk Remote Android™ app in the Google Play™ Store
1
3
5
6 7
2
4
8

1. LCD Display - The Firehawk FX display is multifunctional, showing
dierent information depending on the footswitches and modes you
access. In most cases, you’ll see the Bank & Preset location and title
for the currently loaded tone. We cover other items shown in the LCD
display throughout this Guide.
2. Bluetooth® Pairing Button - Using Bluetooth® technology, your
Firehawk FX communicates wirelessly with your mobile device.
Before running the Firehawk Remote app, you'll need to pair
Firehawk FX with your mobile device as follows:
• Enter Pairing mode on the Firehawk FX by pressing the Bluetooth®
button on the top panel - it will ash.
• Enter Bluetooth® Pairing mode on your iOS device, or open the
Bluetooth® Settings menu on your Android™ device.
• Your Firehawk FX device’s unique name will appear on your mobile
device. Android™ users may need to select "Scan for Devices" to
refresh the list of available Bluetooth® devices.
• Select your Firehawk FX unit's unique name on your mobile device
- this completes the pairing conguration and you are ready for
wireless operation!
3. Tone Controls - When using Firehawk Remote with your mobile
device, all tone adjustments can be made using the app Editor
screen. You can also tweak your guitar sound manually with these
Firehawk FX onboard Tone Controls:
• DRIVE: Adjusts the current Amp Model's Drive level.
• BASS, MID, TREBLE: Adjusts the Bass, Mid and Treble levels for
the current Amp Model's tone stack.
• FX: Adjusts the FX parameter assigned to the “FX Tweak” feature as
part of the Preset. This assignment can be edited in the Firehawk
Remote app.
• REVERB: Adjusts the Reverb level for the current Preset.
4. Master Volume Knob - This big knob controls the overall output
level, as well as provides easy access to your guitar level and the
current Amp Model's volume for individual adjustment.
Master Volume LED ring
Master Volume LED Ring - The ring of LEDs surrounding the Master
Volume knob lights up in various ways, depending on the current
parameter being adjusted.
• Selectable Volume Modes: There are three volume modes
available, which are accessed by pressing the Master Volume knob
to adjust each of the following parameters:
• Master Volume: When the LEDs are lit red, the knob adjusts the
overall volume output from the device. Press the knob once to
access the Guitar Level mode.
• Guitar Level: When the LEDs are lit white, the knob
independently adjusts the guitar (and Variax) level. This allows
you to balance the level of your guitar versus music playback.
Press the knob once to access the Channel Volume mode.
• Amp Model Channel Volume: When the LEDs are lit pink,
the knob independently adjusts the Channel Volume for the
current Preset's Amp Model. This is oered as an alternative to
adjusting the Amp volume within the Firehawk Remote app.
Press the knob once to return to Master Volume mode.
• Tone Controls: When any Tone knob on the device is adjusted, its
current Preset-stored level is indicated by a single red LED. All other
LEDs are lit white to display the current level as you turn the knob.
NOTE: Also see the later Live Edit Mode section for additional editing
options.

5. FX Footswitches - Footswitches (FS1–FS5) toggle the FX Blocks
On or O, just like a board full of analog pedals. Each footswitch can
be assigned to a dierent FX Block per Preset, as indicated by the
colored LED surrounding each footswitch. The LED colors indicate:
Yellow (Compressor & Stomp), Blue (Modulation), Purple (Synth),
Green (Delay), Orange (Reverb), White (Looper) and Turquoise (FX
Loop). When pressing one of these footswitches, you’ll also see its
assigned Block description and On/O state momentarily shown
in the LCD display. All FS1–FS5 footswitch assignments can be
created and edited using the Firehawk Remote app. See the
following Firehawk Remote App section for details.
6. Preset & Bank Select Footswitches - Firehawk FX comes loaded
with 128 Presets, comprised of 4 Preset locations (A–D) stored
within each of the Banks (1–32). The LCD display shows the Bank
number, location and title of the currently loaded Preset.
01B Lead the Way
LCD display showing Bank, Preset location and title
Each Preset stores all of the Amp and FX parameter settings that
dene the characteristics of the tone, Footswitch & Controller
assignments and FX Loop settings. Use the Bank and Preset Select
footswitches to load and save Presets on Firehawk FX.
NOTE: An unlimited number of Presets can be downloaded, created,
edited, saved and rearranged on your device using the mobile app!
See more details in the following Firehawk Remote App section.
To Load a Preset: Press one of the four Preset Select footswitches
(A–D) to load the Preset within the current Bank. The red LED around
the footswitch indicates your current selection.
To Load a Preset that Resides in a Dierent Bank: Select the
Bank, then choose the Preset Select footswitch. Use the Bank Up
and Bank Down footswitches to navigate through Banks. Once
you’ve reached the desired Bank (as indicated in the ashing LCD
Display) press one of the Preset Select footswitches (A–D) to load
the desired Preset within the Bank. The Bank select functionality will
time out after 5 seconds if no footswitch is selected.
Preset Status Indicator: Whenever you change an Amp or FX
setting from its original value, a dot appears between the Preset's
location number and title within the LCD Display indicating that the
Preset is now in an “unsaved” state. You’ll want to Save to retain
your changes to the Preset.
05C.Tone 4 Days
A "dot" indicates an "unsaved" Preset state
To Save a Preset: Press and hold the lit footswitch that indicates
your current selection to enter Save Mode. An arrow character
appears at the left of the LCD Display and the entire display ashes
to indicate you are in Save Mode. To exit Save Mode without making
any changes, wait 5 seconds without touching any controls and the
process will time out and exit automatically.
05CTone 4 Days Days
>
A ashing display and an "arrow" at the left indicates Save Mode
To Save the Edited Preset to the Preset’s Existing Location:
Simply press and hold the same Preset Select footswitch again.
Once the display stops ashing, your edited settings are saved,
overwriting the former Preset in the location.
To Save to a Dierent Bank and Preset Location: While in Save
Mode, navigate to the desired Bank and Preset location by tapping
the Bank Up/Bank Down footswitch, and then tapping the Preset
Select footswitch for your preferred Preset location. The location
number and title of the Preset that currently resides in this location is
shown in the ashing LCD Display. Press and hold the Preset Select
footswitch assigned to this location to replace the location’s current
Preset with your edited Preset. The LCD will stop ashing and the
title of your new, saved Preset will be displayed.

7. Tap Tempo Button - Pressing the TAP button a few times sets
the tempo, which Delays and other FX that oer "sync-to-tempo"
can then follow. The footswitch LED ashes in time to indicate the
tempo for the current Preset (the ashing behavior can optionally be
disabled in the Firehawk Remote app).
Tuner Mode - Press and hold the TAP button for a few seconds
to enter Tuner Mode. Pluck an individual string on your guitar and
you’ll see the name of the note and its pitch in the LCD, as shown
below. When the graphic bar is to the right of center, your string is
sharp; when it is to the left, your string is at. When the bar is within
the center range, your string is in tune. Touch any footswitch or knob
to exit Tuner Mode.
Sharp
Flat
In tune
The Tuner Mode displayed in the LCD screen
Note: You'll also see the LEDs around the Master Volume knob light
up similarly to indicate the tuning status when in Tuner Mode.
8. Expression Pedal - The onboard Expression Pedal can be set to
two dierent Pedal Modes for each Preset: Volume/Wah Mode,
provides control of either the Volume or Wah (toggled using the
pedal's toe switch), and Tweak Mode provides control of the same
Amp or FX parameter that is assigned to the device's FX Knob. Yo u
can optionally connect an Expression Pedal (such as a Line 6 EX-1)
to the PEDAL 2 jack on the rear panel for greater control. Note that
Pedal 2 is automatically detected when connected, and your Pedal
functions change as described in the following Conguring Pedal
Functionality section.
A
A
A

Configuring Pedal Functionality
50%
Bass
Feedbac
k
50%
50%
Bass
You'll nd the options for PEDAL MODE within the Inspector Pane of
the Firehawk Remote app's Editor screen. The current Pedal Mode
is also indicated by the VOL and WAH LEDs at the bottom left of the
pedal. The following table shows the specic control functions for the
onboard Pedal and Pedal 2 (if a Pedal 2 is connected to the device) for
each Pedal Mode.
PEDAL MODE
WAH / VOLUME
No Pedal 2
WAH / VOLUME
With Pedal 2
TWEAK
No Pedal 2
TWEAK
With Pedal 2
ONBOARD PEDAL
FUNCTION
Wah / Volume
Toe switch toggles Wah or Vol
Wah Only
Toe switch toggles On/Off
Tweak Only
Toe switch has no function
Wah / Volume
Toe switch toggles Wah or Vol
Pedal Mode Functionality
Assigning the Pedal to the FX TWEAK Parameter
Using the Firehawk Remote app, practically any FX parameter can be
assigned to FX TWEAK control - allowing it to be adjusted via the FX
knob and, optionally, by the Expression Pedal as well. To assign the FX
TWEAK in the app:
• Tap the FX block in the top of the Editor screen to edit the FX
parameter you'd like to control.
• Tap and hold on the desired parameter slider to assign the it to FX
TWEAK - you'll see an "FX" indicator appear on the slider.
• Tap and hold on the "FX" indicator to display the Pedal options.
• Select Ye s to control the established FX TWEAK parameter
with the Pedal.
PEDAL 2
FUNCTION
Not Applicable
Volume Only
Not Applicable
Tweak Only
LED
INDICATORS
WAH or VOL lit
respectively
WAH lit when
Wah is On
WAH and VOL
both lit
WAH or VOL lit
respectively
• Tap and drag either end of the Pedal Range Slider bar to set
the minimum (heel-down position) and maximum (toe forward
position) pedal range.
FX Tweak
assignment
indicator
Delay Digital Delay
Time
Mix
FX
Assign to Pedal
600 ms
No Yes
Note
43%
Yes / No for
pedal control
of FX Tweak
parameter
Pedal Range
Feedback
Firehawk Remote app - FX Tweak& Pedal Assign options
50%
slider

Rear Panel Connections
9 10 11
GUITAR INPEDAL 2
LEFT/MONO RIGHT LEFT/MONO RIGHT LEFT/MONO RIGHT LEFT/MONO RIGHT
STOMP
LINE
FX SENDFX RETURN
12 13 14 15 16
MAIN OUT
GND
LIFT
9. Pedal 2 - Connect an optional Expression Pedal for even more control.
See the Expression Pedal description in the previous section.
10. Guitar Input - Plug your 1/4-inch guitar cable in here.
11. Eects Loop - Provides two jacks each for mono or stereo FX
SEND and FX RETURN. Set the FX LOOP LEVEL switch to
optimize the signal for either LINE (for line-level devices) or STOMP
(for most “stomp box” guitar pedals). Note that the position of the FX
LOOP Block within any Preset’s signal chain can be edited using the
Firehawk Remote app.
12. XLR Output - Connect XLR cables here for an ideal connection
to recording devices or as direct sends to the house mixer, PA, or
to Line 6 StageSource® powered, full-range speakers.* If you are
experiencing hums and buzzes, set the Ground Switch to LIFT to
eliminate ground loops between your equipment.
13. 1/4-Inch Output - Connect 1/4-inch cables here to send your guitar
signal to a guitar amplier, recorder, mixer or PA system.*
*NOTE: The level and signal present on the XLR and 1/4-Inch
outputs is dependent on the setting of the OUTPUT MODE button.
See the following Output Modes section for more info.
OUTPUT
MODE
1/4" OUT
LINE
AMP
PHONES
USB POWER
VARIAX
17 18
9VDC
2.5A min
14. Headphones (12Ω output) - Plug your 1/4-inch stereo headphones
cable in here. Headphone volume is controlled by the Master Volume
knob.
15. Variax - Connect your Line 6 Variax guitar here. This input captures
all the Variax output and provides power to the instrument. See the
following Using a Line 6 Variax section for more info.
16. USB Port - Connect to a Mac®, Windows® computer or iPad® to
utilize Firehawk FX as a quality Stereo In/Out, 24-Bit digital audio
interface for direct recording with your favorite software.
For Mac® or iPad®: Just connect via USB and Firehawk FX is
ready to use. iPad® connectivity requires the use of an iPad® Camera
Connection Kit USB adapter (not included).
For Windows®: Download & install the Line 6 Firehawk FX USB
ASIO® audio driver from www.line6.com/software.
17. Power Supply Input - Use only the supplied Line 6 DC Power Supply
connected here to power the unit.
18. Power - Switch On the power with this rocker switch.

Firehawk Remote Mobile Application
A
Variax Gate Wah Stomp Mod Delay
B
Lead the Way
C
Vol Amp+Cab EQ Comp Reverb
Stomp Classic Distortion
Drive
Gain
E
Tone
FS1 FS2 FS3 FS4 FS5
Firehawk Remote App - Editor Screen
FX Loop
Looper
68%
43%
50%
D
F
H
G
C. Signal Flow Pane - Each icon button represents a Processing Block
and shows the routing order and bypass state of all eects for your
current tone. Tap on any Block here to select it and the Block's
options are displayed within the Inspector Pane below.
D. Processing Blocks - Each of the several Block types oers its own
properties and functions. Many Blocks are moveable within the
signal chain, as indicated below. To move a Block, press, hold and
drag the Block left/right in the signal chain - vertical line indicators
show all available locations where you can "drop" the Block.
• Variax Input Block - Provides options for a Line 6 Variax guitar. See
the following Using a Line 6 Variax section.
• Standard Blocks - The Amp & Cab Block contains your choice of
Amp & Cab models, and the others include a "xed" eect (Comp
and Gate). Standard Blocks cannot be moved.
• FX Blocks - Contain a dedicated eect type (Volume, Wah &
Reverb) and have some moveability.
• Flex FX Blocks - Can change the FX type they contain (Stomp,
Mod, Delay or Pitch/Synth) and have more exible routing
capabilities.
• Looper Block - Displays its Volume and EQ parameters below.
The Looper can also be assigned to any one of the FS1-FS5
footswitches and can be moved to either the start or end of the
signal chain - see the Using the Looper section for details.
E. Block Inspector Pane - All editable parameters for the selected
Block are presented here.
F. Model Select and Bypass Buttons - The Model Select button (at
the left) pops up a menu to choose an Amp, Cab or FX model for the
selected Block's type. The Bypass button toggles the Block On/O.
A. Menu/Back Button - Tap to reveal the slide-out Main Menu screen.
(See the following App Features section for more info.) This button
changes to a Back button within other screens.
B. Preset Title - The title for the current Preset is shown here.
G. Parameter Sliders - Allow adjustment for all settings for the selected
Block's Amp or FX models. Note that you can press and hold a
slider to assign the parameter to be controlled by the FX Knob and
Expression Pedal (see Conguring Pedal Functionality above).

H. FS1–FS5 Footswitch Assignment Buttons - Tap the desired FS
button to assign your Firehawk FX device's respective FX footswitch
to toggle the selected FX Block On/O. Note that the footswitch LED
will match the color of the assigned FX Block model type for easy
identication.
Firehawk Remote App Features
The slide-out Main Menu is where you'll nd central access to all features
in the Firehawk Remote app.
Editor - Edit any tone that is currently loaded by the app. Change
Amp Models, FX, Footswitch & Pedal Assignments and routing of
processing “Blocks” - See the previous app Editor section.
Hardware Presets - Browse, recall, edit, manage and back up
tones saved within your Firehawk FX device.
Cloud Search - Search for tones from the ever-growing Line 6
Cloud for new guitar tones published by other Firehawk FX &
AMPLIFi users just like you!
My Tones - Browse, recall, search, edit and manage the saved
tones in your Line 6 account. You can also send tones to your
device as hardware presets.
Tone Info/Save - Edit the tone’s name and other metadata that
facilitates searching & Tone Matching to songs. Save tones
directly to your Firehawk FX or to the Cloud, or publish tones to
support the Firehawk community.
Tuner - Get in tune quickly by using the Tuner.
Music Library - Jam along with tracks from your mobile device's
music library and Firehawk Remote will serve up guitar tones to
match based on the song title, artist, genre, or other tags.
Levels - Remotely adjust the "blend" of guitar to music playback
volume.
Firehawk FX Device Firmware Updates
Always run the latest rmware in your Firehawk FX for best performance
results. There are two methods for checking and installing rmware
updates:
• Using the Line 6 Updater Utility - This is the recommended
method and is fastest for device rmware updates. The Line
6 Updater Utility is a free software application for Mac® and
Windows® available from www.line6.com/software. Download
and install the utilily on your computer to get started. With your
Firehawk FX device powered On, connect it to your computer's
USB port and launch the Updater Utility. It will automatically detect
your connected device and inform you of available updates - Just
follow the steps in the Updater Utility to install the latest rmware.
• Using the Firehawk Remote application - The Firehawk
Remote app will automatically inform you whenever a device
rmware update is available. It is also possible to install rmware
updates from within the app - Just follow the prompts and it will
walk you through the entire update process. Note that this updates
the Firehawk FX device wirelessly via Bluetooth®, without the need
for a computer or added software, however, the process takes quite
a bit longer than using the Line 6 Updater Utility.
Settings - View info about the app, get help, update your
Firehawk FX device’s rmware, and set preferences for music
playback and tone loading.

Using a Line 6 Variax
Firehawk FX supports the use of any Line 6 Variax® instrument via
the VARIAX connection on the rear panel. And with any James Tyler®
Variax® (JTV) or Variax® Standard instrument, control of alternate tunings
and model/magnetic pickup switching are supported as well. For best
results, use only Line 6 supplied, Variax-compatible cables – not standard
Ethernet or other cables – to avoid damage to the jack. Learn more about
the Variax instruments at www.line6.com.
To Edit and Save Variax guitar Model & Tone Knob options: Launch
the Firehawk Remote app, go to the app's Editor screen and tap the
Variax Input block at the left of the Signal Flow pane. The following
Variax options will appear in the lower portion of the app screen.
• MODEL CONTROLLED BY: This is a global option that aects
behavior for all Firehawk FX presets.
• When set to FIREHAWK: The Firehawk FX sends the stored
Variax Model & Tone Knob settings to the guitar upon the
loading of a Firehawk Preset. If you adjust your Variax guitar's
on-board settings, the Variax settings are captured and then
stored within the Firehawk Preset.
• When set to VARIAX: The stored MODEL & TONE KNOB
POSITION Variax settings are not sent to the guitar upon
loading a Firehawk preset. If you adjust your Variax guitar's onboard settings, these will be heard, but not captured or stored
within the Firehawk preset.
• TUNING CONTROLLED BY: This is a global option that aects the
behavior of all Firehawk presets.
• When set to FIREHAWK: The Alt. Tunings stored within any
Firehawk Preset are sent to your Variax guitar upon recall of the
Preset.
• When set to VARIAX: The Alt. Tunings stored within any
Firehawk preset are not sent to your Variax guitar upon recall
of the preset.
• VARIAX STRING 1 - 6: With a JTV or Standard Variax, you can use
these six parameters to congure the tuning oset (by number of
frets) you want applied to each individual guitar string. (The note
value displayed assumes your guitar is tuned to standard tuning -
E, A, D, G, B, E.)
• MODEL: Allows you to select the desired Variax guitar model &
pickup position to be stored as part of the Firehawk FX preset.
• TONE KNOB POSITION: Allows the Variax guitar's Tone Knob
value to be stored with the Firehawk preset.
• PICKUP MODE: (On JTV or Variax Standard guitars only.) Allows
choosing the Model and Magnetic pickup options.
Variax Alternate Tuning options: Use the VARIAX STRING 1- 6 options
to edit the pitch oset individually for each string, as described above.
The tuning is saved as part of the Firehawk Preset and the Variax Tuning
option provides the option to load the saved tunings on your Variax when
recalling Firehawk Presets.
Using the Looper
Firehawk FX includes a Looper, allowing you to quickly and easily
record, playback and overdub loops. Use the Firehawk Remote app to
assign the Looper to one of the FS1–FS5 FX footswitches, change the
Looper's position in the signal ow and edit the Looper Volume & EQ
parameters as desired. Once assigned to a footswitch, you can access
that single footswitch to trigger all the following functions:
To start recording: Press the dim white, Looper-assigned footswitch.
The footswitch LED will ash red, indicating the Looper is recording.
To stop recording: Press the Looper switch again to end recording. The
LED will ash green, indicating the Looper is playing back your loop.
To overdub on top of your recorded loop: Press the Looper switch
again while the loop is playing. The LED will turn orange, indicating it’s in
Overdub Mode.

To reverse playback of your loop: Press and hold the Looper switch
for ~2 seconds while the loop is playing. Press and hold the Looper
switch again to revert back to non-reverse playback.
To stop Looper playback: Double-tap the Looper footswitch. The
LED stops ashing and turns bright white, indicating a loop is stored in
memory. Press the Looper footswitch again to restart playback of the
stored loop.
To delete the recorded loop and start from scratch: Stop the Looper
and press and hold the footswitch for ~2 seconds. The LED returns to
dim white, indicating there is no loop in memory.
Output Modes
The OUTPUT MODE switch found on the Firehawk FX rear panel
cleverly congures the audio signals sent out the XLR and 1/4-inch
outputs to optimize them for your setup:
• Line Out Mode optimizes the guitar sound for direct recording and
full-range monitoring. The signal is at line level and simulates the
sound of a mic’d amp out of both the XLR and 1/4” outputs.
• Amp Out Mode is very dierent in that the guitar sound is
optimized for connecting into the front of a guitar amp. The signal
is at instrument level and is not appropriate to monitor through
headphones or a full range system, therefore, the guitar signal is
only present at the 1/4” outputs in this mode.
• Because Bluetooth® streamed audio does not typically sound best
playing through a guitar amp, the 1/4” outs carry only the guitar
signal when in Amp Out Mode – Bluetooth® audio is only present
at the XLR and Headphone outs in this mode.
As shown in the following table, the guitar audio signal is optimized for
a full range system versus for a guitar amp, and the level for each signal
also changes with the LINE and AMP Output Mode settings.
LINE MODE AMP MODE
XLR Output
Audio
XLR Output
Level
1/4” Output
Audio
1/4” Output
Level
LINE vs. AMP Mode - Audio signal type and level sent to outputs
Guitar Tone is Studio/Direct optimized
Includes Bluetooth streamed playback
8.219 dBu / 6.0 dBv 8.219 dBu / 6.0 dBv
Guitar Tone is Studio/Direct optimized
Includes Bluetooth streamed playback
Line level Instrument level
Bluetooth streamed playback
only
Guitar Tone only - Amplifier
optimized
NOTE: In either OUTPUT MODE setting, the PHONES output always
receives the same audio as the XLR outputs.
Live Edit Mode
The Live Edit Mode allows you quick access to the individual FX
parameters on the Firehawk FX device as an alternative to using the
Firehawk Remote app for adjusting your FX settings. The steps are as
follows.
Editing FX Parameters
• Enter Live Edit Mode by simultaneously pressing both the
Bank Up and Bank Down footswitches. The two rows of
footswitches, FS1–FS5 and A–D, will alternate ashing. You'll see
abbreviations for the processing blocks accessible for each row of
footswitches are displayed in the LCD to help you choose what you
want to edit. As indicated, the FX and Looper blocks are accessed
via FS1–FS5 and the Amp, Cab & EQ are accessed via A–C.
DRV REV MOD DLY LPR AMP CAB PEQ
The LCD displays the editable blocks for the row of ashing
footswitches

The following table describes how the dierent processing Blocks are
indicated on the device while in Live Edit Mode.
BLOCK TYPE ABBREVIATION
Drives & Dynamics
Compressor
Filters, Synths & Pitch
Modulation
Delays
Reverb
FX Loop
Looper
Amp
Speaker Cabinet
Preset EQ
IN LCD SCREEN
DRV
CMP
SYN
MOD
DLY
REV
FXL
LPR
AMP
CAB
PEQ
FOOTSWITCH LED
COLOR
Yellow
Purple
Blue
Green
Orange
Turquoise
White
Red
• You can adjust the value for one parameter, then simply tap
the footswitch again to edit another. Your edited values are
all retained until you exit Live Edit Mode, at which point you
choose to Save or discard them.
• Note that Model Select option allows you to choose a dierent
model type, which then becomes assigned to the current
footswitch.
• To Edit a Dierent Block: Press any other FS1–FS5 or A–D
footswitch to access its assigned block. You'll then be able to edit
its current model, or load a dierent model, using the same steps
mentioned above.
• To Exit Live Edit Mode: Press both the Bank Up and
Bank Down footswitches simultaneously.
Be sure to Save to retain your edited settings. See the previous
6. Preset & Bank Select Footswitches section for details on Save
Mode.
NOTE: The device's Tone, Reverb & FX knobs and the Tap Tempo
footswitch all continue to function while in Live Edit Mode.
• Select a Block to Edit: Press the footswitch assigned to the Block
that you wish to edit. You'll see the LCD rst show the full name
of the selected Block's current model, and and then display the
current model's rst parameter - now you're ready for editing.
Digital Delay
First the full model name is shown, then its rst editable parameter
DLY:Time 430ms
• To Edit the Current Parameter: Move the device's Expression
Pedal or Master Volume Knob to adjust the editable value. Or,
press the Bank Up or Bank Down footswitches to adjust the
value in ne increments. You'll see the parameter's current value
indicated in the LCD and by the Master Volume knob's LED ring.
• To Edit a Dierent Parameter: Repeatedly press the same
footswitch to cycle through all editable parameters for the current
model.
Factory Reset & Pedal Calibration
Performing a Factory Reset restores the Firehawk FX to the original
factory settings and Presets. Be sure to use the Firehawk Remote app
to back up your customized Presets before performing a Factory
Reset! After performing a Factory Reset, it is recommended that you
next perform the Pedal Calibration for proper Pedal operation.
• Factory Reset: Simultaneously press and hold the Master Volume
Knob and the TAP footswitch as you power on the unit.
• Pedal Calibration: Power O your Firehawk FX device, then press
and hold footswitch A while powering On the unit. Follow the steps
in the LCD screen to calibrate the on-board Expression Pedal.

IMPORTANT: BY ACCEPTING, INSTALLING OR USING ANY PART OF THE SOFTWARE PROVIDED
WITH OR EMBEDDED IN YOUR NEW LINE 6 PRODUCT (THE “SOFTWARE”), YOU ARE AGREEING
TO ALL OF THE TERMS AND CONDITIONS OF THIS AGREEMENT AND CONSENTING TO BE
BOUND BY AND BECOME A PARTY TO THIS AGREEMENT. IF YOU DO NOT AGREE TO ALL THE
TERMS AND CONDITIONS OF THIS AGREEMENT, OR CANNOT COMPLY WITH THESE TERMS
AND CONDITIONS, DISCONTINUE THE INSTALLATION PROCESS AND YOU WILL HAVE NO
AUTHORITY TO USE THE SOFTWARE.
LINE 6’S WILLINGNESS TO GRANT THIS AGREEMENT IS EXPRESSLY CONDITIONED UPON YOUR
ASSENT TO ALL THE TERMS AND CONDITIONS OF THIS AGREEMENT, TO THE EXCLUSION OF
ALL OTHER TERMS. IF THESE TERMS ARE CONSIDERED AN OFFER BY LINE 6, ACCEPTANCE IS
EXPRESSLY LIMITED TO THESE TERMS.
1. GRANT OF LICENSE
SUBJECT TO THE TERMS AND CONDITIONS SET FORTH HEREIN, LINE 6, INC., (“LINE 6”) GRANTS YOU AN INDIVIDUAL, PERSONAL,
NON-SUBLICENSABLE, NONEXCLUSIVE LICENSE TO USE ONE (1) COPY OF THE SOFTWARE, IN OBJECT CODE FORM ONLY AND ONLY IN
ACCORDANCE WITH THE APPLICABLE END USER DOCUMENTATION, IF ANY (THE “LICENSE”). YOU WILL NOT, DIRECTLY OR INDIRECTLY,
REVERSE ENGINEER, DECOMPILE, DISASSEMBLE OR OTHERWISE ATTEMPT TO DISCOVER THE SOURCE CODE OR UNDERLYING IDEAS OR
ALGORITHMS OF THE SOFTWARE; MODIFY, TRANSLATE, OR CREATE DERIVATIVE WORKS BASED ON THE SOFTWARE; OR COPY (EXCEPT
FOR ARCHIVAL PURPOSES), RENT, LEASE, DISTRIBUTE, ASSIGN, OR OTHERWISE TRANSFER RIGHTS TO THE SOFTWARE; USE THE
SOFTWARE FOR TIMESHARING OR SERVICE BUREAU PURPOSES OR OTHERWISE FOR THE BENEFIT OF A THIRD PARTY; OR REMOVE ANY
PROPRIETARY NOTICES OR LABELS ON THE SOFTWARE. AS BETWEEN THE PARTIES, YOU ACKNOWLEDGE THAT LINE 6 AND ITS LICENSORS
RETAIN OWNERSHIP OF THE SOFTWARE, ANY PORTIONS OR COPIES THEREOF, AND ALL RIGHTS THEREIN THROUGHOUT THE WORLD.
UPON TERMINATION OF THIS AGREEMENT FOR ANY REASON, THE LICENSE AND ALL RIGHTS GRANTED TO YOU UNDER THIS AGREEMENT
WILL TERMINATE AND YOU WILL CEASE TO USE AND DESTROY THE SOFTWARE. YOU MAY PERMANENTLY TRANSFER THE RIGHTS GRANTED
TO YOU UNDER THIS AGREEMENT ONLY AS PART OF A PERMANENT SALE OR TRANSFER OF THE HARDWARE DEVICE CONTAINING THE
SOFTWARE, AND ONLY IF THE RECIPIENT AGREES TO BE BOUND BY THE TERMS AND CONDITIONS OF THIS AGREEMENT. THE SOFTWARE IS
PROVIDED AS IS AND SUBJECT TO THE WARRANTY DISCLAIMERS AND LIMITATIONS OF LIABILITY SET FORTH BELOW.
2. “BETA” VERSIONS
YOU ACKNOWLEDGE AND AGREE THAT THE SOFTWARE IDENTIFIED AS A “BETA” VERSION MAY CONTAIN BUGS, DEFECTS OR LIMITED
FUNCTIONALITY AND THE PRIMARY PURPOSE OF PROVIDING IT TO YOU HEREUNDER IS TO OBTAIN FEEDBACK ON THE SOFTWARE’S
PERFORMANCE AND THE IDENTIFICATION OF DEFECTS. YOU FURTHER ACKNOWLEDGE AND AGREE THAT “BETA” VERSIONS HAVE NOT BEEN
FULLY TESTED AND MAY INCLUDE FEATURES OR FUNCTIONALITY CURRENTLY UNDER DEVELOPMENT THAT IS NOT SUPPORTED BY LINE 6
AND THAT SECTION 4 BELOW DOES NOT APPLY. YOU ARE ADVISED TO SAFEGUARD IMPORTANT DATA, TO USE CAUTION AND NOT TO RELY IN
ANY WAY ON THE CORRECT FUNCTIONING OR PERFORMANCE OF “BETA” SOFTWARE AND/OR ACCOMPANYING MATERIALS. UPON RELEASE
BY LINE 6 OF A COMMERCIAL VERSION OF THE SOFTWARE, YOU AGREE TO RETURN OR DESTROY THE “BETA” VERSION OF SUCH SOFTWARE.
3. RESTRICTIONS
YOU WILL ONLY USE THE SOFTWARE FOR LAWFUL PURPOSES AND IN COMPLIANCE WITH ALL APPLICABLE LAWS. YOU HEREBY AGREE
TO DEFEND AND INDEMNIFY LINE 6 AGAINST ANY CLAIM OR ACTION THAT ARISES FROM YOUR USE OF THE SOFTWARE IN AN UNLAWFUL
MANNER.
4. SUPPORT
SUBJECT TO THE TERMS HEREOF, LINE 6 WILL PROVIDE YOU WITH TELEPHONE AND E-MAIL SUPPORT SERVICES FOR THE SOFTWARE.
UNDER NO CIRCUMSTANCES WILL LINE 6 HAVE ANY OBLIGATION TO PROVIDE YOU WITH HARD-COPY DOCUMENTATION, UPGRADES,
ENHANCEMENTS, MODIFICATIONS, OR TOLL FREE TELEPHONE SUPPORT FOR THE SOFTWARE.
SOFTWARE LICENSE AGREEMENT
TERMS AND CONDITIONS
5. TERMINATION
THIS AGREEMENT IS EFFECTIVE UNTIL TERMINATED. EITHER PARTY MAY TERMINATE THIS AGREEMENT UPON WRITTEN NOTICE TO THE
OTHER PARTY. LINE 6 MAY ALSO TERMINATE THIS AGREEMENT IMMEDIATELY, WITHOUT PRIOR NOTICE OR LIABILITY, IF YOU BREACH ANY
OF THE TERMS OR CONDITIONS OF THIS AGREEMENT. ALL SECTIONS OF THIS AGREEMENT WHICH BY THEIR NATURE SHOULD SURVIVE
TERMINATION WILL SURVIVE TERMINATION, INCLUDING, WITHOUT LIMITATION, WARRANTY DISCLAIMERS AND LIMITATIONS OF LIABILITY.
6. WARRANTY DISCLAIMER
THE SOFTWARE AND ANY ACCOMPANYING DOCUMENTATION IS PROVIDED ON AN “AS IS” “AS
AVAILABLE” BASIS WITHOUT WARRANTY OF ANY KIND TO THE EXTENT AUTHORIZED BY LAW.
LINE 6 DISCLAIMS ANY AND ALL WARRANTIES, WHETHER ORAL OR WRITTEN, EXPRESS OR IMPLIED, INCLUDING, WITHOUT
LIMITATION, IMPLIED WARRANTIES OF MERCHANTABILITY, FITNESS FOR A PARTICULAR PURPOSE, AND NON-INFRINGEMENT. LINE 6 AND ITS LICENSORS ASSUME NO RESPONSIBILITY FOR ANY DAMAGES SUFFERED BY YOU, INCLUDING,
WITHOUT LIMITATION, LOSS OF DATA AND ITEMS OR MATERIALS FROM ERRORS OR OTHER MALFUNCTIONS WHETHER
CAUSED BY LINE 6 OR BY YOUR OWN ERRORS OR OMISSIONS. LINE 6 DOES NOT WARRANT THAT THE SOFTWARE WILL
MEET YOUR REQUIREMENTS OR THAT OPERATION OF THE SOFTWARE WILL BE UNINTERRUPTED OR ERROR FREE OR
THAT DEFECTS WILL BE CORRECTED. YOU ASSUME RESPONSIBILITY FOR SELECTING THE SOFTWARE TO ACHIEVE YOUR
INTENDED RESULTS, AND FOR THE RESULTS OBTAINED FROM YOUR USE OF THE SOFTWARE. YOU SHALL BEAR THE ENTIRE
RISK AS TO THE QUALITY AND THE PERFORMANCE OF THE SOFTWARE.
7. LIMITATION OF LIABILITY
NOTWITHSTANDING ANYTHING CONTAINED IN THIS AGREEMENT OR OTHERWISE, LINE 6 WILL NOT BE LIABLE WITH RESPECT TO THE
SUBJECT MATTER OF THIS AGREEMENT UNDER ANY CONTRACT, NEGLIGENCE, MISREPRESENTATION, STRICT LIABILITY OR OTHER LEGAL
OR EQUITABLE THEORY FOR ANY INCIDENTAL, CONSEQUENTIAL, EXEMPLARY OR PUNITIVE DAMAGES OF ANY KIND TO THE EXTENT
AUTHORIZED BY LAW. IN NO EVENT WILL LINE 6 BE OBLIGATED, CONTRACTUALLY OR OTHERWISE, TO INDEMNIFY YOU FOR ANY LOSSES
THAT YOU MAY INCUR IN CONNECTION WITH THE SOFTWARE. THE AVAILABILITY OF “BETA” VERSIONS OF THE SOFTWARE DOES NOT CREATE
ANY OBLIGATION FOR LINE 6 TO CONTINUE TO DEVELOP, SUPPORT, REPAIR, OFFER FOR SALE OR IN ANY OTHER WAY CONTINUE TO PROVIDE
THE SOFTWARE IN “BETA” FORM OR FUTURE VERSIONS THEREOF.
8. EXPORT RESTRICTIONS
YOU ACKNOWLEDGE THAT THE SOFTWARE, OR ANY PART THEREOF, OR ANY PROCESS OR SERVICE THAT IS THE DIRECT PRODUCT OF THE
SOFTWARE (THE FOREGOING COLLECTIVELY REFERRED TO AS THE “RESTRICTED COMPONENTS”) ARE OF U.S. ORIGIN. YOU AGREE TO
COMPLY WITH ALL APPLICABLE INTERNATIONAL AND NATIONAL LAWS THAT APPLY TO THESE PRODUCTS, INCLUDING THE U.S. EXPORT
ADMINISTRATION REGULATIONS, AS WELL AS END-USER, END-USE AND DESTINATION RESTRICTIONS ISSUED BY U.S. AND OTHER
GOVERNMENTS.
9. MISCELLANEOUS
THE FAILURE OF EITHER PARTY TO EXERCISE IN ANY RESPECT ANY RIGHT PROVIDED FOR HEREIN WILL NOT BE DEEMED A WAIVER OF ANY
FURTHER RIGHTS HEREUNDER. IF ANY PROVISION OF THIS AGREEMENT IS FOUND TO BE UNENFORCEABLE OR INVALID, THAT PROVISION
WILL BE LIMITED OR ELIMINATED TO THE MINIMUM EXTENT NECESSARY SO THAT THIS AGREEMENT WILL OTHERWISE REMAIN IN FULL FORCE
AND EFFECT AND ENFORCEABLE. THIS AGREEMENT WILL BE GOVERNED BY AND CONSTRUED IN ACCORDANCE WITH THE LAWS OF THE
STATE OF CALIFORNIA WITHOUT REGARD TO THE CONFLICT OF LAWS PROVISIONS THEREOF. BOTH PARTIES AGREE THAT THIS AGREEMENT
IS THE COMPLETE AND EXCLUSIVE STATEMENT OF THE MUTUAL UNDERSTANDING OF THE PARTIES AND SUPERSEDES AND CANCELS ALL
PREVIOUS WRITTEN AND ORAL AGREEMENTS, COMMUNICATIONS AND OTHER UNDERSTANDINGS RELATING TO THE SUBJECT MATTER OF THIS
AGREEMENT, AND THAT ALL MODIFICATIONS MUST BE IN A WRITING SIGNED BY BOTH PARTIES, EXCEPT AS OTHERWISE PROVIDED HEREIN.
NO AGENCY, PARTNERSHIP, JOINT VENTURE, OR EMPLOYMENT IS CREATED AS A RESULT OF THIS AGREEMENT AND YOU DO NOT HAVE ANY
AUTHORITY OF ANY KIND TO BIND LINE 6 IN ANY RESPECT WHATSOEVER. ALL NOTICES UNDER THIS AGREEMENT WILL BE IN WRITING AND
WILL BE DEEMED TO HAVE BEEN DULY GIVEN WHEN RECEIVED, IF PERSONALLY DELIVERED; THE DAY AFTER IT IS SENT, IF SENT FOR NEXT
DAY DELIVERY BY RECOGNIZED OVERNIGHT DELIVERY SERVICE; AND UPON RECEIPT, IF SENT BY CERTIFIED OR REGISTERED MAIL, RETURN
RECEIPT REQUESTED.

N222
Line 6, Inc.:
26580 Agoura Road,
Calabasas, CA 91302-1921 USA
Imported by
Yamaha Music Europe GmbH
Calabasas, CA Line 6, Inc.:
Siemensstrasse 22-34, 25462 Rellingen, Germany
Tel: (49)-4101-303-0
 Loading...