


 Loading...
|
Table of Contents |
|
|
Introduction |
5 |
System introduction |
5 |
Driving restrictions |
6 |
What is SYNC ? |
7 |
Safety information |
8 |
Privacy Information |
8 |
How to get going |
9 |
|
|
System overview |
14 |
Map display options |
21 |
Display voice commands |
21 |
Status bars |
22 |
Home screen |
22 |
Loading pictures |
23 |
Reverse camera |
25 |
Quick reference chart |
26 |
Setting the clock |
28 |
|
|
Voice recognition system overview |
32 |
How to use voice commands |
34 |
Adjusting the voice prompt volume |
35 |
Voice recognition tutorial |
37 |
Tutorial voice commands |
37 |
Voice name tags |
38 |
User profiles |
38 |
User profile voice commands |
41 |
|
|
Audio features |
42 |
AM/FM |
43 |
HD Radio™ |
45 |
Radio voice commands |
45 |
SIRIUS satellite radio voice commands |
52 |
Satellite radio |
52 |
CD |
55 |
CD voice commands |
58 |
Playing a DVD in the system |
58 |
DVD voice commands |
60 |
Video CD voice commands |
61 |
1
2012 Centerstack (ng1)
Supplement, 3rd Printing USA (fus)

Table of Contents
Disc voice commands |
61 |
Jukebox features |
62 |
Recording (saving) music to your jukebox |
62 |
Accessing the music in your jukebox |
62 |
Creating a playlist |
64 |
Jukebox voice commands |
66 |
User Device (if equipped) |
67 |
Rear DVD voice commands |
69 |
DVD (if equipped) |
70 |
Climate features (if equipped) |
71 |
Climate voice commands |
73 |
|
|
Information menu |
74 |
Where am I? |
74 |
Hybrid information |
74 |
SIRIUS Travel Link™ |
82 |
SIRIUS Travel Link™ voice commands |
86 |
Accessing your calendar |
87 |
Accessing the help screen |
87 |
|
|
Sound menu features |
89 |
|
|
Setting a destination |
91 |
Setting a destination by voice |
92 |
Quick destination options |
93 |
Standard destination options |
94 |
POI categories |
100 |
Route selection |
105 |
Destination voice commands |
107 |
Quick touch buttons |
110 |
Map icons |
111 |
|
|
Navigation route preferences |
114 |
Map preferences |
116 |
Route preferences |
117 |
Navigation voice commands |
120 |
2
2012 Centerstack (ng1)
Supplement, 3rd Printing USA (fus)
|
Table of Contents |
|
|
General Information |
121 |
Map updates |
121 |
Navigation end user license agreement |
121 |
Glossary |
127 |
SYNC phone features (if equipped) |
132 |
Quickstart - How to get going |
132 |
Pairing your phone through your navigation system |
132 |
Making a call |
134 |
SYNC phone features |
135 |
Accessing your phone book |
136 |
Call history |
137 |
System settings |
137 |
Adding (pairing) a phone |
138 |
Connecting a phone |
138 |
Deleting a phone |
139 |
Advanced settings |
140 |
Turning Bluetooth on/off |
141 |
911 Assist™ |
142 |
Vehicle Health Report |
145 |
Setting a ring tone |
150 |
Message notification |
151 |
Automatically download your phone book |
152 |
Modifying your phone book and call history |
153 |
Turning prompts on/off |
155 |
Returning to factory defaults |
156 |
Performing a master reset |
156 |
Installing new vehicle applications |
157 |
Accessing SYNC system information |
158 |
SYNC Apps |
159 |
Traffic, Directions and Information |
164 |
SYNC AppLink™ |
167 |
Text messaging with your navigation system |
168 |
Forwarding a text message |
172 |
Voice commands in phone mode |
173 |
3
2012 Centerstack (ng1)
Supplement, 3rd Printing USA (fus)

Table of Contents
SYNC media features (if equipped) |
176 |
Connecting your digital media player to SYNC |
176 |
SYNC media features |
177 |
What’s playing? |
178 |
Supported player, media formats and metadata information |
178 |
Accessing and using your USB port |
178 |
Streaming music from your phone |
179 |
Using the Auxiliary input jack (Line in) |
180 |
Using the play all feature |
181 |
Selecting and playing specific artists |
182 |
Selecting and playing specific albums |
183 |
Selecting different genres |
183 |
Accessing your playlists |
184 |
Playing a specific track |
185 |
Exploring the USB device |
185 |
Accessing BT devices |
186 |
Adding a new device in discovery or discoverable mode |
187 |
Voice commands in media mode |
188 |
|
|
SYNC End user license agreement |
190 |
|
|
Index |
198 |
|
|
The information contained in this publication was correct at the time of going to print. In the interest of continuous development, we reserve the right to change specifications, design or equipment at any time without notice or obligation. No part of this publication may be reproduced, transmitted, stored in a retrieval system or translated into any language in any form by any means without our written permission. Errors and omissions excepted.
© Ford Motor Company 2011
4
2012 Centerstack (ng1)
Supplement, 3rd Printing USA (fus)
Introduction
MOBILE MEDIA NAVIGATION SYSTEM
Your vehicle is equipped with a mobile media navigation system which allows you to listen to, record and save music, play DVDs (audio and video), navigate the vehicle and operate climate control functions (if equipped).
Your system has a large range of features, yet is easy to use. The display screen is the primary means for operating the system through the use of its vertically tabbed menus, text screens and menu displays. Screen selections are made by touching the desired area on the touchscreen. The “tabs” along the left side of the screen represent the major components of the system. The status bars at the top and bottom of the screen will display for the majority of the time once the system is turned on and ready for operation. The top status bar will contain menu names, icons, and a clock. The lower status bar contains climate information (if equipped), icons and advisory messages. Please refer to Status bars in the System Overview chapter for more information. Navigation guidance is shown on the touchscreen display and is supplemented with voice prompts.
5
2012 Centerstack (ng1)
Supplement, 3rd Printing USA (fus)

Introduction
DRIVING RESTRICTIONS
In order to prevent the navigation system from distracting you while driving, access to certain functions are restricted when the vehicle is traveling above 5 mph (8 km/h). At this time, only the Quick Destination menu items are available for destination entry. Restricted functions include:
•Touchscreen keyboard during destination entry (Street address, POI, Freeway Entrance/Exit, Intersection)
•Scrolling of long lists
•Travel Link™ subscriptions (if active) such as movie times, ski conditions, sports scores and scrolling of the weather map
•Editing/Adding entries in the Address Book
•Editing/Adding entries in the Avoid Areas List
•Jukebox restrictions such as creating/editing playlists, sorting playlists, editing track, artist and album names
•Uploading photographs
Note: If your vehicle is equipped with SYNC , similar features will be restricted also.
When the vehicle begins to move and the Select Route Screen is shown, the highlighted route is automatically selected and guidance begins. When the vehicle speed is reduced to 5 mph (8 km/h) or less, system restrictions are lifted and you have full access to the system.
6
2012 Centerstack (ng1)
Supplement, 3rd Printing USA (fus)

Introduction
SYNC (IF EQUIPPED)
SYNC is a hands-free communications and entertainment system that literally ‘syncs up’ with all other multimedia systems in your vehicle. SYNC delivers convenience with voice activated calling and hands-free conversations, digital media player command and control as well as easy to use voice commands. The world outside your vehicle cabin may be chaotic, but inside, with SYNC , it’s always a smooth ride. All you have to do is sync it and stow it. We’ll take care of the rest.
Welcome to the new world of ingenuity and passion - technology that is both fun and functional. Welcome to SYNC .
Please visit www.SyncMyRide.com.
SYNC features
SYNC offers a variety of phone and media features, such as:
•Send and receive hands-free calls
•Play your digital music through voice activated commands
•Use voice recognition to access your cell phone’s contact list
•Transfer an active phone conversation to a hands-free environment
•Play music stored on your digital media player
•Use your device while charging through the USB port
•Listen to music streaming from your Bluetooth enabled cellular phone
•Advanced voice recognition system fluent in English, French and Spanish
7
2012 Centerstack (ng1)
Supplement, 3rd Printing USA (fus)

Introduction
SAFETY INFORMATION
WARNING: Driving while distracted can result in loss of vehicle control, accident and injury. Ford strongly recommends that you
use extreme caution when using any device or feature that may take your focus off the road. Your primary responsibility is the safe operation of the vehicle. We recommend against the use of any handheld device while driving, encourage the use of voice-operated systems when possible and that you become aware of applicable state and local laws that may affect use of electronic devices while driving.
•Do not attempt to service or repair the system. See your authorized dealer.
•Do not operate playing devices if the power cords and/or cables are broken, split or damaged. Carefully place cords and/or cables where they will not be stepped on or interfere with the operation of pedals, seats and/or compartments, or safe driving abilities.
•Do not leave playing devices in the vehicle in extreme conditions as it could cause damage to your device. Refer to your device’s user guide for further information.
•For your safety, some functions are speed dependent and cannot be performed when the vehicle is traveling at speeds 5 mph (8 km/h) and below.
•Ensure that you review your device’s user guide before using with SYNC .
PRIVACY INFORMATION
When a cellular phone is connected to SYNC , SYNC creates a profile within your vehicle that is linked to that cellular phone. This profile is created in order to offer you more cellular features and to operate more efficiently. Among other things, this profile may contain data about your cellular phone book, text messages (read and unread), and call history, including history of calls when your cell phone was not connected to SYNC . In addition, if you connect a media device, SYNC creates and retains an index of media content supported by SYNC . SYNC also records a short development log of approximately 10 minutes of all recent SYNC activity. The log profile and other SYNC data may be used to improve SYNC and help diagnose any problems that may occur.
8
2012 Centerstack (ng1)
Supplement, 3rd Printing USA (fus)

Introduction
The cellular profile, media device index, and development log will remain in the vehicle unless you delete it and are generally accessible only in the vehicle when the cellular phone or media player is connected. If you no longer plan to use SYNC or the vehicle, we recommend you perform a Master Reset to erase all information stored in SYNC .
SYNC data cannot be accessed without special equipment and access to the vehicle’s SYNC module. Ford Motor Company and Ford of Canada will not access SYNC data for any purpose other than as described absent consent, a court order, or where required by law enforcement, other government authorities, or other third parties acting with lawful authority. Other parties may seek to access the information independently of Ford Motor Company and Ford of Canada. For further privacy information, see the sections on 911 Assist™ (if equipped), Vehicle Health Report (if equipped), and Traffic, Directions and Information (if equipped).
VOICE RECOGNITION
Your navigation system is equipped with a voice activated feature which allows you to “speak” certain commands to the system. For further information, please refer to the Voice recognition chapter. You can also press 
 and say a command or “Help” after the prompt.
QUICK START
WARNING: Driving while distracted can result in loss of vehicle control, accident and injury. Ford strongly recommends that you
use extreme caution when using any device or feature that may take your focus off the road. Your primary responsibility is the safe operation of the vehicle. We recommend against the use of any handheld device while driving, encourage the use of voice-operated systems when possible and that you become aware of applicable state and local laws that may affect use of electronic devices while driving.
9
2012 Centerstack (ng1)
Supplement, 3rd Printing USA (fus)
Introduction
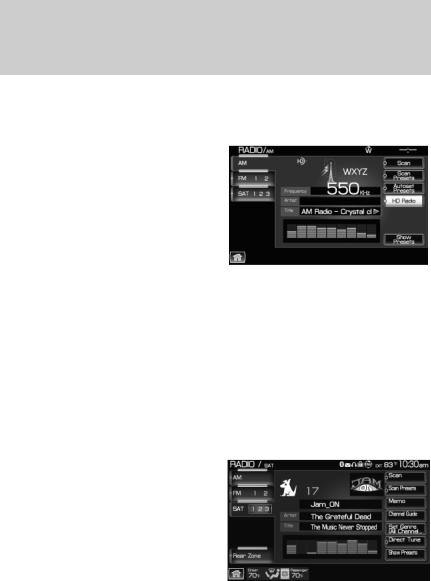
TO PLAY A RADIO STATION
1.Ensure that the navigation system is on.
2.Press the RADIO hard button.
3.Select the ‘AM’ or ‘FM’ tab on the touchscreen.
•Turn the TUNE knob to the right/left to go up/down the frequency band in individual increments.
•Or, press SEEK to find the next strong station up/down the frequency band.
Note: Since RDS is always ON if the PTY (Program type) is selected, the station selection will be limited to that specific genre. In satellite radio mode (if activated), SEEK is limited to the selected genre.
TO PLAY SATELLITE RADIO (IF ACTIVATED)
1.Ensure that the navigation system is on.
2.Press the RADIO hard button on the navigation system.
3.Select the ‘SAT’ tab on the
touchscreen. (If your vehicle is equipped with Satellite Radio, the SAT tab will be displayed on the radio screen).
For further information on Satellite Radio, refer to Satellite Radio in the Audio Features chapter.
TO LOAD A CD OR DVD:
1.Insert a CD or DVD into the slot.
2.A CD will begin to play. A DVD will play audio and video if the vehicle is in Park (P). Otherwise, only the audio will play.
10
2012 Centerstack (ng1)
Supplement, 3rd Printing USA (fus)
Introduction
3. Use the touch controls on the screen to advance tracks, scan, pause, view the track list, etc.
TO PLAY A PREVIOUSLY LOADED CD OR DVD:
1.Ensure that the navigation system is on.
2.Press the MEDIA hard button on the navigation system.
3.Select CD/DVD tab on the
touchscreen (if there is not a CD or DVD loaded into the system, the tab will be disabled and NO DISC will appear in the status bar when you try to select it).
4. A CD will begin to play. A DVD will begin to play audio and video if the vehicle is in P (Park). Otherwise, only audio will play.
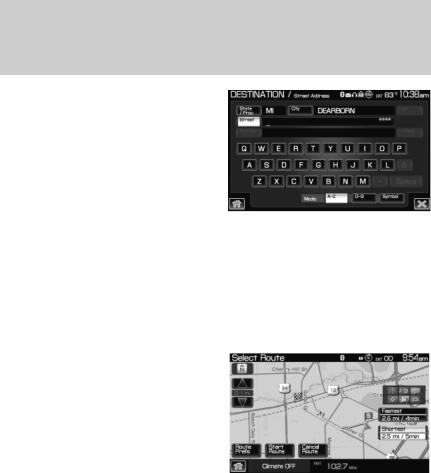
TO SET A DESTINATION USING THE NAVIGATION SYSTEM:
1.Ensure that the navigation system is on.
2.Press the DEST hard button on the navigation system.
3.Select the ‘Standard’ tab on the
touchscreen and then press ‘Street Address’ to enter a specific street address as your destination. (From this screen you can also choose POI, Address book entry, previous destination, Phone number, Freeway Entrance/Exit , Map or intersection as your destination).
11
2012 Centerstack (ng1)
Supplement, 3rd Printing USA (fus)
Introduction
4. Enter the required information. Please note that:
•The system uses a Smart Speller, which helps facilitate entering information through the keyboard.
•Accented characters in English, Spanish and French are converted internally to non-accented characters for search purposes.
5.The screen will show the point entered on a map. If this is the intended destination, press ‘Set As Dest’. A message will pop up while the system is computing the route.
6.Select the desired route on the
right hand side of the screen. There will be up to three routes possible (fastest, shortest and unrestricted) from which to choose, each highlighted with a different color. For each route, the overall distance, route conditions and the estimated travel time are displayed.
7. Press ‘Start Route’ and follow the instructions.
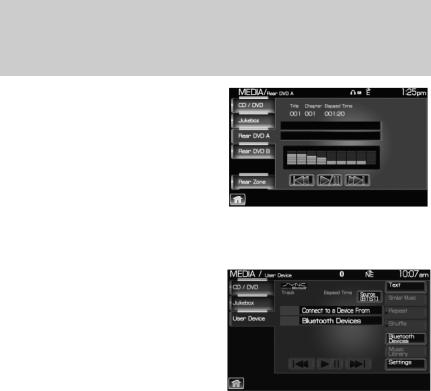
TO PLAY A PREVIOUSLY LOADED DVD IN THE FAMILY ENTERTAINMENT DVD SYSTEM (IF EQUIPPED)
Note: The images seen in this section, and the functions they represent, are only available with the headrest DVD system and are only available on Flex and MKT vehicles if the headrest DVD option is ordered from the factory when ordering the vehicle. For all other headrest DVD systems installed on vehicles other than the Flex and MKT, or for headrest DVD systems installed on vehicles already available in a dealer inventory, these functions are NOT available.
1. Press the MEDIA hard button on the navigation system. 12
2012 Centerstack (ng1)
Supplement, 3rd Printing USA (fus)
Introduction
2. Press the Rear DVD A or Rear DVD B tab to access the desired monitor system.
The previously loaded DVD will begin to play in the system.
USING SYNC (IF EQUIPPED)
Your vehicle may be equipped with SYNC — a hands-free communication and entertainment system which allows you to connect and use a portable media player through a USB port located in your vehicle, pair a Bluetooth enabled cellular phone, and operate these devices through your vehicle. Please refer to the SYNC media chapter
for more information on using portable media players with SYNC and refer to the SYNC phone chapter for information on pairing your Bluetooth enabled cellular phone and using the phone features.
13
2012 Centerstack (ng1)
Supplement, 3rd Printing USA (fus)
 Navigation System")
System overview
FORD SYSTEM
LINCOLN SYSTEM
Note: If your navigation system does not appear as one of the systems above, please refer to Navigation system in the next section.
14
2012 Centerstack (ng1)
Supplement, 3rd Printing USA (fus)
System overview
WARNING: Driving while distracted can result in loss of vehicle control, accident and injury. Ford strongly recommends that you
use extreme caution when using any device or feature that may take your focus off the road. Your primary responsibility is the safe operation of the vehicle. We recommend against the use of any handheld device while driving, encourage the use of voice-operated systems when possible and that you become aware of applicable state and local laws that may affect use of electronic devices while driving.
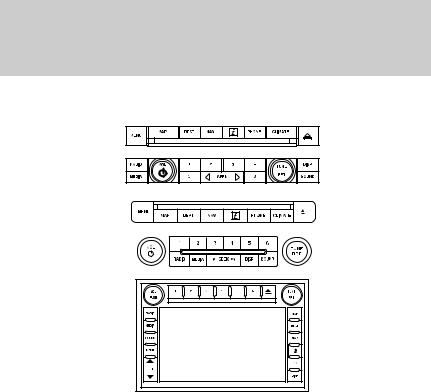
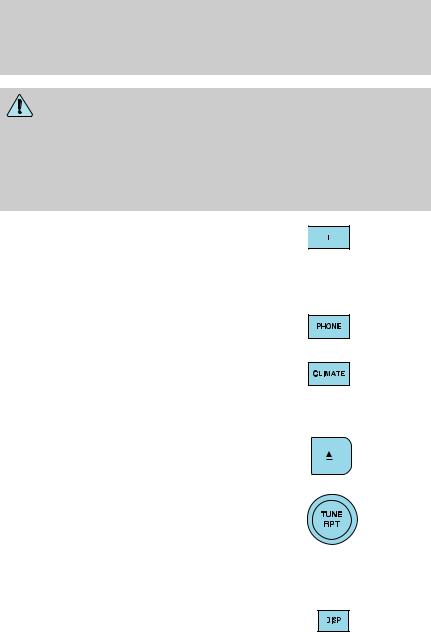
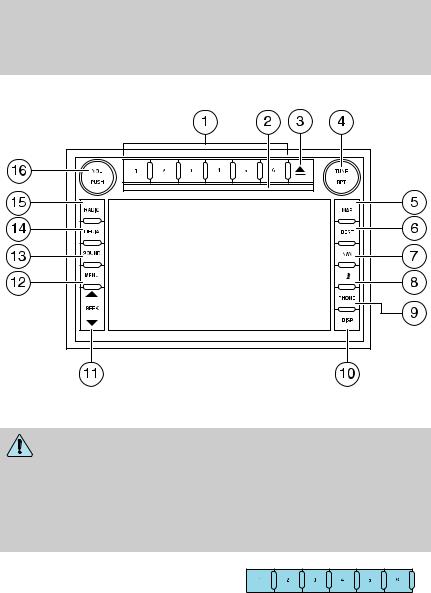
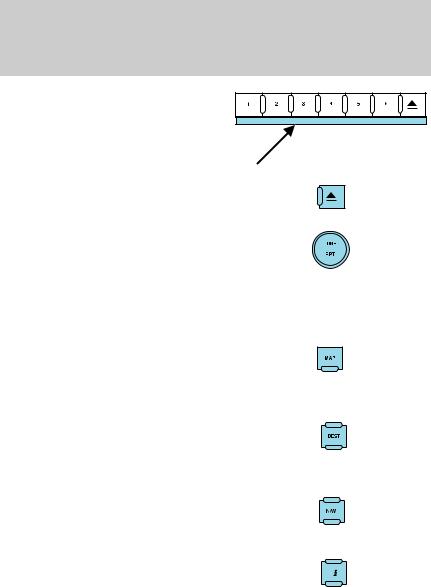
1.I (Information): Press I to access the information menu. Press while the information menu is active
to step through the information tabs of: Where am I?, HEV (if equipped), SIRIUS Travel Link™ (if activated), the Calendar, System Info (System Information) and Help.
2.PHONE: Press PHONE to access
the SYNC phone menu (if equipped).
3.CLIMATE: Press CLIMATE to access the climate menu. Press the button while the climate menu is
active to step through the climate menu tabs of Front Zone and Rear Zone (if equipped).
4. (Eject): Press
  (Eject) to
eject the disc in the slot.
5. TUNE: In radio or satellite
radio mode (if activated), turn to advance in individual increments up/down the frequency/channel
listing.
In MP3 mode, turn to advance to the next/previous folder.
RPT: In navigation mode, press the knob in while navigation guidance is active to repeat the last spoken navigation guidance prompt.
6. DISP: Press the DISP button to step through the following display modes: On, Status Bar Only, and Off.
15
2012 Centerstack (ng1)
Supplement, 3rd Printing USA (fus)
System overview
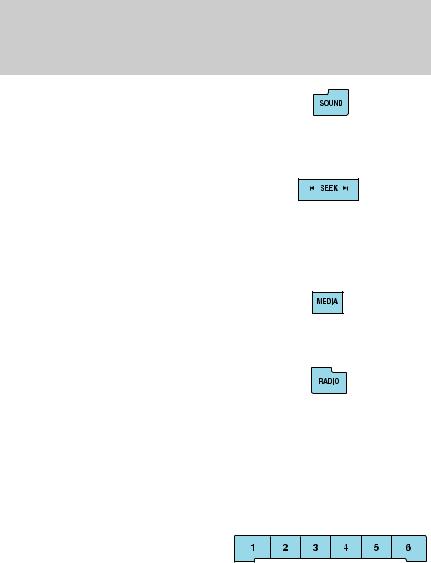
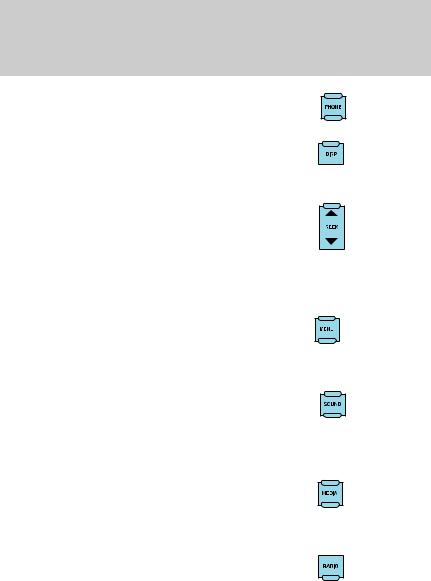
7. SOUND: Press SOUND to access
the sound menu. Press while the sound menu is active to step
through the sound menu tabs of
Bass/Treble, Balance/Fade, SCV (Speed compensated volume), DSP (Digital Signal Processing) and the Visualizer.
8. SEEK:In radio and satellite radio mode (if activated),
press  /
/ to seek to the
previous/next available station or channel within the currently selected Category/Genre.
In CD/DVD mode, press  /
/ to access the previous/next track or chapter.
9.MEDIA: Press MEDIA to access the media menu. Press while the media menu is active to step
through the available media sources of CD/DVD, Jukebox, User Device and Rear DVD access (if equipped).
10.RADIO: Press RADIO to access
the radio menu. Press while the radio menu is active to step through
the available radio sources of AM, FM1, FM2, SAT1, SAT2, and SAT3 (satellite radio, if activated).
11.VOL (On/off/volume): Press to turn the audio system on/off. Press and hold to turn the navigation radio completely off. Turn to adjust the volume of the audio system or the navigation voice prompts as they are being given.
Note: If a route is active when the navigation system is turned off, the route is resumed when the system is turned on again.
12.Memory presets:In radio and
satellite radio mode (if activated): Press 1-6 to access your previously saved preset
stations/channels. To save to a preset: Tune to the desired station/channel. Press and hold the desired preset button in which you would like to store the station/channel. The sound will momentarily mute and then return when the preset is saved.
16
2012 Centerstack (ng1)
Supplement, 3rd Printing USA (fus)
System overview
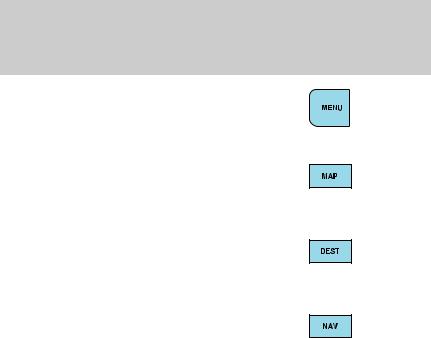
13. MENU: Press MENU to access
the system menu. Press while the system menu is active to step
through the system menu tabs of
Display, Clock, Feedback Settings, System Settings and Valet Mode.
14.MAP: Press MAP to access the navigation map. Press while the map display is active to center the map
on the current vehicle position. Press while the map display is active and a route is active to step through the different map guidance views.
15.DEST: Press DEST to access
the navigation destination entry menu. Press while the navigation
destination entry menu is active to show additional destination entry techniques.
16.NAV: Press NAV to access the navigation menu. Press while the navigation menu is active to step through the navigation menu tabs.
17.CD/DVD slot: Insert a CD or DVD, label side up.
After the system initializes, the screen will be divided in two sections:
•Status bars: This is the top and bottom portion of screen that displays the clock or date and useful information, depending on the current mode.
•Display area: The interactive screen that is activated by finger touch and changes depending on current system operation. Graphical buttons are displayed in this area depending on the current screen for you to make choices.
17
2012 Centerstack (ng1)
Supplement, 3rd Printing USA (fus)
System overview
Navigation system
Note: If your navigation system does not appear as this system, please refer to the previous section.
WARNING: Driving while distracted can result in loss of vehicle control, accident and injury. Ford strongly recommends that you
use extreme caution when using any device or feature that may take your focus off the road. Your primary responsibility is the safe operation of the vehicle. We recommend against the use of any handheld device while driving, encourage the use of voice-operated systems when possible and that you become aware of applicable state and local laws that may affect use of electronic devices while driving.
1. Memory presets: In radio and
satellite radio mode (if activated): Press 1-6 to access
your previously saved preset
stations/channels. To save to a preset: Tune to the desired station/channel. Press and hold the desired preset button in which you would like to store the station/channel. The sound will momentarily mute and then return when the preset is saved.
18
2012 Centerstack (ng1)
Supplement, 3rd Printing USA (fus)
System overview
2. CD/DVD slot: Insert a CD or DVD, label side up.
3.  (Eject): Press
  (Eject) to eject the disc in the slot.
4. TUNE: In radio or satellite
radio mode (if activated), turn to advance in individual increments
up/down the frequency/channel listing.
In MP3 mode, turn to advance to the next/previous folder.
RPT: In navigation mode, press the knob in while navigation guidance is active to repeat the last spoken navigation guidance prompt.
5. MAP: Press MAP to access the
navigation map. Press while the map display is active to center the map
on the current vehicle position. Press while the map display is active and a route is active to step through the different map guidance views.
6. DEST: Press DEST to access the navigation destination entry menu. Press while the navigation destination entry menu is active to
show additional destination entry techniques.
7. NAV: Press NAV to access the navigation menu. Press while the navigation menu is active to step through the navigation menu tabs.
8. I (Information): Press I to access the information menu. Press while the information menu is active
to step through the information tabs
of: Where am I?, HEV (if equipped), SIRIUS Travel Link (if activated), the Calendar, System Info., and Help.
19
2012 Centerstack (ng1)
Supplement, 3rd Printing USA (fus)
System overview
9. PHONE: Press PHONE to access the SYNC phone menu (if equipped).
10. DISP: Press the DISP button to step through the following display modes: On, Status Bar Only, and Off.
11. SEEK:In radio and satellite radio mode (if activated),
Press  /
/ to seek to the
previous/next available station or
channel within the currently selected Category/Genre.
In CD/DVD mode, press  /
/ to access the previous/next track or chapter.
12. MENU: Press MENU to access the system menu. Press while the system menu is active to step
through the system menu tabs of Display, Clock, Feedback Settings, System Settings and Valet Mode.
13. SOUND: Press SOUND to access the Sound menu. Press while the sound menu is active to step
through the sound menu tabs of
Bass/Treble, Balance/Fade, SCV (Speed compensated volume), DSP and the Visualizer.
14. MEDIA: Press MEDIA to access the media menu. Press while the media menu is active to step
through the available media sources
of CD/DVD, Jukebox, User Device and Rear DVD screens (if equipped).
15. RADIO: Press RADIO to access the radio menu. Press while the radio menu is active to step through
the available radio sources of AM, FM1, FM2, SAT1, SAT2, and SAT3 (satellite radio, if activated).
20
2012 Centerstack (ng1)
Supplement, 3rd Printing USA (fus)
System overview
16. VOL (On/off/volume): Press to
turn the audio system on/off. Press and hold to turn the navigation
radio completely off. Turn to adjust
the volume of the audio system or the navigation voice prompts as they are being given.
Note: If a route is active when the navigation system is turned off, the route is resumed when the system is turned on again.
After the system initializes, the screen will be divided in two sections:
•Status bars: This is the top and bottom portion of the screen that displays the clock or date and useful information, depending on the current mode.
•Display area: The interactive screen that is activated by finger touch and changes depending on current system operation. Graphical buttons are displayed in this area depending on the current screen for you to make choices.
SCREEN DIFFERENCES
Depending on your vehicle line and option package, your screen may vary in appearance from the screens shown in this supplement. These differences could include: background color, tab options, climate controls and other features. Your features may also be limited depending on your market. (For example, SIRIUS Travel Link™ is only available in the continental United States). Please check with your authorized dealer for availability.
Display options
You can choose to turn your screen on/off and also if you would like to view the status bars on the top and bottom of the screen. To access:
Press DISP repeatedly to cycle through these options.
Voice commands in display mode (if equipped)
While in display mode, press 
 or VOICE on the steering wheel controls. When prompted, you may say any of the following commands:
• Display on |
• Auto |
• Day |
• Night |
• Status bar |
• Display off |
• Brighter |
• Dimmer |
• Help |
|
21
2012 Centerstack (ng1)
Supplement, 3rd Printing USA (fus)
System overview
Note: If you are not in display mode, press 
 or VOICE on the steering wheel controls. When prompted, say, “Display mode” and then any of the above commands.
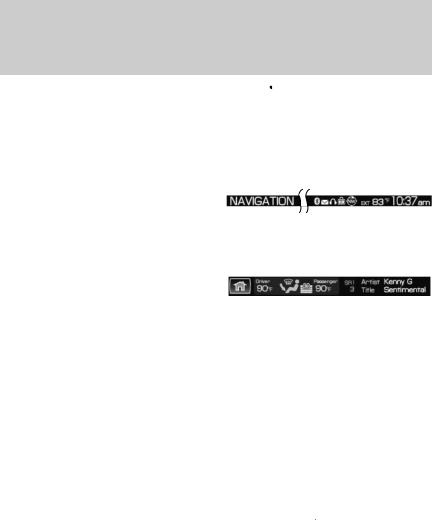
STATUS BARS
Your screens may have status bars on the top and bottom of each screen.
The status bar on the top of the
screen will tell your current mode, the exterior temperature, the time
as well as display icons if you have
enabled Bluetooth, or are using headphones with your Rear overhead mounted Family entertainment DVD system among other options.
The status bar on the bottom of the screen may list the Home icon, the current temperature selected for the
Driver and Passenger as well as the fan speed and air flow direction, the current mode being used (if equipped), the Artist and Title of the currently playing CD (if available), Artist and Title for Jukebox (if available) and satellite radio (if activated).
Note: As climate controls are vehicle dependent, some vehicles may not display climate readings in the status bar.
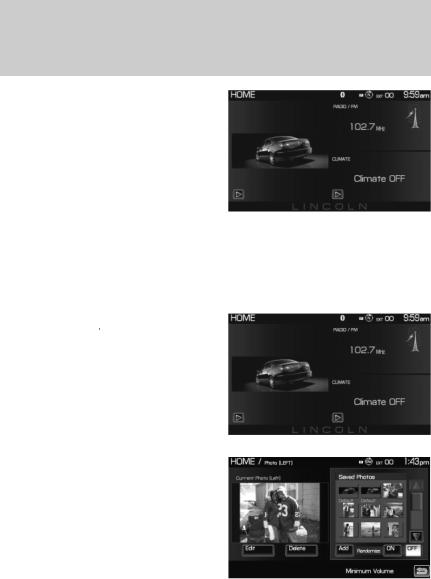
HOME SCREEN
Your system has a Home Screen where you can save/view favorite pictures, view your current audio and climate control settings as well as display the audio visualizer or the hybrid fuel economy (if equipped). You can split the screen in to two or three different sections, or you can choose to have one main view.
To access your home screen, press the house icon ( ) at the bottom left hand corner of any screen.
22
2012 Centerstack (ng1)
Supplement, 3rd Printing USA (fus)
System overview
The left side of the screen will display an uploaded photo or the map screen. The right side can also display the uploaded photo. The upper right panel will only display the current audio settings. The lower right panel displays the vehicle’s climate settings (if equipped), the visualizer or the hybrid fuel economy (if equipped).
Press  on the bottom of the display to access the settings screen for the left or right side.
Loading pictures
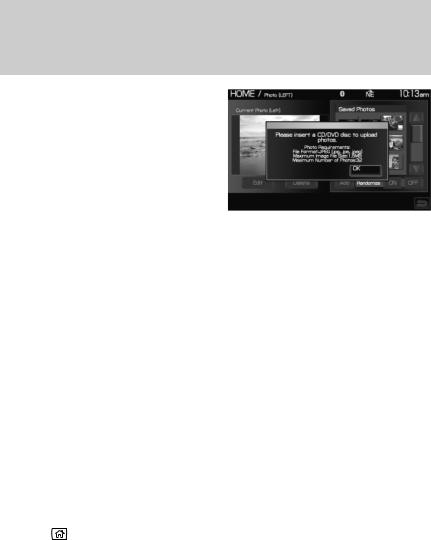
Your system allows you to save and view up to 32 photos. To access:
1.Ensure that you are on the Home Screen. (Press  at the bottom left of any screen to access.)
2.Touch the left side of the home screen to initiate the left screen photo display and saved photos screen.
3.Select the ‘Add’ button on the touchscreen. The following disclaimer will appear, “Please confirm the supported photo formats”.
23
2012 Centerstack (ng1)
Supplement, 3rd Printing USA (fus)
System overview
4.When the pop-up dialog box with the disclaimer appears, press OK and ensure that you are using the proper format.
5.Insert a CD-ROM which contains your photos as jpegs.
6.Press OK. The photos will be listed on the right half of the screen.
7.Select either ADD or ADD ALL.
The photos are now saved to the hard drive.
Photo display limitations:
•The file must be 1.5MB or less.
•The extension of the file must be one of JPE/JPG/JPEG.
•The CD or DVD must be ISO 9660 format, UDF format is not supported.
•The file path must be 255 characters or less.
•Up to 256 files or folders can be displayed in one folder.
•Not compatible with discs written in Packet Write mode.
•Only the photograph(s) which meet these conditions will be displayed.
Note: When burning a CD, ensure that you ‘close’ or ‘finalize’ the disc when the CD-burning process finishes (you should select this option before you start burning). Consult your software manual or the program’s help files if you’re not sure how to finalize the disc. Also, write the audio data into the first session of a multi-session CD as audio systems won’t be able to sort through other sessions to find more audio tracks.
Editing and deleting photos
1. |
Press |
to access the home screen. |
2. |
Touch the current photo on the home screen. |
|
3. |
To edit the photo: |
|
• Select the Edit button.
• Adjust the photo by zooming in or out, moving right, left, up or down and also rotating left or right.
• Press the Reset button to return to the original image. 4. To delete the photo, select the Delete button.
24
2012 Centerstack (ng1)
Supplement, 3rd Printing USA (fus)
System overview
5. To delete all stored photos:
•Press the Menu hard button.
•Select the System Settings tab on the touchscreen.
•Press the View button for Delete Stored Items.
•Select Saved photos.
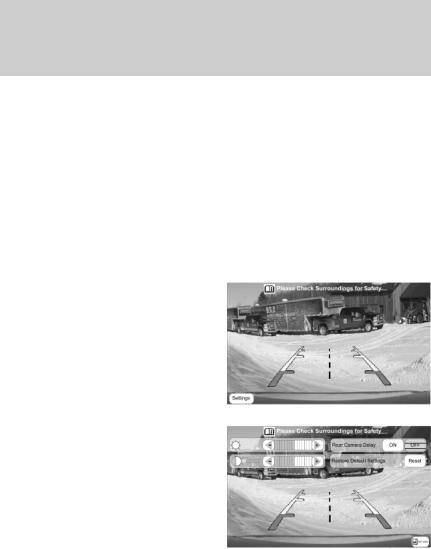
REVERSE CAMERA (IF EQUIPPED)
Your vehicle may be equipped with a reverse camera on the tailgate which provides a video image of the area behind the vehicle. When the transmission is in R (Reverse), an image will automatically display on the navigation screen. Once the vehicle is back in D (Drive), the image will continue to display until you are driving over 5 mph (8 km/h). To remove this image from the screen, press any hard button on the navigation system.
When the vehicle is in R (Reverse), press SETTINGS to make adjustments to the brightness of the display as well as the rear camera display.
When the rear camera delay function is ON, it extends the display of the camera image into Drive mode until vehicle speed is greater than 5 mph (8 km/h). This is useful when trying to engage/disengage a trailer. Once you shift out of R (Reverse), the image will be removed from the screen. The default for the rear camera delay is off.
Prior to using, ensure that the camera lens is clear of any debris, mud, etc. and that both reverse lamps are operational if using at night.
Depending on your vehicle, you may have a Zoom button (if equipped) as well as additional selections under the Settings button.
For complete information, refer to Rear-view Camera System in the Driving chapter in your Owner’s Guide.
25
2012 Centerstack (ng1)
Supplement, 3rd Printing USA (fus)

System overview
QUICK REFERENCE CHART
SYNC works with your navigation system, DVD system (if equipped), voice commands and also through your steering wheel controls. Below is a quick listing of the functions of some steering wheel controls and navigation system controls.
Navigation |
|
Steering wheel |
Function |
||
bezel control |
|
|
control |
||
|
|
|
|||
N/A |
|
|
|
|
Press to answer an incoming call. |
|
|
|
|
|
Press to send a call or text message |
|
|
|
|
|
(if supported). |
|
|
|
|
|
Press and hold to end a call. |
|
|
|
|
|
|
|
|
|
|
|
Press it initiate a redial. |
N/A |
VOICE |
Press to activate Voice Recognition. |
|||
|
|
|
|
|
Press and hold to end an active |
|
|
|
|
|
voice session. |
|
|
|
|
|
Refer to the Voice recognition |
|
|
|
|
|
system overview chapter for further |
|
|
|
|
|
information. |
SEEK |
, |
|
Press to access the previous/next |
||
|
|
, |
|
preset radio station, preset satellite |
|
|
|
|
|||
|
|
|
channel (if activated) or CD track. |
||
|
|
|
|
|
|
|
|
|
|
|
Press and hold to seek to the next |
|
|
|
|
|
satellite channel (if activated). |
N/A |
OK |
Press to confirm your selection. |
|||
MEDIA |
N/A |
Press repeatedly to access all |
|||
|
|
|
|
|
available media sources in your |
|
|
|
|
|
vehicle such as: CD, DVD, Jukebox, |
|
|
|
|
|
Rear Zone, Rear DVD (if equipped) |
|
|
|
|
|
Line In, and User Device (if |
|
|
|
|
|
equipped with SYNC ). |
PHONE |
N/A |
Press to access SYNC PHONE |
|||
|
|
|
|
|
features. |
26
2012 Centerstack (ng1)
Supplement, 3rd Printing USA (fus)
System overview
SYSTEM MENU FEATURES
Your system has many menu features such as allowing you to adjust the touchscreen brightness, adjusting the time and languages, adjusting the feedback and system settings. To access, press the MENU hard button on the navigation system.
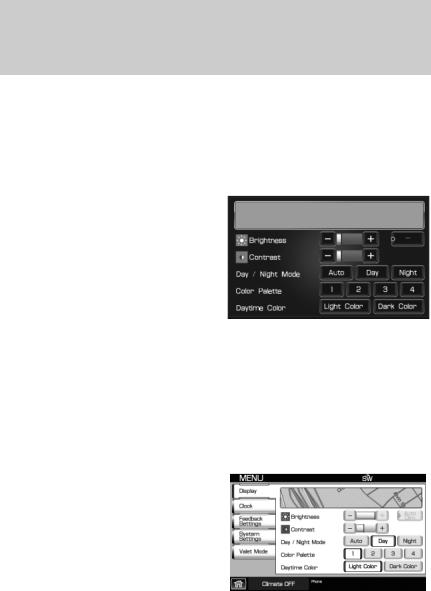
Display options
1.Press the MENU hard button.
2.Select the ‘Display’ tab on the touchscreen. Select from the following display options:
Brightness: Select AUTO DIM to manually adjust the brightness by pressing + or —.
Contrast: Press + to increase and
— to decrease the level of contrast on the screen.
Day/Night Mode: Select ‘Day’ to always display day mode or ‘Night’ to always display night mode. Select ‘Auto’ for the screen to automatically change between day and night mode.
Color Palette (Available on Lincoln vehicles only): Select between four different background colors: 1. Black, 2. Blue, 3. Green, 4. Red.
Daytime color: Press to select Light color or Dark color for the screen lighting.
Note: When the headlamps are on under high ambient light conditions, the system will remain in day mode, even if night is selected.
27
2012 Centerstack (ng1)
Supplement, 3rd Printing USA (fus)

System overview
Setting the clock
1.Press the MENU hard button.
2.Select the ‘Clock’ tab on the touchscreen. Select from the following display options:
Time set buttons: To set the time, press +, — to increase/decrease the time and select AM or PM.
Display clock: Press to turn the clock display on/off.
Format: Press to select between 12 hour and 24 hour format.
Auto time zone: If enabled, the system will automatically adjust the time when you enter into a new time zone. If disabled, you will have to manually adjust the time when entering different time zones. Note: The system does not implement daylight savings time.
Restore defaults: Select ‘Reset’ to reset to the default settings.
Note: If your vehicle is equipped with an in-dash analog clock, you can set the time on this screen but it may not appear in status bar for viewing purposes.
Feedback settings
1.Press the MENU hard button.
2.Select the ‘Feedback Settings’ tab on the touchscreen. Select from the following display options:
Voice recognition user profile: You can ‘train’ the system to better recognize your voice. Two profiles can be created. Refer to the Voice Recognition section for more information.
28
2012 Centerstack (ng1)
Supplement, 3rd Printing USA (fus)

System overview
Button tone: Select to select/adjust when the system will sound a tone. Press ‘Button tone’ to then select from:
•All Buttons: Select to have the system sound a tone when any hard or soft key is touched.
•Touch Screen: Select to have the system only sound a tone when a selection is made on the touch screen.
•Off: Select to turn off all tones.
Voice volume: Press + to increase or — to decrease the volume level of the navigation voice. Voice volume adjustment also includes the volume level of chimes.
Voice recognition interaction mode: This feature determines the level of interaction/feedback you will receive from the system.
•Standard: This is the default setting. The ‘Standard setting’ provides you with the most interaction / feedback in the form of prompts.
•Advanced: This feature has less prompts and feedback.
Voice recognition confirmation:
•On: Select to have the system always ask to confirm/verify a command.
•Off: Select to have the system ask less frequently to confirm /verify a command.
System settings
1.Press the MENU hard button.
2.Select the ‘System Settings’ tab on the touchscreen. Select from the following display options:
Language: Select between ‘English’, ‘Francais’ or ‘Espanol’.
Units: Select between ‘English’ and ‘Metric’.
Keyboard layout: Select ‘ABC’ or ‘QWERTY’ for the keyboard layout in the display.
29
2012 Centerstack (ng1)
Supplement, 3rd Printing USA (fus)
System overview
Delete stored items: Select ‘View’ to see what areas contain stored items. You can then choose to delete all of the entries from these ’areas’ : Address Book, Previous Destinations, Avoid areas, Saved Photos and Voice Recognition Profiles.
Restore factory default settings: Press ‘Reset’ to return to the factory default settings.
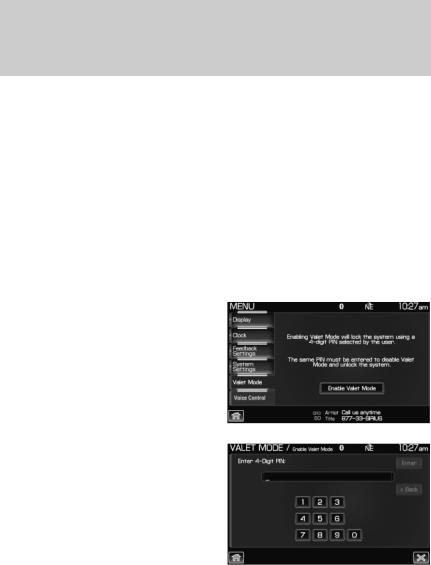
Valet Mode: Press to access Valet Mode.
•Enable Valet Mode: Select to lock the system with a four digit PIN. The same PIN must be entered to unlock the system and disable valet mode.
Valet mode
1.Press the MENU hard button.
2.Select the ‘Valet Mode’ tab on the touchscreen. Press ‘Enable Valet Mode’.
3. Enter a four digit Personal Identification Number (PIN) and press ‘Enter’. The system will ask you to re-enter the PIN. Once entered, select ‘Enable’ to activate Valet mode. The system is then locked until the correct four digit PIN is entered.
Note: The PIN can be reset by simultaneously pressing and holding presets 1 and 5 while on the PIN entry screen. After approximately five seconds, the system will transition to the Valet mode screen indicating that the PIN is reset. Once you have reset the PIN, the system will then allow you to set a new PIN.
30
2012 Centerstack (ng1)
Supplement, 3rd Printing USA (fus)
Loading...