


PARTS & SERVICE MANUAL
Digital Countertop Series 2500
REV: 11.2.10
Lincoln Foodservice Products, LLC 1111 North Hadley Road
Fort Wayne, Indiana 46804
Telephone: 260.459.8200 Fax: 888.790.8193
Technical Support: 800.678.9511 lincolnfp.com

MODEL NUMBER KEY
EXAMPLE: 2501-000-U-0001620
25 |
|
01 |
- |
0 |
|
00 |
- |
U |
- 00 0 |
1620 |
|
Size |
|
|
|
|
|
|
|
|
|
|
|
|
Platform |
|
|
|
|
|
|
|
|
|
|
|
|
|
|
|
|
|
|
|
|
|
|
|
|
|
|
Finger Setup
Agency Code (i.e. CE & RoHS combined)
Custom Configuration Code (i.e. General Market Version)
Language Code
Indicates voltage (i.e. 208V, 1 phase, 60 Hz)
Model (i.e. Digital Countertop)
|
CODE |
|
LANGUAGE |
|
COUNTRY |
|
|
CODE |
|
LANGUAGE |
COUNTRY |
|
0 |
|
English |
|
Dom. & Int. Default |
|
|
N |
|
Finnish |
Finland |
||
|
B |
|
French |
|
France/Luxembourg |
|
|
O |
|
Restricted |
--- |
|
|
|
|
|
|
|
|
|
|
|
|
|
|
|
C |
|
German |
|
Germany |
|
|
P |
|
Norwegian |
Norway |
|
|
|
|
|
|
|
|
|
|
|
|
|
|
|
D |
|
Italian |
|
Italy |
|
|
Q |
|
English |
Japan |
|
|
|
|
|
|
|
|
|
|
|
|
|
|
|
E |
|
Spanish |
|
Spain |
|
|
R |
|
Swedish |
Sweden |
|
|
F |
|
English |
|
UK/India/Africa/Hungary |
|
|
S |
|
English |
Australia |
|
|
|
|
|
|
|
|
|
|
|
|
|
|
|
G |
|
Spanish |
|
Mexico/Latin America |
|
|
T |
|
Mandarin |
China |
|
|
H |
|
Portuguese |
|
Portugal |
|
|
U |
|
Restricted |
--- |
|
|
I |
|
Not Used |
--- |
|
|
V |
|
English |
Pacific Rim/Korea |
||
|
|
|
|
|
|
|
|
|
|
|
|
|
|
J |
|
Danish |
|
Denmark |
|
|
W |
|
English |
Middle East |
|
|
|
|
|
|
|
|
|
|
|
|
|
|
|
K |
|
Dutch & |
|
Belgium |
|
|
X |
|
Not Used |
--- |
|
|
|
French |
|
|
|
|
|
|||||
|
|
|
|
|
|
|
|
|
|
|
|
|
|
L |
|
Dutch |
|
Netherlands |
|
|
Y |
|
Not Used |
--- |
|
|
|
|
|
|
|
|
|
|
|
|
|
|
|
M |
|
Greek |
|
Greece |
|
|
Z |
|
Not Used |
--- |
|
|
AGENCY CODE TABLE |
|
|
|
|
|
|
|
|
|
||
CODE |
AGENCY |
N |
No Agency |
E |
CE & RoHS compliance combined |
U |
US & Canada compliance only |
|
|
A |
Advantage style oven to be phased-out |
|
|
B |
Australia AGA |
|
|
2 |
Digital Countertop Service Manual |

DIGITAL DISPLAY CONTROL PANEL
DISPLAY SCREEN
TEMPERATURE CONTROL BUTTON |
MENU PRESET BUTTONS |
BELT DIRECTION BUTTON |
BELT SPEED / TIME CONTROL |
ON / OFF SWITCH |
|
|
|
|
BUTTON |
|
OPERATING INSTRUCTIONS
! |
WARNING: |
Do not work around conveyor belt with long hair, loose clothing, or dangling jewelry. Getting caught in |
the conveyor belt could result in serious injury! |
Prior to operating your new countertop oven, it is important to understand the available options. Following is a chart designed to better illustrate these options.
CONTROLS
Belt Speed / Time Control
Temperature Control
Belt Direction
DESCRIPTION
Belt speed refers to how quickly the food item travels through the oven. This is shown on the display board as a unit of measure (fast to slow) between 0:30 seconds and 15:00 minutes.
The countertop oven will allow you to determine the temperature setting of the oven. You have the ability to program your oven so that more (or less) heat will emanate from the unit. This is shown on the display board as a unit of measure between 90°F – 600°F.
The countertop oven will allow you to change the direction in which the conveyor belt moves. Pressing the “Belt Direction Button” will change the direction of travel between left-to-right and right-to-left options.
POWER-UP THE OVEN
1.Turn the “On/Off Switch” to the “on” position. The oven will now run according to the previously programmed settings. Allow the oven to preheat for approximately 30 minutes.
ON / OFF SWITCH
Digital Countertop Service Manual |
3 |
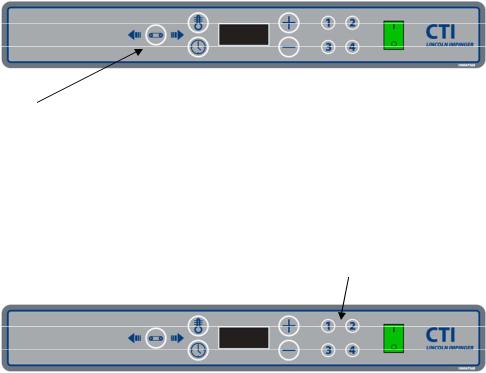
CHANGE BELT DIRECTION
1. Press the “Belt Direction Button” to change the direction in which the conveyor belt travels.
BELT DIRECTION BUTTON
PROGRAMMING THE FOUR MENU PRESET BUTTONS
1.Press and hold the desired menu button (1-4) for approximately 5 seconds. The display screen will flash the temperature setpoint. Press the (+) or (-) button to reach the desired temperature.
NOTE: All menu presets come with default settings of “Pizza” at 550°F / 6:00.
MENU PRESET BUTTONS
2.Press and release the menu button again to reach the time/belt speed setpoint. The display will flash the time/belt speed setpoint. Press the (+) or (-) button to reach the desired time/belt speed.
3.Press and release the menu button again to reach the menu item name. The display will flash a menu item name. Press the (+) or (-) button to locate the desired name. Once the desired name has been selected, press and release the menu button again to activate the menu setting.
NOTE: The following menu items have been preset into the software package of this oven.
• Pizza |
• Sandwich |
• Wrap |
• Wings |
• Chicken |
• Menu 1 |
• Breakfast |
• Snack |
• Menu 2 |
• Breadsticks |
• Snack |
• Menu 3 |
• Thin Pizza |
• Dinner |
• Menu 4 |
4 |
Digital Countertop Service Manual |

PROGRAMMING THE MANUAL MODE
1.Press and hold the Time and Temperature buttons for approximately 5 seconds to enter manual mode. Press the Time button to allow for changes in time. Press the (+) or (-) button to reach the desired time.
BELT DIRECTION BUTTON |
BELT SPEED / TIME CONTROL |
|
|
|
BUTTON |
2.Press and release the Temperature button to allow for changes to temperature. Press the (+) or (-) button to reach the desired temperature. Press and release the Temperature button again to leave manual mode and activate the manual settings.
TEMPERATURE CONTROL BUTTON
SHUTDOWN
1.Push the “On/Off Switch” to the “off” position.
2.As each countertop oven is equipped with a 30-minute cool-down timer, the fan motor will continue to run for 30 minutes after the unit has been turned off. The fan motor will automatically stop at the end of the 30minute cool-down period.
ON / OFF SWITCH
Digital Countertop Service Manual |
5 |
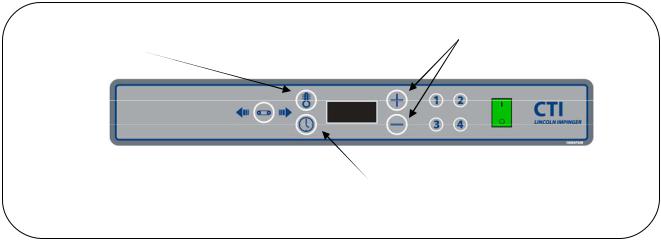
ACCESSING SUBSET MENU OPTIONS
There are three settings that can be accessed by an authorized technician; the temperature calibration setting, temperature display (°F or °C) and the conveyor belt direction.
SUBSET MENU INSTRUCTIONS
(+) AND (-) BUTTONS
TEMPERATURE CONTROL BUTTON
BELT SPEED / TIME CONTROL
BUTTON
STEP ONE
To access the subset menu, press and hold the (+) and (-) buttons for approximately 5 seconds. The calibration value will be displayed. If a change to the calibration value is desired, press either the (+) or (-) buttons until the desired value is reached. If no change to calibration value is needed, press the “Temperature Control” button to reach the temperature display setting.
STEP TWO
Complete step one. To change the temperature display setting between °F and °C, simply press the (+) or (-) button until the desired setting is displayed. If no change to the temperature display setting is needed, press the “Belt Speed / Time Control” button to reach the conveyor belt direction setting.
STEP THREE
Complete steps one and two. To change the conveyor belt direction, press the (+) or (-) button until the desired belt direction setting is reached. Once reached, press the “Belt Speed / Time Control” button to save the changes and exit the subset menu.
6 |
Digital Countertop Service Manual |

SEQUENCE OF OPERATION
Power Supply
Control Box Auto Cool Down
Main Fan Circuit
Heating Circuit
Oven Control
Conveyor Drive
Electrical Power is supplied to the oven by a three conductor cord set. Black conductor is HOT.
White conductor is HOT. Green conductor is ground.
Line voltage is supplied through the fuses(F1, F2)and line one(L1) through the manual resettable control box high limit(T1) to the ON/OFF switch, the Cooling Fan Thermostat(T2), the Cool Down Timer(TD), and to the Main Fan Relay(R2).
The cooling fan thermostat is connected to the axial fan that cools the control box. Line two (L2) connects to the other side of the Control Box Cooling Fan motor bypassing the ON/OFF switch. The thermostat closes at 120°F cycling the fan keeping the control box below 120°F
Upon activating the ON/OFF switch, power is supplied to the Cool Down Timer (TD) through the timer (TD) to the Main Fan Relay (R2) through the relay (R2) to power the Main Fan (M1).
When the heating contactor then closes, supplying line voltage to the SSR for the heater. Line voltage is then supplied to the element through the SSR as needed to maintain set point temperature.
Upon closing the ON/OFF switch, the transformer is supplied line voltage and then supplies 24 VAC to the control board and controls the conveyor motor. The control reads the thermocouple and cycles the SSR to the heater to maintain set point temperature. The control board also reads the input from the key pad to make adjustments for cook time and temperature.
The control board transformer’s (XR) secondary supplies 24 VAC to the control board (CNTR). The conveyor control converts AC to DC and DC power is supplied to the conveyor motor (M3). 2-29 VDC is supplied to the motor (M3) through 4 wires (2 sets A+ A- & B+ B-).
Digital Countertop Service Manual |
7 |

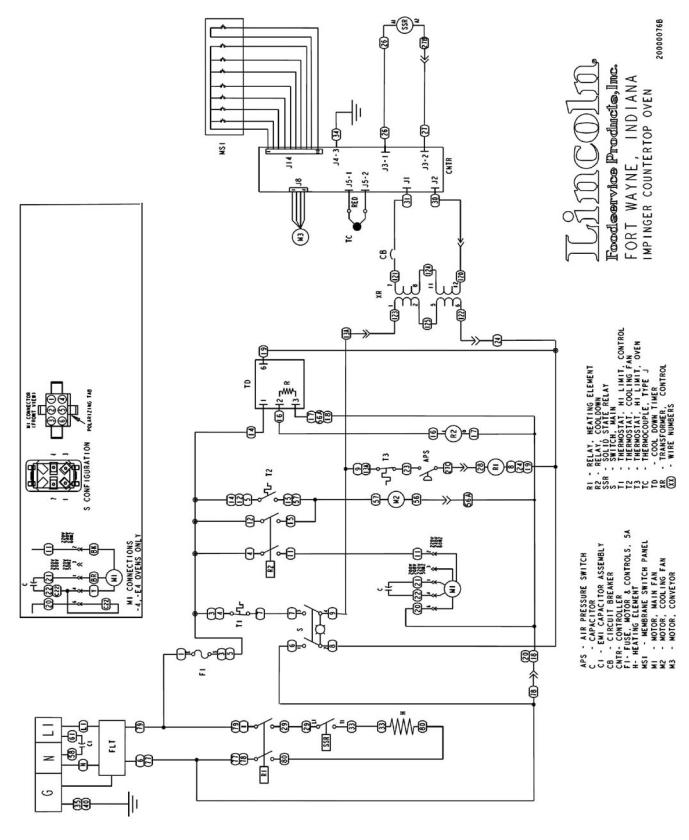
SCHEMATIC DIAGRAM
2501-000, 2501-001, 2501-002, 2501-003, 2501-008, 2501-009, 2502-000, 2502-001, 2502-002, 2510-000
8 |
Digital Countertop Service Manual |
SCHEMATIC DIAGRAM
2504-000, 2504-001, 2514-000
Digital Countertop Service Manual |
9 |

SCHEMATIC DIAGRAM
2505-000
10 |
Digital Countertop Service Manual |

SCHEMATIC DIAGRAM
2508-000, 2509-000, 2512-000, 2512-004
Digital Countertop Service Manual |
11 |
 Loading...