

LG NB4535A User manual
OWNER’S MANUAL
Sound Bar
System
Please read this manual carefully before operating your set and retain it for future reference.
NB4535A (NB4535A, S43A1-D)
<![endif]>PORTUGUÊS ΕΛΛΗΝΙΚΑ ESPAÑOL ITALIANO SLOVENŠČINA NEDERLANDS FRANÇAIS DEUTSCH ENGLISH
www.lg.com
NB4530A-NE.BDEULLP_ENG_2314.indd 1 |
2015-04-01 3:53:02 |
1 GettingStarted
2 Getting Started
Safety Information |
confined space such as a book case or similar unit. |
|||
|
|
|
WARNING: Do not install this equipment in a |
|
|
|
|
CAUTION: Do not block any ventilation openings. |
|
|
CAUTION |
|
Install in accordance with the manufacturer’s |
|
|
RISK OF ELECTRIC SHOCK |
|
instructions. |
|
|
|
Slots and openings in the cabinet are provided for |
||
|
DO NOT OPEN |
|
||
CAUTION: TO REDUCE THE RISK OF ELECTRIC |
ventilation and to ensure reliable operation of the |
|||
product and to protect it from over heating. The |
||||
SHOCK DO NOT REMOVE COVER (OR BACK) NO |
||||
openings shall be never be blocked by placing |
||||
USER-SERVICEABLE PARTS INSIDE REFER SERVICING |
||||
the product on a bed, sofa, rug or other similar |
||||
TO QUALIFIED SERVICE PERSONNEL. |
||||
surface. This product shall not be placed in a built- |
||||
|
|
|
||
|
This lightning flash with |
in installation such as a bookcase or rack unless |
||
|
proper ventilation is provided or the manufacturer’s |
|||
|
arrowhead symbol within an |
|||
|
instruction has been adhered to. |
|||
|
equilateral triangle is intended to |
|||
|
|
|||
|
alert the user to the presence of |
|
||
|
uninsulated dangerous voltage |
CAUTION concerning the Power Cord |
||
|
within the product’s enclosure |
|||
|
Most appliances recommend they be placed upon |
|||
|
that may be of sufficient |
|||
|
a dedicated circuit; |
|||
|
magnitude to constitute a risk of |
|||
|
That is, a single outlet circuit which powers only |
|||
|
electric shock to persons. |
|||
|
The exclamation point within an |
that appliance and has no additional outlets or |
||
|
branch circuits. Check the specification page of this |
|||
|
equilateral triangle is intended |
|||
|
owner’s manual to be certain. Do not overload wall |
|||
|
to alert the user to the presence |
|||
|
outlets. Overloaded wall outlets, loose or damaged |
|||
|
of important operating and |
|||
|
wall outlets, extension cords, frayed power cords, or |
|||
|
maintenance (servicing) |
|||
|
damaged or cracked wire insulation are dangerous. |
|||
|
instructions in the literature |
|||
|
Any of these conditions could result in electric |
|||
|
accompanying the product. |
|||
|
shock or fire. Periodically examine the cord of your |
|||
WARNING: TO PREVENT FIRE OR ELECTRIC SHOCK |
||||
appliance, and if its appearance indicates damage |
||||
HAZARD, DO NOT EXPOSE THIS PRODUCT TO RAIN |
||||
or deterioration, unplug it, discontinue use of the |
||||
OR MOISTURE. |
||||
appliance, and have the cord replaced with an |
||||
|
|
|
||
CAUTION: The apparatus shall not be exposed to |
exact replacement part by an authorized service |
|||
water (dripping or splashing) and no objects filled |
center. Protect the power cord from physical or |
|||
with liquids, such as vases, shall be placed on the |
mechanical abuse, such as being twisted, kinked, |
|||
apparatus. |
pinched, closed in a door, or walked upon. Pay |
|||
|
|
|
particular attention to plugs, wall outlets, and |
|
|
|
|
the point where the cord exits the appliance. To |
|
|
|
|
disconnect power from the mains, pull out the |
|
|
|
|
mains cord plug. hen installing the product, ensure |
|
|
|
|
that the plug is easily accessible. |
|
NB4530A-NE.BDEULLP_ENG_2314.indd 2 |
2015-04-01 3:53:03 |
|
|
Getting Started 3 |
||
|
|
|
|
|
This device is equipped with a portable battery or |
Disposal of waste batteries/accumulators |
|||
accumulator. |
|
|
|
|
|
|
|
||
Safety way to remove the battery or the |
|
|
|
|
battery from the equipment: Remove the |
|
|
|
|
old battery or battery pack, follow the steps |
|
|
|
|
in reverse order than the assembly. To prevent |
|
|
|
|
contamination of the environment and bring on |
Pb |
|||
possible threat to human and animal health, the |
||||
old battery or the battery put it in the appropriate |
1. This symbol may be combined with chemical |
|||
container at designated collection points. Do |
||||
not dispose of batteries or battery together with |
symbols for mercury(Hg), cadmium(Cd) or |
|||
other waste. It is recommended that you use |
lead(Pb) if the battery Contains more that |
|||
local, free reimbursement systems batteries and |
0.0005% of mercury,0.002% of cadmium or |
|||
accumulators. The battery shall not be exposed to |
0.004% of lead. |
|||
excessive heat such as sunshine, fire or the like. |
2. All batteries/accumulators should be |
|||
|
|
disposed separately from the municipal |
||
|
|
waste stream via designated collection |
||
Disposal of your old appliance |
facilities appointed by the government or the |
|||
|
|
local authorities. |
||
|
|
|||
|
|
3. The correct disposal of Your old batteries/ |
||
|
|
accumulators will help to prevent potential |
||
|
|
negative consequences for the environment, |
||
|
|
animal and human health. |
||
|
|
4. For more detailed information about disposal |
||
|
|
of Your old batteries/accumulators, please |
||
|
|
contact Your city office, waste disposal |
||
1. All electrical and electronic products should |
service or the shop where You purchased the |
|||
be disposed of separately from the municipal |
product. |
|||
waste stream via designated collection |
|
|
|
|
facilities appointed by the government or the |
|
|
|
|
local authorities. |
|
|
|
|
2. The correct disposal of your old appliance |
|
|
|
|
will help prevent potential negative |
|
|
|
|
consequences for the environment and |
|
|
|
|
human health. |
|
|
|
|
3. For more detailed information about disposal |
|
|
|
|
of your old appliance, please contact your |
|
|
|
|
city office, waste disposal service or the shop |
|
|
|
|
where you purchased the product. |
|
|
|
|
1 GettingStarted
NB4530A-NE.BDEULLP_ENG_2314.indd 3 |
2015-04-01 3:53:03 |
1 GettingStarted
4 |
Getting Started |
|
|
|
|
|
|
Europe Notice |
|
Italy Notice |
|
|
|
|
A general authorization is requested for outdoor |
|
|
|
use in Italy. |
|
|
|
The use of these equipments is regulated by: |
|
|
|
|
|
|
|
|
LG Electronics hereby declares that this/these product(s) is/are in compliance with the essential requirements and other relevant provisions of Directive 1999/5/EC, 2004/108/EC, 2006/95/EC, 2009/125/EC and 2011/65/EU.
Please contact to the following address for obtaining a copy of the DoC (Declaration of Conformity).
Contact office for compliance of this product :
LG Electronics Inc.
EU Representative, Krijgsman 1,
1186 DM Amstelveen, The Netherlands
yy Please note that this is NOT a Customer Service contact point. For Customer Service Information, see Warranty Card or contact the dealer that you purchased this product.
Indoor Use Only
RF Radiation Exposure Statement
This equipment should be installed and operated with minimum distance 20 cm between the radiator and your body.
1.D.L.gs 1.8.2003, n. 259, article 104 (activity subject to general authorization) for outdoor use and article 105 (free use) for indoor use, in both cases for private use.
2.D.M. 28.5.03, for supply to public of RLAN access to networks and telecom services.
L’uso degli apparati è regolamentato da:
1.D.L.gs 1.8.2003, n. 259, articoli 104 (attività soggette ad autorizzazione generale) se utilizzati al di fuori del proprio fondo e 105 (libero uso) se utilizzati entro il proprio
fondo, in entrambi i casi per uso private.
2.D.M. 28.5.03, per la fornitura al pubblico dell’accesso R-LAN alle reti e ai servizi di telecomunicazioni.
Brazil Notice
Este equipamento opera em caráter secundário, isto é, não tem direito a proteção contra interferência prejudicial, mesmo de estações do mesmo tipo, e não pode causar interferência a sistemas operando em caráter primário.
NB4530A-NE.BDEULLP_ENG_2314.indd 4 |
2015-04-01 3:53:03 |

|
|
|
|
Table of Contents 5 |
||
|
|
|
|
|
||
Table of Contents |
|
3 |
Operating |
|||
|
|
21 |
Basic operations |
|||
|
|
21 |
– USB operation |
|||
1 |
Getting Started |
21 |
Other operations |
|||
21 |
– DRC (Dynamic Range Control) |
|||||
2 |
Safety Information |
21 |
– AV Sync |
|||
21 |
– Turn off the sound temporarily |
|||||
6 |
Unique features |
|||||
21 |
– Displaying file and input source |
|||||
6 |
– Auto power down |
|||||
22 |
– AUTO POWER On/Off |
|||||
6 |
– Portable In |
|||||
22 |
– Auto power down |
|||||
6 |
– Speaker ez (easy) setup |
|||||
22 |
– Sleep timer setting |
|||||
6 |
– LG Sound Sync |
|||||
23 |
– LG Sound Sync |
|||||
6 |
Introduction |
|||||
24 |
Using Bluetooth technology |
|||||
6 |
– Symbols used in this manual |
|||||
25 |
– Listening to music stored on the |
|||||
6 |
Accessories |
|||||
|
|
Bluetooth devices |
||||
7 |
Remote control |
|
|
|||
26 |
Sound adjustment |
|||||
8 |
Front panel |
|||||
26 |
– Setting the surround mode |
|||||
8 |
Rear panel |
|||||
26 |
– Auto volume On/Off |
|||||
9 |
Installing the sound bar |
|||||
26 |
– Adjust the woofer level settings |
|||||
9 |
Installing the cover foot |
|||||
27 |
Controlling a TV with the supplied remote |
|||||
|
|
|||||
2 |
Connecting |
|
|
control |
||
27 |
– Setting up the remote to control your |
|||||
10 |
Mounting the main unit on a wall |
|
|
TV |
||
|
|
|
|
|||
12 |
Connecting the AC adapter |
4 |
Troubleshooting |
|||
12 |
Setting up |
|||||
12 |
– Pairing wireless subwoofer |
|
|
|
|
|
28 |
Troubleshooting |
|||||
13 |
Connecting to your TV |
|||||
|
|
|
|
|||
13 |
– Using an OPTICAL cable |
|
|
|
|
|
14 |
– Connecting with this unit and TV |
5 |
Appendix |
|||
|
using an HDMI cable |
|
|
|
|
|
|
29 |
Trademarks and licenses |
||||
14 |
– HDMI cable Checklist |
|||||
30 |
Specifications |
|||||
14 |
– Enjoy rich sound broadcast of the |
|||||
31 |
Maintenance |
|||||
|
channel by the sound bar |
|||||
|
31 |
– Handling the unit |
||||
16 |
– ARC (Audio Return Channel) function |
|||||
|
|
|
|
|||
16– Additional information for HDMI
17– What is SIMPLINK?
18Optional equipment connection
18– HDMI connection
19– PORT. (Portable) IN connection
19 – Listening to music from your portable player
19– OPTICAL IN connection
19– Speaker ez (easy) setup
20– USB playback
20 – Playable file
1
2
3
4
5
NB4530A-NE.BDEULLP_ENG_2314.indd 5 |
2015-04-01 3:53:03 |
1 GettingStarted
6 Getting Started
Unique features
Auto power down
This unit supports to turn off by itself for saving energy consumption.
Portable In
Listen to music from your portable device. (MP3, Notebook, etc)
Speaker ez (easy) setup
Listen to sound from TV, DVD or Digital device with vivid 2.1 or 2.0 ch mode.
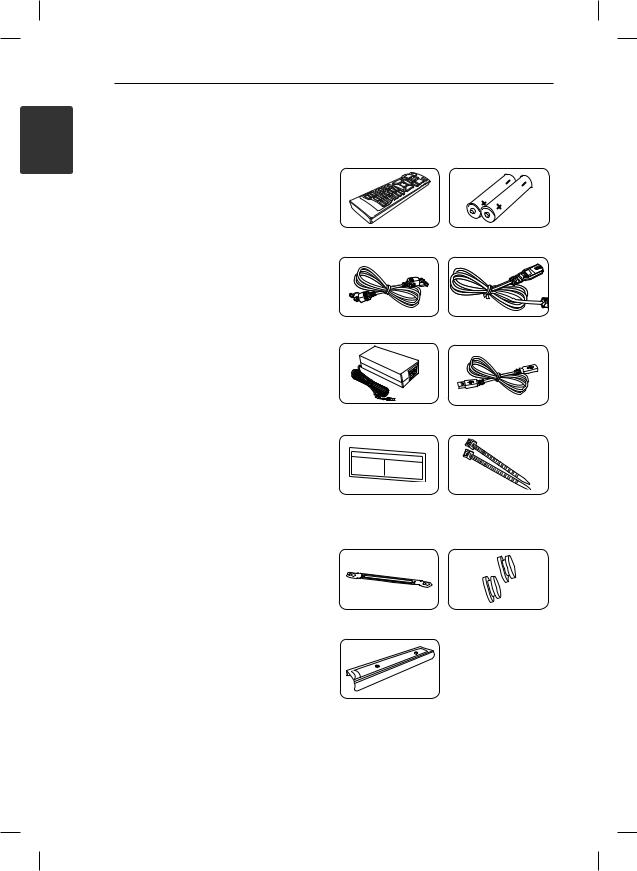
Accessories
Please check and identify the supplied accessories.
Remote control (1) |
Batteries (2) |
|
|
|
|
Optical cable (1) |
Power cord (1) |
LG Sound Sync
Controls volume level of this unit by the remote control of your LG TV that is compatible with LG Sound Sync.
AC adapter (1) |
USB Cable (1) |
Introduction
Symbols used in this manual
,,Note
Indicates special notes and operating features.
>>Caution
Indicates cautions for preventing possible damages from abuse.
Wall Mount Bracket |
Cable ties for arranging |
|
Installation Template |
||
cables (2) |
||
(1) |
||
|
Wall bracket (1) |
Shaft wall mount (2) |
Cover foot_19mm (1) |
|
NB4530A-NE.BDEULLP_ENG_2314.indd 6 |
2015-04-01 3:53:05 |

Getting Started |
7 |
|
|
Remote control |
• • • • • • • • • • A • |
|
|
|
1(Power) : Switches the unit ON or OFF. |
|
FUNCTION : Selects the function and the input |
|
source. |
|
W/SFOLDER : Searches for a folder of MP3/WMA |
|
files. When a USB containing MP3/WMA files in |
|
several folders is being played, |
|
press W/S FOLDER to select the folder you want |
|
to play. |
|
OPTICAL : Changes input source to OPTICAL |
|
directly. |
|
MUTE @: Mutes the sound. |
|
VOL +/- : Adjusts speaker volume. |
|
• • • • • • • • • • B • |
|
AUTO POWER : This function is automatically |
|
turned on the unit. (Refer to the page 22) |
|
AV SYNC : Synchronizes the audio and video. |
|
INFO : Displays the information of a file or an input |
|
source. |
|
REPEAT : Listens to your files repeatedly or |
|
randomly. |
|
C/V(Skip/Search) : |
|
- Skips Fast backward or Forward. |
|
- Searches for a section within a file. |
|
Z(Stop) : Stops playback. |
|
d/M(Play/Pause) : Starts playback. / Pauses |
|
playback. |
|
SOUND EFFECT : Selects a sound effect mode. |
|
AUTO VOLUME : Turns on and off the AUTO |
|
VOLUME mode. |
|
WOOFER LEVEL : Sets the sound level of woofer. |
Replacement of battery |
• • • • • • • • • • C • |
Remove the battery cover on the rear of the |
0 to 9 numerical buttons : Selects a file directly. |
|
|
Remote Control, and insert two (size AAA) battery |
DRC : Sets the DRC. |
with and matched correctly. |
SLEEP : Sets the system to turn off automatically at |
|
|
|
a specified time. |
|
• • • • • • • • • • D • |
|
TV Control buttons : See page 27. |
1 GettingStarted
NB4530A-NE.BDEULLP_ENG_2314.indd 7 |
2015-04-01 3:53:06 |
8 Getting Started
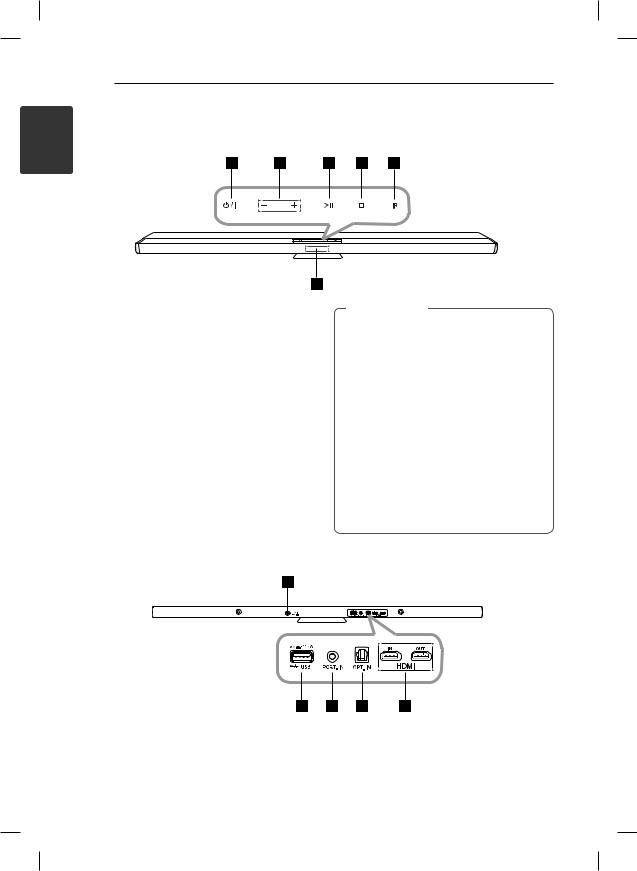
Front panel
1 GettingStarted
A1/!
B- / + (Volume -/+) Adjusts volume level.
CT(Play/Pause)
DI(Stop)
EF (Function)
Selects the function and input source.
FDisplay window
>>Caution
Precautions in using the touch buttons
yy Use the touch buttons with clean and dry hands.
- In a humid environment, wipe out any moisture on the touch buttons before using.
yy Do not press the touch buttons hard to make it work.
- If you apply too much strength, it can damage the sensor of the touch buttons.
yy Touch the button that you want to work in order to operate the function correctly.
yy Be careful not to have any conductive material such as metallic object on the touch buttons. It can cause malfunctions.
Rear panel
A DC. IN 25V 02A |
D OPT.(Optical) IN |
B USB port |
E HDMI IN/ OUT |
C PORT.(Portable) IN |
|
NB4530A-NE.BDEULLP_ENG_2314.indd 8 |
2015-04-01 3:53:07 |
|
Getting Started 9 |
|
|
|
|
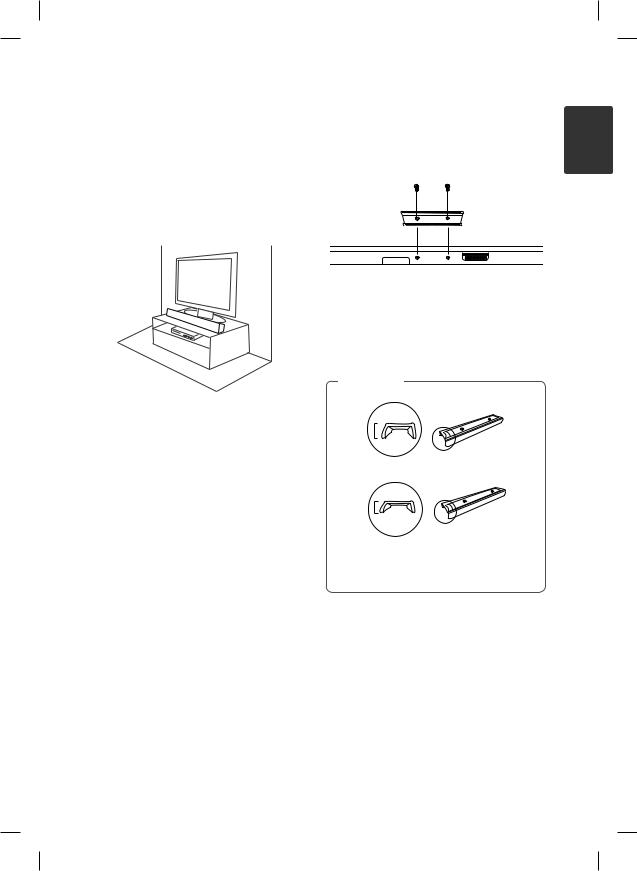
Installing the sound |
Installing the cover |
|
bar |
foot |
|
You can hear the sound by connecting the unit to the other device : TV, Blu-ray disc player, DVD player, etc.
Place the unit in front of the TV and connect it to the device you want. (Refer to pp.13 - 20)
1. Turn the unit upside down.
2. Place the cover foot on the bottom of the unit to match screw holes with those on the unit.
3. Fix it with screws as shown in the illustration above.
,,Note
|
(It has been already |
26mm |
installed to the unit.) |
|
19mm
1 GettingStarted
You can exchange 26 mm foot (factory installed) with 19 mm to change the height of your unit.
NB4530A-NE.BDEULLP_ENG_2314.indd 9 |
2015-04-01 3:53:07 |
2
<![if ! IE]><![endif]>Connecting
10 Connecting
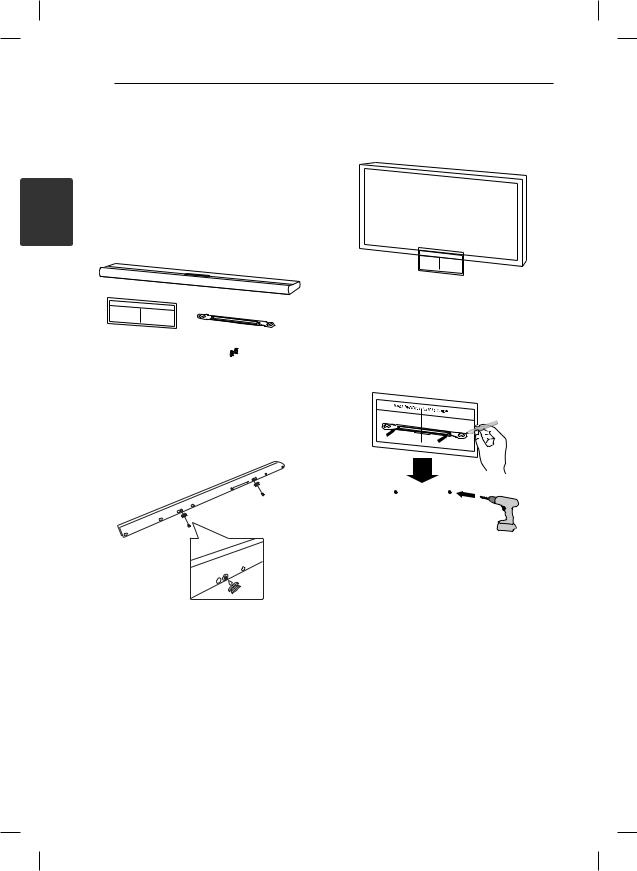
Mounting the main |
2. |
Bracket Installation Template with the bottom |
|
unit on a wall |
Match the TV’s BOTTOM EDGE of Wall Mount |
||
|
of TV and attach to the position. |
||
|
|
||
You can mount the main unit on a wall. |
|
TV |
|
|
|
|
|
|
|
|
|
Detach the cover foot of the unit, keep the |
|
|
|
detached cover foot for later installation and use |
|
|
|
the screws to hang the unit on the wall. |
|
|
|
Prepare shaft wall mount and bracket. |
|
|
|
Unit |
|
|
|
Wall Mount Bracket |
Wall bracket |
Installation Template |
|
|
Shaft wall mount |
1.Locate the shaft wall mount on the screw hole of the unit's back and then fix it onto the unit with the screw.
3.When you mount it on a wall (concrete), use the wall plugs. You should drill some holes. A guide sheet (Wall Mount Bracket Installation Template) is supplied to drill. Use the sheet to check the point to drill.
NB4530A-NE.BDEULLP_ENG_2314.indd 10 |
2015-04-01 3:53:08 |
 Loading...