

LG MS2587AR Owner’s Manual

MICROWAVE OVEN
OWNER’S MANUAL
PLEASE READ THIS OWNER’S MANUAL THOROUGHLY BEFORE OPERATING.
MS2587AR
P/No.: MFL62131901


You cannot operate your oven with the door open due to the safety interlocks
built into the door mechanism. These safety interlocks automatically switch off
any cooking activity when the door is opened; which in the case of a
microwave oven could result in harmful exposure to microwave energy.
It is important not to tamper with the safety interlocks.
Do not place any object between the oven front face and the door or allow
food or cleaner residue to accumulate on sealing surfaces.
Do not operate your oven if it is damaged. It is particularly important that the
oven door closes properly and that there is no damage to the: (1) door(bent),
(2) hinges and latches (broken or loosened), (3) door seals and sealing
surfaces.
Your oven should not be adjusted or repaired by anyone except qualified
service personnel.
Warning
Precautions to avoid possible exposure to excessive microwave energy.
When heating liquids, e.g. soups, sauces and beverages in your microwave
oven, delayed eruptive boiling can occur without evidence of bubbling. This
could result in a sudden boil over of the hot liquid. To prevent this possibility
the following steps should be taken:
1 Avoid using straight sided containers with narrow necks.
2 Do not overheat.
3 Stir the liquid before placing the container in the oven and again halfway
through the heating time.
4 After heating, allow to stand in the oven for a short time, stir or shake
them(especially the contents of feeding bottles and baby food jars) again
carefully and check the temperature of them before consumption to avoid
burns (especially, contents of feeding bottles and baby food jars).
Be careful when handling the container.
Warning
Always allow food to stand after being cooked by
microwaves and check the temperature of them
before consumption. Especially contents of feeding
bottles and baby food jars.
Please ensure cooking times are correctly set as
over cooking may result in the FOOD catching fire
and subsequent damage to your oven.
3
Precautions
Contents
4
How the Microwave Oven Works
Microwaves are a form of energy similar to radio and television waves and
ordinary daylight. Normally, microwaves spread outwards as they travel
through the atmosphere and disappear without effect. Microwave ovens,
however, have a magnetron which is designed to make use of the energy in
microwaves. Electricity, supplied to the magnetron tube, is used to created
microwave energy.
These microwaves enter the cooking area through openings inside the oven.
A turntable or tray is located at the bottom of the oven. Microwaves cannot
pass through metal walls of the oven, but they can penetrate such materials
as glass, porcelain and paper, the materials out of which microwave-safe
cooking dishes are constructed.
Microwaves do not heat cookware, though cooking vessels will eventually get
hot from the heat generated by the food.
Child Lock
A very safe appliance
Your microwave oven is one of the safest of all home
appliances. When the door is opened, the oven
automatically stops producing microwaves. Microwave
energy is converted completely to heat when it enters
food, leaving no “left over” energy to harm you when
you eat your food.
Safety precautions
Place the oven in the level location of your choice with
more than 85cm height but make sure there is at least
30cm of space on the top and 10cm at the rear for proper
ventilation. The front of the oven should be at least 8cm from the
edge of the surface to prevent tipping.
An exhaust outlet is located on top or side of the oven. Blocking
the outlet can damage the oven.
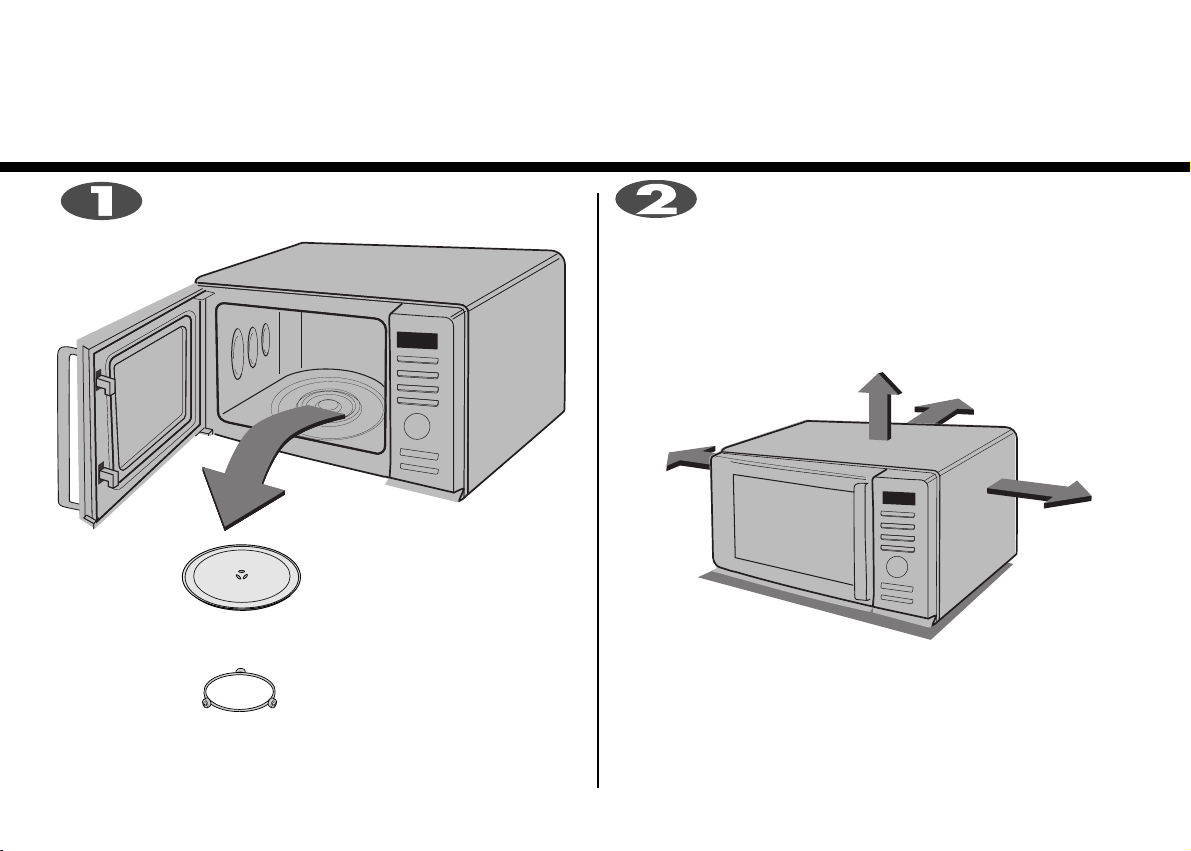
Unpack your oven and place it on a flat level
surface.
By following the basic steps on these two pages you will be able to quickly check that your oven is operating
THIS OVEN SHOULD NOT BE USED FOR COMMERCIAL CATERING
PURPOSES
GLASS TRAY
ROTATING RING
5
correctly. Please pay particular attention to the guidance on where to install your oven. When unpacking your
oven make sure you remove all accessories and packing. Check to make sure that your oven has not been
damaged during delivery.
Unpacking &
Installing
Open your oven door by pulling the DOOR HANDLE.
Place the
GLASS TRAY on top.
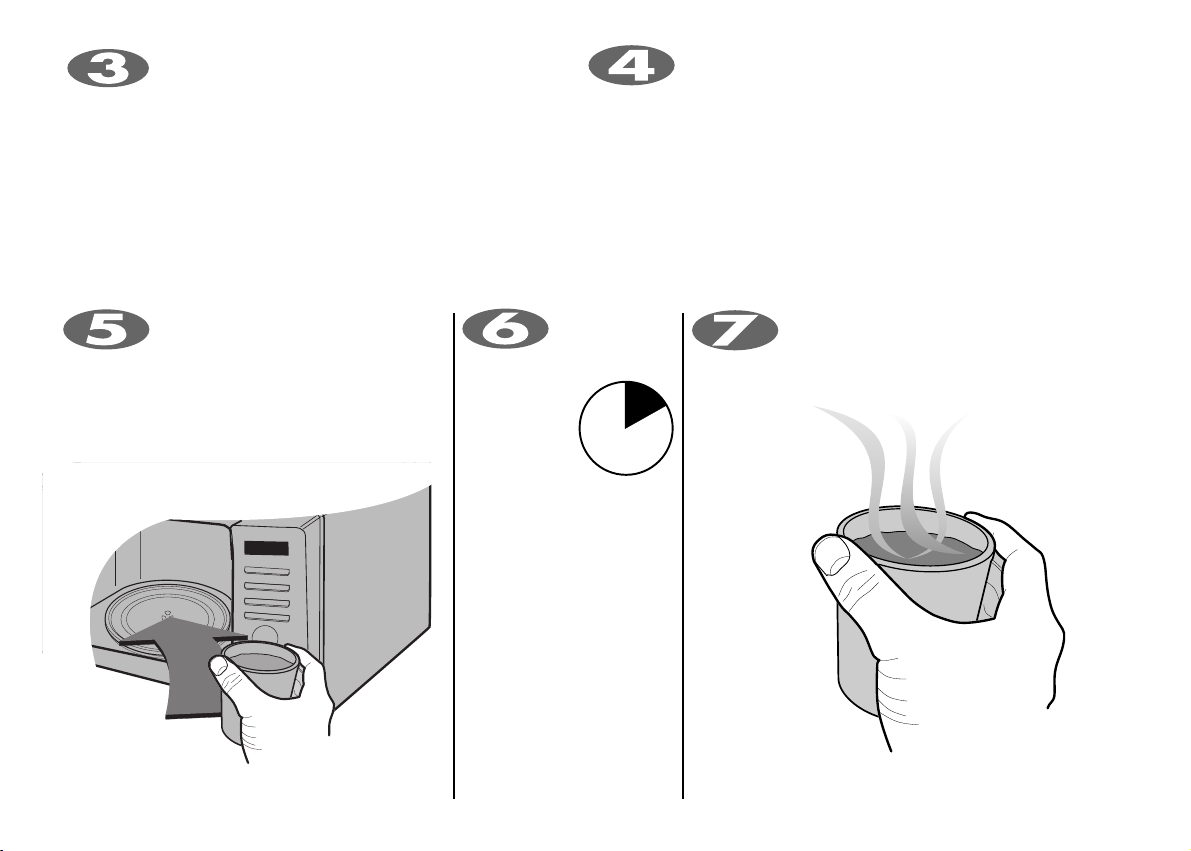
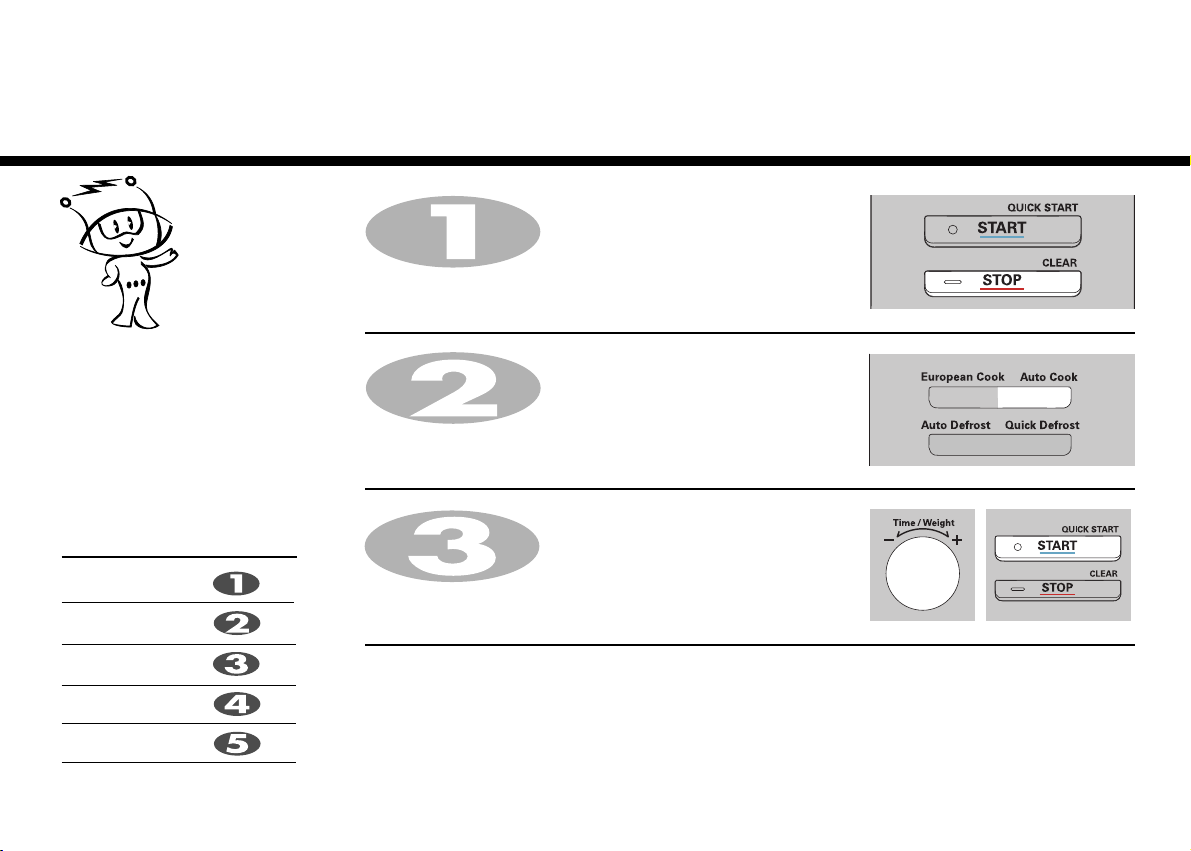
Plug your oven into a standard household socket.
Make sure your oven is the only appliance
connected to the socket. If your oven does not operate
properly, unplug it from the electrical socket and then plug it
back in.
6
ROTATING RING
inside the oven and place the
Fill a microwave safe container with
300 ml (1/2 pint) of water. Place on
the GLASS TRAY and close the oven door. If you
have any doubts about what type of container to
use please refer to page
27 .
to set
of cooking
time.
Press the START
button once
30 seconds
30
MINU TOS
Seconds
oven door and test the temperature of the water. If your
oven is operating the water should be warm. Be careful
when removing the container it may be hot.
YOUR OVEN IS NOW INSTALLED
The DISPLAY will count down from 30 seconds
When it reaches 0, BEEP sounds. Open the
You can set either 12 hour clock or 24 hour clock.
In the following example I will show you how to set the time for 14:35 when using the 24 clock.
Make sure that you have removed all packaging from your oven.
When your oven is plugged in for the
first time or when power resumes after a
power cut, a ‘0’ will be shown in the
display; you will have to reset the clock.
If the clock (or display) shows any
strange looking symbols, unplug your
oven from the electrical socket and plug
it back in and reset the clock.
Make sure that you have correctly installed your oven as described
earlier in this book.
Press STOP/CLEAR.
Press CLOCK once.
(If you want to use different option, Press CLOCK once more.
If you want to change different option after setting clock, you have to
unplug and plug it back in.)
Turn DIAL until display shows “14: ”.
Press START for hour confirmation.
Turn DIAL until display shows “14:35”.
Press STRAT.
The clock starts counting.
7
Setting the
Clock
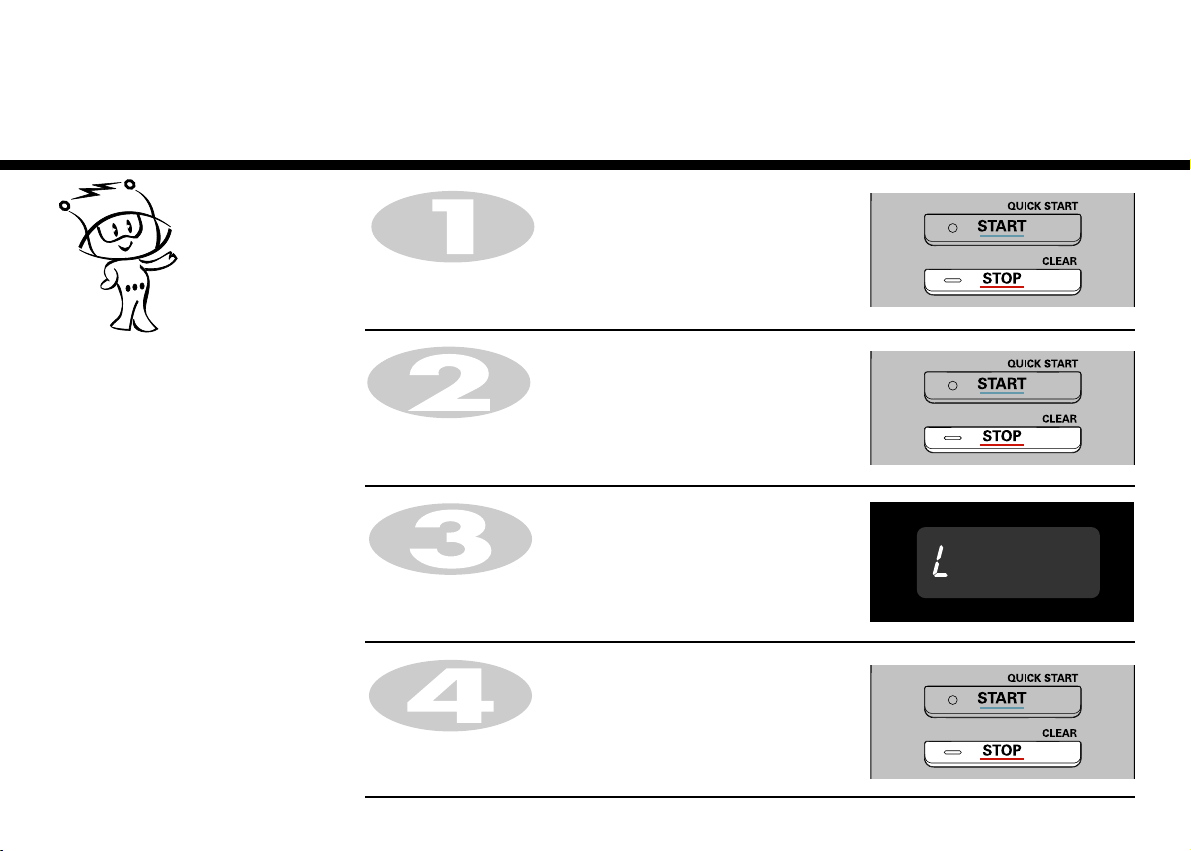
Child
Lock
Press and hold STOP/CLEAR until “L” appears on the display and
BEEP sounds.
The CHILD LOCK is now set.
The time will disappear on the display if you have set the clock.
“L” remains on the display to let you know that CHILD LOCK is set.
To cancel CHILD LOCK press and hold STOP/CLEAR until “L” disappears.
You will hear BEEP when it’s released.
Your oven has a safety feature that
prevents accidental running of the oven.
Once the child lock is set, you will be
unable to use any functions and no
cooking can take place.
However your child can still open the
oven door.
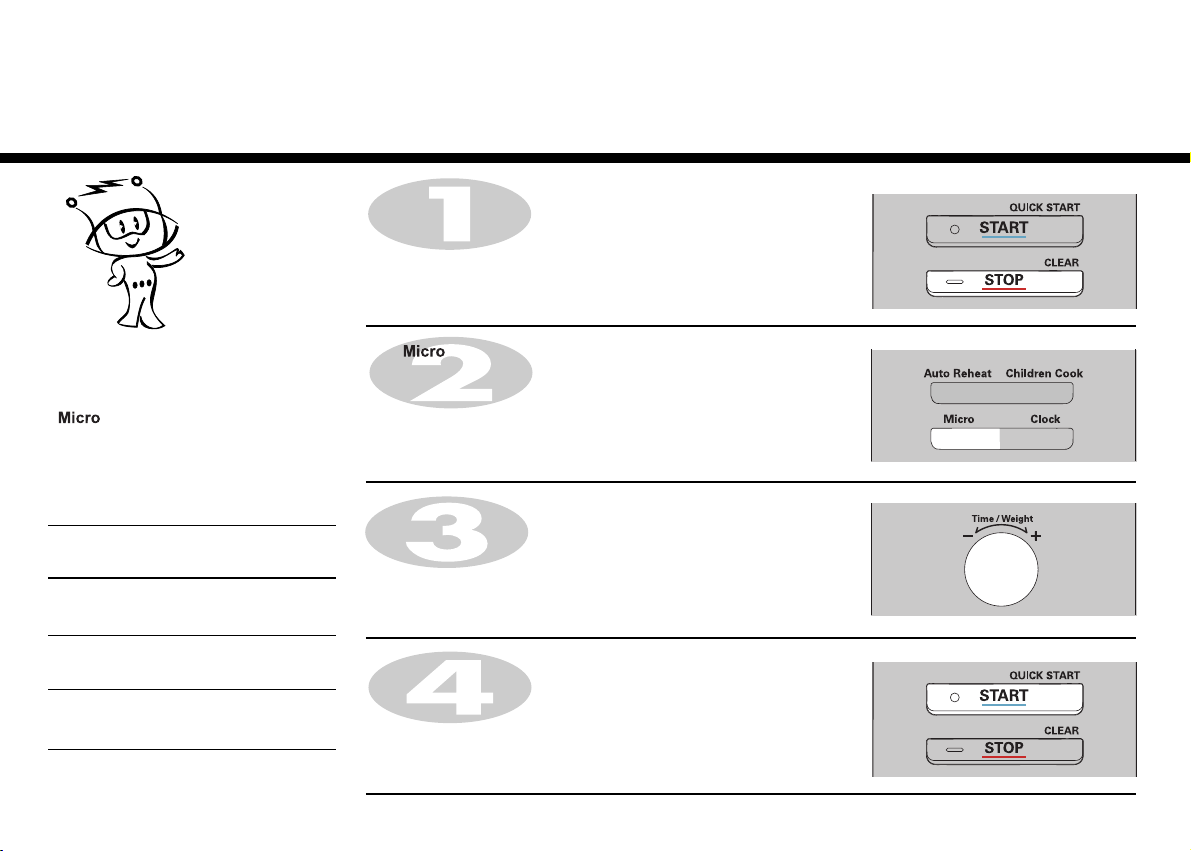
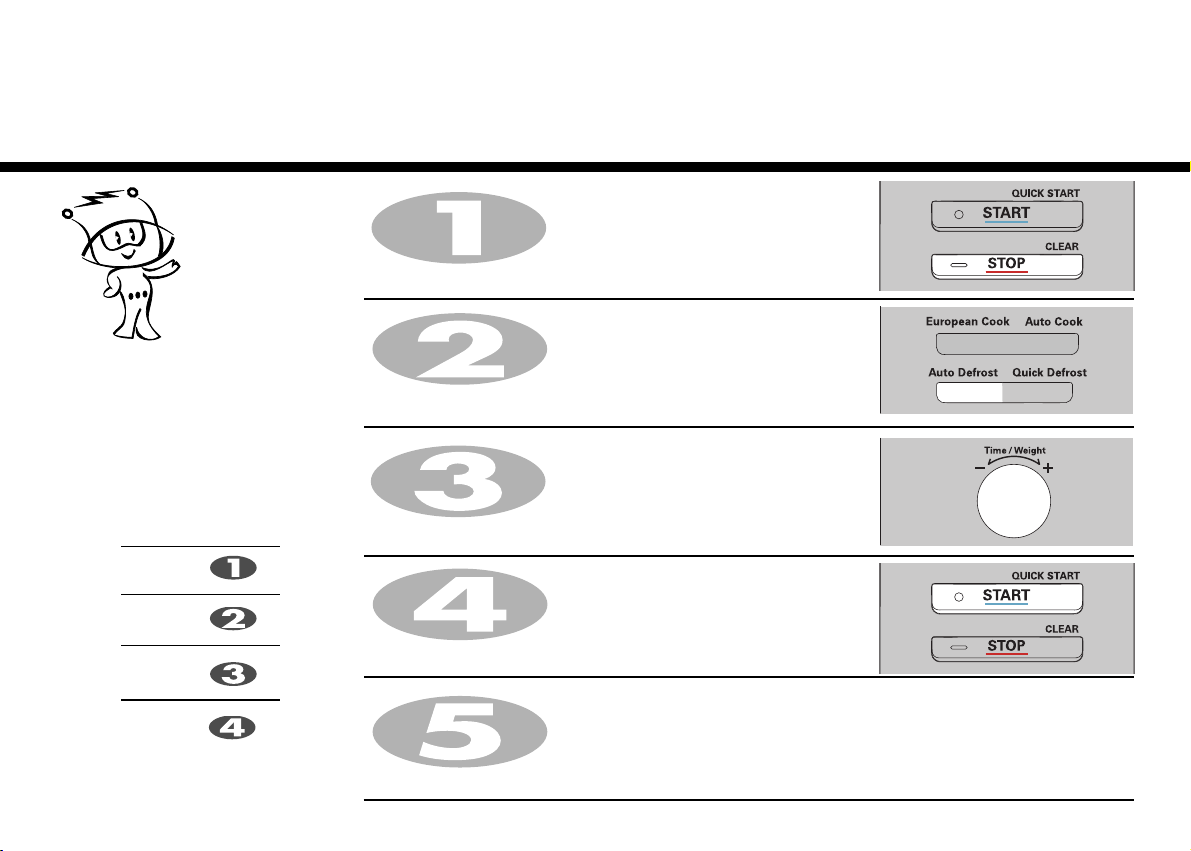
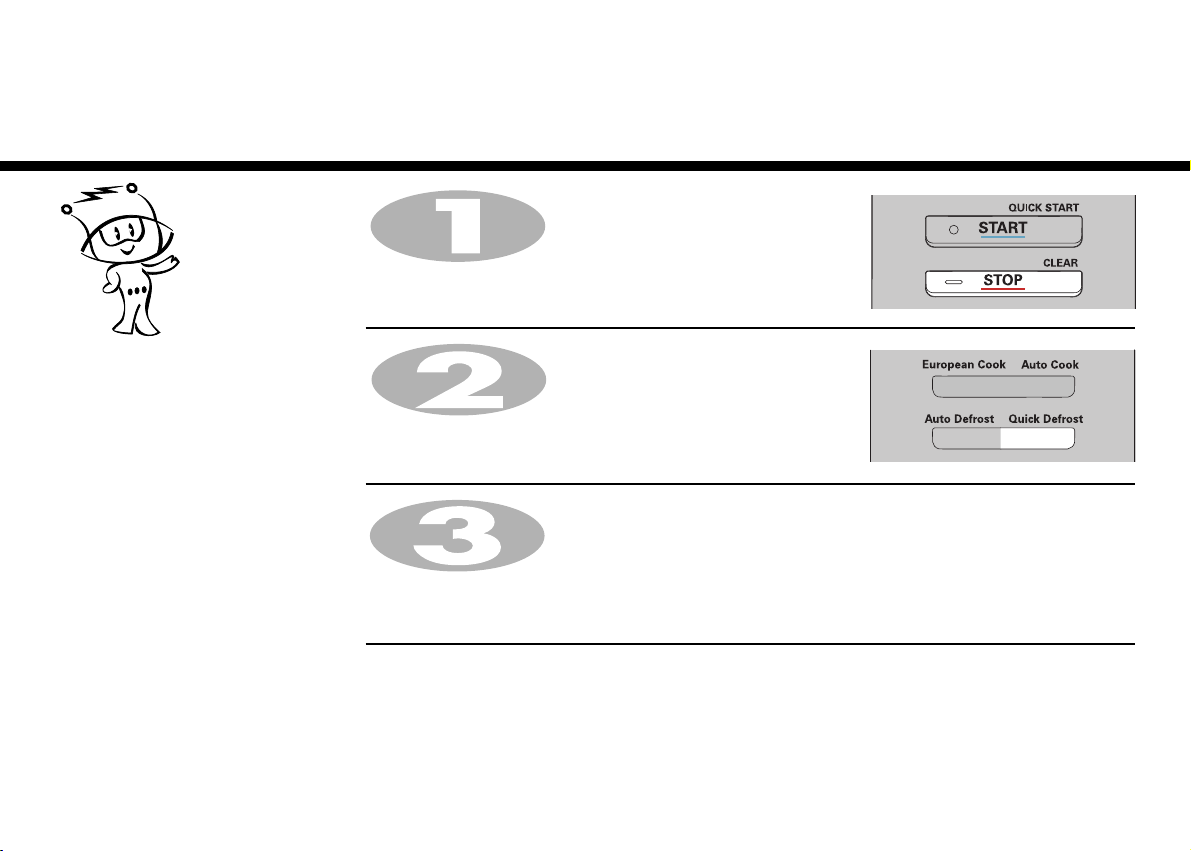
Press STOP/CLEAR.
8
Make sure that you have correctly installed your oven as described earlier
in this book.
Press STOP/CLEAR.
Press START.
Your oven has five microwave Power
settings. High power is automatically
selected but repeated presses of the
key will select a different power
level .
In the following example I will show you how to cook some food on 80% power for 5 minutes and 30 seconds with .
Make sure that you have correctly installed your oven as described earlier
in this book.
Press STOP/CLEAR.
Press twice to select 80% power.
“680” appears on the display.
9
POWER
HIGH
MAX
MEDIUM
HIGH
MEDIUM
DEFROST
MEDIUM LOW
LOW
%
100%
80%
60%
40%
20%
Power Output
850W
680W
510W
340W
170W
Micro Power
Cooking
Turn DIAL until display shows “5:30”.

Micro Power
Your microwave oven is equipped with 5 power levels to give you maximum flexibility and control over cooking.
The table below shows the examples of food and their recommended cooking power levels for use with this
microwave oven.
10
POWER LEVEL
POWER LEVEL
(%)
HIGH * Boil Water
* Brown minced beef
* Cook poultry pieces, fish, vegetables
* Cook tender cuts of meat
MEDIUM HIGH * All reheating
* Roast meat and poultry
* Cook mushrooms and shellfish
* Cook foods containing cheese and eggs
MEDIUM * Bake cakes and scones
* Prepare eggs
* Cook custard
* Prepare rice, soup
DEFROST/ * All thawing
MEDIUM LOW * Melt butter and chocolate
* Cook less tender cuts of meat
LOW * Soften butter & cheese
* Soften ice cream
* Raise yeast dough
USE
POWER O UTPUT
100%
80%
60%
40%
20%
850W
680W
510W
340W
170W
Level
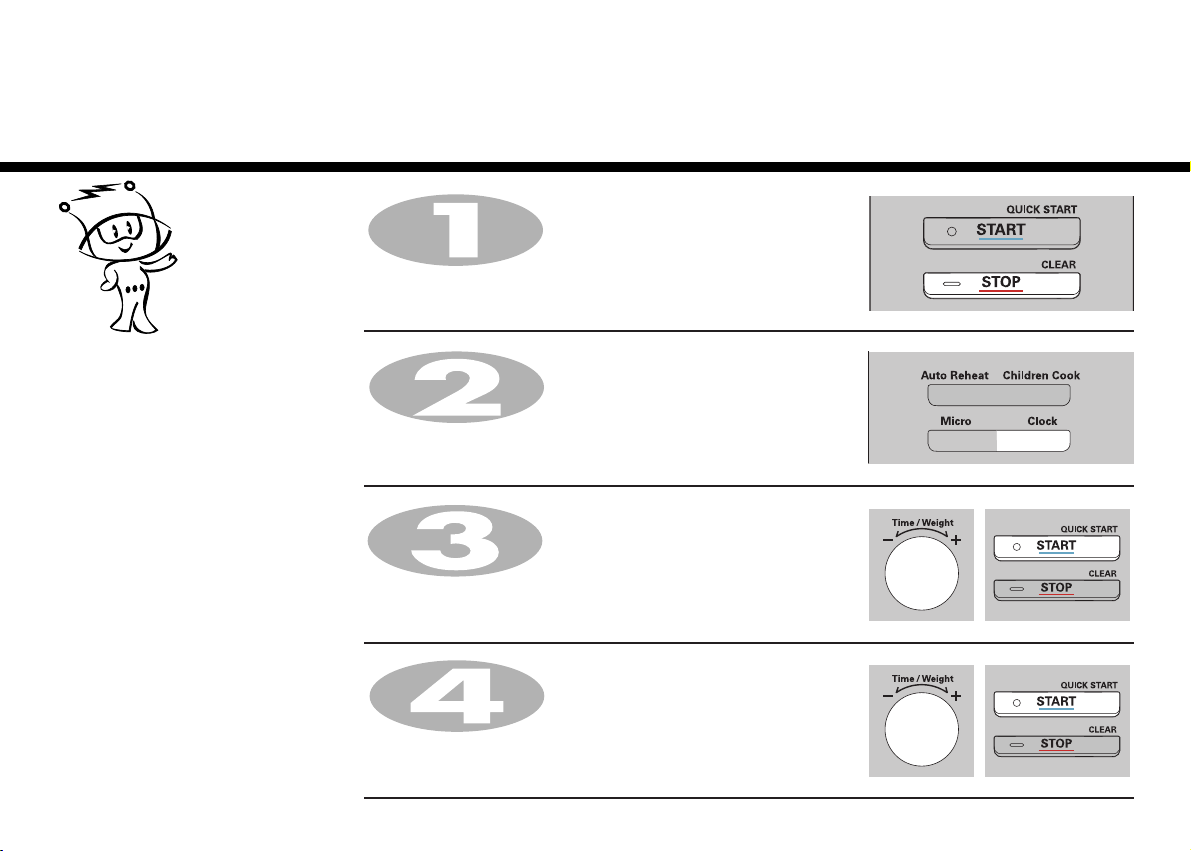
In the following example I will show you how to set 2 minutes of cooking on high power.
Press STOP/CLEAR .
Press START four times to select 2 minutes on HIGH power.
Your oven will start before you have finished the fourth press.
During QUICK START cooking, you can extend the cooking time by repeatedly
pressing the START button.
The QUICK START feature allows you to
set 30 seconds intervals of HIGH power
cooking with a touch of the START
button.
11
Quick
Start
Auto
AUTO REHEAT allows you to cook most of
your favorite food easily by selecting the
food type and entering the weight of the
food.
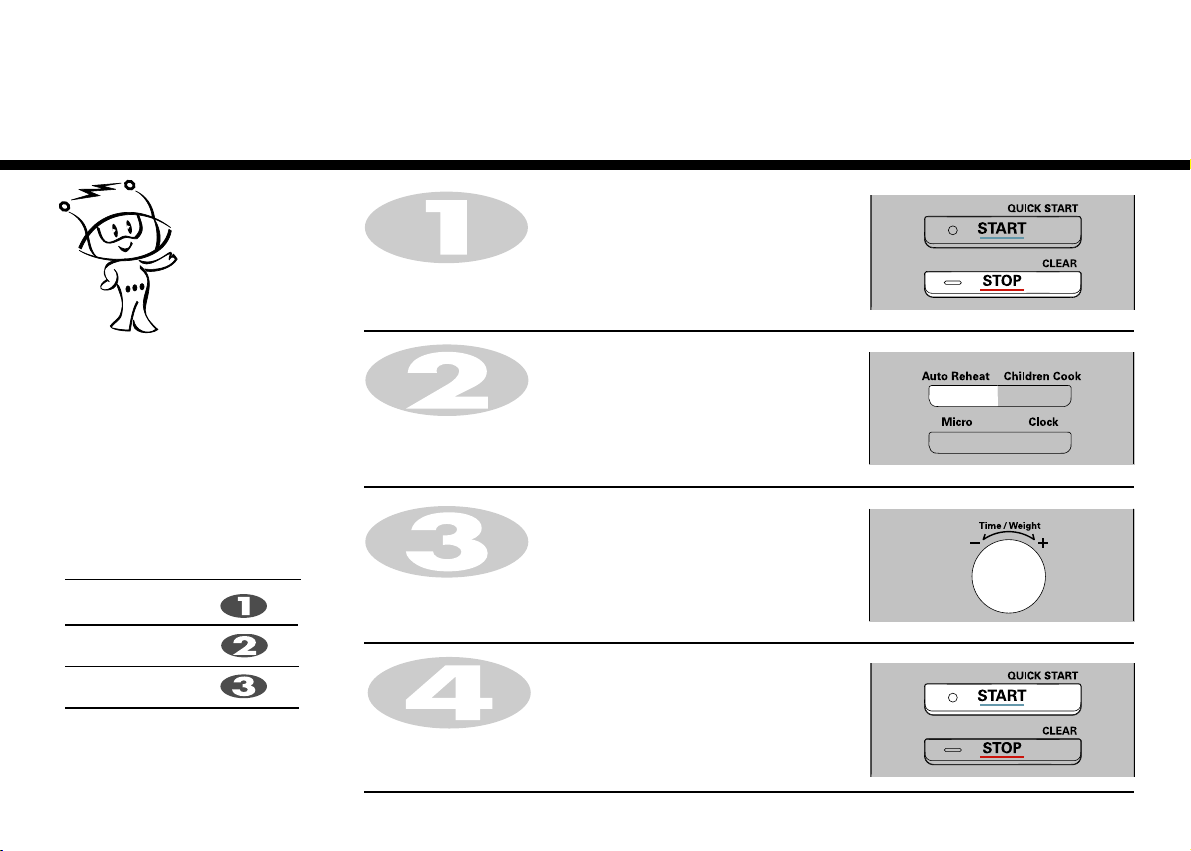
Press STOP/CLEAR .
“rh-2” appears on the display.
Turn DIAL until display shows “0.6”.
Press START.
Press START.
Press
time
times
times
Category
CHILLED MEAL
FROZEN MEAL
CHILLED PIZZA
Press
AUTO REHEAT
time
times
times
12
Reheat
In the following example I will show you how to cook 0.6kg of Frozen Meal.
Press AUTO REHEAT twice to select Frozen Meal.

FUNCTION CATEGORY WEIGHT LIMIT UTENSILS FOOD TEMP. INSTRUCTIONS
1. CHILLED
MEAL
2. FROZEN
MEAL
3. CHILLED
PIZZA
AUTO
REHEAT
Refrigerated
Frozen
Refrigerated
Own tray
Own tray
Low rack
Pierce using a skewer on the surface.
Place food on the glass turntable. After cooking, allow to standfor 2-3 minutes
before serving.
- Stirrable e.g : Spaghetti bolognese, Beef stew
- Non-stirrable e.g : Lasagne, Cottage pie
Note :
For food contained in bag(s), pierce meat portion and rice/pasta portions, etc.
- For stirrable foods, stir at beep.
- Non-stirrable foods, it is not necessary to stir at beep.
Same as above.
This function is for reheating leftover chilled pizza. Place chilled pizza on the
low rack over the metal tray.
After cooking, take food out immediately. Stand for 2~3 minutes.
0.3 kg ~ 0.6 kg
0.3 kg ~ 0.6 kg
0.2 kg ~ 0.4 kg
13
AUTO COOK allows you to cook most of
your favorite food easily by selecting the
food type and entering the weight of the
food.
In the following exa mple I will show you how to cook 0.6 kg of fresh vegeta ble.
Press STOP/CLEAR .
Press AUTO COOK twice to select Fresh vegetable.
Turn DIAL until display shows “0.6”.
Press START.
Auto
Cook
Category
JACKET POTATO
FRESH VEGETABLE
FROZEN VEGETABLE
RICE
FRESH FISH
Press
AUTO COOK
time
times
times
times
times
time
times
times
times
times
14
FOOD CATEGORY WEIGHT LIMIT UTENSILS FOOD TEMP. INSTRUCTIONS
1. JACKET
POTATO
2. FRESH
VEGETABLE
3. FROZEN
VEGETABLE
4. RICE
Room
Room
Frozen
Room
Microwave-
safe bowl
Microwave-
safe bowl
Choose medium sized potatoes 170 -200g.
Wash and dry potatoes. Pierce the potatoes several times with fork. Place the potatoes on
the glass turntable. Adjust weight and press start. After cooking, remove the potatoes from
the oven. Let stand covered with foil for 5 minutes.
Place vegetables in a microwave-safe bowl. Add water.
Cover with wrap. After cooking, stir and allow to stand for
2 minutes. Add amount of water according to the quantity.
** 0.2kg - 0.4kg : 2 Tablespoon
** 0.5kg - 0.8kg : 4 Tablespoon
Place vegetables in a microwave-safe bowl. Add water.
Cover with wrap. After cooking, stir and allow to stand for
2 minutes. Add amount of water according to the quantity.
** 0.2kg - 0.4kg : 2 Tablespoon
** 0.5kg - 0.8kg : 4 Tablespoon
Wash rice. Darin water.
Place rice & boiling water in a deep and large bowl.
** Rice - After cooking, stand covered for 5 minutes or until water is absorbed.
kg ~ 1.0 kg
kg ~ 0.8 kg
0.2 kg ~ 0.8 kg
0.1 kg ~ 0.3 kg
Weight 100g 200g 300g Cover
Boiling water 200ml 400ml 600ml Yes /Vent corner
15
0.2
Microwave-
safe bowl
5. FRESH FISH
0.2
kg ~ 0.6 kg
0.2
Microwave-
safe bowl
Microwave-
safe flan dish
Refrigerated
Whole fish, steaks
- Oily fish : salmon, mackerel
- White fish : cod, haddock
Arrange in a single layer in a large microwave-safe flan dish.
Cover dish tightly with plastic wrap and pierce in several places.
Place on the glass turntable. Adjust weight and press start.
After cooking, remove the dish from the oven. Allow to stand for 3 minutes before serving.
Auto
Defrost
The temperature and density of food varies, I would recommend that the food is checked before cooking
commences. Pay particular attention to large joints of meat and chicken, some foods should not be
completely thawed before cooking. The BREAD programme is suitable for defrosting small items such as
rolls or a small loaf. These will require a standing time to allow the centre to thaw. In the following
example I will show you how to defrost 1.4 Kg of frozen poultry.
Your oven has four microwave defrost
settings:- MEAT, POULTRY, FISH and
BREAD; each defrost category has
different power settings. Repeated
presses of the AUTO DEFROST button
will select a different setting.
Category
MEAT
POULTRY
FISH
BREAD
time
times
times
times
Enter the weight of the frozen food that you are about to defrost.
Turn DIAL until display shows “1.4”.
Press START.
During defrosting your oven will “BEEP”, at which point open the oven door, turn food over and separate to
ensure even thawing. Remove any portions that have thawed or shield them to help slow down thawing. After
checking close the oven door and press START to resume defrosting.
Your oven will not stop defrosting (even when the beep sounded) unless the door is opened.
Press AUTO DEFROST twice to select the POULTRY defrosting
programme.
Press STOP/CLEAR.
Weight the food that you are about to defrost. Be certain to remove any
metallic ties or wraps; then place the food in your oven and close the
oven door.
16
Press
AUTO
DEFROST

AUTO W EIGHT DEFROST GUIDE
* Food to be defrosted should be in a suitable microwave proof container and place uncovered on the glass turnta ble.
* If necessa ry, shield small area s of meat or poultry with flat pieces of aluminum foil. This will prevent thin areas becoming warm during defrosting. Ensure the
foil does not touch the oven walls.
W hen BEEP, a t this piont remove the food fromthe microwave oven,turn the food over and return to the microwave oven. Press start to continue. At the end of
the program, remove the food from the microwave oven, cover with foil and allow to stand until completely thawed.
To thaw completely, for example joints of meat a nd whole chickens should STA ND for a minimum of 1 hour before cooking.
Category Weight Limit Utensil Food
0.1 ~ 4.0 kg
Microwave ware
(Flat plate)
Meat
Minced beef, Fillet steak, Cubes for stew, Sirloin steak, Pot roast, Rump roast, Beef burger
Turn food over at beep.
After defrosting, let stand for 5-15 minutes.
Poultry
Whole chicken, Legs, Breasts, Turkey breasts(under 2.0kg)
Turn food over at beep.
After defrosting, let stand for 20-30 minutes.
Fish
Fillets, Steaks, Whole fish, Sea foods
Turn food over at beep.
After defrosting, let stand for 10-20 minutes.
Meat
Poultry
Fish
0.1 ~ 0.5 kg
Paper towel
or flat plate
Sliced bread, Buns, Baguette, etc.
Bread
17
* Separa te items like minced meat, chops, sausages as soon a s possible.
Lamp chops, Rolled roast, Sausage, Cutlets(.2cm)
Separate slices and place between paper towel or flat plate.
Turn food over at beep.
After defrosting, let stand for 1-2 minutes.
Quick
Your oven has a microwave quick
defrost setting (
Press STOP/CLEAR.
Weight the food that you are about to defrost. Be certain to remove
any metallic ties or wraps; then place the food in your oven and close
the oven door.
Press QUICK DEFROST.
The oven will start automatically.
During defrosting your oven will “BEEP”, at which point open the oven door, turn food over and separate to
ensure even thawing. Remove any portions that have thawed or shield them to help slow down thawing. After
checking close the oven door and press START to resume defrosting.
Your oven will not stop defrosting (even when the beep sounded) unless the door is opened.
Minced meat
18
Defrost
Use this function to thaw only 0.5kg of Minced meat very quickly.
This will require a standing time to allow the center to thaw. In the following example will show you how to defrost
0.5kg of frozen minced meat.
).

UTENSIL INSTRUCTIONS
Minced meat
Microwave ware
Remove the meat completely from it's wrapping. Place the mince onto a microwave-safe plate. When BEEP, at this point remove the mince from the microwave
oven, turn the mince over and return to the microwave oven . Press start to continue. At the end of the program remove the mince from the microwave oven ,
cover with foil and allow to stand 5-15 minutes or until completely thawed.
Minced meat
A
UTO W
EIGHT DEFROST GUIDE
19
CATEGORY WEIGHT
0.5kg
(Flat plate)
Turn food over at beep
After defrosting, let stand for 5-15 minutes
 Loading...