

Lexus RX 350 Quick Guide
When Driving
Topic 3
Entering and Exiting
Topic 1
Before Driving
Topic 2
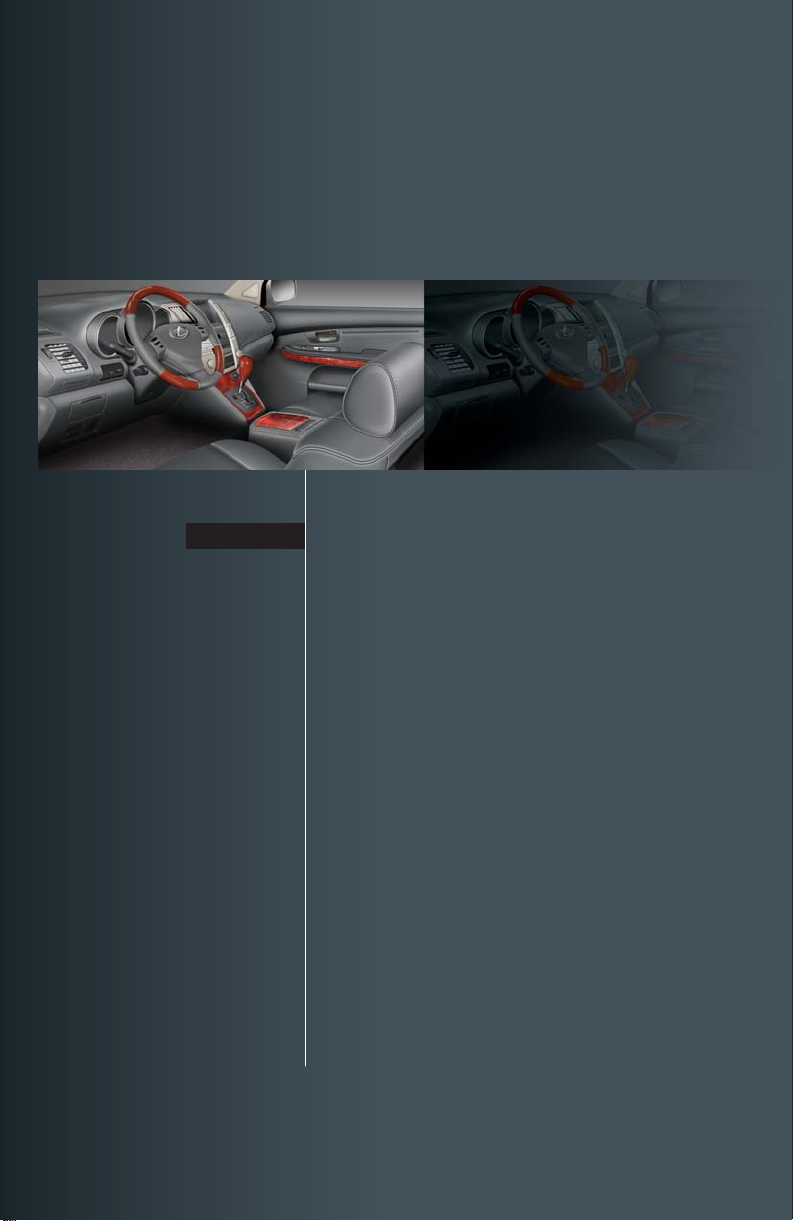
Overview
Contents
l Starting P.1 9
l Automatic Transmission
(Multi-mode) P. 2 0
l Automatic Transmission
(Standard) P.2 1
l Parking Brake P. 2 1
l Tu rn Si gn al Le ve r P. 2 2
l Emergency Flasher Switch P. 2 2
l Cruise Control P. 2 3
l Dynamic Laser Cruise
Control P. 2 4
l Keys P. 7
l Wireless Remote Control P. 8
l Theft Deterrent System P.9
The Quick Guide i s not intended as a substitute for your
Owner’s
Manual
. We strongly encourage you to review the
Owner’s
Manual
and supplementary manuals so you will have a better
understanding of your vehicle’s capabilities and limitations.
l Electronically Modulated
Air Suspension P. 2 5
l Trip Information Display P. 2 6
l ECT SNOW Switch P. 2 7
l Front Seats P.1 1
l Rear Seats P. 1 2
l Driving Position Memory P.1 3
l Head Restraints P.1 4
l Seatbelts P.1 5
l
Outside Rear View Mirrors
P.1 6
l Anti-glare Inside
Rear View Mirror P. 1 6
l Steering Wheel P.1 7
1
Entering and Exiting
Before Driving
When Driving
Rain and
Night Driving
Driving Comfort
Opening and Closing
What to do if ...
Customizing
Yo u r L e xu s
Driving Comfort
Topic 5
Opening and Closing
Topic 6
What to do if ...
Customizing Your Lexus
Responding to warning/indicator lights
and other problems that may arise.
A list of features that can be customized.
Rain and Night Driving
Topic 4
l Headlights P. 2 9
l Fog Lights P. 3 0
l
Windshield Wipers and Washer
P. 3 0
l
Rear Window Wiper and Wa sher
P. 3 1
l Headlight Cleaner P. 3 1
l Rear Window and Outside Rear
View Mirror Defogger, and
Windshield Wiper De-icer P. 3 2
l
Instrument Panel Light Control
P. 3 2
l Multi-display Light Control P. 3 3
l Glove Box P.4 3
l Seat Heaters P.4 3
l Compass P. 4 3
l Door Locks P. 4 5
l Moon Roof P. 4 6
l Back Door P. 4 7
l Fuel Tank Cap P. 4 8
l Hood P. 4 9
l Power Wi ndows P. 5 0
l Audio System P. 3 5
l Rear Seat Entertainment
System P. 3 8
l Air Conditioning System P. 4 0
l Console Boxes P. 4 1
l Cup Holders P. 4 2
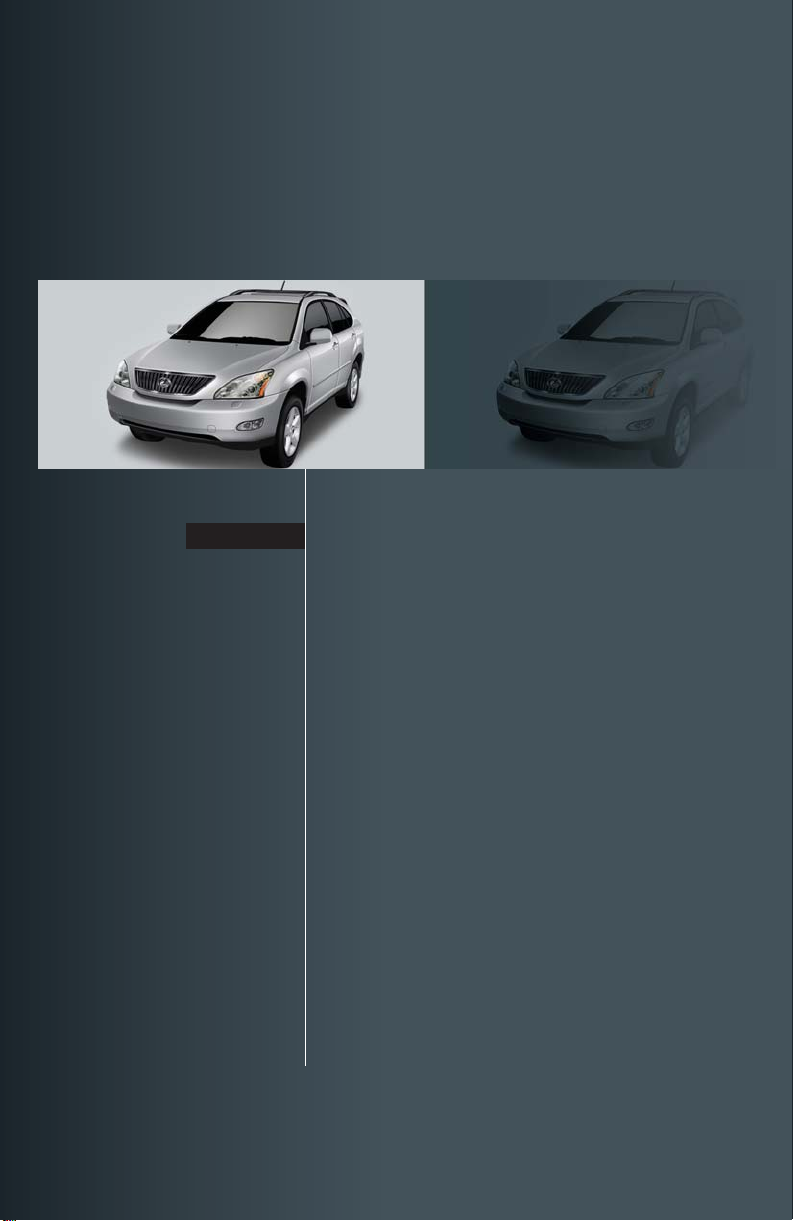
Depending on specifications, the vehicle shown in the illustration may
differ from your vehicle in terms of color and equipment.
2
Overview
P.19
P.29
P.22
P.30
P.13
P.45
P.45
P.50
P.50
P.49
P.21
P.17
P.17
P.25
P.23, 24
P.30
P.31
P.24
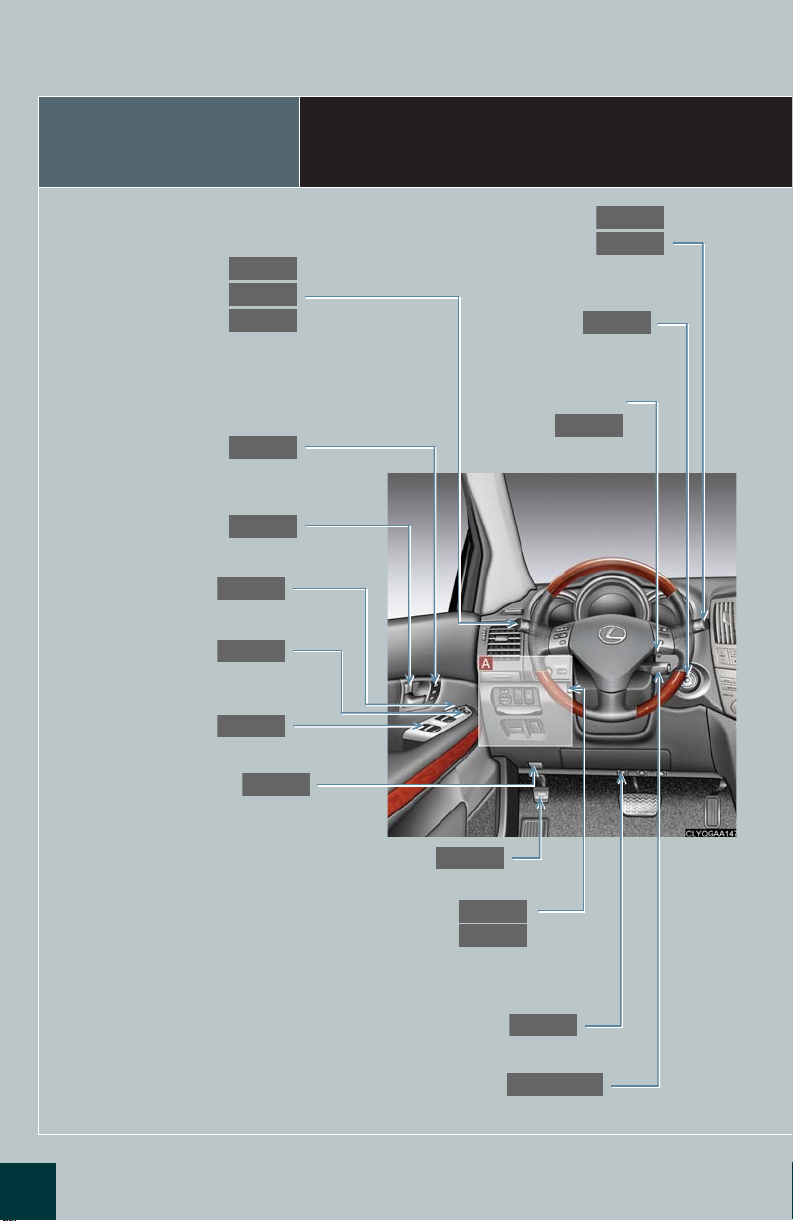
Headlight switch
Turn signal lever
Fog light switch
Instrument Panel
Windshield wipers and washer switch
Rear window wiper and washer switch
Ignition switch
Driving position
memory switches
Inside door lock button
Door lock switch
Window lock switch
Power window switches
Hood release lever
Tilt and telescopic steering control switch
Parking brake pedal
Tilt steering lock release lever
Distance switch
3
Height control switch
Cruise control switch

Multi-display light control button
P.33
P.22
P.26
P.32
P.40
P.35
P.47
P.43
P.25
P.20, 21
P.43
P.31
P.27
Emergency flasher switch
Trip information display
Rear window and outside rear view mirror
defogger, and windshield wiper de-icer
Air conditioning system
Audio system
Power back door
main switch
Glove box
Height select switch
Automatic transmission shift lever
ECT SNOW switch
Headlight cleaner switch
Seat heater switches
: If equipped
4
Overview
P.42
P.32
P.16
P.25
P.47
P.29
P.48
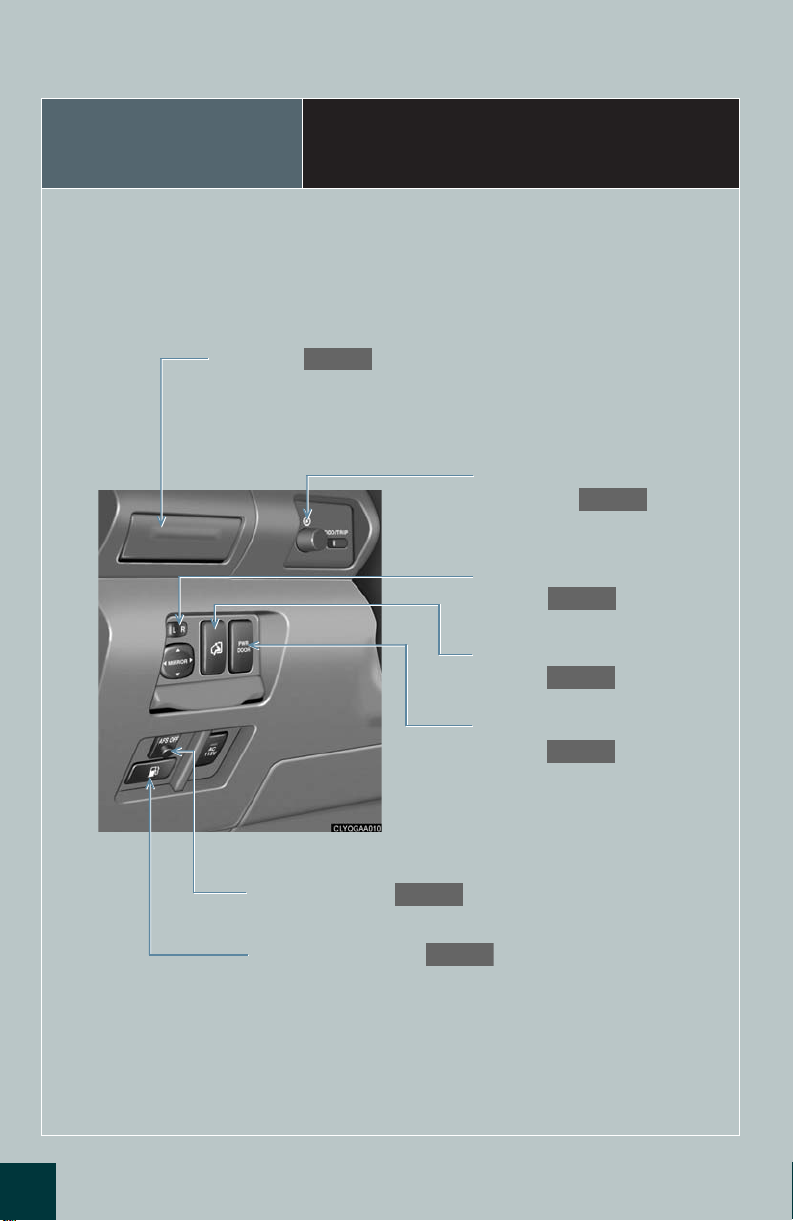
Cup holder
Instrument Panel
Instrument panel light
control knob
Outside rear view mirror
switches
Easy access mode
switch
5
AFS OFF switch
Fuel filler door opener
Power back door
switch
: If equipped
Topic 1
Entering and Exiting
Keys ............................................................................. 7
Wireless Remote Control..................................... 8
Theft Deterrent System ......................................... 9
Topic 1
Entering and Exiting
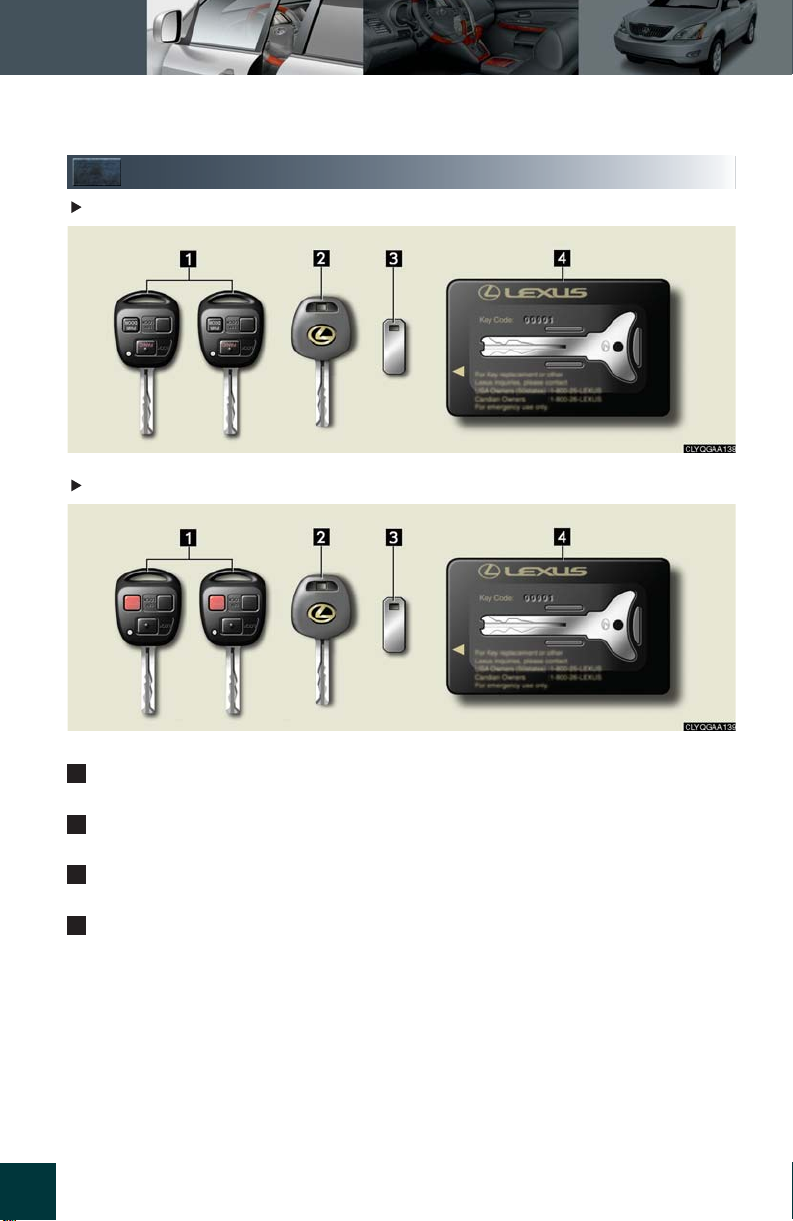
Keys
1
2
3
4
With power back door
Without power back door
Master keys
These keys work in every lock.
Val et ke y
This key cannot lock/unlock the glove box.
Key number plate
Keep the plate in a safe place, such as your wallet. Do not keep the plate in the vehicle.
Flat key
This key works in every lock.
Lexus recommends that you always carry the flat key with you for emergency use.
7
Topic 1
Entering and Exiting
Entering and Exiting
When Driving
Rain and
Night Driving
Driving Comfort
Opening and Closing
What to do if ...
Customizing
Yo u r L e xu s
Before Driving
Before Driving
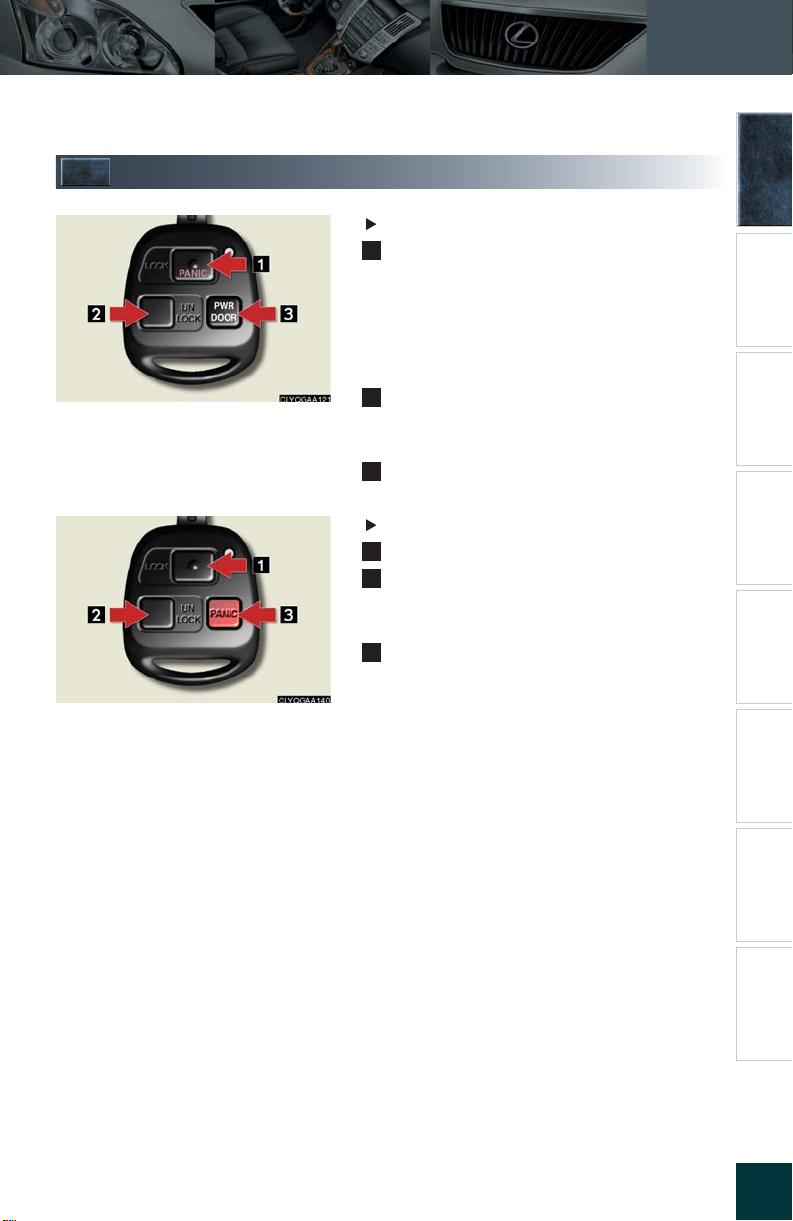
Wireless Remote Control
1
2
3
1
2
3
With power back door
Press: locks all doors
Press an d hold: sounds the alarm
(Use the alarm to attract attention to the vehicle in order to help deter break-ins. To stop the
alarm, press any button on the wireless remote
control.)
Press on ce: unlocks the driver's door
Press twice: unlocks all doors
Press an d hold: opens the windows*
Press an d hold: opens or closes the back door
Without power back door
Press: locks all doors
Press on ce: unlocks the driver's door
Press twice: unlocks all doors
Press an d hold: opens the windows*
Press an d hold: sounds the alarm
(Use the alarm to attract attention to the vehicle in order to help deter break-ins. To stop the
alarm, press any button on the wireless remote
control.)
*: On vehicles with a standard moon roof, the moon roof will also open.
8
Topic 1
Entering and Exiting
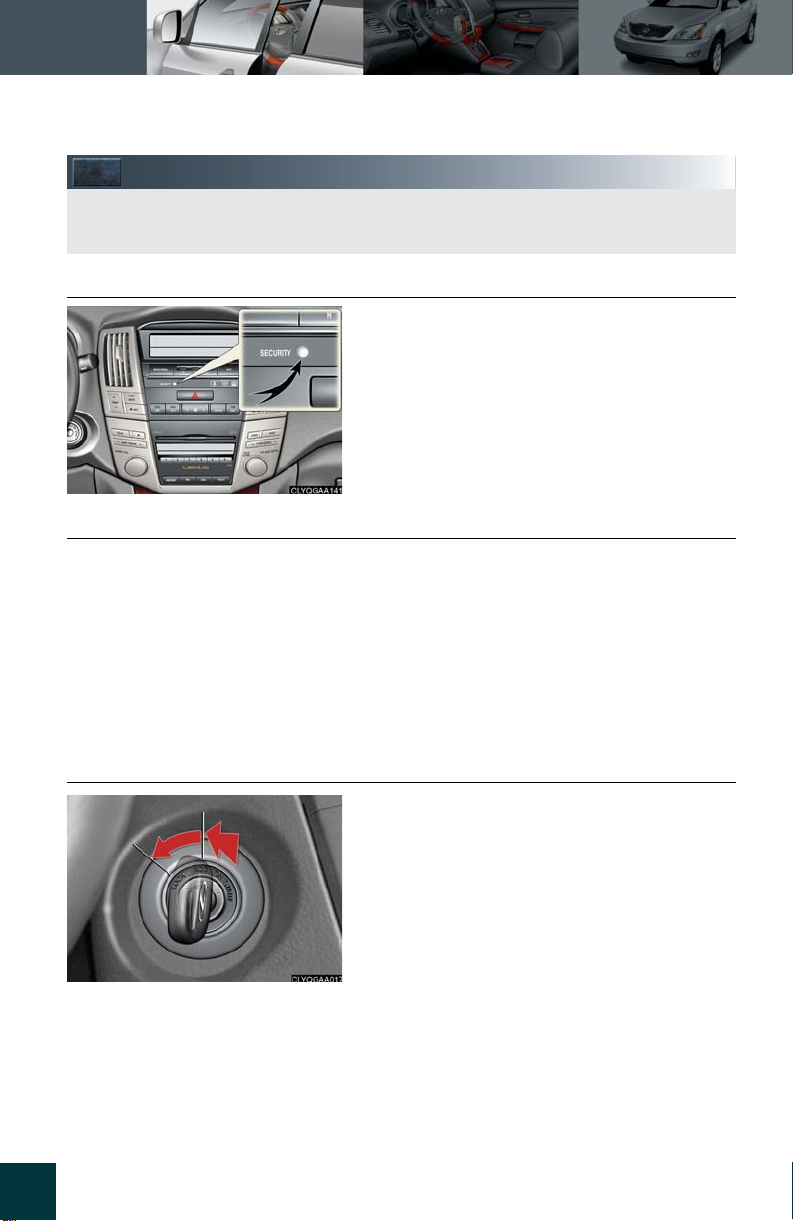
Theft Deterrent System
The theft deterrent system includes the following features to help protect your vehicle
from theft.
n Engine immobilizer system
The engine immobilizer system prevents the
engine from being started in the event that an
attempt is made to start the vehicle using an
unregistered key.
The security indicator light flashes to indicate that
the system is set.
n Alarm
The alarm detects forcible entry and attracts attention to the vehicle by sounding the horn
and flashing the exterior lights in the event that an attempt is made to forcibly open the doors
or hood that have been locked.
To set the alarm: lock all the doors from outside the vehicle. When all the doors are locked, the
security indicator light comes on to indicate that the alarm is in its preparation state. The indicator light begins to flash after approximately 30 seconds to indicate that the system is armed.
To deactivate or stop the alarm: unlock the doors using the key or the wireless remote control, or turn the ignition key to the ON position. (The alarm will stop after several seconds.)
n Steering lock
The steering wheel locks when the ignition key is
turned to the LOCK position.
9
Topic 2
Before Driving
Front Seats................................................................ 11
Rear Seats................................................................ 12
Driving Position Memory .................................... 13
Head Restraints ..................................................... 14
Seatbelts................................................................... 15
Outside Rear View Mirrors ............................... 16
Anti-glare Inside Rear View Mirror................. 16
Steering Wheel ...................................................... 17
Topic 2
Before Driving
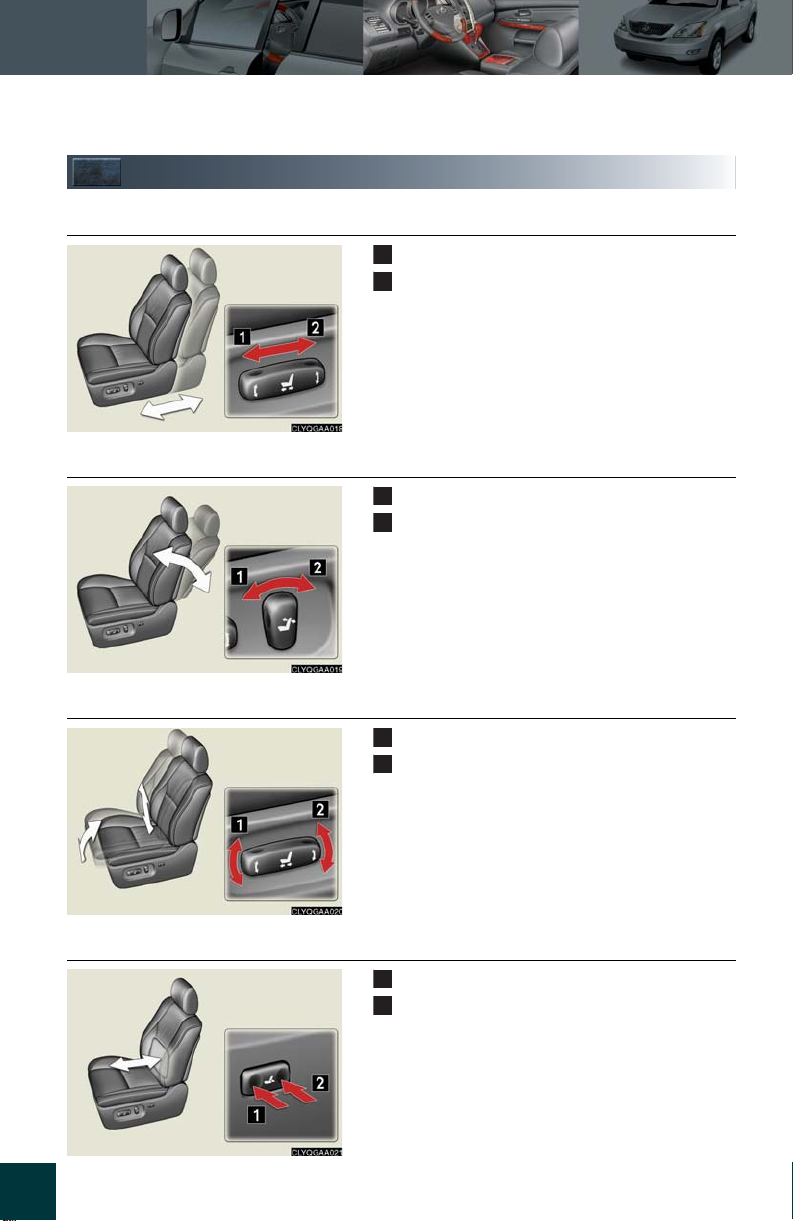
Front Seats
1
2
1
2
1
2
1
2
n Adjusting seat position
n Adjusting seatback angle
n Adjusting the seat cushion
Moves the seat forward
Moves the seat backward
Tilts the seatback forward
Reclines the seatback
Raises and lowers the front of the cushion
Raises and lowers the entire seat
n Adjusting the lumbar support
11
Firmer
Softer
Topic 2
Before Driving
Entering and Exiting
Before Driving
When Driving
Rain and
Night Driving
Driving Comfort
Opening and Closing
What to do if ...
Customizing
Yo u r L e xu s
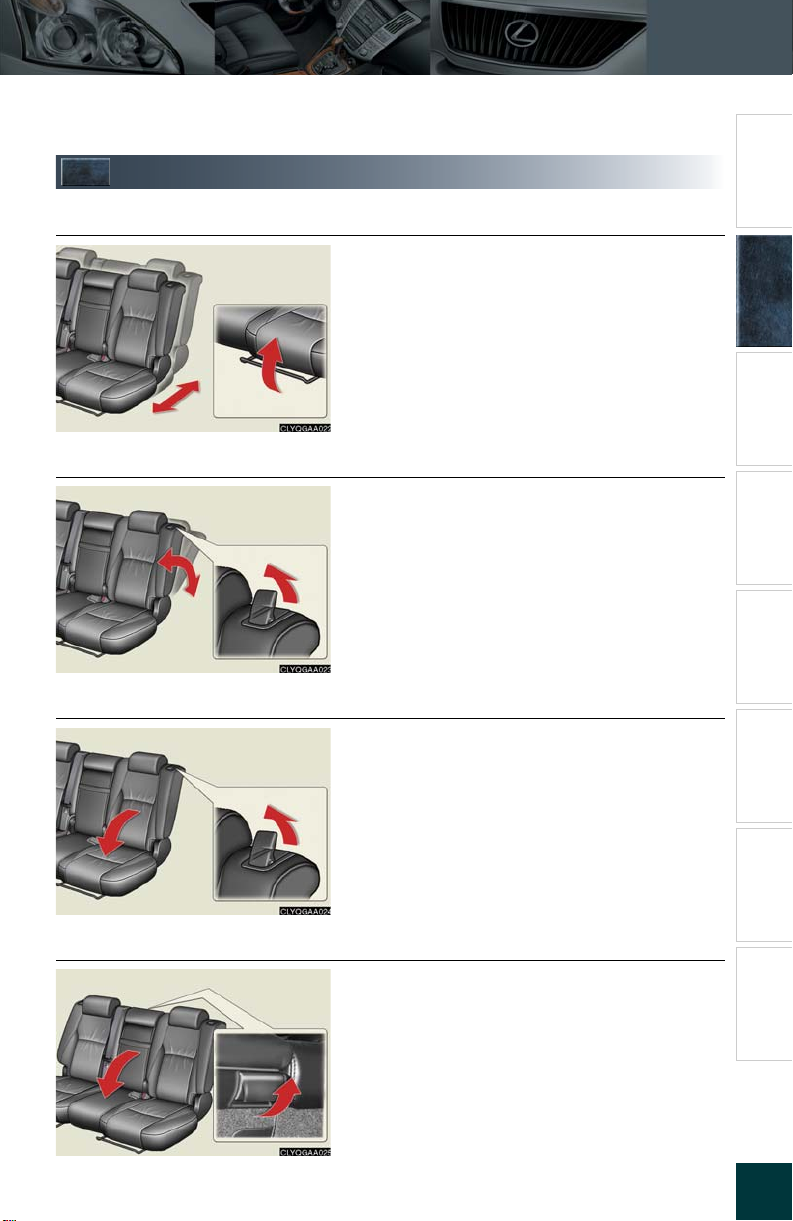
Rear Seats
n Adjusting seat position
n Adjusting seatback angle
n Folding down the seatback
With the lever raised, slide the seat forward or
backward.
Pull the lever and tilt the seatback forward or
backward.
Pull the lever and fold the seatback down until it
locks.
n Folding down the center seatback only
To return the seatback, pull the lever and lift the
seatback up.
Pull the lever behind the center seatback and fold
the seatback down.
12
Topic 2
Before Driving
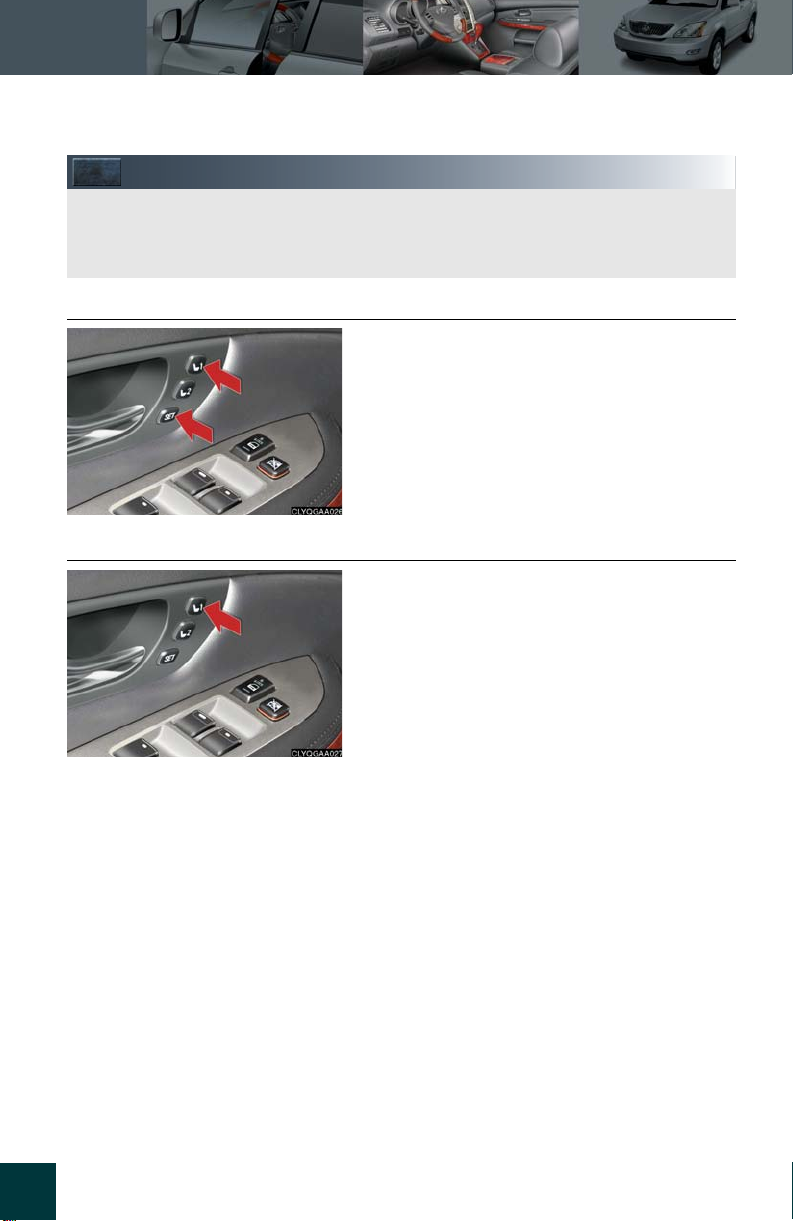
Driving Position Memory (If Equipped)
The driver's seat, steering wheel and outside rear view mirrors can be returned to a previously set position by simply pressing a button.
Positions can be conveniently recorded for the vehicle's primary drivers.
n Setting memory positions
n Recalling memory positions
While holding down the SET button, press and
hold memory button 1 or 2 until you hear a beep.
The current position of the seat, steering wheel
and outside rear view mirrors are recorded.
Press memory button 1 or 2.
13
Topic 2
Before Driving
Entering and Exiting
Before Driving
When Driving
Rain and
Night Driving
Driving Comfort
Opening and Closing
What to do if ...
Customizing
Yo u r L e xu s
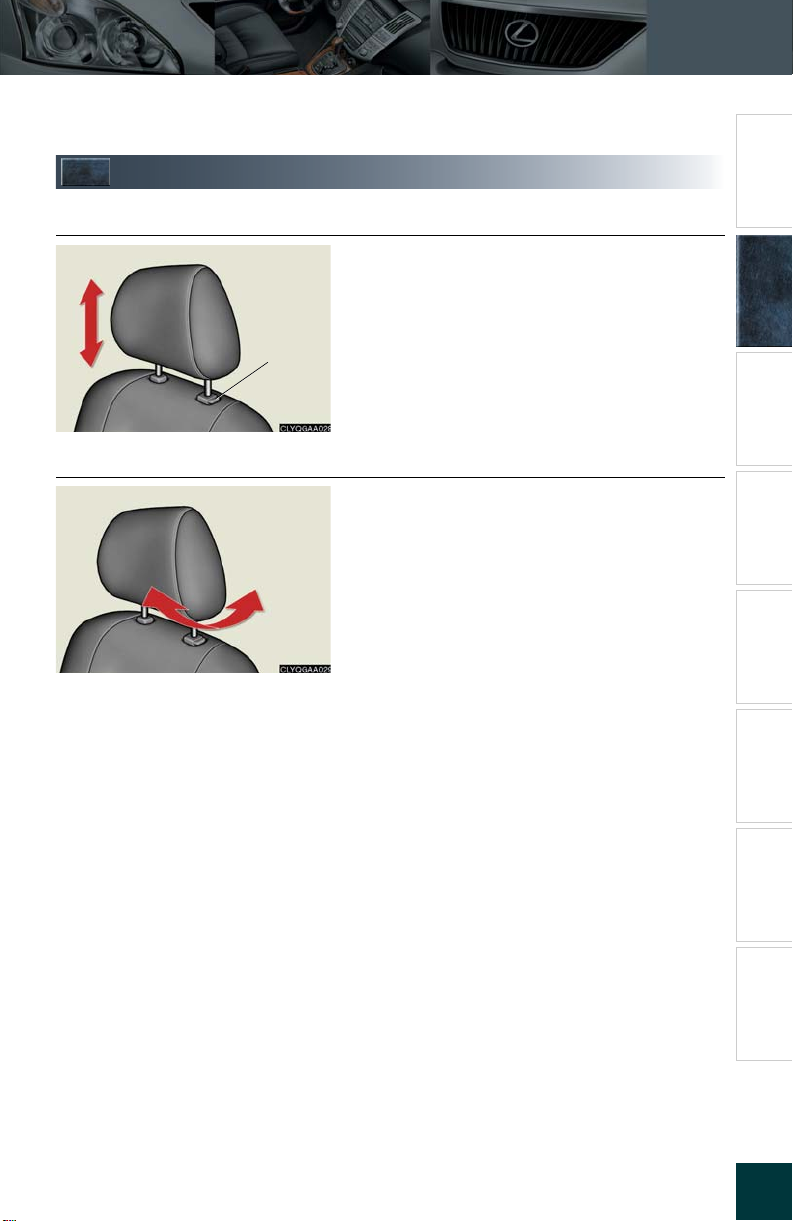
Head Restraints
Lock
relea se
button
n Vertical adjustment
To r ai s e : push the head restraint upward.
To l ow e r : push the head restraint down while
pressing the lock release button.
n Angle adjustment (front seats only)
Move forward and backward.
14
Topic 2
Before Driving
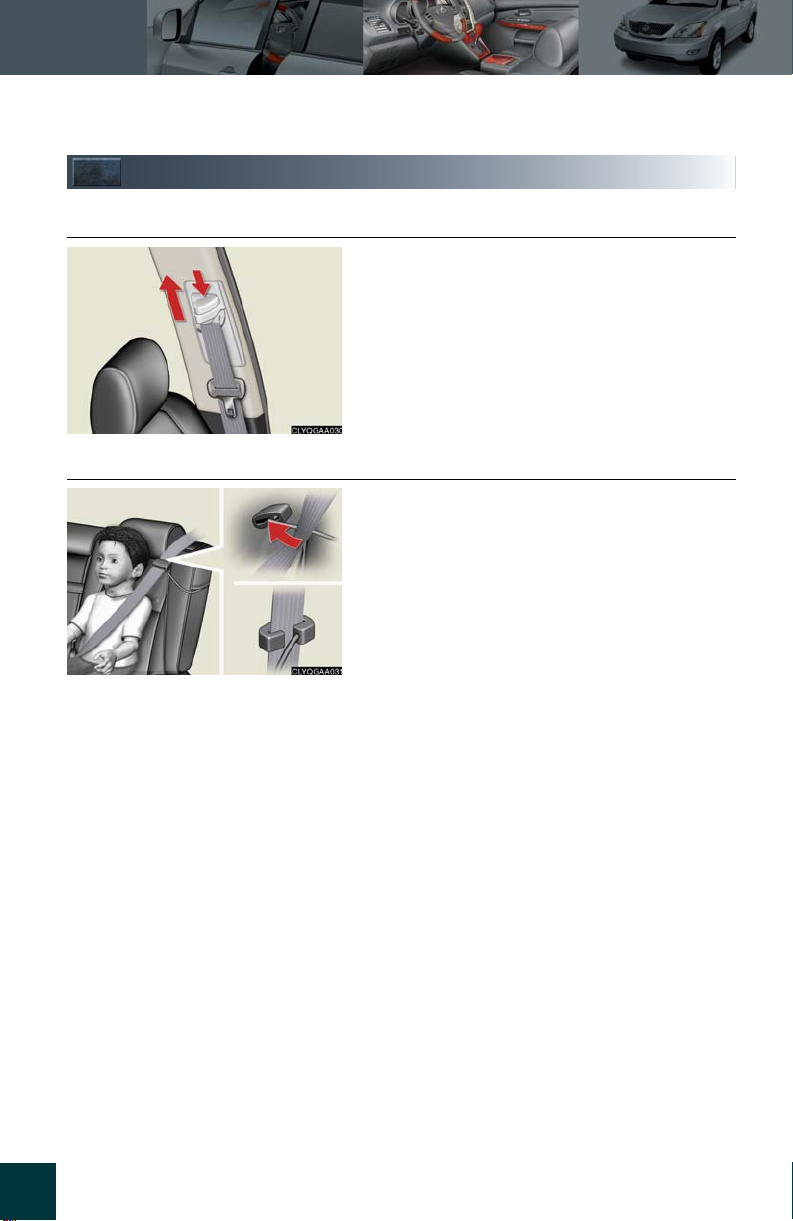
Seatbelts
n Adjusting shoulder belt height (front seats only)
To ra i s e: push the anchor upward.
To lo we r : depress the button and push the anchor
down.
n Seatbelt comfort guides (outside rear seats only)
If the shoulder belt sits close to the neck, pass the
seatbelt through the comfort guide.
15

Topic 2
Before Driving
Entering and Exiting
Before Driving
When Driving
Rain and
Night Driving
Driving Comfort
Opening and Closing
What to do if ...
Customizing
Yo u r L e xu s
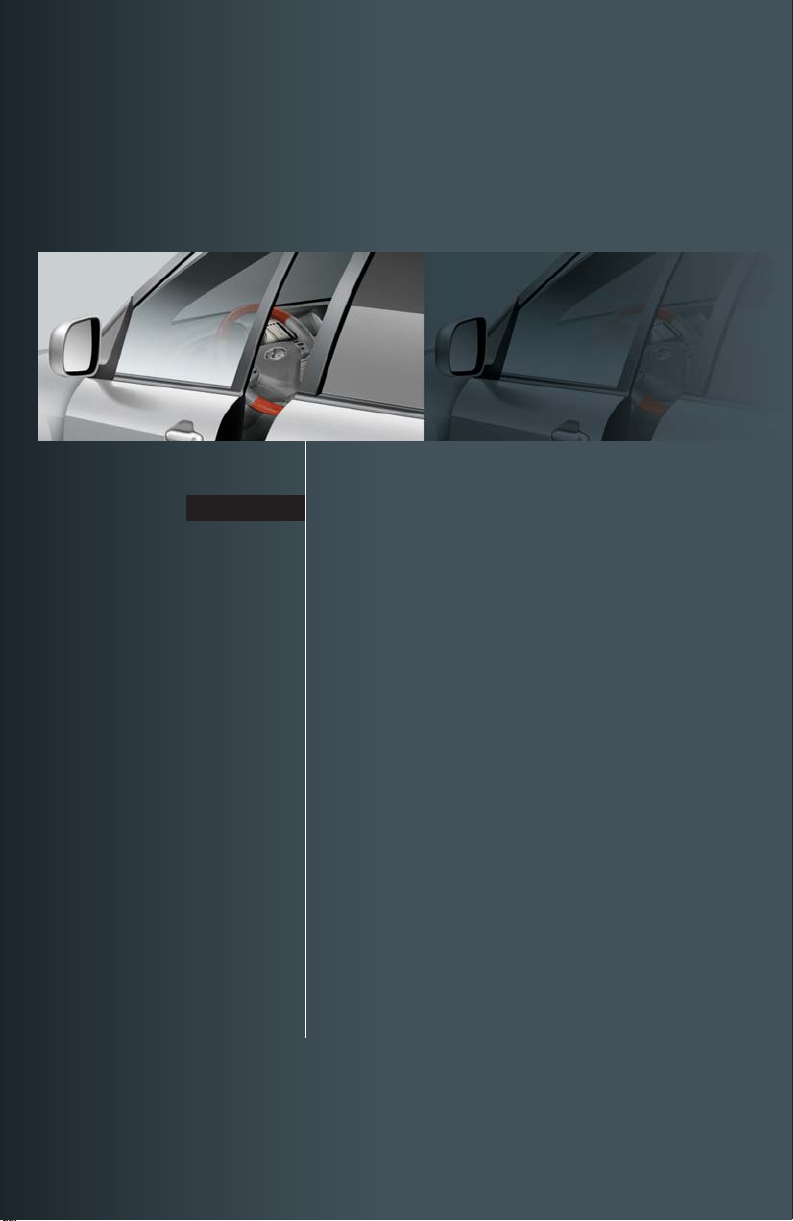
Outside Rear View Mirrors
The anti-glare mirror uses a sensor to detect light from vehicles behind and automatically
reduces glare.
To select the mirror you wish to adjust (L or R),
use the master switch.
To adjust mirror angle, use the control switch.
On vehicles with driving position memory, the
mirrors will automatically angle downwards when
the vehicle is reversing.
To disable this function, set the master switch in
the neutral position (between L and R).
Anti-glare Inside Rear View Mirror
To turn the anti-glare function ON/OFF, press
and hold the button for 3 seconds.
The indicator comes on when the anti-glare function is turned ON.
16

Topic 2
Before Driving
Steering Wheel
1
2
3
4
n Manually adjustable type
To adjust the steering wheel, pull the lever up
while holding the steering wheel, tilt the steering
wheel to the desired angle, and release the lever.
n Pow er- ad justab le type
Up
Down
Away from the driver
Toward the driver
The power-adjustable type steering wheel retracts automatically when the ignition key is
removed to allow for easy exit and entry. The steering wheel returns automatically to its previously set position when the key is inserted into the ignition switch.
17
Topic 3
When Driving
Starting ..................................................................... 19
Automatic T ransmission (Mu lti-mode)........... 20
Automatic Transmission (Standard) .................. 21
Parking Brake ......................................................... 21
Turn Signal Lever .................................................. 22
Emergency Flasher Switch................................ 22
Cruise Control ...................................................... 23
Dynamic Laser Cruise Control........................ 24
Electronically Modulated Air Suspension.... 25
Trip Information Display ..................................... 26
ECT SNOW Switch ............................................. 27
 Loading...