

Lexus Gs350 2007 Owner's Manual

The Quick Guide is not intended as a substitute for your
Information Provided by:
Manual
Manual
Contents
understanding of your vehicle’s capabilities and limitations.
Overview
To p ic 1
Entering and Exiting
lKeys P.7 lSmart Access System with
Push-button Start P. 8
lAnti-theft System P.9
. We strongly encourage you to review the
and supplementary manuals so you will have a better
Owner’s
To p ic 2
Before Driving
lSeats P.11 lDriving and Seat Position Memory
System P.1 2
lHead Restraints P.1 3
lSeatbelts P.1 3
lOutside Rear View Mirrors P.1 4
lInside Rear View Mirror P.14
lSteering Wheel P.1 5
lOdometer/Trip Meter and
Trip Meter Reset Buttons P.1 5
Owner’s
1
To p ic 3
When Driving
lStarting P.1 7 lTransmission P.1 8 lParki ng B rake P.1 8 lMulti-information Display P.1 9 lTu rn Signal Leve r P. 20 lEmergency Flasher Switch P.20 lMode Select Switch P.20 lIntuitive Parking Assist P.2 1 lCruise Control P. 2 2
lDynamic Radar Cruise
Control P.23
lAVS (Adaptive Variable
Suspension) P. 24
lTRAC/VSC Off Mode P. 24

Topic 4
Information Provided by:
Entering and Exiting
Topic 5
Driving Comfort
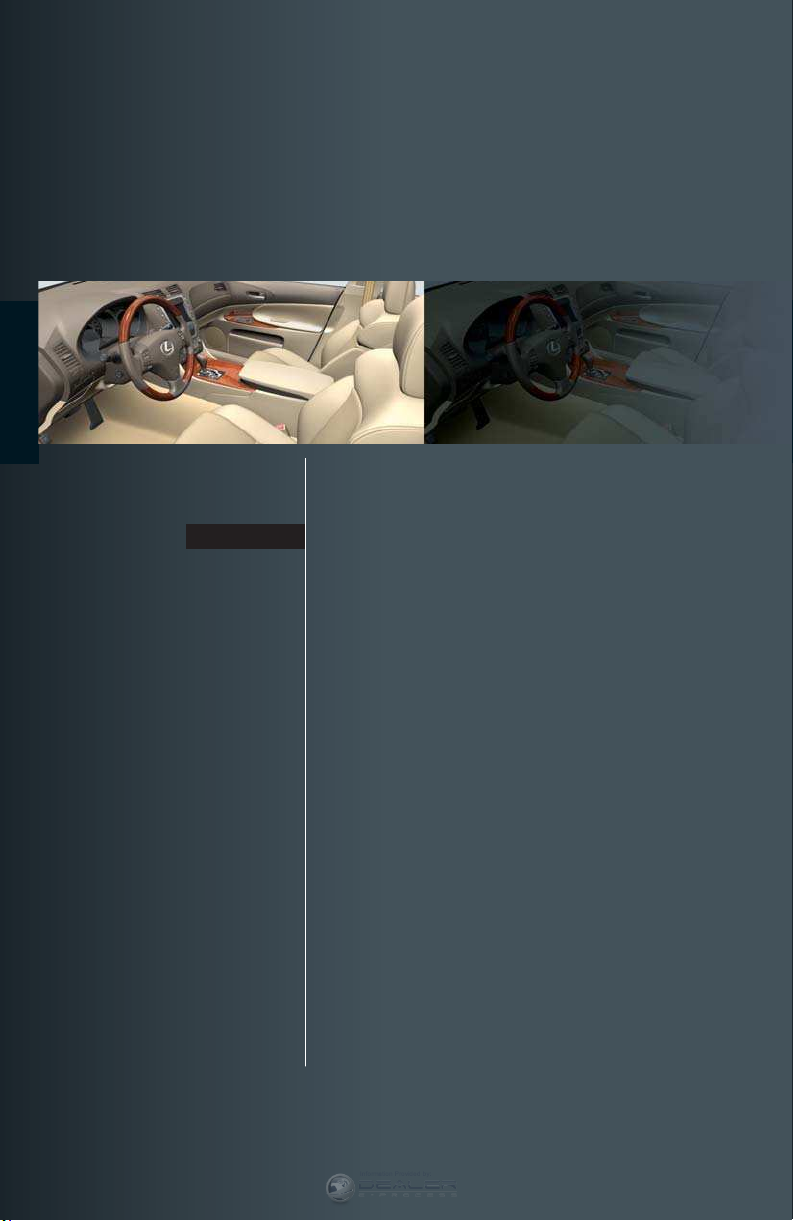
lTouch Screen P.3 1 lAir Conditioning System P. 3 2 lAudio System P. 3 4 lHands-free System P. 36 lAshtrays P.37 lSeat Heaters/Seat Heaters
and Ventilators P. 3 8
lConsole Box P. 39
lGlove Box P.40
lCup Holders P.40
Rain and Night Driving
lHeadlights P. 2 7 lFog Lights P.2 8 lWindshield Wipers and
Wa s h e r s P. 28
lHeadlight Cleaner P. 2 9
lRear Window and Outside Rear
View Mirror Defoggers P. 2 9
l
Instrument Panel Light Control
lInterior Lights P. 41
lRear Sunshade P.4 1
lCompass P.4 1
lLuggage Mat P.42
lLexus Link System P.42
Topic 6
P. 29
Before Driving When Driving
Night Driving Driving Comfort
Rain and
Opening and Closing
What to do if ...
Customizing Your Lexus
Depending on specifications, the vehicle shown in the illustration may
differ from your vehicle in terms of color and equipment.
Opening and Closing
lDoor Locks P.45 lPower Wind ows P.4 6 lMoon Roof P.46 lFuel Tank Cap P.4 7 lHood P.47 lTr u n k P.48
Responding to warning/indicator lights
and other problems that may arise.
A list of features that can be customized.
What to do if ...
Customizing
Yo u r L e xu s
2
Overview
Information Provided by:
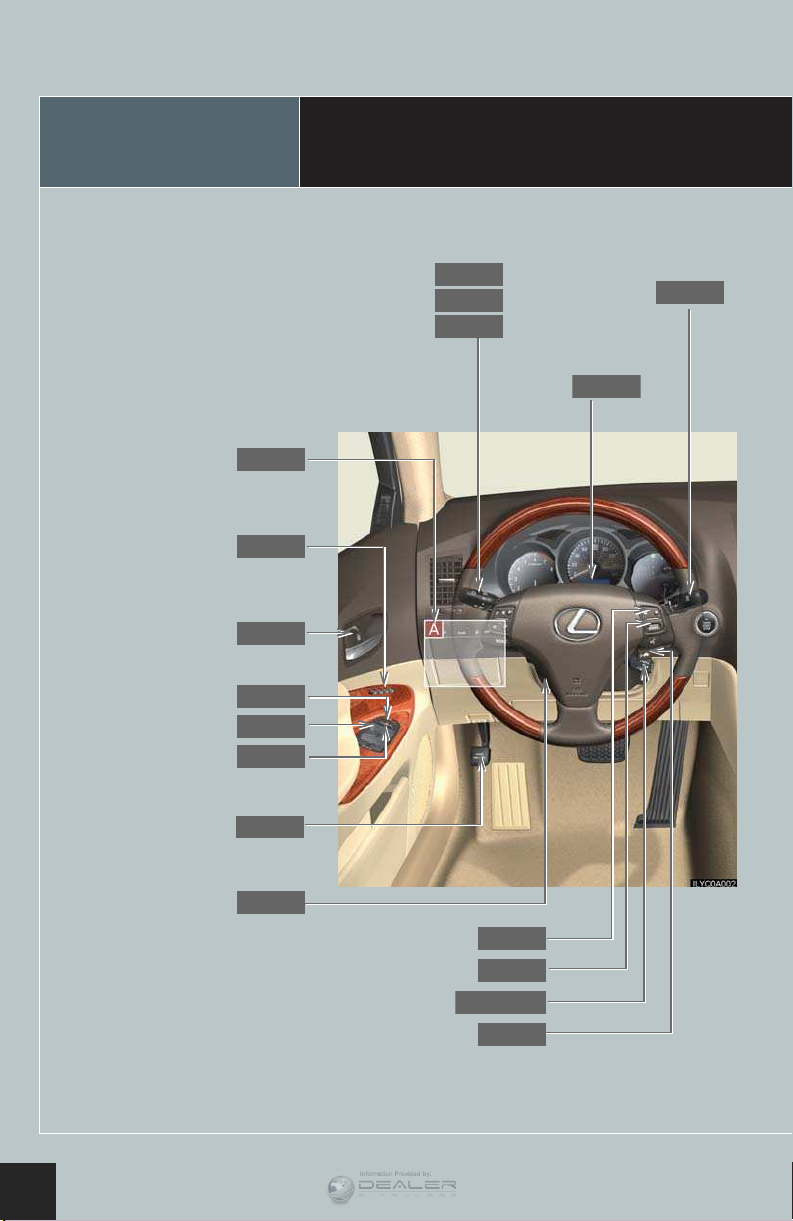
Instrument Panel
See
Driving and seat position
memory switches ∗
Inside door lock button
Window lock switch
Power window switches
Door lock switch
Parking brake pedal
Headlight switch
Turn signal lever
P.5
P.12
P.45
P.46
P.46
P.45
P.18
Fog light switch
P.27
P.20
P.28
Windshield wipers and
washer switch
Multi-information display
P.19
P.28
Tilt and telescopic
steering control switch
3
P.15
Telephone switch
Cruise control switch
Distance switch∗
“DISP” switch
P.36
P.19
P.22, 23
P.23
Engine switch
Information Provided by:
Audio system
P.17
P.34
Air conditioning system
Rear window and outside rear
view mirror defoggers
P.32
P.29
Security indicator
Glove box
P.40
Trunk opener main switch
Emergency flashers
P.5
See
Seat heater switches∗
Seat heater/ventilator
switches∗
P.38
Vehicle stability control system off switch
Mode select switch
“AVS” switch∗
P.20
P.24
P.9
P.48
P.20
P.24
∗ : If equipped
4

Overview
Information Provided by:
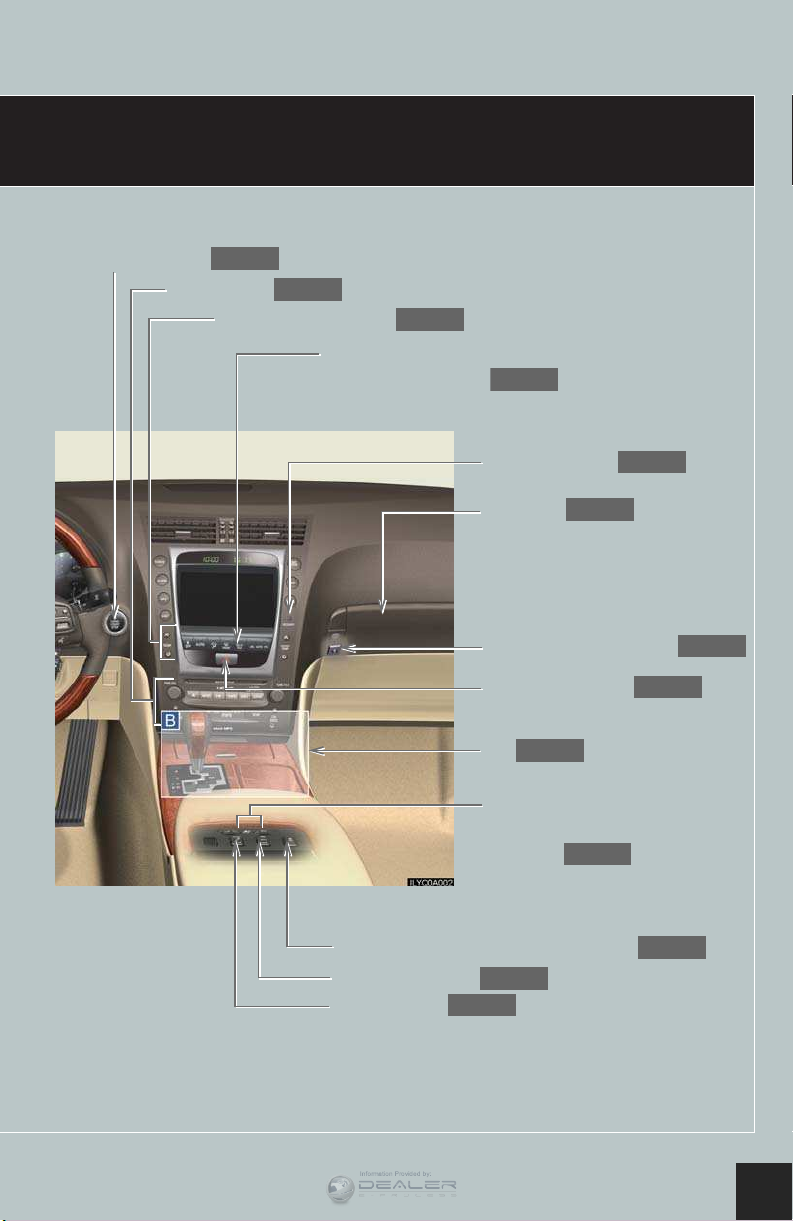
Instrument Panel
Headlight cleaner switch
Rear sunshade switch
Intuitive parking assist switch∗
AFS cancel switch
P.29
P.41
P.21
P.27
Odometer/trip meter and trip meter reset buttons
Instrument panel light control
Trunk opener
Fuel filler door opener
Outside rear view mirror switches
P.15
P.29
P.48
P.47
P.14
5
Shift lever
Ashtray
Cup holders
P.18
P.37
P.40
∗ : If equipped

Topic 1
Information Provided by:
Entering and Exiting
Keys
n Electronic key
n Mechanical key
l Locks and unlocks the doors
l Opens the trunk
l Starts and stops the engine
l Locks and unlocks the doors
l Opens the trunk
l Locks and unlocks the glove box
The mechanical key is stored inside the electronic
key. To extract the key, release the latch and pull.
n Wireless remote control
Locks the doors
1
Unlocks the doors
2
Opens the trunk
3
Sounds the alarm
4
(To stop the alarm, push any button on the
wireless remote control.)
The wireless remote control can also be used to open the windows and moon roof.
To do so, simply press and hold button.
7
Entering and Exiting
Information Provided by:
Smart Access System with Push-button Start
The smart access system with push-button start allows you to enter and exit the vehicle
or start the engine by simply carrying the electronic key in your pocket or bag.
For details on starting the engine, see page 17.
n Entering the vehicle
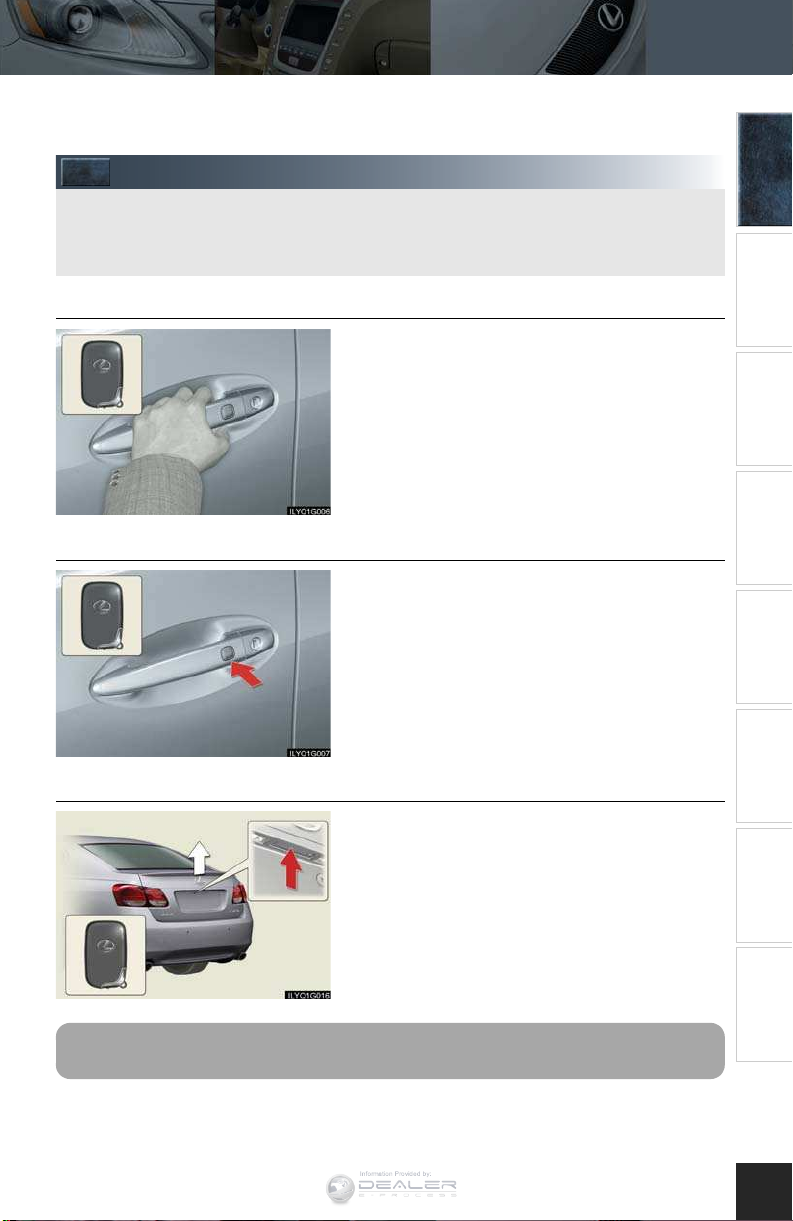
To unlock the vehicle, simply grasp the door handle.
n Exiting the vehicle
To lock the vehicle, press the button on the door
handle.
Topic 1
Entering and Exiting
Before Driving
When Driving
Night Driving Driving Comfort
Before Driving
Rain and
n Opening the trunk
To open the trunk, press the button.
For details on what to do when the electronic key battery becomes discharged, see page 52.
Opening and Closing
What to do if ...
Customizing
Yo u r L e xu s
8
Topic 1
Information Provided by:
Entering and Exiting
Anti-theft System
The anti-theft system includes the following features to help protect your vehicle from theft.
n Engine immobilizer system
The engine immobilizer system prevents the
engine from being started in the event that an
attempt is made to start the vehicle using an
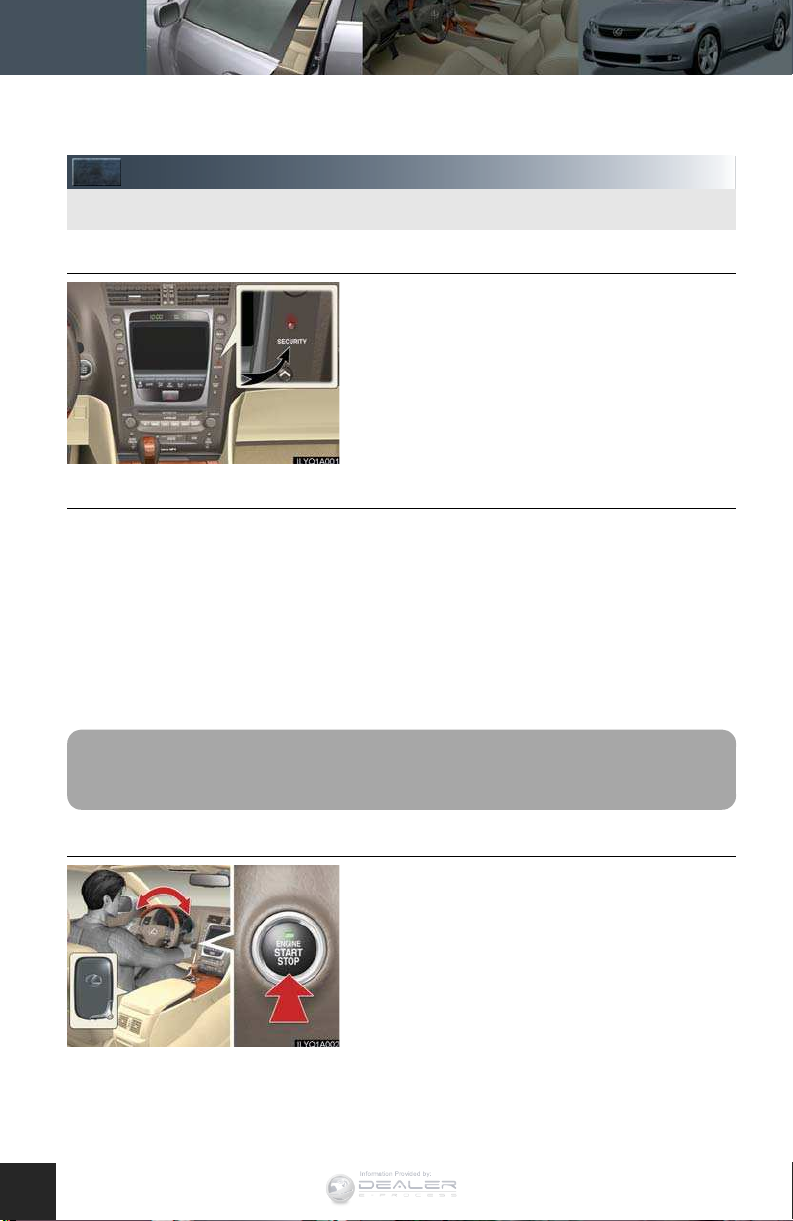
ILYQ1A001
n Alarm
unregistered key.
The security indicator light flashes to indicate that
the system is set.
When forcible entry is detected, the alarm
attracts attention to the vehicle by sounding the
horn and flashing the exterior lights.
When all the doors are locked, the security indicator light comes on and begins to flash after
approximately 30 seconds to indicate that the
system is armed.
To stop the alarm, start the engine or unlock the doors or trunk using the entry function or
the wireless remote control. (The alarm will stop after several seconds.)
n Steering lock
The steering lock is engaged when the driver’s
door is opened with the engine switch OFF.
ILYQ1A002
9

To pi c 1
Information Provided by:
Entering and Exiting
Keys ............................................................................. 7
Smart Access System with Push-button
Start ............................................................................. 8
Anti-theft System..................................................... 9
Topic 2
Information Provided by:
Before Driving
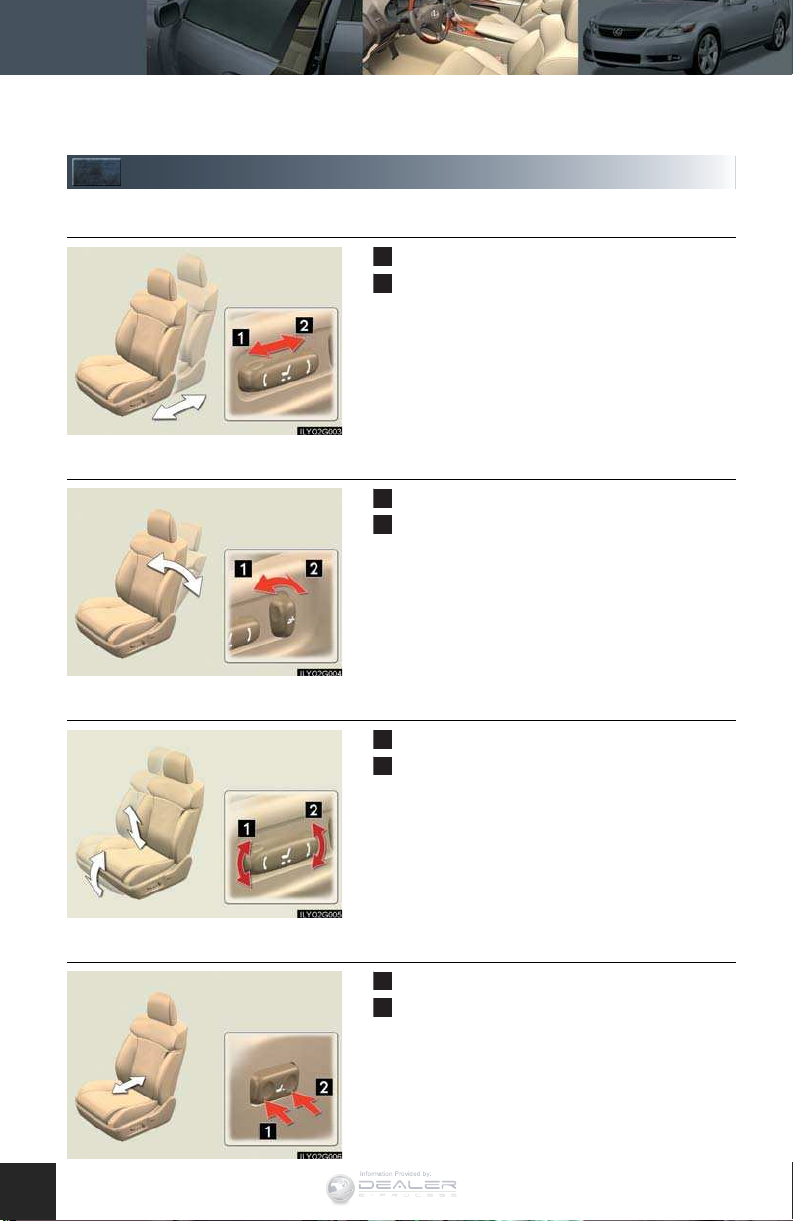
Seats
n Adjusting seat position
n Adjusting seatback angle
Moves the seat forward
1
Moves the seat backward
2
Tilts the seatback forward
1
Reclines the seatback
2
n Adjusting the seat cushion
n Adjusting the lumbar support
11
Raises and lowers the front of the cushion
1
Raises and lowers the entire seat
2
Firmer
1
Softer
2

Before Driving
Information Provided by:
Driving and Seat Position Memory System (If Equipped)
The seats can be returned to a previously set position by simply pressing a button.
The position of the steering wheel and the outside rear view mirrors is adjusted along with the
driver's seat.
Positions can be conveniently stored for the vehicle's primary drivers and passengers.
n Setting memory positions
While holding down the SET button, press and
hold one of the memory buttons (1, 2, or 3) until
you hear a beep.
The current position of the driver’s or front passenger’s seat, the outside rear view mirror and the
steering wheel (driver’s side only) are stored.
n Recalling memory positions
Press one of the memory buttons (1, 2, or 3).
Topic 2
Entering and Exiting
Before Driving When Driving
Night Driving Driving Comfort
Rain and
n Linking driving position memory with door unlock operation
(driver's seat only)
While holding down the desired memory button,
press and hold either the or button on
the wireless remote control until you hear a beep.
Linking driving position memory to the door unlock operation allows the memory position
to be recalled automatically when the driver's door is opened. (The linked function does not
operate if the driver's door is unlocked using the mechanical key or manually from inside
the vehicle.)
Opening and Closing
What to do if ...
Customizing
Yo u r L e xu s
12
Topic 2
Information Provided by:
Before Driving
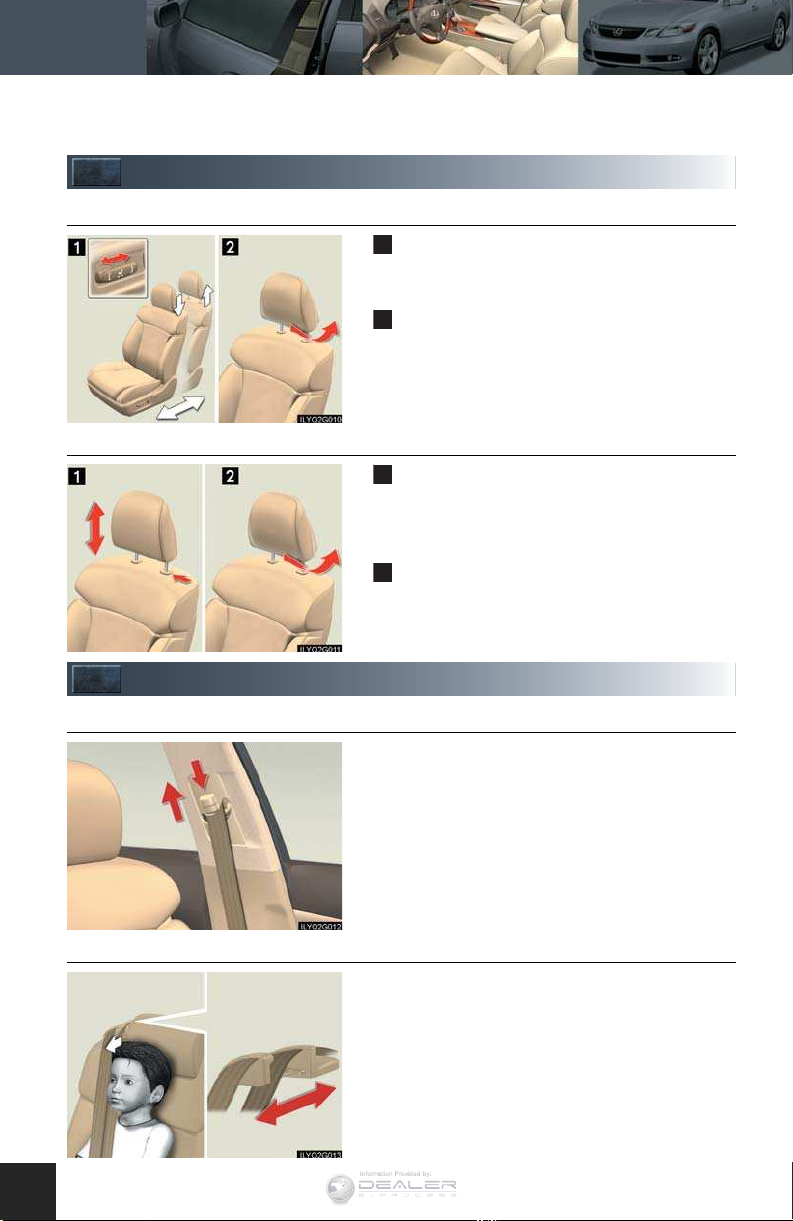
Head Restraints
n Driver’s seat
n Front and rear passenger’s seat
Height adjustment: head restraint height can
1
be adjusted automatically along with the seat
position adjustment. (→ P.1 1 )
Horizontal adjustment: grip head restraint and
2
twist to tilt forward or backward.
Height adjustment: to raise the head restraint,
1
pull it upward. To lower the head restraint,
push it down while pressing the lock release
button.
Horizontal adjustment (Except rear center
2
seat): grip head restraint and twist to tilt forward of backward.
Seatbelts
n Adjusting shoulder belt height (front seats only)
To ra i s e: pull the anchor upward.
To low e r : depress the button and push the anchor
down.
n Seatbelt comfort guides (outboard rear seats only)
If the shoulder belt fits close to the neck, slide the
comfort guide forward.
13
Outside Rear View Mirrors
Information Provided by:
Topic 2
Before Driving
Entering and Exiting
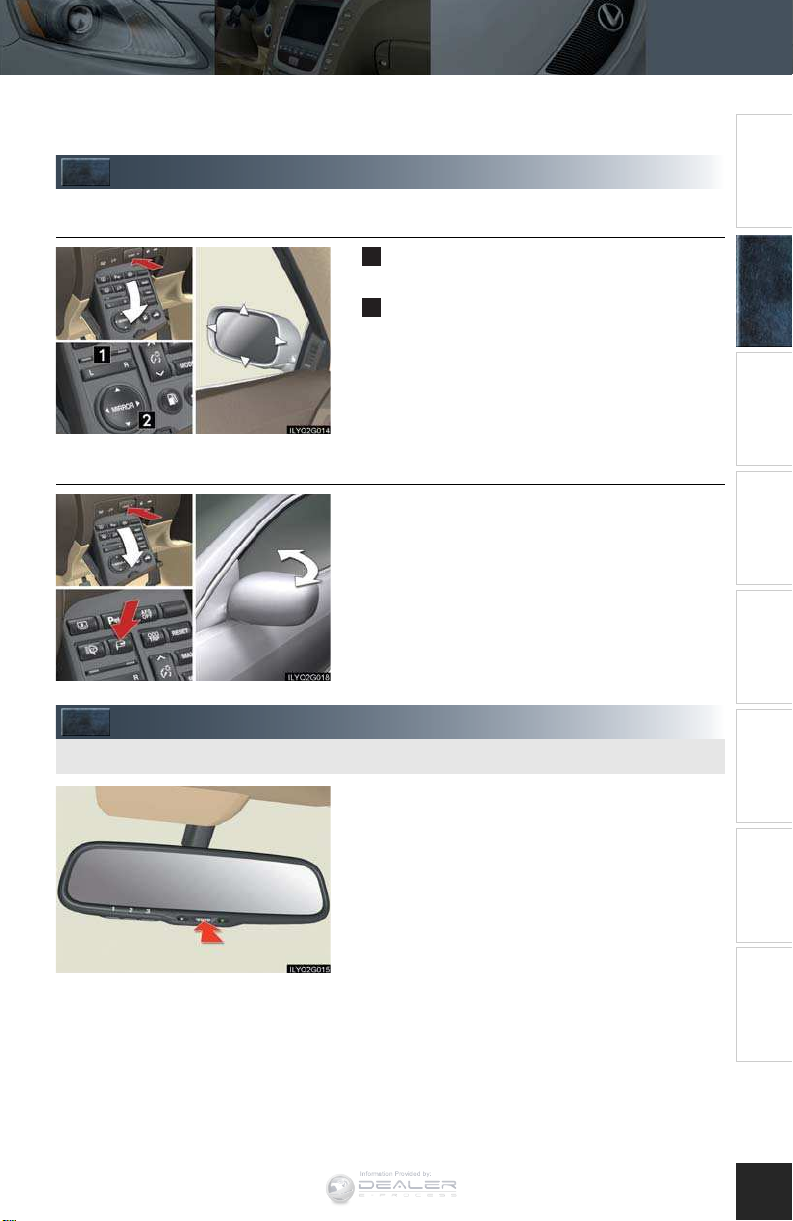
n Adjusting the mirrors
To select the mirror you wish to adjust (L or R),
1
use the select switch.
To adjust mirror angle, use the control switch.
2
The mirrors will automatically angle downwards
when the vehicle is reversing.
To disable this function, set the select switch in the
neutral position (neither L nor R selected).
n Fold ing the mirro rs
To fold the mirrors back, press the button. Press
the button again to return them to the extended
position.
Inside Rear View Mirror
The mirror uses a sensor to detect light from vehicles behind and automatically reduces glare.
To turn AUTO mode ON/OFF, press the AUTO
button.
The indicator comes on when AUTO mode is
turned ON.
Before Driving When Driving
Night Driving Driving Comfort
Rain and
Opening and Closing
What to do if ...
Customizing
Yo u r L e xu s
14
Topic 2
Information Provided by:
Before Driving
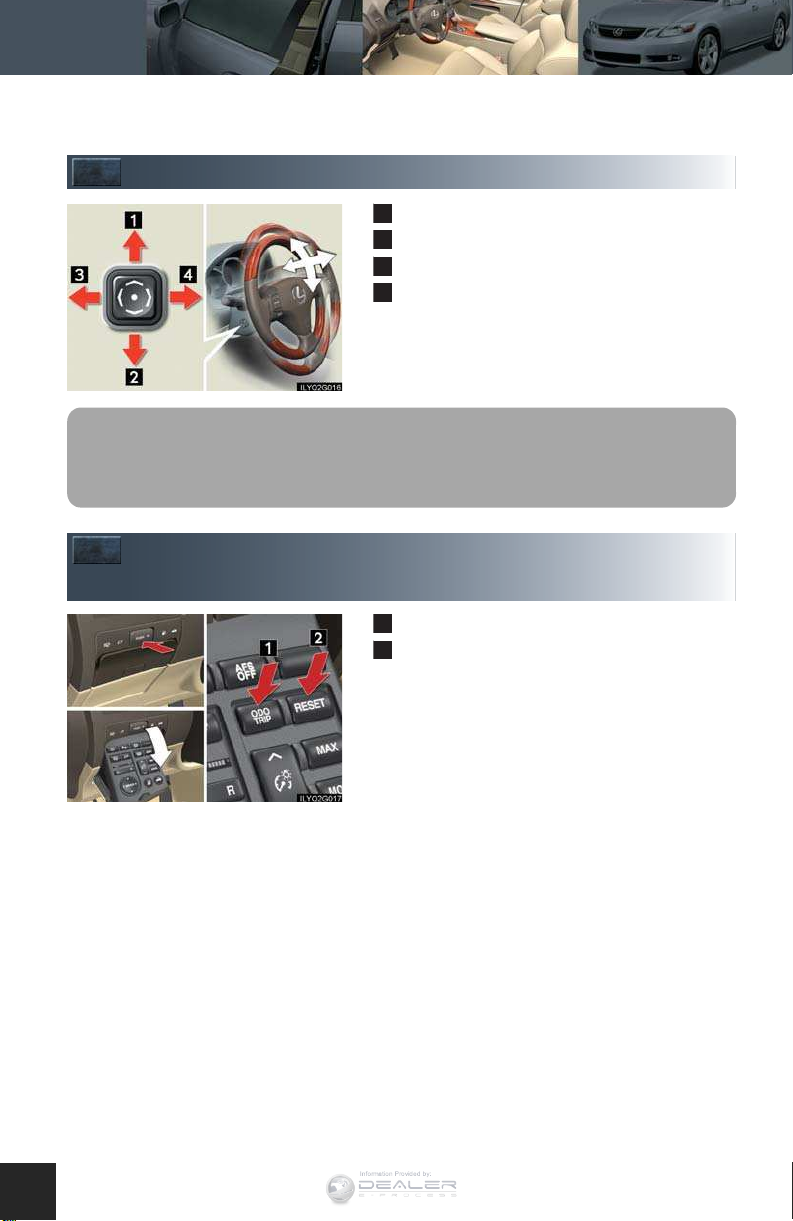
Steering Wheel
Up
1
Down
2
Away from the driver
3
Toward the driver
4
The steering wheel retracts automatically when the engine switch is turned OFF to allow for
easy exit and entry. The steering wheel returns automatically to its previously set position
when the engine switch is switched to ACC or IG-ON mode.
Odometer/Trip Meter and Trip Meter Reset
Buttons
15
Changes the display.
1
Resets the trip meter driving range to 0.
2
To pi c 2
Information Provided by:
Before Driving
Seats ........................................................................... 11
Driving and Seat Position Memory System... 12
Head Restraints ..................................................... 13
Seatbelts................................................................... 13
Outside Rear View Mirrors ............................... 14
Inside Rear View Mirror...................................... 14
Steering Wheel ...................................................... 15
Odometer/Trip Meter and Trip Meter Reset
Buttons ...................................................................... 15

Topic 3
Information Provided by:
When Driving
Starting
With the electronic key on your person, the engine can be started by simply pressing the
engine switch, while depressing the brake pedal.
(The mechanical key cannot be used to start the engine.)
n Starting the engine
Make sure the parking brake is engaged and the
shift lever is in P.
Depress the brake pedal.
ILYQ3A001
n Stopping the engine
Engage the parking brake and shift the shift lever to P.
Press the engine switch.
The engine switch indicator light turns
green.
Press the engine switch.
n Changing power modes
To change power modes without turning on the engine, press the engine switch without
depressing the brake pedal. The modes can be changed in the following order:
OFF mode
(Indicator light: off)
ACC mode
(Indicator light: amber)
IG-ON mode
ILYQ3A002
17

Transmission
Information Provided by:
Topic 3
When Driving
Entering and Exiting
n Shift positions
P Pa r k *
R Reverse
N Neutral (drive not engaged)
D Drive
S S mode
*: The engine can only be started in P.
The vehicle can only be shifted out of P when
the engine switch is in IG-ON mode and the
brake pedal is depressed.
n S mode
S mode allows the driver to select the shift range manually based on driving conditions.
Shift the shift lever to S.
To upsh i f t: shift the shift lever toward "+".
To dow n s hi f t : shift the shift lever toward "-".
The selected shift range is displayed on the
instrument cluster.
Before DrivingBefore Driving When DrivingWhen Driving
Night Driving Driving Comfort
Rain and
Opening and Closing
Parking Brake
To s e t: firmly depress the parking brake pedal.
To releas e : depress the parking brake pedal
again.
What to do if ...
Customizing
Yo u r L e xu s
18

Topic 3
Information Provided by:
When Driving
Multi-information Display
The multi-information display shows information about your vehicle, including the items
shown below.
n Display information
l Trip information
• Outside temperature
• Driving range
ILYQ3A003
n Changing the display
• Average fuel consumption after refueling
• Current fuel consumption
l Intuitive parking assist information
(if equipped)
l Dynamic radar cruise control settings
(if equipped)
l Wa rni ng me ss ag es
Trip information items can be switched by pressing the DISP switch.
n When using the intuitive parking assist or dynamic radar cruise control, the appropriate
display is shown on the screen.
n If a problem is detected in any of the vehicle's systems, a warning message is shown on the
multi-information display.
19

Turn S ig n a l L ever
Information Provided by:
Left turn signal
1
Right turn signal
2
To signal a lane change, move the lever partway and hold.
Emergency Flasher Switch
Engaging the emergency flasher switch causes all
the turn signal lights to flash.
Topic 3
When Driving
Entering and Exiting
Before DrivingBefore Driving When DrivingWhen Driving
Night Driving Driving Comfort
Rain and
Mode Select Switch
Use the mode select switch to select the driving mode that best suits the driving and road
conditions.
Pow er mode
1
For more powerful acceleration and uphill
driving.
Normal mode
ILYQ3A004
2
Snow mode
3
For starting or accelerating on snow-covered
roads or other slippery surfaces.
An indicator comes on when in power or snow
mode.
Opening and Closing
What to do if ...
Yo u r L e xu s
20
Customizing

Topic 3
Information Provided by:
When Driving
Intuitive Parking Assist (If Equipped)
The system uses a screen display and buzzer to inform the driver of obstacles near the
vehicle when parking or driving at low speed.
n Turning the system on and off
The system can be turned on and off using the
intuitive parking assist switch.
n Screen display
Sensors are used to detect obstacles near the
vehicle. The distance to a detected obstacle is
shown by the number of indicator bars.
Indicates obstacles detected by the dual sen-
1
sors
Indicates the steering maneuvers required to
2
avoid an obstacle.
Indicates obstacles detected by the rear cor-
3
ner sensors
Indicates obstacles detected by the back sen-
4
sors
21
When Driving
Information Provided by:
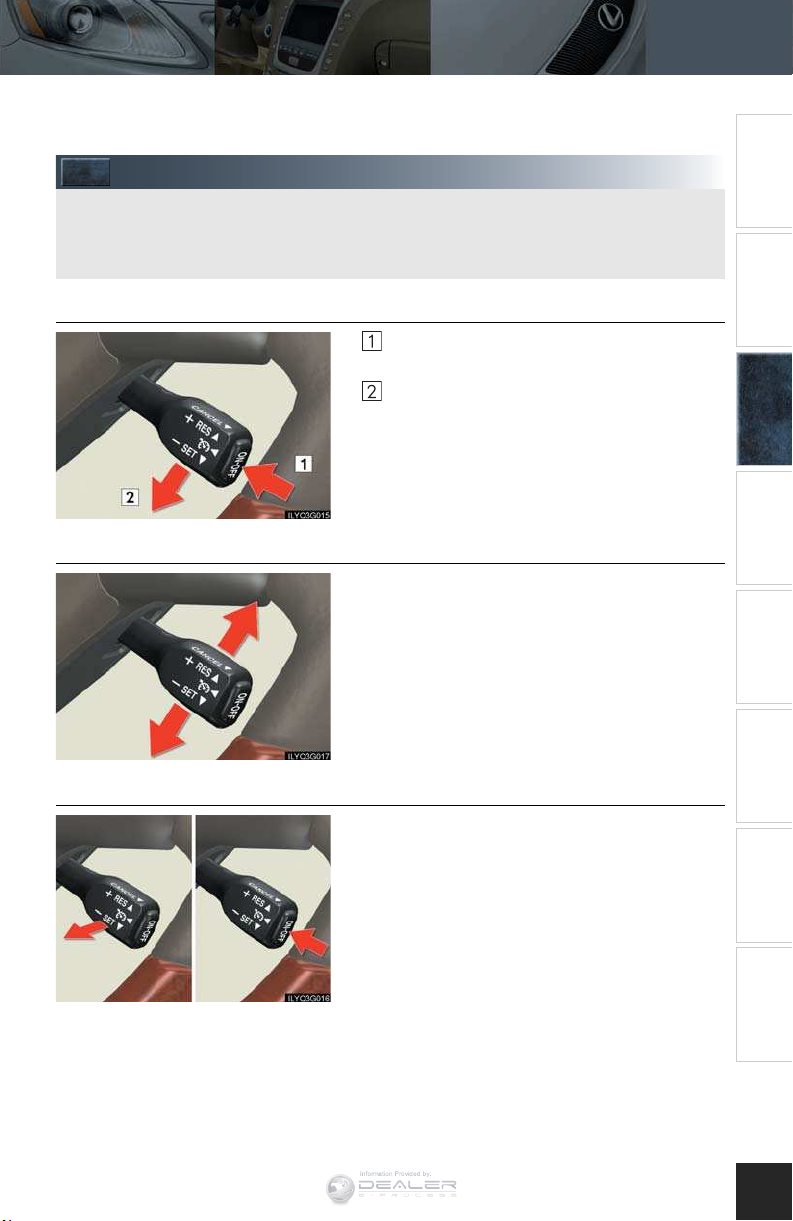
Cruise Control
Cruise control allows the driver to maintain a constant speed without having to operate the
accelerator pedal.
Use for highway driving or when traveling at a constant speed for long periods of time.
n Setting the speed
Press the ON-OFF button.
The system will turn on.
Accelerate or decelerate to the desired
speed, and then push the lever down.
This sets the speed in the cruise control
memory.
n Adjusting the speed setting
To increase speed: push the lever up.
To decrease speed: push the lever down.
Topic 3
Entering and Exiting
Before DrivingBefore Driving When DrivingWhen Driving
Night Driving Driving Comfort
Rain and
n Canceling
Release the lever when the desired speed is
reached.
To temporarily cancel the cruise control, pull the
lever.
To turn the system off, press the ON-OFF button.
Opening and Closing
What to do if ...
Customizing
Yo u r L e xu s
22

Topic 3
Information Provided by:
When Driving
Dynamic Radar Cruise Control (If Equipped)
Dynamic radar cruise control supplements conventional cruise control with a vehicle-tovehicle distance control mode.
n Cruise control display
Cruise control settings are shown on the multiinformation display.
Vehicle ahead indicator
1
Vehicle-to-vehicle distance
2
Preset speed
3
n Vehicle-to-vehicle distance control mode
Press the ON-OFF button.
Accelerate or decelerate to the desired
speed, and then push the lever down.
Following distance can be adjusted using the
vehicle-to-vehicle distance control switch.
n Conventional (constant speed) cruise control mode
Press the ON-OFF button.
Push the lever forward and hold for at least
one second.
Accelerate or decelerate to the desired
speed, and then push the lever down.
n Adjusting the speed setting
To increase speed: push the lever up.
To decrease speed: push the lever down.
Release the lever when the desired speed is
reached
n Canceling
To temporarily cancel the dynamic radar cruise
control, pull the lever.
To turn the system off, press the ON-OFF button.
The vehicle-to-vehicle distance control mode maintains the preset cruising speed as long
as no vehicle is detected ahead.
23

When Driving
Information Provided by:
AVS (Adaptive Variable Suspension)
(If Equipped)
AVS controls the suspension and steering wheel operation according to the road and
driving conditions.
Sports mode
1
Suitable for meandering mountainous driving or high speed driving.
Normal mode
ILYQ3A005
2
Suitable for normal driving.
TRAC/VSC Off Mode
This switch turns off the traction control system or vehicle stability control system.
Use this switch if the wheels get stuck in snow, mud etc.
Topic 3
Entering and Exiting
Before DrivingBefore Driving When DrivingWhen Driving
Night Driving Driving Comfort
Rain and
ILYQ3A006
To turn off TRAC: Push the VSC OFF switch
briefly. The slip indicator light will come on.
To turn off VSC: Push and hold the VSC OFF
switch for 3 seconds when the vehicle is not moving. The slip indicator light and VSC OFF indicator light will come on.
Push the button again to turn the system back on.
Opening and Closing
What to do if ...
Customizing
Yo u r L e xu s
24

Topic 3
Information Provided by:
When Driving
25
To pi c 3
Information Provided by:
When Driving
Starting ..................................................................... 17
Transmission......... ................................................... 18
Parking Brake ......................................................... 18
Multi-information Display................................... 19
Turn Signal Lever.................................................. 20
Emergency Flasher Switch................................ 20
Mode Select Switch............................................. 20
Intuitive Parking Assist ........................................ 21
Cruise Control ...................................................... 22
Dynamic Radar Cruise Control ....................... 23
AVS (Adaptive Variable Suspension)............ 24
TRAC/VSC Off Mode ....................................... 24

Topic 4
Information Provided by:
Rain and Night Driving
Headlights
The side marker, parking, tail, license plate and
1
instrument panel lights turn on.
The headlights and all lights listed above turn on.
2
The headlights and parking lights turn on/off
3
automatically in accordance with ambient light
levels.
To engage the high beams, push the lever forward.
To flash the high beams, pull the lever and hold.
n AFS (Adaptive Front lighting System)
AFS improves visibility on curves by automatically adjusting the horizontal orientation of the
headlights in accordance with vehicle speed and the degree of the tire angle that are controlled by steering input.
The system can be turned on and off using the
AFS OFF switch.
27

Fog Lights
Information Provided by:
The fog lights can be used only when the headlights (low beam) are on.
Windshield Wipers and Washers
n Intermittent wiper with interval adjuster (if equipped)
MIST: operates once
INT: intermittent operation*
LO : low speed
HI: high speed
*: Wiper interval can be adjusted by turning the
band.
To spray washer fluid, pull the lever.
The wipers will operate automatically.
n Rain-sensing windshield wipers (if equipped)
MIST: operates once
AUTO: automatic operation*
LO : low speed
HI: high speed
*: Sensitivity can be adjusted by turning the band.
Topic 4
Rain and Night Driving
Entering and Exiting
Before DrivingBefore Driving When Driving
Night Driving
Night Driving Driving Comfort
Opening and Closing
What to do if ...
Rain and
Rain and
To spray washer fluid, pull the lever.
The wipers will operate automatically
Yo u r L e xu s
28
Customizing

Topic 4
Information Provided by:
Rain and Night Driving
Headlight Cleaner
Rear Window and Outside Rear View
Mirror Defoggers
The headlight cleaner can be used only when the
engine switch is in IG-ON mode and the headlights
are on.
To defog the rear window and outside mirrors,
press the button.
Press again to cancel.
The system turns off automatically after 15 minutes.
Instrument Panel Light Control
29
Brighter
1
Darker
2
Maximum brightness
3
Changes the cluster glass tint
4

To pi c 4
Information Provided by:
Rain and Night Driving
Headlights............................................................... 27
Fog Lights ................................................................ 28
Windshield Wipers and Washers .................... 28
Headlight Cleaner ............................................... 29
Rear Window and Outside Rear View
Mirror Defoggers................................................. 29
Instrument Panel Light Control ....................... 29
Topic 5
Information Provided by:
Driving Comfort
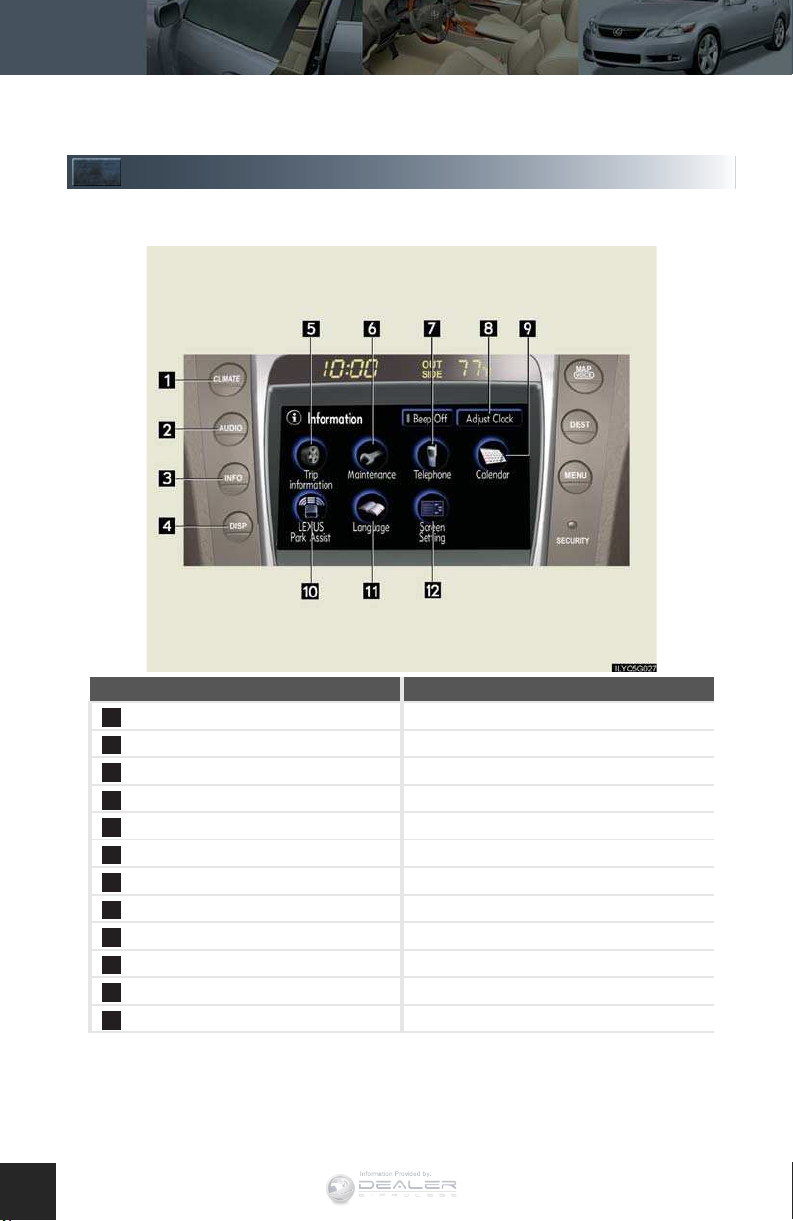
Touch Screen
By touching the screen with your finger, you can control the audio system, air conditioning
and adjust the screen display, etc. For details, see the Owner’s Manual.
When you press this button... This display appears.
CLIMATE
1
AUDIO
2
INFO
3
DISP
4
Trip information
5
Maintenance
6
Te l e p h o n e
7
Adjust Clock
8
Calendar
9
LEXUS Park Assist
10
Language
11
Screen Setting
12
*: See Navigation System Owner’s Manual.
31
Air conditioning operation screen
Audio control screen
Information screen
Display screen
Trip information screen
Maintenance screen*
Telephone screen
Adjust clock screen
Calendar screen*
LEXUS Park Assist setting screen
Select language screen
Screen setting screen
 Loading...