

Page 1
1 QUICK GUIDE 11
2 BASIC FUNCTION 31
3 NAVIGATION SYSTEM 75
4 AUDIO/VISUAL SYSTEM 145
5 VOICE COMMAND SYSTEM 227
6 INFORMATION 245
7 PERIPHERAL MONITORING SYSTEM 249
8 PHONE 279
9 LEXUS ENFORM 321
10 12.3-INCH DISPLAY 347
INDEX 355
For more information about the following items, see the “Owner’s Manual”.
Air conditioning
Energy monitor (GS 450h)
Fuel consumption
Vehicle customization settings
11
GS_Navi+MM_OM30F12U_(U)
15.09.09 19:53
Page 2

Introduction
NAVIGATION AND MULTIMEDIA SYSTEM OWNER’S MANUAL
This manual explains the operation of the system. Please read this manual carefully to
ensure proper use. Keep this manual in your vehicle at all times.
The screen shots in this document and the actual screens of the system differ depending on whether the functions and/or a contract existed and the map data available at
the time of producing this document.
In some situations when changing between screens, it may take longer than normal for
the screen to change, the screen may be blank momentarily or noise may be displayed.
Please be aware that the content of this manual may be different from the system in
some cases, such as when the system’s software is updated.
2
GS_Navi+MM_OM30F12U_(U)
15.09.09 19:53
Page 3

NAVIGATION SYSTEM (WITH NAVIGATION FUNCTION)
The Navigation System is one of the most technologically advanced vehicle accessories ever developed. The system receives satellite signals from the Global Positioning
System (GPS) operated by the U.S. Department of Defense. Using these signals and
other vehicle sensors, the system indicates your present position and assists in locating
a desired destination.
The navigation system is designed to select efficient routes from your present starting
location to your destination. The system is also designed to direct you to a destination
that is unfamiliar to you in an efficient manner. The system uses DENSO maps. The calculated routes may not be the shortest nor the least traffic congested. Your own personal local knowledge or “short cut” may at times be faster than the calculated routes.
The navigation system’s database includes Point of Interest categories to allow you to
easily select destinations such as restaurants and hotels. If a destination is not in the database, you can enter the street address or a major intersection close to it and the system will guide you there.
The system will provide both a visual map and audio instructions. The audio instructions
will announce the distance remaining and the direction to turn in when approaching an
intersection. These voice instructions will help you keep your eyes on the road and are
timed to provide enough time to allow you to maneuver, change lanes or slow down.
Please be aware that all current vehicle navigation systems have certain limitations that
may affect their ability to perform properly. The accuracy of the vehicle’s position depends on satellite conditions, road configuration, vehicle condition or other circumstances. For more information on the limitations of the system, refer to page 139.
GS_Navi+MM_OM30F12U_(U)
15.09.09 19:53
3
Page 4
IMPORTANT INFORMATION ABOUT THIS MANUAL
WARNING
NOTICE
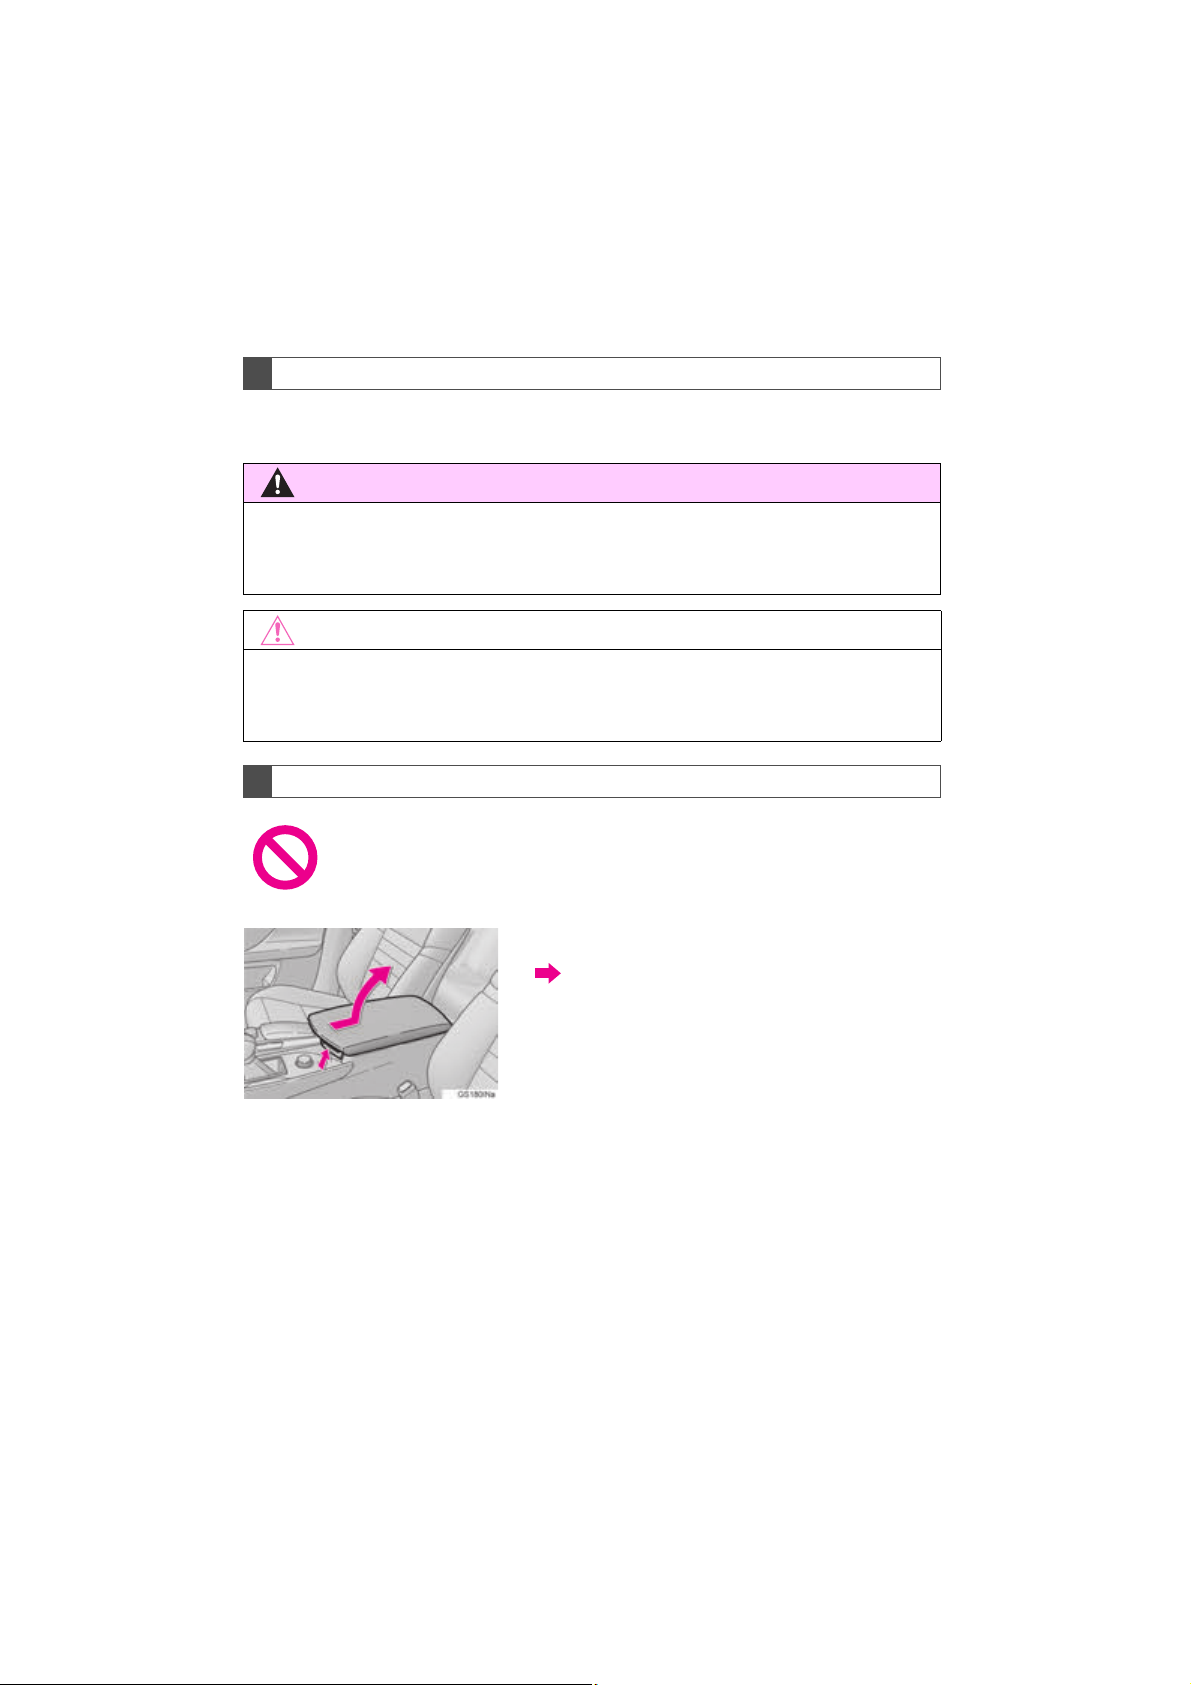
For safety reasons, this manual indicates items requiring particular attention with the
following marks.
●This is a warning against anything which may cause injury to people if the warning is
ignored. You are informed about what you must or must not do in order to reduce the risk of
injury to yourself and others.
●This is a warning against anything which may cause damage to the vehicle or its equipment
if the warning is ignored. You are informed about what you must or must not do in order to
avoid or reduce the risk of damage to your vehicle and its equipment.
SYMBOLS USED IN ILLUSTRATIONS
Safety symbol
The symbol of a circle with a slash through it means “Do not”, “Do not do
this” or “Do not let this happen”.
Arrows indicating operations
Indicates the action (pressing, turning, etc.)
used to operate switches and other devices.
4
GS_Navi+MM_OM30F12U_(U)
15.09.09 19:53
Page 5
HOW TO READ THIS MANUAL
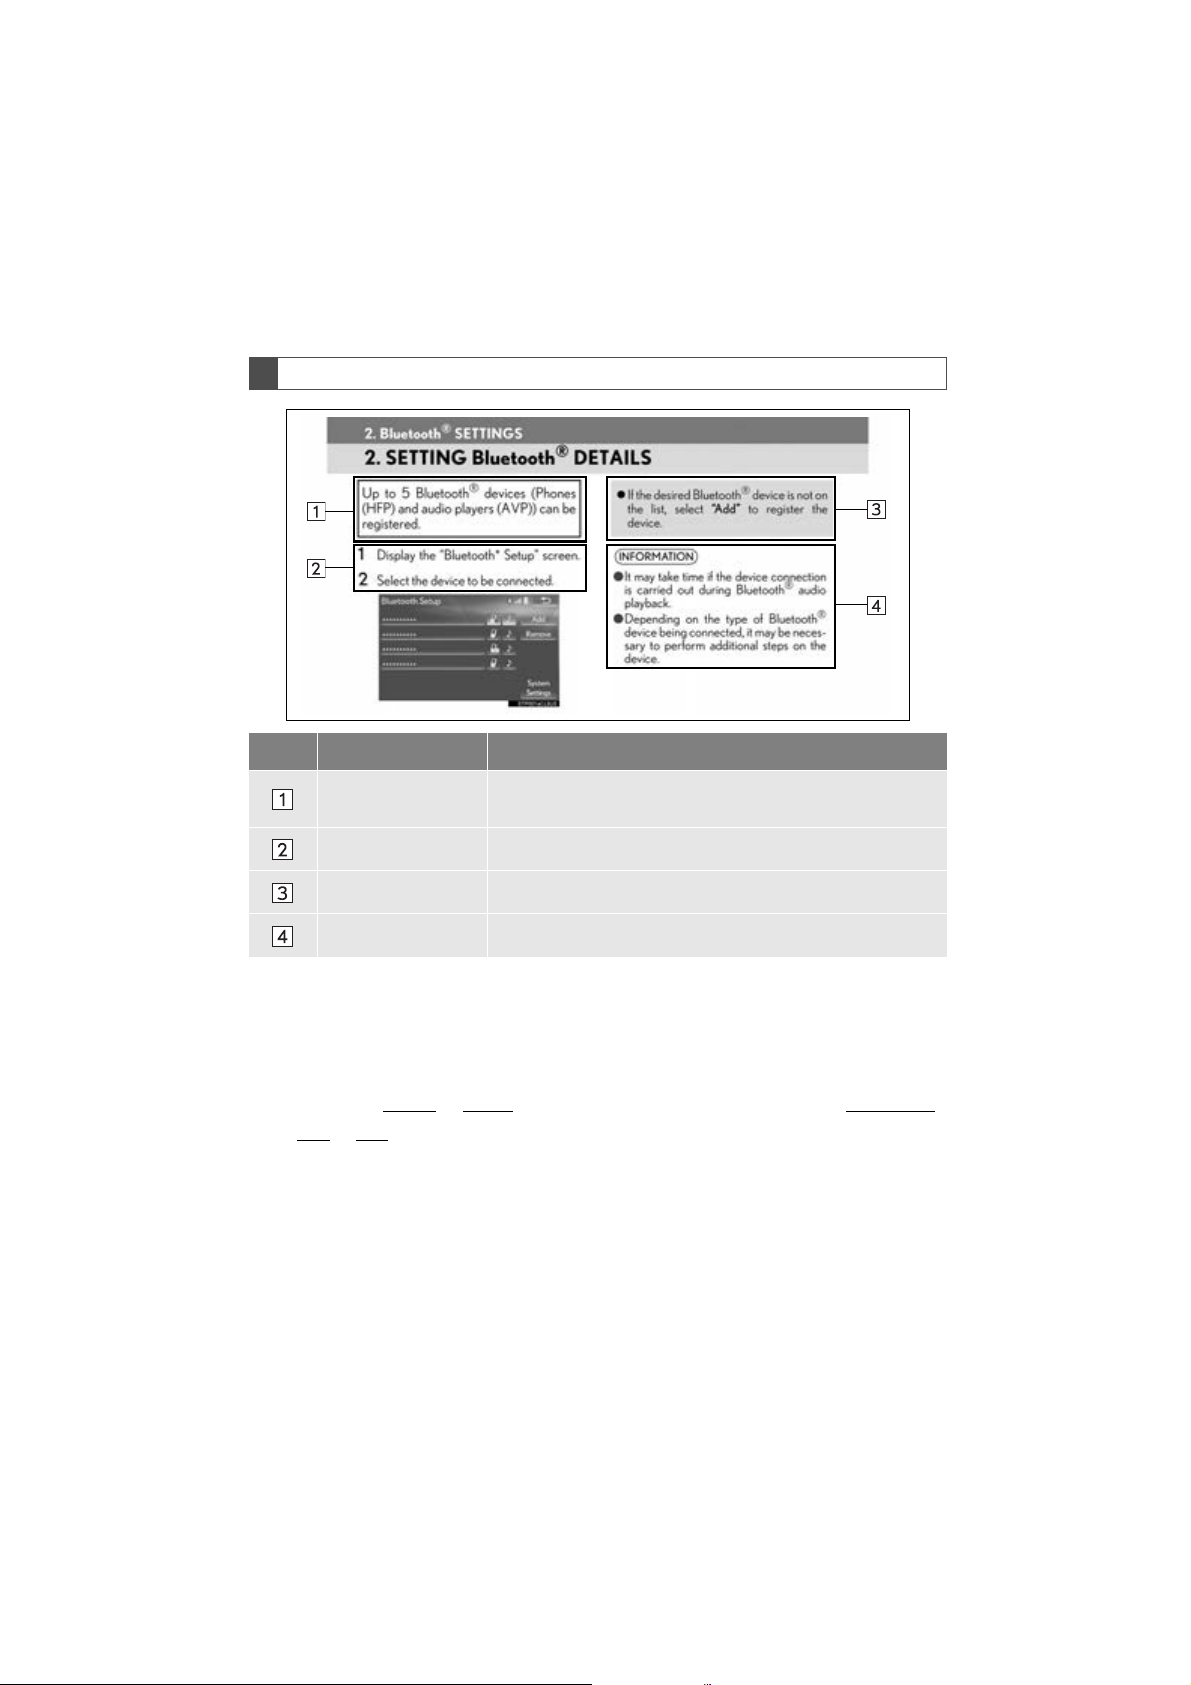
No. Name Description
Operational
Outlines
Main Operations The steps of an operation are explained.
Related Operations A main operation’s supplementary operations are described.
Information Useful information for the user is described.
An outline of the operation is explained.
■ INFORMATION FOR HYBRID VEHICLES IS WRITTEN IN BRACKETS
NEXT TO THE INFORMATION FOR GASOLINE VEHICLES
Different writing styles for gasoline and hybrid vehicles
Example
When the engine
*1 <power>*2 switch is turned to ACCESSORY or IGNITION
ON*1 <ON>*2 mode, the initial screen will be displayed and the system will begin
operating.
1
: Vehicles with gasoline engine
*
2
: Vehicles with hybrid system
*
GS_Navi+MM_OM30F12U_(U)
15.09.09 19:53
5
Page 6
SAFETY INSTRUCTION
WARNING
(WITHOUT NAVIGATION
SYSTEM)
To use this system in the safest possible
manner, follow all the safety tips shown below.
Do not use any feature of this system to the
extent it becomes a distraction and prevents safe driving. The first priority while
driving should always be the safe operation
of the vehicle. While driving, be sure to observe all traffic regulations.
Prior to the actual use of this system, learn
how to use it and become thoroughly familiar with it. Read the entire manual to make
sure you understand the system. Do not allow other people to use this system until
they have read and understood the instructions in this manual.
For your safety, some functions may become inoperable when driving. Unavailable
screen buttons are dimmed.
●For safety, the driver should not operate
the system while he/she is driving. Insufficient attention to the road and traffic may
cause an accident.
SAFETY INSTRUCTION (WITH
NAVIGATION SYSTEM)
To use this system in the safest possible
manner, follow all the safety tips shown below.
This system is intended to assist in reaching
the destination and, if used properly, can do
so. The driver is solely responsible for the
safe operation of your vehicle and the safety
of your passengers.
Do not use any feature of this system to the
extent it becomes a distraction and prevents safe driving. The first priority while
driving should always be the safe operation
of the vehicle. While driving, be sure to observe all traffic regulations.
Prior to the actual use of this system, learn
how to use it and become thoroughly familiar with it. Read the entire manual to make
sure you understand the system. Do not allow other people to use this system until
they have read and understood the instructions in this manual.
For your safety, some functions may become inoperable when driving. Unavailable
screen buttons are dimmed. Only when the
vehicle is not moving, can the destination
and route selection be done.
6
GS_Navi+MM_OM30F12U_(U)
15.09.09 19:53
Page 7
WARNING
●For safety, the driver should not operate
the navigation system while he/she is
driving. Insufficient attention to the road
and traffic may cause an accident.
●While driving, be sure to obey the traffic
regulations and maintain awareness of
the road conditions. If a traffic sign on the
road has been changed, route guidance
may not have the updated information
such as the direction of a one way street.
While driving, listen to the voice instructions
as much as possible and glance at the
screen briefly and only when it is safe. However, do not totally rely on voice guidance.
Use it just for reference. If the system cannot determine the current position correctly, there is a possibility of incorrect, late, or
non-voice guidance.
The data in the system may occasionally be
incomplete. Road conditions, including
driving restrictions (no left turns, street closures, etc.) frequently change. Therefore,
before following any instructions from the
system, look to see whether the instruction
can be done safely and legally.
This system cannot warn about such things
as the safety of an area, condition of streets,
and availability of emergency services. If unsure about the safety of an area, do not drive
into it. Under no circumstances is this system a substitute for the driver’s personal
judgement.
Use this system only in locations where it is
legal to do so. Some states/provinces may
have laws prohibiting the use of video and
navigation screens next to the driver.
7
GS_Navi+MM_OM30F12U_(U)
15.09.09 19:53
Page 8

TABLE OF CONTENTS
QUICK GUIDE
1
1. BASIC FUNCTION......................................... 12
Remote Touch........................................................... 12
“Menu” SCREEN .................................................... 14
HOME SCREEN ....................................................18
2. QUICK REFERENCE..................................20
“Setup” SCREEN....................................................20
“Information” SCREEN........................................22
3. NAVIGATION OPERATION .................. 24
REGISTERING HOME......................................24
REGISTERING PRESET
DESTINATIONS................................................25
OPERATION FLOW: GUIDING THE
ROUTE....................................................................26
SETTING HOME AS THE
DESTINATION...................................................27
4. FUNCTION INDEX......................................28
FUNCTION INDEX ............................................28
BASIC FUNCTION
2
1. BASIC INFORMATION BEFORE
OPERATION ...............................................32
INITIAL SCREEN.................................................. 32
HOW TO USE THE Remote Touch............. 34
HOME SCREEN OPERATION....................36
ENTERING LETTERS AND
NUMBERS/LIST SCREEN
OPERATION ......................................................38
SCREEN ADJUSTMENT....................................41
LINKING MULTI-INFORMATION
DISPLAY AND NAVIGATION
SYSTEM.................................................................43
2. Bluetooth® SETTINGS................................. 44
REGISTERING/CONNECTING
Bluetooth
SETTING Bluetooth
®
DEVICE......................................... 44
®
DETAILS.....................50
3. OTHER SETTINGS .........................................61
GENERAL SETTINGS.........................................61
VOICE SETTINGS................................................67
VEHICLE SETTINGS..........................................69
8
GS_Navi+MM_OM30F12U_(U)
15.09.09 19:53
Page 9
NAVIGATION SYSTEM
3
1. BASIC OPERATION ..................................... 76
QUICK REFERENCE .........................................76
MAP SCREEN OPERATION.........................79
MAP SCREEN INFORMATION .................84
TRAFFIC INFORMATION.............................. 90
2. DESTINATION SEARCH ...........................93
DESTINATION SEARCH
OPERATION.......................................................93
STARTING ROUTE GUIDANCE..............105
3. ROUTE GUIDANCE .................................. 110
ROUTE GUIDANCE SCREEN.................... 110
TYPICAL VOICE GUIDANCE
PROMPTS.............................................................117
EDITING ROUTE.................................................118
4. MEMORY POINTS ....................................122
MEMORY POINTS SETTINGS...................122
5. SETUP ..............................................................132
DETAILED NAVIGATION
SETTINGS ...........................................................132
TRAFFIC SETTINGS..........................................137
6. TIPS FOR THE NAVIGATION
SYSTEM........................................................139
GPS (GLOBAL POSITIONING
SYSTEM)..............................................................139
MAP DATABASE VERSION AND
COVERED AREA ........................................... 142
3. MEDIA OPERATION ................................ 175
CD ...............................................................................175
DVD ...........................................................................178
USB MEMORY....................................................183
iPod.............................................................................187
Bluetooth
AUX...........................................................................198
®
AUDIO............................................ 192
4. AUDIO/VISUAL REMOTE
CONTROLS ..............................................202
STEERING SWITCHES..................................202
REAR SEAT AUDIO CONTROL
SWITCHES........................................................205
5. SETUP ............................................................ 208
AUDIO SETTINGS ...........................................208
6. TIPS FOR OPERATING THE
AUDIO/VISUAL SYSTEM....................213
OPERATING INFORMATION .................. 213
VOICE COMMAND SYSTEM
5
1. VOICE COMMAND SYSTEM
OPERATION.............................................228
VOICE COMMAND SYSTEM..................228
CASUAL SPEECH
RECOGNIZATION.....................................236
COMMAND LIST .............................................237
2. MOBILE ASSISTANT
OPERATION.............................................242
MOBILE ASSISTANT ......................................242
1
2
3
4
5
6
7
8
9
10
AUDIO/VISUAL SYSTEM
4
1. BASIC OPERATION ................................... 146
QUICK REFERENCE .......................................146
SOME BASICS.....................................................148
2. RADIO OPERATION ................................157
AM/FM RADIO ................................................... 157
XM Satellite Radio ............................................... 167
INTERNET RADIO............................................. 174
INFORMATION
6
1. INFORMATION DISPLAY ......................246
RECEIVING DOPPLER WEATHER
INFORMATION.............................................246
DATA SERVICES SETTINGS...................... 247
GS_Navi+MM_OM30F12U_(U)
15.09.09 19:53
9
Page 10

TABLE OF CONTENTS
PERIPHERAL MONITORING
7
SYSTEM
1. LEXUS PARKING
ASSIST MONITOR ................................. 250
LEXUS PARKING ASSIST
MONITOR........................................................250
ESTIMATED COURSE LINE
DISPLAY MODE............................................255
PARKING ASSIST GUIDE LINE
DISPLAY MODE............................................257
LEXUS PARKING ASSIST MONITOR
PRECAUTIONS..............................................259
THINGS YOU SHOULD KNOW ............264
2. INTUITIVE PARKING ASSIST............... 266
INTUITIVE PARKING ASSIST ....................266
INTUITIVE PARKING ASSIST
SETTING............................................................. 277
PHONE
8
1. PHONE OPERATION (HANDS-FREE
SYSTEM FOR CELLULAR
PHONES) ...................................................280
QUICK REFERENCE .....................................280
SOME BASICS.....................................................281
CALLING ON THE Bluetooth
PHONE .............................................................. 285
RECEIVING ON THE Bluetooth
PHONE ................................................................ 291
TALKING ON THE Bluetooth
PHONE ...............................................................292
Bluetooth
®
FUNCTION.......................................................295
PHONE MESSAGE
®
®
®
2. SETUP .............................................................300
PHONE SETTINGS......................................... 300
3. WHAT TO DO IF... ...................................... 312
TROUBLESHOOTING...................................312
LEXUS ENFORM
9
1. LEXUS ENFORM-OVERVIEW............. 322
FUNCTIONAL OVERVIEW....................... 322
TYPE A: FUNCTION ACHIEVED BY
USING A CELLULAR PHONE.............. 324
TYPE B: FUNCTION ACHIEVED BY
USING DCM AND THE
NAVIGATION SYSTEM ...........................328
TYPE C: FUNCTION ACHIEVED BY
USING DCM......................................................331
2. LEXUS ENFORM OPERATION.......... 332
LEXUS Enform Remote...................................332
LEXUS Enform Service Connect................ 333
LEXUS App Suite...............................................334
LEXUS Enform Destinations .........................339
Lexus Insider..........................................................342
3. SETUP.............................................................345
LEXUS App Suite SETTINGS ......................345
12.3-INCH DISPLAY
10
1. 12.3-INCH DISPLAY OPERATION .... 348
12.3-INCH DISPLAY-OVERVIEW..........348
USING SIDE DISPLAY...................................350
INDEX
ALPHABETICAL INDEX.............................. 356
10
GS_Navi+MM_OM30F12U_(U)
15.09.09 19:53
Page 11

1
QUICK GUIDE
BASIC FUNCTION
1
1. Remote Touch ............................................... 12
2. “Menu” SCREEN ......................................... 14
STATUS DISPLAY ...................................................... 16
3. HOME SCREEN ......................................... 18
1
2
3
4
5
QUICK REFERENCE
2
1. “Setup” SCREEN ........................................ 20
2. “Information” SCREEN............................. 22
NAVIGATION OPERATION
3
1. REGISTERING HOME............................ 24
2. REGISTERING PRESET
DESTINATIONS...................................... 25
3. OPERATION FLOW: GUIDING THE
ROUTE........................................................ 26
4. SETTING HOME AS THE
DESTINATION ........................................ 27
FUNCTION INDEX
4
1. FUNCTION INDEX .................................. 28
6
7
8
9
10
GS_Navi+MM_OM30F12U_(U)
15.09.09 19:53
11
Page 12
1. BASIC FUNCTION
*
1
*
2
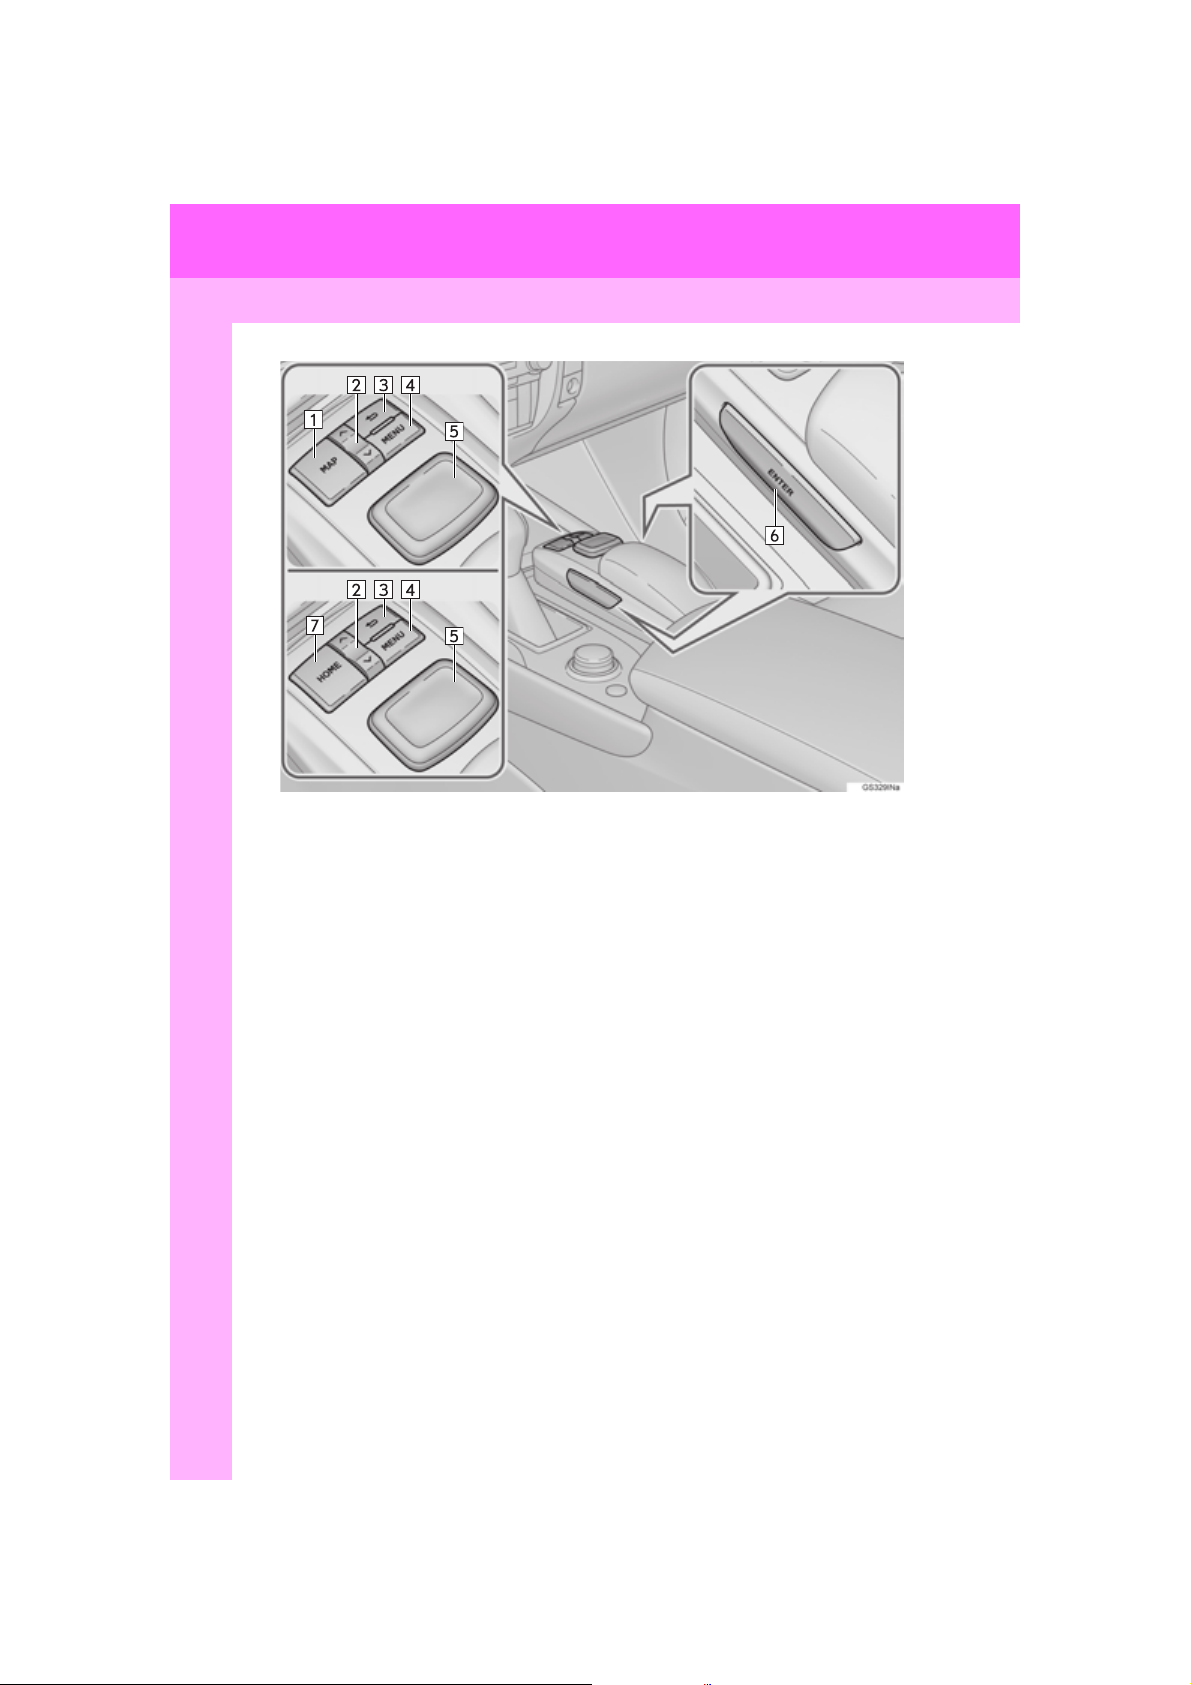
1. Remote Touch
*1: With 12.3-inch display
2
: With 8-inch display
*
12
GS_Navi+MM_OM30F12U_(U)
15.09.09 19:53
Page 13
1. BASIC FUNCTION
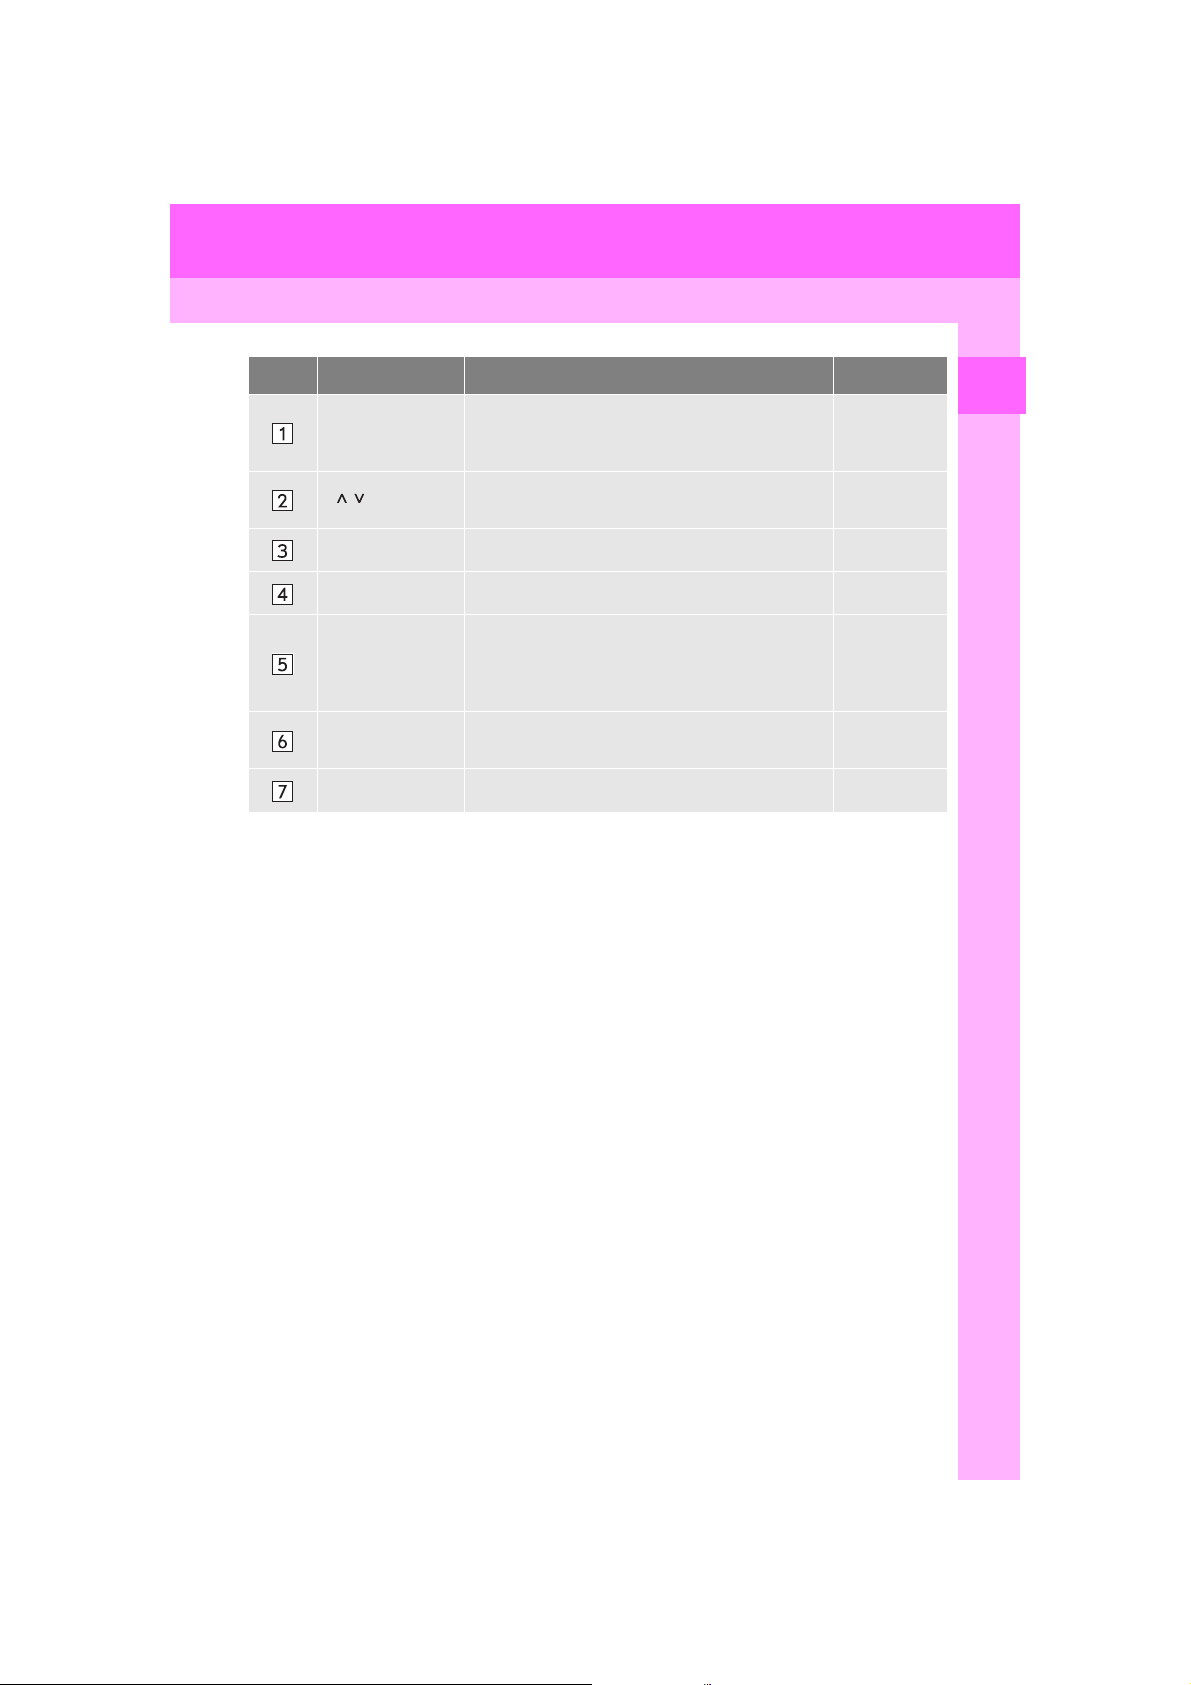
No. Name Function Page
Press to display the current position, cancel the
“MAP” button
screen scroll, start guidance, and repeat a voice
76, 79
guidance.
“ · ” button
Press to scroll the list screen and to change the
scale of the map.
34, 39, 80
Back button Press to display the previous screen. 34
“MENU” button Press to display the “Menu” screen. 14
Move in the desired direction to select a function,
Remote Touch
knob
letter and screen button.
Press to enter the selected function, letter or
34
screen button.
“ENTER” button
Press to enter the selected function, letter or
screen button.
34
“HOME” button Press to display the home screen. 18, 36
1
QUICK GUIDE
GS_Navi+MM_OM30F12U_(U)
15.09.09 19:53
13
Page 14
1. BASIC FUNCTION
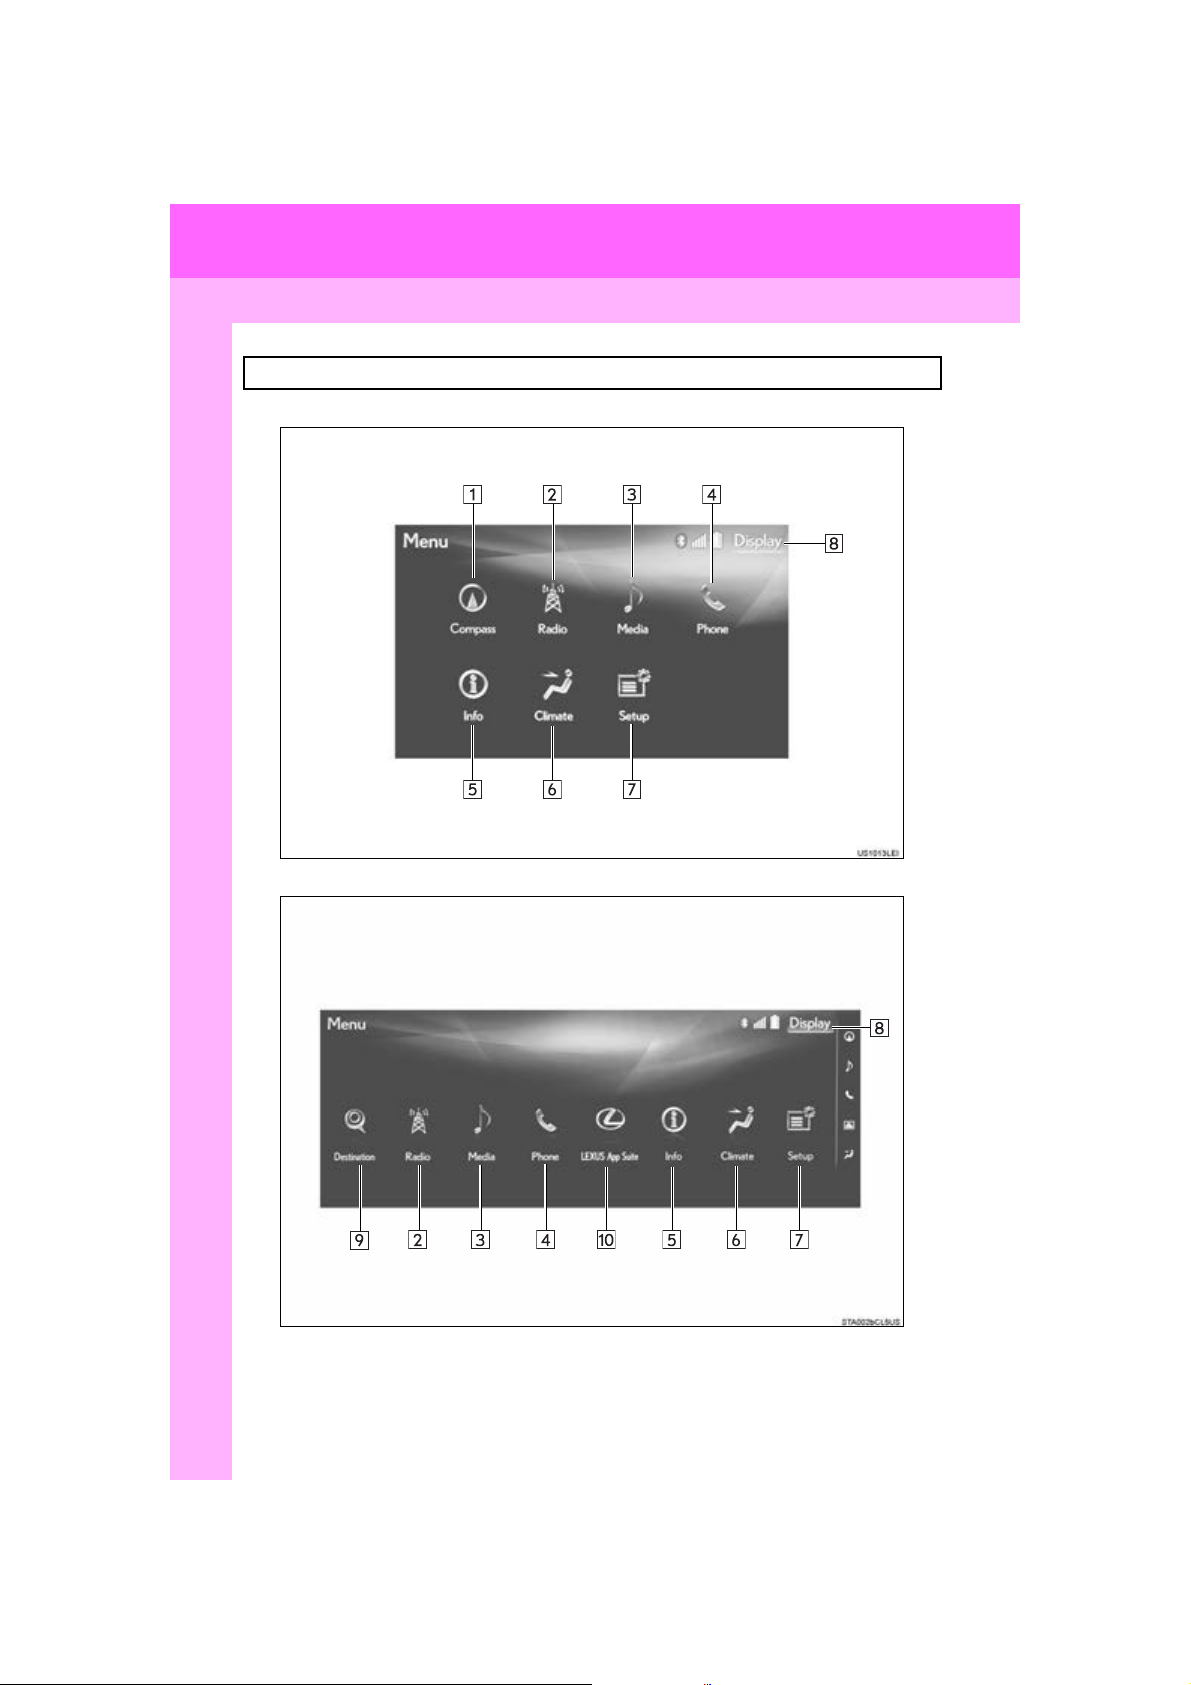
2. “Menu” SCREEN
To display this screen, press the “MENU” button on the Remote Touch.
With 8-inch display
With 12.3-inch display
14
GS_Navi+MM_OM30F12U_(U)
15.09.09 19:53
Page 15
1. BASIC FUNCTION
INFORMATION
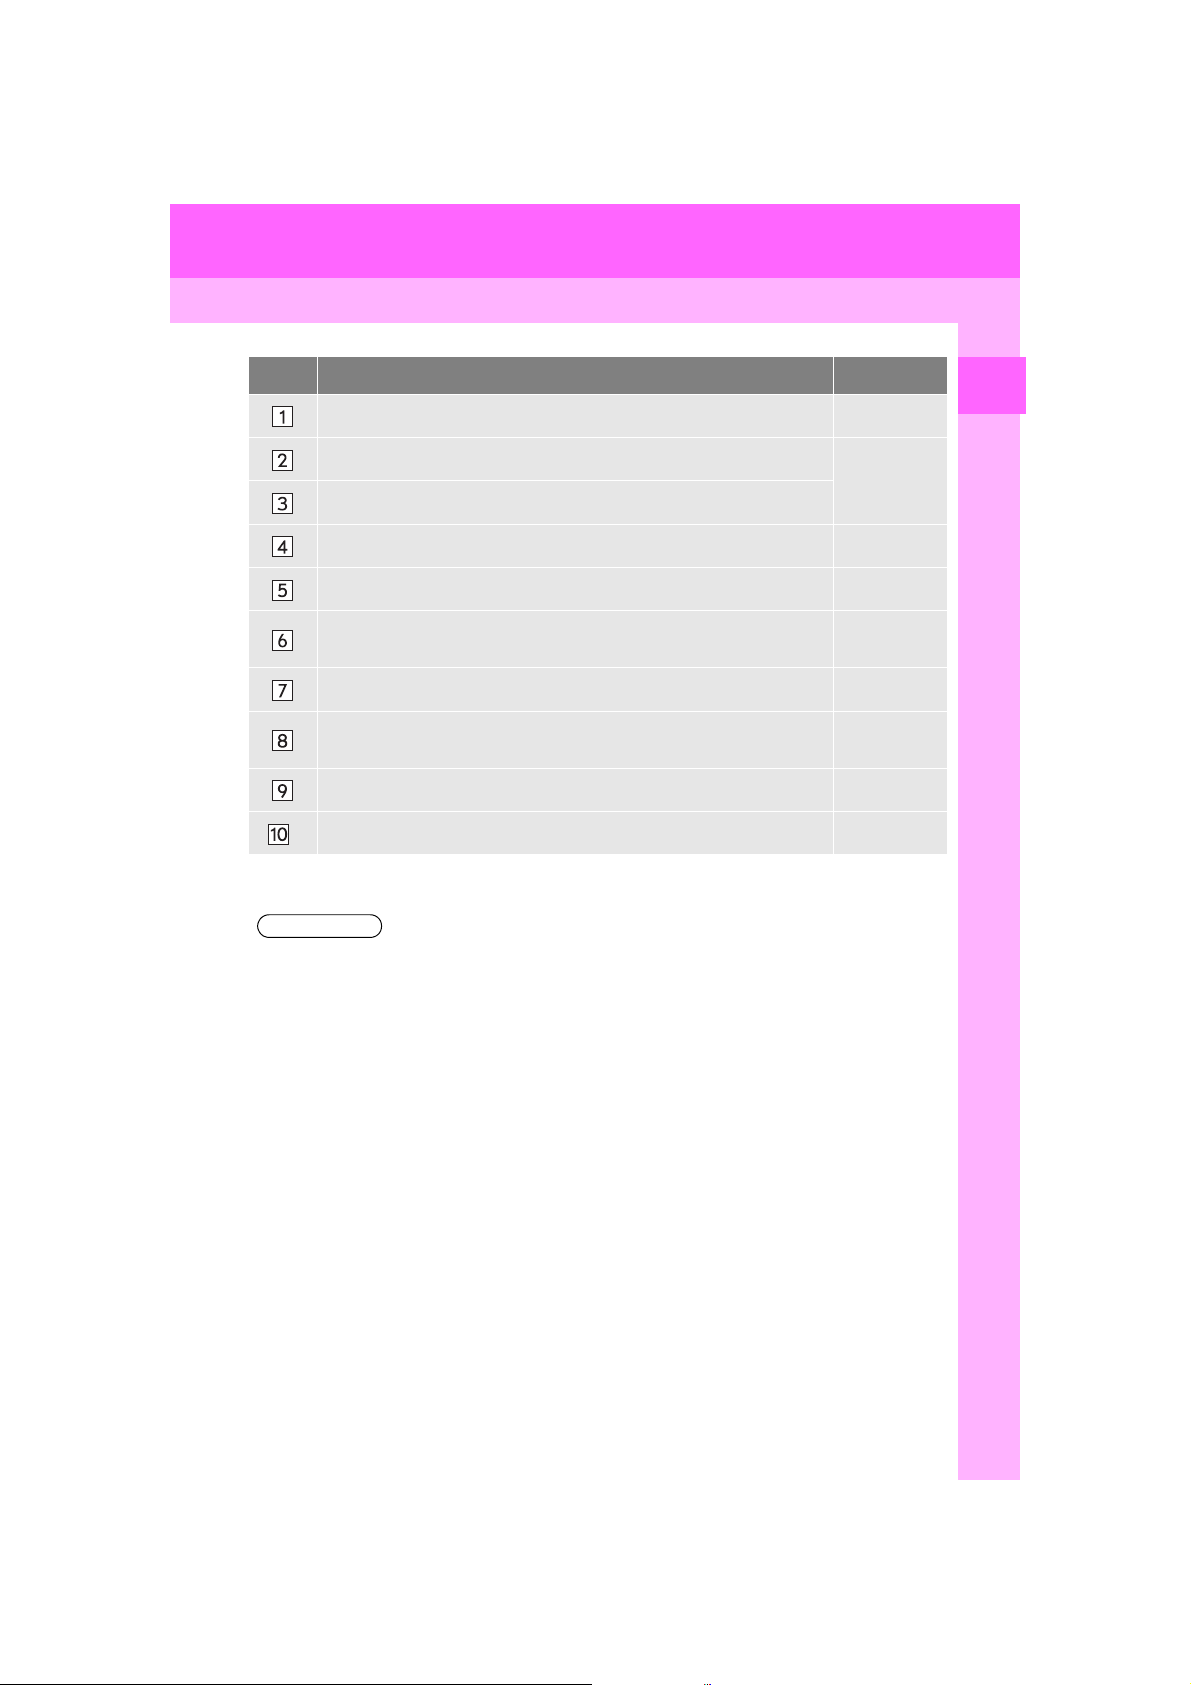
No. Function Page
Select to display the compass mode screen.
Select to display the radio control screen.
Select to display the media control screen.
Select to display the hands-free operation screen. 280
Select to display the “Information” screen. 22
Select to display the air conditioning control screen.
“Own er’s
Manual”
Select to display the “Setup” screen. 20
Select to adjust the contrast and brightness of the screens, turn the
screen off, etc.
Select to display the “Destination” screen. 93
Select to display the “LEXUS App Suite” screen. 334
*
*: This function is not made available on some models.
1
QUICK GUIDE
146
41
●With 12.3-inch display: When the split-screen display is selected, the “Menu” screen will be
displayed on the main display. (P. 3 4 8 )
15
GS_Navi+MM_OM30F12U_(U)
15.09.09 19:53
Page 16

1. BASIC FUNCTION
STATUS DISPLAY
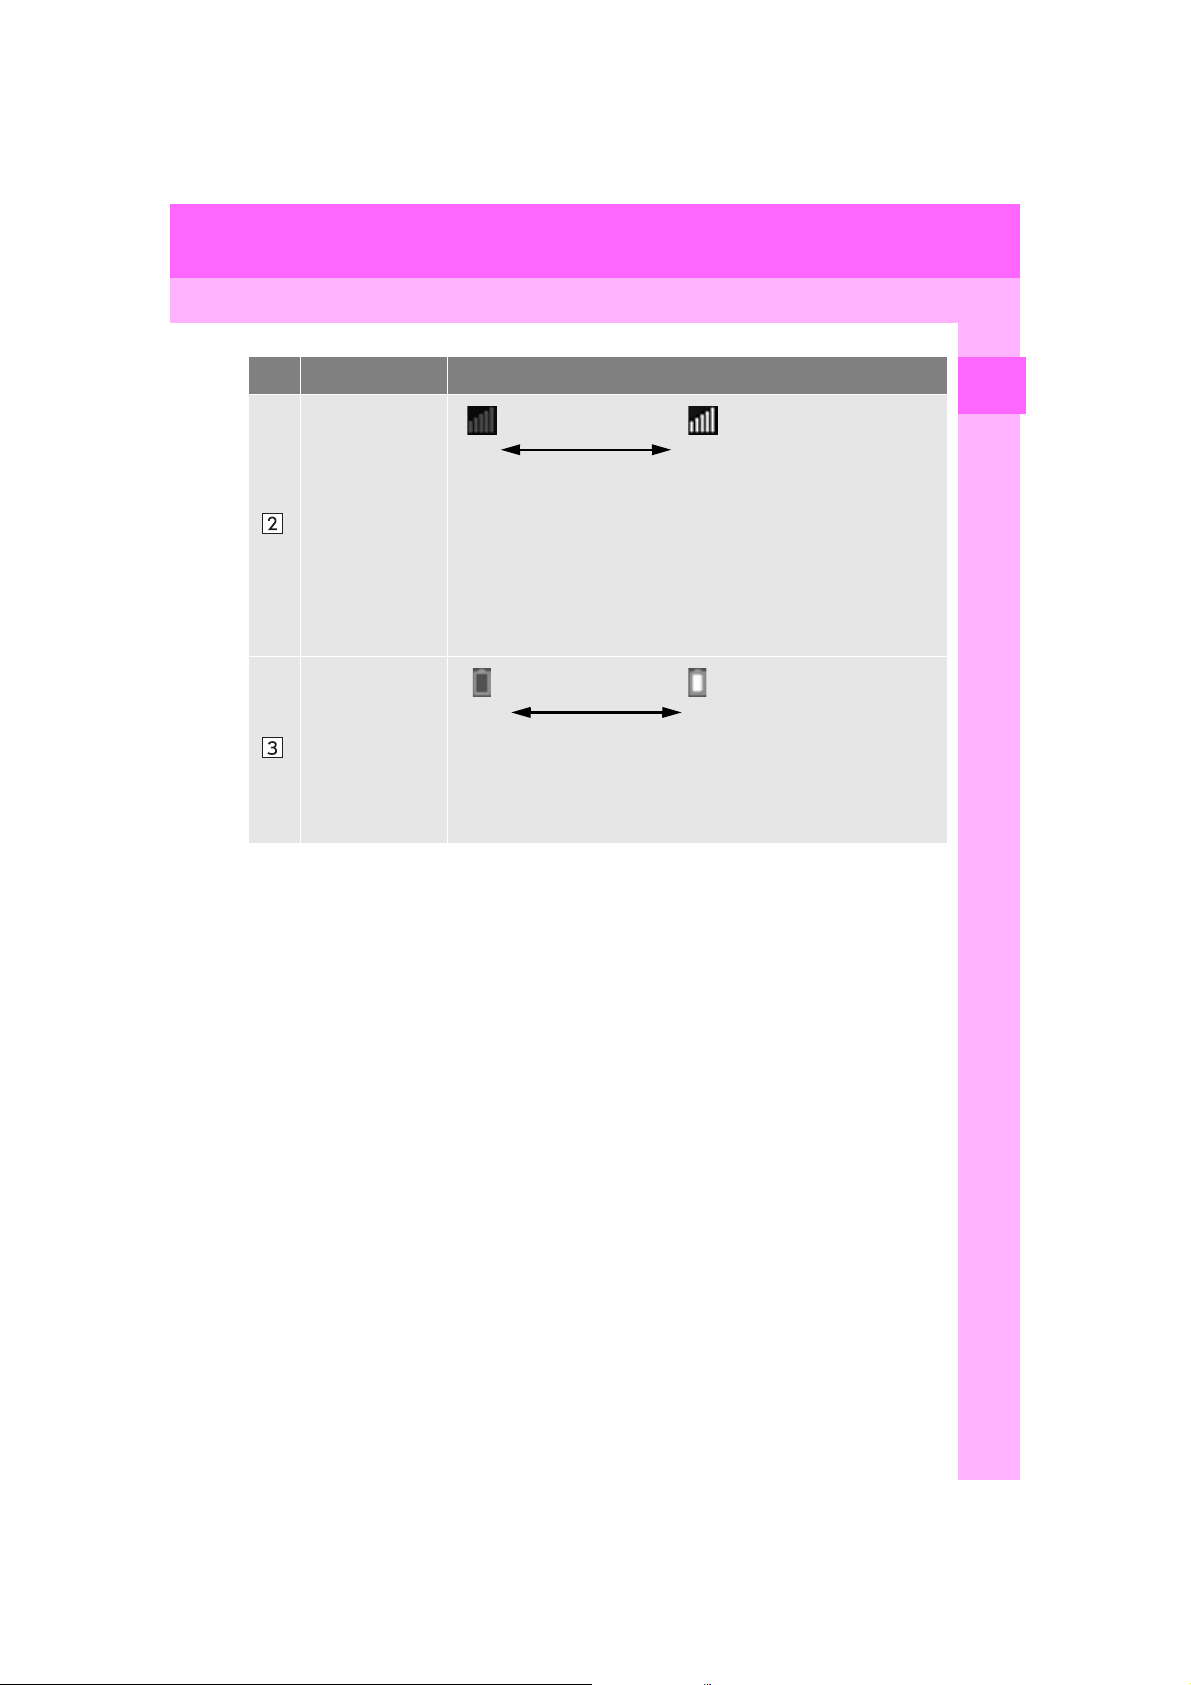
The condition of the Bluetooth® connection, as well as the level of reception and the
amount of cellular phone battery charge left, are displayed on the status bar. This status
bar is shown on all modes.
No. Indicators Conditions
(Gray) (Blue)
No connection Poor Good
®
connection is built into the instru-
The condition of
the Bluetooth
connection
An antenna for the Bluetooth
ment panel. The condition of the Bluetooth
deteriorate and the system may not function when a Bluetooth
®
phone is used in the following conditions and/or places:
The cellular phone is obstructed by certain objects (such as when
it is behind the seat or in the glove box or console box).
The cellular phone is touching or is covered with metal materials.
®
Leave the Bluetooth
Bluetooth
16
®
connection is good.
phone in a place where the condition of the
®
connection may
®
GS_Navi+MM_OM30F12U_(U)
15.09.09 19:53
Page 17
1. BASIC FUNCTION
No. Indicators Conditions
Poor Excellent
The level of reception does not always correspond with the level
displayed on the cellular phone. The level of reception may not be
The level of reception
displayed depending on the phone you have.
When the cellular phone is out of the service area or in a place
inaccessible by radio waves, “No Service” is displayed.
“Rm” is displayed when receiving in a roaming area. While roam-
ing, display “Rm” top-left on the icon.
The receiving area may not be displayed depending on the type of
phone you have.
The amount of
battery charge
left
Empty Full
The amount displayed does not always correspond with the
amount displayed on the Bluetooth
®
The amount of battery charge left may not be displayed depending
®
on the type of the Bluetooth
device connected.
This system does not have a charging function.
1
QUICK GUIDE
device.
GS_Navi+MM_OM30F12U_(U)
15.09.09 19:53
17
Page 18
1. BASIC FUNCTION
*: With 8-inch display
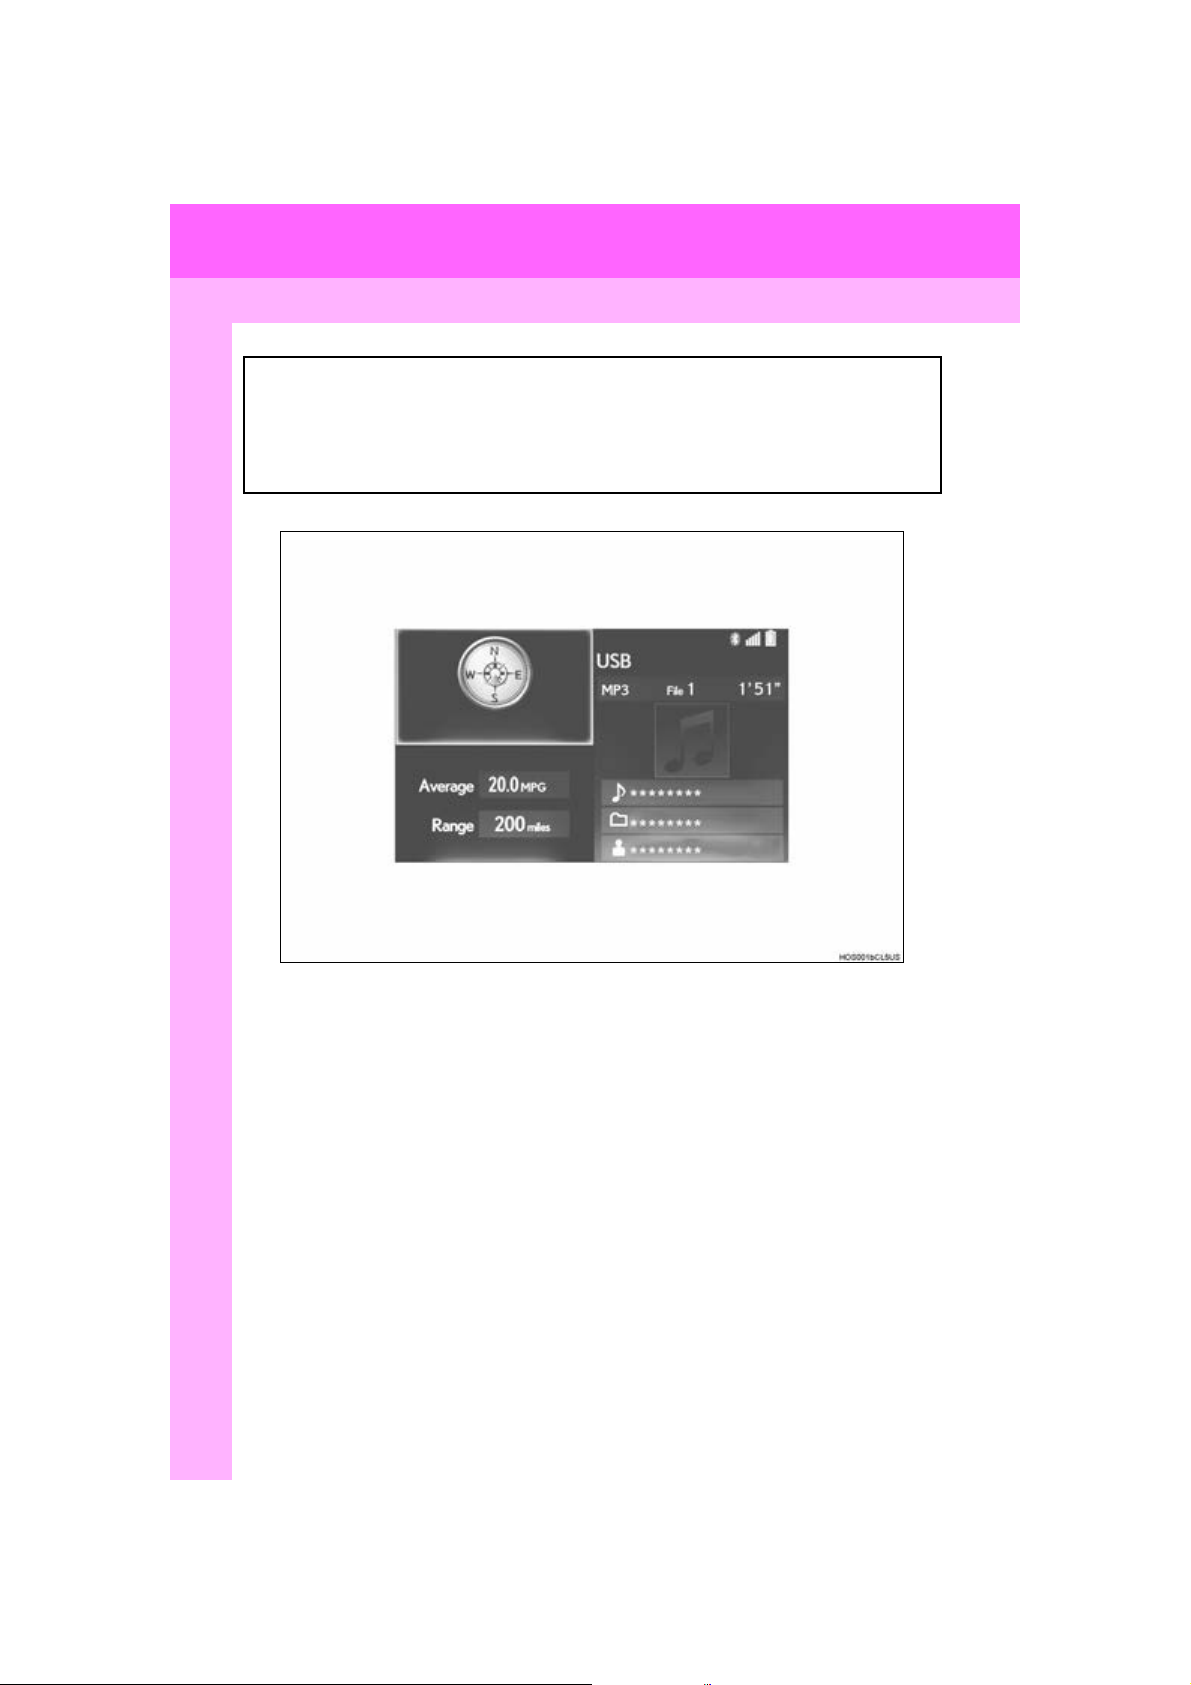
3. HOME SCREEN*
To display this screen, press the “HOME” button on the Remote Touch.
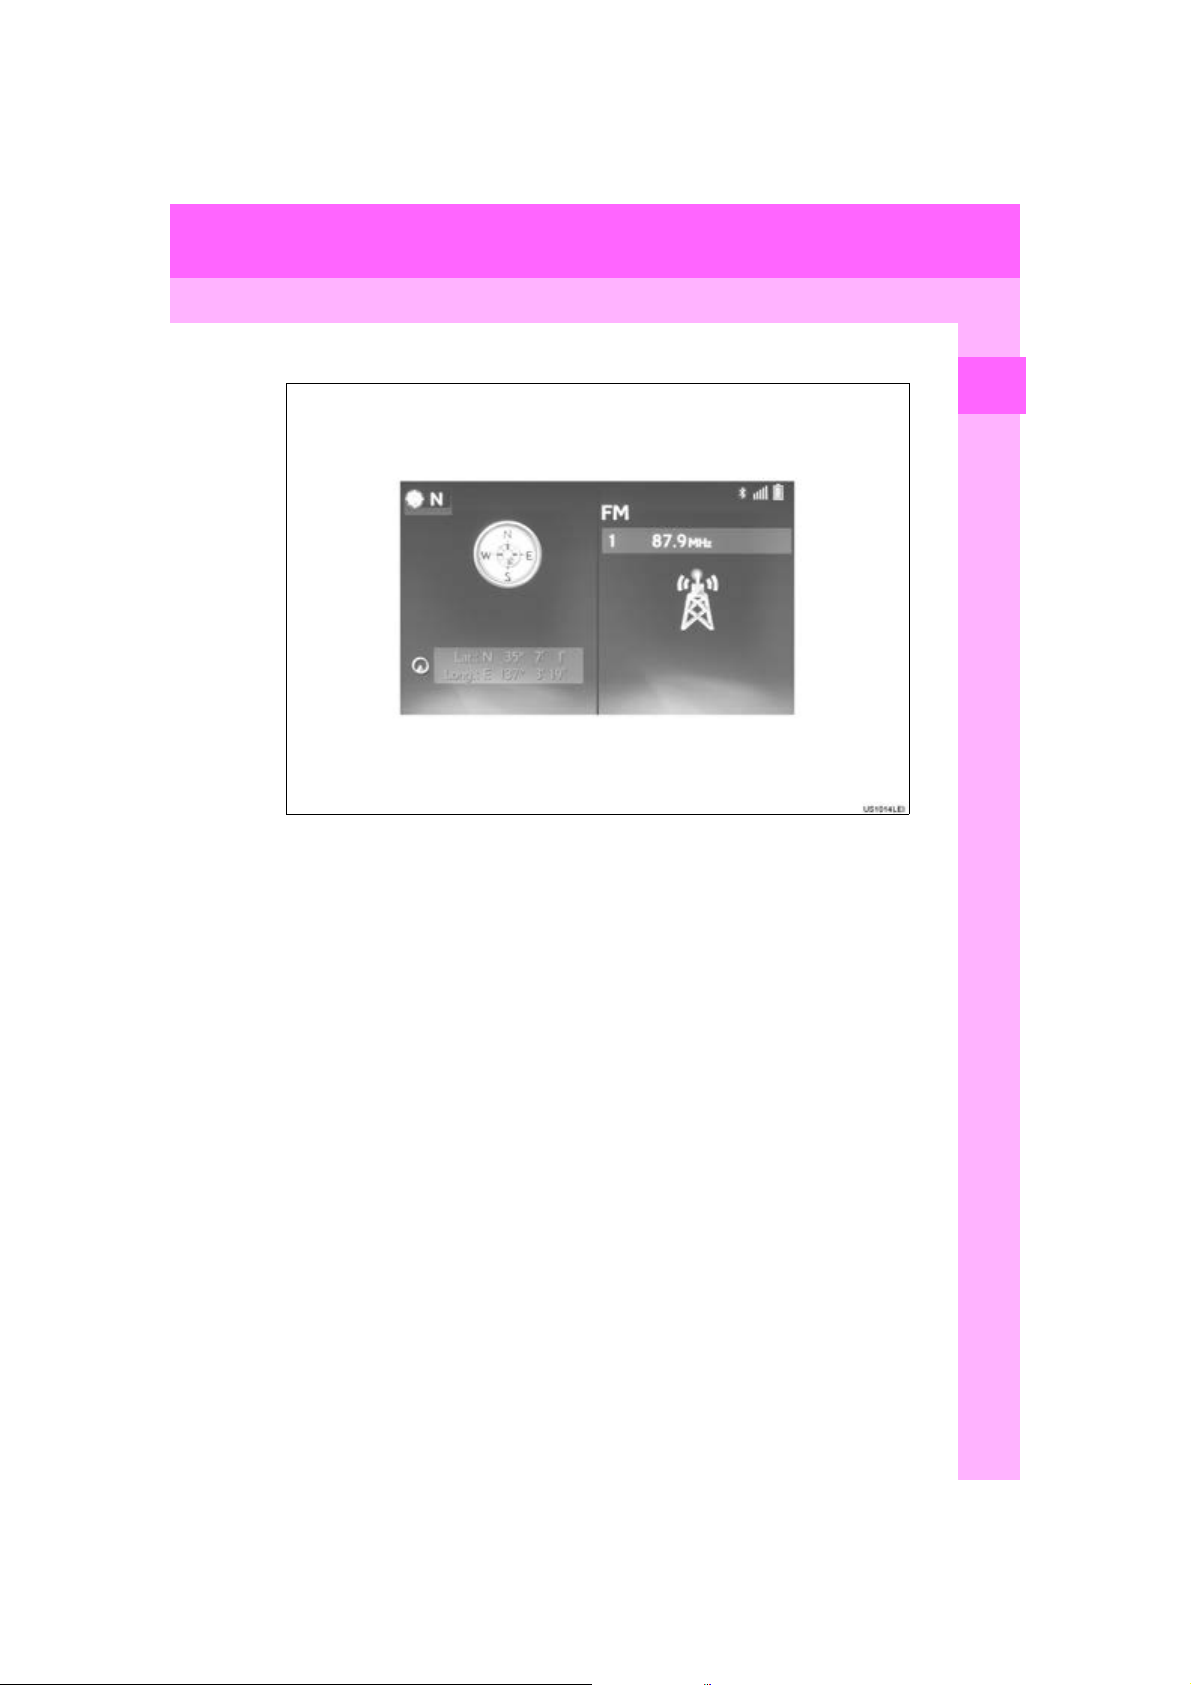
The home screen can display multiple information screens, such as the audio system
screen and fuel consumption screen, simultaneously. When a screen is selected, the
selected screen is switched to a full screen display.
For details about setting the home screen: P.36
Three-way split screen
18
GS_Navi+MM_OM30F12U_(U)
15.09.09 19:53
Page 19
1. BASIC FUNCTION
Two-way split screen
1
QUICK GUIDE
GS_Navi+MM_OM30F12U_(U)
15.09.09 19:53
19
Page 20
2. QUICK REFERENCE
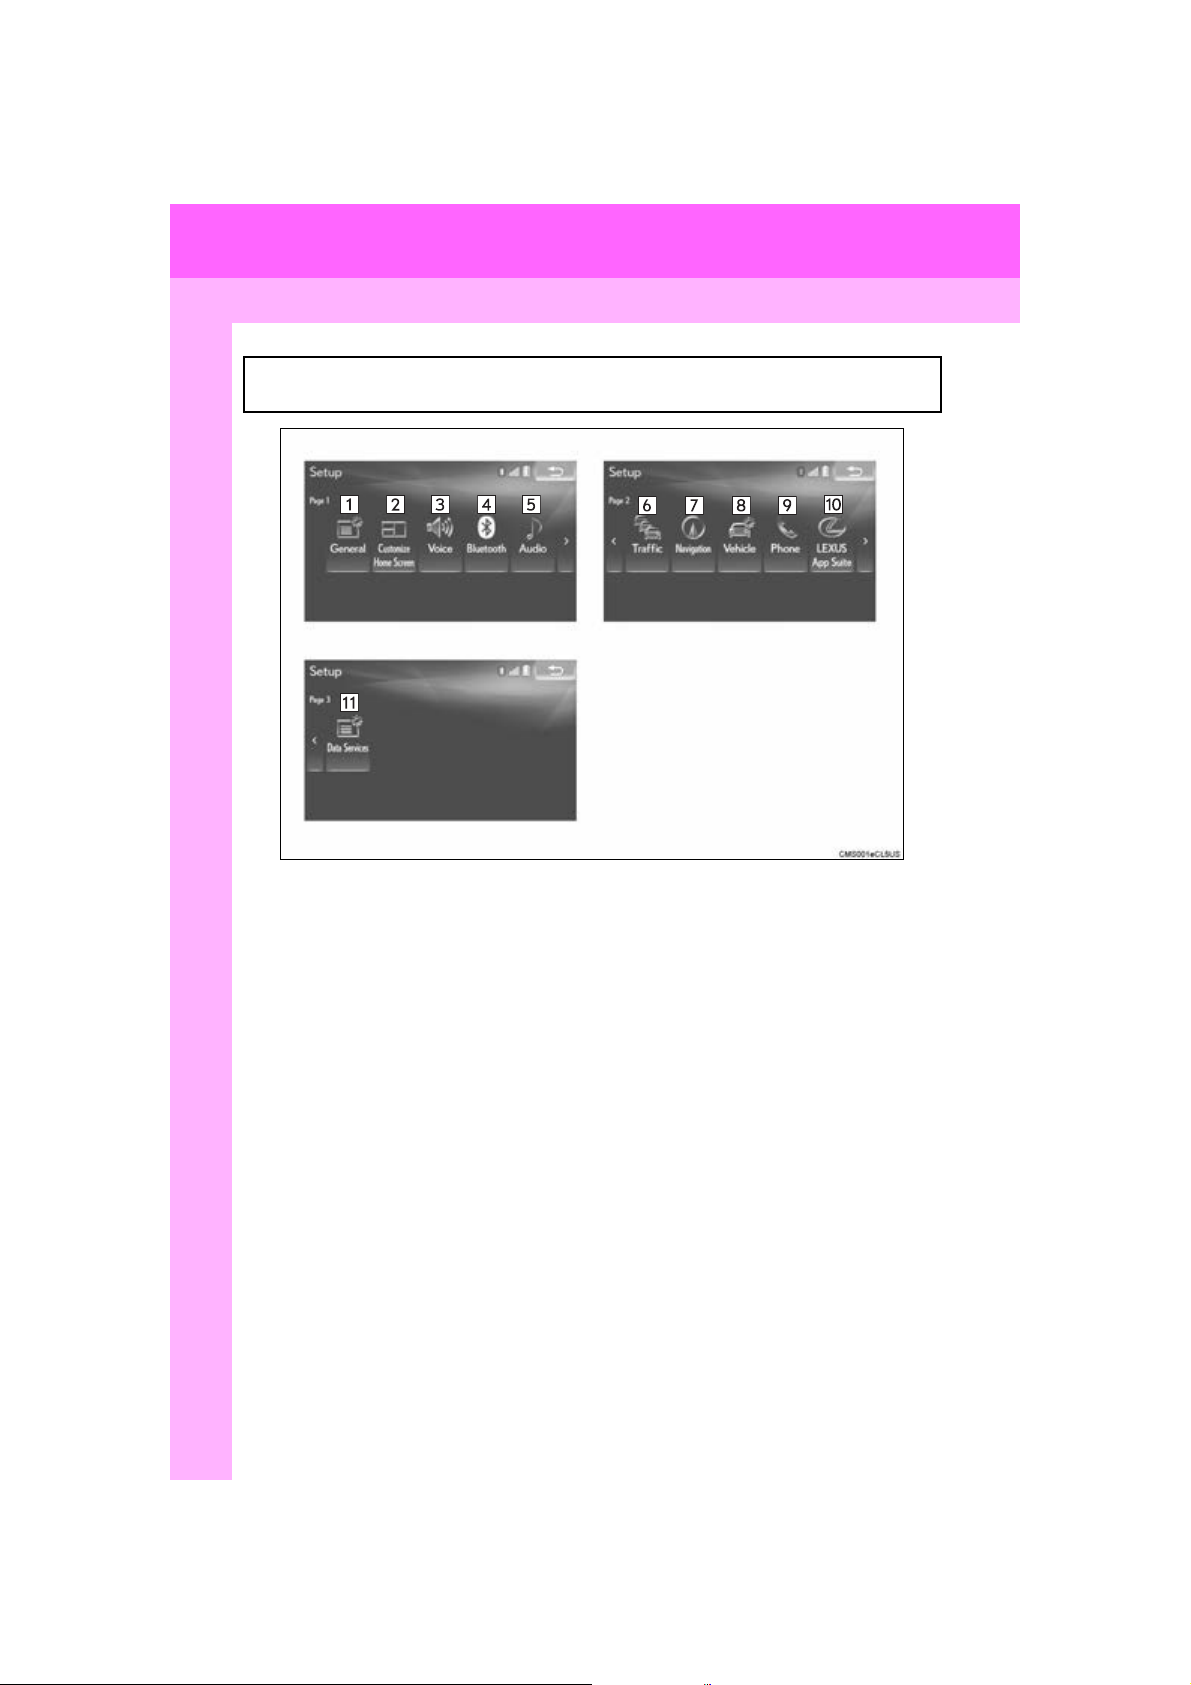
1. “Setup” SCREEN
To display this screen, press the “MENU” button on the Remote Touch, then select
“Setup”.
20
GS_Navi+MM_OM30F12U_(U)
15.09.09 19:53
Page 21
2. QUICK REFERENCE
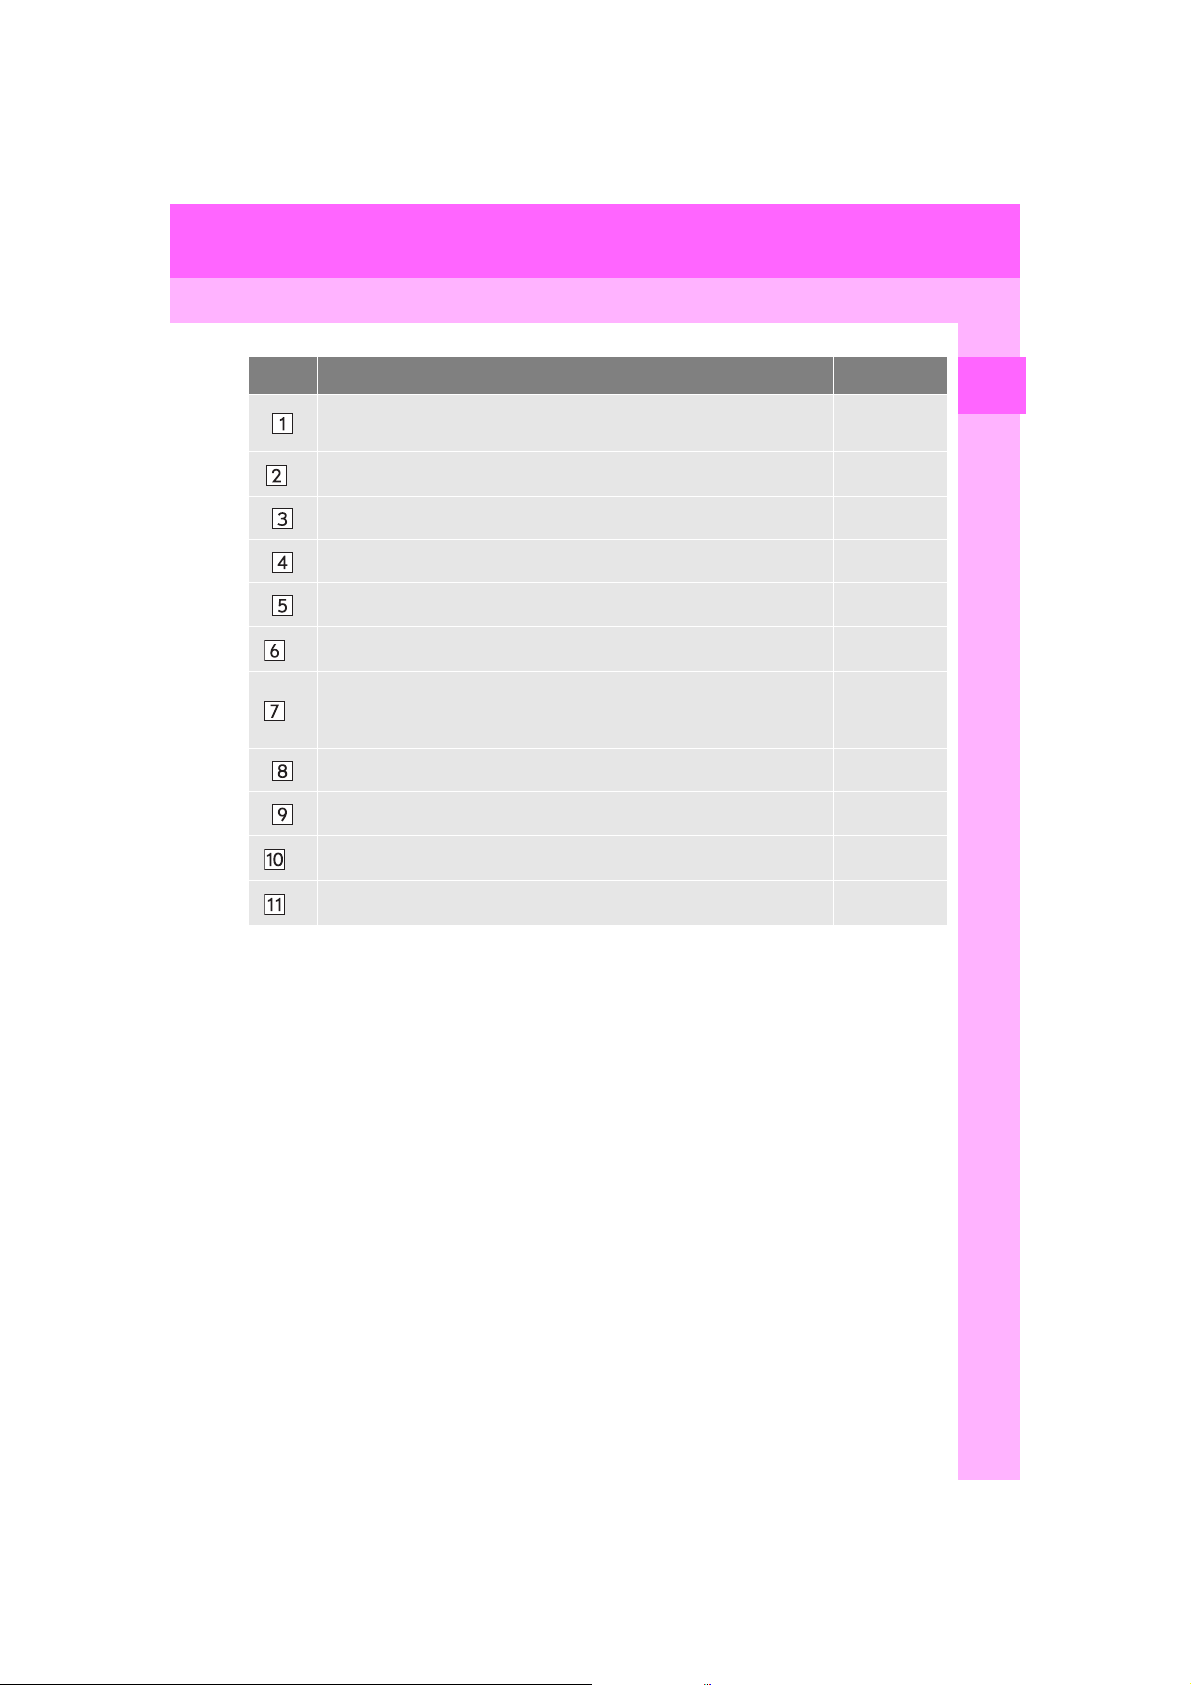
No. Function Page
Select to change the selected language, operation sound, automatic
screen change settings, etc.
1
Select to change the display items/area and the home screen layout. 36
*
Select to set the voice guidance settings. 67
Select to set Bluetooth® phones and Bluetooth® audio devices. 50
Select to set radio and external media settings. 208
2
Select to set traffic information. 137
*
Select to set memory points (home, preset destinations, address book
3
entries, areas to avoid), navigation details or to delete previous destina-
*
122, 132
tions.
Select to set vehicle information such as maintenance information. 69
Select to set the phone sound, contacts, message settings, etc. 300
2
Select to set LEXUS App Suite settings. 345
*
2
Select to set data services settings. 247
*
1
: With 8-inch display
*
2
: With 12.3-inch display (This function is not made available on some models.)
*
3
: With 12.3-inch display
*
1
61
QUICK GUIDE
GS_Navi+MM_OM30F12U_(U)
15.09.09 19:53
21
Page 22
2. QUICK REFERENCE
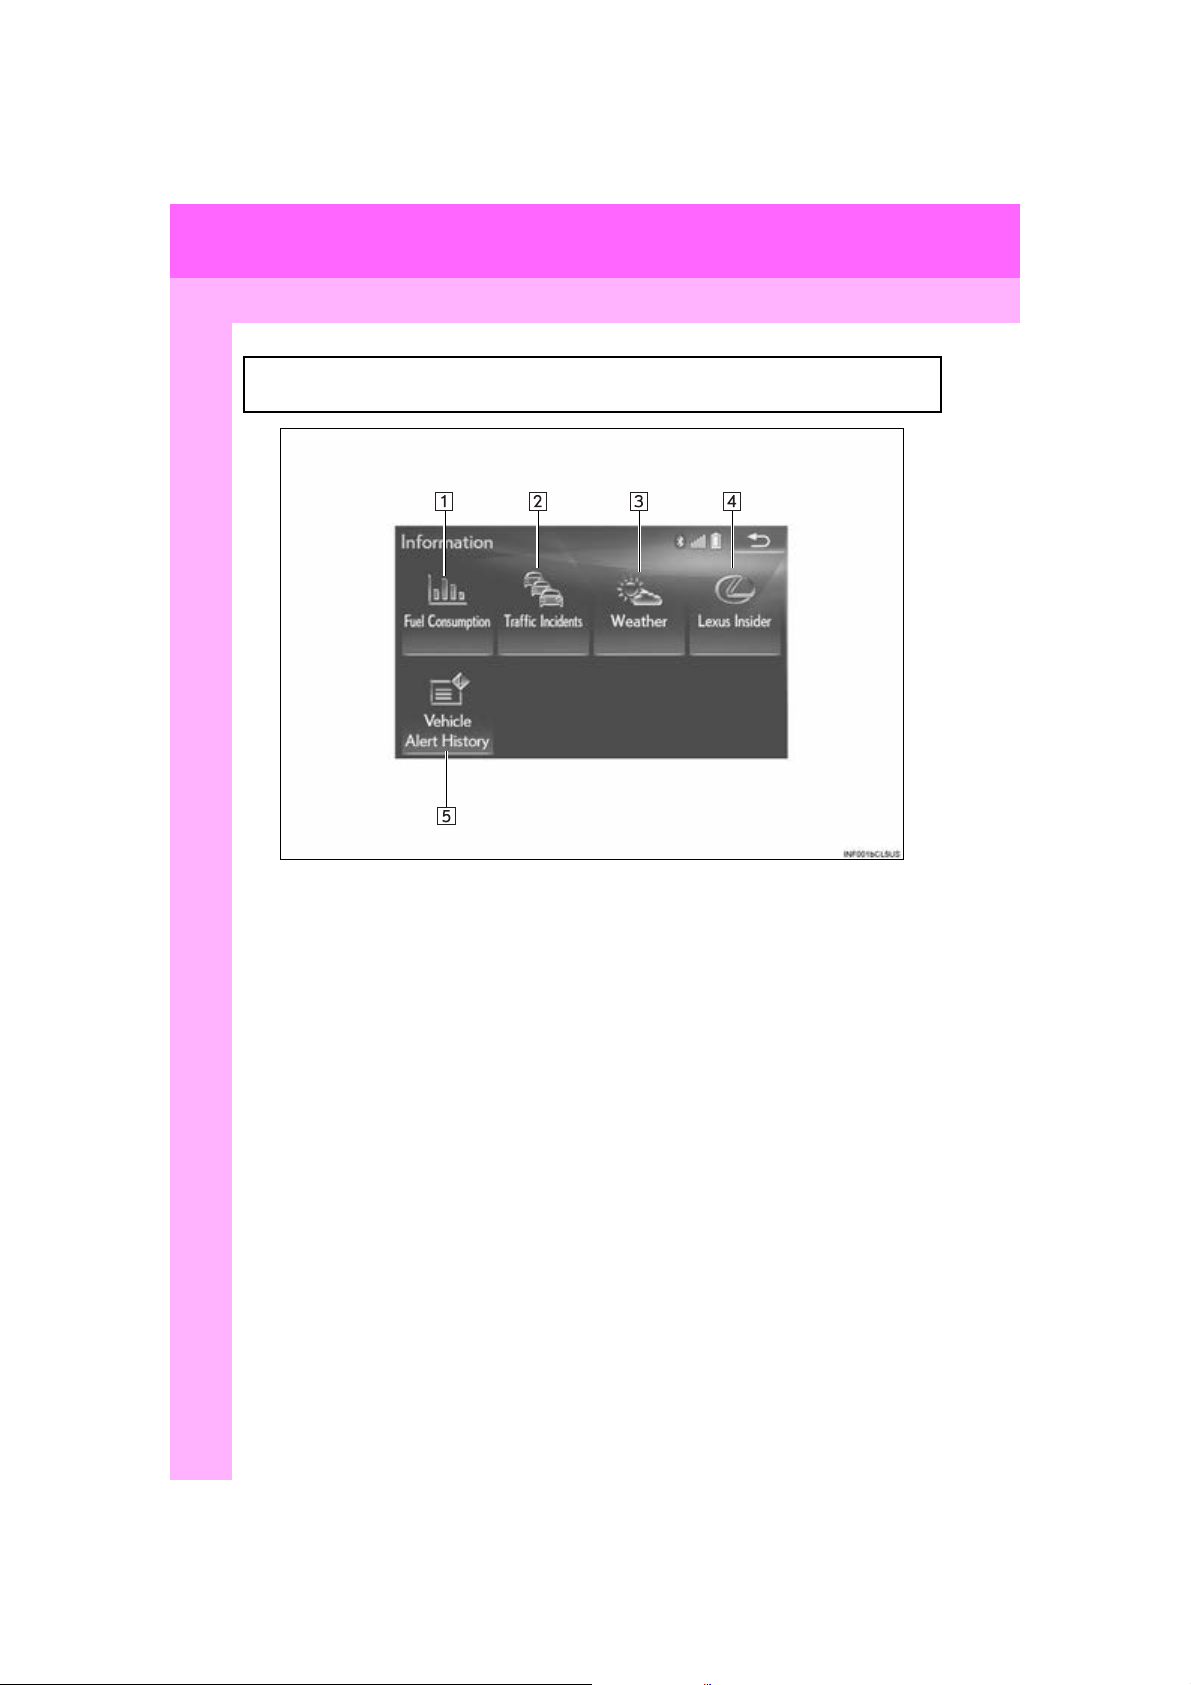
2. “Information” SCREEN
To display this screen, press the “MENU” button on the Remote Touch, then select
“Info”.
22
GS_Navi+MM_OM30F12U_(U)
15.09.09 19:53
Page 23
2. QUICK REFERENCE
No. Function Page
Select to display the energy monitor or fuel consumption screen.
1
*
Select to display traffic information. 90
2
*
Select to display weather information. 246
1
*
Select to display the “LEXUS Insider” screen. 342
1
*
Select to display the vehicle alert history.
1
: With 12.3-inch display (This function is not made available on some models.)
*
2
: This function is not made available on some models.
*
“Own er’s
Manual”
1
QUICK GUIDE
GS_Navi+MM_OM30F12U_(U)
15.09.09 19:53
23
Page 24
3. NAVIGATION OPERATION
1
*: With 12.3-inch display
2
34567
1. REGISTERING HOME*
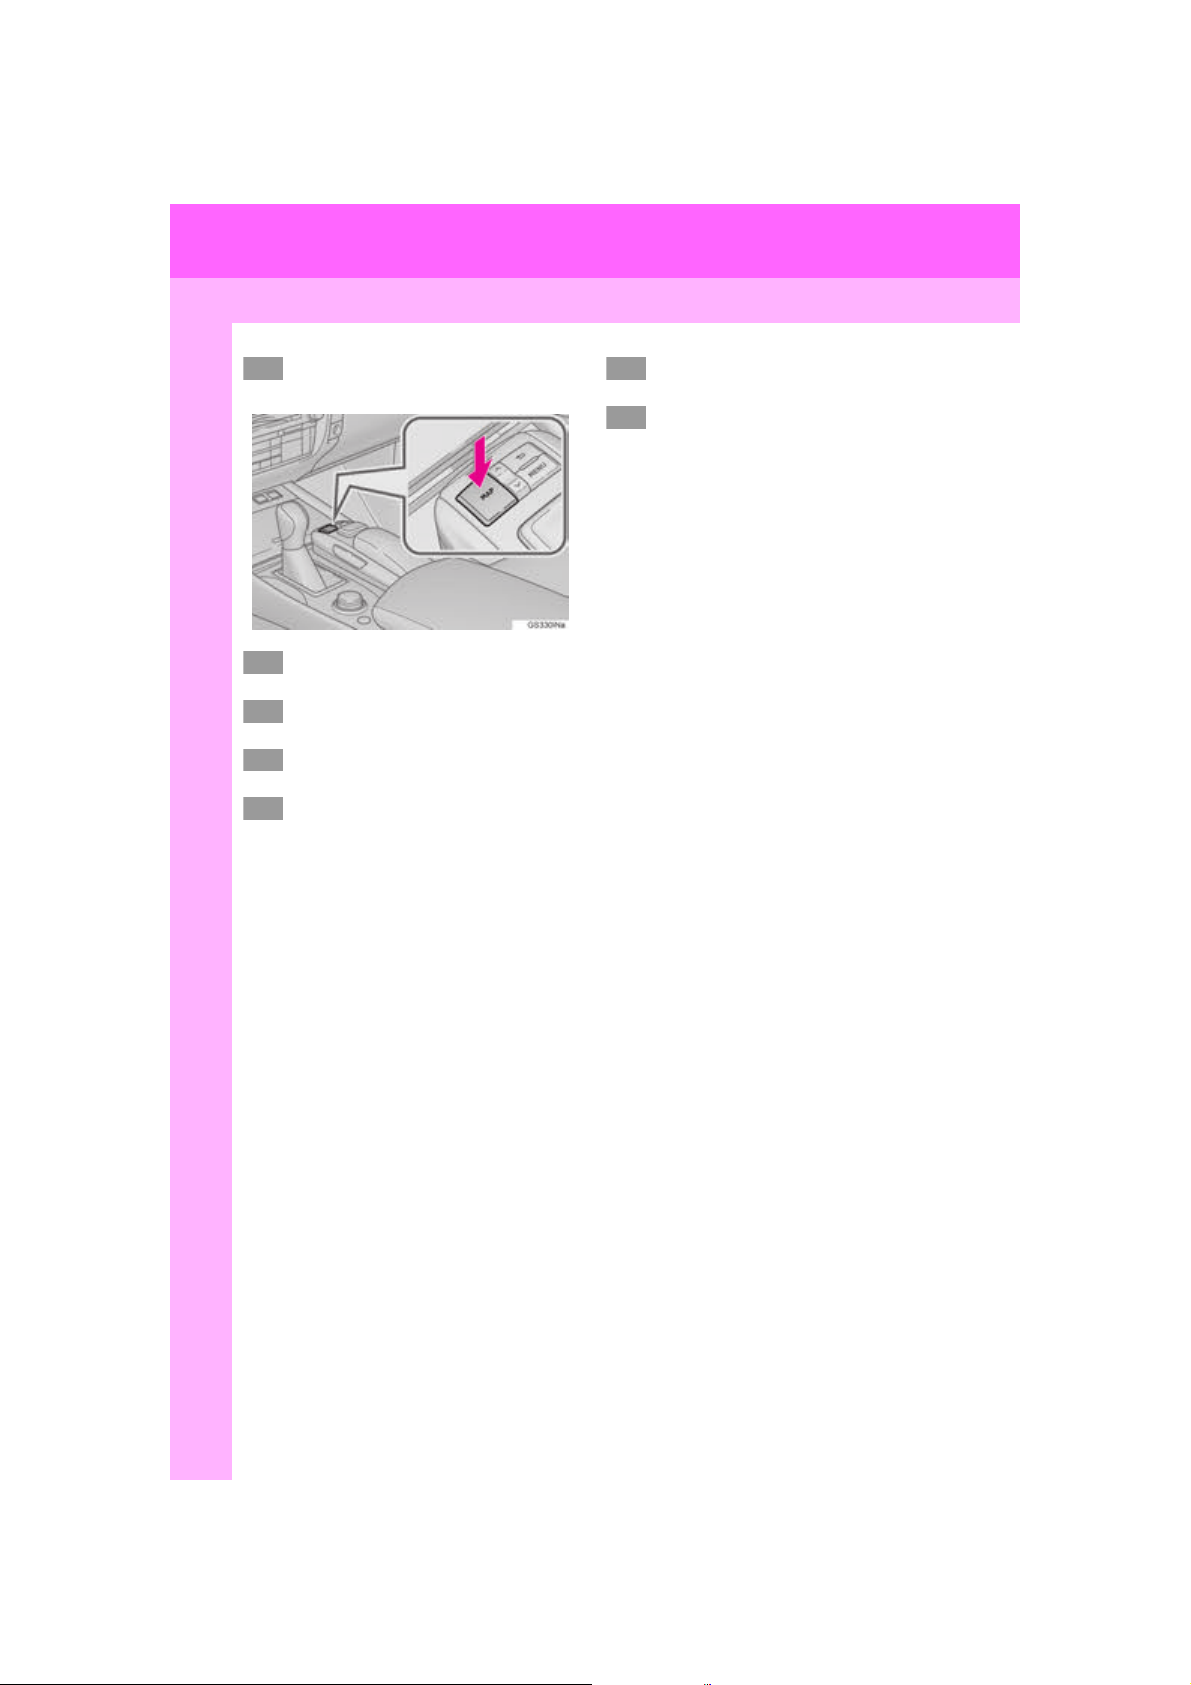
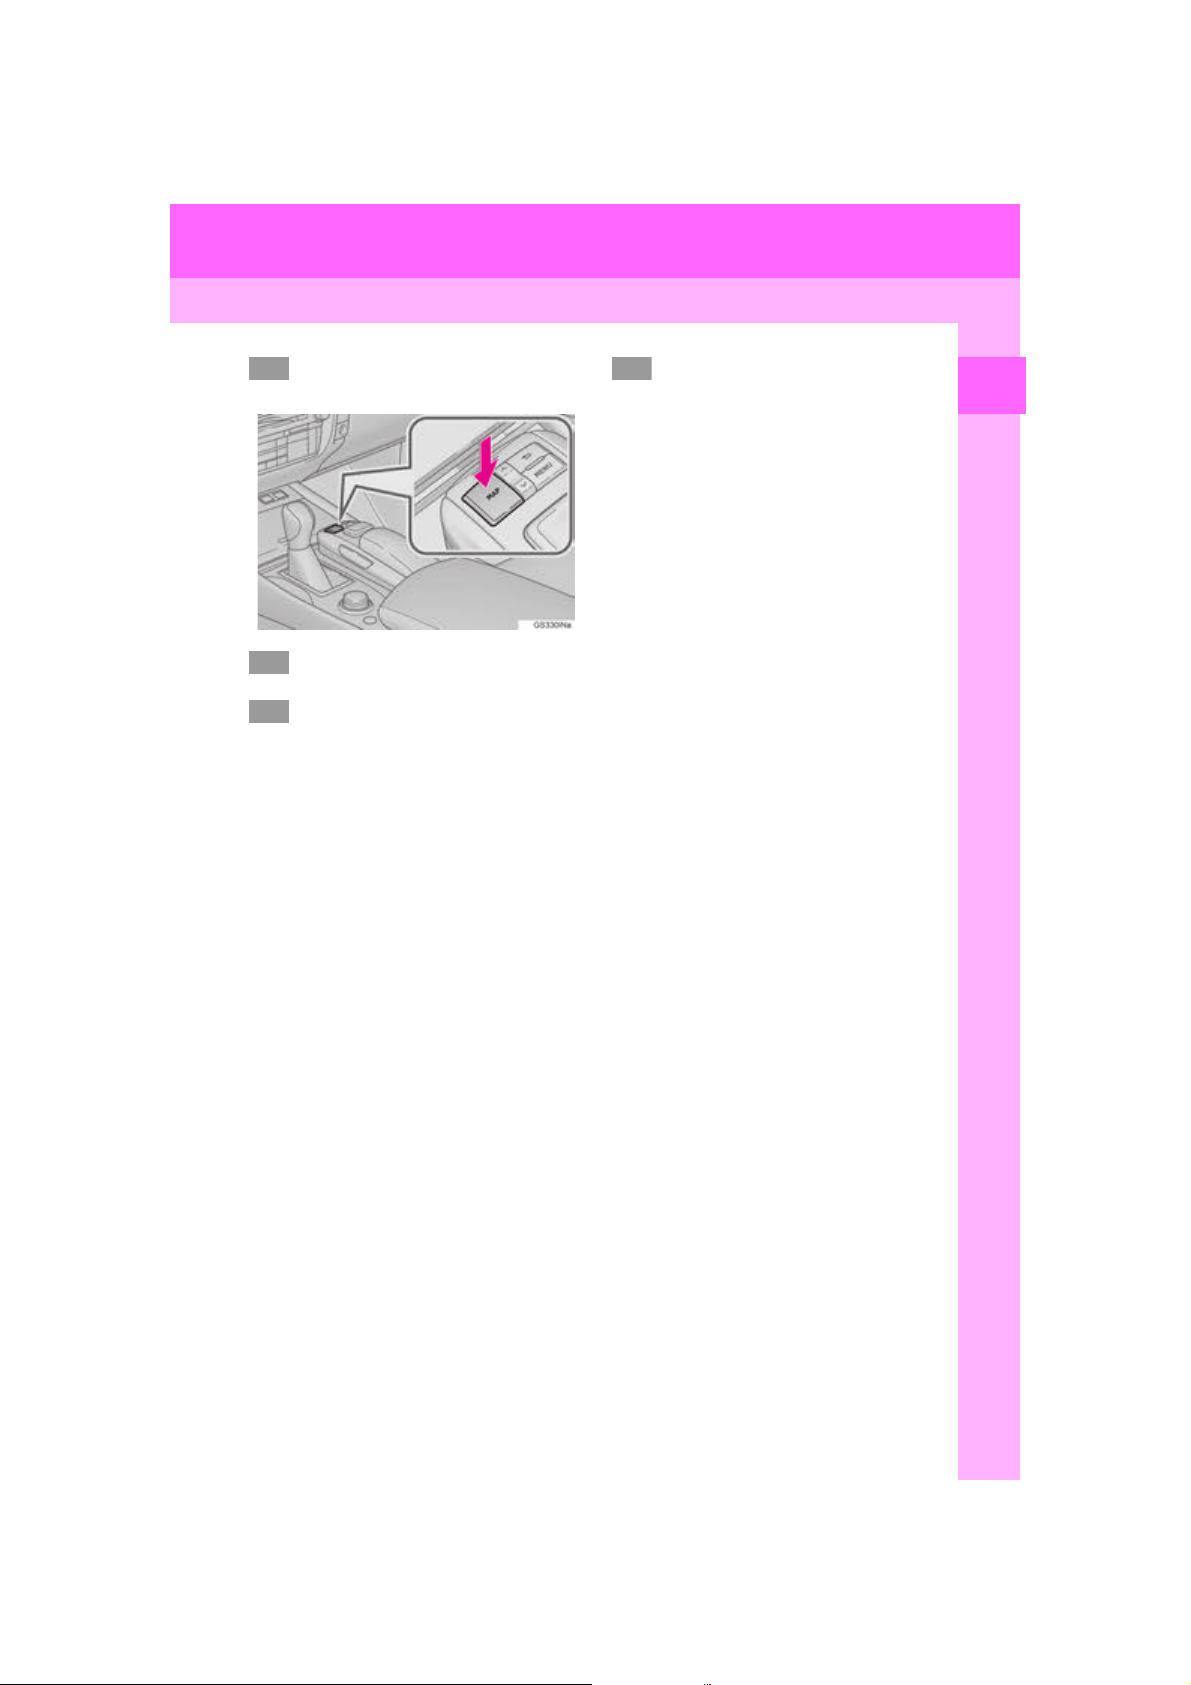
Press the “MAP” button on the
Remote Touch.
Select “Dest.”.
Select “Go Home”.
Select “Yes”.
There are different kinds of methods to search for your home.
(P.9 3 )
Select “Enter”.
Select “OK”.
Registration of home is complete.
Registering home in a different way
P.123
Editing the name, location, phone num-
ber and icon
P.123
Setting home as the destination
P.95
24
GS_Navi+MM_OM30F12U_(U)
15.09.09 19:53
Page 25
3. NAVIGATION OPERATION
1
*: With 12.3-inch display
23456
7
2. REGISTERING PRESET DESTINATIONS*
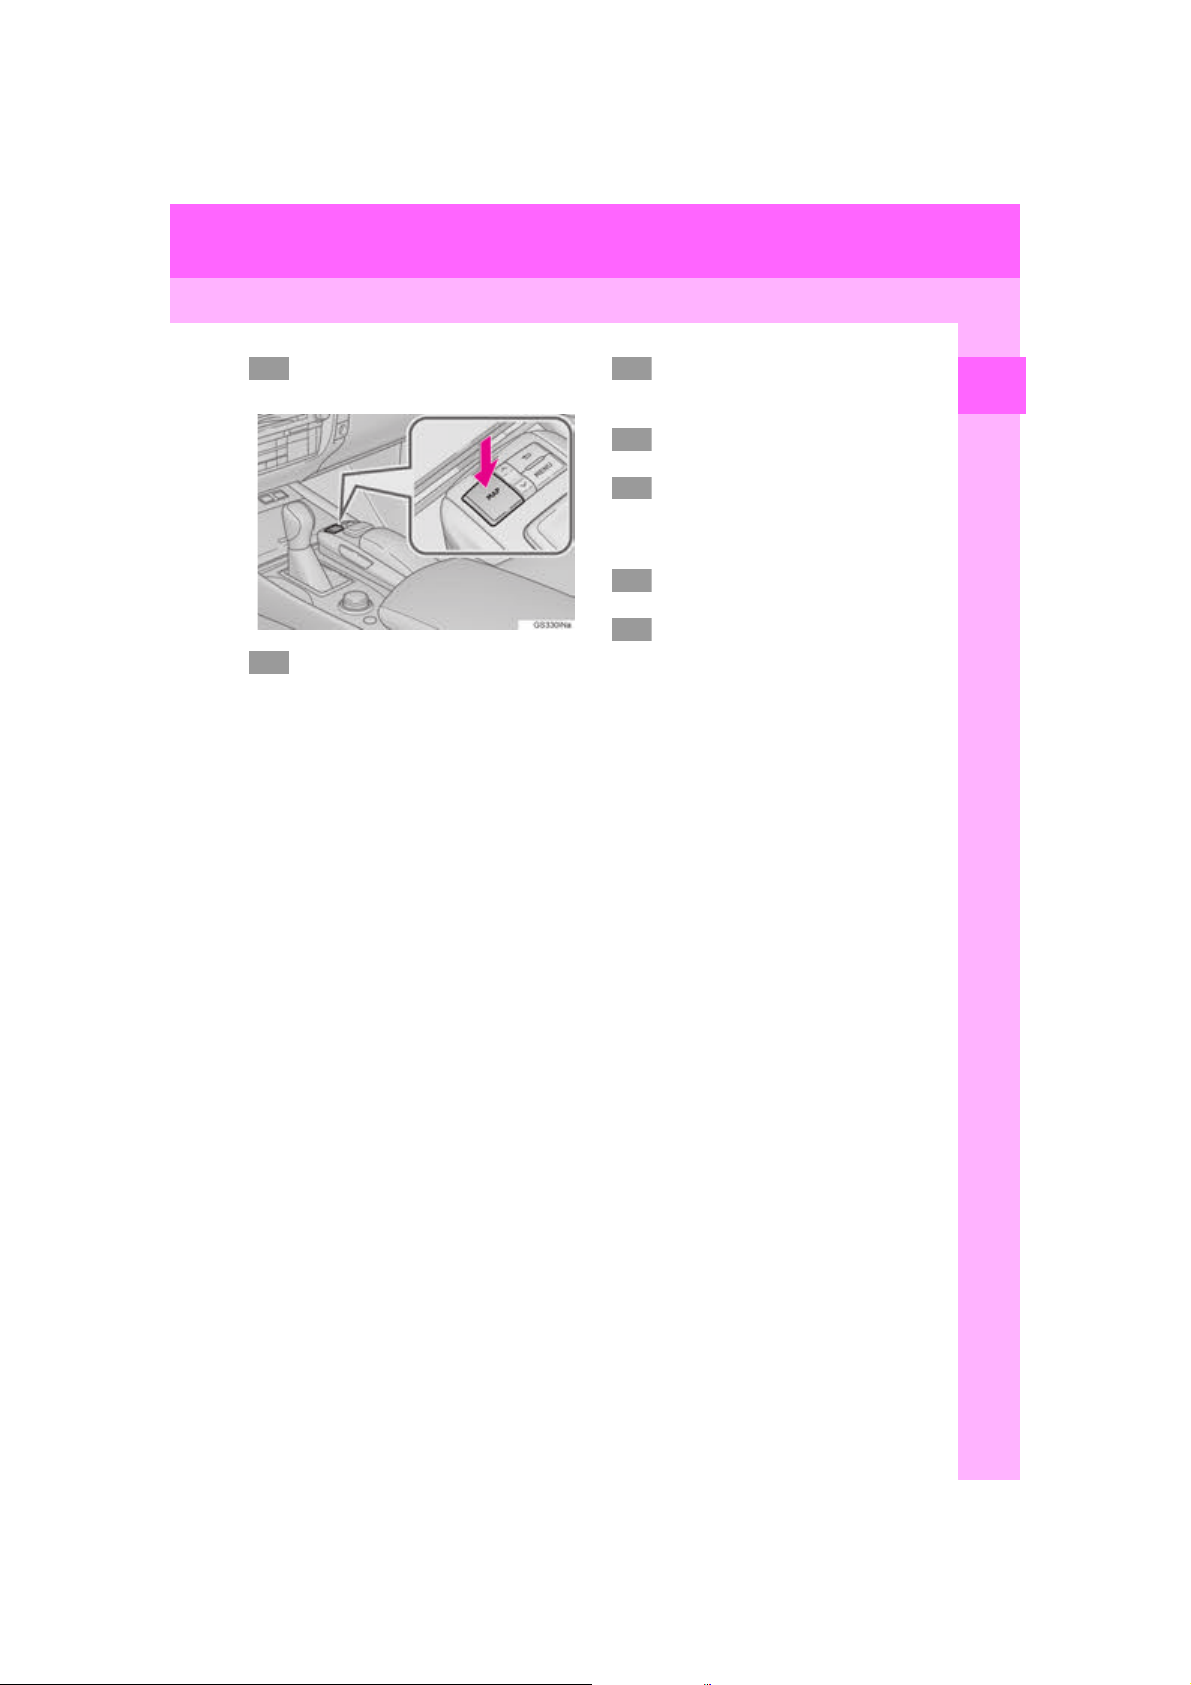
Press the “MAP” button on the
Remote Touch.
Select “Dest.”.
Select one of the preset destination
buttons.
Select “Yes”.
There are different kinds of methods to search for a destination.
(P.9 3 )
Select “Enter”.
Select “OK”.
Registration of preset destinations is complete.
Registering preset destinations in a dif-
ferent way
P.124
Editing the name, location, phone num-
ber and icon
P.125
Setting preset destinations as the desti-
nation
P.95
1
QUICK GUIDE
25
GS_Navi+MM_OM30F12U_(U)
15.09.09 19:53
Page 26
3. NAVIGATION OPERATION
1
*: With 12.3-inch display
2
345
3. OPERATION FLOW: GUIDING THE ROUTE*
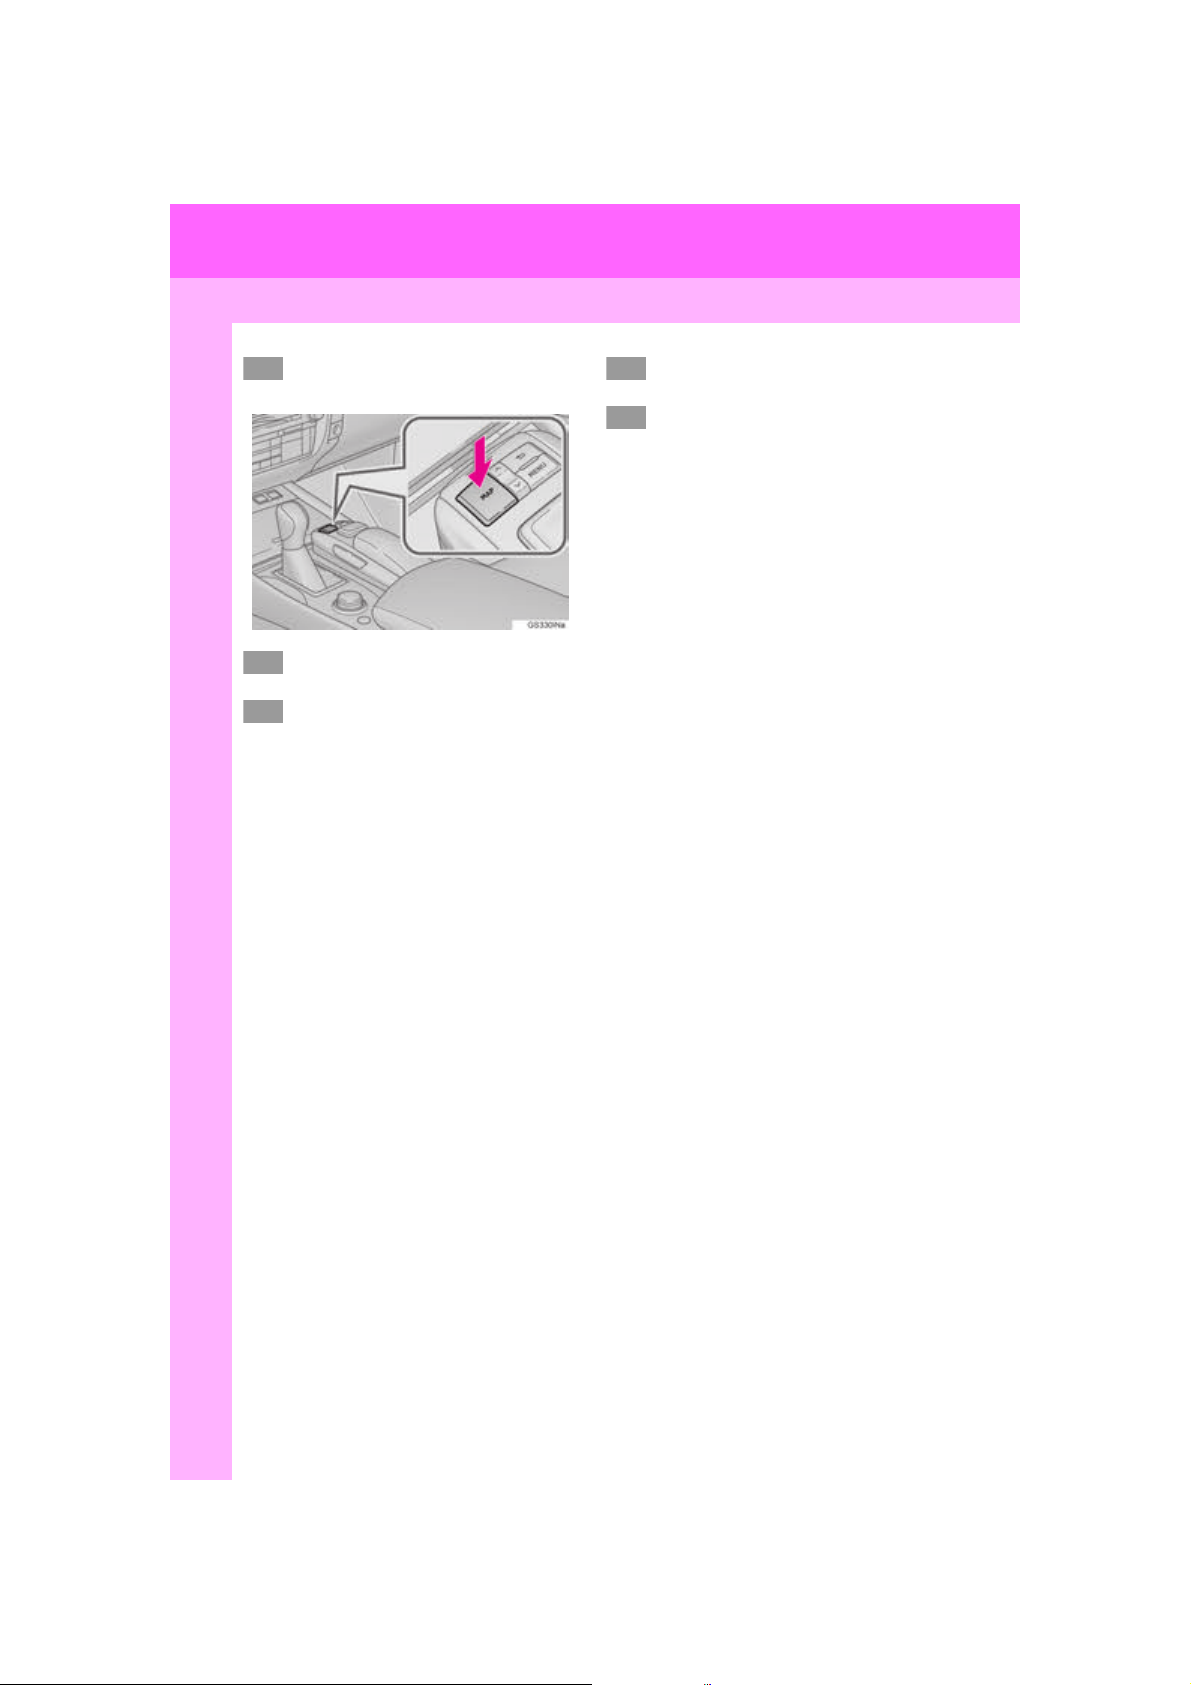
Press the “MAP” button on the
Remote Touch.
Select “Dest.”.
There are different kinds of methods to search for a destination.
(P.9 3 )
Select “Go”.
Select “OK”.
Selecting routes other than the one recommended (P.105)
Guidance to the destination is displayed
on the screen and can be heard via voice
guidance.
26
GS_Navi+MM_OM30F12U_(U)
15.09.09 19:53
Page 27
3. NAVIGATION OPERATION
1
*: With 12.3-inch display
2
3
4
4. SETTING HOME AS THE DESTINATION*
Press the “MAP” button on the
Remote Touch.
Select “Dest.”.
Select “Go Home”.
Select “OK”.
Selecting routes other than the one recommended (P.105)
Guidance to the destination is displayed
on the screen and can be heard via voice
guidance.
1
QUICK GUIDE
27
GS_Navi+MM_OM30F12U_(U)
15.09.09 19:53
Page 28

4. FUNCTION INDEX
*: With 12.3-inch display
1. FUNCTION INDEX
Map*
Displaying maps Page
Viewing the map screen 76
Displaying the current position 79
Viewing the current position vicinity map 82
Changing the scale 80
Changing the map orientation 81
Displaying map Information 84
Displaying the estimated travel/arrival time to the destination 111
Selecting the map mode 82
Displaying traffic information 90
Searching for destinations Page
Searching for the destination 93
Changing the search area 95
Route guidance*
Before starting or during route guidance Page
Starting route guidance 105
Editing the route 118
Viewing the entire route map 112
Adjusting route guidance volume 67
Deleting the destination 119
Address book Page
Registering address book entries 126
Marking icons on the map 127
28
GS_Navi+MM_OM30F12U_(U)
15.09.09 19:53
Page 29

4. FUNCTION INDEX
Useful functions
Information Page
Displaying vehicle maintenance* 70
*: With 12.3-inch display
Hands-free system (for cellular phone) Page
Registering/connecting a Bluetooth® phone 44
Making a call on a Bluetooth® phone 285
Receiving a call on the Bluetooth® phone 291
Voice command system Page
Operating the system with your voice 228
Peripheral monitoring system Page
Viewing behind the rear of the vehicle 250
1
QUICK GUIDE
GS_Navi+MM_OM30F12U_(U)
15.09.09 19:53
29
Page 30

30
GS_Navi+MM_OM30F12U_(U)
15.09.09 19:53
Page 31
2
BASIC FUNCTION
1
2
BASIC INFORMATION BEFORE
1
OPERATION
1. INITIAL SCREEN ....................................... 32
2. HOW TO USE THE Remote Touch...... 34
3. HOME SCREEN OPERATION ........... 36
4. ENTERING LETTERS AND
NUMBERS/LIST SCREEN
OPERATION............................................ 38
ENTERING LETTERS AND NUMBERS ....... 38
LIST SCREEN............................................................... 39
5. SCREEN ADJUSTMENT ......................... 41
6. LINKING MULTI-INFORMATION
DISPLAY AND NAVIGATION
SYSTEM...................................................... 43
Bluetooth® SETTINGS
2
1. REGISTERING/CONNECTING
Bluetooth
REGISTERING A Bluetooth® PHONE
FOR THE FIRST TIME .......................................... 44
REGISTERING A Bluetooth
PLAYER FOR THE FIRST TIME ...................... 46
PROFILES ..................................................................... 48
®
DEVICE............................... 44
®
AUDIO
2. SETTING Bluetooth® DETAILS ............ 50
“Bluetooth* Setup” SCREEN ................................ 50
REGISTERING A Bluetooth
DELETING A Bluetooth
CONNECTING A Bluetooth
EDITING THE Bluetooth
INFORMATION.................................................... 55
“System Settings” SCREEN.................................... 57
OTHER SETTINGS
3
®
DEVICE ........... 51
®
DEVICE.................. 53
®
DEVICE ...... 53
®
DEVICE
1. GENERAL SETTINGS............................... 61
GENERAL SETTINGS SCREEN ........................ 61
2. VOICE SETTINGS..................................... 67
VOICE SETTINGS SCREEN ............................... 67
3
4
5
6
7
8
9
10
3. VEHICLE SETTINGS ................................ 69
MAINTENANCE ....................................................... 70
*: The Bluetooth® word mark and logos are registered trademarks owned by Bluetooth SIG, Inc.
GS_Navi+MM_OM30F12U_(U)
15.09.09 19:53
31
Page 32
1. BASIC INFORMATION BEFORE OPERATION
WARNING
*: With 12.3-inch display
1. INITIAL SCREEN
1 When the engine <power> switch is
turned to ACCESSORY or IGNITION
ON <ON> mode, the initial screen will
be displayed and the system will begin
operating.
Images shown on the initial screen can be
changed to suit individual preferences.
(P. 6 4 )
CAUTION SCREEN*
After a few seconds displays the initial
screen, the caution screen will be displayed.
Waiting about 5 seconds or selecting
“Con tinue” switches to the last displayed
screen. (Press any button on the Remote
Touch, the function’s corresponding screen
will be displayed.)
●When the vehicle is stopped with the
engine running <the hybrid system operating>, always apply the parking brake for
safety.
MAINTENANCE
INFORMATION*
This system reminds users when to replace certain parts or components and
shows dealer information (if registered)
on the screen.
When the vehicle reaches a previously
set driving distance or date specified for
a scheduled maintenance check, the
“Maintenance Reminder” screen will be
displayed when the system is turned on.
This screen goes off if the screen is not
operated for several seconds.
To prevent this screen from being dis-
played again, select “Do Not Display
This Message Again”.
To register maintenance information:
P. 7 0
If is selected, the registered phone
number can be called.
32
GS_Navi+MM_OM30F12U_(U)
15.09.09 19:53
Page 33
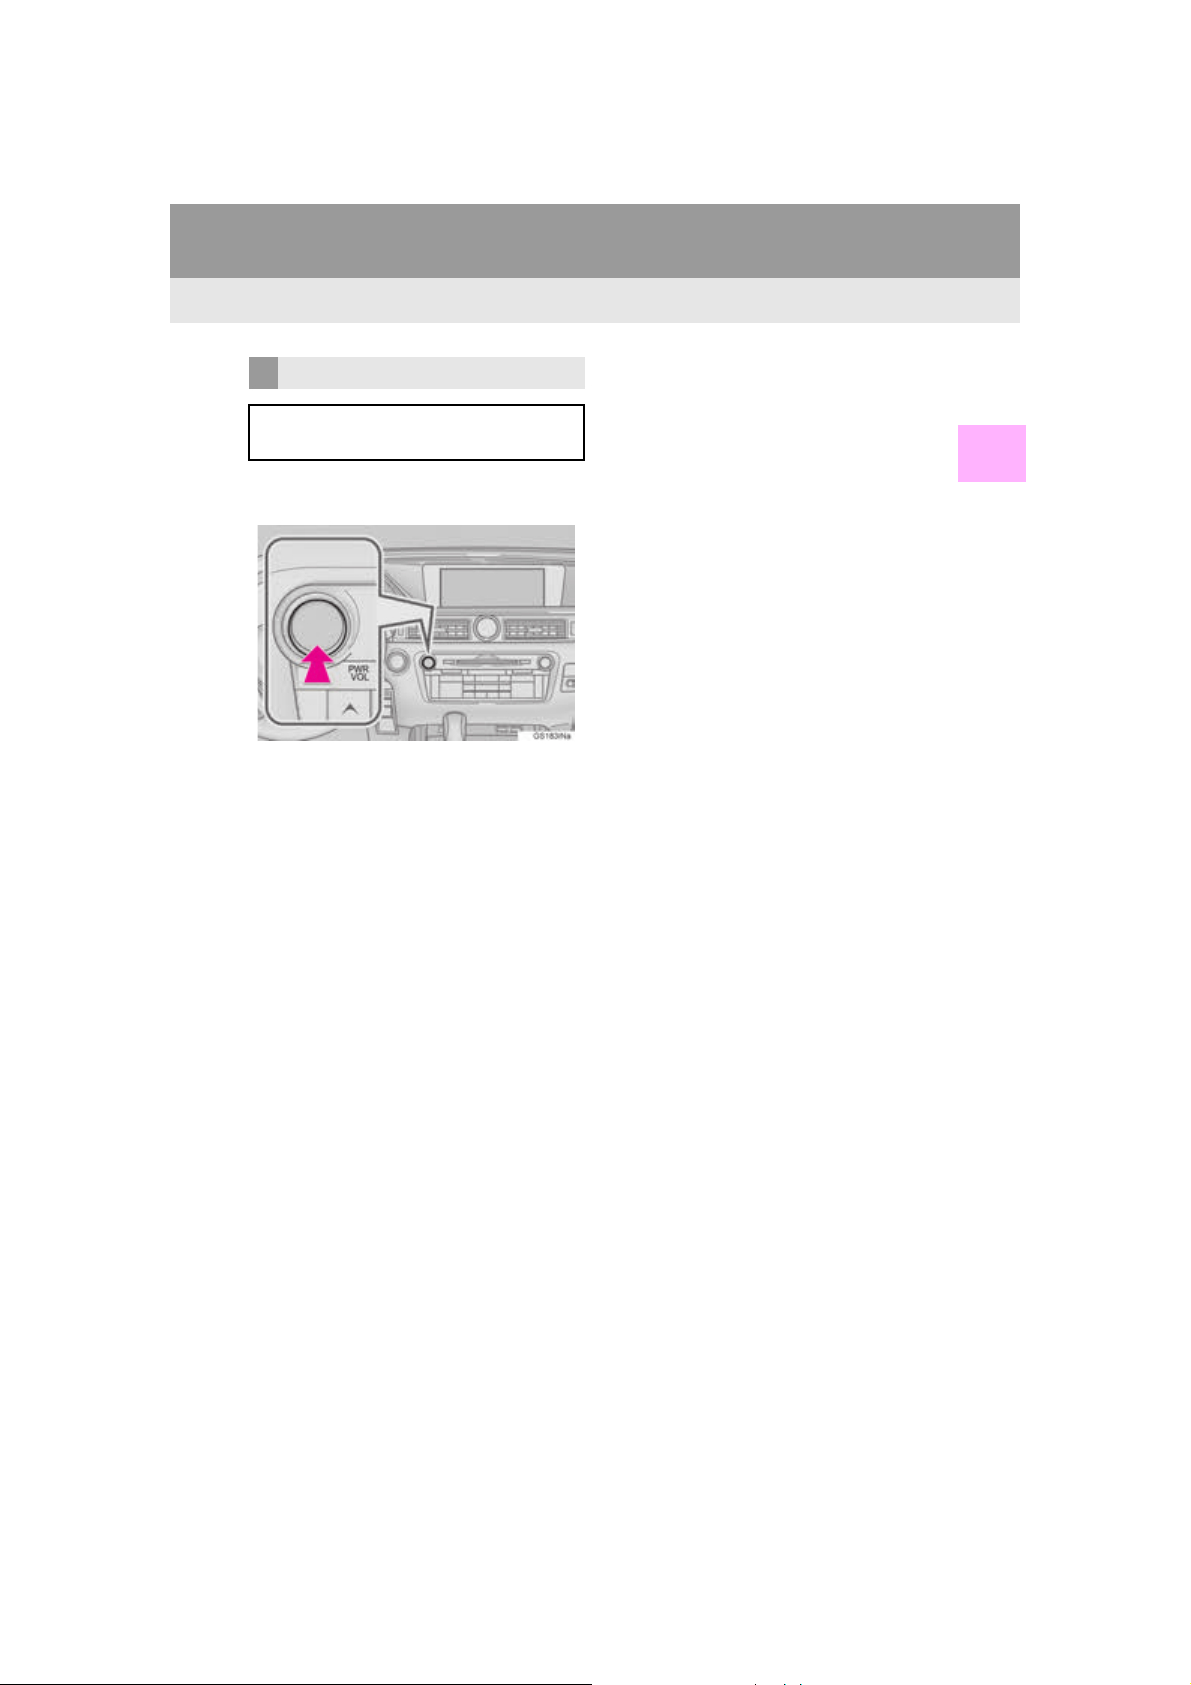
RESTARTING THE SYSTEM
When system response is extremely
slow, the system can be restarted.
1 Press and hold the “PWR•VOL” knob
for 3 seconds or more.
1. BASIC INFORMATION BEFORE OPERATION
2
BASIC FUNCTION
GS_Navi+MM_OM30F12U_(U)
15.09.09 19:53
33
Page 34
1. BASIC INFORMATION BEFORE OPERATION
2. HOW TO USE THE Remote Touch
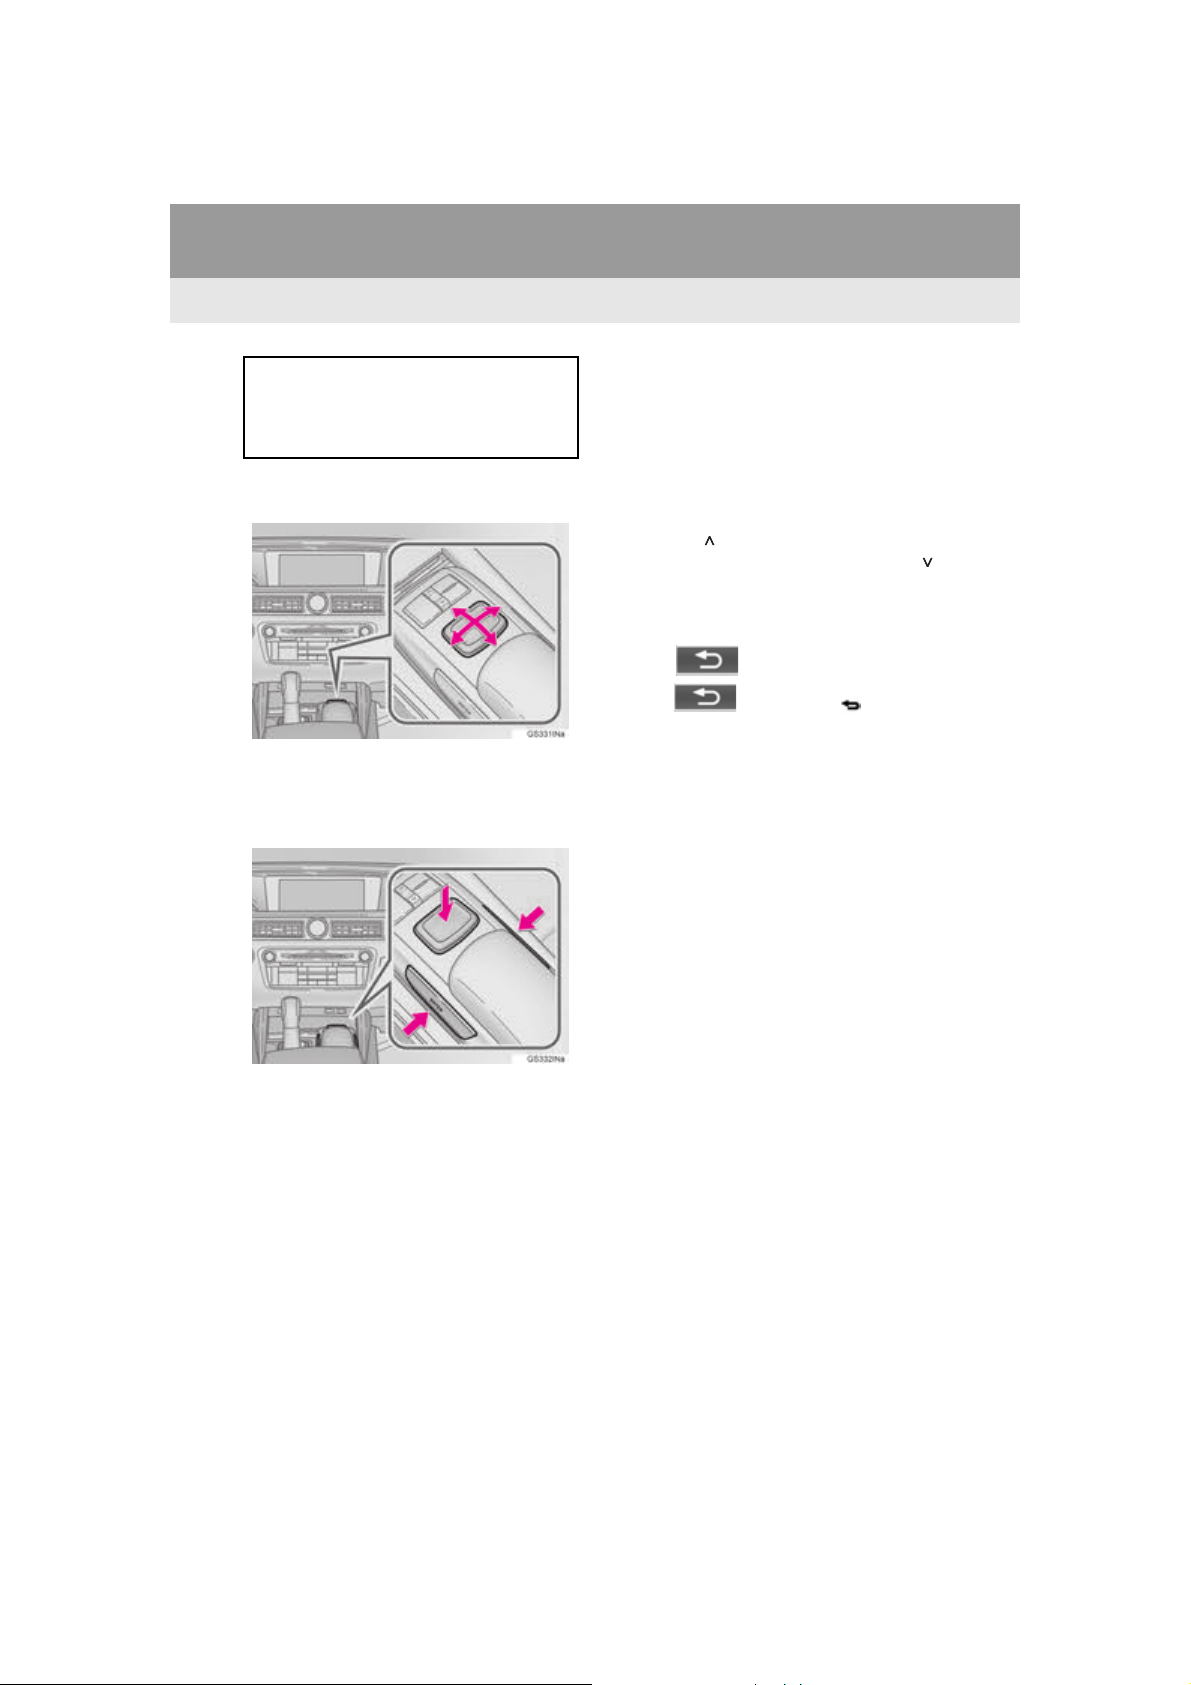
This system can be operated by the
Remote Touch when the engine
<power> switch is in ACCESSORY or
IGNITION ON <ON> mode.
1 Use the Remote Touch knob to select
the desired button on the screen.
2 To select a screen button, press the
Remote Touch knob or an “ENTER”
button. Once a button has been selected, the screen will change.
When the pointer moves close to a button,
it will be automatically pulled onto that button. The strength of this pull can be
adjusted. (P. 6 1 )
The pointer will disappear from the screen
if it is not moved for 6 seconds. Operation
of the Remote Touch knob will cause the
pointer to reappear.
Press the “ ” button on the Remote Touch
to zoom in on the map screen and the “ ”
button to zoom out. These buttons can also
be used to scroll up and down on list
screens.
When is displayed on the screen,
select or press the button on
the Remote Touch to return to the previous
screen.
Press the “MENU” button on the Remote
Touch to display the “Menu” screen.
(P.1 4 )
With 8-inch display: The home screen can
be displayed by pressing the “HOME” button on the Remote Touch. (P.1 8 )
With 12.3-inch display: The map screen can
be displayed by pressing the “MAP” button
on the Remote Touch. (P. 7 9 )
34
GS_Navi+MM_OM30F12U_(U)
15.09.09 19:53
Page 35
1. BASIC INFORMATION BEFORE OPERATION
WARNING
NOTICE
INFORMATION
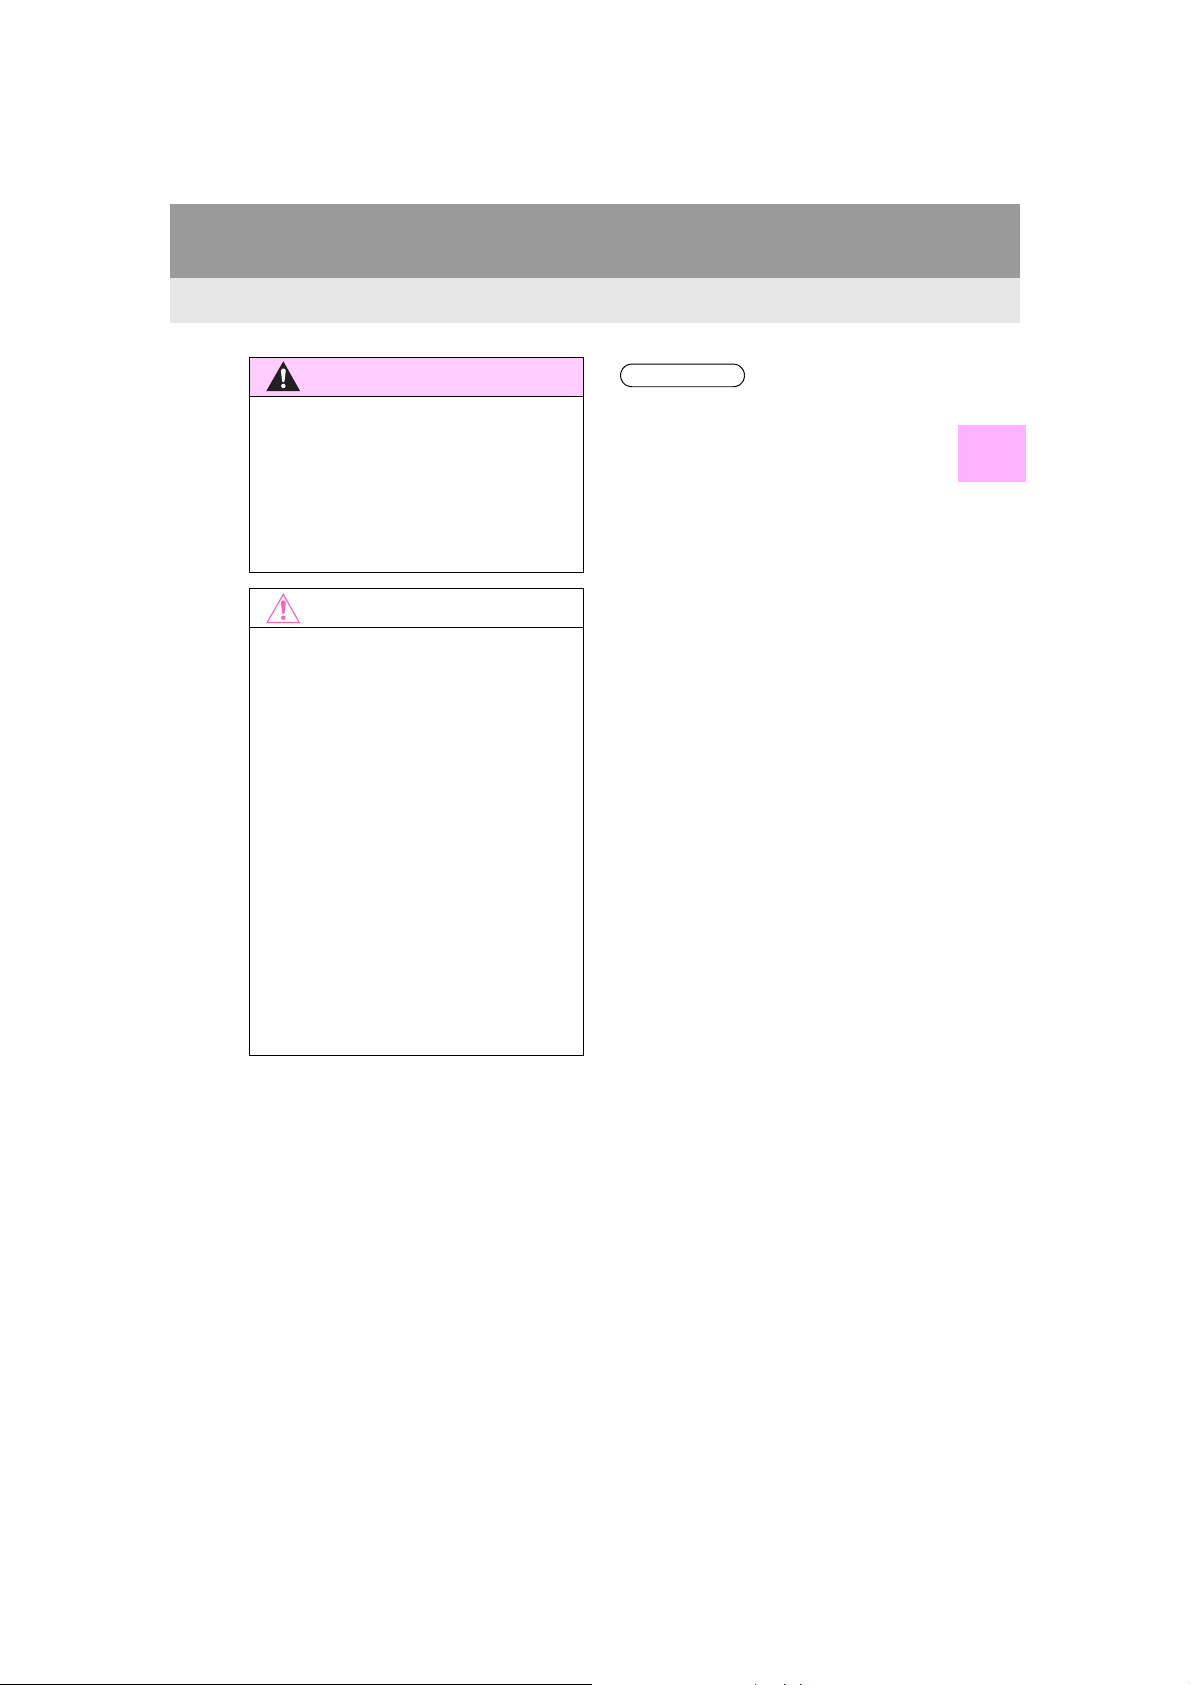
●Do not allow fingers, fingernails or hair to
become caught in the Remote Touch as
this may cause an injury.
●Be careful when touching the Remote
Touch in extreme temperatures as it may
become very hot or cold due to the temperature inside the vehicle.
●Do not allow the Remote Touch to come
into contact with food, liquid, stickers or lit
cigarettes as doing so may cause it to
change color, emit a strange odor or stop
functioning.
●Do not subject the Remote Touch to
excessive pressure or strong impact as
the knob may bend or break off.
●Do not allow coins, contact lenses or
other such items to become caught in the
Remote Touch as this may cause it to stop
functioning.
●Items of clothing may rip if they become
caught on the Remote Touch knob.
●If your hand or any object is on the
Remote Touch knob when the engine
<power> switch is in ACCESSORY
mode, the Remote Touch knob may not
operate properly.
●Under extremely cold conditions, the
Remote Touch knob may react slowly.
2
BASIC FUNCTION
35
GS_Navi+MM_OM30F12U_(U)
15.09.09 19:53
Page 36
1. BASIC INFORMATION BEFORE OPERATION
*: With 8-inch display
3. HOME SCREEN OPERATION*
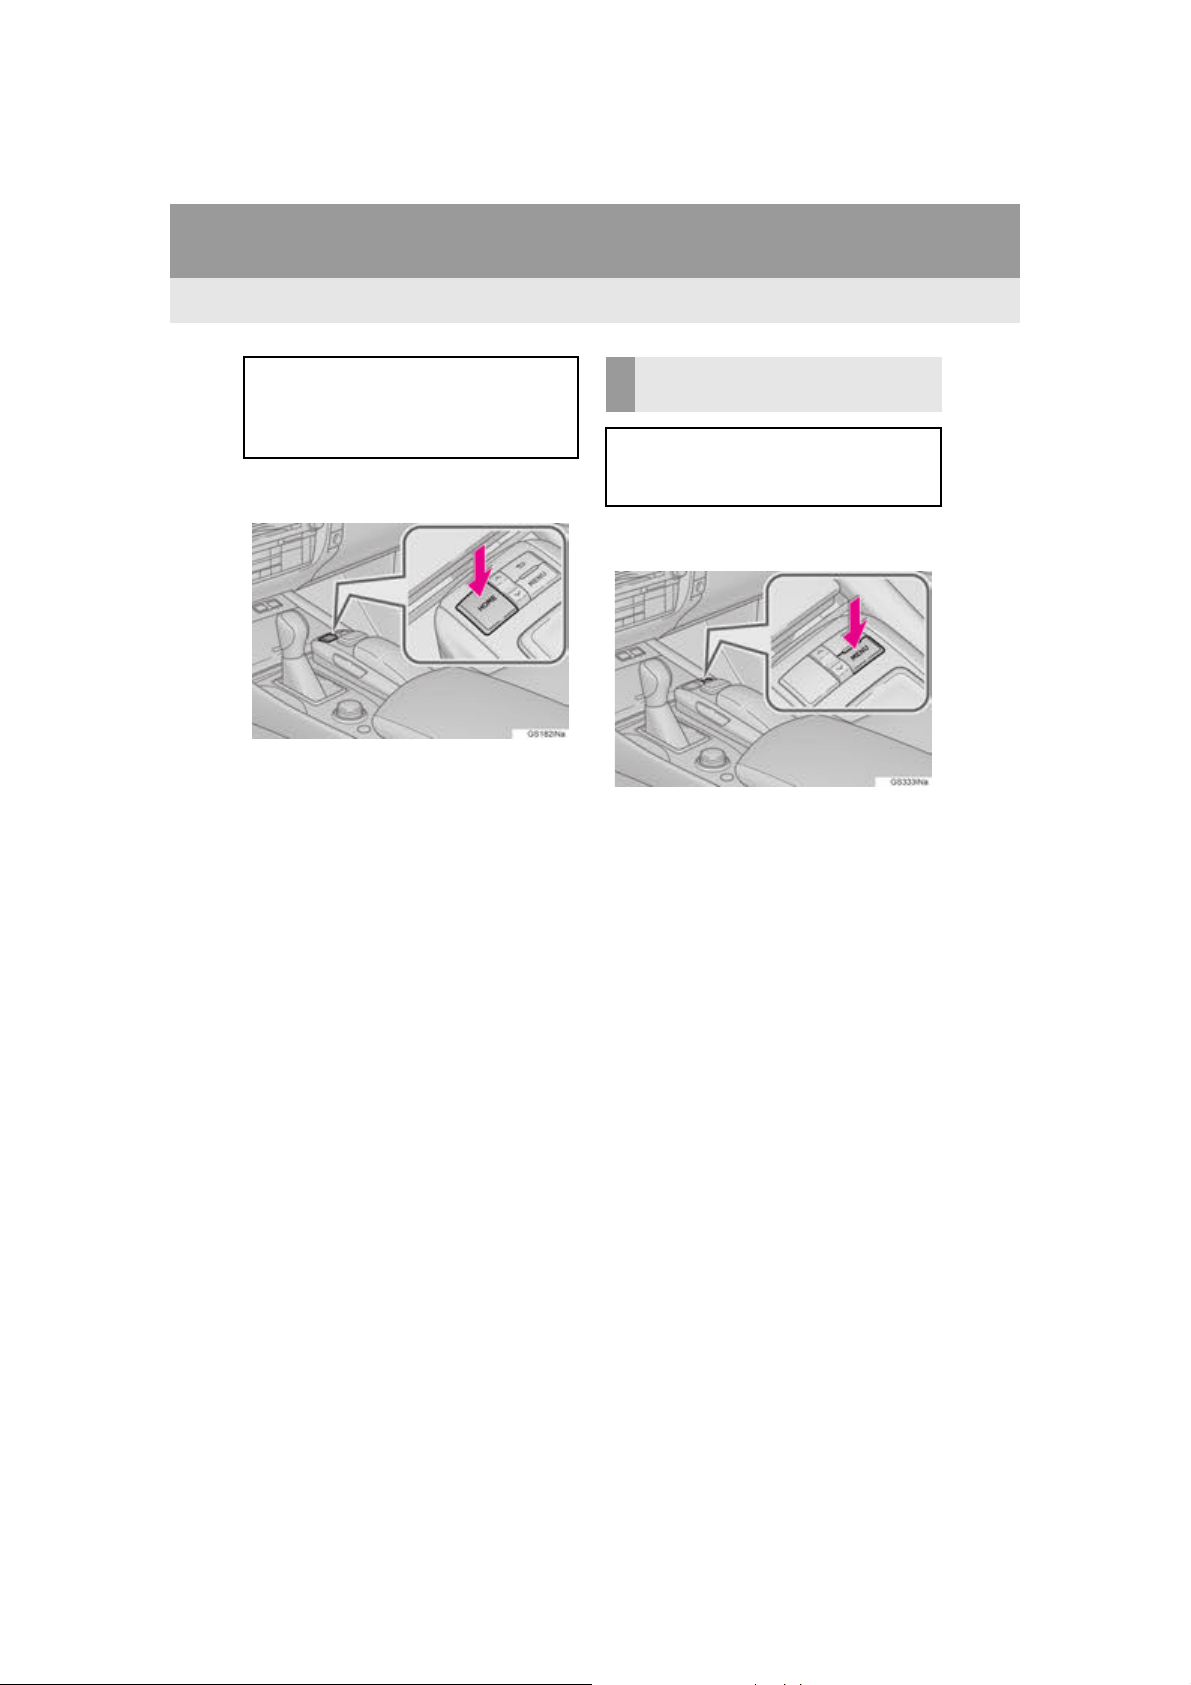
The home screen can display multiple
information screens, such as the audio
system screen and fuel consumption
screen, simultaneously.
1 Press the “HOME” button on the
Remote Touch.
2 Check that the home screen is dis-
played.
When a screen is selected, the selected
screen will change to a full screen display.
CUSTOMIZING THE HOME
SCREEN
The display items/area on the home
screen and the home screen layout can
be changed.
1 Press the “MENU” button on the
Remote Touch.
2 Select “Setup”.
3 Select “Customize Home Screen”.
36
GS_Navi+MM_OM30F12U_(U)
15.09.09 19:53
Page 37
1. BASIC INFORMATION BEFORE OPERATION
INFORMATION
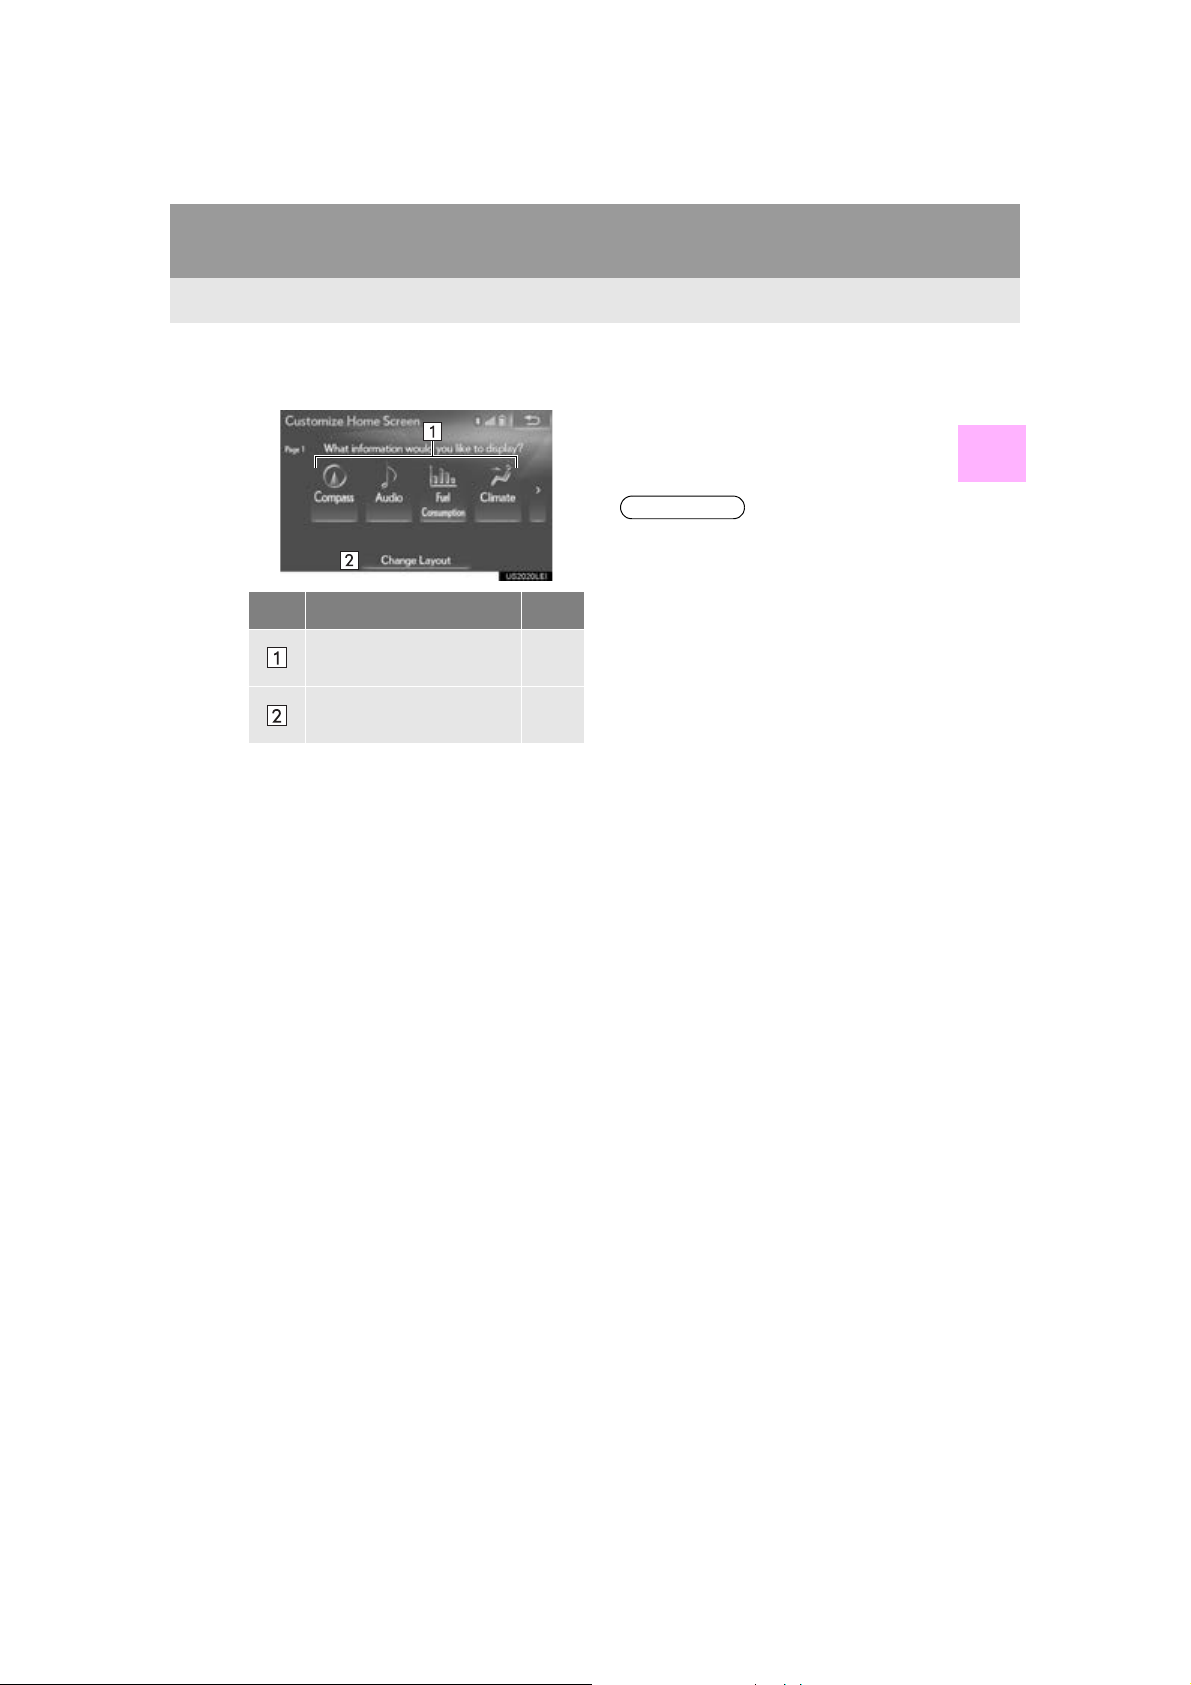
4 Check that “Customize Home Screen”
is displayed.
No. Function Page
Select to change the display items/area.
Select to change the home
screen layout.
37
37
■ CHANGING THE DISPLAY
ITEMS/AREA
1 Select the desired item.
2 Select the desired area.
●When the selected item is already being
displayed and another area is selected for
that item, the item that it is replacing will
be displayed in the original item’s location.
■ CHANGING THE HOME SCREEN
LAYOUT
1 Select “Change Layout”.
2 Select the desired screen layout.
2
BASIC FUNCTION
37
GS_Navi+MM_OM30F12U_(U)
15.09.09 19:53
Page 38
1. BASIC INFORMATION BEFORE OPERATION
4. ENTERING LETTERS AND NUMBERS/LIST SCREEN OPERATION
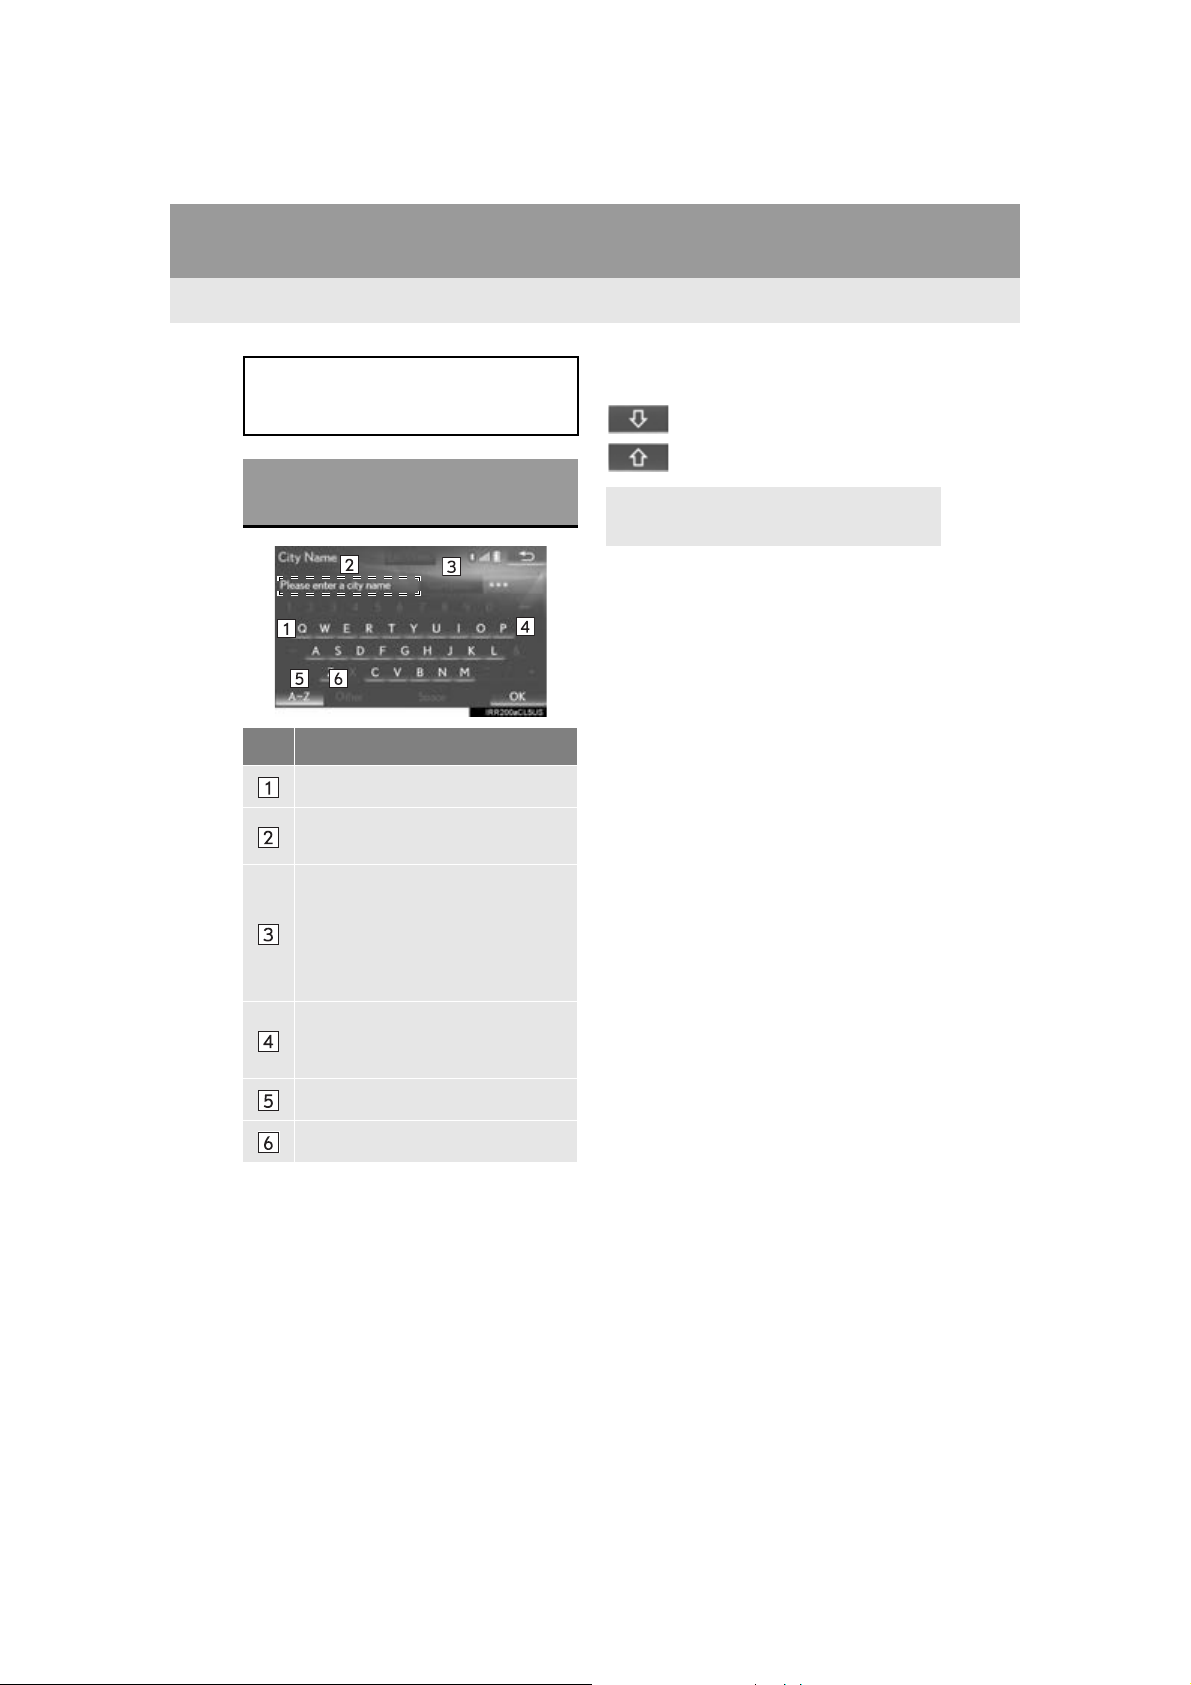
When searching by an address, name,
etc., or entering data, letters and numbers can be entered via the screen.
ENTERING LETTERS AND
NUMBERS
No. Function
Select to enter desired characters.
Text field. Entered character(s) will
be displayed.
During character entry, when there is
only one available option for the next
character(s), the next character(s)
will be displayed in gray text in the
text field automatically. Gray text is
entered by selecting this button.
On certain letter entry screens, letters can
be entered in upper or lower case.
: Select to enter in lower case.
: Select to enter in upper case.
Keyboard layout can be changed.
(P. 6 1 )
38
Select to erase one character. Select
and hold to continue erasing characters.
Select to display the alphabet keys.
Select to display other symbols.
GS_Navi+MM_OM30F12U_(U)
15.09.09 19:53
Page 39
LIST SCREEN
INFORMATION
LIST SCREEN OPERATION
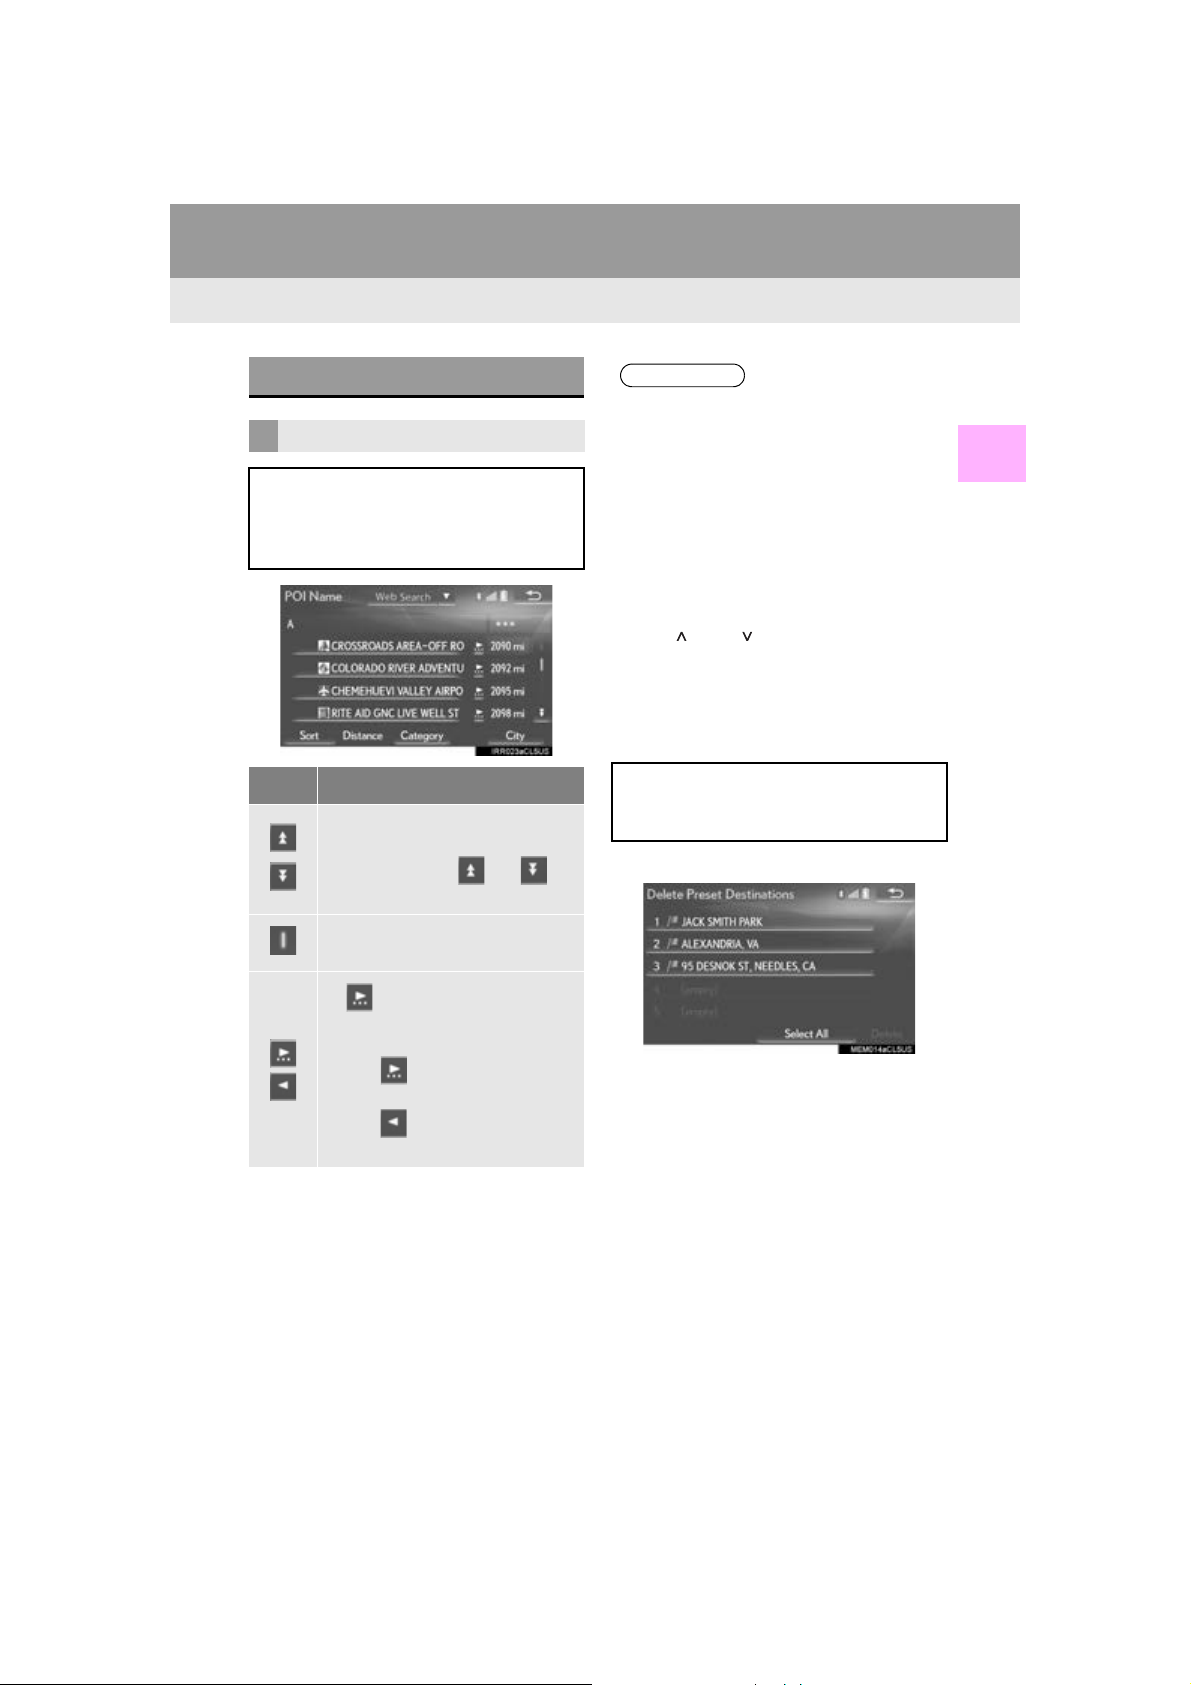
The list screen may be displayed after
entering characters. When a list is displayed, use the appropriate screen button to scroll through the list.
1. BASIC INFORMATION BEFORE OPERATION
●Matching items from the database are
listed even if the entered address or name
is incomplete.
●The list will be displayed automatically if
the maximum number of characters is
entered or matching items can be displayed on a single list screen.
●The number of matching items is shown
on the right side of the screen. If the number of matching items is more than 999,
the system displays “” on the screen.
●The “” and “” buttons on the Remote
Touch can be used to scroll up and down
on list screens.
■ SELECTING ALL ITEMS
2
BASIC FUNCTION
Icon Function
Select to skip to the next or previous page.
Select and hold or to
scroll through the displayed list.
This indicates the displayed
screen’s position.
If appears to the right of an
item name, the complete name is
too long to display.
Select to scroll to the end of
the name.
Select to move to the beginning of the name.
Some lists contain “Select All”. If
“Select All” is selected, it is possible to
select all items.
1 Select “Select All”.
“Unselect All”: Unselect all items in the list.
39
GS_Navi+MM_OM30F12U_(U)
15.09.09 19:53
Page 40
1. BASIC INFORMATION BEFORE OPERATION
*: With 12.3-inch display
INFORMATION
SORTING*
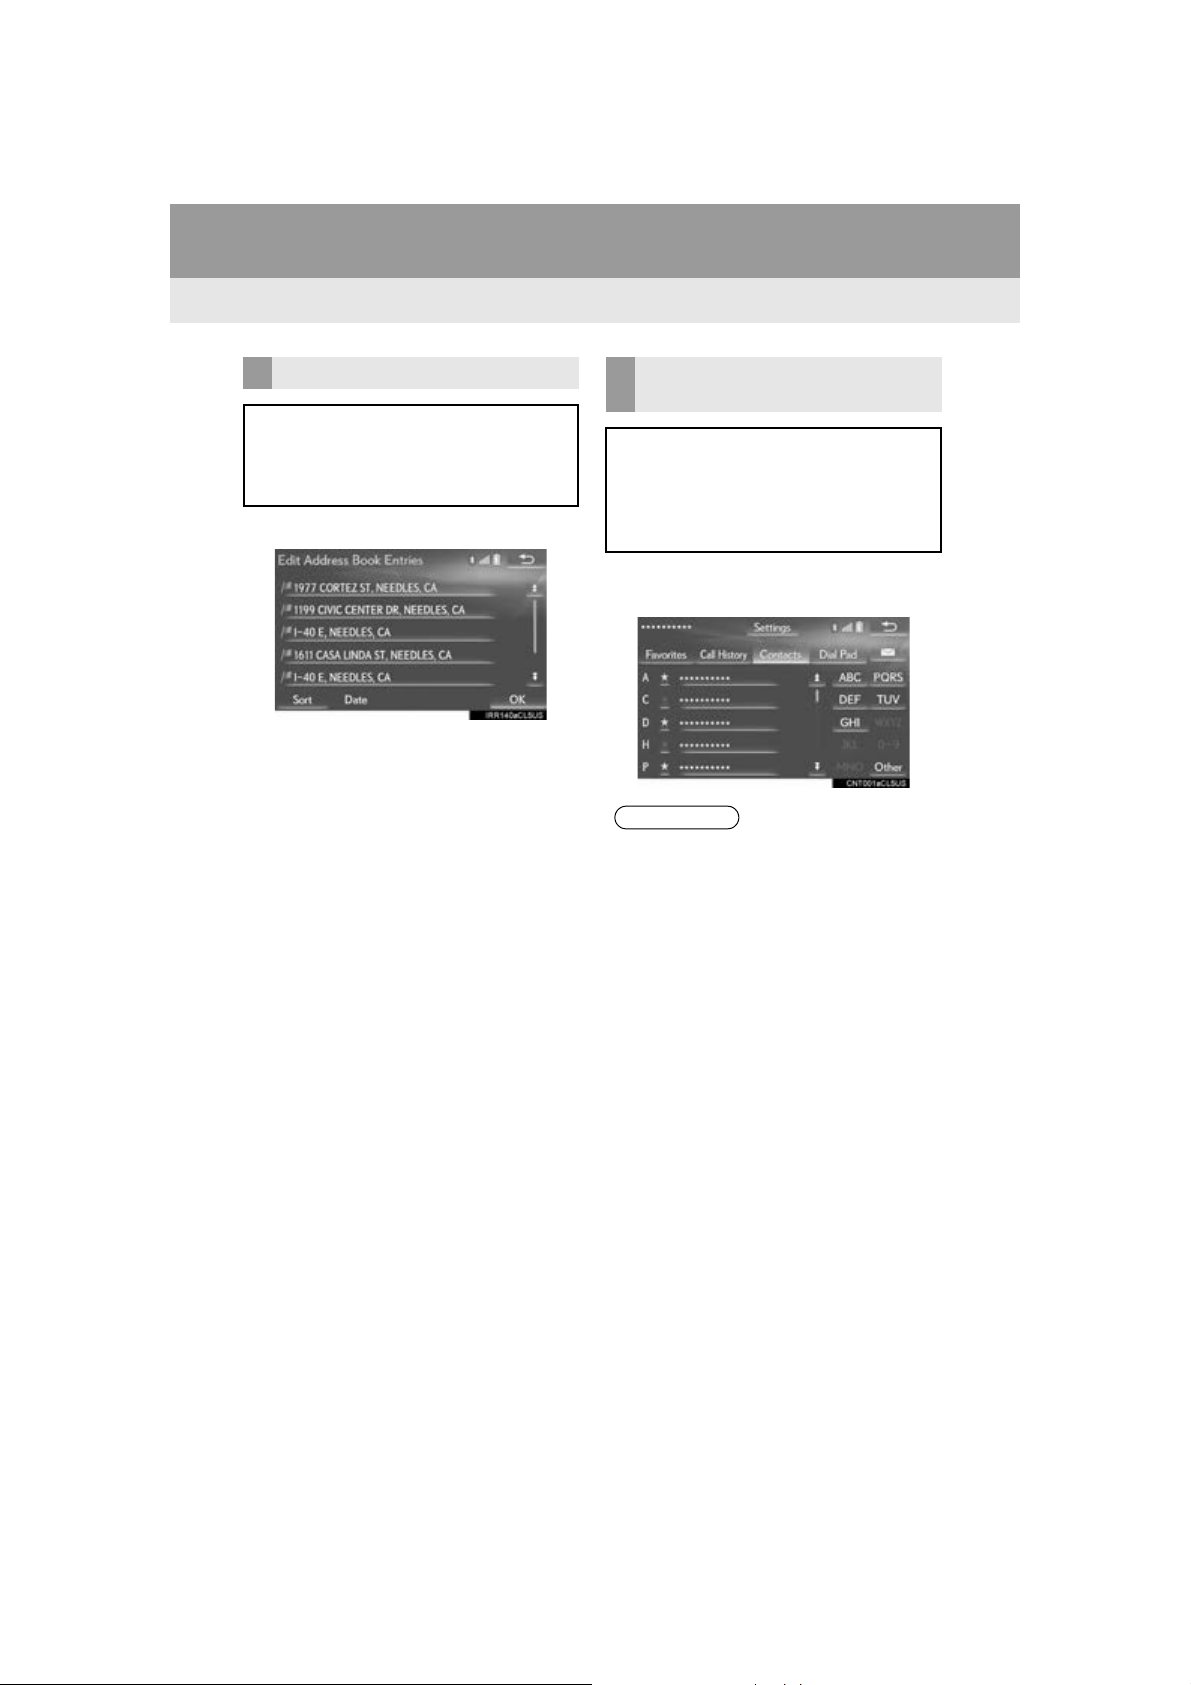
The order of a list displayed on the
screen can be sorted in the order of distance from the current location, date,
category, etc.
1 Select “Sort”.
2 Select the desired sorting criteria.
CHARACTER JUMP BUTTONS
IN LISTS
Some lists contain character screen buttons, “A B C ”, “DEF” etc., which allow a
direct jump to list entries that begin with
the same letter as the character screen
button.
1 Select the desired character jump but-
tons.
●Every time the same character screen
button is selected, the list starting with the
subsequent character is displayed.
40
GS_Navi+MM_OM30F12U_(U)
15.09.09 19:53
Page 41
1. BASIC INFORMATION BEFORE OPERATION
5. SCREEN ADJUSTMENT
The contrast and brightness of the
screen display and the image of the
camera display can be adjusted. The
screen can also be turned off, and/or
changed to either day or night mode.
(For information regarding audio/visual
screen adjustment:
P.154)
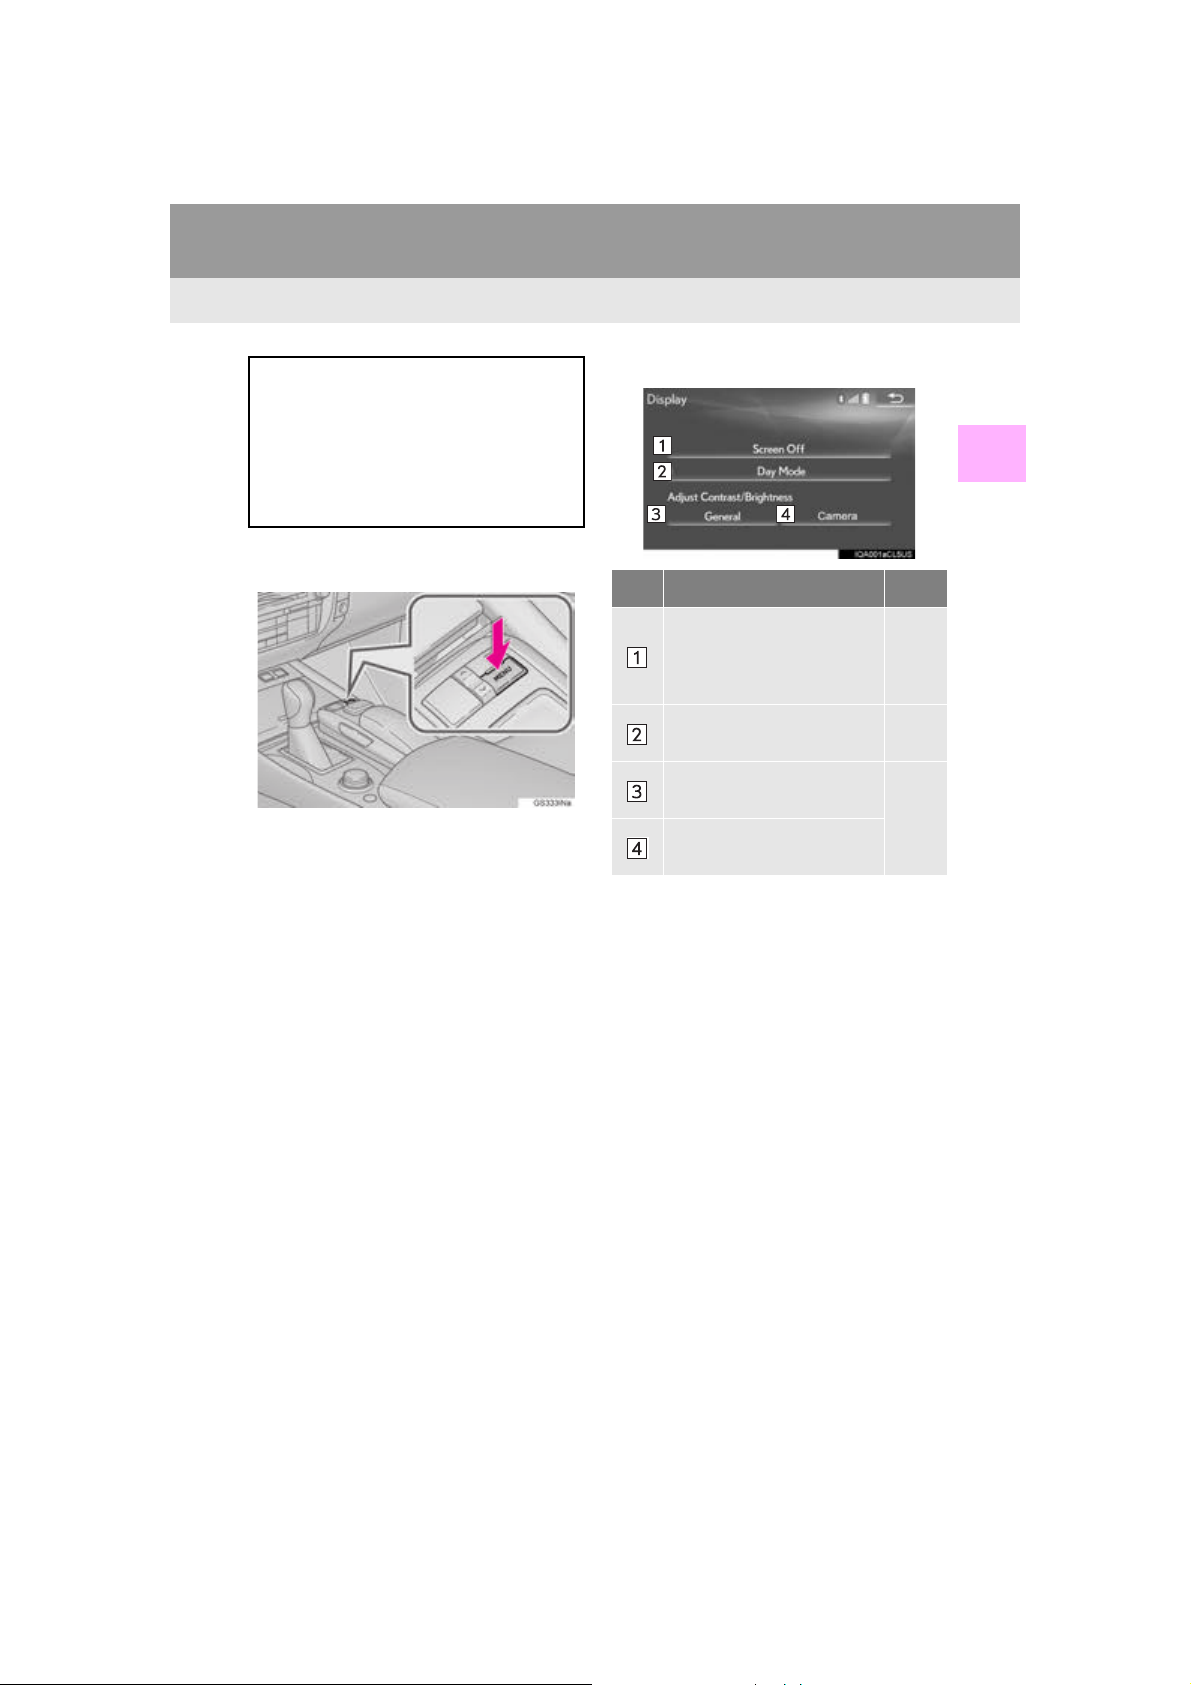
1 Press the “MENU” button on the
Remote Touch.
2 Select “Display”.
3 Select the items to be set.
No. Function Page
Select to turn the screen off.
To turn it on, press any button on the audio panel or on
the Remote Touch.
Select to turn day mode
on/off.
Select to adjust the screen
display.
Select to adjust the camera
display.
2
BASIC FUNCTION
42
42
GS_Navi+MM_OM30F12U_(U)
15.09.09 19:53
41
Page 42
1. BASIC INFORMATION BEFORE OPERATION
INFORMATION
INFORMATION
CHANGING BETWEEN DAY
AND NIGHT MODE
Depending on the position of the headlight switch, the screen changes to day
or night mode. This feature is available
when the headlight is switched on.
1 Select “Day Mode”.
●If the screen is set to day mode with the
headlight switch turned on, this condition
is memorized even with the engine
<hybrid system> turned off.
ADJUSTING THE CONTRAST/
BRIGHTNESS
The contrast and brightness of the
screen can be adjusted according to the
brightness of your surroundings.
1 Select “General” or “Came ra”.
2 Select the desired item.
“Display (General)” screen only: Select “”
or “” to select the desired display.
Screen button Function
“Contrast” “+”
“Contrast” “-”
“Brightness” “+”
“Brightness” “-”
Select to strengthen the
contrast of the screen.
Select to weaken the
contrast of the screen.
Select to brighten the
screen.
Select to darken the
screen.
42
●The side screen will be adjusted to the
same image quality as the main screen.
GS_Navi+MM_OM30F12U_(U)
15.09.09 19:53
Page 43
1. BASIC INFORMATION BEFORE OPERATION
*: With 12.3-inch display
6. LINKING MULTI-INFORMATION DISPLAY AND NAVIGATION SYSTEM
The following functions of the navigation system are linked with the multi-information
display in the instrument cluster:
• Navigation*
•Audio
etc.
These functions can be operated using multi-information display control switches on
the steering wheel. For details, refer to “Owner’s Manual”.
2
BASIC FUNCTION
GS_Navi+MM_OM30F12U_(U)
15.09.09 19:53
43
Page 44
2. Bluetooth® SETTINGS
1. REGISTERING/CONNECTING Bluetooth® DEVICE
REGISTERING A Bluetooth®
PHONE FOR THE FIRST TIME
To use the hands-free system, it is neces-
®
sary to register a Bluetooth
phone with
the system.
Once the phone has been registered, it
is possible to use the hands-free system.
This operation cannot be performed
while driving.
For details about registering a
Bluetooth
1 Turn the Bluetooth
®
device: P.51
®
connection setting
of your cellular phone on.
This function is not available when
Bluetooth
lular phone is set to off.
®
connection setting of your cel-
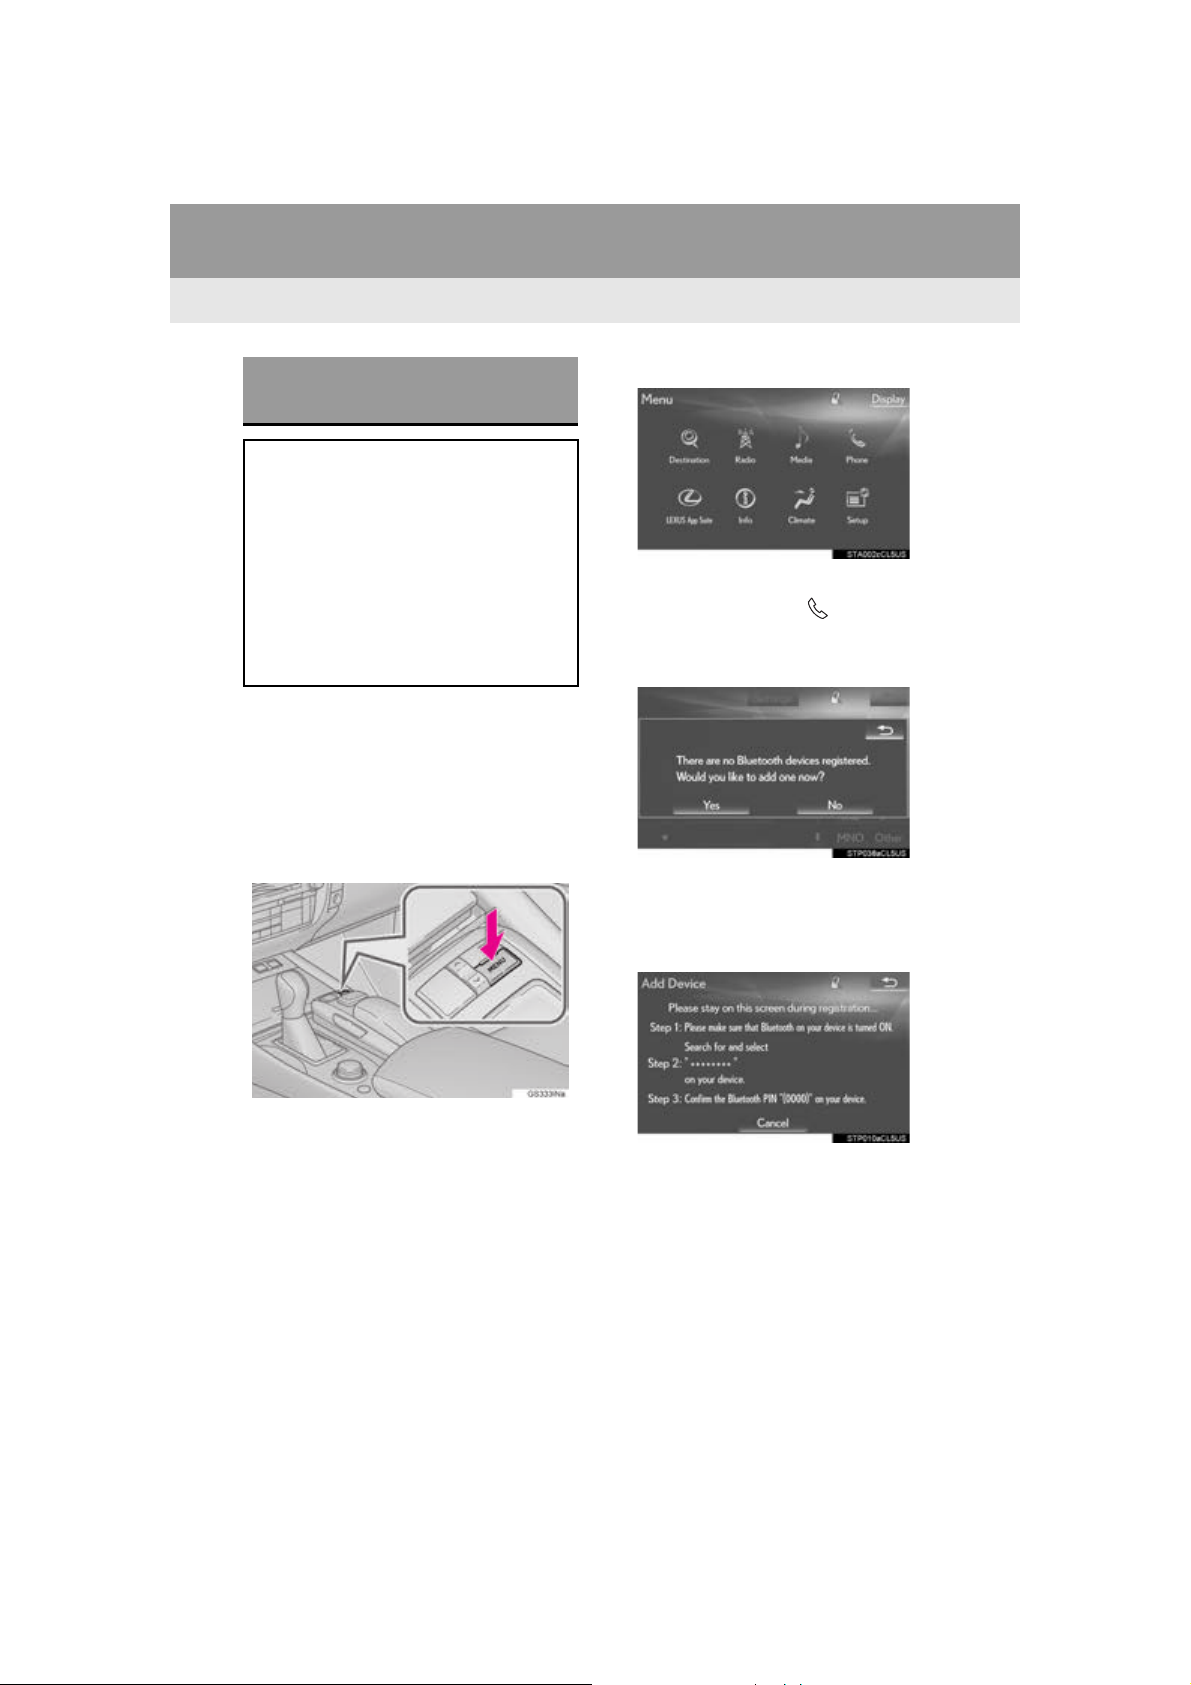
2 Press the “MENU” button on the
Remote Touch.
3 Select “Phone”.
Operations up to this point can also be per-
formed by pressing the switch on the
steering wheel.
4 Select “Yes” to register a phone.
5 When this screen is displayed, search
for the device name displayed on this
screen on the screen of your
Bluetooth
®
device.
44
For details about operating the Bluetooth
device, see the manual that comes with it.
To cancel the registration, select “Can cel” .
GS_Navi+MM_OM30F12U_(U)
15.09.09 19:53
®
Page 45
2. Bluetooth® SETTINGS
INFORMATION
device.
®
device using
6 Register the Bluetooth
your Bluetooth
®
A PIN code is not required for SSP (Secure
Simple Pairing) compatible Bluetooth
devices. Depending on the type of Blue-
®
tooth
device being connected, a message
confirming registration may be displayed
on the Bluetooth
®
device’s screen.
Respond and operate the Bluetooth
device according to the confirmation message.
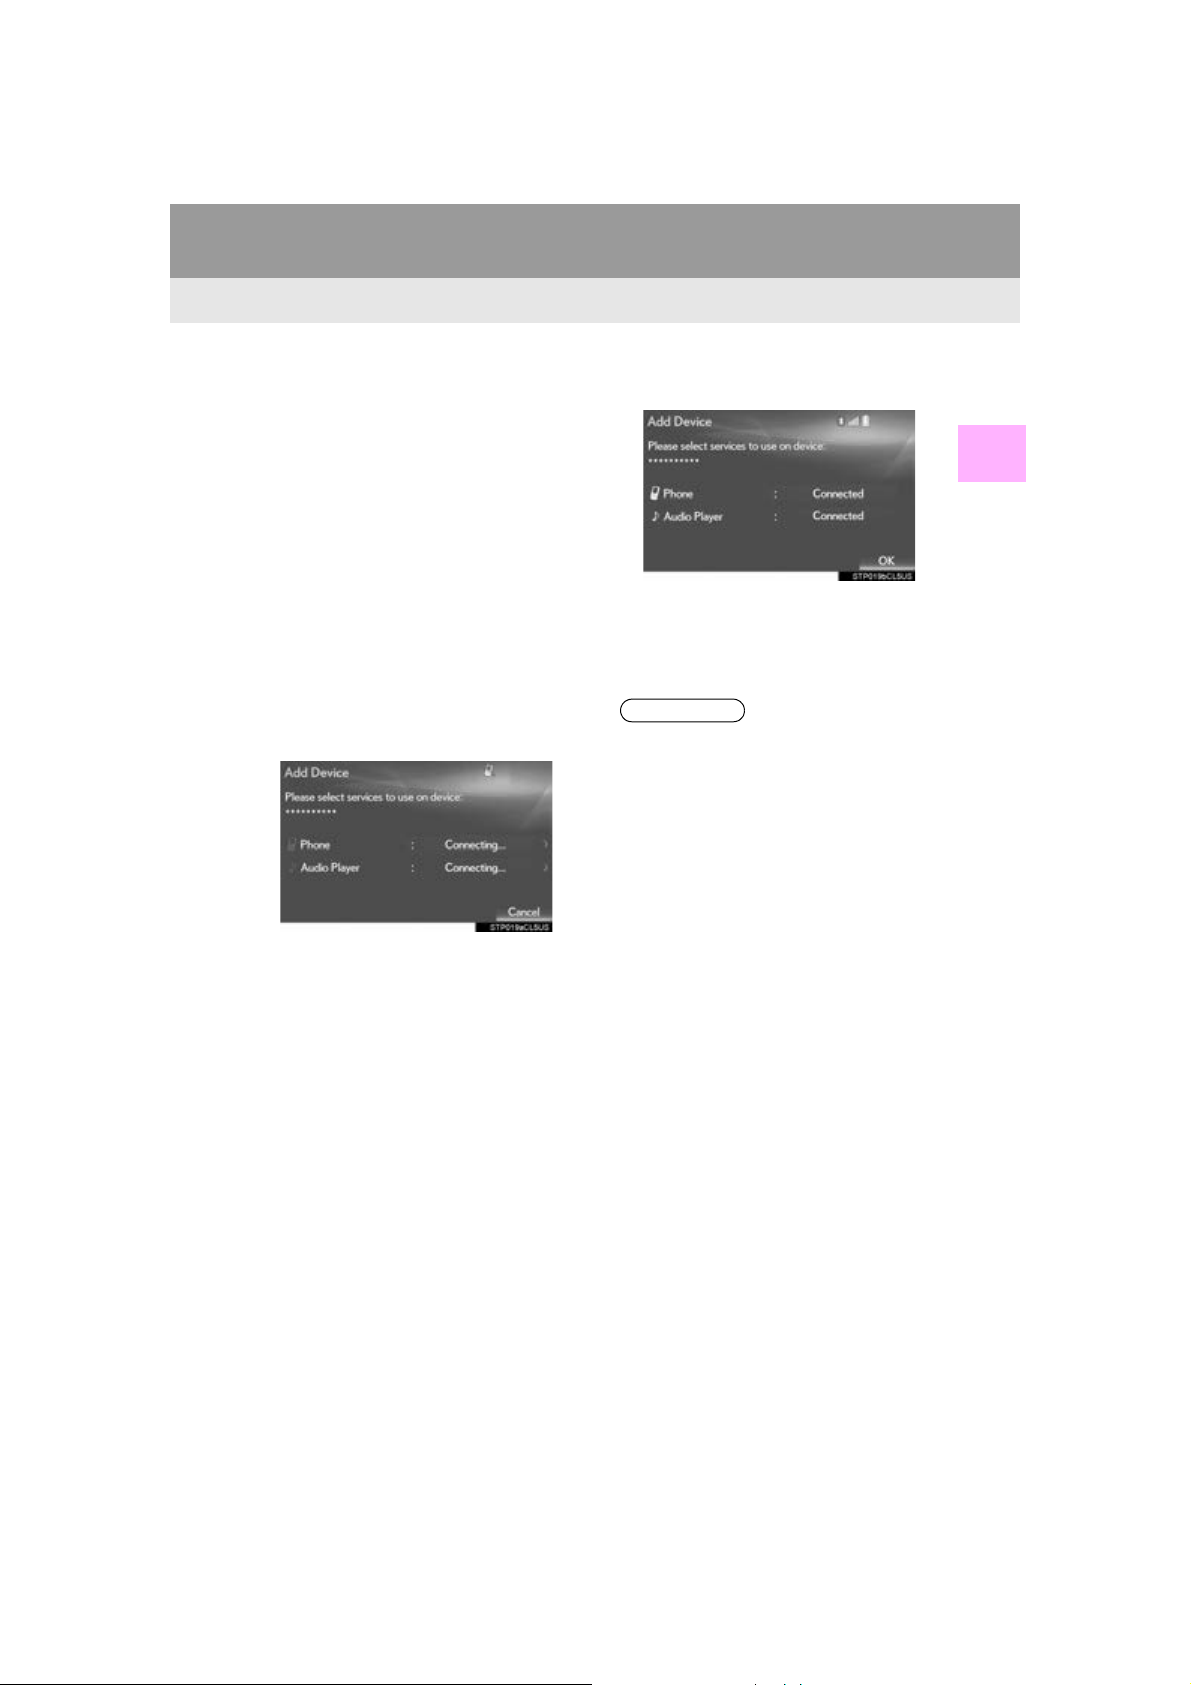
7 Check that the following screen is dis-
played, indicating pairing was successful (a Bluetooth® link has been
established but registration is not yet
complete).
8 Check that “Connected” is displayed
and registration is complete.
®
®
If displayed, select “OK” to complete the
registration process.
If an error message is displayed, follow the
guidance on the screen to try again.
●If a cellular phone does not operate prop-
erly after being connected, turn the cellular phone off and on and then connect it
again.
2
BASIC FUNCTION
The system waits for connection requests
coming from the registered device.
At this stage, the Bluetooth
®
functions are
not yet available.
To cancel the registration, select “Can cel”.
45
GS_Navi+MM_OM30F12U_(U)
15.09.09 19:53
Page 46
2. Bluetooth® SETTINGS
REGISTERING A Bluetooth®
AUDIO PLAYER FOR THE
FIRST TIME
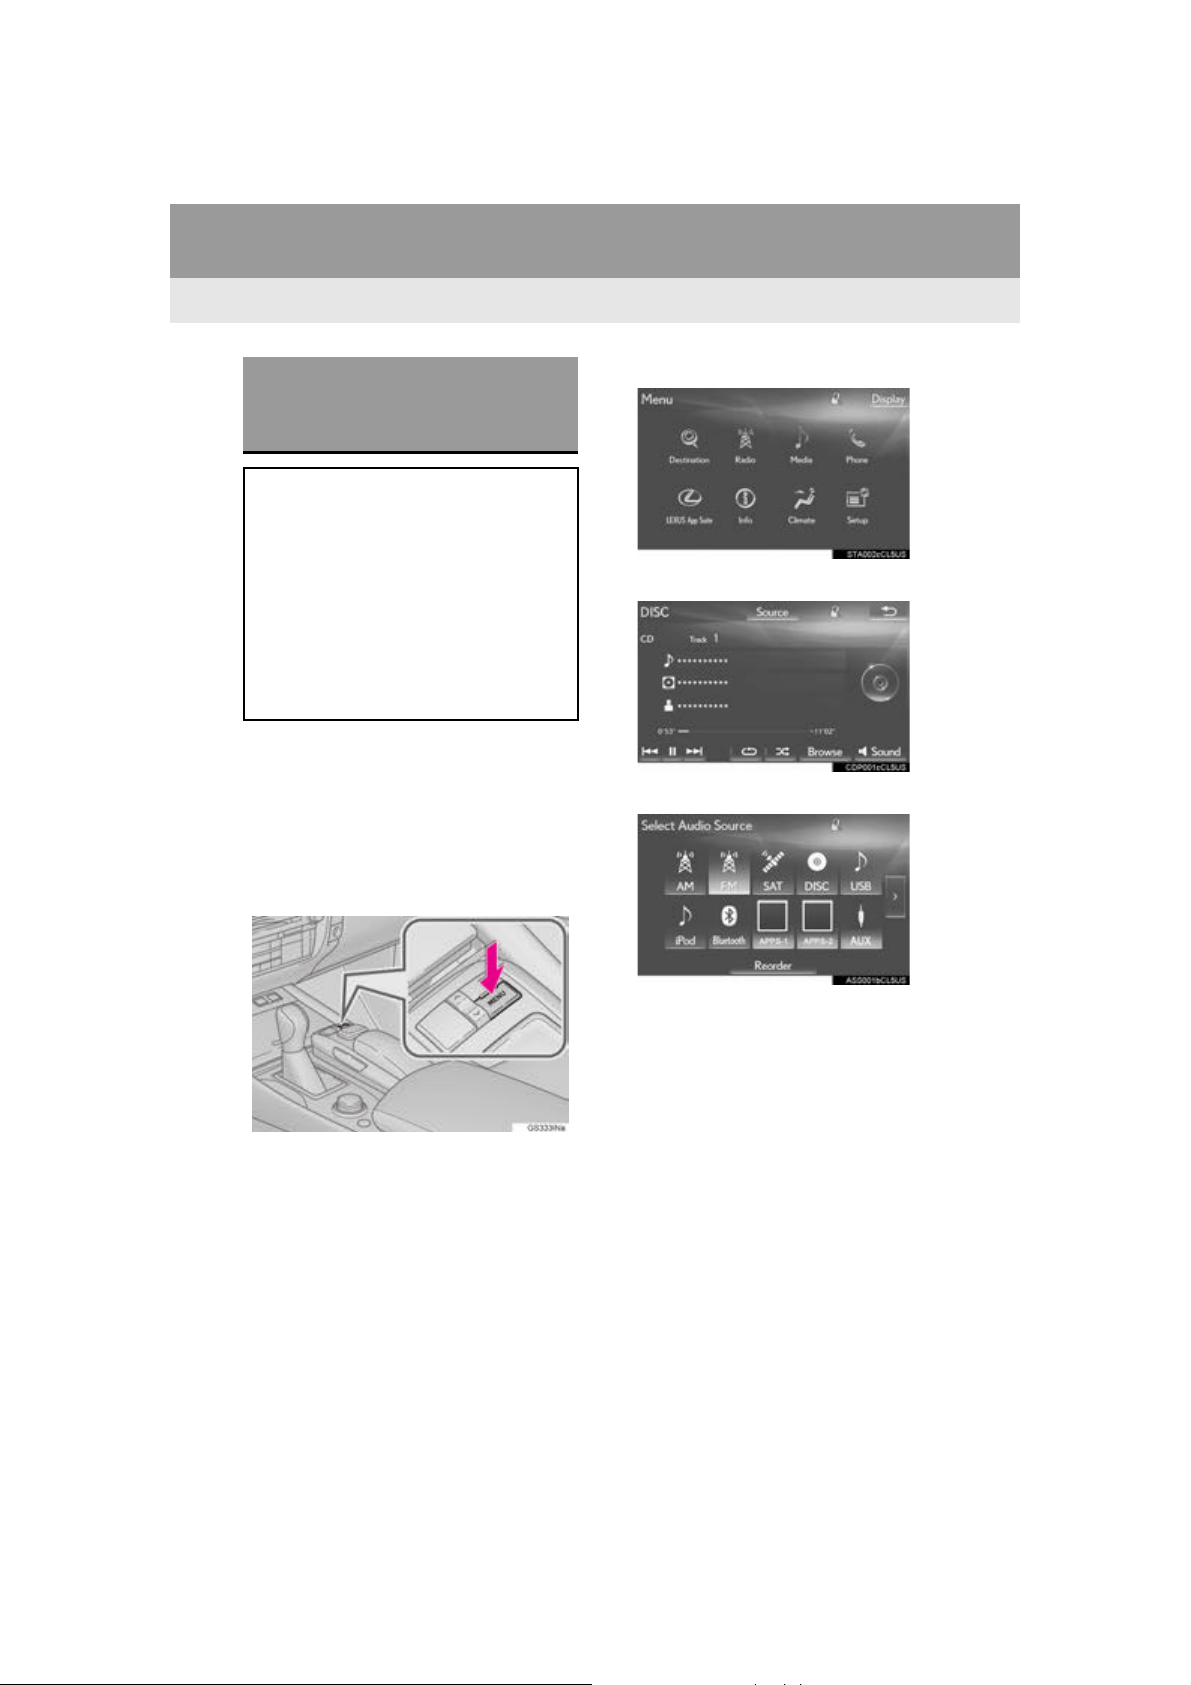
To use the Bluetooth® Audio, it is necessary to register an audio player with
the system.
Once the player has been registered, it
is possible to use the Bluetooth
®
Audio.
This operation cannot be performed
while driving.
For details about registering a
Bluetooth® device: P.51
1 Turn the Bluetooth
of your audio player on.
This function is not available when the
Bluetooth
audio player is set to off.
®
connection setting of your
®
connection setting
2 Press the “MENU” button on the
Remote Touch.
3 Select “Radio” or “Media”.
4 Select “Source”.
5 Select “Bluetooth*”.
46
*: The Bluetooth
registered trademarks owned by Bluetooth SIG, Inc.
GS_Navi+MM_OM30F12U_(U)
15.09.09 19:53
®
word mark and logos are
Page 47
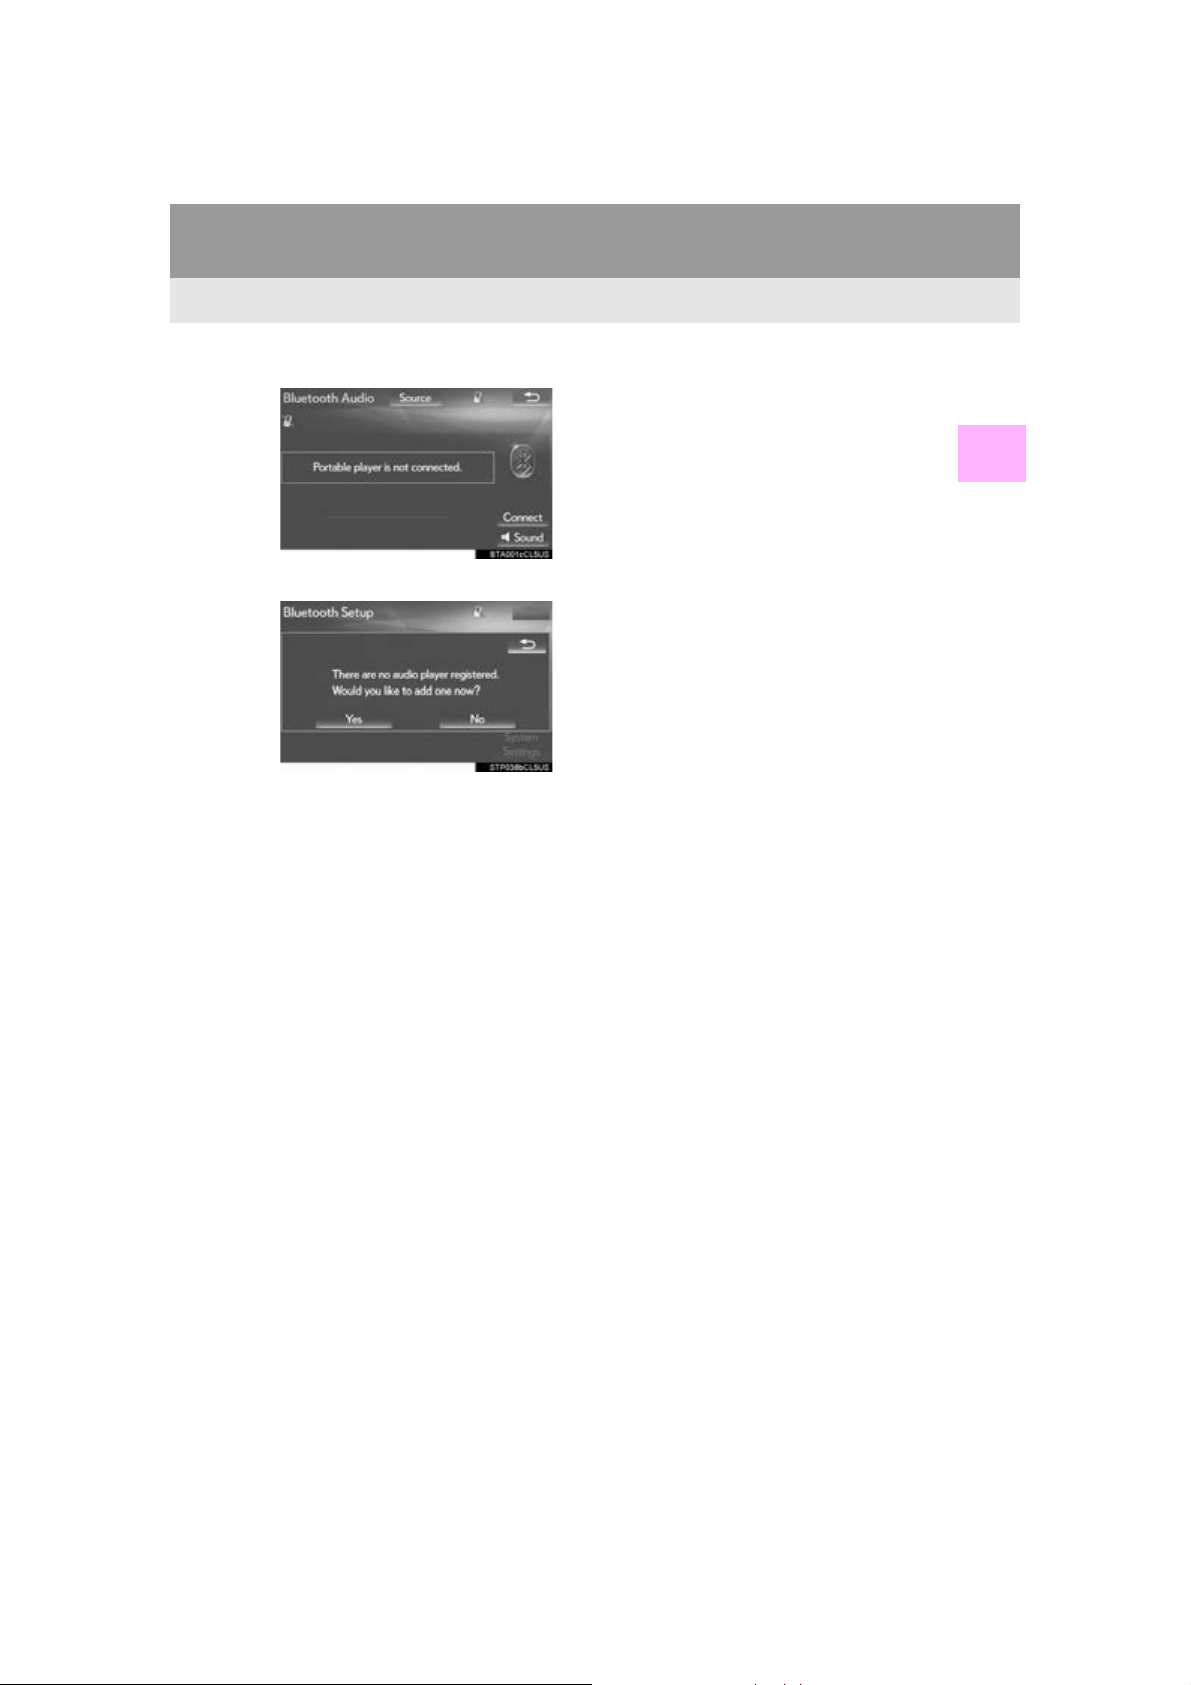
6 Select “Connect”.
7 Select “Yes” to register a audio player.
8 Follow the steps in “REGISTERING A
Bluetooth
TIME” from “STEP 5”. (P.44)
®
PHONE FOR THE FIRST
2. Bluetooth® SETTINGS
2
BASIC FUNCTION
GS_Navi+MM_OM30F12U_(U)
15.09.09 19:53
47
Page 48
2. Bluetooth® SETTINGS
PROFILES
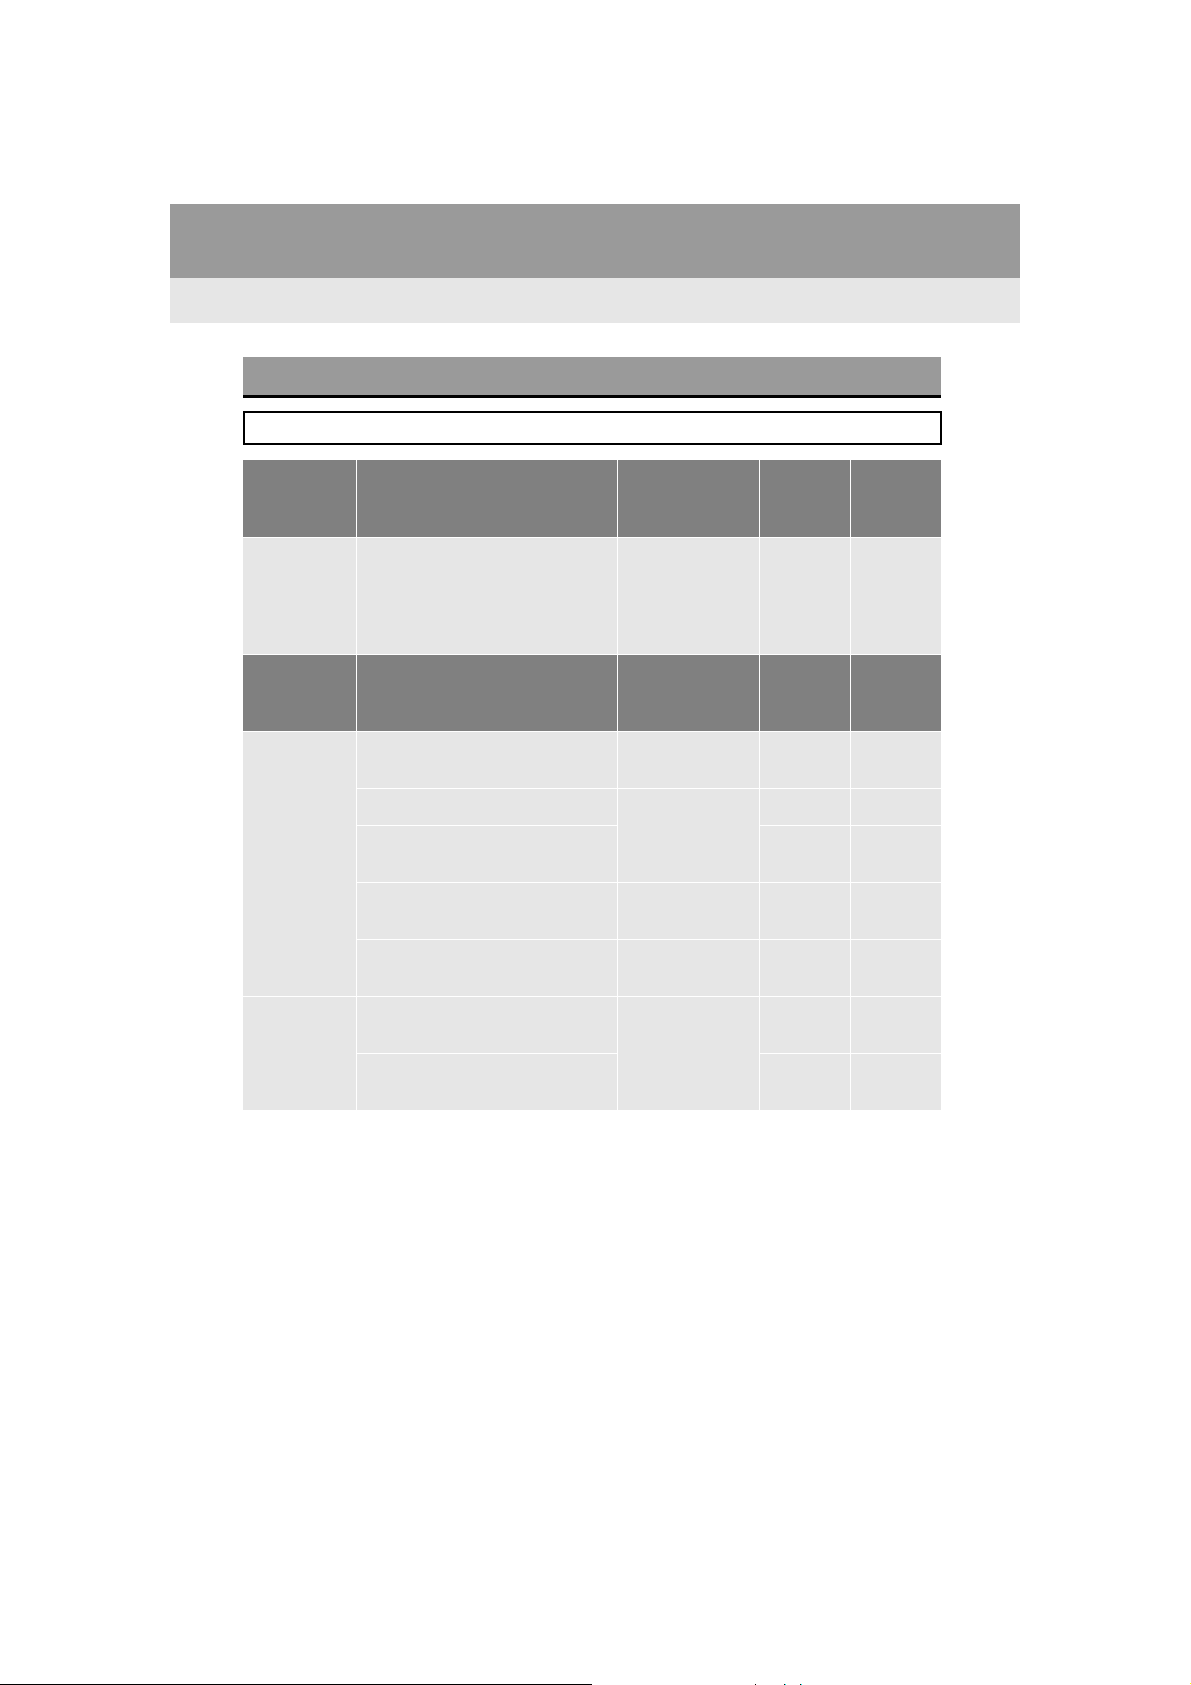
This system supports the following services.
Bluetooth®
Device
Bluetooth
Phone/
Bluetooth
Audio
Player
Bluetooth®
Device
Bluetooth
Phone
Bluetooth
Audio
Player
Spec. Function
®
®
Bluetooth® Specification
Profile Function
HFP (Hands-Free Profile)
OPP (Object Push Profile)
PBAP (Phone Book Access
®
Profile)
MAP (Message Access Profile)
SPP (Serial Port Profile)
A2DP (Advanced Audio Distri-
®
bution Profile)
AVRCP (Audio/Video Remote
Control Profile)
Registering a
®
Bluetooth
de-
vice
Hands-free
system
Transferring the
contacts
Bluetooth
®
phone message
“LEXUS App
Suite” function
Bluetooth® audio system
Require-
ments
Ve r. 2 . 0
Require-
ments
Recommenda-
tions
Ve r. 3 . 0
+EDR
Recommenda-
tions
Ver. 1.0 Ver. 1.6
Ve r.1 .1 Ve r. 1 . 2
Ver. 1.0 Ver. 1.1
Ver. 1.0
Ve r. 1 .2
Ver. 1.0 Ver. 1. 3
Ver. 1.0 Ver. 1. 5
48
GS_Navi+MM_OM30F12U_(U)
15.09.09 19:53
Page 49

2. Bluetooth® SETTINGS
INFORMATION
●If your cellular phone does not support HFP, registering the Bluetooth® phone or using
OPP, PBAP, MAP or SPP profiles individually will not be possible.
®
●If the connected Bluetooth
the Bluetooth
®
device function may not work properly.
●Refer to http://www.lexus.com/MobileLink
device version is older than recommended or incompatible,
to find approved Bluetooth® phones for this
system.
The Bluetooth® word mark and logos are registered trademarks owned by Bluetooth
SIG, Inc. and any use of such marks by PIONEER CORPORATION is under license.
Other trademarks and trade names are those of their respective owners.
2
BASIC FUNCTION
49
GS_Navi+MM_OM30F12U_(U)
15.09.09 19:53
Page 50
2. Bluetooth® SETTINGS
2. SETTING Bluetooth® DETAILS
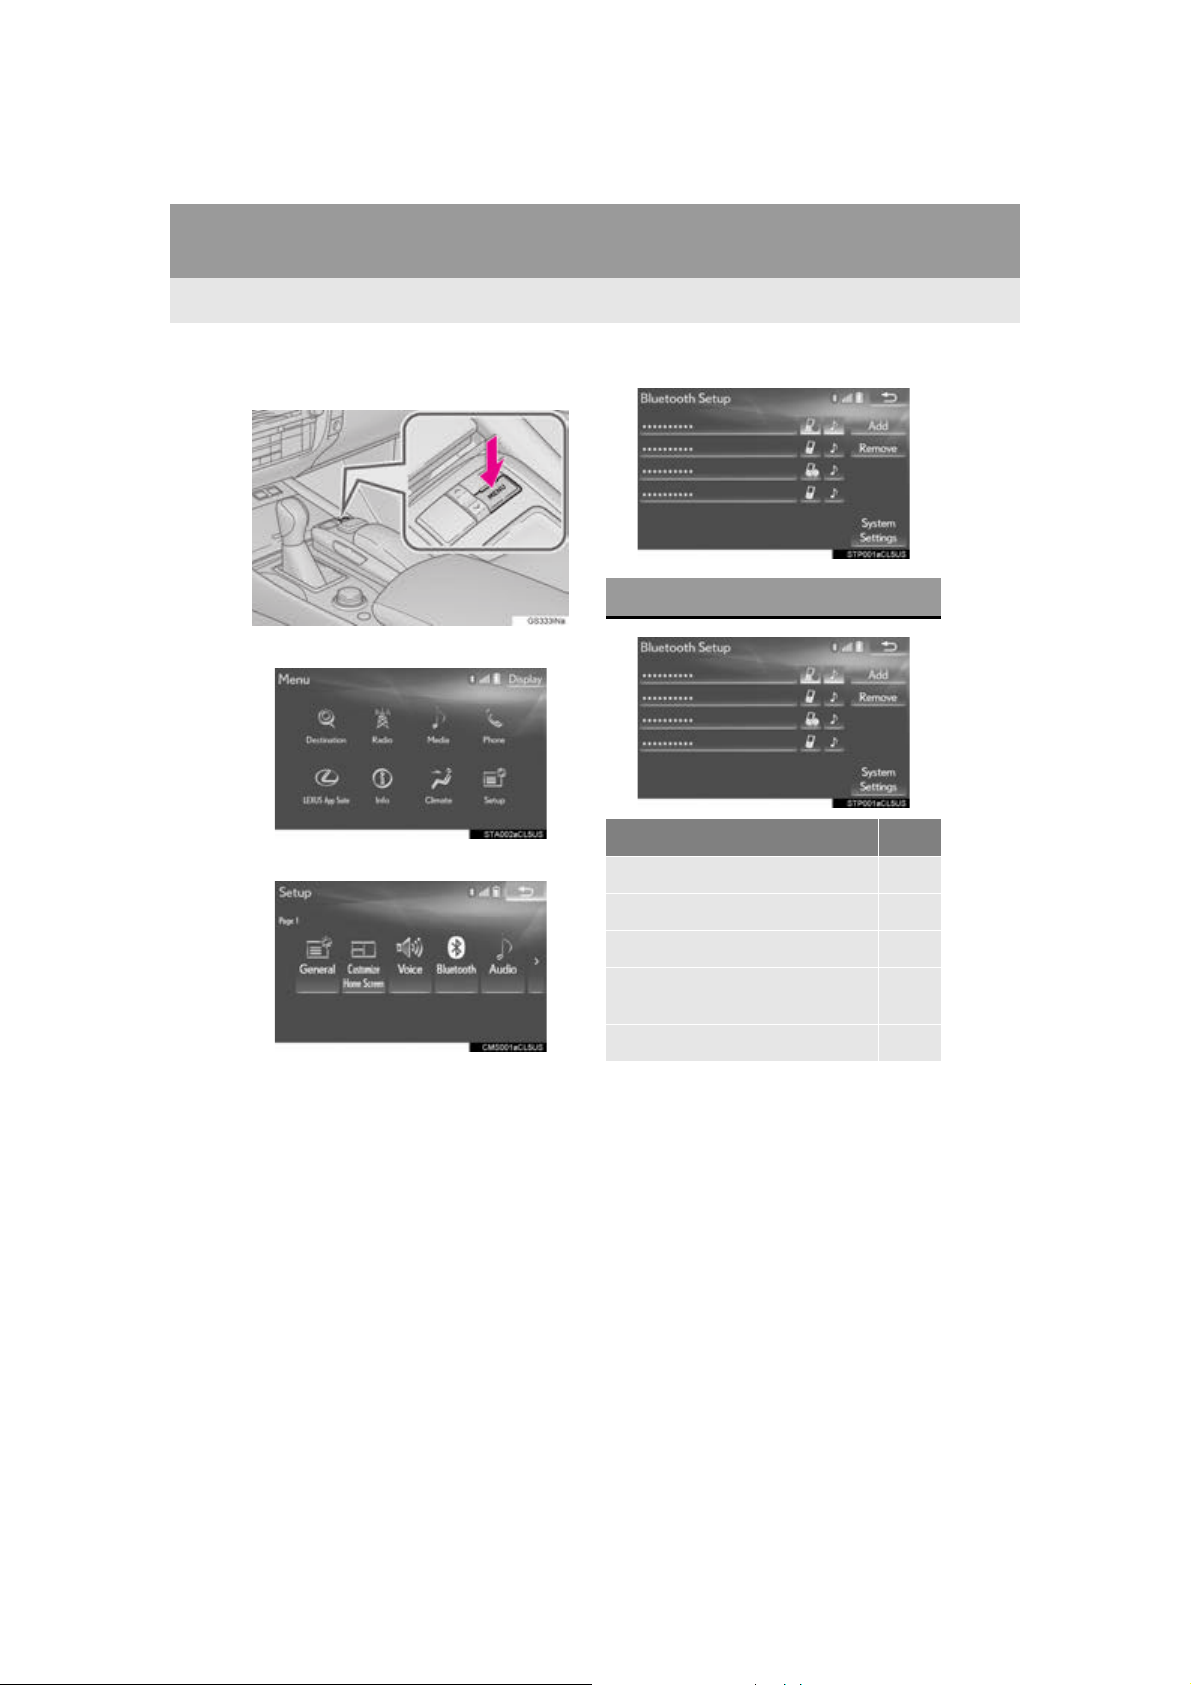
1 Press the “MENU” button on the
Remote Touch.
2 Select “Setup”.
3 Select “Bluetooth*”.
4 Select the desired item to be set.
“Bluetooth* Setup” SCREEN
Function Page
Registering a Bluetooth® device 51
Deleting a Bluetooth® device 53
Connecting a Bluetooth® device 53
50
Editing the Bluetooth® device information
Bluetooth® system settings 57
®
*: The Bluetooth
word mark and logos are
registered trademarks owned by Bluetooth SIG, Inc.
55
GS_Navi+MM_OM30F12U_(U)
15.09.09 19:53
Page 51
2. Bluetooth® SETTINGS
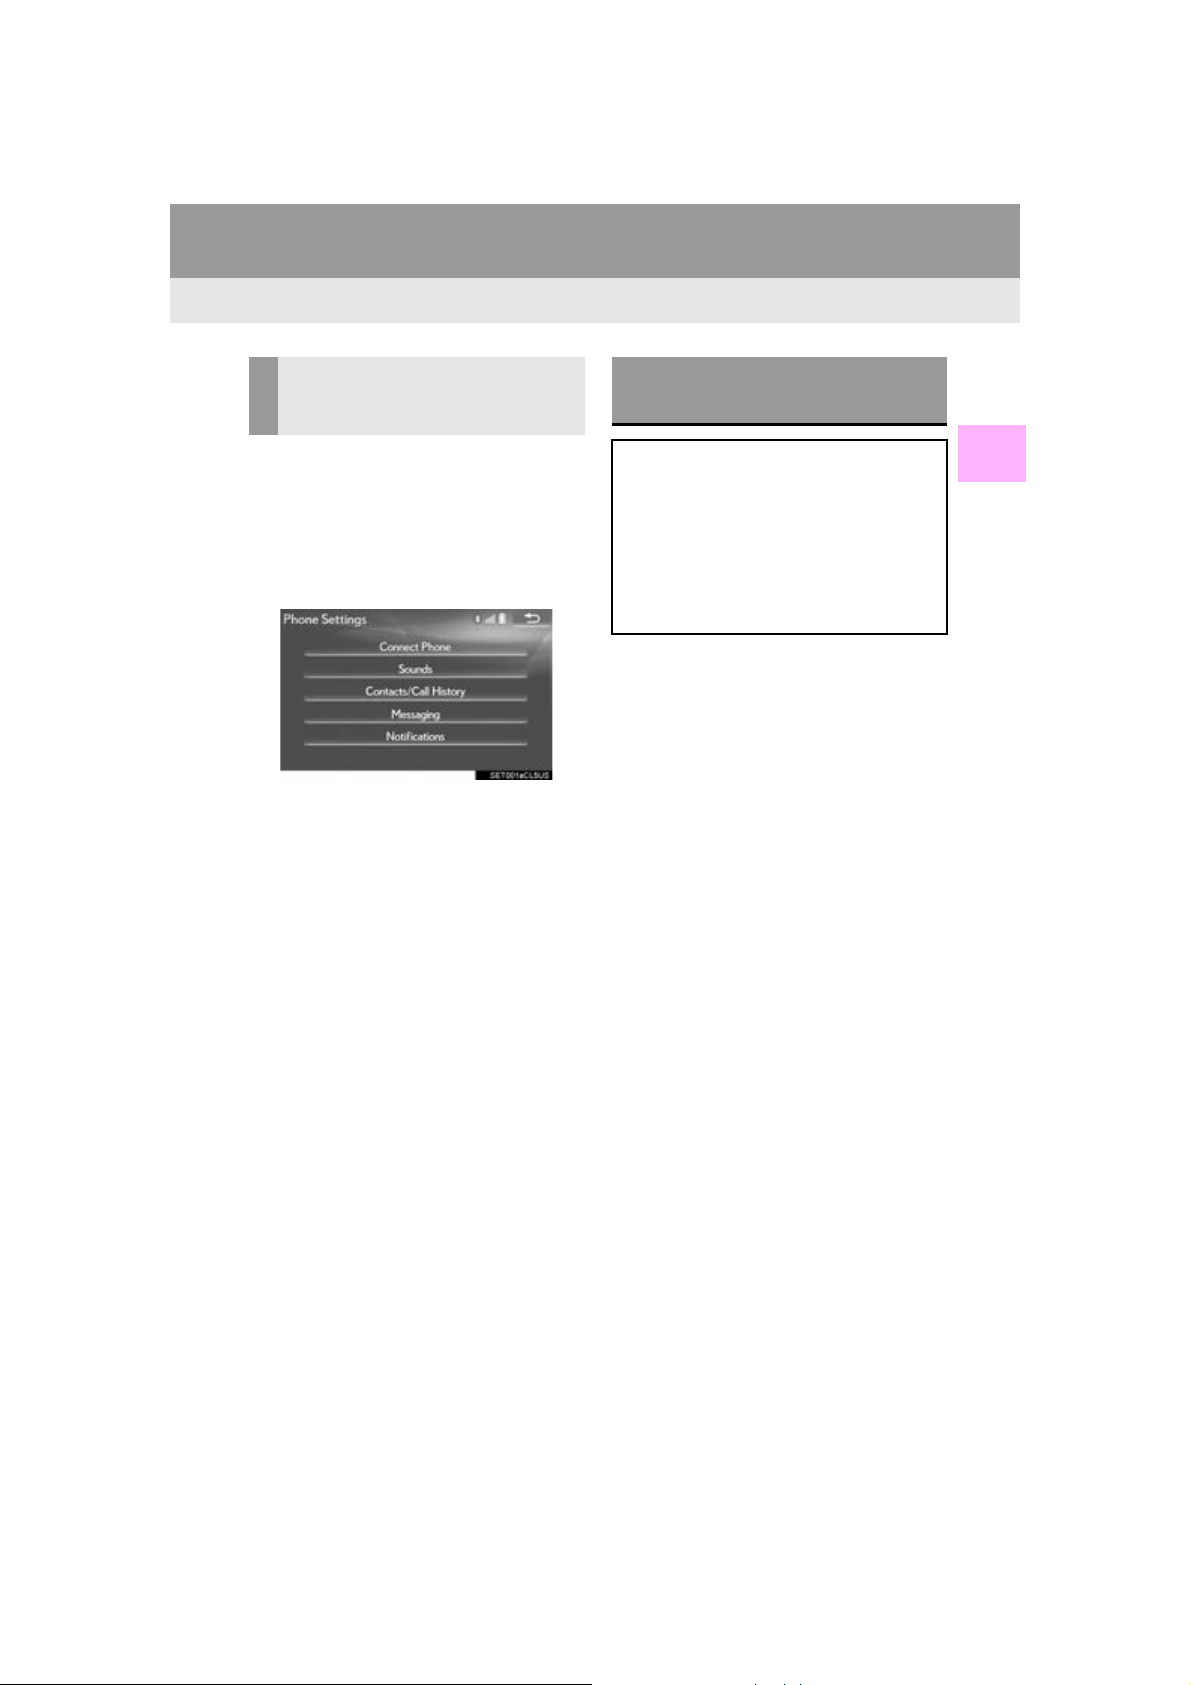
DISPLAYING THE “Bluetooth*
Setup” SCREEN IN A
DIFFERENT WAY
1 Press the “MENU” button on the
Remote Touch.
2 Select “Setup”.
3 Select “Phone”.
4 Select “Connect Phone”.
REGISTERING A Bluetooth®
DEVICE
Up to 5 Bluetooth® devices can be registered.
®
Bluetooth
compatible phones (HFP)
and audio players (AVP) can be registered simultaneously.
This operation cannot be performed
while driving.
1 Display the “Bluetooth* Setup” screen.
(P.50)
2 Select “A d d ” .
®
When another Bluetooth
nected
To disconnect the Bluetooth® device,
select “Yes”.
When 5 Bluetooth® devices have al-
ready been registered
A registered device needs to be replaced.
Select “Yes”, and select the device to be
replaced.
*: The Bluetooth® word mark and logos are
registered trademarks owned by Bluetooth SIG, Inc.
device is con-
2
BASIC FUNCTION
GS_Navi+MM_OM30F12U_(U)
15.09.09 19:53
51
Page 52
2. Bluetooth® SETTINGS
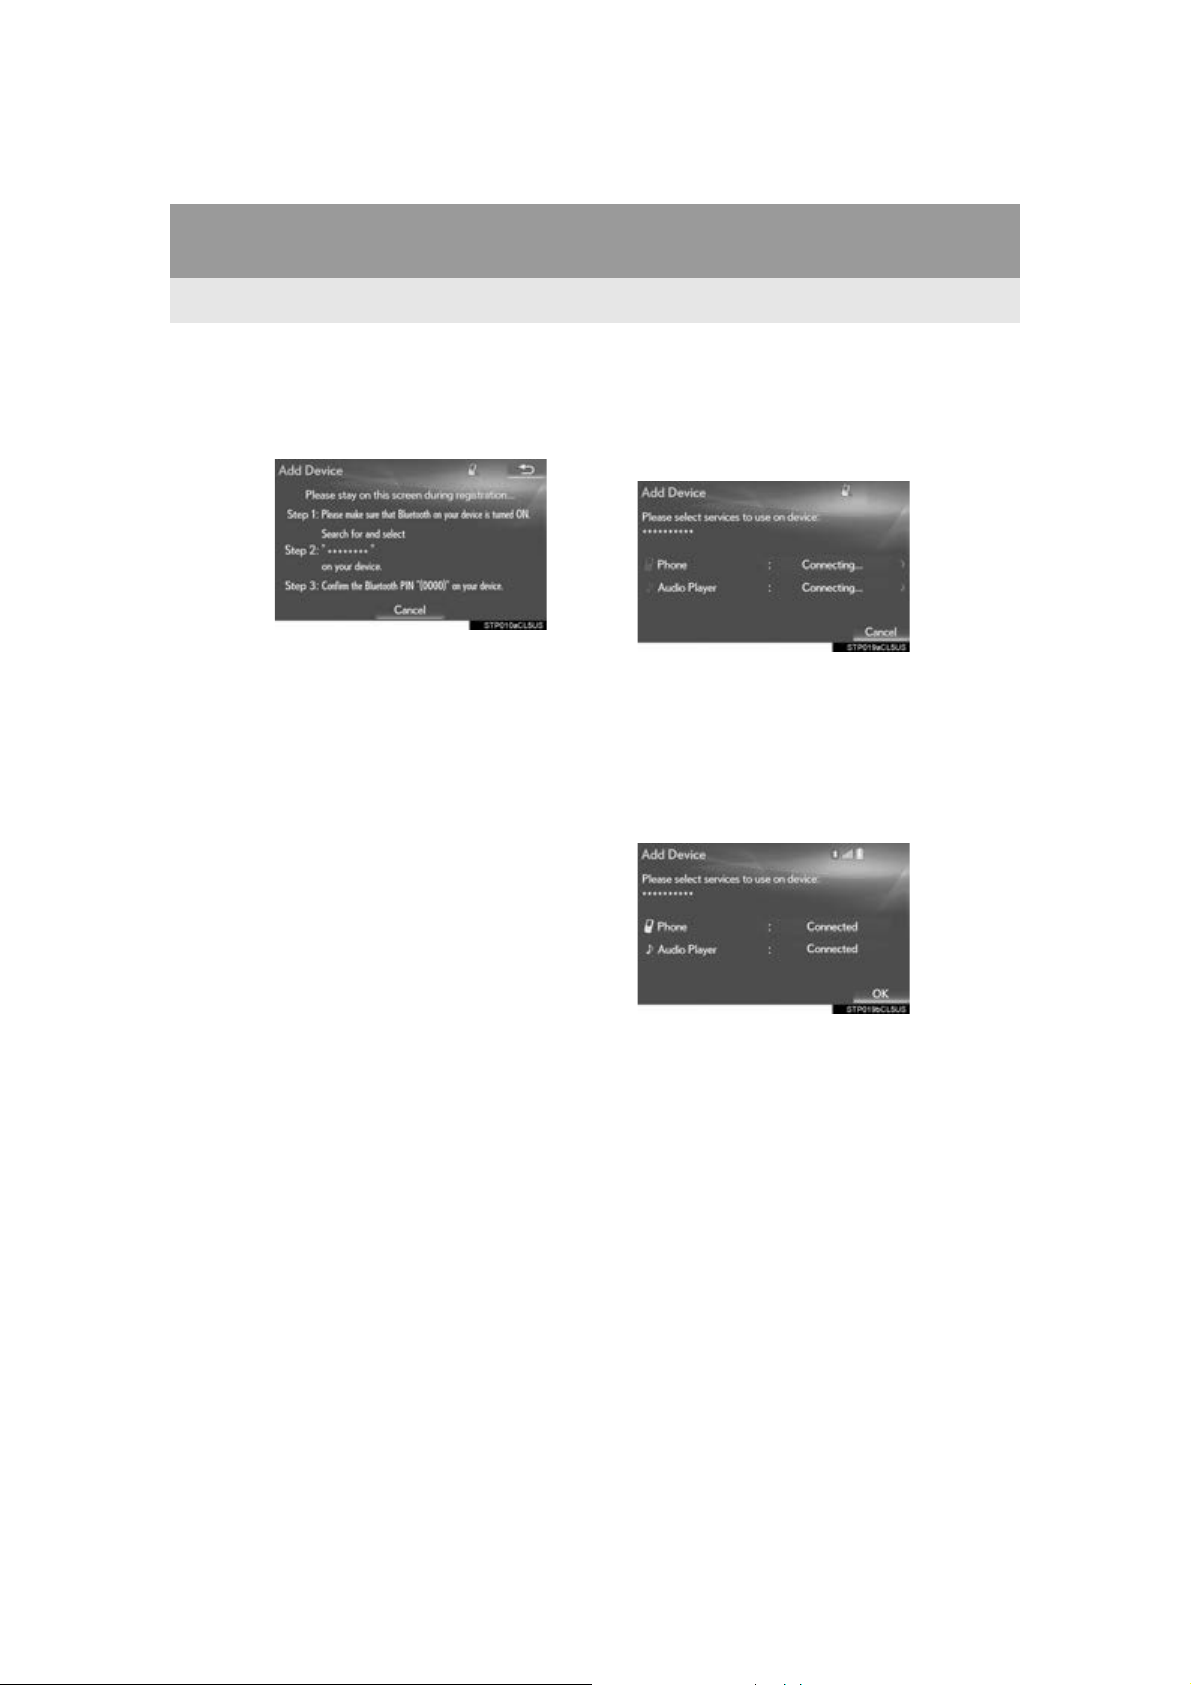
3 When this screen is displayed, search
for the device name displayed on this
screen on the screen of your
Bluetooth
For details about operating the Bluetooth
device, see the manual that comes with it.
To cancel the registration, select “Can cel”.
4 Register the Bluetooth
your Bluetooth
A PIN code is not required for SSP (Secure
Simple Pairing) compatible Bluetooth
devices. Depending on the type of
Bluetooth
message confirming registration may be
displayed on the Bluetooth
screen. Respond and operate the
Bluetooth
mation message.
®
device.
®
device using
®
device.
®
device being connected, a
®
device’s
®
device according to the confir-
5 Check that the following screen is dis-
played, indicating pairing was successful (a Bluetooth
established but registration is not yet
complete).
®
The system waits for connection requests
coming from the registered device.
At this stage, the Bluetooth
not yet available.
To cancel the registration, select “Can cel” .
6 Check that “Connected” is displayed
®
and registration is complete.
®
link has been
®
functions are
52
If displayed, select “OK” to complete the
registration process.
If an error message is displayed, follow the
guidance on the screen to try again.
GS_Navi+MM_OM30F12U_(U)
15.09.09 19:53
Page 53
2. Bluetooth® SETTINGS
INFORMATION
DELETING A Bluetooth®
DEVICE
This operation cannot be performed
while driving.
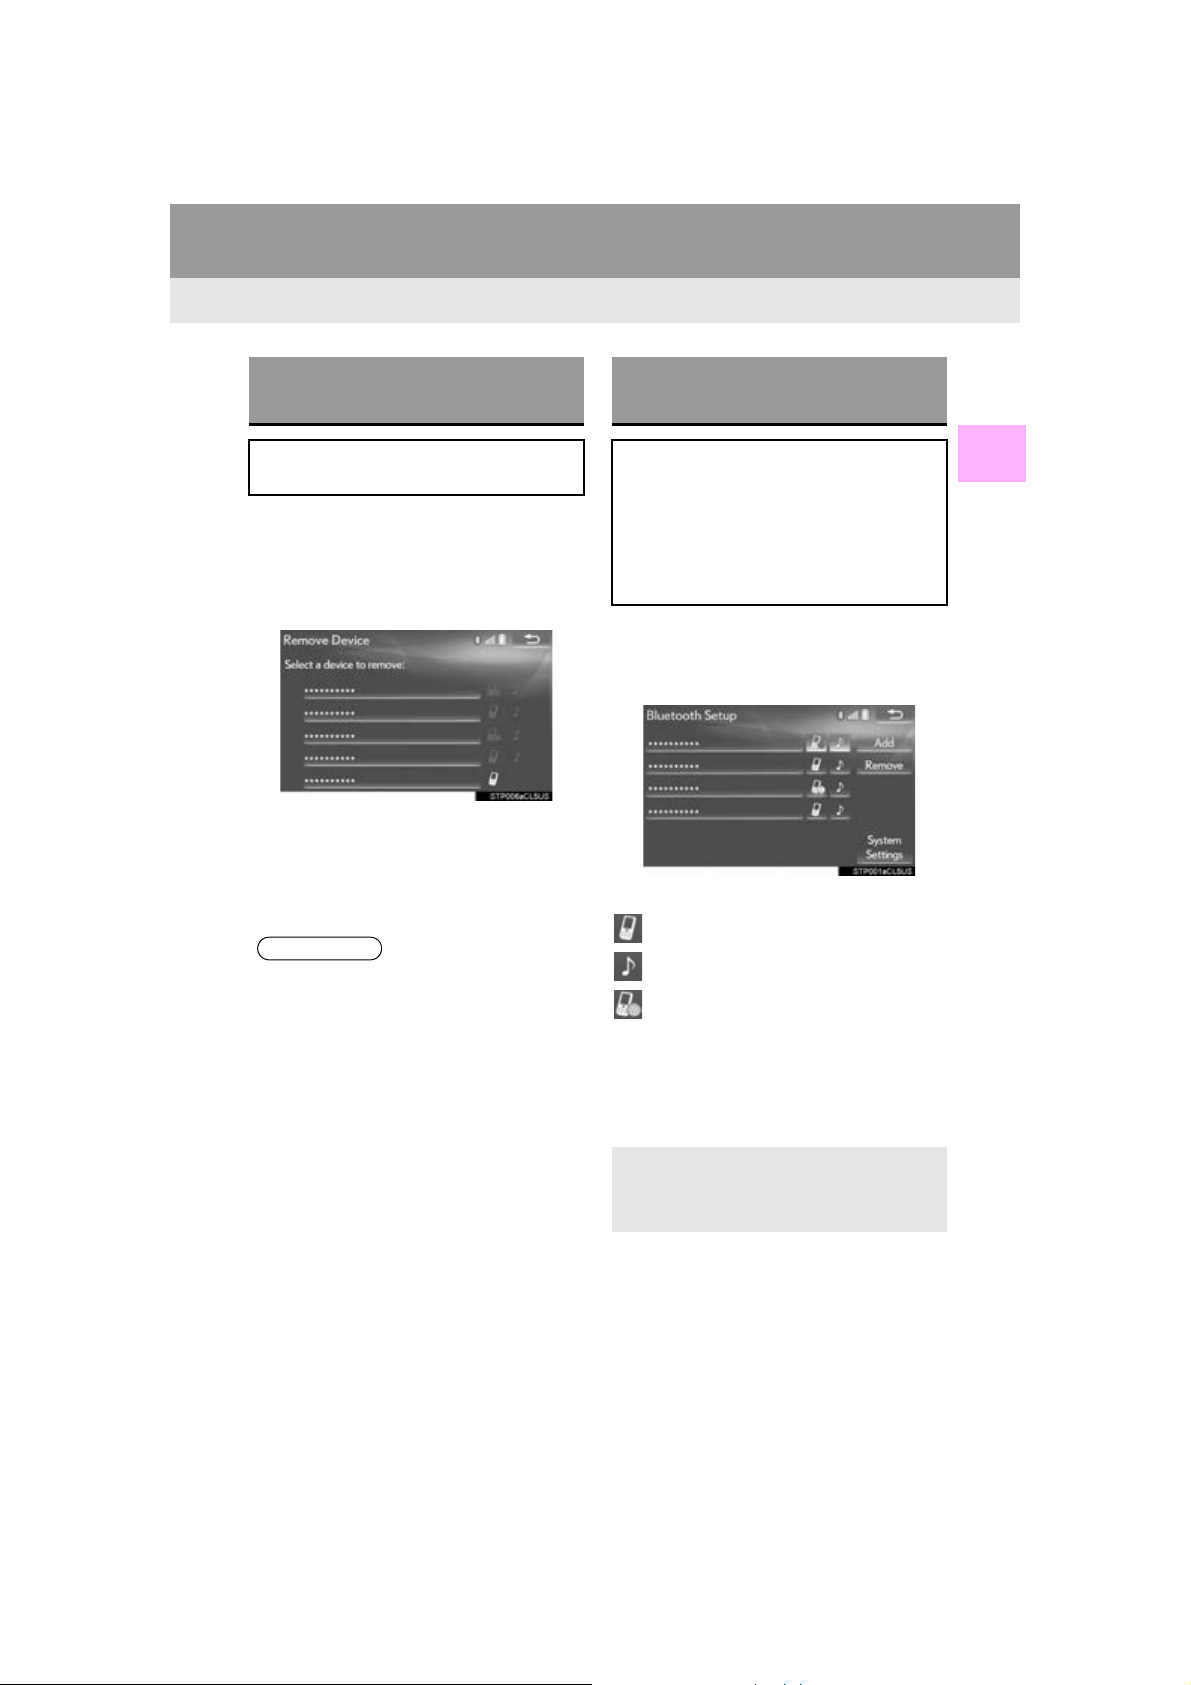
1 Display the “Bluetooth* Setup” screen.
(P.50)
2 Select “Remove”.
3 Select the desired device.
4 Select “Yes” when the confirmation
screen appears.
5 Check that a confirmation screen is dis-
played when the operation is complete.
CONNECTING A Bluetooth®
DEVICE
Up to 5 Bluetooth® devices (Phones
(HFP) and audio players (AVP)) can be
registered.
If more than 1 Bluetooth
®
device has
been registered, select which device to
connect to.
1 Display the “Bluetooth* Setup” screen.
(P.50)
2 Select the device to be connected.
Supported profile icons will be displayed.
: Phone
2
BASIC FUNCTION
●When deleting a Bluetooth® phone, the
contact data will be deleted at the same
time.
: Audio player
: Phone/“LEXUS App Suite” service
The profile icon for a currently connected
device will be displayed in color.
Selecting a profile icon which is not cur-
rently connected will switch the connection
to the function.
If the desired Bluetooth® device is not on
the list, select “A d d ” to register the
device. (P. 5 1 )
*: The Bluetooth® word mark and logos are
registered trademarks owned by Bluetooth SIG, Inc.
53
GS_Navi+MM_OM30F12U_(U)
15.09.09 19:53
Page 54
2. Bluetooth® SETTINGS
INFORMATION
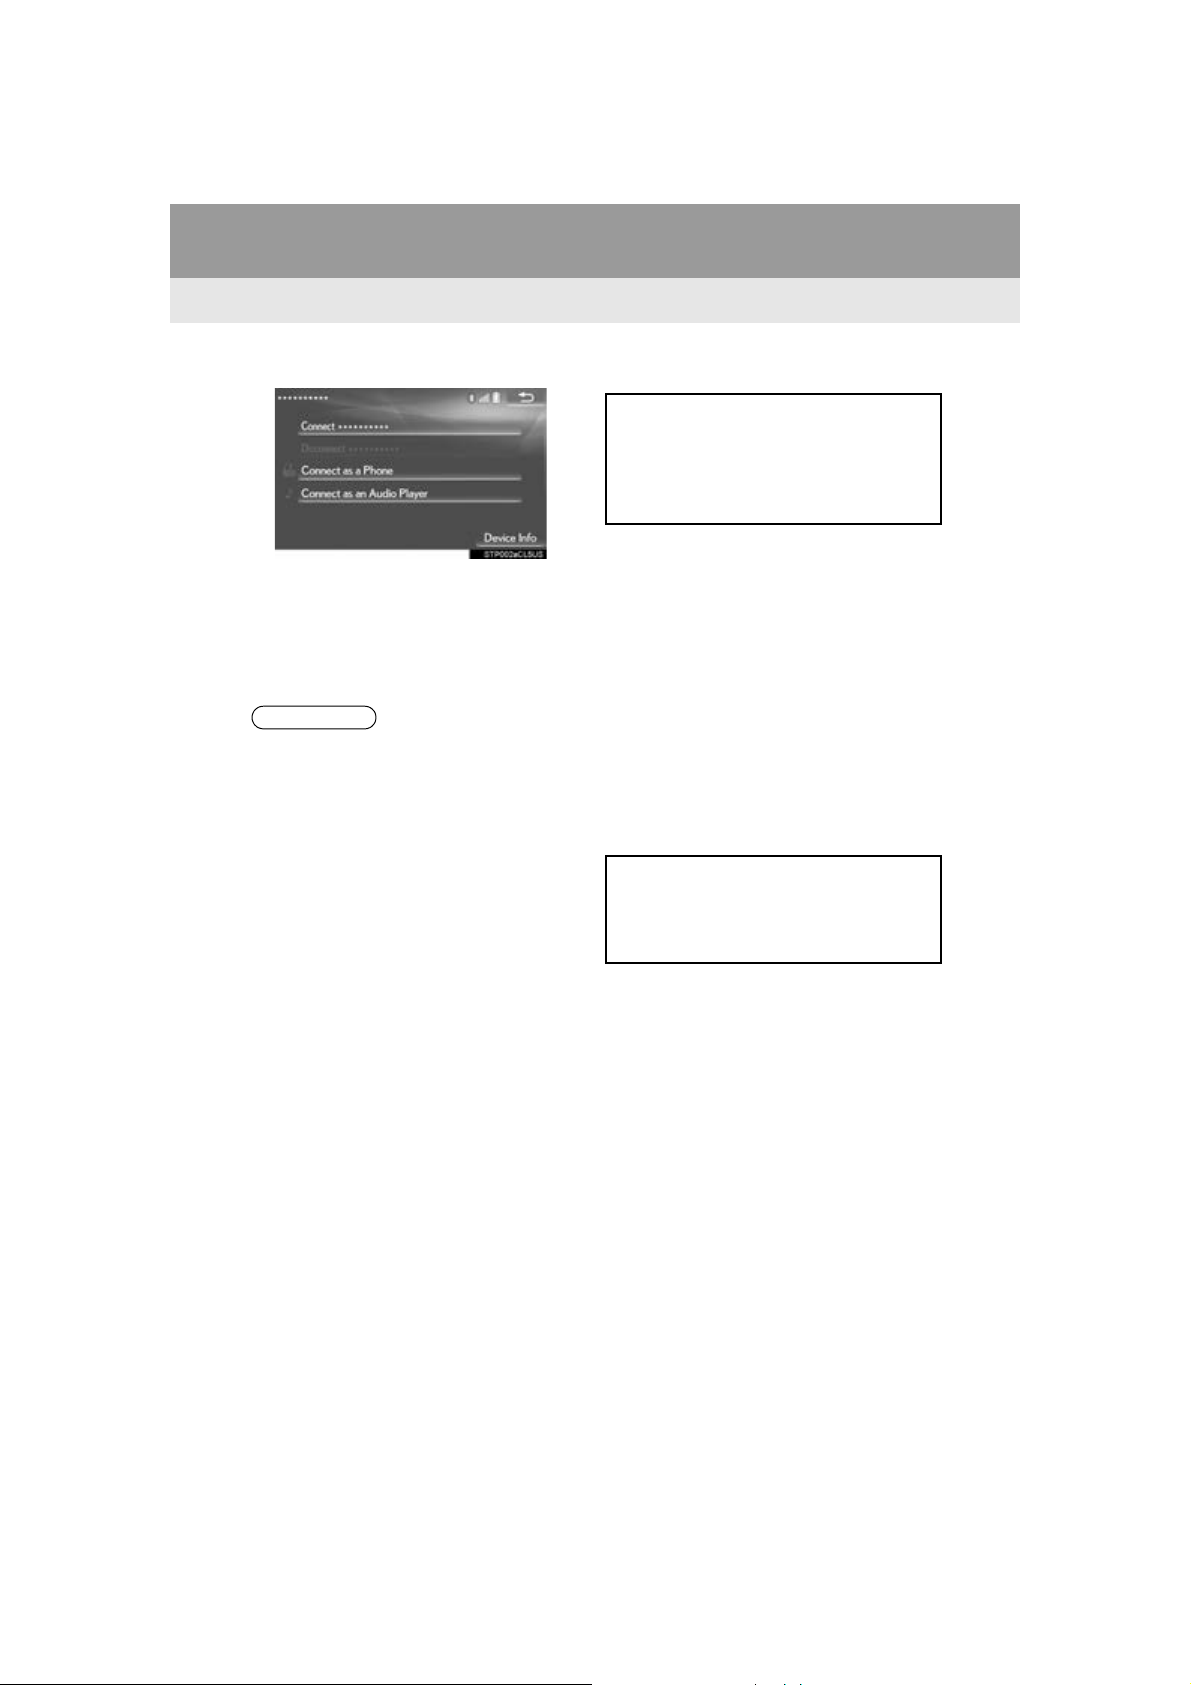
3 Select the desired connection.
4 Check that a confirmation screen is dis-
played when the connection is complete.
If an error message is displayed, follow the
guidance on the screen to try again.
●It may take time if the device connection
is carried out during Bluetooth
playback.
●Depending on the type of Bluetooth
device being connected, it may be necessary to perform additional steps on the
device.
●When disconnecting a Bluetooth
device, it is recommended to disconnect
using the system.
®
audio
®
®
■ AUTO CONNECTION MODE
To turn auto connection mode on, set
“Bluetooth* Power” to on. (P.58)
®
Leave the Bluetooth
device in a location where the connection can be established.
When the engine <power> switch is in
ACCESSORY or IGNITION ON <ON>
mode, the system searches for a nearby
registered device.
The system will connect with the registered
device that was last connected, if it is
nearby. When automatic connection priority is set to on and there is more than one
registered Bluetooth
system will automatically connect to the
Bluetooth
(P. 5 8 )
®
phone with the highest priority.
®
phone available, the
■ CONNECTING MANUALLY
When the auto connection has failed or
“Bluetooth* Power” is turned off, it is
®
necessary to connect Bluetooth
man-
ually.
54
1 Press the “MENU” button on the
Remote Touch.
2 Select “Setup”.
3 Select “Bluetooth*”.
4 Follow the steps in “CONNECTING A
Bluetooth
(P.53)
*: The Bluetooth
registered trademarks owned by Bluetooth SIG, Inc.
®
DEVICE” from “STEP 2”.
®
word mark and logos are
GS_Navi+MM_OM30F12U_(U)
15.09.09 19:53
Page 55
2. Bluetooth® SETTINGS
■ RECONNECTING THE Bluetooth
PHONE
If a Bluetooth® phone is disconnected
due to poor reception from the
®
Bluetooth
network when the engine
<power> switch is in ACCESSORY or
IGNITION ON <ON> mode, the system automatically reconnects the
®
Bluetooth
phone.
®
EDITING THE Bluetooth®
DEVICE INFORMATION
The Bluetooth® device’s information
can be displayed on the screen. The displayed information can be edited.
This operation cannot be performed
while driving.
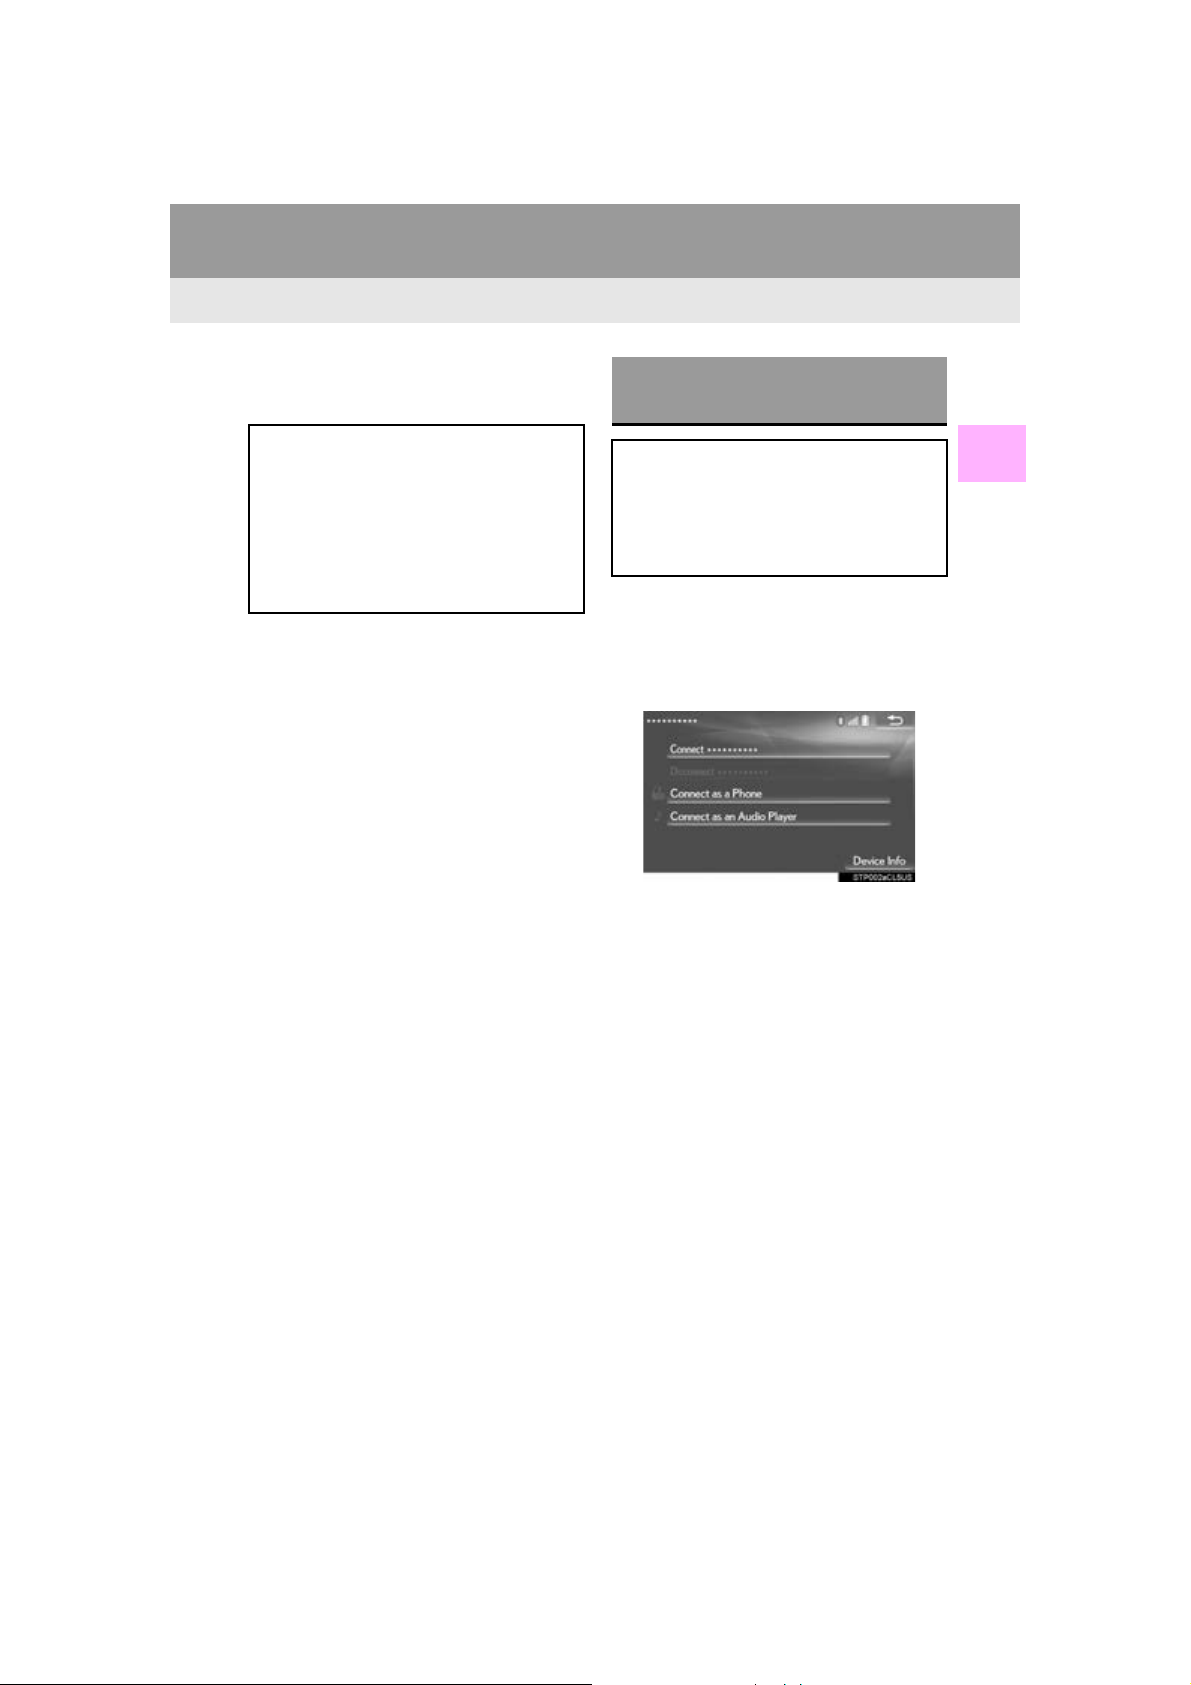
1 Display the “Bluetooth* Setup” screen.
(P.50)
2 Select the desired device to be edited.
3 Select “Device Info”.
*: The Bluetooth
registered trademarks owned by Bluetooth SIG, Inc.
®
word mark and logos are
2
BASIC FUNCTION
GS_Navi+MM_OM30F12U_(U)
15.09.09 19:53
55
Page 56
2. Bluetooth® SETTINGS
INFORMATION
INFORMATION
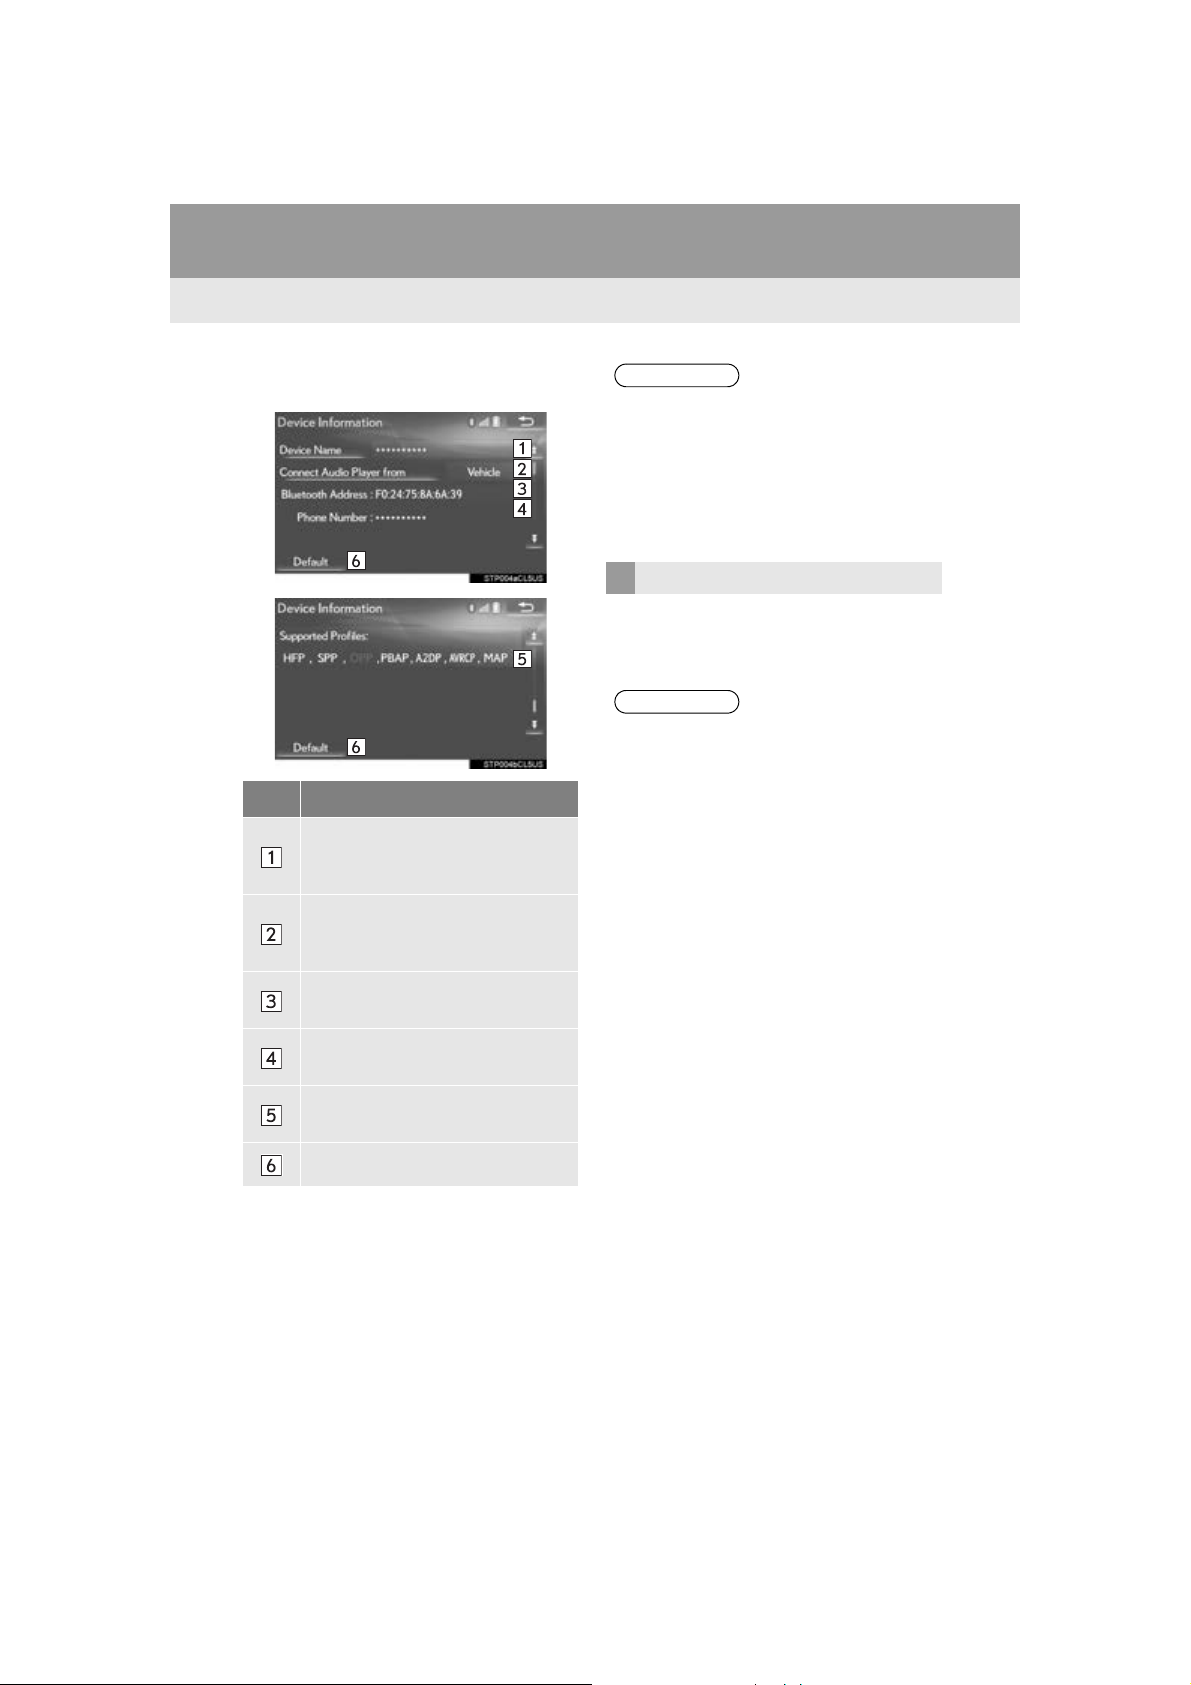
4 Confirm and change the Bluetooth
device information.
No. Information
The name of the Bluetooth® device.
Can be changed to a desired name.
(P.56)
Select to set the Bluetooth® audio
player connection method.
(P.57)
®
●If 2 Bluetooth® devices have been regis-
tered with the same device name, the
devices can be distinguished referring to
the device’s address.
●Depending on the type of phone, some
information may not be displayed.
CHANGING A DEVICE NAME
1 Select “Device Name”.
2 Enter the name and select “OK” .
●Even if the device name is changed, the
name registered in your Bluetooth
device does not change.
®
56
Device address is unique to the device and cannot be changed.
Phone number of the Bluetooth
phone.
Compatibility profile of the
Bluetooth
Select to reset all setup items.
®
device.
®
GS_Navi+MM_OM30F12U_(U)
15.09.09 19:53
Page 57
2. Bluetooth® SETTINGS
SETTING AUDIO PLAYER
CONNECTION METHOD
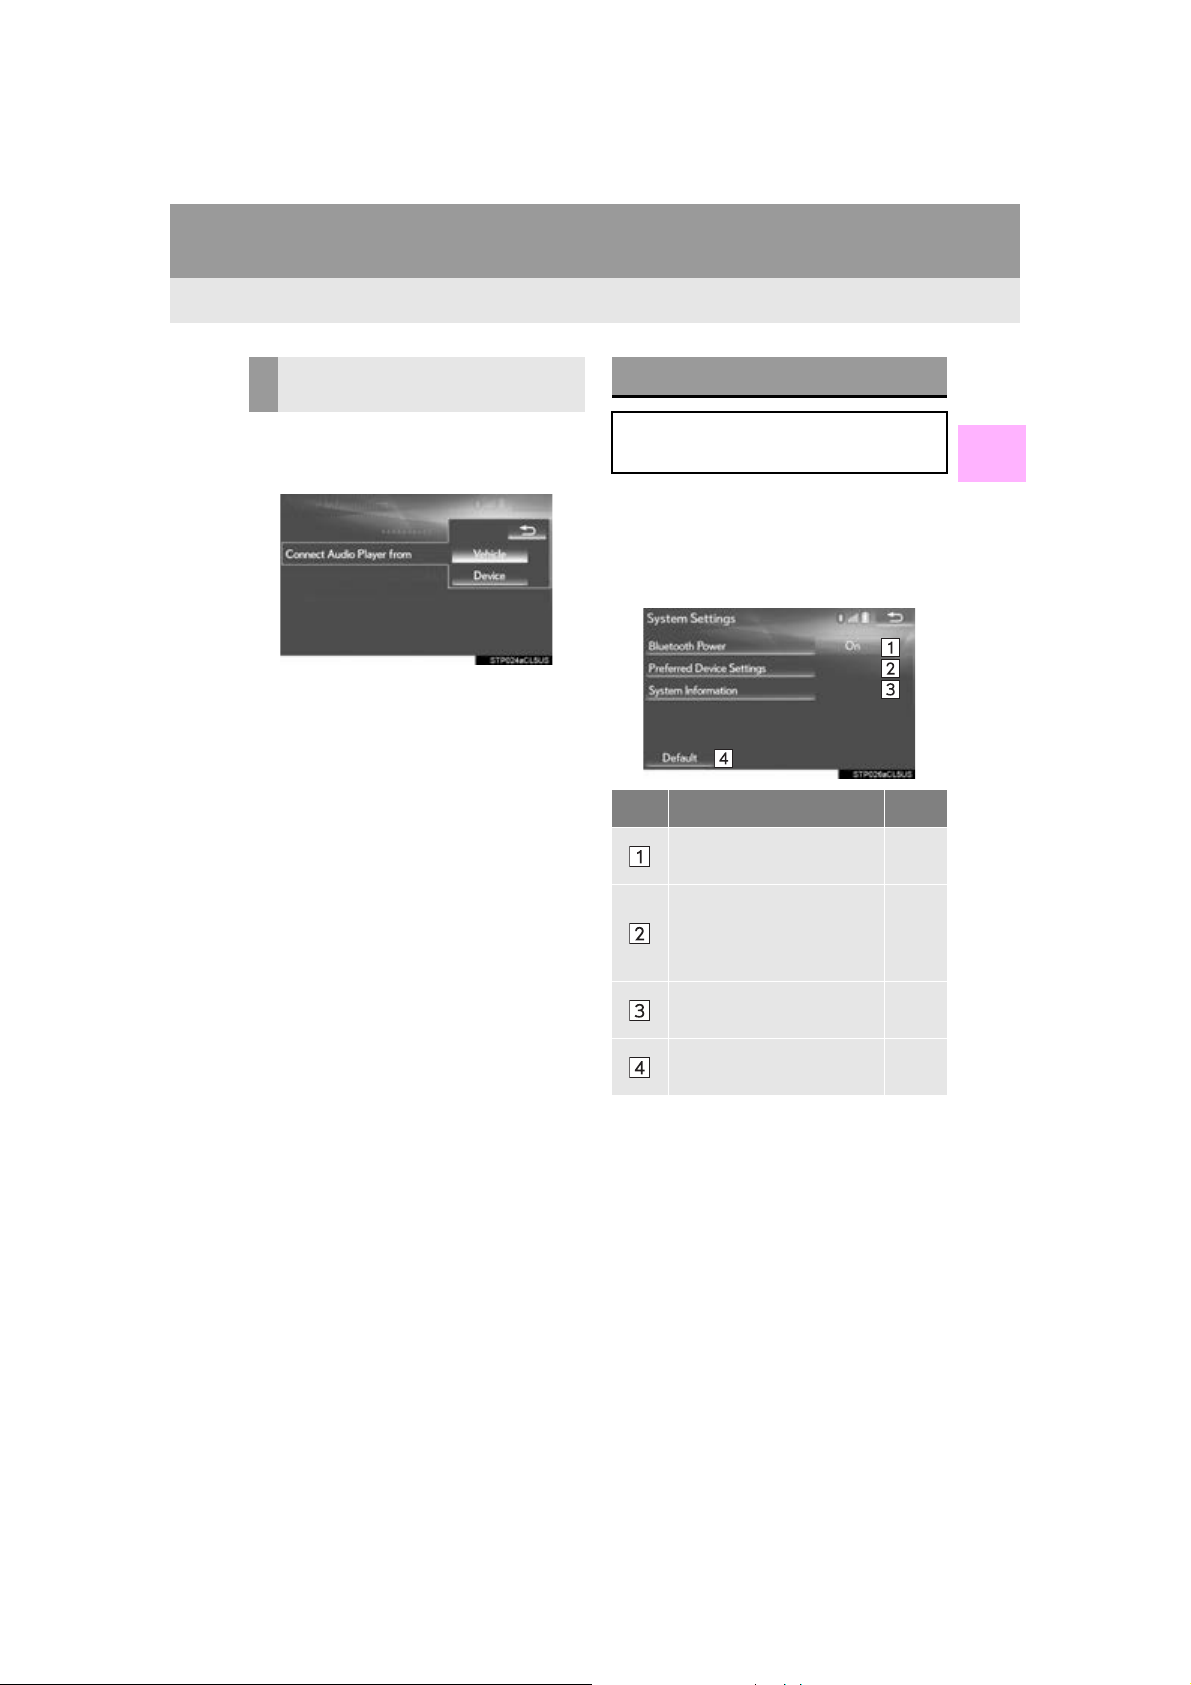
1 Select “Connect Audio Player from”.
2 Select the desired connection method.
“Vehicle”: Select to connect the audio sys-
tem to the audio player.
“Device”: Select to connect the audio play-
er to the audio system.
Depending on the audio player, the “Vehi-
cle” or “Device” connection method may
be best. As such, refer to the manual that
comes with the audio player.
“System Settings” SCREEN
The Bluetooth® settings can be confirmed and changed.
1 Display the “Bluetooth* Setup” screen.
(P.50)
2 Select “System Settings”.
3 Select the desired item to be set.
No. Function Page
Select to set Bluetooth
connection on/off.
Select to change the automatic connection priority of
the registered Bluetooth
devices.
®
58
58
®
2
BASIC FUNCTION
Select to edit the system information.
Select to reset all setup
items.
*: The Bluetooth
®
word mark and logos are
registered trademarks owned by Bluetooth SIG, Inc.
GS_Navi+MM_OM30F12U_(U)
15.09.09 19:53
59
57
Page 58
2. Bluetooth® SETTINGS
INFORMATION
INFORMATION
CHANGING “Bluetooth*
Power”
1 Select “Bluetooth* Power”.
When “Bluetooth* Power” is on:
®
The Bluetooth
connected when the engine <power> switch
is in ACCESSORY or IGNITION ON
<ON> mode.
When “Bluetooth* Power” is off:
The Bluetooth
and the system will not connect to it next
time.
●While driving, the auto connection state
can be changed from off to on, but cannot be changed from on to off.
*: The Bluetooth
registered trademarks owned by Bluetooth SIG, Inc.
SETTING AUTOMATIC
CONNECTION PRIORITY
device is automatically
®
device is disconnected,
®
word mark and logos are
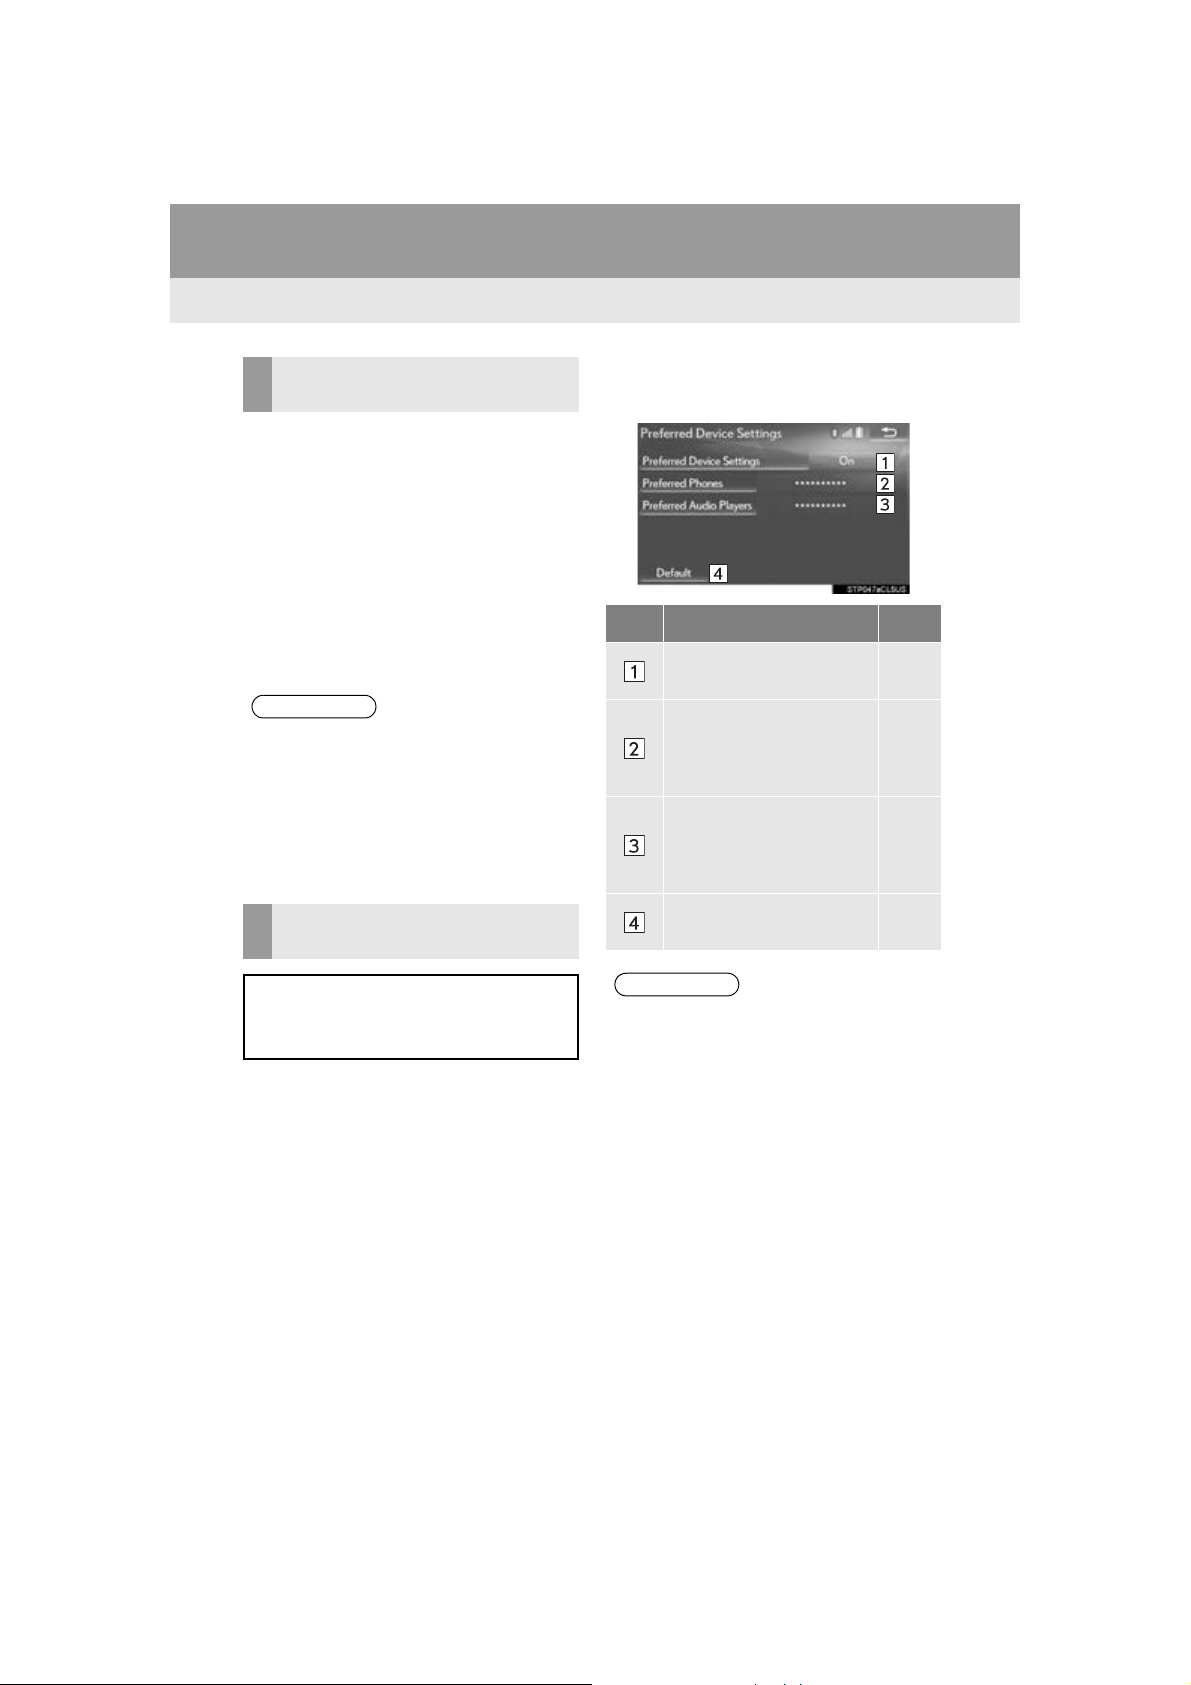
1 Select “Preferred Device Settings”.
2 Select the desired item to be set.
No. Function Page
Select to set automatic
connection priority on/off.
Select to change the automatic connection priority of
the registered Bluetooth
phones.
Select to change the automatic connection priority of
the registered Bluetooth
audio players.
Select to reset all setup
items.
59
®
59
®
The automatic connection priority of the
®
registered Bluetooth
devices can be
changed.
58
●A newly registered Bluetooth® device
will automatically be given the highest
automatic connection priority.
GS_Navi+MM_OM30F12U_(U)
15.09.09 19:53
Page 59
2. Bluetooth® SETTINGS
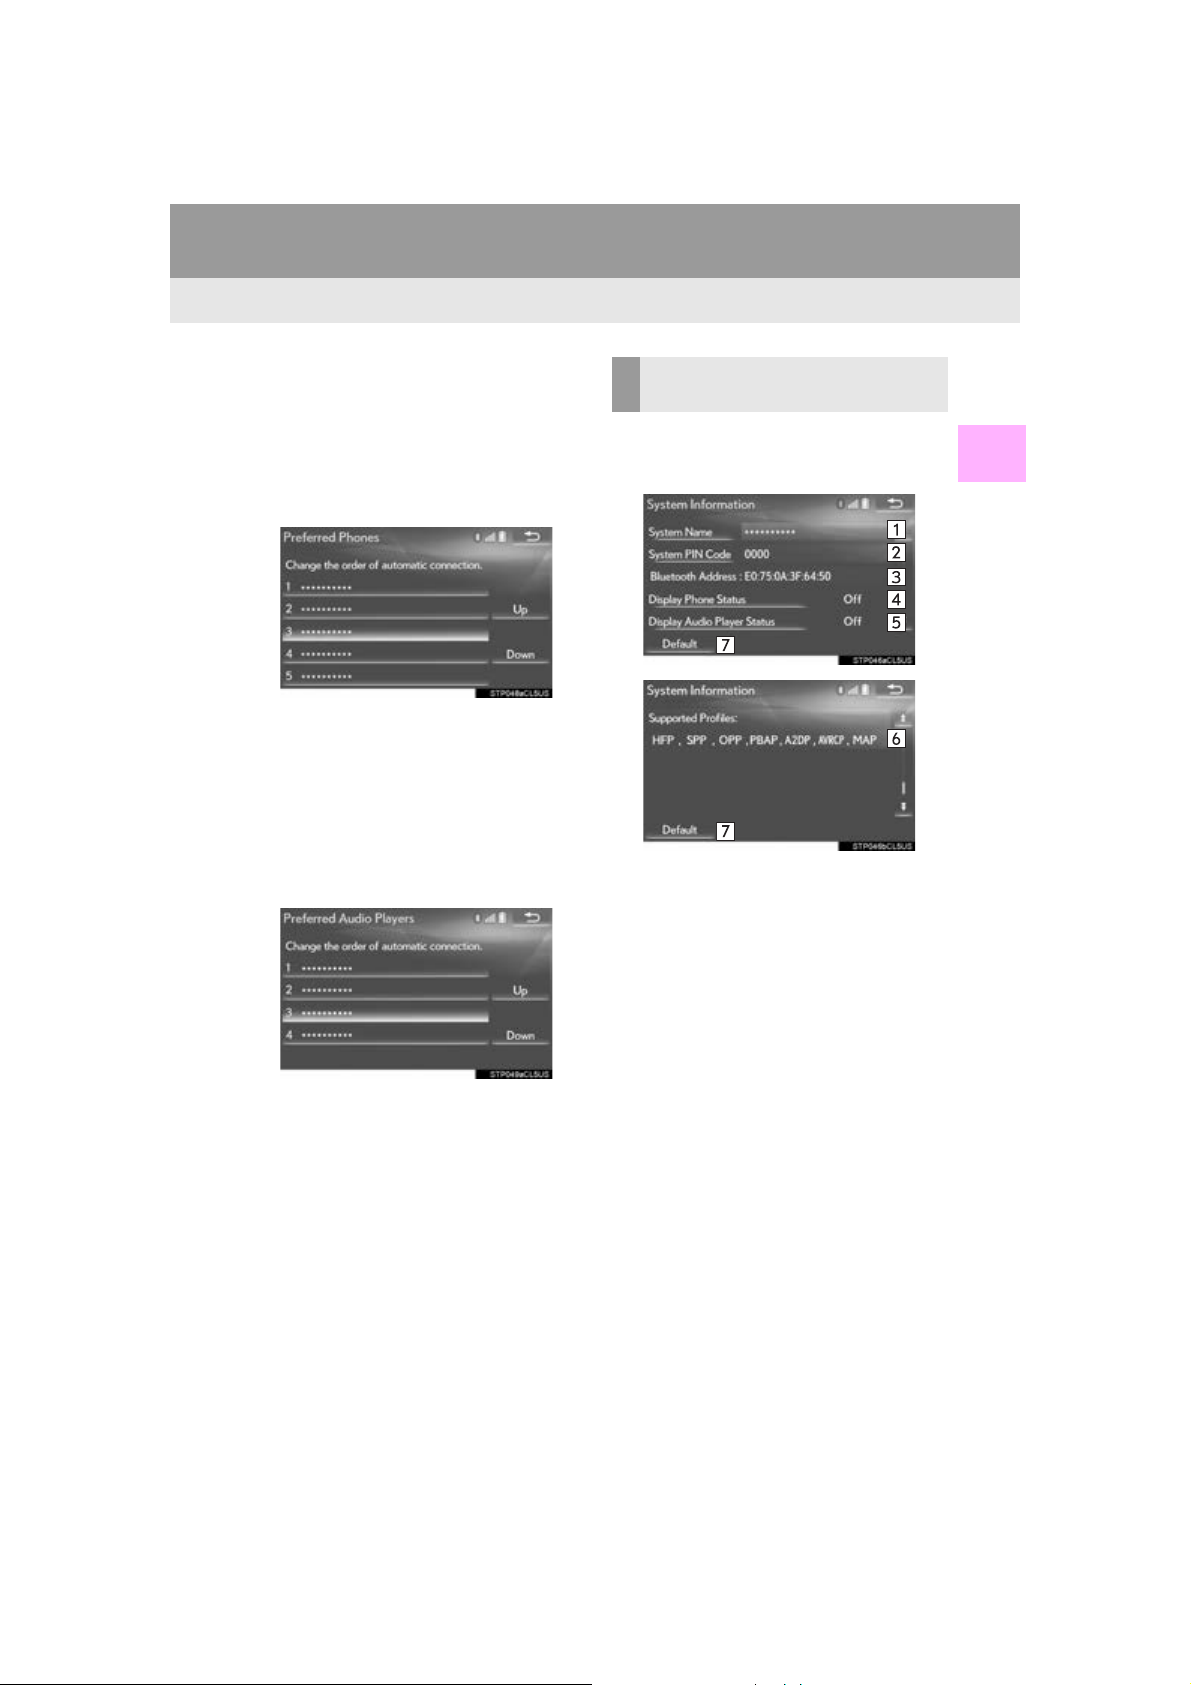
■ CHANGING PHONE AUTOMAT-
IC CONNECTION PRIORITY
1 Select “Preferred Phones”.
2 Select the desired Bluetooth
and select “Up” or “Down” to change
the preferred order.
■ CHANGING AUDIO PLAYER AU-
TOMATIC CONNECTION PRIORITY
®
device
1 Select “Preferred Audio Players”.
2 Select the desired Bluetooth
and select “Up” or “Down” to change
the preferred order.
®
device
EDITING THE SYSTEM
INFORMATION
1 Select “System Information”.
2 Select the desired item to be set.
2
BASIC FUNCTION
GS_Navi+MM_OM30F12U_(U)
15.09.09 19:53
59
Page 60
2. Bluetooth® SETTINGS
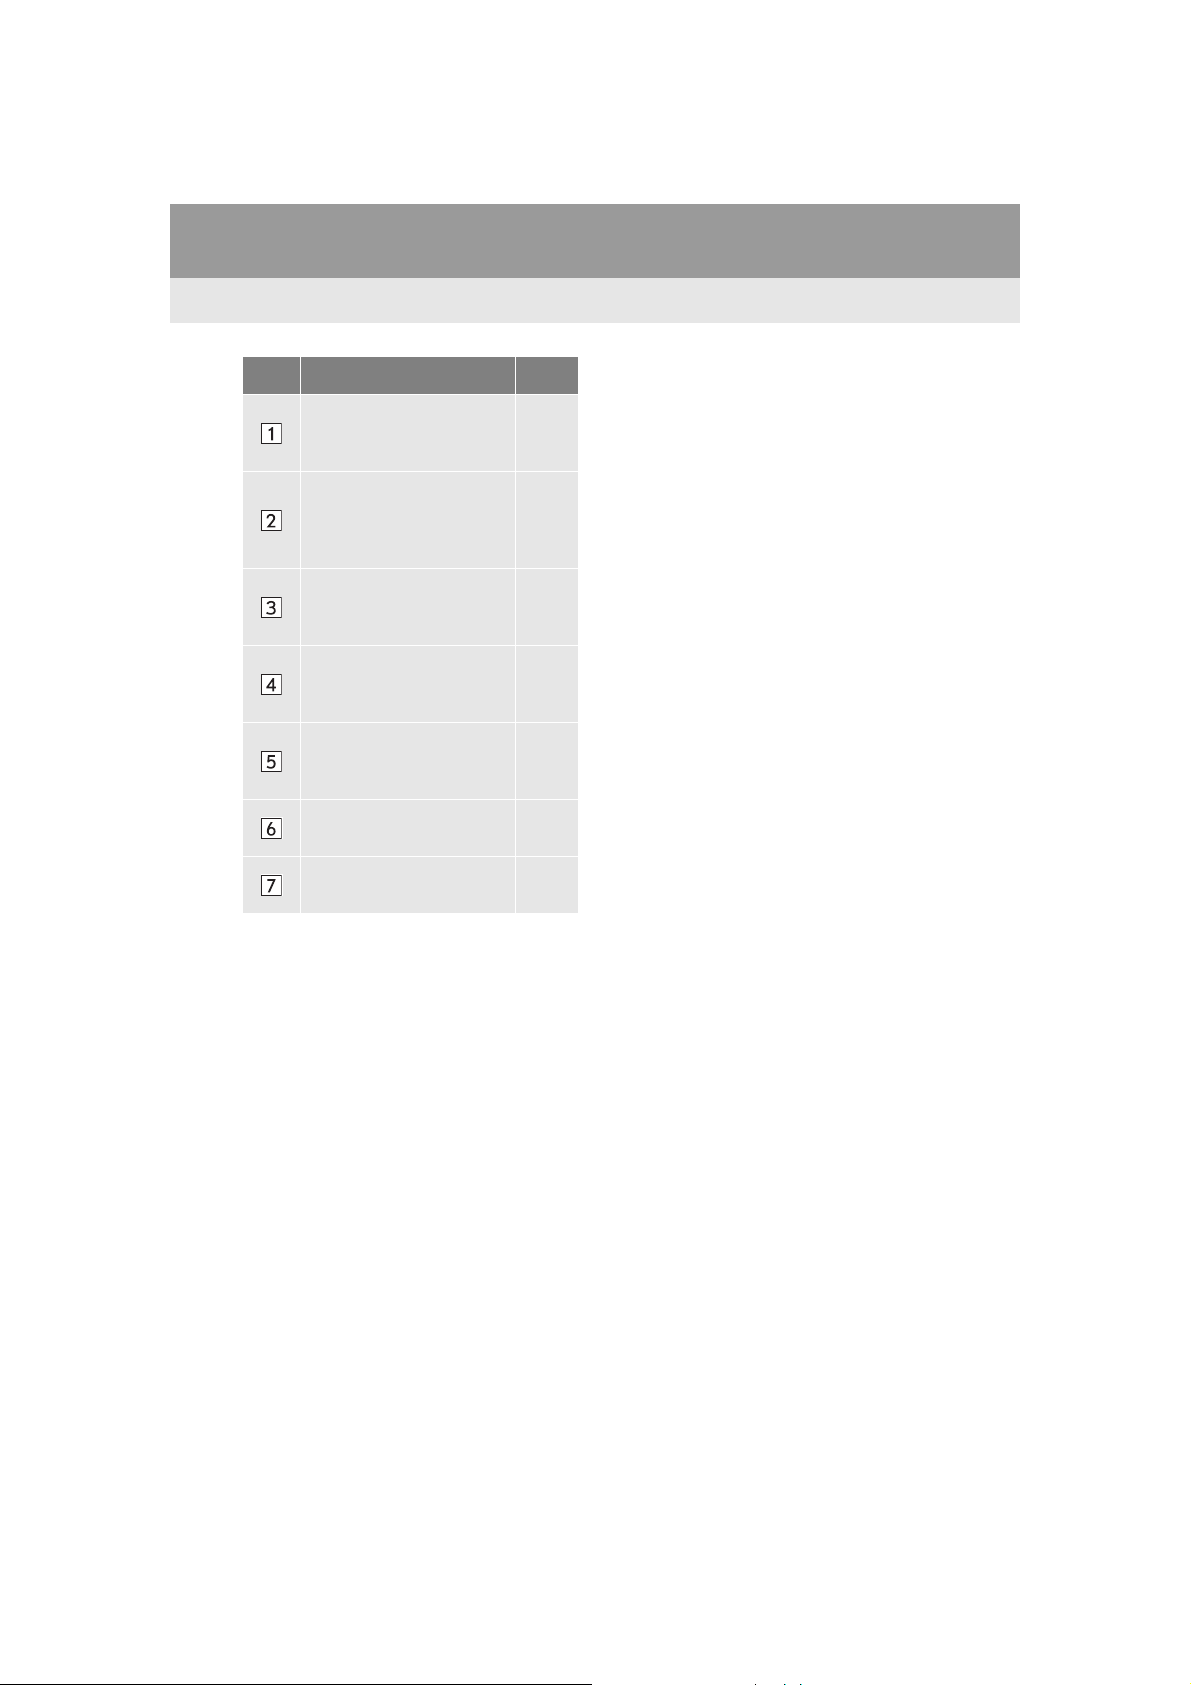
No. Information Page
Displays system name. Can
be changed to a desired
name.
PIN code used when the
Bluetooth
registered. Can be
changed to a desired code.
Device address is unique to
the device and cannot be
changed.
Select to set the phone connection status display on/
off.
Select to set the connection
status display of the audio
player on/off.
Compatibility profile of the
system
Select to reset all setup
items.
®
device was
60
60
■ EDITING THE SYSTEM NAME
1 Select “System Name”.
2 Enter a name and select “OK” .
■ EDITING THE PIN CODE
1 Select “System PIN Code”.
2 Enter a PIN code and select “OK”.
60
GS_Navi+MM_OM30F12U_(U)
15.09.09 19:53
Page 61
3. OTHER SETTINGS
1. GENERAL SETTINGS
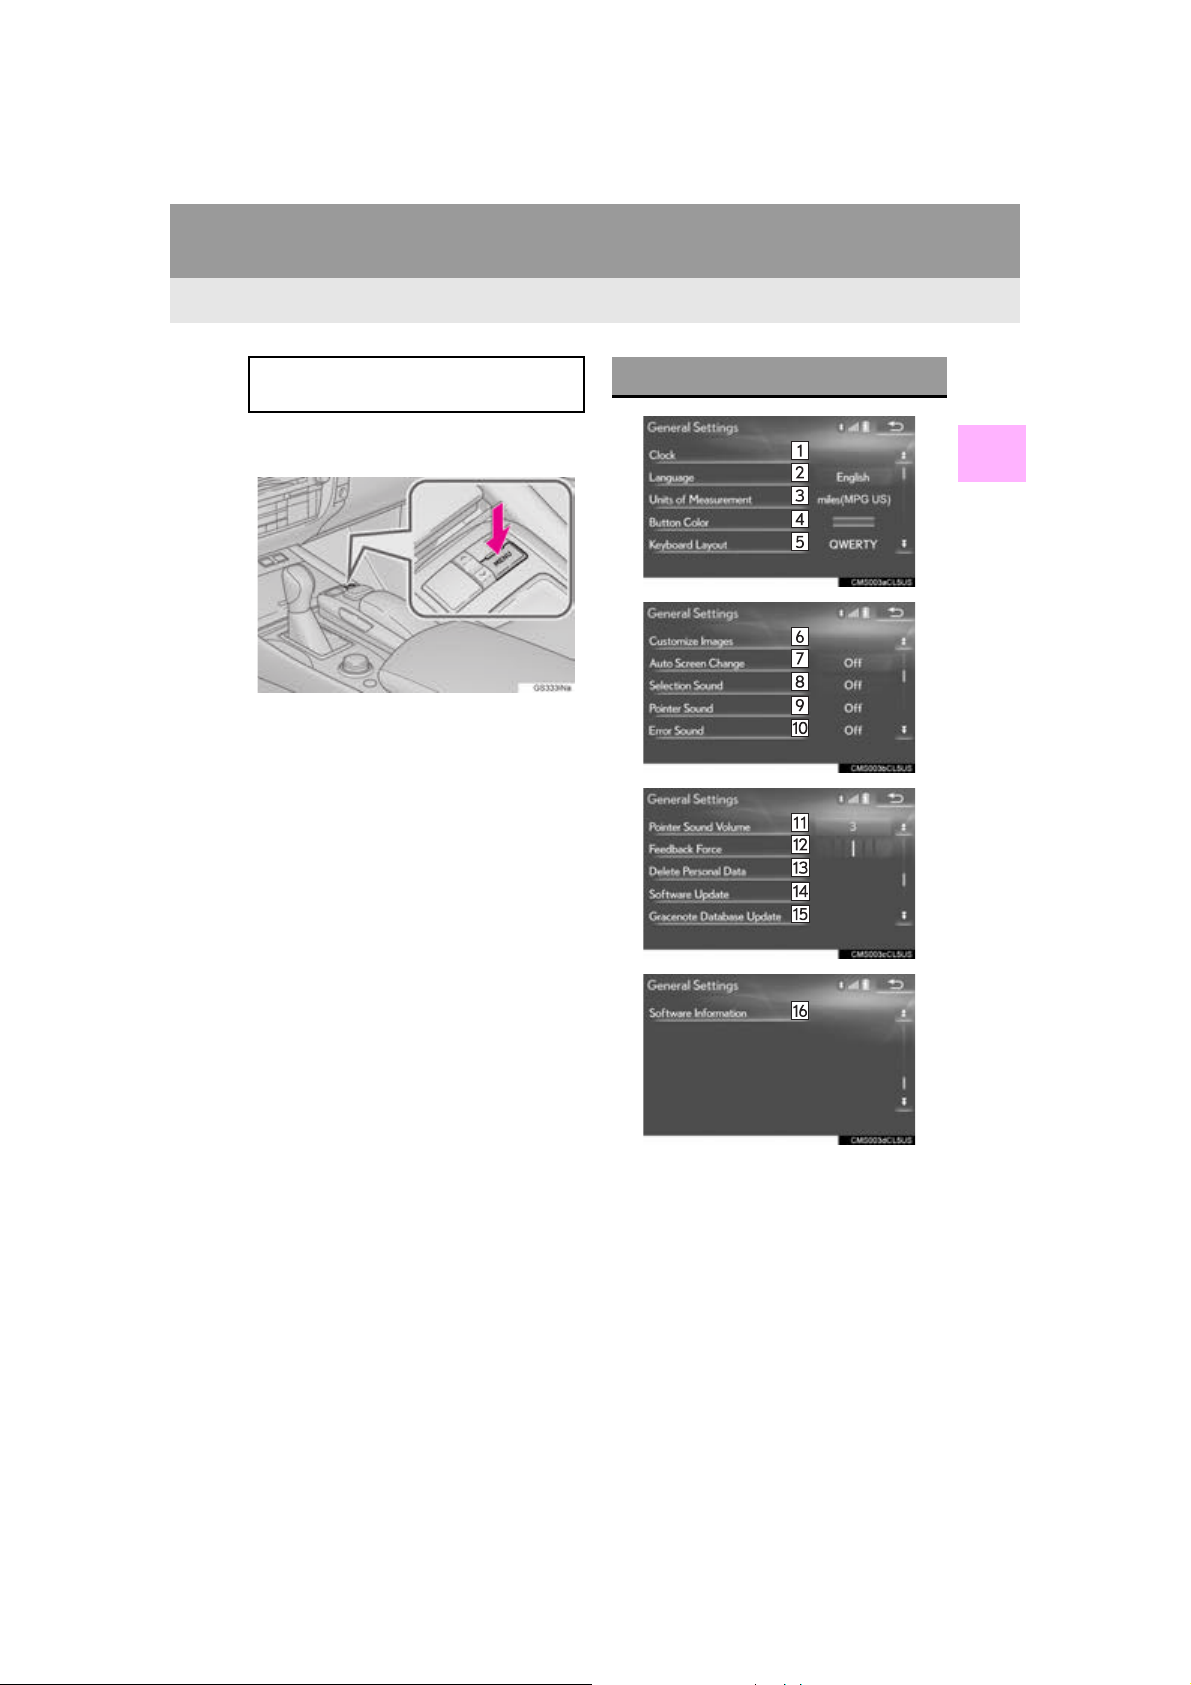
Settings are available for automatic
screen change, operation sounds, etc.
1 Press the “MENU” button on the
Remote Touch.
2 Select “Setup”.
3 Select “General”.
4 Select the items to be set.
GENERAL SETTINGS SCREEN
2
BASIC FUNCTION
GS_Navi+MM_OM30F12U_(U)
15.09.09 19:53
61
Page 62
3. OTHER SETTINGS
*: With 12.3-inch display
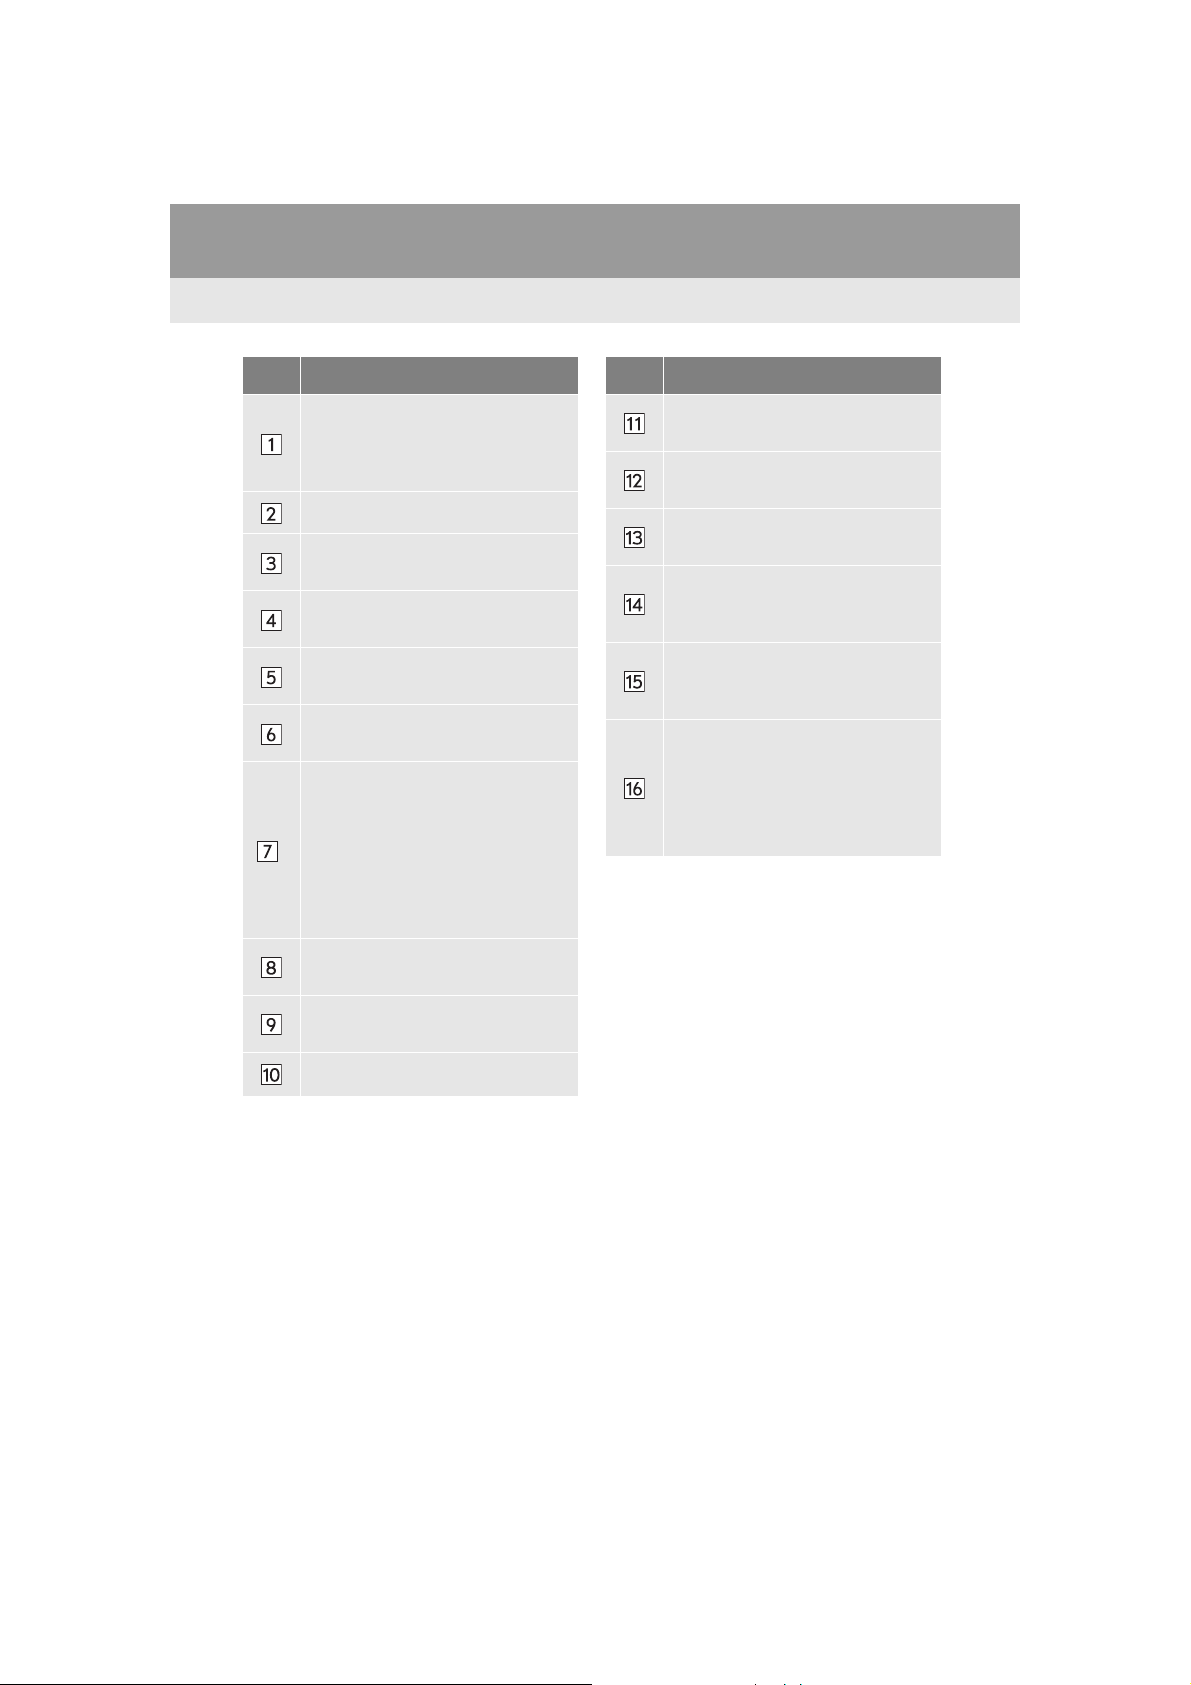
No. Function
Select to change the time zone, set
the daylight saving time on/off and
set the automatic adjustment of the
clock on/off. (P.63)
Select to change the language.
Select to change the unit of measure
for distance/fuel consumption.
Select to change the screen button
color.
Select to change the keyboard layout.
Select to customize the startup/
screen off images. (P.64)
Select to set automatic screen
changes from the audio/air conditioning control screen to the previous screen to on/off. When set to on,
*
the screen will automatically return
to the previous screen from the audio/air conditioning control screen
after 20 seconds.
No. Function
Select to adjust the pointer sound
volume.
Select to adjust the strength of the
pull from the buttons to the pointer.
Select to delete personal data.
(P.66)
Select to update software versions.
For details, contact your Lexus
dealer.
Select to update “Gracenote” database versions. For details, contact
your Lexus dealer.
Select to display the software information. Notices related to third party
software used in this product are enlisted. (This includes instructions for
obtaining such software, where applicable.)
62
Select to set the selection sounds
on/off.
Select to set the pointer sounds on/
off.
Select to set the error sounds on/off.
GS_Navi+MM_OM30F12U_(U)
15.09.09 19:53
Page 63
3. OTHER SETTINGS
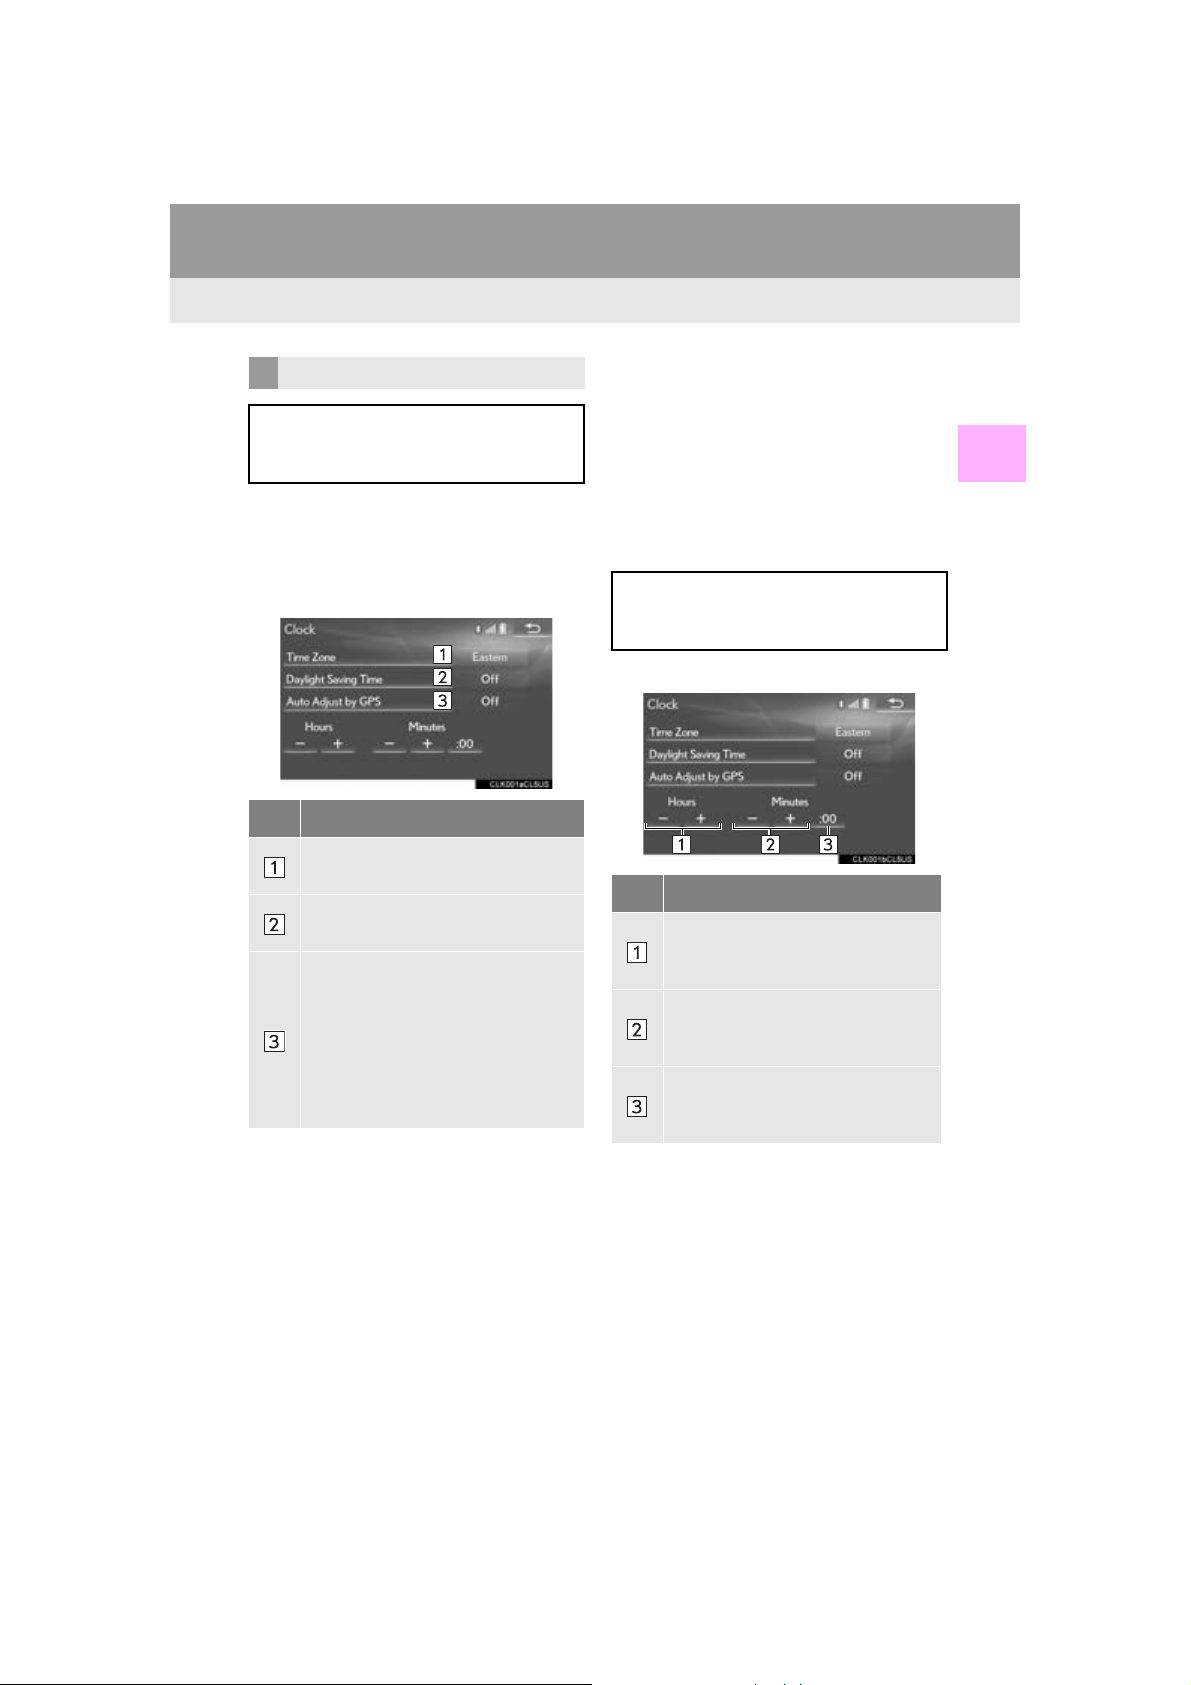
CLOCK SETTINGS
Used for changing the time zone and
setting of daylight saving time and automatic time adjustment on/off.
1 Display the “General Settings” screen.
(P.61)
2 Select “Cloc k”.
3 Select the items to be set.
No. Function
Select to change the time zone.
(P.63)
Select to set daylight saving time on/
off.
Select to set automatic adjustment of
the clock by GPS on/off. When set to
on, the system will automatically adjust the clock to the current position’s
time zone when the vehicle moves to
a different time zone. When set to off,
the clock can be manually adjusted.
(P.63)
■ SETTING THE TIME ZONE
1 Select “Time Zone”.
2 Select the desired time zone.
If “Ot her ” is selected, the zone can be
adjusted manually. Select “+” or “-” to
adjust the time zone.
■ MANUAL CLOCK SETTING
When “A ut o Ad j u s t b y G PS ” is turned
“Off ”, the clock can be manually adjust-
ed.
1 Select the desired item.
No. Function
Select “+” to set the time forward
one hour and “-” to set the time back
one hour.
Select “+” to set the time forward
one minute and “-” to set the time
back one minute.
Select to round to the nearest hour.
e.g. 1:00 to 1:29 1:00
1:30 to 1:59 2:00
2
BASIC FUNCTION
GS_Navi+MM_OM30F12U_(U)
15.09.09 19:53
63
Page 64
3. OTHER SETTINGS
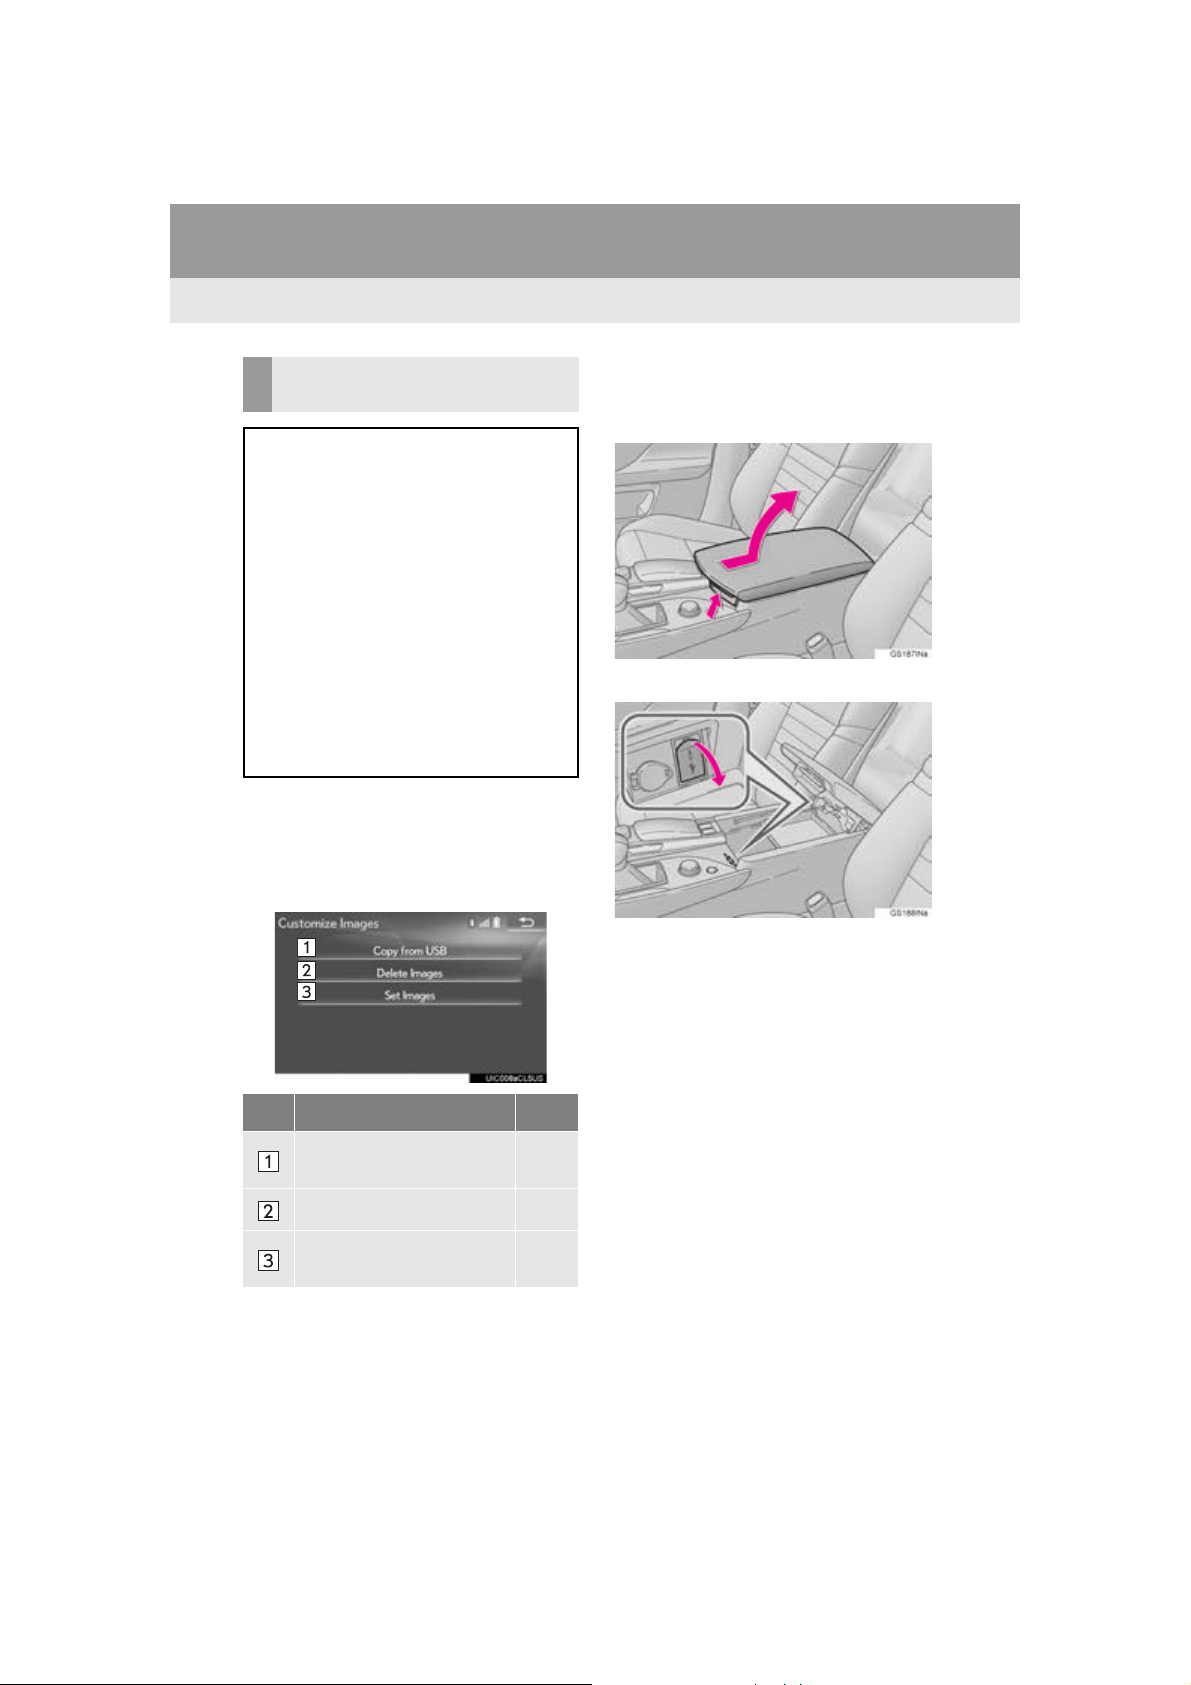
CUSTOMIZING THE STARTUP
AND SCREEN OFF IMAGES
An image can be copied from a USB
memory and used as the startup and
screen off Images.
With 12.3-inch display: The built-in movie can also be set as the startup image.
When the engine <power> switch is
turned to ACCESSORY or IGNITION
ON <ON> mode, the initial screen (startup image) will be displayed. (P.32)
When “Screen Off” on the “Display”
screen is selected, the screen is turned
off and the desired screen off image that
is set is displayed. (To turn the screen off:
P.41)
1 Display the “General Settings” screen.
(P.61)
2 Select “Customize Images”.
3 Select the items to be set.
■ TRANSFERRING IMAGES
1 Grip the knob to release the lock, and
lift the armrest to open.
2 Open the cover and connect a device.
Turn on the power of the USB memory if it
is not turned on.
3 Select “Copy f rom USB”.
No. Function Page
Select to copy images from
a USB memory.
Select to delete images. 66
Select to set an image as the
startup or screen off image.
64
64
65
GS_Navi+MM_OM30F12U_(U)
15.09.09 19:53
Page 65
3. OTHER SETTINGS
NOTICE
INFORMATION
4 Select the desired images from the list
and then select “Copy”.
The selected image is displayed on the
right side of the screen. If the selected
image file is broken or incompatible,
will be displayed.
The remaining number of image files that
can be transferred is displayed at the bottom of the screen.
5 Select “Yes” when the confirmation
screen appears.
●Depending on the size and shape of the
device that is connected to the system,
the armrest may not close fully. In this
case, do not forcibly close the armrest as
this may damage the device or the terminal, etc.
●When saving image files to a USB mem-
ory to be transferred to the system, save
the images in a folder named “Image” (Im-a-g-e, case sensitive). If a different
folder name is used, the system will not
recognize the image files.
●The compatible file extensions are JPG
and JPEG.
●An image’s file name, including file exten-
sion, can be up to 32 characters.
●Image files of 10 MB or less can be trans-
ferred.
●Up to 10 images can be transferred to the
system.
●Files with non-ASCII filenames can not
be transferred.
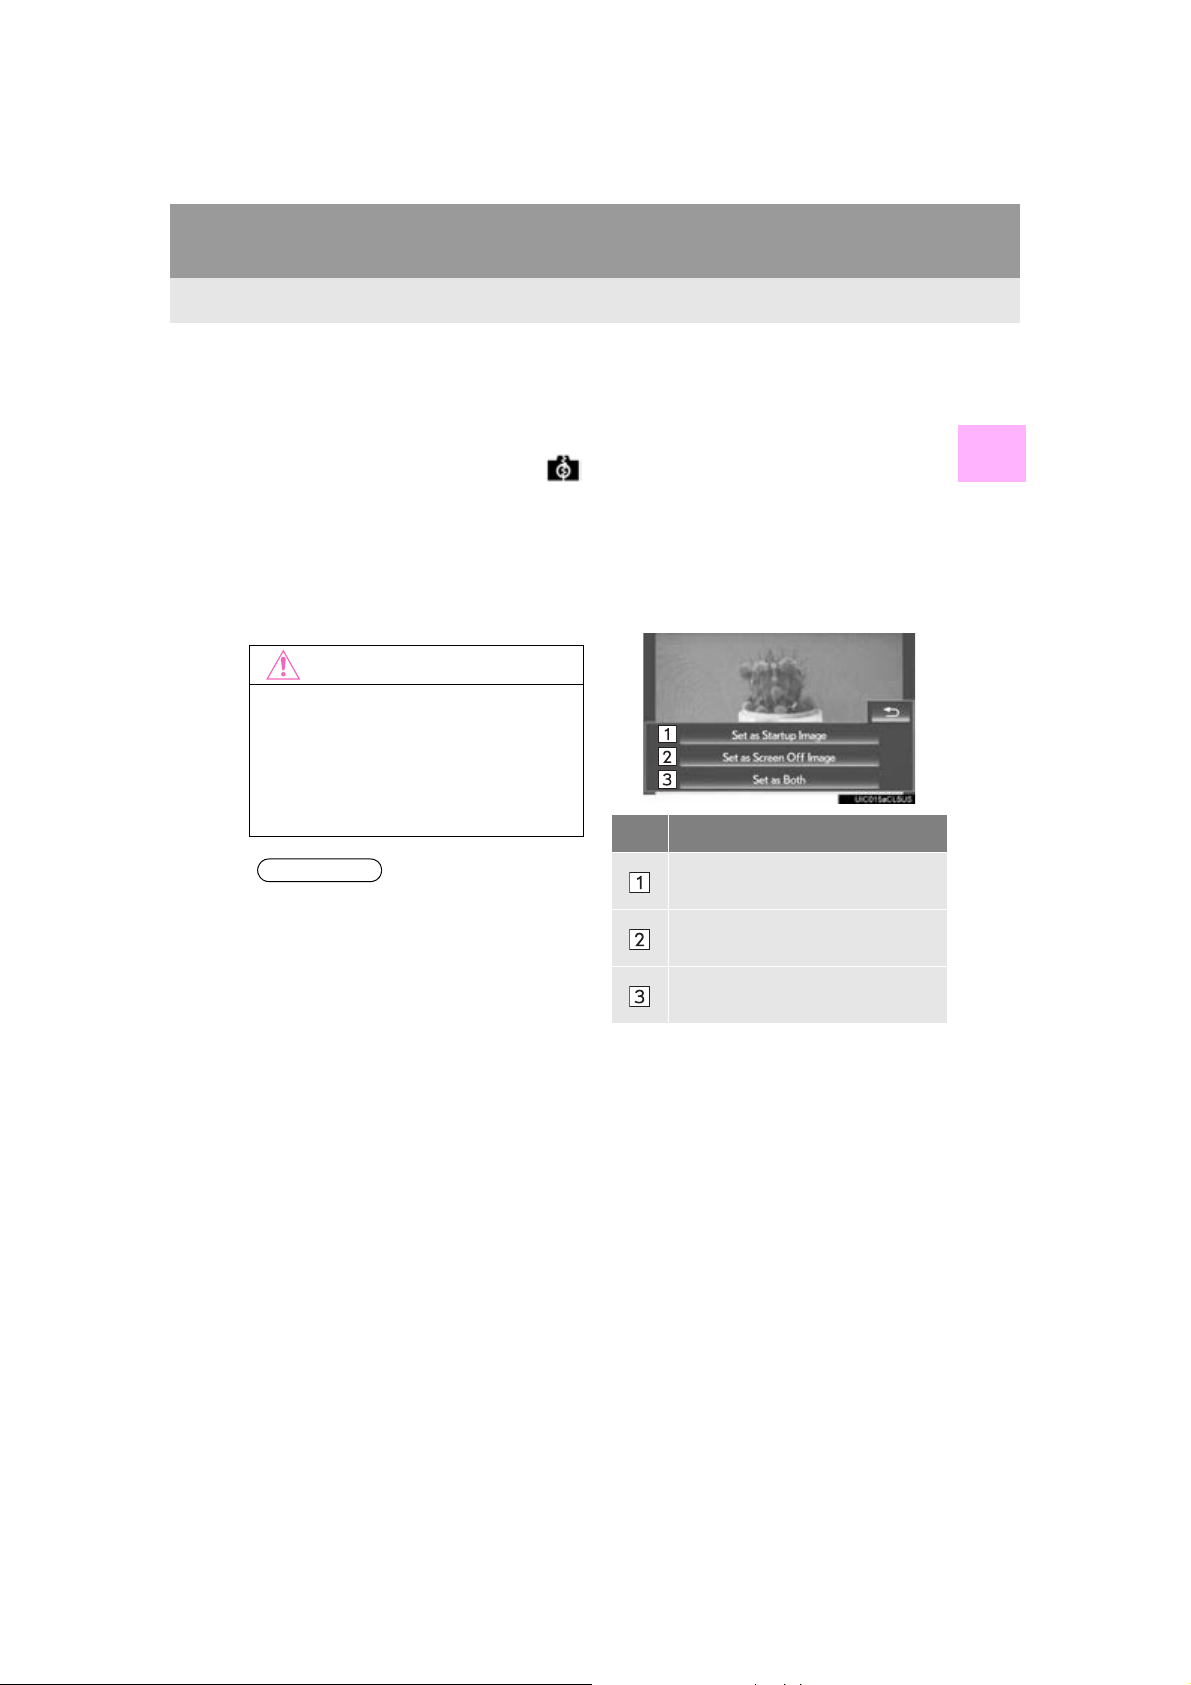
■ SETTING THE STARTUP AND
SCREEN OFF IMAGES
1 Select “Set Images”.
With 8-inch display
2 Select the desired image.
With 12.3-inch display
2 Select the “Movies” or “Images” tab
and select the desired movie or image.
3 Select the desired items to be set.
No. Function
Select to set an image as the startup
image.
Select to set an image as the screen
off image.
Select to set an image as both the
startup and screen off image.
2
BASIC FUNCTION
65
GS_Navi+MM_OM30F12U_(U)
15.09.09 19:53
Page 66
3. OTHER SETTINGS
NOTICE
*: With 12.3-inch display
■ DELETING TRANSFERRED IMAG-
ES
1 Select “Delete Images”.
2 Select the images to be deleted and se-
lect “Delete”.
3 Select “Yes” when the confirmation
screen appears.
DELETING PERSONAL DATA
1 Display the “General Settings” screen.
(P.61)
2 Select “Delete Personal Data”.
3 Select “Delete”.
4 Select “Yes” when the confirmation
screen appears.
Registered or changed personal settings
will be deleted or returned to their default
conditions.
For example:
• General settings
• Navigation settings*
• Audio settings
•Phone settings
•Lexus Enform settings*
●Make sure the map microSD card is
inserted when deleting personal data.
The personal data cannot be deleted
when the map microSD card is removed.
To delete the data, after inserting the map
microSD card, turn the engine <power>
switch to ACCESSORY or IGNITION
ON <ON> mode.
66
GS_Navi+MM_OM30F12U_(U)
15.09.09 19:53
Page 67
3. OTHER SETTINGS
INFORMATION
2. VOICE SETTINGS
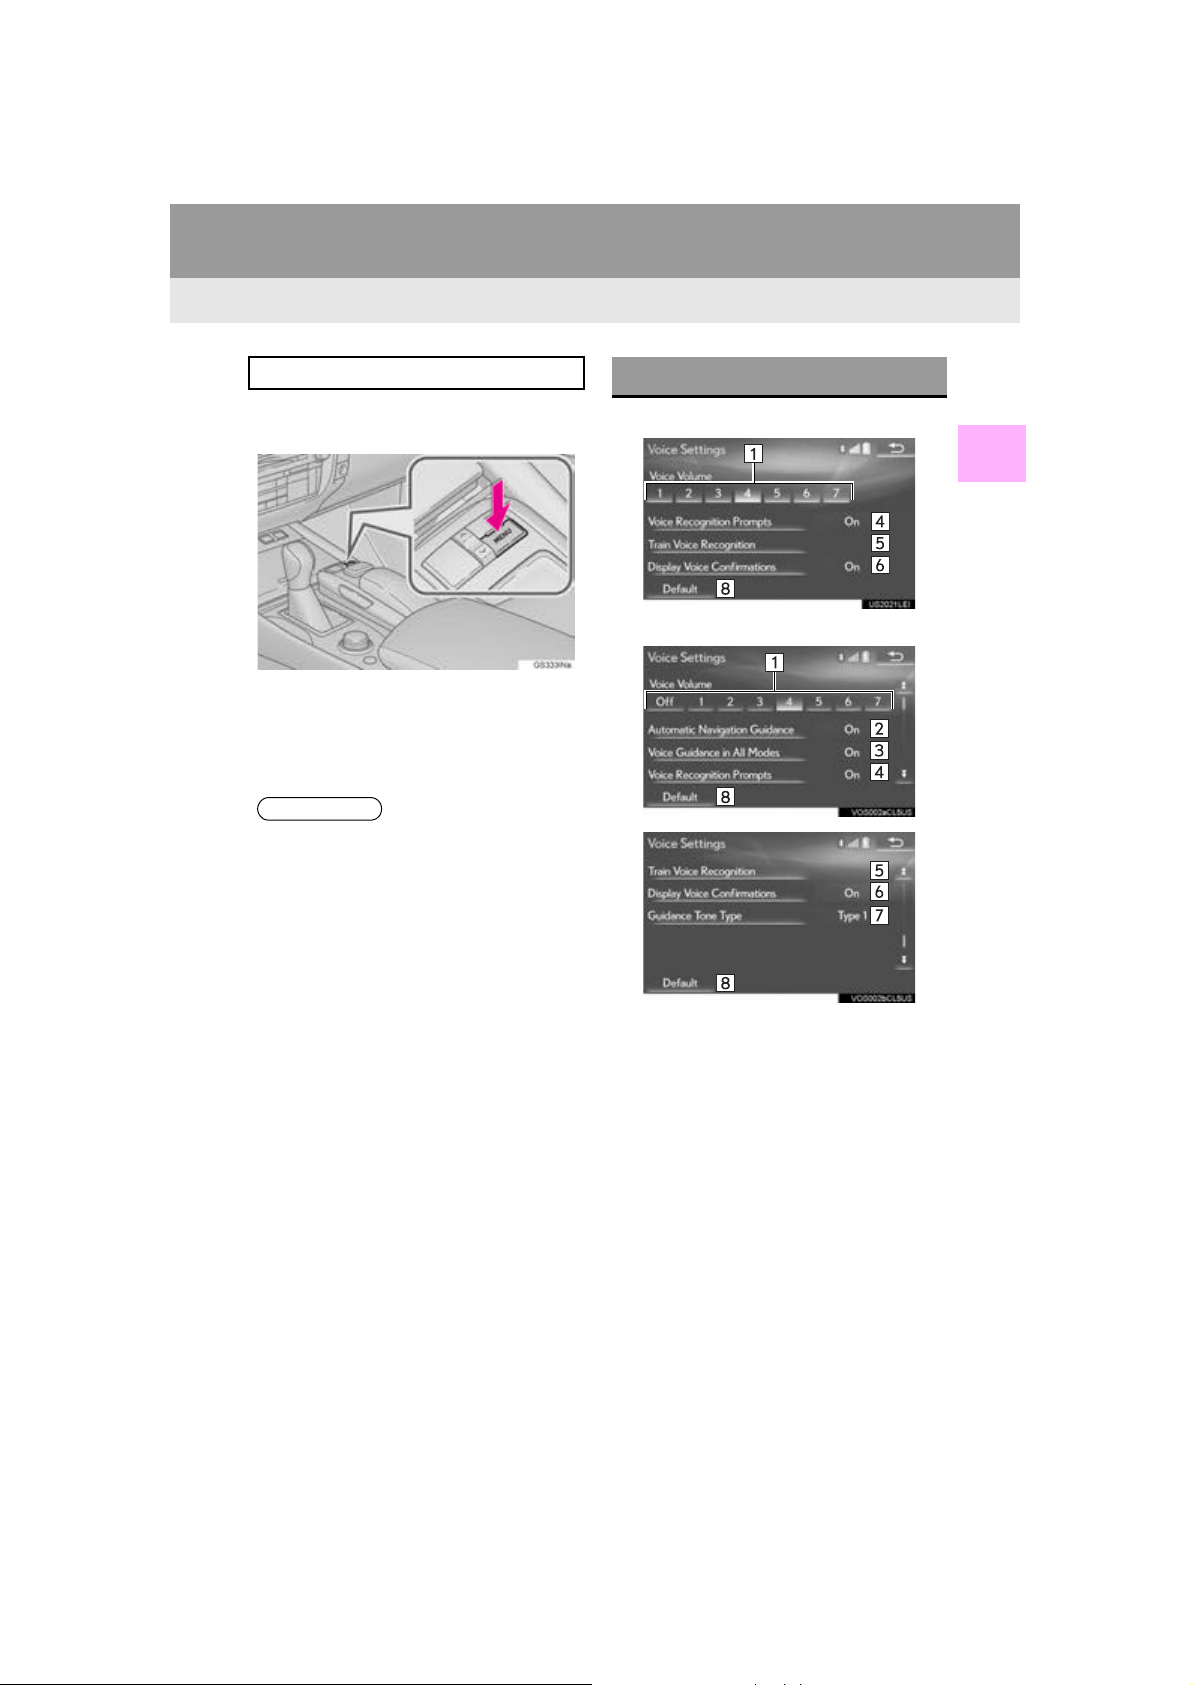
Voice guidance etc. can be set.
1 Press the “MENU” button on the
Remote Touch.
2 Select “Setup”.
3 Select “Voice”.
4 Select the items to be set.
●“Voice Settings” screen can also be dis-
played from the voice recognition top
screen. (P. 2 3 1 )
VOICE SETTINGS SCREEN
With 8-inch display
2
BASIC FUNCTION
With 12.3-inch display
67
GS_Navi+MM_OM30F12U_(U)
15.09.09 19:53
Page 68
3. OTHER SETTINGS
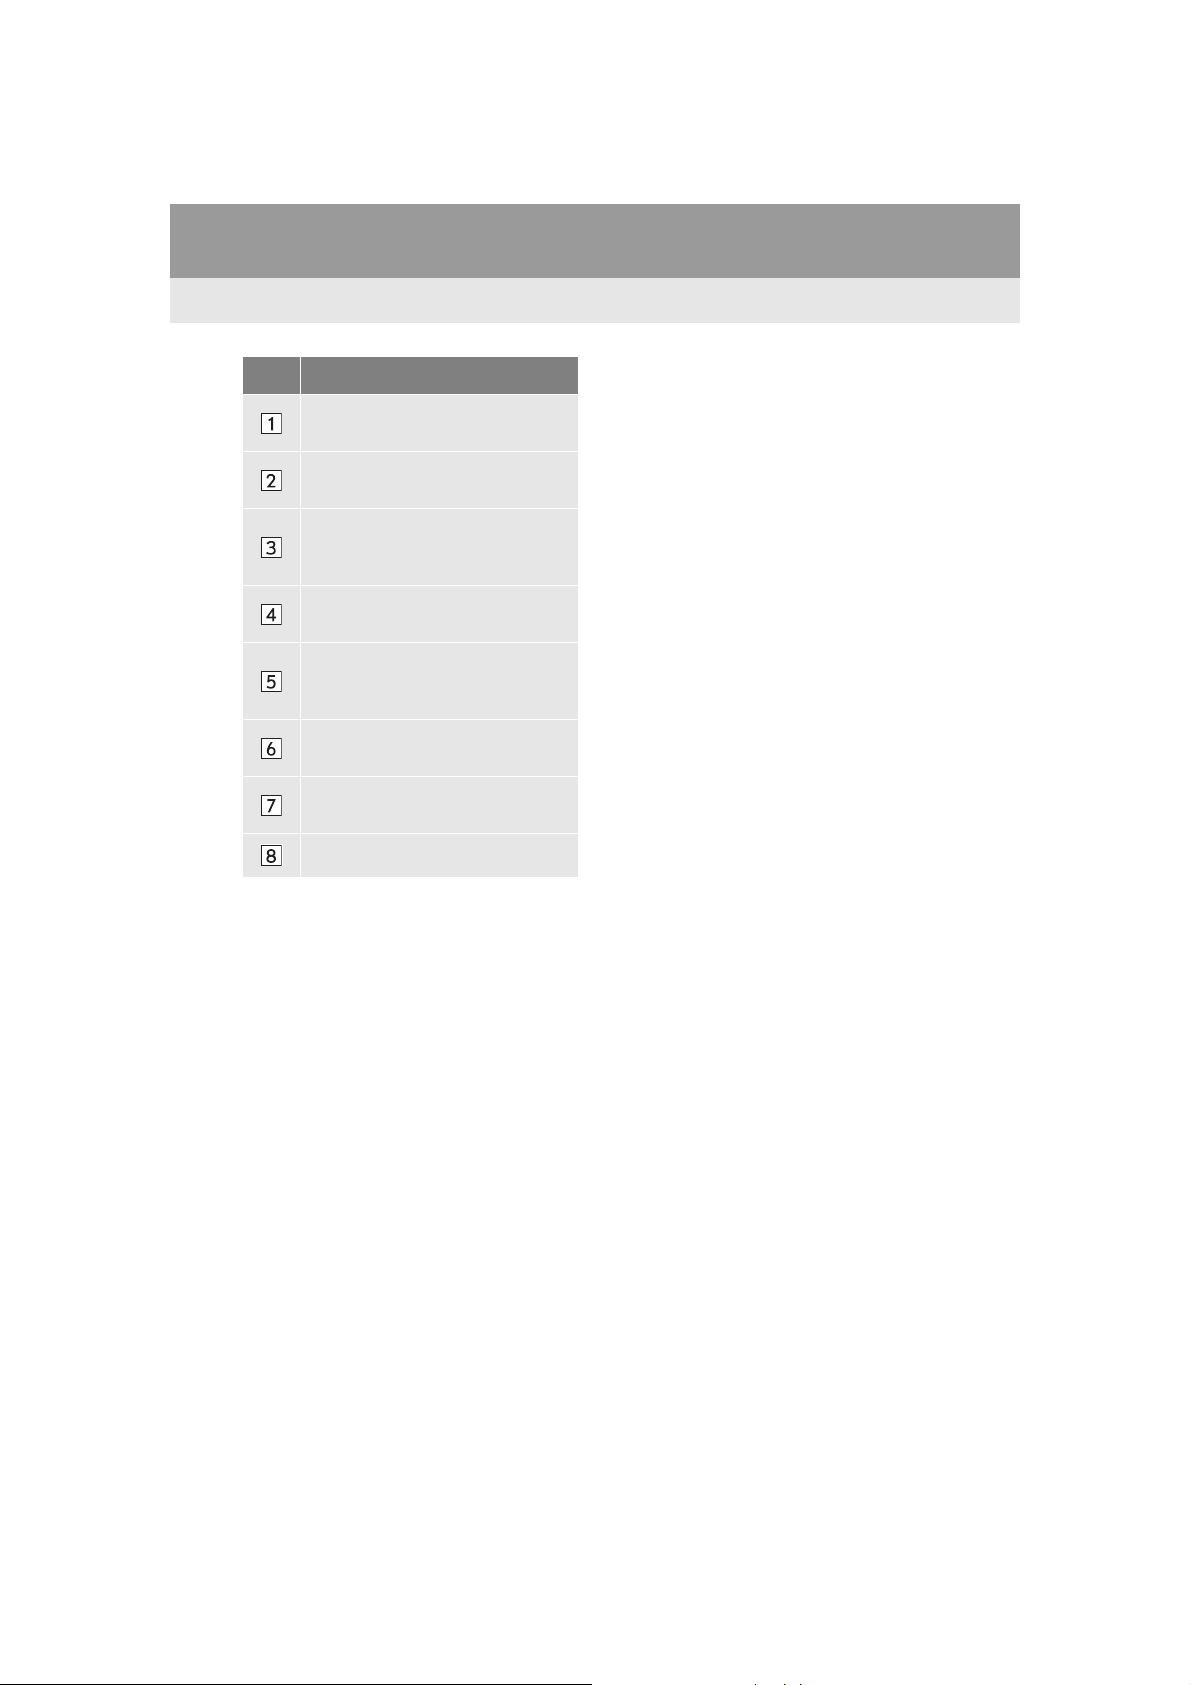
No. Function
Select to adjust the volume of voice
guidance.
Select to set the voice guidance during route guidance on/off.
Select to set the voice guidance during audio/visual and/or air conditioning system use on/off.
Select to set the voice recognition
prompts on/off.
Select to train voice recognition.
The voice command system adapt
the user accent.
Select to set the voice confirmation
display on/off.
Select to set the beep sound of navigation guidance.
68
Select to reset all setup items.
GS_Navi+MM_OM30F12U_(U)
15.09.09 19:53
Page 69
3. OTHER SETTINGS
3. VEHICLE SETTINGS
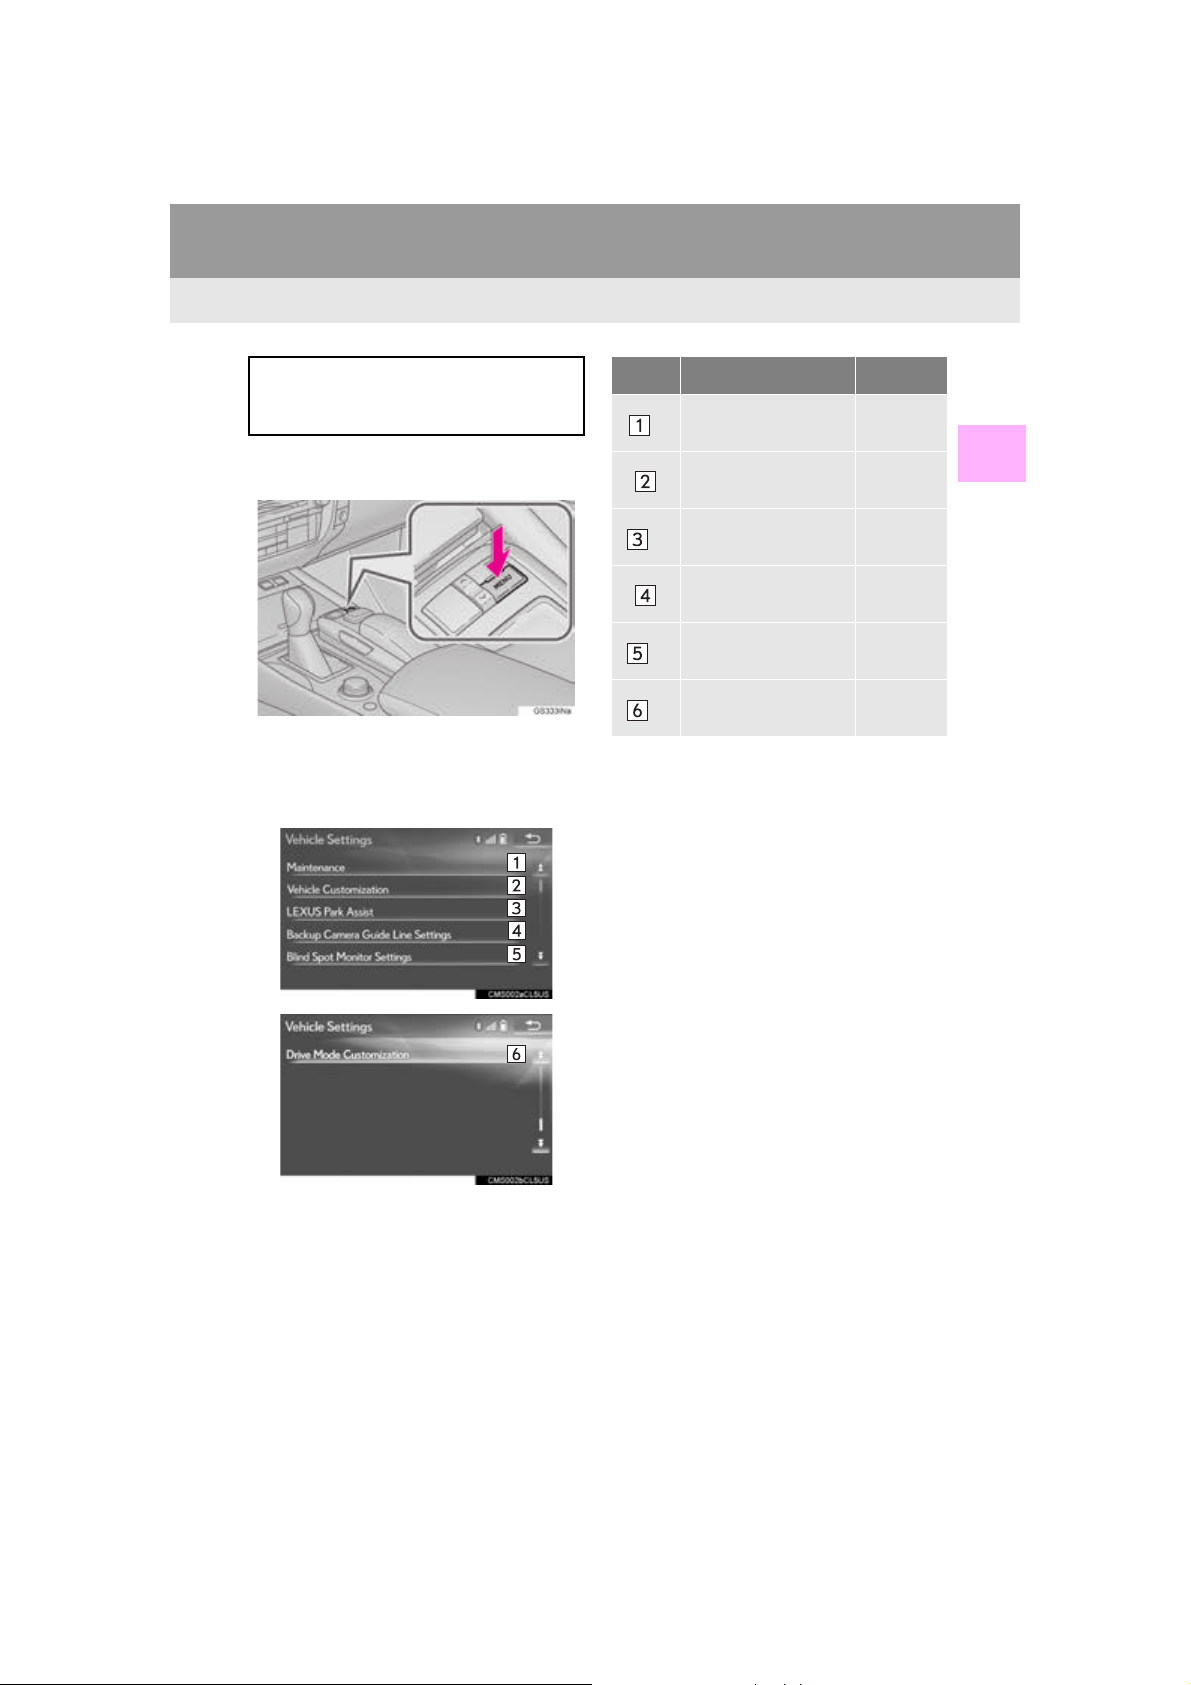
Settings are available for maintenance,
vehicle customization, intuitive parking
assist-sensor, etc.
1 Press the “MENU” button on the
Remote Touch.
2 Select “Setup”.
3 Select “Vehicle”.
4 Select the items to be set.
No. Function Page
Select to set mainte-
1
*
nance.
Select to set vehicle
customization.
Select to set intuitive
2
*
parking assist-sensor.
Select to set back
camera guide line.
Select to set blind
2
*
spot monitor.
Select to set driving
2
*
mode.
*1: With 12.3-inch display
2
: If equipped
*
70
“Owne r’s
Manual”
277
254
“Owne r’s
Manual”
“Owne r’s
Manual”
2
BASIC FUNCTION
GS_Navi+MM_OM30F12U_(U)
15.09.09 19:53
69
Page 70
3. OTHER SETTINGS
*: With 12.3-inch display
INFORMATION
MAINTENANCE*
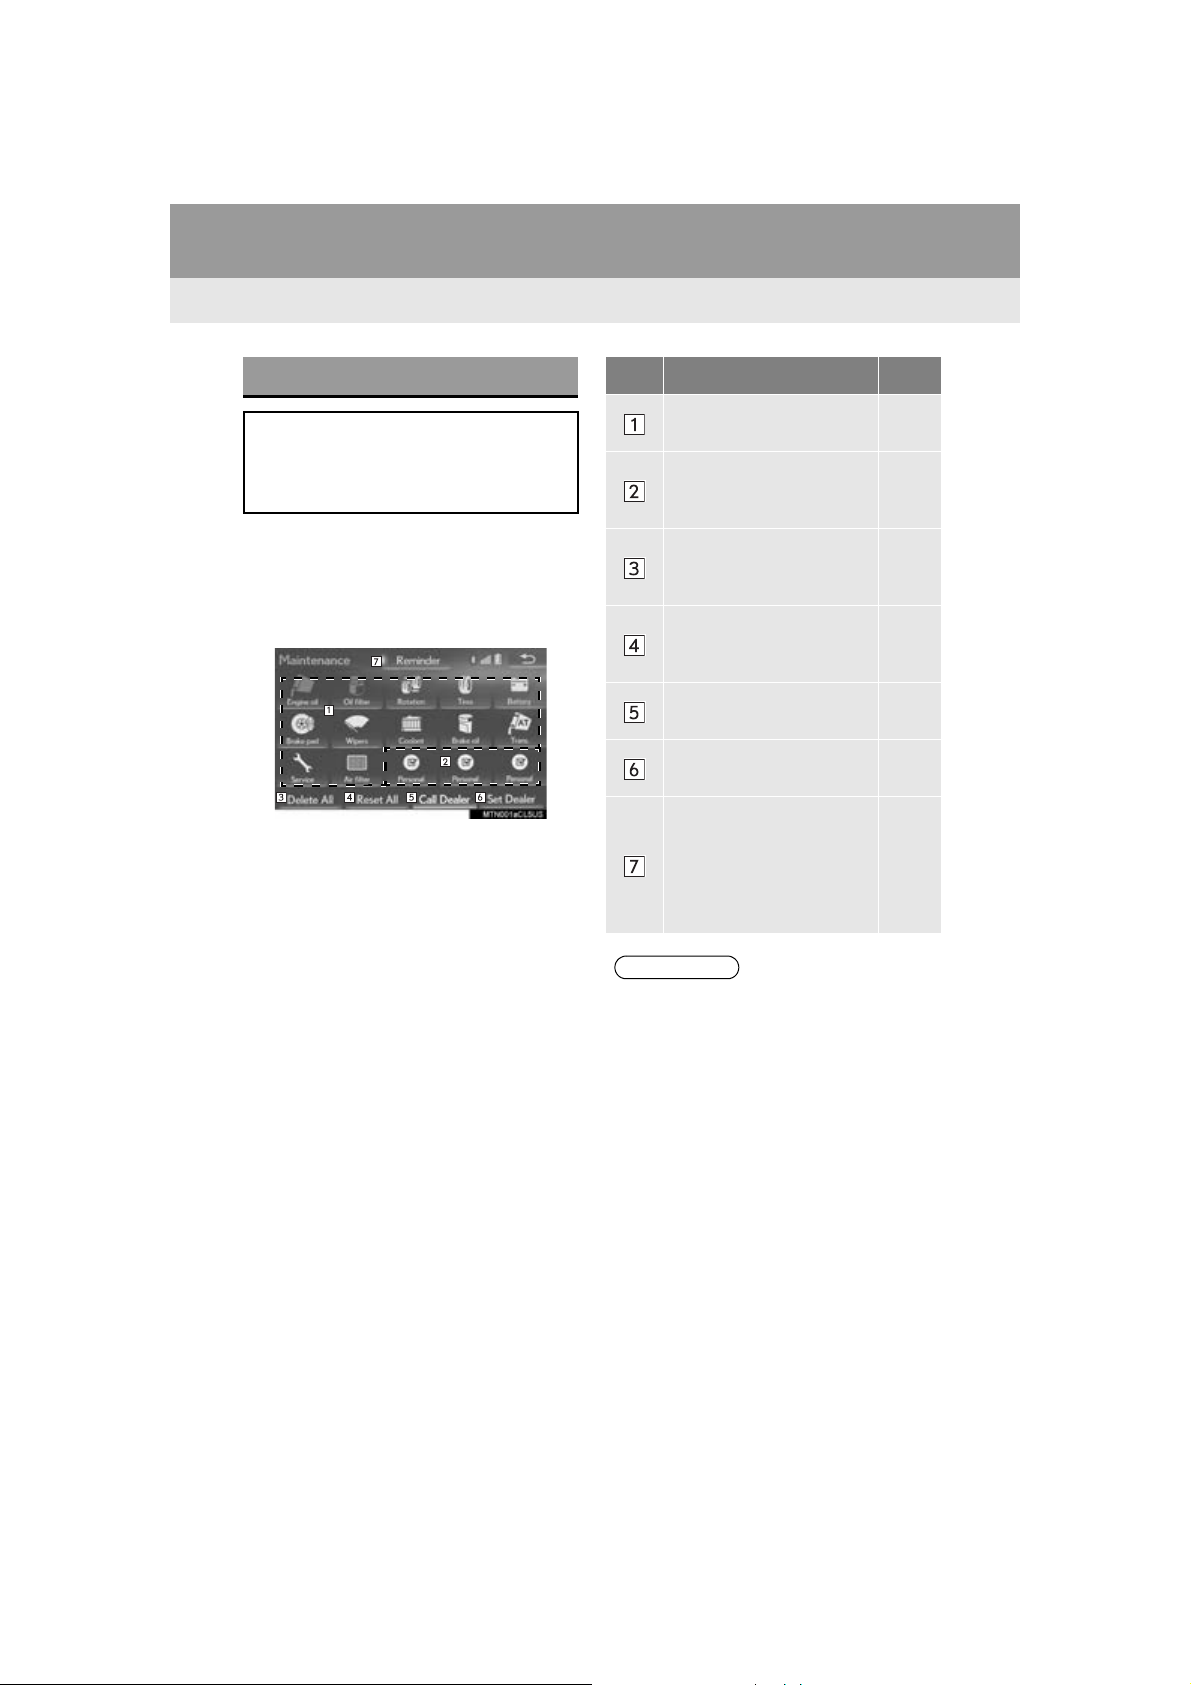
When the system is turned on, the
“Maintenance Reminder” screen displays when it is time to replace a part or
certain components. (P.32)
1 Display the “Vehicle Settings” screen.
(P.69)
2 Select “Maintenance”.
3 Select the desired item.
No. Function Page
Select to set the condition
of parts or components.
Select to add new information items separately from
provided ones.
Select to cancel all conditions which have been entered.
Select to reset the items
which have expired conditions.
Select to call the registered
dealer.
Select to register/edit dealer information.
When set to on, the indicator will illuminate. The system is set to give
maintenance information
with the “Maintenance Reminder” screen.
71
71
32
70
●When the vehicle needs to be serviced,
the screen button color will change to
orange.
GS_Navi+MM_OM30F12U_(U)
15.09.09 19:53
Page 71
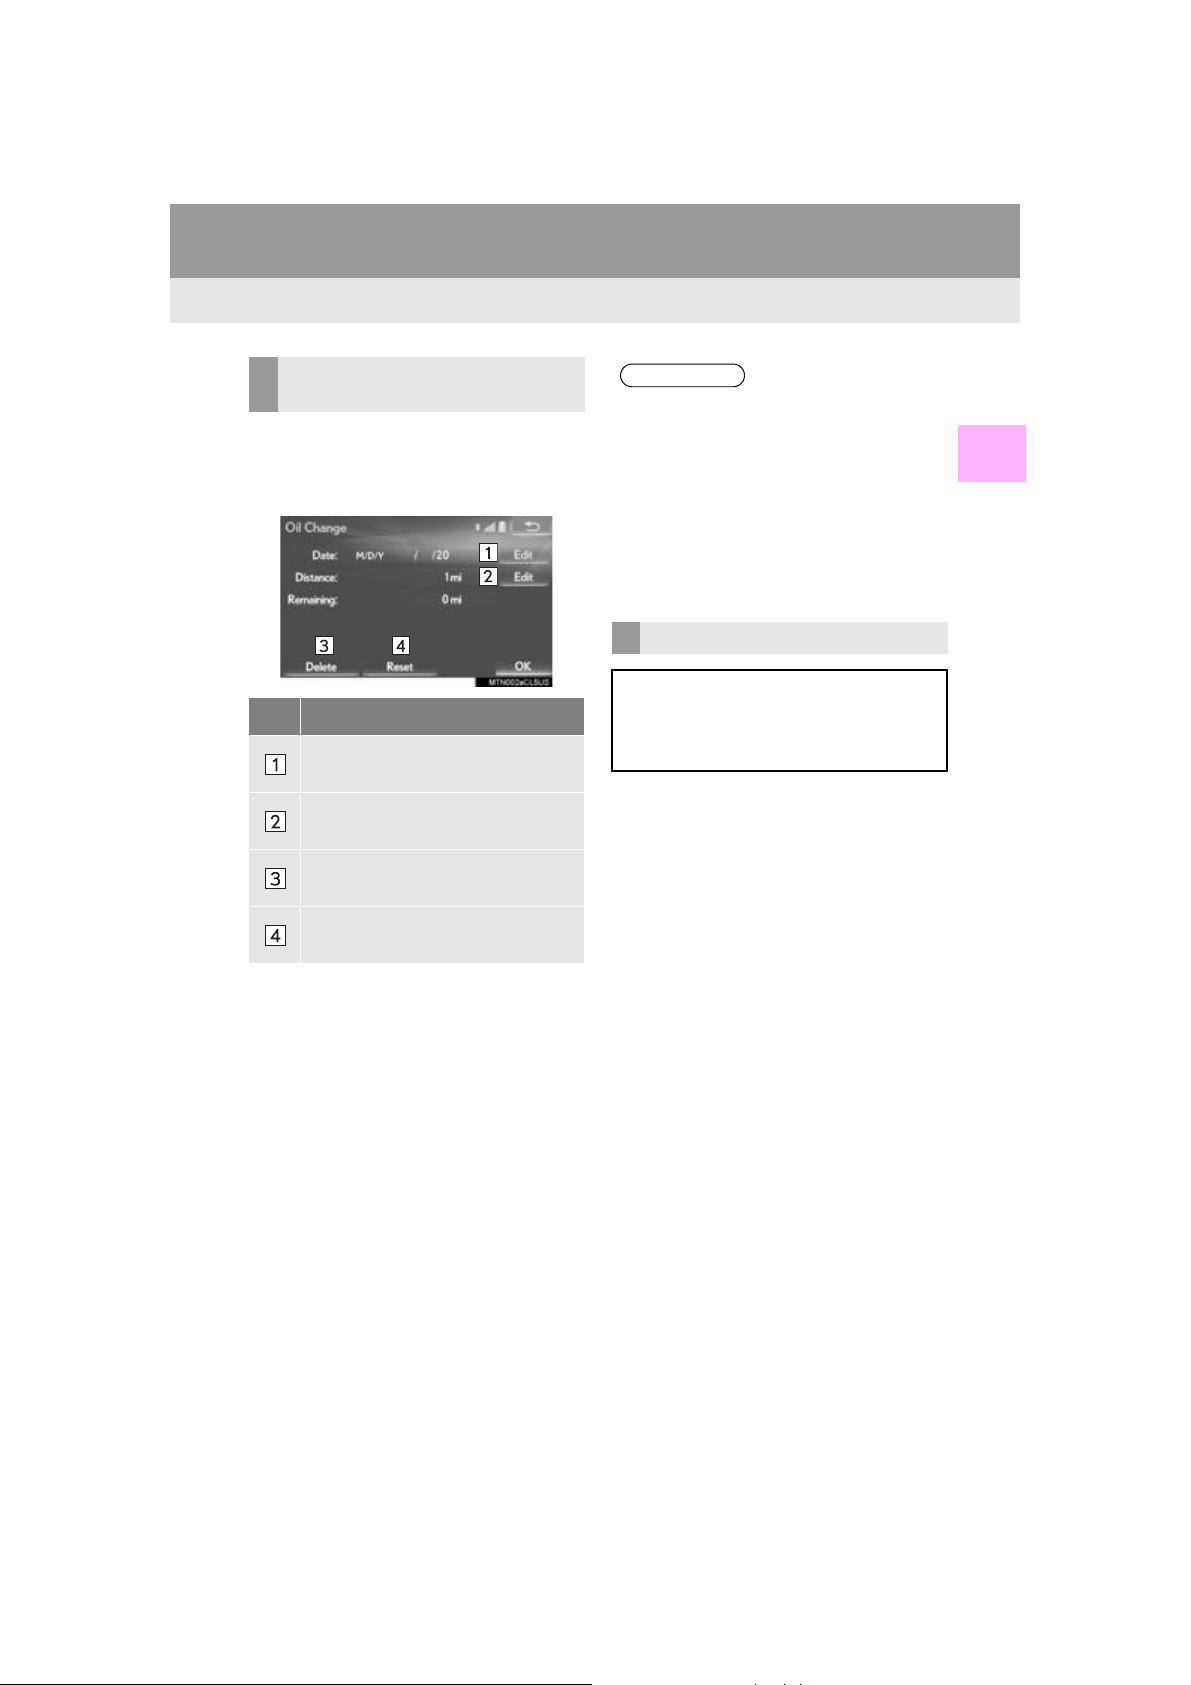
MAINTENANCE
INFORMATION
INFORMATION SETTING
1 Select the desired part or component
screen button.
2 Set the conditions.
No. Function
Select to enter the next maintenance
date.
Select to enter the driving distance
until the next maintenance check.
Select to cancel the conditions which
have been entered.
Select to reset the conditions which
have expired.
3. OTHER SETTINGS
●For scheduled maintenance information,
refer to “Warranty and Services Guide/
Owner’s Manual Supplement/Scheduled
Maintenance”.
●Depending on driving or road conditions,
the actual date and distance that maintenance should be performed may differ
from the stored date and distance in the
system.
DEALER SETTING
Dealer information can be registered in
the system. With dealer information registered, route guidance to the dealer is
available.
1 Select “Set Dealer”.
2 Select the desired item to search for the
location. (P.93)
The editing dealer screen appears after
setting the location.
2
BASIC FUNCTION
3 Select “O K” after entering the condi-
tions.
71
GS_Navi+MM_OM30F12U_(U)
15.09.09 19:53
Page 72
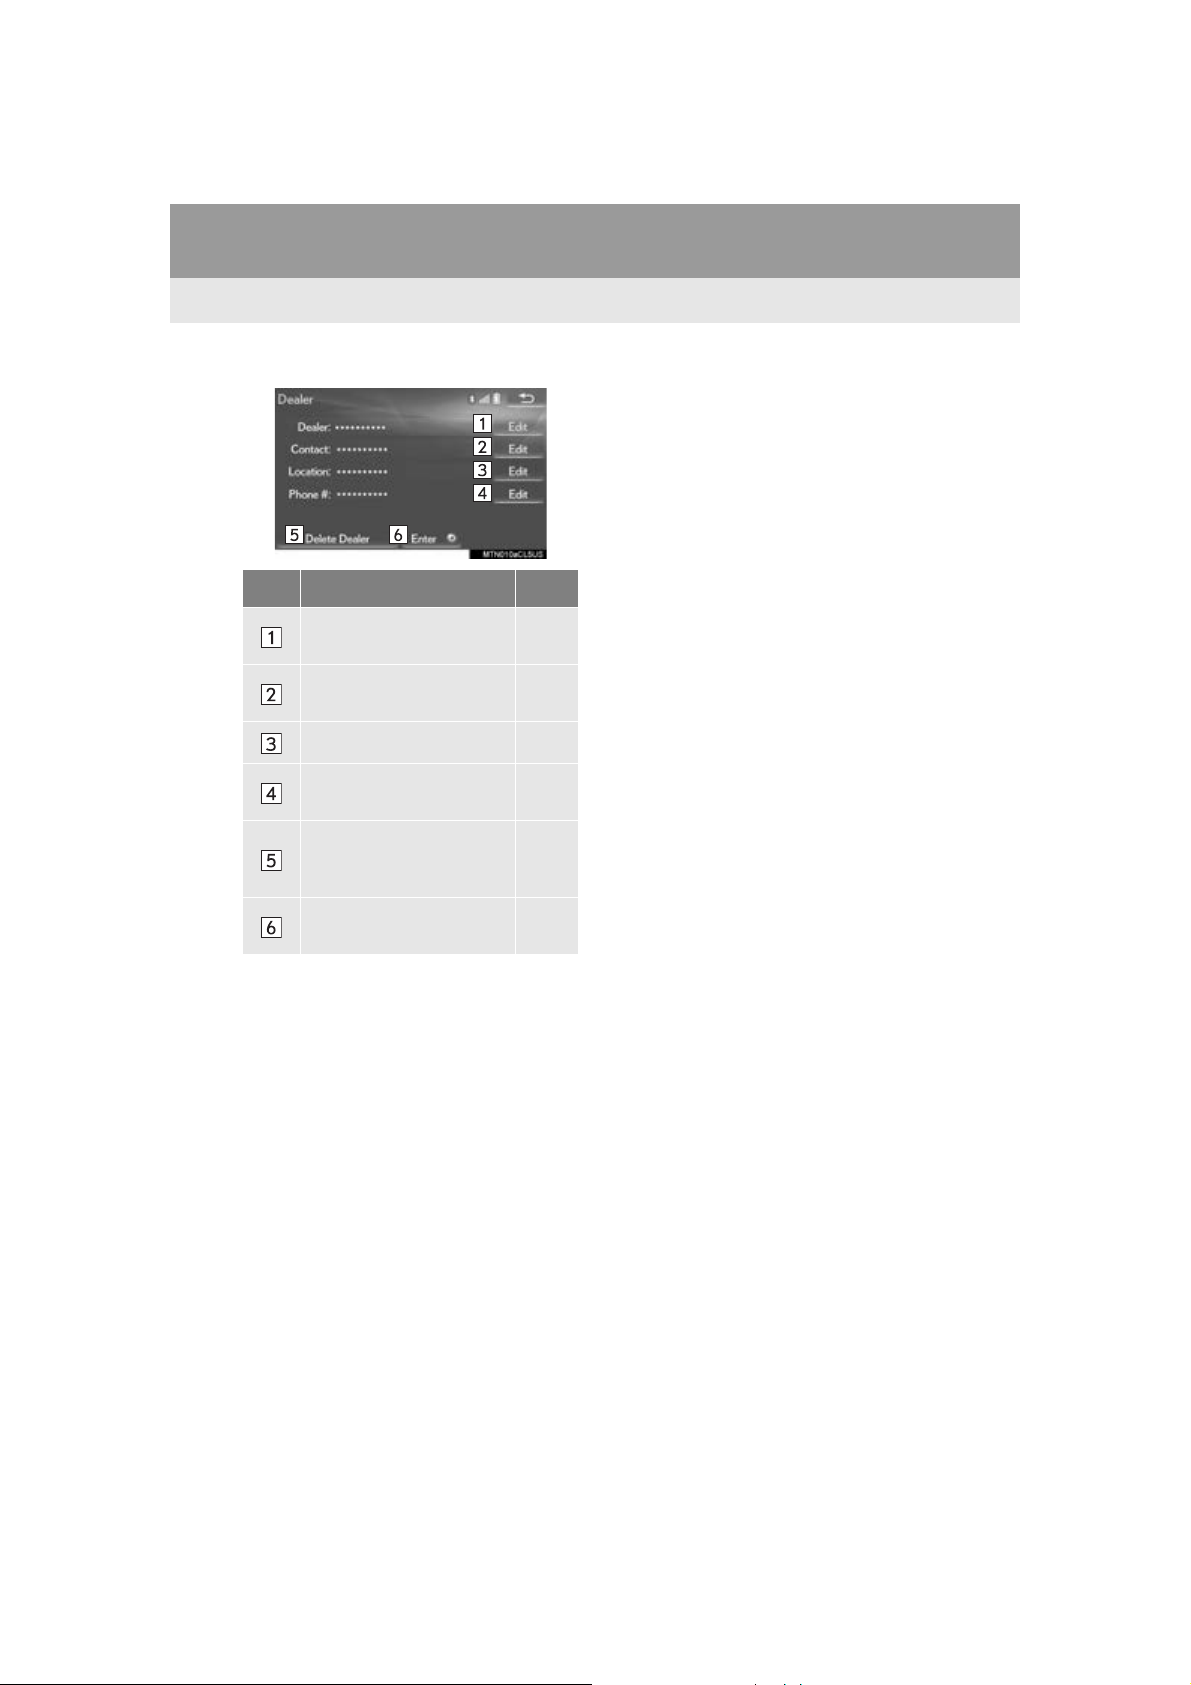
3. OTHER SETTINGS
3 Select the items to be edited.
No. Function Page
Select to enter the name of
a dealer.
Select to enter the name of
a dealer member.
Select to set the location. 72
Select to enter the phone
number.
Select to delete the dealer
information displayed on
the screen.
Select to set the displayed
dealer as a destination.
72
72
72
105
■ EDITING DEALER OR CONTACT
NAME
1 Select “Edit” next to “Dealer” or
“Contact”.
2 Enter the name and select “OK” .
■ EDITING THE LOCATION
1 Select “Edit” next to “Location”.
2 Scroll the map to the desired point
(P.83) and select “OK”.
■ EDITING PHONE NUMBER
1 Select “Edit” next to “Phone #”.
2 Enter the phone number and select
“OK”.
72
GS_Navi+MM_OM30F12U_(U)
15.09.09 19:53
Page 73

3. OTHER SETTINGS
2
BASIC FUNCTION
GS_Navi+MM_OM30F12U_(U)
15.09.09 19:53
73
Page 74

3
NAVIGATION SYSTEM
BASIC OPERATION
1
1. QUICK REFERENCE ............................... 76
MAP SCREEN............................................................. 76
NAVIGATION OPTIONS SCREEN .............. 78
2. MAP SCREEN OPERATION ................ 79
CURRENT POSITION DISPLAY...................... 79
MAP SCALE ............................................................... 80
ORIENTATION OF THE MAP............................ 81
SWITCHING THE MAP MODE........................ 82
SCREEN SCROLL OPERATION..................... 82
ADJUSTING LOCATION IN SMALL
INCREMENTS........................................................ 83
3. MAP SCREEN INFORMATION......... 84
DISPLAYING MAP INFORMATION ........... 84
DISPLAYING INFORMATION ABOUT
THE ICON WHERE THE CURSOR IS
SET................................................................................. 87
STANDARD MAP ICONS .................................. 89
4. TRAFFIC INFORMATION .................... 90
DISPLAYING TRAFFIC INFORMATION
ON THE MAP.......................................................... 92
*
DESTINATION SEARCH
2
1. DESTINATION SEARCH
OPERATION ........................................... 93
SELECTING SEARCH AREA............................ 95
SETTING HOME AS DESTINATION............ 95
SETTING PRESET DESTINATIONS AS
DESTINATION ...................................................... 95
SEARCHING BY ADDRESS ............................... 96
SEARCHING BY POINT OF INTEREST ...... 97
DESTINATION SEARCH BY
DESTINATION ASSIST ..................................... 101
SEARCHING FROM PREVIOUS
DESTINATIONS.................................................... 101
SEARCHING BY ADDRESS BOOK ............. 101
SEARCHING BY EMERGENCY ................... 102
SEARCHING BY INTERSECTION AND
FREEWAY ............................................................... 102
SEARCHING BY MAP......................................... 104
SEARCHING BY COORDINATES .............. 104
2. STARTING ROUTE GUIDANCE ...... 105
CONFIRM DESTINATION SCREEN........... 106
ENTIRE ROUTE MAP SCREEN ...................... 106
74
GS_Navi+MM_OM30F12U_(U)
15.09.09 19:53
Page 75
3
*
NAVIGATION SYSTEM
1
2
ROUTE GUIDANCE
3
1. ROUTE GUIDANCE SCREEN ........... 110
SCREEN FOR ROUTE GUIDANCE ............. 110
ROUTE OVERVIEW ............................................... 112
DURING FREEWAY DRIVING........................ 113
WHEN APPROACHING
INTERSECTION.................................................... 115
TURN LIST SCREEN............................................... 116
TURN-BY-TURN ARROW SCREEN ............ 116
2. TYPICAL VOICE GUIDANCE
PROMPTS ................................................. 117
3. EDITING ROUTE...................................... 118
ADDING DESTINATIONS ................................. 118
REORDERING DESTINATIONS..................... 118
DELETING DESTINATIONS ............................. 119
SETTING ROUTE PREFERENCES ................. 119
SELECTING ROUTE TYPE ................................ 119
DETOUR SETTING ................................................ 120
STARTING FROM ADJACENT ROAD ........ 121
MEMORY POINTS
4
1. MEMORY POINTS SETTINGS.......... 122
SETTING UP HOME ............................................. 123
SETTING UP PRESET DESTINATIONS ...... 124
SETTING UP ADDRESS BOOK ..................... 126
SETTING UP AREAS TO AVOID................... 129
DELETING PREVIOUS
DESTINATIONS.................................................... 131
SETUP
5
1. DETAILED NAVIGATION
SETTINGS................................................ 132
SCREENS FOR NAVIGATION
SETTINGS................................................................ 132
2. TRAFFIC SETTINGS ............................... 137
SCREEN FOR TRAFFIC SETTINGS.............. 137
TIPS FOR THE NAVIGATION
6
SYSTEM
1. GPS (GLOBAL POSITIONING
SYSTEM) .................................................. 139
LIMITATIONS OF THE NAVIGATION
SYSTEM .................................................................... 139
3
4
5
6
7
8
9
10
2. MAP DATABASE VERSION AND
COVERED AREA................................. 142
MAP INFORMATION .......................................... 142
ABOUT THE MAP DATA ................................... 142
*: With 12.3-inch display
75
GS_Navi+MM_OM30F12U_(U)
15.09.09 19:53
Page 76
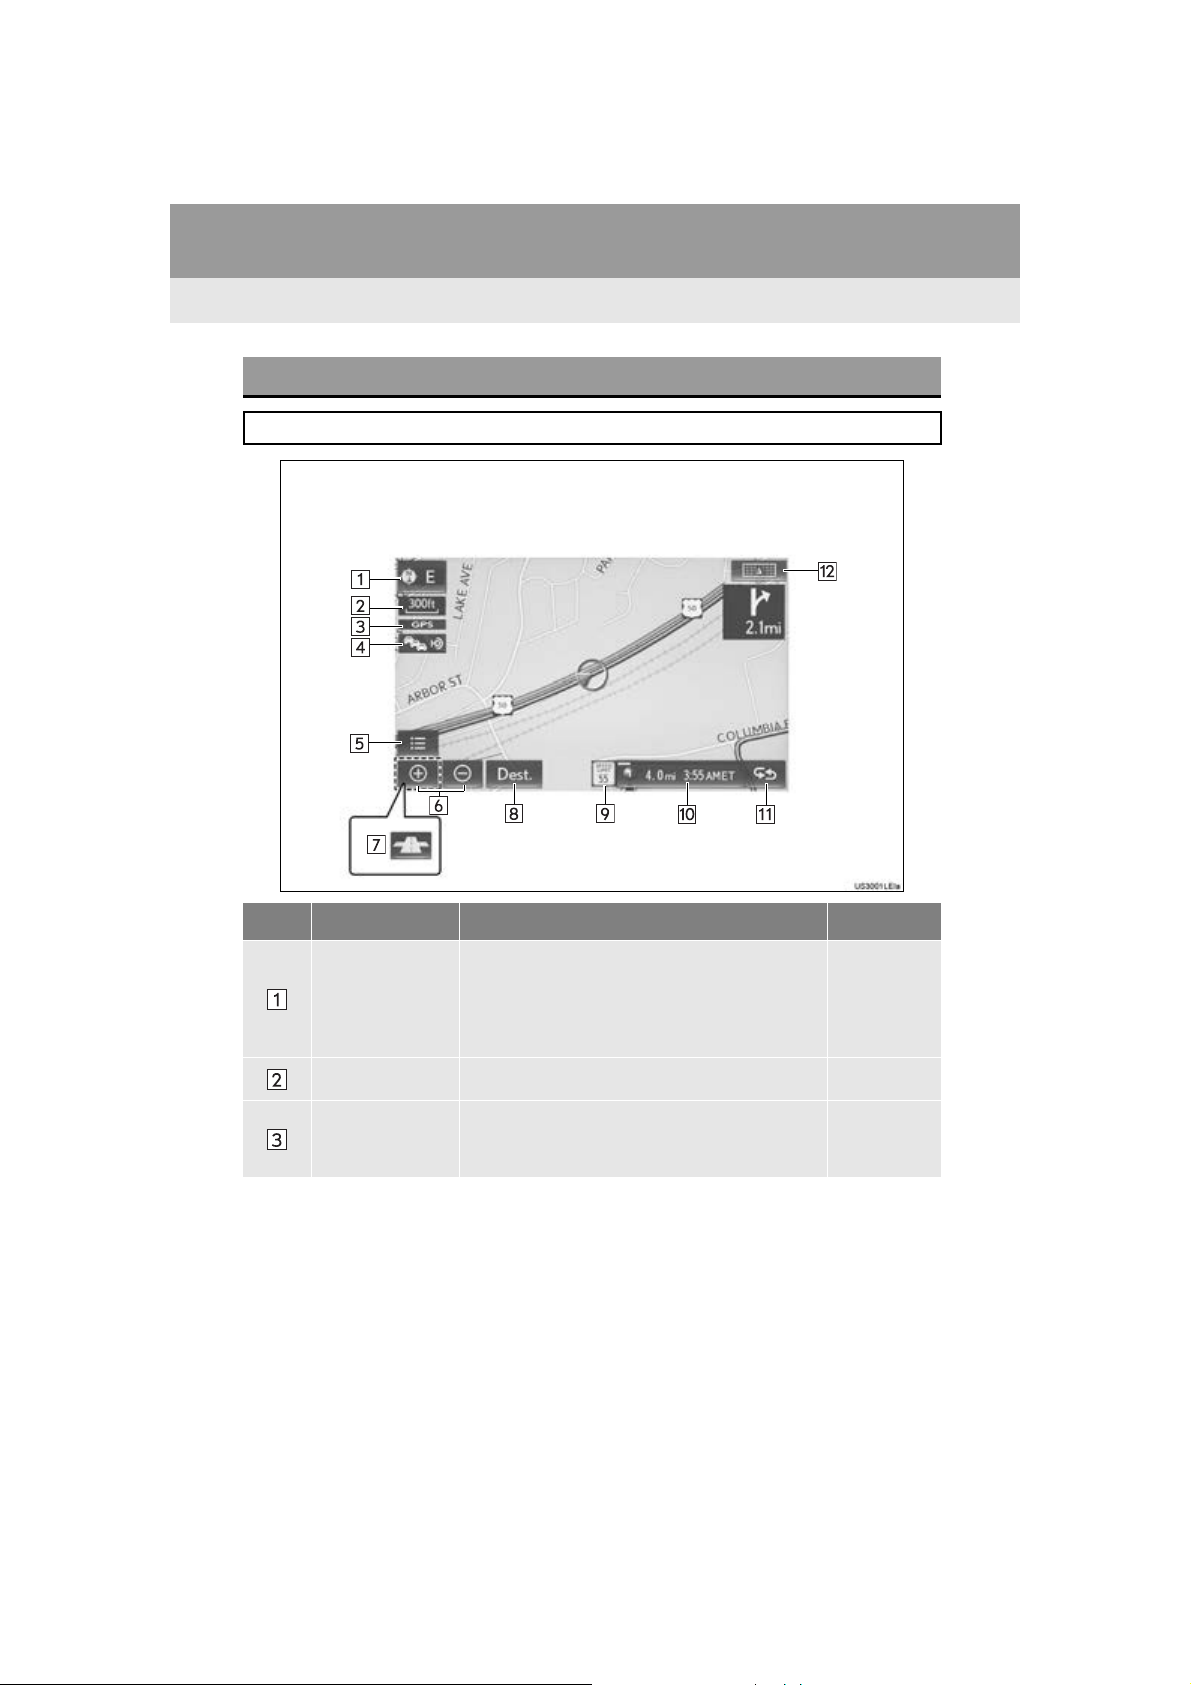
1. BASIC OPERATION
1. QUICK REFERENCE
MAP SCREEN
To display the map screen, press the “MAP” button on the Remote Touch.
No. Name Function Page
2D north up, 2D
heading up or 3D
heading up symbol
Scale indicator This figure indicates the map scale. 80
“GPS” mark
(Global Positioning System)
76
Indicates whether the map orientation is set to
north-up or heading-up. The letter(s) beside this
symbol indicate the vehicle’s heading direction
(e.g. N for north). In 3D map, only a heading-up
view is available.
Shows that the vehicle is receiving signals from
the GPS.
81
139
GS_Navi+MM_OM30F12U_(U)
15.09.09 19:53
Page 77
1. BASIC OPERATION
INFORMATION
No. Name Function Page
Shows that traffic information is received. Select
*
Traffic indicator
to start voice guidance for traffic information.
When traffic information is received via HD Radio
90
broadcast, HD mark is displayed on the right.
Options button Select to display the “Navigation Options” screen. 78
Zoom in/out button
Footprint map
button
Destination button
Speed limit icon
Select to magnify or reduce the map scale. When
either button is selected, the map scale indicator
bar appears at the bottom of the screen.
Select to display the footprint map screen. 80
Select to display the “Destination” screen. 93
Indicates the speed limit on the current road. The
display of the speed limit icon can be set to on/off.
Displays the current street name, or the distance
Route information bar
with the estimated travel time/arrival time to the
destination. The route information bar fills from
left to right as the vehicle progresses on the route.
Route information button
Screen change
button
*: This function is not made available on some models.
Select to change the display between the current
street name and the distance with the estimated
travel/arrival time.
Select to change the map screen to full screen dis-
play.
80
84
111
3
NAVIGATION SYSTEM
●Certain screen buttons on the map screen will disappear several seconds after the Remote
Touch has been operated. This setting can be changed so that all the screen buttons will
always be displayed.(P.1 3 2 )
●Press the “MAP” button on the Remote Touch to display the address of the current position
on the map screen or repeat voice guidance.
77
GS_Navi+MM_OM30F12U_(U)
15.09.09 19:53
Page 78
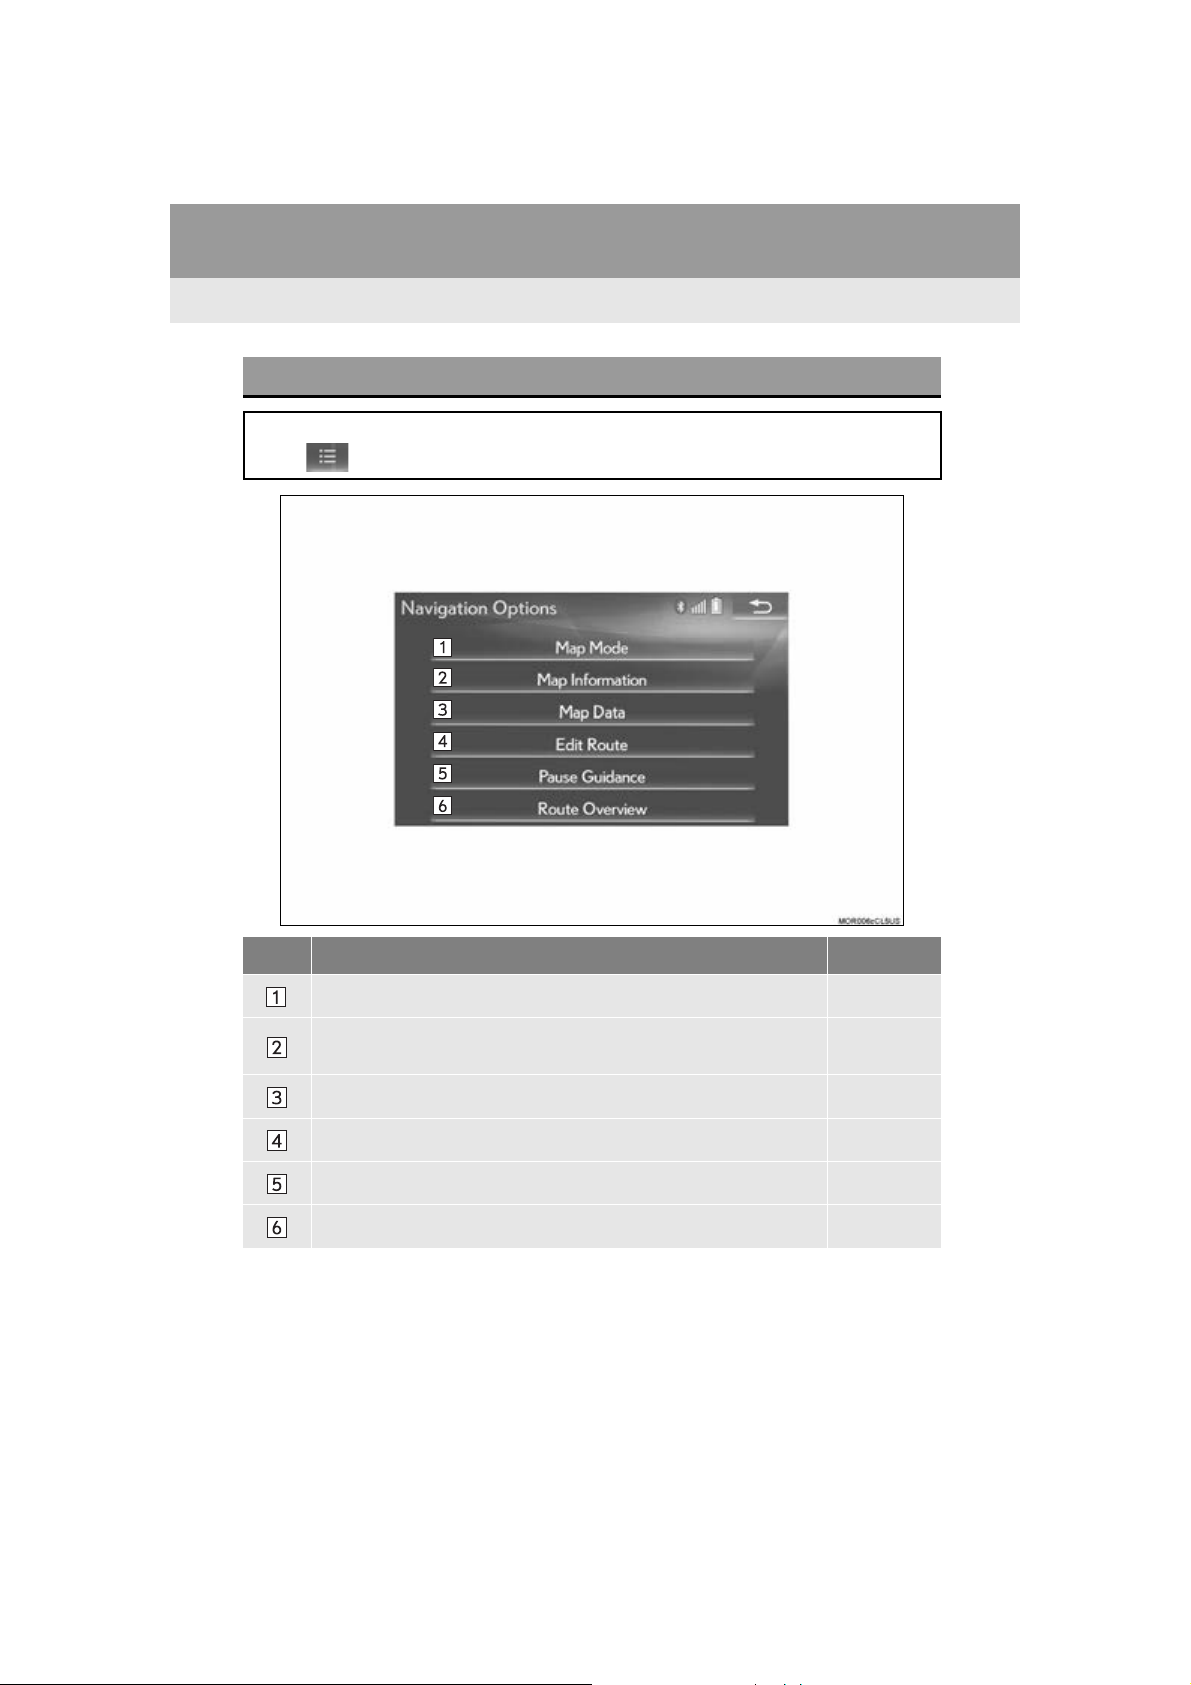
1. BASIC OPERATION
NAVIGATION OPTIONS SCREEN
The navigation options screen can be reached by the following methods:
Select on the map screen.
No. Function Page
Select to change the map configuration. 82
Select to change the displayed map information such as POI icons,
route trace, speed limit, etc.
(P.76)
84
78
Select to display the map version and coverage area. 142
Select to edit the set route. 118
Select to pause or resume route guidance.
Select to display the overview of the entire route. 112
GS_Navi+MM_OM30F12U_(U)
15.09.09 19:53
Page 79
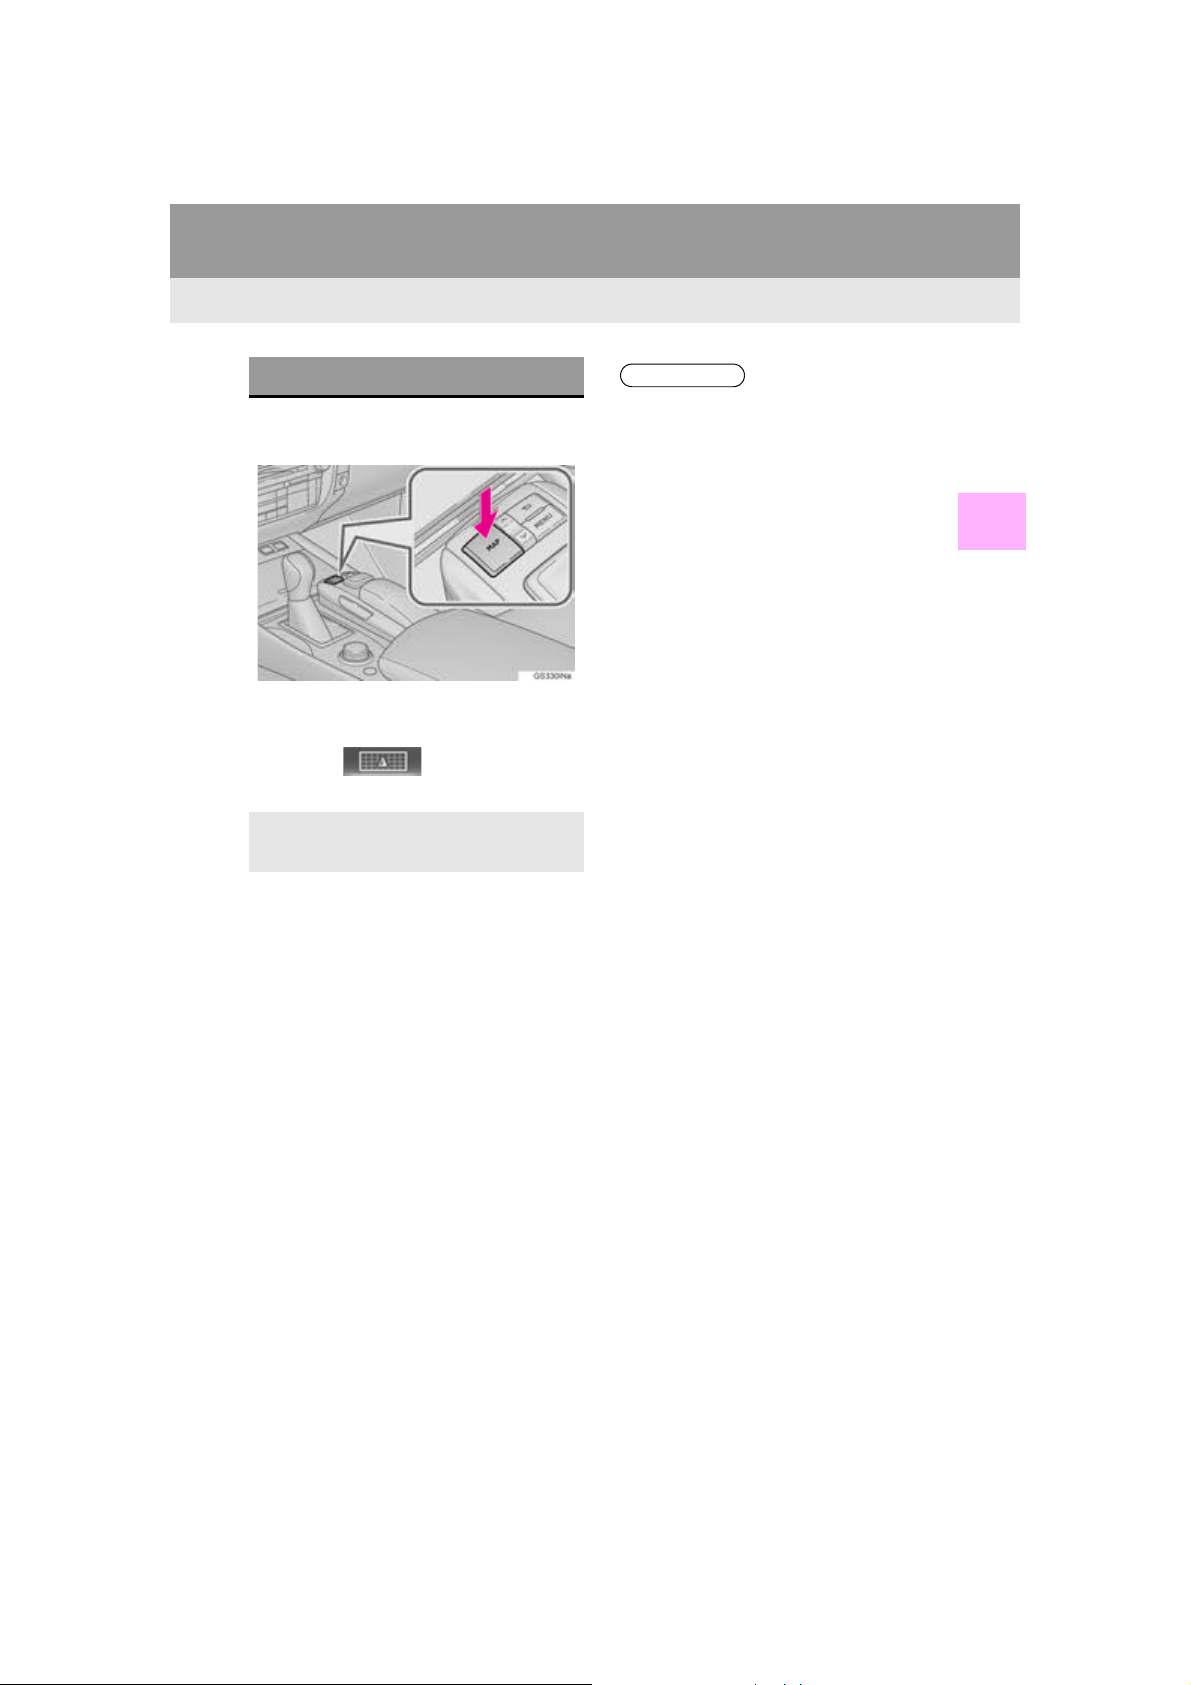
1. BASIC OPERATION
INFORMATION
2. MAP SCREEN OPERATION
CURRENT POSITION DISPLAY
1 Press the “MAP” button on the Remote
Touch.
2 Check that the current position map is
displayed.
Selecting will change the map
screen to full screen display.
To correct the current position manu-
ally:
P.1 3 5
●While driving, the current position mark
is fixed on the screen and the map moves.
●The current position is automatically set
as the vehicle receives signals from the
GPS (Global Positioning System). If the
current position is not correct, it is automatically corrected after the vehicle
receives signals from the GPS.
●After the 12-volt battery disconnection,
or on a new vehicle, the current position
may not be correct. As soon as the system receives signals from the GPS, the
correct current position is displayed.
3
NAVIGATION SYSTEM
79
GS_Navi+MM_OM30F12U_(U)
15.09.09 19:53
Page 80
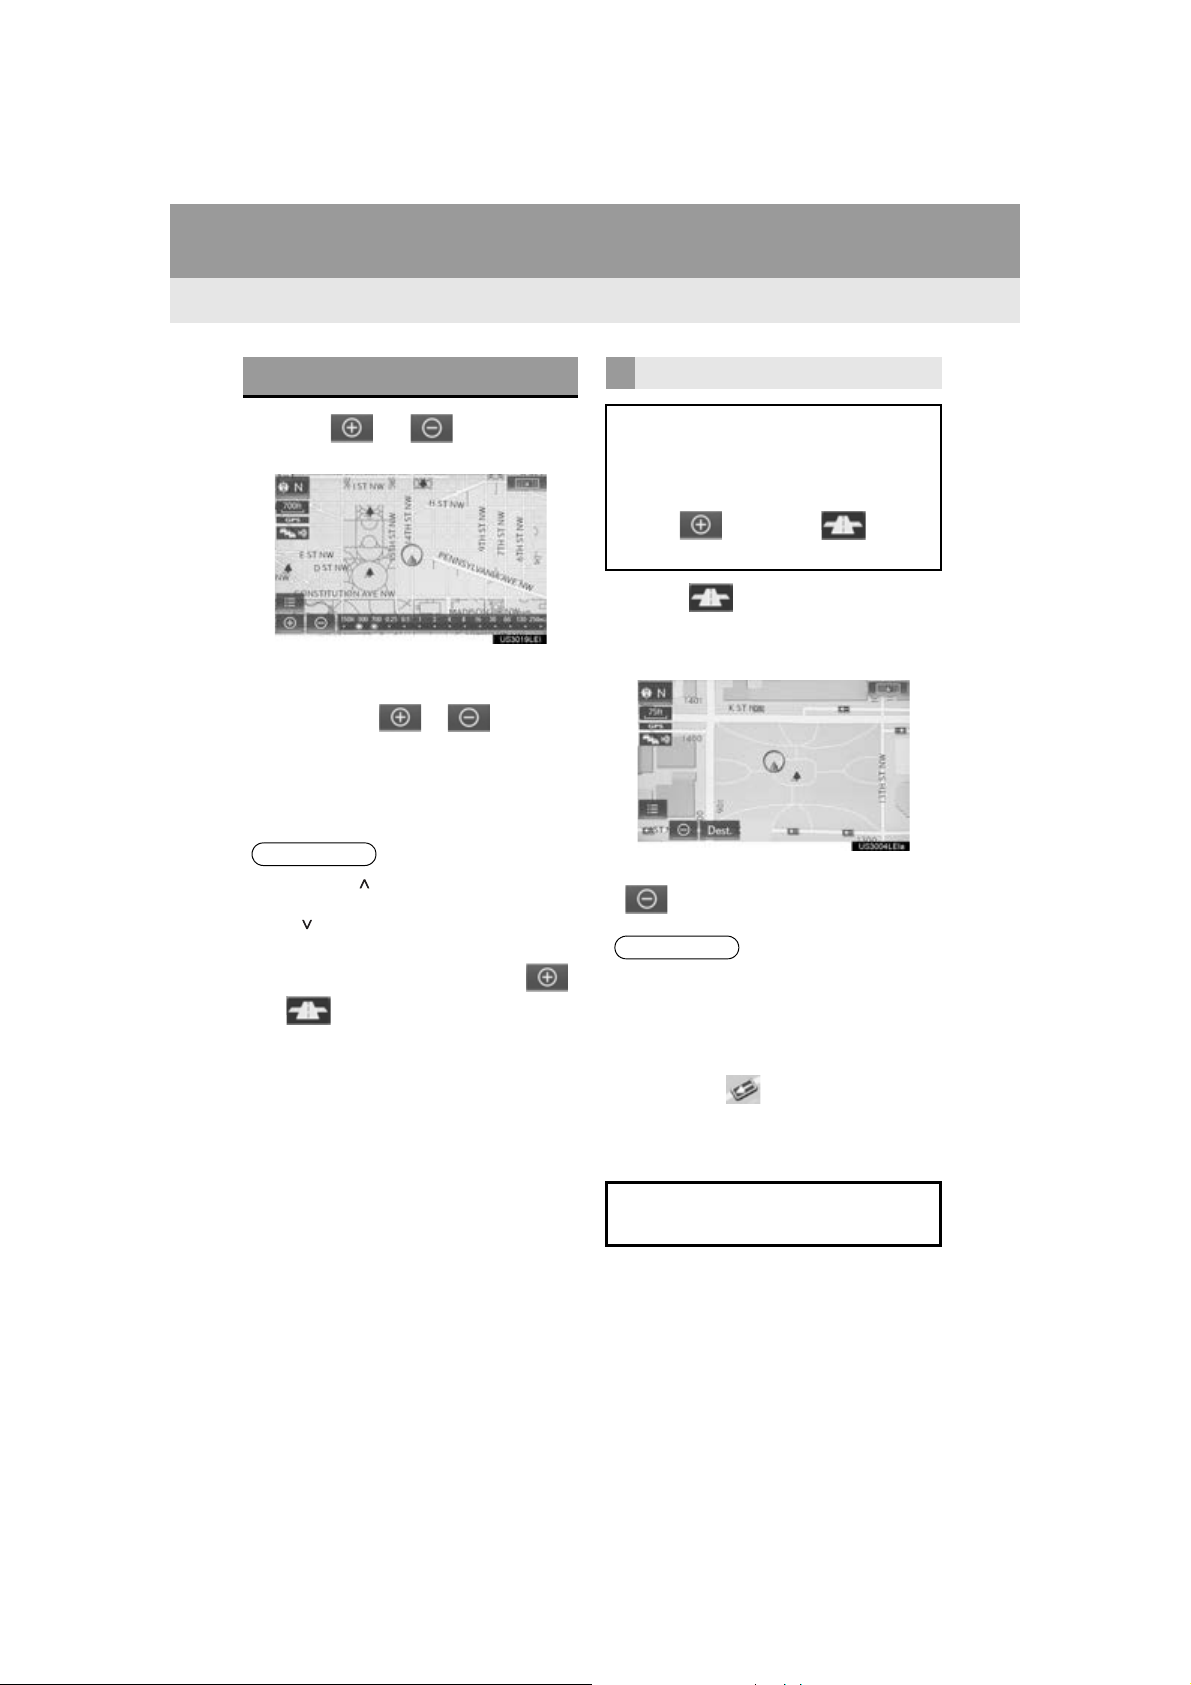
1. BASIC OPERATION
INFORMATION
INFORMATION
MAP SCALE
1 Select or to change the
scale of the map screen.
The scale indicator bar appears at the bot-
tom of the screen.
Select and hold or to continue
changing the scale of the map screen.
The scale of the map screen can also be
changed by selecting the scale bar directly.
This function is not available while driving.
●Press the “” button on the Remote
Touch to zoom in on the map screen and
the “” button to zoom out.
●In areas where the footprint map is avail-
able the map scale changes from
to when at the minimum range.
FOOTPRINT MAP
For areas covered by the footprint map
(some major cities), a footprint map on a
scale of 75 ft. (25 m) can be selected.
When the map is scaled down to 150 ft.
(50 m), changes to and can
be selected to display the footprint map.
1 Select on the map screen.
2 Check that the footprint map is dis-
played.
To return to the normal map display, select
.
●If the map or the current position is
moved to the area which is not covered
by the footprint map, the screen scale
automatically changes to 150 ft. (50 m).
●On the footprint map, a one way street is
displayed by .
●Scrolling on the footprint map is not avail-
able while driving.
Building footprints in the database were
created and provided by HERE.
80
GS_Navi+MM_OM30F12U_(U)
15.09.09 19:53
Page 81
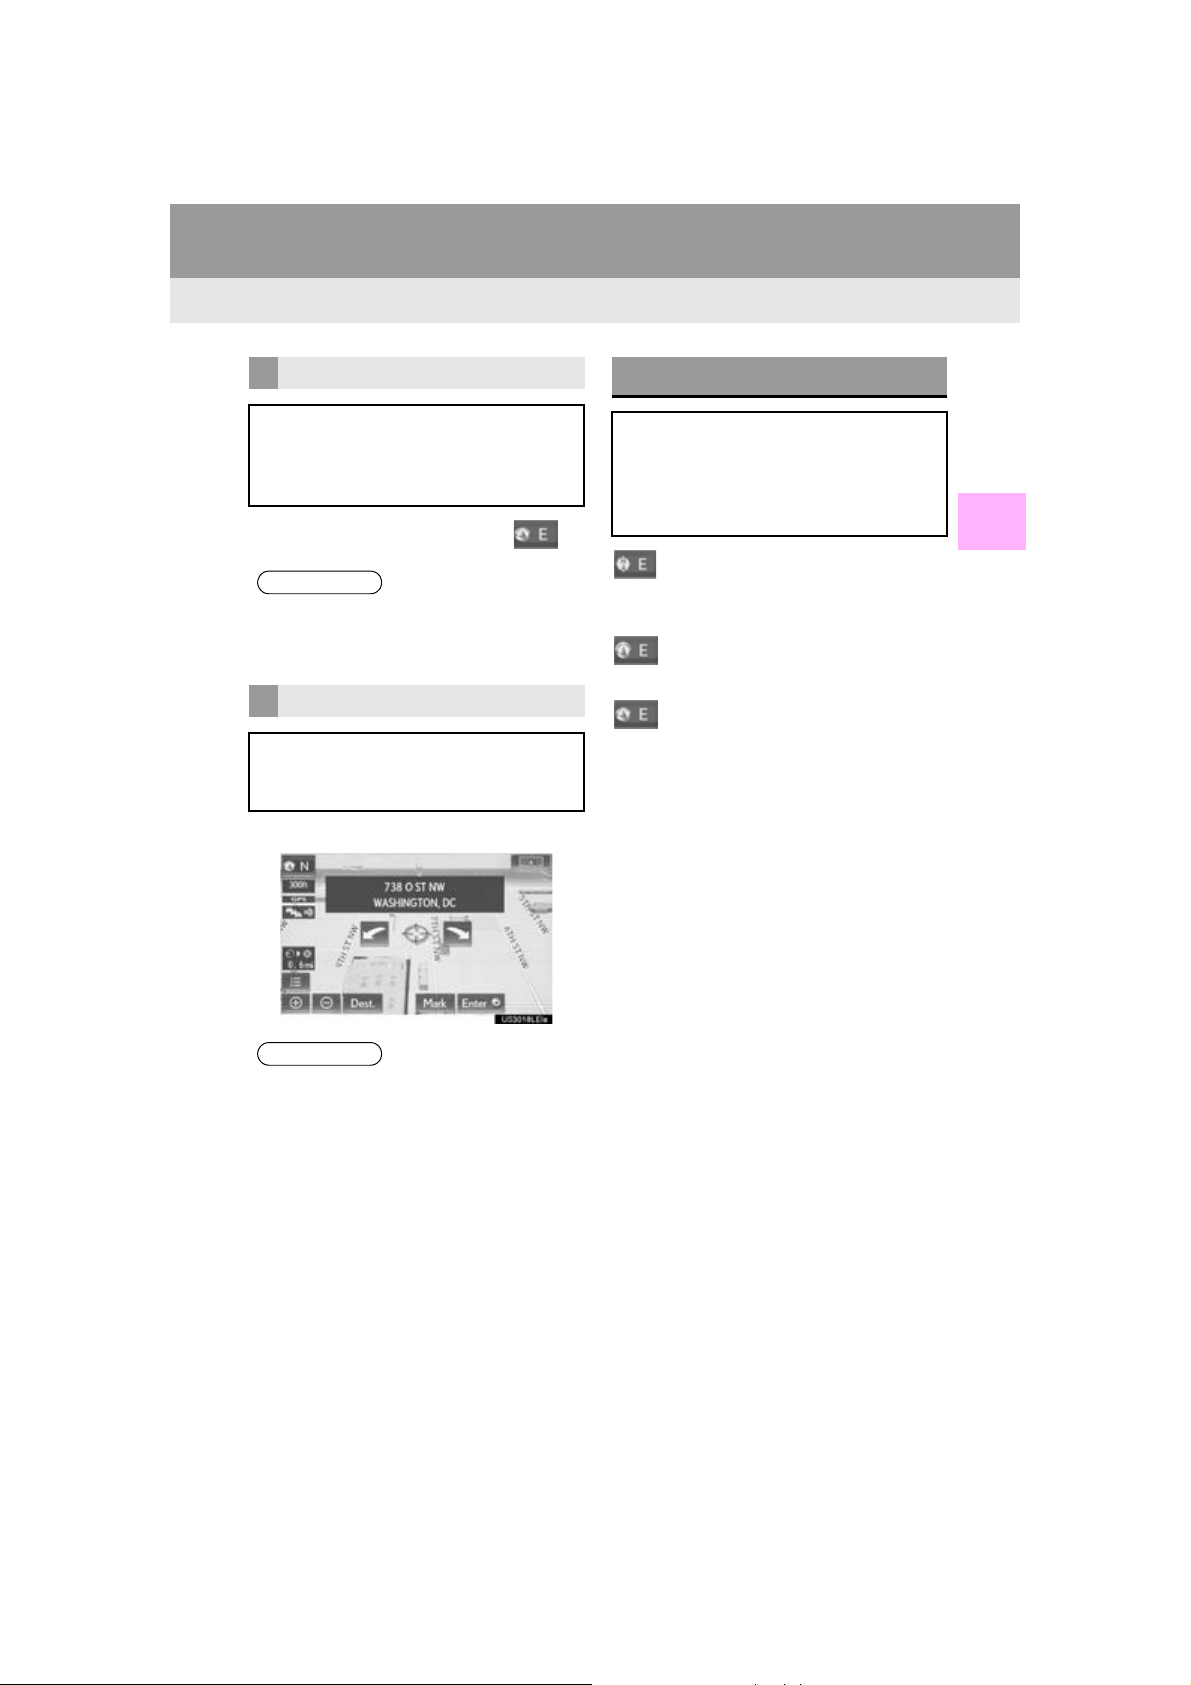
1. BASIC OPERATION
INFORMATION
INFORMATION
3D CITY MODEL MAP
A 3D city model map can be displayed
for some areas in major cities when the
map scale is 700 ft. (200 m) or less on
the 3D map screen.
To display the normal map, select .
●The 3D city model map can be set the
display on/off. (P. 1 3 2 )
ROTATING 3D MAP
3D map and 3D city model map can be
rotated when arrows appear around the
cursor while scrolling.
1 Select an arrow to rotate.
ORIENTATION OF THE MAP
The orientation of the map can be
changed between 2D north-up, 2D
heading-up and 3D heading-up by selecting the orientation symbol displayed
at the top left of the screen.
: North-up symbol
Regardless of the direction of vehicle travel,
north is always up.
: Heading-up symbol
The direction of vehicle travel is always up.
: 3D Heading-up symbol
The direction of vehicle travel is always up.
The letter(s) beside this symbol indicate the
vehicle’s heading direction (e.g. N for
north).
3
NAVIGATION SYSTEM
●The viewing angle of the 3D map can be
changed. (P.1 3 5 )
81
GS_Navi+MM_OM30F12U_(U)
15.09.09 19:53
Page 82
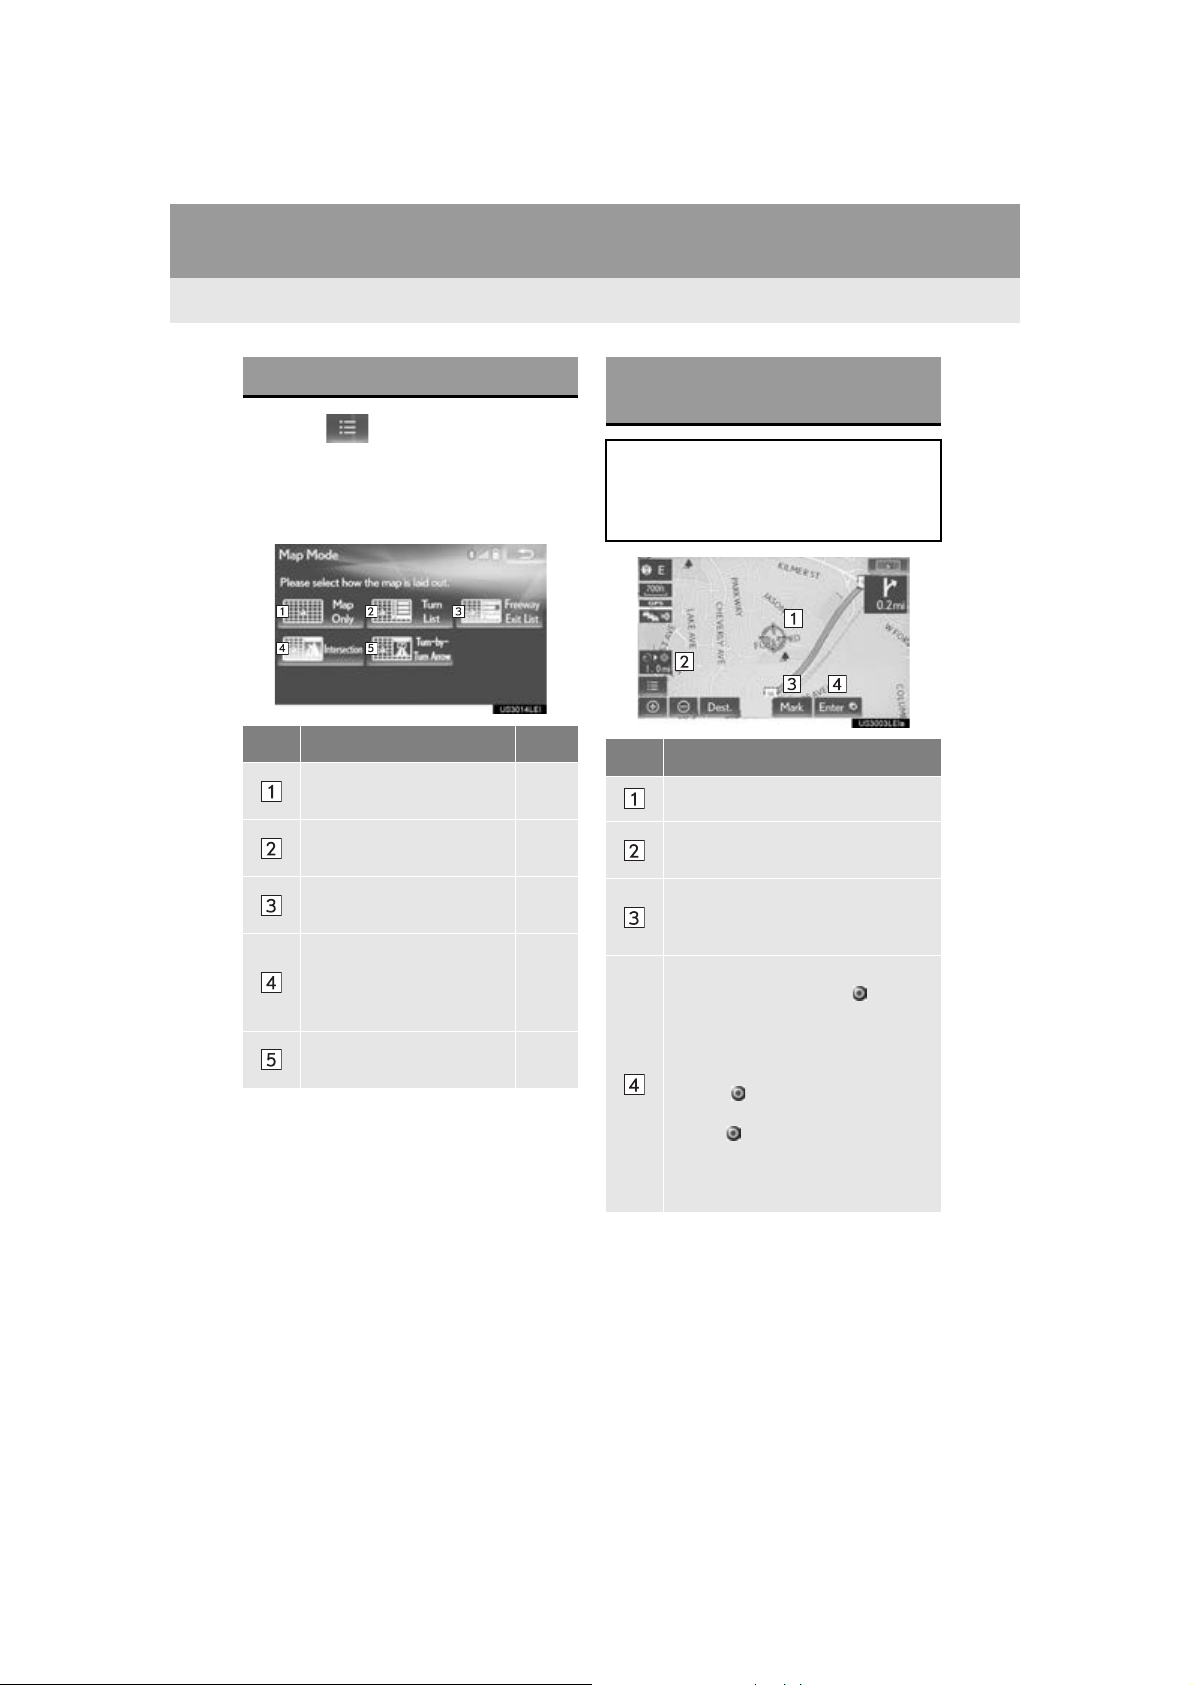
1. BASIC OPERATION
SWITCHING THE MAP MODE
1 Select on the map screen.
(P.78)
2 Select “Map Mode”.
3 Select the desired configuration button.
No. Function Page
Select to display the single
map screen.
Select to display the turn list
screen.
Select to display the freeway exit list screen.
Select to display the intersection guidance screen or
the guidance screen on the
freeway.
Select to display the turnby-turn arrow screen.
Depending on the conditions, certain
screen configuration buttons cannot be
selected.
116
113
115
116
SCREEN SCROLL
OPERATION
Use the scroll feature to move the desired point to the center of the screen for
looking at a point on the map that is different from the current position.
No. Information/Function
Cursor mark
Distance from the current position to
the cursor mark
Select to register as a memory point.
To change the icon, name,
P.126
Select to set as a destination.
When selecting “Go to ” on the
following map screen, the navigation
system performs a search for the
route. (P.105)
If a destination has already been set,
“Go to ” and “Add to Route” will
be displayed.
“Go t o ”: Select to delete the existing destination(s) and set a new one.
“A d d t o R ou t e ” : Select to add a destination.
etc.:
82
GS_Navi+MM_OM30F12U_(U)
15.09.09 19:53
Page 83
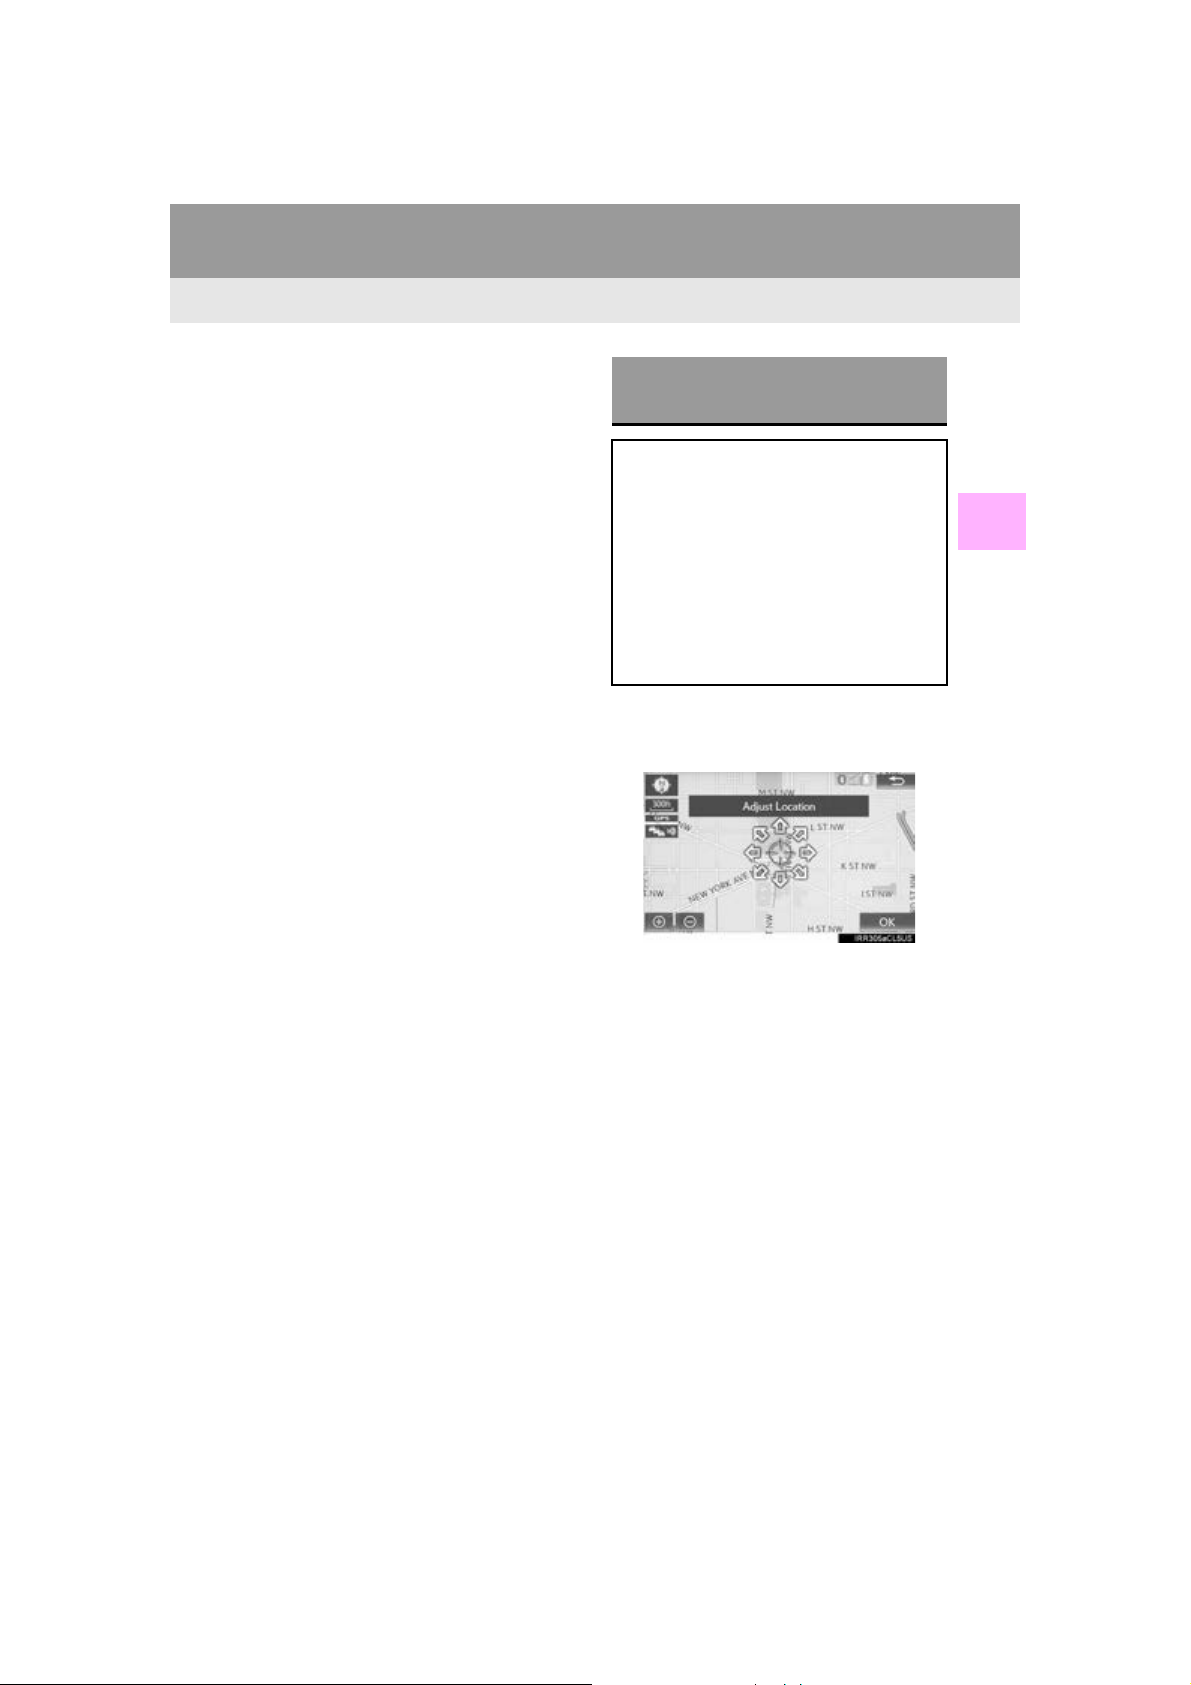
1. BASIC OPERATION
To scroll over the map screen, place the
cursor mark in the desired position and
then press and hold the Remote Touch
knob. The map will continue scrolling in that
direction until the knob is released.
Press the “MAP” button on the Remote
Touch to return to the current position.
ADJUSTING LOCATION IN
SMALL INCREMENTS
The cursor location can be adjusted in
small increments when “A d j u s t Lo c a -
tion” is selected on the setting map
screen.
Also, when changing the location of
memory points on the editing screen
(P.128) and adjusting the current position mark manually on the “Calibration”
screen (P.135), 8 directional arrows
may appear for this purpose.
1 Select one of the 8 directional arrows to
move the cursor to the desired point
and then select “OK”.
3
NAVIGATION SYSTEM
The cursor can also be moved by briefly
selecting a desired point on the map.
83
GS_Navi+MM_OM30F12U_(U)
15.09.09 19:53
Page 84
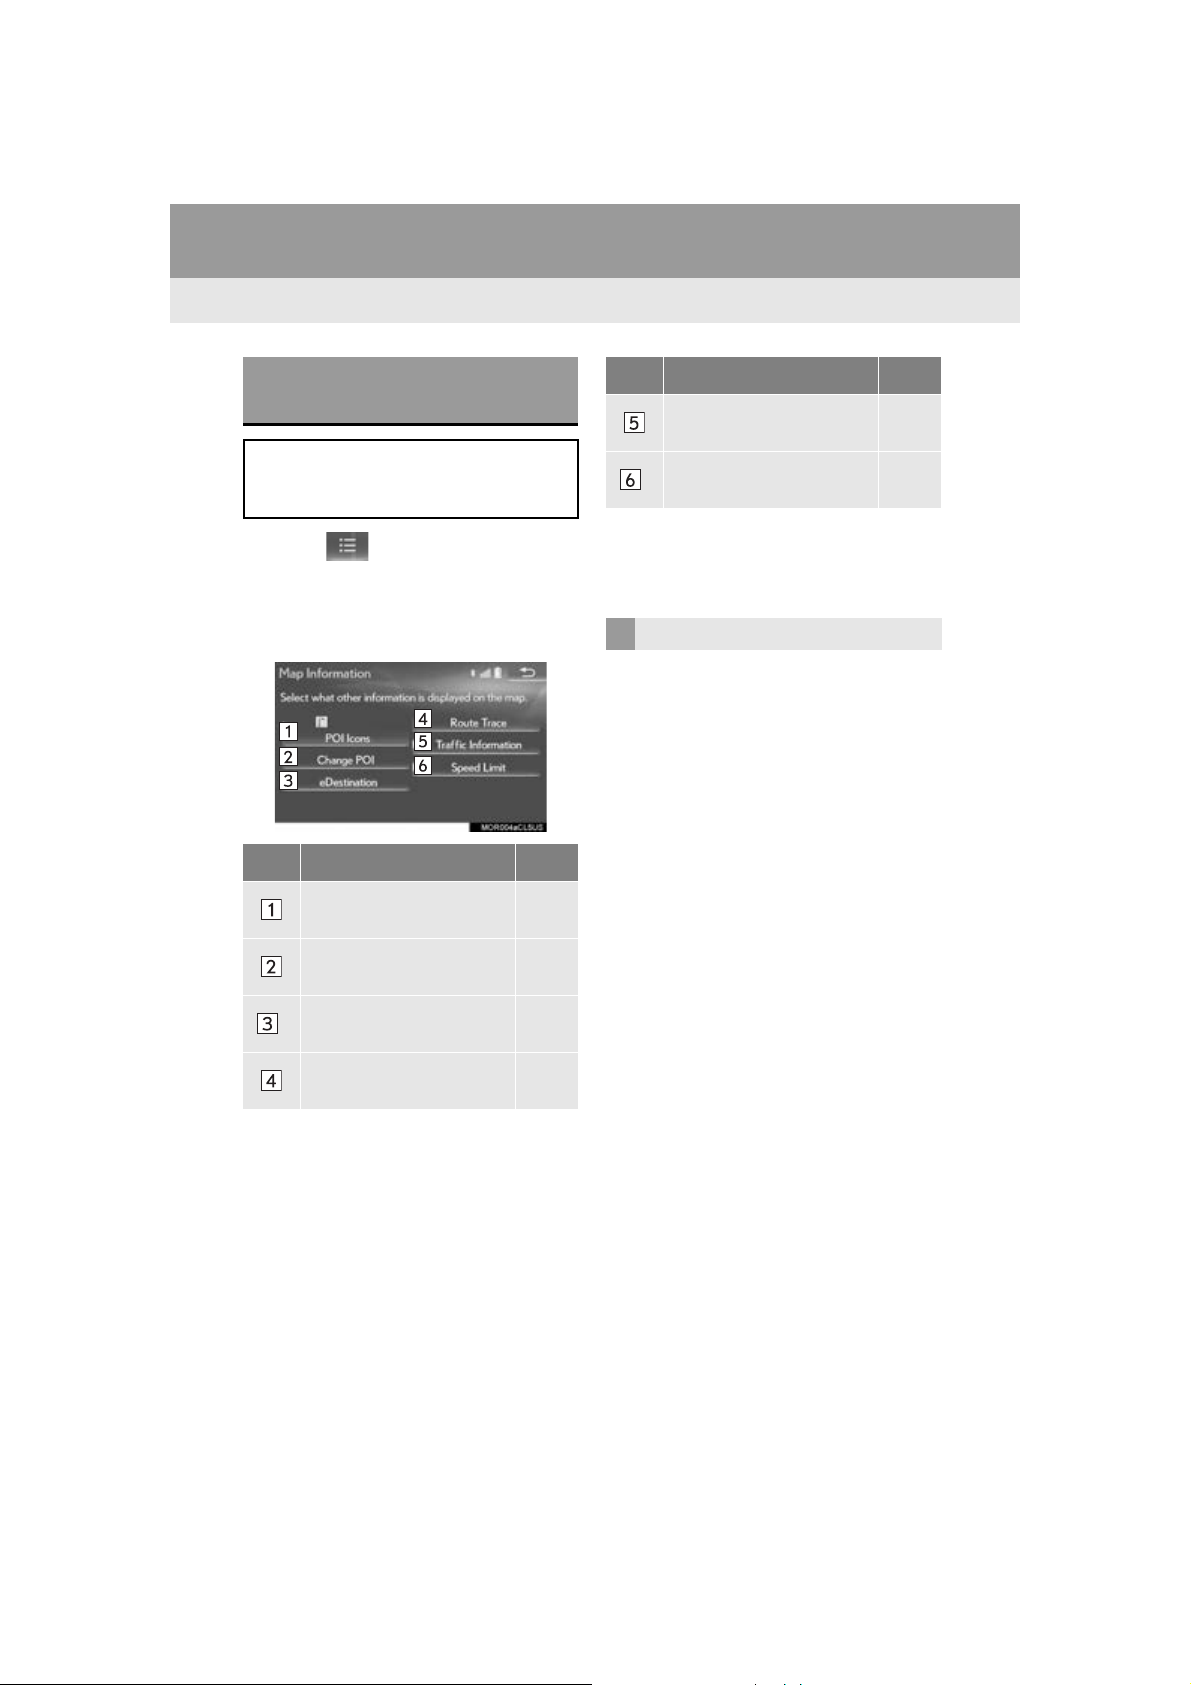
1. BASIC OPERATION
3. MAP SCREEN INFORMATION
DISPLAYING MAP
INFORMATION
Information such as POI icons, route
trace, speed limit, etc. can be displayed
on the map screen.
1 Select on the map screen.
(P.78)
2 Select “Map Information”.
3 Select the desired items to be displayed.
No. Function Page
Select to display the selected POI icons.
No. Function Page
Select to display traffic information.
Select to display speed limit
*
icon.
*: This function is not made available on
some models.
When set to on, the indicator will illuminate.
90
SELECTING THE POI ICONS
1 Display the “Map Information” screen.
(P.84)
2 Select “Select POI”.
When the POI icons to be displayed on the
map screen have already been set,
“Change POI” is displayed.
84
Select to select or change
POI icons.
Select to display
*
eDestination icons.
Select to display route
trace.
84
340
86
GS_Navi+MM_OM30F12U_(U)
15.09.09 19:53
Page 85
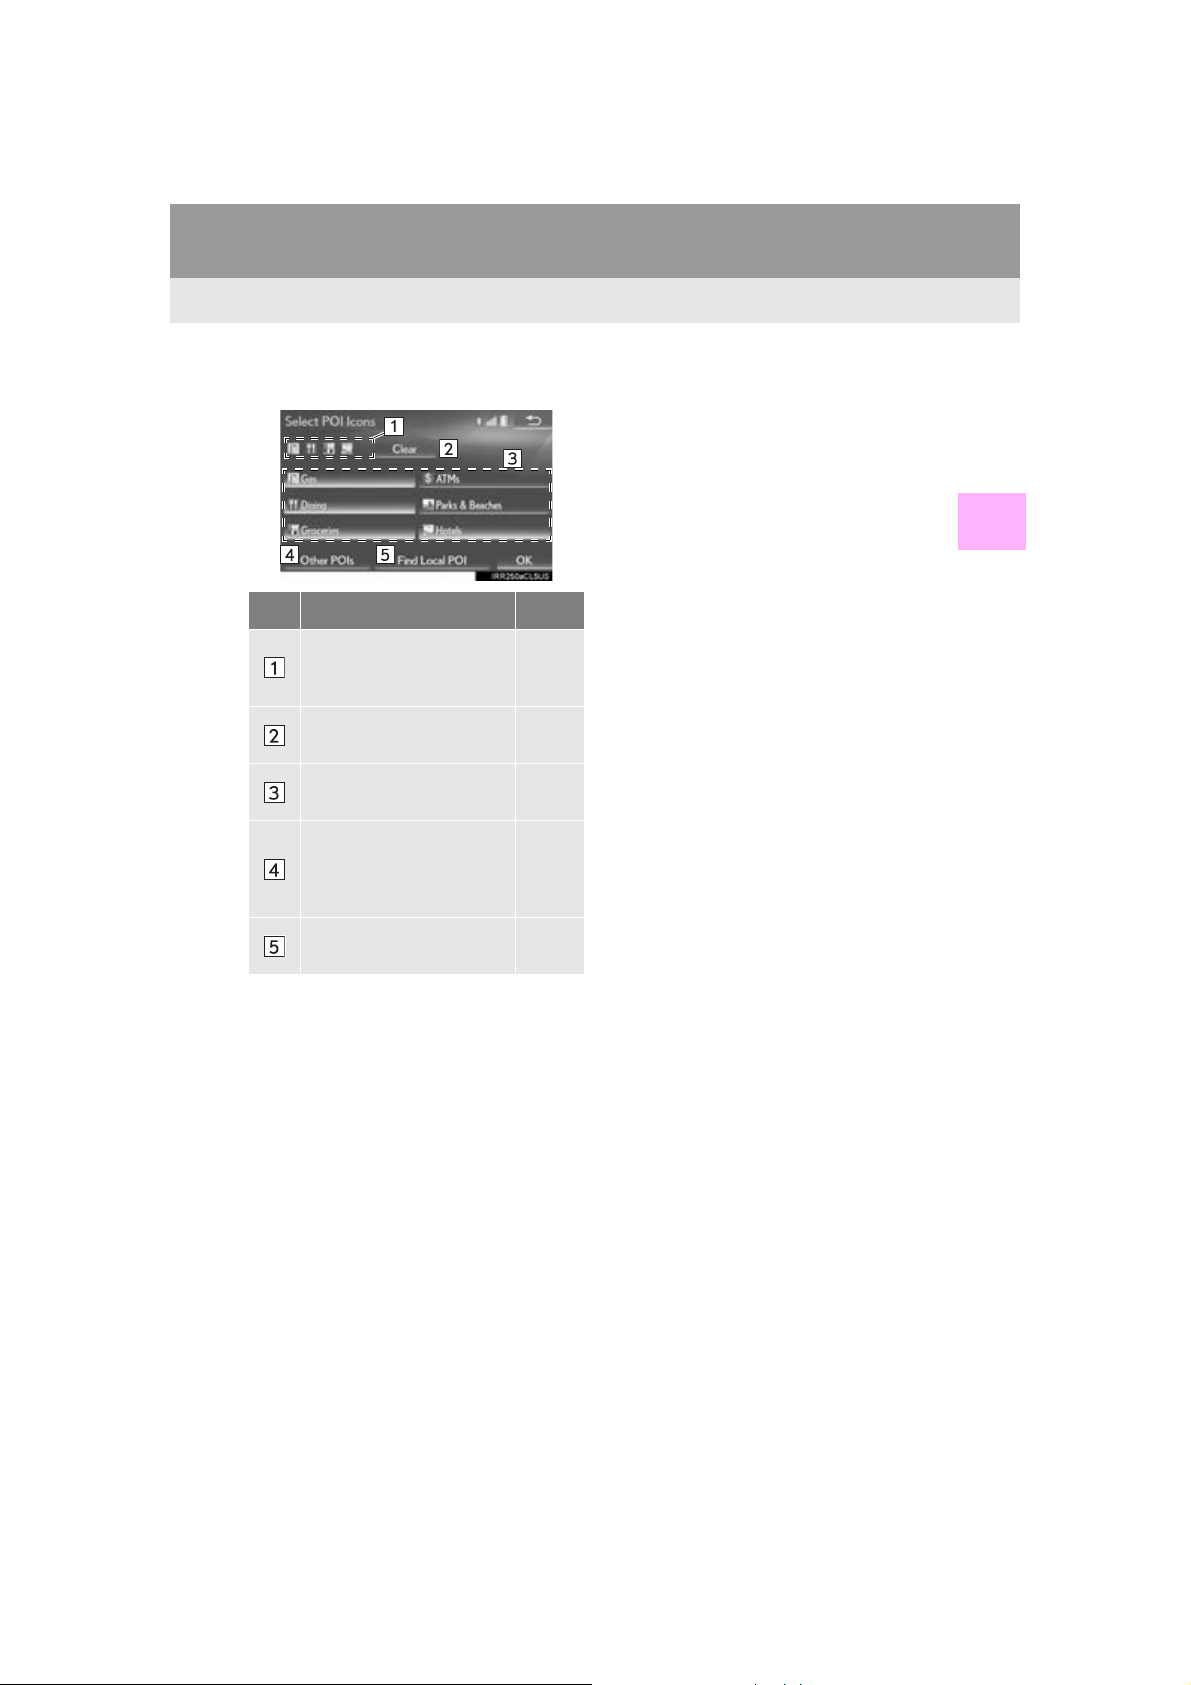
1. BASIC OPERATION
3 Select the desired POI category and se-
lect “OK”.
No. Information/Function Page
Displays up to 5 selected
POI icons on the map
screen.
Select to cancel the selected POI icons.
Displays up to 6 POI icons
as favorite POI categories
Select to display other POI
categories if the desired
POIs cannot be found on
the screen.
Select to search for the
nearest POIs.
134
85
86
■ SELECTING OTHER POI ICONS
TO BE DISPLAYED
1 Select “Other POIs”.
2 Select the desired POI categories and
select “OK”.
“List All Categories”: Select to display all
POI categories. To add more POI categories, select “More”.
3
NAVIGATION SYSTEM
GS_Navi+MM_OM30F12U_(U)
15.09.09 19:53
85
Page 86
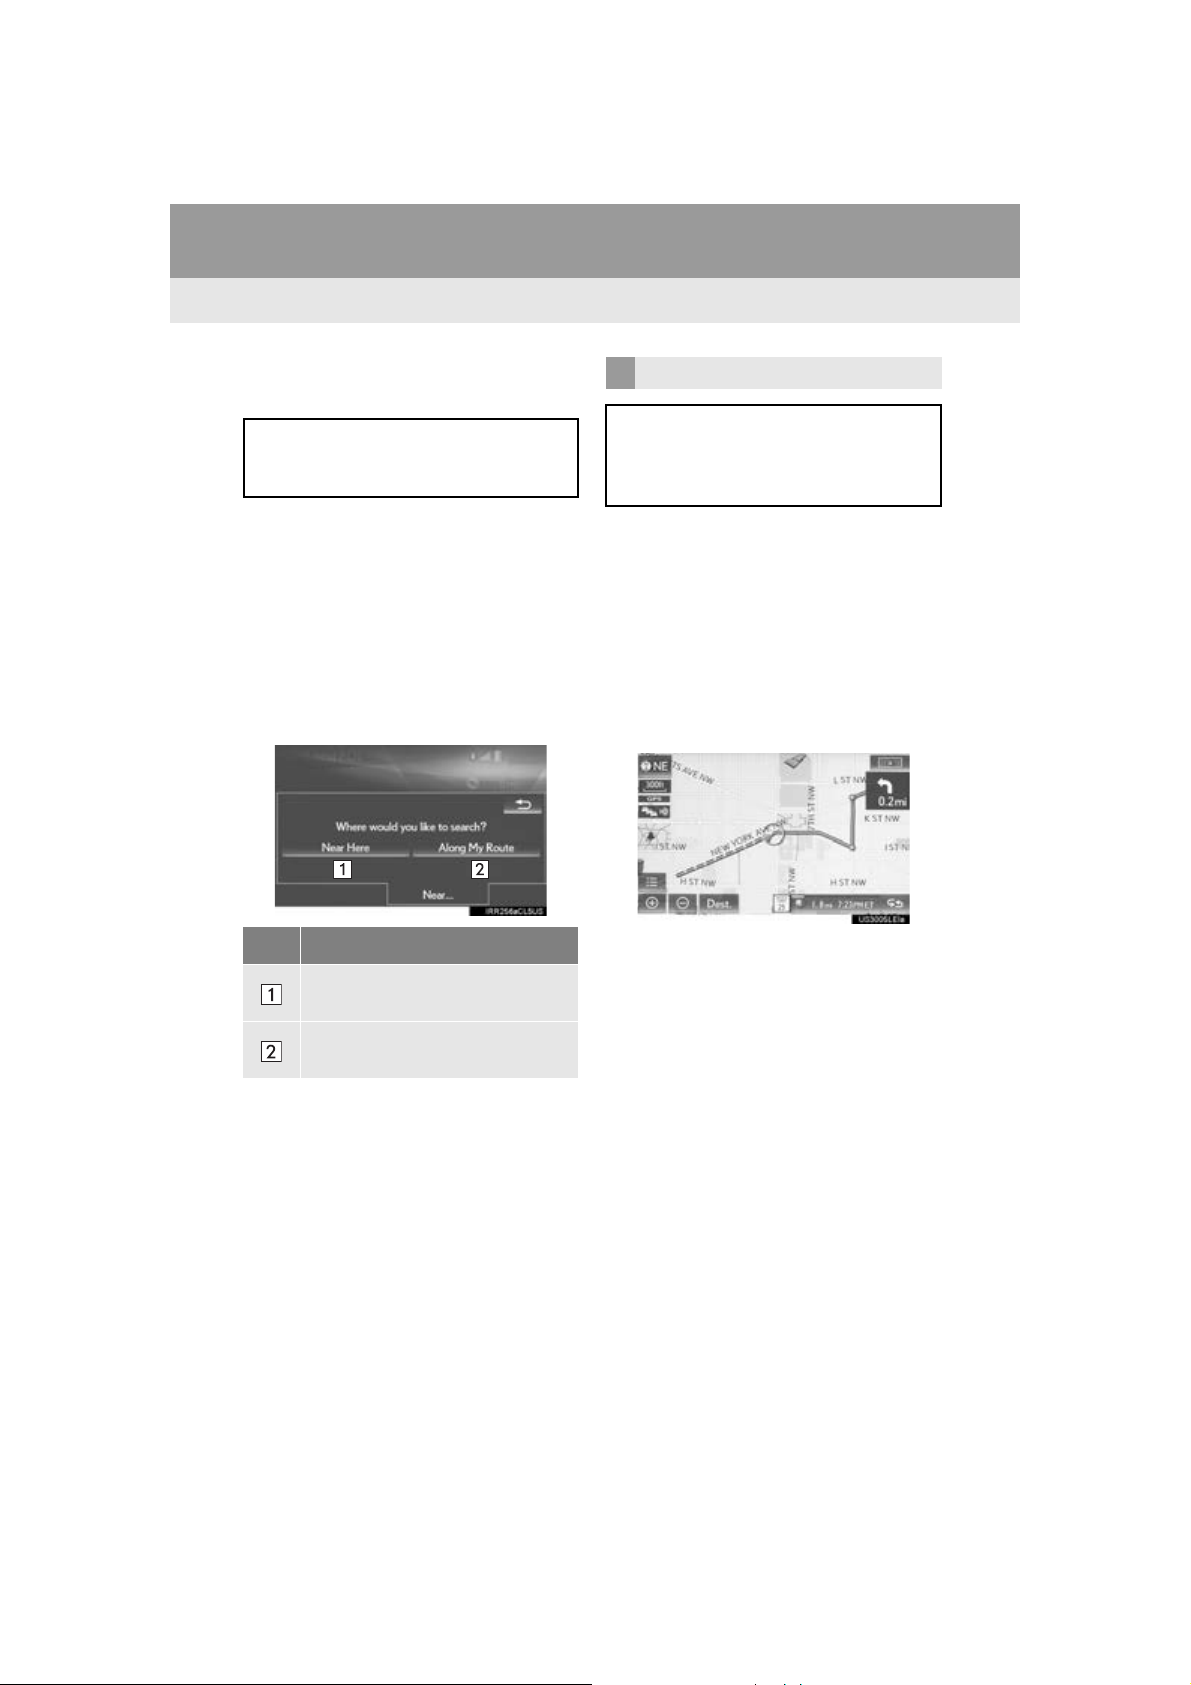
1. BASIC OPERATION
■ DISPLAYING THE LOCAL POI
LIST
POIs that are within 20 miles (32 km) of
the current position will be listed from
among the selected categories.
1 Select “Find Local POI”.
2 Select the desired POI.
“Near...”: Select to search for POIs near the
current position or along the route.
3 Check that the selected POI is dis-
played on the map screen.
When “Near...” is selected
1 Select the desired item.
No. Function
ROUTE TRACE
The traveled route can be stored and retraced on the map screen. This feature is
available when the map scale is 30 miles
(50 km) or less.
■ START RECORDING THE ROUTE
TRACE
1 Display the “Map Information” screen.
(P.84)
2 Select “Route Trace”.
The “Route Trace” indicator illuminates and
the route trace starts.
3 Check that the traveled line is displayed.
86
Select to search for POIs near the
current position.
Select to search for POIs along the
route.
GS_Navi+MM_OM30F12U_(U)
15.09.09 19:53
Page 87
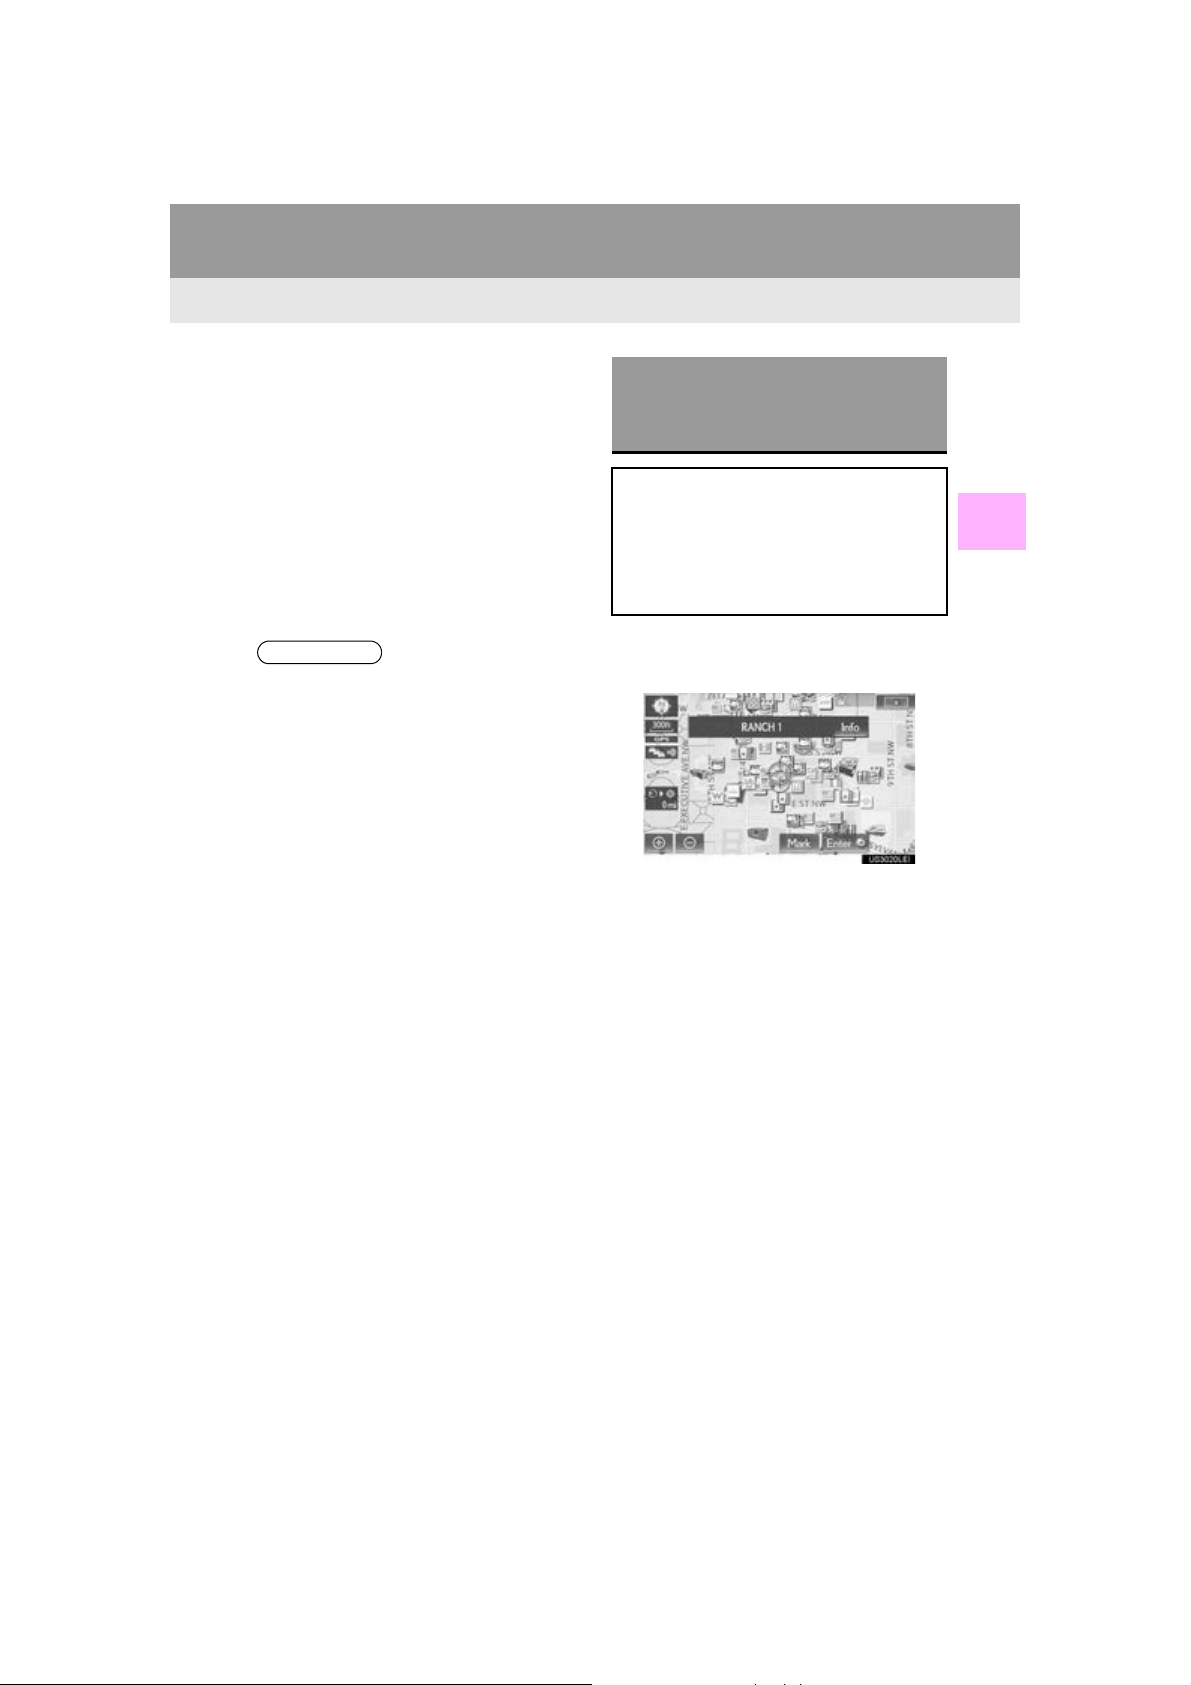
1. BASIC OPERATION
INFORMATION
■ STOP RECORDING THE ROUTE
TRACE
1 Display the “Map Information” screen.
(P.84)
2 Select “Route Trace” again.
3 A confirmation screen will be displayed.
“Yes”: Select to keep the recorded
route trace.
“No”: Select to erase the recorded
route trace.
●The traveled route can be stored up to
124 miles (200 km).
DISPLAYING INFORMATION
ABOUT THE ICON WHERE
THE CURSOR IS SET
When the cursor is placed over an icon
on the map screen, the name bar is displayed on the upper part of the screen. If
“Info” appears on the right side of the
name bar, detailed information can be
displayed.
1 Place the cursor over an icon.
2 Select “Info”.
3
NAVIGATION SYSTEM
87
GS_Navi+MM_OM30F12U_(U)
15.09.09 19:53
Page 88

1. BASIC OPERATION
INFORMATION
*: This function is not made available on some models.
“Mark”: Select to register as a memory
point. To change the icon, name, etc.:
P.126
“Enter ”: Select to set as a destination.
: Select to call the registered
number.
“Delete”: Select to delete destination or
memory point.
“Edit”: Select to display the edit memory
point screen.
“Detail”: Select to display detailed informa-
tion.*
●Even when traffic information is not cur-
rently being received, traffic information
and “Info” will be displayed for a while
after traffic information has been
received.
●In some situations, calls to a POI may
automatically change to an international
call or may not be possible as a domestic
call.
88
GS_Navi+MM_OM30F12U_(U)
15.09.09 19:53
Page 89
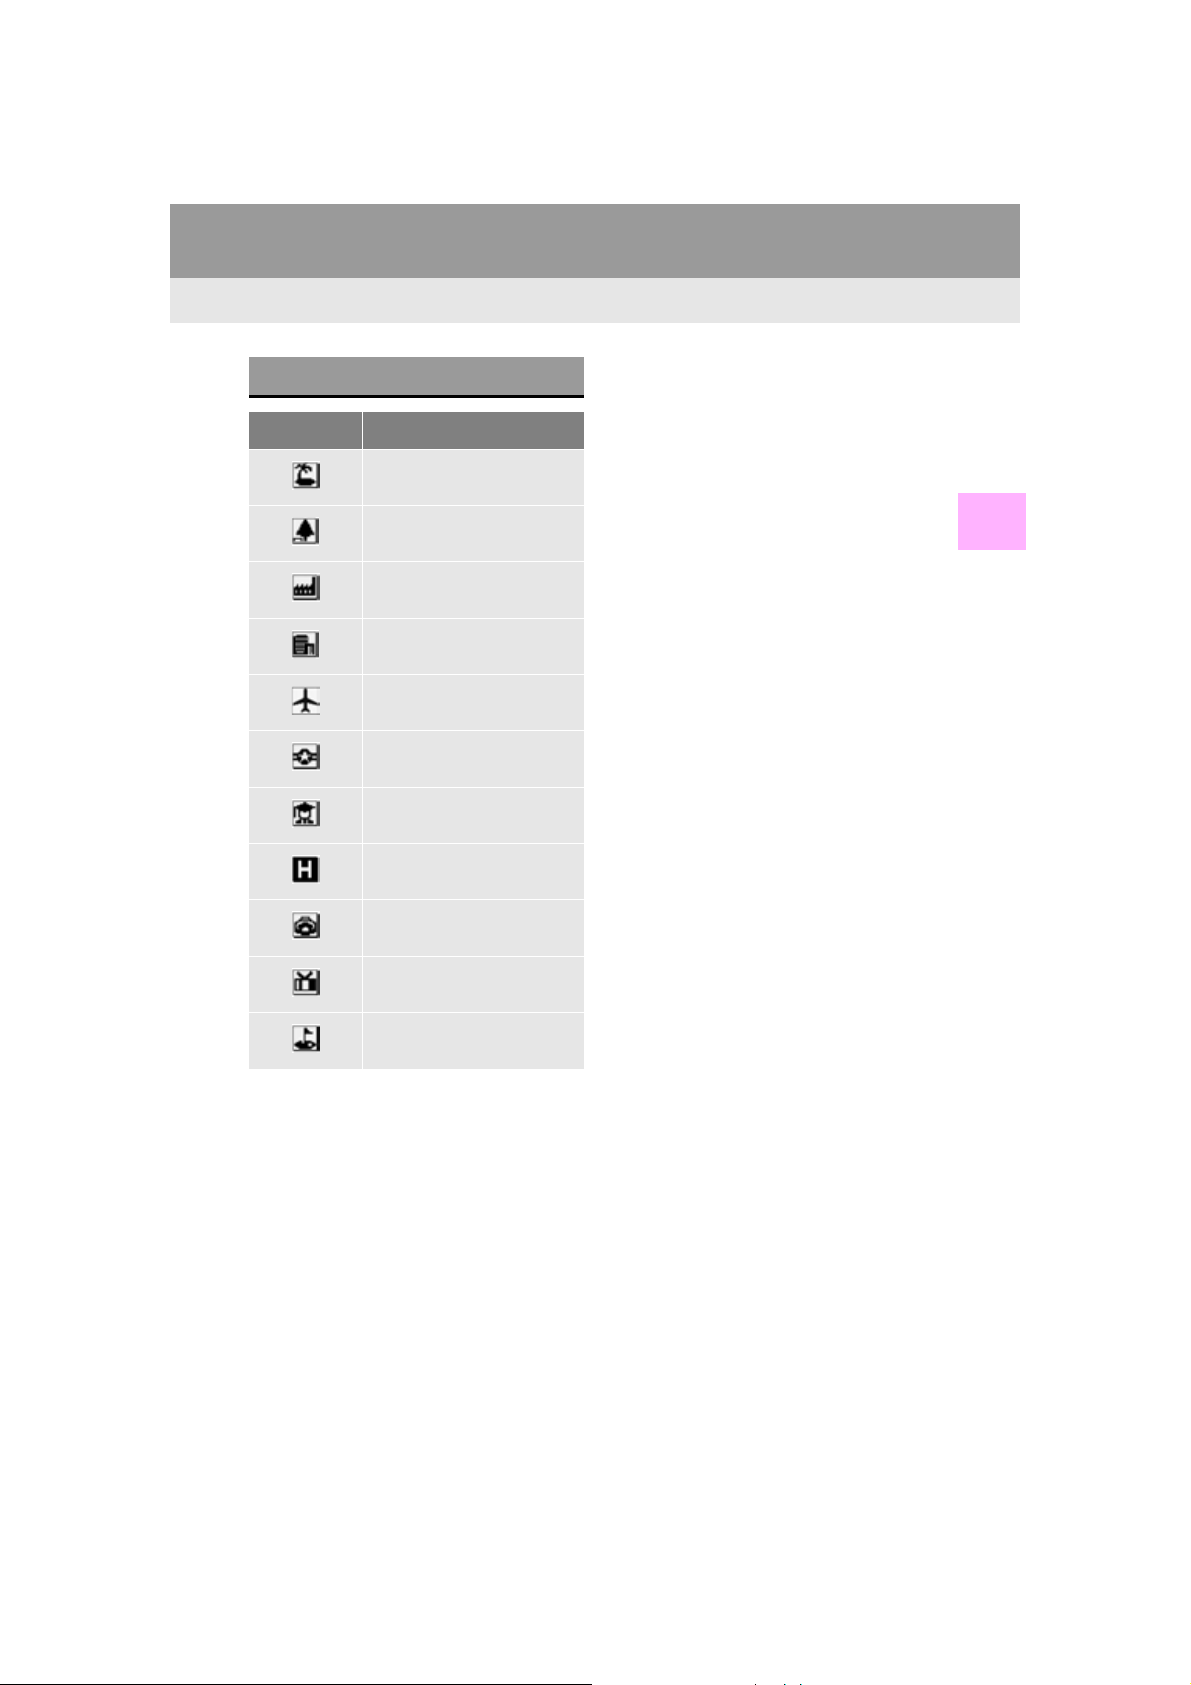
STANDARD MAP ICONS
Icon Name
Island
1. BASIC OPERATION
Park
Industry
Business facility
Airport
Military
University
Hospital
Stadium
Shopping mall
Golf
3
NAVIGATION SYSTEM
GS_Navi+MM_OM30F12U_(U)
15.09.09 19:53
89
Page 90
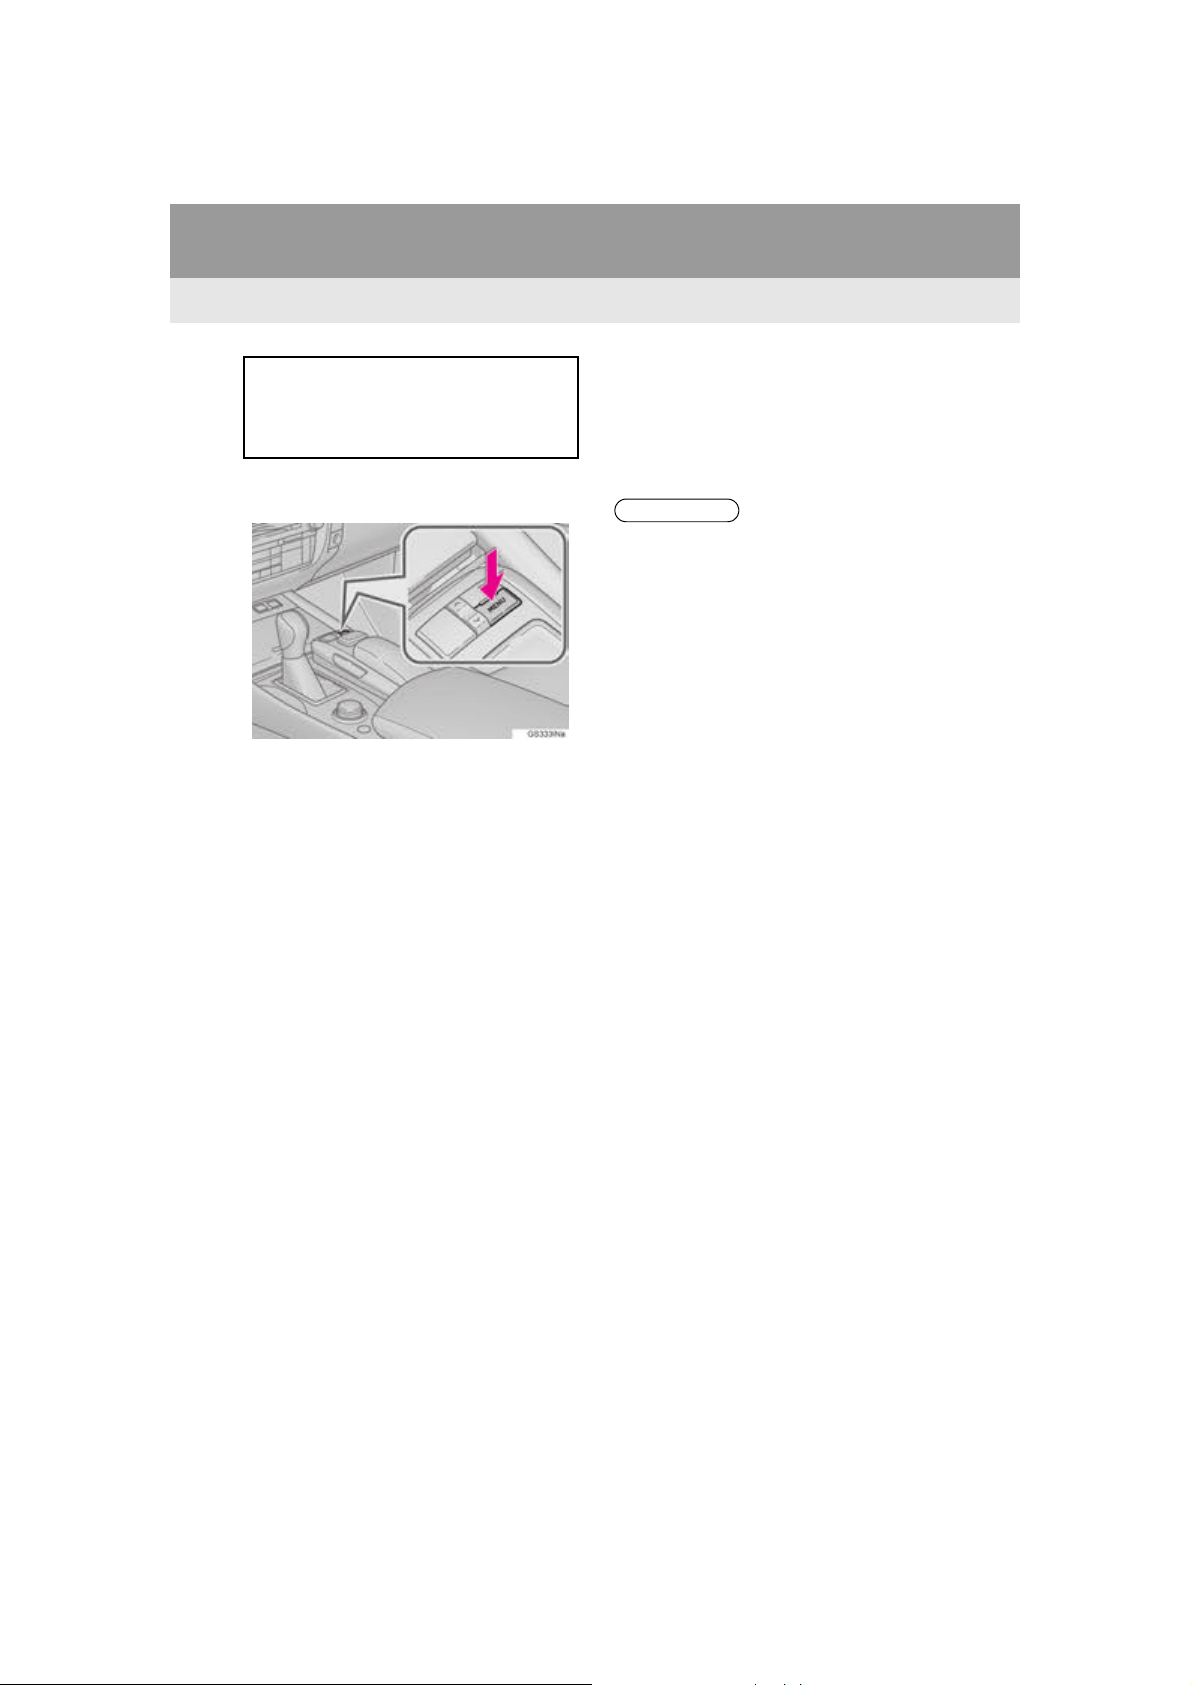
1. BASIC OPERATION
INFORMATION
*: This function is not made available on some models.
4. TRAFFIC INFORMATION*
Traffic data can be received via HD Radio broadcast or LEXUS App Suite to
display traffic information on the map
screen.
1 Press the “MENU” button on the
Remote Touch.
2 Select “Info”.
3 Select “Traffic Incidents”.
4 Select the desired item.
“Traffic Event List”: Select to display a list of
current traffic information. (P.91)
“Predictive Traffic Map”: Select to display a
map with predictive traffic data. (P.91)
●If a large amount of information is being
received, it may take longer than normal
for the information to be displayed on the
screen.
90
GS_Navi+MM_OM30F12U_(U)
15.09.09 19:53
Page 91

1. BASIC OPERATION
DISPLAYING TRAFFIC
INFORMATION
A list of current traffic information can
be displayed along with information on
the location and the distance of the incident.
1 Display the “Traffic” screen. (P.90)
2 Select “Traffic Event List”.
3 Select the desired traffic information.
“On Current Road”: Select to display traffic
information for the current road.
“On Current Route”: Select to display traf-
fic information for the set route.
When set to on, the indicator will illuminate.
4 Check that the traffic information is dis-
played.
“Detail”: Select to display detailed traffic information.
DISPLAYING PREDICTIVE
TRAFFIC MAP
A map with predictive traffic data can be
displayed.
1 Display the “Traffic” screen. (P.90)
2 Select “Predictive Traffic Map”.
3 Scroll the map to the desired point and
set the time of predictive traffic information.
The time of the predictive traffic informa-
tion can be displayed in 15-minute steps up
to +45 minutes.
“+”: Moves the time forward 15 minutes.
“-”: Moves the time back 15 minutes.
3
NAVIGATION SYSTEM
GS_Navi+MM_OM30F12U_(U)
15.09.09 19:53
91
Page 92

1. BASIC OPERATION
DISPLAYING TRAFFIC
INFORMATION ON THE MAP
1 Select on the map screen.
(P.78)
2 Select “Map Information”.
3 Select “Traffic Information”.
When set to on, the indicator will illuminate.
4 Check that the traffic information is dis-
played.
: The icons show traffic incident, road
repair, traffic obstacles, etc. Select to display traffic information and start voice guidance for the traffic information.
: The color of the arrow changes de-
pending on the traffic information received.
The indicator is displayed as follows.
: Traffic information has been
received.
: Traffic information has been
received via HD Radio broadcast.
No icon: Traffic information has not been
received.
92
GS_Navi+MM_OM30F12U_(U)
15.09.09 19:53
Page 93
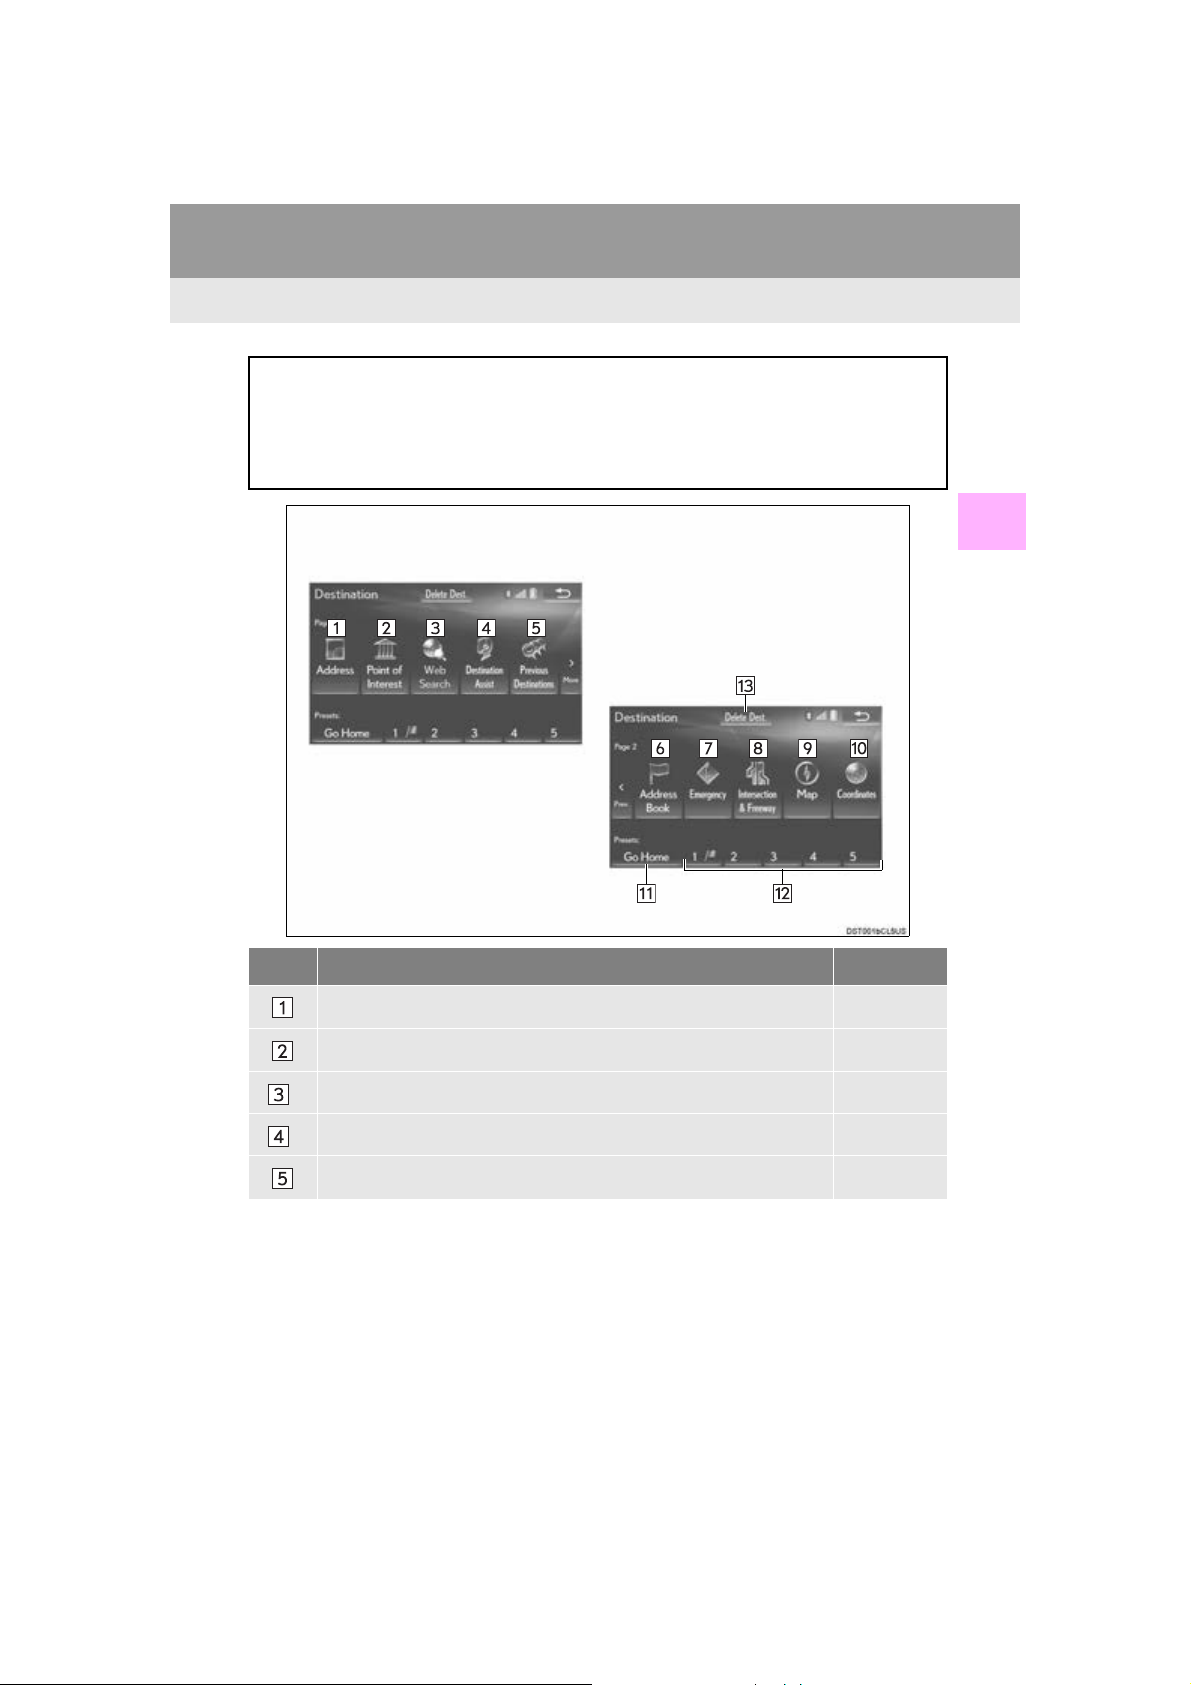
2. DESTINATION SEARCH
1. DESTINATION SEARCH OPERATION
The “Destination” screen can be reached by the following methods:
From the map screen
Select “Dest.” on the map screen. (P.76)
From the “Menu” screen
Select “Destination” on the “Menu” screen. (P.1 4 )
3
NAVIGATION SYSTEM
No. Function Page
Select to search for a destination by address. 96
Select to search for a destination by point of interest. 97
Select to search for a destination by online database. 337
*
Select to search for a destination via the Lexus response center. 339
*
Select to search for a destination from previously set destinations. 101
93
GS_Navi+MM_OM30F12U_(U)
15.09.09 19:53
Page 94
2. DESTINATION SEARCH
No. Function Page
Select to search for a destination from a registered entry in “Address
Book”.
Select to search for a destination from emergency service points. 102
Select to search for a destination by intersection or freeway entrance/
exit.
Select to search for a destination by the last displayed map. 104
Select to search for a destination by coordinates. 104
Select to set a destination by home. 95
Select to set a destination from preset destinations. 95
Select to delete set destinations. 119
*: This function is not made available on some models.
101
102
94
GS_Navi+MM_OM30F12U_(U)
15.09.09 19:53
Page 95
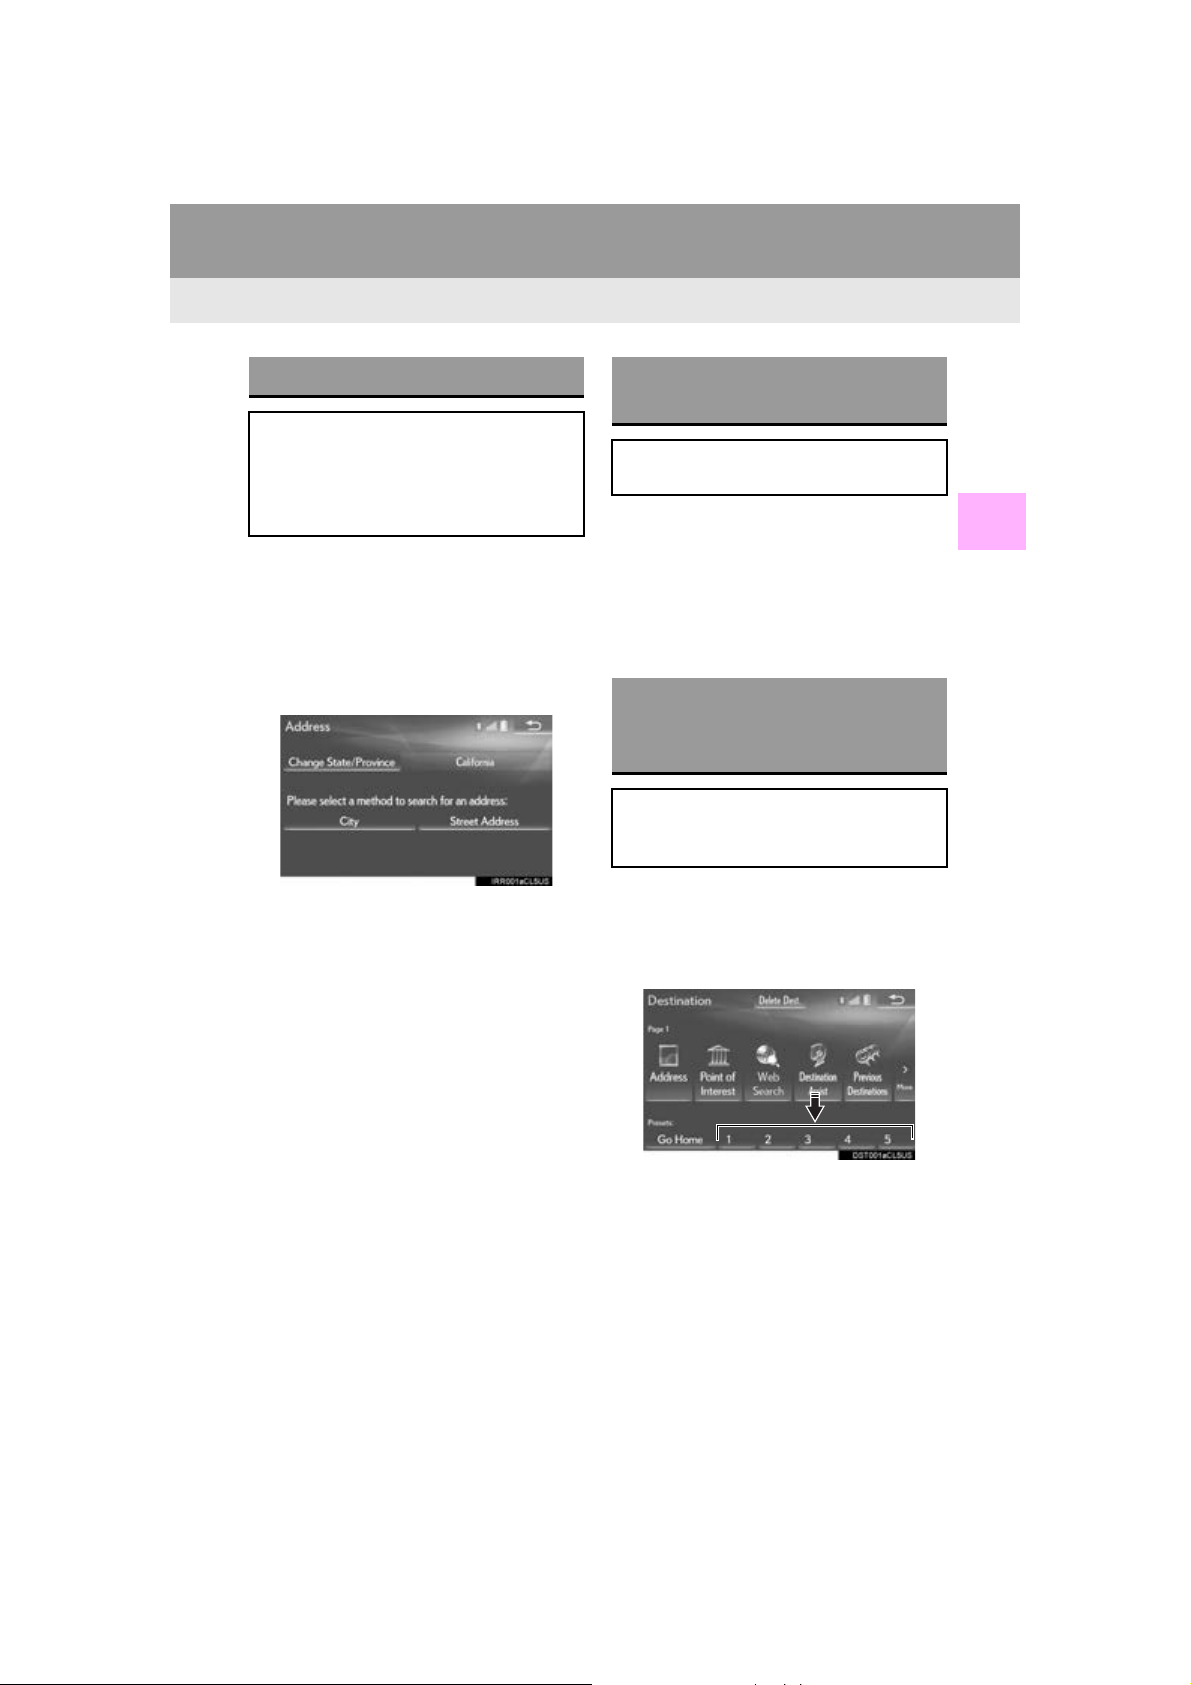
2. DESTINATION SEARCH
SELECTING SEARCH AREA
The selected state (province) can be
changed to set a destination from a
different state (province) by using
“Address”, “Point of Interest” or
“Intersection & Freeway”.
1 Display the “Destination” screen.
(P.93)
2 Select “A d d r e s s ” , “Point of Interest” or
“Intersection & Freeway”.
3 Select “Select State/Province” or
“Change State/Province”.
If a state (province) has not been selected
yet, “Select State/Province” is displayed.
4 Select the desired state (province).
To change countries, select the “United
States”, “Canada” or “Mexico” tab.
For map database information and updates:
P.1 0 5
SETTING HOME AS
DESTINATION
To use this function, it is necessary to
register a home address. (P.123)
1 Display the “Destination” screen.
(P.93)
2 Select “Go Home”.
The navigation system performs a search
for the route and the entire route map is
displayed. (P.1 0 5 )
SETTING PRESET
DESTINATIONS AS
DESTINATION
To use this function, it is necessary to
register preset destinations to the preset
screen buttons (1-5). (P.124)
1 Display the “Destination” screen.
(P.93)
2 Select any of the preset destination but-
tons (1-5).
3
NAVIGATION SYSTEM
The navigation system performs a search
for the route and the entire route map is
displayed. (P.1 0 5 )
95
GS_Navi+MM_OM30F12U_(U)
15.09.09 19:53
Page 96
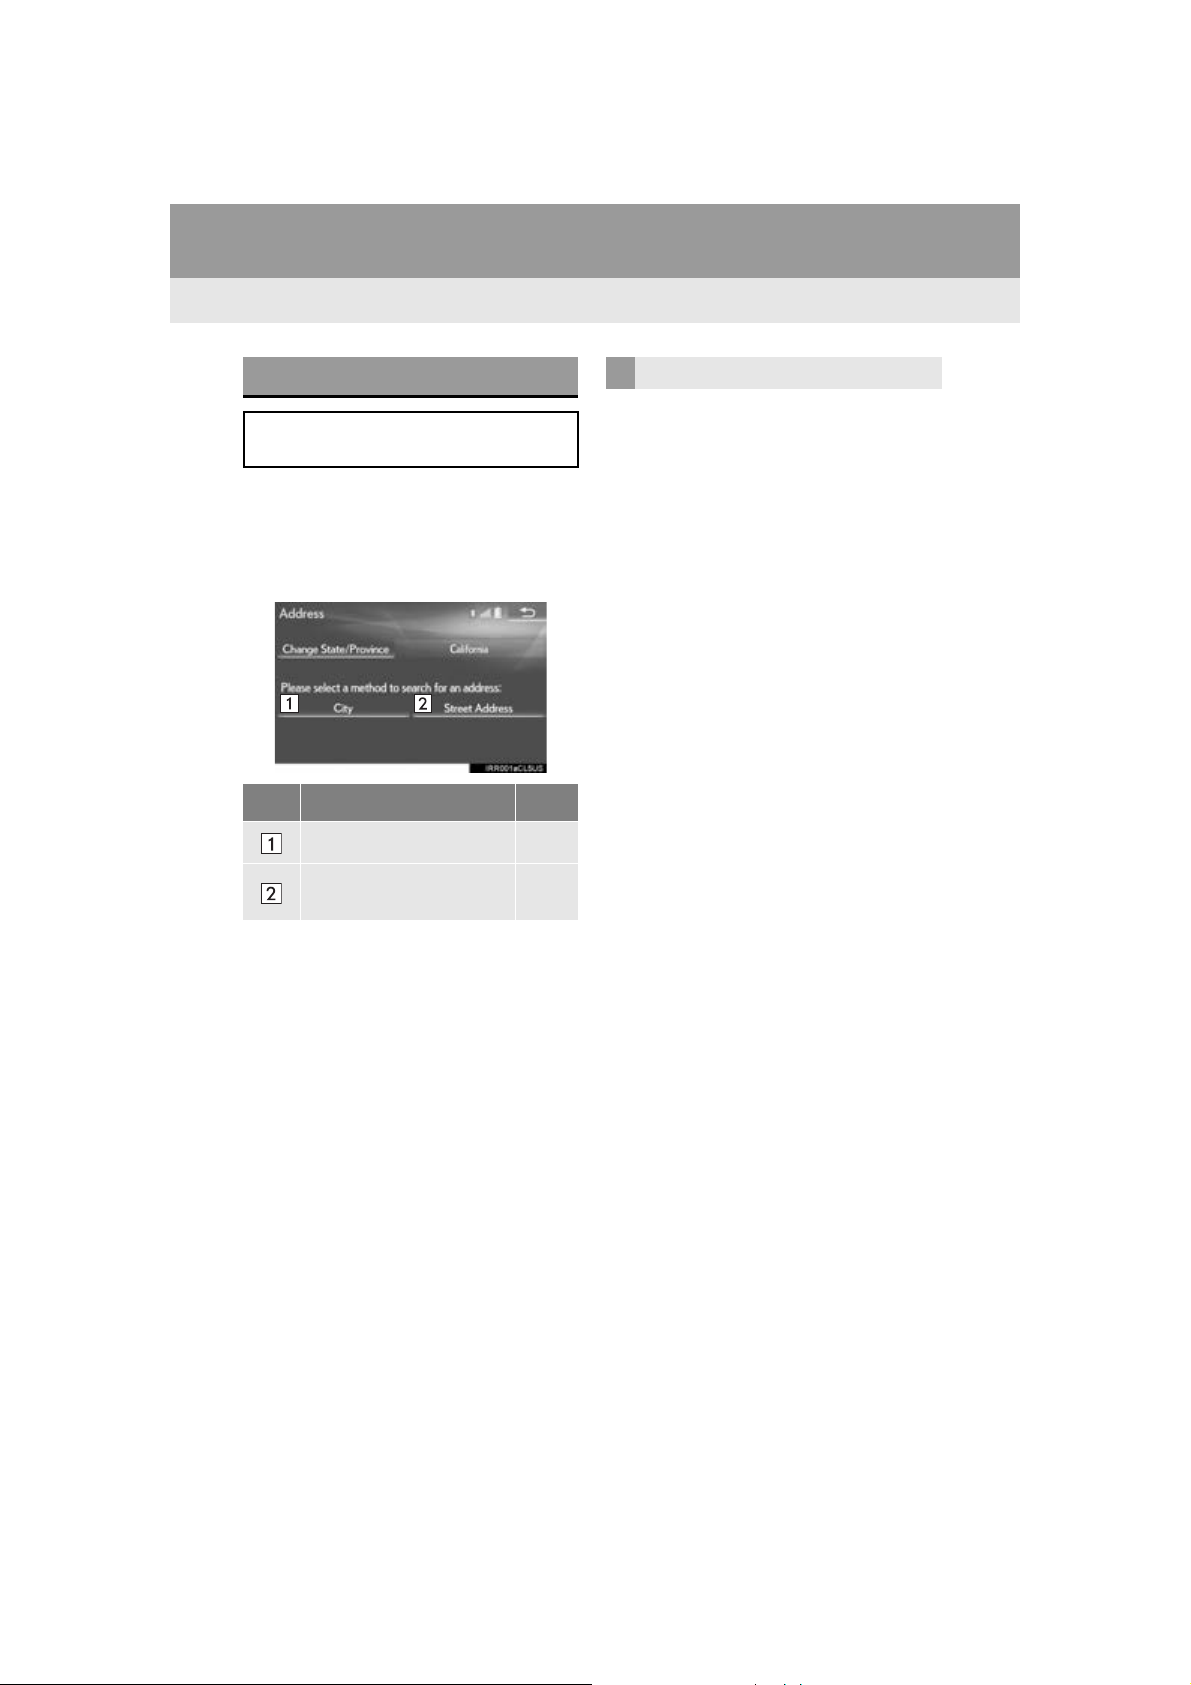
2. DESTINATION SEARCH
SEARCHING BY ADDRESS
There are 2 methods to search for a destination by address.
1 Display the “Destination” screen.
(P.93)
2 Select “Address”.
3 Select the desired search method.
No. Function Page
Select to search by city. 96
Select to search by street
address.
97
SEARCHING BY CITY
1 Select “Cit y”.
2 Enter a city name and select “OK”.
“Last 5 Cities”: Select the city name from
the list of the last 5 cities.
3 Select the desired city name.
4 Enter a street name and select “OK”.
5 Select the desired street name.
6 Enter a house number and select “OK”.
If the same address exists, the address list
screen will be displayed. Select the desired
address.
96
GS_Navi+MM_OM30F12U_(U)
15.09.09 19:53
Page 97
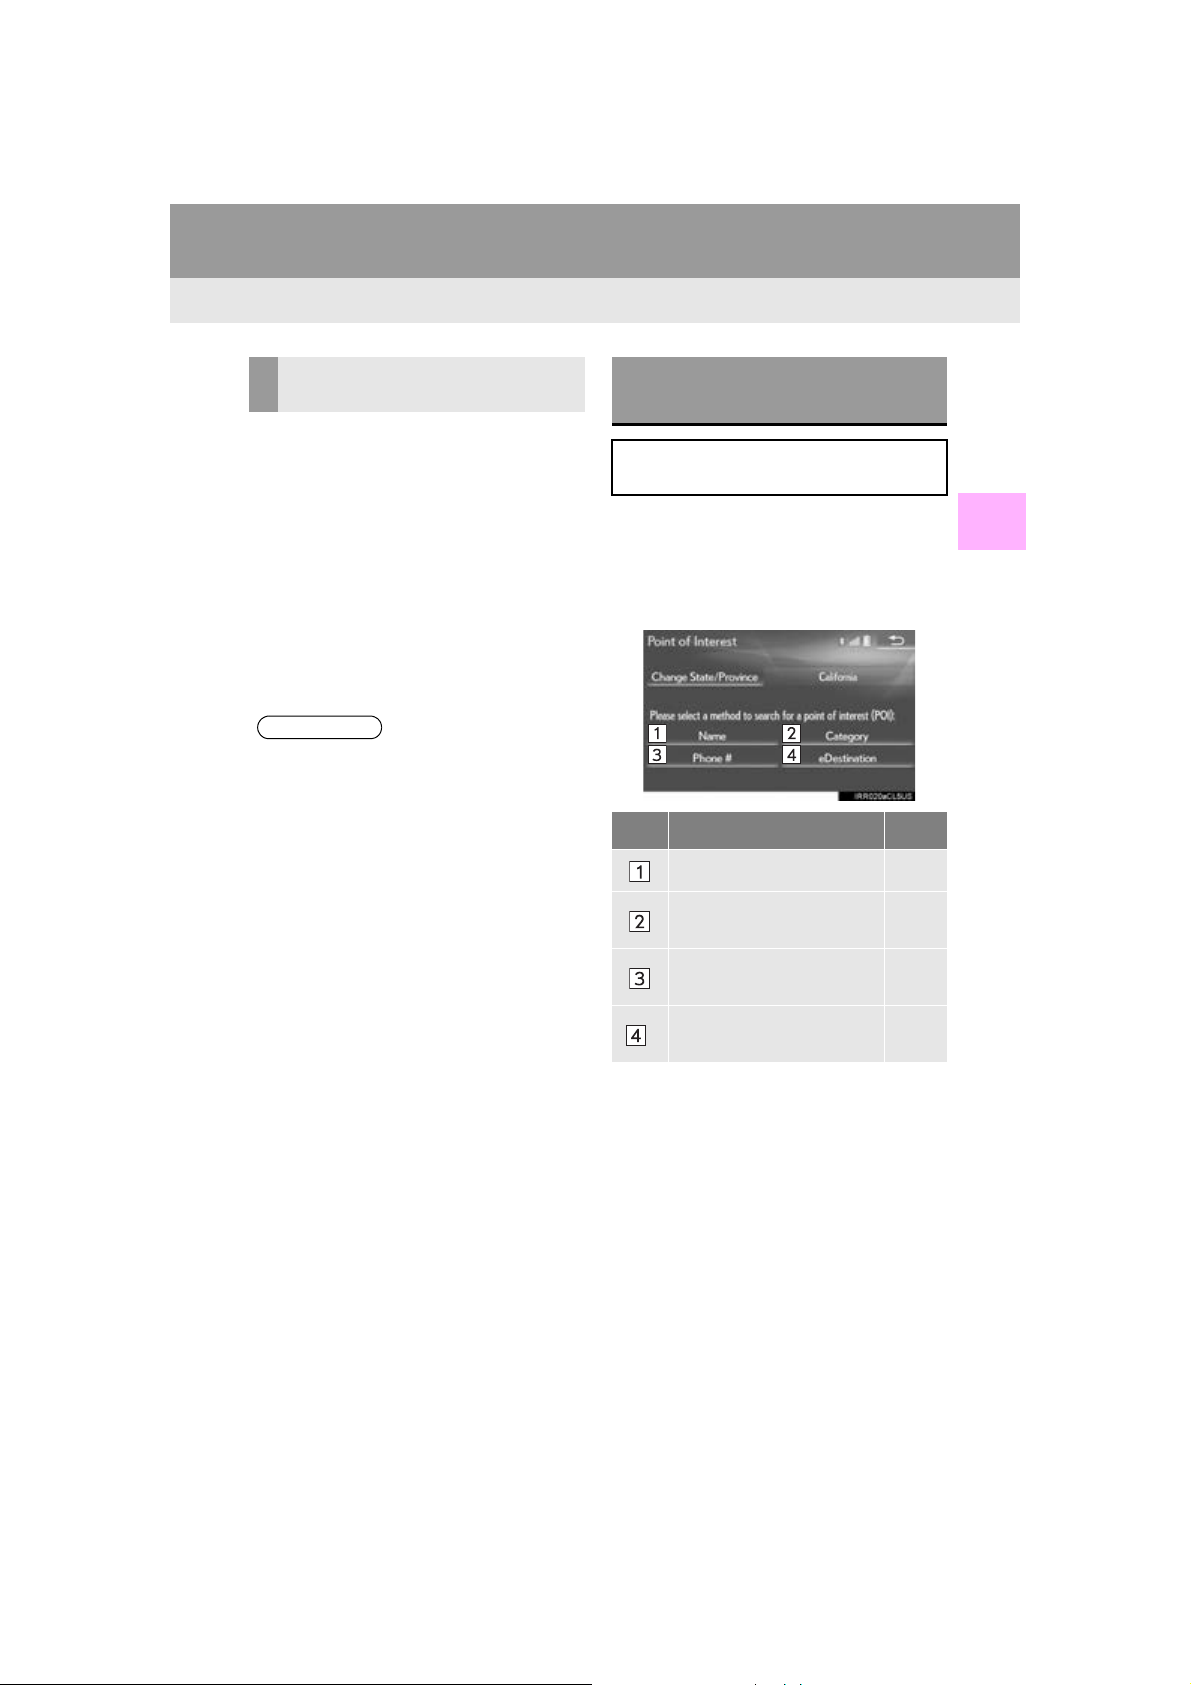
2. DESTINATION SEARCH
INFORMATION
SEARCHING BY STREET
ADDRESS
1 Select “Street Address”.
2 Enter a house number and select “OK”.
3 Enter a street name and select “O K”.
4 Select the desired street name.
5 Enter a city name and select “OK”.
6 Select the desired city name.
If the same address exists, the address list
screen will be displayed. Select the desired
address.
●A street name can be searched using
only the body part of its name.
For example: S WESTERN AVE
• A search can be performed by entering
“S WESTERN AVE”, “WESTERN AVE”
or “WESTERN”.
SEARCHING BY POINT OF
INTEREST
There are 4 methods to search for a destination by Points of Interest.
1 Display the “Destination” screen.
(P.93)
2 Select “Point of Interest”.
3 Select the desired search method.
No. Function Page
Select to search by name. 98
Select to search by category.
99
3
NAVIGATION SYSTEM
Select to search by phone
number.
Select to search by
*
eDestination.
*: This function is not made available on
some models.
100
341
97
GS_Navi+MM_OM30F12U_(U)
15.09.09 19:53
Page 98
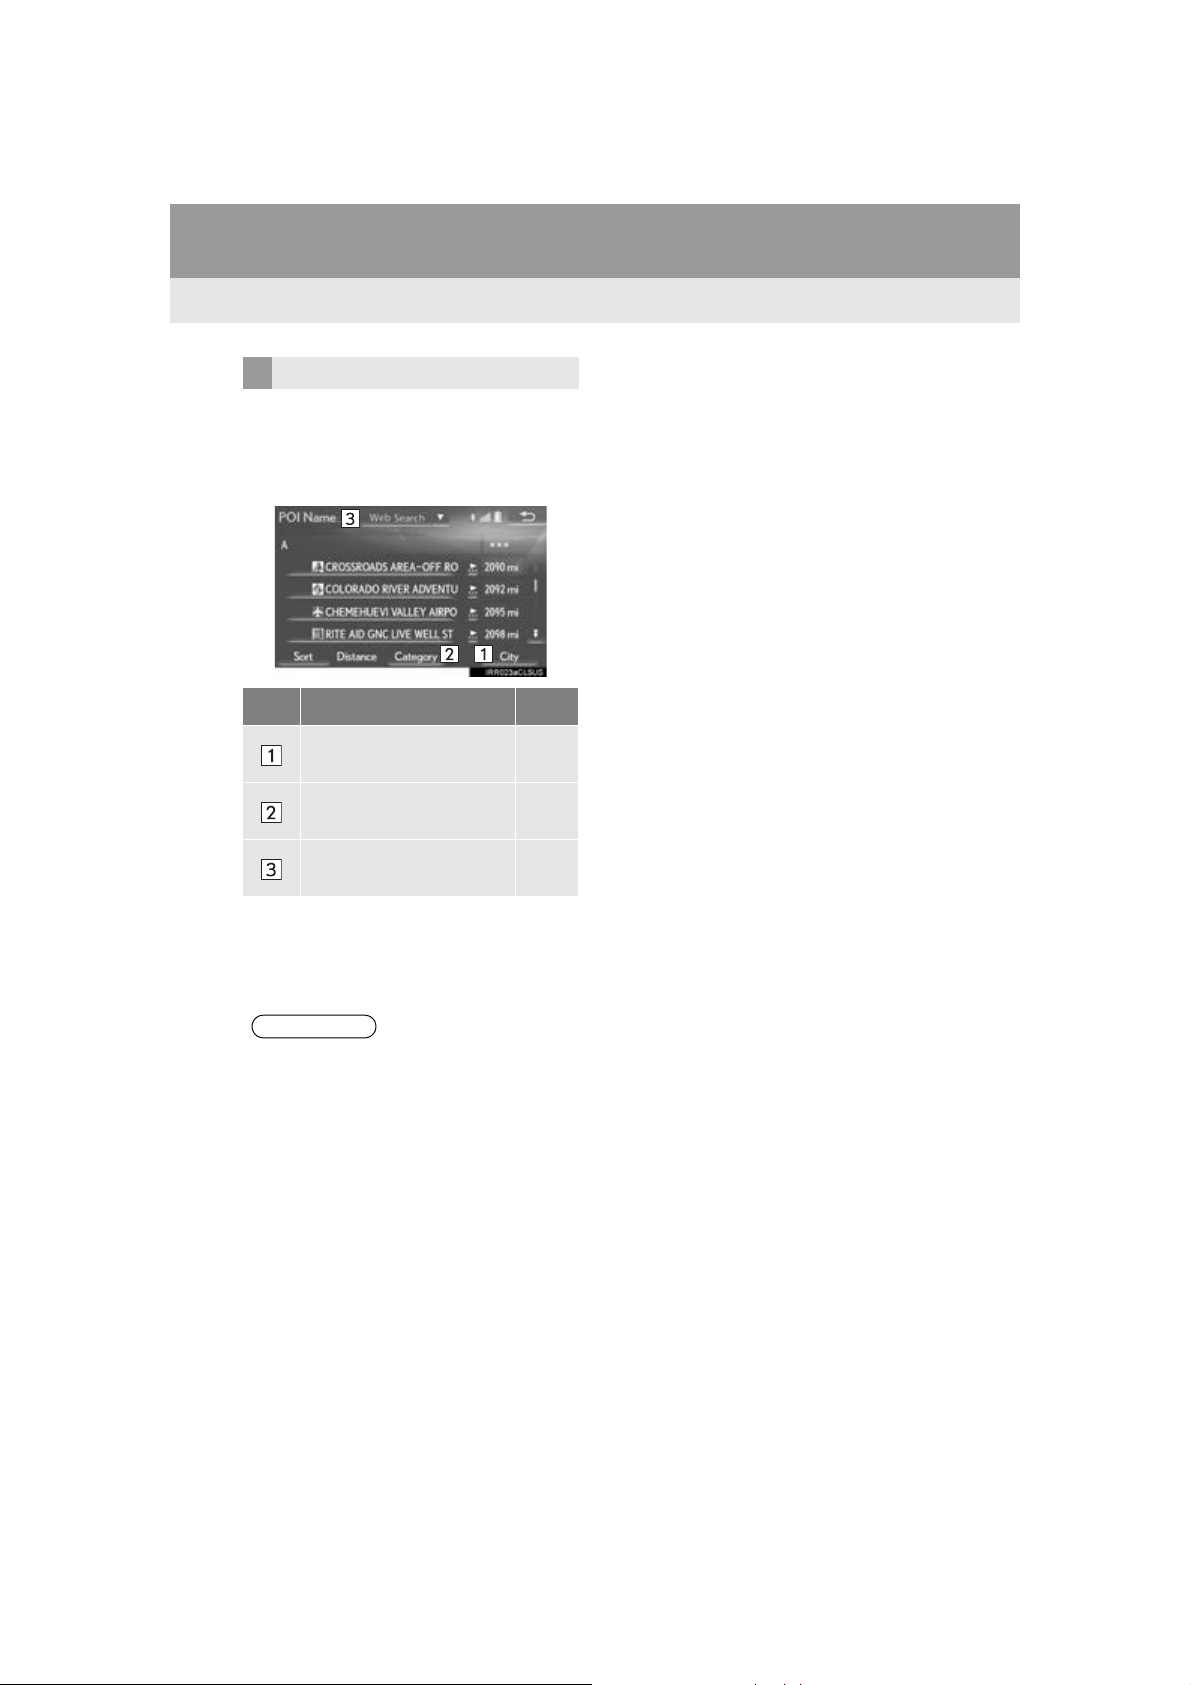
2. DESTINATION SEARCH
INFORMATION
SEARCHING BY NAME
1 Select “Name”.
2 Enter a POI name and select “OK”.
3 Select the desired POI.
No. Function Page
Select to search for POI in
the desired city.
Select to search for POI
from the category list.
Select to search for POI using online database.
When entering the name of a specific POI,
and there are 2 or more sites with the same
name, the list screen will be displayed.
Select the desired POI.
98
98
99
■ SELECTING A CITY TO SEARCH
1 Select “Cit y”.
2 Enter a city name and select “OK”.
“Any City”: Select to cancel the city setting.
3 Select the desired city name.
4 Select the desired POI.
■ SELECTING FROM THE CATEGO-
RIES
1 Select “Category”.
2 Select the desired category.
If there is more than 1 detailed item of the
selected category, the detailed list will be
displayed.
“List All Categories”: Select to display all
POI categories.
3 Select the desired POI.
●To search for a facility name using multi-
ple search words, put a space between
each word.
98
GS_Navi+MM_OM30F12U_(U)
15.09.09 19:53
Page 99
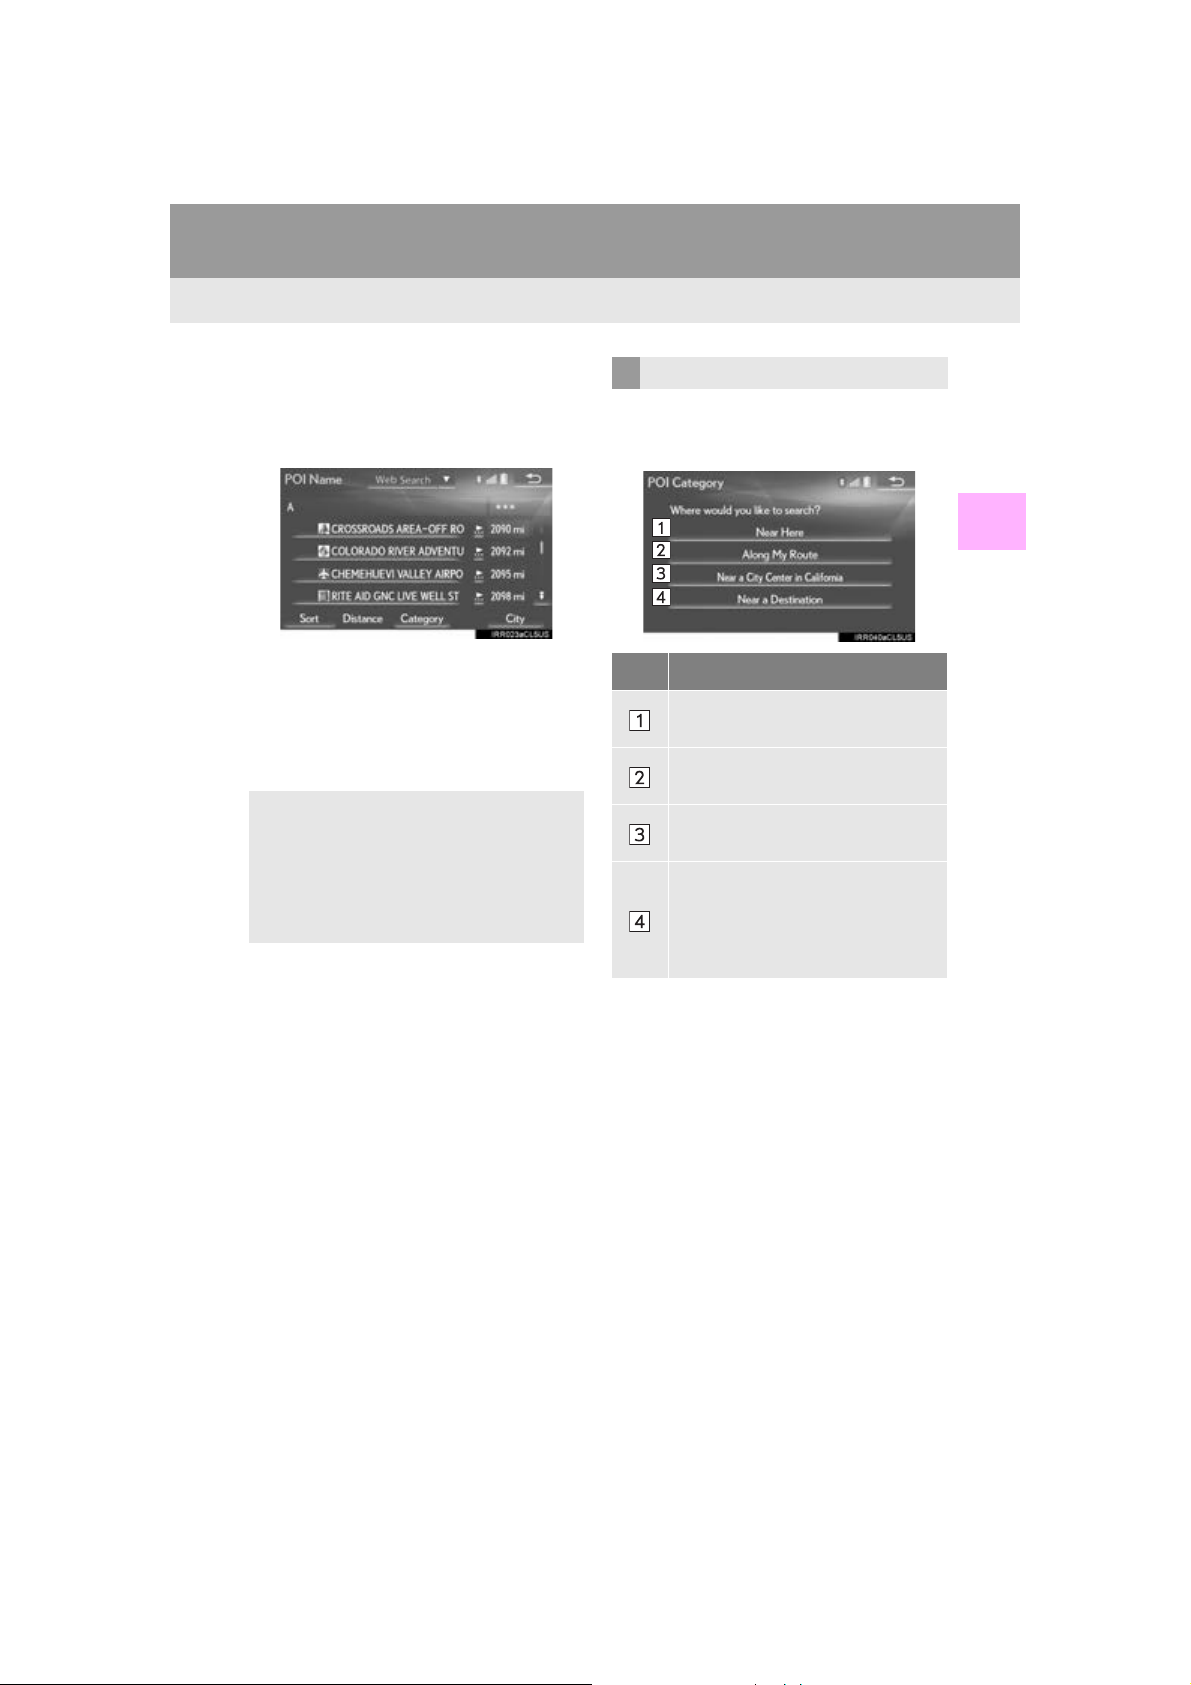
2. DESTINATION SEARCH
*: This function is not made available on some models.
■ SEARCHING FOR POI USING
WEB SEARCH*
1 Select “” next to “Web Search” to se-
lect a search engine.
2 Select the desired search engine icon.
The selected search engine icon will be dis-
played on the top center of the POI list
screen.
3 Select the search engine icon.
Accessing to a search engine
For the procedure on how to conduct a
search via a search engine, go to “SETTING A DESTINATION USING
LEXUS App Suite” (P.337), and follow
the steps from 3 onward.
SEARCHING BY CATEGORY
1 Select “Ca tegor y”.
2 Select the desired search point.
3
NAVIGATION SYSTEM
No. Function
Select to set the search point from
near the current position.
Select to search for POIs along the
set route.
Select to set the search point from
near a city center. (P.100)
Select to set the search point from
near a destination. When more than
1 destination has been set, a list will
be displayed on the screen. Select
the item to be set.
GS_Navi+MM_OM30F12U_(U)
15.09.09 19:53
99
Page 100

2. DESTINATION SEARCH
INFORMATION
INFORMATION
INFORMATION
3 Select the desired POI category.
If there is more than 1 detailed item of the
selected category, the detailed list will be
displayed.
“List All Categories”: Select to display all
POI categories.
“Favorite POI Categories”: Select to use
the 6 POIs that have been previously
set.(P.134)
4 Select the desired POI.
“Web Search”: Select to search for POI us-
ing online database. (P.99)
●The names of POIs located within
approximately 200 miles (320 km) from
the selected search point can be displayed.
When “Near a City Center in XX*” is se-
lected
1 Select “Near a City Center in XX”.
2 Enter a city name and select “OK”.
“Last 5 Cities”: Select the city name from
the list of the last 5 cities.
3 Select the desired city name.
4 Select “OK” when the city center map
screen is displayed.
5 Follow the steps from 3 onward in
“SEARCHING BY CATEGORY”.
(P.99)
*:XX represents the selected search area
name.
●If the navigation system has never been
used, selecting the city name from “Last 5
Cities” will not be available.
SEARCHING BY PHONE
NUMBER
100
1 Select “Phone #”.
2 Enter a phone number and select “OK”.
If there is more than 1 site with the same
number, the list screen will be displayed.
●If there is no match for the entered phone
number, a list of identical numbers with
different area codes will be displayed.
GS_Navi+MM_OM30F12U_(U)
15.09.09 19:53
 Loading...